1
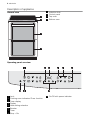
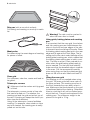
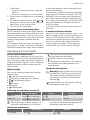
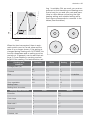
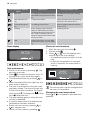
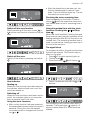
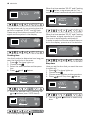
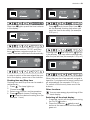
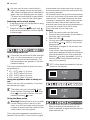
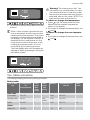
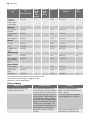
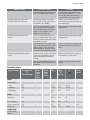
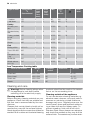
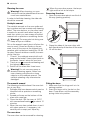
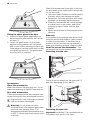
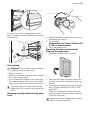
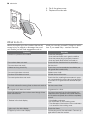
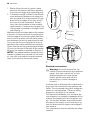
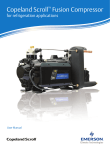
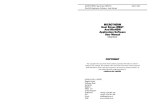
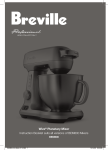
user manual
Cooker
EKD60760
2 electrolux
Electrolux. Thinking of you.
Share more of our thinking at www.electrolux.com
Contents
Safety instructions
Description of appliance
Before first use
Operating the induction hob
Operating the Touchpanel
Operating the oven
Tips, tables and advice
Cleaning and care
2
4
7
8
9
14
21
24
What to do if...
Technical Data
Installation
Environmental Information
Guarantee/Customer Service
European Guarantee
www.electrolux.com
30
31
31
33
33
35
35
Subject to change without notice
Safety instructions
Important safety instructions!
Read carefully and keep for furture reference!
Electrical safety
• This appliance must only be connected by
a registered electrician.
• In the event of a fault or damage to the appliance: Take the fuses out or switch off.
• Repairs to the appliance must only be
carried out by qualified service engineers. Considerable danger may result
from improper repairs. If repairs become
necessary, please contact our Customer
Services or your dealer.
Installation
Any work required on the cooker must be
carried out by a qualified engineer. Repairs carried out by inexperienced persons
may cause injury or serious malfunctioning.
For cookers with a plug: Make sure that the
plug is completely pushed into the mains
socket. The cooker is heavy. Edges and corners with which you do not normally come
into contact, can be sharp. Use gloves when
moving the cooker. The anti-tip guard must
be fitted so that you avoid the cooker tipping
when subjected to abnormal loading.
Important! Do not place the cooker on an
extra plinth or other height increasing unit.
This means more risk that the cooker will tip
over!
Child Safety
• Children should be supervised to ensure
that they do not play with the appliance.
• Never leave children unsupervised when
the appliance is in use.
• The appliance is fitted with a child safety
device.
• Accessible parts may become hot during
use. Young children should be kept away.
For people with pacemakers
Electrolux has examined the way in which induction hobs affect different types of pacemakers. The result shows that there is no risk
whatsoever for people with pacemakers to
use induction hobs, as long as they respect
a safety distance of 30 cm from the hob.
If you have a pacemaker, we suggest however that you contact your doctor for advice. If there is any doubt whatsoever, we
recommend that you do not use products
fitted with induction hobs.
Safety whilst Using
• This appliance is intended to be used for
cooking, roasting and baking food in the
home.
• Take care when connecting electric appliances to sockets nearby. Make sure that
the cooker cable does not get crushed behind the appliance when install or moving
the cooker.
• Warning: Risk of burns! The appliance
get hot during use. Do not touch the hob
or the interior of the oven during use.
electrolux 3
• Using ingredients containing alcohol in the
oven may create an alcohol-air mixture
that is easily ignited. In this case, open the
door carefully. Do not have embers,
sparks or naked flames in the vicinity when
opening the door.
• This appliance is not intended for use by
persons (including children) with reduced
physical, sensory or mental capabilities, or
lack of experience and knowledge, unless
the have been given supervision or instruction concerning use of the appliance by a
person responsible for their safety.
• Switch off the power supply to the cooker
and contact Service for repairs.
How to avoid damage to the appliance
• Never use a cracked ceramic glass plate.
Liquids could, if they boil over, or during
cleaning, penetrate down into the live electrical components.
• Never place metal objects such as lids,
knives and spoons on the hob. They become hot if a heating zone is switched on
by mistake.
• Never leave a deep fat fryer, melting fat,
paraffin or other easily flammable substance unattended. In the event of fire, turn
off the appliance and switch off the fan.
Extinguish the fire with a pot lid, never
use water.
• The ceramic glass plate must be used with
the greatest care. For example, flaming
with brandy or other forms of alcohol can
result in traces of fat in the fan igniting and
causing serious fires. Similarly, flames and
burning fat spills can cause injury to people.
• Check the bottoms of pots and pans. Pans
which bulge outwards tend to swivel easily
on the ceramic glass hob.
• Do not line the oven with aluminium foil and
do not place baking trays, pots, etc. on the
oven floor, as the heat that builds up will
damage the oven enamel.
• Do not store any flammable materials inside the oven. These could ignite when the
oven is switched on.
• Warning! Alcohol and similar substances,
which can form explosive gases, or other
substances that can cause a fire or explosion must not be used in the oven.
• After switching off the cooling fan, do not
keep uncovered dishes in the oven. Moisture may condense in the oven interior or
on the glass doors and may get into the
units.
• Do not keep chemicals or cleaning agents
in the storage drawer.
• Switch off the power supply to the appliance and contact Service for repairs.
Note on enamel coating.
Changes in the colour of the oven’s enamel coating as a result of use do not
affect the appliance’s suitability for normal and correct use. They therefore do
not constitute a defect in the sense of
the warranty law.
Care and Cleaning
• Keep the ceramic glass hob and ovens
clean. Fat and spilled material can cause
much smoke when heated and are also a
possible fire hazard.
• Immediately after use (while the plate is still
hot) clean with the blade scraper to remove sugar and spills with a high sugar
content, such as marmalade, and also any
melted plastic or foil, in order to avoid damage to the hob. Be careful, the blade scraper is extremely sharp.
Unpacking
Check that the cooker is in perfect condition
and not damaged. You must notify your retailer immediately of any damage that has
occurred during transport. For direct deliveries, any transport damage must be notified
to Customer Services within seven days of
delivery.
The packaging can be recycled. Contact
your local council for more information on recycling facilities in your area.
Do not forget to remove packing material
from inside the oven before it is used.
4 electrolux
Description of appliance
1
2
3
4
General view
1
2
Induction hob
Control panel
Top oven
Bottom oven
3
4
Operating panel overview
1
9
1
2
3
4
5
6
7
8
8
Lock
Cooking zone indicators/Timer function
Timer display
Display
Heat setting selection
Booster
Timer
Stop + Go
2
3
4
5
6
7
9 On/Off with power indicator
electrolux 5
Oven equipment, bottom oven
Hob overview
1
1
2
10
2
3
4
5
6
5
4
3
2
1
7
8
4
3
9
1
2
3
4
3
1
2
3
4
5
6
7
8
9
10
4
Accessories
Ø 145 mm
Ø 180 mm
Ø 145 mm
Ø 210 mm
Oven equipment, top oven
1
2
7
5
Top heat element
Heating element
Oven light bulb
Meat probe connection
Fat filter
Oven light bulb
Fan heating elements
Bottom heat
Oven shelf runners, removable
Shelf positions
Clean the accessories before using
them for the first time. Wash the shelves,
roasting pan, etc. in hot water and washing-up liquid. Rinse and dry.
6
1
2
3
4
5
6
7
Top heat element
Heating element
Oven light bulb
Meat probe connection
Bottom heat
Oven shelf runners, removable
Shelf positions
Baking tray
For cakes and biscuits.
6 electrolux
Drip pan (with a non-stick surface)
For baking and roasting or as a tray to catch
fat.
Warning! The rails must be pushed in
when the oven door is closed.
Meat probe
For determining the exact degree of cooking
for pieces of meat.
Oven grid
For cookware, cake tins, roasts and food to
be grilled.
Telescopic runners
Make sure that the cooker anti-tip guard
is fitted.
The telescopic runners consist of two rails
that can be pulled out. The shelves, the
roasting pan and the grid are laid on top of
the rails. A locating pin keeps the shelf in position (see the illustration).
Using of the telescopic runners facilitates
cooking. For example, when steak or chips
are to be basted, the roasting pan is easily
pulled out on the rails.
Using grids, baking plates and roasting
pan
It is important that the oven grid, the shelves
and the roasting pan are fixed between the
stops in the front and rear edges of the rails
to prevent them from falling off the rails. Place
the baking plate/roasting pan/grid in the rear
edge and fix against the front edge. The locating pin fits into a slot under the edge of the
baking plate/roasting pan, which means that
the baking plate/roasting pan is held in position. The rails must be in their pushed-in position when the grid/baking plate/roasting
pan is inserted. For the best shelf stability,
make sure that the bevelled edge is inwards
in the oven. Pull the accessories carefully
when using them so that the plate/pan/grid
does not fall off the rails. Maximum load 20
kg.
Using the oven grid
The locating pin is not needed when using
the grid. The oven grid shelf has a mark on
its upper surface. This marking must be at
the front (towards the oven door) when in
use. Make sure that food placed on the grid
is positioned behind the marking. Otherwise
there is a risk that it will not be cooked properly at the front. The grid can be placed in the
roasting pan. The maximum weight to be
placed on the grid is 10 kg.
electrolux 7
Warning! Make sure that the locating
pin hooks in under the baking plate
edge/roasting pan and that the baking
plate/roasting pan rests on the rails,
otherwise it can fall off the rails in the
pulled-out position. When the baking
plate/roasting pan is removed in the
pulled-out position, the rails must be
pushed back again so that the oven
door can be closed. Use oven gloves
because the rails are hot.
Before first use
Setting and changing the time
The oven only operates when the time
has been set.
Cook time
or End time
oven functions are set.
nor any
When the power to the oven is connected, a
clock symbol flashes until you have set the
time on the clock.
Heat the oven empty
1. Press or to set the right time.
2. To change time already set, press On/Off
. Then press
until
flashes Follow the instructions in alternative 1.
After about 5 seconds the clock stops flashing and the time is shown in the display.
The appliance is now ready to use.
The time can only be modified, if the
child safety device is deactivated, none
of the clock functions Countdown ,
Warning! Keep children under
supervision! The appliance becomes
very hot.
Important: Do not use sharp, abrasive
cleaning agents! These could damage
the surface.
Do not forget to remove all packing material from inside the oven.
The oven must be burnt off before it is used
for the first time. This is done as follows:
Heat up one oven at a time!
1. Open the oven door and remove all the
accessories from the oven cavity.
2. Switch on the oven . Select hot air
by using or . Select a temperature of
200oC. The temperature can be changed
by using and . The oven door must
be closed.
3. Leave the oven at this setting for about
one hour.
4. Move over to the Max grill function
by
using
or . Select a temperature of
200oC. The temperature can be changed
8 electrolux
by using and . The oven door must
be closed.
5. Leave the oven at this setting for about
30 minutes.
6. Switch off the cooker .
7. Then leave the oven door open for about
two hours and air out the kitchen.
8. Clean the oven, the door and the ovenstep units with hot water and washing-up
liquid. Dry the oven.
The first time an oven is used, there may still
be a slight smell. This will not affect the food
in any way and is not a health-hazard.
The door lock
The door lock makes it more difficult for children to open the door. The lock is engaged
when the cooker is delivered, but can be disconnected as necessary.
Top oven
To open the door
Move the lock to the right when you want to
open the door.
Disconnecting the lock
Check that the oven is not hot! Move the lock
to the right, lift up and move it further slightly
to the right, then lift the left-hand edge of the
button.
Connecting the lock
Move the lock to the right and down.
Bottom oven
To open the door
Move the lock to the right when you want to
open the door.
Disconnecting the lock
Check that the oven is not hot! Move the lock
to the right, pull the lock slightly against you
and continue to the right. Push the left edge
in.
Connecting the lock
Move the lock to the right and then back to
the starting point.
The cooling fan
The cooker is fitted with a cooling fan. The
purpose of the fan is to keep the appliance
cool. The cooling fan starts automatically
when the oven temperature is approx.
120oC. When only the hob is used, the fan
has a delayed start. When the appliance is
switched off, the fan stops automatically
when oven temperature has decreased to
approx. 250oC.
Operating the induction hob
The glass in the hob tolerates, heat, cold
and temperature shocks, but is sensitive
to impact. A spice jar or grinder falling
onto the plate could crack it. Never use
the hob to stand on, off-load materials
onto or use as a storage area.
The power applied to the left heating zones
will vary according to how much energy the
top oven needs. The more power that is used
for the oven (e.g. Quickstart, Conventional
heating, Turbo Max Grill or Max grill) the less
power will be available for the right heating
zones.
When a zone cannot be used fully, the display for the selected zone will flash between
the maximum available power and the set
value. When the oven is switched off, the
zone will automatically return to the set value.
If the two right or left cooking zones are used
at the same time their power cannot be used
maximal. Depending which cooking zone
that first started decides which cooking zone
that got the highest power.
The top oven and the left heating zones
share the same energy source (the same
electric phase) when they are used simultaneously. It is a power regulation to
prevent a circuit overload.
The induction zones
The induction zones have settings from 0 to
9 (can be seen in the hob), where 9 provides
the greatest heat.
Do this when you want to use the hob:
The induction hob
The hob has four heating zones. They are
heated with the aid of a magnetic field, i.e.
induction. This means that
• cooking takes place faster compared with
a normal glass hob
• the zone responds “directly” to a change
in the heating setting.
Note that the induction zones can still be
hot after use.
electrolux 9
of the other zones must be reduced (this is
done automatically).
It is possible to use both zones at the same
time, even with one set on booster. BUT REMEMBER that one zone has a reduced effect, which means a longer cooking time. In
the case of other settings, you will not notice
any great difference, no zone has priority
over the others.
A certain sound can occur when using certain pans.
A simple induction principle
When a current passes through a coil, it creates a magnetic field. Under a heating zone
there is a coil fitted with ferrite rods. When a
pan (with a magnetic bottom) is placed on the
zone, the coil and rods create an almost
closed magnetic system. The energy produced heats up the pan and its contents.
1. Check that
– the pan or frying-pan has a magnetic
bottom.
– the pan or frying-pan is not too small.
2. Place a pan or frying-pan on the heating
zone.
3. Choose the desired setting with or .
Remember that the pan heats up much
faster than on an ordinary hob.
4. Turn off the hob after use.
The zones share the heating effect
NOTE that when the left or the right induction
zones are switched on at the same time, they
share the heating effect. This is shown by a
clicking sound from the hob and the fact that
cooking may possibly increase and decrease.
The reason is that they share the same energy source. In order to utilise the maximum
top effect (booster) on a zone, then the effect
Operating the Touchpanel
•
Touch Control sensor fields
The appliance is operated using Touch Control sensor fields. Functions are controlled by
touching sensor fields and confirmed by displays and acoustic signals. Touch the sensor
fields from below, without covering other
sensor fields.
that the child-proof blocking unit (function lock) has been activated
•
Faulty function /Over-heating
•
Cookware is unsuitable or too small or
no cookware has been placed on the
cooking zone
Residual heat indicator
Digital display
Each of the cooking zones has a display
which shows:
•
that the hob is switched on
•
selection of heat retention setting
•
, the selected position
•
Automax
•
Booster
•
residual heat
Warning! Warning! Risk of burns from
residual heat. After being switched off,
the cooking zones need some time to
cool down. Look at the residual heat
indicator .
Residual heat can be used for melting
and keeping food warm
Switching the appliance on and off
Control panel
Display
Pilot light
Switch on
Touch
for 2 seconds
/
lights up
Switch off
Touch
for 1 second
/ none
goes out
After switching on, within approx. 10
seconds a heat setting or a function
must be set, otherwise the appliance automatically switches itself off.
Setting the heat setting
Control panel
To increase
Touch
Indicator
to
10 electrolux
Control panel
To decrease
Touch
To switch off
Touch
Indicator
to
and
at the same time
The keep warm setting
lies between
and . It is used to keep
food warm.
Locking/unlocking the control panel
The control panel, with the exception of the “On/Off” sensor field, can be locked at any time
to prevent the change of settings.
Control panel
Switch on
Touch
Switch off
Touch
When you switch the appliance off, the
locking function is automatically switched off.
Using the automatic heating function
This appliance is fitted with two special automatic heating systems. One is called Booster and is good to use for fast boiling of example water. The other function is called Automax. The function is engaged each time
you wish to use it. It works like this: You select the setting for the heat that you consider
suitable for cooking/roasting. The heating
zone starts at the highest heat setting and
goes over automatically to the selected setting after a certain time. Please read more
under the functions for more information and
how to use the it.
Booster function
When this function is engaged, the induction
zones heat up with a higher effect for a limited
time (the effect is decreased automatically to
setting 9 after a time). If the Booster function
is used at the same time on the two right or
left zones, then the effect will be reduced on
one of the zones (this occurs automatically).
The function is engaged each time you wish
to use it. It functions like this:
• Set the desired heat with or . Press
the Boost symbol
on the zone you
want to use or increase to which can be
seen in the display with .
This function is good to use for fast boiling of
water.
Display
(for 5 seconds)
previously set heat setting
The Automax function
The function is engaged each time you wish
to use it. It works like this:
You select the setting for the heat that you
consider suitable for cooking/roasting. The
heating zone starts at the highest heat setting
and goes over automatically to the selected
setting after a certain time.
Cooking/roasting with Automax
This is how you activate the function. Note!
This must be done each time you wish to
use the automatic system.
1. Set the function Automax , A appears in
the display.
2. Then make the desired setting for cooking/roasting. It takes about 5 seconds
before A lights up in the indication area.
The heater zone display shows A. This implies that the heating zone operates at maximum heat for a certain time, depending on
the heating setting selected. See the diagram.
electrolux 11
ting 1 is suitable. But, as usual, you must experiment to find the setting and heating zone
that is best for you and your pots and pans.
Here is a little advice concerning the right
heating setting and suitable heating zone.
Each zone corresponds to a number in the
tables (See illustration).
9
8
7
6
5
4
MIN.
3
2
2
1
1
0
1
2
3
4
5
6
7
8
9
TEMP.
When the time has expired, there is automatic switch-over to the set value and the
letter A is no longer shown. If the setting is
changed during heating with AUTOMAX this
function disappears and re-setting must be
carried out. In general it can be said that settings 2–5 are suitable for cooking and settings 6–8 for roasting. For heat retention, setCooking with
Automax
Porridge (oats, rye)
5
Portions
3
Zone
Setting
2
1, 3
3
42
3
3
Potatoes
2-4
1, 3
3-4
Rice
2
1, 3
2
4
1, 3
3
4-6
3
3
4-8
Root vegetables
3
4-5
Melting butter
1, 3
1
Melting block chocolate
1, 3
1
Roasting with Automax
Entrecôte
Pork chops
Meat balls 2
Pancakes
Potatoes, raw
Zone
One portion
3/4 decilitre
Setting
2
7-8
4
7-8
2
6
4
6
4
6-7
4
6-7
2
7
4
7
2
6
12 electrolux
Roasting with Automax
Eggs
Zone
Setting
4
6
2
6-7
4
6-7
Using the child safety device
The child safety device prevents unintentional use of the appliance.
Switching on the child safety device
Step
Control panel
Display/Signal
1.
Switch on appliance. (Do not set a
heat setting.)
2.
Touch
for 4 seconds
The child safety device is switched on.
Switching off the child safety device
Step
Control panel
Display/Signal
1.
Switch on appliance. (Do not set a
heat setting.)
2
Touch
3.
for 4 seconds
lights up
Switch appliance off.
The child safety device is switched off.
The child safety device can only be
switched on and off, if no heat setting is set.
cooking session; it remains activated afterwards.
The child safety device can be
switched off in this way for a single
Overriding the child safety device
Step
Control panel
1.
Display / Signal
Switch appliance on
2.
Touch
for 4 seconds
lights up
Until the appliance is next switched off, it can be used as normal. After switching off the appliance, the
child safety device is active again.
After overriding the child safety device, a heat setting or a function
must be set within approx. 10 sec-
onds, otherwise the appliance automatically switches itself off.
Using the timer
Function
Condition
Outcome after the time has
elapsed
Automatic cut-out
a heat setting is set
acoustic signal and 00 flashes,
the cooking zone switches itself
off
Countdown timer
cooking zones not in use
acoustic signal and 00 flashes
electrolux 13
Selecting a cooking zone
Step
Control panel
1.
Touch
once
2.
Touch
once
Display
Pilot light of the first cooking zone flashes
Pilot light of the second cooking zone flashes
3.
Touch
once
Pilot light of the third cooking zone flashes
4.
Touch
once
Pilot light of the fourth cooking zone flashes
If a heat setting is set on this cooking zone in addition to a countdown
timer, the cooking zone is switched
off after the time set has elapsed.
If a cooking zone is switched off, the
timer function set is also switched
off.
If other timer functions are set, after
a few seconds the shortest remaining time of all the timer functions is
displayed and the corresponding pilot light flashes.
If the pilot light is flashing more
slowly, the heat setting can be set or
modified.
Setting the time
Step
Control panel
1.
Select
2.
Touch
for the cooking zone
Indicator
The pilot light for the cooking zone selected flashes
00 to 99 minutes
or
After a few seconds the pilot light flashes more slowly. The time is set. The time counts down.
Switching off the timer function
Step
Control panel
1.
Select
2.
Touch
for the cooking zone
Indicator
Pilot light of cooking zone selected
flashes faster. Time remaining is displayed
The time remaining counts backwards
to 00
The pilot light goes out. The Timer function for the selected cooking zone is switched off.
Changing the time
Step
Control panel
Indicator
1.
Select
for the cooking zone
Pilot light of the selected cooking zone
flashes faster. Time remaining is displayed
2.
Touch
or
01 to 99 minutes
After a few seconds, the pilot light flashes more slowly. The time is set. The time counts down.
14 electrolux
Displaying the time remaining for a cooking zone
Step
1.
Control panel
Press
Indicator
Pilot light of the cooking zone selected
flashes faster. The time remaining is
displayed
for the cooking zone
After a few seconds the pilot light flashes more slowly.
Switching off the acoustic signal
Step
1.
Control panel
Indicator
The acoustic signal to acknowledge
Touch
The acoustic signal stops
Safety switch-off of the cooking zones
If one of the cooking zones is not switched
off after a certain time or the heating setting
is not changed, the cooking zone concerned
is switched off automatically.
Residual heating is shown by (“hot”) in the
digital display for the cooking zone concerned.
The cooking zones are switched off automatically in accordance with the following
timetable:
• Setting , , after 6 hours
• Setting , after 5 hours
• Setting after 4 hours
• Setting , , , after 1.5 hours
If one or more of the cooking zones should
shut off before the expiration of the stated
time, see the chapter “Problems and remedies”
Safety switch-off for other reasons
Any liquid that boils over and finishes up on
the touch panel, activates immediate switching-off of all the cooking zones and their settings. The same effect occurs if a wet cloth
is placed on the touch panel. In order to be
able to use the hob again, in both cases it
must be switched off, after the liquid or cloth
has been removed.
Choice of cooking utensils
Warning! Use only pans that are
intended for use with a ceramic glass
hob and oven.
When choosing a pan or frying-pan for the
hob, remember that the pan bottom:
• must be magnetic.
• does not need to be completely adapted
to the zone size, but a small pan on a large
zone means longer cooking time.
• must be smooth or finely patterned.
We recommend the following minimum dimensions for the pan bottom diameter;
Heating zone (diam)
Pan/fryingpan (diam.
mm)
210
180
180
145
145
120
It is naturally best for the zone and the pan
bottom to be the same size.
Operating the oven
It is normal for steam and condensation to
form on the oven door. This condensation is
from the food being cooked and does not influence safety or oven function.
The oven is fitted with removable shelf steps
with five levels in the bottom oven and three
levels in the top oven.
Practical use
Warning! Never place aluminium foil, a
roasting pan or a shelf directly on the
bottom of the oven. If the bottom heater
is blocked, the enamel can be damaged
by over-heating.
The oven becomes hot when used, keep
an eye on children.
The principle of hot air
An annular heating element round the fan
heats up the air, which is then spread
through the air channels in the oven rear wall
by the fan. The hot air circulates in the oven
before it is once again sucked in through the
fan grille. Heat is transferred quickly and ef-
electrolux 15
fectively, and this generally means that you
can use a lower oven temperature than with
upper and lower heating. Lower the temperature by 15- 20% if the recipe says that you
should use a temperature of between 160
and 225°C. The higher the temperature, the
greater the decrease. At temperatures over
225°C it is better to use upper and lower
heating.
Oven functions, top oven
The oven functions
For all functions, the yellow control lamp on
the control panel lights up during heating and
goes out when the temperature has been
reached (it lights up and goes out when the
thermostat switches on and off).
Application
Heating element/ fan
Conventional
For baking and roasting on one
oven level.
Top heating element and bottom
heating element (starts with automatic quickstart which becomes
top/bottom heating when the selected temperature is reached)
Browning
For gratinating and browning
Grill element and bottom heating
element
Bottom heat
For baking cakes with crispy or
crusty bases
Bottom heat
Max. Grill
For grilling flat foodstuffs placed in
the middle of the grill and for toasting.
Grill element and upper heating
element
Light
Using this function you can light
up the oven interior, e.g. for cleaning.
Oven functions, bottom
oven
Application
Heating element/ fan
Hot air
For roasting and baking on different levels at the same time. Set
the oven temperatures 20-40 °C
lower than when using Conventional heating.
Annular element and fan
Conventional
For baking and roasting on one
oven level.
Top heating element and bottom
heating element (starts with Automatic quickstart, Hot air and bottom heat, which becomes top/
bottom heating when the selected temperature is reached)
Pie/pizza function
For baking on one oven level
Lower element, annular element
dishes that require more intensive and fan
browning and a crispy base. Set
the oven temperatures 20-40 °C
lower than when using Conventional.
Low temperature
roasting
For food that is suitable for cook- Annular element and fan (120°C
ing at low temperature for a longer or 150°C for 10 minutes and then
time, about 4-5 hours. Can also
80°C)
be used to dry fruit and mushrooms.
Turbo Max Grill (gratin preparation)
For roasting larger joints of meat
or poultry on one level. The function is also suitable for gratin and
browning.
Grill element, upper heating element and fan
16 electrolux
Oven functions, bottom
oven
Application
Heating element/ fan
Max. Grill
For grilling flat foodstuffs placed in
the middle of the grill and for toasting.
Grill element and upper heating
element
Heat retention setting
To keep food warm.
Upper element and lower heating
elements. (Pre-set at 80°C)
Thawing/drying setting
For thawing frozen food.
Bottom heating element and fan
(From 30°C)
Thawing
When thawing meat, fish and
Lighting and fan.
glazed or filled baked products,
the temperature should be set at
zero. Grids or shelves can be
placed in several slots when there
is much to thaw.
Light
Using this function you can light
up the oven interior, e.g. for cleaning.
Oven display
User instructions:
• Switch on the oven by pressing . The
top oven is pre-set.
• Press
to choose the bottom oven. To
change oven, press the button again.
• Choose ovenfunction by pressing
or
.
• When the selected function lights up, the
oven starts to heat up.
• The user time shows how long the oven
has been utilised. The time is shown only
if none of the clock functions, the Signal
clock symbol , Cooking time
or Stop
have been set.
time
• The oven lighting goes on when an oven
function is selected.
• A signal is heard when the desired oven
temperature has been reached.
• Switch off one oven by pressing
or
for chosen oven.
• Switch off both ovens by pressing .
Choice of oven functions
1. Start the oven with the button .
2. Choose oven .
3. Press
or
until the desired oven
function lights up in the display.
– A temperature starts to light in the display.
– Unless the temperature is changed
within 5 seconds, the oven starts to
heat up.
The oven function can be changed while
the oven is in operation.
Changing the oven temperature
Press or to increase or decrease temperature.
electrolux 17
Switch off the oven function
or
Before switching off the oven, press
until no oven function is shown in the display.
Switch off the oven
Switch off the oven by pressing the button
.
Heat indicator
Heating up
When the oven function has been selected,
the indicator starts to flash how much the
oven has heated up.
Switching off
When the oven functions have been switched off, the indicator lights up to show that
there is residual heat in the oven.
Using the clock functions
• After a clock function has been selected
the associated function flashes for about 5
seconds. During this time the desired
times can be set or changed with the button or .
• After the desired time has been set, the
function flashes again for about 5 seconds. Then the function lights up. The set
time starts to count down.
Checking the set or remaining time
Press repeatedly on the button Function
choice
until the respective clock function flashes and the set or remaining time is
shown.
Using the residual heat with the clock
functions Cooking time
and Stop
time
When the clock functions Cooking time and
Stop time are used, the oven switches off the
heating elements after 90% of the set or calculated time. The remaining residual heat is
used to continue the cooking process up to
the end of the set time.
The signal clock
To programme a time. A signal sounds when
the time has expired. This function has no
effect on the oven.
1. Press . The clock symbol lights up.
2. Choose oven .
3. Press the button
until flashes .
4. Select the desired time with the
buttons.
or
The remaining time is shown after about 5
seconds. The signal clock
lights up. A
signal is heard when 90% of the time has
passed.
18 electrolux
When the time reaches “00.00” and Cooking
time
flashes, a signal sounds for 2 minutes. The oven is automatically switched off.
The signal sounds for one minute when the
set time is reached “00.00” and
flash.
Press one of the buttons to switch off the
signal and the symbol in the display.
Cooking time
Use this function to determine how long you
want the food to be in the oven.
1. Press . The lamp lights up.
2. Choose oven .
3. Select the oven function and temperature.
4. Press
until
flashes.
When the time reaches “00.00” and Cooking
time flashes, a signal sounds for 2 minutes.
The oven is automatically switched off.
In order to switch off the sound and the symbol in the display, press one of the buttons.
Stop time
Here you set the time that you want the oven
to switch off.
1. Press . The lamp lights up.
2. Choose oven .
3. Choose oven function and temperature.
4. Press
until Stop time
flashes.
5. Select the desired time by pressing the
or buttons (max. 09.59 hours).
5. Use the
time.
The cooking time lights up
.
and
buttons to select stop
electrolux 19
Stop time
lights up and the time is shown
in the display.
When the time reaches “00.00” and Stop
time
flashes a signal sounds for 2 minutes. The oven is switched off automatically.
In order to switch of the sound and the symbol in the display, press one of the buttons.
Cooking time and Stop time
Cooking time and Stop time can be used simultaneously.
1. Press . The lamp lights up.
2. Choose oven
3. Select oven function and temperature.
4. Press
and choose Cooking time
and set the desired cooking time (for
example 1 hour).
5. Press
and choose Stop time
to
set the desired finishing time when you
want the food to be ready (for example
2.05 p.m.).
Cooking time
and Stop time
light up
in the display. The oven starts automatically
after the pre-set time (for example 1.05 p.m.)
When the oven time has expired, a signal is
heard for 2 minutes and the oven is switched
off automatically (for example 2.05 p.m.).
To switch off the sound, press one of the
buttons.
Other functions
You can save energy by switching off the
clock display
Switching off the clock display
1. If required, switch off the appliance using
button.
the On/Off
2. Press the Selection
button and
button at the same time until the display
goes out.
20 electrolux
As soon as the oven is switched on
again, the display comes on automatically. When the appliance is switched off
again, the cock display goes out again.
To have the clock display on permanently again, you must set the clock again.
Switching on the clock display
1. If required, switch off the appliance using
the On/Off
button.
2. Press the Selection
button and
button at the same time until the display
is visible again.
Oven safety switch-off
If the oven not switched off after a certain
time, or if the temperature is not modified, it switches off automatically. The
last temperature set appears in the temperature display.
The oven switches itself off when the oven
temperature is:
• 30 - 120oC after 12.5 hours
• 120 - 200oC after 8.5 hours
• 200 - 250oC after 5.5 hours
• 250 - maxoC after 3.0 hours
Using the appliance after a safety cutout:
Switch the oven off completely. It can then
be switched on again.
thermometer and make sure that no part of
the thermometer comes into contact with the
top heating element.
For the best result, the tip of the thermometer
must be in the centre of the meat which heat
reaches last. Oven heat influences the thermometer, therefore the whole tube must be
inside the meat. Remember that the thermometer can show the wrong temperature if
it comes into contact with fat or bone.
Put in the food from a cold oven.
Setting:
1. Stick the meat probe into the meat.
2. Connect the meat probe into the outlet in
the oven (right-hand side).
3. Start the oven .
4. You can now set the desired temperature
by pressing or . 60ºC is the pre-set
temperature.
The display changes to the current core
temperature.
If the current core temperature has already been displayed, before the desired
core temperature is set, then press the
Selection
button repeatedly, until the
function Meat Probe flashes and then
carry out the setting.
30ºC is the lowest temperature that are
shown in the display.
The safety cut-out is cancelled, if the
clock function Cooking time
/ Stop
time
or the oven function Low temperature cooking
is set.
Using the Meat probe
Warning! Be careful not to burn yourself
on the heating coils in the top of the
oven, or on the oven step units when you
connect or disconnect the contact to the
meat probe. Use oven gloves.
The meat probe tolerates temperatures of
between 30 and 99°C. Use only the original
5. Choose oven function and temperature.
When the desired temperature in the
meat is reached, a signal sounds and the
oven switches off.
electrolux 21
6. To switch off the sound, press one of the
buttons.
Within a few minutes a provisional end
time is calculated, at which the core temperature set will be reached. This time is
constantly recalculated and updated in
the display. For the system to work it is
essential that the meat probe is in the
meat and the socket at the start of the
cooking process and that it is not removed during the cooking process.
The time display and core temperature
displays a "flashing rectangle" during the
calculation phase.
Warning! The meat probe is hot. You
can easily burn yourself when you take
the thermometer out of the oven outlet.
7. Disconnect the meat probe from the oven
outlet and take out the meat. NOTE! The
oven and the meat probe are hot.
To check or change the temperature
• Press
until the meat probe function
flashes and the chosen temperature
shows in the display.
• If you want to change the temperature, use
and .
To check or change the oven temperature
• If you want to change the temperature, use
and .
Tips, tables and advice
The baking/roasting times are guiding principles.
Baking table
Type of baking
Temperature
oC
Conventional
Oven
level
(bottom
oven)
Oven
level
(top
oven)
Minutes
Temperature oC
Hot air
Oven
level
Soft cakes
Fruit cakes
150-170
1
1
70-80
140-150
1
Sponge cake
160-18
1
ovenbottom
45-60
150-160
1
Muffin
220-225
3
2
10-20
160-170
1+4
225-250
3
2
6-10
200
3
Cakes
Swiss roll
22 electrolux
Type of baking
Pastries
made with
butter, flour,
sugar (egg)
Temperature
oC
Conventional
Oven
level
(bottom
oven)
Oven
level
(top
oven)
Minutes
Temperature oC
Hot air
Oven
level
170-180
3
2
20-30
150-160
1+4
Short pastry
biscuits
170-180
3
2
10-15
150-160
1+4
Gingerbread
biscuit
190-200
3
2
8-12
170-190
1+4
Puff pastries
180-200
3
2
20-30
160-180
1+4
Tin loaf
190-210
1
1
30-40
170-190
2
Loaf
175-225
2
1
35-45
180-190
1+4
Swedish teacake
220-225
3
1
12-18
180-190
1+4
Buns
225-250
2
1
7-10
180-190
1+4
Bun ring/flat
long-shaped
bun
180-200
2
1
20-30
170-180
3
Potato gratin
200
1
1
45-50
180-190
1
Batter pudding
200-225
2
2
20-35
180-190
3
Pan-pizza
210-220
1
1
16-20
180-200
1+4
Biscuits
Bread
White bread
Oven dishes
Always place a ovengrid on the bottom of the
oven when something is suggest to be
placed on the ovenbottom.
Tips for baking
Baking result
Bread/yeasted doughs and
sponge cakes fall flat.
Possible cause
Remedy
If the oven temperature is too
low, the dough can rise and then
go down again and become flat.
Check the set temperature
against recommendations in tables or recipes.
Bread/yeasted doughs have not Check the rising times against
risen properly. Excessively long recommendations in recipes.
rising time after rolling out can
give a flat result. Bread/yeasted
doughs should rise at room temperature, out of draughts. The
dough should spring back after
light pressure on the surface.
Not enough yeast or baking
powder.
Check in the recipe that you
have taken the right amount.
electrolux 23
Baking result
Possible cause
Remedy
If the fat/liquid mixture is too hot, The correct temperature of the
it ruins the effect of the yeast.
liquid for fresh yeast is 37°, concerning dry yeast see the recommendations on the packet.
Bread/yeasted doughs and
sponge cakes turn out dry.
Cakes/oven dishes are too
brown.
Cakes/oven dishes are pale in
colour.
Not enough liquid, too much
flour, or the wrong type of flour
can result in dry bread.
Check in the recipe that you
have taken the right amounts of
flour and liquid.
If the oven temperature is too
low, the material being baked
must remain in the oven much
longer to be cooked, and it
therefore becomes dry.
Check that you have set the right
temperature.
If the oven temperature is too
Check that you have set the right
high, the cakes/oven dishes be- temperature.
come too brown before they are
completely cooked.
Food positioned too high in the
oven is receiving too much top
heating, when using top and
bottom heating, and the opposite effect when placed too low.
Check in the table or recipe that
you have chosen the correct position.
Aluminium foil, a tray or a roasting pan on the bottom of the
oven is blocking the bottom
heating.
Make sure that there is nothing
in the bottom of the oven.
Light-coloured baking tins pro- Change to darker-coloured bakduce paler cakes than dark-col- ing tins.
oured tins.
Roasting table
Type of meat
Temperature
oC
Conventional
Oven
level
(bottom
oven)
Oven
level
(top
oven)
Min.
oC
Temp.
oC
Hot air
Oven
level
Beef
Roast beef
- rare
125
2
1
55-75
120
50-55
2
- medium
125
2
1
75-85
120
55-60
2
- well done
125
2
1
100-1
30
120
70-75
2
Ham joint
170
2
1
90-10
5
160
80
2
Loin of pork
170
2
1
105
160
85
2
Chop, spare rib
175
2
1
90
165
-
1+4
Meat loaf
170
2
2
60-70
160
75-80
2
Pork
Veal/Lamb
Roast veal/
lamb
24 electrolux
Type of meat
Temperature
oC
Conventional
Oven
level
(bottom
oven)
Oven
level
(top
oven)
Min.
oC
Temp.
oC
Hot air
Oven
level
- medium
170
2
1
90
160
70
2
- well done
170
1
1
105
160
75
2
Chicken, poulard
190
2
1
50-60
180
85
2
Chicken/turkey
fillet
220
3
2
35-50
200
75
2
Turkey, poulard
or half
170
1
1
45-55
160
90
2
Duck
160
2
1
40-55
150
2
Goose
160
1-2
1
40-55
150
2
Boiling of fish
100-110
2
2
50-70
Trout. 200-250
g
200
3
2
20-25
190
3
Pike-perch. ca.
1 kg
220
3
2
25-30
200
3
Whole fish
200
2
1
30-35
190
65
3
Whole salmon.
ca. 1 kg
210
2
1
20-25
200
58
3
Poultry
Fish
Low Temperature Cooking table
Food to be cooked
Weight
g
TemperatureoC
Oven level
Minutes
Roast beef
1000-1500
150
1
90-110
Fillet of beef
1000-1500
150
3
90-110
Roast veal
1000-1500
150
1
100-120
Steaks
200-300
120
3
20-30
Cleaning and care
Warning! Before cleaning always allow
the appliance to cool down before
switching off at the electricity supply.
Cleaning materials
Before using any cleaning materials on your
appliance, check that they are suitable and
that their use is recommended by the manufacturer
Cleaners that contain bleach should not be
used as they may dull the surface finishes.
Harsh abrasives and scourers should also be
avoided. Multi-surface anti-bacterial cleaning
products should not be used on the ceramic
hob or on the surrounding trims.
Cleaning outside of the appliance
Do not use abrasive cleaning materials e.g.
abrasive cream cleaners, wire wool pads or
scourers on painted or printed finishes as
damage may occur. Regularly wipe over the
control panel, doors and appliance sides using a clean cloth and hot soapy water. To
prevent streaking, finish with a soft cloth.
Stainless Steel cream cleaners are abrasive
and should be avoided as they may dull the
surface finish. The easiest way to clean stain-
electrolux 25
less steel surfaces is by using a soft cloth and
the clean agent (only supplied to stainless
steel appliances). Any spillage on the stainless steel finish must be wiped off immediately. You can also try window cleaning
agents. If the surface is very dirty, you can try
spirit such as technical spirit.
Warning! Note that the anti-tip guard
does not function when you have pulled
out the cooker in order to clean behind
it.
Warning! For safety reasons, do not
clean the appliance with steam jet or
high-pressure cleaning equipment.
Handle
It is strongly recommended that only hot
soapy water be used for cleaning the handles. Any other cleaning materials may dull
the surface finish.
Cleaning the ceramic hob
Make sure the ceramic glass is cool before
cleaning. It is important to clean the ceramic
hob daily to prevent foodstuff being burnt on.
Take care to avoid the hob trims when cleaning the ceramic glass as they may be damaged by the cleaning agents.
Daily cleaning
Use hob-cleaning product specifically designed for ceramic hobs daily. If foodstuff is
not allowed to burn on it will be much easier
to clean off.
1. Apply a small amount of hob cleaner on
the hob and wipe with a soft cloth, a clean
paper towel or anything similar. Make
sure it will not damage the hob.
2. Wipe off residues of cleaner with another
damp paper towel and polish dry with a
soft cloth.
To remove more stubborn marks
1. Cream cleaner may be used to clean off
more stubborn stains or to remove discolouration.
2. Use a plastic pad designed for non-stick
saucepans with cream cleaner for removal of more stubborn stains.
To remove burnt on foodstuff
We strongly recommend the use of a Ceramic Hob Scraper (incorporating a single
edge razor blade) to remove spillage on the
hob, in particular sugar solutions, which if not
removed can cause permanent damage.
1. Make sure the ceramic glass is cool.
2. Use a ceramic hob scraper with care at
an angle of 30o to remove as much foodstuff as possible.
Use hob cleaner or cream cleaner to finish off as directed above.
Warning! Keep the blade scraper out of
the reach or children. Use the blade
scraper with care, the blade is extremely
sharp.
To reduce marking of the hob
• Make sure the bottom of the saucepan and the cooking areas is clean
and dry before cooking begins .
• Ensure saucepans are large enough
to accommodate food to avoid boilover
• If possible, wipe up spills and splatters
as they occur, but take care to avoid
steam burns.
• Avoid using a dishcloth or sponge to
clean the hob. These may leave a layer
of soiled detergent on the hob surface, which will be burn and discolour
the next time the hob is used.
• Avoid the use of:
• Household detergents and bleaches.
– Impregnated plastic or nylon pads
that are not described as suitable
for non-stick saucepans.
– Abrasive cleaning pads, scourers
and steel wool pads.
– Chemical oven cleaners, e.g. aerosols and oven pads.
– Rust stain, bath and sink stain removers .
• Any of the above products may cause
damage of the hob.
• It is dangerous to mix different cleaning products. The chemicals in them
may react with each other with hazardous results.
• Sugar solutions must be removed
from the hob before the syrup has set
otherwise damage to the hob surface
will occur.
• Avoid placing plastic items, foil or
dishes on the hot surface as this will
cause damage to the hob.
26 electrolux
Cleaning the oven
Warning! When cleaning, no oven
functions must be selected and the oven
must have cooled down.
In order to facilitate cleaning, the side rails
should be removed.
When the oven door opens, the lamps
light and the hot air fan stops.
Removing the door:
1. Open the oven door about one-third of
the way (parking position).
Catalytic enamel
The catalytic enamel on the oven walls and
top is porous and has a certain self-cleaning
effect. The oven bottom, on the other hand
is made of a smooth and rather harder enamel from which you can scrape off spilled
material with a spatula or something similar.
Warning! The oven gets hot during use.
Keep an eye on children.
Dirt on the enamel is partly burnt off when the
oven is used. If there are flecks on the enamel, burn off the oven at the highest temperature with top/bottom heating for 30–60
minutes. Remove stubborn marks, for example fat, like this:
1. “Drench” the catalysis enamel with soft
soap and hot water. Use a nylon brush on
the flecks. Leave it alone for one hour.
2. Then turn on
conventional heating and
the highest temperature.
3. Switch off the oven after three hours.
2. Grasp the sides of the oven door with
both hands and pull the door off the oven.
3. Lift off the door
Warning! Do not use oven spray or
abrasive cleaning agents. Never use
oven cleaning compound or sharp
objects on the catalysis enamel. The
catalytic sheeting may otherwise be
damaged.
The smooth enamel
The following should be done if the oven bottom is very dirty:
1. Spillages that have become stuck can be
loosened with a spatula or something
similar.
2. Spread soft soap on the bottom of the
oven with a sponge.
3. Close the door. Set the oven at 100°C
with conventional heating for about 10
minutes.
4. When the oven has cooled down, rinse it
with clean water or, if necessary, rub
carefully with a soap pad. Wipe dry.
The oven door
The oven door can be removed for cleaning.
Fitting the door:
1. Make sure that the hinge unit is in its
parking position.
2. Insert the hinge unit in the slot on the
door. Press down until the assembly
spring clicks into position.
electrolux 27
2
1
3. Close the oven door.
The oven door glass
Warning! Do not use the oven door as
a foot-rest.
The oven door is made up of two parts with
heat reflecting glass to give a lower surface
temperature. The inner glass panes can be
removed for cleaning.
Cleaning between the glass panes
Warning! Take care that you do not
damage the door glass. Formation of
cracks at the edges could cause it to
break after being heated a few times.
Warning! Do not use harsh abrasive
cleaners or sharp metal scrapers to
clean the oven door glass since they can
scratch the surface, which may result in
shattering of the glass.
Please take care when closing the door
after the glass / glasses are removed as
the door becomes considerably lighter.
Removing the upper glass pane in the
oven door
1. Grasp the upper glass pane at its lower
edge and push it against spring pressure
towards the oven door handle, until it is
free at the bottom (1).
2. Lift up the pane slightly at the bottom and
pull it out (2).
Removing the central glass in the door
1. Grasp the central glass pane at its lower
edge and push it towards the oven door
handle, until it is free at the bottom (1).
2. Lift up the pane slightly at the bottom and
pull it out (2).
3. Clean the glass.
2
1
Fitting the central glass panes in the
door
1. Insert the central glass panes in order, diagonally from above into the glass retainer on the handle side (1).
2. Lower the central pane and push it towards the lower edge of the door until it
will go no further against the lower retainer (2).
28 electrolux
2
1
Fitting the upper glass in the door
1. Insert the upper glass diagonally from
above into the glass retainer on the handle side (1).
2. Lower the glass plate. Lay the pane
against spring pressure on the handle
side in front of the retaining profile on the
lower edge of the door and push it under
the retaining profile (2). The glass pane
must be firmly in position!
Wash the accessories thoroughly in hot water and washing-up liquid before using them
for the first time.
• Use tools made of plastic or wood instead
of metal, which can damage the plate.
• Remember that pots and pans with rough
surfaces can damage the accessories.
• Clean the accessories with a soft sponge
or a dish-brush in hot water, and a little
washing-up liquid. Never use the dishwasher.
• Never use wire wool or sharp objects when
cleaning.
Side rails
It is possible to remove the side rails on both
the right and left side walls to make it easier
to clean the side walls. To facilitate the removal of dirt an fat, they can be soaked in
water with washing up liquid. Wash by hand.
Note! Do not use the dishwasher. This
removes all the fat and impairs their function.
Removing the side rails
2
1
Accessories
Clean the accessories
Wash the shelves, dripping pan, etc. in hot
water and washing-up liquid. Rinse and dry.
First pull the rail away from the oven wall (1)
and then disengage to the rear (2).
2
Non-stick accessories
These accessories have a dirt-repellent coating and a long life if they are treated correctly
Bright spots in the coating do not mean
that the surface is damaged.
Warning! Do not place non-stick
accessories on a hot ceramic glass plate
since this can damage them. The
accessories tolerate a temperature of up
to 250°C. Never heat them without food
or dough.
1
Replacing the side rails
Important! Important! The rounded ends of
the guides must point to the front!
electrolux 29
To insert the rail first engage again at the
back (1) and then insert in the front and press
into place (2).
1
1. Take off the glass cover by turning it anticlockwise and clean it.
2. If necessary:
Replace with oven lamp, 25 Watt, 230
V, 300 °C heat-resistant.
3. Re-fit the glass cover.
Replacing the side oven light bulb/
Cleaning the glass cover
1. Take out the side rails on the left.
2
Oven lighting
Warning! Risk of electric shock! Before
replacing the oven light bulb:
– Switch oven off.
– Make sure that the cooker is disconnected
from the power supply.
– For cookers with a cable, pull out the plug.
– For other cookers, disconnect the power
supply by using the universal pole switch.
To protect the oven light bulb and the
glass cover, lay a cloth on the floor of the
oven.
Changing oven light bulb/cleaning glass
cover
2. Remove and clean the glass cover with
the help of a small, blunt object (e.g. teaspoon).
3. If necessary: Replace with new bulb with
an E14 base, marked 230-240V, 25W
and 300°C.
Order the replacement lamp from your
local service centre (see section "Service/
Customer Service").
Always touch the halogen lamp using a
cloth to avoid oil burning.
30 electrolux
4. Re-fit the glass cover.
5. Replace the side rails.
What to do if...
Never do anything to the cooker that could
cause injury to people or damage the product. Below you will find suggestions as to
what you can do yourself if there is a problem. If you need help - contact Service.
Problem
Remedy
There is no power to the cooker
Check the following:
• that the fuse/fuses are in good condition
• that the power plug is properly inserted
• that any earth fault switch is turned on
The cooker does not work
Check that the function lock is not active
The oven does not work
Set the clock
It takes too long to boil/fry
Check that you have selected a suitable pan
with good heat conductivity
The oven light does not work
Replace oven bulb
The door lock does not work
Activate the lock function
The meat probe does not work
Check that the roasting thermometer is properly connected in the oven; take it out and then
re-connect it. Programme the desired temperature
The clock shows the wrong time or does not work at Set the correct time
all
The signal clock does not work
Programme in a time
Sound is heard from the cooker even though it has
been switched off
The sound comes from the thermostat controlled fan which protects the cooker electronics. No action required, since this is completely
normal.
F flashes in the hob display
• Unsuitable cookware
• No cookware on the cooking zone
• The diameter of the bottom of the cookware
is to small for the cooking zone
- ligths up in the hob display
Check the fuses
F9 lights up in the oven display
Pull the plug out of the wall outlet. Connect up
again and re-start the cooker
electrolux 31
Problem
Remedy
F11 lights up in the oven display
The meat probe contact is not properly inserted into the outlet in the oven
Error code lights up in the oven display (starts with F) Contact your local service centre
Technical Data
Product width
596 mm
Oven
Rating
Product depth
595 mm
Top Heating Element
1000 W
Product height
900 mm
Bottom Heating Element
1000 W
Grill Heating Element
1600 W
Energy Efficiency Class
Top Oven
A
Ring Heating Element
1400 W
Bottom Oven
A
Induction Hob
Rating
The area of the bakingtray (cm2)
1488
140 mm Induction Heating
Element
1350/2500 W
180 mm Induction Heating
Element
1700/2800 W
210 mm Induction Heating
Element
2100/3100 W
We reserve the right to make changes. This
appliance meets the requirements of EC Directives 89/336/EEC and 73/23/EEC.
The availability of a heating element varies
according to the specification of products.
Installation
Warning! Any work required on the
cooker must be carried out by a
qualified expert. The cooker is heavy.
Edges and corners, with which you do
not normally come into contact, can be
sharp. Use gloves when moving the
appliance.
When delivered, the cooker is adjusted to a
bench height of 900 mm. The cooker has a
fixed plinth. Take care when positioning the
cooker that you do not block the ventilation
outlets (behind the cooker and at the top behind the hood), the cooker must not be pushed in under a tiled edge or similar. There must
be a clear surface of at least 40 cm on both
sides of the cooker.
Make sure that the cooker cable does not get
crushed when moving the cooker.
Horizontal adjustment
The cooker must be level so that, for example, fat spreads evenly in the frying pan. Place
a spirit level or a frying pan containing water
on the ceramic glass plate when you want to
check whether the cooker is level. If neces-
sary, from the front of the plinth, you can adjust the cooker wheels and feet by 15 mm.
Use a screwdriver to adjust the rear wheels
and a Polygrip for the front feet.
The anti-tip guard
Warning! The anti-tip guard must be
fitted to prevent the cooker from tipping
over with abnormal loads. The anti-tip
guard only works when the cooker has
been pushed into place.
How you install the ant-tip guard:
32 electrolux
1. Before fitting the anti-tip guard, make
sure that the cooker has been adjusted
to the correct height and is standing level.
2. The attachment (B) is fitted to the left side
when delivered. Measure out where the
anti-tip guard (A) is to be located, 60 mm
down from the edge of the hob and 50
mm from the wall (cupboard). Screw it
firmly into solid material or use suitable
reinforcement. The entire anti-tip guard (A
+B) can also be located on the right-hand
side (See fig. 1).
Make sure that the surface behind the cooker
is smooth. If there are tiles or a moulding behind the edge of the ceramic glass plate then
there must be a space with the same dimension between the anti-tip guard and the wall.
This is so that the anti-tip guard is firmly attached to the cooker and functions correctly.
Check that the anti-tip guard projects at least
20 mm into the hole in the back of the cooker
(B) when the cooker is pushed in (See fig. 2).
NOTE! If the space between the bench cupboards is greater than the width of the cooker, then you must adjust the side measurement if you want to centre the cooker.
1
2
Electrical connections
Warning! Any work required on the
cooker must be carried out by a qualified
expert. Any work carried out by nonqualified people can mean poorer
cooker performance and result in
personal injury and/or damage to
property.
A cooker that is delivered with a cable and a
plug must be connected to an earthed wall
outlet. The connected rating and voltage are
shown on the data plate. There is a wiring
diagram on the back of the cooker.
The electrical installation is to include a device whereby it is possible to separate all the
poles of the equipment from the power supply. The contact breaker should disconnect
all poles of the supply in such way as to ensure full disconnection under overvoltage III
connections.
This requirement must be satisfied for safety
reasons.
electrolux 33
For cookers with plug: Make sure that the
plug is completely pushed into the mains
socket.
Environmental Information
Deactivate the door lock so that children
cannot be locked inside the oven.
The packaging can be recycled. Contact
your local council for more information
on recycling facilities in your area.
Save Energy!
• Use a lid and you halve energy consumption.
• Steaming and pressure cooking also
save energy.
Warning! To ensure that the appliance
does not pose a danger, it should be
made inoperable prior to disposal. Pull
the mains plug from the socket and
remove the mains cable from the
appliance.
The symbol
on the product or on its packaging indicates that this product may not be
treated as household waste. Instead it
should be taken to the appropriate collection
point for the recycling of electrical and electronic equipment. By ensuring this product is
disposed of correctly, you will help prevent
potential negative consequences for the en-
vironment and human health, which could
otherwise be caused by inappropriate waste
handling of this product. For more detailed
information about recycling of this product,
please contact your local council, your
household waste disposal service or the
shop where you purchased the product.
Guarantee/Customer Service
Belgium
DECLARATION OF GUARANTEE TERMS.
Our appliances are produced with the greatest of care. However, a defect may still occur.
Our consumer services department will repair this upon request, either during or after
the guarantee period. The service life of the
appliance will not, however, be reduced as a
result.
This declaration of guarantee terms is based
on European Union Directive 99/44/EC and
the provisions of the Civil Code. The statutory
rights that the consumer has under this legislation are not affected by this declaration of
guarantee terms.
This declaration does not affect the vendor's
statutory warranty to the end user. The appliance is guaranteed within the context of
and in adherence with the following terms:
1. In accordance with provisions laid down
in paragraphs 2 to 15, we will remedy
free of charge any defect that occurs
within 24 months from the date the appliance is delivered to the first end user.
These guarantee terms do not apply in
the event of use for professional or
equivalent purposes.
2. Performing the guarantee means that
the appliance is returned to the condition
3.
4.
5.
6.
7.
8.
it was in before the defect occurred. Defective parts are replaced or repaired.
Parts replaced free of charge become
our property.
So as to avoid more severe damage, the
defect must be brought to our attention
immediately.
Applying the guarantee is subject to the
consumer providing proof of purchase
showing the purchase and/or delivery
date.
The guarantee will not apply if damage
caused to delicate parts, such as glass
(vitreous ceramic), synthetic materials
and rubber, is the result of inappropriate
use.
The guarantee cannot be called on for
minor faults that do not affect the value
or the overall reliability of the appliance.
The statutory warranty does not apply
when defects are caused by:
– a chemical or electrochemical reaction
caused by water,
– abnormal environmental conditions in
general,
– unsuitable operating conditions,
– contact with harsh substances.
The guarantee does not apply to defects
due to transport which have occurred
34 electrolux
9.
10.
11.
12.
outside of our responsibility. Nor will the
guarantee cover those caused by inadequate installation or assembly, lack of
maintenance or failure to respect the assembly instructions or directions for use.
Defects that result from repairs or measures carried out by people who are not
qualified or expert or defects that result
from the addition of non-original accessories or spare parts are not covered by
the guarantee.
Appliances that are easy to transport
may be delivered or sent to the consumer services department. Home repairs
are only anticipated for bulky appliances
or built-in appliances.
If the appliances are built-in, built-under,
fixed or suspended in such a way that
removing and replacing them in the
place where they are fitted takes more
than half an hour, the costs that result
there from will be charged for. Connected damage caused by these removal
and replacement operations will be the
responsibility of the user.
If, during the guarantee period, repairing
the same defect repeatedly is not conclusive, or if the repair costs are considered disproportionate, in agreement with
the consumer, the defective appliance
may be replaced with another appliance
of the same value. In this event, we reserve the right to ask for a financial contribution calculated according to the
length of time it has been used.
Electrolux Home
Products Belgium
ELECTROLUX
SERVICE Bergensesteenweg 719
1502 Lembeek
Consumer services
13. A repair under guarantee does not mean
that the normal guarantee period will be
extended nor that a new guarantee period begins.
14. We give a twelve month guarantee for
repairs, limited to the same defect.
15. Except in the event where liability is legally imposed, this declaration of guarantee terms excludes any compensation
for damage outside the appliance for
which the consumer wishes to assert his
rights. In the event of legally admitted liability, compensation will not exceed the
purchase price paid for the appliance.
These guarantee terms are only valid for appliances purchased and used in Belgium. For
exported appliances, the user must first
make sure that they satisfy the technical conditions (e.g.: voltage, frequency, installation
instructions, type of gas, etc.) for the country
concerned and that they can withstand the
local climatic and environmental conditions.
For appliances purchased abroad, the user
must first ensure that they meet the qualifications required in Belgium. Non-essential or
requested adjustments are not covered by
the guarantee and are not possible in all cases.
Our consumer services department is always
at your disposal, even after the guarantee
period has expired.
Address for our consumer services department:
Belgium
Tel.:
Fax.:
02/363.04.44
02/363.04.00
02/363.04.60
Tel.:
Fax.:
00 352 42 431-1
00 352 42 431-360
E-mail: [email protected]
Luxembourg
Grand-Duché de
Luxembourg ELECTROLUX HOME
PRODUCTS Rue de
Bitbourg. 7 L-1273
Luxembourg-Hamm
Consumer services
electrolux 35
E-mail: [email protected]
European Guarantee
This appliance is guaranteed by Electrolux in
each of the countries listed at the back of this
user manual, for the period specified in the
appliance guarantee or otherwise by law. If
you move from one of these countries to another of the countries listed, the appliance
guarantee will move with you subject to the
following qualifications:• The appliance guarantee starts from the
date you first purchased the appliance
which will be evidenced by production of a
valid purchase document issued by the
seller of the appliance.
• The appliance guarantee is for the same
period and to the same extent for labour
and parts as exists in your new country of
residence for this particular model or range
of appliances.
• The appliance guarantee is personal to the
original purchaser of the appliance and
cannot be transferred to another user.
• The appliance is installed and used in accordance with instructions issued by Electrolux and is only used within the home, i.e.
is not used for commercial purposes.
• The appliance is installed in accordance
with all relevant regulations in force within
your new country of residence.
The provisions of this European Guarantee
do not affect any of the rights granted to you
by law.
www.electrolux.com
Albania
+35 5 4 261 450
Rr. Pjeter Bogdani Nr. 7 Tirane
Belgique/België/Belgien
+32 2 363 04 44
Bergensesteenweg 719, 1502
Lembeek
Česká republika
+420 2 61 12 61 12
Budějovická 3, Praha 4, 140 21
Danmark
+45 70 11 74 00
Sjællandsgade 2, 7000 Fredericia
Deutschland
+49 180 32 26 622
Muggenhofer Str. 135, 90429
Nürnberg
Eesti
+37 2 66 50 030
Pärnu mnt. 153, 11624 Tallinn
España
+34 902 11 63 88
Carretera M-300, Km. 29,900
Alcalá de Henares Madrid
France
www.electrolux.fr
Great Britain
+44 8705 929 929
Addington Way, Luton, Bedfordshire LU4 9QQ
Hellas
+30 23 10 56 19 70
4, Limnou Str., 54627 Thessaloniki
Hrvatska
+385 1 63 23 338
Slavonska avenija 3, 10000 Zagreb
Ireland
+353 1 40 90 753
Long Mile Road Dublin 12
Italia
+39 (0) 434 558500
C.so Lino Zanussi, 26 - 33080
Porcia (PN)
Latvija
+371 67313626
Kr. Barona iela 130/2, LV-1012,
Riga
Lietuva
+370 5 278 06 03
Ozo 10a, LT-08200 Vilnius
36 electrolux
Luxembourg
+352 42 431 301
Rue de Bitbourg, 7, L-1273
Hamm
Magyarország
+36 1 252 1773
H-1142 Budapest XIV, Erzsébet
királyné útja 87
Nederland
+31 17 24 68 300
Vennootsweg 1, 2404 CG - Alphen aan den Rijn
Norge
+47 81 5 30 222
Risløkkvn. 2 , 0508 Oslo
Österreich
+43 18 66 400
Herziggasse 9, 1230 Wien
Polska
+48 22 43 47 300
ul. Kolejowa 5/7, Warszawa
Portugal
+35 12 14 40 39 39
Quinta da Fonte - Edificio Gonçalves Zarco - Q 35 -2774-518
Paço de Arcos
Romania
+40 21 451 20 30
Str. Garii Progresului 2, S4,
040671 RO
Schweiz - Suisse - Svizzera
+41 62 88 99 111
Industriestrasse 10, CH-5506
Mägenwil
Slovenija
+38 61 24 25 731
Gerbičeva ulica 98, 1000 Ljubljana
Slovensko
+421 2 43 33 43 22
Electrolux Slovakia s.r.o., Electrolux Domáce spotrebiče SK,
Seberíniho 1, 821 03 Bratislava
Suomi
www.electrolux.fi
Sverige
+46 (0)771 76 76 76
Electrolux Service, S:t Göransgatan 143, S-105 45 Stockholm
Türkiye
+90 21 22 93 10 25
Tarlabaşı caddesi no : 35 Taksim İstanbul
Россия
+7 495 937 7837
129090 Москва,
Олимпийский проспект, 16,
БЦ "Олимпик"
Україна
+380 44 586 20 60
04074 Київ,
вул.Автозаводська, 2а, БЦ
"Алкон"
electrolux 37
38 electrolux
electrolux 39
www.electrolux.com
339 6191 00-A-062008