1
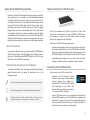
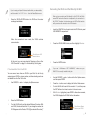
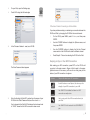
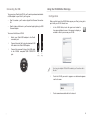
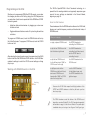
® ®ÂØÒňΠV-Combo VR-09 Workshop The VR-09 and the iPad © 2013 Roland Corporation U.S. All rights reserved. No part of this publication may be reproduced in any form without the written permission of Roland Corporation U.S. iPad® is a registered trademark of Apple Inc. VR09WS04 1 About the VR-09 Workshop Booklets Roland’s V-Combo VR-09 is designed for today’s performing musician, with everything he or she needs in a single, affordable instrument that weighs just a little more than 12 easy-to-carry pounds. All of the must-have sounds are here, from Roland’s acclaimed piano, electric piano, and Virtual Tone Wheel organ to synths, horns, strings, drums, and anything you’d want to pull off a gig in style. There’s no digging through menus while your audience waits, either—it’s all right there at your fingertips. And with the six always-live effect knobs and D Beam, your audience won’t believe what you can do with the V-Combo VR-09. There’s also a free iPad app for serious sound programming. Of course, battery power also means you can take your musical magic anywhere. Taking Total Control of VR-09 Sounds Once you’ve connected your VR-09 to your iPad, you’ll be in total control of all of the settings for the current ORGAN or SYNTH sound. Any changes you make on the iPad instantly change the sound beneath your fingertips on the VR-09 itself. This makes the VR-09 Editor app a great way to About This Booklet If you’ve got an Apple iPad, you can edit and create VR-09 ORGAN and SYNTH sounds using our free VR-09 Editor app, available in Apple’s App Store. This booklet explains how to connect your VR-09 to your iPad and how the VR-09 Editor app works. Understanding the Symbols in This Booklet Throughout this booklet, you’ll come across information that deserves special attention—that’s the reason it’s labeled with one of the following symbols. • program sounds offstage—when you’ve got the time to really dig in and create something all your own. The VR-09 itself is built for the stage, where programming takes a back seat to performance. The VR-09 Editor app lets you dig deep down into the VR-09 sounds. • manipulate sounds onstage—since you have control of all their settings, the iPad can serve as a powerful realtime controller. Connecting Your VR-09 and iPad You can connect your VR-09 and your iPad • wirelessly via WiFi—using the Roland Wireless Connect system. Roland Wireless Connect requires the purchase of a Roland WNA1100 Wireless USB Adapter (sold separately) for your VR-09. We’ll discuss setting up a wireless connection in “Connecting Via WiFi” on page 3. • using a USB cable—when you’ve purchased and attached the required USB adapter for your iPad (USB cable and adapter sold separately). To jump to the section of this booklet explaining how to set up a wired USB connection, see “Connecting Via USB” on page 6, which you can jump to by clicking here. A note is something that adds information about the topic at hand. A tip offers suggestions for using the feature being discussed. Warnings contain important information that can help you avoid possible damage to your equipment, your data, or yourself. 2 Connecting Via WiFi You have a choice of how you want your VR-09 and iPad to wirelessly communicate. • • If you’re going to be using the VR-09 and iPad at home—you can use your home’s WiFi network, or LAN (“Local Area Network”). Your iPad’s probably already using it, so when your VR-09 joins the network they’ll be able to communicate with each other. You can use a LAN connection anywhere LAN there’s a WiFi network to which you can connect. If you want to be able to use the VR-09 and iPad anywhere— you can connect them directly to each other using the VR-09’s Ad-Hoc mode. This method works when no LAN is available Ad-Hoc to you, so it’s a good way to connect your VR-09 and iPad in locations where there may be no network, such as in clubs or other performance venues. Ad-Hoc mode also doesn’t require a WiFi router as a LAN does. Here’s how to get your LAN connection set up: 1 Insert the WNA1100 into the jack inside the VR-09’s front-panel USB MEMORY compartment. 2 Press the VR-09’s MENU button, and then highlight Wireless. 3 Press the ENTER button. If you see “<<Wireless>> NOT AVAILABLE,” make sure your WNA1100 is correctly installed in its jack. The default Wireless screen appears: Some Details About the VR-09 and WiFi You only need to set up communication the first time you use the VR-09 and iPad together. If this screen isn’t what you see, use the CURSOR buttons to find it. The WNA1100 is an 802.11 b/g/n-compliant device that can be used with most any WiFi network’s router and with any iPad. Routers make a WPS connection after receiving a message from the device being connected. Most WPS-supporting routers have a button you can press to prepare the router to receive this message. When you connect the VR-09 to a LAN, it uses WPS (“WiFi Protected Setup”). Most routers support this super-simple connection protocol. Apple Airport Extreme routers do support WPS, though they refer to it as “connecting to a WiFi printer” instead of as “WPS.” If you’re using another kind of WPS router and it doesn’t have a WPS button, check its manual to learn how it handles WPS. and If your router doesn’t have a WPS button, consult its documentation to learn how to use its WPS feature. 4 Press your router’s WPS button. 3 If you’re using an Airport Extreme, double-click your base station, and then select Add WiFi Printer... from the Base Station menu. 5 Connecting the VR-09 and iPad Directly Via WiFi When you’re connecting an iPad directly to the VR-09, the iPad’s normal WiFi network connection is replaced by its connection to the VR-09. Therefore, its internet access via WiFi will be inactive until you restore its connection to a WiFi network. Press the VR-09’s ENTER button—the VR-09 and the router exchange handshakes. When the connection’s been made, the VR-09 confirms communication. 1 Insert the WNA1100 into the jack inside the VR-09’s front-panel USB MEMORY compartment. 2 Press the VR-09’s MENU button, and then highlight Wireless. 3 Press the ENTER button. This will be your WiFi network’s name. At this point, you can jump ahead to “Keeping an Eye on Your WiFi Connection” on page 5 in this booklet by clicking here. If You Have More Than One VR-09 You can connect more than one VR-09 to your iPad. You do this by assigninig each VR-09 a unique number, and then selecting each one as needed from the iPad. To do this: 1 Use CURSOR and to display the Options screen: 2 Press the ENTER button. 3 Turn the VALUE dial to set the desired Wireless ID number. With one VR-09, this should be left at 0. If you change the number, the VR-09 appears to the iPad as “VR-09_[the selected ID number].” If you see “<<Wireless>> NOT AVAILABLE,” make sure your WNA1100 is correctly installed in its jack. 4 Use the CURSOR and and then press ENTER. buttons to find the Options screen, 5 Press the 6 Turn the VALUE dial to set Ad-Hoc mode to ON, and then press the EXIT button a few times to return to the main menu. 7 With Wireless highlighted, press ENTER—after a few moments, the VR-09 displays the VR-09’s Ad-Hoc information. button once to display the Ad-Hoc Mode screen. This will be a different value on your VR-09. 4 8 On your iPad, open the Settings app. 9 Touch Wi-Fi along the left-hand edge. Settings If You Have Trouble Connecting in Ad-Hoc Mode If you have problems making or maintaining a connection between the VR-09 and iPad, try changing the VR-09 Ad-Hoc mode channel: 10 1 On the VR-09, press MENU, select Wireless, and then press ENTER. 2 Use the CURSOR buttons to display the Options screen, and then press ENTER. 3 Use the CURSOR buttons to display the Ad-Hoc Channel screen and turn the VALUE dial to select a different channel. 4 Redo Steps 8-11 above for selecting the VR-09 on the iPad. In the Choose a Network... area, touch VR-09. Keeping an Eye on Your WiFi Connection The Enter Password sheet appears: After making your WiFi connection, press EXIT on the VR-09 until you return to the main screen in Organ or Synth mode. In the upperrighthand corner of the screen, you’ll see an icon that gives you the status of your WiFi connection at a glance. This icon Tells you this about your WiFi connection As with the bars on a cell phone, this shows you the strength of your WiFi connection to your LAN. Your WNA1100 is installed, but there’s no WiFi connection currently active. 11 Enter the five-digit Ad-Hoc KEY number from the screen of your VR-09 into the iPad’s Password field, and then touch Join. You’re returned to the iPad’s WiFi tab where the checkmark next to “VR-09” shows that the WiFi connection’s been made. You’re using an Ad-Hoc WiFi connection directly to your iPad. no icon Your WNA1100 isn’t inserted in the USB MEMORY jack. 5 Connecting Via USB Using the VR-09 Editor iPad App To connect your iPad to the VR-09, you’ll need to purchased and attach a USB adapter to your iPad. If you’ve got an • iPad 3 or earlier—you’ll need an Apple iPad Camera Connection Kit. • iPad 4 or later, or iPad mini—you’ll need an Apple Lightning to USB Camera Adapter. Configuration When you first launch the VR-09 Editor app on your iPad, you’ve got to pair it with your VR-09. Here’s how. 1 To connect the iPad and VR-09: 1 Attach your iPad’s USB adapter to the iPad’s connector jack. 2 Connect the wide, flat A plug of a standard USB A-B cable to the iPad’s USB adapter. 3 Connect the narrower B plug of the USB cable to the VR-09’s rear-panel USB COMPUTER jack. A plug In the VR-09 Editor, touch the gear icon located in the upper-righthand corner of the screen to display a window in which you can see your VR-09. B plug If you’ve got multiple VR-09s WiFi-enabled, you’ll see them all in this list. 2 Touch the VR-09 you want to program—a checkmark appears next to its name. 3 Touch somewhere outside the list to close it. 6 Programming on the iPad Whether you’re programming ORGAN or SYNTH sounds, you can hear the changes you make on the Pad by playing the VR-09 keyboard as you make them. Here’s how to operate the iPad’s ORGAN and SYNTH controls in general: • Adjust bar, slider and knob values—by dragging up or down over the slider or knob. • Toggle switches and buttons on and off—by touching the switches or buttons. To program an ORGAN sound, touch the ORGAN button at the top left of the iPad screen. To program a SYNTH sound, touch the SYNTH button next to it. After selecting the type of sound you want to program, touch the READ button to the left of the ORGAN and SYNTH buttons—the VR-09 Editor updates its settings to match the VR-09’s current settings so things stay in sync. Working with ORGAN Sounds on the iPad Everything else Drawbars The VR-09’s SuperNATURAL Virtual Tonewheel technology is a powerful tool for creating authentic and organically responsive organ sounds. Its many settings are described in the Owner’s Manual, beginning on page 16. About the iPad Drawbars These drawbars act like the ORGAN-section sliders on the VR-09 itself, allowing you to set the frequency content, and therefore the timbre, of ORGAN sounds. When you’re playing Use a single, unlayered ORGAN sound the UPPER drawbars for controlling the ORGAN sound. a split with an ORGAN sound for both the left and right hands the LOWER drawbars for controlling the left hand sound, and the UPPER bars for controlling the right. a split with an ORGAN sound for the left hand and a PIANO or SYNTH sound for the right the LOWER drawbars for the ORGAN sound. a split/layer combo with an ORGAN sound for the left hand, and second ORGAN sound layered with a PIANO or SYNTH sound for the right hand use the LOWER drawbars for the lefthand organ, and the UPPER drawbars for the righthand organ. Onscreen, the VR-09 Editor swaps the left/right positions of the UPPER and LOWER drawbars so that they fall under your free hand as you play. The PEDAL drawbars control the timbre of the ORGAN sound played by a connected Roland PK-6 or PK-9 (purchased separately) as described on page 8 of the Owner’s Manual. The pedal option is available when you’re using a Jazz Organ or Rock Organ type. 7 About Everything Else The Two SYNTH Screens Obviously, these controls affect any single, unlayered ORGAN sound you’re programming. What may be less obvious is that when you’re working with a spit, a layer, or a split/layer, they affect all of the ORGAN sounds together, including any pedal drawbars you’re using. The VR-09’s SYNTH sounds have more settings than can fit on a single Pad screen. Working with SYNTH Sounds on the iPad To get to the second screen, touch the LFO tab. The LFO tab Selecting the SYNTH Sound You Want to Program The VR-09 Editor app allows you to work with any SYNTH sound, whether it’s being played alone, in a layer, or in a split. At the top of the iPad SYNTH screen, you can see the VR-09’s currently selected SYNTH sounds. Each SYNTH sound is shown with a lit blue button. The currently active tab is orange. To switch back to the first SYNTH screen, touch OSC FILTER/AMP tab. In this example, a single SYNTH sound is selected on the VR-09. A single SYNTH sound is shown as being UPPER 1. To program a SYNTH sound, touch its SELECT button, as shown above. The button turns red to show you which SYNTH sound—if there’s a layer or split in use—is selected for programming. The OSC FILTER/AMP tab Here’s what a layer looks like with a SYNTH sound as the second layer. It’s currently selected. Here’s a split using two SYNTH sounds. The righthand sound is currently selected for programming. 8 Understanding SYNTH Programming SYNTH Sound Control Area Sound name Sound categpry Value display The VR-09 Editor app reveals the complete structure of a VR-09 SYNTH sound. If you’re familiar with synthesizer programming, it’ll all look familiar, as the sounds are built using a traditional subtractive synthesis architecture. The SYNTH Sound Control area applies to the entire SYNTH sound. It shows you the sound’s name and category, and its Value display shows you the current value of any parameter you adjust as you’re adjusting it. Here’s what else is there and what it does. Setting This parameter: Can be set to: UNISON SW turns the Unison feature on and off. Unison slightly detunes the sound’s partials to make the sound bigger. ON, OFF The Anatomy of a SYNTH Sound UNISON SIZE 2, 4, 6, 8 Each SYNTH sound in the VR-09 is made up of the combination of as many as three “partials” playing together. Each partial contributes some characteristic to the overall SYNTH sound. adjusts the amount of Unison detuning. MONO sets whether only single notes can be played at a time, or whether chords can be played. MONO (single notes), POLY (chords) PORTAMENTO SW turns Portamento on and off. Portamento causes pitches to glide from played note to played note. ON, OFF PORTAMENTO TIME sets the speed of note-gliding. 0-127 If, however, you’re new to synth programming, the following sections explain how everything works. Partial 1 Partial 2 Partial 3 SYNTH sound There are controls that affect the individual partials, and controls that affect the behavior of the overall SYNTH sound. Let’s start on the first SYNTH screen with settings that control the whole sound. (Continued on next page) 9 Setting This parameter: Can be set to: WAVE SHAPE adds bottom to the sound by adding a second pitch, one octave down, to Partial 1 when it’s using one of the first five WAVE options, as described in the OSC Controls table below. 0-127 determines the overall volume of the SYNTH sound. 0-127 TONE LEVEL OSC Controls—These controls set the basic sound, pitch, and shape of the partial. Setting This parameter: Can be set to: WAVE determines the most basic aspect of the partial’s sound: the type of sound wave it produces. • —sawtooth wave • —square wave • —pulse/PWM • —triangle wave • NOISE • SUPER SAW • PCM—these are The Partial Switches and SELECT Buttons sampled sound waves. With PCM selected, touch the PCM number to display a menu from which you can select the desired sound wave. Partial switches The Partial switches turn each of the sound’s three partials on or off. When a partial is turned on, its switch lights yellow. VARIATION selects one of three variations available for the selected wave. A, B, C—The WAVE button’s color shows the current variation: • A—Unlit • B—red • C—green PITCH sets the pitch of the partial in semitones. -24 to +24 DETUNE adjusts the pitch of the partial in fine increments. -50 to +50 You program a single partial at a time. To select the partial you want to work on, touch its SELECT button so it lights orange. As you work on a partial, you can temporarily turn the sound’s other partials off to better hear what you’re doing. Programming a Partial Once you’ve selected a partial to program, you can set up the chain of virtual devices through which its sound passes. Each device in some way shape’s the partial’s sound. OSC (Oscillator) (Continued on next page) MOD FILTER Here’s what the controls for these devices do. AMP turns Ring Modulation on or off. Ring Modulation combines the first two partials to create a complex timbre. OFF, RING 10 OSC Controls—These controls set the basic sound, pitch, and shape of the partial. OSC Controls—These controls set the basic sound, pitch, and shape of the partial. Setting This parameter: Can be set to: Setting This parameter: Can be set to: PWM adjusts the amount of change, or “modulation,” applied by the LFO to the width of the pulse wave when WAVE is set to pulse/PWM. 0 to 127 ENV DEPTH -63 to + 63 PW manually sets the width of the pulse wave when WAVE is set to pulse/ PWM. 0 to 127 sets the degree to which the pitch envelope affects the partial’s pitch. Settings higher than 0 cause the pitch to go sharp of the PITCH and DETUNE settings; values below 0 cause the pitch to go flat. SUPER SAW DETUNE sets the width of the SUPER SAW wave when WAVE is set to SUPER SAW. 0 to 127 A sets the envelope Attack time, the amount of time it takes for a note to reach its highest pitch after a key is pressed, as set by ENV DEPTH, described below. 0 to 127 D sets the envelope Decay time, the amount of time it takes for a note’s pitch to go from its highest pitch to the one set with PITCH and DETUNE. 0 to 127 The A, D, and ENV DEPTH OSC settings together make up the partial’s pitch “envelope.” A pitch envelope makes the tuning of a partial less static and more alive. When some real instruments— guitar and trumpet, for example—are played, each note goes slightly sharp for an instant before settling into tune. You can simulate this behavior using a positive ENV DEPTH setting and short A and D times. Negative ENV DEPTH settings cause a note to start slightly flat and then bend upwards. Longer A and D times produce interesting, if less organic, pitch movement. 11 FILTER Controls—Each partial’s sound is a stack of sound waves vibrating over and over at different speeds, or “frequencies,” and therefore different pitches. Combined, they act as the partial’s overtones, producing its tonal character. By removing frequency ranges from a partial, you change its tone. Each frequency range is called a “frequency” for short. FILTER Controls—Each partial’s sound is a stack of sound waves vibrating over and over at different speeds, or “frequencies,” and therefore different pitches. Combined, they act as the partial’s overtones, producing its tonal character. By removing frequency ranges from a partial, you change its tone. Each frequency range is called a “frequency” for short. Setting This setting: Can be set to: Setting This setting: Can be set to: MODE selects a type of filter. • BYPASS—so the RESONANCE sets the volume of the cutoff frequency range. 0 to 127 KEY FOLLOW so the Cutoff frequency automatically changes as you move up and down the keyboard. -100 to +100. Positive values make the Cutoff higher as you move up the keyboard, and lower as you move down. Negative values raise it as you go down, and lower it as you go up. A sets the amount of time it takes for the Cutoff to reach its highest value from its manual setting after a key is pressed. 0 to 127 D sets how long it takes the Cutoff value to change from its maximum to its Sustain setting, described next. 0 to 127 S sets the Cutoff value that remains in place until you let go of a key. 0 to 127 • • • • filter’s turned off. LPF—so the filter removes frequencies above the Cutoff frequency, described below. HPF—so the filter removes frequencies below the Cutoff. BPF—so the filter removes frequencies around the Cutoff. PKG—so the filter removes frequencies everywhere except around the Cutoff. CUTOFF determines the manual setting of the Cutoff, the frequency at which the filter starts removing content from the partial. 0 to 127. The frequency range the filter removes relative to the Cutoff depends on the MODE setting. SLOPE determines how steeply the filter removes frequencies above or below the Cutoff frequency. -12dB / oct (for more gradual filtering), -24db / oct (for more sudden, extreme filtering) (Continued on next page) 12 FILTER Controls—Each partial’s sound is a stack of sound waves vibrating over and over at different speeds, or “frequencies,” and therefore different pitches. Combined, they act as the partial’s overtones, producing its tonal character. By removing frequency ranges from a partial, you change its tone. Each frequency range is called a “frequency” for short. Setting This setting: Can be set to: R sets how long it takes for the Cutoff value to return to its manual setting when you let go of the key. 0 to 127 ENV DEPTH determines how strongly the filter envelope affects the Cutoff setting. -63 to +63. Positive values push the cutoff above its manual setting. Negative values lower it. The A, D, S, and R and ENV DEPTH FILTER envelope settings allow you to automatically change the manual Cutoff setting over time. Without an envelope, the partial’s frequencies are filtered according the manual Cutoff setting over the length of the note, so the note has one bright/warm character throughout. An envelope allows you to automatically move the Cutoff value over time, producing automated tonal changes as the note plays to make it more animated. AMP Controls—These controls set the final volume and panning of the partial and determine the way that its volume changes over time. Setting This setting: Can be set to: PAN determines the left/right position of the partial in the VR-09’s stereo output. 64L (al the way left) to 63R (all the way right) LEVEL sets the volume of the partial. Each partial has its own volume, and then there’s a TONE LEVEL setting for the entire SYNTH sound, as described in “SYNTH Sound Controls” on page 9. 0 to 127 A sets how long it takes for a partial note to reach its LEVEL setting, above, after a key is pressed. 0 to 127 D sets how long it takes the partial’s volume to change from its manual LEVEL setting to its Sustain setting, described next. 0 to 127 S sets a volume that remains in place until you let go of a key. 0 to 127 R sets how long it takes for the note to fade away to silence after you release its key. 0 to 127 As with a filter envelope, the A, D, S, and R envelope settings allow you to automatically change the partial’s manual LEVEL setting over time. This allows you to make the sound of the partial more expressive by adding dynamic movement to its notes. 13 To finish programming the partial, touch the LFO tab to change to the LFO screen. “LFO” stands for “Low Frequency Oscillator.” An LFO produces sound like a partial does, only it’s so low-pitched you can’t hear it directly. Instead, the LFO is applied to other settings, causing them to rise and fall over and over at the LFO’s frequency. Each partial has two LFOs, and their use is optional. LFOs aren’t devices the partial passes through—rather, they affect the behavior of the OSC, FILTER, and AMP devices. MODULATION LFO Controls—These settings control vibrato added to the partial when you push the VR-09’s Pitch Bend/Modulation lever forward. Setting This setting: Can be set to: SHAPE sets the type of wave shape the lever LFO uses as it cycles over and over. • • • • • TEMPO SYNC acts as an on/off switch for Tempo Sync, which locks the lever LFO cycle with the VR-09’s DRUM-area tempo. ON (green), OFF (unlit) RATE sets the rhythmic relationship between the lever LFO and the DRUM tempo when Tempo Sync is on. 16, 12, 8, 4, 2, 1 (beat value), assorted time signatures RATE CONTROL sets how much pushing the lever forward affects the lever Rate value. -63 to +63 PITCH DEPTH sets the amount of the lever LFO applied to the partial’s pitch. -63 to +63 LFO OSC (Oscillator) FILTER Modulation LFO AMP —triangle wave —sine wave —sawtooth wave —square wave —sample and hold—the wave shape changes with each cycle. • RND (Random)—the LFO shape changes randomly constantly. (Continued on next page) 14 MODULATION LFO Controls—These settings control vibrato added to the partial when you push the VR-09’s Pitch Bend/Modulation lever forward. Setting This setting: Can be set to: FILTER DEPTH sets the amount of the lever LFO applied to the partial’s filter Cutoff. -63 to +63 AMP DEPTH sets the amount of the lever LFO applied to the partial’s volume. -63 to +63 LFO Controls—These settings determine the behavior of an LFO you can apply to the partial’s pitch, filter, and/or volume. LFO Controls—These settings determine the behavior of an LFO you can apply to the partial’s pitch, filter, and/or volume. Setting This setting: Can be set to: RATE sets the rhythmic relationship between the LFO and the DRUM tempo when Tempo Sync is on. 16, 12, 8, 4, 2, 1 (beat value), assorted time signatures FADE TIME sets how long it takes for the LFO to reach its full effect after the key is pressed. 0 to 127 PITCH DEPTH sets the amount of the LFO applied to the partial’s pitch. -63 to +63 This setting: Can be set to: FILTER DEPTH SHAPE sets the type of wave shape the LFO uses as it cycles over and over. • • • sets the amount of the LFO applied to the partial’s filter Cutoff. -63 to +63 Setting AMP DEPTH sets the amount of the LFO applied to the partial’s volume. -63 to +63 TEMPO SYNC acts as an on/off switch for Tempo Sync, which locks the LFO cycle with the VR-09’s DRUM-area tempo. —triangle wave —sine wave —sawtooth wave • —square wave • —sample and hold—the wave shape changes with each cycle. • RND (Random)— the LFO shape changes randomly constantly. ON (green), OFF (unlit) Saving iPad ORGAN and SYNTH Sounds Changes you make to sounds using the VR-09 Editor app are temporary—to preserve them, save them as registrations on the VR-09. To learn all about registrations, see the VR-09 Workshop booklet Using Registrations. The End We hope you’ve found this Workshop booklet helpful. If you’re interested in learning more, we’ve got some great VR-09 video articles in our Knowledge Base. And be sure to keep an eye out for other VR-09 downloads at www.RolandUS.com. 15