1
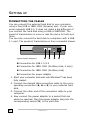
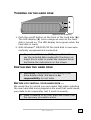
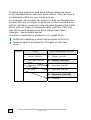
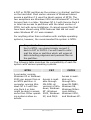
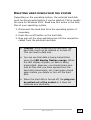
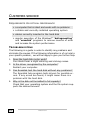
User Guide
External
Hard Disk
with USB 1.1/2.0 and
IEEE 1394 connection
Copyright © 2003
All rights reserved.
This manual is protected by Copyright.
The Copyright is owned by Medion®.
Trademarks:
MS-DOS® and Windows® are registered trademarks of Microsoft®.
Pentium® is a registered trademark of Intel®.
Other trademarks are the property of their respective owners.
We reserve the right to make technical changes.
Contents:
Safety and installation .............................................. 3
Cleaning.................................................................... 4
Data security ........................................................... 4
Introduction ................................................................. 5
What’s included .......................................................... 5
System requirements .................................................. 5
Setting up.................................................................... 6
Connecting the cables ................................................. 6
Turning on the hard disk.............................................. 7
Installing the hard disk ................................................ 7
Before you install your hard disk ................................ 7
Partitioning programs ............................................... 9
Partitioning the drive ................................................ 9
Formatting the drive ................................................. 9
Choosing between NTFS, FAT, and FAT32 ...................10
Deleting hard disks from the system.............................13
Customer service .........................................................14
Troubleshooting ......................................................14
Do you require additional support?.............................15
Warranty ..................................................................15
Limitation of warranty ..............................................16
Limits of liability......................................................16
Local law................................................................16
Making copies of This manual ......................................16
2
ENGLISH
SAFETY AND INSTALLATION
Please read this chapter carefully and observe all listed
notes. This will ensure reliable operation and long life expectancy of your product. Keep these instructions with your
product at all times. The proper set up, use and care can
help extend the life of your product. In the event that you
transfer ownership of this product, please provide these instructions to the new owner.
Changing the hard disk must only be performed by a person
who is experienced in repairing and upgrading PCs.
Should you not possess the necessary qualifications, call
in a technician.
Hard disks are extremely fragile. Never let the drive fall or be
pushed or shaken as this could irreversibly damage the data on
the hard disk. Make sure of this especially when transporting
the hard disk. We provide no guarantee for this type of damage.
Follow the user guide for your PC.
Only use the hard disk with the original power supply unit.
The socket must be located near the equipment and be easy
to reach. If the power adapter plug is pulled out, the external hard disk will be disconnected from the mains.
Do not insert any objects through the slits and openings
into the interior of the hard disk. This could lead to a
short circuit or even cause a fire.
Never open the hard disk casing. If you do so, the hard disk
will no longer be covered by the guarantee and it will inevitably damage the hard disk.
Do not let children play unattended with electrical devices. Children cannot always recognize the possible danger.
The hard disk is not designed for use in commercial applications/situations.
After transportation, wait until the equipment is at room
temperature before turning it on. If there is a large difference in temperature or humidity, damp can build up through
condensation and cause an electrical short circuit.
In order to avoid damage from a fall, place the hard disk on a
stable and level surface which os not liable to any vibrations.
INTRODUCTION
3
Keep your hard disk and all connected equipment away from
damp and avoid dust, heat and direct sunlight in order to
prevent operational problems.
The slits and openings in the hard disk are for air circulation.
Do not cover these openings, as this could lead to overheating.
For additional safety, we recommend using power connection
through a power surge protection unit in order to protect your
equipment from power surges and lightning strikes.
The voltages and interfaces used in the equipment are in line
with the low voltage protection guidelines set out in
EN60950. Connections to other equipment may only be
made using similar interfaces with low voltage protection in
accordance with EN 60950.
Please use our Service Center if you have any technical problems with your hard disk. If repairs are needed, please use
exclusively our authorised service partners.
ELECTROMAGNETIC COMPATIBILITY
On connecting the hard disk, you must keep to the guidelines
for electromagnetic compatibility.
Make sure that it is located at least one meter away from
sources of high frequency and magnetic disturbance (TVs,
speakers, mobile telephones, etc. ) in order to avoid operational problems and data loss.
CLEANING
As a rule, it is not necessary to clean the equipment. Before cleaning,
always pull out the plug and all connection cables.
Caution! This equipment does not include any parts that
need servicing or cleaning.
Make sure that the hard disk casing does not get dirty. Do not
use any solvents, corrosive or gaseous cleaning products.
DATA SECURITY
Every time you update your data make back-up copies on an
external storage medium. MEDION does not assume liability
for data loss or damage to data storage units, and no claims
can be accepted for damages resulting from the loss of data
or consequential losses.
4
ENGLISH
INTRODUCTION
WHAT’S INCLUDED
Please check to ensure that your product is complete and inform
us within 14 days of purchase if anything is missing. The following should be included with the hard drive:
External 3.5” hard disk in compact casing
USB 2.0/1.1 connection cable
IEEE 1394 (FireWire/iLink) connection cable
Power supply unit
User guide, guarantee documents
Driver software for Windows® 98SE
SYSTEM REQUIREMENTS
Computer
Processor
Operating system
Working memory
Connection
PC/AT compatible computer
Pentium class above 200 MHz
Windows® 98SE/2000/ME/XP
32 MB or more
USB or IEEE1394 interface
INTRODUCTION
5
SETTING UP
CONNECTING THE CABLES
You can connect the external hard disk to your computer
using a free USB or IEEE 1394 (Firewire) port. If your computer supports USB 2.0, it does not make a big difference if
you connect the hard disk using a USB or IEEE1394. The
speed of transmission is more or less the same for both systems.
You can also connect the hard disk to computers with a USB
1.1 port. The speed of transmission is then somewhat slower.
(approximate diagram)
n
o
p
q
n Connection for USB 1.1/2.0
o Connection for IEEE 1394 (FireWire,iLink, 4 pole)
p Connection for IEEE 1394 (FireWire,iLink)
q Connection for power adapter
1. Start your computer and wait until Windows® has been
fully loaded.
2. Connect the desired data connection cable to the corresponding connection (n, o or p) in your external hard
disk.
3. Connect the other end of the connection cable to your
computer.
4. Now connect the power adaptor to a socket that can
easily be reached. Plug the power adaptor plug into the
corresponding socket (q) in the hard disk.
6
ENGLISH
TURNING ON THE HARD DISK
n
o
(approximate diagram)
1. Push the on/off button on the front of the hard disk (n).
The LED display (o) turns orange as soon as the hard
disk is turned on. The LED display turns green when the
hard disk is ready.
2. With Windows® ME/2000/XP the hard disk is now automatically recognised and connected.
Â
If you have Windows® 98SE, you will need to
use the included data media with the driver on.
Insert this in order to install the required driver
and follow the instructions on the screen.
INSTALLING THE HARD DISK
Â
CAUTION! Partitioning or formatting a disk
drive deletes data. We assume no
responsibility for lost data.
BEFORE YOU INSTALL YOUR HARD DISK ...
We would like to remind you once again that when installing
the new hard disk some programs are used that could cause
your data to be irreversibly lost if used incorrectly.
Â
Make a backup of all your data and check that
the recovery procedure works.
SETTING UP
7
Creating new partitions and drive letters influences previously installed drives and their drive letters. This can have a
considerable effect on your whole system.
For example, the system can refuse to start up because the
system files are no longer to be found on the recorded drive
letters. Similarly, programs may not work because the installation path no longer corresponds after partition. CDs may
also fail to work because the drive letters have been
changed. (see example below)
In order to avoid these problems or to repair them ...
Install the operating system and program on drive C:.
Install programs accessed by CD again on the new
drive.
Example:
Before
After installing the new HD
C: Primary (old HD)
C: Primary (old HD)
D: Expanded (old HD)
D: Primary (new HD)
E:
Expanded (old HD)
E:
Expanded (old HD)
F:
CD-ROM
F:
Expanded (old HD)
G: Expanded (new HD)
H: CD-ROM
8
ENGLISH
PARTITIONING PROGRAMS
With Windows® 2000/XP use the data media management
help program in order to install the hard disk. You can find
the program in the computer management.
With some operating systems you must have administration
rights to install a hard disk.
With Windows® 98SE/ME the hard disk is installed with the
DOS program FDISK.
Look under help in Windows for detailed information on using
the program.
PARTITIONING THE DRIVE
Partitioning a drive divides the space into different areas
which can be accessed as separate logic drives (with letters
C:, D:, E: etc.). Read the operating system manual to find
out to partition hard drives.
FORMATTING THE DRIVE
In order to remove data from the hard disk, the partitions
must be formatted.
Â
CAUTION! You must be totally sure about
which drive letter to enter so that you don’t
format a drive that contains data you wish to
keep.
You can carry out the partitioning using Windows® Explorer
(right click on the drive and select format).
Read which formatting options you have in the next section.
SETTING UP
9
CHOOSING BETWEEN NTFS, FAT, AND FAT32
When you use Windows XP and Windows 2000 you can
choose between three file systems for disk partitions: NTFS,
FAT, and FAT32. Use the information below to compare the
file systems. NTFS is the recommended file system for the
following reasons:
NTFS is more powerful than FAT or FAT32, and includes features required for hosting Active Directory as well as other
important security features. You can use features such as
Active Directory and domain-based security only by choosing
NTFS as your file system.
It is easy to convert partitions to NTFS. The Setup program
makes conversion easy, whether your partitions used FAT,
FAT32, or the older version of NTFS. This kind of conversion
keeps your files intact (unlike formatting a partition). If you
do not need to keep your files intact and you have a FAT or
FAT32 partition, it is recommended that you format the partition with NTFS rather than convert from FAT or FAT32. Formatting a partition erases all data on the partition and allows
you to start with a clean drive.
Whether a partition is formatted with NTFS or converted using the convert command, NTFS is the better choice of file
system. For more information about Convert.exe, after completing Setup, click Start, click Run, type cmd, and then
press ENTER. In the command window, type help convert
and then press ENTER.
In order to maintain access control on files and folders and
support limited accounts, you must use NTFS. If you use
FAT32, all users will have access to all files on your hard
drive, regardless of their account type (administrator, limited, or standard.)
NTFS is the file system that works best with large disks. (The
next best file system for large disks is FAT32.)
There is one situation in which you might want to choose FAT
or FAT32 as your file system. If it is necessary to have a
computer that will sometimes run an earlier version of Windows and other times run Windows XP, you will need to have
10
ENGLISH
a FAT or FAT32 partition as the primary (or startup) partition
on the hard disk. Most earlier versions of Windows cannot
access a partition if it uses the latest version of NTFS. The
two exceptions are Windows 2000 and Windows NT 4.0 with
Service Pack 4 or later. Windows NT 4.0 with Service Pack 4
or later has access to partitions with the latest version of
NTFS, but with some limitations: It cannot access files that
have been stored using NTFS features that did not exist
when Windows NT 4.0 was released.
For anything other than a situation with multiple operating
systems, however, the recommended file system is NTFS.
Â
Important: Once you convert a drive or partition to NTFS, you cannot simply convert it
back to FAT or FAT32. You will need to reformat the drive or partition which will erase all
data including programs and personal files on
the partition.
The following table describes the compatibility of each file
system with various operating systems.
NTFS
A computer running
Windows XP or Windows
2000 can access files on
an NTFS partition. A
computer running Windows NT 4.0 with Service Pack 4 or later
might be able to access
some files. Other operating systems allow no
access.
FAT
FAT32
Access is availAccess is avail- able only
able through
through WinMS-DOS, all
dows 95 OSR2,
versions of Win- Windows 98,
dows, Windows Windows MillenNT, Windows
nium Edition,
2000, Windows Windows 2000,
XP, and OS/2.
and Windows XP.
SETTING UP
11
The following table compares disk and file sizes possible with
each file system.
NTFS
Recommended
minimum volume
size is approximately 10 megabytes (MB). Volumes much larger
than 2 terabytes
(TB) are possible.
Cannot be used on
floppy disks.
FAT
Volumes from size
up to 4 gigabytes
(GB). Does not
support domains.
FAT32
Volumes from 512
MB to 2 TB. In Windows XP, you can
format a FAT32
volume up to 32 GB
only. Does not support domains.
File size limited
Maximum file size is
Maximum file size is
only by size of vol4 GB.
2 GB.
ume.
Â
12
Note: Some older programs may not run on
an NTFS volume, so you should research the
current requirements for your software before
converting.
ENGLISH
DELETING HARD DISKS FROM THE SYSTEM
Depending on the operating system, the external hard disk
must be disconnected before it can be deleted. This is usually
the case for Windows 2000. Read how this works in the help
files of your operating system.
1. Disconnect the hard disk from the operating system if
necessary.
2. Press the on/off button on the hard disk.
3. Now pull out the plug and disconnect all the connection
cables from the external hard disk.
Â
Caution: While accessing the hard disk, the
hard disk must not be deleted or turned off.
This can lead to data loss.
Â
You can see that data is being transmitted
when the LED display flashes orange. When
the LED display is green, no data is being
transmitted. However, you should make sure
that all files that you have opened from the
hard disk (documents, etc.) have been closed
again before you delete or turn off the hard
disk.
Â
When the hard disk is turned off, the plug can
be pulled out of the socket so it does not
consume any electricity.
SETTING UP
13
CUSTOMER SERVICE
REQUIREMENTS FOR OPTIMAL PERFORMANCE:
¾ a computer that is intact and works with no problems
¾ a stable and correctly installed operating system
¾ cables correctly inserted in the hard disk
¾ regular execution of the Windows® “defragmenting”
and “scandisk” programs to remove sources of error
and increase the system performance
TROUBLESHOOTING
The following is a guide in order to identify any problems and
eliminate the causes. If the following information is of no help to
your specific problem, we will be happy to give you further help.
1. Does the hard disk motor work?
You should hear a slight whirring and clicking noises.
2. Is the driver recognised by the computer?
Restart your computer.
3. Can Scandisk test the hard disk without any problems?
The Scandisk help program tests drivers for possible errors. If any errors are found, it might mean there is a
problem with the hard disk.
4. Why is the disk not formatted to full capacity?
Check that your operating system and the file system supports the desired amount.
14
ENGLISH
DO YOU REQUIRE ADDITIONAL SUPPORT?
If the suggestions in the previous section have not solved
your problem, please contact the hotline. We will try and help
you over the telephone. However, before you contact your
nearest MEDION Technology Centre, please have the following information available:
-
How is your computer configured?
-
What additional peripherals do you use?
-
What messages, if any, appear on your screen?
-
What software were you using when the error occurred?
-
What steps have you already undertaken to solve the
problem?
-
If you have already been given a customer number,
please have this available.
WARRANTY
PLEASE READ THIS LIMITED WARRANTY CAREFULLY TO UNDERSTAND YOUR
RIGHTS AND OBLIGATIONS.
The sales receipt is considered valid proof of purchase and should be kept in
a safe place. This receipt will be required for receiving any warranty service.
This warranty is transferable. When transferring ownership to a third party,
please provide the receipt and warranty information.
We warrant to the end user that each product, including related software,
accessories, media and supplies, shall be free from defects in materials and
workmanship for the warranty time from date of purchase. This warranty
covers only those defects that arise as a result of normal use of the product.
This warranty does not cover any other problems, including problems that
arise as a result of improper maintenance or modification; software, accessories, media or supplies not provided or supported by us; or operation
outside the manufacturer’s specifications.
Any parts of this product repaired or exchanged by a valid service representative will be covered under the original warranty period. Do not leave any
media in the DVDRW drive. Products shipped without accessories will be
returned without accessories. Any replacement product or component may
be either new or like new, provided that it’s functionality is at least equal to
that of the part being replaced.
CUSTOMER SERVICE
15
LIMITATION OF WARRANTY
To the extent allowed by local law, no other warranties are made with respect to this personal computer or the warranty services by any person,
including but not limited to us and our suppliers. The express warranty
stated above is the only express warranty made to you and is provided in
lieu of all other express or implied warranties and conditions (if any) including any created by any other documentation or packaging. For additional
warranty information, please refer to enclosed warranty card.
LIMITS OF LIABILITY
To the extent allowed by local law, except for the obligations specifically set
forth in this warranty statement, in no event shall we or our third party
suppliers are liable for direct, indirect, special, incidental, or consequential
damage, whether based on contract or any other legal theory and whether
advised of the possibility of such damages. This includes loss or damage of
personal data on your PC.
LOCAL LAW
This warranty statement gives you legal rights. You may also have other
rights which vary from jurisdiction to jurisdiction. To the extent this warranty
statement is inconsistent with local law, certain disclaimers and limitations of
this statement may not apply to the customer.
MAKING COPIES OF THIS MANUAL
This manual contains information protected by law. All rights reserved. Duplicating this information in mechanical, electronic, or any other form, without the
written approval by the manufacturer, is prohibited by copyright law.
16
ENGLISH