1
0
000002
8
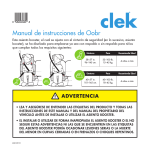
Oobr Instruction Manual
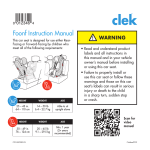
This belt-positioning booster seat (booster seat) is designed for use in either full back mode
or backless mode by children who meet all of the following requirements:
)FJHIU
8FJHIU
3FDPNNFOEFE"HF
38 –57 in.
96–145 cm.
33–100 lb.
15–45 kg.
4 years & up
)FJHIU
8FJHIU
3FDPNNFOEFE"HF
40 –57 in.
101–145 cm.
40–100 lb.
18–45 kg.
4 years & up
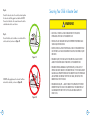
WARNING
t3&"%"/%6/%&345"/%130%6$5-"#&-4"/%"--*/4536$5*0/4*/5)*4
."/6"-"/%*/:0637&)*$-&08/&34."/6"-#&'03&*/45"--*/(03
64*/(5)*4#0045&34&"5
t'"*-63&501301&3-:*/45"--0364&5)*4#0045&34&"503'0--085)&4&
8"3/*/(4"/%5)04&0/5)*4#0045&34&"54-"#&-4$"/3&46-5*/
4&3*064*/+63:03%&"5)505)&$)*-%*/"4)"31563/46%%&/4501
03$3"4)
JULY2013
Checklist for Proper Use
This is only a checklist — you must read and understand all of the warnings
and instructions on this booster seat’s labels and in this manual before installing or using
this booster seat.
When Using This Booster Seat in Full Back Mode
(with Seat Back)
√ Child weighs between 33 and 100 lb. (15 and 45 kg.), height is between 38 and 57 in.
(96 to 145 cm.)
√ Recommended that child is at least 4 years of age, (but NEVER before 3 years of age)
√ Child is sitting in the booster seat in a forward-facing location in the vehicle rear seat
√ Vehicle seat belt is correctly routed beneath Armrests and through the Shoulder
Belt Guide
When Using This Booster Seat in Backless Mode
(without Seat Back)
√ Child weighs between 40 and 100 lb. (18 and 45 kg.), height is between 40 and 57 in.
(101 to 145 cm.) and is at least 4 years of age
√ Child is at least 4 years of age
√ Child is sitting in the booster seat in a forward-facing location in the vehicle rear seat
√ Vehicle seat belt is correctly routed beneath Armrests and shoulder belt is properly
positioned on child’s shoulder
√ There is no slack in the vehicle seat belt
√ Vehicle lap belt sits low and snugly on the child’s hips and is not twisted. The shoulder
belt MUST be at or above the child’s shoulder, lie snugly across the midpoint of the
child’s chest and across the center of the shoulder, and MUST not be twisted
√ Child is sitting upright and is not slouching
√ There is no slack in the vehicle seat belt
√ The tops of the child’s ears are below the top of the vehicle seat back or headrest in its
highest adjustment position
√ Vehicle lap belt sits low and snugly on the child’s hips and is not twisted. The shoulder
belt MUST be at or above the child’s shoulder, lie snugly across the midpoint of the
child’s chest and across the center of the shoulder, and MUST not be twisted
√ Booster seat is securely installed with both LATCH Connectors attached to vehicle’s
LATCH lower anchors, if available
√ Child is sitting upright and is not slouching
√ The tops of the child’s ears are below the top of the booster seat Headrest
√ Booster seat is securely installed with both LATCH Connectors attached to vehicle’s
LATCH lower anchors, if available
ii
Table of Contents
Checklist for Proper Use .......................................................................................... i
When Using This Booster Seat in Full Back Mode (with Seat Back) .......................... i
When Using This Booster Seat in Backless Mode (without Seat Back) ......................ii
Booster Seat Features............................................................................................. 3
Registration & Recall Information ............................................................................ 4
Registering Your Booster Seat............................................................................. 5
Warnings .............................................................................................................. 6
Certification ........................................................................................................... 9
Size & Age Limitations ..........................................................................................10
When Using This Booster Seat in Full Back Mode (with Seat Back) ........................10
When Using This Booster Seat in Backless Mode (without Seat Back) ....................12
Vehicle Information ...............................................................................................13
Vehicle Child Restraint Anchorage System (LATCH) ..............................................13
Vehicle Seat Location Requirements ...................................................................14
Vehicle Seat Belt Requirements ..........................................................................15
Unsafe Vehicle Seat Belt Systems ................................................................16
Installing Booster Seat WITHOUT Using LATCH Connectors ..................................... 33
Installing Booster Seat in Full Back Mode WITHOUT Using LATCH Connectors ...... 34
Installing Booster Seat in Backless Mode WITHOUT Using LATCH Connectors ....... 36
Securing Your Child in Booster Seat ...................................................................... 38
When Using Booster Seat in Full Back Mode (with Seat Back) ............................. 39
Adjusting the Headrest ............................................................................. 46
When Using Booster Seat in Backless Mode (without Seat Back).......................... 47
Installing/Removing Seat Back ............................................................................. 53
Installing/Removing Cup Holder (drink-thingy™) ................................................ 56
Instruction Manual Storage ...................................................................................57
Care & Cleaning .................................................................................................. 58
Removing/Installing Seat Cushion & Seat Cushion Cover .................................... 58
Washing Instructions ........................................................................................62
Seat Cushion Cover Washing Instructions ....................................................62
Seat Back Cover & Headrest Cover Fabric Washing Instructions .................... 63
Seat Frame (Exterior Plastics Only) Washing Instructions ............................... 64
Accessories .......................................................................................................... 64
Warranty ............................................................................................................ 65
Installing/Removing Booster Seat Using LATCH Connectors .....................................17
Installing Booster Seat in Full Back Mode When Using LATCH Connectors .............18
Adjusting the Seat Back Recline ................................................................. 23
Removing Booster Seat in Full Back Mode When Using LATCH Connectors ........... 25
Installing Booster Seat in Backless Mode When Using LATCH Connectors ............. 26
Removing Booster Seat in Backless Mode When Using LATCH Connectors............ 32
1
® Clek and Clek logos, Olli, Ozzi, and Oobr are registered trademarks of Clek Inc.
For a complete list of Clek Inc. trademarks please visit www.clekinc.com/trademarks.
For concerns related to parts or the
use and maintenance of this product,
please contact us at:
Clek Inc.
12 Upjohn Rd., Suite 1
Toronto, Ontario Canada
M3B 2V9
www.clekinc.com
2
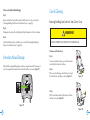
Booster Seat Features
Registration & Recall Information
10 Instruction Manual
(store in compartment under seat)
1
LATCH Connectors
2
Recline Handle
3
Seat Cushion
4
Cup Holder (drink-thingy™)
5
Armrests
6
Seat Back Release Strap
(to remove Seat Back for
backless mode)
7
Seat Back
(for full back mode)
8
Headrest
9
Headrest Adjuster
WARNING
11 Lap Belt Guides
12 Shoulder Belt Guides
t$)*-%3&453"*/54$06-%#&3&$"--&%'034"'&5:3&"40/4:06.645
REGISTER THIS RESTRAINT (BOOSTER SEAT) TO BE REACHED IN A RECALL.
13 Seat Base
Oobr
Model Name: ___________________________________________________________________
9
8
Serial Number: __________________________________________________________________
12
5
Manufactured In: ________________________________________________________________
(yyyy/mm/dd)
7
1
Date of Purchase: ________________________________________________________________
11
3
13
2
10
3
4
6
4
Registering Your Booster Seat
Please fill in the information on the previous page for your records. The model name,
serial number and manufacturing date can be found on a label affixed to the underside
of this booster Seat Base.
Fill out the prepaid registration postcard attached to the seat and mail it today.
Child restraints could be recalled for safety reasons. You MUST register this restraint
(booster seat) to be reached in a recall. Send your name, address, e-mail address
if available, and the restraint’s model number and manufacturing date to Clek Inc.,
12 Upjohn Rd., Suite 1, Toronto, Ontario, Canada M3B 2V9, or call Clek Inc’s
customer service line at 1-866-656-2462 to register, or you may register online
at http://www.clekinc.com/register. For recall information, call the U.S. Government’s
Vehicle Safety Hotline at 1-888-327-4236 (TTY: 1-800-424-9153),
or go to http://www.NHTSA.gov.
Warnings
WARNING — DEATH or
SERIOUS INJURY can occur
FAILURE TO PROPERLY INSTALL OR USE THIS BOOSTER SEAT OR FOLLOW THESE
WARNINGS AND INSTRUCTIONS AND THOSE ON THIS BOOSTER SEAT’S
LABELS CAN RESULT IN SERIOUS INJURY OR DEATH OF THE CHILD IN A SHARP
TURN, SUDDEN STOP OR CRASH.
t%0/05*/45"--0364&5)*4#0045&34&"56/5*-:063&"%"/%
UNDERSTAND THE INSTRUCTIONS IN THIS MANUAL AND IN YOUR VEHICLE
OWNER’S MANUAL. DO NOT LET OTHERS INSTALL OR USE THIS BOOSTER
SEAT UNLESS THEY UNDERSTAND HOW TO CORRECTLY INSTALL AND USE IT.
t5)*4#0045&34&"5.645#&*/45"--&%#:"/"%6-5
t/&7&3"--085)&$)*-%50#6$,-&5)&.4&-7&4*/5)*4#0045&34&"5
t'"*-63&50$)004&5)&$033&$5#0045&34&"5.0%&'6--#"$,03
#"$,-&44
"/%501301&3-:4&$63&:063$)*-%$"/*/$3&"4&5)&3*4,
OF INJURY OR DEATH.
t64&0/-:5)&7&)*$-&4-"1"/%4)06-%&3#&-54:45&.8)&/
RESTRAINING THE CHILD IN THIS BOOSTER SEAT.
5
6
WARNING — DEATH or
SERIOUS INJURY can occur (continued)
t /&7&364&8*5)0/-:"-"1#&-5503&453"*/"$)*-%*/5)*4#0045&3
SEAT. USE WITHOUT A LAP AND SHOULDER BELT CAN RESULT IN SERIOUS
INJURY OR DEATH.
t %0/0564&5)*4#0045&34&"58*5).0503*;&%03%003.06/5&%
BELT SYSTEMS.
t 4&$63&5)*4$)*-%3&453"*/58*5)5)&7&)*$-&4$)*-%3&453"*/5
ANCHORAGE SYSTEM IF AVAILABLE OR WITH A VEHICLE BELT.
t %0/0564&5)*4#0045&34&"5"'5&3"/"$$*%&/50'"/:,*/%
AN ACCIDENT CAN CAUSE DAMAGE TO THIS BOOSTER SEAT THAT YOU
CANNOT SEE.
t %0/0564&5)*4#0045&34&"5"'5&3/*/&
:&"34'30.5)&%"5&0'
MANUFACTURE. THE DATE OF MANUFACTURE CAN BE FOUND ON THE
LABEL AFFIXED TO THE UNDERSIDE OF THE BOOSTER SEAT CUSHION BASE.
WARNING — DEATH or
SERIOUS INJURY can occur (continued)
t%0/0564&"$$&4403*&4031"3548*5)5)*4#0045&34&"505)&3
5)"/5)04&1307*%&%#:$-&,*/$64&0'"$$&4403*&4031"354'30.
OTHER MANUFACTURERS COULD ALTER THE PERFORMANCE OF THIS
BOOSTER SEAT.
t"70*%#63/*/+63:— ALWAYS TOUCH THE SURFACES OF THE PARTS FIRST
BEFORE PUTTING THE CHILD IN THIS BOOSTER SEAT. THIS BOOSTER SEAT
CAN BECOME VERY HOT IF LEFT IN THE SUN AND CAN BURN THE
$)*-%44,*/
t,&&15)*4."/6"-*/5)&4503"(&$0.1"35.&/5-0$"5&%0/5)&
BOTTOM OF THIS BOOSTER SEAT FOR FUTURE USE.
t/&7&364&"4&$0/%)"/%#0045&34&"503"#0045&34&"58)04&
)*4503::06%0/05,/08
t3&(*45&3:063#0045&34&"58*5)$-&,*/$
t %0/05"55&.1550.",&3&1"*34500305)&38*4&.0%*':035".1&3
WITH THIS BOOSTER SEAT.
t /&7&364&5)*4#0045&34&"5*'*5*4%"."(&%03)"4.*44*/(1"354
7
8
Certification
t5IJTCPPTUFSTFBUDPOGPSNTUPBMMBQQMJDBCMF'FEFSBM.PUPS7FIJDMF4BGFUZ4UBOEBSET
and is certified for use in motor vehicles.
tThis booster seat is not certified for aircraft use because aircraft seats DO NOT have
shoulder belts.
Size & Age Limitations
WARNING
t'"*-63&50$)004&5)&$033&$5#0045&34&"5.0%&'6--#"$,03
#"$,-&44
'03:063$)*-%4)&*()5"/%8&*()5.":*/$3&"4&5)&
3*4,0'*/+63:03%&"5)
The child MUST meet ALL of the following requirements on
page 10 through page 12 to use this booster seat:
When Using This Booster Seat in
Full Back Mode (with Seat Back)
t $IJMETXFJHIUJTCFUXFFOBOEMC
(15 and 45 kg.), AND
t $IJMETIFJHIUJTCFUXFFOBOEJO
(96 and 145 cm.), AND
t 3FDPNNFOEFEUIBUDIJMEJTBUMFBTUZFBSTPGBHF
(but NEVER before 3 years of age)
9
10
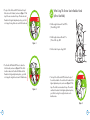
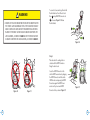
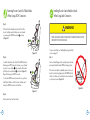
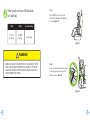
When Using This Booster Seat in Backless Mode
(without Seat Back)
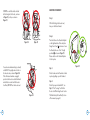
t5IFUPQTPGUIFDIJMETFBST.645CFCFMPXUIFUPQPG
this booster seat’s Headrest, as shown in Figure 1. If the
tops of the ears are above the top of this booster seat’s
Headrest in the highest adjustment position, your child
is too large for using this booster seat in full back mode.
t $IJMETXFJHIUJTCFUXFFOBOEMC
(18 and 45 kg.), AND
t $IJMETIFJHIUJTCFUXFFOBOEJO
(101 and 145 cm.), AND
Figure 1
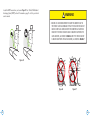
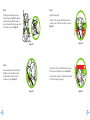
t $IJMEJTBUMFBTUZFBSTPGBHF"/%
t5IF4IPVMEFS#FMU(VJEF.645CFBUPSBCPWFUIF
child’s shoulder, as shown in Figure 2. If the child’s
shoulder is above the Shoulder Belt Guide with the
Headrest in its highest adjustment position, your child
is too large for using this booster seat in full back mode.
Figure 2
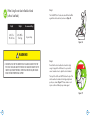
t 5IFUPQTPGUIFDIJMETFBST.645CFCFMPXUIFUPQPG
the vehicle seat back or the vehicle seat’s headrest in the
highest adjustment position, as shown in Figure 3. If the
tops of the child’s ears are above the top of the vehicle
seat back or headrest in the highest adjustment position,
your child is too large for using this booster seat in
backless mode.
Figure 3
11
12
Vehicle Information
Vehicle Seat Location Requirements
Vehicle Child Restraint Anchorage System (LATCH)
WARNING
t-"5$)TUBOETGPS-PXFS"ODIPSTBOE5FUIFSTGPS
Children. These terms refer to the anchors built into a
vehicle for attaching child restraints and consists of two
lower anchors at the crease between the vehicle seat
back and vehicle seat cushion and a top tether anchor
behind the vehicle seat. The Clek booster seat has been
designed to attach securely to only the vehicle’s LATCH
lower anchors.
tNPEFMZFBSWFIJDMFTPSOFXFSIBWFBUMFBTUUXP
seating locations with a LATCH Anchorage System.
Some 2001 and 2002 model year vehicles have LATCH
Anchorage Systems. 2000 model year vehicles or older
DO NOT have LATCH Anchorage Systems. See your
vehicle owner’s manual or visit www.clekinc.com if you
are unsure if your vehicle is equipped with a LATCH
Anchorage System.
t"$$03%*/(50"$$*%&/545"5*45*$4$)*-%3&/"3&4"'&38)&/1301&3-:
RESTRAINED IN REAR VEHICLE SEATING POSITIONS, RATHER THAN FRONT
SEATING POSITIONS.
t*.1301&31-"$&.&/50'5)*4#0045&34&"5*/:0637&)*$-&*/$3&"4&4
5)&3*4,0'4&3*064*/+63:03%&"5)40.&4&"5*/(104*5*0/4*/
YOUR VEHICLE MAY NOT BE SAFE FOR THIS BOOSTER SEAT. SOME VEHICLES
DO NOT HAVE ANY SEATING POSITIONS THAT CAN BE USED SAFELY WITH
THIS BOOSTER SEAT. IF YOU ARE NOT SURE WHERE TO PLACE THIS BOOSTER
SEAT IN YOUR VEHICLE, CONSULT YOUR VEHICLE OWNER’S MANUAL OR
CALL 1-866-656-2462.
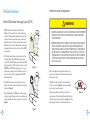
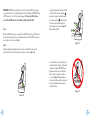
Figure 4
Before using this booster seat please reference your
vehicle owner’s manual for information about air bags
and booster seat use.
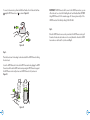
t5IF-"5$)MPXFSBODIPSTBSFMPDBUFEJOUIFDSFBTF
between the vehicle seat back and vehicle seat cushion,
as shown in Figure 4.
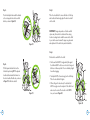
NEVER use this booster seat in a front vehicle seat
location, as shown in Figure 6, unless recommended
by your vehicle owner’s manual,
t*GOPUSFBEJMZWJTJCMFUIF-"5$)MPXFSBODIPSTNBZCF
noted by a symbol located near the crease between the
vehicle seat back and vehicle seat cushion, as shown in
Figure 5.
Whenever possible secure this booster seat in the
center position of the seat directly behind the front seats.
However, this position is sometimes equipped with a lap
belt only and cannot be used with this booster seat.
Figure 6
Figure 5
13
14
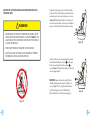
Install this booster seat only on vehicle seats that face forward. NEVER install this booster
seat on vehicle seats facing sideways or backwards, as shown in Figure 7.
UNSAFE VEHICLE SEAT BELT SYSTEMS
DO NOT USE ANY OF THE FOLLOWING VEHICLE
SEAT BELT SYSTEMS WITH THIS BOOSTER SEAT:
t /&7&3VTFBMBQPOMZCFMUBTTIPXOJOFigure 8.
Figure 7
Figure 8
Only use this booster seat on vehicle seats with seat backs that lock in an upright position.
Check that the vehicle seat back is locked in the upright position.
Vehicle Seat Belt Requirements
WARNING
t /&7&3VTFBQBTTJWFSFTUSBJOUMBQPSTIPVMEFSCFMU
mounted on door, as shown in Figure 9.
Figure 9
t 64&0/-:5)&7&)*$-&4-"1"/%4)06-%&3#&-54:45&.8)&/
RESTRAINING THE CHILD IN THIS BOOSTER SEAT.
t /&7&364&5)*4#0045&34&"58*5)"7&)*$-&4&"5#&-55)"5*4$65
DAMAGED, FRAYED OR INOPERABLE.
t 64*/(5)*4#0045&34&"58*5)"/6/4"'&7&)*$-&4&"5#&-54:45&.$"/
RESULT IN SERIOUS INJURY OR DEATH. PAY CAREFUL ATTENTION TO THESE
4:45&.440.&0'5)&4&"5#&-545)"5"3&/054"'&5064&-00,7&3:
.6$)-*,&4&"5#&-545)"5"3&4"'&5064&*':06"3&6/463&
CONSULT YOUR VEHICLE OWNER’S MANUAL OR CALL 1-866-656-2462.
t /&7&3VTFBQBTTJWFSFTUSBJOUMBQCFMUXJUIB
motorized shoulder belt, as shown in Figure 10.
Figure 10
15
16
Installing Booster Seat in Full Back Mode
When Using LATCH Connectors
Installing/Removing Booster Seat
Using LATCH Connectors
IMPORTANT: This booster seat is designed to be used with the vehicle’s LATCH
Anchorage System. Always secure this booster seat to the vehicle’s LATCH Anchorage
System, if available. If your vehicle does not have a LATCH Anchorage System, you can
still use this booster seat. See “Installing Booster Seat WITHOUT Using LATCH
Connectors” section of this manual on page 33.
WARNING
t '"*-63&501301&3-:*/45"--0364&5)*4#0045&34&"5*/$3&"4&45)&
3*4,0'4&3*064*/+63:03%&"5)505)&$)*-%"/%05)&34*/"4)"31
TURN, SUDDEN STOP OR CRASH.
To install Seat Back, see “Installing/Removing Seat Back”
section of this manual on page 53.
Step 1.
Select a forward-facing vehicle seating location which has
a lap and shoulder belt and LATCH Anchorage System.
If the vehicle seat back is adjustable, make sure the seat
back is locked in the upright position. DO NOT allow the
child to sit in this booster seat while the vehicle seat back
is reclined, as shown in Figure 11.
Locate the LATCH lower anchors (as explained in the
“Vehicle Child Restraint Anchorage System (LATCH)”
section of this manual and in your vehicle owner’s manual).
Figure 11
t 50"70*%*/+63:5)*4#0045&34&"5.645#&*/45"--&%#:"/"%6-5
t /&7&3-&"7&5)*4#0045&34&"56/4&$63&%*/:0637&)*$-&5)*4
BOOSTER SEAT MUST REMAIN CONNECTED TO THE LATCH LOWER
ANCHORS IN THE VEHICLE OR SECURED BY THE VEHICLE’S SEAT BELT EVEN
WHEN NOT IN USE. IN A SHARP TURN, CRASH OR SUDDEN STOP, AN
UNSECURED BOOSTER SEAT CAN BE THROWN AROUND AND COULD
SEVERELY INJURE VEHICLE OCCUPANTS.
17
18
WARNING
t%0/0564&5)&-"5$)$0//&$5034504&$63&5)*4#0045&34&"550
THE VEHICLE’S LATCH ANCHORAGE SYSTEM IF THE SEAT BELT OR SEAT BELT
#6$,-&*4/05&"4*-:"$$&44*#-&8*5)5)*4#0045&34&"5-"5$)&%*/
1-"$&03*'5)&7&)*$-&4&"5#&-5#6$,-&*4-0$"5&%*/#&58&&/5)&
LATCH ANCHORS, AS SHOWN IN FIGURE 12. OR IF THE VEHICLE SEAT BELT
IS LOCATED IN BETWEEN THE LATCH ANCHORS, AS SHOWN IN FIGURE 13.
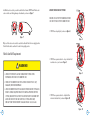
To connect to lower anchors, pull and hold
Recline Handle on front of booster Seat
Base 1 and pull LATCH Connectors out
2 , as shown in Figure 14. Release
Recline Handle.
1
2
Figure 14
Step 2.
Place booster in the seating location
selected with the LATCH Connectors
facing the vehicle seat.
Figure 12
19
Figure 13
Secure the LATCH Connectors to the
vehicle LATCH lower anchors by aligning
the LATCH Connectors with the vehicle
LATCH anchors and pressing the LATCH
Connectors against the LATCH lower
anchors until you hear each LATCH
Connector click, as shown in Figure 15.
Figure 15
20
IMPORTANT: If LATCH Connectors fail to connect to the vehicle’s LATCH lower anchors,
you can still use this seat. See “Installing Booster Seat in Full Back Mode WITHOUT Using
LATCH Connectors” section of this manual on page 34. Please notify Clek Customer
Service if the LATCH Connectors fail to latch by calling 1-866-656-2462.
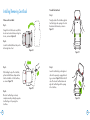
Step 3.
To adjust, pull and hold the Recline Handle
on the front of the booster Seat Base 1
and push the booster Seat Back towards
the vehicle’s seat back 2 until the back of
this booster seat sits firmly against the
vehicle seat back, as shown in Figure 17.
Release Recline Handle.
Once the LATCH Connectors are connected to the LATCH lower anchors, pull forward on
this booster seat to make sure it is securely attached to the vehicle’s LATCH lower anchors
on both sides. If not, start over at Step 1.
2
1
Figure 17
Step 4.
Complete installation by adjusting this booster seat so the back of this booster seat
contacts the front of the vehicle seat back or headrest, as shown in Figure 16.
Ensure that the booster seat Headrest is in
contact with the front surface of the vehicle
seat back or headrest. DO NOT allow a
gap between the booster seat Headrest
and the vehicle seat back or headrest,
as shown in Figure 18. A gap between
the booster Seat Base and the vehicle seat
back is acceptable when being used in
the full back mode.
Figure 18
Figure 16
21
22
ADJUSTING THE SEAT BACK RECLINE (FULL BACK MODE WHEN USING LATCH
CONNECTORS ONLY):
WARNING
To adjust to reclined position, pull on the Recline Handle
located on the front of the Seat Base and slide this booster
seat towards you to the desired recline position, as shown
in Figure 20. Release Recline Handle to lock booster seat
in the recline position. Make sure the booster seat Headrest
remains in contact with the vehicle seat back or headrest.
t%0/05"--08"("1#&58&&/5)*4#0045&34&"5)&"%3&45"/%5)&
7&)*$-&4&"5#"$,037&)*$-&)&"%3&45"44)08/*/FIGURE 19. SUCH
"("1*/$3&"4&45)&3*4,0'4&3*064*/+63:03%&"5)505)&$)*-%*/
A SUDDEN STOP OR CRASH.
Figure 20
t NEVER ATTEMPT TO RECLINE THIS BOOSTER SEAT WHILE DRIVING.
t"-8":4&/463&5)"55)&7&)*$-&-"1"/%4)06-%&3#&-5*41301&3-:
POSITIONED AND SNUGLY ADJUSTED ON THE CHILD.
To return this booster seat to the upright position, pull and
hold the Recline Handle with one hand 1 and then push
this booster seat towards the vehicle seat back 2 , as
shown in Figure 21. Release Recline Handle to lock booster
seat in the upright position.
IMPORTANT: Always check vehicle seat belt fit on the
child after adjusting the recline position of this booster
seat. See Step 7 of the “Securing Your Child in Booster
Seat When Using Booster Seat in Full Back Mode
(with Seat Back)” section of this manual on page 43.
2
1
Figure 21
Figure 19
23
24
Removing Booster Seat in Full Back Mode
When Using LATCH Connectors
Installing Booster Seat in Backless Mode
When Using Latch Connectors
Step 1.
Pull on the Recline Handle located on the front of the
booster Seat Base and slide this booster seat towards
you exposing the LATCH Connectors 1 , as shown
in Figure 22.
WARNING
t 8)&/*/#"$,-&44.0%&5)&#"$,0'5)*4#0045&34&"5#"4&.645
$0/5"$55)&7&)*$-&4&"5#"$,
1
To remove Seat Back, see “Installing/Removing Seat Back”
section on page 53.
Figure 22
Step 2.
Step 1.
Locate the red buttons on the front of the LATCH Connectors.
Releasing one LATCH connector at a time, use your thumb
to press in on one button 2 while using the other hand to
pull this booster seat forward 3 , as shown in Figure 23.
Repeat for the opposite LATCH connector.
Select a forward-facing vehicle seating location which has
a lap and shoulder belt and LATCH Anchorage System.
If the vehicle seat back is adjustable, make sure the seat
back is locked in the upright position. DO NOT allow the
child to sit in this booster seat while the vehicle seat back
is reclined, as shown in Figure 24.
3
To store the LATCH Connectors when not in use, pull and
hold Recline Handle on front of booster Seat Base and
then push LATCH Connectors into Seat Base.
2
Figure 23
Figure 24
Step 3.
Remove this booster seat from vehicle.
25
26
Locate the LATCH lower anchors, as shown in Figure 25. See “Vehicle Child Restraint
Anchorage System (LATCH)” section of this manual on page 13 or refer to your vehicle
owner’s manual.
WARNING
t%0/0564&-"5$)$0//&$5034504&$63&5)*4#0045&34&"550
THE VEHICLE’S LATCH ANCHORAGE SYSTEM IF THE SEAT BELT OR SEAT BELT
#6$,-&*4/05&"4*-:"$$&44*#-&8*5)5)*4#0045&34&"5-"5$)&%*/
1-"$&03*'5)&7&)*$-&4&"5#&-5#6$,-&*4-0$"5&%*/#&58&&/5)&
LATCH ANCHORS, AS SHOWN IN FIGURE 26. OR IF THE VEHICLE SEAT BELT
IS LOCATED IN BETWEEN THE LATCH ANCHORS, AS SHOWN IN FIGURE 27.
Figure 25
Figure 26
27
Figure 27
28
To connect to lower anchors, pull and hold Recline Handle on front of booster Seat Base
1 and pull LATCH Connectors out 2 , as shown in Figure 28.
1
IMPORTANT: If LATCH Connectors fail to connect to the LATCH lower anchors, you can
still use this seat. See section titled “Installing Booster Seat in Backless Mode WITHOUT
Using LATCH Connectors” of this manual on page 36. However, please notify us if the
LATCH Connectors fail to latch by calling 1-866-656-2462.
Step 3.
2
Once the LATCH Connectors are securely connected to the LATCH lower anchors, pull
forward on this booster seat to make sure it is securely attached to the vehicle’s LATCH
lower anchors on both sides. If not, start over at Step 1.
Figure 28
Step 2.
Place this booster seat in the seating location selected with the LATCH Connectors facing
the vehicle seat.
Secure the LATCH Connectors to the vehicle LATCH lower anchors by aligning the LATCH
Connectors with the vehicle LATCH anchors and pressing the LATCH Connectors against
the LATCH lower anchors until you hear each LATCH Connector click, as shown in
Figure 29.
Figure 29
29
30
Removing Booster Seat in Backless Mode
When Using LATCH Connectors
Step 4.
Complete installation by adjusting this
booster seat so the back of this booster
seat contacts the front of the vehicle
seat back, as shown in Figure 30.
Step 1.
Figure 30
To adjust, pull and hold the Recline Handle
on the front of this booster Seat Base 1
and push this booster seat towards the
vehicle’s seat back 2 until the back of this
booster seat sits firmly against the vehicle
seat back, as shown in Figure 31. Release
Recline Handle.
Pull on the Recline Handle located on the
front of this booster Seat Base and slide
this booster seat towards you exposing
the LATCH Connectors 1 , as shown in
Figure 33.
1
Figure 33
Step 2.
2
1
Figure 31
Locate the red buttons on the front of the
LATCH Connectors. Releasing one LATCH
Connector at a time, use your thumb to
press in on one button 2 while using the
other hand to pull this booster seat forward
3 , as shown in Figure 34. Repeat for the
opposite LATCH Connector.
To store the LATCH Connectors when not in
use, pull and hold Recline Handle on front
of booster Seat Base and then push LATCH
Connectors into Seat Base.
Ensure that this booster seat is in contact
with the front surface of the vehicle seat
back. DO NOT allow a gap between this
booster seat and the vehicle seat back,
as shown in Figure 32.
3
2
Figure 34
Step 3.
Remove this booster seat from vehicle.
Figure 32
31
32
Installing Booster Seat WITHOUT
Using LATCH Connectors
WARNING
t'"*-63&501301&3-:*/45"--0364&5)*4#0045&34&"5*/$3&"4&45)&
3*4,0'4&3*064*/+63:03%&"5)505)&$)*-%"/%05)&34*/"4)"31
TURN, SUDDEN STOP OR CRASH.
t50"70*%*/+63:5)*4#0045&34&"5.645#&*/45"--&%#:"/"%6-5
t/&7&3-&"7&5)*4#0045&34&"56/4&$63&%*/:0637&)*$-&5)*4
BOOSTER SEAT MUST REMAIN CONNECTED TO THE LATCH LOWER ANCHORS
IN THE VEHICLE OR SECURED BY THE VEHICLE’S SEAT BELT EVEN WHEN NOT
IN USE. IN A SHARP TURN, CRASH OR SUDDEN STOP, AN UNSECURED
BOOSTER SEAT CAN BE THROWN AROUND AND COULD SEVERELY INJURE
VEHICLE OCCUPANTS.
Installing Booster Seat in Full Back Mode
WITHOUT Using LATCH Connectors
To install Seat Back, see “Installing/Removing Seat Back”
section of this manual on page 53.
Step 1.
Select a forward-facing vehicle seating location, which has
a lap and shoulder belt.
If the vehicle seat back is adjustable, make sure the seat
back is locked in the upright position. DO NOT allow the
child to sit in booster seat while the vehicle seat is reclined,
as shown in Figure 35.
Check that LATCH Connectors are fully retracted.
To fully retract LATCH Connectors, pull and hold Recline
Handle on front of booster seat and push LATCH
Connectors into Seat Base.
Figure 35
t8)&//0564*/(-"5$)$0//&$50345)&#"$,0'5)*4#0045&34&"5
#"4&.645$0/5"$55)&7&)*$-&4&"5#"$,
33
34
Installing Booster Seat in Backless Mode
WITHOUT Using LATCH Connectors
Step 2.
Center this booster seat on the vehicle seat and position
this booster seat firmly against seat back with LATCH
Connectors tucked into the crease between the vehicle
seat back and vehicle seat cushion.
To remove Seat Back, see “Installing/Removing
Seat Back” section of this manual on page 53.
Step 3.
Step 1.
Ensure that the booster Seat Base is in contact with the
vehicle seat back, as shown in Figure 36.
Select a forward-facing vehicle seating location, which has
a lap and shoulder belt.
Figure 36
If the vehicle seat back is adjustable, make sure the seat
back is locked in the upright position. DO NOT allow the
child to sit in this booster seat while the vehicle seat is
reclined, as shown in Figure 38.
Check that LATCH Connectors are fully retracted.
To fully retract LATCH Connectors, pull and hold Recline
Handle on front of booster seat and push LATCH
Connectors into Seat Base.
Figure 38
DO NOT allow gap between the booster Seat Base
and vehicle seat back, as shown in Figure 37.
Figure 37
35
36
Securing Your Child in Booster Seat
Step 2.
Center this booster seat on the vehicle seat and position
this booster seat firmly against seat back with LATCH
Connectors tucked into the crease between the vehicle
seat back and vehicle seat cushion.
WARNING
t64&0/-:"7&)*$-&4-"1"/%4)06-%&3#&-54:45&.8)&/
RESTRAINING THE CHILD IN THIS BOOSTER SEAT.
Step 3.
Ensure that the booster Seat Base is in contact with the
vehicle seat back, as shown in Figure 39.
t7&)*$-&-"1"/%4)06-%&3#&-5.645#&1301&3-:104*5*0/&%"/%
SNUGLY ADJUSTED ON CHILD.
Figure 39
t/&7&364&0/-:"-"1#&-5503&453"*/"$)*-%*/5)*4#0045&34&"5
USE WITHOUT A LAP AND SHOULDER BELT CAN RESULT IN SERIOUS INJURY
OR DEATH.
t50"70*%*/+63:5)&$)*-%.645#&4&$63&%#:"/"%6-5/&7&3
"--085)&$)*-%50#6$,-&5)&.4&-7&4*/5)*4#0045&34&"5
t50"70*%4&3*064"#%0.*/"-*/+63:03%&"5)"$)*-%.6454*5
UPRIGHT AND NOT SLOUCH IN THIS BOOSTER SEAT. IF THE CHILD CANNOT
."*/5"*/"/613*()5104*5*0/*/5)*4#0045&34&"58*5)5)&*3#"$,
"/%#6550$,4*/$0/5"$58*5)5)&4&"5#"$,%0/0564&5)*4
BOOSTER SEAT WITH THE CHILD.
DO NOT allow gap between the booster Seat Base
and vehicle seat back, as shown in Figure 40.
t50"70*%#63/*/+63:— ALWAYS TOUCH THE SURFACES OF THE PARTS
BEFORE PUTTING THE CHILD IN THIS BOOSTER SEAT. THIS BOOSTER SEAT
CAN BECOME VERY HOT IF LEFT IN THE SUN AND COULD BURN THE
$)*-%44,*/
Figure 40
37
38
When Using Booster Seat in Full Back Mode
(with Seat Back):
Height
Weight
Recommended Age
38 –57 in.
96–145 cm.
33–100 lb.
15–45 kg.
4 years & up
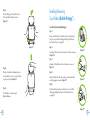
Step 1.
The child MUST sit in this booster seat
with their back flat against the Seat Back,
as shown in Figure 41.
Figure 41
WARNING
t%*4$0/5*/6&64&0'5)*4#0045&34&"5*/'6--#"$,.0%&*'50140'
CHILD’S EARS ARE ABOVE THE BOOSTER SEAT HEADREST IN THE HIGHEST
"%+645.&/5104*5*0/4&7&3&)&"%03/&$,*/+63*&4$06-%3&46-5
WITHOUT PROPER HEAD SUPPORT.
Step 2.
Position the lap belt underneath the Armrest
on the side opposite the vehicle seat belt
buckle, as shown in Figure 42.
Figure 42
39
40
Step 3.
Step 5.
Pull the lap and shoulder belt over the
child while positioning BOTH the lap and
shoulder belt underneath the Armrest on
the vehicle seat belt buckle side and buckle
the seat belt, as shown in Figure 43.
Adjust Headrest height.
The bottom of the Shoulder Belt Guide should be at
or above the top of the child’s shoulders, as shown in
Figure 45.
Figure 45
Figure 43
Step 4.
The tops of the child’s ears MUST be below the top of
this booster seat’s Headrest, as shown in Figure 46.
Route shoulder belt through the Shoulder
Belt Guide on the side that the vehicle
shoulder belt will contact the child’s
shoulder, as shown in Figure 44.
To adjust Headrest height, see “Adjusting the Headrest”
section of this manual on page 46.
Figure 44
41
Figure 46
42
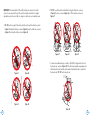
IMPORTANT: If the shoulder belt is off the child’s shoulder, not centered on the child’s chest,
or the ears are above the top of the headrest in the highest adjustment position, then your
child is too large to use this booster seat in full back mode.
Step 6.
Pull on shoulder belt to remove all slack out of the lap and
shoulder belt and snugly adjust the vehicle seat belt onto
the child.
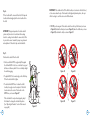
t %0/05QPTJUJPOBOZQBSUPGUIFWFIJDMFTFBUCFMUPWFSUIFUPQPGUIF"SNSFTUBTTIPXO
in Figure 48, behind the Armrest, as shown in Figure 49, under the child’s arm, as shown
in Figure 50, or behind the child, as shown in Figure 51.
IMPORTANT: Design and operation of vehicle seat belt
systems vary from vehicle to vehicle and from seating
location to seating location within the same vehicle. Refer
to your vehicle owner’s manual for proper use, placement
and adjustment of the vehicle’s lap and shoulder belts.
Step 7.
Check vehicle seat belt fit on the child:
t7FIJDMFTFBUCFMUT.645mUTOVHMZBOEMBZnBUBHBJOTU
the child and MUST not be loose or twisted. A snug seat
belt does not allow any slack. It lies in a relatively straight
line without sagging.
Figure 48
Figure 49
Figure 50
Figure 51
t5IFMBQCFMU.645TJUMPXBOETOVHMZPOUIFDIJMETIJQT
Pull on the shoulder belt to tighten.
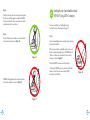
t5IFTIPVMEFSCFMU.645CFBUPSBCPWFUIFDIJMET
shoulder, lie snugly across the mid point of the child’s
chest and across the center of the shoulder in the
GREEN zone, as shown in Figure 47.
If the shoulder belt is not positioned properly, adjust
the Headrest to change the shoulder belt position.
(See “Adjusting the Headrest” section of this manual
on page 46.)
43
Figure 47
44
ADJUSTING THE HEADREST:
DO NOT use with the vehicle shoulder
belt touching the child’s neck, as shown
in Figure 52, or face, as shown in
Figure 53.
Step 1.
With child sitting in this booster seat,
have your child lean forward.
Step 2.
Figure 52
Figure 53
To avoid serious abdominal injury or death,
a child MUST sit upright and not slouch in
this booster seat, as shown in Figure 54.
If the child cannot maintain an upright
position in this booster seat with their back
and buttocks in contact with this booster
Seat Back, DO NOT use this booster seat.
Step 3.
1
2
Figure 55
Check to make sure the Headrest is locked
in place by pulling up on the Headrest.
Step 4.
Figure 54
45
Press the button on the Headrest Adjuster
on the right-hand side of the seat (when
facing front of seat) 1 and raise or lower
the Headrest into one of the 11 height
positions 2 , as shown in Figure 55.
Release button on the Headrest Adjuster
to lock in place.
Check for proper shoulder belt fit. See
Step 7 of the “Securing Your Child in
Booster Seat When Using Booster Seat in
Full Back Mode (with Seat Back)” section
of this manual on page 43.
46
When Using Booster Seat in Backless Mode
(without Seat Back):
Height
Weight
Recommended Age
40 –57 in.
101–145 cm.
40–100 lb.
15–45 kg.
4 years & up
Step 1.
The child MUST sit in this booster seat with their back flat
against the vehicle seat back, as shown in Figure 56.
Figure 56
WARNING
t%*4$0/5*/6&64&0'5)*4#0045&34&"5*/#"$,-&44.0%&*'50140'
5)&$)*-%4&"34"3&"#07&5)&7&)*$-&4&"5#"$,03)&"%3&45*/5)&
)*()&45"%+645.&/5104*5*0/4&7&3&)&"%03/&$,*/+63*&4$06-%
RESULT WITHOUT PROPER HEAD SUPPORT.
Step 2.
Ensure that the vehicle seat back or headrest is high
enough to support the child’s head. See your vehicle
owner’s manual on how to adjust the vehicle headrest.
The tops of the child’s ears MUST be below the top of the
vehicle seat back or headrest in the highest adjustment
position, as shown in Figure 57. Severe head or neck
injuries could result without proper head support.
Figure 57
47
48
Step 3.
Step 5.
Position the lap belt underneath the Armrest
on the side opposite the vehicle seat belt
buckle, as shown in Figure 58.
Pull on the shoulder belt to remove all slack out of the lap
and shoulder belt and snugly adjust the vehicle seat belt
onto the child.
Figure 58
IMPORTANT: Design and operation of vehicle seat belt
systems vary from vehicle to vehicle and from seating
location to seating location within the same vehicle. Refer
to your vehicle owner’s manual for proper use, placement
and adjustment of the vehicle’s lap and shoulder belts.
Step 6.
Check vehicle seat belt fit on the child:
t 7FIJDMFTFBUCFMUT.645mUTOVHMZBOEMBZnBUBHBJOTU
the child and MUST not be loose or twisted. A snug seat
belt does not allow any slack. It lies in a relatively straight
line without sagging.
Step 4.
Pull the lap and shoulder belt over the
child while positioning BOTH the lap and
shoulder belt underneath the Armrest on
the vehicle seat belt buckle side, as shown
in Figure 59. Buckle the seat belt.
t 5IFMBQCFMU.645TJUMPXBOETOVHMZPOUIFDIJMETIJQT
Pull on the shoulder belt to tighten.
Figure 59
t 8IFOTJUUJOHPOUIJTCPPTUFSTFBUUIFTIPVMEFSCFMU
MUST lie snugly across the mid point of the child’s chest
and across the center of the shoulder in the GREEN
zone, as shown in Figure 60.
Figure 60
49
50
IMPORTANT: If the shoulder belt is off the child’s shoulder, not centered on the child’s
chest, or the ears are above the top of the vehicle seat back or headrest in the highest
adjustment position, then your child is too large to use this booster seat in backless mode.
t %0/05VTFXJUIUIFWFIJDMFTIPVMEFSCFMUUPVDIJOHUIFDIJMETOFDLBTTIPXO
in Figure 65, or face, as shown in Figure 66, or off their shoulder, as shown in
Figure 67.
t %0/05QPTJUJPOBOZQBSUPGUIFWFIJDMFTFBUCFMUPWFSUIFUPQPGUIF"SNSFTUBTTIPXO
in Figure 61, behind the Armrest, as shown in Figure 62, under the chlid’s arm, as shown
in Figure 63, or behind the child, as shown in Figure 64.
Figure 65
Figure 61
Figure 62
Figure 63
Figure 64
Figure 66
Figure 67
t 5PBWPJETFSJPVTBCEPNJOBMJOKVSZPSEFBUIBDIJME.645TJUVQSJHIUBOEOPUTMPVDIJO
this booster seat, as shown in Figure 68. If the child cannot maintain an upright position
with their back in contact with the vehicle seat back and their buttocks in contact with
this booster seat, DO NOT use this booster seat.
Figure 68
51
52
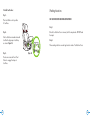
Installing/Removing Seat Back
To Install the Seat Back:
To Remove the Seat Back:
Facing the back of the Seat Base, align the
Seat Back legs in the openings in the Seat
Base behind the Armrests, as shown in
Figure 71.
Step 1.
Step 1.
Facing the front of this booster seat, tilt this
booster seat counter-clockwise, resting it on
its side, as shown in Figure 69.
Step 2.
Locate the Seat Back Release Strap on the
bottom right side of seat.
Figure 71
Step 3.
Step 2.
While holding the top of the Seat Back,
pull and hold the Release Strap and then
slide the Seat Back out of the Seat Base,
as shown in Figure 70.
Lower the Seat Back leg on the right and
slide into the opening to engage the back
leg, as shown in Figure 72. Rotate the left
side of the booster Seat Back down and
align the Seat Back leg with the opening
in the Seat Base.
Step 4.
Once the Seat Back leg is released,
complete removal by rotating the opposite
Seat Back leg out of opening in the
Seat Base.
53
Figure 69
Figure 70
Figure 72
54
Step 3.
Installing/Removing
Cup Holder (drink-thingy™)
Press the left leg into the Seat Back lock
(listen for audible click), as shown in
Figure 73.
To Install Cup Holder (drink-thingy™):
Step 1.
Remove Seat Cushion from Seat Base and set Seat Cushion to
side. (See section titled “Removing/Installing Seat Cushion &
Seat Cushion Cover,” on page 58.)
Figure 73
Step 2.
Locate Cup Holder slots on front corners of Seat Base, as shown
in Figure 75.
Figure 75
Step 3.
Align tabs of Cup Holder to slots in Seat Base, as shown in
Figure 76.
Step 4.
Step 4.
Once the Seat Back is installed, pull up on
the Seat Back to ensure it is securely locked
in place, as shown in Figure 74.
Slide Cup Holder tabs into slots ensuring top and bottom tabs
are fully engaged, as shown in Figure 77.
Figure 76
Step 5.
Step 5.
If Seat Back is not locked, repeat
Steps 1–4, above.
Figure 74
Install Seat Cushion back onto Seat Base. (See section titled
“Removing/Installing Seat Cushion & Seat Cushion Cover,”
on page 58.)
Figure 77
55
56
To Remove Cup Holder (drink-thingy™):
Step 1.
Remove Seat Cushion from Seat Base and set Seat Cushion to side. (See section titled
“Removing/Installing Seat Cushion & Seat Cushion Cover,” on page 58.)
Care & Cleaning
Removing/Installing Seat Cushion & Seat Cushion Cover
Step 2.
WARNING
Holding onto the outside of the Cup Holder, slide Cup Holder tabs out of slots in Seat Base.
Step 3.
Install Seat Cushion back onto Seat Base. (See section titled “Removing/Installing Seat
Cushion & Seat Cushion Cover,” on page 58.)
t/&7&364-&34&"58*5)0654&"5$64)*0/*/1-"$&
To Remove Seat Cushion Cover:
Instruction Manual Storage
After carefully reading and following these instructions, keep this manual for future use and
store in the compartment located on the bottom of the Seat Base, as shown in Figure 78.
Step 1.
To remove Seat Cushion Cover, you must first remove the
entire Seat Cushion from the Seat Base.
Step 2.
Pull up on bottom front edge of Seat Cushion to release it
from the front of the Seat Base, as shown in Figure 79.
Figure 79
Step 3.
Pull the Seat Cushion forward to fully release it from the
Seat Base, as shown in Figure 80.
Figure 78
Figure 80
57
58
Step 4.
To Install Seat Cushion Cover:
Turn Seat Cushion over to locate the
Seat Cushion Cover attachments,
as shown in Figure 81.
Step 1.
Place Seat Cushion Cover on a flat surface
with Seat Cushion Cover attachments facing up,
as shown in Figure 84.
Figure 81
Step 2.
Place Seat Cushion into Seat Cushion Cover,
aligning the seat cushion with the Seat Cushion
Cover attachments.
Step 5.
Using your thumb, push inward on
each Seat Cushion Cover attachment one
at a time to release the Cover from the
Seat Cushion, as shown in Figure 82.
Figure 84
Figure 82
Step 3.
Reattach Seat Cushion Cover attachments to Seat Cushion
by wrapping the Seat Cushion Cover sides around the
entire Seat Cushion, as shown in Figure 85.
Figure 85
Step 6.
Remove Seat Cushion Cover from
Seat Cushion, as shown in Figure 83.
Figure 83
59
60
Washing Instructions
To Install Seat Cushion:
Step 1.
SEAT CUSHION COVER WASHING INSTRUCTIONS
Place Seat Cushion onto top surface
of Seat Base.
Step 1.
Once the Seat Cushion Cover is removed, set the foam pad aside. DO NOT wash
foam pad.
Step 2.
Slide Seat Cushion rearward underneath
Seat Back to align snaps in Seat Base,
as shown in Figure 86.
Step 3.
Step 2.
Follow washing instructions on wash tag located on inside of Seat Cushion Cover.
Figure 86
Press down on rear and front of Seat
Cushion to engage front snaps to
Seat Base.
61
62
SEAT BACK COVER & HEADREST COVER FABRIC WASHING INSTRUCTIONS
SEAT FRAME (EXTERIOR PLASTICS ONLY) WASHING INSTRUCTIONS
IMPORTANT: The booster Seat Back Cover and Headrest Cover are not removable
for washing.
Use a soft cloth with warm water and soap. Apply light pressure with cloth in small
circular motions.
Step 1.
Accessories
If the spot has dried, try lightly brushing or scraping off the residual. Wipe surface
with water.
Step 2.
If a spot still remains, apply a mild detergent to fabric with a light mist.
Optional trim covers and accessories for this product may be purchased at:
http://www.shopclek.com
Step 3.
Work area using soft brush or edge of spoon from outside of spot towards the middle.
Step 4.
Allow solution to work for approximately one minute.
Step 5.
Remove with clean water or blot with clean soft towel.
Step 6.
Repeat Steps 3-5 as necessary until spot is removed.
Step 7.
Rinse with clear lukewarm water and blot with clean soft white cloth as final step.
63
64
Warranty
Warranty Limitations
Limited Warranty
This warranty does not cover the effects of normal wear and tear or damages
resulting from negligence, modification, improper installation, accidents, misuse or
abuse of this product. It is expressly agreed that the obligations of Clek Inc. and the
original consumer purchaser’s remedies under the limited warranty contained herein
are exclusive and are strictly limited to the repair or replacement of the product. This
limited warranty is conditional upon strict compliance with the provisions of the
owner’s manual. In no event will Clek Inc. or the dealer selling this product be liable
to you for any damages, including incidental or consequential damages, arising out
of the use or inability to use this product.
Clek Inc. warrants only to the original consumer purchaser and only if this product was
purchased (new and unused in an unopened box) from an authorized Clek retailer listed
at www.clekinc.com, that this product will be free from defects in material and
workmanship for one (1) years from the date of original purchase (the “Warranty Period”).
During the Warranty Period, Clek Inc. will, at its option, repair or replace this product if it
is found by the manufacturer to be defective in material or workmanship. Clek Inc.
reserves the right to discontinue or change parts, fabrics, models, or products, or to
substitute this product with a comparable model or product. To make a claim under this
warranty, please contact us at http://www.clekinc.com/ contact_us/, call us at 1-866656-2462, or write to us at Clek Inc., 12 Upjohn Rd., Suite 1, Toronto, Ontario, Canada
M3B 2V9. An original receipt is required to validate your warranty and shipping charges
will be the responsibility of the original consumer purchaser. To expedite the processing of
any future warranty claims and to verify the original date of purchase, please complete
and mail the pre-addressed owner registration card within thirty (30) days of purchase.
65
Limitation of Warranties and State/Provincial Law Rights
The warranty and remedies as set forth above are exclusive and in lieu of all others,
oral or written, express or implied. To the extent permitted by applicable law, any
implied warranties, including implied warranties of merchantability and fitness for a
particular purpose, are hereby disclaimed. Some states/provinces do not allow
limitations as to how long an implied warranty lasts or the exclusion or limitation of
incidental or consequential damages, so the above limitations may not apply to you.
This warranty gives you specific legal rights, and you may have other rights, which
vary from state/province to state/province. Neither Clek Inc. nor the dealer selling
this product has authorized any person to create for it any other warranty, obligation,
or liability in connection with this product.
66
,FFQUIJT*OTUSVDUJPO.BOVBMGPSGVUVSFVTF
Store in compartment on bottom of this booster seat.
w w w.clekinc.com
Clek Inc.
12 Upjohn Rd., Suite 1
Toronto, Ontario Canada
M3B 2V9
1-866-656-2462
rel.01JULY2013