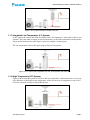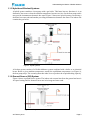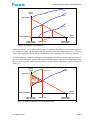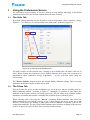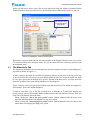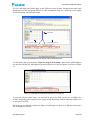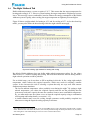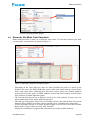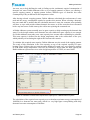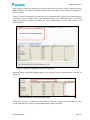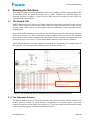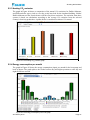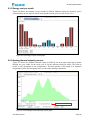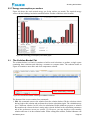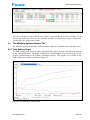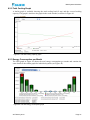
1
Daikin
Daikin Altherma
Altherma
User’s
User’s Manual
Manual
E2S n.v. Technologiepark, 5 B9051 Zwijnaarde Belgium www.e2s.be
Table of Contents
Table of Contents
1
2
3
4
5
Understanding the Basics of Daikin Altherma .................................................................... 1
1.1
Several Daikin Altherma Systems .................................................................................... 1
1.1.1 Mono Bloc System ........................................................................................................ 1
1.1.2 Wall Mounted Low Temperature (LT) System ............................................................ 1
1.1.3 Integrated Low Temperature (LT) System ................................................................... 2
1.1.4 High Temperature (HT) System ................................................................................... 2
1.1.5 Hybrid and Bivalent Systems ....................................................................................... 3
1.1.6 Ground Source (GS) System......................................................................................... 3
1.2
Selection through a Static Simulation............................................................................... 4
1.2.1 The definition of the required (heating) capacity......................................................... 4
1.2.2 The definition of a heating season ................................................................................ 4
1.2.3 The definition of a location and climate....................................................................... 5
1.2.4 The selection of a system .............................................................................................. 5
1.3
Using Databases................................................................................................................. 7
1.3.1 The central database ...................................................................................................... 7
1.3.2 The company database .................................................................................................. 7
Initial Setup............................................................................................................................... 8
2.1
Disclaimer and Welcome Screens..................................................................................... 8
2.2
The Main Screen................................................................................................................ 9
Using the Preferences Screen................................................................................................ 11
3.1
The Units Tab................................................................................................................... 11
3.2
The Prices Tab.................................................................................................................. 11
3.3
The Electricity Tab........................................................................................................... 12
3.4
The Night Setback Tab .................................................................................................... 14
3.5
The Calculation Parameters Tab ..................................................................................... 15
3.6
The Other Energy Sources Tabs...................................................................................... 16
Making a Selection ................................................................................................................. 18
4.1
General Considerations ................................................................................................... 18
4.2
Estimating the Required Heating Capacity .................................................................... 19
4.3
Selecting the Different Systems ...................................................................................... 20
4.3.1 Mono Bloc Systems .................................................................................................... 20
4.3.2 Wall Mounted Low Temperature (LT) Systems......................................................... 20
4.3.3 Integrated Low Temperature (LT) Systems................................................................ 21
4.3.4 High Temperature (HT) Systems................................................................................ 21
4.3.5 Hybrid Systems............................................................................................................ 21
4.3.6 Ground Source (GS) Systems ..................................................................................... 22
4.3.7 Heat Pump Systems..................................................................................................... 22
4.3.8 Bivalent Systems ......................................................................................................... 22
4.4
Domestic Hot Water Tank Selections ............................................................................. 23
Showing the Solutions............................................................................................................ 26
5.1
The Results Tab................................................................................................................ 26
5.1.1 The Schematic Solution .............................................................................................. 26
5.1.2 The Result Graph......................................................................................................... 27
5.1.3 The Solution List ......................................................................................................... 28
5.2
The Graphs Tab................................................................................................................ 29
5.2.1 Operation Period.......................................................................................................... 30
5.2.2 Heating energy cost ..................................................................................................... 30
5.2.3 Heating CO2 emission ................................................................................................. 31
5.2.4 Energy consumption per month.................................................................................. 31
25 February 2014
Page i
Table of Contents
5.2.5 Energy cost per month................................................................................................. 32
5.2.6 Heating thermal output by source............................................................................... 32
5.2.7 Energy consumption per surface................................................................................. 33
5.3
The Solution Basket Tab ................................................................................................. 33
5.4
The Reports Tab............................................................................................................... 34
6 Multiple System Selections.................................................................................................... 39
6.1
Creating a Multiple System Solution.............................................................................. 39
6.2
The Multiple System Graphs Tab ................................................................................... 40
6.2.1 Total Heating Graph .................................................................................................... 40
6.2.2 Total Cooling Graph.................................................................................................... 41
6.2.3 Energy Consumption per Month ................................................................................ 41
7 Special Operations ................................................................................................................. 42
7.1
Getting a New Version..................................................................................................... 42
7.2
Making an MCS Selection .............................................................................................. 45
7.3
Using Specific Climate Data........................................................................................... 46
8 Borehole Dimensioning.......................................................................................................... 48
List of Figures
Figure 1: A mono bloc system............................................................................................................ 1
Figure 2: A LT system with wall mounted indoor unit ..................................................................... 2
Figure 3: A LT system with integrated indoor unit, backup heater and water tank ......................... 2
Figure 4: A HT system........................................................................................................................ 2
Figure 5: Hybrid systems ................................................................................................................... 3
Figure 6: A GS system........................................................................................................................ 3
Figure 7: Defining the required capacity for heating ........................................................................ 4
Figure 8: Defining the heating period................................................................................................ 5
Figure 9: The selection of a heat pump.............................................................................................. 6
Figure 10: A solution with heat pump and backup heater................................................................. 6
Figure 11: The two databases in Daikin Altherma ............................................................................ 7
Figure 12: The disclaimer screen ....................................................................................................... 8
Figure 13: The welcome screen ......................................................................................................... 9
Figure 14: The start up screen when running Daikin Altherma for the first time............................ 9
Figure 15: A selected location .......................................................................................................... 10
Figure 16: An overview of the available units................................................................................. 11
Figure 17: Defining the currency and the prices ............................................................................. 12
Figure 18: Defining the price periods and the electricity prices..................................................... 13
Figure 19: Separate price periods and prices for a heat pump........................................................ 13
Figure 20: Defining night setback for heating and cooling ............................................................ 14
Figure 21: Defining calculation limits and sort order ..................................................................... 15
Figure 22: Defining the different boiler parameters........................................................................ 17
Figure 23: The settings screen, ready to start making a selection .................................................. 18
Figure 24: Estimating the required heating capacity....................................................................... 19
Figure 25: Selecting mono bloc systems ......................................................................................... 20
Figure 26: Selecting LT, wall mounted systems.............................................................................. 20
Figure 27: Selecting LT, integrated systems.................................................................................... 21
Figure 28: Selecting HT systems ..................................................................................................... 21
Figure 29: Selecting hybrid systems ................................................................................................ 21
Figure 30: Selecting GS systems ..................................................................................................... 22
Figure 31: Selecting heat pump systems ......................................................................................... 22
Figure 32: Selecting bivalent systems ............................................................................................. 23
Figure 33: Selecting a water tank and tapping pattern.................................................................... 23
25 February 2014
Page ii
Table of Contents
Figure 34: Domestic hot water tank required extra capacity from a Daikin Altherma system..... 24
Figure 35: Selecting an integrated domestic hot water tank........................................................... 25
Figure 36: Defining a customized tapping pattern .......................................................................... 25
Figure 37: The result tab with the list of solutions and the data about the proposed solution ...... 26
Figure 38: Getting more information about a device through Internet or Extranet....................... 27
Figure 39: Explanation of the terms in the result graph.................................................................. 27
Figure 40: The different elements in the solution list...................................................................... 28
Figure 41: The list of solutions for a heating and cooling selection............................................... 29
Figure 42: The operation period graph for heating and cooling..................................................... 30
Figure 43: The heating energy cost graph ....................................................................................... 30
Figure 44: The heating CO2 emission graph ................................................................................... 31
Figure 45: The energy consumption per month graph.................................................................... 31
Figure 46: The energy cost per month graph................................................................................... 32
Figure 47: The heating thermal output per source graph ................................................................ 32
Figure 48: The energy consumption per surface graph................................................................... 33
Figure 49: The solution basket containing two different solutions ................................................ 33
Figure 50: The reports tab ................................................................................................................ 34
Figure 51: Example of a solution overview chapter ....................................................................... 34
Figure 52: The technical details in a report ..................................................................................... 35
Figure 53: The supplementary explanations text ............................................................................ 35
Figure 54: An excerpt from the field settings report ....................................................................... 36
Figure 55: The first part of the information fiche for customers .................................................... 37
Figure 56: Excerpt from section heat loss and sizing of the heating system ................................. 37
Figure 57: Adding extra information in the report headers and footers ......................................... 38
Figure 58: Creating a multiple system solution............................................................................... 39
Figure 59: Combining the single systems into a multiple system solution.................................... 40
Figure 60: The total heating capacity graph .................................................................................... 40
Figure 61: The total cooling capacity graph .................................................................................... 41
Figure 62: The total energy consumption graph.............................................................................. 41
Figure 63: The about box with upgrade command button.............................................................. 42
Figure 64: The version upgrade screen............................................................................................ 43
Figure 65: No new versions available.............................................................................................. 43
Figure 66: Upgrading to a newer version ........................................................................................ 44
Figure 67: Notice about collecting statistics data............................................................................ 44
Figure 68: The result graph when using a MCS selection .............................................................. 45
Figure 69: Editing climate data ........................................................................................................ 46
Figure 70: Adding MCS or importing a climate file....................................................................... 47
Figure 71: The solution basket showing the borehole dimensioning command ........................... 48
Figure 72: Selecting a vertical borehole dimensioning................................................................... 48
Figure 73: Selecting or entering the kind of bedrock...................................................................... 49
Figure 74: Vertical borehole results ................................................................................................. 49
Figure 75: Selecting a horizontal borehole dimensioning .............................................................. 50
25 February 2014
Page iii
Understanding the Basics of Daikin Altherma
1
Understanding the Basics of Daikin Altherma
This chapter describes the general principles used in Daikin Altherma. Several elements from the
next sub sections will also be explained in the next chapters, but in terms of how to perform a
selection.
1.1
Several Daikin Altherma Systems
A Daikin Altherma system consists of four parts: a heat pump, a backup heater, a hydro box, also
called indoor unit, and a water tank. The heat pump provides the largest part, if not all, of the
required capacity. At very low ambient temperature values, the heat pump may not be able to
produce all of the required capacity (see section 1.2.4 and Figure 9). In that case, the indoor unit
uses its back up heater to produce the remaining capacity. An alternative is using another heat
source, as for example a gas boiler. At low temperature values, this heat source takes over from
the heat pump and produces the required heating. The indoor unit produces warm water for space
heating via radiators, floor heating or water indoor units. Optionally, it can also warm up the
water of a domestic hot water tank used for shower, washing, cleaning, …etc.
Daikin Altherma combines those four parts into six basic systems to offer a maximum of
flexibility in finding solutions.
1.1.1 Mono Bloc System
This system integrates the heat pump, the indoor unit and the backup heater into a single device,
which is installed outdoors. The water tank is optional. The indoor unit partially heats up the
domestic hot water with its extra capacity. The remaining capacity may be delivered by solar
energy or by a water tank heater. Figure 1 shows a mono bloc system with water tank, both using
a 400V power supply with 3 phases. The red piping lines all contain water.
Figure 1: A mono bloc system
1.1.2 Wall Mounted Low Temperature (LT) System
This system uses consists of a heat pump, an indoor unit with a backup heater and a water tank,
as shown in Figure 2. The indoor unit is mounted on a wall. The piping marked in black between
the heat pump and its indoor unit contains refrigerant. The other piping contains water in the
same way as for the mono bloc installation.
As for the mono bloc system, the water tank is optional and the indoor unit heats it up with its
spare capacity. The water tank may use solar energy to provide the remaining capacity or use a
water tank heater.
The low temperature refers to the low water temperature with a minimum of 20°C or 25°C and a
maximum of 50°C or 55°C, depending on the models used.
25 February 2014
Page 1
Understanding the Basics of Daikin Altherma
Figure 2: A LT system with wall mounted indoor unit
1.1.3 Integrated Low Temperature (LT) System
In this system the indoor unit with its backup heater also integrates a water tank, which is not
optional. The water tank no longer needs an extra heater, as the indoor unit and its backup heater
warms up the domestic hot water. Figure 3 gives an example of such system.
The low temperature refers to the same range as the previous system.
Figure 3: A LT system with integrated indoor unit, backup heater and water tank
1.1.4 High Temperature (HT) System
Figure 4 shows that this system is similar to the low temperature wall mounted one. In fact, the
only difference is the higher water temperature, which can now get a temperature of up to 80°C.
Of course, the devices used are also different ones.
Figure 4: A HT system
25 February 2014
Page 2
Understanding the Basics of Daikin Altherma
1.1.5 Hybrid and Bivalent Systems
A hybrid system combines a heat pump with a gas boiler. This latter has two functions: it is an
alternative heat source when the ambient temperature becomes too low for the heat pump and it
may provide instantaneous domestic hot water. Figure 5 shows two hybrid systems: one having a
domestic hot water tank and another providing instantaneous domestic hot water. The indoor unit
contains the gas boiler.
Figure 5: Hybrid systems
A bivalent system consists of a Daikin Altherma system combined with a boiler or an electrical
heater. Below a given ambient temperature, usually the equilibrium temperature (see Figure 9),
the heat pump stops. The second system then takes over to produce the required heating capacity.
1.1.6 Ground Source (GS) System
Figure 6 shows a ground source system. The indoor unit extracts heat from the ground and uses it
for space heating and for domestic hot water in its integrated water tank.
Figure 6: A GS system
25 February 2014
Page 3
Understanding the Basics of Daikin Altherma
1.2
Selection through a Static Simulation
Daikin Altherma selects Daikin Altherma systems using a static simulation to get solutions
covering the required capacity at any time during a year. To perform such a static simulation,
Daikin Altherma uses four kinds of data, as explained in the next sub sections.
1.2.1 The definition of the required (heating) capacity
Figure 7 graphically shows that Daikin Altherma needs four data to define a required heating
capacity: the maximum required capacity is at the lowest ambient temperature and the minimum
required capacity is at a temperature for which heating is no longer needed. Consequently, the
minimum heating capacity is always zero. The maximum heating capacity is the one you have to
enter and which must be covered at all times.
Required
Capacity
Maximum capacity
Ambient
Minimum capacity (0kW)
Temperature
Lowest temperature
Highest temperature
(Design temperature)
(No more heating)
Figure 7: Defining the required capacity for heating
The lowest ambient temperature value is location dependent. Daikin Altherma offers up to 4300
locations world wide, containing minimum ambient temperature values. You define the highest
ambient temperature value in the Daikin Altherma Preferences screen so that the same value can
be used for several projects.
1.2.2 The definition of a heating season
Using the sliders at the bottom of Figure 8, you define the heating season by selecting the months
of the year during which the selected Daikin Altherma system must heat. Outside these months,
the system will not heat, even when the ambient temperature drops below the highest ambient
temperature. Figure 8 shows the different parts of a heating season definition:
- The green curve gives the average ambient temperature per month.
- The red horizontal line shows the highest ambient temperature above which no heating is
needed. You define this temperature in the Preferences window (see section 3.5).
- The blue horizontal line shows the lowest ambient temperature below which no cooling is
needed. This information is only necessary when selecting a heating and cooling solution.
- Below the graphs are small rectangles showing the months of the year. The colored months
define the heating season and the other months define the cooling season.
Note that the average ambient temperature of the first and the last month of the heating season
may be higher than the highest temperature limit (at 16°C). This means that only a few days or
part of days may need a heating capacity.
25 February 2014
Page 4
Understanding the Basics of Daikin Altherma
160C
Figure 8: Defining the heating period
1.2.3 The definition of a location and climate
When selecting a location, you also automatically select a climate with temperature data for each
hour of the year, which makes up a total of 8760 data. For heating, Daikin Altherma only
considers the data within the heating season and the ones with temperature values below the
highest ambient temperature.
The records found for the heating season define the number of times per year a given ambient
temperature will occur. The solution found (see next item) must cover all required capacities
corresponding with the different ambient temperature values. To produce these capacities, the
solution also needs a corresponding power input. Summing up this power input data results in
energy consumption for a year.
1.2.4 The selection of a system
An Altherma system may consist of a heat pump and an indoor unit with backup heater. The heat
pump delivers a capacity that diminishes with the ambient temperature. Below a minimum
ambient temperature defined for that heat pump, it is no longer capable of delivering any
capacity. Figure 9 shows the results for three different systems:
1. The heat pump of system 1 covers the required capacities for all ambient temperature values.
No extra heating capacity is necessary.
2. The heat pump of system 2 covers the required capacities, up to the point where its delivered
capacity is equal to the required capacity. This point is the equilibrium point. For ambient
temperature values below that point, the heat pump is no longer capable to deliver the
required capacity and will use a supplemental heating source to add the remaining required
capacity. This heating source is an electrical backup heater integrated in the indoor unit.
3. The heat pump of system 3 also cannot cover the required capacities. In addition, its delivered
capacity drops to zero, at the moment the ambient temperature is out of range for that system.
From that point on, the electrical backup heater must be capable of providing all required
capacity.
An Altherma system may also contain an alternative heat source, as for example a gas boiler,
which either complements the heat pump, as the electrical backup heater does, or takes over from
the heat pump to provide all required heating capacity for ambient temperature values below the
equilibrium point.
25 February 2014
Page 5
Understanding the Basics of Daikin Altherma
System1
Required
Capacity
System2
Maximum capacity
System3
Ambient
Minimum capacity (0kW)
Temperature
Lowest temperature
Highest temperature
Equilibrium points
(Design temperature)
(No more heating)
Figure 9: The selection of a heat pump
Although System 1 covers the required capacity at all times, the solution may be quite costly due
to a larger heat pump. On the other hand, the seasonal COP of the solution may be a very good
figure, showing that the yearly energy consumption is low compared to the delivered capacity.
A Daikin Altherma solution consisting of a heat pump and a backup heater, such as System 2,
may be a cheaper solution, provided the electrical backup heater is not used too frequently during
the year and covers the (small) capacity shortage at low ambient temperature values, as shown in
Figure 10:
Heat pump
Required
+
Capacity
Backup heater
Heat pump
Maximum capacity
Backup
Heater
Ambient
Minimum capacity (0kW)
Temperature
Lowest temperature
Equilibrium point
(Design temperature)
Highest temperature
(No more heating)
Figure 10: A solution with heat pump and backup heater
25 February 2014
Page 6
Understanding the Basics of Daikin Altherma
1.3
Using Databases
The Daikin Altherma program consists of a single file and does not need any installation. To be
able to perform its functions, it contains two databases, as shown in Figure 11:
Device Database
Heat pumps, Indoor units,
Backup heaters, Water tanks
Possible Configurations, …
Company Database
Locations, Climate files
Daikin Altherma
Figure 11: The two databases in Daikin Altherma
1.3.1 The central database
The central database stores the definitions of all devices that make up a Daikin Altherma system.
A definition contains capacities, physical dimensions and limits, allowed combinations of
devices, …etc.
Having these definitions stored into an integrated database offers several advantages:
- Daikin Altherma is independent from other files, making sure you cannot accidentally move
or delete them. All data are available and accessible at any time.
- The device database has an expiration date, as Daikin may decide to launch new devices,
abolish existing ones or offer extra options. When the device database becomes outdated, so is
Daikin Altherma. A newer Daikin Altherma version automatically contains an updated device
database.
- The device database data are read-only, making sure you get the same results, even across
different projects.
- It is possible to have a Daikin Altherma version, which is specific for a given region, making
sure you only create projects using devices that are available in your region.
1.3.2 The company database
The company database contains up to 4300 locations with their geographical position and
altitude. Each of the locations contains eight limits for the ambient temperature data: minimum
and maximum temperature values during the winter and summer, both during the day and night.
Daikin Altherma uses those limits to create a climate file for each hour of a year. In addition, a
location also contains three extra data:
1. The definition of a MCS (Micro-generation Certificate Scheme) temperature for which Daikin
Altherma must ensure that the required capacities at this value and for all temperature values
above are always and only covered using only the heat pump. This means that the MCS
temperature must be on the equilibrium point (see Figure 10) or at its right. The current
company database contains MCS temperature values for cities in the United Kingdom.
2. The CO2 emission factor when producing electricity and expressed in kg CO2 / kWh. With
this value, Daikin Altherma calculates the CO2 emission of the Daikin Altherma solution and
compares it with the CO2 emission of other boilers.
3. The primary energy factor, which is the conversion factor between the total energy used to
produce electrical energy and the delivered electrical energy. The delivered electrical energy is
the electrical energy produced by the total energy minus the distribution losses.
25 February 2014
Page 7
Initial Setup
2
Initial Setup
2.1
Disclaimer and Welcome Screens
When starting Daikin Altherma for the very first time, a few screens will appear, after which you
must fill in some setup data before being able to make a first selection.
The disclaimer screen in Figure 12 appears when running Daikin Altherma for the first time or
for each new version. It shows the general conditions of using this software.
Figure 12: The disclaimer screen
To continue, you first have to select "I accept these conditions" and click the "Continue" button.
The Daikin Altherma program stops if you select "I do not accept these conditions", and click
the "Continue" button.
The welcome screen in Figure 13 appears always by default. By unchecking "Always show this
message when starting the program" it no longer will appear at start up. In addition to the
welcome message, this window contains a "Look for Upgrades now" button, allowing
downloading the latest Daikin Altherma version. Section 7.1 explains in more detail how to do
this, how to display this screen from the About screen and how to get this welcome screen appear
again when starting up the Daikin Altherma program.
25 February 2014
Page 8
Initial Setup
Figure 13: The welcome screen
2.2
The Main Screen
After the initial screens, the main Daikin Altherma screens comes up. When starting it for the
first time, a screen in Figure 14 appears looking rather empty:
Figure 14: The start up screen when running Daikin Altherma for the first time
In fact, Daikin Altherma needs a location to get data for a climate file and a heating season. You
define this location by selecting a country and a city within that country.
Both lists are quite long. Finding the required country (city) may require scrolling through this
list. However, a faster way is click on the list and type the first letters of the country (city).
Daikin Altherma will then locate the country (city) in the list starting with the letters typed. You
must type these letters at a minimum pace defined by the Windows installation. However, in
25 February 2014
Page 9
Initial Setup
most cases typing one letter is enough to position close to the required country (city).
After selecting a location, Daikin Altherma fills in the temperature limits, the typical CO2
emission factor, the primary energy factor and the heating season for that location, encircled in
blue in Figure 15.
Figure 15: A selected location
At the bottom of the screen, a message appears explaining that you must fill in additional data in
the preferences screen. The sections 3.2, 3.3 and 3.6 give more details about this screen and the
minimum required data to fill in.
25 February 2014
Page 10
Using the Preferences Screen
3
Using the Preferences Screen
The Preferences screen consists of six tabs, defining several settings that apply to all Daikin
Altherma projects. The next sections explain these tabs more in detail.
3.1
The Units Tab
By default, Daikin Altherma uses the SI units to express temperature values, capacities, energy,
distances, …etc. However, it is also possible to use other units, as shown in Figure 16:
Unit in effect
Available unit
Figure 16: An overview of the available units
The units in effect are the selected ones. Clicking on an available unit will make it the one in
effect. When closing the preferences screen, Daikin Altherma will replace all occurrences of
dimensioned values (capacities, energy, temperature, …etc) by converted values using the
selected units.
The "Restore Defaults" button reselects the original Daikin Altherma settings. This is not only
applicable on this tab, but also on other tabs as well.
3.2
The Prices Tab
This tab defines the prices and the installation cost for all devices that are possibly used in a
Daikin Altherma solution, as shown in Figure 17. Although it is possible to enter those data
manually, a much better solution is selecting a price file. This file comes from a Daikin affiliate,
distributor or installer and contains a complete list of Daikin devices with their prices.
When selecting such a file using the "Browse" command, Daikin Altherma only selects the
Daikin Altherma devices and the currency to use. It then displays the prices in this prices tab.
However, when prices are missing or when prices must be adapted or corrected, you can still
change them manually. The only value Daikin Altherma does not allow to change is the currency
used, as all prices in a price file have been expressed in that currency.
25 February 2014
Page 11
Using the Preferences Screen
When you did not yet select a price file or have removed it using the "Clear" command, Daikin
Altherma needs a currency. In those cases, that field becomes editable and you have to enter it.
Select a price file
(with expiration date)
or manually fill and
adapt prices
Figure 17: Defining the currency and the prices
When there is no price data filled in, the material table in the Daikin Altherma report (see section
5.4) will not contain prices and price totals. So, you only must fill in the currency to proceed with
the minimum setup.
3.3
The Electricity Tab
The electricity tab defines the low and high price periods, together with the corresponding prices
per kWh, as shown in Figure 18.
In many countries the tariff for one kWh of electricity depends on the hour of the day or the day
of the week when this electricity was used. Daikin Altherma uses two electricity tariffs: the tariff
at a low price period and at the high price period. Together with these prices, you may select the
hours for each day of the week during which the low tariff applies.
Figure 18 shows a low price period from 0h up to 6h and from 22h to 23h, which also applies for
all weekdays. This is the default definition.
To add an extra hour (e.g. at 7h), you click the box on Monday at 7h and while keeping the
mouse pressed, move it downwards. Daikin Altherma shows the selected boxes in blue. Now you
click one of the buttons below the table:
- When clicking the "Set to low price period" button, Daikin Altherma fills the boxes with
asterisks and marks them as belonging to a low price period.
- When clicking the "Set to high price period" button, Daikin Altherma clears the boxes and
marks them as belonging to a high price period.
25 February 2014
Page 12
Using the Preferences Screen
The low and high price tariffs apply to the different electric heaters (backup heater and water
tank heater) and the heat pump. However, some installations may use a different power supply
for the heat pump with different tariffs.
Selection
Low price period
High price period
Figure 18: Defining the price periods and the electricity prices
To enter those data, you check the "Separate tariff for heat pump" check mark, which displays
an extra tab with the low and high price periods and prices for the heat pump, as shown in Figure
19:
Figure 19: Separate price periods and prices for a heat pump
To proceed with the initial setup, you must fill in prices per kWh for the low and high price
periods. Depending on a separate power supply for the heat pump, Daikin Altherma requires two
or four prices to fill in.
If both prices are identical, as shown in Figure 18 and Figure 19, there is no difference between a
low and high price period.
25 February 2014
Page 13
Using the Preferences Screen
3.4
The Night Setback Tab
Daikin Altherma assumes a room set point of 21°C. This means that the target temperature for
heating and cooling is 21°C. However, when heating, the target temperature at night may become
lower. This not only is more comfortable, but also reduces the energy consumption of the Daikin
Altherma system. Equally, when cooling, the target temperature at night may become higher.
Figure 20 shows a night setback for heating at 16°C and for cooling at 25°C. As for the electricity
tariffs, you may also define the hours during which the night setback must apply.
Same mechanism to define and select as for electricity periods
Figure 20: Defining night setback for heating and cooling
By default, Daikin Altherma does not define night setback temperature values. So, the values
filled in are 21°C, both for heating and cooling. The hour table has hours filled in during which a
night setback operation would be probable.
For an initial setup, you do not have to fill in anything in this tab. In fact, using night setback
temperature values reduces the required capacities, which may result in selecting a smaller
system. It also increases the risk of selecting a system that may not cope well with extreme
ambient temperature situations:
- The lowest ambient temperature values probably occur during the night 1 . By setting a night
setback temperature, you reduce the required capacity and rule out the possibility that the
system may need more capacity because the customer wants a more comfortable temperature.
So, you must make sure the system covers at least the required capacity using a combination
of heat pump and backup heater (see section 1.1.5).
- A similar situation may occur for cooling, though customers would probably complain less
when not covering the required cooling capacity at all times.
1
The coldest moment at the night mostly occur one hour after sunrise. In fact, during the night the earth is cooling
down. When the sun rises above the horizon, it is still not powerful enough to heat up the surface. So, the earth is
still cooling down. The actual heating occurs more or less one hour after sunrise.
25 February 2014
Page 14
Using the Preferences Screen
3.5
The Calculation Parameters Tab
In the previous section it became clear that an optimal Daikin Altherma system is the result of
many considerations. As shown in Figure 21, the calculation parameters tab adds more elements
to consider:
Figure 21: Defining calculation limits and sort order
- As depicted in Figure 7, a Daikin Altherma system must cover the required heating capacity
from the design heating temperature (the coldest ambient temperature on the selected
location) up to the ambient temperature for which it no longer needs a heating capacity. You
may change this temperature value within the range of 10°C to 18°C, with a default value of
16°C. The higher this ambient temperature, the longer the Daikin Altherma system will have
to heat.
- A similar situation occurs for cooling, where the Daikin Altherma system must cover the
required cooling capacity from the design cooling temperature (the hottest ambient
temperature on the selected location) down to the ambient temperature for which it no longer
needs a cooling capacity. You may change this temperature value within the range of 17°C to
26°C, with a default value of 22°C.
- As shown in Figure 10, a possible solution consists of a combination of a heat pump with a
backup heater or any other heat source. The most efficient element in this combination is of
course the heat pump. However, it may be more efficient to use a smaller heat pump needing
its backup heater for a small percentage of the total required capacity than selecting a larger
heat pump. So, you may select a percentage of the total capacity that must be covered by the
heat pump. This value may range from 0% to 100% (no electrical backup heater or extra heat
source allowed) with a default value of 50%.
- When defining a solution consisting of multiple systems, it is unlikely that the capacity
delivered by the sum of all systems exactly covers the required (total) capacity. Generally the
solution would be slightly too large. So, you may decide to allow a tolerance. This means that
25 February 2014
Page 15
Using the Preferences Screen
each individual system must cover its required load, but that the sum of the systems may
cover a load that is lower by a tolerance percentage of the given total required capacity.
Changing one or all of these four values may have an important impact on the solutions found or
ruled out.
When finishing its selections (see chapter 4), Daikin Altherma calculates a set of possible
solutions and sorts them according to three sorting criteria:
1. Seasonal COP: this is a measurement of the energy efficiency of a Daikin Altherma system.
The higher this value, the more efficient the system is and the lower the energy consumption.
2. Spare capacity: Daikin Altherma only withholds solutions that completely cover the required
capacities, either only using the heat pump or the combination of the heat pump with the
backup heater. However, it is highly unlikely to find a system that always covers exactly the
required capacity. In most cases there will be extra capacity available, which is called spare
capacity 2 .
3. The price: this is only possible if you either loaded a price file or entered the prices for the
different Daikin Altherma devices (see section 3.2).
Obviously, the customer wants the most energy efficient system with the smallest spare capacity
and the lowest price.
3.6
The Other Energy Sources Tabs
A Daikin Altherma heat pump uses electricity to produce its heating or cooling capacity. This
results in an energy consumption expressed in kWh. To compare a Daikin Altherma solution
with gas, fuel and pellets boilers, their consumption must be converted to kWh as well.
The last tab of the preferences window contain the data to fill in for different kinds of boilers, as
shown in Figure 22:
- You may enter the price for a gas boiler for 1 kWh or for 1 m3 (see Figure 22 at the right). In
the latter case, you must define the thermal energy for 1 m3 gas.
- The price for a lpg boiler may be entered for 1 liter or 1 kg (see Figure 22 at the right),
together with the thermal energy for one liter or 1 kg of LPG.
- The price for a fuel boiler must be entered for 1 liter of fuel, together with the thermal energy
for 1 liter of fuel.
- The price for a pellets boiler must be entered for 1 kg of pellets, together with the thermal
energy for 1 kg of pellets.
In addition to the prices, you must also enter the boiler efficiencies and their CO2 emission.
Daikin Altherma fills in reasonable defaults for these values. However, you may get more
accurate values from gas and fuel company invoices or boiler manufacturers.
2
This spare capacity is not lost. Daikin Altherma uses its spare capacity to help heating up the domestic hot water,
which is an optional component of a Daikin Altherma system.
25 February 2014
Page 16
Using the Preferences Screen
Figure 22: Defining the different boiler parameters
25 February 2014
Page 17
Making a Selection
4
Making a Selection
This chapter explains the different steps to follow to make a first selection. This chapter explains
the different possible settings for a selection
4.1
General Considerations
After having filled in the minimum required data in the preferences screen (see chapter 3), you
can start making a selection by filling in or clicking fields at the right hand of the settings tab of
the main window (see Figure 23).
Figure 23: The settings screen, ready to start making a selection
This selection part is highly dynamic and changes depending on what your select. The fields
shown in Figure 23 appear in all selections:
- Conditioned surface: this value gives the total surface the selected Daikin Altherma system
must condition (heat or heat and cool). The unit used depends on the settings in units tab of
the preferences screen: m2 or sqft (see Figure 16).
- Use multiple systems: when selected, the solution may consist of several Daikin Altherma
systems combined (see Chapter 6).
- The required capacity for heating. This is an important value and has probably been calculated
by an engineering office or can be estimated using the data from the customer's invoices.
- At several places on different screens, Daikin Altherma has a small blue question mark icon.
Clicking it brings up a window containing an explanatory text, such as the one shown in
Figure 23. Note that the main settings tab contain two more of those icons (at the left of the
screen), which are explained in section 7.3.
- The application is either heating only or heat pump. In the latter case, you must also enter a
required cooling capacity (see section 4.3, Figure 31).
- During the heating season, the Daikin Altherma system changes the water temperature: the
25 February 2014
Page 18
Making a Selection
highest temperature is during the coldest ambient temperature values and the lowest
temperature at the highest ambient temperature. Although you can change these minimum and
maximum water temperature values, changing them may lead to a system that reacts slower
on steep ambient temperature changes. It is highly recommended not to change them, except
for specific fine-tuning purposes.
- The power supply defines the available power supply at the customer's premises. From this
value, Daikin Altherma selects systems that can be connected to that power supply:
° If the customer has a one-phase power supply, only one-phase Daikin Altherma systems
with the same frequency are possible. For example: 230V, 50Hz.
° If the customer has a 3-phase power supply without a neutral connection, Daikin Altherma
systems are possible with 1, 2 or 3-phase connections, but with the same voltage and
frequency. For example: 400V, 50Hz.
° If the customer has a 3-phase power supply with a neutral connection, all Daikin Altherma
systems with the same frequency are possible, either at the same voltage or at a lower
voltage. For example: 400V, 50Hz with neutral allows connections at 400V and at 230V.
- Domestic hot water. Each Daikin Altherma system has a water tank, some of which are
optional, depending on the solution found. When you select a water tank, an extra tab appears
to fill in the water tank selection (see Chapter 4.4).
4.2
Estimating the Required Heating Capacity
When a customer wants to replace an existing system by a Daikin Altherma system, the required
heating capacity may be difficult to calculate or estimate. For that reason, Daikin Altherma offers
an estimation of the required capacity using the customer's invoices, as shown in Figure 24:
Figure 24: Estimating the required heating capacity
Click on the calculator icon to bring up the load estimation window. Depending on the installed
old system, the customer has invoices for the consumption of gas (expressed in m3 or kWh), fuel
(expressed in liter), electricity (expressed in kWh), LPG (expressed in liter or kg) or pellets
(expressed in kg). The settings in the preferences window (see section 3.6 and Figure 22) define
the boiler efficiencies and the conversion factors to energy.
Using these data, Daikin Altherma calculates a first estimation. In Figure 24, the estimation for
an annual consumption of 750m3 gas is 5.0kWh for space heating. However, when the installed
old system is also using gas for the production of domestic hot water, it is necessary to find out
how much gas is actually used for space heating.
25 February 2014
Page 19
Making a Selection
To that purpose, you need to check the "Energy consumption includes DHW" checkmark, to
display a table to select a tapping pattern, defining a typical use of domestic hot water. Daikin
Altherma offers a few predefined tapping patterns, but also allows entering a specific tapping
pattern. Section 4.4 explains in more detail how to do that.
Using the selected or defined tapping pattern, Daikin Altherma corrects the initial estimation.
When closing the load estimation window, Daikin Altherma copies the calculated capacity into
the required heating capacity field of the main window.
4.3
Selecting the Different Systems
As explained in section 1.1, Daikin Altherma offers several basic systems, depicted in Figure 1,
Figure 2, Figure 3, Figure 4, Figure 5 and Figure 6 respectively. The screen parts shown in this
section explain how to make their selection.
4.3.1 Mono Bloc Systems
In addition to the conditioned surface and
required heating capacity, you click the
application (heating only or heat pump), select the
heating solution, the system layout, possibly the
water temperature range (see section 4.1) and the
available power supply. Finally you define
whether or not you need a domestic hot water
tank. The actual water tank selection occurs in a
separate tab (see section 4.4). Figure 25 shows a
completed settings tab for the selection of heating
only mono bloc systems.
Daikin Altherma guides the selection from top to
bottom. When you finally click on one of the Figure 25: Selecting mono bloc systems
domestic hot water radio buttons (Yes or No),
Daikin Altherma calculates all possible solutions for this selection (see chapter 5).
4.3.2 Wall Mounted Low Temperature (LT) Systems
Figure 26 shows the selection of a low
temperature system, which is very similar to a
mono bloc system selection. As Daikin Altherma
offers both wall mounted and integrated low
temperature systems, you have to select the indoor
unit placement (wall mounted). The other fields
are identical to a mono bloc selection.
Figure 26: Selecting LT, wall mounted systems
25 February 2014
Page 20
Making a Selection
4.3.3 Integrated Low Temperature (LT) Systems
In a low temperature system with an integrated
water tank, the domestic hot water tank is not
optional. In fact, it is integrated in the indoor unit.
So, domestic hot water selection criterion
disappears and is replaced by a message, as
shown in Figure 27.
Figure 27: Selecting LT, integrated systems
4.3.4 High Temperature (HT) Systems
The water temperature of a high temperature
system is considerably higher (see Figure 28) than
the previous systems. Whereas the other Daikin
Altherma systems help in heating up the domestic
hot water using their spare capacity, high
temperature Daikin Altherma systems fully heat
up the domestic hot water.
Figure 28: Selecting HT systems
4.3.5 Hybrid Systems
Although it is possible to
select a hybrid system to cover
a 3.2kW heating capacity, the
resulting system is largely over
dimensioned (see Figure 29).
In fact, a hybrid system can
deliver 27.0kW. So, only
consider hybrid systems when
the required capacity is closer
to 27.0kW.
Too small for hybrid
Note that a hybrid system does
not take the percentage into
account be covered by a heat Figure 29: Selecting hybrid systems
pump (see section 3.5).
A hybrid system uses two heat sources: a heat pump, using electricity and a gas boiler. When the
temperature is too low for a heat pump, the hybrid system will use the gas boiler. However, when
there is a choice (heat pump or gas boiler), there are two possible operation modes:
25 February 2014
Page 21
Making a Selection
1. Economical mode: depending on the prices entered for electricity (see section 3.3) and gas
(see section 3.6), Daikin Altherma will use the cheapest one.
2. Ecological mode: depending on the CO2 emission factor (see sections 1.3 and 3.6) and the
primary energy factor (see section 1.3), Daikin Altherma will use the one producing the least
CO2.
The selected operation mode determines the calculated total energy consumption cost of the
hybrid system.
4.3.6 Ground Source (GS) Systems
Selecting a ground source system is almost
identical to selecting a low temperature system
with integrated water tank (see Figure 30).
However, you must enter a brine temperature.
This value may range from -5°C to +10°C. The
higher this temperature is, the larger the available
capacities are. Note however, that this parameter
is bound to the installation. By default, this value
is set to 2°C.
Figure 30: Selecting GS systems
4.3.7 Heat Pump Systems
Heat pump systems use a reversible indoor unit,
allowing space heating and cooling. So, youalso
have to enter the required cooling capacity (see
Figure 31). As for heating, it is also possible to
change the water temperature, which should be
done with extreme care and only for specific finetuning purposes.
There are heat pump selections possible for mono
bloc and low temperature systems.
4.3.8 Bivalent Systems
Figure 31: Selecting heat pump systems
A bivalent system consists of a Daikin Altherma system complemented with a second heat
source, as shown in Figure 32.
As this second heat source is not integrated in a Daikin Altherma system, you need to define its
heating capacity. To cover the required heating capacity, Daikin Altherma will then use this
second heat source for all ambient temperature values below the equilibrium point (see Figure 9)
and the selected Daikin Altherma system (a LT Mono Bloc in Figure 32) the ambient
temperature values above the equilibrium point.
To make sure Daikin Altherma finds a solution, the percentage covered by the heat pump defined
in the Preferences window (see section 3.5) must be set to 50%. In fact, both systems (Daikin
Altherma and a boiler) will probably be operational about halve of the time.
25 February 2014
Page 22
Making a Selection
Figure 32: Selecting bivalent systems
4.4
Domestic Hot Water Tank Selections
Daikin Altherma offers a whole set of different water tanks. To select the required water tank,
you must make several choices as shown in Figure 33:
Figure 33: Selecting a water tank and tapping pattern
- Depending on the water tank type, there are three possible heat sources to warm up the
domestic hot water: the Daikin Altherma system, solar water panels and an electric heater.
Some water tanks allow combining these three heat sources, others two (Daikin Altherma
system and solar water panel or Daikin Altherma system and electric heater) and still others
only connect to a Daikin Altherma system.
- The selected tank material has an influence on the price of the solution. In some cases, the
selected tank material also lead to different tank types.
- The tank type only appears if there are several tanks with the same tank material. The current
database shows stainless steel tanks with two possible types: a standard and a design tank.
- A more important criterion is of course the tank volume. You can select one of the available
tank volumes. Typical values are 150L, 200L and 300L.
- Finally, the selected power supply defines the tank to use for the possible solutions.
25 February 2014
Page 23
Making a Selection
An extra way to help defining the tank is finding out the (minimum) required consumption of
domestic hot water. Daikin Altherma offers a set of tapping patterns or allows you entering a
specific tapping pattern. A tapping pattern defines different types of domestic hot water
consumption per day at different water temperature values.
After having selected a tapping pattern, Daikin Altherma calculated the total amount of water
used and the energy consumption required to produce this amount. When selecting a domestic
hot water tank that is smaller than the calculated amount of water, the customer most probably
will have to cope with periods without domestic hot water, as all the water has been consumed
before any heat source could warm up the cold water replacing the consumed one.
A Daikin Altherma system normally uses its spare capacity to help warming up the domestic hot
water. For the design stainless steel domestic hot water tanks this spare capacity is not enough.
So, Daikin Altherma must take some extra capacity into account when calculating its solutions.
This extra capacity is defined for the design temperature, that is the coldest hour of the year,
which probably occurs during the night or the first hour after sunrise.
To calculate this required extra capacity, Daikin Altherma uses the result of the tapping pattern.
The result of this calculation is the extra capacity on top of the required capacity for space
heating. Figure 34 shows the two extra messages displayed in such case: you required a capacity
of 6kW at the design temperature. However, by selecting a design tank, the total capacity the
Daikin Altherma system must cover at the design temperature is 3.6kW, an extra 0.4kW.
Figure 34: Domestic hot water tank required extra capacity from a Daikin Altherma system
The calculation of the required extra capacity uses an absolute maximum energy consumption of
100kWh for a domestic hot water tank, which is a very high figure corresponding with daily
domestic hot water consumption of 2865liter.
25 February 2014
Page 24
Making a Selection
After having selected the domestic hot water tanks and entered the required tapping pattern,
Daikin Altherma calculates the possible solutions and shows them in the results tab, explained in
the next chapter.
Figure 35 shows the domestic hot water tab for an integrated tank. In that case no tank selection
is possible. In fact, the tank volume is now connected to the size of the backup heater. So, Daikin
Altherma proposes solutions containing the valid combinations of water tank volumes and
backup heaters.
No selection for integrated tanks
Figure 35: Selecting an integrated domestic hot water tank
Instead of using a predefined tapping pattern, you may also select a custom pattern, as shown in
Figure 36:
Figure 36: Defining a customized tapping pattern
In that case, you have to fill in how many times per day the customer uses domestic hot water
and for what purpose. Entering a value immediately updates the totals.
25 February 2014
Page 25
Showing the Solutions
5
Showing the Solutions
This chapter explains how Daikin Altherma shows the resulting solutions, what graphical data
are available about the selected solution, how to gather solutions in a solution basket for
reporting and how to produce a report. Each of these actions are grouped in tabs, which are
explained in the next sections.
5.1
The Results Tab
Daikin Altherma always considers all Daikin Altherma systems that correspond to the selected
criteria. It then checks if each of these systems cover the required capacity for each hour of the
heating season, either only by the heat pump or by the combination of the heat pump and the
backup heater.
Some of the Daikin Altherma systems may be too small or may need more backup capacity than
allowed (see section 3.5). Those solutions are marked in the list with a red cross. The solutions
that comply are then sorted according to the order defined in the calculation parameters tab of the
preferences screen (see section 3.5) from which Daikin Altherma selects the best solution.
Finally Daikin Altherma sorts the solutions according to the investment cost to display them in
the result tab. This tab contains three different parts, as shown in Figure 37:
Solution according to the sorting criteria
defined in the calculation parameters tab
of the preferences screen
Figure 37: The result tab with the list of solutions and the data about the proposed solution
5.1.1 The Schematic Solution
The upper left part in Figure 37 shows the scheme of the selected solution, which is similar to the
pictures shown in section 1.1. At the bottom of that picture two red icons appear: one for the
outdoor unit and one for the indoor unit (hydro box). These icons stand for Internet and Extranet
connections showing more information about these devices.
25 February 2014
Page 26
Showing the Solutions
Figure 38 shows how to get this extra information:
Figure 38: Getting more information about a device through Internet or Extranet
5.1.2 The Result Graph
The upper right part in Figure 37 shows the graph for the selected solution, which is similar to
the graphs in section 1.1.5 (Figure 9 and Figure 10).
- The legend at the bottom of the graph explains the colors used.
- The graph also contains specific points: the design temperature with required capacity, the
design capacity with extra capacity for a domestic hot water tank (if any) and the equilibrium
point.
- At the bottom left of the graph,
Daikin Altherma displays the
calculated seasonal COP, the
produced thermal energy and the
number of hours of a year the
backup heater was used.
- The graph also contains a blue
question mark icon, containing
text explaining in more detail the
different parts of the graph. For
the heating data, clicking this icon
would display the following text:
Figure 39: Explanation of the terms in the result graph
25 February 2014
Page 27
Showing the Solutions
5.1.3 The Solution List
The list at the bottom in Figure 37 shows all possible solutions.
- If a solution does not comply, Daikin Altherma prefixes it with a red cross. If you only want
to see valid solutions, the top of the list contains the "Only valid solutions" checkmark.
Checking it removes all solution s prefixed by a red cross.
- Daikin Altherma prefixes the proposed solution with a green arrow (see Figure 40, at the
bottom left). However, you may click on any other solution and confirm its selection as the
preferred one by clicking the "Accept Solution" button. The required solution in Figure 40 is
the system ERLQ011CAV3.
- You may change the initial sort order of the results by clicking a column header showing
calculated results, on which an upwards pointing blue arrow will appear, meaning that the
solutions are now sorted in increasing order of the selected column. Clicking the column
header a second time will sort the results in decreasing order. The list in Figure 40 is sorted in
ascending order for the column H%HP.
- Finally, you may click the "Add to Basket" command button. Daikin Altherma then copies the
selected solution – i.e. the one with the green arrow in the left column – to the solution basket
(see section 5.3). This is a list of solution s that will appear in a report (see section 5.4).
Figure 40: The different elements in the solution list
The table below shows the abbreviations used in the table column headers and their explanation
Abbreviation Explanation
Extra
Shows the extra heating capacity. For Daikin Altherma systems only, this is
mainly the backup heater capacity.
DHW
Domestic hot water tank.
H %HP
Percentage of the total required heating capacity covered by the heat pump.
H %Extra
Percentage of the total required heating capacity covered by the extra heater
source, which is mainly the backup heater.
H EnCns
Yearly energy consumption for heating.
H EnCost
Yearly energy cost for heating.
H SpCap
Spare capacity in heating, inclusive the extra heater source
SCOP
Seasonal COP, where COP stands for Coefficient Of Performance.
25 February 2014
Page 28
Showing the Solutions
Similar results appear when selecting a heat pump system for heating and cooling, as shown in
Figure 41:
Figure 41: The list of solutions for a heating and cooling selection
The upper right corner now contains two graphs: one for heating, similar to the one shown in
Figure 37, and one for cooling. The most important difference with heating is that there is no
equilibrium point for cooling. In fact, if the heat pump cannot deliver the required cooling
capacity, there is no extra cooling source helping it. So, in that case the solution is not accepted
and will be marked with a red cross.
Remark also that the Daikin Altherma system must provide the largest cooling capacity at the
highest ambient temperature, which is considered the cooling design temperature.
5.2
The Graphs Tab
Daikin Altherma produces seven different kinds of graphs. These contain extra information when
selecting a solution for heating and cooling instead of for heating only. Each graph contains a
blue question mark icon explaining it in more detail. The bottom of a graph shows a legend of
the colors used and may contain extra information, such as energy consumption results, split up
per outdoor unit and backup heater and for day and night operation. The next sub sections give
examples of each of the graphs.
25 February 2014
Page 29
Showing the Solutions
5.2.1 Operation Period
Figure 42 shows a graph with the simulated outdoor temperature variations within the defined
heating months. For heat pumps the graph also shows the temperatures in the cooling months.
Explains the graph
Explains the colors used
Figure 42: The operation period graph for heating and cooling
5.2.2 Heating energy cost
The graph in Figure 43 shows a comparison of the simulated annual running costs for Daikin
Altherma compared to other boiler types. The calculation is based upon the yearly-required
thermal input for the selected building, each systems coefficient of performance (without pump)
and the energy prices entered (see sections 3.3 and 3.6).
Figure 43: The heating energy cost graph
25 February 2014
Page 30
Showing the Solutions
5.2.3 Heating CO2 emission
The graph in Figure 44 shows a comparison of the annual CO2 emissions for Daikin Altherma,
and different boiler types, sized to cover the yearly heat load for the simulated building. Neither
Daikin Altherma nor the electric heater will have any direct emissions. The emission from these
systems is based on calculations according to the average CO2 emission from the selected
country's electricity production. A pellets boiler is considered as almost CO2 neutral.
Figure 44: The heating CO2 emission graph
5.2.4 Energy consumption per month
The graph in Figure 45 shows the energy consumption (input) per month for the heat pump and
back up heater. The graph splits u the results between day and night operations to take day and
night tariffs into account.
Figure 45: The energy consumption per month graph
25 February 2014
Page 31
Showing the Solutions
5.2.5 Energy cost per month
Figure 46 shows the running cost per month for Daikin Altherma using the electricity prices
entered and the power input as shown in the graph from the previous sub section 5.2.4.
Figure 46: The energy cost per month graph
5.2.6 Heating thermal output by source
Figure 47 shows the simulated thermal output in kWh for the heat pump and back up heater
through one year, either for the whole year or for the different electricity tariffs. The back up
heater is only operational at low temperatures. The main portion of the output is at moderate
temperatures where the heat pump can cover the entire heating requirement.
Three different results
Figure 47: The heating thermal output per source graph
25 February 2014
Page 32
Showing the Solutions
5.2.7 Energy consumption per surface
Figure 48 shows the total emitted energy per living surface per month. The required energy
varies with the buildings insulation standard and the weather conditions at the location.
Figure 48: The energy consumption per surface graph
5.3
The Solution Basket Tab
The solution basket is a kind of container to hold several selections, to produce a single report
containing these solutions and allowing a customer to compare them. The solution basket in
Figure 49 contains a mono bloc and a low temperature solution.
Solution basket editing commands
Figure 49: The solution basket containing two different solutions
The bottom of the screen contains four commands:
1. Edit: this command removes the solution from the solution basket, fills the selection criteria
having lead to this solution and performs the selection calculation again. The calculation may
give a different solution. In fact, after its calculations Daikin Altherma proposes a solution
that matches the closest the three sorting order criteria defined in the calculation parameters
tab of the preferences screen (see section 3.5). However, you may decide to select another
solution and store it in the solution basket. When editing that solution, Daikin Altherma will
25 February 2014
Page 33
Showing the Solutions
fill in the same selection criteria, but will find another more optimal solution. As such
situations may occur, Daikin Altherma requires a confirmation when you click this edit
command.
2. Remove: removes the selected solution from the solution basket.
3. Move up: moves up the selected solution in the solution basket. This changes the order of
solutions and may result in an easier comparison of the solutions.
4. Move down: move down the selected solution in the solution basket.
Daikin Altherma only allows making a report if there is at least one solution in the solution
basket.
5.4
The Reports Tab
Before making a report, Daikin Altherma checks if you filled in a project name, reference and
client name. To avoid switching back and forth between the settings tab – where those fields
appear – the reports tab repeats them, as shown in Figure 50:
Figure 50: The reports tab
The reports tab also contains several checkmarks defining the report contents. However, when
the solution basket contains several solutions, the first chapter of the report gives a solution
overview with a comparison table, as shown in Figure 51:
Figure 51: Example of a solution overview chapter
25 February 2014
Page 34
Showing the Solutions
The remaining of the report contains the following chapters
- Material list: a table with the different components of the solution: the heat pump, the indoor
unit, the bottom plate heater (if any) and the domestic hot water tank (if any). The table also
shows prices for the material cost and the installation cost, if these values have been filled in
(see section 3.2).
- Selection criteria: these are the criteria used in the settings tab (see section 4.3).
- Technical details: this chapter shows the technical
data coming from the Daikin database (see section
1.3). Figure 52 gives an example of the technical
details for a mono bloc selection.
- Domestic hot water: when the solution contains a
domestic hot water tank, Daikin Altherma adds
the selected tapping pattern (see section 4.4,
Figure 33) to the report, if that item has been
selected.
- Supplementary explanations: this is the text that
Daikin Altherma displays when clicking the
"Supplementary Explanations" command button
at the top of the main screen (see Figure 14). It
contains general information about how Daikin
Altherma makes its calculations, the assumptions
made, important settings to compare results with Figure 52: The technical details in a report
the results from gas and fuel boilers, …etc. Figure
53 shows the window appearing when clicking this "Supplementary Explanations"
command button
Figure 53: The supplementary explanations text
25 February 2014
Page 35
Showing the Solutions
- Field settings report: this chapter displays all settings on the Daikin Altherma system during
its commissioning and fills in the selection criteria if they are relevant for the commissioning.
Figure 54: An excerpt from the field settings report
- Information fiche for customers: this is a general text for the customers:
° For Daikin Altherma systems that are ECO label certified, it shows the measurement
conditions for which the data are valid.
° It explains how to reduce heat loss and solar gain of a building.
° It contains a fiche to fill in by the installer after commissioning.
Figure 55 shows the first page of the information fiche for customers for an installation
having a EU Ecolabel certification.
25 February 2014
Page 36
Showing the Solutions
Figure 55: The first part of the information fiche for customers
- Information fiche for installers: this is a three page text for installers, containing the
following sections:
° In the same way as for the customer information, this text starts with the measurement
conditions for which the data are valid for ECO label certified Daikin Altherma systems.
° Minimum information to be supplied by the manufacturer.
° Reducing the heat loss and solar gain of buildings
° Heat loss and sizing of the heating system. Figure 56 shows a few important paragraphs
from this section of the information fiche for installers.
Figure 56: Excerpt from section heat loss and sizing of the heating system
° Training for installers and drillers
- Information fiche for installers: these are the different graphs shown in section 5.2.
If there are several Daikin Altherma systems in the solution basket, all this information repeats
25 February 2014
Page 37
Showing the Solutions
for each of the systems.
Below the report settings, there are two command buttons (see Figure 50):
1. Create a report command button
Clicking this button creates a report after which Daikin Altherma starts MSword to open the
report.
2. Report headers and footers command button
This brings up a window, as shown in Figure 57, to define an extra logo in the headers and
add address information in the footers of the reports
Logo comes here
Header
Report page
Footer
Address comes here
Figure 57: Adding extra information in the report headers and footers
25 February 2014
Page 38
Multi-System Selections
6
Multiple System Selections
A single Daikin Altherma system may not cover the required capacity of large building. In that
case, you must select several Daikin Altherma systems. The sum of their capacities will then
cover the total required capacities.
6.1
Creating a Multiple System Solution
Figure 58 shows how to create multiple system solution:
Select system per system and
add it to the system basket
Figure 58: Creating a multiple system solution
- Check the "Use multiple systems" check mark. Daikin Altherm will then show to fields to
enter the total required heating and cooling capacities. If there is no need for a cooling
capacity, this field may remain zero.
- Now you can select a single system to cover the required capacity of a system. In Figure 58,
the required heating capacity for the mono bloc system is 5.7kW.
- Daikin Altherma calculates the possible solutions and indicates the accepted one with a green
arrow, in the same way as a regular selection (see chapter 4).
- Instead of adding the accepted solution to the solution basket, you now add it to the multiple
system by clicking the "Add to Multiple System" command button.
When checking the "Use multiple systems" check mark, Daikin Altherma replaces the solution
basket by a "Multiple System Solution" tab containing a table with the individual systems, as
shown in Figure 59. In this table, Daikin Altherma shows the total required capacity and reduces
it by the tolerance defined in the Preferences window (see section 3.5). It also shows the total
capacity covered yet.
- If this total is below the required capacity – the given tolerance (= 18KW in Figure 59), the
solution is marked with a red cross, as it is not yet completed.
- If this total is between the range of required capacity – the given tolerance to required
capacity (18kW to 20kW in Figure 59), the solution is accepted.
- If this total is larger than the required capacity (20kW in Figure 59), the solution is accepted,
but Daikin Altherma gives a warning of a possibly over dimensioned system.
25 February 2014
Page 39
Multi-System Selections
Figure 59: Combining the single systems into a multiple system solution
Note that a multiple system solution may consist of several different systems. In Figure 59, all
systems are mono bloc. However, it is perfectly possible to combine for instance a mono bloc
system with a low temperature system.
6.2
The Multiple System Graphs Tab
The multiple systems tab also three different graphs, which are explained in the next sub section.
6.2.1 Total Heating Graph
The total heating graph shows the total required heating capacity and the total delivered capacity
by the individual systems. This graph is calculated by distributing the total required load over the
systems, proportionally to the systems’ maximum capacity. This graph is very similar to the
graph in the result window, as shown in Figure 37.
Figure 60: The total heating capacity graph
25 February 2014
Page 40
Multi-System Selections
6.2.2 Total Cooling Graph
A similar graph is available showing the total cooling load (if any) and the covered cooling
capacity. This graph is similar to the graph in the result window, as shown in Figure 41.
Figure 61: The total cooling capacity graph
6.2.3 Energy Consumption per Month
The final graph in Figure 62 shows the total energy consumption per month and contains the
same details as the similar graph for individual systems (see Figure 45).
Figure 62: The total energy consumption graph
25 February 2014
Page 41
Special Operations
7
Special Operations
This chapter explains how to get a new Daikin Altherma version over an Internet connection,
making a MCS (Micro-generation Certificate Scheme) selection and how to create or use a
specific climate file.
7.1
Getting a New Version
When starting Daikin Altherma, the welcome screen (see Figure 13) contains the "Look for
upgrades now" command button to check available version. However, depending on the setting
of the "Always show this message when starting the program" checkmark, this screen may or
may not appear.
In case this screen does not appear, you first have to click the "About" command button (see
Figure 14), which brings up a screen as shown in Figure 63:
Figure 63: The about box with upgrade command button
This screen contains the "Upgrade" command button and clicking it will bring up a second
window to check the available versions. The "Disclaimer" command button brings up the same
screen as shown in Figure 12, but without the acceptance radio buttons. Instead it just contains a
"Close" command button.
A version consists of five parts:
1. The program name. In fact, the central server to download program versions from contains
different selection programs. So, the upgrade program must be able to select the correct one.
2. The program version. In Figure 63, the Daikin Altherma program version is 3.8.0.
3. The program language. Daikin Altherma comes in different language versions (English,
French, …etc). In Figure 63, the Daikin Altherma language is English.
4. The configuration used for filtering of the devices. Depending on the region, Daikin may
decide whether or not to offer specific devices. For example, it has no sense to provide Daikin
Altherma heat pumps with a bottom plate heater in the South of Europe, as bottom plate
heaters are only necessary on locations with very low ambient temperature values. The set of
available devices are defined in configurations. The default configuration contains all devices.
5. The version number of the central database (8.6.5. in Figure 63).
25 February 2014
Page 42
Special Operations
Click the "Look for upgrades now" command button in the Welcome screen or the Upgrade"
command button in the About screen, to bring up a screen as shown in Figure 64:
Must contain a valid server name
List of available versions
Figure 64: The version upgrade screen
At the top its show the name of the server where to check for new versions. In Europe, this server
is called DENV. If that field shows n/a, the version was not an official Daikin version and cannot
upgrade to a new version. Below the server name are the different parts making up a version.
The download section defines what configurations to look up. Each country may have versions
that only are available for that country. You may also select the language of the software. This
language may differ from the official languages used in the selected country. The check mark
"Show Sublanguages" not only shows the available languages, but also variants of a language
(e.g. English UK and English US).
Daikin Altherma automatically looks up the available versions for the given country and
language. If there are no new versions available, it will give a message as shown in Figure 65,
before displaying the window from Figure 64:
Figure 65: No new versions available
25 February 2014
Page 43
Special Operations
Figure 66 shows the same window as in Figure 64, when upgrading from an older version of
Daikin Altherma. The list at the bottom now contains three possible versions, with at the right a
description. As this description may become long, the "Configuration Description" command
button brings up a window containing the complete description text.
Figure 66: Upgrading to a newer version
The "Download Selected Version" command button brings up a confirmation window. When
clicking the "Yes" button, a last window appears, as shown in Figure 67:
Figure 67: Notice about collecting statistics data
25 February 2014
Page 44
Special Operations
It explains that Daikin Altherma is collecting statistics data during its execution and sends these
to the Mantra server, together with the version, the configuration, the language, …etc. These data
are used to perform an analysis about the use of Daikin Altherma, the kind of projects developed,
…etc. If you do not agree with sending this information, Daikin Altherma does not download a
new version.
After having accepted the conditions shown in Figure 67, Daikin Altherma starts the download
of the new version, stops itself and starts the new version. On a normal Internet connection, this
process takes less than one minute.
7.2
Making an MCS Selection
Some location definitions in the company database (see section 1.3) contain an MCS (Microgeneration Certificate Scheme) temperature. When a location contains such a temperature,
Daikin Altherma slightly changes the selection rules:
- From the MCS temperature on, the Daikin Altherma system must cover the required capacity
and all capacities up to zero heating temperature only using the heat pump capacities. This
means that the backup heater can only be used for temperature values below this MCS
temperature.
- Daikin Altherma extrapolates the required capacity for the lowest ambient temperature value
in the climate file. This was the original design temperature. The Daikin Altherma system
must still cover this extrapolated capacity as well, but may used its backup heater if needed.
- The required capacity must be covered at the MCS temperature using the maximum water
temperature defined in the setting tab (see for instance Figure 25). For ambient temperature
values lower than the MCS temperature, the maximum water temperature must also be
extrapolated. However, this may lead to a water temperature outside the capacity table. In that
case, Daikin Altherma will give a message that no selection is possible.
Figure 68 shows the resulting graph from the result tab:
Extrapolated capacity
Required capacity
Figure 68: The result graph when using a MCS selection
- The MCS temperature will always be on or at the right of the equilibrium temperature.
- The MCS temperature is a certified temperature and depends on the location.
- In Figure 68, the required heating capacity at the MCS temperature is 5.0kW. The
extrapolated capacity is 6.3kW at the design temperature i.e. the lowest ambient temperature
for the selected location.
25 February 2014
Page 45
Special Operations
7.3
Using Specific Climate Data
Next to the location selection in the settings tab, the "Edit" command button allows editing these
ambient temperature and CO2 limits. Clicking it to brings up the window of Figure 69:
Figure 69: Editing climate data
- The minimum and maximum ambient temperature values in the winter and summer and for
day and night come from ASHRAE. These are extreme values that have been averaged over a
number of years. This edit screen allows you changing them and will have an immediate
influence on the selection. So, you should be extremely careful when changing these values.
- The CO2 value is typical per region and comes from Eurelectric. It depends on the number of
power plants and the power plant types used within that region.
- The PR factor is typical per region and comes from Eurelectric as well. It depends on the
distance to transport electrical energy from the power plant to the end user destination.
When using an edited climate file, the button next to the "Edit" button becomes active. This is
the "Remove" button. Clicking it removes the edited climate data and reverts to the original data.
Figure 70 show two other possible actions on the climate data provided by default:
1. Checking the "MCS temperature" checkmark shows an edit field to enter the MCS
temperature. This should be used with extreme care, as MCS temperature values are certified
values. You must make sure to enter the correct MCS temperature for the specific location.
2. Checking the "Use climate file" checkmark allows importing climate files from VRV_Pro.
Some affiliates have purchased climate files from the meteorological institutes and imported
them for VRV_Pro. Using the "Browse" command button, Daikin Altherma imports these
VRV_Pro cls files.
25 February 2014
Page 46
Special Operations
Figure 70: Adding MCS or importing a climate file
25 February 2014
Page 47
Borehole Dimensioning
8
Borehole Dimensioning
When adding a ground source system to the solution basket (see section 5.3), Daikin Altherma
displays an extra "Borehole Dimensioning" command button, as shown in Figure 71:
Figure 71: The solution basket showing the borehole dimensioning command
Clicking this button brings up a window, as shown in Figure 72, in which you first select the kind
of borehole (vertical or horizontal) at the left side. Depending on this selection, Daikin Altherma
shows a conceptual drawing of the borehole, on which it indicates the data to enter.
Figure 72: Selecting a vertical borehole dimensioning
The part below that that drawing consists of two parts: a data entry part and the results part:
1. Data entry
Daikin Alterma needs two data to calculate the borehole depth: the kind of bedrock and the
25 February 2014
Page 48
Borehole Dimensioning
borehole diameter. Daikin Altherma fills in the borehole diameter in Figure 72 with a default
value of 0.14m. You can select the kind of bedrock from a list of definitions or enter your own
definition, as shown in Figure 73:
Filled in
Selecting a bedrock type
To fill in
Entering a bedrock type
Figure 73: Selecting or entering the kind of bedrock
2. Results part
Once both data have been filled in, Daikin Altherma calculates the required borehole depth,
together with a few selection results that are used for that calculation, as shown in Figure 74:
Figure 74: Vertical borehole results
- The borehole depth is the depth of the vertical borehole in the selected bedrock and with a
given diameter (e.g. 0.14m).
- The average incoming brine temperature is the brine temperature used to select the ground
source system. You define its value in selection part of a ground source system, as shown in
Figure 30.
- The energy taken out per year is the sum of the space energy taken out and the domestic hot
water energy taken out.
° The space energy taken out is the total thermal energy delivered to the space to heat minus
the electrical energy needed to produce this thermal energy:
TotalTherm alEnergy Space
ThermalEne rgy Space = TotalTherm alEnergy Space −
COPSeasonal
25 February 2014
Page 49
Borehole Dimensioning
° The domestic hot water energy taken out is calculated in a similar way:
TotalTherm alEnergy DHW
ThermalEnergy DHW = TotalTherm alEnergy DHW −
COPDHW
The COPDHW is the performance factor of the domestic hot water tank, which is 2.68 for
the water tank of a ground source system.
- The average power is the energy taken out divided by the running hours of the system. This
includes the hours to heat up the space as well as the hours to heat up the domestic hot water
at moment there is no need for space heating: outside the heating season or when the ambient
temperature becomes too high during the heating season (e.g. a hot day in the spring).
Figure 75 shows the borehole dimensioning window when selecting a horizontal borehole:
Figure 75: Selecting a horizontal borehole dimensioning
You now have to enter three data:
1. The kind of soil, which you can either select from a list or enter the conductivity and latent
heat data for a specific kind of soil.
2. The pipe depth, which is filled as 1m by default.
3. The center-to-center pipe distance, which is equally filled in as 1m by default.
With those data Daikin Altherma then calculates the total length of pipes in the selected soil and
displays the same data as for a vertical borehole dimensioning. In fact, these other data are
independent of the selected borehole dimensioning.
25 February 2014
Page 50