1
203Z User Guide
1
Introduction
Introduction.........................................................................3
Getting Started
Parts & Functions.............................................................. 6
Display..................................................................................7
USIM Card............................................................................ 8
SD Card................................................................................ 9
203Z User Guide Contents
Charging Battery.............................................................. 11
Charging Mobile Phone or Smartphone........................... 13
Power On/Off................................................................... 14
Settings on Wi-Fi Router................................................ 15
Confirming on Wi-Fi router............................................. 26
Connecting with WLAN
WLAN (Wi-Fi).....................................................................32
Activating WLAN (Wi-Fi) Function..................................32
Connecting Windows PC................................................... 33
Connecting Mac.................................................................37
Connecting iPhone/iPad....................................................38
Connecting Android™ Device........................................... 40
Connecting Nintendo 3DS LL/3DS/DSi LL/DSi/DS..........41
Connecting PSVITA/PSP ® ................................................. 48
Connecting PS3 ® ...............................................................52
Connecting WPS Supported WLAN Devices..................... 54
Connecting with Micro USB Cable (Windows)
USB Connection with a Windows PC............................... 56
Device Recognition/Removal on Windows PC..................56
Software Installation (Windows).................................... 58
Connecting with Micro USB Cable (Mac)
USB Connection with a Mac.............................................62
Device Recognition/Removal on Mac............................... 62
Setup for Mac...................................................................64
Settings
Overview of WEB UI.........................................................66
WEB UI Window.................................................................69
Checking Device Information........................................... 72
Sharing SD Card, Managing Files.....................................77
Quick Settings.................................................................. 87
Setting 4G/LTE/3G.......................................................... 89
Setup of Data Traffic..................................................... 97
Internet Wi-Fi................................................................... 99
LAN Wi-Fi........................................................................108
Firewall............................................................................ 117
Settings for Router....................................................... 122
Settings for Ethernet....................................................124
Advanced Settings..........................................................127
Mobile Utility..................................................................133
Troubleshooting.............................................................. 138
Specifications..................................................................140
Settings on WEB UI........................................................141
SoftBank 203Z
Appendix
2
Glossary........................................................................... 148
Warranty & Service........................................................ 149
Customer Service............................................................ 149
Safety Precautions
Safety Precautions......................................................... 152
General Notes................................................................. 158
RF Exposure Information/Specific Absorption Rate (SAR)
Information..................................................................... 159
3
Introduction
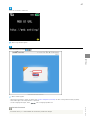
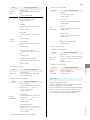
Introduction
Use Wi-Fi router in any of these operating environments.
Use outside these environments may affect performance.
Read "Safety Precautions" and this guide thoroughly
Operating environment (hardware, connected peripherals,
beforehand for proper usage.
installed applications, etc.) may also affect performance.
Accessible services may be limited by contract conditions.
Introduction
Before You Begin
Operating Environment (Compatible
OSs)
・For computer support, OS version upgrade information,
etc., see corresponding manufacturer's product support
Guide Usage Notes
Most operation descriptions are based on default settings.
documentation.
・The information for operating environment (compatible
OSs) listed here is the current information for Wi-Fi router
sold as of August 2013. Check ZTE Japan Customer Support
Website (Japanese) for the latest information in regards to
Screenshots & Key Labels
operating environment.
Item
Screenshots and Key labels are provided for reference only.
Description
Windows XP Home Edition Service Pack 3
Actual windows, menus, etc. may differ in appearance.
Windows XP Professional Service Pack 3
Windows XP (64-bit)
Windows Vista Home Basic (32-bit or 64-
Other Notations
bit)
Windows Vista Home Premium (32-bit or
This product is referred to as "Wi-Fi router" in this guide.
64-bit)
microSD™/microSDHC™ card is referred to as "SD Card."
Windows Vista Business (32-bit or 64-bit)
Compatible
Operating
Systems
Windows Vista Ultimate (32-bit or 64-bit)
Windows 7 Starter (32-bit)
Windows 7 Home Basic (32-bit or 64-bit)
Windows 7 Home Premium (32-bit or 64bit)
Windows 7 Professional (32-bit or 64-bit)
Windows 7 Ultimate (32-bit or 64-bit)
Windows 8 (32-bit or 64-bit)
Windows 8 Pro (32-bit or 64-bit)
Mac OS X 10.6 to 10.8
Compatible OS includes both English and
Japanese versions.
Available Hard
Disk Capacity
Recommended
Resolution
50 MB required (100 MB+ recommended)
(common to all Operating Systems listed
above)
1024 x 768 or higher
Microsoft Internet Explorer 7.0 or later
Compatible
Browser
Mozilla Firefox 22.0 or later
Safari 4.0 or later
Opera 15.0 or later
Google Chrome 28.0 or later
SoftBank 203Z
4
Package Contents
The following items are included in the package. Please
confirm package contents before use. Contact "Customer
Service" for missing items.
Keep accessories including Warranty in a safe place.
Wi-Fi router has an irremovable Internal Battery.
・203Z
・AC Charger (ZECAP1)
・Micro USB Cable (ZEDAD1)
・クイックスタート(準備編) (Japanese)
・クイックスタート(接続編) (Japanese)
・お願いとご注意 (Japanese)
・Warranty (Wi-Fi router, AC Charger)
・WLAN Initialization Sticker
Trademarks
・ZTE, ZTE中興, and ZTE logo are trademarks or registered
trademarks of ZTE Corporation in China/other countries.
Copyright © 2013 ZTE Corporation. All rights reserved.
・SoftBank, SoftBank's equivalent in Japanese and the
SoftBank logo are registered trademarks or trademarks of
SoftBank Mobile Corp. in Japan and other countries.
・Microsoft ® , Windows ® , Internet Explorer, Windows Vista ®
are registered trademarks of Microsoft Corporation in the
United States/other countries.
Microsoft Windows Operating System is indicated in its
abbreviated form as Windows.
・The trademark "iPhone" is used with a license from Aiphone
K.K., and iPhone, iPad, and Multi-Touch are trademarks of
Apple Inc. TM and © 2011 Apple Inc. All rights reserved.
・Apple is a trademark of Apple Inc.
Factory Default Settings
When connecting Wi-Fi devices to Wi-Fi router, SSID (network
name) and security key are required.
See WLAN Initialization Sticker for default SSIDs and security
keys.
・Two SSIDs are set to Wi-Fi router. By default, WPA is set as
security for both SSID A and SSID B.
・For greater security, use WPA/WPA2. Some game consoles
may not be WPA compatible. See game console user guide for
compatibility.
SSID A
SSID A security key (WPA)
SSID B
SSID B security key (WPA)
Getting Started
・Wi-Fi router accommodates software updates. Use the
latest software.
・Note that connection speeds may drop or connections
may be disabled depending on line traffic or connection
environments.
・When using WLAN overseas, change the settings according
to the laws of those countries.
・PlayStation, PSP, and PS3 are registered trademarks of Sony
Computer Entertainment Inc. PSVITA is a trademark of Sony
Computer Entertainment Inc.
・Nintendo 3DS LL, Nintendo 3DS, Nintendo DS, Nintendo
DSi LL, Nintendo DSi, and Nintendo Wi-Fi Connection are
registered trademarks or trademarks of Nintendo.
・microSD and microSDHC logos are trademarks of SD-3C, LLC.
・"Android™" is a trademark or registered trademark of
Google Inc.
・The names of companies, products, and services use in
this guide are registered trademarks or trademarks of the
respective companies.
Getting Started
Parts & Functions.............................................................. 6
Display..................................................................................7
USIM Card............................................................................ 8
SD Card................................................................................ 9
Charging Battery.............................................................. 11
Charging Mobile Phone or Smartphone........................... 13
Power On/Off................................................................... 14
Settings on Wi-Fi Router................................................ 15
Confirming on Wi-Fi router............................................. 26
6
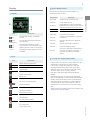
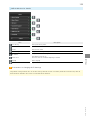
Parts & Functions
Touch Keys
Front/Top/Bottom
Parts
Part
Description
Display
Wi-Fi router status appears
SD Card
Slot
USIM Card
Slot
External
Device Port
Power
Supply Port
Install USIM Card
(
Connect Micro USB Cable
(
)
Power Key
(
Description
Press more than 3 seconds to restart Wi-
)
Press to turn Display off/on
Press to wake from Sleep mode
Slide to power ON/OFF Wi-Fi router
Touch more than 3 seconds to go back to
Select upper item or increase number by
one (zero appears next to nine)
)
Select lower item or decrease number by
one (nine appears next to zero)
)
ENTER Key
Insert specified cable
Go back to previous window or input field
main window
DOWN Key
Fi router
INFO Key
(
)
UP Key
Install SD Card
Part
Restart
(
(
Keys
Key
BACK Key
Description
)
Confirm selection, and proceed to the next
window or input field
7
Display
Status Notifications
Wi-Fi router gives information on communications and
Display
malfunction statuses via texts.
Notification
Description
SoftBank 4G or ULTRA SPEED area
DATA SUB
ULTRA SPEED sub area
Signal detected, but service unavailable
No Service
(Immediately after moving into the service
area from outside the service area, etc.)
Item
Description
Communication, battery, and message
Icons
statuses
Text messages regarding communication
Status
notifications
Data
and malfunction
Out of Service
No signal
Insert USIM
USIM Card not installed
Invalid USIM
Invalid USIM Card installed
Enter PIN
Enter PUK
PIN entry required (PIN entry is required
on WEB UI)
PUK entry required (PUK is required on
WEB UI)
Data communication volume for Data
USIM Busy
Reading from/writing to USIM Card
traffic/Maximum traffic, and Data traffic
USIM Lock
USIM Card completely locked
transfer
regarding Maximum traffic via bar display
volume
(bar becomes red when Maximum traffic is
USIM Card is permanently locked because
PUK Lock
exceeded)
Getting Started
DATA MAIN
PUK entry was incorrect ten times in a
row (USIM Card needs to be changed
(paid))
Icons
Turning off Display/Sleep Mode
Icon
Description
Mobile network reception level
Out of service area
Connected Internet Wi-Fi/Internet Wi-Fi
reception level
Internet Wi-Fi disabled
Appears when roaming
Battery full
Battery low
No battery (charging required)
,
or
・If Wi-Fi router is not used for 1 minute, Display turns off
automatically. Press INFO key to illuminate Display.
・If not using or charging Wi-Fi router for a while with
no connected WLAN devices, Wi-Fi router enters Sleep
mode after Display has turned off to save power. (Sleep
activation timer is set to 1 minute by default.)
・After Wi-Fi router enters Sleep mode, WLAN becomes
disabled.
・Pressing INFO key will turn on Display and cancel Sleep
mode. After Sleep mode is canceled, WLAN becomes enabled
and Wi-Fi router will be able to connect to WLAN devices.
・Some WLAN devices can disconnect the WLAN connection
if there has been no data communication for a while. If
Connected Network
Connected to Internet Wi-Fi
Connected to Internet
disconnected by such a device, Wi-Fi router enters Sleep
mode.
・Change the setting for sleep activation timer on Web UI. See
"Sleep Timer Setting (Sleep Mode)."
Unconnected to Internet
Connected WLAN devices
WLAN disabled
Software update available
There is a message
Can supply power
SoftBank 203Z
Cannot supply power
8
USIM Card
USIM Card is an IC card that contains customer information
including phone number.
Handling USIM Card
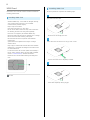
Installing USIM Card
Be sure to power off to perform the following steps.
Open USIM Card Slot Cover
・SoftBank Mobile Corp. is not liable for damages resulting
from installing USIM Card into an IC card reader
manufactured by another company.
・Keep IC chip surface clean.
・Clean USIM Card with a dry, soft cloth.
・Do not attach label on USIM Card. May cause malfunction.
・For handling, see USIM Card user guide (Japanese).
・USIM Card is the property of SoftBank Mobile Corp.
・Reissue of USIM Card due to loss or damage incurs a charge.
・Be careful not to damage your nails.
・Return USIM Card when canceling subscription.
・Returned USIM Cards are recycled for environmental
conservation.
・Specifications and capabilities are subject to change
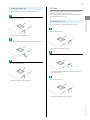
Insert USIM Card into Slot with IC chip up until it clicks
without notice.
・Keep a copy of information saved to USIM Card. SoftBank
Mobile Corp. is not liable for damages incurred due to loss
of saved information.
・In case USIM Card or Wi-Fi router (USIM Card inserted) is
lost or stolen, urgently request to have usage suspended.
Contact "Customer Service," General Information.
・Power off Wi-Fi router before removing/installing USIM
Card.
・Confirm that USIM Card is completely installed.
Close USIM Card Slot Cover
IC card
・Close Cover completely leaving no gaps.
9
Removing USIM Card
Be sure to power off to perform the following steps.
SD Card
With SD Card, Wi-Fi router can be used as USB storage by a
computer connected via Micro USB Cable.
Wi-Fi router accepts SD Cards up to 32 GB. Compatibility is
not guaranteed with all SD Cards.
Open USIM Card Slot Cover
Be sure to power off to perform the following steps.
Open SD Card Slot Cover
Getting Started
Installing SD Card
・Be careful not to damage your nails.
Push USIM Card and release slowly, and then remove USIM Card
・Be careful not to damage your nails.
Insert SD Card into Slot with metal terminals up until it clicks
Close USIM Card Slot Cover
・If SD Card is released before being completely locked, SD
Card might pop out.
・Close Cover completely leaving no gaps.
Close SD Card Slot Cover
・Close Cover completely leaving no gaps.
SoftBank 203Z
10
Removing SD Card
Be sure to power off to perform the following steps.
Cautions for SD Card Usage
Installing/Removing SD Card
Do not use excessive force when installing/removing SD
Card; may injure hands and fingers or damage SD Card.
Open SD Card Slot Cover
Do not install SD Card with excessive force. Do not
misplace a removed SD Card.
Data Backup
Data saved to SD Card may be lost or altered due to
accident or malfunction. Keep a copy of important data.
SoftBank Mobile Corp. is not liable for damages resulting
from loss or alteration of data.
・Be careful not to damage your nails.
Operations while Reading/Writing Data
Never power off while reading/writing data. It may damage
saved data or cause malfunctions.
Push SD Card and release slowly, and then remove SD Card
Battery Level
Data may not be read/written correctly if Battery is low.
・If SD Card is released before being completely locked, SD
Card might pop out.
Close SD Card Slot
・Close Cover completely leaving no gaps.
11
Charging Battery
Wi-Fi router is not charged fully at time of purchase. Charge
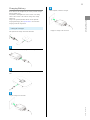
When complete, remove AC Charger
Battery before using.
Also, Battery discharges even if Wi-Fi router is not being
used. If Wi-Fi router is not used for a long time, charge
before use.
charging/discharging. See "Specifications" for estimated
charging times and usage times.
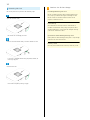
Using AC Charger
Use specified AC Charger and Micro USB Cable.
・Unplug AC Charger from AC outlet.
Getting Started
Usage times gradually become shorter due to repeated
Insert Micro USB Cable (USB plug) into AC Charger
Insert Micro USB Cable (Micro USB plug) into External Device
Port
Plug AC Charger into AC outlet
SoftBank 203Z
12
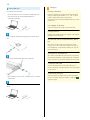
Using USB (PC)
Use supplied Micro USB Cable.
・Be sure to power on the PC to perform the following steps.
・USB charging may not be possible depending on PC
connection environment.
Charging
Charging Conditions
Under low temperatures charging performance decreases.
Charge in temperatures between -10 °C - +45 °C. Do not
charge in places where there is high humidity.
USB charging may be unavailable depending on Wi-Fi router
temperature.
Use Supplied Accessories
Always use supplied AC Charger or Micro USB Cable.
Charging with PC
Charging takes longer than with AC Charger. Time required
Insert Micro USB Cable (Micro USB plug) into External Device
depends on the connected PC.
Port
Wi-Fi Router and AC Charger Becoming Warm/
Hot
Wi-Fi router and AC Charger may become warm while
charging. This is not a malfunction. However, stop using
them immediately if they become extremely hot; they may
be malfunctioning.
Precaution for Extended Use
Wi-Fi router may become hot when used for a long time or
Insert Micro USB Cable (USB plug) into PC USB port
while charging, especially in high temperatures. Prolonged
contact with skin may cause low-temperature burn injuries.
Connecting USB Cable
Confirm that orientation of Micro USB Cable plugs is
correct. Connecting in wrong orientation may cause damage
or malfunction.
Display while Charging
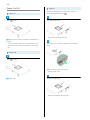
・Upon connecting the first time, the device driver is installed
automatically.
When complete, remove Micro USB Cable from PC and Wi-Fi
router
Animation appears on Display of Wi-Fi router even when
power is off. When charging is complete, "100%" and
appear on Display.
13
Charging Mobile Phone or
Smartphone
Wi-Fi router can be used as a mobile battery. Use a cable that
the mobile phone or smartphone specifies when charging them
from Wi-Fi router. Do not use supplied Micro USB Cable for
Wi-Fi router because it is for charging Wi-Fi router only.
function is ON. See "Setting Power Supply Function" to change
the setting.
See SoftBank Mobile Website (http://www.softbank.jp/
mobile/) to check models that can be powered from Wi-Fi
router.
Charging Conditions
Power supply is not possible when battery power is lower
than 30%.
Power supply stops when battery power becomes lower
than 30% when supplying power. To restart power supply,
remove Micro USB Cable from mobile phone or smartphone
and Wi-Fi router and charge Wi-Fi router to have 40% or
more battery power.
Restart Wi-Fi router if power supply is unavailable even if
Battery has 30% or more battery power.
Power supply is not available while Wi-Fi router is
charging.
Charging Mobile Phone or Smartphone
Getting Started
Power Supply function needs to be ON. Default of this
Charging Mobile Phone or Smartphone
Change Power Supply function to ON if set to OFF.
Use Specified Accessories
Insert USB plug of Micro USB Cable specified by mobile phone
or smartphone into Wi-Fi router Power Supply Port
Do not use supplied Micro USB Cable to charge a mobile
phone or smartphone manufactured by another company.
Use specified cable specified by the mobile phone or
smartphone.
Wi-Fi Router Becoming Warm/Hot
Wi-Fi router may become warm while charging. This is not
a malfunction. However, stop using it immediately if it
becomes extremely hot; it may be malfunctioning.
Connecting USB Cable
Confirm that orientation of Micro USB Cable plugs is
correct. Connecting in wrong orientation may cause damage
or malfunction.
Insert Micro USB plug of Micro USB cable into External
Connection Port of mobile phone or smartphone
Termination of Power Supply Due to Safeguard
Function
If the charging current required for the mobile phone or
smartphone exceeds Wi-Fi router’s supply current (1 A),
Wi-Fi router’s safeguard function works and may terminate
power supply functions.
Power supply begins.
When complete, remove Micro USB Cable from mobile phone or
smartphone and Wi-Fi router
SoftBank 203Z
14
Power On/Off
Power On
Slide
to ON
Restart
Perform the following steps to restart Wi-Fi router if it
cannot be powered on/off with
.
Open SD Card Slot Cover
・Be careful not to damage your nails.
WLAN function activates and connects automatically to
Internet.
・"Enter PIN" appears when PIN is set to USIM Card. Start
WEB UI and enter PIN. See "PIN Management" for setting
Press Restart Key for about 3 seconds with a fine-tipped
object.
PIN.
Power Off
Slide
to OFF
Wi-Fi router restarts automatically.
・Settings are not reset.
Power is off.
Close SD Card Slot Cover
・Close Cover completely leaving no gaps.
15
Precautions for Restarting Wi-Fi router
Pressing Key
Be careful not to hurt your fingers when pressing key.
Do not press the key strongly. It may cause damage.
Settings on Wi-Fi Router
Operate Display on Wi-Fi router to set ON/OFF for Internet
Wi-Fi, login password of SoftBank Wi-Fi spot, Maximum Data
Traffic, Reset Date, ON/OFF for showing data traffic, etc.
Note that operating of Display is disabled while operating
WEB UI. Log out from WEB UI to operate Display on Wi-Fi
router.
Do not use sharply pointed objects. They may cause
damage.
Using a pen or a pencil may deface the key with ink or
pencil lead.
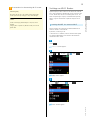
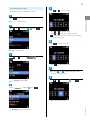
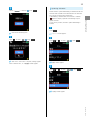
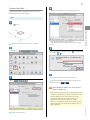
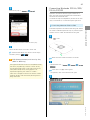
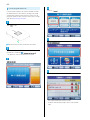
Setting ON/OFF for Internet Wi-Fi
Setting ON/OFF for Internet Wi-Fi enables/disables Wi-Fi
router to connect to the Internet.
By default, the setting is ON.
Getting Started
Tools
If Internet Wi-Fi is enabled, maximum communication speed
may decrease depending on the number of WLAN devices
connected to Wi-Fi router.
Touch
"メニュー" window appears.
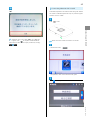
Touch
or
to select
設定
Touch
"設定" window appears.
Confirm
Wi-Fi
is selected
Touch
"Wi-Fi" window appears.
SoftBank 203Z
16
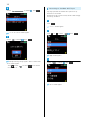
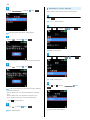
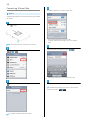
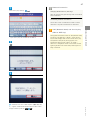
Connecting to SoftBank Wi-Fi Spot
Confirm
インターネットWi-Fi
is selected
Touch
Input login password for SoftBank Wi-Fi Spot and set up
connection in this window.
SoftBank Wi-Fi Spot function is ON by default. When changing
the setting, use WEB UI.
Touch
"メニュー" window appears.
"インターネットWi-Fi" window appears.
Confirm
ON
is selected
Touch
or
to select
設定
Touch
"設定" window appears.
Message indicating settings appears. About 3 seconds later,
"Wi-Fi" window appears.
・Touch
to select OFF and Touch
Confirm
Wi-Fi
is selected
to not connect
to Internet Wi-Fi.
"Wi-Fi" window appears.
Touch
Touch
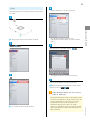
17
Touch
to select
ソフトバンクWi-Fiスポット
Touch
Touch
to go back to box on left.
Getting Started
・Touch
to move to next box
Confirmation window appears.
Repeat steps
Touch
to select
Yes
to
to enter four-digit password
Touch
Confirm password
Touch
in the last box (OK)
Input login password window appears.
・If skipping the setting, Touch
Touch
to select No and
.
Login password for SoftBank Wi-Fi Spot is set and message
appears. About 3 seconds later, "Wi-Fi" screen appears.
・Showing Input Login Password window again after setting
the password redisplays "0000."
Touch
or
・Touch
or
to toggle numbers.
・Touch
or
firmly until number is changed.
・
to select the login password number.
is unavailable to return to previous screen. Complete
the following steps first.
SoftBank 203Z
18
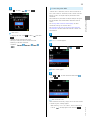
Setting Power Supply Function
Set whether or not to use Wi-Fi router as a mobile battery. By
Confirm
ON
is selected
Touch
default, setting is ON.
Touch
"メニュー" window appears.
Touch
or
to select
設定
Touch
Message indicating setting appears. About 3 seconds later,
"設定" window appears.
・If skipping the setting, Touch
Touch
to select OFF and
. When Wi-Fi router is restarted, the setting
returns to ON .
・When Power Supply function is set to ON, Icon appears.
is shown when power supply is available.
is shown when
power supply is not available such as when Wi-Fi router is
charging or battery power is low.
"設定" window appears.
Touch
or
to select
"給電" window appears.
給電
Touch
19
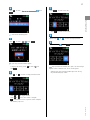
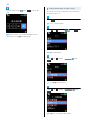
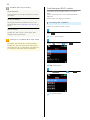
Setting Data Traffic
Set Maximum Data Traffic. By default, 2 GB is set.
Touch
or
to enter number
・Touch
or
to toggle numbers.
・Touch
or
firmly until number is changed.
Touch
Getting Started
"メニュー" window appears.
Touch
or
to select
設定
Touch
・
is unavailable to return to previous screen. Complete
the following steps first.
Touch
to move to next box
"設定" window appears.
Touch
or
to select
データ通信量
Touch
・Touch
to go back to box on left.
Repeat steps
to
to enter three-digit number
・Set number from 001 to 999.
Touch
"データ通信量" window appears.
Confirm
最大通信量
is selected
or
to select unit
Touch
Touch
・Select unit from KB, MB, GB.
SoftBank 203Z
"最大通信量" Setting window appears.
20
Setting Reset Date of Data Traffic
Confirm number and unit
Touch
in the last box
(OK)
Set the day of the month to reset data traffic automatically.
By default, setting is 31.
Touch
"メニュー" window appears.
Touch
or
to select
設定
Touch
Maximum Traffic is set and message appears. About 3
seconds later, "データ通信量" window appears.
"設定" window appears.
Touch
or
to select
データ通信量
Touch
"データ通信量" window appears.
Touch
or
to select
自動リセット日
"自動リセット日" Setting window appears.
Touch
21
Touch
or
to enter number.
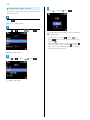
Setting ON/OFF for Displaying Data
Traffic
Set whether or not to show total volume of data transfer,
maximum traffic, and its bar graph. By default, setting is OFF.
・Values for data transfer volumes are approximate.
Getting Started
Touch
"メニュー" window appears.
・Touch
or
to toggle numbers.
・Touch
or
firmly until number is changed.
・
is unavailable to return to previous screen. Complete
Touch
or
to select
設定
Touch
the following steps first.
Touch
to move to next box
"設定" window appears.
・Touch
to go back to box on left.
Repeat steps
to
Touch
or
to select
データ通信量
Touch
to enter three-digit number
・Set number from 1 to 31.
Confirm number
Touch
in the last box (OK)
"データ通信量" window appears.
Auto Reset Date is set and message appears. About 3
seconds later, "データ通信量" window appears.
when the last day of the month is not the 31st.
SoftBank 203Z
・Setting "31" resets data at the last day of the month even
22
Resetting Data Traffic Manually
Touch
or
to select
表示ON/OFF
Touch
Reset the data traffic manually.
Touch
"メニュー" window appears.
Touch
or
to select
設定
Touch
"表示ON/OFF" Setting window appears.
Touch
to select
ON
Touch
"設定" window appears.
Touch
or
to select
データ通信量
Touch
Message indicating setting appear. About 3 seconds later,
"データ通信量" Setting window appears.
・If skipping the setting, Touch
Touch
to select OFF and
.
・When setting is ON, total volume of data used, maximum
traffic and its bar graph appear in the window.
"データ通信量" window appears.
Touch
or
to select
手動リセット
"手動リセット" window appears.
Touch
23
Updating Software
Confirm
リセット
is selected
Touch
Enable automatic update downloading to download/install new
software when available and no WLAN devices are connected.
Wi-Fi router also reactivates automatically.
If downloading is disabled when new software is available,
appears on Display. Implement the following steps to
At the time of purchase, automatic update downloading is
enabled.
Touch
Confirmation window appears.
Touch
to select
Yes
Touch
Reset starts. After reset is complete, message appears.
About 3 seconds later, "データ通信量" window appears.
Getting Started
update software.
"メニュー" window appears.
Touch
or
to select
設定
Touch
"設定" window appears.
Touch
or
to select
その他
Touch
"その他" window appears.
SoftBank 203Z
24
Resetting to Factory Settings
Confirm
ソフトウェア更新
is selected
Touch
Reset all Wi-Fi router settings to their factory defaults.
Touch
"メニュー" window appears.
Touch
or
to select
設定
Touch
Software Update Confirmation window appears.
Confirm
更新
is selected
Touch
"設定" window appears.
Touch
or
to select
その他
Touch
・Data communication is not available during Software Update.
Confirm
実行
is selected
Touch
"その他" window appears.
Touch
or
to select
オールリセット
If the current software is not the latest version, download
is started automatically.
About 3 seconds later from completing download, installation
starts.
About 3 seconds later from completing installation, Wi-Fi
router restarts automatically and then message appears.
・Touch
Confirm
to avoid updating.
OK
is selected
Main window appears.
Touch
Confirmation window appears.
Touch
25
Connecting with WPS
Touch
to select
Yes
Touch
"Internet Wi-Fi" connection, of Wi-Fi router to Internet via
Wi-Fi, and "LAN Wi-Fi" connection, of Wi-Fi router to WLAN
devices via Wi-Fi can respectively be performed via WPS
connection.
WPS connection is performed via PIN (PIN code) or PBC (push
router.
See "Settings WPS Connection Method (WPS)" for WPS
connections settings via "Internet Wi-Fi."
See "Configuring Settings for Connecting WPS Supported
WLAN Devices" for WPS connections with Wi-Fi router and
WLAN devices.
Getting Started
button) methods. PBC method allows connection via Wi-Fi
Reset starts.
・If skipping the reset, Touch
to select No and Touch
Touch
.
・Modified settings need to be set again.
・Settings in USIM Card and SD Card are not reset.
"メニュー" window appears.
・Resetting can be done via WEB UI:
On WEB UI, Settings
Reset
Advanced
Reset
Touch
or
to select
WPS
Touch
"WPS" window appears.
Touch
or
to select connection destination
Touch
WPS connection starts.
When connected successfully, Display returns to menu window.
If connecting fails, message appears.
is set to OFF , message appears after touching
.
SoftBank 203Z
・When selecting "インターネットWi-Fi", and if Internet Wi-Fi
26
SoftBank Wi-Fi Spot Setting
Initial Password
Initial password is the four-digit password set at time of
subscription.
Confirming on Wi-Fi router
Check WEB UI URL and telephone numbers, etc. via Wi-Fi
router.
However, Display operation is not available while WEB UI is
logged into.
Operate Display after logging out of WEB UI.
Setting on WEB UI
Setting login password for SoftBank Wi-Fi Spot is also
possible on WEB UI. See "SoftBank Wi-Fi Spot Setting" for
details.
Confirming URL of WEB UI
Confirm URL of WEB UI to select the menu.
Default Setting
SoftBank Wi-Fi Spot function is ON by default. When
changing the setting, use WEB UI.
Touch
"メニュー" window appears.
Cautions for SoftBank Wi-Fi Spot Usage
With WEB UI, when Internet Wi-Fi functions (including
Confirm
情報
is selected
Touch
SoftBank Wi-Fi Spots) are activated from being inactive,
WLAN connections for PCs, game devices, smartphones, etc.
are momentarily disconnected, and then reconnected.
"情報" window appears.
Confirm
WEB UI URL
is selected
URL of WEB UI appears.
Touch
27
Confirming Phone Numbers
Confirming Messages
Confirm phone numbers saved in USIM Card.
Check unread messages. When there are unread messages,
appears on Display.
Touch
Getting Started
Touch
"メニュー" window appears.
"メニュー" window appears.
Confirm
情報
is selected
Touch
Confirm
情報
is selected
Touch
"情報" window appears.
"情報" window appears.
Touch
or
to select
電話番号
Touch
Touch
or
to select
お知らせ
Touch
Phone numbers appear.
Message appears.
・When there is no message, "お知らせはありません" appears.
SoftBank 203Z
28
Confirming Software Version
Confirming Authentication Information
Confirm software version currently installed.
Wi-Fi router supports display of an electronic nameplate
that certifies conformity with technical standards. Confirm
authentication information as per the following steps.
Touch
"メニュー" window appears.
Touch
"メニュー" window appears.
Confirm
情報
is selected
Touch
Confirm
情報
is selected
Touch
"情報" window appears.
"情報" window appears.
Touch
or
to select
技術情報
Touch
Touch
or
to select
技術情報
Touch
認証情報
Touch
"情報" window appears.
"情報" window appears.
Confirm
ソフトウェアバージョン
is selected
Touch
Touch
or
to select
Software version appears.
Authentication information appears. Touch
scroll the window.
or
to
29
Confirming SSID and Password
Confirm SSID and passwords on Wi-Fi router.
By default, showing of SSID and password is set to ON.
"メニュー" window appears.
Touch
or
to select
SSIDとパスワード
Touch
Getting Started
Touch
SSID and password appears.
・If Multi SSID is set to ON, the SSIDs and passwords for SSID
A and SSID B appear.
Display of SSIDs and passwords
Set ON/OFF for showing SSIDs and passwords via WEB UI.
See "Advanced Settings" for details.
SoftBank 203Z
30
Connecting with WLAN
WLAN (Wi-Fi).....................................................................32
Activating WLAN (Wi-Fi) Function..................................32
Connecting Windows PC................................................... 33
Connecting Mac.................................................................37
Connecting iPhone/iPad....................................................38
Connecting Android™ Device........................................... 40
Connecting Nintendo 3DS LL/3DS/DSi LL/DSi/DS..........41
Connecting PSVITA/PSP ® ................................................. 48
Connecting PS3 ® ...............................................................52
Connecting WPS Supported WLAN Devices..................... 54
32
WLAN (Wi-Fi)
Activating WLAN (Wi-Fi) Function
Power Wi-Fi router on to connect to Internet automatically.
Overview
Wi-Fi router supports IEEE 802.11b/g/n standards. Connect
Connecting to 4G/LTE/3G
WLAN devices (PC, game console, etc.) via WLAN for wireless
data transfers.
Wi-Fi router supports Wi-Fi Protected Setup (WPS), which
allows WLAN connection settings to be easily configured on
Slide
to ON
any WPS-compliant device.
Enter Wi-Fi router's SSID and security keys to connect nonWPS compliant WLAN devices.
See supplied WLAN Initialization Sticker for SSID and security
keys.
This section describes how to set up initial WLAN connection
to Nintendo 3DS, Nintendo 3DS LL, Nintendo DS series * , PS
Vita (PlayStation ® Vita), PSP ® (PlayStation ® Portable), PS3 ®
(PlayStation ® 3), WPS compatible devices, Windows PC and
Mac.
*Nintendo DS series is a generic name for Nintendo DSi LL/
DSi/DS.
・These settings should be performed when Wi-Fi router
is connected the first time to another WLAN device.
Thereafter, simply activate Wi-Fi (WLAN) to automatically
connect Wi-Fi router to the Wi-Fi (WLAN) device.
・Some WLAN devices can disconnect the WLAN connection
if there has been no data communication for a while. If
disconnected by such a device, Wi-Fi router enters Sleep
mode. See "Turning off Display/Sleep Mode."
WLAN (Wi-Fi)
Advanced Settings
Change WLAN settings as required. See "LAN Wi-Fi"
Simultaneous Connection
Use Wi-Fi router to connect up to 14 WLAN devices
simultaneously.
Automatic Update for Optimizing a Wi-Fi
Connection
Wi-Fi router may automatically receive and update the
software to optimize the connection settings.
Cautions for WLAN Usage
Ensuring Security
To ensure security, change default network name (SSID)
and security key (WPA).
Communication Speed
If Internet Wi-Fi or Multi SSID is enabled, maximum
communication speed may decrease depending on the
number of WLAN devices connected to Wi-Fi router.
WLAN function activates and connects to Internet.
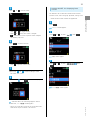
33
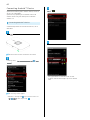
Connecting Windows PC
Operations are based on WLAN encryption method set to WPA.
Select Wi-Fi router SSID
Connect
Windows 8
Slide
to ON
・If default SSID has been changed: Select current network
name.
WLAN function activates and connects to Internet.
Enter security key correctly
Next
Connecting with WLAN
・See supplied Initialization Sticker for SSID.
Activate PC WLAN function
・The methods for powering ON PC WLAN functions vary for
each model. Check with each manufacturer.
Move the pointer into upper-right or lower-right corner (on
touchscreen, Swipe In from the right edge)
charm
Connected WLAN device count on Wi-Fi router Display
increases by one (e.g.
).
・See supplied Initialization Sticker for security key.
・Confirmation message regarding PC sharing may appear, but
it is not set here. For PC sharing, refer to Windows help.
SoftBank 203Z
34
Windows 7
Select Wi-Fi router SSID
Slide
Connect
to ON
WLAN function activates and connects to Internet.
・See supplied Initialization Sticker for SSID.
Activate PC WLAN function
・If default SSID has been changed: Select current network
name.
Start
Control Panel
Network and Sharing Center
Network and Internet
Enter security key correctly
OK
Connect to a network
Connected WLAN device count on Wi-Fi router Display
increases by one (e.g.
).
・See supplied Initialization Sticker for security key.
35
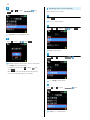
Windows Vista
Select Wi-Fi router SSID
Slide
Connect
to ON
・See supplied Initialization Sticker for SSID.
・If default SSID has been changed: Select current network
name.
Activate PC WLAN function
Start
Control Panel
Network and Internet
Enter security key correctly
Connecting with WLAN
WLAN function activates and connects to Internet.
接続
Network and Sharing Center
・See supplied Initialization Sticker for security key.
Connect to a network
Close
Connected WLAN device count on Wi-Fi router Display
increases by one (e.g.
).
SoftBank 203Z
36
Windows XP
Select Wi-Fi router SSID
Slide
Connect
to ON
WLAN function activates and connects to Internet.
・See supplied Initialization Sticker for SSID.
・If default SSID has been changed: Select current network
Activate PC WLAN function
Start
Control Panel
name.
Network and Internet
Network Connections
Wireless Network Connection
networks
from Network Tasks
Enter security key in Network key and Confirm network key
correctly
View available wireless
Connect
Connected WLAN device count on Wi-Fi router Display
increases by one (e.g.
).
・See supplied Initialization Sticker for security key.
SSID (Network Name) and Security Key
(WPA or WEP Key)
See supplied Initialization Sticker for SSID (Network Name)
and security key (WPA key). If default SSID or security key
has been changed, select current SSID or security key.
SSID (network name) factory setting appears as an
alphanumeric beginning with "203Za-" or "203Zb-."
Unless this is changed, be careful to not connect to other
appearing networks from which nearby WLAN signals are
being transmitted.
37
Connecting Mac
Screenshots/operations are based on Mac OS X 10.8, with
In Network Name pulldown list, select Wi-Fi router SSID
WLAN encryption method set to WPA.
Mac
Slide
to ON
WLAN function activates and connects to Internet.
In Apple menu,
System Preferences...
Network
・If default SSID has been changed: Select current network
name.
Enter security key in Password correctly
this network
Connecting with WLAN
・See supplied Initialization Sticker for SSID.
Check Remember
OK
・See supplied Initialization Sticker for security key.
Confirm Network Name is set to Wi-Fi router SSID
Select
Wi-Fi
Turn Wi-Fi On
Connected WLAN device count on Wi-Fi router Display
increases by one (e.g.
).
SSID (Network Name) and Security Key
(WPA or WEP Key)
See supplied Initialization Sticker for SSID (Network Name)
and security key (WPA key). If default SSID or security key
has been changed, select current SSID or security key.
SSID (network name) factory setting appears as an
alphanumeric beginning with "203Za-" or "203Zb-."
Unless this is changed, be careful to not connect to other
appearing networks from which nearby WLAN signals are
being transmitted.
SoftBank 203Z
WLAN function activates.
38
Connecting iPhone/iPad
In Choose a Network list, Tap Wi-Fi router SSID
iPhone
Screenshots/operations are based on WLAN encryption method
set to WPA.
Slide
to ON
・See supplied Initialization Sticker for SSID.
・If default SSID has been changed: Tap current network
name.
WLAN function activates and connects to Internet.
Enter security key in Password correctly
Settings
Join
Wi-Fi
・See supplied Initialization Sticker for security key.
Confirm Network Name is set to Wi-Fi router SSID
OFF
Connected WLAN device count on Wi-Fi router Display
increases by one (e.g.
On is shown and WLAN function activates.
).
39
iPad
Screenshots/operations are based on WLAN encryption method
In Choose a Network list, Tap Wi-Fi router SSID
set to WPA.
Slide
to ON
・See supplied Initialization Sticker for SSID.
・If default SSID has been changed: Tap current network
name.
Settings
Wi-Fi
Enter security key in Password correctly
Connecting with WLAN
WLAN function activates and connects to Internet.
Join
・See supplied Initialization Sticker for security key.
OFF
Confirm Network Name is set to Wi-Fi router SSID
Connected WLAN device count on Wi-Fi router Display
increases by one (e.g.
).
SSID (Network Name) and Security Key
(WPA or WEP Key)
See supplied Initialization Sticker for SSID (Network Name)
and security key (WPA key). If default SSID or security key
has been changed, select current SSID or security key.
SSID (network name) factory setting appears as an
alphanumeric beginning with "203Za-" or "203Zb-."
Unless this is changed, be careful to not connect to other
appearing networks from which nearby WLAN signals are
being transmitted.
SoftBank 203Z
On is shown and WLAN function activates.
40
Connecting Android™ Device
Operations on based on generic Android™ devices, with Wi-Fi
Wi-Fi
(
)
security set to WPA/WPA2.
Operations vary depending on the Android™ device. See
Android™ device user guide. Descriptions are based on
Android™ 2.3.
Connecting Android™ Device
Screenshots/operations are based on WLAN security set to
WPA/WPA2.
Slide
to ON
In Network Name list, Tap Wi-Fi router's SSID
WLAN function activates and connects to Internet.
In Settings menu,
Wireless & network settings
Wi-Fi
settings
・See supplied WLAN Initialization Sticker for SSID.
・If default SSID has been changed: Tap current network
name.
Wi-Fi settings screen appears.
・Android 4.1: Settings menu
ON
Tap a button on "Wi-Fi" to
Wi-Fi . Then, skip to Step
.
41
Enter Security Key in
Password
Connect
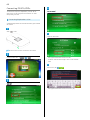
Connecting Nintendo 3DS LL/3DS/
DSi LL/DSi/DS
Operations are based on WLAN encryption method set to
WPA, using game software compatible with Nintendo Wi-Fi
Connection for Nintendo DS series.
The connection steps are independently verified. Do not make
inquiry to Nintendo Co., Ltd about descriptions given here.
Connecting Nintendo 3DS LL/3DS
Screenshots/operations are based on WLAN encryption method
method is not set to WPA. See Nintendo 3DS user guide.
Slide
to ON
・See supplied Initialization Sticker for security key.
Connecting with WLAN
set to WPA. Screenshots/operations may vary when encryption
Confirm Network Name is set to Wi-Fi router SSID
Connected WLAN device count on Wi-Fi router Display
increases by one (e.g.
).
SSID (Network Name) and Security Key
(WPA or WEP Key)
WLAN function activates and connects to Internet.
See supplied Initialization Sticker for SSID (Network Name)
In Nintendo 3DS menu,
and security key (WPA key). If default
ネット設定
SSID or security
本体設定
はじめる
インター
key has been changed, select current SSID or security key.
SSID (network name) factory setting appears as an
alphanumeric beginning with "203Za-" or "203Zb-."
Unless this is changed, be careful to not connect to other
"Wi-Fiコネクション設定" screen appears.
・For operation, refer to each software user guide.
appearing networks from which nearby WLAN signals are
being transmitted.
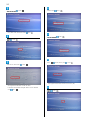
インターネット接続設定
SoftBank 203Z
42
接続先の登録
Touch Wi-Fi router SSID
・See supplied Initialization Sticker for SSID.
・If default SSID has been changed: Touch current network
自分で設定する
name.
Enter Security Key correctly
アクセスポイントを検索
決定
・See supplied Initialization Sticker for security key.
OK
43
Connecting Nintendo DSi LL/DSi
OK
Screenshots/operations are based on WLAN encryption method
set to WPA. Screenshots/operations may vary when encryption
method is not set to WPA.
Slide
to ON
WLAN function activates and connects to Internet.
device count on Wi-Fi router Display increases by one (e.g.
).
In Nintendo DSi menu,
Connecting with WLAN
Connection Test starts. When "接続テストに成功しまし
た!" appears, click OK to complete. Connected WLAN
本体設定
・For operation, refer to each software user guide.
Touch
on the right side of the screen twice
SoftBank 203Z
44
インターネット
Touch any
未設定
接続設定
アクセスポイントを検索
上級者設定
Touch Wi-Fi router SSID
・See supplied Initialization Sticker for SSID.
・If default SSID has been changed: Touch current network
name.
45
Touch the entry field
OK
・See supplied Initialization Sticker for security key.
Connecting with WLAN
Enter security key correctly
OK
OK
Connection test starts. When complete, "接続に成功しまし
た" appears. Connected WLAN device count on Wi-Fi router
Display increases by one (e.g.
).
OK
SoftBank 203Z
46
Connecting Nintendo DS
If the encryption method is set to WPA, Nintendo DS cannot
Touch any
未設定
be connected. WPA is set by default; use WEB UI to change
authentication method in Basic Settings to "OPEN," set the
encryption scheme to "WEP," and set a security key in the Key
field. See "Basic Settings for WLAN."
Slide
to ON
アクセスポイントを検索
WLAN function activates and connects to Internet.
On Nintendo DS, activate game software compatible with
Nintendo Wi-Fi Connection
Wi-Fiコネクション設定
・For operation, refer to each software user guide.
Wi-Fi接続先設定
Select Wi-Fi router SSID
・See supplied Initialization Sticker for SSID.
・If default SSID has been changed: Touch current network
name.
47
Network Connection
Enter security key correctly
決定
Changing WLAN Security Settings
Note that changing Encryption settings ends current WLAN
device connections.
Confirming Internet Connection
Confirm Wi-Fi router is connected to Internet. Internet
connection is required to establish Wi-Fi connections.
See supplied Initialization Sticker for SSID (Network Name)
・Input security key that has been set on WEB UI.
and security key (WPA key). If default
SSID or security
key has been changed, select current SSID or security key.
SSID (network name) factory setting appears as an
alphanumeric beginning with "203Za-" or "203Zb-."
Unless this is changed, be careful to not connect to other
はい
appearing networks from which nearby WLAN signals are
Connecting with WLAN
SSID (Network Name) and Security Key
(WPA or WEP Key)
being transmitted.
はい
Connection test starts. When complete, "接続に成功しまし
Display increases by one (e.g.
).
SoftBank 203Z
た。" appears. Connected WLAN device count on Wi-Fi router
48
Connecting PSVITA/PSP ®
The connection steps are independently verified. Do not
Wi-Fi Settings
make inquiry to Sony Computer Entertainment Inc. about
descriptions given here.
Connecting PlayStation ® Vita
Screenshots/operations are based on WLAN encryption method
set to WPA.
Slide
to ON
Tap Wi-Fi router SSID
WLAN function activates and connects to Internet.
In PSVITA Home menu,
Settings
Start
・See supplied Initialization Sticker for SSID.
・If default SSID has been changed: Touch current network
name.
Enter security key
Network
・See supplied Initialization Sticker for security key.
49
Connecting PSP ® (PlayStation ®
Portable)
OK
Screenshots/operations are based on PSP-2000/PSP-3000,
with WLAN encryption method set to WPA.
Screenshots/operations may vary for PSP-1000* or when
encryption method is not set to WPA. See PSP ® user guide.
*Some steps may vary for PSP-1000 system software earlier
than version 1.52.
Slide
to ON
Connecting with WLAN
When complete, Wi-Fi setting screen appears. Connected
WLAN device count on Wi-Fi router Display increases by one
(e.g.
).
WLAN function activates and connects to Internet.
On PSP ® , Slide WLAN Switch to On
In PSP ® Home menu, select
Settings
Settings
Network
Press
Infrastructure Mode
Press
SoftBank 203Z
50
New Connection
Press
Confirm SSID
・PSP-1000: Enter connection name
Press
Press
.
WPA-PSK (TKIP)
Scan
Press
Press
Press
Select Wi-Fi router SSID
Enter security key
Press
Press
・See supplied Initialization Sticker for security key.
・See supplied Initialization Sticker for SSID.
・If default SSID has been changed: Select current network
name
Press
.
Easy
Press
51
Confirm Connection Name
Press
.
The connection test starts. When complete, test results
appear. Connected WLAN device count on Wi-Fi router Display
increases by one (e.g.
Confirm settings
)
Press
SSID (Network Name) and Security Key
(WPA or WEP Key)
Connecting with WLAN
・PSP-1000: This screen does not appear. Skip to Step
Press
See supplied Initialization Sticker for SSID (Network Name)
and security key (WPA key). If default
SSID or security key has been changed, select current SSID
or security key.
SSID (network name) factory setting appears as an
alphanumeric beginning with "203Za-" or "203Zb-."
Unless this is changed, be careful to not connect to other
appearing networks from which nearby WLAN signals are
being transmitted.
Press
SoftBank 203Z
52
Connecting PS3 ®
The connection test starts. When complete, test results
Wireless
Press
appear.
Connecting PS3 ®
Screenshots/operations are based on WLAN encryption method
set to WPA. Screenshots/operations may vary when encryption
method is not set to WPA. See PS3 ® user guide.
Slide
to ON
Scan
Press
WLAN function activates and connects to Internet.
In PS3 ® Home menu, select
Settings
Settings
Internet Connection Settings
Network
Select Wi-Fi router SSID
Press
・See supplied Initialization Sticker for SSID.
・If default SSID has been changed: Select current network
name
OK
Press
Confirm SSID
Easy
.
Press
Press
Press
53
WPA-PSK/WPA2-PSK
SSID (Network Name) and Security Key
(WPA or WEP Key)
Press
See supplied Initialization Sticker for SSID (Network Name)
and security key (WPA key). If default
SSID or security key has been changed, select current SSID
or security key.
SSID (network name) factory setting appears as an
alphanumeric beginning with "203Za-" or "203Zb-."
Unless this is changed, be careful to not connect to other
appearing networks from which nearby WLAN signals are
being transmitted.
Enter security key
Press
Connecting with WLAN
Press
・See supplied Initialization Sticker for Security Key.
Confirm settings
Press
Settings are saved.
Press
increases by one (e.g.
).
SoftBank 203Z
The connection test starts. When complete, test results
appear. Connected WLAN device count on Wi-Fi router Display
54
Connecting WPS Supported WLAN
Devices
Confirm
LAN Wi-Fi
is selected
Touch
WPS Supported WLAN Devices
Slide
to ON
Connection starts.
Connect from WLAN devices via WPS
WLAN function activates and connects to Internet.
Activate the device WLAN functions and prepare for WPS
settings as required
When complete, "WPS接続に成功しました" appears.
If other settings are required with WLAN devices, follow the
onscreen instructions
Connected WLAN device count on Wi-Fi router Display
increases by one (e.g.
Touch
"メニュー" screen appears.
).
Notes on WPS Usage
Display Operation on Wi-Fi Router
Touch
or
to select
WPS
Touch
Display operation is not possible while logged in to WEB UI.
Operate Display after logging out of WEB UI.
Setting WPS
Setting methods for WPS functions vary according to
device. See WLAN device user guide.
SSID Stealth
If SSID Stealth is enabled on SSID A, WPS functions are not
available. See "Basic Settings for WLAN."
"WPS" screen appears.
Encryption Method
When WEP encryption method is set, even if WPS functions
are enabled, WPS functions are not available to make
connections.
Connecting with Micro USB
Cable (Windows)
USB Connection with a Windows PC............................... 56
Device Recognition/Removal on Windows PC..................56
Software Installation (Windows).................................... 58
56
USB Connection with a Windows
PC
Overview
Device Recognition/Removal on
Windows PC
Device Recognition (Windows)
Wi-Fi router automatically connects to Internet when powered
Upon connecting the first time, the device driver is installed
on. Connect with PC via Micro USB cable to allow data
automatically.
communication.
Power on PC
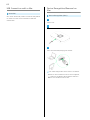
Insert Micro USB Cable into Wi-Fi router External Device Port
Insert Micro USB Cable (USB plug) into PC USB Port
PC should recognize Wi-Fi router within a few seconds.
57
Device Removal (Windows)
・For Windows 8/7, exit WEB UI before removing Wi-Fi router.
・For Windows Vista/Windows XP, use the Safely Remove
After a message saying that Wi-Fi router can be removed
safely appears, remove Wi-Fi router
Hardware function to stop Wi-Fi router before removing WiFi router. Follow these steps to remove Wi-Fi router.
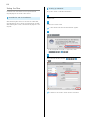
Double-click
in task tray
Safely Remove Hardware window appears.
・Windows XP: Double-click
in task tray.
Removal is complete.
USB Mass Storage Device
Stop
When SD Card is installed, follow these steps:
Click
in task tray
Eject Removable Disk
・After a message saying that the hardware can be
removed safely appears, remove Wi-Fi router.
Cautions for Removing Wi-Fi Router
Standby/Hibernation
Wi-Fi router may malfunction if PC enters standby
(suspend/resume) or hibernation with it connected. Be sure
to remove Wi-Fi router before leaving a PC unattended,
etc. Wi-Fi router may malfunction if connected before PC
starts/restarts. Remove Wi-Fi router before starting/
restarting PC.
Stop a Hardware device window appears.
・Windows XP: Select USB Mass Storage Device .
・Be sure to select the correct device when multiple USB
devices are connected.
Connecting with Micro USB Cable (Windows)
When SD Card is Installed
WEB UI
Exit WEB UI before removing Wi-Fi router. Do not remove
Wi-Fi router during transmissions.
OK
SoftBank 203Z
・Confirm that Wi-Fi router can be safely removed from PC.
58
Software Installation (Windows)
When connecting the first time, the device driver is installed
automatically.
Uninstalling Driver
Screenshots/operations are based on Windows 8.
If installation does not automatically start due to the PC
environment, follow these steps:
Desktop
Start Explorer
Manual Installation
Screenshots/operations are based on Windows 8.
Computer
・Power on the PC first, and then connect Wi-Fi router to the
PC.
Uninstall or change a program
Desktop
Start Explorer
Computer
・Windows 7: Click Start menu
・Windows Vista: Click Start menu
・Windows XP: Click Start menu
Computer .
Computer .
My computer .
Double-click "PocketWiFi"
Select "PocketWiFi"
Uninstall
Uninstallation is complete.
Operations on Windows 7, Windows
Vista or Windows XP
Windows 7
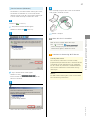
Follow these steps:
Start menu
User Account Control dialog box appears.
・Windows XP: This dialog box does not appear. When
complete, browser activates and WEB UI login window opens.
Control Panel
Programs and Features
Yes
Programs
PocketWiFi
Uninstall
on User Account Control dialog box
Uninstallation is complete.
Windows Vista
Yes
Follow these steps:
Installation is complete.
・Windows Vista: Click Continue .
Start menu
Control Panel
Programs and Features
Continue
Programs
PocketWiFi
Uninstall
on User Account Control dialog box
Uninstallation is complete.
Windows XP
Follow these steps:
Start menu
Programs
Control Panel
PocketWiFi
Uninstallation is complete.
Add or Remove
Remove
59
Cautions for Installation
Removal of Wi-Fi Router
Do not remove Wi-Fi router during installation. May cause
installation failure, system malfunction or other system
errors.
Administrator Privileges
Log in to an account with administrator privileges.
Connecting with Micro USB Cable (Windows)
SoftBank 203Z
60
Connecting with Micro USB
Cable (Mac)
USB Connection with a Mac.............................................62
Device Recognition/Removal on Mac............................... 62
Setup for Mac...................................................................64
62
USB Connection with a Mac
Device Recognition/Removal on
Mac
Overview
Wi-Fi router automatically connects to Internet when powered
Device Recognition (Mac)
on. Connect with Mac via Micro USB cable to allow data
communication.
Power on Mac
Insert Micro USB Cable into Wi-Fi router External Device Port
Insert Micro USB Cable (USB plug) Mac USB Port
Mac should recognize Wi-Fi router within a few seconds.
・When Wi-Fi router installed with an SD Card is recognized,
appears on the desktop. Nothing appears when Wi-Fi
router is not installed with an SD Card.
63
Device Removal (SD Card installed)
Device Removal (SD Card not installed)
When removing Wi-Fi router that is installed with an SD Card
When removing Wi-Fi router that is not installed with an SD
from Mac, follow these steps. Files saved in SD Card may be
Card from Mac, follow these steps.
damaged if Wi-Fi router is improperly removed.
Make sure that data transmissions are not in progress.
Click
Finder appears.
Click (
Remove Wi-Fi router from Mac
) removal icon for Wi-Fi router
Removal is complete.
Sleep Mode
Remove Wi-Fi router from Mac
Wi-Fi router may malfunction if Mac enters Sleep mode
with it connected. Be sure to remove Wi-Fi router
before leaving a Mac unattended, etc. Wi-Fi router may
malfunction if connected before Mac starts/restarts.
Remove Wi-Fi router before starting/restarting Mac.
WEB UI
Exit WEB UI before removing Wi-Fi router. Do not remove
Wi-Fi router during transmissions.
Connecting with Micro USB Cable (Mac)
Cautions for Removing Wi-Fi Router
Removal is complete.
SoftBank 203Z
64
Setup for Mac
Installation and uninstallation are not required because
required programs are stored in Wi-Fi router.
Installation and Uninstallation
Setting up Network
Set up Wi-Fi router in "Network Preferences..."
Power on Mac
When connecting Wi-Fi router to Mac with Micro USB Cable,
required programs such as drivers are automatically installed.
When removing Wi-Fi router, uninstallation of programs is not
required.
Connect Wi-Fi router to Mac
"A new network interface has been detected." appears.
Network Preferences...
・If the message does not appear, in Apple menu, select
System Preferences...
Network .
Select detected network interface
Using DHCP
Apply
IP address is set and Wi-Fi router connects to network.
Settings
Overview of WEB UI.........................................................66
WEB UI Window.................................................................69
Checking Device Information........................................... 72
Sharing SD Card, Managing Files.....................................77
Quick Settings.................................................................. 87
Setting 4G/LTE/3G.......................................................... 89
Setup of Data Traffic..................................................... 97
Internet Wi-Fi................................................................... 99
LAN Wi-Fi........................................................................108
Firewall............................................................................ 117
Settings for Router....................................................... 122
Settings for Ethernet....................................................124
Advanced Settings..........................................................127
Mobile Utility..................................................................133
66
Overview of WEB UI
Use WEB UI functions in a browser to check and change Wi-Fi router's settings, by connecting Wi-Fi router to a PC or smartphone via
Micro USB Cable or WLAN.
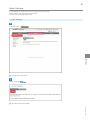
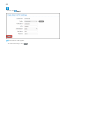
Activating WEB UI
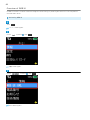
Touch
"メニュー" window appears.
Confirm
情報
is selected
Touch
"情報" window appears.
Confirm
WEB UI URL
is selected
URL of WEB UI appears.
Touch
67
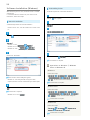
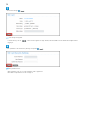
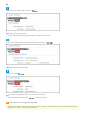
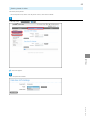
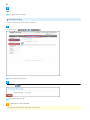
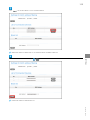
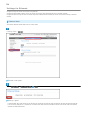
Enter URL in browser's address bar
WEB UI Login window appears.
Enter administrator password
Login
Settings
WEB UI window appears.
・Administrator password is "admin" by default. See "Account Management (Password)" for how to change administrator passwords.
・Simultaneous login from multiple devices is impossible.
・To switch language to English, select English from the language pulldown list.
To enhance security, it is recommended that the default password be changed.
SoftBank 203Z
Default Password
68
Cautions for Operating WEB UI
Logging in to WEB UI
While operating Display on Wi-Fi router, WEB UI cannot be logged into. Show main window on Wi-Fi router then log into WEB UI.
Changing Settings while Wi-Fi router is wirelessly connected to the device
Using WEB UI to change Internet Wi-Fi Settings while Wi-Fi router is wirelessly connected to the device may close the WLAN
connection. After completing settings, reconnect WLAN the device.
69
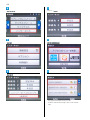
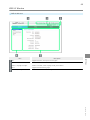
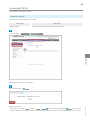
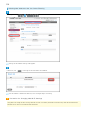
WEB UI Window
WEB UI Window
Description
Tabs
Toggle Information, Settings and SD Card pages
Status Indicators
Indicate Wi-Fi router status including connection status
Connect, Language and Logout
Connect to network, select language and log in/out WEB UI
Menus
Toggle information/setting pages
Information/Setting Area
Show current information and settings for functions
Settings
Item
SoftBank 203Z
70
Tabs, Menus, and Information/Setting Area
Item
Description
Information
Show menus for Status (Information screen)
Settings
Show menus for Settings (Settings screen)
SD Card
Show menus for SD Card (SD Card screen)
Menus
Toggle information/setting screens
Information/Setting Area
Show current information and settings for functions
Status Indicators
Item
Description
Network Type
Network type currently connected (4G, LTE, 3G)
Network Operator Name
Show network operator name
Signal Strength of Mobile Network
Level of signal strength
Internet Connection Status
Status of network connection
USIM Card
Show USIM Card activated/inactivated
Connected WLAN Devices
Number of connected WLAN devices
Battery Status
Indicate battery level or charging status
Phone Number
Phone number of USIM Card
71
Connect, Language, and Logout
Item
Description
Connect
Connect to network according to settings
Language
Select language
Logout
Log out from WEB UI
Settings
SoftBank 203Z
72
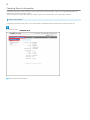
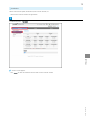
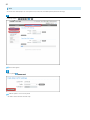
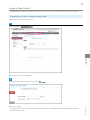
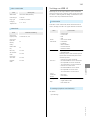
Checking Device Information
Check device information, system information, current information on network conditions, amount of data uploaded/downloaded, and
information on manuals and customer support.
Device information, information on manuals and customer support can be accessed directly from Login window in WEB UI.
Device Information
Check device information of Wi-Fi router such as Phone Number, SSID (Network Name), Software Version, Hardware Version, etc.
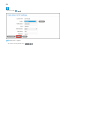
In Information screen,
Device Information
Device Information screen appears.
73
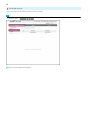
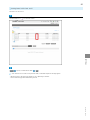
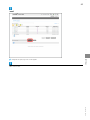
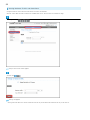
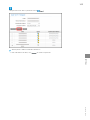
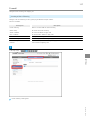
Statistics
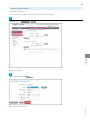
Confirm communication speed, connected time, data transfer volumes, etc.
・Values for data transfer volumes are approximates.
In Information screen,
Statistics
Settings
Statistics screen appears.
・Click Reset to reset the connected time and values for data transfer volumes.
SoftBank 203Z
74
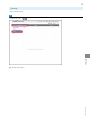
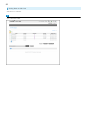
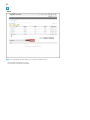
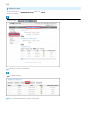
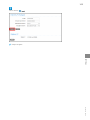
Connected Devices
Confirm Host name and MAC address of devices currently connected.
In Information screen,
List of Connected Devices
List of Connected Devices screen appears.
75
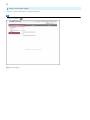
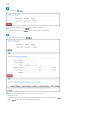
Message
Confirm received message.
In Information screen,
Message
Settings
Message screen appears.
SoftBank 203Z
76
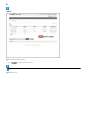
Support Information (Help)
Show URLs for Manual Download and ZTE Support Information.
In Information screen,
Help
Help screen appears.
77
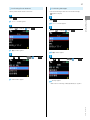
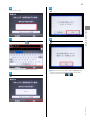
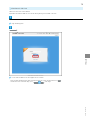
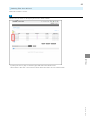
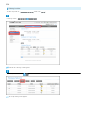
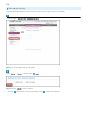
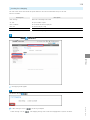
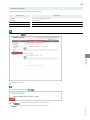
Sharing SD Card, Managing Files
Set the sharing mode of SD Card. Also, check files stored in SD Card through WEB UI, and add or delete files to/from SD Card.
Sharing SD Card Data
There are two methods for sharing SD Card; USB and HTTP.
Select USB to use Wi-Fi router as a Flash memory when connecting to PC with Micro USB Cable.
Select HTTP to transfer data between SD Card and PC through WEB UI. The range of content and access rights for SD card can also be
set.
In SD Card screen,
SD Card
Settings
SD Card screen appears.
Select Mode
Apply
If Mode is set to USB , the setting is complete.
・"SD Card Security Settings" appears when Mode is set to HTTP .
SoftBank 203Z
・If Mode is set to HTTP , more setting items appear.
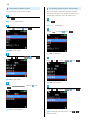
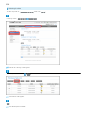
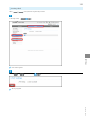
78
Set SD Card Settings
Apply
The settings are applied.
・If Share Setting is set to Enable , "View SD Card" appears on Login window, and files/folders can be viewed and managed without
logging in.
Enter password in SD Card Security Settings as required
Apply
New password is set.
・When password is not set, "Current Password" field is grayed out.
・Note down the password so as not to forget it.
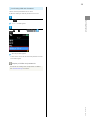
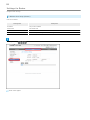
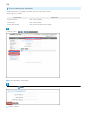
79
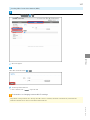
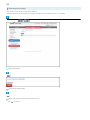
View Data in SD Card
Show list of data in SD Card in WEB UI.
Operations are based on Mode set to HTTP and Sharing Setting set to Enable in SD Card.
Activate WEB UI.
Login window appears.
View SD Card
Settings
List of files and folders in SD Card appears on HTTP screen.
・Input Password window appears when password has been set. Enter password and click Apply .
・To show data in SD Card after login, click SD Card
HTTP after login.
SoftBank 203Z
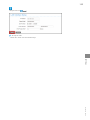
80
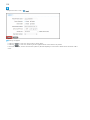
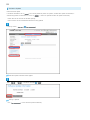
Click folder name to check.
Files and folders in the selected folder are shown.
・Click Root to go back to the root directory.
・Click Back to go back to the upper directory.
・Click New and enter name to make a new folder in the shown directory.
・Click Rename of a file or folder to modify the name.
・Click Back to Login to go back to Login window.
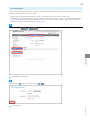
81
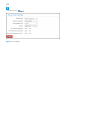
Saving Data in SD Card to PC
Save data in SD Card to PC.
Click download icon (
) of the file to save
Settings
Save as
Specify the destination folder
Save
After selected file is saved to the specified folder, a download completion message appears.
・Method to specify the destination folder may vary depending on browser.
・Do not reload the page while downloading the file.
SoftBank 203Z
82
Saving Data to SD Card
Save data in PC to SD Card.
Open a destination folder
83
Browse
Settings
Dialog box for specifying a file to save appears.
Select a file to save.
SoftBank 203Z
84
Upload
A saving completion message appears; the file name is added to the list.
・Do not reload page while saving a file.
・File more than 2 GB cannot be uploaded.
85
Deleting Files from SD Card
Delete files or folders in SD Card.
Add check mark to the box at the beginning of each file or folder to delete.
Settings
・By moving from this list page to a different page, added check marks become invalid.
・Add or remove a check mark in the title row to add or remove check marks for all of the boxes shown.
SoftBank 203Z
86
Delete
Confirmation message appears.
・Click Delete All to delete all data in SD Card.
Yes
Deletion starts.
87
Quick Settings
In Quick Settings, set required main items via a wizard to use Wi-Fi router.
Settings made in Quick Settings can be altered later.
Use other menus to make detailed settings.
Quick Settings
In Settings screen,
Quick Settings
Settings
Quick Settings screen appears.
Confirm information
Next
SSID Configuration screen appears.
SoftBank 203Z
88
Set SSID name and enable/disable SSID Stealth
Next
Security Setting screen appears.
・Currently selected Network Name (SSID) is shown in Network Name (SSID) field.
Select Authentication Method and Encryption Method, and set Security Key
Next
Setting Confirmation screen appears.
Confirm the settings
Apply
The settings are applied and Display returns to Quick Setting screen.
・Return to corresponding screens using Previous to change the settings.
Precaution for Changing the Settings
Using WEB UI to change LAN Wi-Fi Settings while Wi-Fi router is wirelessly connected to the device may close the WLAN connection.
Reconnect Wi-Fi router to re-establish WLAN connection.
89
Setting 4G/LTE/3G
Configure 4G/LTE/3G network connection.
Network Settings
Items to be set in Network Settings are as follows.
Setting item
Description
Network Operator
In Settings screen,
Set how to select (automatic/manual) the network operator
Network Settings
Network Operator
Settings
Network Operator Select screen appears.
Select Network Operator
Apply
・When "Manual" is selected, Apply changes to Search . Search
Select available network operator
Apply to set a network
operator. However, if searching while "Manual" is selected in Japan, Network Operator will not be displayed and it cannot be set up.
SoftBank 203Z
Setting is applied.
90
APN
Set Access Point Name (APN) as an initial profile. Also, create, edit, and delete profiles (connection settings).
In Settings screen,
Network Settings
APN
APN screen appears.
Select a profile
Set as default
Selected profile is set to initial profile.
・Set APN of DATA SUB with the same steps.
91
Saving New Profiles
Items to be set are as follows.
Setting item
Description
Profile
Already saved profiles appear in pull-down list
Profile Name
Enter profile names
APN
Enter APN
Authentication
Select authentication method
User Name
Enter user name
Password
Enter password
In Settings screen,
Network Settigns
APN
Settings
APN screen appears.
Add New
SoftBank 203Z
APN Setting screen appears.
92
Set each item
Apply
Confirmation screen appears.
・To cancel the settings, click Cancel .
93
Editing Saved Profiles
Edit already saved profiles.
・The initial profile set by default and the profile currently used cannot be edited.
In Settings screen,
Network Settings
APN
Settings
APN screen appears.
Select the profile to be edited
SoftBank 203Z
94
Edit each item
Apply
Edited APN is applied.
・To save as initial profile, click Set as default .
95
Deleting Saved Profiles
Delete already saved profiles.
・The initial profile set by default and the profile currently used cannot be deleted.
In Settings screen,
Network Settings
APN
Settings
APN screen appears.
Select the profile to be deleted
SoftBank 203Z
Confirmation screen appears.
Delete
96
OK
The selected profile is deleted.
Overseas Roaming
Overseas, roaming service for 3G network is available.
In Settings screen,
Network Settings
Overseas Roaming
Overseas Roaming screen appears.
Select On/Off
Apply
The selected mode is applied.
Cautions for Use Overseas
After moving from overseas to Japan, power off and restart.
97
Setup of Data Traffic
Set whether or not to show data traffic on Display of Wi-Fi router. Also, set maximum data and date to reset the traffic volume.
Showing Data Traffic on Display of Wi-Fi router
Show data traffic on Display of Wi-Fi router.
In Settings screen,
Setup of Data Traffic
Settings
Setup of Data Traffic screen appears.
Add check mark to "Display Data traffic on LCD screen"
Apply
・On Display of Wi-Fi router, total volume of data used, maximum traffic, and bar graph which shows the percentage of usage for
maximum traffic are shown.
SoftBank 203Z
Setting is applied.
98
Setting Maximum Traffic and Reset Date
Configure maximum traffic and auto reset date of the traffic accumulated.
Maximum traffic does not mean the amount of available data traffic. Use this value as a measure of usage.
In Settings screen,
Setup of Data traffic
Setup of Data Traffic screen appears.
Set each item
Apply
Settings are applied.
・Setting auto reset date to 31 resets the data on the last day of the month even when the last day is not the 31st.
99
Internet Wi-Fi
Use Wi-Fi router to connect to Wi-Fi routers at home and work, and to SoftBank Wi-Fi spots to connect to the Internet. This Internet
connection is described here as "Internet Wi-Fi."
Basic Settings for Internet Wi-Fi
Configure basic settings for Internet Wi-Fi connection.
Disable Multi SSID in advance to configure Internet Wi-Fi. See "LAN Wi-Fi" for details.
In Settings screen,
Internet Wi-Fi
Internet Wi-Fi
Settings
Internet Wi-Fi Setting screen appears.
Select
Enable / Disable
for Internet Wi-Fi Settings
Apply
Setting is applied.
・Multi SSID is unavailable while Internet Wi-Fi is active.
・If Internet Wi-Fi is enabled, maximum communication speed may decrease depending on the number of WLAN devices connected to Wi-Fi
router.
SoftBank 203Z
・SoftBank Wi-Fi Spot cannot be accessed if Internet Wi-Fi connection is disabled.
100
SoftBank Wi-Fi Spot Setting
In Settings screen,
Internet Wi-Fi
Internet Wi-Fi
Internet Wi-Fi Settings screen appears.
Set each item for SoftBank Wi-Fi Spot Setting
Apply
Settings are applied.
・Select Enable then enter password. Password is the four-digit password set in your contract.
101
Connecting to Profile
To connect profiles, Internet Wi-Fi Settings needs to be Enable .
Configure up to 30 profiles.
In Settings screen,
Internet Wi-Fi
Internet Wi-Fi
Settings
Internet Wi-Fi Settings screen appears.
Select desired profile to connect with via Wi-Fi
Connect
Confirmation screen appears.
Yes
SoftBank 203Z
Wi-Fi router connects to Internet with the selected profile.
102
Adding Profiles
To show the profile list, Internet Wi-Fi Settings needs to be Enable .
Add up to 26 profiles.
In Settings screen,
Internet Wi-Fi
Internet Wi-Fi
Internet Wi-Fi Settings screen appears.
Add
in Wireless Network
Scan is performed and Add Wi-Fi Hotspot screen appears.
103
Configure each item or select a profile from the list
Apply
Selected profile is added to the Wireless Network list.
・If SSID to be added is not shown, click Refresh to refresh the profile list.
Settings
SoftBank 203Z
104
Editing Profiles
To show the profile list, Internet Wi-Fi Settings needs to be Enable .
In Settings screen,
Internet Wi-Fi
Internet Wi-Fi
Internet Wi-Fi Settings screen appears.
Select the profile to be edited
Edit
Wi-Fi Spot Editing screen appears.
105
Edit as necessary
Apply
Changes are applied.
Settings
SoftBank 203Z
106
Deleting Profiles
To show the profile list, Internet Wi-Fi Settings needs to be Enable .
In Settings screen,
Internet Wi-Fi
Internet Wi-Fi
Internet Wi-Fi Settings screen appears.
Select the profile to be deleted
Confirmation screen appears.
Yes
The selected profile is deleted.
Delete
107
Setting WPS Connection Method (WPS)
In Settings screen,
Internet Wi-Fi
WPS
Settings
WPS screen appears.
Select WPS connection method
Apply
The settings become effective.
・If "PIN" is selected, click Get PIN to get PIN code.
Precaution for Changing Internet Wi-Fi Settings
Using WEB UI to change Internet Wi-Fi Settings while Wi-Fi router is wirelessly connected to the device may close the WLAN
connection. Reconnect Wi-Fi router to re-establish WLAN connection.
SoftBank 203Z
108
LAN Wi-Fi
Wi-Fi router can establish WLAN connections for PCs, smartphones, and game devices. This WLAN connection is referred to as "LAN WiFi."
Connected devices access the Internet via Internet Wi-Fi on Wi-Fi router.
Basic Settings for WLAN
Set Multi SSID and SSID for Wi-Fi router.
Disable Internet Wi-Fi in advance to configure Multi SSID. See "Internet Wi-Fi" for details.
Items to be set are as follows.
Setting item
Description
Multi SSID
Set Multi SSID Enable/Disable
Network Name (SSID)
Set network name (SSID)
Privacy Separator
SSID Stealth
Authentication Method
WPA ENCRYPTION
Encryption scheme
Set Enable/Disable this item. If enabled, it will forbid all devices that are connected to the
same SSID from communicating with one another.
Set Enable/Disable for this item. If enabled, SSID will be invisible, and other WLAN devices
will not be able to detect it.
Select authentication method for network connection request.
Select WPA encryption method. This item is shown when WPA-PSK, WPA2-PSK or WPA-PSK/
WPA2-PSK is selected in Authentication Method.
Select encryption scheme. This item is shown when OPEN is selected in Authentication
Method.
Select default WEP key. This item is shown when OPEN is selected in Authentication Method
Default Key
and WEP is selected in Encryption scheme, or when SHARED is selected in Authentication
Method.
Security Key
Set security key.
Max Station Number
Set the maximum number of devices that can be connected to the same SSID.
109
In Settings screen,
LAN Wi-Fi
Basic Settings
Settings
Basic Settings of LAN Wi-Fi screen appears.
Select
Enable / Disable
in Multi SSID
Apply
When selecting Enable , confirmation message appears. When selecting Disable , setting is applied.
・When selecting Enable , Following items are shown; Multi SSID Isolation and whether or not to enable the clients with SSID B access
to the WEB UI. Select Enable in Multi SSID Isolation to enable SSID A and SSID B to communicate with one another.
Yes
SoftBank 203Z
110
Configure each item in SSID 1
Apply
Settings are applied.
・If selecting Enable in Multi SSID, setting items of SSID B appear.
・If selecting Enable in Multi SSID, connecting to WPS supported devices in WPS mode is not possible.
・If Multi SSID is enabled, maximum communication speed may decrease depending on the number of WLAN devices connected to Wi-Fi
router.
111
Advanced Settings
Items to be set are as follows.
Setting item
Description
Network Mode
Select WLAN network mode.
Frequency Bandwidth
Select frequency bandwidth of 20 MHz or 40 MHz.
Country/Region Code
Select country or region code from the list. Change this item to use Wi-Fi router in overseas.
Channel
Select channel from Auto (1-11) or Auto (1-13).
Out of Service Notification
Wi-Fi Automatic Disconnection
Show SSID and password on LCD
In Settings screen,
LAN Wi-Fi
Set ON/OFF for out of service notification. If setting is ON, browser will be dedicated to the
home page of WEB UI when network is out of service.
Set ON/OFF for Wi-Fi automatic disconnection. Wi-Fi will be disconnected when network is
out of service.
Set whether SSID and password are shown on Display of Wi-Fi router or not.
Advanced Settings
Settings
Advanced Settings in LAN Wi-Fi screen appears.
SoftBank 203Z
112
Configure each item
Settings are applied.
Apply
113
Configuring Settings for Connecting WPS Supported WLAN Devices
Configure WPS function to use.
To connect WPS supported WLAN devices, see "Connecting WPS Supported WLAN Devices."
In Settings screen,
LAN Wi-Fi
WPS
Settings
WPS Setting screen appears.
Configure each item
Apply
Settings are applied and WPS function is available.
・If "PIN" is selected in WPS, enter eight-digit number generated by connecting device.
SoftBank 203Z
114
MAC Address Filtering
Save WLAN device MAC addresses to be restricted from connecting to Wi-Fi router. Save up to ten addresses.
In Settings screen,
LAN Wi-Fi
MAC Address Filtering
Setting for MAC address filtering screen appears.
Select
Enable / Disable
in Blacklist Switch
Apply
When setting Disable , setting is complete.
・Go to step
to block devices currently connected. Skip to step
to add new MAC addresses.
115
Click
Block
for the MAC address in List of Connected Devices.
Blocked MAC address is deleted from List of Connected Devices and added to Black list.
Apply
Settings
Enter MAC address of WLAN device to block
Entered MAC address is added to Black list.
SoftBank 203Z
116
Deleting MAC Addresses Set for Packet Filtering
In Settings screen,
LAN Wi-Fi
MAC Address Filtering
Setting for MAC address filtering screen appears.
In Black list, click
Delete
to the right of the MAC address to be deleted.
The MAC address is deleted from Black list, and is no longer subject to filtering.
Precaution for Changing LAN Wi-Fi Settings
Using WEB UI to change LAN Wi-Fi Settings while Wi-Fi router is wirelessly connected to the device may close the WLAN connection.
Reconnect Wi-Fi router to re-establish WLAN connection.
117
Firewall
Configure IP/Port Filtering, Port Mapping, etc.
Setting IP/Port Filtering
Set/apply rules for connecting or not by specifying IP addresses and port numbers.
Items are as follows.
Setting Item
Description
IP/Port Filtering
Select a function mode for IP/Port Filtering
Default Policy
Set action for IP/Port Filtering
Source IP Address
Set source IP address to apply rules
Dest. IP Address
Set destination IP address to apply rules
Protocol
Select protocols to apply rules
Source Port Range
Set source port number or range to apply rules
Dest. Port Range
Set destination port number or range to apply rules
Comment
Enter comments regarding rules
In Settings screen,
Firewall
IP/Port Filtering
Settings
IP/Port Filtering screen appears.
SoftBank 203Z
118
Set Basic Settings
Apply
If IP/Port Filtering is set to Disable , the setting is complete.
・If IP/Port Filtering is set to Enable , IP/Port Filtering Settings field appears.
Configure IP/Port Filtering Setting
Apply
Applied rules appear in IP/Port filtering rules that you have set up.
・Set up to ten rules.
・To delete specific rules, check the check box corresponding to the rules to delete and click Delete .
・Select Disable in IP/Port Filtering to disable all the rules.
119
Setting Port Mapping
Set rules so that access from Internet to specific devices in the LAN can be controlled. Set up to ten rules.
Items are as follows.
Setting Item
Description
Basic Settings
Select Port Forwarding action mode
Src. Port
Set port numbers to open
Dest. IP Address
Set IP address of device to open port
Dest. Port
Set destination port range
Protocol
Set protocol to use
Comment
Enter comments regarding rules
In Settings screen,
Firewall
Port Mapping
Settings
Port Mapping screen appears.
Set the Basic Settings
Apply
・If Basic Settings is set to Enable , "Port Mapping Settings" and "Current Port Mapping Rules in System" are shown.
SoftBank 203Z
If Basic Settings is set to Disable , the setting is complete.
120
Configure each item in Port Mapping Settings
Apply
Applied Port Mapping rules appear on Current Port Mapping Rules in System list.
・To delete specific rules, check the checkbox corresponding to the rules to delete and click Delete .
・Select Disable in Basic Settings to disable all the rules.
121
Setting UPnP
Select Enable / Disable UPnP (Universal Plug and Play) function.
In Settings screen,
Firewall
UPnP
Settings
UPnP screen appears.
Select
Enable / Disable
in UPnP Settings
Apply
Setting is applied.
SoftBank 203Z
122
Settings for Router
Configure router settings.
LAN Interface Setup (Router)
Items are as follows.
Setting Item
Description
IP Address
Set private IP address
Subnet Mask
Set subnet mask
DHCP Server
Select DHCP server function mode
DHCP IP Pool
Set DHCP IP pool starting address and ending address
DHCP Lease Time
Set IP address lease time
In Settings screen,
Router Settings
Router screen appears.
123
Configure each item
Apply
Settings are saved.
・Restart Wi-Fi router to activate saved settings.
Settings
SoftBank 203Z
124
Settings for Ethernet
Configure settings to connect the Internet using Ethernet.
Configure Ethernet Mode to select the way to connect the Internet when disconnecting from an Ethernet network.
Configure Ethernet Settings to select IP address acquisition mode (Automatic/Manual) to connect the Internet through an Ethernet
network.
Ethernet Mode
Set Ethernet Mode to Normal Mode or Wi-Fi Priority Mode.
In Settings screen,
Ethernet
Ethernet screen appears.
Select
Normal Mode / Wi-Fi Priority Mode
Apply
Setting is applied.
・In Normal Mode, 4G/LTE/3G and Wi-Fi are searched for connecting the Internet when the Ethernet network has been disconnected.
・In Wi-Fi Priority Mode, Wi-Fi is searched for 10 seconds then 4G/LTE/3G are searched to connect the Internet when the Ethernet
network has been disconnected.
125
Ethernet Settings
Configure the following items to obtain IP address manually.
Setting item
Description
IP Address
Set IP address for WAN interface.
Subnet Mask
Set subnet mask.
Default Gateway
Set default gateway for WAN interface.
Primary DNS Server Address
Set the first DNS address for WAN interface.
Secondary DNS Server Address
Set the second DNS address for WAN interface.
In Settings screen,
Ethernet
Settings
Ethernet screen appears.
Select IP Address Acquisition Mode
Apply
If Automatic is selected in IP Acquisition Mode, setting is complete.
・If Manual is selected in IP Acquisition Mode, setting items are shown.
SoftBank 203Z
126
Configure each item
Apply
Settings are applied
Precaution for Setting Ethernet
If Wi-Fi has been selected, a delay will occur when starting communication after disconnecting the Ethernet network.
127
Advanced Settings
Configure settings such as connection mode, Administrator Password, Sleep Timer, etc.
Mode Switch
Select a connection mode (Router Mode/Bridge Mode).
In Settings screen,
Advanced
Mode Switch
Settings
Mode Switch screen appears.
Select
Router Mode / Bridge Mode
Apply
Setting is applied.
SoftBank 203Z
128
Account Management (Password)
Change password entry for logging in to WEB UI. By default, the setting is "admin."
Setting items are as follows.
Setting item
Description
Current Password
Enter current Password
New Password
Enter a new Password
Confirm New Password
Enter the new Password for confirmation
In Settings screen,
Advanced
Account Management
Account Management screen appears.
Enter for each item
Setting is applied.
Apply
129
PIN Management
Personal Identification Number (PIN) is the USIM security code. Change PIN, or Enable/Disable PIN Authentication to control USIM access.
By default, PIN code of USIM Card is set to "9999."
・Note that once PIN Authentication enabled, Wi-Fi router is not available unless PIN is entered to connect to PC.
・Incorrectly entering PIN three consecutive times activates PIN Lock. PUK Code is required to unlock it. For details about PUK, contact
Customer Service. Incorrectly entering PUK Code ten consecutive times locks Wi-Fi router completely. If Wi-Fi router is completely
locked, Wi-Fi router must be serviced. Contact Customer Service.
In Settings screen,
Advanced
PIN Management
Settings
PIN Management screen appears.
Select PIN Status
Apply
SoftBank 203Z
Setting is applied.
Enter Current PIN as necessary
130
Resetting the Settings
Reset all Wi-Fi router settings to their factory defaults.
Following information are not restored; data in USIM Card, data in SD Card, software version if it is updated.
In Settings screen,
Advanced
Reset
Reset screen appears.
Reset
Confirmation message appears.
Yes
Reset all Wi-Fi router settings to their factory defaults.
・Click No to cancel it.
131
Sleep Timer Setting (Sleep Mode)
If not using or charging Wi-Fi router for a while with no connected WLAN devices, Wi-Fi router enters Sleep mode after Display has
turned off to save power. By default, it is set to 1 minute.
In Settings screen,
Advanced
Sleep Timer Setting
Settings
Wi-Fi Sleep Settings screen appears.
Select Sleep Time
Apply
Setting is applied.
SoftBank 203Z
132
Software Update
Execute Software Update.
If Automatic Download is set to Enable , Wi-Fi router periodically checks for updates, and when new updates are available, it
automatically updates the software. If it is set to Disable , it checks for updates but does not update automatically.
・Packet fees are not incurred for software updating.
・Other functions are not available while software is being updated.
In Settings screen,
Advanced
Software Update
Software Update Information screen appears.
Select
Enable / Disable
in Automatic Download
Apply
Setting is updated.
・Click Software Update to start software update immediately.
133
Mobile Utility
Access WEB UI via smartphone to show WEB UI for mobile.
Activating WEB UI via Mobile Devices
Make sure mobile devices are properly connected to Wi-Fi router via WLAN
・See "WLAN(Wi-Fi)" for WLAN connection.
On Wi-Fi router, Touch
Select
情報
and Touch
Select
WEB UI URL
and Touch
URL of WEB UI is shown In Display.
Enter URL in browser's Address Bar
Settings
WEB UI Home screen appears.
SoftBank 203Z
134
Logging in to WEB UI via Mobile Devices
In Home screen, Tap
Quick Setting ,
Basic Status
or
SD Card
Login screen appears.
Enter administrator password
Login
A screen for the menu Tapped in step
appears.
・Administrator password is set to "admin" by default. See "Account Management (Password)."
135
WEB UI Window for Mobile
Item
Description
Quick Setting
Show Quick Setting screen
Basic Status
Show Basic Status screen
SD Card
Show SD Card screen
Customer Support
Jump to Customer Support Page
User Manual
Jump to Manual download Page
WEB UI for PC
Show WEB UI screen for PC
Language
Select language
Logout
Log out WEB UI
Settings
Some functions are unavailable depending on browser
Precaution for Changing Wi-Fi Settings
Using WEB UI to change Internet Wi-Fi or LAN Wi-Fi Settings while Wi-Fi router is wirelessly connected to the device may close the
WLAN connection. Reconnect Wi-Fi router to re-establish WLAN connection.
SoftBank 203Z
136
Appendix
Troubleshooting.............................................................. 138
Specifications..................................................................140
Settings on WEB UI........................................................141
Glossary........................................................................... 148
Warranty & Service........................................................ 149
Customer Service............................................................ 149
138
Troubleshooting
Troubleshooting
If problems remain unresolved even after the following
troubleshooting, contact a SoftBank Shop or Customer Service,
General Information.
Troubleshooting
Q. Unable to connect WLAN
A. Make sure Wi-Fi router is properly connected to PC.
A. If WPS connection fails, see WLAN device user guide. If
still unable to connect, set Wi-Fi router manually. See
"WLAN (Wi-Fi)."
A. To connect WPS PIN specified WLAN device, confirm
PIN. See "Configuring Settings for Connecting WPS
Supported WLAN Devices."
A. If OPEN WEP encryption method is set, check whether
correct WEP key is entered. If WEP key is forgotten,
see "Basic Settings for WLAN" to reset WEP key, and
again connect.
A. Check whether correct WPA Key is entered. If WPA Key
is forgotten, see "Resetting to Factory Settings" and
reset Wi-Fi router, or see "WLAN Initialization Sticker"
to reset WPA key, and again connect. In addition,
the WPA/WPA2 encryption methods might not be
compatible depending on the WLAN devices. See user
guide for the WLAN device being used.
139
Q. PC does not recognize Wi-Fi router
Q. Internet connection fails
A. Make sure Wi-Fi router is properly connected to PC.
A. Make sure you are within the service area.
A. Remove Wi-Fi router from PC, restart PC, then
A. If signal reception is poor, move to where signal is
reconnect Wi-Fi router.
strong, then reconnect.
A. For Windows 8, follow these steps to confirm proper
Wi-Fi router installation.
Desktop
Properties
Explorer
of day, wait a little while then reconnect.
Right click
Computer
System Properties
Device Manager
Hardware
MMS Storage USB Device" in "Disk drives," "Remote
NDIS based Internet Sharing Device" in "Network
adapters," and "USB Mass Storage Device" in "Universal
Serial Bus controllers" are shown.
Wi-Fi router installation.
System Properties
Manager
network settings are correct.
Q. Transmission fails
A. Make sure Wi-Fi router is properly connected to PC via
Wi-Fi or with Micro USB Cable. If connected via a Micro
USB Cable, disconnect the Micro USB Cable from Wi-Fi
router and PC, then reconnect it.
A. For Windows 7, follow these steps to confirm proper
Right click
A. Activate WEB UI and confirm that 3G/4G settings and
Confirm that "CWID USB SCSI
CD-ROM USB Device" in "DVD/CD-ROM drives," "ZTE
Explorer
A. The access point might be busy depending on the time
Computer
Properties
Hardware
Device
Confirm that "CWID USB SCSI CD-ROM
USB Device" in "DVD/CD-ROM drives," "ZTE MMS
A. Signal may be weak. Move to where signal is stronger.
A. Restart Wi-Fi router.
A. Check Wi-Fi router battery level. If battery level is
low, charge using AC Charger, or by connecting to PC
via a Micro USB Cable. See "Charging Battery."
Storage USB Device" in "Disk drives," "Remote NDIS
based Internet Sharing Device" in "Network adapters,"
and "USB Mass Storage Device" in "Universal Serial Bus
controllers" are shown.
A. For Windows Vista, follow these steps to confirm
proper Wi-Fi router installation.
Right click
Properties
Computer
Properties
User Account Control
Device Manager
System
Hardware
Confirm that "CWID USB SCSI
CD-ROM USB Device" in "DVD/CD-ROM drives," "ZTE
A. Signal may be weak. Move to where signal is stronger.
A. Connection may be poor. Try again later.
A. Interference with nearby WLAN device etc. may occur.
Change Wi-Fi router channel or connect with Micro USB
Cable.
Q. Forgot PIN/Unknown, PUK/USIM Card is locked
A. Contact Customer Service, General Information.
NDIS based Internet Sharing Device" in "Network
adapters," and "USB Mass Storage Device" in "Universal
Serial Bus controllers" are shown.
A. For Windows XP, follow these steps to confirm proper
Wi-Fi router installation.
Right click
Hardware
My Computer
Device Manager
Properties
Confirm that
"CWID USB SCSI CD-ROM USB Device" in "DVD/CD-ROM
drives," "ZTE MMS Storage USB Device" in "Disk drives,"
"Remote NDIS based Device" in "Network adapters,"
Q. USIM Card is not recognized
A. Confirm that USIM Card is properly installed. See
Appendix
MMS Storage USB Device" in "Disk drives," "Remote
Q. Transmissions are slow
"Installing USIM Card."
A. Check USIM Card for damage.
A. Check USIM Card IC chip for scratches/corrosion.
A. Debris on USIM Card (particularly on IC chip) may
prevent recognition. Clean it with a soft cloth.
A. Contact Customer Service, General Information.
and "USB Mass Storage Device" in "Universal Serial Bus
controllers" are shown.
Q. Drivers are not automatically installed when Wi-Fi
router is connected (Windows PCs only)
A. New hardware recognition takes a few seconds. If
installer does not automatically activate, remove Wi-Fi
router from PC, then reconnect.
A. Install the drivers manually. See "Manual Installation."
Q. Confirming Administrator logon
A. For Windows 8, follow these steps:
Move the pointer into the upper-right or lower-right
corner
charm
Control Panel
Change
account type
in User Accounts and Family Safety
Make sure the account is "Administrator."
A. For Windows 7, follow these steps:
Start menu
Control Panel
User Account
User Account
Confirm
that the type of account currently logged into is
"Administrator."
SoftBank 203Z
and Family Safety
140
Specifications
Q. "Out of Service" appears outside Japan
A. Power off and restart.
203Z
Q. Resetting factory defaults (Reset)
Item
A. Select menu on Wi-Fi router to reset. See "Resetting to
Model Name
Factory Settings."
A. To reset the settings via WEB UI. See "Resetting the
Settings."
Dimensions 1
Weight 1
Q. Old phone number appears in WEB UI.
Interface
A. Depending on contract/cancellation method, old phone
number may appear in WEB UI.
Power
Consumption 1
Q. Performance is unstable
A. Avoid extreme temperatures/high humidity/direct
sunlight/dusty areas. Check "Safety Precautions" to
not provided by SoftBank Mobile Corp. are not
203Z
67.7 mm (h) × 110.2 mm (w) × 18.7 mm
(d)
168 g
USB 2.0
microSD Card or microSDHC Card
Standby: 0.02 W
Connected: 1.24 W
Power consumption varies by usage
Operating
Operating Temperature: -10 °C to +45 °C
Environment
Operating Humidity: 5 % to 95 %
AXGP: 2.5 GHz
use in an appropriate environment.
A. Do not use invalid software. Operations using software
Description
W-CDMA: 1.5 GHz, 1.7 GHz, 2.1 GHz
Frequency
(overseas usage), 850 MHz (overseas
usage)
guaranteed.
FDD-LTE: 1.7 GHz
WAN: 4G (AXGP/FDD-LTE), 3G (W-CDMA),
Q. Connection failed without notice
Compatible
3G High Speed (HSUPA, HSDPA), ULTRA
A. Connection method may have been changed. Confirm
Networks
SPEED (HSPA+, DC-HSDPA)
WLAN: IEEE802.11b/g/n
connection method on Display.
A. Restart Wi-Fi router.
Q. Connection for voice chatting or video chatting fails.
A. Make sure you are within the service area.
Charging
5.5 hours (AC charger charging)
Time 1, 2
12 hours (USB charging)
Continuous
Standby Time
A. Signal may be weak. Move to where signal is stronger.
Continuous
A. Enable UPnP to follow these steps:
Communication
Settings
Firewall
UPnP
900 hours
1, 3
select
"Enable" then click "Apply."
Power Supply
Voltage
Power Supply
Q. IP address error is shown.
Current
A. If IP address of Internet Wi-Fi and IP address of WiFi router is duplicated, IP address error is shown on
Display of Wi-Fi router.
When using the Internet Wi-Fi function, and connect
14 hours
Time 1, 3
DC 5.2 V ± 5 %
1A
1
Approximate values
2
Varies by ambient temperature, Battery usage, etc.
3
Varies by environment, signal conditions, etc.
to the Internet through the access point of the
public WLAN service, duplicating the IP address of
the LAN Wi-Fi Internet and Wi-Fi may occur, Internet
AC Charger
connection is unavailable in this situation.
Activate WEB UI and change current IP address in "IP
Address" field by selecting Settings
Router
Item
Description
Model Name
AC Charger (ZECAP1)
set to "192.168.128.1." If an IP address error occurs in
Weight
32 g
this setting, change the third portion of the "128" in
Rated Voltage
DC 5 V ± 5 %
Rated Current
1.5 A - 1.8 A
Input Voltage
100 V - 240 V, 50 Hz - 60 Hz
Settings . (By default, IP address of Wi-Fi router is
the "192.168.128.1" from the left to another number).
Accordingly, change IP address in DHCP IP Pool and
click Apply . If Wi-Fi router’s IP address is changed,
be aware that even if functions are linked to the IP
address, Firewall configuration might need to be
changed.
141
Settings on WEB UI
Micro USB Cable
Item
Description
Model Name
Micro USB Cable (ZEDAD1)
Cable Length
1200 mm
Plug Type
Standard-A, micro-B
Charging
Temperature
Followings are the settings on WEB UI. Options and default
values for setting items in Settings screen and SD Card screen
are shown. If accessing WEB UI through a mobile device, some
items or names may be modified or omitted.
0 °C - 55 °C
Information
Check Wi-Fi router information, devices connected to Wi-Fi
router, messages, and URLs for support website and manuals.
Materials
Item
Parts
Outer Case
(Display side)
Materials/Finishing
Battery
- Phone Number
- Current APN
Translucent PC, IML
- IMEI
- SSID
Outer Case
(side and
PC
Device
- Max. Access Number
Information
- LAN Domain
- IP Address
Cover)
Power Slide
Key
INFO Key
SD Card Slot
Cover
USIM Card
Slot Cover
USB Slot
Cover
Information
- WAN IP Address
PC
- Firmware Version
PC+TPU
- Upload Speed
- Hardware Version
- Download Speed
PC+TPU
Following items of each network operator
(DATA MAIN and DATA SUB) and total of
PC+TPU
network operators
- Duration of current connection
PC+TPU
Statistics
- Data downloaded of current connection
- Data uploaded of current connection
- Total used data of current connection
- Duration of current month
- Data uploaded of current month
- Total used data of current month
List of
Connected
Devices
Message
Help
- Host name
Appendix
- Data downloaded of current month
- MAC address
- Message
- Support Website URL
- User Manual URL
Settings (Options and Default)
Set details.
・Quick Settings
SoftBank 203Z
142
Items
SSID Setting
Setting Range/Default
Items
Setting Range/Default
SSID
Profile Name
- Options: Alphanumeric characters and
- Options: Alphanumeric characters and
symbols (! # ( ) + - . / % = ? @ ^ _ { | }
symbols (except ,(comma) " : ; < > &
~ and space) of up to 32 characters
[backslash] ¥) of up to 63 characters
- Default:
1
SSID Stealth
APN
- Options: Enable, Disable
- Options: Dynamic, Static/Alphanumeric
- Default: Disable
characters and symbols (except ,(comma)
Authentication Method
" : ; < > & [backslash] ¥) of up to 63
characters
- Options: OPEN, SHARED, WPA-PSK,
WPA2-PSK, WPA-PSK/WPA2-PSK
- Default: WPA-PSK/WPA2-PSK
Data Main
APN Settings
WPA ENCRYPTION
Authentication
- Options: NONE, CHAP, PAP
User Name
- Options: AES, TKIP, AUTO
- Default: AUTO
- Options: Alphanumeric characters and
Encryption scheme (when "OPEN" is
[backslash] ¥) of up to 63 characters
symbols (except ,(comma) " : ; < > &
selected on "Authentication Method")
Password
- Options: NO ENCRYPTION, WEP
- Default: NO ENCRYPTION
- Options: Alphanumeric characters and
Security Key
[backslash] ¥) of up to 63 characters
- Options: Alphanumeric characters and
Profile Name
symbols (except ,(comma) " : ; < > &
- Options: Alphanumeric characters and
Authentication
[backslash] ¥) of up to 63 at least 8
symbols (except ,(comma) " : ; < > &
Method
characters, or 64 hexadecimal digits (0 to
[backslash] ¥) of up to 63 characters
symbols (except ,(comma) " : ; < > &
9, A to F)
- Default:
APN
1
- Options: Dynamic, Static/Alphanumeric
Default Key
characters and symbols (except ,(comma)
- Options: 1 to 4
" : ; < > & [backslash] ¥) of up to 63
- Default: 1
characters
WEP Key 1 to 4
- Options: 64-bit key: Alphanumeric
Data Sub APN
Settings
Authentication
- Options: NONE, CHAP, PAP
characters and symbols (! # ( ) + - . /
% = ? @ ^ _ { | } ~) of 5 characters or
User Name
10 hexadecimal digits (0 to 9, A to F),
- Options: Alphanumeric characters and
128-bit key: Alphanumeric characters and
symbols (except ,(comma) " : ; < > &
symbols (! # ( ) + - . / % = ? @ ^ _ { | }
[backslash] ¥) of up to 63 characters
~) of 13 characters or 26 hexadecimal
1
digits (0 to 9, A to F)
Password
- Default: (none)
- Options: Alphanumeric characters and
symbols (except ,(comma) " : ; < > &
See supplied WLAN Initialization Sticker for Network
[backslash] ¥) of up to 63 characters
Name (SSID) and Security Keys (WPA key).
・Network Settings > Network Operator
Items
Setting Range/Default
Network Operator
Network
- Options: Automatic (4G/LTE/3G),
Operator
Manual
- Default: Automatic (4G/LTE/3G)
・Network Settings > APN
・Network Settings > Overseas Roaming
Items
Overseas
Roaming
Setting Range/Default
Overseas Roaming
- Options: On, Off
- Default: Off
・Setup of Data traffic
143
Items
Setting Range/Default
Items
Maximum traffic
- Options: 0 to 999, KB/MB/GB
Setup of Data
traffic
Internet Wi-Fi
Internet Wi-Fi
- Default: 2 GB
- Default: 31
・Internet Wi-Fi > Internet Wi-Fi
- Options: Enable, Disable
- Default: Enable
SoftBank Wi-Fi Spot Setting
Auto reset date
- Options: 1 to 31
Setting Range/Default
- Options: Enable, Disable
SoftBank
- Default: Enable
Wi-Fi Spot
Setting
Password
- Options: 0000 to 9999
- Default: (none) 1
Profile
- Options: Alphanumeric characters and
symbols (except ,(comma) " : ; < > &
[backslash] ¥) of up to 63 characters
- Default: (none)
Network Name (SSID)
- Options: Alphanumeric characters and
symbols (! # ( ) + - . / % = ? @ ^ _ { | }
~ and space) of up to 32 characters
- Default: (none)
Authentication Method
- Options: OPEN, SHARED, WPA-PSK,
WPA2-PSK, WPA-PSK/WPA2-PSK
- Default: OPEN
WPA ENCRYPTION
- Options: TKIP, AES, AUTO
- Default: AUTO
Security Key
Wireless
symbols (except ,(comma) " : ; < > &
[backslash] ¥) of up to 63 at least 8
characters, or 64 hexadecimal digits (0 to
9, A to F)
- Default: (none)
Appendix
Network
- Options: Alphanumeric characters and
Encryption scheme
- Options: NO ENCRYPTION, WEP
- Default: NO ENCRYPTION
Default Key
- Options: 1 to 4
- Default: 1
WEP Key 1 to 4
- Options: 64-bit key: Alphanumeric
characters and symbols (! # ( ) + - . /
% = ? @ ^ _ { | } ~) of 5 characters or
10 hexadecimal digits (0 to 9, A to F),
128-bit key: Alphanumeric characters and
symbols (! # ( ) + - . / % = ? @ ^ _ { | }
~) of 13 characters or 26 hexadecimal
digits (0 to 9, A to F)
1
Initial password is the four-digit password set in your
contract.
・Internet Wi-Fi > WPS
SoftBank 203Z
- Default: (none)
144
Items
Setting Range/Default
Items
Setting Range/Default
WPS
Multi SSID
- Options: PBC, PIN
- Options: Enable, Disable
- Default: (none)
WPS
- Default: Disable
Basic Settings
PIN
Multi SSID Isolation
- Options: 8 decimal digits
- Options: Enable, Disable
- Default: (none)
- Default: Disable
Network Name (SSID)
・LAN Wi-Fi > Basic Settings
- Options: Alphanumeric characters and
symbols (! # ( ) + - . / % = ? @ ^ _ { | }
~ and space) of up to 32 characters
- Default:
1
Privacy Separator
- Options: Enable, Disable
- Default: Disable
SSID Stealth
- Options: Enable, Disable
- Default: Disable
Authentication Method
- Options: OPEN, SHARED, WPA-PSK,
WPA2-PSK, WPA-PSK/WPA2-PSK
- Default: WPA-PSK/WPA2-PSK
WPA ENCRYPTION
- Options: TKIP, AES, AUTO
- Default: AUTO
Security Key
- Options: Alphanumeric characters and
symbols (except ,(comma) " : ; < > &
SSID 1
[backslash] ¥) of up to 63 at least 8
characters, or 64 hexadecimal digits (0 to
9, A to F)
- Default:
1
Encryption scheme
- Options: NO ENCRYPTION, WEP
- Default: NO ENCRYPTION
Default Key
- Options: 1 to 4
- Default: 1
WEP Key 1 to 4
- Options: 64-bit key: Alphanumeric
characters and symbols (! # ( ) + - . /
% = ? @ ^ _ { | } ~) of 5 characters or
10 hexadecimal digits (0 to 9, A to F),
128-bit key: Alphanumeric characters and
symbols (! # ( ) + - . / % = ? @ ^ _ { | }
~) of 13 characters or 26 hexadecimal
digits (0 to 9, A to F)
- Default: (none)
Max Station Number
- Options: 1 to 14 2
- Default: 14 3
145
SSID
Items
- Options: Alphanumeric characters and
Network Mode
symbols (! # ( ) + - . / % = ? @ ^ _ { | }
- Options: Auto (11b/11g/11n), 11b, 11g,
~ and space) of up to 32 characters
- Default:
11n
1
- Default: Auto (11b/11g/11n)
Privacy Separator
Frequency Bandwidth
- Options: Enable, Disable
- Options: 20 MHz, 20 MHz/40 MHz
- Default: Disable
- Default: 20 MHz/40 MHz
SSID Stealth
Country/Region Code
- Options: Enable, Disable
- Options: (List)
- Default: Disable
Authentication Method
- Options: OPEN, SHARED, WPA-PSK,
WPA2-PSK, WPA-PSK/WPA2-PSK
- Default: JAPAN
Advanced
Channel
Settings
- Options: Auto (1-11), Auto (1-13)
- Default: Auto (1-11)
- Default: WPA-PSK/WPA2-PSK
Out of Service Notification
WPA ENCRYPTION
- Options: On, Off
- Options: TKIP, AES, AUTO
- Default: On
- Default: AUTO
Wi-Fi Automatic Disconnection
Security Key
- Options: On, Off
- Options: Alphanumeric characters and
- Default: On
symbols (except ,(comma) " : ; < > &
SSID 2
[backslash] ¥) of up to 63 at least 8
Show SSID and password on LCD
characters, or 64 hexadecimal digits (0 to
- Options: On, Off
9, A to F)
- Default:
- Default: On
1
Encryption Scheme
・LAN Wi-Fi > WPS
Items
- Options: NO ENCRYPTION, WEP
- Default: NO ENCRYPTION
- Options: -
- Default: 1
WPS
WPS
- Options: PIN, PBC
- Default: (none)
- Options: 64-bit key: Alphanumeric
characters and symbols (! # ( ) + - . /
WPS PIN
% = ? @ ^ _ { | } ~) of 5 characters or
- Options: 8 decimal digits
10 hexadecimal digits (0 to 9, A to F),
- Default: (none)
128-bit key: Alphanumeric characters and
~) of 13 characters or 26 hexadecimal
digits (0 to 9, A to F)
- Default: (none)
Max Station Number
1
1
1
See supplied WLAN Initialization Sticker for Network
Name (SSID) and Security Keys (WPA key).
・LAN Wi-Fi > MAC Address Filtering
Items
Setting Range/Default
- Options: 1 to 13
Settings for
Blacklist Switch
- Default: 7
MAC address
- Options: Enable, Disable
filtering
- Default: Disable
See supplied WLAN Initialization Sticker for Network
Name (SSID) and Security Keys (WPA key).
2
1 to 13 (when Multi SSID is Enable)
3
7 (when Multi SSID is Enable)
MAC Address
Blacklist
- Options: Number of six sets of 00 to FF
- Default: (none)
・Firewall > IP/Port Filtering
SoftBank 203Z
・LAN Wi-Fi > Advanced Settings
Appendix
- Default:
- Options: 1 to 4
symbols (! # ( ) + - . / % = ? @ ^ _ { | }
Setting Range/Default
SSID Setting
Default Key
WEP Key 1 to 4
Setting Range/Default
146
Items
Setting Range/Default
Items
IP/Port Filtering
- Options: Enable, Disable
UPnP Settings
UPnP Settings
- Default: Disable
Basic Settings
Default Policy
- Options: Accepted, Forbidden
- Default: Accepted
・Router Settings
Items
- Options: Number of four sets of 0 to
255
255
- Default: 192.168.128.1
- Default: (none)
Subnet Mask
Dest. IP Address
- Options: Number of four sets of 0 to
- Options: Number of four sets of 0 to
255
255
- Default: 255.255.255.0
- Default: (none)
DHCP Server
Protocol
Settings
- Options: Enable, Disable
- Options: TCP+UDP, TCP, UDP, ICMP
- Default: TCP+UDP
LAN Interface
Setup
Source Port Range
- Default: 192.168.128.20
- Default: 1 - 65535
DHCP IP Pool (end IP address)
Dest. Port Range
- Options: Number of four sets of 0 to
- Options: 1 - 65535 Join by "-" if
255
specifying range
- Default: 192.168.128.253
- Default: 1 - 65535
DHCP Lease Time (hour)
Comment
- Options: 1 to 24
- Default: (none)
・Firewall > Port Mapping
- Default: 24
・Ethernet
Setting Range/Default
Basic Settings
- Options: Enable, Disable
- Default: Disable
Src. Port
- Options: 1 to 65000
- Default: (none)
Dest. IP Address
- Options: Number of four sets of 0 to
255
- Default: (none)
Dest. Port
- Options: 1 to 65000
- Default: (none)
Protocol
- Options: TCP+UDP, TCP, UDP
- Default: TCP+UDP
Comment
- Default: (none)
・Firewall > UPnP
DHCP IP Pool (start IP address)
255
specifying range
Port Mapping
- Default: Enable
- Options: Number of four sets of 0 to
- Options: 1 - 65535 Join by "-" if
Items
Setting Range/Default
IP Address
- Options: Number of four sets of 0 to
Filtering
- Options: Enable, Disable
- Default: Disable
Source IP Address
IP/Port
Setting Range/Default
147
Items
Setting Range/Default
・Advanced > PIN Management
Ethernet Mode
Ethernet
- Options: Normal Mode, Wi-Fi Priority
Mode
Mode
Items
PIN Status
- Options: Enable, Disable
- Default: Normal Mode
- Default: Disable
IP Address Acquisition Mode
- Options: Automatic, Manual
Current PIN
- Default: Automatic
- Options: Four to eight-digit number
- Default: (none) 1
IP Address
- Options: Number of four sets of 0 to
255
- Default: (none)
New PIN
PIN
Management
Subnet Mask
- Default: (none)
- Default: (none)
Ethernet
PUK
Default Gateway
- Options: Eight-digit number
- Options: Number of four sets of 0 to
- Default: (none)
255
- Default: (none)
1
Primary DNS Server Address
・Advanced > Sleep Timer Setting
- Options: Number of four sets of 0 to
255
PIN is "9999" by default.
Items
Secondary DNS Server Address
- Options: Number of four sets of 0 to
Wi-Fi Sleep
Settings
・Advanced > Mode Switch
- Options: Router Mode, Bridge Mode
Minutes
Setting Range/Default
Software
Automatic Download
Update
- Options: Enable, Disable
Information
- Default: Enable
Appendix
Connection Mode
10 Minutes, 15 Minutes, 30 Minutes, 60
・Advanced > Software Update
Items
Setting Range/Default
- Options: 1 Minute, 3 Minutes, 5 Minutes,
- Default: 1 Minute
255
- Default: (none)
Setting Range/Default
Sleep Time
- Default: (none)
Mode Switch
- Default: (none)
- Options: Four to eight-digit number
255
Items
- Options: Four to eight-digit number
Confirm New PIN
- Options: Number of four sets of 0 to
Settings
Setting Range/Default
- Default: Router Mode
・Advanced > Account Management
Items
Setting Range/Default
SD Card
Configure sharing mode of SD Card.
Current Password
If "USB" is selected, Wi-Fi router is available as a removable
- Options: Alphanumeric characters and
disk when connected to PC with USB Cable.
symbols (! # ( ) + - . / % = ? @ ^ _ { | }
If "HTTP" is selected, files in SD Card are checked on WEB UI.
~) of up to 15 characters
Moreover, saving data in SD Card to PC, saving data in PC to
- Default: (none) 1
SD Card, changing file names, making new folders, deleting
files and folders in SD Card are possible on WEB UI.
New Password
Account
Management
- Options: Alphanumeric characters and
symbols (! # ( ) + - . / % = ? @ ^ _ { | }
~) of up to 15 characters
- Default: (none)
Confirm New Password
symbols (! # ( ) + - . / % = ? @ ^ _ { | }
~) of up to 15 characters
- Default: (none)
1
Administrator password is "admin" by default.
SoftBank 203Z
- Options: Alphanumeric characters and
148
Glossary
The name used to identify a WLAN access
Glossary
SSID
point. If there is more than one wireless
(Service Set
LAN access point in the communication
IDentifier)
range, specify the access point to be
connected to.
Term
Description
Install in Wi-Fi router to use. Information
USIM Card
(Dual Cell
High Speed
Downlink
Packet
An extended standard for data receiving
which has sped up the W-CDMA that is
used in mobile phones.
Access)
(Dynamic
Host
Configuration
Protocol)
W-CDMA
(Wideband-
A third-generation wireless
Code Division
communications system for performing
Multiple
broadband communications.
Access)
This function automatically assigns an IP
DHCP
address to devices to be connected to the
IP network, to provide the information
needed for the connection. Setting for
WEP (Wired
Equivalent
Privacy)
the connection is simplified, but since the
network via a firewall, referred to as a
DMZ
demilitarized zone. Since all of the ports
(DeMilitarized
are opened to the outside via terminals
Zone)
that are set in the DMZ host, server
WPA (WiFi Protected
Access)
are automatically generated will be
used. Also, two encryption methods
are used, AES (Advanced Encryption
Standard) which supports long encryption
keys and TKIP (Temporal Key Integrity
Protocol) which dynamically changes the
encryption keys, for conducting more
secure communications.
HSDPA
(High Speed
An extended standard for data receiving
Downlink
which has sped up the W-CDMA that is
Packet
used in mobile phones.
Access)
HSPA+ (High
An extended standard for data receiving
Speed Packet
which has sped up the W-CDMA that is
Access +)
used in mobile phones.
Access)
or 13 characters is adopted.
authentication, encryption keys that
to be specially set to enable their use.
Uplink Packet
method that uses a shared key of either 5
key that is set in advance. After
applications and online games do not need
(High Speed
in wireless communication. Encryption
improves on WEP. It is a pre-shared
identifying the terminal with an IP
A region isolated from the internal
An encryption standard initially used
This is an encryption standard that
IP address changes with each connection,
address is not possible.
HSUPA
such as the contracted customer’s phone
number is stored in USIM Card.
DC-HSDPA
WPS (WiFi Protected
Setup)
connections and security settings. Several
connection methods are available such as
push-button and PIN code methods.
A number of several digits which is issued
by a WLAN device that is WPS-compatible.
WPS PIN
When setting via WPS PIN code method,
enables secure WLAN setting via the input
An extended standard for data receiving
of this number into Wi-Fi router.
which has speeded up the W-CDMA that is
A system for monitoring access from an
used in mobile phones.
Next generation of high-speed
A function which easily enables WLAN
Firewall
external network such as the Internet
to an internal network (LAN), to prevent
LTE (Long
communications standard for transmitting
unauthorized intrusions.
Term
and receiving data. Third generation (3G)
Evolution)
communications standard used in mobile
A number for specifying applications
and services to receive data via Internet
phones has been sped up.
MAC Address
(Media
Access
Control
Address)
PIN (Personal
Identification
Number)
Unblocking
Key)
can be specified, and it is partitioned
6-byte ID number uniquely assigned to
all network devices. Typically, a MAC
address is a hexadecimal and is expressed
into three categories; a well-known
Port Number
port number that can be determined
by general applications (0 to 1023), a
as "XX:XX:XX:XX:XX:XX."
registered port number that uses specific
applications (1024 to 49151), etc., and a
Personal identification number required to
dynamic/private port number that can be
use USIM Card on Wi-Fi router. Even if WiFi router is lost or stolen, use by others
freely used (49152 to 65535).
is prevented.
Service which enables mobile phones to be
PUK
(Personal
communications. Numbers 0 to 65535
Roaming
Key to unlock the PIN lock.
used within the area networks of other
providers based upon agreements between
mobile phone providers.
149
Warranty & Service
Customer Service
For SoftBank Wi-Fi router or service information, call General
Warranty
Wi-Fi router purchase includes Warranty.
Information. For repairs, call Customer Assistance.
SoftBank Customer Support
・Confirm shop name and purchase date.
・Read contents of Warranty and keep it in a safe place.
・Check warranty period in the Warranty.
Precautions
General Information
From a SoftBank handset, dial toll free at 157
From a landline/IP phone, dial toll free at 0800-919-0157
Damages
SoftBank Mobile Corp. is not liable for any damages
resulting from the use of this Wi-Fi router.
Customer Assistance (loss or
malfunction)
Accidents/Repairs
From a SoftBank handset, dial toll free at 113
Files and settings may be lost or altered due to accidents
If you cannot reach a toll free number, use the number
or repairs. Keep a copy of important files, etc. SoftBank
Mobile Corp. is not liable for damages resulting from loss
or alteration of files or settings due to accident or repair.
From a landline/IP phone, dial toll free at 0800-919-0113
(charges apply) below for your service area:
Hokkaido Area, Tohoku Area, Hokuriku Area, Kanto &
Koshinetsu Area: 022-380-4380
Tokai Area: 052-388-2002
Disassembling/Modifying Wi-Fi Router
Note that SoftBank Mobile Corp. does not accept
disassembled or modified products for repairs.
Services
Before submitting Wi-Fi router for repairs, contact Customer
to describe problem in detail.
・During the warranty period, repairs will be made under the
terms and conditions described in the Warranty.
・After the warranty period, repairs will be upon request; if
said repairs can be made, you will be charged for them.
Further Inquiry
Chugoku & Shikoku Area, Kyushu & Okinawa Area:
092-687-0010
SoftBank Technical Support Center
(Setup, Operations & Technical Issues)
Setup, Operations & Technical Issues:
Service hours
Weekdays 9:00 am – 7:00 pm
Saturdays, Sundays, and holidays 9:00 am – 5:00 pm
From a SoftBank handset, dial toll free at
5525
Appendix
Service, General Information or a SoftBank Shop; be prepared
Kansai Area: 06-7669-0180
From a landline/IP phone, dial toll free at 0088-21-5525
*Not available from outside Japan.
SoftBank Mobile Global Call Center
For more information, contact a SoftBank Shop or
From outside Japan, dial +81-3-5351-3491 (toll free from
Customer Service, General Information.
SoftBank handsets)
If handset is lost/stolen, call this number immediately
(international charges apply)
ZTE Japan Customer Support Website
(Japanese)
http://www.zte.co.jp/products/handsets/handsets_gallery/
SoftBank 203Z
150
Safety Precautions
Safety Precautions......................................................... 152
General Notes................................................................. 158
RF Exposure Information/Specific Absorption Rate (SAR)
Information..................................................................... 159
152
Safety Precautions
Read safety precautions before using Wi-Fi router.
Wi-Fi Router, USIM Card, AC Charger,
Micro USB Cable
Observe precautions to avoid injury to self or others, or
damage to property.
SoftBank Mobile Corp. is not liable for any damages resulting
from use of this product.
Labels & Symbols
Use SoftBank specified devices (AC Charger or
Micro USB Cable) only.
These labels indicate the degree of risk from improper use.
Make sure you thoroughly understand their meanings before
reading on.
Use of non-specified devices may cause Internal Battery to
leak, overheat, rupture or ignite; or may cause AC Charger
to overheat, ignite or malfunction.
Mark
Descriptions
Great risk of death or serious injury from
improper use
Do not disassemble/modify/solder Wi-Fi router.
Risk of death or serious injury from
improper use
May cause fire, injury, electric shock or malfunction.
Modifying Wi-Fi router is a violation of the Radio Law and
Risk of minor injury or damage to
subject to penalty.
property from improper use
These symbols indicate prohibited or compulsory actions. Make
sure you thoroughly understand their meanings before reading
on.
Keep liquids away from Wi-Fi router.
If Wi-Fi router is not dried after exposure to fluids
Mark
Descriptions
Prohibited actions
(water, pet urine etc.), or connected to PC while wet,
overheating, electric shock, fire, injury, malfunction, etc.
may occur. Be careful of where used or handled.
Disassembly prohibited
Exposure to liquids prohibited
Use with wet hands prohibited
Compulsory actions
Unplug power cord
Do not charge, use or leave Wi-Fi router in
places subject to high temperatures (near an
open flame or heating equipment, in direct
sunlight or inside a car on a hot day.) Also, do
not charge, use or leave Wi-Fi router in warm
places (inside of hermetically-closed bag or
pocket, inside of kotatsus, electric blankets,
or inside pockets together with pocket heater,
etc.) where heat easily builds up since the same
risks might be incurred.
May cause deformation or malfunctions, Also, the outer
housing may become hot resulting in burns.
Do not use excessive force to connect AC
Charger or Micro USB Cable. Connect after
checking the orientation of the terminals.
Internal Battery may leak, overheat, rupture or ignite.
153
Do not place Wi-Fi router, AC Charger, or Micro
USB Cable in a microwave oven or pressure
cooker, or on an induction cooktop.
Do not place Wi-Fi router on an uneven or
unstable surface.
May cause Internal Battery to leak, overheat, rupture or
malfunctions.
Wi-Fi router may fall, leading to injuries or Wi-Fi router
ignite; or may cause Wi-Fi router, AC Charger, Micro USB
Cable to overheat, emit smoke, ignite or malfunction.
Keep Wi-Fi router out of reach of infants.
Turn off Wi-Fi router when entering gas
stations or other places where flammable
gases (propane gas, gasoline, etc.) or fine
particulates are generated. Be sure to turn
off Wi-Fi router beforehand. Do not charge
Internal Battery in such places.
Failing to do so may result in small parts being accidentally
swallowed or may cause injury.
Gases may ignite.
When a child uses Wi-Fi router, parental
supervision is advised.
Using Wi-Fi router near petrochemicals or other flammables
Provide child with proper instructions. Failing to do so may
may cause fire or explosion.
cause injury, etc.
Do not drop/throw Wi-Fi router or expose it to
excessive shock.
Wi-Fi Router
May cause malfunction.
If you notice an unusual sound, odor, smoke,
etc. while using or storing Wi-Fi router,
immediately turn PC power off.
Do not dispose of Wi-Fi router in fire.
May cause Internal Battery to leak, rupture or ignite.
Continued use may cause fire or electric shock.
May cause Internal Battery to leak, overheat, rupture or
ignite.
May cause short circuit, resulting in fire or malfunction.
Safety Precautions
Keep liquids (water, pet urine, etc.) and
conductive materials (e.g. pencil lead, metal
fragments, metal necklaces, hairpins, etc.)
away from External Device Port.
Do not damage (nail, hammer, stomp, etc.)
Wi-Fi router or subject it to strong impacts/
shocks.
If Internal Battery fluid gets into eyes,
immediately rinse with clean water and consult
a doctor. Do not rub eyes.
Failing to do so may result in loss of eyesight.
SoftBank 203Z
154
Do not sit down with Wi-Fi router in your
trousers pocket.
Do not dispose of Internal Battery as municipal
waste.
Excess weight may damage Display, Internal Battery or
Bring used Internal Battery to a SoftBank Shop.
other parts resulting in overheating, fire or injury.
Keep Wi-Fi router power off near high
precision electronic devices or devices using
weak signals.
Wi-Fi router may cause these devices to malfunction.
Do not use Wi-Fi router in a vehicle if it
affects in-vehicle electronic devices.
Use of Wi-Fi router in some types of vehicles may, in
some rare cases, affect in-vehicle electronic devices and
interfere with safe driving.
Devices that may be affected:
Hearing aids, implanted cardiac pacemakers, implanted
defibrillators and other electronic medical equipment;
fire alarms, automatic doors and other automatic control
devices.
If skin abnormality occurs with use of Wi-Fi
router, immediately discontinue use and consult
a doctor.
Wi-Fi router contains metals, etc. Depending on your
Keep Wi-Fi router power off aboard aircraft.
physical condition, you may experience itchiness, rash, etc.
For more information, see Materials.
When in-flight use is permitted, observe airline
instructions.
If thunder is heard while outside, immediately
seek shelter.
Keep magnetic cards, etc. away from Wi-Fi
router.
Failing to do so may cause magnetic data on a cash card,
credit card, telephone card or floppy disk to be lost.
Failing to do so may attract lightning and cause electric
shock.
If Internal Battery fluid gets on your skin or
clothing, immediately stop Wi-Fi router use and
rinse with clean water.
Internal Battery fluid may harm your skin.
If Internal Battery is not fully charged even
after specified charging time, stop charging.
Internal Battery may leak, overheat, rupture or ignite.
Keep Wi-Fi router away from pets.
Bites may cause Internal Battery to leak, overheat, rupture
or ignite, or cause device malfunction or fire.
Wi-Fi router may become hot during prolonged
use, especially in warm surroundings.
Skin contact for extended period may cause lowtemperature burns.
155
USIM Card & SD Card
AC Charger & Micro USB Cable
Do not insert objects other than SD Card into
SD Card Slot.
Do not cover or wrap with clothing or bedding
during charging.
Doing so may cause overheating, electric shock or
Heat may build up resulting in fire or malfunction.
malfunction.
Do not subject SD Card to vibration or shock or
remove it from Slot while data is being written
onto or read from SD Card.
Doing so may cause data loss or malfunction.
Use the specified power supply and voltage.
Failing to do so may cause fire or malfunction.
AC Charger: 100 to 240 V AC (for household AC outlets
only)
Also, do not use commercially available voltage
converters, as when traveling.
May cause fire, electric shock or malfunction.
Use only SD Card supported by Wi-Fi router.
Failing to do so may cause data loss or malfunction. Wi-Fi
router supports SD Card with a storage capacity of up to
32 GB.
Hold plug and unplug AC Charger from outlet
before extended periods of Wi-Fi router disuse.
Failing to do so may cause electric shock, fire or
malfunction.
Do not use excessive force when installing or
removing USIM Card.
Doing so may cause a malfunction. Be careful not to injure
a hand or finger when removing USIM Card.
If liquid (water, pet urine, etc.) gets into AC
Charger, immediately hold plug and unplug AC
Charger from outlet.
Failing to do so may cause electric shock, smoke emission
or fire.
Install specified USIM Card only.
Contact with IC chip on USIM Card is a
potential cause of data loss or failure. Please
avoid unnecessary contact.
Although USIM Card may become warm while
using Wi-Fi router, this is not a malfunction.
Please use as it is.
If dust accumulates on AC Charger plug, hold
plug and unplug AC Charger from outlet and
wipe with a dry cloth.
Failing to do so may cause fire.
Safety Precautions
Using other USIM cards may cause malfunction/data loss.
When plugging AC Charger into outlet, keep
conductive materials (pencil lead, metal parts,
necklaces, hair pins, etc.) away from AC
Charger plug/Micro USB Cable terminals and
plug AC Charger firmly into outlet.
fire, etc.
SoftBank 203Z
Failing to do so may cause electric shock, short circuit,
156
Do not plug/unplug AC Charger with wet hands.
May cause electric shock or malfunction.
Firmly hold plug and unplug AC Charger from
outlet before cleaning.
Failing to do so may cause electric shock.
If thunder is audible, do not touch AC Charger.
May cause electric shock.
Do not unplug AC Charger by pulling the cord.
Firmly hold plug and unplug AC Charger.
Pulling the cord may damage the cord resulting in electric
Supplied Micro USB Cable is only for charging
Wi-Fi router. Do not use the charging
equipment of third-party products.
If any damage such as short-circuiting, fire or failure has
occurred by using supplied Micro USB Cable for charging
the third-party products, SoftBank Mobile is not liable for
any damages resulting from the use of this cable. Use a
shock or fire.
Use AC Charger in an environment of -10 °C to
+45 °C ambient temperature and 5 % to 95 %
humidity.
cable that a mobile phone or smartphone specifies when
charging them from Wi-Fi router.
Do not connect at the same time Micro USB
Cable to External Device Port and Power Supply
Port of Wi-Fi router.
May cause malfunction.
When AC Charger is connected to an outlet,
do not pull on cord or otherwise subject AC
Charger to strong shock.
May cause injury or malfunction.
Do not touch Wi-Fi router with sweaty hands
or place it into sweaty clothing pockets.
Sweat and humidity may erode the internal components of
Wi-Fi router and cause overheating or malfunction.
Do not pull, bend with excessive force or twist
Micro USB Cable.
Do not damage or modify Micro USB Cable. Do not place
objects on Micro USB Cable. Do not apply heat and keep
Micro USB Cable away from heaters.
Damage to Micro USB Cable may cause electric shock,
overheating or fire.
157
Do not use AC outlet damaged or its plug is
loose.
Wi-Fi Router Use & Electronic Medical
Equipment
Keep Wi-Fi router a minimum of 15 centimeters
away from implanted cardiac pacemakers or
implanted defibrillators.
Radio waves may interfere with the operation of implanted
cardiac pacemakers or implanted defibrillators.
This section is based on "Guidelines on Safeguarding
Medical Equipment from Electromagnetic Waves from Mobile
Phones and Other Devices" (Electromagnetic Compatibility
Conference Japan), and "Research Report on the Influence of
Electromagnetic Waves on Medical Equipment" (Association of
Radio Industries and Businesses, March 2001).
When using electronic medical equipment
(other than implanted cardiac pacemakers/
defibrillators) outside of medical institutions,
consult device manufacturer about the
influence of radio waves.
Radio waves may interfere with the operation of electronic
medical equipment.
Wi-Fi router radio waves may affect electronic
medical equipment. Observe these guidelines in
medical institutions:
・Do not bring Wi-Fi router into an operating room, ICU
(Intensive Care Unit) or CCU (Coronary Care Unit).
・Turn off Wi-Fi router in hospital wards.
・Turn off Wi-Fi router even in lobbies or areas where
use is permitted if there is electronic medical equipment
nearby.
・Observe the instructions of individual medical
institutions and do not use or bring Wi-Fi router into
prohibited areas.
Radio waves may interfere with the operation of implanted
cardiac pacemakers or implanted defibrillators.
Safety Precautions
There may be wearers of medical equipment
such as implanted pacemakers or defibrillators
around you. When you are in a crowd etc. and
you have difficulties to keep a distance of
15 cm or more from others, power off Wi-Fi
router.
SoftBank 203Z
158
General Notes
General Use
Wi-Fi (Wireless LAN)
・Precautions
Do not use Wi-Fi (WLAN) near devices emitting
electromagnetic waves such as electrical appliances or AV/
OA equipment.
・With the exception of specialized models, SoftBank 4G
・Electromagnetic noise (e.g. from microwave ovens) may
services are unavailable.
impair or disable communications.
・Wi-Fi router accommodates software updates. Use the
・Using Wi-Fi (WLAN) near a TV or radio, etc. may cause
latest software.
interference/impair signal reception.
・Wi-Fi router employs radio waves. Signals may be disrupted
・If multiple Wi-Fi (WLAN) access points in close vicinity are
even within service areas if you are indoors, underground,
using the same channel, search may fail.
inside a tunnel or inside a vehicle. If you move to a location
with poor signal strength, a call may be suddenly cut off.
・Wireless Frequencies & Modulations
Wi-Fi frequency that Wi-Fi router uses is as follows.
・When using Wi-Fi router in public places, take care not
to annoy other people around you. Use of Wi-Fi router is
prohibited in some public places such as in theaters or on
buses and trains.
・Wi-Fi router is a wireless station under Japanese Radio
Law. You may be requested to submit your Wi-Fi router for
inspection based on this law.
・Data stored on Wi-Fi router may be corrupted or lost on the
Items
Descriptions
2.4
2400 MHz range
・Wi-Fi router is used improperly.
DS/OF
DSSS or OFDM modulation
・Wi-Fi router is exposed to static electricity or electrical
4
Maximum interference range of 40 m
following occasions:
noise.
Utilizes 2400 - 2483.5 MHz band with
・Wi-Fi router is turned off during operation.
mobile device bandwidth differentiation
・Wi-Fi router malfunctions or is sent for repairs.
SoftBank accepts no liability whatsoever for the corruption
or loss of stored data. Be sure to keep a separate memo of
important data to limit damage caused by data corruption or
loss to a minimum.
・If using a WLAN device abroad, configuration changes based
on the law of the country are required. Confirm user manual
for the settings.
・Connection speed may drop or connections may not be
1
Available channels vary depending on the country.
2
For use aboard aircraft, contact the airline beforehand.
3
If using WLAN abroad, confirm usable frequency, laws and
regulations in that country.
・2.4 GHz Device Cautions
Wi-Fi (WLAN) device operating frequency band is used
by industrial, scientific, consumer and medical equipment
established depending on line traffic or connection
including microwave ovens, premises radio stations for
environments.
identifying mobile units used in manufacturing lines (radio
・Do not use Wi-Fi router in or near places where explosives
stations requiring a license), specified low power radio
are handled. Wi-Fi router use may lead to an explosion, or
stations (radio stations requiring no license) and amateur
affect explosion devices.
radio stations (radio stations requiring a license).
・Wi-Fi router USIM Card cannot be used with some mobile
devices (including previously sold SoftBank models).
・Since Wi-Fi router and AC Charger might get hot while
1. Before using the device, confirm that premises radio
stations for identifying mobile units, specified low power
radio stations and amateur radio stations are not being
charging or while being used for prolonged periods, contact
operated nearby.
with the skin for a long time may result in low-temperature
2. If the device causes harmful radio interference to
burns. Be careful in handling.
premises radio stations for identifying mobile units,
immediately change the frequency band or stop use, and
move to another location to avoid crosstalk (e.g. wall
Handling
・Avoid exposing Wi-Fi router to rain, snow or high humidity.
Wi-Fi router is not waterproof.
・Do not use Wi-Fi router in extreme temperatures, direct
sunlight or humid or dusty places.
・Do not drop Wi-Fi router or subject it to excessive shock.
・To clean Wi-Fi router, wipe it with a dry soft cloth. Do not
use alcohols, thinners, benzene or other solvents. Doing so
may cause discoloration and remove the print.
partitions, etc.).
・WLAN Usage Security Precautions
Using Wi-Fi router without setting security increases risk
of data interception. Wi-Fi router security is set by default.
SoftBank recommends changing default security settings
to enhance data safety. For more information on security
settings, see this guide or Wi-Fi device guide.
・Beware that due to Wi-Fi (WLAN) specifications, security
settings can still be compromised by special means.
・For assistance with security settings, contact Customer
Service.
・SoftBank cannot be held liable for WLAN security issues.
159
RF Exposure Information/Specific
Absorption Rate (SAR) Information
FCC RF Exposure Information
Your handset is a radio transmitter and receiver. It is
designed and manufactured not to exceed the emission limits
Specific Absorption Rate (SAR)
Information for this Product
・This product "203Z" meets international guidelines on radio
wave protection.
This product is designed to abide by permitted levels for
radio wave protection as recommended by international
guidelines. These international guidelines are set forth
by the World Health Organization in cooperation with the
ICNIRP**, and the permitted levels provide a sufficient
safety margin regardless of age and health of the user.
International guidelines define the permitted levels of
exposure for radio wave protection by an averaged Specific
Absorption Rate, or SAR.
The SAR limit for this communication terminal is 2.0 watts/
kilogram (W/kg). The highest SAR value for this product is
0.584 W/kg when used in the following prescribed manner.
While there may be differences between the SAR levels of
individual products, all products meet the permitted levels.
・Use close to the body
To use this product close to the body, maintain a separation
of 1.0 cm from the body. This will ensure this product
meets international guidelines on radio wave protection*.
The World Health Organization has announced that "A large
number of studies have been performed over the last two
decades to assess whether mobile phones pose a potential
health risk. To date, no adverse health effects have been
established as being caused by mobile phone use."
*A method of measuring SAR when a mobile phone is used
at positions other than at the ear was established in March
2010 through an international standard (IEC62209-2).
International Commission on Non-Ionizing Radiation
Protection.
For more information about SAR, see the following websites:
- Ministry of Internal Affairs and Communications (MIC)
http://www.tele.soumu.go.jp/e/sys/ele/body/index.htm
for exposure to radio frequency (RF) energy set by the Federal
Communications Commission of the U.S. Government.
The guidelines are based on standards that were developed
by independent scientific organization through periodic and
thorough evaluation of scientific studies. The standards
include a substantial safety margin designed to assure the
safety of all persons, regardless of age and health.
The exposure standard for wireless handsets employs a unit of
measurement known as the Specific Absorption Rate, or SAR.
The SAR limit set by the FCC is 1.6 W/kg. The tests are
performed in positions and locations (e.g. at the ear and worn
on the body) as required by the FCC for each model.
The highest SAR value for this model handset as reported to
the FCC when worn on the body in a holder or carry case, is
0.51 W/kg.
Body-worn Operation; This device was tested for typical
body-worn operations with the back of the handset kept
1.0 cm from the body. To maintain compliance with FCC RF
exposure requirements, use accessories that maintain a 1.0
cm separation distance between the user's body and the back
of the handset. The use of beltclips, holsters and similar
accessories should not contain metallic components in its
assembly.
The use of accessories that do not satisfy these requirements
may not comply with FCC RF exposure requirements, and
should be avoided.
The FCC has granted an Equipment Authorization for this
model handset with all reported SAR levels evaluated as
in compliance with the FCC RF emission guidelines. SAR
information on this model handset is on file with the FCC
and can be found under the Display Grant section of http://
www.fcc.gov/oet/ea/ after searching on FCC ID Q78MF98PUSH.
Additional information on Specific Absorption Rates (SAR) can
be found on FCC Radio Frequency Safety website at http://
transition.fcc.gov/oet/rfsafety/.
http://www.arib-emf.org/index02.html (Japanese)
Electromagnetic Safety
For body worn operation, this mobile phone has been tested
and meets RF exposure guidelines when used with an accessory
containing no metal and positioning the handset a minimum 10
mm from the body. Use of other accessories may not ensure
compliance with RF exposure guidelines.
Safety Precautions
- Association of Radio Industries and Businesses (ARIB)
SoftBank 203Z
160
European RF Exposure Information
Your mobile device is a radio transmitter and receiver. It is
designed not to exceed the limits for exposure to radio waves
recommended by international guidelines. These guidelines
were developed by the independent scientific organization
ICNIRP and include safety margins designed to assure the
protection of all persons, regardless of age and health.
The guidelines use a unit of measurement known as the
Specific Absorption Rate, or SAR. The SAR limit for mobile
devices is 2.0 W/kg. As mobile devices offer a range of
functions, they can be used in other positions, such as on the
body as described in this User Guide. In this case, the highest
tested SAR value is 1.46 W/kg**. As SAR is measured utilizing
the devices highest transmitting power the actual SAR of this
device while operating is typically below that indicated above.
This is due to automatic changes to the power level of the
device to ensure it only uses the minimum level required to
reach the network.
The World Health Organization has stated that present
scientific information does not indicate the need for any
special precautions for the use of mobile devices. They note
that if you want to reduce your exposure then you can do so
by limiting the length of calls or using a hands-free device to
keep the mobile phone away from the head and body.
*The tests are carried out in accordance with international
guidelines for testing.
**A method of measuring SAR when a mobile phone is used at
positions other than at the ear was established in March 2010
through an international standard (IEC62209-2). MIC technical
regulation was reported in October 2011 by the Information
and Communications Council.
- World Health Organization
http://www.who.int/emf
- List of Specific Absorption Rates (SAR) for radio waves
http://mb.softbank.jp/mb/support/sar/
(Japanese)
161
A
Activating WLAN (Wi-Fi) Function..................................32
Advanced Settings..........................................................127
C
Charging Battery.............................................................. 11
Charging Mobile Phone or Smartphone........................... 13
203Z User Guide Index
Checking Device Information........................................... 72
Confirming on Wi-Fi router............................................. 26
Connecting Android™ Device........................................... 40
Connecting iPhone/iPad....................................................38
Connecting Mac.................................................................37
Connecting Nintendo 3DS LL/3DS/DSi LL/DSi/DS..........41
Connecting PS3 ® ...............................................................52
Connecting PSVITA/PSP ® ................................................. 48
Connecting Windows PC................................................... 33
Connecting WPS Supported WLAN Devices..................... 54
Customer Service............................................................ 149
D
Device Recognition/Removal on Mac............................... 62
Device Recognition/Removal on Windows PC..................56
Display..................................................................................7
F
Firewall............................................................................ 117
G
General Notes................................................................. 158
Glossary........................................................................... 148
I
Internet Wi-Fi................................................................... 99
Introduction.........................................................................3
L
LAN Wi-Fi........................................................................108
M
Mobile Utility..................................................................133
O
SoftBank 203Z
Overview of WEB UI.........................................................66
162
P
Parts & Functions...............................................................6
Power On/Off................................................................... 14
Q
Quick Settings.................................................................. 87
R
RF Exposure Information/Specific Absorption Rate (SAR)
Information..................................................................... 159
S
Safety Precautions......................................................... 152
SD Card................................................................................ 9
Setting 4G/LTE/3G.......................................................... 89
Settings for Ethernet....................................................124
Settings for Router....................................................... 122
Settings on WEB UI........................................................141
Settings on Wi-Fi Router.................................................15
Setup for Mac...................................................................64
Setup of Data Traffic......................................................97
Sharing SD Card, Managing Files.....................................77
Software Installation (Windows).....................................58
Specifications..................................................................140
T
Troubleshooting.............................................................. 138
U
USB Connection with a Mac.............................................62
USB Connection with a Windows PC............................... 56
USIM Card............................................................................ 8
W
Warranty & Service........................................................ 149
WEB UI Window.................................................................69
WLAN (Wi-Fi).....................................................................32
SoftBank 203Z User Guide
October 2013, First Edition
SoftBank Mobile Corp.
Visit SoftBank Shop for assistance
Model : SoftBank 203Z
Manufacturer : ZTE Corporation