1
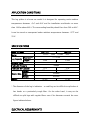
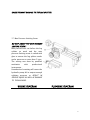
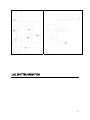
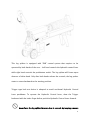
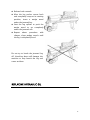
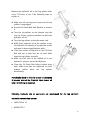
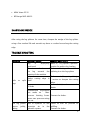
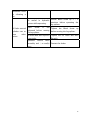
FOR YOUR SAFETY
READ AND UNDERSTAND THE ENTIRE MANUAL
BEFORE OPERATING MACHINE
MODLE NUMBER : □ LS5T-37
□ LS5T-52
SERIAL NUMBER :
Both model number and serial number may be found on the main label.
You should record both of them in a safe place for future use.
Save This Manual for Future Reference
5 TON LOG SPLITTER
Owner’s Manual
TABLE OF CONTENTS
CONTENTS
PAGE
Safety Warnings & Cautions
2-4
Application Conditions
4
Specifications
5
Electrical Requirements
5
Contents of Shipping Container
5
Wiring Diagram
7
Plumbing Diagram
7
Log Splitter Operation
8, 9
Freeing a Jammed Log
9
Sharpening Wedge
10
Trouble Shooting
11
Parts Schematic (1)
12
Parts Schematic (2)
13
Set up and Preparation for Operation
Replacing Hydraulic Oil
6, 7
10
1
SAFETY WARNINGS & CAUTIONS
SYMBOL AFFIXED TO THE
MACHINE
SAFETY WARNINGS & INSTRUCTIONS
UNDERSTAND YOUR LOG SPLITTER
Read and understand the owner’s manual and labels
affixed to the log splitter. Learn its application and
limitations as well as the specific potential hazards
peculiar to it.
INSPECT YOUR LOG SPLITTER
Check your log splitter before turning it on. Keep guards
in place and in working order. Form a habit of checking to
see that keys and adjusting wrenches are removed from
tool area before turning it on. Replace damaged, missing
or failed parts before using it.
AVOID DANGEROUS CONDITIONS
Put the log splitter on a 60 - 75cm high, stable, flat, and
level work bench where there is plenty of room for
handling, and help the operator stay alert. Bolt the log
splitter to the work surface if it tends to slip, walk, or
slide. Keep your work area clean and well lighted.
Cluttered areas invites injuries.
Do not use the log splitter in wet or damp areas or expose
it to rain. Do not use it in areas where fumes from paint,
solvents or flammable liquids pose a potential hazard.
DRUGS, ALCOHOL AND MEDICATION
Do not operate the log splitter while under the influence
of drugs, alcohol, or any medication that could affect your
ability to use it properly.
INSPECT YOUR LOG
Make sure there are no nails or foreign objects in logs to
be split. The ends of the logs must be cut square.
Branches must be cut of flush with the trunk
PROTECT YOUR EYES AND FACE
Any log splitter may throw foreign objects into the eyes.
This can cause permanent eye damage. Always wear
safety goggles. Everyday eyeglasses have only impact
2
resistant lenses. They are not safety glasses. Do not put
the log splitter on the ground for operations. This is
awkward operating position that the operator has to bring
his face close to the machine, and thus risks being struck
by wood chips or debris
EXTENSION CORDS
Improper use of extension cords may cause inefficient
operation of the log splitter which can result in
overheating. Be sure the extension cord is no longer than
10m and its section is no less than 2.5mm2 to allow
sufficient current flow to the motor.
Avoid use of free and inadequately insulated connections.
Connections must be made with protected material
suitable for outdoor use.
AVOID ELECTRICAL SHOCK
Check that the electric circuit is adequately protected and
that it corresponds with the power, voltage and frequency
of the motor. Check that there is a ground connection,
and a regulation differential switch upstream.
Ground the log splitter. Prevent body contact with
grounded surfaces: pipes, radiators, ranges, and
refrigerator enclosures.
Never open the pushbutton box on the motor. Should this
be necessary, contact a qualified electrician.
Mark sure your fingers do not touch the plug’s metal
prongs when plugging or unplugging the log splitter.
KEEP VISITORS AND CHILDREN AWAY
The log splitter must be always operated by one person
only. Other people should keep a safe distance from the
work area, especially when the log splitter is under
operations. Never use another people to help you with
freeing jammed log.
DRESS PROPERLY
Do not wear loose clothing, gloves, neckties or jewelry
(rings, wrist watches). They can be caught in moving
parts.
Protective electrically non conductive gloves and non-skid
footwear are recommended when working. Wear
3
protective hair covering to contain long hair, preventing it
from get caught in machinery.
DON’T OVERREACH
Floor must not be slippery.
Keep proper footing and
balance at all times. Never stand on log splitter. Serious
injury could occur if the tool is tipped or if the cutting
tools is unintentionally contacted. Do not store anything
above or near the log splitter where anyone might stand
on the tool to reach them.
AVOID INJURY FROM UNEXPECTED ACCIDENT
Always pay full attention to the movement of the log
pusher.
Do not attempt to load the log on until the log pusher has
stopped. Keep hands out of the way of all moving parts.
PROTECT YOUR HANDS
Keep you hands away from splits and cracks which open
in the log; They may close suddenly and crush or
amputate your hands. Do not remove jammed logs with
you hands.
DON’T FORCE TOOL
It will do a better and safer job at its design rate. Never
try to split logs larger than those indicated in the
specifications table. This could be dangerous and may
damage the machine.
Don’t use log splitter for a purpose for which it was not
intended.
NEVER LEAVE TOOL RUNNING UNATTENDED
Don’t leave tool until it has come to a complete stop.
DISCONNECT POWER
Unplug when not in use, before making adjustments,
changing parts, cleaning, or working on the log splitter;
Consult technical manual before servicing.
PROTECT THE ENVIRONMENT
Take used oil to an authorized collection point or follow
the stipulations in the country where the log splitter is
used.
Do not discharge into drains, soil or water.
4
MAINTAIN YOUR LOG SPLITTER WITH CARE
Keep
the
log
splitter
clean
for
best
and
safest
performance.
MAKE THE WORKSHOP CHILDPROOF
Lock the shop. Disconnect master switches. Store the log
splitter away from children and others not qualified to use
it.
5
APPLICATION CONDITIONS
This log splitter is a home use model. It is designed for operating under ambient
temperatures between +5oC and 40oC and for installation at altitudes no more
than 1000m above M.S.L. The surrounding humidity should less than 50% at 40oC.
It can be stored or transported under ambient temperatures between -25oC and
55oC.
SPECIFICATIONS
Model Number
LS5T-37
Motor
230V~
Diameter *
Log Capacity
Length
Overall Size
1500W
37cm
52cm
20Mpa
1.6 L
2.4L
955mm
1200mm
Width
260mm
Height
485mm
Weight
IP54
5t
Hydraulic Pressure
Length
50Hz
5 ~ 25cm
Splitting Force
Hydraulic Oil Capacity
LS5T-52
45 kg
50 kg
* The diameter of the log is indicative – a small log can be difficult to split when it
has knobs or a particularly tough fiber. On the other hand, it may not be
difficult to split logs with regular fibers even if its diameter exceeds the max.
figure indicated above.
ELECTRICAL REQUIREMENTS
6
Connect the main leads to a standard 230V+10% (50Hz+1Hz) electrical supply
which has protection devices of under-voltage, over-voltage, over-current as well
as a residual current device (RCD) which maximum residual current rated at
0.03A.
CONTENTS OF THE SHIPPING CONTAINER
A. Log Splitter
1 set
B. Support Leg
1 pc
C. Owner’s Manual
1 pc
D. Loose Part Bag (containing)
M8 Bolts & Nuts
Note : Hardware to mount this log
spliter
to
a
work
bench
is
5 sets
NOT
supplied.
SET UP AND PREPARATION FOR OPERATION
1. Bolt the Support Leg to the Log Splitter, lift the log splitter by the handles at
both ends and place it on a 60 – 75cm high, stable, flat and level work surface.
2. Familiarize yourself with the controls and features of this log splitter in the
illustrations.
7
1.
Oil Tank
2.
Log Pusher
3.
Work Table
4.
Wedge
5.
Lift Handle
6.
Support Leg
7.
Work Table Extension w/
Log Retaining Plates
8.
Switch
9.
Motor
10. Pushbutton Box
11. Wheels for Minor Moving
ONLY.
12. Lift Handle
13. Hydraulic Control Lever
14. Control Lever Guard
15. Bleed Screw
16.
Oil
Drain
Bolt
w/
Dipstick
Before operating the log splitter, the Bleed Screw should be loosened by some
rotations until air can go in and out of the oil tank smoothly. Air flow thru the
Bleed Screw hole should be detectable during the log splitter is under operations.
Before moving the log splitter, make sure the Bleed Screw is tightened to avoid oil
leaking from this point.
FAILED TO LOOSEN THE BLEED SCREW WILL KEEP THE SEALED AIR IN
HYDRAULIC
SYSTEM
DECOMPRESSED.
SUCH
BEING
COMPRESSED
CONTINUOUS
AIR
AFTER
COMPRESSION
BEING
AND
DECOMPRESSION WILL BLOW OUT THE SEALS OF THE HYDRAULIC SYSTEM AND
8
CAUSE PERMANT DAMAGE TO THE LOG SPLITTER.
17. Max Pressure Limiting Screw
DO NOT ADJUST THE MAX PRESSURE
LIMITING SCREW !
Max pressure was set before the log
splitter
ex
work
and
the
max
pressure limiting screw is sealed with
glue to ensure the log splitter works
under pressure no more than 5 tons.
The setting was done by qualified
mechanics
with
professional
instruments.
Unauthorized resetting will cause the
hydraulic pump fail to output enough
RESULT IN
SERIOUS INJURY AS WELL AS DAMAGE
TO THE MACHINE .
splitting
pressure
or
WIRING DIAGRAM
PLUMBING DIAGRAM
9
LOG SPLITTER OPERATION
10
This log splitter is equipped with “ZHB” control system that requires to be
operated by both hands of the user – Left hand controls the hydraulic control lever
while right hand controls the pushbutton switch. The log splitter will freeze upon
absence of either hand. Only after both hands release the controls, the log pusher
starts to return backward to the starting position.
Trigger type lock-out device is adopted to avoid accidental Hydraulic Control
Lever pushdown. To operate the Hydraulic Control Lever, draw the Trigger
backward with the index finger before push the Hydraulic Control Lever forward.
Never force the log splitter for more than 5 seconds by keeping pressure
11
on it to split excessively hard wood.
After this time interval, the oil under pressure will be overheated and the machine
could be damaged. For such extremely hard log, rotate it by 90o to see whether it
can be split in a different direction. In any case, if you are not able to split the log,
this means that its hardness exceeds the capacity of the machine and thus that
log should be discarded to protect the log splitter.
Always set logs firmly on the log
retaining plates and work table. Make
sure logs will not twist, rock or slip
while being split. Do not force the
blade by splitting the log on the upper
part. This will break the blade or
damage the machine.
Break log in the direction of its growing grain. Do not place log across the log
splitter for splitting. It may be dangerous and may seriously damage the machine.
Do not attempt to split 2 pieces of logs at the same time. One of them may fly up
and hit you.
FREEING A JAMMED LOG
12
Release both controls.
After the log pusher moves back
and completely stops at its starting
position,
insert
a
wedge
wood
under the jammed log.
Start the log splitter to push the
wedge
wood
to
go
completely
under the jammed one.
Repeat
above
procedure
with
sharper slope wedge woods until
the log is completely freed.
Do not try to knock the jammed log
off. Knocking about will damage the
machine or may launch the log and
cause accident.
REPLACING HYDRAULIC OIL
13
Replace the Hydraulic oil in the log splitter after
every 150 hours of use. Take following steps to
replace it.
Make sure all moving parts stops and the log
splitter is unplugged.
Unscrew Oil Drain Bolt with Dipstick to remove
it.
Turn the log splitter on the Support Leg side
over an 4 liters capacity container to drain the
hydraulic oil off.
Turn the log splitter on the the motor side.
Refill fresh hydraulic oil at the volume as per
the hydraulic oil capacity of a particular model
indicated in above specifications table.
Clean the surface of Dipstick on the Oil Drain
Bolt and put it back into the oil tank while
keep the log splitter vertically.
Make sure the level of the refilled oil is just
between 2 grooves around the Dipstick.
Clean the Oil Drain Bolt before thread them
back. Make sure they are tightened to avoid
leakage
before
place
the
log
splitter
horizontally.
Periodically check oil level to ensure it is between
2 grooves around the Dipstick. Upon Lower oil
level, oil refilling is required.
Following hydraulic oils or equivalent are recommend for the log splitter’s
hydraulic transmission system:
•
SHELL Tellus 22
•
MOBIL DTE 11
14
•
ARAL Vitam GF 22
•
BP Energol HLP-HM 22
SHARPENING WEDGE
After using the log splitters for some time, sharpen the wedge of the log splitter
using a fine-toothed file and smooth any burrs or crushed area along the cutting
edge.
TROUBLE SHOOTING
PROBLEM
PROBABLE CAUSE
Log
is
REMEDY SUGGESTED
improperly Refer to “ Log Splitter Operation”
positioned
section for perfect log loading.
The sizes or hardness of Reduce
the
log
exceeds
the
log
sizes
before
the splitting it on the log splitter
capacity of the machine
Fails
logs
to
Wedge
split blunt
cutting
edge
is
“ section to sharpen the cutting
edge.
Locate leak(s) and contact the
Oil leaks
dealer
Unauthorized
was
Refer to “ Sharpening Wedge
made
Pressure
adjustment
on
Max.
Limiting
Screw. Contact the dealer.
Lower max pressure rating
was set.
The log pusher Lack of hydraulic oil and Check oil level for possible oil
moves
taking
jerkily, excessive
air
hydraulic system.
in
the refilling.
Contact the dealer.
15
unfamiliar noise
or
vibrating
a
lot
Air
sealed
in
hydraulic
system while operating.
Oil leaks around
cylinder ram or
from
points.
other
Bleed
Screw
is
Loosen Bleed Screw by 3 ~ 4
rotations before operating the
log splitter
not
tightened before moving
the log splitter.
Tighten
the
Bleed
Screw
before moving the log splitter.
up
Oil Drain Bolt with Dipstick Tighten the Oil Drain Bolt with
is not tight.
Hydraulic
Dipstick.
Control
Valve
Assembly and / or seal(s) Contact the dealer
worn
16
PARTS SCHEMATIC (1)
17
PARTS SCHEMATIC (2)
18