1
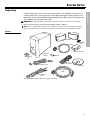
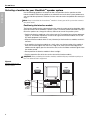
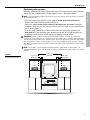
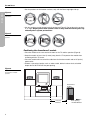
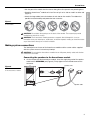
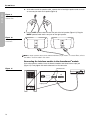
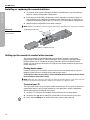
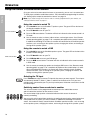
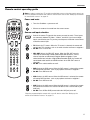
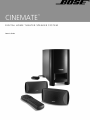
CINEMATE ™ DIGITAL HOME THEATER SPEAKER SYSTEM 2ZQHU¶V*XLGH Français Español English SAFETY INFORMATION Please read this guide Please take the time to follow the instructions in this guide carefully. It will help you set up and operate your system properly and enjoy all of its advanced features. Please save this guide for future reference. The Interface module is to be used only with the Acoustimass® module in the Bose® CineMate™ speaker system. WARNING: To reduce the risk of fire or electrical shock, do not expose the product to rain or moisture. WARNING: The apparatus shall not be exposed to dripping or splashing, and objects filled with liquids, such as vases, shall not be placed on the apparatus. As with any electronic products, use care not to spill liquids into any part of the system. Liquids can cause a failure and/or a fire hazard. The lightning flash with arrowhead symbol within an equilateral triangle alerts the user to the presence of uninsulated dangerous voltage within the system enclosure that may be of sufficient magnitude to constitute a risk of electrical shock. The exclamation point within an equilateral triangle, as marked on the system, is intended to alert the user to the presence of important operating and maintenance instructions in this owner’s guide. CAUTION: To prevent electric shock, match the wide blade of the line cord plug to the wide slot of the AC (mains) receptacle. Insert fully. Note: Where the mains plug is used as the disconnect device, such disconnect device shall remain readily operable. WARNING: No naked flame sources, such as lighted candles, should be placed on the apparatus. Class B emissions limits This Class B digital apparatus meets all requirements of the Canadian Interference-Causing Equipment Regulations (Canada only). Please dispose of used batteries properly, following any local regulations. Do not incinerate. Note: This product must be used indoors. It is neither designed or tested for use outdoors, in recreation vehicles, or on boats. This product conforms to the EMC Directive 89/336/EEC and to the Low Voltage Directive 73/23/EEC. The remote control conforms to the RTTE Directive 99/5/EC (R+TTED).The complete Declaration of Conformity can be found on <www.bose.com>. Additional safety information See the additional instructions on the Important Safety Information sheet enclosed in the shipping carton. %RVH&RUSRUDWLRQ1RSDUWRIWKLVZRUNPD\EHUHSURGXFHGPRGLILHGGLVWULEXWHGRURWKHUZLVHXVHGZLWKRXWSULRUZULWWHQSHUPLVVLRQ 2 English Español Français CONTENTS INTRODUCTION 4 SYSTEM SETUP 5 OPERATION 16 CARE AND MAINTENANCE 22 INTRODUCTION . . . . . . . . . . . . . . . . . . . . . . . . . . . . . . . . . . . . . . . . . . . . . . . . . . . . . . . . . . . . 4 Before you begin . . . . . . . . . . . . . . . . . . . . . . . . . . . . . . . . . . . . . . . . . . . . . . . . . . . . . . . . . . . . . . . . . . . . . . . . . . . . . For your records . . . . . . . . . . . . . . . . . . . . . . . . . . . . . . . . . . . . . . . . . . . . . . . . . . . . . . . . . . . . . . . . . . . . . . . . . . . . . . 4 4 SYSTEM SETUP . . . . . . . . . . . . . . . . . . . . . . . . . . . . . . . . . . . . . . . . . . . . . . . . . . . . . . . . . . . 5 Unpacking . . . . . . . . . . . . . . . . . . . . . . . . . . . . . . . . . . . . . . . . . . . . . . . . . . . . . . . . . . . . . . . . . . . . . . . . . . . . . . . . . . Selecting a location for your CineMateTM speaker system . . . . . . . . . . . . . . . . . . . . . . . . . . . . . . . . . . . . . . . . . . . . . . Positioning the Interface module . . . . . . . . . . . . . . . . . . . . . . . . . . . . . . . . . . . . . . . . . . . . . . . . . . . . . . . . . . . . Positioning the speakers . . . . . . . . . . . . . . . . . . . . . . . . . . . . . . . . . . . . . . . . . . . . . . . . . . . . . . . . . . . . . . . . . . Positioning the Acoustimass® module . . . . . . . . . . . . . . . . . . . . . . . . . . . . . . . . . . . . . . . . . . . . . . . . . . . . . . . . Making system connections . . . . . . . . . . . . . . . . . . . . . . . . . . . . . . . . . . . . . . . . . . . . . . . . . . . . . . . . . . . . . . . . . . . . Connecting the speakers to the Acoustimass module . . . . . . . . . . . . . . . . . . . . . . . . . . . . . . . . . . . . . . . . . . . Connecting the Interface module to the Acoustimass module . . . . . . . . . . . . . . . . . . . . . . . . . . . . . . . . . . . . . Connecting your TV to the Interface module . . . . . . . . . . . . . . . . . . . . . . . . . . . . . . . . . . . . . . . . . . . . . . . . . . . Using TV audio output jacks . . . . . . . . . . . . . . . . . . . . . . . . . . . . . . . . . . . . . . . . . . . . . . . . . . . . . . . . . . . . . . . Connecting the power cord . . . . . . . . . . . . . . . . . . . . . . . . . . . . . . . . . . . . . . . . . . . . . . . . . . . . . . . . . . . . . . . . Standby and Power LED indicators . . . . . . . . . . . . . . . . . . . . . . . . . . . . . . . . . . . . . . . . . . . . . . . . . . . . . . . . . . Setting up your TV for the CineMateTM speaker system . . . . . . . . . . . . . . . . . . . . . . . . . . . . . . . . . . . . . . . . . . . . . . . . Selecting the FIXED audio output option on your TV . . . . . . . . . . . . . . . . . . . . . . . . . . . . . . . . . . . . . . . . . . . . . Turning the TV internal speakers off . . . . . . . . . . . . . . . . . . . . . . . . . . . . . . . . . . . . . . . . . . . . . . . . . . . . . . . . . . Installing or replacing the remote batteries . . . . . . . . . . . . . . . . . . . . . . . . . . . . . . . . . . . . . . . . . . . . . . . . . . . . . . . . . Setting up the remote to control other sources . . . . . . . . . . . . . . . . . . . . . . . . . . . . . . . . . . . . . . . . . . . . . . . . . . . . . . Finding device codes . . . . . . . . . . . . . . . . . . . . . . . . . . . . . . . . . . . . . . . . . . . . . . . . . . . . . . . . . . . . . . . . . . . . . To control your TV . . . . . . . . . . . . . . . . . . . . . . . . . . . . . . . . . . . . . . . . . . . . . . . . . . . . . . . . . . . . . . . . . . . . . . . To control a combination device . . . . . . . . . . . . . . . . . . . . . . . . . . . . . . . . . . . . . . . . . . . . . . . . . . . . . . . . . . . . 5 6 6 7 8 9 9 10 11 11 11 12 13 13 13 14 14 14 14 15 OPERATION . . . . . . . . . . . . . . . . . . . . . . . . . . . . . . . . . . . . . . . . . . . . . . . . . . . . . . . . . . . . . . 16 Using the remote to control other sources . . . . . . . . . . . . . . . . . . . . . . . . . . . . . . . . . . . . . . . . . . . . . . . . . . . . . . . . . Using the remote to watch TV . . . . . . . . . . . . . . . . . . . . . . . . . . . . . . . . . . . . . . . . . . . . . . . . . . . . . . . . . . . . . . Using the remote to watch a DVD . . . . . . . . . . . . . . . . . . . . . . . . . . . . . . . . . . . . . . . . . . . . . . . . . . . . . . . . . . . Selecting the TV input . . . . . . . . . . . . . . . . . . . . . . . . . . . . . . . . . . . . . . . . . . . . . . . . . . . . . . . . . . . . . . . . . . . . Switching control from one device to another . . . . . . . . . . . . . . . . . . . . . . . . . . . . . . . . . . . . . . . . . . . . . . . . . . Remote control operating guide . . . . . . . . . . . . . . . . . . . . . . . . . . . . . . . . . . . . . . . . . . . . . . . . . . . . . . . . . . . . . . . . . Verifying a device code . . . . . . . . . . . . . . . . . . . . . . . . . . . . . . . . . . . . . . . . . . . . . . . . . . . . . . . . . . . . . . . . . . . . . . . . 16 16 16 16 16 17 21 CARE AND MAINTENANCE . . . . . . . . . . . . . . . . . . . . . . . . . . . . . . . . . . . . . . . . . . . . . . . . . . . . 22 Cleaning your speaker system . . . . . . . . . . . . . . . . . . . . . . . . . . . . . . . . . . . . . . . . . . . . . . . . . . . . . . . . . . . . . . . . . . . Limited warranty . . . . . . . . . . . . . . . . . . . . . . . . . . . . . . . . . . . . . . . . . . . . . . . . . . . . . . . . . . . . . . . . . . . . . . . . . . . . . . Accessories . . . . . . . . . . . . . . . . . . . . . . . . . . . . . . . . . . . . . . . . . . . . . . . . . . . . . . . . . . . . . . . . . . . . . . . . . . . . . . . . . Troubleshooting . . . . . . . . . . . . . . . . . . . . . . . . . . . . . . . . . . . . . . . . . . . . . . . . . . . . . . . . . . . . . . . . . . . . . . . . . . . . . . Customer service . . . . . . . . . . . . . . . . . . . . . . . . . . . . . . . . . . . . . . . . . . . . . . . . . . . . . . . . . . . . . . . . . . . . . . . . . . . . . Technical information . . . . . . . . . . . . . . . . . . . . . . . . . . . . . . . . . . . . . . . . . . . . . . . . . . . . . . . . . . . . . . . . . . . . . . . . . . 22 22 22 22 23 23 3 Français Español English INTRODUCTION INTRODUCTION Before you begin Thank you for purchasing a Bose® CineMateTM digital home theater speaker system, which delivers the superb acoustic performance needed to enjoy the full audio impact of DVDs and other exciting home entertainment. Using our TrueSpaceTM signal processing technology, CineMate speakers provide improved spaciousness for bold 3-D effects and movie-like realism from surround encoded DVDs and other entertainment sources. In fact, they provide much of the performance of premium five-speaker systems, yet from a modest array of equipment. Your system includes: • Small, easy-to-place shelf speakers • An attractive floor-standing Acoustimass® module • An easy-to-use, universal infrared (IR) remote control • An Interface module that provides simple audio connections to your TV and receives IR remote control signals Setup help The CineMate digital home theater speaker system easily connects to your TV and other home theater equipment. To help you set up your CineMate system, the following items are provided: • Quick Setup Guide • Setup DVD • Detailed instructions in the Setup section of this owner’s guide For your records The serial number is located on the rear of the Acoustimass module. Serial number: ____________________________________________________________________ Dealer name: _____________________________________________________________________ Dealer phone: __________________________ Purchase date: ____________________________ We suggest you keep your sales receipt and product registration card together with this owner’s guide. 4 English Español Français SYSTEM SETUP Unpacking WARNING: To avoid danger of suffocation, keep plastic bags out of the reach of children. Check to be sure your system includes the parts shown in Figure 1. Note: Now is a good time to find the serial number on the rear of the Acoustimass® module. Copy that number onto your product registration card and in the space provided on page 4. Figure 1 Carton contents Speakers Small rubber feet Interface module Acoustimass module Large rubber feet Batteries 8-foot power cord* Universal remote control Setup disc 15-foot speaker cable 6-foot stereo cable * The appropriate power cord for your region is provided. 5 SYSTEM SETUP Carefully unpack your system. Save all packing materials, which provide the safest way to transport your system. If any part of the system appears damaged, do not attempt to use it. Notify Bose or your authorized Bose® dealer immediately. For Bose contact information, refer to the address sheet included in the carton. Français Español English SYSTEM SETUP Selecting a location for your CineMateTM speaker system SYSTEM SETUP Use the following guidelines to choose locations and positions for the speakers and the Interface module. While these guidelines are offered to ensure the best system performance, you may find other placement variations that are more convenient and provide the sound you enjoy. Note: Keep in mind that the Acoustimass® module is the only part of this system that connects to a power outlet. Positioning the Interface module The Interface module receives commands from the universal remote control and provides audio input connections for the CineMateTM speaker system. The remote control commands allow you to turn the speakers on, change the volume, and mute or turn off the speaker system. • Position the Interface module on a flat surface near the TV and other home theater equipment (Figure 2). The remote should have a clear line of sight to the Interface module, the TV, and any other equipment it will control. • Keep the Interface module within 15 feet (4.6 meters) of the Acoustimass module, to which it connects. • If you position the Interface module on a shelf, make sure the front edge of the module is flush with the front edge of the shelf. If on a high shelf, make sure the front edge of the module extends slightly past the front of the shelf, so the shelf does not block signals from the remote control. • Do not position the Interface module in direct sunlight. • Peel the protective film off the lens on the front of the Interface module. CAUTION: When positioning the Interface module, avoid blocking any ventilation openings on the TV or other electronic equipment. Figure 2 Example location for the Interface module Left Interface module 6 Right English Español Français SYSTEM SETUP Positioning the speakers SYSTEM SETUP Choosing a good location for the speakers will allow you to experience the audio surround effects that your CineMateTM home theater speaker system is designed to deliver. Note: The left and right speakers are identical. Place one speaker to the left of your TV and the other one to the right. • Place the left and right speakers at least 3 feet (1 meter) apart from each other to optimize the surround sound experience (Figure 3). • Place each speaker within 3 feet (1 meter) of the edge of the TV screen. Placing the speakers more than 3 feet away from the TV may cause the sound to seem separated from the TV picture (Figure 3). • If you are using a bookshelf or a home entertainment unit, place each speaker at the front edge of its shelfPositioning the speakers too far back in an enclosed space can change the overall quality of sound and alter the program’s sound effects. CAUTION: Choose a stable and level surface for both speakers. Vibration can cause the speakers to move, particularly on smooth surfaces like marble, glass, or highly polished wood. If you are placing the speakers on a smooth surface, be sure to attach one set of the small rubber feet to the bottom surface of each speaker. You can obtain additional rubber feet (PN 178321) from Bose® Customer Service. For Bose contact information, refer to the address sheet included in the carton. Note: The speakers can be mounted on Bose brackets, table stands, or floor stands. For ordering information, refer to “Accessories” on page 22. Additional or longer cables may also be ordered. Figure 3 Recommended positioning of left and right speakers 3 ft (1 m) maximum Left 3 ft (1 m) minimum 3 ft (1 m) maximum Right 7 Français Español English SYSTEM SETUP SYSTEM SETUP • Set the speakers on their bottom surfaces, only, with the Bose® logo right-side up. Figure 4 Recommended speaker orientation • Aim the speakers straight ahead into the listening area (Figure 5). Do not place the speakers at an angle. Angling one or both speakers into or away from the listening area significantly alters system performance. Figure 5 Recommended speaker position Positioning the Acoustimass® module • Place the module at the same end of the room as the TV and the speakers (Figure 6). • Keep the module at least 3 feet (1 meter) away from the TV to prevent the module from interfering with the TV screen. • Place the module within reach of the cable from the Interface module and an AC (mains) power outlet. • Choose a convenient location such as under a table, behind a sofa or chair, or behind drapes but DO NOT BLOCK the port opening. Figure 6 Recommended Acoustimass module position Acoustimass module 3 ft (1 m) minimum 8 Port opening DO NOT BLOCK English Español Français SYSTEM SETUP • Aim the port of the module into the room or along the wall to prevent over-powering bass. • Attach the large rubber feet to the bottom of each foot on the module. The rubber feet provide increased stability and protection from scratches. Figure 7 AC INPUT MUSIC R CENTE Recommended orientation for the module CAUTION: Do not block the openings on the back of the module. These openings provide ventilation for the built-in circuitry. CAUTION: The Acoustimass module generates a magnetic field. Although this is not an immediate risk to your video tapes, audio tapes, and other magnetic media, you should not store any of these items directly on or near the module. Making system connections The labeled jacks on the rear of the Acoustimass module and the custom cables supplied with the system ensure a fast and easy hookup. CAUTION: Do not plug the Acoustimass module into an AC power (mains) outlet until all other connections are made. Connecting the speakers to the Acoustimass module 1. On the rear panel of the Acoustimass module, insert the single-plug end of the speaker cable into the SPEAKERS jack (Figure 8). Firmly tighten the two thumbscrews on the connector. Figure 8 Thumbscrews Speaker cable connection to the Acoustimass module Speaker cable 9 SYSTEM SETUP • Stand the Acoustimass® module on its feet. Do not lay it on its side or stand it on either end (Figure 7). Français Español English SYSTEM SETUP SYSTEM SETUP 2. At the other end of the speaker cable, separate the left and right speaker cords as much as necessary to reach each speaker (Figure 9). Figure 9 Separating left and right speaker cords 3. Plug the LEFT speaker cable into the rear jack of the left speaker (Figure 10). Plug the RIGHT speaker cable into the rear jack on the right speaker. Figure 10 Left and right speaker connections RIGHT LEFT Note: A longer speaker cable can be ordered from Bose, if you need it. To contact Bose, refer to the address sheet included in the carton. Connecting the Interface module to the Acoustimass® module On the Acoustimass module, insert the Interface module connector into the input jack (Figure 11). Firmly tighten the two thumbscrews on the connector. Figure 11 Thumbscrews Interface cable connection Input jack 10 English Español Français SYSTEM SETUP Connecting your TV to the Interface module SYSTEM SETUP After setting up the system speakers and Interface module, connect the audio output of your TV to the TV AUDIO input jacks on the Interface module, using the supplied stereo cable (Figure 12). Figure 12 Connections between your TV and the Interface module Stereo cable TV connection panel Using TV audio output jacks Audio output jacks are not standard on all brands of TVs. Some TVs have more than one set of audio output jacks; others have none. Use the guidelines below to help determine how to connect your TV to the Interface module. • If your TV has two sets of audio output jacks that are labeled FIXED (FIX) and VARIABLE (VAR), use the jacks labeled FIXED (recommended for the highest sound quality). If there is only one audio output jack labelled FIX/VAR (Out To TV, or Monitor Out, etc.), then you may need to find the $XGLR2XWSXWitem in your TV’s on-screen menu and select )L[HG. See “Selecting the FIXED audio output option on your TV” on page 13. • If your TV has only VARIABLE (VAR) audio output jacks, you can connect the Interface module to them. However, if you use the VARIABLE audio output jacks, you must be sure to turn off your TV’s internal speakers and turn up your TV volume. See “Turning off the TV internal speakers” on page 13. • If your TV does not have any audio output jacks, you can connect the CineMate™ speaker system to the audio output jacks of another source, such as a DVD player or cable/satellite box. However, you will hear sound only from the connected source through your CineMate speakers. Connecting the power cord CAUTION: Do not plug the Acoustimass® module into an AC power (mains) outlet until the speakers and Interface module are connected. CAUTION: For dual-voltage models only, be sure to set the dual-voltage switch on the back of the Acoustimass module to the appropriate voltage for your area (115V or 230V) before connecting to power. If you are not sure about the proper voltage for your area, consult your local electrical authorities. 1. Insert the small connector end of the power cord into the AC input connector on the Acoustimass module (Figure 13). 2. Insert the large end of the cord into an AC power (mains) outlet. 11 Français Español English SYSTEM SETUP SYSTEM SETUP Note: On 220-240V models only, turn the Acoustimass® module POWER switch to on (l). Figure 13 Power cord as the final connection AC power connector SPEAKERS AC power switch Provided on 220-240V rated systems only 115/230V selection switch Provided on 115/230V dual-voltage rated systems only Note: Bose recommends using a safety agency-approved surge protector on all electronic equipment. Voltage variations and spikes can damage electronic components in any system. A quality suppressor can eliminate the vast majority of failures attributed to surges and may be purchased at electronics stores. Standby and Power LED indicators Once you have connected the CineMate™ system to a power source, the red LED on the front of the Interface module will light, indicating that the system is in Standby mode. When the system is powered on, the green LED on the front of the Interface module will light. The green LED will flash each time the Interface module receives a command from the remote. Figure 14 Standby and power LEDs on the Interface module 12 Power LED (green) Standby LED (red) English Español Français SYSTEM SETUP Setting up your TV for the CineMateTM speaker system Your TV audio menu may also include an option for selecting a FIXED or VARIABLE audio output. If possible, use FIXED for the highest sound quality. The following describes the most common ways to make these changes in your TV. Refer to your TV owner’s guide for specific instructions for your brand. Turning off the TV internal speakers Newer TVs normally have a setup menu item for turning off speakers. Older TVs may have a speaker on/off switch on the rear panel near the audio output jacks. Using a TV setup menu 1. Using your TV remote, display the audio menu on your TV screen. In most cases this can be done by pressing the 0HQX button and selecting $XGLR. 2. Locate the 6SHDNHUV2Q2IImenu item, select 6SHDNHUV2II and exit the menu. If your TV does not have a menu setting for turning off the internal speakers, exit the audio menu and reduce the TV volume to its lowest setting. Using a speaker on/off switch If the rear panel of your TV has a SPEAKER ON/OFF switch, set it to the OFF position and adjust the TV volume to about 80% of the highest volume. Selecting the FIXED audio output option on your TV Changing this setting is based on how you connected the Interface module to your TV (see “Using TV audio output jacks” on page 11). 1. Using your TV remote, display the audio menu on your TV screen. In most cases this can be done by pressing the Menu button and selecting Audio. 2. Turn off the TV speakers (see “Turning off the TV internal speakers”). 3. Locate the Audio Output item in the TV menu and select Fixed. Exit the audio menu, and reduce the TV volume to its lowest setting. If you do not have the option of selecting either Fixed or Variable, turn off the TV speakers (see “Turning off the TV internal speakers”), exit the audio menu, and adjust the TV volume to about 80% of the highest volume. 13 SYSTEM SETUP To enjoy the full benefit of hearing TV audio through the CineMateTM speaker system, the internal speakers in your TV should be turned off. Your TV may have an on-screen audio menu that includes an option for turning the TV speakers on or off. Français Español English SYSTEM SETUP Installing or replacing the remote batteries SYSTEM SETUP 1. On the back of the remote, slide open the battery compartment. If you are replacing batteries, remove and discard the old batteries. 2. Insert two new AA (IEC-R6) 1.5V batteries, or their equivalent, as shown in Figure 15. (Two AA batteries are supplied in the product carton.) Match the plus (+) and minus (–) marked on the batteries with the plus (+) and minus (–) inside the battery compartment. 3. Slide the battery compartment cover back into place. Note: Replace the batteries when the remote control stops operating or its range seems reduced. Figure 15 (2) AA batteries (IEC-R6) + Installing the remote control batteries + Battery compartment cover Setting up the remote to control other sources The universal remote control provided with your CineMate™ speaker system can be programmed to control your TV, cable/satellite box, VCR, DVD player, and Digital Video Recorder (DVR) such as TiVo brands or ReplayTV brands. With the CineMate universal remote, you can enjoy the convenience of using only one remote control for all your home theater equipment. Finding device codes In order to control your TV and other sources with the universal remote control, you must program the remote with a five-digit device code for each source. To find device codes for your source, see the CineMate Universal Remote Device Codes book included in the product carton. Note: More than one code may work with your particular brand of device. If you notice a lack of response or limited functionality after setting up the remote, try a different code. To control your TV The steps below show how to set up the remote to control your TV. To set up the remote to control other sources, you will need to follow the same procedure, using the appropriate device code and source button for each source. 1. Locate the TV section in the CineMate Universal Remote Device Codes book. 2. Locate the five-digit device code(s) for your brand of TV and start with the first one. 3. Press and hold Setup on the remote until all five source buttons light up. 14 05.Setup.fm Page 15 Tuesday, May 31, 2005 2:56 PM English Español Français SYSTEM SETUP TV source button 4. Press the TV source button. Only the TV source button will remain lit. 5. On the remote keypad, enter the first device code for your brand of TV. 7. Point the remote at your TV and press TV On-Off. If your TV does not respond, go back to Step 1 and try another code. Follow the same procedure for each of your other sources, using the appropriate device code and source button for each source. Note: During programming, the five source buttons will flash rapidly three times if you press an invalid key or enter an unavailable device code. If this happens, go back to Step 1 and start over. To control a combination device • If you are programming the remote to control a combination device that has more than one source, such as a VCR/DVD unit, you can program the combination code into either remote control source. You may find it convenient to program the code twice – once for the VCR and once for the DVD. • To find the right device code, first search the “COMBINATION” listings in the CineMate™ device codes book. If you cannot find a valid code there, then search the listings for individual device types (TV, CBL, VCR, DVD, etc.). Note: If you need to verify which device code is currently programmed in your remote, see “Verifying a device code” on page 21. 15 SYSTEM SETUP 6. Check that the TV source button blinks twice and turns off after the code is entered. Français Español English OPERATION Using the remote to control other sources OPERATION Once your universal remote control has been set up correctly, you can use it to control your TV, DVD player, and other audio/video sources. For information on programming the remote, see “Setting up the remote to control other sources” on page 14. Note: If you need to verify which device code is currently programmed in your remote, see “Verifying a device code” on page 21. Using the remote to watch TV 1. Press On-Off to turn on the CineMate™ speaker system. The green LED on the front of the Interface module will light. TV source button 2. Press TV On-Off to turn on your TV. 3. Press the TV source button. The button will flash to indicate that the remote control is in TV mode. 4. Use the remote to select a channel, adjust volume, and navigate menus. See “Remote control operating guide” on page 17 for a complete description of the remote’s buttons. In addition to controlling TV functions, the remote will control the basic CineMate speaker functions, such as turning on the speaker system, changing the volume, and muting or turning off the speaker system. Using the remote to watch a DVD 1. Press On-Off to turn on the CineMate speaker system. The green LED on the front of the Interface module will light. DVD source button 2. Press TV On-Off to turn on your TV. 3. Press DVD On-Off to turn on your DVD player. 4. Press the DVD source button. The button will flash to indicate that the remote control is in DVD mode. 5. Use the remote to control play options and navigate DVD menus. See “Remote control operating guide” on page 17 for a complete description of the remote buttons. In addition to controlling DVD functions, the remote will always control the basic CineMate speaker functions, such as turning on the speaker system, changing the volume, and muting or turning off the speaker system. Selecting the TV input Press TV-Video to select the correct TV input for the source you want to watch. These inputs are commonly labeled TV, Video 1, Video 2, and AUX on the back of the TV. If you have multiple inputs connected to your TV, you may need to press this button several times to find the correct input. Switching control from one device to another The universal remote can be programmed to control up to five audio/video sources and will control the functions of one source at a time. The source buttons light up when selected to indicate which source the remote is currently controlling. You can easily switch control from one device to another by pressing the source button that corresponds with the source you want to control. In addition to controlling the selected source, the remote will always control the basic CineMate speaker functions, such as turning on the speaker system, changing the volume, and muting or turning off the speaker system. 16 2SHUDWLRQIP English Español Français OPERATION Remote control operating guide Power and mute • Turns the CineMate™ system on or off. • Silences or restores the sound from the current source. Source and input selection • Selects the correct TV input for the source you want to watch. These inputs are commonly labeled TV, Video 1, Video 2, and AUX. If you have multiple inputs connected to your TV, you may need to press this button several times to find the correct input. • TV: Selects the TV source. When the TV source is selected, the remote will control your TV’s functions, such as channel selection and menu navigation.* • On-Off: Turns TV on or off. • CBL-SAT: Selects the CBL-SAT source. When the CBL-SAT source is selected, the remote will control cable/satellite box functions, such as channel selection and Electronic Program Guide navigation. If your cable/satellite box includes a Digital Video Recorder (DVR), the remote will control both cable/satellite and DVR functions when CBL-SAT source is selected.* • On-Off: Turns cable/satellite on or off. • DVD: Selects the DVD source. When the DVD source is selected, the remote will control DVD functions, such as play options and menu navigation.* • On-Off: Turns DVD on or off. • VCR: Selects the VCR source. When the VCR source is selected, the remote will control VCR functions, such as play options and menu navigation.* • On-Off: Turns VCR on or off. • AUX: Selects the AUX source. When the AUX source is selected, the remote will control the functions of a VCR or DVR device that is connected to your AUX jack.* • On-Off: Turns VCR or DVR (connected to the AUX jack) on or off. *Requires programming the remote with a specific device code. See “Setting up the remote to control other sources” on page 14. 17 2SHUDWLRQIP OPERATION Note: In order to control your TV and other audio/video sources using the remote control, you must first program the remote with a device code for each source. See “Setting up the remote to control other sources” on page 14. Français Español English OPERATION Remote control operating guide – cont. OPERATION Menu and program selection Note: The menu and program selection buttons will control only one source at a time, depending on which source is selected on your remote (TV, CBL-SAT, DVD, VCR, or AUX). • Exits the Setup mode. • Exits the menu or Electronic Program Guide of the currently selected source (if supported). • Skips ahead one page in the Electronic Program Guide (if supported). CBL-SAT source must be selected. • Skips back one page in the Electronic Program Guide (if supported). CBL-SAT source must be selected. • Displays the menu for the selected source. • Displays details of items in Electronic Program Guide (if supported). • Displays the Electronic Program Guide (if supported). CBL-SAT source must be selected. • Confirms a menu selection or introduces the next level of menu options. • Moves up, down, left, or right in on-screen menus. 18 2SHUDWLRQIP English Español Français OPERATION Remote control operating guide – cont. OPERATION Play options Note: The functionality of the play options buttons may vary depending on the brand of your device(s). Some features may not be supported by your brand. See your owner’s guide(s) for more information. • Skips to the next or previous channel, or DVD track/chapter. • Raises or lowers the volume of the current source. • Pressing + restores muted sound from the current source. • Pressing – lowers the volume of the current source, but does not restore muted sound. • Stops the DVD, VCR or DVR program. • Pauses a currently playing DVD, VCR, or DVR program. • Starts the DVD, VCR or DVR program. • Rewinds or forwards the DVD, VCR or DVR. • Starts Instant replay for DVR (if supported). • Initiates the record function. The source that will record a program (VCR or DVR) must be selected. Press firmly to initiate. • Initiates Quick Skip for DVR (if supported). • Initiates Return to Live for DVR (if supported). • Enters device codes. • Selects a channel, DVD chapter, or numbered menu item (if supported). • Enters Setup mode (for entering device codes into the remote). Press and hold for 3 seconds to enter Setup mode. • Returns to previously selected channel. 19 2SHUDWLRQIP Français Español English OPERATION Remote control operating guide – cont. OPERATION Play options – cont. • Switches between VCR and TV as the current video input source on your VCR or VCR combination device. • Switches between widescreen options and normal TV display (if supported). • Displays the list of DVR recorded programs (if supported). • Displays cable/satellite program information (if supported). Cable-specific buttons These buttons operate cable-specific functions (if supported). TeleText buttons (Europe only) Turns on the TeleText feature (if supported). Turns off the TeleText feature (if supported). Expands TeleText (top). Press again to expand TeleText (bottom). Press a third time to return to normal (if supported). Cable-specific or TeleText buttons 20 2SHUDWLRQIP English Español Français OPERATION Verifying a device code If you need to reprogram a device code, see “Setting up the remote to control other sources” on page 14. 1. Press and hold Setup until all five source buttons light up (about three seconds). 2. Press the source button of the device you want to verify (TV, CBL-SAT, DVD, VCR, or AUX). Only the selected source button will remain lit. 3. Press Info. 4. Press 1 on the remote and count the number of times the five source buttons blink (zero is indicated by a long blink). This is the first digit. 5. Press 2 on the remote and count the number of times the five source buttons blink (zero is indicated by a long blink). This is the second digit. 6. Press 3 on the remote and count the number of times the five source buttons blink (zero is indicated by a long blink). This is the third digit. 7. Press 4 on the remote and count the number of times the five source buttons blink (zero is indicated by a long blink). This is the fourth digit. 8. Press 5 on the remote and count the number of times the five source buttons blink (zero is indicated by a long blink). This is the fifth digit. 9. Press Exit. 21 2SHUDWLRQIP OPERATION When you programmed your remote during setup, a device code for each source was stored in the remote. If you need to verify which code has been programmed for a particular source, follow the steps below. Français Español English CARE AND MAINTENANCE Cleaning your speaker system CARE AND MAINTENANCE • You may clean the surface of your speakers, Acoustimass® module, and Interface module with a soft, damp cloth. You can use an ammonia-free window cleaner on a soft cloth to maintain the finish. • Do not use any sprays near the speakers. Do not use any solvents, chemicals, or cleaning solutions containing alcohol, ammonia, or abrasives. • Do not allow liquids to spill into any openings. • The speaker grilles require no special care, although you may vacuum them carefully, if necessary. Limited warranty The CineMate™ speaker system is covered by a limited transferable warranty. Details of the warranty are provided on the product registration card that came with your system. Please fill out the information section on the card and mail it to Bose. Accessories The CineMate speakers are compatible with Bose® mounting accessories, including the UB-20 wall brackets, UFS-20 floor stands, and UTS-20 table stands. Bose also offers cable adapters, for use in running speaker cable through walls, and longer speaker wire, as needed. For further information or to order mounting brackets, stands, or cable adapters, contact your Bose dealer. Or, to call Bose directly, refer to the address sheet included in the carton. Troubleshooting Problem What to do No power, no LEDs • Make sure the Acoustimass® module power switch (230V units only) is turned on. • Make sure the power cord is inserted securely into the Acoustimass module and plugged firmly into an operating AC wall outlet (mains). • Make sure the Interface module is plugged into the Acoustimass module properly. • Unplug the Acoustimass module power cord from the AC wall outlet for one minute, then reconnect it. This allows the unit to reset itself. Check that the red Standby LED on the front of the Interface module is now lit. No sound • Make sure the CineMate speaker system is turned on. The green LED on the front of the Interface module should be lit. • Increase the volume. • Check to see if the sound source is muted. Press the remote control Mute button to unmute it. • Make sure the Interface module and speaker cables are both firmly connected to the jacks on the Acoustimass module. • Check the speaker connections. • Unplug the power cord from the outlet for one minute, then reconnect it. This allows the system to reset itself. • Check that the correct TV/Video input has been selected. See “Selecting the TV input” on page 16. • Check the connections from the Interface module to the TV or other source. • Check that the TV’s audio output is enabled. See your TV owner’s guide for information. • If the TV’s audio output is VARIABLE (VAR), make sure the TV’s internal speakers are turned off and the TV volume is turned up. 22 English Español Français CARE AND MAINTENANCE What to do Sound but no picture • Make sure the TV is turned on. • Check that the correct TV/Video input is selected. See “Selecting the TV input” on page 16. Remote control is inconsistent or does not work • Check the battery to be sure it is installed properly. • Point the remote control at the Interface module. • Relocate the Interface module, making sure it is in a clear line of sight to the remote and there are no obstructions. • Make sure the protective film is removed from the lens on the front of the Interface module. • Check that the source button on the remote blinks when a button is pressed. • Check that the green LED on the Interface module blinks off briefly when a remote button is pressed. • Check that a device code has been programmed for the selected source. See “Verifying a device code” on page 21. • There may be more than one device code for your brand of device. Find your device and brand in the CineMateTM Universal Device Codes book. Try programming another code, then check the device for improved functionality. Sound is distorted • Make sure speaker cables are not damaged and the connections are secure. • Reduce the audio output level from the TV connected to the Interface module. Sound is coming from the TV • Turn off your TV’s internal speakers. See “Turning off the TV internal speakers” on page 13. • Turn down the TV volume. Customer service For additional help in solving problems, contact Bose® Customer Service. Refer to the address sheet included with the system. Technical information Power rating Weight USA/Canada: 120V 60Hz 300W International: 220-240V 50/60Hz 300W Dual voltage: 115/230V 50/60Hz 300W Speakers: 2.7 lb (1.2 kg) each Acoustimass module: 23.3 lb (10.6 kg) Source inputs Speakers: polymer Acoustimass module: polymer TV AUDIO Finish Dimensions Speakers: 31/2"H x 77/8"W x 51/4"D (8.7 cm x 19.9 cm x 13.6 cm) Acoustimass® module: 141/2"H x 83/4"W x 191/8"D (36.7 cm x 22.2 cm x 48.5 cm) 23 CARE AND MAINTENANCE Problem %RVH&RUSRUDWLRQ7KH0RXQWDLQ )UDPLQJKDP0$86$ $05HY&&0