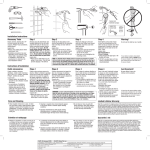
1
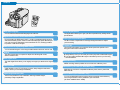
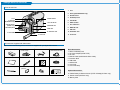
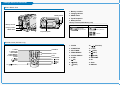
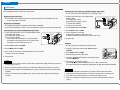
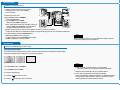
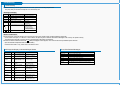
Digital Video Camcorder
SC-D453/D455/D457
Features......................................................2
Notes and Safety Instructions ....................3
Getting to Know Your Camcorder...........4
Playback ..............................................7
Basic Recording............................................8
Maintenance........................................8
* Samsung Electronics’ Internet Home Page
http://www.samsung.com
Troubleshooting...................................9
Features
¡¶«∞¿« ∆ ؿ¡°
Multi OSD Language
You can select the desired OSD language from OSD List.
Digital Data Transfer Function with IEEE1394
By incorporating the IEEE1394 (i.LINK™: i.LINK is a serial data transfer protocol
and interconnectivity system, used to transmit DV data) high speed data transport
port, both moving and still images can be transferred to a PC, making it possible
to produce or edit various images.
USB Interface for Digital Image Data Transfer
You can transfer images to a PC using the USB interface without an add-on card.
PHOTO
The photo function lets you capture an object as a still along with sound,
while in camera mode.
900x Digital Zoom
The 900x Digital Zoom allows you to magnify an image up to 900 times its original
size.
Color TFT LCD
A high-resolution color TFT LCD gives you clean, sharp images as well as the
ability to review your recordings immediately.
Digital Image Stabilizer (DIS)
The DIS compensates for any handshake, reducing unstable images,
particularly at high magnification.
Various Digital Effects
The digital effects allows you to give your films a special look by adding various
special effects.
Back Light Compensation (BLC)
The BLC function compensates for the bright background behind a subject
you're recording.
Program AE
The program AE enables you to alter the shutter speed and aperture to suit
the type of scene/action to be filmed.
Digital Still Camera Function
■
■
Using Memory Card, you can easily record and play back standard still images.
You can transfer standard still images on the Memory Card to your PC using
the USB interface.
MPEG Recording
MPEG recording makes it possible to record video onto a Memory Card.
Multi Memory Card Slot (SC-D455/D457 only)
Multi Memory Card slot is compatible with Memory Stick, Memory Stick PRO,
MMC and SD.
Built-in Memory (SC-D455/D457 only)
You can use digital still camera functions without a separate external Memory
Card, using the built-in memory installed in your Camcorder.
(SC-D455: 32MB/SC-D457: 64MB)
2
Notes and Safety Instructions
Notices regarding Copyright
Television programmes, video tapes, DVD titles, films, and other programme materials
may be copyrighted.
Unauthorized copying of copyrighted material may be against the law.
All the trade names and registered trademarks mentioned in this manual or other
documentation provided with your Samsung product are trademarks or registered
trademarks of their respective holders.
Notes regarding Moisture Condensation
1. A sudden rise in atmospheric temperature may cause condensation to form inside the
Camcorder.
for example:
- When you move the Camcorder from a cold location to a warm location
(e.g. from outside to inside during the winter.)
- When you move the Camcorder from a cool location to a hot location
(e.g. from inside to outside during the summer.)
2. If the
(DEW) protection feature is activated, leave the Camcorder for at least two
hours in a dry, warm room with the cassette compartment opened and the Battery pack
removed.
Notes regarding Camcorder
1. Do not leave the Camcorder exposed to high temperatures (above 60°C or 140°F).
For example, in a parked car in the sun or exposed to direct sunlight.
2. Do not let the Camcorder get wet.
Keep the Camcorder away from rain, sea water, and any other form of moisture.
If the Camcorder gets wet, it may get damaged.
Sometimes a malfunction due to exposure to liquids cannot be repaired.
Notes regarding the Battery Pack
- Be sure to use a recommended battery pack as described on page 22.
The batteries are available at a SAMSUNG retailer.
- Make sure that the Battery pack is fully charged before starting to record.
- To preserve battery power, keep your Camcorder turned off when you are
not operating it.
- If your Camcorder is in CAMERA mode, and it is left in STBY mode without
being operated for more than 5 minutes with a tape inserted,
it will automatically turn itself off to protect against unnecessary battery
discharge.
- Make sure that the Battery pack is fitted firmly into place.
Do not drop the Battery pack. Dropping the Battery pack may damage it.
- A brand-new Battery pack is not charged.
Before using the Battery pack, you need to charge it completely.
- Fully discharging a Lithium-Ion battery damages the internal cells. The Battery pack may be
prone to leakage when fully discharged.
Notes regarding the Battery pack
When the battery reaches the end of its life, please contact your local dealer.
The batteries have to be dealt with as chemical waste.
Notes regarding the Video Head Cleaning
- To ensure normal recording and a clear picture, clean the video heads regularly.
If a square block-shape distorts playback, or only a blue screen is displayed, the video
heads may be dirty.
If this happens, clean the video heads with a dry type cleaning cassette.
- Do not use a wet-type cleaning cassette. It may damage the video heads.
Note regarding the Lens
Do not film with the camera lens pointing directly at the sun.
Direct sunlight can damage the CCD (Charge Coupled Device).
Notes regarding electronic Viewfinder
1. Do not position the Camcorder such that the Viewfinder is pointing towards the sun.
Direct sunlight can damage the inside of the Viewfinder. Be careful when placing the
Camcorder under sunlight or near a window exposed to sunlight.
2. Do not pick up the Camcorder by holding the Viewfinder.
3. Applying excessive force to the Viewfinder may damage it.
Notes regarding ‘Record’ or ‘Playback’ Using the LCD Screen
1. The LCD screen has been
manufactured using high precision
technology. However, there may be
tiny dots (red, blue or green in color)
that appear on the LCD screen.
These dots are normal and do not
affect the recorded picture in any way.
2. When you use the LCD screen under direct sunlight or
outdoors, it maybe difficult to see the picture clearly.
If this occurs, we recommend using the Viewfinder.
3. Direct sunlight can damage the LCD screen.
Notes regarding the Hand Strap
- To ensure a steady picture while filming, check that the hand
strap is properly adjusted.
- Do not force your hand into the hand strap as you could
damage it.
3
Getting to Know Your Camcorder
Front & Left View
1. Lens
2. LED Light (SC-D455/D457 only)
3. Remote Sensor
1. Lens
6. EASY.Q button
4. Hand Strap Hook
5. Internal MIC
2. LED Light
(SC-D455/D457 only)
7. TFT LCD Screen
3. Remote Sensor
(SC-D457 only)
8. IEEE1394 Jack
6. EASY.Q button
7. TFT LCD Screen
8. IEEE1394 Jack
4. Hand Strap Hook
9. USB Jack
10. AV/S-Video Jack
5. Internal MIC
9. USB Jack
10. AV/S-Video Jack
11. Jack Cover
11. Jack Cover
Accessories Supplied with Camcorder
Make sure that the following basic accessories are supplied with your digital video camera.
4. Multi-AV Cable
(Audio/Video/S-Video Cable)
2. AC Power Adapter
(AA-E8 TYPE)
3. AC cord
5. Instruction Book
6. USB Cable
7. Software CD
8. Lens Cover
9. Lens Cover Strap
10. Lithium Battery
(CR2025)
11. Remote Control
12. Memory Stick
1. Lithium Ion Battery Pack
Basic Accessories
1.
2.
3.
4.
5.
6.
7.
8.
9.
Lithium Ion Battery Pack
AC Power Adapter (AA-E8 TYPE)
AC Cord
Multi-AV Cable (Audio/Video/S-Video Cable)
Instruction Book
USB Cable
Software CD
Lens Cover
Lens Cover Strap
Optional Accessories
10. Lithium Battery for Remote Control. (TYPE: CR2025) (SC-D457 only)
11. Remote Control (SC-D457 only)
12. Memory Stick
4
Getting to Know Your Camcorder
Left Side View
1. Speaker
2. Mode Switch (MEMORY/TAPE)
3. DISPLAY
1. Speaker
4. Focus Adjustment Knob
4. Focus Adjustment Knob
5. Viewfinder
5. Viewfinder
6. Function buttons
FADE
2. Mode Switch
BLC
S.SHOW
PLAYER
-
CAMERA
EASY.Q
M.Player
-
: REW
REC SEARCH –
: FF
REC SEARCH +
FWD
: PLAY/STILL
FADE
S.SHOW(SLIDE SHOW)
: STOP
BLC
MULTI
MULTI
REC SEARCH
3. DISPLAY
6. Function buttons
7. COLOR NITE/PB ZOOM
REV
7. COLOR NITE/PB ZOOM
Right & Top View
1. Menu Selector (VOL/MF)
6. TAPE EJECT
1. Menu Selector (VOL/MF)
2. MENU button
7. Zoom Lever
8. PHOTO button
9. External MIC
10. Cassette Door
3. Start/Stop button
4. Power Switch
2. MENU button
3. Start/Stop button
4. Power Switch (CAMERA or PLAYER)
5. DC Jack
6. TAPE EJECT
7. Zoom Lever
8. PHOTO button
9. External MIC
5. DC Jack
10. Cassette Door
5
Getting to Know Your Camcorder
Rear & Bottom View
1. Memory Card Slot
2. Charging indicator
5. Battery Release
3. RESET button
4. Tripod Receptacle
5. Battery Release
Memory Card Slot (Usable Memory Card)
1. Memory Card Slot
SC-D453 only
2. Charging indicator
SC-D455/D457 only
Memory Stick
Memory Stick PRO
Memory Stick
Memory Stick PRO
3. RESET button
4. Tripod Receptacle
SD/MMC
Remote Control (SC-D457 only)
1. PHOTO
2. START/STOP
3. SELF TIMER
4. ZERO MEMORY
5. PHOTO SEARCH
6. A.DUB
7.
(FF)
8.
(REW)
9.
(PLAY)
10.
/
(Direction)
1. PHOTO
10.
/
(Direction)
2. START/STOP
11. F. ADV
18. DISPLAY
3. SELF TIMER
12.
(STOP)
17. Zoom
4. ZERO MEMORY
13.
(STILL)
5. PHOTO SEARCH
14.
(SLOW)
6. A.DUB
15. DATE/TIME
7.
(FF)
16. X2
8.
(REW)
17. Zoom
9.
(PLAY)
18. DISPLAY
16. X2
15. DATE/TIME
14.
(SLOW)
13. (STILL)
12. (STOP)
11. F. ADV
6
Playback
Tape Playback
Connecting to a TV which has no Audio and Video Input Jacks
✤ The Playback function works only in Player mode.
✤ You can connect your Camcorder to a TV through a VCR.
Playback on the LCD Screen
✤ It is easier to view a tape using the LCD screen as opposed to the viewfinder when in a
moving automobile or outdoors.
Playback on a TV Monitor
1. Connect the Camcorder to your VCR with the
Multi-AV cable.
■ The yellow jack: Video
■ The white jack: Audio(L) - Mono
■ The red jack: Audio(R)
S-Video input
VCR
DV
AV/ S
Connecting to a TV which has Audio/Video Input Jacks
1. Connect the Camcorder to your TV with the Multi-AV cable.
■ The yellow jack: Video
■ The white jack: Audio(L)-mono
■ The red jack: Audio(R)
- If you connect to a monaural TV, connect the yellow
jack (Video) to the video input of the TV and the white
jack (Audio L) to the audio input of the TV.
2. Connect a TV to the VCR.
3. Set the Power switch to PLAYER.
Audio/Video/
S-Video
Antenna
4. Set the Mode switch to TAPE.
S-Video input
TV
Video input-Yellow
Camcorder
Audio input
(left)-White
Audio input
(right)-Red
DV
5. Turn on both the TV and VCR.
■ Set the input selector on the VCR to Line.
■ Select the channel reserved for your VCR on the TV set.
6. Play the tape.
USB
AV/ S
Audio/Video/
S-Video
Playback
✤ You can play the recorded tape in Player mode.
2. Set the Power switch to PLAYER.
3. Set the Mode switch to TAPE.
4. Turn on the TV and set the TV/VIDEO selector on the TV to Video.
■ Refer to the TV user’s manual.
5. Play the tape.
Notes
■
You may use the S-Video connector on the cable to obtain better quality pictures if you have an
S-Video jack on your TV.
■
Even if you use the S-Video connector, you still need to make audio connections on your TV.
■
If you connect the cable to the Audio/Video jack, you will not hear sound from the Camcorder's
speakers.
■
Camcorder
USB
TV
✤ To play back a tape, the television must be NTSC compatible.
✤ We recommend that you use the AC Power adapter as the power source for the Camcorder.
Video input-Yellow
Audio input(left)-White
Audio input(right)-Red
If only a mono audio input is available on the TV set, use the Audio cable with the white jack
(Audio L).
1. Connect a power source and set the Power switch to
PLAYER.
2. Set the Mode switch to TAPE.
3. Insert the tape you wish to play back.
4. Using the / (REW/FF) buttons, find the first position
you wish to play back.
5. Press the
(PLAY/STILL) button.
■ The images you recorded will appear on the TV after a few seconds.
■ If a tape reaches its end while being played back, the tape will rewind automatically.
Notes
■
■
■
■
The playback mode (SP/LP) is determined by the mode in which the tape was recorded.
If the VCR has an S-Video input terminal, you may use S-Video Connector for better quality.
The S-Video Connector transmits video only. Connect Audio cables for sound.
If only a mono audio input is available on the TV set, use the audio cable with the white jack
(Audio L).
7
Basic Recording
Making your First Recording
1.Connect a power source to the Camcorder.
(A Battery pack or a AC Power adapter)
Insert a cassette.
1
2
2.Remove the Lens cover.
3.Set the Power switch to CAMERA.
■ Open the LCD screen.
4
3
■ Set the Mode switch to TAPE.
Make sure that STBY is displayed.
■ If the write protection tab of the cassette is open (set
to save), STOP and Protection! will be displayed.
Release the write protection tab to record.
■ Make sure the image you want to record appears on the LCD screen or Viewfinder.
■ Make sure the battery level indicates that there is enough remaining power for your expected recording time.
√
√
4.To start recording, press the Start/Stop button.
■ REC ● is displayed on the LCD screen.
To stop recording, press the Start/Stop button again.
■ STBY is displayed on the LCD screen.
Note
Detach the Battery pack when you are finished recording to prevent
unnecessary battery power consumption.
Maintenance
Cleaning and Maintaining the Camcorder
Cleaning the Video Heads
To ensure normal recording and clear pictures, clean the video heads when the playback pictures display
square block-shaped noise or distortion, or a blue screen appears.
(blue screen)
1. Set the Power switch to PLAYER.
Notes
■
Check the quality of the picture using a videocassette.
- If the picture quality has not improved, repeat the operation.
■
Clean the video heads with a dry type cassette cleaner.
■
Some cleaning cassette products stop automatically.
Refer to the cleaning cassette’s instructions for detailed information.
If the problem continues after the cleaning, consult your nearest
Samsung dealer or Authorized Service Center.
2. Set the Mode switch to TAPE.
3. Insert the cleaning tape.
4. Press the
5. Press the
(PLAY/STILL) button.
(STOP) button after 10 seconds.
8
Troubleshooting
Troubleshooting
✤ Before contacting a Samsung authorized service center, perform the following simple checks.
They may save you the time and expense of an unnecessary call.
Self Diagnosis Display
Display Blinking
slow
Informs that...
Action
the Battery pack is almost discharged. Change to a charged one.
Tape end ! slow
When the remaining time on the tape
is about 2 minutes.
Prepare a new one.
Tape end !
no
the tape reached its end.
Change to a new one.
No Tape !
slow
there is no tape in Camcorder.
Insert a tape.
Protection ! slow
the tape is protected from recording.
If you want to record, release
the protection.
slow
the Camcorder has some mechanical
fault.
1. Eject the tape.
2. Set to OFF.
3. Detach the battery.
4. Reattach the battery.
* If unresolved contact your local
Samsung service center.
slow
moisture condensation has formed in
the Camcorder.
see below.
....D
L
C
R
Moisture Condensation
✤ If the Camcorder is brought directly from a cold place to a warm place, moisture may condense inside the Camcorder,
on the surface of the tape, or on the lens. In this condition, the tape may stick to the drum head and be damaged or the unit may not operate correctly.
The Camcorder is fitted with a moisture sensor to resist damage under these circumstances.
✤ If there is moisture inside the Camcorder,
(DEW) is displayed. If this happens, none of the functions except cassette ejection will work.
Open the cassette compartment and remove the battery.
Leave the Camcorder in a dry, warm room for at least two hours.
Self Diagnosis Display in M.Cam/M.Player Modes
Display
Blinking
Informs that...
Action
No Memory Card ! slow
There is no Memory Card in
the Camcorder.
Insert a Memory Card.
Memory Full !
There is not enough memory
to record.
Change to a new Memory
Card. Erase recorded image.
No image !
slow
slow
There are no images recorded
on the Memory Card.
Record new images.
Write protect !
slow
The Memory Card is record
protected.
Release the write protect tab
on the Memory Card.
Protect !
slow
When you try to delete
a protected image.
Cancel the protection of
image.
Read error !
slow
The Camcorder cannot
playback.
Format a Memory Card or
insert Memory Card recorded
on this Camcorder.
Write error !
slow
The Camcorder cannot record.
Format a Memory Card or
change to a new Memory Card.
Now Formatting... !
slow
The Memory Card needs to
format.
Format a Memory Card.
Now deleted...
slow
When processing file delete.
Wait until delete has been
finished.
Memory Card error !
slow
If inserted Memory Card is not
recognized by the Camcorder.
Eject and re-insert the
memory card.
Try another Memory Card.
Direct Print Related Messages
Display
Explanation
Paper error
There is a problem with the paper.
No paper
Paper is not correctly inserted or there is no paper.
Paper Jam
The paper jammed during printing.
Ink error
There is a problem with the ink cassette.
No Ink
The ink cartridge is not inserted or is out of ink.
Print error
Turn off the printer and turn it back on.
File error
You attempted to print an image that was made with another
camcorder, has a different format, or was edited on a computer.
9