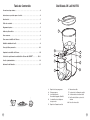
1
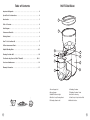
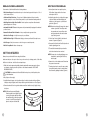
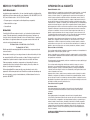
User Manual /
Manual del Usuario
Burr Mill BMH Series
Molinillo de Piñones serie BMH
© 2011 Sunbeam Products, Inc. doing business as Jarden Consumer Solutions. All rights reserved.
Distributed by Sunbeam Products, Inc. doing business as Jarden Consumer Solutions,
Boca Raton, Florida 33431.
U.S. 1-800-MR. COFFEE® (1-800-672-6333)
Canada 1-800-667-8623
Visit us at www.mrcoffee.com
You will find exciting and entertaining tips and ideas,
including great recipes!
SPR102810-661
© 2011 Sunbeam Products, Inc. operando bajo el nombre de Jarden Consumer Solutions.
Todos los derechos reservados. Distribuido por Sunbeam Products, Inc. operando bajo el nombre
de Jarden Consumer Solutions, Boca Raton, Florida 33431.
Visítenos en www.mrcoffee.com
Ahí encontrará consejos e ideas excitantes y entretenidos,
¡incluyendo excelentes recetas!
Printed in China/Impreso en China P.N. 146552
www.mrcoffee.com
IMPORTANT SAFEGUARDS
To reduce the risk of fire, electric shock and/or injury to persons, basic safety
precautions should always be followed when using electrical appliances,
including the following:
1. READ ALL INSTRUCTIONS BEFORE USING THE MACHINE.
2. To protect against electric shock, do not immerse cord, plugs or machine in
water or in any other liquid.
3. Close adult supervision is necessary when this appliance is used by or near
children.
4. Press START/STOP button and unplug from outlet when not in use and before
cleaning. Allow the appliance to cool before installing or removing parts and
before cleaning the appliance.
5. Avoid contacting moving parts.
6. Do not operate any appliance with a damaged cord or plug or after the
appliance malfunctions, or has been damaged in any manner. Return this
appliance only to the nearest Authorized Service Center for examination, repair
or adjustment.
7. The use of accessory attachments not recommended for MR. COFFEE® products
may cause hazards or injuries.
8. Do not use the appliance outdoors.
9. Do not let the appliance cord hang over edge of table or counter, or touch hot
surfaces.
10. Check the appliance hopper for presence of foreign objects before using.
11. Do not place this appliance on or near a hot gas or electric burner or in a
heated oven.
12. To disconnect, press the START/STOP button, then remove the plug from the
wall outlet.
13. Do not use the appliance for other than intended household use.
Please read ALL of the instructions in this manual carefully before you begin
to use this appliance. Proper care and maintenance will ensure a long life and
a trouble-free operation for this appliance. Please save these instructions and
refer to them for cleaning and care tips.
SAVE THESE INSTRUCTIONS
INTRODUCTION
Thank you for selecting Mr. Coffee BMH Series Burr Mill. Only a MR. COFFEE®
Burr Mill delivers better taste at a great value!
SPECIAL CORD SET INSTRUCTIONS
1. A short power supply cord is provided to reduce the hazards resulting from
a person or pet becoming entangled in, or tripping over, a longer cord.
2. An extension cord may be purchased and used if care is exercised
in its use.
3. If an extension cord is used, the marked electrical rating of the extension
cord must be at least 10 amps and 120 volts. The resulting extended cord
must be arranged so that it will not drape over a countertop or tabletop
where it can be pulled on by children or tripped over accidentally.
4. This appliance has a polarized plug (one blade is wider than the other). To
reduce the risk of electric shock, this plug will fit in a polarized outlet only one
way. If the plug does not fit fully in the outlet, reverse the plug. If it still does
not fit, contact a qualified electrician. Do not modify the plug in any way.
5.You can customize the length of the power cord so that it is the exact
length you desire. To increase the length of the power cord: grasp the
power cord (not the power plug) and gently lift it out of the slot, then pull
it away from the grinder. To decrease the length of the power cord: grasp
the power cord (not the power plug), lift it out of the slot and wrap into
the base of the grinder. Lock the cord in the slot when finished.
WARNING! To reduce the risk of fire or electric shock, do not remove any
service covers. There are no user serviceable parts inside the Burr Mill.
Only authorized personnel should repair the Burr Mill.
2
3
Table of Contents
PARTS DIAGRAM
Important Safeguards . . . . . . . . . . . . . . . . . . . . . . . . . . . . . . . . . . . . . . . . . . . 2
Special Cord Set Instructions. . . . . . . . . . . . . . . . . . . . . . . . . . . . . . . . . . . . . . 2
1
Introduction . . . . . . . . . . . . . . . . . . . . . . . . . . . . . . . . . . . . . . . . . . . . . . . . . . 3
Table of Contents . . . . . . . . . . . . . . . . . . . . . . . . . . . . . . . . . . . . . . . . . . . . . 4
Parts Diagram. . . . . . . . . . . . . . . . . . . . . . . . . . . . . . . . . . . . . . . . . . . . . . . . . 5
2
Features and Benefits . . . . . . . . . . . . . . . . . . . . . . . . . . . . . . . . . . . . . . . . . . . 6
Getting Started . . . . . . . . . . . . . . . . . . . . . . . . . . . . . . . . . . . . . . . . . . . . . . . . 6
How To Use Your Burr Mill . . . . . . . . . . . . . . . . . . . . . . . . . . . . . . . . . . . . . . . 7
co
ars
French Pr e
ess
ne
fine
Espresso
Es
Espre
Coffee Measurement Chart. . . . . . . . . . . . . . . . . . . . . . . . . . . . . . . . . . . . . . . . 8
6
8
Cleaning Your Burr Mill . . . . . . . . . . . . . . . . . . . . . . . . . . . . . . . . . . . . . . . . . 10
Troubleshooting Your Mr. Coffee® Burr Mill . . . . . . . . . . . . . . . . . . . . . . . 10-11
1
stst
opart
10
8
med
4
3
2
Helpful Grinding Hints. . . . . . . . . . . . . . . . . . . . . . . . . . . . . . . . . . . . . . . . . 8-9
iu
Drip Co m
ffee
10
12
4
9
5
8
Service and Maintenance . . . . . . . . . . . . . . . . . . . . . . . . . . . . . . . . . . . . . . . 12
Warranty Information . . . . . . . . . . . . . . . . . . . . . . . . . . . . . . . . . . . . . . . . . 13
7
6
4
1 Bean Hopper Lid
6 Grinding Chamber
2 Bean Hopper
7 Grinding Chamber Chute
3 ON/OFF Indicator Light
8 Mill Motor Housing
4 Built-In Scoop/Cleaning Brush
9 Start/Stop & Cup Selection Dial
5 Grinding Chamber Lid
10 Grind Selection
5
Burr Mill FEATURES AND BENEFITS
HOW TO USE YOUR Burr Mill
Your new Mr. Coffee Burr Mill has the following features:
1.After all parts have been put into place,
fill the Bean Hopper with coffee beans
and replace the lid.
• Automatic Shut-Off - Eliminates the guesswork by automatically stopping at the desired
portion chosen.
• Stainless Steel Design - A stylish accessory for your kitchen.
• On/Off Indicator Light - LED illuminates letting you know your Burr Mill is ready for use.
3.Set the Cup Selection Dial to the desired
amount of grounds (Figure 3).
6
4.Press and hold briefly the Start/Stop button to
start the grinding process.
5.The unit will automatically stop when the
selected volume has been reached.
GETTING STARTED
Always clean your Burr Mill before using the first time.
Make sure that your 1st cup of coffee is as good as can be by cleaning your Mr. Coffee Burr
Mill before its first use. Just follow these simple steps:
1.Wash the bean hopper and grinding chamber parts with warm soapy water. (Never
use abrasive cleansers, steel wool pads or other abrasive materials. UNIT IS NOT
DISHWASHER SAFE).
CAUTION! Never immerse the Burr Mill itself in water, in any other liquid or place
in the dishwasher.
NOTE: You may also stop the grinding process
at anytime by pressing the Start/Stop
Brand: Mr. Coffee
button again.
Model: Burr Mill Grinder
8 10
Start
Stop
Max
• Built-In Scoop/Brush - Makes clean up easy.
Figure 2
8 10
Start
Stop
12
• Cord Storage - Safely stores excess cord to keep your countertop neat.
6
12
• Removable Ground Coffee Chamber - Lets you easily transfer ground coffee.
NOTE: Grind size setting will change the output
volume of grounds. Fine will produce
less grounds and course will product
more grounds when the same volume
(cup) setting is used.
2 4
• Start/Stop Button & Cup Selection Dial - Perfect portions every time with automatic
grind settings from 2-18 cups.
2.Adjust the grind size by rotating the hopper
counterclockwise and then aligning the
indicator on the hopper to your desired
grind size (Figure 2).
2 4
• 18 Custom Grind Selections - Choose from 18 different grind selections from fine
(espresso grade) to course (French Press grade) for your customized brewing method.
Max
• Whole Bean Hopper - Removable and easy to clean bean hopper holds up to a ½ lb. of
coffee beans at a time.
Art Doc Number: 146492
Figure 3
Revision: 1
Notes:
- To Scale 1:1
- Use CorelDRAW files for reproduction.
Description: ID Spec/ Master Art
6.Remove the coffee chamber and lidPage:
and
use
3 of 6
the grounds as needed.
7.Cleaning brush can be used to remove dust
from grind chamber chute located behind
the removable grinding chamber (Figure 4).
2. Dry all pieces thoroughly.
3.Install the Bean Hopper onto the unit and turn clockwise (several rotations-will hear
clicking as unit gets tighter) until it stops with the grind size indicator on Fine (Figure 1).
4.Please chamber lid back on grinder chamber and then install into unit, tightly locking
into place.
NOTE: If all Bean Hopper and Grinding
Chamber parts are not tightly in place
correctly, the safety switches within
the machine will not allow the grinder
to work. You MUST have all parts in
place to safely use the Burr Mill.
Notes:
Brand: Mr. Coffee
Model: Burr Mill Grinder
Description: ID Spec/ Master Art
- To Scale 1:1
Figure 4
- Use CorelDRAW files for reproduction.
Page: 3 of 6
Figure 1
6
7
COFFEE MEASUREMENT CHART
• For Mr. Coffee® Espresso products:
For Medium Ground Coffee
- Set the Burr Mill to Fine grind.
Cups of Coffee (5 oz. each)
Bean Quantity Approximate (Tablespoons)
12 Cups
12 Tbsp
10 Cups
10 Tbsp
8 Cups
8 Tbsp
6 Cups
6 Tbsp
4 Cups
4 Tbsp
2 Cups
2 Tbsp
1. T he amount of whole coffee beans required is about the same as the specified
quantity of medium ground coffee tablespoons.
2. The unit will work for about 1 minute if you have selected the 12 cups setting.
3. The unit may be stopped during grinding by:
• The user - you may press the Start/Stop button at any time to stop the grinding
operation.
• Opening the hopper lid during operation – check that you have enough beans.
• An out of position ground coffee chamber – check that it is not full. Close the lid,
place it in the correct position and adjust the timer setting to avoid overfilling the
ground coffee chamber before resuming operation.
NOTE: A
void overfilling the ground coffee chamber. This can cause the unit motor to
overheat and break a thermal fuse inside the mill, possibly damaging the unit
permanently.
NOTE: If all Bean Hopper and Grinding Chamber parts are not tightly in place correctly, the
safety switches within the machine will not allow the grinder to work. You MUST
have all parts in place to safely use the Burr Mill.
HELPFUL GRINDING HINTS FOR BEST RESULTS
You may customize the above bean quantity recommendations as you familiarize yourself
with your new MR. COFFEE® Burr Mill, but always bear in mind the following:
1. U
sing finer grounds than required for brewing coffee in an automatic drip coffee maker
might cause an overflow of the paper filter and/or the brew basket. Also, the taste of
the coffee might be stronger than desired. If this happens, use less coffee grounds or
change the grind setting to medium or to whichever setting is necessary to obtain the
desired result.
2. U
sing coarser grounds than required for brewing coffee in an automatic drip coffee
maker might cause an overflow of the paper filter and/or the brew basket. Also, the
taste of the coffee might be weaker than desired. If this happens, use more coffee
grounds to obtain the desired result. For a regular or stronger cup of coffee, adjust the
grind setting to a medium to fine setting.
3. W
hen a finer setting is required to brew espresso or cappuccino, please grind the
amount of coffee grounds recommended by your product manufacturer.
8
- For 2 oz. of espresso coffee, 2 tsp (0.6 tbsp) of fine grind are required. Set the
Timer to 3 cups, this will keep the unit ON enough time to grind the finer grounds
required.
- For 4 oz. of espresso coffee, 4 tsp (1.3 tbsp) of fine grind are required. Set the
Timer to 5 cups, this will keep the unit ON enough time to grind the finer grounds
required.
• Using improper medium or coarse coffee grinding settings might affect the taste of the
brewed espresso coffee, because the optimum coffee extraction is not achieved. If
you like a strong cup of espresso, make sure the grind setting is fine.
4. W
hen a coarser setting is required to brew coffee manually, in a percolator or using
a French Press, grind the amount of coffee grounds recommended by your product
manufacturer.
• Mr. Coffee® recommendation:
- Set the Burr Mill to a coarse grind setting.
- S et the timer to 8-10 cups, this will keep the unit ON enough time to grind enough
coffee for 12 cups of brewed coffee.
- Given that coarse grounds will take up more volume, always set the timer for 2-4
cups less than the amount desired.
NOTE: Remember, you can customize the recommendations above as you discover which
setting best meets your personal coffee-making preference. As in the case of
automatic drip coffee makers,
- U
sing an excessive amount of coffee grounds for brewing coffee in a percolator
might cause an overflow of the percolator brew basket.
- U
sing finer grounds than required for brewing coffee manually in a percolator, or
using a French Press, might cause an overflow of the percolator brew basket and/
or the taste of the coffee might be stronger than desired. If you want a regular or
weaker cup of coffee, adjust the grind setting to a medium to coarse setting.
5. Use only coffee beans in this appliance.
6. The ground coffee chamber and its lid must always be in place when using this
appliance.
7. Do not use the finest setting when grinding coffee for your automatic drip
coffeemaker. The finer grounds could cause the coffee basket to overflow.
8. To avoid overheating the motor, do not grind more than 2 full whole bean hoppers or
2 full 12-cup cycles without a break. Allow the motor to cool to room temperature at
least 2 minutes between cycles.
9. If the grinder stops working after running consecutive cycles, unplug the grinder from
the wall outlet and allow it to cool for at least an hour. Then plug grinder back in and
use as needed.
10. Flavored coffee beans will gum up the burrs and leave an oily residue when stored in
the whole bean hopper for long periods of time.
9
11. C
lean after every third use for best performance.
12. A
fter using, open the grinder to the coarsest setting and run empty to clear the
grinding path.
NOTE: F or optimum freshness of your coffee beans, do NOT store in the bean hopper for
extended periods of time.
Troubleshooting cont.
THE COFFEE
GROUNDS
PRODUCED
ARE
INSUFFICIENT
CLEANING INSTRUCTIONS
• Unit and Burr Mill are not clean
Remember to always clean your Burr Mill before using it for the first time. Then, to ensure
optimal mill function and durability, clean it regularly following these simple steps:
1. Always unplug your Burr Mill after use and before cleaning.
2.Wash the bean hopper and coffee chamber parts with warm soapy water. (Never
use abrasive cleansers, steel wool pads or other abrasive materials. UNIT IS NOT
DISHWASHER SAFE)
CAUTION! Never immerse the Burr Mill itself in water, in any other liquid or place
in the dishwasher.
3. Dry all pieces thoroughly.
• There is a foreign object between the
two Burr Mills
PROBLEM
POSSIBLE CAUSE
SOLUTION
THE UNIT DOES
NOT GRIND
• Hopper is not securely intact
• TURN HOPPER CLOCKWISE UNTIL STOPS, THEN
MOVE INDICATOR COUNTERCLOCKWISE, BACK
TILL YOU HAVE INDICATOR LINED UP WITH
DESIRED GRIND SETTING
• SECURE HOPPER LID
• PLACE CHAMBER IN PROPER POSITION
10
• PRESS AND HOLD BRIEFLY START/STOP BUTTON
• PLUG UNIT IN
• WAIT FOR POWER TO BE RESTORED
• unplug unit for at least an hour then
plug back in and use as needed
• Remove Hopper & Empty to Clear
Blockage
• UNPLUG UNIT, PLACE TOP Burr Mill IN
PROPER POSITION
• CLEAN UNIT, UNPLUG IT AND CLEAN Burr
Mill
• UNPLUG UNIT AND CAREFULLY DISLODGE
FOREIGN OBJECT
• CLEAN UNIT, UNPLUG IT AND CLEAN Burr
Mill
• There’s a foreign object between the
two Burr Mills
• UNPLUG UNIT AND CAREFULLY DISLODGE
FOREIGN OBJECT
• Grind setting is not correct
• TURN HOPPER TO CORRECT GRIND SETTING
THE UNIT
STOPS
GRINDING
• Grind setting is incorrect
• SET GRIND SETTING CORRECTLY
• PLACE CHAMBER IN PROPER POSITION
• Ground coffee chamber is not in
correct position
• Start/Stop button has been pressed
• The unit has been unplugged
• There’s a power outage
• Ground coffee chamber is full and is
clogging the Burr Mill compartment
NOTE: If all Bean Hopper and Grinding Chamber parts are not tightly in place correctly, the
safety switches within the machine will not allow the grinder to work. You MUST
have all parts in place to safely use the Burr Mill.
Your MR. COFFEE® Burr Mill has been carefully designed to give you many years of trouble-free
service. In the unlikely event that your new Burr Mill does not operate satisfactorily, please review
the following potential problems and try the steps recommended BEFORE you call an Authorized
Sunbeam Service Center.
• PLACE CHAMBER IN PROPER POSITION
• Unit and Burr Mill are not clean
5.Place chamber lid back on grinder chamber and then install into unit, tightly locking into
place.
TROUBLESHOOTING YOUR MR. COFFEE® Burr Mill
• SET Grinder setting CORRECTLY
• ADD BEANS TO HOPPER
THE SIZE OF
GROUND
COFFEE
PARTICLES
IS NOT
CONSISTENT
4.Install the Bean Hopper onto the unit and turn clockwise (several rotations-will hear
clicking as unit gets tighter) until it stops with the grind size indicator on Fine.
• Hopper lid is not on tight
• Ground coffee chamber is not in
position
• Start button has not been pressed
• Unit is unplugged
• There’s a power outage
• Motor has overheated, thermal fuse
is open
• Hopper Chute Clogged (or Blocked)
• Grinder setting is incorrect
• Insufficient amount of whole beans in
hopper
• Ground coffee chamber moved out of
position during operation
• Top Burr Mill is not in proper position
THE CUP
SELECTION DIAL
DOES NOT TURN
THE GRIND
SETTING hopper
DOES NOT TURN
• PRESS AND HOLD BRIEFLY START/STOP
BUTTON again
• PLUG UNIT IN
• WAIT FOR POWER TO BE RESTORED
• REMOVE CHAMBER, EMPTY AND
REPLACE; UNPLUG UNIT AND CLEAN
Burr Mill COMPARTMENT IF NEEDED
• Motor has overheated, thermal fuse
is open
• unplug unit for at least an hour then plug back in and use as
needed
• Timer is at 2 cup setting, cannot turn
counterclockwise anymore
• TURN CLOCKWISE TO SET DESIRED
NUMBER OF CUPS
• Timer is at 18 cup setting, cannot turn
clockwise anymore
• TURN counter CLOCKWISE TO SET
DESIRED NUMBER OF CUPS
• Cup selection dial is broken
• call MR. COFFEE® Consumer Service Department number below
• Hopper is at the Fine Setting, cannot
turn clockwise anymore
• TURN COUNTERCLOCKWISE FOR
DESIRED GRIND SETTING
• Unit and Burr Mill are not clean
• CLEAN UNIT, UNPLUG IT AND CLEAN
Burr Mill
• There’s a foreign object between the
two Burr Mills
• UNPLUG UNIT AND CAREFULLY
DISLODGE FOREIGN OBJECT
Do you still have questions? You can call us toll-free at the MR. COFFEE® Consumer Service
Department 1-800-MR. COFFEE® (1-800-672-6333) or you can visit us at www.mrcoffee.com
11
SERVICE AND MAINTENANCE
WARRANTY INFORMATION
Replacement Parts
1-YEAR LIMITED WARRANTY
The following replacement parts (as well as the complete unit) are available by visiting
us online at www.mrcoffee.com , or call 1-800-MR-COFFEE (1-800-672-6333) in the
U.S. or 1-800-667-8623 in Canada:
Sunbeam Products, Inc. doing business as Jarden Consumer Solutions or if in Canada, Sunbeam
Corporation (Canada) Limited doing business as Jarden Consumer Solutions (collectively “JCS”)
warrants that for a period of one year from the date of purchase, this product will be free from
defects in material and workmanship. JCS, at its option, will repair or replace this product or
any component of the product found to be defective during the warranty period. Replacement
will be made with a new or remanufactured product or component. If the product is no longer
available, replacement may be made with a similar product of equal or greater value. This is your
exclusive warranty. Do NOT attempt to repair or adjust any electrical or mechanical functions on
this product. Doing so will void this warranty.
• Bean Hopper w/Lid (both available separately)
• Grinding Chamber w/Lid
• Scoop/Brush
Repairs
If your Burr Mill requires service, do not return it to the store where you purchased it.
All repairs and replacements must be made by Sunbeam or an authorized Sunbeam
Service Center. If you live in the U.S. or Canada, please call us at the following toll-free
telephone numbers to find the location of the nearest authorized service center:
U.S. 1-800-MR. COFFEE® (1-800-672-6333)
Canada 1-800-667-8623
You may also visit our website at www.mrcoffee.com for a list of service centers.
To assist us in serving you, please have the coffeemaker model number and date of
purchase available when you call. The model number is stamped on the bottom metal
plate of the Burr Mill.
We welcome your questions, comments or suggestions. In all your communications,
please include your complete name, address and telephone number and a description
of the problem.
Visit our website at www.mrcoffee.com and discover the secret to brewing the perfect
cup of coffee. You will also find a rich blend of gourmet recipes, entertaining tips and
the latest information on MR. COFFEE® products.
This warranty is valid for the original retail purchaser from the date of initial retail purchase and is
not transferable. Keep the original sales receipt. Proof of purchase is required to obtain warranty
performance. JCS dealers, service centers, or retail stores selling JCS products do not have the
right to alter, modify or any way change the terms and conditions of this warranty.
This warranty does not cover normal wear of parts or damage resulting from any of the following:
negligent use or misuse of the product, use on improper voltage or current, use contrary to
the operating instructions, disassembly, repair or alteration by anyone other than JCS or an
authorized JCS service center. Further, the warranty does not cover: Acts of God, such as fire,
flood, hurricanes and tornadoes.
What are the limits on JCS’s Liability?
JCS shall not be liable for any incidental or consequential damages caused by the breach of any
express, implied or statutory warranty or condition.
Except to the extent prohibited by applicable law, any implied warranty or condition of
merchantability or fitness for a particular purpose is limited in duration to the duration of the
above warranty.
JCS disclaims all other warranties, conditions or representations, express, implied, statutory or
otherwise.
JCS shall not be liable for any damages of any kind resulting from the purchase, use or misuse of,
or inability to use the product including incidental, special, consequential or similar damages or
loss of profits, or for any breach of contract, fundamental or otherwise, or for any claim brought
against purchaser by any other party.
Some provinces, states or jurisdictions do not allow the exclusion or limitation of incidental
or consequential damages or limitations on how long an implied warranty lasts, so the above
limitations or exclusion may not apply to you.
This warranty gives you specific legal rights, and you may also have other rights that vary from
province to province, state to state or jurisdiction to jurisdiction.
How to Obtain Warranty Service
In the U.S.A.
If you have any question regarding this warranty or would like to obtain warranty service, please
call 1-800-672-6333 and a convenient service center address will be provided to you.
In Canada
If you have any question regarding this warranty or would like to obtain warranty service, please
call 1-800-667-8623 and a convenient service center address will be provided to you.
In the U.S.A., this warranty is offered by Sunbeam Products, Inc. doing business as Jarden
Consumer Solutions located in Boca Raton, Florida 33431. In Canada, this warranty is offered by
Sunbeam Corporation (Canada) Limited doing business as Jarden Consumer Solutions, located
at 20 B Hereford Street, Brampton, Ontario L6Y 0M1. If you have any other problem or claim in
connection with this product, please write our Consumer Service Department.
PLEASE DO NOT RETURN THIS PRODUCT TO ANY OF THESE ADDRESSES
OR TO THE PLACE OF PURCHASE.
12
13
ADVERTENCIAS DE SEGURIDAD
Para disminuir el riesgo de un fuego, corrientazo eléctrico y/o lesión a las
personas, siempre deben obedecerse las precauciones fundamentales de
seguridad al utilizarse artefactos eléctricos, incluyendo las siguientes:
1. LEA TODAS LAS INSTRUCCIONES ANTES DE UTILIZAR LA UNIDAD.
2. Para protegerse de un corrientazo eléctrico, no sumerja el cordel, el enchufe o
la unidad en agua ni en cualquier otro líquido.
1. Se requiere una supervisión adulta atenta cuando esta unidad es utilizada por,
o cerca de, niños.
1. Oprima el botón de Inicio/Pare (STOP/START) y desenchufe la unidad del
tomacorriente cuando no se esté utilizando y antes de limpiarla. Permita que la
unidad se enfríe antes de instalar o remover partes y antes de limpiar la unidad.
1. Evite hacer contacto con las partes en movimiento.
1. No opere artefacto eléctrico alguno con un cordel o enchufe averiado o luego
de que la unidad se averíe o haya sido dañada de manera alguna. Devuelva
esta unidad solamente al Centro de Servicio Autorizado más cercano para su
examen, reparación o ajuste.
1. El uso de aditamentos accesorios que no están recomendados para los
productos MR. COFFEE® pueden causar riesgos de daños o lesiones.
1. No utilice la unidad a la intemperie.
1. No permita que el cordel de la unidad cuelgue del borde de una mesa o
mostrador, ni que haga contacto con superficies calientes.
1. Examine el tanque alimentador o tolva para asegurarse de que no contiene
objetos extraños antes de utilizar la unidad.
1. No coloque esta unidad encima o cerca de un quemador caliente eléctrico o
de gas, ni en un horno caliente.
1. Para desconectar la unidad, oprima el botón de Inicio/Pare (STOP/START),
luego remueva el enchufe del tomacorriente.
1. No utilice la unidad para cualquier fin que no sea el uso doméstico para el cual
fue fabricada.
¡ADVERTENCIA! Para disminuir el riesgo de un incendio o de descarga
eléctrica, noquite las cubiertas para dar servicio a la unidad. No hay
piezas a las que el usuario pueda dar servicio en el interior de la cafetera.
Sólo el personal autorizado debe reparar la cafetera.
14
Por favor lea cuidadosamente TODAS las instrucciones en este manual
antes de que comience a utilizar esta unidad. El cuidado y mantenimiento
apropiados asegurarán una larga vida y una operación sin problemas para
esta unidad. Por favor conserve estas instrucciones y refiérase a ellas para
consejos sobre la limpieza y el cuidado.
CONSERVE ESTAS INSTRUCCIONES
INTRODUCCIÓN
Gracias por elegir el Molinillo de Piñones Serie BMH Mr. Coffee. Sólo el
Molinillo de Piñones MR. COFFEE® ofrece el mejor sabor al mejor precio!
INSTRUCCIONES ESPECIALES SOBRE EL CORDEL ELÉCTRICO
1. Se provee un cordel eléctrico corto para disminuir los riesgos de que una
persona o mascota se pudieran enredar o tropezar con un cordel más
largo.
2. Se puede adquirir y utilizar una extensión eléctrica si se usa con
precaución.
3. Si se utiliza una extensión eléctrica, la calificación eléctrica rotulada de
la extensión debe ser de al menos 10 amperios y 120 voltios. El cordel
extendido resultante debe acomodarse para que no cuelgue del borde de
un mostrador o mesa donde pueda ser tirado por niños o donde se pueda
tropezar con él accidentalmente.
4. Esta unidad cuenta con un enchufe polarizado (uno de sus contactos es más
ancho que el otro). Para disminuir el riesgo de un corrientazo eléctrico, este
enchufe sólo podrá penetrar en un tomacorriente polarizado. Si el enchufe
no penetra completamente en el tomacorriente, inviértalo. Si aún no se
puede enchufar, comuníquese con un electricista autorizado. No modifique el
enchufe de manera alguna.
5.Usted puede ajustar el largo del cordel eléctrico de manera que sea de
la longitud precisa que usted desee. Para aumentar el largo del cordel
eléctrico: agarre el cordel eléctrico (no el enchufe) y hálelo hacia arriba de su
hendidura con delicadeza, retirándolo de la cafetera. Para disminuir el largo
del cordel eléctrico: agarre el cordel eléctrico (no el enchufe) y hálelo hacia
arriba de su hendidura, insertándolo con delicadeza en la cafetera. Fije el
cordel en la hendidura cuando termine.
15
Tabla de Contenido
Diagrama de las Partes
Precauciones importantes . . . . . . . . . . . . . . . . . . . . . . . . . . . . . . . . . . . . . . . . . . 2
Instrucciones especiales para el cordón. . . . . . . . . . . . . . . . . . . . . . . . . . . . . . . 2
Introducción . . . . . . . . . . . . . . . . . . . . . . . . . . . . . . . . . . . . . . . . . . . . . . . . . . . . 3
1
Tabla de contenido. . . . . . . . . . . . . . . . . . . . . . . . . . . . . . . . . . . . . . . . . . . . . . . 4
Diagrama de partes . . . . . . . . . . . . . . . . . . . . . . . . . . . . . . . . . . . . . . . . . . . . . . . 5
2
Atributos y Beneficios. . . . . . . . . . . . . . . . . . . . . . . . . . . . . . . . . . . . . . . . . . . . . 6
Para comenzar. . . . . . . . . . . . . . . . . . . . . . . . . . . . . . . . . . . . . . . . . . . . . . . . . . . 6
Cómo usar su Molinillo de Piñones. . . . . . . . . . . . . . . . . . . . . . . . . . . . . . . . . . . . 7
Cartilla de Medidas del café. . . . . . . . . . . . . . . . . . . . . . . . . . . . . . . . . . . . . . . . . 8
co
ars
French Pr e
ess
8
8
stst
opart
10
1
2
Servicio y Mantenimiento. . . . . . . . . . . . . . . . . . . . . . . . . . . . . . . . . . . . . . . . . . 12
med
6
Solución de problemas de su Molinillo de Piñones Mr. Coffee®. . . . . . . . 10-11
3
4
Limpiando su Molinillo de Piñones. . . . . . . . . . . . . . . . . . . . . . . . . . . . . . . . . . . 10
ne
fine
Espresso
Es
Espre
Consejos útiles para moler. . . . . . . . . . . . . . . . . . . . . . . . . . . . . . . . . . . . . . . . 8-9
iu
Drip Co m
ffee
12
4
10
9
5
8
Información de Garantía . . . . . . . . . . . . . . . . . . . . . . . . . . . . . . . . . . . . . . . . . . 13
7
6
1 Tapa de la tolva para granos
6 Cámara de molido
2 Tolva para granos
7 Conducto de la Cámara de molido
3 L uz indicadora de
Encendido/Apagado (On/Off)
8 Cubierta del motor del molinillo
4 C
uchara/Brocha de limpieza
incorporados
5 Tapa de la Cámara de molido
16
9 P erilla de Inicio/Pare y selección
de taza
10 Selección de molido
17
Cómo usar su Molinillo
de Piñones
• Botón de Inicio/Pare y Perilla de selección de taza - Obtenga cantidades perfectas
cada vez con posiciones automáticas de molido para 2 a 18 tazas.
• Apagado automático - Evite tener que adivinar , se detiene automáticamente en la
cantidad deseada.
• Diseño de Acero Inoxidable - un accesorio estilizado para su cocina.
• Almacenaje del cordón - Almacena de forma segura el cordón para dejar ordenado su
tablero de cocina.
• Cuchara/Brocha incorporados - Le permite una limpieza fácil.
Para comenzar
Siempre limpie su Molinillo de Piñones antes de usar por primera vez.
Asegúrese de que la primera taza de café sea tan buena como sea posible limpiando su
Molinillo de Piñones MR. COFFEE® antes del primer uso. Simplemente siga los siguientes
pasos:
1.Lave las partes de la Tolva para granos y de la Cámara de café con agua tibia jabonosa.
(Nunca use limpiadores abrasivos, esponjas de metal o cualquier tipo de material
abrasivo. ESTA UNIDAD NO SE PUEDE LAVAR EN EL LAVAPLATOS)
PRECAUCIÓN: Nunca sumerja el Molinillo de Piñones en agua o cualquier otro
líquido ni coloque en el lavaplatos.
2. Seque todas las partes minuciosamente
3.Instale la Tolva para granos en la unidad y gírela en dirección de las manecillas del reloj
( se oirán varios chasquidos al rotar a medida que la unidad queda más ajustada) hasta
que pare con el indicador del tamaño de grano en Fino (Figura 1)
4.Coloque la tapa de la cámara sobre la cámara
de molido y luego instálela en la unidad,
asegurándola y ajustándola en su lugar.
NOTA: Si las partes de la Tolva para granos y de
la Cámara de molido no están correctamente
ajustadas en su lugar, los mecanismos de
seguridad de la máquina no le permitirán que
el Molinillo funcione. Usted DEBE tener todas
las partes en su lugar para usar el Molinillo de
Piñones de manera segura.
18
6
6
3.Fije la perilla de selección de Taza a la
cantidad deseada de granos molidos
(Figura 3).
4.Presione y sostenga por un momento el botón
de Inicio/Pare para iniciar el proceso de
molido
Brand: Mr. Coffee
Model: Burr Mill Grinder
Description: ID Spec/ Master Art
Figura 2
8 10
Start
Stop
8 10
Start
Stop
12
• Luz indicadora de Encendido/Apagado (On/Off) - Una Luz LED se ilumina para hacerle
saber que el Molinillo de Piñones está listo para su uso.
NOTA: La selección del tamaño de grano
cambiará el resultado del volumen granos
molidos. Un tamaño fino producirá menos
granos molidos y el grueso producirá más
granos molidos cuando se use la misma
posición de tamaño de taza.
12
• Cámara de café molido desmontable - le permite transferir con facilidad el café molido.
2.Ajuste el tamaño de grano rotando la tolva
en dirección contraria a las manecillas del
reloj y alineando el indicador en la tolva con
el tamaño de grano deseado (Figura 2)
2 4
• 18 posiciones de granos al gusto - Elija 18 posiciones diferentes de tamaños de granos,
de fino (grado expreso) a grueso (grado Prensa Francesa) para su método de preparado
al gusto.
1.Una vez que todas las partes han sido
colocadas en su lugar, llene la Tolva para
granos con granos de café y coloque la
tapa.
2 4
• Tolva para grano entero - Tolva para granos removible y fácil de limpiar con una
capacidad de hasta ½ libra de granos de café a la vez.
Max
Su nuevo Molinillo de Piñones Mr. Coffee tiene los siguientes atributos:
Max
ATRIBUTOS Y BENEFICIOS DE SU MOLINILLO DE PIÑONES
Art Doc Number: 146492
Figura 3
Revision: 1
Notes:
- To Scale 1:1
- Use CorelDRAW files for reproduction.
5.La unidad se detendrá automáticamente
Page:
3 of 6
cuando el volumen seleccionado se
haya
alcanzado
NOTA: También puede detener el proceso
de molido en cualquier momento
presionando el botón de Inicio/Pare
nuevamente
6.Remueva la cámara de café y la tapa y use
los granos molidos a su gusto.
7.La brocha para limpieza puede usarse para
remover el polvo del conducto de la cámara
de molido ubicado
en la parte de atrás de la
Brand: Mr. Coffee
cámara de molido
desmontable
(Figura 4).
Model:
Burr Mill Grinder
Notes:
- To Scale 1:1
Figura 4
- Use CorelDRAW files for reproduction.
Description: ID Spec/ Master Art
Page: 3 of 6
Figura 1
19
Cartilla de Medidas del café
3.Cuando se requiere un molido más fino de granos para preparar expreso o capuccino,
por favor muela la cantidad de granos de café recomendada por el fabricante del
producto.
Para café molido mediano
• Para productos Expreso MR. COFFEE®:
Tazas de café (3 onzas c/u)
Cantidad aproximada de granos (Cucharadas)
12 tazas
12 cucharadas
- Fije el Molinillo de Piñones a un molido fino.
10 tazas
10 cucharadas
8 tazas
8 cucharadas
- Para 2 onzas de café expreso, se requieren 2 cucharaditas (0.6 cucharadas) de
molido fino. Fije el reloj a 3 tazas, esto mantendrá la unidad prendida por suficiente
tiempo para moler los granos más finos tal como se requiere.
6 tazas
6 cucharadas
4 tazas
4 cucharadas
2 tazas
2 cucharadas
1. L a cantidad de granos enteros de café requerida es aproximadamente la misma que la
cantidad especificada de cucharas de granos de café molido mediano.
2.La unidad funcionará por aproximadamente un minuto si uste selecciona la posición de
12 tazas.
3. La unidad puede pararse durante el molido por:
- Para 4 onzas de café expreso, se requieren 4 cucharaditas (1.3 cucharadas) de
molido fino. Fije el reloj a 5 tazas, esto mantendrá la unidad prendida por suficiente
tiempo para moler los granos más finos tal como se requiere
• El usar una posición de molido de café inadecuado ya sea medio o grueso puede
afectar el sabor del café expreso preparado, puesto que la extracción optima de café
no ha sido alcanzada. Si le gusta una taza de café expreso más fuerte, asegúrese de
que la posición del molido de granos sea fina.
4. C
uando se requiera una posición de molido más grueso para preparar café
manualmente en una cafetera de filtro o en una prensa francesa, muela la cantidad de
granos de café recomendados por el fabricante del producto.
• E l usuario- Usted puede presionar el botón de Inicio/Pare en cualquier momento para
detener la operación de molido.
• Recomendación de MR. COFFEE®:
• Abrir la tapa de la tolva durante la operación: revise que tiene suficientes granos
- Fije el reloj a 8 a 10 tazas, esto mantendrá la unidad prendida por suficiente tiempo
para moler suficiente café para 12 tazas de café preparado.
• L a cámara de molido de café está fuera de posición- Revise que no esté llena. Cierre la
tapa, colóquela en la posición correcta y ajuste la posición del reloj para evitar llenar
en exceso la cámara de molido de café antes de reanudar la operación.
- Fije el Molinillo de Piñones a una posición de molido gruesa.
- Dado que los granos molidos gruesos ocupan mayor volumen, siempre fije el reloj
de 2 a 4 tazas menos que la cantidad deseada.
NOTA: E vite llenar en exceso la cámara de molido de café. Esto puede causar que el
motor de la unidad se sobrecaliente y se queme un fusible térmico dentro del
molinillo, dañando posiblemente la unidad de forma permanente.
NOTA: Recuerde que puede usar las recomendación de arriba a su gusto a medida que
descubre cual posición se acerca más a su preferencia personal de preparación de
café. Como en el caso de cafeteras automáticas de goteo,
NOTA: S i todas las partes de la tolva para granos y la cámara de molido no están
correctamente ajustadas en su lugar, los mecanismos de seguridad de la máquina
no le permitirán que el Molinillo funcione. Usted DEBE tener todas las partes en su
lugar para usar el Molinillo de Piñones de manera segura.
- El usar una cantidad excesiva de granos de café molido para prepara café en una
cafetera de filtro puede causar un rebalse de la canasta de filtrado.
Consejos útiles para moler con mejores resultados
Usted puede elegir al gusto las cantidades recomendadas arriba a medida que se
familiariza con su nuevo Molinillo de Piñones Mr. Coffee, pero siempre tenga presente lo
siguiente:
1. E l usar granos molidos más finos que lo que se requiere para preparar café en una
cafetera de goteo automático puede causar un rebalse en el filtro de papel o en la
canasta de filtrado. Adicionalmente, el sabor del café puede resultar más fuerte que
lo deseado. Si esto sucede, use menos granos molidos de café o cambie la posición
de los granos a mediano o a la posición que sea necesaria para obtener el resultado
deseado.
2. E l usar un molido más grueso que lo que se requiere para preparar café en una
cafetera de goteo automático puede causar un rebalse en el filtro de papel o en la
canasta de filtrado. Adicionalmente, el sabor del café puede resultar más suave que
lo deseado. Si esto sucede, use más granos de café molido para obtener el resultado
deseado. Para una taza de café regular o más fuerte, ajuste la posición de los granos
de mediano a fino.
20
- El usar granos molidos más finos que lo que se requiere para preparar café
manualmente en una cafetera de filtro o una prensa francesa puede causar un
rebalse de la canasta de filtrado y/o el sabor del café puede ser más fuerte que
lo deseado. Si usted quiere una taza de café regular o de sabor suave, ajuste la
posición del molido de mediano a grueso.
5. Use solamente granos de café en este aparato.
6. La cámara de molido de café y su tapa deben siempre estar en su lugar cuando use
este aparato.
7. No use la posición de molido más fina cuando muela café para su cafetera automática
de goteo. Los granos molidos finos pueden causar que la canasta de café se rebalse.
8. Para evitar sobrecalentar el motor, no muela mas de 2 tolvas llenas de granos
anteros o 2 ciclos completos de 12 tazas sin parar. Permita que el motor se enfríe a
temperatura ambiente por lo menos por 2 minutos entre ciclos.
9. Si el molinillo deja de funcionar después de haberse usado por ciclos consecutivos,
desenchufe el molinillo del tomacorriente de pared y permita que se enfríe por lo
menos por una hora. Luego enchufe el molinillo de vuelta y use de acuerdo a su
necesidad.
10. G
ranos de café con sabores engomarán los piñones y dejarán un residuo aceitoso
cuando se guarden en la tolva para granos por un periodo de tiempo largo.
21
11. Limpie después de cada tercer uso para un mejor rendimiento.
12. Luego de usar, abra el molinillo a la posición mas gruesa y déjelo correr en vacío para
limpiar el paso del molido.
NOTA: Para una frescura óptima de sus granos de café, no los guarde en la tolva para
granos por largos periodos de tiempo.
Continuación de Solución de Problemas
El café
molido
producido es
insuficiente
Instrucciones de Limpieza
Acuerdese de limpiar siempre su Molinillo de Piñones antes de usar por primera vez. Para
asegurar el funcionamiento óptimo y la durabilidad de su molinillo, límpielo regularmente
siguiendo estos simples pasos:
1. Siempre desenchufe su Molinillo de Piñones después de usar y antes de limpiar.
2.Lave las partes de la tolva para granos y la cámara de café con agua tibia jabonosa.
(Nunca use limpiadores abrasivos, esponjas de metal o cualquier tipo de material
abrasivo. ESTA UNIDAD NO SE PUEDE LAVAR EN EL LAVAPLATOS)
PRECAUCION: Nunca sumerja el Molinillo de Piñones en agua o cualquier otro
líquido ni coloque en el lavaplatos.
3. Seque todas las partes minuciosamente
4.Instale la Tolva para granos en la unidad y gírelos en dirección de las manecillas del reloj
( se oirán varios chasquidos al rotar a medida que la unidad queda más ajustada) hasta
que pare con el indicador del tamaño de grano en Fino.
PROBLEMA
La unidad no
muele
CAUSA POSIBLE
• La tolva no está asegurada en su lugar
• La tapa de la tolva no está ajustada
• La cámara de molido de café no está en
posición
• El botón de Inicio no ha sido presionado
• La unidad está desenchufada
• Hay un corte de electricidad
• El motor ha sobrecalentado, el fusible
térmico esta abierto
• El conducto de la tolva está atorado (o
bloqueado)
22
• Coloque la cámara en posición
correcta
• Desenchufe la unidad, coloque
el piñón superior del molinillo en
posición correcta
• Limpie la unidad, desenchufe y limpie el
piñón del molinillo
• Desenchufe la unidad y retire el objeto
extraño cuidadosamente
• La unidad y el molinillo de piñones no
están limpios
• Hay un objeto extraño entre los dos
piñones del molinillo
• La posición de molido es incorrecta
• Limpie la unidad, desenchufe y limpie el
piñón del molinillo
• Desenchufe la unidad y retire el objeto extraño cuidadosamente
• Cambie la tolva a la posición de molido correcta
La unidad
deja de
moler
• La posición de molido es incorrecta
• La cámara de molido de café no está en
la posición correcta
• El botón de Inicio/Pare ha sido
presionado
• Fije el molido correctamente
• Coloque la cámara en posición
correcta
• Presione y sostenga
momentáneamente el botón de Inicio/
Pare de nuevo
• Enchufe la unidad
• Espere a que la electricidad regrese
• Retire la cámara, vacíela y vuélvala a colocar, desenchufe la unidad y
limpie el compartimento del piñón del
molinillo si es necesario
• Desenchufe la unidad por lo menos
por una hora luego enchufe
de nuevo y use de acuerdo a su necesidad
• La unidad ha sido desenchufada
• Hay un corte de electricidad
• La cámara de molido de café está llena
y está atorando el compartimento del
piñón del molinillo
• El motor ha sobrecalentado, el fusible
térmico está abierto
La perilla de
selección de
taza no gira
• El reloj está en posición de 2 tazas, ya no
puede girar más hacia la izquierda
• El reloj está en posición de 18 tazas, ya
no puede girar más hacia la derecha
• La perilla de selección de taza está rota
SOLUCIÓN
• Gire la tolva en dirección de las manecillas del reloj hasta que paren
luego mueva el indicador en dirección contraria a las manecillas del reloj,
hasta que tenga el indicador alineado
con la posición de molido deseada.
• Asegure la tapa de la tolva
• Coloque la cámara en la posición
correcta
• Presione y sostenga momentáneamente el
botón de Inicio/Pare
• Enchufe la unidad
• Espere a que la electricidad regrese
• Desenchufe la unidad por unos 30 minutos
luego enchufe de nuevo y use de acuerdo a su necesidad
• Retire la tolva y vacíela para despejar el bloqueo
• La cámara de molido de café se ha movido
fuera de posición durante la operación
• El piñón superior del molinillo no está en
posición correcta
El tamaño
de las
partículas
de café
molido no es
constante
NOTA: Si las partes de la Tolva para granos y de la Cámara de molido no están
correctamente ajustadas en su lugar, los mecanismos de seguridad de la máquina
no le permitirán que el Molinillo funcione. Usted DEBE tener todas las partes en su
lugar para usar el Molinillo de Piñones de manera segura.
Su Molinillo de Piñones MR. COFFEE® ha sido diseñado cuidadosamente para brindarle muchos
años de servicio sin problemas. En el caso poco probable de que su nuevo Molinillo de Piñones
no opere satisfactoriamente , por favor revise los problemas posibles y trate estos pasos
recomendados ANTES de llamar al Centro de Servicio Autorizado MR. COFFEE®.
• Fije el molido correctamente
• Añada granos a la tolva
• La unidad y el molinillo de piñones no
están limpios
• Hay un objeto extraño entre los dos
piñones del molinillo
5.Coloque la tapa de la cámara sobre la cámara de molido y luego instálela en la unidad,
asegurándola y ajustándola en su lugar.
Solución de problemas de su Molinillo de Piñones MR. COFFEE®
• La posición de molido es incorrecta
• Cantidad insuficiente de granos en la tolva
La selección
de molido
de la tolva
no gira
• La tolva está en la posición fina y ya no
puede girar más hacia la derecha
• La unidad y el molinillo de piñones no
están limpios
• Hay un objeto extraño entre los dos
piñones del molinillo
• Gire en dirección de las manecillas
del reloj para fijar el número
deseado de tazas
• Gire en dirección contraria de las manecillas del reloj para fijar el
número deseado de tazas
• Llame al número del Departamento de Servicio al Consumidor MR Coffee aquí abajo
• Gire en dirección contraria de las manecillas del reloj para la posición
de molido deseado
• Limpie la unidad, desenchufe y limpie el piñón del molinillo
• Desenchufe la unidad y retire el objeto extraño cuidadosamente
ún tiene preguntas? Puede llamarnos al número sin cargo del Departamento de Servicio
A
al Consumidor MR Coffee® 1800 MR Coffee (1800 672 6333) o puede visitarnos en
www.mrcoffee.com.
23
SERVICIO Y MANTENIMIENTO
INFORMACIÓN de GARANTÍA
Partes Reemplazables
Garantía Limitada de 1 Año
Las siguientes partes reemplazables ( así como la unidad completa) están disponibles
visitándonos en línea en www.mrcoffee.com o llamando al 1800 MR COFFEE (1800 672
6333) en los Estados unidos o 1 800 667 8623 en Canadá:
Sunbeam Products, Inc. operando bajo el nombre de Jarden Consumer Solutions, o en Canadá,
Sunbeam Corporation (Canada) Limited operando bajo el nombre de Jarden Consumer
Solutions, (en forma conjunta, “JCS”), garantiza que por un período de un año a partir de la
fecha de compra, este producto estará libre de defectos de materiales y mano de obra. JCS,
a su elección, reparará o reemplazará este producto o cualquier componente del mismo que
presente defectos durante el período de garantía. El reemplazo se realizará por un producto o
componente nuevo o reparado. Si el producto ya no estuviera disponible, se lo reemplazará por
un producto similar de valor igual o superior. Ésta es su garantía exclusiva. No intente reparar o
ajustar ninguna función eléctrica o mecánica de este producto. Al hacerlo elimínará ésta garantía.
• Tolva para granos con tapa (ambos están disponibles por separados)
• Cámara de Molido con tapa
• Cuchara/Brocha
Reparaciones
Si su Molinillo de Piñones requiere de servicio, no la devuelva a la tienda donde la
compró. Todas las reparaciones y reemplazos deben hacerse por Sunbeam o un
Centro de Servicio Autorizado Sunbeam. Si vive en los Estados Unidos o Canadá por
favor llámenos a los siguientes números sin cargo para encontrar la ubicación del
centro de servicio autorizado más cercano.
En Estados Unidos 1 800 MR Coffee ( 1800 672 6333)
En Canadá1 800 667 8623
También puede visitar nuestra página Web en www.mrcoffee.com para una lista de
centros de servicio.
Para ayudarnos a servirlo, por favor tenga a la mano el número del modelo y la fecha
de compra del Molinillo de Piñones cuando nos llame. El número de modelo está
estampado en la placa de metal en la parte inferior de su Molinillo de Piñones.
Todas sus preguntas, comentarios y sugerencias son bienvenidas. En todas sus
comunicaciones por favor incluya su nombre completo, dirección y número de
teléfono y la descripción del problema.
Visite nuestra página Web en www.mrcoffee.com y descubra el secreto de la
preparación de una taza perfecta de café. También encontrará una variedad muy rica
de recetas gourmet, consejos de entretenimiento y la última información sobre los
productos MR COFFEE®.
La garantía es válida para el comprador minorista original a partir de la fecha de compra inicial
y la misma no es transferible. Conserve el recibo de compra original. Para solicitar servicio en
garantía se requiere presentar un recibo de compra. Los agentes y centros de servicio de JCS
o las tiendas minoristas que venden productos de JCS no tienen derecho a alterar, modificar ni
cambiar de ningún otro modo los términos y las condiciones de esta garantía.
Esta garantía no cubre el desgaste normal de las piezas ni los daños que se produzcan como
resultado de uso negligente o mal uso del producto, uso de voltaje incorrecto o corriente
inapropiada, uso contrario a las instrucciones operativas, y desarme, reparación o alteración
por parte de un tercero ajeno a JCS o a un Centro de Servicio autorizado por JCS. Asimismo, la
garantía no cubre actos fortuitos tales como incendios, inundaciones, huracanes y tornados.
What are the limits on JCS’s Liability?
JCS no será responsable de daños incidentales o emergentes causados por el incumplimiento de
alguna garantía o condición expresa, implícita o legal.
Excepto en la medida en que lo prohíba la ley aplicable, cualquier garantía o condición implícita
de comerciabilidad o aptitud para un fin determinado se limita, en cuanto a su duración, al plazo
de la garantía antes mencionada.
JCS queda exenta de toda otra garantías, condiciones o manifestaciones, expresa, implícita, legal
o de cualquier otra naturaleza.
JCS no será responsable de ningún tipo de daño que resulte de la compra, uso o mal uso
del producto, o por la imposibilidad de usar el producto, incluidos los daños incidentales,
especiales, emergentes o similares, o la pérdida de ganancias, ni de ningún incumplimiento
contractual, sea de una obligación esencial o de otra naturaleza, ni de ningún reclamo iniciado
contra el comprador por un tercero.
Algunas provincias, estados o jurisdicciones no permiten la exclusión o limitación de los daños
incidentales o emergentes ni las limitaciones a la duración de las garantías implícitas, de modo
que es posible que la exclusión o las limitaciones antes mencionadas no se apliquen en su caso.
Esta garantía le otorga derechos legales específicos y es posible que usted tenga otros derechos
que varían de un estado, provincia o jurisdicción a otro.
Cómo solicitar el servicio en garantía
En los Estados Unidos.
Si tiene alguna pregunta sobre esta garantía o desea recibir servicio de garantía, llame al
1-800-672-6333 y podrá obtener la dirección del centro de servicio que le resulte más
conveniente.
En Canadá
Si tiene alguna pregunta sobre esta garantía o desea recibir servicio de garantía, llame al
1-800-667-8623 y podrá obtener la dirección del centro de servicio que le resulte más conveniente.
En los Estados Unidos, esta garantía es ofrecida por Sunbeam Products, Inc. operando bajo el
nombre de Jarden Consumer Solutions, Boca Ratón, Florida 33431. En Canadá, esta garantía
es ofrecida por Sunbeam Corporation (Canada) Limited operando bajo el nombre de Jarden
Consumer Solutions, 20 B Hereford Street, Brampton, Ontario L6Y 0M1. Si usted tiene otro
problema o reclamo en conexión con este producto, por favor escriba al Departamento de
Servicio al Consumidor.
24
POR FAVOR NO DEVUELVA ESTE PRODUCTO A NINGUNA DE ESTAS DIRECCIONES
NI AL LUGAR DE COMPRA.
25
NOTES
26
NOTAS
27