1
ZEUS
AEL Embedded Linux
Development Kit
Quickstart Manual
Zeus Embedded Linux Development Kit Quickstart
Disclaimer
The information in this manual has been carefully checked and is believed to be accurate. Eurotech Ltd assumes no
responsibility for any infringements of patents or other rights of third parties, which may result from its use.
Eurotech Ltd assumes no responsibility for any inaccuracies that may be contained in this document. Eurotech Ltd makes
no commitment to update or keep current the information contained in this manual.
Eurotech Ltd reserves the right to make improvements to this document and/or product at any time and without notice.
Warranty
This product is supplied with a 3 year limited warranty. The product warranty covers failure of any Eurotech Ltd
manufactured product caused by manufacturing defects. The warranty on all third party manufactured products utilised by
Eurotech Ltd is limited to 1 year. Eurotech Ltd will make all reasonable effort to repair the product or replace it with an
identical variant. Eurotech Ltd reserves the right to replace the returned product with an alternative variant or an equivalent
fit, form and functional product. Delivery charges will apply to all returned products. Please check www.eurotech-ltd.co.uk for
information about Product Return Forms.
Trademarks
Linux is a registered trademark of Linus Torvalds.
RedBoot, Fedora and Red Hat are registered trademarks of Red Hat Inc. This product contains a copy of the installation
media for the Fedora Core Linux distribution. This media is not a product of Red Hat, Inc. or the Fedora project and is not
endorsed by Red Hat, Inc. or the Fedora project. It is a product of Eurotech Ltd and we have no relationship with Red Hat,
Inc. or the Fedora project. The media is identical in every respect to the standard Fedora Core install media.
ARM and StrongARM are registered trademarks of ARM Ltd.
Intel and XScale are trademarks or registered trademarks of Intel Corporation or its subsidiaries in the United States and
other countries.
CompactFlash is the registered trademark of SanDisk Corp.
All other trademarks and copyrights referred to are the property of their respective owners.
This product includes software developed by the University of California, Berkeley and its contributors.
Revision History
Manual
PCB
Date
Comments
Issue A
2 November 2006
First full release.
Issue B
17 May 2007
Minor updates
Issue C
1st October 2007
Minor updates, Eurotech rebranding.
© 2007 Eurotech Ltd.
For contact details, see page 37.
ISO 9001
FM12961
ZEUS Embedded Linux Development Kit Quickstart
Contents
Contents
Introduction ........................................................................................................................................4
Handling your board safely ....................................................................................................5
About this manual ..............................................................................................................................6
Related documents ................................................................................................................6
Conventions ...........................................................................................................................6
Getting started ...................................................................................................................................8
What’s in the kit?....................................................................................................................8
What else do I need? .............................................................................................................9
What peripherals are supported?.........................................................................................10
Unsupported hardware features ..........................................................................................10
ZEUS ‘at a glance’ ........................................................................................................................... 11
Unpacking and connecting up..........................................................................................................12
Flat panel display .............................................................................................................................15
Connecting a flat panel TFT screen .....................................................................................15
Power supply ...................................................................................................................................16
RedBoot ...........................................................................................................................................17
What is RedBoot? ................................................................................................................17
AEL Embedded Linux ......................................................................................................................19
What is AEL Embedded Linux? ...........................................................................................19
Booting the system ..............................................................................................................19
Logging in ............................................................................................................................19
Setting up networking ..........................................................................................................20
The file system.....................................................................................................................21
Linux kernel .........................................................................................................................22
Wireless modem support and operation ..............................................................................23
Hardware configuration....................................................................................................................28
Serial ports...........................................................................................................................28
PC/104 .................................................................................................................................28
LCD controller ......................................................................................................................29
Touchscreen ........................................................................................................................33
Using MMC/SD cards ..........................................................................................................33
Using CompactFlash cards..................................................................................................34
Support software..............................................................................................................................35
Target support software .......................................................................................................35
Intel Integrated Performance Primitives (IPPs)....................................................................35
ZEUS Development Kit example programs .....................................................................................36
Appendix A – Contacting Eurotech Ltd ............................................................................................37
Index ................................................................................................................................................38
© 2007 Eurotech Ltd
Issue C
3
ZEUS Embedded Linux Development Kit Quickstart
Introduction
Introduction
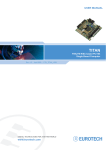
The ZEUS is an ultra low power, high functionality, EPIC-compatible Single Board
Computer (SBC) based on the Intel 520MHz PXA270 XScale RISC processor. The
PXA270 is an implementation of the Intel XScale micro-architecture combined with a
comprehensive set of integrated peripherals including:
•
Intel® Wireless MMX™ designed for high-performance multimedia.
•
3 high-performance UARTS.
•
Enhanced LCD controller.
•
USB host/client.
•
USB OTG.
•
4-bit SD I/O.
•
MMC/SD card.
•
Memory stick.
•
Keypad controller.
•
Advanced camera interface.
The ZEUS board offers many additional features that make it ideal for power-sensitive
embedded communications, multimedia, and automotive applications. These include:
•
Up to 64MB Flash.
•
4/5 wire analog touchscreen interface.
•
Dual Ethernet.
•
4 additional UARTs.
•
AC’97 audio.
•
CAN bus.
•
PC/104 bus expansion.
•
GPIO.
•
CompactFlash+ socket.
•
Optional, vehicle compatible 10 - 30v DC power input.
•
ZEUS expansion modules offering support for a variety of wireless modems, a GPS
receiver, and an IEEE802.15.4 / ZigBee radio for sensor networks.
Refer to the ZEUS Technical Manual for full details of the SBC features.
© 2007 Eurotech Ltd
Issue C
4
ZEUS Embedded Linux Development Kit Quickstart
Introduction
Handling your board safely
Anti-static handling
The ZEUS and other circuit boards have CMOS devices. These could be damaged in
the event of static electricity being discharged through them. Please observe anti-static
precautions at all times when handling circuit boards. This includes storing boards in
appropriate anti-static packaging and wearing a wrist strap when handling them.
Packaging
Before returning a board to Eurotech Ltd, please ensure that it is adequately packed,
preferably in the original packing material.
© 2007 Eurotech Ltd
Issue C
5
ZEUS Embedded Linux Development Kit Quickstart
About this manual
About this manual
This manual helps you get your ZEUS single board computer up and running as
quickly as possible. It provides information about the components contained in your
ZEUS Development Kit and tells you how to unpack, connect, and configure the board.
Related documents
This manual is supplied as part of the ZEUS Linux Development Kit. Other manuals
are available on the CD-ROM that accompanies your Development Kit. These include
the ZEUS Technical Manual and the AEL Embedded Linux Technical Manual.
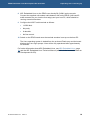
The AEL Embedded Linux Technical Manual provides detailed information about AEL
Embedded Linux, including:
•
Configuration files and boot scripts.
•
Procedure for making an application run automatically at boot.
•
AEL Embedded Linux contents.
•
Installation instructions.
•
Utilities.
•
Secure Shell (SSH) information.
•
Procedure for compiling a kernel.
Conventions
Symbols
The following symbols are used in this guide:
Symbol
Explanation
Note - information that requires your attention.
Tip - a handy hint that may provide a useful alternative or
save time.
Caution – proceeding with a course of action may damage
your equipment or result in loss of data.
Jumper is fitted.
continued…
© 2007 Eurotech Ltd
Issue C
6
ZEUS Embedded Linux Development Kit Quickstart
Symbol
About this manual
Explanation
Jumper is not fitted.
Jumper fitted on pins 1-2.
Jumper fitted on pins 2-3.
Typographical conventions
This manual contains examples of commands that you can enter. These are shown as
follows:
$ make install DESTDIR=/tmp/target-install
The initial symbol ($ in this case) indicates the prompt that the command is for, and
should not be typed.
The prompts used are explained in the following table:
Prompt
Explanation
$
Linux (bash shell) as a regular user.
#
Linux (bash shell) as root.
RedBoot>
RedBoot command line.
Different fonts are used throughout the manual to identify different types of information,
as follows:
Font
Explanation
Italics
Parts of a command that should be substituted with
appropriate values.
Bold
Information that you enter yourself.
Screen text
Information that is displayed on screen.
© 2007 Eurotech Ltd
Issue C
7
ZEUS Embedded Linux Development Kit Quickstart
Getting started
Getting started
What’s in the kit?
The ZEUS AEL Embedded Linux Development Kit is available with a number of
options including:
•
Basic ZEUS Embedded Linux Development.
•
ZEUS Embedded Linux Development Kit with flat panel touchscreen display.
•
ZEUS Embedded Linux Development Kit with wireless modem / GPS receiver.
•
ZEUS Embedded Linux Development Kit with flat panel touchscreen display and
wireless modem / GPS receiver.
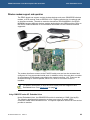
The standard kit includes the following items:
•
ZEUS-520-M128-F32-001-R6 processor board.
•
+24V @2.5 A (110-240VAC input) power supply.
•
ZEUS-FPIF for easy connection to flat panel displays.
•
ZEUS-FPIF 40 way ribbon cable.
•
PC/104 stand off kits (2 sets).
•
This Quickstart manual. (Other technical manuals are included on CD.)
•
Ethernet crossover cable (1m).
•
Null modem serial cable (2m).
•
LVDS cable to un-terminated wires (150mm).
•
CAN bus cable to D-sub9 socket.
•
RS-422/485 cable to D-sub9 socket.
•
20 way ribbon cable to x2 D-sub9 plugs.
•
GPIO to un-terminated wires (300mm).
•
Audio breakout cable to audio jack sockets (line in, line out and microphone).
The Development Kit also includes:
1
•
AEL Embedded Linux support and installation CD.
•
Fedora Core 5 DVD installation media 1.
•
AEL Embedded Linux Technical Manual on CD.
fedora.redhat.com
© 2007 Eurotech Ltd
Issue C
8
ZEUS Embedded Linux Development Kit Quickstart
Getting started
The Development Kit may be supplied with an optional TFT flat panel touchscreen
display. The extra items supplied with the touchscreen are:
•
NEC 6.5" flat panel (NL6448BC20-08E).
•
Backlight inverter module.
•
All associated cables.
•
Analog resistive 6.5" touchscreen.
The Development Kit is also available with an optional GSM/GPRS wireless modem
and a GPS receiver that comprises:
•
MODEM #1 module fitted with Sony Ericsson GR64 Quad band GPRS modem.
•
Quad band antenna.
•
Fastrax iTRAX03 12 channel GPS receiver.
•
GPS antenna.
What else do I need?
An x86 Linux system compliant with version 1.3 of the Linux Standard Base 1 is
required for the AEL Embedded Linux host environment. Suitable systems include PCs
with Debian GNU/Linux, RedHat Linux, Fedora Core, or SUSE Linux.
The Linux system requires a spare RS232 serial port (capable of 115200 bit/s) with a
male DB-9 connector and suitable terminal emulation software, such as minicom.
It is also useful if you can obtain the following information:
•
Networking details for the ZEUS. If your network does not have a DHCP server,
ask your network or system administrator for the following:
- IP address and subnet mask (netmask).
- Default gateway IP address (if required).
- Name server (DNS) IP address (optional).
1
•
Networking details for the host machine.
•
Alternatively, for standalone systems, the board can be connected directly to your
host machine’s Ethernet interface using the crossover adapter provided in the
Development Kit. Please refer to the section Setting up networking, page 20.
www.linuxbase.org/
© 2007 Eurotech Ltd
Issue C
9
ZEUS Embedded Linux Development Kit Quickstart
Getting started
What peripherals are supported?
Linux supports the following peripherals in this release:
•
Seven UARTs: COM1 through to COM7 (includes the processor’s internal FFUART,
BTUART and STUART, and support for the wireless modem and GPS receiver).
•
On-board Flash with JFFS2.
•
Ethernet interfaces.
•
Audio codec.
•
Flat panel display.
•
Battery backed SRAM.
•
Real time clock.
•
Watchdog.
•
PC/104 expansion bus. Drivers are available for a range of Eurotech and third
party PC/104 boards.
•
USB 1.1 host controller.
•
CF+ socket.
•
SD Memory cards.
•
Analog Touchscreen.
•
I2C.
•
GPIO.
•
Temperature sensor.
Unsupported hardware features
The USB client controller, CAN controller, power management and Quick Capture
Camera Interface are not yet fully supported under Linux on the ZEUS.
ZigBee is not supported as part of the standard development kit. Please contact
Eurotech Ltd to discuss ZigBee options and solutions.
The ZEUS Linux Development Kit is part of a continuous process of development.
Please contact a member of the technical support team for the latest drivers. See
Appendix A - Contacting Eurotech Ltd on page 37.
© 2007 Eurotech Ltd
Issue C
10
ZEUS Embedded Linux Development Kit Quickstart
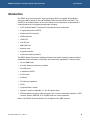
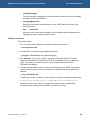
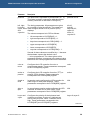
ZEUS ‘at a glance’
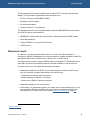
ZEUS ‘at a glance’
Audio
GPIO
SRAM Camera
PXA270 DRAM
Flat panel LCD
Touchscreen
4w/5w
Flat panel
LCD - LVDS
Alternative 5v
power input
CAN bus
Flash
Reset switch
JTAG
Serial
RS422/485
User
jumpers
2x serial
RS232/
485/422
10-30V power User
2x
input (optional) LEDs Ethernet
2x USB USB
host
client
COM1
RS232
PC/104 COM2
RS232
SD/SDIO/
MMC
IEEE
802.15.4 /
ZigBee
header
DRAM
CompactFlash (CF+)
ZEUS
wireless
modem/
GPS port
© 2007 Eurotech Ltd
Issue C
11
ZEUS Embedded Linux Development Kit Quickstart
Unpacking and connecting up
Unpacking and connecting up
This section guides you, step-by-step, through the process of connecting up the ZEUS
for the first time and powering up the system. The ZEUS is delivered ready to run.
There are no link settings or configuration switches that need to be adjusted for the
board to operate; however as instructed below, you should enable the battery link so
that the on-board RTC operates as expected.
A number of the components are static-sensitive, so standard anti-static
precautions must be taken during use. For more information, see Anti-static
handling, page 5.
If you follow the procedure described below, the board powers up automatically and
loads the RedBoot boot loader from the on-board Flash array. At this point you can
interrupt the boot process, if you wish, and access the RedBoot command prompt. If
you do not interrupt the normal boot sequence, after a 1 second pause the system
continues to load and boot Linux (AEL Embedded Linux). Linux will be fully operational
after approximately 30 seconds.
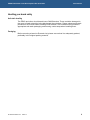
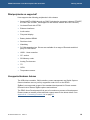
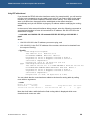
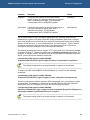
The following diagram shows a typical setup used for ZEUS Embedded Linux
development:
J9
J4
J14
J7
J1
J24
J2
BAT1
J17
ZEUS
JP2
HOST PC
J16
RESET BUTTON
J5
J18
TERMINAL EMULATOR
J12
J3
ethØ eth1
J8
J19
J13
J10
J6
J11
J15
COM 1
COM 2
COM 1
COM 1
POWER
SUPPLY
© 2007 Eurotech Ltd
ethØ
Issue C
12
ZEUS Embedded Linux Development Kit Quickstart
Unpacking and connecting up
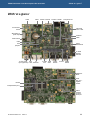
To power up the ZEUS and boot AEL Embedded Linux follow these steps:
1
Remove the ZEUS CPU board and all other cables from the Development Kit box
and place them on a static-free work surface. If the board shows any signs of
damage during transit, please contact Eurotech Ltd before proceeding.
2
Enable the battery by moving the jumper labelled JP2 across pins 1 and 2, as
illustrated:
3
Plug one end of the Ethernet cable into the socket labeled J6 ETH0 (left hand RJ45
connector as you view the front edge) and the other end into your development
system. (A crossover cable is supplied in the kit. This is supplied to enable direct
connection between the ZEUS and your host development PC. If you want to use a
hub you must use a straight-through cable instead.)
4
Optional. If your kit includes a flat panel display, follow these additional instructions:
•
Plug one end of the interface cable into the ZEUS flat panel connector J14
FLAT PANEL. Plug the other end into the ZEUS FPIF board connector J1.
•
On the ZEUS FPIF board, JP1 must have a link present in position A
•
Plug the large connector on the LCD cable into the ZEUS FPIF board
connector J2. Plug the D-shaped connector into the LCD panel and the smaller
cable into the backlight inverter board connector CN1.
•
Plug the two remaining cables from the LCD into the backlight inverter board
connectors CN2 and CN3.
Please note:
5
•
For this step and step 5, refer to the diagram on page 15.
•
You should make sure that the power is off while connecting the
LCD, as the backlight inverter generates a very high voltage.
Optional. If the touchscreen is to be used, do the following:
•
Plug the 4-wire ribbon cable into the ZEUS connector J1.
•
Plug the other end of the 4-wire cable into the touchscreen.
Pin 1 is marked on the touchscreen with an arrow. The 4-wire ribbon
cable must be oriented so that the brown wire is connected to pin 1.
6
Fit the ZEUS power supply to the power input J3.
7
Fit the appropriate AC power cord to the power supply unit.
© 2007 Eurotech Ltd
Issue C
13
ZEUS Embedded Linux Development Kit Quickstart
Unpacking and connecting up
8
AEL Embedded Linux on the ZEUS uses /dev/ttyS0 (COM1) as the console.
Connect the supplied null-modem cable between J11 on the ZEUS ((left hand Dsub9 connector as you view the front edge) and your host PC, which should be
running a terminal emulator.
9
Configure the HOST serial terminal as follows:
•
115200 bit/s.
•
No parity.
•
8 data bits.
•
No flow control.
10 Switch on the ZEUS board once the terminal emulator is set up on the host PC.
The Linux operating system is loaded from the on-board Flash array and the board
displays the Linux login prompt. Linux will be fully operational after approximately
30 seconds.
For further information about AEL Embedded Linux, see AEL Embedded Linux, page
19, and the AEL Embedded Linux Technical Manual (which is in the /manuals/ folder on
the Development Kit CD).
© 2007 Eurotech Ltd
Issue C
14
ZEUS Embedded Linux Development Kit Quickstart
Flat panel display
Flat panel display
The ZEUS board can be used to drive a whole variety of flat panels including a 6.5"
NEC TFT flat panel (part number NL6448BC20-08E), as supplied in the flat panel
variant of the Development Kit.
For information about other flat panels supported by the ZEUS board, contact Eurotech
technical support. See Appendix A - Contacting Eurotech Ltd, page 37.
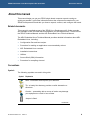
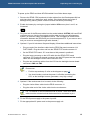
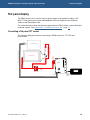
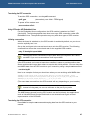
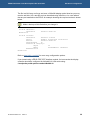
Connecting a flat panel TFT screen
The following diagram illustrates connecting a ZEUS board to a TFT LCD and
touchscreen:
PIN 1
INVERTER CABLE
ZEUS TOUCH SCREEN CABLE
INVERTER
TOUCH SCREEN
LCD DISPLAY
J14
FLAT
PANEL
ZEUS
J1
FLAT PANEL CABLE
J2
LCD DATA
CABLE
PSU
24V O/P
ZEUS-FPIF
J1
TOUCH
© 2007 Eurotech Ltd
Issue C
J3
10-30V
POWER
INPUT
15
ZEUS Embedded Linux Development Kit Quickstart
Power supply
Power supply
The power supply provided in the kit is rated at 2.5A, +24V DC. This is designed to
support the requirements of the ZEUS SBC, flat panel display (typically 1.5A @ 5V), as
well as the wireless modem and GPS components. If additional devices are powered
from the supply, please ensure that the overall current rating is not exceeded.
For more information on ZEUS power supply requirements and power management,
refer to the section Power and Power Management in the ZEUS Technical Manual.
© 2007 Eurotech Ltd
Issue C
16
ZEUS Embedded Linux Development Kit Quickstart
RedBoot
RedBoot
What is RedBoot?
RedBoot is a complete bootstrap environment for embedded systems. Based on the
eCos Hardware Abstraction Layer, RedBoot inherits the eCos qualities of reliability,
compactness, configurability, and portability.
RedBoot enables download and execution of embedded applications via serial or
Ethernet, including embedded Linux and eCos applications. It can be used for both
product development (debug support) and in deployed products in the field (Flash
update and network booting).
Ethernet download support is included. This means RedBoot can retrieve its IP
parameters via BOOTP or DHCP, and program images can be downloaded using
TFTP or HTTP. Images can also be downloaded over serial (using X- or Y-modem) or
loaded from a JFFS2 file system on the on-board Flash.
An interactive command-line interface is accessible via serial or Ethernet and allows
management of Flash images, image download, RedBoot configuration, etc. For
unattended or automated startup, boot scripts can be stored in Flash. This allows, for
example, loading of images from Flash or a TFTP server.
You cannot use the command-line interface via Ethernet if you have an
automatic boot script enabled which launches an application or another
operating system, since RedBoot does not stop to listen for TCP/IP activity.
The AEL Embedded Linux Technical Manual contains details of many of the RedBoot
commands that are useful when using RedBoot as a boot loader for another operating
system (such as Linux) or to launch an application. Full RedBoot documentation is
available in the eCos Reference Manual, which is in the /manuals/ folder on the
Development Kit CD.
Default boot script
The default boot script on the ZEUS loads a Linux kernel from the JFFS2 file system
and executes it:
clock –L 16 –N 5
mount -t jffs2 -f filesystem
load -r -b %{FREEMEMLO} %{kernel}
exec -c %{cmdline}
%{FREEMEMLO} is a predefined alias for the lowest address of available memory.
%{kernel} is an alias for the full path name of the Linux kernel to boot.
%{cmdline} is an alias for the kernel command line to use.
Refer to the AEL Embedded Linux Technical Manual for further details.
© 2007 Eurotech Ltd
Issue C
17
ZEUS Embedded Linux Development Kit Quickstart
RedBoot
CPU core clock frequency and the clock command
RedBoot on the ZEUS initialises the core, system bus, and memory controller clocks to
104 MHz. RedBoot provides an additional command (clock), which can be used to set
the clocks to a subset of the frequencies described in section 3.5 of the PXA270
Developer’s Manual (clock implicitly sets CCCR[A], CLKCFG[B] and CLKCFG[T]). The
clock command takes parameters for the L (Run-mode to oscillator ratio) and N (turbomode to run-mode ratio) settings, which determine the various clocks according to the
following formulae:
•
Turbo-mode frequency = 13 MHz * L * N
•
Run-mode frequency = 13 MHz * L
•
System bus frequency = 13 MHz * L
•
Memory controller frequency = 13 MHz * L
•
LCD frequency = 13 MHz * L / K,
where K = 1 (L = 2-7), K = 2 (L = 8-16), or K = 4 (L = 17-31).
The value of N should be twice the actual value. Therefore, to set N to 1.5, pass the
option –N 3. For example:
•
To set the core clock frequency to 312 MHz, and the system bus and memory
controller clocks to 208 MHz enter:
RedBoot> clock –L 16 –N 3
•
To set the core clock frequency to 520 MHz, and the system bus and memory
controller clocks to 208 MHz enter:
RedBoot> clock –L 16 –N 5
Do not exceed the maximum core clock frequency specified by the particular
PXA270 fitted on the board.
© 2007 Eurotech Ltd
Issue C
18
ZEUS Embedded Linux Development Kit Quickstart
AEL Embedded Linux
AEL Embedded Linux
What is AEL Embedded Linux?
AEL Embedded Linux is a space optimised standard Linux that includes many of the
standard file, shell, and text utilities. As well as the basic Linux system, the default
installation includes:
•
OpenSSH Secure Shell.
•
Web server.
For a complete list of software and an explanation of how to add and remove
packages, please consult the AEL Embedded Linux Technical Manual on the
Development Kit CD.
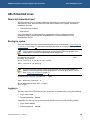
Booting the system
Once the system has been connected and powered up as described in Unpacking and
connecting up on page 12, the board automatically boots to a Linux prompt, as follows:
The versions of software components running on the ZEUS may differ from
those shown in the following example boot sequences.
Uncompressing Linux......................................... done,
booting the kernel.
Linux version 2.6.16.28-arcom1-2-zeus
...
INIT: version 2.78 booting
...
If you do not have a DHCP server and you have not configured a static IP
address, the board pauses at this point while it searches for a DHCP server.
See Setting up networking, page 20.
Configuring network interfaces... done.
...
INIT: Entering runlevel: 2
...
Arcom Embedded Linux V4I2 (ttyS0)
zeus login:
Logging in
You may login to the ZEUS as root (the superuser or administrator) using the following:
•
Login name: root
•
Default password: arcom
Optionally you may log into a user account called arcom using the following details:
•
Login name: arcom
•
Default password: arcom
© 2007 Eurotech Ltd
Issue C
19
ZEUS Embedded Linux Development Kit Quickstart
AEL Embedded Linux
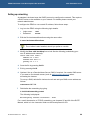
Setting up networking
As standard, the board uses the DHCP protocol to configure the network. This requires
a DHCP server to be available on your network. For details please consult your
network administrator.
To configure the ZEUS to use a static IP address, follow these steps:
1
2
Log in to the ZEUS using the following login details:
•
Login name:
root
•
Password:
arcom
Edit the file /etc/network/interfaces using the nano editor:
# nano /etc/network/interfaces
The vi editor is also installed, should you prefer to use this.
3
Modify the iface eth0 inet dhcp line to look like the following (substituting your
own IP address and netmask):
iface eth0
address
netmask
gateway
inet static
10.7.28.2
255.255.0.0
10.7.1.1
4
Save the file by pressing Ctrl-O.
5
Exit by pressing Ctrl-X.
6
Optional. Set up a Domain Name Server (DNS) if required. You need a DNS server
if you want to use domain names (such as www.eurotech-ltd.co.uk) when
accessing the Internet.
To set up a DNS, edit the file /etc/resolv.conf and add your DNS server address as
follows:
nameserver 10.7.1.9
7
Reinitialise the networking by typing:
# /etc/init.d/networking restart
The following is displayed:
Reconfiguring network interfaces...done
For a useful introduction to TCP/IP networking, see chapters 25 and 26 of the RUTE
Manual, which is in the /manuals/ folder on the Development Kit CD.
© 2007 Eurotech Ltd
Issue C
20
ZEUS Embedded Linux Development Kit Quickstart
AEL Embedded Linux
The file system
The file system used on the on-board Flash is a compressed Journaling Flash File
System (JFFS2). JFFS2 has the following advantages:
•
Robustness.
•
A power fail-safe mechanism.
•
No integrity scan (fsck) is required at boot time.
•
Flash wear levelling.
•
Transparent compression with a typical compression ratio of 2:1.
The on-board Flash is partitioned using RedBoot FIS.
The following table shows the default Flash layout:
Partition #
Block device
Size (KB)
Offset (KB)
Description
0
/dev/mtdblock0
256
0
RedBoot
1
/dev/mtdblock1
(remainder)
256
Filesystem
2
/dev/mtdblock2
124
128 (from end) RedBoot FIS partition
table
3
/dev/mtdblock3
4
4 (from end)
RedBoot configuration
In addition, a 4MB RAM-based file system is mounted on /var/tmp for temporary files.
These are lost during reboot.
The basic AEL Embedded Linux install uses about 14MB of physical Flash. On a board
with 32MB of Flash memory fitted, this leaves about 18MB free. This is about 36MB of
free space, assuming a typical 2:1 compression ratio.
You can make additional space available by removing unused packages. For example,
if you do not require video support, removing xorg and its components could release
about 2MB. For more information on removing packages, refer to the AEL Embedded
Linux Technical Manual, which is in the /manuals/ folder on the Development Kit CD.
The default Flash image is available from the /images/ folder on the Development Kit
CD. Please refer to the AEL Embedded Linux Technical Manual for an explanation of
how to reload a complete Flash image.
© 2007 Eurotech Ltd
Issue C
21
ZEUS Embedded Linux Development Kit Quickstart
AEL Embedded Linux
Linux kernel
The version of the Linux kernel used on the ZEUS is a standard 2.6 Linux kernel tree
with support for Eurotech’s boards.
Source and configuration
The kernel sources are installed in the host environment as
/opt/arcom/src/linux-source-VERSION.tar.gz.
Once you have unpacked the kernel source you can configure the default ZEUS kernel
by entering:
$ make ARCH=arm zeus_defconfig
The kernel may now be built and installed as described in the AEL Embedded Linux
Technical Manual.
Default command line
The default kernel command line is:
console=ttyS0,115200 rootfstype=jffs2 root=/dev/mtdblock1 ro
© 2007 Eurotech Ltd
Issue C
22
ZEUS Embedded Linux Development Kit Quickstart
AEL Embedded Linux
Wireless modem support and operation
The ZEUS board can support various wireless devices such as a GSM/GPRS wireless
modem, a GPS receiver, and an IEEE802.15.4 / ZigBee radio device via optional addon interface modules. The add-on modules denoted as ZEUS MODEM-1 and ZEUS
MODEM-2 support different wireless modem technologies and OEM modules. Refer to
the ZEUS Technical Manual for more detailed information on the individual modems
supported.
The modem interfaces connect to the PXA270 serial ports and can be accessed and
configured in Linux as standard serial ports. In addition to this, there are also a number
of control/status GPIO signals connected to the module interface, J23. These can be
accessed through a GPIO Expander, MAX7313, which is connected to the I²C
interface.
For specific information on how the ZEUS serial ports are mapped in AEL
Embedded Linux. See Serial Ports on page 28.
Using GSM/GPRS under AEL Embedded Linux
Under Embedded Linux, the GSM/GPRS module is attached to COM5 (/dev/ttyS4).
The following details provide examples on how to set up an IP based GPRS
connection under AEL Embedded Linux. The specific operation varies from one service
provider to another.
© 2007 Eurotech Ltd
Issue C
23
ZEUS Embedded Linux Development Kit Quickstart
AEL Embedded Linux
Hardware and software requirements
•
A ZEUS MODEM-1 board fitted with the GR64 Quad band GSM/GPRS module and
the supplied GSM antenna.
•
A SIM card from a wireless service provider that offers GPRS connections.
•
User name, password and Access Point Name (APN) for the GPRS service of the
wireless modem service provider (MSP).
This information is available on the internet or from the GPRS service
provider. For example, the details for T-Mobile (USA) and O2 (UK) are:
•
username: {blank}; password: {blank}; APN: internet2.voicestream.com
•
username: web; password: password; APN: mobile.o2.co.uk
There are many websites that provide the above MSP information on a
country-by-country basis. A list of the major providers is included on the
development kit CD (/examples/gprs-providers). Contact your service
provider if you are having difficulty locating the required information.
The following examples use the O2 UK MSP information
Software configuration
Follow these steps:
1
On the ZEUS AEL Embedded Linux CD you will find some useful scripts and
utilities that help turn the modem on and off. These are located in a package called
‘\packages\arcom-utils’. Copy the .deb install file to the ZEUS board and install it
using:
# dpkg –i modem-utils-zeus_1_arm.deb
Refer to the section ZEUS Development Kit example programs on page 36, for
more information on what is contained in this package.
2
Check and edit the following files as necessary.
•
/etc/ppp/peers/gprs
Change this to:
© 2007 Eurotech Ltd
-
Specify which serial port the GPRS module is connected to. (For the ZEUS,
this should be /dev/ttyS4.)
-
Specify the baud rate of the serial port used for the wireless modem. (For
the ZEUS, this is typically 9600.)
-
Specify the (MSP specific) user name in double quotes: user "web".
Issue C
24
ZEUS Embedded Linux Development Kit Quickstart
•
AEL Embedded Linux
/etc/ppp/chat/gprs
This is usually left unchanged, as the information provided in this file is already
programmed into the SIM card.
•
/etc/ppp/pap-secrets
Specify the user name and password for your GPRS service provider in the
following format:
web * password
where the user name and the asterisk, and the asterisk and the password, are
separated by any number of spaces or tabs.
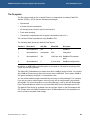
Initiating a connection
Follow these steps:
1
Turn on the wireless module by entering the following command:
# zeus-modem-on.sh
2
Start the PPP connection using the pon command:
# pon gprs (alternatively use: pppd call gprs)
3
Run ifconfig; if you can see ‘ppp0’ in the output of ifconfig then PPP is active.
Note that it can take a few seconds for PPP to be enabled, so if you cannot see
ppp0, run ifconfig a few seconds later; you should then find that the PPP
connection has started.
4
Confirm that the ZEUS is able to connect to the Internet over GPRS. The easiest
way to do this is to ping a known IP address, for example Eurotech’s web site IP
address:
# ping 194.200.159.163
Following the above command, you should see a string of messages similar to this:
84 bytes from 194.200.159.163: icmp_seq=0 ttl=110 time=992.2 ms
Observe the time value, which is usually much greater than corresponding
broadband time values because GPRS is a slower connection.
© 2007 Eurotech Ltd
Issue C
25
ZEUS Embedded Linux Development Kit Quickstart
AEL Embedded Linux
Using PPP with ethernet
If you booted the ZEUS with other interfaces active (for example eth0), you will need to
use the route command to set up a static route to the IP you want to ping via the ppp0
interface (e.g. the Eurotech website IP address shown above). If no other interfaces
were up at boot time, then ppp0 will be established as the default interface
automatically and you will be able to ping any IP address without modifying the routing
tables.
In the event of other network interfaces being present, enter the following command at
your terminal emulator to force all connections to IP address 194.200.159.163 to be
established via ppp0:
# route add -net 194.200.159.163 netmask 255.255.255.255 gw 192.168.202.1
ppp0
where:
•
194.200.159.163 is the IP address you want to ping, and
•
192.168.202.1 is the P-t-P IP address of the modem, which can be obtained from
the output of ifconfig:
# ifconfig
lo
ppp0
Link encap:Local Loopback
inet addr:127.0.0.1 Mask:255.0.0.0
UP LOOPBACK RUNNING MTU:16436 Metric:1
RX packets:10 errors:0 dropped:0 overruns:0 frame:0
TX packets:10 errors:0 dropped:0 overruns:0 carrier:0
collisions:0 txqueuelen:0
RX bytes:660 (660.0 B) TX bytes:660 (660.0 B)
Link encap:Point-Point Protocol
inet addr:10.225.150.216 P-t-P:192.168.202.1 Mask:255.255.255.255
UP POINTOPOINT RUNNING NOARP MULTICAST MTU:1500 Metric:1
RX packets:44 errors:0 dropped:0 overruns:0 frame:0
TX packets:59 errors:0 dropped:0 overruns:0 carrier:0
collisions:0 txqueuelen:3
RX bytes:2830 (2.7 KiB) TX bytes:4328 (4.2 KiB)
You can check that the route has been added to the kernel's routing table by calling
route with no arguments:
# route
Kernel IP routing table
Destination
Gateway
194.200.159.163 192.168.202.1
Genmask
Flags Metric Ref
255.255.255.255 UGH
0
0
Use Iface
0 ppp0
Note that it will take a while before the final routing table is displayed while route
checks that all routes are valid.
© 2007 Eurotech Ltd
Issue C
26
ZEUS Embedded Linux Development Kit Quickstart
AEL Embedded Linux
Terminating the PPP connection
To end the PPP connection, use the poff command:
# poff gprs
(alternatively use: killall –TERM pppd)
To power off the modem use:
# zeus-modem-off.sh
Using GPS under AEL Embedded Linux
For the Embedded Linux configuration, the GPS module is attached to COM7
(/dev/ttyS6). The following details show how to set up a GPS connection under AEL
Embedded Linux. The specific operation may vary with other types of GPS receiver.
Initiating a connection
When the board is switched on, the GPS module is enabled by default, so you do not
need to explicitly turn it on.
Set up the serial port to the correct baud rate to suit the GPS receiver. The following
command line will set the correct baud rate for the supplied GPS module.:
# stty -F /dev/ttyS6 speed 4800
Running the above command will report back 9600 on completion but it does
set 4800. If you run it a second time it will report 4800
If the GPS module can locate at least three satellites it starts to provide position data.
Some modules take longer than others to acquire their initial position. You can dump the
raw NMEA data from the GPS module to your console by using a simple cat command:
# cat /dev/ttyS6
Here is an example of what you should see when you are receiving valid NMEA data:
$GPRMC,170446.000,A,5211.3763,N,00008.3102,E,0.11,294.58,041006,,,A*61
$GPGGA,170447.000,5211.3763,N,00008.3101,E,1,08,1.0,17.6,M,47.0,M,,0000*6A
$GPGSA,A,3,25,10,21,06,16,30,23,07,,,,,1.5,1.0,1.2*35
(The exact data returned from the GPS module will vary depending on your location.)
Instead of using cat, you can use minicom on the port if you prefer.
The NMEA data returned from the GPS module can be fed directly into applications
such as VisualGPS and Google Earth back on an external host to gain a visual
representation of the GPS data.
Terminating the GPS connection
Press Ctrl-C to stop the cat command dumping data from the GPS receiver to your
console.
© 2007 Eurotech Ltd
Issue C
27
ZEUS Embedded Linux Development Kit Quickstart
Hardware configuration
Hardware configuration
Serial ports
There are 7 serial ports on the ZEUS. Three ports are connected directly to the
PXA270 processor and the remaining ports are provided via a quad UART. In AEL
Embedded Linux, the ports have the following designations:
Serial port
Device
Source
Connector
Comment
COM1
/dev/ttyS0
Quad UART
J11
Default console
COM2
/dev/ttyS1
Quad UART
J15
RS232
COM3
/dev/ttyS2
Quad UART
J18 or J19
J18 is for RS485/422
J19 is for RS232
COM4
/dev/ttyS3
Quad UART
J19
RS485/422
COM5
/dev/ttyS4
PXA270 FFUART
J23
Wireless modem
COM6
/dev/ttyS5
PXA270 BTUART
J21
ZigBee option
COM7
/dev/ttyS6
PXA270 STUART
J23
GPS
For more information on the hardware configuration of the serial ports, please refer to
the section Serial COM ports in the ZEUS Technical Manual.
PC/104
The PC/104 bus on the ZEUS is attached via the second PCMCIA controller built in to
the PXA270 processor.
The PC/104 I/O address space is available at physical address 0x30000000 (virtual
address 0xF1000000). This means that a PC/104 card that has been configured at I/O
address 0xXXX is available at virtual address 0xF1000XXX. This virtual address is the
correct value to use when configuring a device driver for that card, rather than the
associated physical address.
The PC/104 memory address space is available at physical address 0x3C000000. This
means that a PC/104 card that has been configured for memory address 0xXXXX is
available at physical address 0x3C00XXXX. It is the responsibility of the driver to map
this address into the kernel's virtual address space before use. The PC/104 interrupts
are mapped as shown in the following table:
© 2007 Eurotech Ltd
Issue C
28
ZEUS Embedded Linux Development Kit Quickstart
PC/104 interrupt
Hardware configuration
ZEUS interrupt
3
160
4
161
5
162
6
163
7
164
10
165
11
166
12
167
For more information, see the section PC/104 Interface in the ZEUS Technical Manual
and the PXA270 Developer’s Manual.
LCD controller
The LCD controller driver module (pxafb) is configured by default for the 640x480 TFT
display (part number NL6448BC20-08E), which is an optional addition to the ZEUS
Development Kit. The driver module can be loaded using the normal modprobe
command:
# modprobe pxafb
In order to use other LCD modules, extra parameters must be passed to the modprobe
command, either on the command line or using one of the methods described in the
AEL Embedded Linux Technical Manual. The options are given as a comma separated
list of parameters. Where a parameter requires a value, it is separated from the
parameter name using a colon. The available parameters are listed in the following
table. The default values shown are suitable for the NL6448BC20-08 TFT display
optionally supplied with the kit. The registers referred to are described in section 7.5.5
of the PXA270 Processor Developer’s Manual, which is in the /references/ folder on
the Development Kit CD.
Parameter
Description
Default
Mode
The required video mode written as:
mode:640x480-16
XRESxYRES-BPP
Where XRES is the X axis resolution, YRES is the
Y axis resolution and BPP is the desired bit depth.
The hardware supports bit depths of 1, 2, 4, 8 and
16-bits. The LCD driver is known to work well in 8or 16-bit mode.
This parameter corresponds to the LCCR1[PPL],
LCCR2[LPP] and LCCR3[BPP] registers.
continued…
© 2007 Eurotech Ltd
Issue C
29
ZEUS Embedded Linux Development Kit Quickstart
Hardware configuration
Parameter
Description
Default
pixclock
The pixel clock, expressed in picoseconds (10-12s).
This value is used in conjunction with the current
memory clock rate to calculate LCCR3[PCD].
pixclock:39722
left, right,
hsynclen,
upper, lower
and
vsynclen
The timing parameters. All parameters are given
as a number of pixel clock ticks. The upper and
lower margins should be 0 for passive (STN)
displays.
left:16,
right:81,
hsynclen:63,
upper:12,
lower:31,
vsynclen:2.
The values correspond to LCCR as follows:
• left corresponds to LCCR1[BLW] + 1.
•
right corresponds to LCCR1[ELW] + 1.
•
hsynclen corresponds to LCCR1[HSW] + 1.
•
upper corresponds to LCCR2[BFW].
•
lower corresponds to LCCR2[EFR].
•
vsynclen corresponds to LCCR2[VSW] + 1.
Several of these values are modified by + 1 because
the hardware expects the desired value
- 1 to be programmed. The values given to this
parameter therefore correspond to the desired value
rather than the value programmed into the hardware.
color or
mono
color
Configures the LCD controller for color or
monochrome panels. These parameters correspond
to the LCCR0[CMS] register.
active or
passive
Configures the LCD controller for active (TFT) or
passive (STN) displays. These parameters
correspond to the LCCR0[PAS] register.
single or
dual
In passive mode configures the LCD controller for
N/A
either single or dual panel displays. These
parameters correspond to the LCCR0[SDS] register.
4pix or
8pix
In monochrome passive mode configures the LCD
N/A
controller for either 4 or 8 pixel mode. These
parameters correspond to the LCCR0[DPD] register.
hsync and
vsync
Configures the polarity of the horizontal and
vertical sync pulses. A value of 0 indicates an
active low sync pulse, while 1 indicates active
high. These parameters correspond to the
LCCR3[HSP] and LCCR3[VSP] registers.
active
hsync:0,vsync:0
continued…
© 2007 Eurotech Ltd
Issue C
30
ZEUS Embedded Linux Development Kit Quickstart
Hardware configuration
Parameter
Description
Default
outputen
Configures the polarity of the output enable
signal. A value of 0 indicates an active low signal
while 1 indicates active high. This parameter
corresponds to the LCCR3[OEP] register.
outputen:1
pixclockpol Configures the polarity of the pixel clock signal. A
value of 0 indicates a falling edge while 1
indicates rising edge. This parameter
corresponds to the LCCR3[PCP] register.
pixclockpol:0
The required values for all of the above parameters are generally defined in the
datasheet for a given LCD panel. Often the timing parameters (pixel clock, margins,
sync pulse lengths) can be derived from values in the datasheet along with a certain
amount of trial and error. It is recommended that you read chapter 7 of the PXA270
Processor Developers manual since many of the parameters given to the driver
correspond directly to settings in the LCD controller hardware.
The default parameters are set to support a TFT type panel, so it is therefore possible
to support another TFT panel by passing only the mode and timings parameters. For
example, to support a 640 x 480 panel such as the NL6448BC20 example described
above, you would use the following command:
# modprobe pxafb options=mode:640x48016,pixclock:39722,left:16,right:81,upper:12,lower:31,hsynclen:63,vsynclen:2
The options string must be a single line with no spaces or line-breaks.
To support an NEC NL3224BC35-20 QVGA display you would use the following
command:
# modprobe pxafb options=mode:320x24016,pixclock:157500,left:7,right:13,upper:1,lower:1,hsynclen:63,vsynclen:20
There is much greater variation between STN type panels, so it is necessary to pass
all parameters. For example, to support a Kyocera KCS057QV1AA-G00 320x240
single panel color STN display you would use the following command:
# modprobe pxafb options=mode:320x2408,pixclock:154000,left:1,right:1,upper:0,lower:0,hsynclen:8,vsynclen:32,passive,c
olor,single,outputen:1,pixclockpol:0,hsync:1,vsync:1
The options string must be a single line with no spaces or line-breaks.
© 2007 Eurotech Ltd
Issue C
31
ZEUS Embedded Linux Development Kit Quickstart
Hardware configuration
The file /etc/X11/xorg.conf may not have a 320x240 display option listed so you may
need to add this. It is a text file and can be edited using either the vi or nano editors
that are pre-installed on the ZEUS. An example showing the required entries is shown
below.
Make a backup of this file before you change it.
Section "Monitor"
Identifier
EndSection
"Generic Monitor"
Section "Screen"
Identifier
"Default Screen"
Device
"PXA270 integrated controller"
Monitor
"Generic Monitor"
DefaultDepth
16
SubSection "Display"
Depth
16
Modes
"NL6448AC20" "320x240"
EndSubSection
EndSection
Refer to http://wiki.x.org/wiki/ for more xorg configuration options.
If you intend using a ZEUS FPIF-CRT interface module, for best results the display
controller should be configured for 640x480-16 VGA mode using:
# modprobe pxafb options=mode:640x480-16
© 2007 Eurotech Ltd
Issue C
32
ZEUS Embedded Linux Development Kit Quickstart
Hardware configuration
Touchscreen
The 4/5-wire resistive touchscreen controller is integrated into the WM9712 AC’97
codec and is supported by the wm97xx-ts module. The Flat Panel Display option for
the Development Kit includes a 4 wire touchscreen. Before loading the touchscreen
driver, you must load the evdev module:
# modprobe evdev
# modprobe wm97xx-ts
The wm97xx-ts module is normally loaded automatically by evdev. You can load
it separately afterwards if you need to change options. Loading it multiple times
should have no adverse effect.
Alternatively, for a 5-wire touch screen the five_wire option is required:
# modprobe wm97xx-ts five_wire=1
Once the required modules have been loaded, you will need to calibrate your
touchscreen driver before it can be used accurately:
# TSLIB_TSDEVICE=/dev/input/event0 ts_calibrate
Once the framebuffer has been loaded and the touchscreen has been installed
and calibrated, you can start the X server with:
# startx &
Using MMC/SD cards
To access SD cards from the ZEUS, the appropriate drivers may need to be installed.
# modprobe pxamci
# modprobe mmc_block
If you have a suitable SD card inserted, it can now be accessed and formatted via
/dev/mmcblk0p1
The SD card interface is hot swappable so you can remove the card and insert it once
the driver has been loaded. As with any storage media, you may need to umount the
file system in AEL Embedded Linux first, to prevent data loss.
Only block devices are currently supported.
© 2007 Eurotech Ltd
Issue C
33
ZEUS Embedded Linux Development Kit Quickstart
Hardware configuration
Using CompactFlash cards
CompactFlash cards are auto-detected on insertion and the appropriate drivers are
installed at that time. As with any storage media, you may need to umount the file
system in AEL Embedded Linux first, to prevent data loss.
© 2007 Eurotech Ltd
Issue C
34
ZEUS Embedded Linux Development Kit Quickstart
Support software
Support software
Target support software
When building applications for ZEUS board you must use the AEL Embedded Linux
host environment. This is a set of utilities that provide a cross compile environment
targeting the ZEUS board. You need a cross compile environment to produce binaries
that work with the libraries installed on the ZEUS.
For an explanation of how to install the host environment, see the AEL Embedded
Linux Technical Manual.
Intel Integrated Performance Primitives (IPPs)
Intel supplies a set of code modules optimised for the XScale processor. These provide
basic functionality, including:
•
Signal, image, speech and audio processing.
•
Vector manipulation.
•
Matrix math.
Further modules providing primitives useful in specific application areas are available.
These application areas include:
•
Audio, video and speech codecs, for example MP3 (MPEG-1 Audio Layer 3),
MPEG-4, H263, JPEG, GSM-AMR and G723.1.
•
Cryptography, for example DES, Triple DES, SHA1 and RSA.
For more information about Intel IPPs, see: www.intel.com.
© 2007 Eurotech Ltd
Issue C
35
ZEUS Embedded Linux Development Kit Quickstart
ZEUS Development Kit example programs
ZEUS Development Kit example programs
The Development Kit CD includes some example programs that show the use of ZEUS
board. They can be found in the /examples directory in the CD.
You can also use the utilities in the arcom-utils package as a reference while
developing your application. This package and its source can be found in
packages/arcom-utils/ directory on the CD. The utilities available and the functionality
they provide are:
•
devmem2: a simple program that demonstrates how to read from, and write to, any
location in memory.
•
rtc-alarm: provides a simple example of how to setup the RTC to generate an
alarm at a particular time.
•
pxaregs: a simple utility to read and modify the registers on a PXA2xx XScale
processor.
•
zeus-sleep.sh: provides an example script to put a ZEUS board into sleep mode.
•
mtd-unlock and mtd-lock: locks or unlocks an mtd device respectively.
•
i2c-regs: reads from and writes to the registers on devices on the I²C bus.
The following modem control utilities and scripts are also available in the
modem-utils-zeus package:
•
zeus-modem-on.sh: enables the modem
•
zeus-modem-off.sh: disables the modem
•
zeus-modem-power.sh: toggles the power to the modem
•
queryserial: a utility that sends commands to a serial port and returns a reply.
Further information on these utilities can be found in the README file in the package.
A MAKEFILE is provided to assist in building them from the sources.
© 2007 Eurotech Ltd
Issue C
36
ZEUS Embedded Linux Development Kit Quickstart
Appendix A – Contacting Eurotech Ltd
Appendix A – Contacting Eurotech Ltd
Eurotech Ltd sales
Eurotech Ltd’s sales team is always available to assist you in choosing the board that
best meets your requirements.
Eurotech Ltd
3 Clifton Court
Cambridge
CB1 7BN
UK
Tel:
Fax:
Email:
+44 (0)1223 403410
+44 (0)1223 410457
[email protected]
Comprehensive information about our products is also available at our web site:
www.eurotech-ltd.co.uk.
While Eurotech Ltd’s sales team can assist you in making your decision, the
final choice of boards or systems is solely and wholly the responsibility of the
buyer. Eurotech Ltd’s entire liability in respect of the boards or systems is as set
out in Eurotech Ltd’s standard terms and conditions of sale. If you intend to
write your own low level software, you can start with the source code on the
disk supplied. This is example code only to illustrate use on Eurotech Ltd’s
products. It has not been commercially tested. No warranty is made in respect
of this code and Eurotech Ltd shall incur no liability whatsoever or howsoever
arising from any use made of the code.
Eurotech Ltd technical support
Eurotech Ltd has a team of dedicated technical support engineers available to provide
a quick response to your technical queries.
Tel:
Fax:
Email:
+44 (0)1223 412428
+44 (0)1223 410457
[email protected]
Eurotech Ltd Group
Eurotech Ltd is a subsidiary of Eurotech Group. For further details see
www.eurotech.com
© 2007 Eurotech Ltd
Issue C
37
ZEUS Embedded Linux Development Kit Quickstart
Index
Index
A
D
additional devices · 16
address, static IP · 19, 24
AEL Embedded Linux · 6, 19, 36
anti-static · 5
applications
boot · 6
embedded · 17
audio · 10
devices, additional · 16
DHCP · 17, 19, 21, 24
display · 10
flat panel · 9
DNS · 21
documents, related · 6
domain name server · 21
download · 17
B
E
binaries · 36
BIOS
default · 15
board
diagram · 11
boot · 12
script · 6, 17
strap · 17
BOOTP · 17
embedded applications · 17
environment · 36
Ethernet · 4, 9
cable · 8, 14
download · 17
interface · 10, 11, 13, 17
example
utilities · 37
F
C
cable
Ethernet · 8, 14
ribbon · 13
camera interface · 4, 11
CAN bus · 4, 8
CD-ROM · 8
clock, real time · 10
command line
interface · 17
kernel · 23
command prompts · 7
configuration files · 6
connect · 12
contact details · 38
contents of kit · 8
conventions · 6
cross compile · 36
CRT · 10
© 2007 Eurotech Ltd
Issue C
file
configuration · 6
system · 22
temporary · 22
FIS · 22
Flash · 10, 14, 17, 22
image · 22
flat panel display · 9, 10, 15
free space · 22
G
GPIO · 4, 8, 10, 11, 24
H
host environment · 36
38
ZEUS Embedded Linux Development Kit Quickstart
Index
I
R
image download · 17
integrated performance primitives · 36
Intel · 2, 36
PXA270 XScale RISC · 4, 11, 18, 24, 29, 30, 32
interface
command line · 17
Ethernet · 10, 11, 13, 17
IP address · 19, 24
static · 21
IPP · See integrated performance primitives
real time clock · 10
RedBoot · 17
FIS · 22
requirements · 9
returns · 5
ribbon cable · 13
J
JFFS2 · 22
Journaling Flash File System · 22
K
kernel · 6
command line · 23
Linux · 23
key · 6
kit contents · 8
L
Linux · 9, 14
AEL Embedded · 19
kernel · 23
login · 19, 21
S
script, boot · 6, 17
SD card · 4, 10, 34
secure shell · 6, 19
serial
download · 17
port · 9
terminal · 14
server · 19
source code · 38
space, additional · 22
SRAM · 10
SSH · 6, 19
static · 5
IP address · 19, 21, 24
support, technical · 38
supported peripherals · 10
symbols · 6
T
MMC · 4, 10, 34
technical support · 38
temporary files · 22
terminal, serial · 14
touchscreen · 9, 13
trademarks · 2
N
U
nano · 21, 25, 28, 33
networking · 9
UARTS · 4, 10, 29
unpack · 12
utilities · 37
M
P
packaging · 5
partition Flash · 22
PC/104 · 29
peripherals supported · 10
pin 1 · 13
port, serial · 9
power
supply · 8, 13, 16
up · 12
primitives · 36
PXA270 XScale RISC · 4, 11, 18, 24, 29, 30, 32
© 2007 Eurotech Ltd
Issue C
V
vi · 21, 25, 28, 33
W
watchdog · 10
39