1
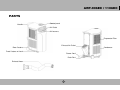
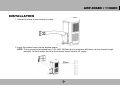
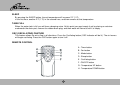
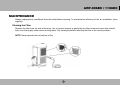
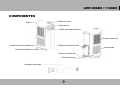
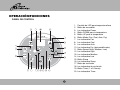
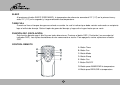
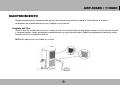
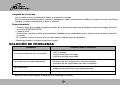
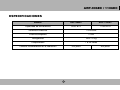
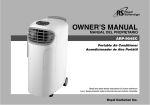
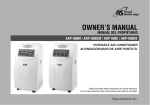
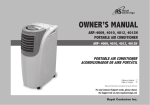
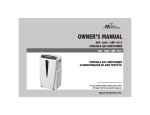
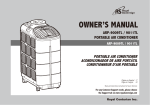
OWNER’S MANUAL
MANUAL DEL PROPIETARIO
ARP-906EC / 1106EC
Portable Air Conditioner
Acondicionador de Aire Portátil
Read and retain these instructions for future reference
For any Customer Support needs, please choose
the Support tab on www.royalsovereign.com
Royal Centurian Inc.
PORTABLE AIR CONDITIONER
Model ARP-906EC / 1106EC
TABLE OF CONTENTS
Parts - - - - - - - - - - - - - - - - - - - - - - - - - - - - - - - - - - - - - - - - - - - - - - - - - - - - - - - - - - - - - - 3
Safety Precautions - - - - - - - - - - - - - - - - - - - - - - - - - - - - - - - - - - - - - - - - - - - - - - - - - - - 4
Installation - - - - - - - - - - - - - - - - - - - - - - - - - - - - - - - - - - - - - - - - - - - - - - - - - - - - - - - - - - 5
Operation/Functions - - - - - - - - - - - - - - - - - - - - - - - - - - - - - - - - - - - - - - - - - - - - - - - - - - 6
Maintenance - - - - - - - - - - - - - - - - - - - - - - - - - - - - - - - - - - - - - - - - - - - - - - - - - - - - - - - - 9
Troubleshooting - - - - - - - - - - - - - - - - - - - - - - - - - - - - - - - - - - - - - - - - - - - - - - - - - - - - 10
Specifications - - - - - - - - - - - - - - - - - - - - - - - - - - - - - - - - - - - - - - - - - - - - - - - - - - - - - - 11
Warranty - - - - - - - - - - - - - - - - - - - - - - - - - - - - - - - - - - - - - - - - - - - - - - - - - - - - - - - - - - 12
2
ARP-906EC / 1106EC
PARTS
Handle
Control panel
Air Outlet
Air Louvers
Evaporator Filter
Rear Casters
Exhaust Air Outlet
Front Casters w/ Lock
Power Cord
Drain Port
Exhaust Hose
3
Condenser
BEFORE USE
SAFETY PRECAUTIONS
If unit has been transported on its side, set the machine upright for 2 hrs. before use.
1. Only use in the upright position on a flat, level surface at least 20” (50cm) from any object or water leak may occur.
2. Do not place objects on top or in front of the unit.
3. Closely supervise children and pets while unit is in use.
4. For indoor use only.
5. Turn off and unplug the unit when it is not in use.
6. Do not use in wet environments.
7. Do not pull the unit by the cord.
8. If the power cord is damaged, it must be replaced by an electrician to avoid hazard or injury.
Make sure there is a green light on the plug when unit is plugged into power source. If not press reset button on plug
until the green LED light on the plug illuminates.
FOR MAXIMUM EFFICIENCY
1. Do not exceed the recommended room size of 300 sq. feet (ARP-906EC) & 400 sq. feet (ARP-1106EC).
2. Keep doors and windows closed.
3. Keep curtains or blinds closed during the sunniest part of the day.
4. Keep filters clean.
5. Once room has reached the desired conditions, reduce the temperature
4
ARP-906EC / 1106EC
INSTALLATION
1. Connect the hose to the exhaust air outlet.
2. Insert the exhaust hose into the window spacer.
NOTE: The hose may be extended from 1-5 ft (300-1500mm) but for maximum efficiency use the shortest length
possible. For best results do not let the exhaust hose exceed a 45° angle.
5
OPERATION/FUNCTIONS
CONTROL PANEL
1. Temperature/Hour LED Display
2. Power button
3. Power light
4. Temperature DOWN button
5. Temperature UP button
6. Mode button (Fan, Cool, Auto, Dry)
7. Fan indicator light
8. Cool indicator light
9. Auto indicator light
10. Dry indicator light (Dehumidifier)
11. Speed button (High, Medium, Low)
12. High indicator light
13. Medium indicator light
14. Low indicator light
15. Sleep button
16. Sleep indicator light
17. Oscillating button
18. Oscillating indicator light
19. Timer button (1-24 hours)
20. Timer indicator light
6
ARP-906EC / 1106EC
ON/OFF
Press this button to start and stop the unit.
MODE
Press this button to select the Fan, Cool, Auto or Dry (Dehumidifier) mode.
The Fan mode will allow you to select a Speed of High, Medium or Low.
The Cool mode will allow you to select a Speed of High, Medium or Low or a specific temperature by using the
UP/DOWN buttons.
The Auto mode will automatically adjust the settings between Fan (High, Low and Medium) and Cool (High, Low and
Medium) depending on the current temperature in the room. Press the Auto button and then use the UP/DOWN button to
select your desired temperature. If the temperature in the room is at 76°F or above the COOL mode and SPEED will
automatically be selected to keep the room at the desired temperature. If the temperature in the room is 75°F or below
FAN mode and SPEED will automatically be selected to keep the room at the desired temperature.
The Dry mode will allow you to dehumidify the room and remove excess moisture.
SPEED
Press the SPEED button to select a High, Medium or Low setting.
TIMER (1-24 Hours)
The timer button will allow you to turn the unit ON or OFF without being in the room.
If the unit is off- Press the TIMER button (Timer indicator light will be lit). Continue pressing the TIMER button until you
select the quantity of hours (1-24) in which you want the unit to turned on. Example- If you want the unit to turn on in 3
hours then Press the button until it shows 3, the unit will automatically turn on in 3 hours.
If the unit is on- Press the TIMER button (Timer indicator light will be lit). Continue pressing the TIMER button until you
select the quantity of hours (1-24) in which you want the unit to turned off. Example- If you want the unit to turn off after 4
hours then press the button until it shows 4, the unit will automatically turn off in 4 hours.
7
SLEEP
By pressing the SLEEP button, the set temperature will increase 2°F (1°C)
in the first hour, another 2°F (1°C) in the second hour, and then remains at that temperature.
TANK FULL
When the water tank is full you will hear a beeping noise. At this point you must empty it out by placing a container
underneath the drain port, remove the rubber drain plug, and then water will flow out until it is empty.
OSC (OSCILLATING) FEATURE
This feature allows the air to flow in all directions. Press the Oscillating button (OSC indicator will be lit). The air louvers
will begin oscillating. Press the OSC button again to turn it off.
REMOTE CONTROL
A - Timer button
B - Fan button
C - Mode button
D - Sleep button
E - Oscillating button
F - ON/OFF button
G - Temperature UP button
H - Temperature DOWN button
8
ARP-906EC / 1106EC
MAINTENANCE
Always unplug the air conditioner from the outlet before cleaning. To maximize the efficiency of the air conditioner, clean
regularly.
Cleaning the Filter
Remove the filter from the side of housing. Use a vacuum cleaner or gently tap the filter to remove loose dust and dirt,
then rinse thoroughly under warm running water. Dry thoroughly before returning the filter to the correct position.
NOTE: Never operate the unit without a filter
9
Cleaning the Housing
Use a soft, damp cloth to wipe the body clean.
Never use chemicals, gasoline, detergents, chemically treated cloths, or other cleansing solutions as this could possibly
damage the housing.
Storage
• Drain any water from the unit by emptying the water through the drain port into the water tray (see the PARTS section).
• Clean the filter
• Unplug and wrap the power cord around the cord holders on the back of the unit.
• If possible, place back in its original carton or cover for storage.
• Always keep the unit in the upright position
TROUBLESHOOTING
Problem
Possible Cause/Solution
The air conditioner does not run
• Press reset button on the plug until the green LED light
on the plug illuminates.
• Check to see if it is plugged in.
• Check to see if the power is on.
The machine is not cooling very well
• Is there direct sunlight? Close all curtains and blinds.
• Check to make sure there are no doors/windows open.
• Check to make sure nothing that produces heat is on.
The unit is vibrating
• The unit may be on an uneven surface. Make sure it is
on a flat surface.
Sudden noise
• The compressor may have turned on. This is normal.
NOTE: Never try to repair or dismantle the unit yourself.
10
ARP-906EC / 1106EC
SPECIFICATIONS
Model
ARP-906EC
ARP-1106EC
Cooling capacity
9000 BTUs
11000 BTUs
Power supply
115V/60Hz
Power/Ampere
10.5A
Refrigerant
R22 / 470g
Timer
1 - 24 hours
Recommended room size
300 sq. ft
11
400 sq. ft
WARRANTY
FULL ONE YEAR WARRANTY
Royal Sovereign warrants each Portable Air Conditioner to be free from defects in material and workmanship. Our obligation under this warranty is limited to the repair or
replacement, free of charge, when delivered to an authorized Royal Sovereign service center, of any defective part(s) thereof, other than parts damaged in transit. This
warranty is in effect to the original purchaser, for a period of one year from the date of purchase and is not transferable. This warranty shall apply only if the air conditioner is
used on Alternating Current (AC) circuit, in accordance with the factory provided instructions which accompany it.
LIMITED FIVE YEAR WARRANTY (COMPRESSOR)
For a period of five years from the date of purchase, when this Royal Sovereign Portable Air Conditioner is operated and maintained according to the instruction manual
provided with the product, Royal Sovereign will supply a replacement compressor (part only), free of charge, if the original compressor is determined to be defective in
workmanship or material. If repair becomes necessary, please contact our customer service center. You will be responsible for all freight, insurance, and any other transportation
charges to get the unit to our factory or service center. If shipping is required, be sure to pack the unit properly to avoid shipping damages, as we will not be responsible for such
damages.
THIS WARRANTY IS VALID THROUGHOUT THE UNITED STATES AND PUERTO RICO ONLY
EXCLUSIONS
This warranty excludes and does not cover defects, malfunctions or failures of your Royal Sovereign Portable Air Conditioner, caused by repairs by unauthorized persons or
service centers, mishandling, improper installation, modification or unreasonable use including incorrect voltage, acts of god, or failure to provide reasonable and necessary
maintenance. This warranty is in lieu of any and all expressed warranties. In no event shall Royal Sovereign be liable for consequential or incidental damages. Some states do
not allow the exclusion or limitation of incidental or consequential damages, so the above limitation or exclusion may not apply to you. This warranty gives you specific legal
rights and you may also have other rights which vary from state to state.
ROYAL SOVEREIGN INTERNATIONAL, INC.
Royal Centurian Inc.
2 Volvo Drive Rockleigh, NJ 07647 USA
TEL : +1) 201-750-1020, +1) 800-397-1025
FAX : +1) 201-750-1022
RS International Australia PTY. LTD.
Royal Sovereign Canada
30 Prime Drive, Seven Hills, NSW 2147, AUSTRALIA
TEL : +61) 2-9674-2127 FAX : +61) 2-9674-2027
164 Oakdale Road, Toronto, Ontario M3N 2S5 CANADA
TEL: +1) 416-741-8400 FAX: +1) 416-741-8185
www.royalsovereign.com / [email protected]
12
Spanish
ARP-906EC / 1106EC
OWNER’S MANUAL
MANUAL DEL PROPIETARIO
ARP-906EC / 1106EC
Acondicionador de Aire Portátil
Lea y conserve estas instrucciones para referencia futura
Para preguntas, por favor. Visite nuestra página de
internet www.royalsovereign.com servicio al cliente.
Royal Centurian Inc.
ACONDICIONADOR DE AIRE PORTÁTIL
Modelo ARP-906EC / 1106EC
ÍNDICE GENERAL
Componentes - - - - - - - - - - - - - - - - - - - - - - - - - - - - - - - - - - - - - - - - - - - - - - - - - - - - 15
Precauciones de seguridad- - - - - - - - - - - - - - - - - - - - - - - - - - - - - - - - - - - - - - - - - - - 16
Instalación - - - - - - - - - - - - - - - - - - - - - - - - - - - - - - - - - - - - - - - - - - - - - - - - - - - - - - - 17
Operación/Funciones - - - - - - - - - - - - - - - - - - - - - - - - - - - - - - - - - - - - - - - - - - - - - - - 18
Mantenimiento - - - - - - - - - - - - - - - - - - - - - - - - - - - - - - - - - - - - - - - - - - - - - - - - - - - - 21
Solución de problemas - - - - - - - - - - - - - - - - - - - - - - - - - - - - - - - - - - - - - - - - - - - - - 22
Especificaciones - - - - - - - - - - - - - - - - - - - - - - - - - - - - - - - - - - - - - - - - - - - - - - - - - - 23
Garantía - - - - - - - - - - - - - - - - - - - - - - - - - - - - - - - - - - - - - - - - - - - - - - - - - - - - - - - - - 24
ARP-906EC / 1106EC
COMPONENTES
Manilla
Panel de control
Salida de aire
Rejillas desviadoras del aire
Filtro de evaporación
Ruedas orientables posteriores
Salida de aire de extracción
Ruedas orientables con traba
Cable de alimentación
Orificio de drenaje
Manguera de escape
15
Condensador
ANTES DEL USO
PRECAUCIONES DE SEGURIDAD
Si la unidad ha sido transportada de lado coloque la máquina en posición vertical por 2 horas antes de usar.
1. Use la unidad sólo en su posición vertical sobre una superficie plana y nivelada, a una distancia mínima de 20
pulg./50 cm de cualquier objeto o podría ocurrir un escape de agua.
2. No coloque objetos en la parte superior de la unidad ni en su parte delantera.
3. Vigile de cerca a niños y mascotas mientras use la unidad.
4. Úsese sólo en interiores.
5. Apague y desenchufe la unidad cuando no la use.
6. No la use en ambientes húmedos.
7. No tire de la unidad tomándola del cable.
8. Si el cable de alimentación se daña, lo debe reemplazar un electricista para evitar riesgos y lesiones.
Este seguro que se prenda la luz verde en el tapón cuando la unidad esta enchufada en la fuente de poder. No
presione el botón de (reset) reinicio hasta que se prenda la luz verde en el LED del tapón.
PARA OBTENER EL MÁXIMO RENDIMIENTO
1. No exceda el tamaño recomendado de 300 pies2 (ARP-906EC) y 400 pies2 (ARP-1106EC) para la habitación.
2. Mantenga cerradas puertas y ventanas.
3. Mantenga cerradas cortinas y persianas durante el momento más soleado del día.
4. Mantenga limpios los filtros.
5. Una vez que la habitación haya alcanzado las condiciones deseadas, reduzca la temperatura.
16
ARP-906EC / 1106EC
INSTALACIÓN
1. Conecte la manguera a la salida de extracción de aire
2. Inserte la manguera de escape en el separador de la ventana.
NOTA: La manguera se puede extender de 1 a 5 pies/300 a 1500 mm, pero, para obtener el máximo rendimiento,
use la menor longitud posible. Para obtener los mejores resultados, no permita que la manguera se doble en
un ángulo menor que 45º.
17
OPERACIÓN/FUNCIONES
PANEL DE CONTROL
1. Pantalla de LED para temperatura/hora
2. Botón de encendido
3. Luz indicadora Power
4. Botón DOWN para la temperatura
5. Botón UP para la temperatura
6. Botón Mode (Fan, Cool, Auto, Dry)
7. Luz indicadora Fan
8. Luz indicadora Cool
9. Luz indicadora Auto
10. Luz indicadora Dry (deshumidificador)
11. Botón Speed (High, Medium, Low)
12. Luz indicadora High
13. Luz indicadora Medium
14. Luz indicadora Low
15. Botón Sleep
16. Luz indicadora Sleep
17. Botón de oscilación
18. Luz indicadora de oscilación
19. Botón Timer (1 a 24 horas)
20. Luz indicadora Timer
18
ARP-906EC / 1106EC
ON/OFF
Presione este botón para encender o apagar la unidad.
MODE
Presione este botón para seleccionar el modo Fan (Ventilador), Cool (Enfriamiento), Auto (Automático) o Dry (Secado)
(deshumidificador).
El modo Fan le permite seleccionar una velocidad High (Alta), Medium (Media) o Low (Baja).
El modo Cool le permite seleccionar una velocidad High, Medium o Low, o una temperatura específica con los botones UP/DOWN
(AUMENTAR/REDUCIR).
El botón Auto realizará ajustes de forma automática entre Fan (High, Low y Medium) y Cool (High, Low y Medium), dependiendo de la
temperatura ambiente actual. Presione el botón Auto y luego, con los botones UP/DOWN, seleccione la temperatura deseada. Si la
temperatura ambiente es igual o mayor que 76° F, el modo COOL y la VELOCIDAD se seleccionarán de forma automática a fin de
mantener la habitación a la temperatura deseada. Si la temperatura ambiente está entre 75° F, el modo FAN y la VELOCIDAD se
seleccionarán de forma automática a fin de mantener la habitación a la temperatura deseada.
El modo Dry le permite deshumidificar la habitación, es decir, eliminar el exceso de humedad.
SPEED
Presione el botón SPEED para seleccionar un ajuste High, Medium o Low.
TIMER (1 a 24 horas)
El botón TIMER (TEMPORIZADOR) le permite ENCENDER o APAGAR la unidad sin siquiera encontrarse en la habitación.
Si la unidad está apagada: Presione el botón TIMER (se encenderá la luz indicadora Timer). Sigua presionando el botón TIMER hasta que
seleccione la cantidad de horas (1 a 24) que desea que transcurran antes de que se encienda la unidad. Por ejemplo, si desea que la
unidad se encienda dentro de 3 horas, presione el botón hasta que aparezca 3, y la unidad se encenderá automáticamente dentro de
esa cantidad de horas.
Si la unidad está encendida: Presione el botón TIMER (se encenderá la luz indicadora Timer) Siga presionando el botón TIMER hasta que
seleccione la cantidad de horas (1 a 24) que desea que transcurran antes de que se apague la unidad. Por ejemplo, si desea que la
unidad se apague dentro de 4 horas, presione el botón hasta que aparezca 4, y la unidad se apagará automáticamente dentro de esa
cantidad de horas.
19
SLEEP
Al presionar el botón SLEEP (DESCANSO), la temperatura de referencia aumentará 2°F (1°C) en la primera hora y
otros 2°F (1°C) en la segunda, y luego mantendrá esa temperatura.
TANK FULL
Cuando se llene el tanque de agua escuchará un sonido. Lo cual le indicará que debe vaciarlo colocando un recipiente
bajo el orificio de drenaje. Quite el tapón de goma del drenaje y haga salir el agua hasta que se vacíe.
FUNCIÓN OSC (OSCILACIÓN)
Esta función permite que el aire fluya en todas direcciones. Presione el botón OSC. (Oscilación) (se encenderá el
indicador OSC). Las rejillas desviadoras de aire comenzarán a oscilar. Para apagarlo, vuelva a presionar el botón
OSC.
CONTROL REMOTO
A- Botón Timer
B- Botón Fan
C- Botón Mode
D- Botón Sleep
E- Botón Osc.
F- Botón ON/OFF
G- Botón para AUMENTAR la temperatura
H- Botón para REDUCIR la temperatura
20
ARP-906EC / 1106EC
MANTENIMIENTO
Siempre desenchufe el acondicionador de aire del tomacorriente antes de limpiarlo. Para obtener el máximo
rendimiento del acondicionador de aire, límpielo con frecuencia.
Limpieza del filtro
Quite el filtro del costado de la carcasa. Limpie el filtro con una aspiradora o dele golpes suaves a fin de eliminar el polvo
y suciedad sueltos; luego, enjuáguelo completamente con agua corriente tibia. Séquelo completamente antes de volver
a poner el filtro en la posición correcta.
NOTA: No opere nunca la unidad sin un filtro.
21
Limpieza de la carcasa
Use un paño suave y húmedo para limpiar el cuerpo de la unidad.
No use nunca productos químicos, gasolina, detergentes, paños químicamente tratados ni ninguna clase de solución de
limpieza, ya que es posible que se dañe la carcasa.
Almacenamiento
• Drene el agua de la unidad vaciándola a través del orificio de drenaje hacia la bandeja recolectora de agua (consulte
la sección COMPONENTES).
• Limpie el filtro.
• Desenchufe y enrolle el cable de alimentación alrededor de los sujetadores que se encuentran en la parte trasera de
la unidad.
• Si es posible, vuelva a colocarla en su caja original o cúbrala antes de guardarla.
• Mantenga siempre la unidad en posición vertical.
SOLUCIÓN DE PROBLEMAS
Problema
El acondicionador de aire no funciona.
La unidad no enfría adecuadamente.
La unidad vibra.
Se produce ruido repentino.
Posible causa o solución
• Presione el botón (reset) reinicio en el tapón hasta que la luz verde del
LED se prenda.
• Verifique que esté enchufado.
• Verifique que esté encendido.
• Si está recibiendo la luz solar directa, cierre todas las cortinas y persianas.
• Verifique que no haya puertas o ventanas abiertas.
• Verifique que no haya fuentes de calor encendidas.
• Es posible que unidad se encuentre en una superficie desnivelada.
Asegúrese de colocarla en una superficie plana.
• Puede que se haya encendido el compresor. Esto es normal.
NOTA: Nunca intente reparar ni desmontar la unidad por su cuenta.
22
ARP-906EC / 1106EC
ESPECIFICACIONES
Modelo
ARP-906EC
ARP-1106EC
Capacidad de enfriamiento
9000 BTU
11000 BTU
Suministro eléctrico
115V/60Hz
Potencia/Amperes
10.5A
Refrigerante
R22 / 470g
Temporizador
1 a 24 horas
300 pies2
Tamaño recomendado de la habitación
23
400 pies2
GARANTÍA
GARANTÍA TOTAL DE UN AÑO
Royal Sovereign garantiza que todos los acondicionadores de aire portátiles están libres de defectos de material y de mano de obra. Nuestra obligación de acuerdo con esta
garantía se limita a la reparación o el reemplazo sin costo de cualquier pieza defectuosa que no haya sido dañada en tránsito, cuando se entregue a un centro de servicios
autorizado de Royal Sovereign. Esta garantía está en vigencia para el comprador original por un período de un año, a partir de la fecha de compra, y es intransferible. Esta
garantía sólo se aplicará si el acondicionador de aire se usa en un circuito de corriente alterna (CA), de acuerdo con las instrucciones de fábrica que lo acompañan.
GARANTÍA LIMITADA DE CINCO AÑOS (COMPRESOR)
Durante un período de cinco años, a partir de la fecha de compra, cuando este acondicionador de aire portátil Royal Sovereign se opere y se le dé mantenimiento de
acuerdo con el manual de instrucciones que viene con el producto, Royal Sovereign suministrará un compresor de repuesto (sólo la pieza) sin costo, si se determina
que el compresor original tiene defectos de material o de mano de obra. Si es necesaria una reparación, comuníquese con nuestro centro de servicio al cliente.
Usted será responsable de los gastos de flete, seguros y de cualquier otro costo de transporte necesarios para hacer llegar la unidad a nuestra fábrica o centro de
servicio. Si necesita enviarla, asegúrese de embalar adecuadamente la unidad para evitar daños durante el transporte, ya que no seremos responsables de éstos.
ESTA GARANTÍA ES VÁLIDA SÓLO EN ESTADOS UNIDOS Y PUERTO RICO
EXCLUSIONES
Esta garantía excluye y no cubre defectos, funcionamiento defectuoso o fallas de su acondicionador de aire portátil Royal Sovereign que hayan sido causados por
reparaciones realizadas por personas o centros de servicio no autorizados, por maltrato, instalación inadecuada, modificación o uso poco razonable, lo que incluye
voltaje incorrecto, daños fortuitos o no realizar el mantenimiento razonable y necesario a la unidad.
Esta garantía reemplaza a todas y cada una de las garantías expresas. Bajo ninguna circunstancia Royal Sovereign será responsable de daños emergentes o
imprevistos. Algunos estados no permiten la exclusión o limitación de los daños imprevistos o emergentes, así que es posible que la limitación o exclusión anterior
no se aplique a su caso. Esta garantía le otorga derechos legales específicos y también podría tener otros derechos que varían de un estado a otro.
ROYAL SOVEREIGN INTERNATIONAL INC.USA
Royal Centurian Inc.
2 Volvo Drive
Rockleigh, NJ 07647 USA
TEL : +1) 201-750-1020, +1) 800-397-1025
FAX : +1) 201-750-1022
Royal Sovereign International Australia PTY. LTD.
Royal Sovereign Canada
30 Prime Drive, Seven Hills, NSW 2147, AUSTRALIA
TEL : +61) 2-9674-2127 FAX : +61) 2-9674-2027
164 Oakdale Road, Toronto, Ontario M3N 2S5 CANADA
TEL: +1) 416-741-8400 FAX: +1) 416-741-8185
www.royalsovereign.com / [email protected]
24