1
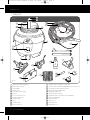
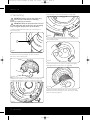
Инструкция
Vax 6121
Перейти в карточку товара
8 800 775 98 98
л чит т нич
ю н льт цию.
гл т чн . Б з вы дны
www.sotmarket.ru
д бн я инф м ция
тзывы, бз ы и
т в
ы
,
Vax 6121(C) User Guide v1.qxd
19/11/07
15:10
Page 1
Vax model number:
6121
6121C
www.vax.co.uk
instruction manual
Multifunction
Please read carefully before using this cleaner.
Always fully extend the mains cable before use.
Retain for future reference.
Vax 6121(C) User Guide v1.qxd
19/11/07
15:10
Page 2
www.vax.co.uk
1. Diagram
1
6121
2
10
3
11
9
4
13
12
5
14
8
15
7
6
19
AAA
18
ANTI
ALLERGEN
17
ADDITIVE
16
24
22
21
20
23
Fig.1/1
1
2
3
4
5
6
7
8
9
10
11
12
Water pump button (green)
Power button (red)
Carry handle
Power cord
Container release clips
Casters
Hose connection port
Solution tube port
Exhaust filter
Hose
Solution tube
Hose connector
2 parts overview
13
14
15
16
17
18
19
20
21
22
23
24
Solution tube to machine connector
Solution tube to wash head/upholstery tool connector
2 x stainless steel extension tubes
Fibreflow carpet wash head
Upholstery wash tool
Vax AAA carpet cleaner
Combination floor head (for dry vacuuming)
2 x paper dust bags
Filter assembly
Crevice tool
Dusting brush
Upholstery tool
Vax 6121(C) User Guide v1.qxd
19/11/07
15:10
2. Safety Information
FOR HOUSEHOLD USE ONLY.
When using the cleaner, basic safety precautions should
always be observed, including the following:
Page 3
21. Using improper voltage may result in damage to the
motor and possible injury to the user. The correct
voltage is listed on the rating label.
22. A hazard may occur if the machine runs over the
power supply cord.
1.
Do not leave the machine unattended when plugged
in. Unplug it from socket when not in use.
23. To prevent dirty water from running into motor, do
not hold the appliance upside-down or lay on its side.
Use appliance in normal vacuuming position.
2.
To prevent electric shock do not use outdoors.
24. Use extra care when cleaning on stairs.
3.
Not to be used as a toy. Children should be supervised to
ensure that they do not play with the appliance.
25. Do not carry appliance while motor is running.
4.
This appliance is not intended for use by persons
(including children) with reduced physical, sensory or
mental capabilities, or lack of experience and knowledge,
unless they have been given supervision or instruction
concerning the use of the appliance by a person
responsible for their safety.
NOTE: Carpets should be dry vacuumed thoroughly
before washing.
5.
Use only as described in this manual.
6.
Do not use with a damaged cord or plug. If the supply
cord and/or plug is damaged, they must be replaced
by the manufacturer, a Vax Service Agent or similarly
qualified persons in order to avoid hazard.
7.
Do not pull or carry by the cord, use the cord as a
handle, allow the cord to come into contact with hot
or sharp surfaces or close a door on the cord.
8.
Do not unplug by pulling on the cord.
9.
Do not handle the plug or machine with wet hands.
NOTE: The unit must be unplugged from the mains
socket outlet after use, and before cleaning or
maintaining the unit.
!
IMPORTANT: This unit is not intended for
commercial use.
PLEASE KEEP THESE INSTRUCTIONS
FOR FURTHER USE.
10. Do not put any objects into openings or operate with
openings blocked, keep them free of anything that
may reduce airflow.
11. Keep hair, loose clothing, fingers and all parts of the
body away from openings and moving parts.
12. Do not use the machine on any glowing, burning or
smoking particles.
13. Do not use without the solution tank and dirty water
tank in place.
14. Do not use the vacuum without the dust bag in place.
15. Turn off all controls before unplugging.
16. Do not use to pick up flammable or combustible
liquids such as petrol, or use in areas where they may
be present.
17. Keep the unit on the floor.
18. Do not use an extension cord.
19. Do not attempt to remove blockages with sharp
objects as they may cause damage.
20. Store indoors put away after use to prevent tripping
accidents.
safety information
3
Vax 6121(C) User Guide v1.qxd
19/11/07
15:10
Page 4
www.vax.co.uk
3. Vacuuming
4. Fit the plug to the solution intake port (Fig.3/4).
IMPORTANT: Always remove the power plug
from the wall outlet before assembling,
servicing or removing accessories.
!
IMPORTANT: Only the red power button should
be “ON” when the machine is in dry vacuuming
mode. The green pump button should be “OFF”.
!
1. Unclip Container Release Clips (A) on both sides of
machine (Fig.3/1).
Fig.3/4
A
Lift out and remove the clean water solution tank. Store
safely away (Fig.3/5).
Fig.3/1
2. Remove the motor top from the unit, turn on its side
and remove the float housing in an anti-clockwise
direction to unscrew (Fig.3/2).
Fig.3/5
Fit the pleated pre-motor filter by pushing and lightly
twisting the filter on the motor top (Fig.3/6).
Fig.3/2
3. Remove the solution connector tube by turning anticlockwise by 90 degrees. Store in a safe place (Fig.3/3).
Fig.3/6
Fit the dust bag by aligning the front of the dust bag
with the inlet slots, and position the dust bag to fill the
inside of the base (Fig.3/7).
Fig.3/3
4 vacuuming
Vax 6121(C) User Guide v1.qxd
19/11/07
15:10
Fig.3/7
Replace the motor top, ensuring that the dust bag is not
trapped. Ensure the motor top is secured to the base with
the two clips (Fig.3/8).
Page 5
Fig.3/10
Fit the combination floor tool by pushing on to the
extension tube (Fig 3/11).
Fig.3/11
Fig.3/8
Insert the flexible hose into the inlet on the main body of
the vacuum cleaner. Push in and twist clockwise a quarter
turn until tight (Fig.3/9).
On/Off Button
Fully unwind the power cord and plug the cord into the
electrical outlet. Turn the vacuum cleaner on by
depressing the button located on the top of the carry
handle (Fig.3/12). The vacuum cleaner can be turned off
by pressing the on/off button again.
Fig.3/9
Push the extension tubes onto the end of the handle
(Fig.3/10).
Fig.3/12
vacuuming
5
Vax 6121(C) User Guide v1.qxd
19/11/07
15:10
Page 6
www.vax.co.uk
Carpet Cleaning
For carpet cleaning, press the rocker switch on the
combination floor tool as shown to raise the brushes
(Fig.3/13).
Fig.3/13
Hard Floor Cleaning
For hard floor cleaning, press the rocker switch on the
combination floor tool as shown to lower the brushes
(Fig.3/14).
4. Accessories
The accessories can be attached directly to the handle by
removing the extension tubes and pushing in the desired
accessory (Fig.4/1).
Fig.4/1
The accessories can also be attached to the extension
tubes for extra reach. Remove the combination floor tool
and push on the desired accessory (Fig.4/2).
Fig.4/2
Crevice Tool: for crevices, corners, cracks etc.
Dusting Brush: for delicate surfaces.
Fig.3/14
6 vacuuming / accessories
Upholstery Tool: for carpet, upholstery, stairs etc.
Vax 6121(C) User Guide v1.qxd
19/11/07
15:10
5. Preparing the Carpet
for Washing
IMPORTANT: Do not use the cleaner as a dry
! vacuum when set up in carpet washing mode.
1. Vacuum carpet thoroughly.
Page 7
6. Getting Ready to Wash
1. Unclip Container Release Clips (A) on both sides of
machine (Fig.6/1).
2. Remove as much furniture from the room as possible. If
unable to remove the furniture, place plastic or foil under
and around the legs until the carpet has dried completely.
A
Helpful hints for cleaning carpet:
1. Only use Vax recommended solution with this machine.
2. Do not oversaturate carpet with cleaning solution while
using the machine.
3. For heavily soiled areas, additional applications may be
necessary.
4. Allow plenty of time to dry carpet thoroughly.
5. Wipe cleaning solution from woodwork and wood to
prevent any damage.
6. Try not to walk on carpet until it is completely dry.
Fig.6/1
2. Lift off motor container and remove filter assembly.
Remove the plug from the solution intake port and
replace the solution connector tube. The machine can be
used for washing by placing the clean water tank (A)
back inside the dirty water tank (B) (Fig 6/2).
7. After carpet is thoroughly dry, vacuum the carpet using
a vacuum cleaner with a revolving brushbar.
8. Before cleaning, determine where to start and end,
making sure not to walk over previously cleaned areas.
A
B
Check for colour fastness
Before cleaning carpet, test for colour fastness. Dampen a
white cloth with solution. Test on a small inconspicuous
area prior to washing. Gently rub the cloth over the area.
Check each colour for colour bleeding. If the cloth remains
clean, it should be safe to clean the carpet.
After cleaning
• Allow carpet to dry completely. Try not to walk on the
carpet until it is dry.
• If it is necessary to walk on the carpet, place white
towels on the areas to be walked on.
Fig.6/2
3. Remove Clean Water Tank (A) from inside the Dirty
Water Tank and fill with warm (max 40°C) water to point
indicated on the tank. Add 1 capful of Vax AAA solution
(for carpets) per litre of water (unless otherwise stated on
the bottle) (Fig 6/3).
• If the carpet is not dry and the furniture must be placed
back in the room, use plastic or foil under the furniture to
prevent staining the carpet.
• Thoroughly clean the dirty water tank with warm
(max 40ºC) tap water.
A
Fig.6/3
4. Replace Clean Water Tank (A) inside Dirty Water Tank (B)
taking care to ensure that the space to allow the dirty
water back into the tank is lined up with the Solution Port
(C) (Fig.6/4).
preparing the carpet / getting ready to wash
7
Vax 6121(C) User Guide v1.qxd
19/11/07
15:10
Page 8
www.vax.co.uk
7. Assembly
1. Push solution tube to machine connector (A) firmly into
Solution Port (A1). Twist solution tube connector (A1) a
quarter turn to the right to lock into place (Fig.7/1).
A
B
C
Fig.6/4
A1
A
5. Replace Motor Container (A) ensuring that the Solution
Pump Hose (B) is aligned with the hole in the Clean Water
Tank (C) so that it goes inside when the Motor Container is
clipped back into position (Fig.6/5).
Fig.7/1
A
2. Push hose connector (B) firmly into Hose Connection
Port (B1). Twist to the right until hose connector locks
into place (Fig.7/2).
B
C
B1
B
Fig.6/5
!
WARNING: Machine must not be plugged in
during this stage.
Fig.7/2
3. Push one end of the extension tube into the handle of
the hose (Fig.7/3).
Fig.7/3
4. Wrap Solution Tube (A) around Hose (B). Ensure that
the solution tube is wrapped loosely enough to allow the
solution to flow freely through the tube (Fig.7/4).
8 getting ready to wash / assembly
Vax 6121(C) User Guide v1.qxd
19/11/07
15:10
Page 9
8. Usage
1. Plug in machine to power supply.
B
2. Press the red button to turn on the power.
3. Press the green button to activate the pump.
A
Washing Carpets
1. On the Fibreflow wash head ensure that the rocker
switch (A) is towards the back of the head to allow water
to flow through the head (Fig.8/1).
Fig.7/4
5. After wrapping the tube around the hose, affix
Solution Tube (A) to Hose (B) using Clips provided (C) to
hold it in place (Fig.7/5).
A
A
B
Fig.8/1
C
Fig.7/5
6. Push the second extension tube into the wash head to
be used and push the end of the solution tube onto the
connection port on the Wash Head / Upholstery Tool
(Fig.7/6).
2. In order to help suck up excess water, the rocker switch
(A) can be pushed to the front position on the Fibreflow
was head. This will prevent water flow, allowing excess
water to be removed (Fig.8/2).
A
Fig.8/2
Washing Upholstery
Fig.7/6
1. Detach wash head from the solution tube and
extension tubes.
2. Pull the extension tube out of the handle of the hose.
3. Attach the upholstery wash tool directly onto the
handle of the hose (Fig.8/3) and wrap the excess solution
tube around as necessary.
assembly / usage
9
Vax 6121(C) User Guide v1.qxd
19/11/07
15:10
Page 10
www.vax.co.uk
9. Dust Bag and Filters:
Removal and Replacement
Fig.8/3
!
IMPORTANT: Always unplug the machine from the
electrical output before removing the dust bag.
!
IMPORTANT: Do NOT use the vacuum cleaner
without ALL of the filters in place.
1. Turn off the vacuum cleaner and unplug it from the
mains. Remove the hose. Unclip the retainer clips on
either side of the vacuum cleaner and lift off to gain
access to the dust bag compartment (Fig.9/1).
4. To start water and solution flow, push the collar on the
wash tool forwards
5. To recover excess water and solution, pull the collar
backwards
NOTE: Do not store cleaner with solution in clean
water tank or dirty water in dirty water tank. Mineral
deposits and mildew can form which will affect the
performance of the machine.
Fig.9/1
2. Lift out the full dust bag (Fig.9/2).
Fig.9/2
3. Dispose of the full dust bag and insert a new dust bag
back into the vacuum cleaner aligning the front of the
dust bag with the inlet slots (Fig.9/3).
Fig.9/3
10 usage / dust bag and filters
Vax 6121(C) User Guide v1.qxd
19/11/07
15:10
Page 11
10. Maintenance
IMPORTANT: Ensure that the machine is
switched off and unplugged from the socket
before carrying out any maintenance.
!
Cleaning the Pre-Motor Filter.
1. Remove the motor top from the unit, turn on its side
and remove the float housing in an anti-clockwise
direction to unscrew (Fig.10/1).
Fig.10/3
2. Remove the filter (Fig.10/4) and wash under a tap.
Allow to dry thoroughly before replacing back into the
machine.
Fig.10/1
2. Remove the blue filter (Fig.10/2) and wash under a tap.
Allow to dry thoroughly before replacing back into the
machine. Replace with a new filter as necessary.
Fig.10/4
3. Once dry, put the filter back into the housing and place
back into the machine.
Cleaning the Pleated Pre-Motor Filter Assembly
1. Remove the filter by twisting gently. This will release it
from the motor housing (Fig.10/5).
Fig.10/2
3. Turn the float housing in a clockwise direction until
secure and place the motor top back onto the unit.
Cleaning the Post-Motor Filter
1. Remove the filter housing at the back of the machine
(Fig.10/3).
Fig.10/5
2. Clean by tapping it against the side of a bin or by
brushing gently.
NOTE: Do not wash this filter. Replace every 9-12
months as needed.
maintenance
11
Vax 6121(C) User Guide v1.qxd
19/11/07
15:10
Page 12
www.vax.co.uk
11. Troubleshooting
WARNING: To reduce the risk of personal injury,
! unplug the vacuum cleaner before performing
maintenance or troubleshooting checks.
PROBLEM: The cleaner won't run.
Cause:
Not properly plugged into electrical outlet.
12. Technical Specification
Voltage:
Wattage:
Capacity:
Cord length:
Weight:
220-240V ~50Hz
1300W
Clean water tank - 4 litres
Dirty water tank - 4 litres
7.5m
7.7kg
Solution: Plug in firmly.
Cause:
No electricity in electrical outlet.
Solution: Check fuse or breaker.
Cause:
On/off switch not turned on.
Solution: Push on/off switch to ‘on’.
Cause:
Blown fuse/tripped breaker.
Solution: Reset circuit breaker or replace fuse.
PROBLEM: Cleaner won’t pick up/loss of suction.
Cause:
Dust bag not installed correctly.
Solution: Review dust bag removal and replacement.
Cause:
Dust bag full or blocked.
Solution: Replace dust bag.
Cause:
Clogged filter.
Solution: Remove filter and clean.
Cause:
Blockage in hose.
Solution: Disconnect hose, remove the obstruction
then re-fit.
PROBLEM: Cleaner/accessories won’t pick up.
Cause:
Accessories not connected properly.
Solution: Refer to page 8 for fitting information.
Cause:
The hose is clogged.
Solution: Remove hose and tools. Remove obstruction.
12 troubleshooting / technical specification
Subject to technical change without notice.
Vax 6121(C) User Guide v1.qxd
19/11/07
15:10
Page 13
This page has been left intentionally blank.
technical specification
13
Vax 6121(C) User Guide v1.qxd
19/11/07
15:10
Page 14
www.vax.co.uk
This page has been left intentionally blank.
14
Vax 6121(C) User Guide v1.qxd
19/11/07
15:10
Page 15
This page has been left intentionally blank.
15
Vax 6121(C) User Guide v1.qxd
19/11/07
15:10
Page 16
---
EEC STATEMENT OF COMPLIANCE
Manufacturer/EEC importer: Vax Limited, hereby on our own responsibility, declare that the
product 6121/6121C Multifunction is manufactured in compliance with the following Directives:
Safety: 2006/95/EC Low Voltage Directive
EMC: 2004/108/EC Electromagnetic Compatibility Directive
Waste electrical products should not be disposed of with household waste. Please recycle where
facilities exist. Check with your Local Authority or retailer for recycling advice.
Vax 6121
Описание
ф мл ни
дит
нл н з 2 мин ты
Д т в
в
м
з
нии
з в
ии
Д т в
и
гл
л жб
т чн я
дд ж и
л т
вин и
л т з з любым
д бным
б м
тзывы
ции и
ид и