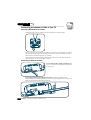
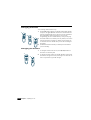
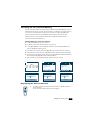
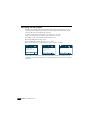
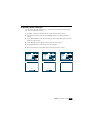
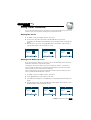
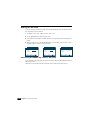
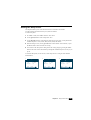
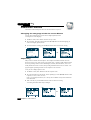
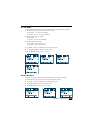
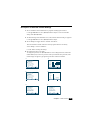
1
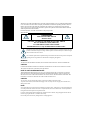
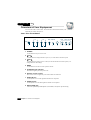
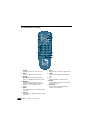
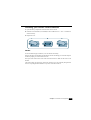
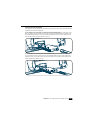
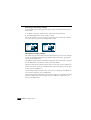
c 1976, 2001 Sanrio Co., Ltd.
13” COLOR TV WITH
REMOTE CONTROL
TV/CATV MODE SELECTION
When shipped from the factory , the TV/CATV menu option is set to
the "CATV"(Cable Television ) mode.
If not using CATV, set this menu option to the "Air" position.
OWNER’S MANUAL
HKTV13
Welcome to the world of the Hello Kitty. My friends at Emerson Radio Corp. are producing this Hello Kitty
Color TV under license from Sanrio Company Ltd. Read this manual before operating this unit to become
familiar with its features and obtain the performance that will bring you continued enjoyment for many
years. In the event you require technical assistance, please call my friends at the Emerson Radio Consumer
Affairs Department at: 800-898-9020.
For future reference, record the serial number in the space provided.
Serial Number:
CAUTION
RISK OF ELECTRIC SHOCK
DO NOT OPEN
CAUTION : TO REDUCE THE RISK OF ELECTRIC SHOCK,
DO NOT REMOVE COVER (OR BACK)
NO USER-SERVICEABLE PARTS INSIDE.
REFER SERVICING TO QUALIFIED SERVICE PERSONNEL.
The lightning flash with arrowhead symbol, within an equilateral triangle, is intended to alert the user to the
presence of uninsulated “dangerous voltage” within the product’s enclosure that may be of sufficient magnitude to constitute a risk electric shock.
The exclamation point within an equilateral triangle is intended to alert the user to the presence of important
operating and servicing instructions in the literature accompanying the appliance.
WARNING
TO PREVENT FIRE OR SHOCK HAZARD, DO NOT EXPOSE THIS APPLIANCE TO RAIN OR MOISTURE.
CAUTION
CHANGES OR MODIFICATIONS NOT EXPRESSLY APPROVED BY THE MANUFACTURER COULD VOID
THE USER’S AUTHORITY TO OPERATE THE EQUIPMENT.
NOTE TO CATV SYSTEM INSTALLER
THIS REMINDER IS PROVIDED TO CALL THE CATV SYSTEM INSTALLER’S ATTENTION TO ARTICLE
820-40 OF THE NEC THAT PROVIDES GUIDELINES FOR PROPER GROUNDING AND, IN PARTICULAR,
SPECIFIES THAT THE CABLE GROUND SHALL BE CONNECTED TO THE GROUNDING SYSTEM OF THE
BUILDING, AS CLOSE TO THE POINT OF CABLE ENTRY AS PRACTICAL.
CAUTION
The AC power cord provided with this product is polarized (one blade wider than the other).
To prevent electrical shock, match wide blade of plug to wide slot, fully insert the AC plug into a standard 120V~,
60Hz polarized outlet.
NOTE
Never connect the plug to an electrical source other than one providing 120V~, 60Hz power. Use only the attached power
cord. If the polarized AC cord does not fit into a non-polarized outlet, do not cut or file the blade. You are responsible for
having the obsolete outlet replaced with a polarized outlet.
If you feel a static discharge when touching the unit, and the unit does not function, simply unplug the unit from the outlet. When you plug the unit back in, it should work normally.
Do not install power cords near any heating element or cooking appliances.
CONTENTS
Table of Contents
Important Safeguards . . . . . . . . . . . . . . . . . . . . . . . . . . . . . . . . . . . . . . . . . . .2
Chapter 1: Overview of Your Equipment . . . . . . . . . . . . . . . . . . . . . . . . . . .4
Your TV's Front Panel . . . . . . . . . . . . . . . . . . . . . . . . . . . . . . . . . . . . . . . . . . . . . . . . . . . . . . . . . . . .4
Your TV's Back Panel . . . . . . . . . . . . . . . . . . . . . . . . . . . . . . . . . . . . . . . . . . . . . . . . . . . . . . . . . . . .5
Your Remote Control . . . . . . . . . . . . . . . . . . . . . . . . . . . . . . . . . . . . . . . . . . . . . . . . . . . . . . . . . . . . .6
Installing your remote control batteries . . . . . . . . . . . . . . . . . . . . . . . . . . . . . . . . . . . . . . . . . . . . . . .7
Notes . . . . . . . . . . . . . . . . . . . . . . . . . . . . . . . . . . . . . . . . . . . . . . . . . . . . . . . . . . . . . . . . . . . . . . . . . .7
Chapter 2: Connecting an Antenna or Cable to Your TV . . . . . . . . . . . . . .8
Connecting an Antenna . . . . . . . . . . . . . . . . . . . . . . . . . . . . . . . . . . . . . . . . . . . . . . . . . . . . . . . . . . .8
Connecting a Cable System . . . . . . . . . . . . . . . . . . . . . . . . . . . . . . . . . . . . . . . . . . . . . . . . . . . . . . . .9
Connecting Other Pieces of Equipment . . . . . . . . . . . . . . . . . . . . . . . . . . . . . . . . . . . . . . . . . . . . .10
Safety Note . . . . . . . . . . . . . . . . . . . . . . . . . . . . . . . . . . . . . . . . . . . . . . . . . . . . . . . . . . . . . . . . . . . .10
Chapter 3: Operating Your TV . . . . . . . . . . . . . . . . . . . . . . . . . . . . . . . . . . .11
Turning your TV On . . . . . . . . . . . . . . . . . . . . . . . . . . . . . . . . . . . . . . . . . . . . . . . . . . . . . . . . . . . .11
Programming Your TV's Channel Memory . . . . . . . . . . . . . . . . . . . . . . . . . . . . . . . . . . . . . . . . . .11
Changing Channels . . . . . . . . . . . . . . . . . . . . . . . . . . . . . . . . . . . . . . . . . . . . . . . . . . . . . . . . . . . . . .12
Changing the Volume . . . . . . . . . . . . . . . . . . . . . . . . . . . . . . . . . . . . . . . . . . . . . . . . . . . . . . . . . . . .12
Changing the TV’s Channel Memory . . . . . . . . . . . . . . . . . . . . . . . . . . . . . . . . . . . . . . . . . . . . . . .13
Adding/Deleting a channel to memory . . . . . . . . . . . . . . . . . . . . . . . . . . . . . . . . . . . . . . . . . . . . .13
Displaying the Current Channel . . . . . . . . . . . . . . . . . . . . . . . . . . . . . . . . . . . . . . . . . . . . . . . . . . .13
Changing the TV’s Input . . . . . . . . . . . . . . . . . . . . . . . . . . . . . . . . . . . . . . . . . . . . . . . . . . . . . . . . .14
Adjusting Video Settings . . . . . . . . . . . . . . . . . . . . . . . . . . . . . . . . . . . . . . . . . . . . . . . . . . . . . . . .15
Returning to the factory settings . . . . . . . . . . . . . . . . . . . . . . . . . . . . . . . . . . . . . . . . . . . . . . . . . . . .16
Descriptions of video settings . . . . . . . . . . . . . . . . . . . . . . . . . . . . . . . . . . . . . . . . . . . . . . . . . . . . . .16
Chapter 4: Using Timer Functions . . . . . . . . . . . . . . . . . . . . . . . . . . . . . . .17
Setting the Clock . . . . . . . . . . . . . . . . . . . . . . . . . . . . . . . . . . . . . . . . . . . . . . . . . . . . . . . . . . . . . . . .17
Setting the Wake-Up Time . . . . . . . . . . . . . . . . . . . . . . . . . . . . . . . . . . . . . . . . . . . . . . . . . . . . . . . .17
Setting the Off Time . . . . . . . . . . . . . . . . . . . . . . . . . . . . . . . . . . . . . . . . . . . . . . . . . . . . . . . . . . . . .18
Canceling the Wake-Up Time or Off Time . . . . . . . . . . . . . . . . . . . . . . . . . . . . . . . . . . . . . . . . . . .18
Setting the Sleep Timer . . . . . . . . . . . . . . . . . . . . . . . . . . . . . . . . . . . . . . . . . . . . . . . . . . . . . . . . . .19
Chapter 5 : Additional Features . . . . . . . . . . . . . . . . . . . . . . . . . . . . . . . . . .20
Changing the Language of the On-Screen Menus . . . . . . . . . . . . . . . . . . . . . . . . . . . . . . . . . . . . . .20
Captioning . . . . . . . . . . . . . . . . . . . . . . . . . . . . . . . . . . . . . . . . . . . . . . . . . . . . . . . . . . . . . . . . . . . . .20
CC on Mute . . . . . . . . . . . . . . . . . . . . . . . . . . . . . . . . . . . . . . . . . . . . . . . . . . . . . . . . . . . . . . . . . . .21
Power Restore . . . . . . . . . . . . . . . . . . . . . . . . . . . . . . . . . . . . . . . . . . . . . . . . . . . . . . . . . . . . . . . . . .21
Parental Control Settings . . . . . . . . . . . . . . . . . . . . . . . . . . . . . . . . . . . . . . . . . . . . . . . . . . . . . . . . .22
Description of Parental Control Settings . . . . . . . . . . . . . . . . . . . . . . . . . . . . . . . . . . . . . . . . . . . . .23
Chapter 6 : Troubleshooting . . . . . . . . . . . . . . . . . . . . . . . . . . . . . . . . . . . .24
Warranty . . . . . . . . . . . . . . . . . . . . . . . . . . . . . . . . . . . . . . . . . . . . . . . . . . . .26
Table of Contents
1
S A F E T Y
IMPORTANT SAFEGUARDS
PLEASE READ ALL THESE INSTRUCTIONS REGARDING YOUR TELEVISION EQUIPMENT AND
RETAIN FOR FUTURE REFERENCE. FOLLOW ALL WARNINGS AND INSTRUCTIONS MARKED
ON THE TV RECEIVER.
1
2
Read all of these instructions.
Save these instructions for later use.
3
Unplug this television equipment from the wall
outlet before cleaning. Do not use liquid cleaners or aerosol cleaners. Use a damp cloth for
cleaning.
4
Do not use attachments not recommended by
the television equipment manufacturer as they
may result in the risk of fire, electric shock or
other personal injury.
5
Do not use this television equipment near
water, for example, near a bathtub, washbowl,
kitchen sink, or laundry tub, in a wet basement,
or near a swimming pool, or the like.
6
Do not place this television equipment on an
unstable cart, stand, or table. The television
equipment may fall, causing serious injury to a
child or adult, and serious damage to the equipment. Use only with a cart or stand recommended by the manufacturer, or sold with the
television equipment. Wall or shelf mounting
should follow the manufacturer's instructions,
and should use a mounting kit approved by the
manufacturer.
6A An appliance and cart combination should be
moved with care. Quick stops, excessive force,
and uneven surfaces may cause the appliance
and cart combination to overturn.
7
Slots and openings in the cabinet and the back
or bottom are provided for ventilation and to
ensure reliable operation of the television
equipment; and to protect it from overheating,
these opening, must not be blocked or covered.
The opening should never be blocked by placing the television equipment on a bed, sofa, rug,
or other similar surface. (This equipment should
never be placed near or over a radiator or heat
register.) This television equipment should not
be placed in a built-in installation such as a
bookcase unless proper ventilation is provided.
8
This television equipment should be operated
only from the type of power source indicated on
the marking label. If you are not sure of the
type of power supplied to your home, consult
your television dealer or local power company.
9
This television equipment is equipped with a
polarized alternating current line plug (a plug
having one blade wider than the other). This
plug will fit into the power outlet only one way.
This is a safety feature. If you are unable to
insert the plug fully into the outlet, try reversing
the plug. If the plug should still fail to fit, contact your electrician to replace your obsolete
outlet. Do not defeat the safety purpose of the
polarized plug.
10 Do not allow anything to rest on the power
cord. Do not locate this television equipment
where the cord will be abused by persons walking on it.
11 Follow all warnings and instructions marked on
the television equipment.
12 For added protection for this television equipment during a lightning storm, or when it is left
unattended and unused for long periods of time,
unplug it from the wall outlet and disconnect
the antenna or cable system. This will prevent
damage to the equipment due to lightning and
power-line surges.
2
Important Safeguards
13 An outside antenna system should not be located in the vicinity of overhead power lines or
other electric light or power circuits, or where it
can fall into such power lines or circuits. When
installing an outside antenna system, extreme
care should be taken to keep from touching such
power lines or circuits as contact with them
might be fatal.
14 Do not overload wall outlets and extension
cords as this can result in fire or electric shock.
15 Never push objects of any kind into this television equipment through openings as they may
touch dangerous voltage points or short-out
parts that could result in a fire or electric shock.
Never spill liquid of any kind on the television
equipment.
16 Do not attempt to service this television equipment yourself as opening or removing covers
may expose you to dangerous voltage or other
hazards. Refer all servicing to qualified service
personnel.
17 Unplug this television equipment from the wall
outlet and refer servicing to qualified service
personnel under the following conditions:
(a) When the power-supply cord or plug is damaged or frayed.
(b) If liquid has been spilled, or objects have fallen into the television equipment.
(f) When the television equipment exhibits a
distinct change in performance - this indicates a need for service.
18 When replacement parts are required, be sure
the service technician has used replacement
parts specified by the manufacturer that have
the same characteristics as the original part.
Unauthorized substitutions may result in fire,
electric shock or other hazards.
19 Upon completion of any service or repairs to
this television equipment, ask the service technician to perform safety checks to determine
that the television is in a safe operating condition.
20 If an outside antenna or cable system is connected to the television receiver, be sure the
antenna or cable system is grounded so as to
provided some protection against voltage
surges and built-up static charges.
Section 810 of the National Electrical Code,
ANSI/NFPA N0.70-1984, provides information
with respect to proper grounding of the mast
and supporting structure, grounding of the
lead-in wire to an antenna discharge unit, size
of grounding conductors, location of
antenna-discharge unit, connection to grounding electrodes, and requirements for the grounding electrode.
(c) If the television equipment has been exposed
to rain or water.
(d) If the television equipment does not operate
normally by following the operating instructions. Adjust only those controls that are covered by the operating instructions as an
improper adjustment of other controls may
result in damage and will often require extensive work by a qualified technician to restore
the TV receiver to its normal operation.
(e) If the television equipment has been
dropped or the cabinet has been damaged.
Important Safeguards
3
CHAPTER
1
Overview of Your Equipment
Your TV comes with a remote control. The section below summarizes the buttons, controls, and terminals that you will use with your TV.
Your TV's Front Panel
CH
VOL
2
3
MENU STAND-BY
VIDEO
AUDIO EAR PHONE
POWER
1
4
5
6
7
8
9
1 POWER
Use this button to turn your TV on or off.
V
2 WCHV
Use these buttons to change channels on your TV, or to select items in the menu system.
B
3 CVOLB
Use these buttons to change your TV's volume, to activate selections in the menu system, or to
change audio and video settings.
4 MENU
Use this button to turn the TV's menu system on and off.
5 STAND-BY(red) indicator
This indicator lights up when the power is off.
6 Remote control receiver
This receiver receives a signal from your remote control. Do not block it.
7 VIDEO IN jack
Use this jack to receive a video signal from another A/V component.
8 AUDIO IN jack
Use this jack to receive an audio signal from another A/V component.
9 EAR PHONE jack
Connect an optional Earphone/Headphone (not included) to this jack for private listening.
4
Chapter 1 : Overview of Your Equipment
Your TV's Back Panel
ANT
VIDEO
AUDIO
1
2
3
1 Antenna terminal(ANT)
Use this terminal to attach an antenna or cable system to your TV.
2 VIDEO IN JACK
This terminal allows the TV to receive a video signal from another component, such as a VCR.
3 AUDIO IN JACK
This terminal allows the TV to receive an audio signal from another component, such as a VCR.
NOTE
VIDEO IN and AUDIO IN on back panel are disconnected when VIDEO IN/AUDIO IN on front
panel is connected.
Chapter 1 : Overview of Your Equipment
5
Your Remote Controls
1. POWER
Use this button to turn your TV on or off.
7. INPUT
Use this button to select TV or VIDEO mode.
2. MUTE
Use to turn the TV's sound on and off.
8. VIDEO
Use this button to display video adjustment
items.
3. VCHW
Use these buttons to change channels on
your TV, or select items in the menu system.
4. CVOLB
Use these buttons to change your TV's
volume, to activate selections in the menu
system, or to change audio and video
settings.
5. MENU
Use this button to turn the TV's menu system
on and off.
6. DISPLAY
Use this button to display the channel number
and status.
6
Chapter 1 : Overview of Your Equipment
9. 0-9
Use these buttons to change channels.
10. SLEEP
Use this button to program the TV to turn off
after a certain time.
11. PREVIOUS
Use this button to return to the previous
channel you were watching.
Installing your remote control batteries
1 Open the battery compartment on the back of the remote control.
2 Install two AA-size batteries (not included) as shown. Make sure the “+” and “-” terminals are
oriented correctly.
3 Replace the cover.
Notes
Do not mix different types of batteries, or mix an old and a new battery.
Remove and replace weak batteries. Weak batteries can leak and damage your controller. Dispose
of batteries properly; never throw them into a fire.
Point your remote at the receiver on the center of the front of the TV. Make sure the receiver is not
blocked.
The remote control can operate up to 30 feet away from the TV, if you are directly facing the front
of the TV. Operating distance diminishes as you move to the sides of the TV.
Chapter 1 : Overview of Your Equipment
7
CHAPTER
2
Connecting an Antenna or Cable to Your TV
Connecting Rod Antenna (included)
Install Rod Antenna on top rear of cabinet and connect other end to the antenna terminal.
Your TV will provide you with the best performance if you connect it to an external antenna or cable system. Follow the directions below make this connection. Please note that you will normally only have to
make one of the connections shown below, not all of them.
All connections will be made to the antenna terminal on the back of your TV. For help in locating the
antenna terminal, see “Your TV's Back Panel” on page 5.
Connecting an External Antenna
If your antenna ends in a single coaxial lead, simply
press or screw the cable onto the antenna terminal on the
back of your TV.
If your antenna ends in a pair of 300 ohm twin leads, you must use a 300-ohm/75-ohm
adapter(included). Place the leads underneath the screws on the adapter, tighten the screws, then press the
adapter onto the antenna terminal on the back of the TV.
8
Chapter 2 : Connecting an Antenna or Cable to Your TV
Antennas with two sets of leads
You might have two sets of leads from your antenna system, especially if you have one antenna for VHF
signals and one antenna for UHF signals.
If your antenna system has both a coaxial lead and twin 300-ohm leads, you must obtain a combiner (available at your local electronics store). Press or screw the coaxial lead onto the combiner; place
the twin leads underneath the screws on the combiner and tighten the screws. Press the cable from combiner onto the antenna terminal on the back of your TV.
If your antenna system has two sets of twin 300-ohm leads, you must obtain a combiner (available
at your local electronics store). Place one set of twin leads underneath the screws on the combiner and
tighten the screws. Do the same with the other set of twin leads. Press the cable from the combiner onto
antenna terminal on the back of your TV.
Chapter 2 : Connecting an Antenna or Cable to Your TV
9
If your cable system requires you to use a converter box for all channels, connect the incoming
cable to the IN terminal on the converter box. Connect another cable between the OUT terminal on
the converter box and the antenna terminal on the TV. You will need to keep your TV tuned to
channel 3 or 4 and change channels using the converter box.
If your cable system only requires you to use a converter box for some channels (i. e. pay-TV
channels),follow these steps: Find the primary incoming coaxial cable. Plug this cable into a splitter
(available at your local electronics store). Connect one coaxial cable between one OUT terminal on
the splitter and the IN terminal on the converter box. Connect another coaxial cable between the
other OUT terminal on the splitter and the B-IN terminal on an A/B switch (available at your local
electronics store.) Connect a third coaxial cable between the OUT terminal on the converter box and
the A-IN terminal on the A/B switch. Finally, connect a coaxial cable between the OUT terminal on
the A/B switch and the antenna terminal on the back of your TV.
When the A/B switch is in the A position, you need to change channels on the converter box (and
your TV should be tuned to channel 3 or 4); when the A/B switch is in the B position you can
change channels on the TV.
Connecting Other Pieces of Equipment
You may want to connect a VCR, laser disc player, satellite receiver, or another type of equipment
to your TV. We recommend that you follow the instructions included with the piece of equipment
you wish to connect.
Safety Note
If you plan on being away from your home for an extended period of time, or if a thunderstorm is
approaching, you should unplug your television, and you may wish to disconnect your TV from a
rooftop or satellite antenna. You do not need to disconnect your TV from a cable system.
10
Chapter 2 : Connecting an Antenna or Cable to Your TV
CHAPTER
3
Operating Your TV
Once you have connected your TV to an antenna or cable system, plugged the TV in, and put batteries in the remote, you are ready to use the TV. The first thing you should do is program your TV so
it memorizes all of available channels.
Turning Your TV On
1 To turn your TV on, press the POWER button on the remote control. You
can also use the POWER button on the front panel. Make sure your TV is
plugged in before you try to turn it on.
Programming Your TV's Channel Memory
Your TV's memory determines the channels that are available using the VCHW buttons. If a channel is not in memory, you can tune to it with the number buttons, but not with the VCHW buttons.
Follow these steps to program your TV's memory:
1 With the TV on, press the Menu button, then “MENU” screen will be displayed as follows.
2
1
3
Set-Up
MENU
05
VIDEO
SETUP
TIME
SPECIAL
Language :
English
Reception :
Air
Memorize Channels
Add/Delete Channels
Input :
TV
Select
Adjust
Next
Use CVOLB and VCHW buttons to select “SETUP”, then “Set-up” menu will Appear.
2 Use the VCHW buttons to select “Reception”, then use the CVOLB buttons to select ‘Air’ or
‘Cable’. If you connected an antenna to your TV, select ‘Air’; If you connected a cable system,
select ‘Cable’.
3 Use the VCHW buttons to select “Memorize Channels”, then use the CVOLB buttons to enter
the “Memorize Channels” process. Again press the CVOLB buttons to begin.
After your TV finishes memorizing the channel, it will return to normal TV viewing.
4 Press the MENU button to return to Set-Up menu.
Your TV's channel memory will not be affected by a power outage. You will not need to re-program
the memory unless you change the type of cable or antenna connected to your TV.
Chapter 3 : Operating Your TV
11
Changing Channels
You can change channels in three ways:
1
1
The VCHW buttons will take you through all memorized channels,
one by one. The VCHW buttons will not access channels that have
not been programmed into the TV's memory. For more information
about programming channels into memory, see the section
“Programming your TV's Channel Memory” on the previous page.
2
The number buttons (0-9) will take you to any channel, even if it has
not been memorized. To change to a channel, enter its number; the
TV will tune to the new channel when you enter the second digit of
the channel.
3
The PREVIOUS button will take you instantly to the last channel
you were watching.
2
3
Changing the Volume
1
2
12
Chapter 3 : Operating Your TV
1
To change the volume of the TV set, use the CVOLB buttons on
the remote or on the front panel.
2
To quickly turn off the sound, press the MUTE button on the remote.
The ‘MUTE’ will appear on screen, colored green. To return the volume to its previous level, press MUTE again.
Changing the TV's Channel Memory
Your TV's memory determines the channels that are available using the VCHW buttons. You can
add channels to this memory or remove them from memory. If a channel is removed from memory,
you can tune to it with the number buttons, but you cannot tune to it with the VCHW buttons.
If just one channel is memorized, the Add/Delete Channels function will search the whole
channels. But if two or more channels are memorized, the Add/Delete Channels function
will search the memorized channels only.
Adding/Deleting a channel to memory
1 Use the number buttons to tune to the channel.
2 On "MENU" mode, select "SETUP" and enter "Set-Up" menu.
3 Use the VCHW buttons to select “Add/Delete Channels”, then use the CVOLB buttons to
enter the “Add/Delete Channels” process.
4 If the channel is not in memory, then use the CVOLB buttons to add the channel from memory.
5 If the channel is in memory, then use the CVOLB buttons to delete the channel from memory.
6 If you are going to delete other channels, then press the VCHW buttons until desired channel is
selected, and press the CVOLB buttons to delete the channel.
7 Wait 10 seconds, or press the MENU button to return to normal TV viewing.
1
2
3
Set-Up
MENU
VIDEO
SETUP
TIME
Set-Up
Language :
English
Reception :
Air
Memorize Channels
Add/Delete Channels
Input :
TV
SPECIAL
Select
4
Adjust
Air 11
This channel is not in memory.
Press VOL
to add.
Press CH for other channels.
Press MENU to return
to Set-Up menu.
Select
Next
Adjust
Next
6
5
Add/Delete Channels
Language :
English
Reception :
Air
Memorize Channels
Add/Delete Channels
Input :
TV
Add/Delete Channels
Air 11
This channel is in memory.
Press VOL
to delete.
Press CH for other channels.
Press MENU to return
to Set-Up menu.
Add/Delete Channels
Air 25
This channel is in memory.
Press VOL
to delete.
Press CH for other channels.
Press MENU to return
to Set-Up menu.
Displaying the Current Channel
1
To quickly see the current channel number and status, press DISPLAY button on
the remote control.
The current channel number and status will be displayed.
Chapter 3 : Operating Your TV
13
Changing the TV's Input
Normally, your TV displays the signal coming through the antenna terminal. However, If you’ve
connected another component to your TV(such as a VCR) using the Video/Audio input, you will
want to be able to view the signal from the component.
To do this, you will need to switch from the ‘TV’ input to the ‘ Line ‘ Input.
Simply press "INPUT" button on remote control. Or follow steps as below.
1 On "MENU" mode, select "SETUP" and enter "Set-Up" menu.
2 Use the VCHW buttons to select “ Input “.
3 Press the CVOLB buttons to change from ‘TV’ to ‘ Line ‘.
4 Wait 10 seconds, or press the MENU button to return to normal TV viewing.
1
2
Set-Up
Language :
English
Reception :
Air
Memorize Channels
Add/Delete Channels
Input :
TV
Select
3
Set-Up
Adjust
Next
Set-Up
Language :
English
Reception :
Air
Memorize Channels
Add/Delete Channels
Input :
TV
Select
Adjust
Next
Language :
Input :
Select
English
Line
Adjust
Next
If two separate AV components are connected at front and rear VIDEO IN/AUDIO IN jacks, the
"SOURCE" from front inputs takes priority. To operate through rear input, make sure to disconnect
front inputs.
14
Chapter 3 : Operating Your TV
Adjusting Video Settings
You may wish to adjust the video settings (e. g. contrast or color) to obtain the most pleasing picture. To do so, follow these directions:
1 On "MENU" mode, select "VIDEO" and enter "Video" menu for picture controls.
2 The “Settings” item will be selected. Use the CVOLB buttons to turn Settings to Preset or
Custom.
3 Use the VCHW buttons to select the video setting you wish to adjust. Descriptions of the video
settings are on the next page.
4 Use the CVOLB buttons to adjust the video setting to the level you prefer.
5 Use the VCHW buttons to select another video setting to adjust.
6 When you are finished, press the MENU button to return to normal TV viewing.
1
3
2
Video
Settings :
Contrast
Brightness
Sharpness
Color
Tint
Select
Video
Video
Custom
Adjust
4
Settings :
Contrast
Brightness
Sharpness
Color
Tint
Next
Select
Adjust
5
Contrast
Settings :
Contrast
Brightness
Sharpness
Color
Tint
Preset
Select
Next
Preset
Adjust
Next
6
Brightness
Chapter 3 : Operating Your TV
15
Returning to the factory settings
If you would like to return to the original video settings, as they were calibrated at the factory, follow these steps :
1 On "MENU" mode, select "VIDEO" and enter "Video" menu for picture controls.
2 Press the CVOLB buttons to set the “Settings” to ‘Preset’.
The TV will remember the ‘Custom’ settings you had previously chosen. When you set “Settings”
to ‘Custom’ again, your previous custom settings will be restored.
1
2
Video
Video
Settings :
Contrast
Brightness
Sharpness
Color
Tint
Select
Custom
Adjust
Next
Settings :
Contrast
Brightness
Sharpness
Color
Tint
Select
Preset
Adjust
Next
Descriptions of video settings
The contrast setting controls the relation between the light and black areas of the screen. If the light
areas are too bright and are losing details, press the CVOL button; if the picture is gray and lacks
contrast, press the VOLB button.
The brightness settings controls the overall amount of light in the picture. If the picture is too bright,
press the CVOL button; if the picture is too dark, press the VOL B button.
Sharpness controls how the TV displays edges of objects on-screen. If the TV shows multiple vertical lines at the edges of an object, press the CVOL button; if the vertical edges of on-screen objects
are fuzzy, press the VOLB button.
The color setting controls the intensity of color. If the color is over-saturated, press the CVOL button; if the color is washed out, press the VOLB button.
The tint setting controls the relationship of red and green in a picture. Tint is especially noticeable in
flesh tones. If flesh tones seem too red or purple, press the VOLB button; if flesh tones are too
green, press the CVOL button.
16
Chapter 3 : Operating Your TV
CHAPTER
4
Using Timer Functions
Your TV has a built in-clock, and you can set the TV to turn on and off at times that you select. You
can also set your TV to turn off after counting down a certain amount of time.
Setting the Clock
1 On "MENU" mode, select "TIME" and enter "Time" menu.
2 The “Set Clock” item will be selected. Press the CVOLB buttons to set the clock.
If you hold down either CVOL or VOLB button, the corresponding numbers will change more
quickly.
3 When the clock is set correctly, use the VCHW buttons to select another “Time” function, or
press the MENU button to return to normal TV viewing.
1
3
2
Time
Time
Set Clock :
Wake-Up time :
Off time :
Sleep Timer :
Select
:
:
:
0 min
Adjust
Time
Set Clock :
Wake-Up time :
Off time :
Sleep Timer :
Next
Select
1 2 : 00 AM
:
:
0 min
Adjust
Set Clock :
Wake-Up time :
Off time :
Sleep Timer :
Next
Select
1 2 : 00 AM
:
:
0 min
Adjust
Next
Settings the Wake-Up Time
If you enter a time in the “Wake-Up time” setting, your TV will automatically turn on at that time.
Follow these instructions to set the “Wake-Up time”.
After Wake-up Timer turns on the TV set, if you do not touch any controls (e.g. remote CH or
VOL key) within 15 minutes, the TV set will turn off automatically. If you do touch any control
within 15 minutes, the TV set will remain on continuously.
This is a safety feature. If you forget to cancel the alarm and the TV turns on while you are not at
home, it will shut off automatically after 15 minutes.
1 On "MENU" mode, select "TIME" and enter "Time" menu.
2 Use the VCHW buttons to select “Wake-Up time” item.
3 If you hold down either CVOL or VOLB button, the corresponding numbers will change more
quickly.
4 When the setting is correct, use the VCHW buttons to select another “Time” function, or press
the MENU button to return to normal TV viewing.
1
3
2
Time
Set Clock :
Wake-Up time :
Off time :
Sleep Timer :
Select
Time
Time
12 : 00 AM
:
:
0 min
Adjust
Next
Set Clock :
Wake-Up time :
Off time :
Sleep Timer :
Select
Set Clock :
Wake-Up time :
Off time :
Sleep Timer :
12 : 00 AM
:
:
0 min
Adjust
Next
Select
12 : 00 AM
06 : 30 AM
:
0 min
Adjust
Chapter 4: Using Timer Functions
Next
17
Setting the Off Time
If you enter a time in the “Off time” setting, your TV will automatically turn off at that time. Follow
these instructions to set the “Off time”.
1 On "MENU" mode, select "TIME" and enter "Time" menu.
2 Use the VCHW buttons to select “Off time” item.
3 If you hold down either CVOL or VOLB button, the corresponding numbers will change more
quickly.
4 When the setting is correct, use the VCHW buttons to select another “Time” function, or press
the MENU button to return to normal TV viewing.
1
3
2
Time
Set Clock :
Wake-Up time :
Off time :
Sleep Timer :
Select
Time
Time
12 : 00 AM
06 : 30 AM
:
0 min
Adjust
Next
Set Clock :
Wake-Up time :
Off time :
Sleep Timer :
Select
12 : 00 AM
06 : 30 AM
:
0 min
Adjust
Next
Set Clock :
Wake-Up time :
Off time :
Sleep Timer :
Select
12 : 00 AM
06 : 30 AM
11 : 30 AM
0 min
Adjust
Next
Canceling the Wake-Up Time or Off Time
If you would like to cancel the Wake-up Time or the Off Time, Press the CVOLB buttons until the
time settings return to “- -:- -”.
The Wake-Up Time and Off Time will not function correctly unless the clock has been set.
18
Chapter 4 : Using Timer Functions
Setting the Sleep Timer
The sleep timer allows you to set an amount of time from 15 minutes to 120 minutes.
TV will count down the amount of time you set, then turn itself off.
To set the sleep timer:
1 On "MENU" mode, select "TIME" and enter "Time" menu.
2 Use the VCHW buttons to select “Sleep Timer” item.
3 Use the CVOLB buttons to set the sleep time. Each time you press VOL, you step between the
available sleep times : 15min, 30min, 45min, 60min, 90min, and 120min.
4 When the setting is correct, use the VCHW buttons to select another “Time” function, or press
the MENU button to return to normal TV viewing.
5 You can also set the “Sleep Timer” during normal TV viewing, simply by pressing the SLEEP
button on the remote control. This button steps through the available sleep times (see step 3), one
by one.
To cancel the Sleep timer, turn the TV off, or set the sleep time to “0” using one of the methods
described above.
1
3
2
Time
Set Clock :
Wake-Up time :
Off time :
Sleep Timer :
Select
Time
Time
12 : 00 AM
06 : 30 AM
11 : 30 AM
0 min
Adjust
Next
Set Clock :
Wake-Up time :
Off time :
Sleep Timer :
Select
12 : 00 AM
06 : 30 AM
11 : 30 AM
0 min
Adjust
Next
Set Clock :
Wake-Up time :
Off time :
Sleep Timer :
Select
12 : 00 AM
06 : 30 AM
11 : 30 AM
0 min
Adjust
Chapter 4 : Using Timer Functions
Next
19
CHAPTER
5
Additional Features
This section contains descriptions of the more advanced features of your TV.
Changing the Language of the On-screen Menus
You can choose to display the on-screen menus in English, Spanish, French.
To change the on-screen language:
1 On"MENU" mode, select "SETUP" and enter "Set-Up" menu.
2 The “Language” item will be selected. Press the CVOLB buttons to select the language you
want to use: English, Spanish, French.
3 To return normal TV viewing, press the MENU button to return to normal TV viewing.
1
Set-Up
Language :
English
Reception :
Air
Memorize Channels
Add/Delete Channels
Input :
TV
Select
Adjust
or
Next
Captioning
Many TV shows contains “Closed Captions”. These captions are hidden words that can be displayed on your TV screen. There are two types of these words : “captions” usually follow the action
on-screen, providing a written version of the dialogue, narration, and sound effects ; “text” is not
usually related to the action on-screen, often providing information such as news or weather. A TV
program might be providing more than one set of captions or one set of text.
To set your TV to display captions or text.
1 On "MENU" mode, select "SPECIAL" and enter "Special" menu.
2 The “Closed Caption” item be selected. To turn captioning on, use the CVOLB buttons to select
Captions (C1 or C2) or Text (T1 or T2).
Only C1 is commonly used and C2, T1 or T2 may not be available. Check your local station for
more information.
3 Wait 10 seconds, or press the MENU button to return to normal TV viewing.
Your setting will remain intact until you change it.
or
20
Chapter 5 : Additional Features
CC on Mute
You can choose following caption mode with combination of Closed Caption and CC on Mute.
1 Closed Caption is always on whether sound is ON or OFF.
Closed Caption : C1 (C2/T1/T2, if available)
CC on Mute : off or C1 (C2/T1/T2, if available)
2 Closed Caption is on, only in Mute.
Closed Caption : off
CC on Mute : C1 (C2/T1/T2, if available)
3 Closed Caption is always OFF.
Closed Caption : off , CC on Mute : off
To select item 2, follow steps as below.
1 On "MENU" mode, select "SPECIAL" and enter "Special" menu.
2 Use the VCHW buttons to select “CC on Mute” item.
3 Use the CVOLB buttons to select “C1” or “C2”.
or
Power Restore
When TV is connected to the outlet which is controlled by the wall switch or a cable box
AC outlet with switch, the power can be turned on by turning those switches.
1 On "MENU" mode, select "SPECIAL" and enter "Special" menu.
2 Use the VCHW buttons select “Power Restore” item.
3 Use the CVOLB buttons to select “On” or “Off”.
Chapter 5 : Additional Features
21
Parental Control Settings
This item helps parents to set the standard for the programs which their children are going to watch.
1 On "MENU" mode, select "SPECIAL" and enter "Special" menu.
2 Use the VCHW buttons to select “Parental Control” item.
3 Use the CVOLB buttons to enter into “Parental Control” settings.
4 The initial password is set at “0000”.
To change the password, use the number buttons(0-9) to enter your password, then “Parental
Control” menu will be displayed. If this is the first time you are using your “Parental Control”
menu, after entering your password you have to remember it.
5 The Parental Lock feature will be selected. Use the CVOLB buttons to toggle “On” or “Off”.
6 Use the VCHW buttons to select the Parental Control settings you wish to adjust.
Descriptions of the Parental Control settings are on the next page.
7 Use the CVOLB buttons to adjust the Parental Control settings.
8 Use the MENU button to return to the one level up menu.
1-1
Enter a new Password
Repeat the Password
----
####
0-9 : Adjust
1-2
Parental Control
Parental Lock : On
TV Guidelines
Movie Ratings
No Rating : Unblock
Ext. Source : Unblock
Change Password
Select
22
Adjust
Prev.
Chapter 5 : Additional Features
Prev.
0-9 : Adjust
Prev.
Description of Parental Control Settings
1. The TV Guidelines set the standard for TV programs excluding sports and news.
Use the VCHW buttons to select, CVOLB buttons to adjust. You can set individual
settings with CVOLB buttons.
2. The Movie Ratings set the standard for movie, video, and other media excluding TV programs.
Use the VCHW buttons to select, CVOLB buttons to adjust.
3. The No Rating item toggles between “Unblock” and “Block”.
This item determines whether to block or not the programs which are not rated by
“Movie Ratings ” and “TV Guidelines”.
Use VOL buttons to change the settings.
4. The initial password is set at "0000".
To change the password, use CVOLB buttons to select "Change Password", and use the
number buttons(0-9) to enter new password. After you entered the new password, confirmation display will appear. Type again the password to confirm new number.
1-2
Rating
1-1
Parental Control
Parental Lock : On
TV Guidelines
Movie Ratings
No Rating : Unblock
Ext. Source : Unblock
Change Password
Select
Adjust
Select
Prev.
2-1
Parental Control
Adjust
Prev.
Prev.
Select
[
: Block]
Adjust
Prev.
4
Parental Control
Parental Lock : On
TV Guidelines
Movie Ratings
No Rating : Unblock
Ext. Source : Unblock
Change Password
Adjust
: Block]
X
NC-17
R
PG-13
PG
G
NR
3-1
Parental Control
Select
[
Adjust
2-2
Parental Lock : On
TV Guidelines
Movie Ratings
No Rating : Unblock
Ext. Source : Unblock
Change Password
Select
All FV D L S V
TV-MA
TV-14
TV-PG
TV-G
TV-Y7
TV-Y
Parental Lock : On
TV Guidelines
Movie Ratings
No Rating : Unblock
Ext. Source : Unblock
Change Password
Prev.
Select
Adjust
Prev.
Chapter 5 : Additional Features
23
CHAPTER
6
Troubleshooting
Your Hello Kitty television is designed to give you trouble-free performance for many years.
If you have a problem with your TV, try the solutions listed below.
If the suggestions listed below do not solve your problem, contact your Emerson dealer or an
autho-rized Emerson service center.
There is no picture or sound, or the TV dosen't turn on.
• Make sure the TV is plugged in.
• Make sure the MUTE is not set.
• Make sure the power is on.
• If there is neither picture or sound, unplug the TV for 30 seconds, then plug it in and try again.
There is no picture or sound on some UHF channels.
• Try another station. If the other stations are OK, it may be a station problem.
• Check that the antenna is connected, is in good working order, has no broken wires, and is adjusted correctly.
• See if anything is interfering with the antenna signal.
• Make sure the AIR/CABLE setting is correct.
The sound is OK, but the picture is poor.
• Try another station. If the other stations are OK, it may be a station problem.
• Check that the antenna is connected and is in good working order, has no broken wires, and is
adjusted correctly.
The picture is OK, but the sound is poor.
• Try another station. If the other stations are OK, it may be a station problem.
• Check that the antenna is connected, is in good working order, has no broken wires, and adjusted
correctly.
There is poor reception on some channels.
• Try another station. If the other stations are OK, it may be a station problem.
• Check that the antenna is connected, is in good working order, has no broken wires, and is adjusted correctly.
You cannot tune to a cable channel.
• Make sure the AIR/CABLE setting is correct.
• The channel may not be programmed into memory.
The picture rolls, slants, shows lines, is grainy, has poor color, or has ghosts.
• Try another station. If the other station are OK, it may be a station problem.
• Check that the antenna is connected, is in good working order, has no broken wires, and is adjusted correctly.
• See of anything is interfering with the antenna signal.
The remote control does not work.
• Make sure the TV is plugged in.
• Make sure there are fresh batteries in the remote control.
• Make sure there is nothing blocking the remote control signal.
24
Chapter 6 :
Troubleshooting
Cleaning the unit
• To prevent fire or shock hazard, disconnect your unit from the AC power source when cleaning
• If the cabinet becomes dusty wipe it with a soft dry dust cloth. Do not use any wax or polish
sprays on the cabinet.
• If the cabinet becomes dirty or smudged with fingerprints it may be cleaned with a soft cloth
slightly dampened with a mild soap and water solution and wrung dry. Never use abrasive cloths
or polishes as these will mar the finish of your unit.
Caution
Never allow any water or other liquids to get inside the unit while cleaning.
SERVICE
TO FIND THE LOCATION AND PHONE
NUMBER OF YOUR NEAREST SERVICE
CENTER PERMITTED TO PERFORM
WARRANTY...
CALL TOLL FREE: 1-800-695-0098
FOR ADDITIONAL SET-UP OR OPERATING ASSISTANCE
PLEASE CALL
1-800-898-9020
FOR CUSTOMER SERVICE PLEASE WRITE TO:
Emerson Radio Corp.
Consumer Affairs Dept.
1901 Diplomat Drive,
Farmers Branch, TX 75234
Chapter 6 :
Troubleshooting
25
WARRANTY
EMERSON RADIO CORP.
HELLO KITTY – MODEL HKTV13
LIMITED WARRANTY
What does this warranty cover? Any manufacturing defects in original material, including original parts and
workmanship, under normal use and conditions.
For how long? One year parts and labor from date of original purchase. Two years on picture tube.
What will we do? If you need service under this warranty, and you provide us with the dated proof of purchase, we
will provide repair service at no charge for labor and parts at an authorized Depot Repair Facility, or replace the product
in our discretion.
How do you make your warranty claim? If it becomes necessary to repair your unit, you can obtain the name and
mailing location of a Depot Repair Facility by dialing 1-800-695-0098. You should pack your unit in a well-padded
heavy corrugated box, enclose your check or money order payable to the Depot Repair Facility in the amount of $9.00 to
cover the return shipping and handling costs, and enclose a copy of your proof of purchase (warranty service will not be
provided without a dated proof of purchase). Finally, you should ship the unit prepaid via UPS or parcel post (insured).
What does your warranty not cover? Your warranty does not cover the following:
Damage from negligence, misuse, abuse, accident, or failure to follow operating instructions.
Use of product in a commercial application or rentals.
Changes or repairs by anyone other than an authorized Depot Repair Facility.
Damage because your unit is improperly connected to the equipment of other manufacturers.
Units on which the serial number has been defaced, modified or removed.
Damage to equipment not properly connected to the product.
Cost incurred in shipping your unit to and from an authorized Depot Repair Facility.
Ordinary adjustments which you can perform as outlined in the owner’s manual.
Signal reception problems caused by external antenna or cable systems.
Products purchased, used, serviced or damaged outside of the United States.
What other limitations apply to your warranty?
THIS WARRANTY IS NON-TRANSFERABLE AND APPLIES ONLY TO THE ORIGINAL PURCHASER AND
DOES NOT EXTEND TO SUBSEQUENT OWNERS OF THE PRODUCT. THIS WARRANTY IS VALID ONLY IN
THE UNITED STATES OF AMERICA. ANY APPLICABLE IMPLIED WARRANTIES, INCLUDING THE WARRANTY OF MERCHANTABILITY, ARE LIMITED IN DURATION TO A PERIOD OF THE EXPRESSED WARRANTY AS PROVIDED ABOVE BEGINNING WITH THE DATE OF ORIGINAL PURCHASE AT RETAIL AND
NO WARRANTIES, WHETHER EXPRESSED OR IMPLIED, SHALL APPLY TO THE PRODUCT THEREAFTER.
WE MAKE NO WARRANTY AS TO THE FITNESS OF THE PRODUCT FOR ANY PARTICULAR PURPOSE OR
USE.
THE EXTENT OF OUR LIABILITY UNDER THIS LIMITED WARRANTY IS THE REPAIR OR REPLACEMENT
PROVIDED ABOVE AND IN NO EVENT WILL OUR LIABILITY EXCEED THE PURCHASE PRICE PAID BY
THE PURCHASER OF THE PRODUCT. UNDER NO CIRCUMSTANCES WILL WE BE LIABLE FOR ANY LOSS,
DIRECT, INDIRECT, INCIDENTAL, SPECIAL, OR CONSEQUENTIAL DAMAGE ARISING OUT OF OR IN
CONNECTION WITH THE USE OF THIS PRODUCT.
How does state law apply to your warranty?
THIS WARRANTY GIVES YOU SPECIFIC LEGAL RIGHTS, BUT YOU MAY ALSO HAVE OTHER RIGHTS
WHICH VARY FROM STATE TO STATE. SOME STATES DO NOT ALLOW LIMITATIONS ON IMPLIED
WARRANTIES OR EXCLUSION OR LIMITATION OF INCIDENTAL OR CONSEQUENTIAL DAMAGE, SO
THESE RESTRICTIONS MAY NOT APPLY TO YOU.
TV130
26
Warranty
EMERSON RADIO CORP.
EMERSON
Part No. 21-2021
108-01
800.898.9020
Printed in Korea