1
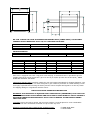
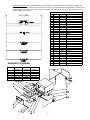
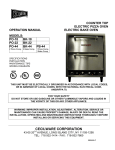
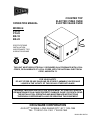
OPERATION MANUAL
COUNTER TOP
ELECTRIC PIZZA OVEN
ELECTRIC BAKE OVEN
MODELS:
PO-18
PO-22
BK-18
BK-22
SPECIFICATIONS
INSTALLATION
MAINTENANCE TIPS
WIRING DIAGRAMS
LISTED
NSF
THIS UNIT MUST BE ELECTRICALLY GROUNDED IN ACCORDANCE WITH LOCAL
CODES, OR IN ABSENCE OF LOCAL CODES, WITH THE NATIONAL ELECTRICAL
CODE, ANSI/NFPA 70.
FOR YOUR SAFETY
DO NOT STORE OR USE GASOLINE OR OTHER FLAMMABLE VAPORS AND
LIQUIDS IN THE VICINITY OF THIS OR ANY OTHER APPLIANCE.
WARNING: IMPROPER INSTALLATION, ADJUSTMENT, ALTERATION, SERVICE
OR MAINTENANCE CAN CAUSE PROPERTY DAMAGE, INJURY OR DEATH. READ
THE INSTALLATION, OPERATING AND MAINTENANCE INSTRUCTIONS
THOROUGHLY BEFORE INSTALLING OR SERVICING THIS EQUIPMENT.
CECILWARE CORPORATION
TH
43-05 20
AVENUE, LONG ISLAND CITY, NY 11105-1295
TEL: 718 932-1414 · FAX: 718-932-7860
NH94A-B 01/06 DH
BK-18 & 22 HAVE ONLY ONE STANDARD STEEL BAKING DECK (LOWER SHELF) OR OPTIONAL
CERAMIC HEARTH BAKE DECK AS PO-18/22. OVENS ARE STACKABLE.
UNIT
PO-18, BK-18
PO-22, BK-22
SHIPPING WEIGHT:
PO-18
138 lbs.
UNIT
PO-18
PO-18
PO-22
BK-18
BK-18
BK-22
A
22.5”
25.5”
B
23.5”
26.5”
C
18.25”
21.0”
PO-22
145 lbs.
BK-18
116 lbs.
BK-22
123 lbs.
ELECTRICAL SPECIFICATIONS
VOLTAGE
AMPS
TOTAL LOAD
120 VAC
15.0 A
1800 W
220 VAC
13.0 A
2850 W
220 VAC
16.4 A
3600 W
120 VAC
14.2 A
1700 W
220 VAC
8.5 A
1850 W
220 VAC
10.0 A
2200 W
TYPE OF CONNECTION
USA
CANADA
NEMA 5-15P
NEMA 5-20P
NEMA 6-15P
NEMA 6-20P
NEMA 6-20P
NEMA 6-30P
NEMA 5-15P
NEMA 5-20P
NEMA 6-15P
NEMA 6-20P
NEMA 6-15P
NEMA 6-15P
Each oven is equipped with a 6 ft. long power cord and plug. A mechanical timer is provided to give an
audible signal at the end of preset time (up to 15 min for po-18/22 up to 60 min for BK-18/22). TIMER
DOES NOT CONTROL THE OVEN.
UNPACKING INSTRUCTION: Carefully unpack the oven and inspect immediately for shipping damages. Your
counter top oven was shipped in a carton designed to give maximum protection in normal handling. It was
thoroughly inspected before leaving the factory and the carrier accepted and signed for it. File any claims
for shipping damage or irregularities with the carrier.
INSTALLATION AND OPERATING INSTRUCTION
WARNING: THIS APPLIANCE IS EQUIPPED WITH THREE-PRONG (GROUNDING) PLUG FOR YOUR
PROTECTION AGAINST SHOCK HAZARD AND SHOULD BE PLUGGED DIRECTLY INTO A PROPERLY
GROUNDED THREE-PRONG RECEPTACLE. DO NOT CUT OR REMOVE THE GROUNDING PRONG
FROM THIS PLUG.
LOCATION: Due to the heat a counter top oven may produce, it must be placed on a non-combustible
surface. Do not store combustible materials on top or under any oven.
MINIMUM CLEARANCE FROM COMBUSTIBLE CONSTRUCTION:
2
3” FROM REAR WALL
3” FROM SIDES
INSTALLATION: The unit may be directly placed on counter. Make sure the counter is level. Clear the
counter area where the unit is to be installed. Place the unit in position on the counter and mark the outline
of the unit. Remove unit and apply sealer (Dow Corning RTV 732 Multipurpose Sealant or its equivalent) on
the counter. Place the unit in position (over the sealer). Make sure that the edges on the unit are sealed
with a heavy bead. Wipe clean any excess sealer.
OPTIONAL LEGS: 4” optional legs are available. To install legs follow these steps:
•
Place the unit on a counter or a flat surface
•
Tilt unit carefully onto its back
•
Screw legs into the bottom of the unit in holes provided
•
Carefully tilt oven up onto the legs and adjust the bottom of the legs to level the unit
INITIAL START UP: After the electrical connections have been made, your oven will need approximately 2
to 3 hours to burn off. The following steps must be completed before your new oven is ready to use.
•
•
•
•
Place the oven in a well-ventilated area.
Open the door and remove any instructions or samples shipped with the unit. Make sure the oven
cavity is empty and the baking decks are properly installed.
With the oven door open, turn the temperature knob to 400°F for 1 hour.
Close the oven door. Increase the temperature to 500°F for at least 1½ hour.
This procedure will dry out the insulation and deck material and will help to insure best baking results.
CAUTION: OVEREXPOSURE TO SMOKE OR FUMES MAY CAUSE NAUSEA AND DIZZINESS.
PIZZA BAKING: Only pizza and bread products can be baked with direct contact with oven decks.
All other products must be placed in pans. Your CECILWARE counter top pizza oven has been designed
to bake pre-baked crusts with ease. The temperature range for pizza baking is usually higher than for
general baking. Pizza should cook at approximately 500°F to 575°F depending on the individual product.
Allow the pizza to bake until the cheese bubbles and bottoms are brown. Do not keep the oven door open
too long when loading since heat will escape, resulting in slower baking.
When production requirements are low, keep the temperature low to prevent the bottoms from
burning. As demand increases, temperature should be raised for quicker recovery time. Fresh dough
generally requires a slightly lower baking temperature and longer bake time than defrosted pre-baked
crusts.
GENERAL BAKING TIPS:
•
•
•
•
•
•
•
•
•
•
Pizza crust should be fully defrosted before baking.
Wet areas on the bottom of a pizza will cause them to stick to the deck. Avoid spills.
For fresh dough pizza (220v ovens only), flour or corn meal on the peel will prevent sticking and
ease placement of the pizza on the deck.
Increasing bake temperatures during heavy production assist in maintaining temperature; after the
rush is over reduce temperature to prevent burning.
Heavily topped pizzas require longer bake times at lower temperatures.
Rotation of the pizza during the cooking cycle is highly recommended.
Placing a screen under a pizza will allow the top to cook without overcooking the bottom.
Frequently scrape and brush off decks to remove burnt residue, which can cause an off flavor to
the product. Residue build-up can slow bake times.
Clean heavily soiled pizza decks by scraping down, brushing off, removing from oven, turning over
and putting back. This procedure will burn off the decks and should be repeated every 6 months.
Do not use water to clean the decks as this could cause the decks to crack.
Using shiny pans or screens will produce products with light bottom color. All pans and screens
should be seasoned before use.
CLEANING: To keep your CECILWARE oven in top shape, periodic cleaning is suggested. ALWAYS CLEAN
THE OVEN ONLY WHEN IT IS COLD. WHEN CLEANING STAINLESS STEEL ALWAYS WIPE IN THE DIRECTION
OF THE GRAIN. From time to time the spillage should be scraped out. For hard to clean spillage, the
following is suggested:
•
Turn the thermostat up to the highest setting and let the oven run for ½ hour.
•
Allow the oven to cool down
•
Brush the residue from deck
NOTE: DO NOT USE WATER TO CLEAN DECKS. CRAKING MAY RESULT.
3
TROUBLESHOOTING: Your CECILWARE oven is designed to be as trouble free as possible. Keeping your
oven clean is all that is normally required. However if your oven stops operating completely, check to see if
power supply cord is plugged in and fuse/circuit breaker has not tripped. For all other problems call your
factory-authorized agency.
PARTS LIST
NO. PO/BK-18 PO/BK-22
DESCRIPTION
1
R821A
R821A HEATER BRACKET
2
G258A
HEATER 600W, 120V
G380A
HEATER 850W, 120V
G260A
HEATER 850W, 220V
G259A
HEATER 1000W, 220V
G336A HEATER 1200W, 220V
3
V199A
V247A BAKING DECK
4
R798A
R847A SHELF
5
R834A
R859A TRIM
6
R818Q
R856Q DOOR
7
R835Q
R835Q HANDLE
8
H227A
H227A HINGE SHAFT
9
P361A
P361A SHAFT BUSHING
10
P360A
P360A DOOR BUSHING
11
C308A
C308A NEON LIGHT
12
M733A
M733A TIMER KNOB (PO)
12a M771A
M771A KNOB W/INSERT (BK)
13
M734A
M734A DIAL PLATE (PO)
14
L646A
L646A THERMOSTAT 650 F (PO)
14a
L672A
L672A THERMOSTAT 550 F (BK)
15
SE44A
SE47A BOTTOM
16
L645A
L645A TIMER 15 MIN (PO)
16a
L670A
L670A TIMER 60 MIN (BK)
17
R795A
R844A BODY WRAP
18
C032A
CH50A POWER CORD
19
B198A
B198A ELECTRIC BOX
20
R817A
R855A BACK COVER
21
P539A
P539A TORQUE KNOB
22
B068A
B068A CERAMIC BUSHING
SCHEMATIC DIAGRAM
UPPER
MIDDLE
HEATER
HEATER
PO-18
600W, 120V
600W, 120V
PO-18-220 850W, 220V
1000W, 220V
PO-22
1200W, 220V 1200W, 220V
BK-18
850W, 120V
NONE
BK-18-220 850W, 220V
NONE
BK-22
1000W, 220W
NONE
BOTTOM
HEATER
600W, 120V
1000W, 220V
1200W, 220V
850W, 120V
1000W, 220V
1200W, 220V
4