1
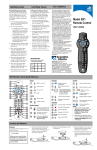
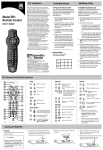
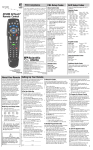
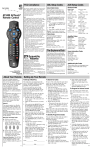
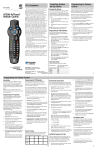
FCC Compliance
AUX Setup Codes
JVC—0086
Kenwood—0042, 0051,
0204, 0640, 0695,
Brand—Code
0840
Aiwa—0171
Krell—0171
Burmester—0434
LXI—0319
California Audio
Linn—0171
Labs—0043
MCS—0043
Carver—0171, 0193
MTC—0434
DKK—0014
Magnavox—0171,
Denon—0017, 0887
0319
Emerson—0319
Marantz—0043, 0171,
Fisher—0193
0194
Garrard—0434
Genexxa—0046, 0319 Mission—0171
NSM—0171
Harman/Kardon—
Onkyo—0115, 0882
0171, 0187
CD Players
AllTouch® 2000
Remote Control
User’s Guide
Hitachi—0046
Receivers
Brand—Code
ADC—0545
Aiwa—0135, 0172,
0203, 1103, 1419
Capetronic—0545
Carver—0203, 1103,
1203
Denon—1118, 1174
Harman/Kardon—
0124, 0203
JBL—0124
Amplifiers
JVC—0088
Kenwood—0041, 1041,
1327, 1583
Linn—0203
MCS—0053
Magnavox—0203,
0545, 1103, 1203
Marantz—0053, 0203,
1103, 1203
Onkyo—0149
Optimus— 0545, 1037
Panasonic—0053,
0323, 1532
Optimus—0014, 0046,
0051, 0159, 0193,
0319, 0434, 0482
Panasonic—0043, 0317
Parasound—0434
Philips—0171, 0640
Pioneer—0046, 0319,
0482
Proton—0171
QED—0171
Quasar—0043
RCA—0067, 0193,
0319
Realistic—0193, 0194,
0434
Rotel—0171, 0434
SAE—0171
Sansui—0171, 0319
Sanyo—0193
Scott—0319
Sears—0319
Sharp—0051, 0194,
0875
Sherwood—0194
Sony—0014, 0504
Soundesign—0159
Tascam—0434
Teac—0194, 0434
Technics—0043, 0317
Victor—0086
Wards—0067, 0171
Yamaha—0050, 0201
Philips—0203, 1103,
1203
Pioneer—0028, 0545,
1037
Quasar—0053
RCA—0545
Sansui—0203, 1103
Sherwood—0516
Sony—0172, 1072,
1172, 1272
Technics—0053, 0323,
1322, 1323, 1532
Thorens—1203
Victor—0088
Wards—0028, 0172,
0203
Yamaha—0190
Home Automation
Brand—Code
Brand—Code
Brand—Code
Aiwa—0420
Carver—0283
Curtis Mathes—0314
Denon—0174
JVC—0345
Linn—0283
Magnavox—0283
Marantz—0283
Panasonic—0322
Philips—0283
Pioneer—0027, 0314
Sony—0703
Technics—0322
Victor—0345
Wards—0027
Yahama—0368
GE—0254
One For All—0181
Radio Shack—0254
Security System—0181
Universal X10—0181
X10—0181
Jerrold—0473, 0534
Scientific-Atlanta—0474
Starcom—0473
About Your Remote Control
Your new AllTouchÒ 2000 Remote Control
functions as four remote controls in one to
operate your TV, VCR, home terminal, or
CD player. If you prefer, you can program
the AllTouch 2000 Remote Control to
operate additional electronic devices, such
as an additional TV or VCR, a stereo
receiver, a DVD player, or a home
automation device.
Miscellaneous Audio
This device complies with Part 15 of the FCC
Rules. Operation is subject to the following two
conditions: (1) This device may not cause
harmful interference, and (2) this device must
accept any interference received, including
interference that may cause undesired
operation.
Note
This equipment has been tested and found to
comply with the limits for a class B digital
device, pursuant to Part 15 of the FCC Rules.
These limits are designed to provide reasonable
protection against harmful interference in a
residential installation. This equipment
generates, uses, and can radiate radio frequency
energy and, if not installed and used in
accordance with the instructions, may cause
harmful interference to radio communication.
However, there is no guarantee that interference will not occur in a particular installation If
this equipment does cause harmful interference
to radio or television reception, which can be
determined by turning the equipment off and
on, the use is encourage to try to correct the
interference by one or more of the following
measures:
• Reorient or relocate the receiving antenna.
• Increase the separation between the
equipment and the receiver.
• Connect the equipment into an outlet on a
circuit different from that to which the
receiver is connected.
• Consult the dealer or an experienced radio/
TV technician for help.
Any changes or modifications not expressly
approved by Scientific-Atlanta could void the
user’s authority to operate this equipment.
United States: Scientific-Atlanta, Inc.,
4261 Communications Drive, P. O. Box 6850,
Norcross, GA 30091-6850; Tel: 770-903-5000;
TWX: 810-799-4912; Telex: 0542898
Europe: Scientific-Atlanta Western Europe Limited.,
Home Park Estate, Kings Langley, Herts WD4 8LZ,
England; Tel: +44-1-923-266133; Fax: +44-1-923-269018
Asia-Pacific: Scientific-Atlanta (HK), Ltd., Suite 56-57,
5/F New Henry House, 10 Ice House Street, Central,
Hong Kong; Tel: 852-2522-5059; Fax: 852-2522-5624
www.scientificatlanta.com
© 2000 Scientific-Atlanta, Inc.
All rights reserved.
Part Number 715117 Rev B
Printed in USA
February 2000
Setting Up Your Remote Control
Mode Keys and Setup Codes
Q: What are mode keys?
A: Press the appropriate mode key to switch
the remote control to operate the device you
want to control.
Batteries
The AllTouch 2000 Remote Control requires
two alkaline AA batteries. When batteries are
properly installed, the remote control’s red
light blinks with each button press.
Q: What are setup codes?
A: Setup Codes are 4-digit codes that identify a
specific brand of equipment that you want the
remote control to operate.
Important Reminder: A diagram in the
battery compartment of the remote control
indicates proper placement of the batteries.
Important Reminder: The AllTouch 2000
Remote Control is not a toy. It is designed for
adult use and should be kept out of the reach of
children under the age of 6 years.
The mode keys are programmed with most of the
popular brands of electronic devices, so before
you perform this procedure, test each mode key.
To test the mode key, turn on your device, press
the mode key for that device, and then press
POWER on the remote control to verify that the
power to the device turns off.
1. To set up a mode key, find the 4-digit code
for your brand of device in one of the setup
code lists in this guide.
2. Turn on your device.
3. Press and hold the SELECT key. As you hold
down the SELECT key, press and hold the
mode key for that device until the LED blinks
twice.
4. Enter the 4-digit setup code.
5. Point the remote control toward the device.
6. Press POWER, PLAY, or CH+ to test
the device.
7. Did the device operate correctly?
• If yes, press POWER, if necessary, to
turn on the device. Press the VOL+,
PLAY, or CH+ key to verify that you
programmed the best code for your
device.
• If no, repeat steps 1 through 6 using a
different setup code.
Note: If all of the codes listed for your
brand of device fail to operate your
device properly, go to the To Search
for Codes section of this guide for
instructions.
8. Repeat steps 1 through 6 for each mode key.
9. Write down your codes for future
reference:
____
____
____
Quick Reference
28
1
27
A
U
X
N
E
X
T
IDE
P
R
E
V
EXI
+
Selects options in menus and IPG
3
Displays interactive guide
6
25
Displays cable settings or Menu
24
Navigates through IPG or settings
7
7
Moves through menus or guides
4
Exits settings, menus, and guides
9
22
Selects and deselects screen item
10
20
Displays channel and program
information
5
–
UTE
LAS
+
INFO
+
VOL
CH
–
–
B
C
1
2
3
4
5
6
7
8
9
FAV
0
*
#
11
12
18
17
8
Selects channels, up or down
13
S
PAS
BY
/VC
TV R
Mode
1
TV Mode Key
2
Cable Mode Key
26
AUX Mode Key
28
VCR Mode Key
Sound
8
A
PPV
16
9
4
21
19
Features vary by cable provider;
some provide access to Pay Per
View Features. Note: Explorer
DHCTs proivde access through
on-screen options.
3
FAV
SELECT
22
20
GU
19
Functions vary by cable provider
POWER
NU
Returns to last channel viewed
11
2
T
23
C
B
L
6
T
24
S
ING
TT
T
V
ME
M
25
SE
26
V
C
R
Viewing and Browsing Control
VCR
VO D
14
10
15
T7669
5
Enters channel numbers
(also used to enter your
personal identification number
[PIN] for parental control)
Views favorite channels
VCR/VOD Control
Note: While in VCR mode, keys control
your VCR.
21
Adjusts volume
23
Mutes sound
Device Control
12
Fast forwards VCR/VOD
13
Records program
27
POWERS on or off
14
Stops VCR/VOD
15
16
Plays VCR/VOD
17
Pauses VCR/VOD
18
Rewinds VCR/VOD
Functions as follows:
• While in VCR mode,
switches TV/VCR input
• While in TV mode,
switches TV/Video input
• While in CBL mode,
controls Bypass option
Setting Up Your Remote, continued
To Search for Codes
If none of the listed codes work, you can
program the remote to search through all of
the available codes for the device specified,
beginning with the most popular codes.
Note: The LED on the remote control also
blinks three times when it reaches the end of
its search.
1. Turn on the device.
2. Press and hold the SELECT key. As
you hold down the SELECT key, press
the mode key for that device and hold
it down until the LED blinks twice.
3. Press 991.
4. Point the remote control toward the
device, and press POWER, PLAY, or
CH+ to test this device code.
5. Did the device operate correctly?
• If yes, go to step 6.
• If no, press the mode key again, then
press POWER, PLAY, or CH+.
Continue to toggle the mode and other
keys until the device is controlled.
6. With the device on, try other device
keys (0, 1, 2, 3, VOL+, REW) to check
the code. If the remote control keys do
not control the device, repeat from step 5.
7. To set the code, press SELECT.
To Identify Programmed Codes
You can determine the code your device
uses by counting the number of times the
LED blinks during the following procedure.
1. Press and hold the SELECT key. As
you hold down the SELECT key, press
the mode key for that device and hold
it down until the LED blinks twice.
2. Press 990.
Advanced Features
3. Press 1; then, count the number of times the
LED blinks. This number indicates the first
digit in the code. For example, 4 blinks
indicates the first digit in the code is 4. If the
LED does not blink, the digit is 0.
4. Press 2; then, count the LED blinks.
The number of blinks indicates the second
number in the code.
5. Press 3; then, count the LED blinks.
The number of blinks indicates the
third number in the code.
6. Press 4; then, count the LED blinks.
The number of blinks indicates the
fourth number in the code.
7. Write down your codes for future reference.
To Program for Volume Control
You can program the remote control to adjust
the volume and operate the mute functions
through any device, such as your home terminal.
The default is through your TV.
1. Turn on the device.
2. Press and hold the SELECT key. As you
hold down the SELECT key, press the mode
for the device that you are programming and
hold it down until the LED blinks twice.
3. Press 993.
4. Press the mode key for the device that you
want to use to control the volume.
5. Point the remote control toward the device
you have chosen and adjust the volume to
confirm operation.
Note: To unlock the volume to each mode,
repeat steps 1 through 6, except at step 2,
press CBL and at step 5, press VOL-.
To Change the Mode Key
You can change your TV, VCR, and AUX mode
keys to control different devices. For example, if
you have a second TV, you can change your
AUX mode key to a second TV mode key by
following this procedure.
1. Press and hold the SELECT key. As you
hold down the SELECT key, press the CBL
mode key and hold it down until the LED
blinks twice.
2. Press 992.
3. Press the mode key for the type of device
you want to control.
4. Press the mode key that you want to use for
this device.
5. To setup the mode key, follow all of the
steps in the Setting Up Your Remote
Control procedure for your brand of
equipment.
6. Write down a record of the changes.
Example: The AUX mode key controls TV
in the den.
The ______ mode key controls
_______________________________.
The ______ mode key controls
_______________________________.
To Program VCR Keys for CBL Mode
You can program the VOD/VCR control keys to
operate your VCR while in CBL mode. If your
cable service provider does not offer the Videoon-Demand (VOD) feature, you can follow these
steps to reprogram the remote control to operate
your VCR functions while in CBL mode. (The
VOD/VCR control keys default to VOD
functions, while in CBL mode.)
1. Turn on the VCR.
2. Press and hold the SELECT key. As
you hold down the SELECT key, press the
CBL mode key and hold it down until the
LED blinks twice.
3. Press 999.
4. Press the VCR mode key.
5. Insert a tape into your VCR and test
the VCR function keys.
Note: To set the remote control back to the
default setting, repeat steps 1 through 4;
however, at step 4, press the CBL mode key.
At step 5, test the VOD functions.
To Change the Power Control
You can change the POWER key to control
several or all of your devices at one time by
following this procedure.
1. Press and hold the SELECT key. As you
hold down the SELECT key, press the
CBL mode key and hold it down until
the LED blinks twice.
2. Press 998.
3. Choose one of the following options to
select which devices you want to turn on
and off at the same time.
• For TV and CBL, press the TV mode
key.
• For TV, CBL, and VCR, press the
VCR mode key.
• For TV, CBL, and AUX, press the
AUX mode key.
• For all devices, press the CBL mode
key.
• To return to the default settings
(each mode key controlled separately), press POWER.
4. Point the remote control toward the
devices, and press and hold POWER
to confirm operation.
Result: The power to the devices may
take a few seconds to turn on/off.
Note: You can still control the power of a
specific device by pressing the mode key
and then pressing POWER within 3 seconds.
TV Setup Codes
Brand—Code
Admiral—0107, 0477
Aiko—0106
Akai—0044
Alaron—0193
American Action–
0194
Anam—0194
AOC—0033, 0044
Audiovox–0106, 0194,
0465, 0637
Baysonic—0194
Belcor—0033
Bell & Howell—0168
Bradford—0194
Brockwood—0033
Brocksonic–0250,
0477
Candle—0044, 0070
Carnivale—0044
Carver—0068
Celebrity—0014
Cineral—0106, 0465
Citizen—0044, 0070,
0074, 0106
Concerto—0070
Contec—0194
Craig—0194
Crosley—0068
Crown—0194
Curtis Mathes—0044,
0061, 0065, 0068,
0070, 0074, 0107,
0159, 0168, 0180,
0465, 1161, 1361
CXC—0194
Daewoo—0033, 0106,
0465, 0637, 0638
Daytron—0033
Denon—0159
Dumont—0031, 0033
Electroband—0014
Emerson—0033, 0168,
0192, 0193, 0194,
0250, 0296, 0477,
0637, 0638
Envision—0044
Fisher—0168
Fujitsu—0193, 0697
Funai–0185, 0193, 0194
Futuretech—0194
GE—0035, 0061, 0065,
0107, 0192, 0296,
0465, 1161, 1361
Gilbrater—0031, 0033,
0044
GoldStar—0033, 0044,
0070, 0192
Gradiente–0067, 0070
Grunpy—0193, 0194
Hallmark—0192
Harley Davidson—0193
Harmon/Kardon–0068
Harvard—0194
Hitachi—0070, 0159
Infinity—0068
Inteq—0031
JBL—0068
JCB—0014
JVC—0067
KEC—0194
Kenwood–0033, 0044
KTV—0044, 0194
LG—0070
Luxman—0070
LXI—0061, 0068,
0168, 0170, 0192
Magnavox—0044,
0068, 0193
Marantz—0044, 0068
Matsushita—0264
Megatron–0159, 0192
Memorex—0070,
0164, 0168, 0192,
0264, 0477
MGA—0033, 0044,
0164, 0192
Midland—0031, 0061,
0065
Minutz—0035
Mitsubishi—0033,
0107, 0164, 0192
Motorola—0107
MTC—0033, 0044,
0070, 0074
Multitech—0194
NAD–0170, 0180, 0192
NEC–0033, 0044, 0070
Nikko—0044, 0106,
0192
NTC—0106
Onwa—0194
Optimus—0168, 0180,
0264
Optonica—0107, 0179
Orion—0193, 0250,
0477
Panasonic–0065, 0264
Penney—0033, 0035,
0044, 0061, 0065,
0070, 0074, 0170,
0192, 1361
Philco—0033, 0044,
0068, 0159, 0477
Philips—0068
Pilot—0033, 0044
Pioneer—0180, 0694
Portland—0033, 0106
Prism—0065
Proscan—0061
Proton—0192
Pulsar—0031, 0033
Quasar–0065, 0179, 0264
RCA—0033, 0061, 0065,
0104, 0107, 1061,
1161, 1261, 1361,
1461
Radio Shack—0033,
0044, 0061, 0070,
0168, 0179, 0192,
0194
Realistic—0033, 0044,
0070, 0168, 0179,
0192, 0194
Runco—0031, 0044
Sampo—0044
Samsung–0033, 0044,
0070, 0074, 0192
VCR Setup Codes
Emerson—0014, 0016,
0051, 0057, 0135,
0198, 0222, 0223,
Brand—Code
0292, 0493
Admiral—0062, 0223
Fisher—0061, 0118
Adventura—0014
Fuji—0047, 0049
Aiko—0292
Funai—0014
Aiwa—0014, 0051,
GE–0049, 0062, 0074,
0321
0254
American Action—
Garrard—0014
0292
American High—0049 Go Video—0446, 0540
GoldStar—0051, 0052
Asha—0254
Gradiente—0014, 0022
Audiovox—0051
Harley Davidson—
Beaumark—0254
0014
Bell & Howell—0118
Harman/Kardon—0052,
Brocksonic—0016,
0095
0135, 0198, 0223,
Harwood—0086
0493
HI-Q—0061
CCE—0086, 0292
Hitachi—0014, 0056
Calix—0051
Hughes Network
Canon—0049
Systems—0056
Carver—0095
JVC—0022, 0081
Cineral—0292
KEC—0051, 0292
Citizen—0051, 0292
Kenwood—0052, 0081
Colt—0086
KLH—0086
Craig—0051, 0061,
0086, 0254, 0285 Kodak—0049, 0051
Curtis Mathes—0049, LXI—0051
Lloyd’s—0014, 0222
0074, 0176
Logik—0086
Cybernex—0254
Daewoo—0059, 0292 Magnasonic—0292
Magnavox—0014,
Denon—0056
0049, 0053, 0095
Dynatech—0014
Magnin—0254
Electrohome—0051
Electrophonic—0051 Marantz—0049, 0095
Marta—0051
Emerex—0046
VCR Codes
Tandy—0107
Sansei—0465
Technics—0065, 0264
Sansui—0477
Technol Ace—0193
Sanyo—0168
Techwood–0065, 0070
Scimitsu—0033
Teknika—0033, 0068,
Scotch—0192
0070, 0074, 0106,
Scott—0033, 0192,
0164, 0193, 0194
0193, 0194, 0250
Telefunken—0070
Sears—0061, 0068,
0070, 0168, 0170, TMK—0070, 0192
Toshiba—0074, 0168,
0185, 0192, 0193
0170
Semivox—0194
Vector Research–0044
Semp—0170
Sharp–0107, 0179, 0694 Victor—0067
Vidikron—0068
Shogun—0033
Vidtech—0033, 0192
Sony—0014
Wards—0033, 0035,
Soundesign—0192,
0044, 0068, 0070,
0193, 0194
0179, 0192, 0193
Squareview—0185
White -Westinghouse—
Starlite—0194
0477, 0637, 0638
SSS—0033, 0194
Yamaha—0033, 0044
Supreme—0014
Sylvania—0044, 0068 Zenith—0031, 0106,
0477
Symphonic—0185
Cable Setup Codes
Matsushita–0049, 0176
MEI—0049
Memorex—0014, 0049,
0051, 0053, 0061,
0062, 0118, 0176,
0223, 0254, 0321,
1051, 1176, 1276
MGA—0057, 0254
MGN Technology–
0254
Minotla—0056
Mitsubishi–0057, 0062,
0081
Motorola—0049, 0062
MTC—0014, 0254
Multitech—0014, 0086
NEC–0052, 0081, 0118
Nikko—0051
Noblex—0254
Olympus—0049
Optimus—0051, 0062,
0118, 0176, 0446,
1062, 1076, 1176,
1276
Orion—0016, 0198,
0223, 0493
Panasonic–0049, 0176,
0239, 0630, 1076,
1176, 1276
Penney—0049, 0051,
0052, 0056, 0254
Pentax—0056
Philco—0049, 0223,
0493
Philips—0049, 0095,
0632
Pilot—0051
Pioneer—0081
Profitronic—0254
Proscan—0074
Protec—0086
Pulsar—0053
Quasar—0049, 0176,
1176
RCA—0049, 0056,
0062, 0074, 0254
Radio Shack—0014,
1051
Radix—0051
Randex—0051
Realistic—0014, 0049,
0051, 0061, 0062,
0118
ReplayTV–0628, 0630
Runco—0053
Samsung—0059, 0254
Sanky—0053, 0062
Sansui—0014, 0081,
0223, 0285, 0493
Sanyo— 0061, 0118,
0254
Scott—0057, 0059,
0135, 0198
Sears—0014, 0049,
0051, 0056, 0061,
0118
Semp—0059
Sharp—0062
Shintom—0086
Shogun—0254
Singer—0086
Sony–0014, 0046, 0049
STS—0056
Sylvania—0014, 0049,
0057, 0095
Symphonic—0014
TMK—0222, 0254
Teac—0014
Technics—0049, 0176
Teknika—0014, 0049,
0051
Thomas—0014
Tivo—0632
Toshiba—0057, 0059
Totevision–0051, 0254
Unitech—0254
Vector—0059
Vector Research–0052
Video Concepts–0059
Videosonic—0254
Wards—0014, 0049,
0056, 0061, 0062,
0074, 0086, 0095,
0254
White Westinghouse—
0223, 0292
XR-1000–0014, 0049,
0086
Yamaha—0052
Zenith—0014, 0053,
0223, 0483
DVD Codes
Note: You must use
the VCR mode key to
program your DVD
player.
Brand—Code
Denon—0504
Harman/Kardon—0596
JVC—0572, 0637
Kenwood—0548
Magnavox—0517
Mitsubishi—0535
Onkyo—0517, 0641
Panasonic—0504, 0646
Philips—0517
Pioneer—0539, 0585,
0646
Proscan—0536
RCA—0536
Samsung—0587
Sharp—0644
Sony—0547
Technics—0504
Theta Digital—0585
Toshiba—0517
Yamaha—0504, 0559
Zenith—0517, 0605
About Cable Codes
Before you program your CBL mode
key with any of the codes below, make
sure that your remote control is not
“locked” by performing the following
steps.
1. Press and hold the SELECT key. As
you hold down the SELECT key,
press the CBL mode key and hold it
down also
until the LED blinks twice.
2. Press 996.
3. Press CH- .
Result: You can now set up your CBL
mode key with one of the following
codes.
Brand—Code
ABC—0022
Americast—0913
Contec—0033
General Instrument—
0290, 0490
Gold Star—0158
Jerrold—0026, 0290,
0490
Memorex—0014
Oak—0333
Panasonic–0014, 0121
Paragon—0014
Pioneer—0158, 0547,
0891
Pulsar—0014
Quasar—0014
Runco—0014
Samsung—0158
Scientific-Atlanta—
Default code: 0458
Additional codes:
0891, 0491, 0022,
0238
Tocom—0026
Toshiba—0014
Zenith—0014, 0539,
0913