1
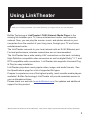
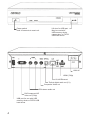
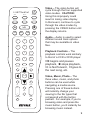
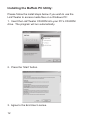
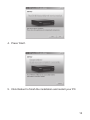
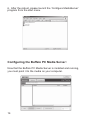
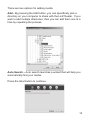
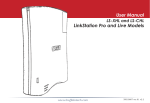
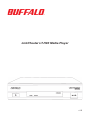
LinkTheater LT-H90 Media Player v1.0 Introduction 3 Product Diagram 4 Connect Your Cables 6 Remote Control 8 Getting Started 11 Install PC Software 12 Using the LinkTheater20 Settings 24 Display Modes28 Using Windows Media Player 30 Transcoder 34 Specifications 36 Warranty 37 Contact 38 Using LinkTheater Thank you for choosing LinkTheater! This manual should help you configure and use your new LinkTheater. Buffalo Technology’s LinkTheater LT-H90 Network Media Player is the missing link between your TV, home entertainment center, and computer network. Now, you can play the movies, music, and photos stored on your computers from the comfort of your living room, through your TV and home entertainment center. The LinkTheater connects to your local network with an RJ-45 Ethernet port. For best performance, wireless connections are not recommended. The LinkTheater has a wide variety of AV connections on the back, including High-Definition compatible video connectors as well as digital Dolby™ 5.1* and DTS compatible audio connectors. LinkTheater also supports Universal Plug & Play for easy installation. LinkTheater plays back most popular video, image, and audio formats. See the Specifications page for a list of supported file types. Prepare to experience one of the highest quality, most versatile media players available! Buffalo Technology’s LinkTheater will provide seamless access to your multimedia archives. Please check our web site (www.buffalotech.com) for updates and additional support for this product. *Manufactured under license from Dolby Laboratories. Colby and the double-D symbo0l are trademarks of Dolby Laboratories. Power switch Hold 10 seconds to reset unit. Lift door for USB port. May be used with USB memory sticks, camcorders, or FAT32 USB hard drives. 120V AC HDMI (720p) 10/100 Ethernet Toslink digital audio out (5.1) Composite Video out RCA stereo audio out D4/Component HD video out (720p) USB port for use with USB memory sticks or FAT32 USB hard drives. Package Contents: • • • • • • • LinkTheater Media Player Ethernet Cable Remote Control with Batteries AC Power Cable LinkTheater CD-ROM User Manual (this guide) Standard A/V Cable (Red, White, and Yellow RCAs) If any items are missing from your package, please contact Buffalo Technology’s Technical Support or contact the place you purchased your product from. Preparation: The LinkTheater connects to a TV or video monitor with composite (RCA), HDMI, D4, or component style video connectors. Find an appropriate place to install the LinkTheater. We recommend that the install place is: • within visible site of the primary seating area. This device uses an IR remote control and requires line of sight. • conveniently located near your TV and Hi-Fi. • on a flat surface or cabinet. We do NOT recommend placing it on top of a warm-running audio/video component, due to potential overheating concerns. Connect your cables: The LinkTheater must be connected to a TV or monitor. Although the LinkTheater plays mp3s and other popular music formats, a TV or monitor is required to navigate and configure options on the LinkTheater. There are many ways to connect the audio and video output of the LinkTheater to a TV or home theater. The following directions describe connecting your LinkTheater to your TV or monitor with the standard yellow analog composite video connector, which almost any TV will have. This cable is included in your LinkTheater package and will work with most TVs. Here’s a simple way to connect your LinkTheater directly to a TV: 1 - Hook up the included analog video cable to your TV or monitor. Most TVs will have the connections color-coded: Yellow for video, red for right-audio, and white for left-audio. 2 - Connect the other end of the analog video cable to the associated ports on the LinkTheater. The ports are also color coded: red for right audio, white for left audio, and yellow for video. 3 - Connect the CAT-5 Ethernet cable into the Ethernet port on the back of the LinkTheater and connect the other end to a router, hub, or switch on your network. 4 - Plug the power cable into an AC power outlet. Buffalo recommends connecting the AC adapter to a power-strip with a surge protector to protect it from power surges caused by lightning. 5 - Plug the power connector from the AC adapter into the back of the LinkTheater. The ‘POWER’ and ‘STANDBY’ lights on the front of the LinkTheater will blink and then turn on. You do not need to press the power button on the front of the LinkTheater. If the lights don’t come on within a few seconds, check that the proper AC adapter is plugged in and seated correctly. Also, check that your power-strip or surge protector is on. 6 - Once the ‘POWER’ and ‘STANDBY’ lights on the front of the LinkTheater are on, the device has properly powered up and is ready for use. At this point, please turn on your TV or monitor. Change your TV or monitor’s source setting to correspond to the input that you plugged the LinkTheater into. Once the LinkTheater’s menu appears, your LinkTheater’s video is properly connected. Note: These instructions are for a simple setup, where the LinkTheater is connected directly to a TV with RCA connections. Many other ways to connect are possible. For instance, if you seek the best overall performance available, you might connect the audio to an AV Receiver with a toslink digital connector and the video to your monitor with a D4-to-component or HDMI cable. If the toslink 5.1 digital audio output is used, you’ll need to enable it in Settings before using it. Additional cables (not included with the LinkTheater) will be necessary for any of these alternate configurations. Remote Control The LinkTheater's navigation and settings are all done via the included remote control. To navigate through the menus, use the up, down, left and right arrows. To make a selection, press the ‘Enter’ key. Also, the left and right arrows can be used to navigate forward and back through the menus. Info – The info button will bring up information regarding the file that is currently being played back. This includes file name info, format info, and in the case of movies and music, how long the file has been playing. Setup – The setup button will instantly take you to the System Settings area. Refresh – The refresh button will automatically refresh what is on the screen. For example, if recent files have been added to a media server, pressing the refresh button may display the new files. Some DLNA servers may need to be refreshed at the server level. Repeat – The repeat button will simply repeat a video or music file that’s being played back. TM INFO SETUP REFRESH REPEAT VIDEO AUDIO STEP/SLOW >/II II> << I< >> >I .:/ abc 1 2 3 ghi jkl mno 4 5 6 pqrs tuv wxyz 7 8 9 CLEAR skip VIDEO def CAPS/NUM 0 MUSIC RETURN skip ENTER VOL DOWN MUTE TRACK < + Audio – Audio is used to select different sound track options that may be available in video files. Playback Controls – The playback controls work similarly to that of a VCR or DVD player. >/II begins and pauses PHOTO HOME UP Video – The video button will cycle through the four supported video modes. CAUTION: Using this improperly could result in losing video display. In that event, continue to cycle through the video modes by pressing the VIDEO button until the display returns. STOP - > ADVANCED ZOOM playback, stops playback, >> is fast forward, >I goes to the next song, etc. Video, Music, Photo – The three video, music, and photo buttons can be used while navigating a media source. Pressing one of these buttons will instantly change your viewing to the file types that correspond with the button pushed. For example, if you’re browsing video and press the music button, you’ll instantly be browsing music instead. Home – The home button will return you to the main navigation hub. Up and Down – The up and down buttons work like Page Up and Page Down does on a computer. This is a quick way to browse through folders that have a lot of media. Volume and Mute – The LinkTheater has its own independent volume control that can be used along with or as an alternative to your TV or sound system’s remote control. This allows you to quickly mute or raise/lower the volume without having to necessarily use the TV or sound system’s remote control. Stop – The stop key will temporarily pause a slideshow that’s in progress. Track – The track button will skip forward or back to the next video, music, or picture file. 10 Getting Started Installing software on your computer. The LinkTheater is designed to play media files that are located on computers and NAS devices. Where do you keep your movies, music, and pictures? If they’re on Windows PCs, then turn to the next page and begin installing software on your PC. If your media files are stored on a NAS device like the TeraStation Live or the LinkStation Live, then you may not need to install software at all. Turn to page 20 to start using your LinkTheater immediately! 11 Installing the Buffalo PC Utility: Please follow the install steps below if you wish to use the LinkTheater to access media files on a Windows PC: 1. Insert the LinkTheater CD-ROM into your PC’s CD-ROM drive. The program will run automatically. 2. Press the ‘Start’ button. 3. Agree to the End User License. 12 4. Press ‘Start’. 5. Click Reboot to finish the installation and restart your PC. 13 6. After the reboot, please launch the ‘Configure MediaServer’ program from the start menu. Configuring the Buffalo PC Media Server: Now that the Buffalo PC Media Server is installed and running, you must point it to the media on your computer. 14 There are two options for adding media: Add - By pressing the Add button, you can specifically pick a directory on your computer to share with the LinkTheater. If you wish to add multiple directories, then you can add them one at a time by repeating the process. Auto Search – Auto search launches a wizard that will help you automatically find your media. Press the Next button to continue. 15 Select which drive or drives you’d like to include in the search. Click on Next. Additional options are available. We recommend that you keep the options as is. Click on Next when ready. After the search completes, you will be asked to confirm which folders you’d like to add to the media server. Checked folders will be shared, unchecked folders will not. Once you have analyzed the list, click on Confirm. 16 The Options tab will let you turn on and off file sharing. It also includes other options, including the ability to control whether the media server starts when your computer starts. To disable file sharing, press the Turn OFF File Sharing button. You may want to turn on Access Control to prevent certain devices from accessing your media content. This is especially important if there are multiple LinkTheaters or other DLNA playback devices on your network. If you’d like to prevent some devices from accessing your date while permitting others, press the Turn ON Access Control button. Press Add to bring up the access control wizard. 17 Press Next. And then press Next again. 18 Select your preferred method for assigning access to drives. Once complete, press Next. You can continue to add more access grants by pressing the Add button again. The access rules will appear in the main application console. Congratulations, you’ve completed the installation and configuration of the Buffalo PC Media Server. 19 Using the LinkTheater Use the remote to choose and play your media files. When the LinkTheater first turns on, it shows the Home screen. Use the up and down arrows on your remote control to highlight your choice, and then press enter to open it. 20 Browse Media will access any of the following media devices: • DLNA Media Servers • The PC Utility that came with your LinkTheater • Buffalo’s DLNA Home Server NAS products (LinkStation Home Server and TeraStation Home Server) • 3rd party DLNA servers like TwonkyVision (www.twonkyvision. com) • Microsoft® Windows® Media Connect • Microsoft® Windows® Media Player 11 • 3rd party UPnP A/V Servers Highlight one and click the right arrow to browse content. Network Shared Folder shows NAS devices on the local network. Highlight one and click the right arrow to browse content. 21 Browse USB shows FAT32 formatted USB storage devices connected directly to the LinkTheater. Highlight one and click the right arrow to browse content. To play a media file, just highlight it and press Enter on the remote. As it plays, you can use the fast-forward and rewind buttons on the remote to navigate through the file. 22 Camcorder Backup will back up your camcorder or camera to a USB hard drive automatically. Connect your FAT32 USB hard drive to the rear panel of the LinkTheater and your camcorder or digital camera to the front-panel USB port. The LinkTheater will back up your media files automatically. Your camcorder must be in mass storage mode for this to work properly. When you see the Complete screen, your files are backed up to the hard drive! 23 Settings Optimise the LinkTheater for your home theater. Right out of the box, your LinkTheater’s basic configuration works well for many users. However, you have the option to modify many of its settings to give the best match with your other equipment. To access settings, choose Settings from the Home menu, or press the Settings button on your remote. 24 System settings are divided into four categories. System Preferences include such settings as the delay times for the screensaver and slideshow, LED brightness, and whether or not to enable the digital audio output. 25 Network Settings contains settings that affect your LinkTheater’s network connection. By default, the LinkTheater uses DHCP to configure all network settings for you automatically, but if you prefer, you may create new profiles with manual settings. 26 Display Settings lets you toggle between various video output modes. This is where you adjust the picture to display properly on your 16x9 HD monitor. Press the Enter button on your remote to toggle through the available modes. 27 Display Settings: The LinkTheater supports four display modes. Changing the display modes could result in your LinkTheater not operating properly so please make sure you know which modes your TV or monitor supports: Composite 480i 4x3 – This is the standard mode. It utilized the standard RCA (yellow) video cable or to transmit video data. 480i means the picture is displayed at the resolution 640x480 interlaced. Component 480p 4x3 – This is identical to the mode above, requiring a TV or monitor with HDMI, D4, or component video, however, this mode uses 640x480 progressive resolution. This is the same resolution that a progressive scan DVD player would use. If your TV or monitor doesn’t support 480p than this mode will NOT work. Component 720p 16x9 – This mode is the native format for many common HDTVs. It’s broadcast over the HDMI and D4/component video connectors. Most widescreen HDTVs should support this mode. It uses 1280x720 progressive resolution. If your TV or monitor doesn’t support 720p than this mode will NOT work. Component 1080i 16x9 – This is the best, highest resolution mode available from the LinkTheater. If your TV or monitor can displays 1080i images, then this is the mode to use. The HD image is transmitted over the D4/component and HDMI video connectors. Use of this mode with 720p monitors is not recommended. Even if they can display it, they’d look better in their native 720p. Only use this mode with HD TVs that display 1080i resolution. Please check with your TV or monitor’s documentation and specifications to determine which mode you should use. NOTE: The LinkTheater can only transmit D4/component and HDMI video simultaneously. It cannot transmit on D4/component and composite or HDMI and composite simultaneously. 28 Reset System Settings will return all settings to their factory defaults. Any changes you’ve made will be lost. 29 Configuring Windows Media Player: With Windows Media Player 11, a PC can stream media files to the LinkTheater. If you’ve already installed the Buffalo PC Media Server utility, then using Windows Media Player 11 may not be necessary. Windows Media Player 11 replaces the Windows Media Connect 2.0 software that was available within previous versions of Windows XP. If you still have Windows Media Connect 2.0 software on your computer, it will continue to work with your LinkTheater, but upgrading to Windows Media Player 11 or later is recommended. Among other functions, Windows Media Player 11 streams multimedia content to devices like LinkTheater. Currently it’s the only way to transmit DRM (Digital Rights Management) protected multimedia files from a Windows XP PC to LinkTheater. If you do not own or use any DRM protected multimedia files then setting up Windows Media Player is not necessary. Windows Media Player supports playback of DRM protected files that use the WinDRM codec. Currently, the LinkTheater only supports playback of DRM protected files that use the WinDRM codec (this includes napster.com, walmart.com, rhapsody.com, movielink.com, cinemanow.com and other sources). You can get the latest version of Windows Media Player from Microsoft’s Window’s Update (http://windowsupdate.microsoft. com ). 30 In Windows Media Player, click Tools and choose Options. From the Library tab, choose Configure Sharing. 31 Make sure that you have a check next to “Share my media to:”. If your LinkStation is powered on and connected to the network, it will appear in the window as an “Unknown Device” with a yellow triangle and an explanation point. Highlight the new “Unknown Device” and click Allow. Note: If more then one device is listed then multiple media players are available on your network; in this case either add all of them or determine which one is your LinkTheater by turning it on and off and seeing how the list is affected. Click Settings to specify what media files to share with your LinkTheater. 32 Change settings as desired. Click OK when done. 33 Transcoder Transcoder software lets you play even more types of files. To play files created by older utilities such as Windows Media player 7 or 8, you’ll need to use transcoder software to convert the files to playable formats. To do this, click Start - Programs BUFFALO - MediaServer - Transcoder. Click Add to add files to the transcode list, and then Start to convert them. 34 For best results, Windows computers streaming media to your LinkTheater should be running DirectX9.0c. You may install DirectX9.0c from the Buffalo software disk. An electronic copy of the LinkStation user manual (this guide) is available on the disk. The electronic copy of the manual is in PDF format. To read it, you will need a PDF reader like Adobe’s Acrobat, included on the disk for your convenience. 35 Specifications LT-H90 LinkTheater Supported Multimedia Formats* Video Formats Audio Formats Image Formats Video Modes MPEG1, MPEG2, MPEG4, XviD**, wmv 9, H.264 MP3, WAV, WMA, M4A (AAC) JPG, BMP, PNG, GIF 480i, 480p, 720p, and 1080i Wired LAN Interface Interface Transmission Speed Connector Type Access Method IEEE 802.3 (10BASE-T), IEEE 802.3u (100BASE-TX) 10 / 100 Mbps RJ-45 CSMA/CD USB Interface Interface Data Transfer Speed USB2.0/1.1 480 Mbps Other Supported OS Product Voltage Power Consumption Dimensions Weight Windows® XP, Windows® 2000 (with SP4), Vista® 50/60 Hz, 120 V Max. 19 W W 8.25 x H 1.94 x D8.25 in Approx. 2.5 lbs. * Included transcoder software allows conversion of older formats such as WMV 7/8 to playable formats as well. ** SD, MP3 audio only. 36 Multimedia Product Warranty Buffalo Technology (Buffalo Inc.) products come with a one-year limited warranty from the date of purchase. If the Buffalo product malfunctions during the warranty period, Buffalo Technology will replace the unit, provided the unit has not been subjected to misuse, abuse, or non-Buffalo technology authorized alteration, modifications or repair. All expressed and implied warranties for the Buffalo Technology product line including, but not limited to, the warranties of merchantability and fitness of a particular purpose are limited in duration to the above period. Under no circumstances shall Buffalo Technology be liable in any way to the user for damages, including any lost profits, lost savings or other incidental or consequential damages arising out of the use of, or inability to use the Buffalo products. In no event shall Buffalo Technology’s liability exceed the price paid for the product from direct, indirect, special, incidental, or consequential damages resulting from the use of the product, its accompanying software, or its documentation. Buffalo Technology/(Buffalo Inc.) does not offer refunds for any product. Technical Support and firmware upgrades for Buffalo Technology products are restricted to the country/region of purchase. Please have your proof of purchase receipt to get warranty support. All defective products shall be returned with a copy of proof of purchase. In no event shall Buffalo Technology’s liability exceed the price paid for the product from direct, indirect, special, incidental, or consequential damages resulting from the use of the product, its accompanying software, or its documentation. Buffalo Technology does not offer refunds for any product. All rights reserved. Buffalo devices are designed for home or office use. Buffalo cannot be made liable for any damages, loss of data or damage following thereof (including, without limitation, damages for loss of business profits, business interruption, loss of business information, or other pecuniary loss) arising out of the use of or inability to use this Buffalo product, even if Buffalo has been advised of the possibility of such damages. We reserve the right to upgrade our products in keeping with technological advances. To protect against power surges and power outages, we strongly recommend that you use power surge protection and UPS solutions suitable for your situation. This warranty is void if: • The product was operated/stored in abnormal use or maintenance conditions; • The product is repaired, modified or altered • The product was subjected to abuse, neglect, electrical fault, improper packaging, accident or acts of nature; • The product was installed improperly; • The serial number of the product is defaced or missing; • The tamper seal on the casing is broken. © 2003-2008 Buffalo Technology (USA), Inc. 37 Contact Information for America and Europe North America: Buffalo Technology USA Inc. 11100 Metric Blvd., Suite 750 Austin, TX 78758 General Inquiries: Monday through Friday 8:30am-5:30pm CST Direct: 512-794-8533 | Toll-free: 800-456-9799 | Fax: 512-794-8520 | Email: [email protected] Technical Support: North American technical support by phone is available 24 hours a day, 7 days a week. (USA and Canada). Toll-free: (866) 752-6210 | Email: [email protected] Europe: Buffalo Technology UK Ltd. 2 Bracknell Beeches, Old Bracknell Lane Bracknell, Berkshire, RG12 7BW United Kingdom General Inquiries: Email: [email protected] Technical Support: European technical support is provided in English, German, Italian, and Spanish. For opening hours and relevant phone numbers, go to www. buffalo-technology.com/contact. 38