1
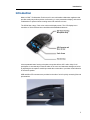
MITEL UC360 COLLABORATION POINT USER GUIDE NOTICE The information contained in this document is believed to be accurate in all respects but is not warranted by Mitel Networks™ Corporation (MITEL®). The information is subject to change without notice and should not be construed in any way as a commitment by Mitel or any of its affiliates or subsidiaries. Mitel and its affiliates and subsidiaries assume no responsibility for any errors or omissions in this document. Revisions of this document or new editions of it may be issued to incorporate such changes. No part of this document can be reproduced or transmitted in any form or by any means - electronic or mechanical - for any purpose without written permission from Mitel Networks Corporation. Trademarks Mitel, UC360 are trademarks of Mitel Networks Corporation. Adobe Acrobat Reader is a registered trademark of Adobe Systems Incorporated. Other product names mentioned in this document may be trademarks of their respective companies and are hereby acknowledged. UC360 User Guide Release 2.0 May 2013 ®,™ Trademark of Mitel Networks Corporation © Copyright 2013, Mitel Networks Corporation All rights reserved ii Table of Contents Chapter 1: What’s New in UC360 Release 2.0 Introduction . . . . . . . . . . . . . . . . . . . . . . . . . . . . . . . . . . . . . . . . . . . . . . . . . . . . . . . . . . . . . . . . . . . 3 Chapter 2: Introduction Introduction . . . . . . . . . . . . . . . . . . . . . . . . . . . . . . . . . . . . . . . . . . . . . . . . . . . . . . . . . . . . . . . . . . . 7 UC360 Product Variants . . . . . . . . . . . . . . . . . . . . . . . . . . . . . . . . . . . . . . . . . . . . . . . . . . . . . . . . . 8 UC360 Collaboration Point - Audio and In-Room Presentation . . . . . . . . . . . . . . . . . . . . . . . . . . 8 UC360 Collaboration Point - Remote Collaboration/Video Appliance . . . . . . . . . . . . . . . . . . . . . 8 About This Document . . . . . . . . . . . . . . . . . . . . . . . . . . . . . . . . . . . . . . . . . . . . . . . . . . . . . . . . . . . 9 Related Documentation . . . . . . . . . . . . . . . . . . . . . . . . . . . . . . . . . . . . . . . . . . . . . . . . . . . . . . . . . 9 Chapter 3: About the UC360 About the UC360 . . . . . . . . . . . . . . . . . . . . . . . . . . . . . . . . . . . . . . . . . . . . . . . . . . . . . . . . . . . . . 13 Main Screen - Conference App . . . . . . . . . . . . . . . . . . . . . . . . . . . . . . . . . . . . . . . . . . . . . . . . . . 14 Function Keys . . . . . . . . . . . . . . . . . . . . . . . . . . . . . . . . . . . . . . . . . . . . . . . . . . . . . . . . . . . . . . 14 Menu Bar . . . . . . . . . . . . . . . . . . . . . . . . . . . . . . . . . . . . . . . . . . . . . . . . . . . . . . . . . . . . . . . . . . 15 App, Display and Camera Controls . . . . . . . . . . . . . . . . . . . . . . . . . . . . . . . . . . . . . . . . . . . . . . 16 Message and Action Area . . . . . . . . . . . . . . . . . . . . . . . . . . . . . . . . . . . . . . . . . . . . . . . . . . . . . 17 Status Bar . . . . . . . . . . . . . . . . . . . . . . . . . . . . . . . . . . . . . . . . . . . . . . . . . . . . . . . . . . . . . . . . . 18 Network Health . . . . . . . . . . . . . . . . . . . . . . . . . . . . . . . . . . . . . . . . . . . . . . . . . . . . . . . . . . . . . 19 Ethernet Trace . . . . . . . . . . . . . . . . . . . . . . . . . . . . . . . . . . . . . . . . . . . . . . . . . . . . . . . . . . . . . . 19 Using Gestures . . . . . . . . . . . . . . . . . . . . . . . . . . . . . . . . . . . . . . . . . . . . . . . . . . . . . . . . . . . . . . . 20 Customizing the UC360 . . . . . . . . . . . . . . . . . . . . . . . . . . . . . . . . . . . . . . . . . . . . . . . . . . . . . . . . 20 Activating the UC360 Display . . . . . . . . . . . . . . . . . . . . . . . . . . . . . . . . . . . . . . . . . . . . . . . . . . 20 Adjusting the In-Call Volume . . . . . . . . . . . . . . . . . . . . . . . . . . . . . . . . . . . . . . . . . . . . . . . . . . . 20 Adjusting the Ringer Volume . . . . . . . . . . . . . . . . . . . . . . . . . . . . . . . . . . . . . . . . . . . . . . . . . . . 20 Adjusting Brightness . . . . . . . . . . . . . . . . . . . . . . . . . . . . . . . . . . . . . . . . . . . . . . . . . . . . . . . . . 20 Using Clean Mode . . . . . . . . . . . . . . . . . . . . . . . . . . . . . . . . . . . . . . . . . . . . . . . . . . . . . . . . . . . . 21 Unmounting Media . . . . . . . . . . . . . . . . . . . . . . . . . . . . . . . . . . . . . . . . . . . . . . . . . . . . . . . . . . . . 21 Using the Keyboard . . . . . . . . . . . . . . . . . . . . . . . . . . . . . . . . . . . . . . . . . . . . . . . . . . . . . . . . . . . 21 Chapter 4: Conference App Introduction . . . . . . . . . . . . . . . . . . . . . . . . . . . . . . . . . . . . . . . . . . . . . . . . . . . . . . . . . . . . . . . . . . 25 iii UC360 User Guide Emergency Calls . . . . . . . . . . . . . . . . . . . . . . . . . . . . . . . . . . . . . . . . . . . . . . . . . . . . . . . . . . . . 25 Making a Conference Call. . . . . . . . . . . . . . . . . . . . . . . . . . . . . . . . . . . . . . . . . . . . . . . . . . . . . . . 26 Preparing for a Video Call . . . . . . . . . . . . . . . . . . . . . . . . . . . . . . . . . . . . . . . . . . . . . . . . . . . . . 26 Activating the HDMI Display . . . . . . . . . . . . . . . . . . . . . . . . . . . . . . . . . . . . . . . . . . . . . . . . . 26 Adjusting the Camera . . . . . . . . . . . . . . . . . . . . . . . . . . . . . . . . . . . . . . . . . . . . . . . . . . . . . . 26 Making an Audio or Video Conference Call . . . . . . . . . . . . . . . . . . . . . . . . . . . . . . . . . . . . . . . . 27 Using Picture-in-Picture (PIP) . . . . . . . . . . . . . . . . . . . . . . . . . . . . . . . . . . . . . . . . . . . . . . . . 28 Making a Consultation Call . . . . . . . . . . . . . . . . . . . . . . . . . . . . . . . . . . . . . . . . . . . . . . . . . . . . . . 29 Saucer Icon . . . . . . . . . . . . . . . . . . . . . . . . . . . . . . . . . . . . . . . . . . . . . . . . . . . . . . . . . . . . . . . . 30 Answering an Incoming Call . . . . . . . . . . . . . . . . . . . . . . . . . . . . . . . . . . . . . . . . . . . . . . . . . . . . . 31 About Incoming Calls . . . . . . . . . . . . . . . . . . . . . . . . . . . . . . . . . . . . . . . . . . . . . . . . . . . . . . . . . 32 Placing a Conference Call on Hold . . . . . . . . . . . . . . . . . . . . . . . . . . . . . . . . . . . . . . . . . . . . . . . . 33 Placing a Consultation Call on Hold . . . . . . . . . . . . . . . . . . . . . . . . . . . . . . . . . . . . . . . . . . . . . . . 34 Switching Between Calls. . . . . . . . . . . . . . . . . . . . . . . . . . . . . . . . . . . . . . . . . . . . . . . . . . . . . . . . 35 Muting a Conference Call . . . . . . . . . . . . . . . . . . . . . . . . . . . . . . . . . . . . . . . . . . . . . . . . . . . . . . . 35 Ending a Conference Call . . . . . . . . . . . . . . . . . . . . . . . . . . . . . . . . . . . . . . . . . . . . . . . . . . . . . . . 36 Ending a Consultation Call . . . . . . . . . . . . . . . . . . . . . . . . . . . . . . . . . . . . . . . . . . . . . . . . . . . . . . 36 Cleaning Up after a Conference Call . . . . . . . . . . . . . . . . . . . . . . . . . . . . . . . . . . . . . . . . . . . . . . 37 Additional Information You May Need to Know . . . . . . . . . . . . . . . . . . . . . . . . . . . . . . . . . . . . . . 38 Audio Calls . . . . . . . . . . . . . . . . . . . . . . . . . . . . . . . . . . . . . . . . . . . . . . . . . . . . . . . . . . . . . . . . . 38 Video Calls . . . . . . . . . . . . . . . . . . . . . . . . . . . . . . . . . . . . . . . . . . . . . . . . . . . . . . . . . . . . . . . . . 38 Conference Call Avatar . . . . . . . . . . . . . . . . . . . . . . . . . . . . . . . . . . . . . . . . . . . . . . . . . . . . . . . 39 Chapter 5: Contacts App About Contacts . . . . . . . . . . . . . . . . . . . . . . . . . . . . . . . . . . . . . . . . . . . . . . . . . . . . . . . . . . . . . . . 43 Finding Contacts . . . . . . . . . . . . . . . . . . . . . . . . . . . . . . . . . . . . . . . . . . . . . . . . . . . . . . . . . . . . . . 43 Calling a Contact . . . . . . . . . . . . . . . . . . . . . . . . . . . . . . . . . . . . . . . . . . . . . . . . . . . . . . . . . . . . . 44 Searching for a Contact . . . . . . . . . . . . . . . . . . . . . . . . . . . . . . . . . . . . . . . . . . . . . . . . . . . . . . . . 45 Using the Dial Pad . . . . . . . . . . . . . . . . . . . . . . . . . . . . . . . . . . . . . . . . . . . . . . . . . . . . . . . . . . . . 46 Chapter 6: Desktop Apps About Using Desktop Applications . . . . . . . . . . . . . . . . . . . . . . . . . . . . . . . . . . . . . . . . . . . . . . . . 49 iv Table of Contents Displaying and Sharing Presentations . . . . . . . . . . . . . . . . . . . . . . . . . . . . . . . . . . . . . . . . . . . . 49 Launching Shared or Non-Shared Applications . . . . . . . . . . . . . . . . . . . . . . . . . . . . . . . . . . . . . 50 Sharing Presentations . . . . . . . . . . . . . . . . . . . . . . . . . . . . . . . . . . . . . . . . . . . . . . . . . . . . . . . . . 51 Displaying your presentation . . . . . . . . . . . . . . . . . . . . . . . . . . . . . . . . . . . . . . . . . . . . . . . . . . . 51 Selecting the Display Mode . . . . . . . . . . . . . . . . . . . . . . . . . . . . . . . . . . . . . . . . . . . . . . . . . . . . 52 More About Video Calls . . . . . . . . . . . . . . . . . . . . . . . . . . . . . . . . . . . . . . . . . . . . . . . . . . . . 53 Tips on Presentation Sharing and Video . . . . . . . . . . . . . . . . . . . . . . . . . . . . . . . . . . . . . . . 53 Paused Applications . . . . . . . . . . . . . . . . . . . . . . . . . . . . . . . . . . . . . . . . . . . . . . . . . . . . . . 54 Accessing More Functionality While in Applications . . . . . . . . . . . . . . . . . . . . . . . . . . . . . . . 54 Using the Browser . . . . . . . . . . . . . . . . . . . . . . . . . . . . . . . . . . . . . . . . . . . . . . . . . . . . . . . . . . . 55 Opening Attachments from Web-based Email . . . . . . . . . . . . . . . . . . . . . . . . . . . . . . . . . . . 56 Accessing MCA Conferences . . . . . . . . . . . . . . . . . . . . . . . . . . . . . . . . . . . . . . . . . . . . . . . . 57 Support for Web-Based Media . . . . . . . . . . . . . . . . . . . . . . . . . . . . . . . . . . . . . . . . . . . . . . . 58 Dialing Phone Numbers from the Web Browser . . . . . . . . . . . . . . . . . . . . . . . . . . . . . . . . . . 58 Settings and Privacy . . . . . . . . . . . . . . . . . . . . . . . . . . . . . . . . . . . . . . . . . . . . . . . . . . . . . . . . . 59 Using Remote RDP . . . . . . . . . . . . . . . . . . . . . . . . . . . . . . . . . . . . . . . . . . . . . . . . . . . . . . . . . . 60 Setting Up Your Computer to Use Remote Desktop . . . . . . . . . . . . . . . . . . . . . . . . . . . . . . 60 Launching Your RDP Session . . . . . . . . . . . . . . . . . . . . . . . . . . . . . . . . . . . . . . . . . . . . . . . 61 Pre-Saved Remote Computer . . . . . . . . . . . . . . . . . . . . . . . . . . . . . . . . . . . . . . . . . . . . . . . 64 Using SmartOffice . . . . . . . . . . . . . . . . . . . . . . . . . . . . . . . . . . . . . . . . . . . . . . . . . . . . . . . . . . . 65 Launching SmartOffice . . . . . . . . . . . . . . . . . . . . . . . . . . . . . . . . . . . . . . . . . . . . . . . . . . . . . 65 Clicking Web Links in Smart Office Documents . . . . . . . . . . . . . . . . . . . . . . . . . . . . . . . . . . 66 Limitations of Using Picsel SmartOffice and Google Docs on the UC360 . . . . . . . . . . . . . . 66 Using Join.Me . . . . . . . . . . . . . . . . . . . . . . . . . . . . . . . . . . . . . . . . . . . . . . . . . . . . . . . . . . . . . . 67 Limitations of Using join.me . . . . . . . . . . . . . . . . . . . . . . . . . . . . . . . . . . . . . . . . . . . . . . . . . 68 Some Practical Applications for join.me . . . . . . . . . . . . . . . . . . . . . . . . . . . . . . . . . . . . . . . . 68 Basic Rules on How Presentation Sharing Works . . . . . . . . . . . . . . . . . . . . . . . . . . . . . . . . . . . 69 Appendix A : External Keyboard - Supported Keys External Keyboard - Supported Keys . . . . . . . . . . . . . . . . . . . . . . . . . . . . . . . . . . . . . . . . . . . . . . 73 Qwerty Keyboard Support . . . . . . . . . . . . . . . . . . . . . . . . . . . . . . . . . . . . . . . . . . . . . . . . . . . . . 74 Azerty Keyboard Support . . . . . . . . . . . . . . . . . . . . . . . . . . . . . . . . . . . . . . . . . . . . . . . . . . . . . . 75 Appendix B : Using Picsel SmartOffice Using Picsel SmartOffice . . . . . . . . . . . . . . . . . . . . . . . . . . . . . . . . . . . . . . . . . . . . . . . . . . . . . . . 79 UC360 SmartOffice Support . . . . . . . . . . . . . . . . . . . . . . . . . . . . . . . . . . . . . . . . . . . . . . . . . 79 Editing User Interface Basics . . . . . . . . . . . . . . . . . . . . . . . . . . . . . . . . . . . . . . . . . . . . . . . . 80 v UC360 User Guide vi CHAPTER 1 WHAT’S NEW IN UC360 RELEASE 2.0 UC360 User Guide 2 What’s New in UC360 Release 2.0 Introduction The following features are being introduced in Mitel®UC360 Collaboration Point, Release 2.0. • User Interface Improvements — the HDMI icons on the UC360 display show the available action instead of the state. See “App, Display and Camera Controls” on page 16. • Message and Action area — you will see new messages and can perform most actions from the blue oval area. See “Message and Action Area” on page 17. • Picture-in-Picture — the HDMI area has a Picture-in-Picture (PIP) icon that allows you to turn on (PIP) during a video call. See “Displaying your presentation” on page 51. • Video with Application Sharing — you have the choice of seeing video conference participants along side the shared application on the HDMI display. See “Tips on Presentation Sharing and Video” on page 53. • Auto Camera On— when you turn on the HDMI monitor for a video call, the camera is automatically turned on. • Hold/Retrieve changes — you can retrieve held calls by pressing the flashing red ring around the photo. See “Placing a Conference Call on Hold” on page 33. • Android Keyboard Disabled — when a USB keyboard and mouse are connected to the UC360, the virtual keyboard is disabled with a few exceptions in the Contacts App. • Network health icon — you will see an icon displayed when the alarm threshold is reached for packet loss on both audio and video calls. See “Network Health” on page 19. • Ethernet Capture — you can capture traces if you experience audio or video issues during a call. See “Ethernet Trace” on page 19. • Android Native Browser Support — you can launch a browser from the App or Share App menu button. See “Using the Browser” on page 55. • Web-based Email and Calendar — you can access Gmail and Outlook Web and open email attachments. See “Using the Browser” on page 55. • Dial phone numbers from web browser — you can dial contact numbers from the browser, for example, from web-based email clients like Gmail and Outlook Web. “Using the Browser” on page 55. • Applications with media support — you can play embedded browser video and it will be sent to the local HDMIs and to any sharing remote parties. See “Support for Web-Based Media” on page 58. • Settings and Privacy — you can clear cache, form data, searches and browsing history by pressing the Menu button (then More -> Settings) while in browser. See “Settings and Privacy” on page 59. • French language keyboard support — the UC360 supports a new language variant for French (France). • join.me™ — you can use a simple screen sharing tool to share your desktop. • SmartOffice Update — you can click web links (hyperlinks) in Word documents. 3 UC360 User Guide • 4 MCA/UCA Support — allows the UC360 to connect to MCA sessions and share video and presentations. CHAPTER 2 INTRODUCTION UC360 User Guide 6 Introduction Introduction Mitel's UC360™ Collaboration Point is an all-in-one multimedia collaboration appliance that provides multi-party audio and video conferencing, in-room presentation display, and remote collaboration for personal office meeting areas and conference rooms. The UC360 has a large 7-inch color multi-touch display screen. The LCD display has a resolution of 1024 x 600 and has a backlight with adjustable brightness. It has a patented beam forming microphone array that delivers 360° audio clarity for all participants. It automatically locates the talker in the room and attenuates background noise by adjusting the microphone sensitivity towards the current talker. It provides visual indication of the active speaker. USB and Micro SD connectors are provided on the side of unit for quickly accessing files and presentations. 7 UC360 User Guide UC360 Product Variants The UC360 Collaboration Point comes in two product variants in Release 2.0. The features of each variant are described below. UC360 Collaboration Point - Audio and In-Room Presentation The UC360 Collaboration Point provides basic Telephony and Conference features and applications: • HD audio with 4-party audio bridge • 16 beam forming microphones • In-room presentation display (Browser, join.me™, RDP, Picsel® SmartOffice™ ) UC360 Collaboration Point - Remote Collaboration/Video Appliance The UC360 Collaboration Point (Remote Collaboration and Video Appliance) supports all the features of the Audio and In-Room Collaboration Appliance, plus the following: • HD audio with 4-party audio and HD video bridge • Presentation display to remote participants • Point-to-point video This document includes procedures for both UC360 product variants. In summary, the UC360 Collaboration Point provides: 8 • Superior audio conferencing capability including a beam forming microphone array • Built-in presentation display capability via HDMI interface that supports connection to high definition LCD display/projector • Built-in compatible MS Office readers and editors • Access to the Browser to open email through Gmail and Outlook Web Access, and display web-based content • Access to join.me™ to use a simple screen sharing tool to share your desktop • Remote desktop access (no need to bring laptop to give a presentation) • Support for multiple file access methods, including USB Flash Drive, micro SD Card, Dropbox™ , Google® Docs, and Box.net • Audio conferences for up to four parties • High Definition video conferencing for up to four parties with an integrated conference bridge • Support for integration with Active Directory and LDAP • Ability to display remote presentations • Support for MCA/UCA Introduction About This Document This document contains the following information: • a general description of the UC360 Collaboration Point, its interface, menu bars, and icons • additional user information not covered in the Quick Reference Card Related Documentation See the following documents for more information on the UC360 Collaboration Point. • UC360 Installation Guide - this guide provides instructions on how to physically connect the UC360. • UC360 Universal Camera Mount Installation Guide — this guide provides instructions on how to mount the UC360 universal camera mounting bracket and camera to the display monitor. • UC360 Quick Reference - this guide provides basic procedures on how to make conference calls, handle calls, and do in-room and remote presentations. • UC360 Administration Guide - this guide provides information on how to configure the UC360 and how to configure the settings in MCD and the 5000 CP. • UC360 Engineering Guidelines - this guide provides information on the UC360 engineering requirements. • MCD System Administration Tool Online Help - Refer to this online help system for instructions on how to program SIP devices on the MCD system. To access UC360 and system-specific documentation: 1. In your browser, go to http://www.edocs.mitel.com. 2. Select a documentation suite from the following drop-down menus: - Applications -> Conferencing and Collaboration -> UC360 Collaboration Point - End User Documents 3. Log in if asked to do so. 4. To view a document, click on the document title. 9 UC360 User Guide 10 CHAPTER 3 ABOUT THE UC360 UC360 User Guide 12 About the UC360 About the UC360 Read this chapter to learn more about the UC360 and how to use it. The UC360 has the following applications: • Conference App — see “Conference App” on page 23 • Contacts App — see “Contacts App” on page 41 • Browser — “Desktop Apps” on page 47 • Remote (RDP) — see “Desktop Apps” on page 47 • Picsel SmartOffice 2 — see “Desktop Apps” on page 47 • Join.me — see “Using Join.Me” on page 67 13 UC360 User Guide Main Screen - Conference App The high-resolution touch screen and simple finger gestures make it easy to use the UC360. Function Keys Function Button Home Menu Press to ... Go to the Home screen Display the Menu bar. See the “App, Display and Camera Controls” on page 16 Back Go back one menu or to the previous screen Mute Turn on/off the microphone Volume Increase or decrease the volume 14 About the UC360 Menu Bar When you press the Menu Menu Button Share App App Settings About button, the menu bar is displayed. Press to ... Share a presentation on the conference room HDMI device and send it to remote conference participants Open an application/presentation on the primary UC360 LCD screen Open the Settings menu Display information about the UC360 and the product variant, hardware and software version. 15 UC360 User Guide App, Display and Camera Controls The icons illustrated on the UC360 display screen allow you to quickly and easily share applications, select the display mode, and turn on and off the camera and picture-in-picture (PIP). The colored icons show the action you can take rather than the state. For example, green means you can turn it on, and red means you turn it off. Icon Press to ... Turn on the camera ’ Turn off the camera Turn on the picture-in-picture (PIP) feature Turn off the picture-in-picture feature Launch a shareable application Select what participants will see: App Only, App & Video, Video Only, Nothing 16 About the UC360 Message and Action Area You can perform most actions from the blue oval area. In this area, you will also see messages pertaining to the active buttons/functions in the Conference app. For example, if you have launched an application, you will see "Tap to resume application" in the blue oval. . You will see some of the same icons in the blue oval area that you see on the UC360 display, plus a few additional icons. Tap on the icon to perform the action. You can use this area to make a call or consultation call, turn the camera and/or PIP on and off, launch applications, select the display mode, clear history, terminate the conference, and launch the in-call dial pad. The table below gives some examples. Icon Message Tap to make a call Tap to terminate the conference Tap to turn off the local camera Tap to clear history Tap to launch an application Tap to share an application Tap to resume an application Tap to select display mode 17 UC360 User Guide Status Bar The status bar at the top of the screen displays information about the UC360 and its network. Status Icon/Information What it means Date Extension number - The number comes from the username field under SIP settings Network connectivity Red: UC360 is disconnected from the network Amber: UC360 is attempting to register with the SIP server Green: UC360 is successfully registered with the SIP server Network Health Icon (see “Network Health” on page 19) Indicates when the alarm threshold is reached for packet loss on both audio and video calls. Ethernet trace icon (see “Ethernet Trace” on page 19) Current time 18 About the UC360 Network Health You will see a network health icon loss on both audio and video calls. displayed when the alarm threshold is reached for packet The icon appears in the following locations: • upper right hand corner next to the Network Status icon • on a conference participant The icon will only appear if there is congestion. If the packet loss falls below the alarm threshold during the call, the network congestion icon will disappear. To see details while network congestion is occurring: 1. Press Menu then Settings 2. Tap Network Congestion Info. . Ethernet Trace The UC360 is configured to allow you to manually capture traces when network impairment is detected. 1. Press Menu then Settings 2. Tap Start Ethernet Trace. . When the Start Ethernet Trace option is selected, a trace icon appears next to the network icon in the upper right hand corner. The trace icon will be visible for the duration of the trace, which is one minute. Contact the System Administrator with details of the UC360 issue. Your administrator can also set an option so ethernet traces are captured automatically when network congestion occurs. 19 UC360 User Guide Using Gestures You can use the following gestures on the UC360 touch screen: Gesture What it does Tap Simply tap your finger on what you want to interact with Drag Place your finger and drag across the screen Scroll Move page up or down quickly, right or left The UC360 does not support the two-finger pinch or zoom. Customizing the UC360 Follow the procedures below to customize the UC360. Activating the UC360 Display • If the UC360 screen is dark, press Home . Note: If a mouse is attached, the mouse does not activate the display. Adjusting the In-Call Volume • Press the volume button during a call. Note: The default setting for the In-call volume is restored after only after a reboot. Adjusting the Ringer Volume • Press the volume button during ringing or idle. Adjusting Brightness 20 1. Press Home to display the Menu bar. 2. Press Settings 3. Tap Brightness. 4. Drag the brightness slider to the desired brightness. . About the UC360 Using Clean Mode Use Clean Mode to clean the UC360 touch screen. 1. Press to display the Menu bar. 2. Press Settings 3. Tap Clean Mode. . The touch screen is disabled. 4. When the screen is clean, hold for 3 seconds to exit Clean Mode. Unmounting Media If you use a USB flash drive or SD card, unmount it before removing it. 1. Press Settings . 2. Select Unmount Media. 3. Select SD Card or USB Flash Drive. 4. Remove the SD card or USB Flash Drive. Note: If you remove a device without properly unmounting it first, you will see an icon (yellow triangle with an exclamation mark) in the status bar in the upper right corner. Using the Keyboard It is recommended that you attach a physical keyboard and mouse to the UC360. The UC360 supports only one physical keyboard and mouse. The on-screen keyboard is disabled in most cases if you have a USB keyboard and mouse attached. It is best to connect the external keyboard while the UC360 is powered off. Then power on the UC360. Alternatively, you can reboot the UC360 after the keyboard has been connected. If a you select French (France) as the language, the AZERTY keyboard is the only supported external keyboard. If French language and an external QWERTY keyboard are desired, you MUST switch language to French (Canada), or it won’t be supported. If you have not attached a keyboard, the on-screen keyboard appears automatically anytime you need to type. Use the keyboard to enter text, such as contact names and IP addresses. See “External Keyboard - Supported Keys” on page 73 for information on the keys supported. 21 UC360 User Guide 22 CHAPTER 4 CONFERENCE APP UC360 User Guide 24 Conference App Introduction This chapter provides the following information on the Conference App: • “Making a Conference Call” on page 26 • “Making a Consultation Call” on page 29 • “Answering an Incoming Call” on page 31 • “Placing a Conference Call on Hold” on page 33 • “Placing a Consultation Call on Hold” on page 34 • “Switching Between Calls” on page 35 • “Muting a Conference Call” on page 35 • “Ending a Conference Call” on page 36 • “Ending a Consultation Call” on page 36 • “Cleaning Up after a Conference Call” on page 37 See “Desktop Apps” on page 47 and “Contacts App” on page 41 to learn more about these applications. Emergency Calls Warning for emergency number dialing Consult your local authorities for Emergency Numbers and 911 or equivalent service availability in your area. To make an Emergency Call: • Dial your Local Emergency Number (911 or equivalent). You may need to dial "8" or "9" or some other digit first. Contact your administrator for more information. 25 UC360 User Guide Making a Conference Call The version of the UC360 that you have determines the type of conference call you can make. You may want to prepare desktop sharing before your call. Audio with In-Room Presentation See “Displaying and Sharing Presentations” on page 49 Video with Remote Collaboration See “Sharing Presentations” on page 51 See “Displaying and Sharing Presentations” on page 49 Note: Only a single bridge is supported in a conference call. Preparing for a Video Call Before making a video call, ensure that your HDMI display is turned on, your camera is positioned correctly, and you have the information you need for presentation sharing. Activating the HDMI Display • If the UC360 screen is dark, press Home . • If the display is still dark, ensure that the HDMI monitor is turned on. When you turn on the HDMI monitor for a video call, the camera is automatically turned on. Adjusting the Camera • Before a video conference call, tap the camera icon on the touch screen. You will see your local video on the display. Check that the camera is positioned at the optimum angle to encompass the best view of the room. 26 Conference App Making an Audio or Video Conference Call 1. Tap a phone The Contacts app is displayed. (See “Contacts App” on page 41.) 2. Select a caller from the Contacts list or use the Dial Pad. 3. Tap the number to call. The call is made. (If the party is video-enabled, a video connection is established.) 4. Tap another phone to add a 2nd or 3rd party. Tip: You can put the connected party on hold first, so they don’t hear ringback and the initial “hello” when you make the 2nd or 3rd call. You can have a maximum of 3 remote participants in the conference, plus yourself. You can make or receive a fourth call, outside of the existing conference, but you cannot add this call to the conference. See “Making a Consultation Call” on page 29. For details on accessing an MCA conference, see “Accessing MCA Conferences” on page 57. 27 UC360 User Guide Using Picture-in-Picture (PIP) Once you are in a video call, you can use picture-in-picture (PIP) to see your local video during the call. • Press to turn on PIP. • Press to turn off PIP. By turning on your PIP, you can monitor your video and make any adjustments as needed. If PIP is being displayed and the user shares an application, the PIP is removed and the control is disabled. This only occurs for the UC360 that has initiated the app sharing.The remote end point will continue to see their PIP. PIP is disabled on the bridge when there is more than one video call. 28 Conference App Making a Consultation Call You may want to set up a call with another participant outside of the conference bridge, even when the bridge is full. You can make this call independent of the conference call. This is referred to as a consultation call. • Consultation calls are audio only. They cannot be video enabled. • There can be a maximum of one consultation call at a time, though up to two more consultation calls can be queued, depending on the number of available conference positions open. To make a consultation call: Note: There must already be an active conference call. 1. Tap the Saucer icon The Contacts app is displayed. (See “Contacts App” on page 41.) 2. Select the contact and make the call. When you are connected to the consultation call, the call fly-out bar is expanded to show more information. The conference call and rest of the Conference App background is blurred and the controls in the Conference App are not available as you can see in the diagram on the next page. When you switch back to the conference call again, the saucer icon will go back to its contracted position after a few seconds. (See “Switching Between Calls” on page 35.) 29 UC360 User Guide Saucer Icon You make a consultation call by pressing the Saucer icon. It is the icon in the lower left of the Conference App main window. It is hidden until a call is established. In the example below, one call has already been made, so the Saucer icon is visible and contracted. When you receive an incoming call, the call appears on the call fly-out bar. Everything in the background of the Conference App is blurred and you can use only the controls on the call fly-out bar. See “Answering an Incoming Call” on page 31 to learn how to use the various icons on the call fly-out bar. 30 Conference App Answering an Incoming Call When a call comes into the UC360, you will hear ringing and see six blue LEDs light up in the light ring in a clockwise rotating pattern. An incoming call always appears on the call fly-out bar. Incoming callers cannot call directly into a conference. The first incoming call must be added directly to the conference. Your camera automatically turns on once you receive a call. You must turn your camera off if you don’t want to send your video. Action Press ... Add the first incoming call to the conference or add queued calls to a conference. Answer the incoming call as a consultation call and talk to the caller. Reject an incoming call. Put a consultation call on hold or retrieve an existing held call. The button acts as a toggle button. Use DTMF tones when necessary. End a call. Note: A convention in the Conference App is that a vertical handset means initiate a call; a horizontal handset means end a call. 31 UC360 User Guide About Incoming Calls 32 • The background darkens to draw attention to the incoming call in the foreground. You can still control the conference call. • The center of the Consultation icon shows the caller’s photo, if available, and a plus sign if there is room to add a caller to the conference. • To answer the first call, you must use the saucer icon directly to the conference. • The UC360 can have a maximum of two queued calls based on the available conference positions open and one consultation call. Another incoming call will be rejected. • Various buttons are visible during a call as explained in “Answering an Incoming Call” on page 31. . This action moves the caller Conference App Placing a Conference Call on Hold Hold allows you to put individual participants on hold in a conference.While participants are on hold, they can still talk to other participants in the conference. To put an individual caller on hold: • Tap Hold on the conference avatar for the individual participant. When a conference participant is put on hold, the ring around the photo flashes red. In a video call, video is blocked in both directions. A static place holder image is displayed in their rectangle on your HDMI device. Your outbound video stream is no longer sent to the on-hold participant. To retrieve the held call: • Tap again to retrieve the call or press the flashing red ring on the conference avatar. The Hold button toggles between Hold and Retrieve. To put the entire conference on hold: • Tap for each participant. You cannot put the entire conference on hold with one single action. See “Conference Call Avatar” on page 39 for more information. 33 UC360 User Guide Placing a Consultation Call on Hold To put a consultation caller on hold: • Tap Hold on the call fly-out bar. When a consultation participant is put on hold, the ring around the photo flashes. You are re-connected to your conference call, if one exists. To retrieve the held call: After a short period of time, the call fly-out bar shrinks back to its contracted position on the left and continues to flash while on hold. 34 1. If necessary, press first to expand the call fly-out bar. 2. Tap to retrieve the call. The Hold button toggles between Hold and Retrieve. Conference App Switching Between Calls You can switch between your conference call and a consultation call. To switch between the conference call and a consultation call: • Tap the Consultation icon . You are connected to the caller. The conference participants are still connected to each other and can see each other, if video-enabled. • To go back to the conference, touch anywhere outside the call fly-out bar. You can also put the consultation call on hold, add it to the conference (if you have not reached the maximum 3 outside callers), or end the call. Muting a Conference Call During a conference call, you may wish to mute your UC360’s microphone. To mute a call: • Press the Mute key. Any conference call and/or consultation call is muted. The Mute key turns off the UC360 microphone, so remote participants cannot hear you. The speaker is still connected. In a video call, remote participants can still see video. To unmute a call: • Press Mute again. 35 UC360 User Guide Ending a Conference Call To end the entire conference call: 1. Press End Conference on the toolbar. 2. Press Yes when prompted by the dialog "Terminate conference call including parties on hold?". To end a call with a single participant: • Press the End Button of that participant . Ending a Consultation Call • 36 Press the End Button on the call fly-out bar. Conference App Cleaning Up after a Conference Call Use the Clean-up feature to remove any traces of activities performed during the conference call. This action preserves privacy and return the UC360 user interface to a clean default state. 1. Press Clean-up . 2. Press Yes when prompted by the dialog “Would you like to delete this history of this session?”. The Clean up action does the following: - clears the browser of passwords, history, cookies, form data, and ends the last browser session - restores screen backlight brightness to its default value - stops application sharing - logs out of the RDP application session - clears Picsel SmartOffice recent documents, closed and open document (unsaved changes are discarded) - unlinks Google Docs and Dropbox accounts in Picsel SmartOffice - clears any states in the Contacts App - turns off the camera on the HDMI device - unmounts an inserted media device 37 UC360 User Guide Additional Information You May Need to Know The following sections provide additional information on various features of the Conference Application. Audio Calls • A UC360 conference call consists of a four-way audio call in which the UC360 conference room and up to three remote parties can hear each other. The UC360 unit's audio devices consist of the hands-free speaker and 16 built-in beam forming microphones. • A conference call always starts off with a single remote party. The UC360 user adds remote parties one at a time. Individual parties can be added to and removed from a conference call at any time with a limit of three remote parties. • An incoming caller cannot call directly into the UC360 conference call. The incoming call arrives as a consultation call and must be added to the conference by the UC360 user. • The audio output from UC360 calls is always to the UC360 built-in hands-free speaker. The HDMI device's speakers are not used. • The volume on the HDMI monitor should be muted or turned to its lowest setting. • The UC360 generates audible tones to all conferenced parties whenever a user enters or leaves the call. Video Calls The Video option includes all the features of Audio, plus the following: 38 • With the Video and Remote Collaboration option, conference calls can be video-enabled. Simultaneous two-way video streams are established with each remote party that is video capable. Video capable means the remote party can display a video signal from the UC360 and is optionally camera-equipped. • Parties added to a conference call start off with video connections if they are capable. Otherwise they are audio only. • Each remote party receives a composite image consisting of the UC360-attached video camera, their own camera/video, and the other conference party videos. The UC360 HDMI device displays this same composite image. • In a two-party video call, the user cannot see UC360’s local camera on the HDMI display, unless they have turned on Picture-in-Picture (PIP). • It is possible that for certain remote parties, the video connection could be uni-directional. This would happen for instance if either UC360 or the remote party was not camera-equipped. • For details on how video conferencing interacts with the Remote Desktop App, see “Basic Rules on How Presentation Sharing Works” on page 69. • You can make video calls using UCA as a video endpoint. Conference App Conference Call Avatar Once a number is dialed, the conference party avatar enter the dialing state as illustrated below. • The animated blue rings around the photo indicate the dialing state. • The remote party's name and number are displayed. • If a photo of the called party is available from the contacts database, it is displayed. Otherwise, a grey background with an outline appears in place of the photo. If the contact's name is available from the contacts database, it is displayed. • If the contact's name is unknown, “Unknown” is displayed. When the called party answers, the conference avatar changes. • The upper button -- hold/retrieve is now enabled. • A red ring around the photo indicates the call is on hold; the call can be retrieved by pressing the red ring around the conference avatar. • A video camera indicates that the remote party is video-enabled. • The End button is available. If End is pressed, the call is terminated and the conference call state returns to idle. • Notice that the icon in the End button is a horizontal handset. A convention in the Conference App is that a vertical handset means initiate a call; a horizontal handset means end a call. 39 UC360 User Guide 40 CHAPTER 5 CONTACTS APP UC360 User Guide 42 Contacts App About Contacts Contacts lets you easily access and search contacts in the corporate directory. The Contacts app automatically displays when you start a call. • Tap a phone. The Contacts App is displayed. Finding Contacts Task Action Navigate by first name Drag First Name to the desired letter or tap the space above the desired letter Drag Last Name to Navigate by last name Drag Last Name to the desired letter or tap the space below the desired letter Drag First Name to Navigate by first/last name Drag First Name to desired letter or tap the space above the desired letter Drag Last Name to the desired letter or tap the space below the desired letter Search all contacts Press Flick through contacts Close Contacts app Tap the X in top menu or press the back key 43 UC360 User Guide Calling a Contact Once you tap a contact name, the following screen pops up. Task Action Call the contact Tap the number to call. Several may be listed: cell, work, home, pager. Go back to Contacts list Close Contacts app 44 Press the back key Press X in top menu or tap X on the pop-up window Contacts App Searching for a Contact You can search first and last names in your Contacts. 1. Tap the search field. 2. Enter search criteria using the on-screen keyboard or external USB keyboard. Note: When you are in the Contacts App, and touch the search box, the soft keyboard will be displayed in all cases even if a USB keyboard is plugged in. Names only match at the start of the word. You can enter a subset of the first and last name, and it will find all matches for that pattern, for example, David Smith, type "da sm" or "sm da". Task Action Search on first name Type letters of first name Search on last name Type letters of last name Edit search criteria Tap search box and the on-screen keyboard returns (or press the clear button) To exit search mode Press the back key 45 UC360 User Guide Using the Dial Pad You can use the dial pad to call a number. • Tap . The following screen is displayed. Task Action Enter a number Type the number on the dial pad Call the number Edit the number To exit dial pad 46 Tap on the dial pad (Some dial plans do not require this.) Press Press X in the top menu or press the back hard key CHAPTER 6 DESKTOP APPS UC360 User Guide 48 Desktop Apps About Using Desktop Applications The UC360 supports the following applications: • Browser — launch a browser to access the web-based content and sign in to your Google® accounts and Outlook Web Access. • Remote RDP — access your PC from the UC360 so you can use any application on your desktop for visual collaboration. • Picsel SmartOffice™ suite — access Microsoft® Office applications and cloud-enabled documents from Google® Docs™, Dropbox, and Box.net. • Join Me — access this simple screen sharing tool to share your desktop. Note: The HDMI display must support 1080p input. Displaying and Sharing Presentations You can access files through Google Docs, Dropbox, Box.net, a USB Flash Drive, a Micro SD Card or RDP — no laptop is required to display presentation material in-room and to remote participants. You can display and share presentations using several methods: • Remote RDP — log onto your desktop and pull up the presentation using a mouse and keyboard. • USB or Micro SD Flash drive — put your presentation on a micro SD card or USB stick and plug it into the UC360 micro SD card slot or USB slot on the side of the UC360. Use the built-in Picsel® SmartOffice™ Suite to open up the presentation. 49 UC360 User Guide Launching Shared or Non-Shared Applications An application can be either shared or non-shared. A shared application is displayed on the conference room HDMI device and is sent to remote conference parties via video streams. In this scenario, the remote parties no longer see participant video images. • Press , and then tap . A non-shared application appears only on the UC360 LCD screen. • Or tap on the UC360 screen. The following screen is displayed for Shared Mode: For more details, see 50 • “Using Remote RDP” on page 60 • “Using SmartOffice” on page 65 • “Using the Browser” on page 55 • “Using Join.Me” on page 67 Desktop Apps Sharing Presentations In a conference call, you can share a presentation in the room on the HDMI monitor and with the remote participants (if they are video-enabled). Before your conference call, turn on the camera and adjust it. This option is only available with Video with Remote Collaboration variant of the UC360. If you are using Windows 7, do the following: 1. Go to Control Panel --> System and Security --> System --> Remote Settings. 2. Select option "Allow connections from computers running any version of Remote Desktop (less secure)". Displaying your presentation 1. Tap on the UC360 screen. The Launch App Shared Mode screen is displayed. 2. Launch the application you wish to use. You have the following options: 51 UC360 User Guide • “Using Join.Me” on page 67 • “Using the Browser” on page 55 • “Using Remote RDP” on page 60 • “Using SmartOffice” on page 65. Selecting the Display Mode Once you have launched the application, you can choose what you want your participants to see: 1. Press , and then tap . You will see the following screen. The choices displayed depend on what is active on the UC360. 2. Select the display mode you wish to use. Icon Description Press this icon to share the application only with the participants. App Only Available when you have already displayed an application on the HDMI. Press this icon to share both the application and video with participants. App + Video Available when you have displayed an application on the HDMI and are in a video call. Press this icon to display the participants’ videos. Video Only Nothing Available when you are in a video call. In a point-to-point call, it will only display the remote party video. Press this icon to quickly hide what’s on the HDMI screen and stop streaming video to the remote participants. Available when you are in a video call or have shared an application. 52 Desktop Apps More About Video Calls When Video + App is selected for the display mode, the video of conference participants display down the right side of the HDMI monitor. Your video always displays at the bottom. Other videos appear on top of your video successively as the calls come in. You have the option of toggling between your presentation/application and video. Tips on Presentation Sharing and Video Task Press ... Navigate on your desktop Use the external mouse and keyboard or the UC360 touch screen Switch from presentation sharing to video Press and then on the touch screen, select Switch from video to presentation sharing Press and then on the touch screen, select Resume application sharing if interrupted Press and then select the App icon to resume app sharing End Sharing Session Press and Press Clean-up Turn on Your Camera Turn off Your Camera to terminate the conference to erase the history of the session. Tap Tap Turn on PIP Tap Turn off PIP Tap 53 UC360 User Guide Paused Applications If your application/presentation is interrupted, you will see a pause image displayed over top your app while it’s in the "Mirror and Freeze" mode. The remote parties will see the Pause as well. To return to your application if interrupted: • Press , and then tap . The Display Mode screen is displayed. • Simply press the icon to resume your previous state/activity. Accessing More Functionality While in Applications When you are in an application, the Menu function key is active for the current application. For example, when using the browser application, you can press the Menu key to access the following browser-specific functions: New window, Bookmarks, Windows, Refresh, Forward, More. To access the UC360 Menu functions, you need to first press the Home key to return to the Conference application, then select the Menu key. 54 Desktop Apps Using the Browser You can use the Browser to access web-based content and browser-based email and share information with video conference participants. You can launch a browser from the App or Non-shared App menu buttons. Once the Launch App Shared Mode screen is displayed, select the Browser icon, and it opens. You can sign in to access: • Google accounts - Gmail, Calendar, Drive, and Contacts • Outlook Web Access - Email, Calendar and Contacts . Note: Only the light version of the Outlook Web App is supported. When you login, you will see "Use the light version of Outlook Web App" selected, and you cannot change the selection. You can read your corporate email and have it displayed on both the local and HDMI display. You can open emails that include attachments and display the attachments directly on your UC360.You can also dial contacts from these applications. • See “Opening Attachments from Web-based Email” on page 56. • See “Dialing Phone Numbers from the Web Browser” on page 58. You can share web pages with conference participants similar to RDP and Picsel Smart Office. Note: When you sign into Google, it defaults to Mobile view. It is recommended that you change to Classic view by scrolling to the bottom of the page and selecting Classic. Also, when accessing Google Calendar, scroll to the bottom of the page and select Desktop. 55 UC360 User Guide Opening Attachments from Web-based Email You can open office attachments from web-based email without downloading them first. You can open a document in the browser during all call scenarios. When email attachments are opened in the browser, the document is displayed in the applicable Smart Office application. The following document types are supported: • Word • Excel • PowerPoint • PDF Tapping on the attachment opens the document, and you will see an animated progress indicator while it opens. If the document type is not supported, you will the message, "This type of file is not supported." If you are sharing with other conference participants, the document is shared with them. Likewise, if the browser is non-shared, the document is not shared. Once you launch a document from an attachment, you can press the Back key to bring the display back to the browser. If you open a document, and a document was previously opened, that document is closed with unsaved edits. You cannot download these documents to an SD card or save any type of document, including .txt documents. 56 Desktop Apps Accessing MCA Conferences You can set up a conference using MCA and the UC360. See the two recommended methods below. Using RDP - Remote Desktop 1. Prior to the meeting, use Gmail to send the meeting invitation (alternatively use Google Calendar). 2. In the meeting room, join the MCA conference from your laptop as the leader. 3. From the MCA join page, under audio instructions enter the phone number of the UC360 and have the system call you. 4. On the UC360, access RemoteRDP. 5. On the UC360 RDP screen, enter your full computer name (i.e. ca123456.mitel.com) and Connect, log in to your computer and go to your Collaboration Client. 6. On the UC360 RemoteRDP session, go to the Collaboration Client and start Sharing (also see “Tips on Presentation Sharing and Video” on page 53 below to toggle from video to app). Using the Web Browser from UC360 1. Follow steps 1 to 3 above. 2. On the UC360, use the web browser to log into your Gmail. 3. On the UC360, in the browser click on the link in the email and join the portion via web client. (See the MCA Quick Reference Card for more information on Personal ID’s if one is required to join the meeting.) 4. On the UC360, select App Only to view presentation (see “Selecting the Display Mode” on page 52 for more information). 5. On your laptop, start sharing your presentation (you will see the sharing on the UC360 and large screen - if equipped). 6. You can select a link from a browser-based email or calendar event to launch a new web page, for example, an MCA conference link. Other UC360’s on the host UC360 bridge should not view the MCA presentation through their UC360 browser. They will see the presentation being shared by the host UC360. 57 UC360 User Guide Support for Web-Based Media Media embedded in web pages can be played and shared with some caveats. Not all video and audio formats will play, as Flash and HTML5 have limited support. Audio can be heard through the local speaker, but will not be mixed to remote parties in a conference yet.You can adjust the volume using the volume keys on the UC360. If an incoming call is received while playing media in the browser (or if you navigate away from the browser with back or home) the media will stop playing and will have to be restarted from the beginning when returning to the browser. • When you are sharing video in a multi-party call, you may need to adjust the media source volume. For example, while talking with the remote parties, your conference volume may be adequate, but once you start sharing media, the volume will be lower to the remote parties. Adjust the media volume by using the volume control on the UC360. • During a video call, if you decide to play the video locally on the UC360 LCD display, the video is not played and you see the following message: "Cannot play video - Sorry this video cannot be played." • If you are sharing your application with video (App & Video), and play a song or video from the web, you will not see your video or the remote participants video while the media player is active. Dialing Phone Numbers from the Web Browser The Browser can identify phone numbers and highlight them as clickable text. When you click a phone number, the Contact App opens, and you can add digits if necessary. Digits are not automatically added. For example, you can create conference calls with people outside of your corporate directory without having to manually dial their numbers. • Look up contact phone numbers stored in your personal Outlook or Gmail contacts. • Dial a number from your Calendar. To dial a number 1. Open Gmail or Outlook in the browser. 2. Click on the contact number. The Contacts App opens. 58 3. Append a 9 or any other digit to dial an outside line. 4. Tap on the dial pad to make call. Desktop Apps Notes About Dialing Numbers from the Web Browser The Conference App determines if the conference can handle another call, and if so, will assign a conference avatar to be the one that is dialing. The dialed digits are displayed in the Contacts App. The cursor is placed at the start of the of the digits edit box in order to pre-pend any digits. The dial plan will not be applied to the number received from the browser; however, once the number is displayed in the Contacts App, if you change the number, the dial plan will perform the necessary checking on each entered digit. Settings and Privacy You can clear the cache, form data, searches and browsing history by pressing the Menu button while in the browser, and then More -> Settings. You have the choice of several options: Clear Cache, Clear History, Clear Passwords, Clear Form Data and so forth. 59 UC360 User Guide Using Remote RDP RDP stands for Remote Desktop Protocol. It is a proprietary protocol developed by Microsoft®, that provides a graphical interface to your computer. Remote (RDP) lets you access a Windows session on your PC or laptop remotely and see the files, programs, and resources exactly as you would if you were sitting at your desk, while you are using the UC360. With RDP, you can display your desktop locally to people in the room with you, or you can share your desktop with remote participants. Tip: Before you use Remote Desktop, do the following: • Ensure that the UC360 has a keyboard and mouse attached. This is very important as it keeps your password hidden while sharing applications in a video call. • Set up your computer to use Remote Desktop. See “Setting Up Your Computer to Use Remote Desktop” on page 60 or see Windows help for instructions. • Have the name of your computer handy. • Make sure your computer is turned on. If you use Remote Desktop on a regular basis, your administrator can preset your UC360 to connect automatically when you use RDP. You will be prompted for your password. See “RDP Settings” on page 68 for more information. Note: RDP may not render remote software properly if it employs high-end graphics, for example, CAD and/or modelling applications. Setting Up Your Computer to Use Remote Desktop To find the full FQDN (hostname and domain) of your desktop PC or Laptop, follow the steps below. This example assumes that Windows 7 installed on the PC. 1. Under the Control Panel, proceed to System. On the page that is displayed, you will see a section labeled Computer name, Domain, and Workgroup settings. 60 2. Under this section, there will be an entry called Full computer name. Beside this entry will be the FQDN for your PC (for example: PC123456.mitel.com). 3. Write this down so that it is available when you set RDP to access your PC from the UC360. Desktop Apps To allow your PC to share information you must: 1. Go to Control Panel in your PC and select System. 2. On the left hand side, select Remote Settings. 3. In the subsequent window, select the appropriate Remote Desktop Settings. For the UC360, select Allow connections from computers running any version of Remote Desktop. Launching Your RDP Session You can launch RemoteRDP in a variety of ways, depending on your use: Non-shared Use • Press to display the Menu bar, then press App . Shared Use • Tap on the UC360 screen. • Or press Menu, then Share App . The Launch App Shared Mode or Non-Shared Mode screen is displayed. 61 UC360 User Guide When you tap RemoteRDP on the Launch screen, the following screen is displayed: 62 Desktop Apps • Enter the hostname or IP Address of your computer in the first text box and press Connect. If using a PC name, ensure that you add the domain name after the name, for example, mycomputer.mitel.com. OR • If your computer’s IP Address or host name has been preset by your administrator, press Connect for the Preset Remote Computer. Your Windows login screen is shown. • Enter your password using the on-screen keyboard or the external keyboard and mouse. You will be connected to your desktop. • Navigate to the application that you want to share with your conference participants. • Note that in Windows 8, you must change the screen resolution to use applications, such as Weather. Note: When you are in a video call, you will no longer see your video participants, unless you have selected App & Video for the display mode. If not, the desktop pre-empts any video images. They also cannot see you. 63 UC360 User Guide Pre-Saved Remote Computer To make remote desktop access easier to use, you can save your computer’s IP address/host name to a USB flash drive. 1. Insert a flash drive into the UC360. 2. Tap 3. Press the RemoteRDP icon on the Launch App Shared Mode screen. 4. Unmount the flash drive. (See “Unmounting Media” on page 21.) 5. Enter your computer’s IP address or hostname in the top text box of the RDP screen and press Save and Connect. on the UC360 screen. Your computer’s hostname/IP address is saved in a file called uc360RDPID on your flash drive. You can now plug your flash drive into any UC360 and will recognizes the file. You will see your hostname/IP address appear in the third section of the screen above, Pre-Saved Remote Computer. Press Connect to access your computer. If you open the RDP screen before inserting your flash drive, press the Refresh button to check for any newly-inserted flash drive. To overwrite the host, enter the new hostname in the top section and press Save & Connect. A dialog box will ask you to confirm overwriting of the old hostname. 64 Desktop Apps Using SmartOffice Picsel® SmartOffice™ suite provides access to MS Office applications, including PDF and Microsoft 97-2010 Word, Excel and Power Point file formats.You can use SmartOffice to access any of your presentations on a USB flash drive or SD card, as well as access to the Dropbox™ and Google® Docs. The UC360 supports a subset of the features in Picsel SmartOffice 2.1. See Appendix B, “Using Piscel SmartOffice" for more information. Launching SmartOffice You can launch SmartOffice in a variety of ways, depending on your use: Non-shared Use • Press to display the Menu bar, then press App . Shared Use • Tap on the UC360 screen. • Or press Menu, then Share App . The Launch App Shared Mode or Non-Shared Mode screen is displayed. Once you select SmartOffice, you will see a splash screen. Next, you will see a screen allowing you to use the SmartOffice browser to navigate to the document and application you need to use. 65 UC360 User Guide Clicking Web Links in Smart Office Documents You can click web links (hyperlinks) in Word documents. Currently, web links are not supported in PDF, Excel and PowerPoint documents. When you click on the web link, the browser opens to the specified web page. If you are sharing the with other conference participants, the opened browser is shared with them. Likewise, if the browser is non-shared, the web link is not shared. Once the browser is launched from a web link, you can press the Back key to bring the display back to the shared document. If you open a browser, and the browser was previously opened to some web page, the browser keeps the previous web page in its Menu/Windows view. Limitations of Using Picsel SmartOffice and Google Docs on the UC360 • You cannot click web links in PDF, Excel and PowerPoint documents. • You cannot print documents from Picsel Smart Office. • When you open a Picsel or Google document with animation, the animation is not visible. Refer to Appendix B “UC360 SmartOffice Support” on page 79 for further details. 66 Desktop Apps Using Join.Me Use join.me™ as a simple screen sharing tool to share your desktop.You can launch it in a variety of ways, depending on your use: Non-shared Use • Press to display the Menu bar, then press App . Shared Use • Tap on the UC360 screen. • Or press Menu, then Share App . The Launch App Shared Mode or Non-Shared Mode screen is displayed. • Press the join.me icon. You will see a sign-in screen. • Enter the code you may have received in an email link or the code given to you from the presenter. • Tap the big green arrow button. You have now joined the sharing session. Note: Clicking a join.me link from an email link is not supported. 67 UC360 User Guide Limitations of Using join.me • The UC360 cannot host a meeting. You can use the RemoteRDP application to control the PC that is hosting the shared join.me session. • The PC hosting the meeting cannot pass control to the join.me client on the UC360. • The join.me client on the UC360 can view the presentation, chat with the participants, pinch the touch screen to zoom in/out of the presentation. • For information about hosting a meeting with join.me, see www.join.me. Some Practical Applications for join.me 68 • With your laptop in the conference room, start join.me on your laptop. Get your presentation, document, or spreadsheet ready. Start join.me on the UC360 and share it on the HDMI display. Control the join.me session from the laptop. • Same as above, but the remote UC360 with an HDMI display also starts the join.me session to the other conference room using the same join.me ID. There is a conference call between the two of you. You can control the presentation from your laptop. • You can use RDP to login to your desktop. Start join.me on your PC. Call another user on the UC360, and they can start their join.me session with your join.me user ID. • Another user can join using the last two scenarios by starting join.me on their PC and call into the UC360 using a regular phone (home, cell, etc). Desktop Apps Basic Rules on How Presentation Sharing Works • You can share any application. Sharing means displaying the app on the UC360 primary screen, and on the HDMI device and transmitting it via video stream to all remote conference call participants who are video capable. (This is available on Video and Remote Collaboration variant only.) • Join.Me can be used to share presentations with non-video participants. • The audio output from applications running on the UC360, whether shared or not, is always played to the UC360 built-in handsfree speaker. The HDMI device speakers are not used for playing media. Ensure the volume is muted or turned down to its lowest level. • You can use the external mouse and keyboard and/or the touch screen on the UC360 to navigate the application, for example, a Power Point presentation. If an external keyboard is connected, the UC360 on-screen keyboard is not available, with a few exceptions. • While your desktop/application is displayed on the in-room HDMI display, it is mirrored to the participants. • If a call comes in, or you press Home or Back button, the last image is captured as a freeze frame and is displayed on the in-room HDMI device as well as to the remote participants with a Pause symbol. The application is no longer interactive. It is in the freeze state. The exception is if you were playing video, and press Home, the Pause symbol appears with a blank screen in the background. • You can resume the desktop/application by pressing the Share Application icon and then the App you were sharing; your desktop resumes interactive mirroring. • The Home or the Back button is the normal way to freeze the shared application and return to the Conference App. This allows you to perform other activities on the UC360 while your desktop is frozen. , 69 UC360 User Guide 70 APPENDIX A EXTERNAL KEYBOARD - SUPPORTED KEYS UC360 User Guide 72 External Keyboard - Supported Keys External Keyboard - Supported Keys It is recommended that you attach a physical keyboard and mouse to the UC360. The UC360 supports only one physical keyboard and mouse. The on-screen keyboard is disabled in most cases if you have a USB keyboard and mouse attached. It is best to connect the external keyboard while the UC360 is powered off. Then power on the UC360. Alternatively, you can reboot the UC360 after the keyboard has been connected. Not all keys or functions on the physical keyboard are supported. Some applications may support more keys or functions than others. See the tables below for a list of the supported keys. A check mark indicates that the keys are supported. • “Qwerty Keyboard Support” on page 74 • “Azerty Keyboard Support” on page 75 73 UC360 User Guide Qwerty Keyboard Support Keys/Functionality Contacts App Remote Desktop Smart Office 2 Web Browser a-Z 1-9 Shift + 0-9 Space ’ , ~ < and > Not supported Not supported Insert Not supported Supported for only some applications Not supported Not supported Home Delete Not supported forward delete Not supported Not supported End Not supported Not supported (inserts 8) Not supported Not supported Page Up/Down Not supported Not supported Not supported Num Lock Not supported Not supported Not supported Caps Lock Shift key twice Not supported Not supported Shift Up Arrow Down Arrow Left Arrow Right Arrow Control + v Not supported Not supported Not supported Control + x Not supported Not supported Not supported Control + z Not supported Not supported Not supported Control + c Not supported Not supported Not supported Not supported Not supported Not supported Not supported Not supported F1 F2-F12 (except for F10) Print Screen Not supported Not supported Not supported Not supported Scroll Lock Not supported Not supported Not supported Not supported Pause Break Not supported Not supported Not supported Not supported Windows key Not supported Not supported Not supported Not supported Tab Not supported Not supported Enter Not supported Esc 74 (except F10) External Keyboard - Supported Keys Azerty Keyboard Support Keys/Functionality a-Z Contacts App RDP Smart Office 2 Web Browser € (not supported) € (not supported) € (not supported) € ( not supported) Umlaut not supported 1-9 ^ (not supported) Shift + 0-9 Space ’ , ~ < and > Not supported Not supported Insert Not supported Not supported Not supported Home Delete Not supported forward Not supported Not supported delete End Not supported Not supported (inserts < when pressed) Not supported Not supported Page Up/Down Not supported Not supported Not supported Num Lock Not supported Not supported Not supported Caps Lock Not supported Not supported Not supported Shift Up Arrow Down Arrow Left Arrow Right Arrow Control + v Not supported Not supported Not supported Control + x Not supported Not supported Not supported Control + z Not supported Not supported Not supported Control + c Not supported Not supported Not supported F1 Not supported Not supported F2-F12 Not supported Not supported Not supported Not supported (except for F10) (except F10) Print Screen Not supported Not supported Not supported Not supported Scroll Lock Not supported Not supported Not supported Not supported Pause Break Not supported Not supported Not supported Not supported Esc 75 UC360 User Guide 76 Keys/Functionality Contacts App RDP Smart Office 2 Web Browser Windows key Not supported Not supported Not supported Not supported Tab Not supported Not supported Enter Not supported APPENDIX B USING PICSEL SMARTOFFICE UC360 User Guide 78 Using Picsel SmartOffice Using Picsel SmartOffice SmartOffice supports the following applications: • File Browser • PDF Viewer • Word Viewer/Editor • Excel Spreadsheet Viewer/Editor • PowerPoint Presentation Editor/Viewer There are some restrictions with the current file type support for password protected files – only encrypted PDF files are supported. The list of supported file extensions are listed below: • txt • rtf • doc • docx • xls • xlsx • ppt • pptx • pdf UC360 SmartOffice Support The UC360 supports a subset of the features in Picsel SmartOffice 2.1.The following features are supported: • Box.net • Visual Explorer • Font compatibility for foreign languages • Resizing images in documents • Performance and stability enhancements • Format support enhancements • JPEG2000 support 79 UC360 User Guide UC360 SmartOffice Limitations The following limitations exist with UC360 SmartOffice support: • You cannot click web links in PDF, Excel and PowerPoint documents • You cannot print documents from Picsel SmartOffice. • When you open a Picsel or Google document with animation, the animation is not visible. In a Word document, the following keys do not work: • The number keys on the number keypad • Caps Lock key • Tab key • Insert, Delete, and End keys See “External Keyboard - Supported Keys” on page 73 for more information. Editing User Interface Basics All files types other than PDF can be edited using a common user interface. Single tapping with a finger or using a mouse will insert an edit cursor. Type using the on-screen touch keyboard or hide that keyboard, and use the attached physical keyboard. Double tap a word to select it. The on-screen popup bar can be used to modify properties of the selected text, such as the font. Cut/Paste can be used to launch another popup menu to copy/cut/paste the selected text. You can save the document using one of the file icon options or by pressing the Back key to exit the editor. You will be offered an option to save or discard changes if there are any unsaved changes. 80