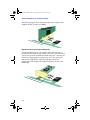
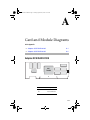
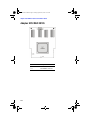
1
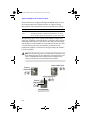
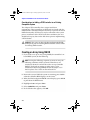
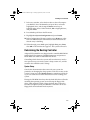
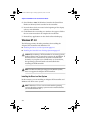
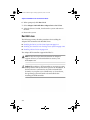
R2N2 RAID IG.BOOK Page 1 Monday, September 9, 2002 12:01 PM
INSTALLATION GUIDE
ADAPTEC SCSI RAID 2010S/2015S
R2N2 RAID IG.BOOK Page i Monday, September 9, 2002 12:01 PM
Adaptec SCSI RAID 2010S/2015S
Installation Guide
R
R2N2 RAID IG.BOOK Page ii Monday, September 9, 2002 12:01 PM
Copyright
© 2000 - 2002 Adaptec, Inc. All rights reserved. No part of this publication may be
reproduced, stored in a retrieval system, or transmitted in any form or by any means,
electronic, mechanical, photocopying, recording or otherwise, without the prior
written consent of Adaptec, Inc., 691 South Milpitas Blvd., Milpitas, CA 95035.
Trademarks
Adaptec and the Adaptec logo are trademarks of Adaptec, Inc., which may be
registered in some jurisdictions.
Windows NT, Windows XP, and Windows 2000 are trademarks of Microsoft
Corporation in the US and other countries, used under license.
Linux is a trademark of Linus Torvalds, RED HAT is a registered trademark of Red
Hat, Inc.
RAIDIOS is a trademark of Intel Corp.
All other trademarks are the property of their respective owners.
Changes
The material in this document is for information only and is subject to change
without notice. While reasonable efforts have been made in the preparation of this
document to assure its accuracy, Adaptec, Inc. assumes no liability resulting from
errors or omissions in this document, or from the use of the information contained
herein.
Adaptec reserves the right to make changes in the product design without reservation
and without notification to its users.
Disclaimer
IF THIS PRODUCT DIRECTS YOU TO COPY MATERIALS, YOU MUST HAVE
PERMISSION FROM THE COPYRIGHT OWNER OF THE MATERIALS TO AVOID
VIOLATING THE LAW WHICH COULD RESULT IN DAMAGES OR OTHER
REMEDIES.
ii
R2N2 RAID IG.BOOK Page iii Monday, September 9, 2002 12:01 PM
Regulatory Compliance Statements
Federal Communications Commission Radio Frequency Interference Statement
WARNING: Changes or modifications to this unit not expressly approved by the party
responsible for compliance could void the user’s authority to operate the equipment.
This equipment has been tested and found to comply with the limits for a Class B digital device,
pursuant to Part 15 of the FCC rules. These limits are designed to provide reasonable protection
against harmful interference in a residential installation. This equipment generates, uses, and can
radiate radio frequency energy, and if not installed and used in accordance with the instruction
manual, may cause harmful interference to radio communications. However, there is no
guarantee that interference will not occur in a particular installation. However, if this equipment
does cause interference to radio or television equipment reception, which can be determined by
turning the equipment off and on, the user is encouraged to try to correct the interference by one
or more of the following measures:
• Reorient or relocate the receiving antenna.
• Increase the separation between equipment and receiver.
• Connect the equipment to an outlet on a circuit different from that to which the receiver is connected.
• Consult the dealer or an experienced radio/television technician for help.
• Use a shielded and properly grounded I/O cable and power cable to ensure compliance of this unit to the
specified limits of the rules.
This device complies with part 15 of the FCC rules. Operation is subject to the following two
conditions: (1) this device may not cause harmful interference and (2) this device must accept any
interference received, including interference that may cause undesired operation.
Adaptec, Inc.
SCSI RAID2010S/2015S
Tested to Comply
With FCC Standards
FOR HOME OR OFFICE USE
European Union Compliance Statement
This Information Technology Equipment has been tested and found to comply with the
following European directives:
EMC Directive 89/336/EEC, as amended by 92/31/EEC and 93/68/EEC
EN 50081-1 (1992)
EN55022 (1994) Class B
EN 50082-1 (1992)
EN61000-4-2 (1998)
EN61000-4-3 (1998)
EN61000-4-4 (1995)
EN61000-4-5 (1995) Surges
EN61000-4-6 (1996) Conducted immunity
EN61000-4-11 (1994) Supply dips of variation
Australian/New Zealand Compliance Statement
This device has been tested and found to comply with the limits for a Class B digital
device, pursuant to the Australian/New Zealand standard AS/NZS 3548 set out by the
Spectrum Management Agency.
iii
R2N2 RAID IG.BOOK Page iv Monday, September 9, 2002 12:01 PM
Canadian Compliance Statement
This Class B digital apparatus meets all requirements of the Canadian InterferenceCausing Equipment Regulations.
Cet appareil numérique de la classe B respecte toutes les exigences du Règlement sur le
matérial brouilleur du Canada.
Japanese Compliance (Voluntary Control Council Initiative)
This equipment complies to class B Information Technology equipment based on VCCI
(Voluntary Control Council for Interface). This equipment is designed for home use but
it may causes radio frequency interference problem if used too near to a television or
radio. Please handle it correctly per this documentation.
iv
R2N2 RAID IG.BOOK Page v Monday, September 9, 2002 12:01 PM
Contents
1
Introduction
Read this First 1-1
Register your controller 1-1
System Requirements 1-2
Storage Requirements for Drivers and Software 1-2
Motherboard Compatibility 1-2
SCSI Requirements 1-2
Kit Contents 1-3
Adaptec ZCR Controller Features 1-3
Specific Characteristics of ZCR Controllers 1-5
About the Documentation 1-7
Overview of the Installation Process 1-7
Storage Management Software Overview 1-8
Safety Information 1-9
Notes, Cautions, and Warnings 1-9
Electrostatic Discharge 1-9
2
Installing Your Controller
Configuring SCSI Devices 2-1
Narrow and Wide SCSI Devices 2-2
LVD and SE Devices 2-2
SCSI Cables 2-2
SCSI Device IDs 2-2
SCSI Termination 2-3
Installing the Controller 2-5
Considerations to Adding a ZCR Controller to an Existing
Compatible System 2-6
Creating an Array Using SMOR 2-6
Determining the Booting Controller 2-7
System Setup 2-7
Configuring the Controller to Boot from Channel 1 2-8
Controller IRQ and Address 2-8
After Setting Up your System 2-9
v
R2N2 RAID IG.BOOK Page vi Monday, September 9, 2002 12:01 PM
Adaptec SCSI RAID 2010S/2015S Installation Guide
3
Installing the Driver
Driver Disks 3-2
Creating the Driver Disk from the Bootable CD 3-2
New Installations 3-3
Windows 2000 and XP 3-4
Installing the Driver in a New System 3-4
Adding the Controller to an Existing System 3-5
Windows NT 4.0 3-6
Installing the Driver in a New System 3-6
Installing the Controller in an Existing System 3-7
Red Hat Linux 3-8
Installing the Driver in a New Linux System 3-9
Installing the Controller in an Existing Linux
System 3-10
Installing a Newer Driver 3-12
4
Installing Storage Management Software
System Requirements 4-2
Linux Considerations 4-2
Installing Storage Manager 4-3
Operating System Compatibility
A
Card and Module Diagrams
Adaptec SCSI RAID 2010S
Adaptec SCSI RAID 2015S
A-1
A-2
B
Troubleshooting
C
Controller Reset Procedures
NVRAM Reset C-2
Flash Mode 0 C-2
D
vi
Specifications
4-3
R2N2 RAID IG.BOOK Page 1 Monday, September 9, 2002 12:01 PM
1
Introduction
In this Chapter
Read this First
1-1
Register your controller
1-1
System Requirements
1-2
Kit Contents
1-3
Adaptec ZCR Controller Features
1-3
About the Documentation
1-7
Overview of the Installation Process
1-7
Storage Management Software Overview
1-8
Safety Information
1-9
Read this First
Before you begin installing your new Adaptec SCSI RAID 2010S/
2015S Zero Channel RAID (ZCR) controller, read this chapter. This
chapter is an important guide to the rest of the documentation and
provides a summary of the installation process.
Register your controller
Before you go any further, please register your ZCR controller at
register.adaptec.com.
1-1
R2N2 RAID IG.BOOK Page 2 Monday, September 9, 2002 12:01 PM
Adaptec SCSI RAID 2010S/2015S Installation Guide
System Requirements
The following system requirements are discussed:
■
Storage requirements for drivers and software.
■
Motherboard compatibility.
■
SCSI requirements.
Storage Requirements for Drivers and Software
Adaptec Storage Management software and device drivers require
approximately 5 MB of disk space. The host system should have
64 MB of memory, and a Pentium processor that is at least as fast as
200 MHz. A mouse and SVGA color monitor are also required.
These requirements are met for the 2010S and 2015S. Motherboards
designed to work with these controllers are server motherboards
having Pentium III or later processors or equivalents with ample
memory and faster than 200 MHz operating speeds.
Motherboard Compatibility
The Adaptec controller requires a motherboard BIOS that:
■
Complies with the PCI Local Bus Specification - revision 2.2.
■
Supports multifunction devices where one of the devices is a
PCI bridge.
■
Provides large memory-mapped address ranges.
■
provides SCSI device connectivity along with at least one
motherboard based SCSI channel.
The Adaptec ZCR controllers provide advanced RAID
functionality to server motherboards incorporating on-board
Adaptec Ultra320 SCSI and Embedded RAID Logic (EMRL) or
RAIDIOS™ logic. The ASR-2010S is designed to work in one of the
supported EMRL- or RAIDIOS-enabled PCI slots. The ASR-2015S
plugs into a specially-designed SO-DIMM PCI connector, present
only on specific motherboards.
SCSI Requirements
The ASR-2010S/2015S ZCRs are designed to be used with Ultra 320
hard disk drives, they will operate, at a reduced level of
1-2
R2N2 RAID IG.BOOK Page 3 Monday, September 9, 2002 12:01 PM
Introduction
performance, with all SCSI devices of Ultra 2 or higher. Use of SCSI
devices older than Ultra 2 is not suggested.
Kit Contents
Your Adaptec controller kit includes:
■
ASR-2010S or ASR-2015S (does not include cables).
■
Warranty cards.
■
Adaptec SCSI RAID 2010S/2015S (this book).
Adaptec ZCR Controller Features
Adaptec ZCR controllers support:
■
RAID levels 0, 1, 5, multilevel 10 and 50, JBOD (Just a Bunch Of
Drives).
■
Fixed cache memory with Error Correction Code (ECC).
■
Predictive caching capability.
■
PCI Local Bus Specification, Revision 2.2 with PCI clock speeds
up to 66 MHz.
■
Microsoft Windows® 2000, Windows® NT, Windows® XP, and
Red Hat Linux.
■
Operating system independent configuration and RAID
creation using Storage Manager On ROM (SMOR).
■
Local and remote configuration, array status, and I/O
monitoring using Adaptec Storage Management software.
■
Intelligent hot spares that automatically replace failed drives.
When multiple hot spares are available on a controller, the
intelligent hot spare algorithm picks the best spare based on
capacity and bus location. RAIDs are rebuilt automatically
using the spare drive.
■
ASPI protocol support for third-party applications and utilities.
■
Flash ROM for easy upgrades of controller firmware, controller
BIOS, and SMOR.
■
Event logging and broadcasting, including messaging for
alphanumeric pagers.
1-3
R2N2 RAID IG.BOOK Page 4 Monday, September 9, 2002 12:01 PM
Adaptec SCSI RAID 2010S/2015S Installation Guide
■
Windows XP, Windows 2000, and Windows NT only—Array
expansion and extension during normal operation on RAID 0 or
RAID 5 arrays with the NTFS file system. Refer to the Adaptec
Storage Management Software User’s Guide for more information.
■
Legacy SCSI devices (including hard disk, tape, CD-ROM,
CD-RW, and Magneto-Optical drives) and jukeboxes.
■
SCSI Accessed Fault-Tolerant Enclosure (SAF-TE) and SCSI
Enclosure Services (SES) for high-availability Local Area
Network (LAN) servers and storage subsystems.
■
Adaptec RAID software supports up to 64 hard disk drives per
array and up to 2 Terabytes of storage capacity per array.
RAID features are summarized in the following table:
PCI bus type (bits/MHz)
Cache, standard (MB)
Channels1
2015S
64/66
48
48
0
0
# Devices per channel2
15
15
Total # devices
30
30
# Connectors, internal1
0
0
1
0
0
RAID 0, 1, 5, 10, 50, JBOD
Yes
Yes
Hot spare
Yes
Yes
Hot swap
Yes
Yes
PCI3
SO-DIMM4
# of
# Connectors, external
Connector type
1
2
3
4
1-4
2010S
64/66
Usable channels and whether they are internal, external, or both
depends on motherboard design. No channels on controller.
ZCR controllers support Ultra320 and legacy hard disk drives
and non-hard-disk-drive devices, such as CD and tape drives.
Requires a special PCI slot designed to support the
motherboard’s RAIDIOS or EMRL logic connections.
Requires a special attachment slot (a PCI connected SO-DIMM)
to connect to the motherboard’s EMRL logic.
R2N2 RAID IG.BOOK Page 5 Monday, September 9, 2002 12:01 PM
Introduction
Specific Characteristics of ZCR Controllers
ZCR controllers perform the same functions as add-in RAID
controller cards, but Adaptec’s ZCR controllers can only be used in
motherboards that support EMRL or RAIDIOS logic and on-board
Adaptec Ultra320 SCSI Protocol Chips (SPC). When a ZCR is not
installed, EMRL logic is not active, letting the SPC function as a
SCSI adapter only.
Note: Neither the ASR-2010S or the ASR-2015S will function
when used with motherboards having embedded Adaptec
7899W or 7892 U160 SCSI chips. Use ASR-2000S or ASR-2005S
controllers for those motherboards using U160 SCSI chips.
Data stored on any individual SCSI hard disk drive must be
backed-up prior to installing a ZCR. Once installed, the ZCR hides
the normal SCSI BIOS and replaces it with an I2O RAID BIOS and
SMOR.
To meet the space constraints of the high-density servers and the
flexibility required for the pedestal servers, EMRL is designed to
support two form factors. One is a PCI add-in card and the other is
a daughter card designed to attach to a motherboard connector.
Functionally the PCI add-in card and the SO-DIMM card are
identical. The primary difference is the form factor of the two cards.
Pedestal Server Form Factor Implementation
The Adaptec PCI-based ZCR controller (2010S) is packaged in a
low profile PCI form factor, targeting the 1U and 2U server market
using a discrete I/O controller on the motherboard. This
implementation is intended to be used in the more generic pedestal
server designs.
The 2010S requires EMRL or RAIDIOS on the motherboard to
allow the Input/Output Controller (IOC) to function normally
when the ZCR controller is not installed, but be hidden and
controlled only by the ZCR controller Input/Output Processor
(IOP) when the Adaptec PCI-based ZCR controller is installed.
1-5
R2N2 RAID IG.BOOK Page 6 Monday, September 9, 2002 12:01 PM
Adaptec SCSI RAID 2010S/2015S Installation Guide
The following figure shows the relationship of the Adaptec ZCR
2010S to the IOC, PCI bus, and EMRL.
P
ZCR-IO
PCI
EM
Logi RL
c IOC
High Density Server Form Factor Implementation
This implementation uses a low-profile connector and card to
provide the ZCR functionality. All the normal PCI signals found in
a PCI slot route to the motherboard ZCR connector -- allowing the
ZCR card to be plugged in without using a PCI slot, critical for
high-density applications. The following figure shows the
relationship of the Adaptec ZCR 2015S to the IOC, PCI bus, and
EMRL logic.
IOP
PCI
1-6
ZCR
EM
Logi RL
c IOC
R2N2 RAID IG.BOOK Page 7 Monday, September 9, 2002 12:01 PM
Introduction
About the Documentation
The complete documentation set for Adaptec ZCR controllers
consists of the following:
■
Adaptec SCSI RAID 2010S/2015S Installation Guide (this book)—
Contains information that helps you to configure and install
your Adaptec ZCR controller and attached devices.
■
Adaptec Storage Management Software User’s Guide—Describes
how to use SMOR, Adaptec Storage Manager software, and the
RAIDUTIL command line utility.
Storage Manager provides online help for creating and managing
RAIDs, including topical and pop-up help displays.
Overview of the Installation Process
The following steps provide an overview of the process of
installing and setting up the controller and configuring the ZCR:
1 Read this entire chapter.
2 Verify that your motherboard is compatible with the controller.
For details, refer to Motherboard Compatibility on page -2.
3 Install and configure your Adaptec ZCR controller and hard
disk drives according to the instructions in Chapter .
4 Use SMOR to set up your boot array. Refer to Chapter .
5 Install the controller driver according to the instructions in
Chapter . If you are building a new system, installing the driver
involves installing the operating system, too.
Chapter presents numerous scenarios for installing the driver.
Identify the scenario that applies to your system before
proceeding. When installing the driver, you may need to use
SMOR to configure the controller or create the array.
6 Install the Adaptec Storage Management software application,
software installation procedures are described in Chapter .
1-7
R2N2 RAID IG.BOOK Page 8 Monday, September 9, 2002 12:01 PM
Adaptec SCSI RAID 2010S/2015S Installation Guide
Storage Management Software Overview
Adaptec supplies a number of software applications for setting up
and managing RAID arrays with the Adaptec ZCR. One is a
Graphical User Interface (GUI), one is a Command-Line Interface
(CLI) that is loaded along with the GUI application, and the third is
provided as a utility that may be used before the operating system
is available.
■
Adaptec Storage Management software—The GUI through
which you interact with the storage subsystem. Storage
Manager supports the following operating systems:
■
Windows NT 4.0, 2000, XP
■
Red Hat Linux 7.3
Note: Up-to-date information, including the latest versions
of drivers and RAID management software for Adaptec
RAID products, may be found by perusing Adaptec’s web
site at www.adaptec.com. Similar information for LINUX
may be found at linux.adaptec.com
Furthermore, Adaptec Storage Management provides
additional features, such as Simple Network Mail Protocol
(SNMP) and Desktop Management Interface (DMI) agents.
■
RAIDUTIL CLI—Provides the same functions as Storage
Manager in environments where a GUI is not available. It is also
scriptable, making it an invaluable companion RAID
configuration utility in environments where many similarlyconfigured RAID subsystems must be replicated quickly. For
details, refer to the Adaptec Storage Management Software User’s
Guide.
■
SMOR—A built-in utility that is part of the controller’s BIOS
code. Start SMOR by pressing Ctrl+A during BIOS startup. For
details, refer to Configuring the Controller to Boot from Channel 1
on page -8.
1-8
R2N2 RAID IG.BOOK Page 9 Monday, September 9, 2002 12:01 PM
Introduction
Safety Information
Any device that uses electricity must be treated with caution. To
ensure general safety:
■
Keep your work area and the computer clean and clear of
debris. Eliminate hazards such as spills or bad wiring.
■
Before opening the system cabinet, unplug the power cord.
Notes, Cautions, and Warnings
This Installation Guide uses notes, cautions, and warnings that
emphasize important information, as described below:
Note: Emphasizes important information that, if ignored,
would not result in injury, property damage, or data loss.
!
Caution: Emphasizes important information that, if ignored,
could cause equipment failure or loss of data.
Warning: Indicates a hazard that could cause injury or property
damage.
Electrostatic Discharge
Electrostatic discharge (ESD) is a natural by-product of human
activity. ESD is transmitted by materials that retain and accumulate
electrical charges.
!
Caution: ESD can damage electronic components when they
are improperly handled and can result in complete or
intermittent failures. Always follow ESD-prevention
procedures when removing and replacing components.
1-9
R2N2 RAID IG.BOOK Page 10 Monday, September 9, 2002 12:01 PM
Adaptec SCSI RAID 2010S/2015S Installation Guide
To prevent ESD damage:
■
Always use an ESD wrist or ankle strap and ensure that it
makes skin contact.
■
Connect the equipment end of the strap to an unpainted metal
surface on the chassis.
■
If no wrist strap is available, ground yourself by touching the
metal chassis.
■
When installing or removing a component, use any available
ejector levers or captive installation screws to properly seat the
bus connectors in the backplane or card slot. These devices
prevent accidental removal, provide proper grounding for the
system, and help to ensure that bus connectors are properly
seated.
■
Handle adapter cards by available handles or edges only. Avoid
touching the printed circuit boards or connectors.
■
Avoid contact between printed circuit boards and clothing. The
wrist strap only protects components from ESD voltages on the
body; ESD voltages on clothing can still cause damage.
■
Place a removed component board-side-up on an antistatic
surface or in an approved antistatic container.
■
If you plan to return the component to Adaptec, immediately
place it in a static-shielding container.
1-10
R2N2 RAID IG.BOOK Page 1 Monday, September 9, 2002 12:01 PM
2
Installing Your Controller
In this Chapter
Configuring SCSI Devices
2-1
Installing the Controller
2-5
Creating an Array Using SMOR
2-6
Determining the Booting Controller
2-7
Configuring SCSI Devices
When configuring devices for Adaptec ZCR controllers, you may
need to:
■
Decide how to position drives on the SCSI bus.
■
Select cables.
■
Enable or disable SCSI termination.
■
Set the SCSI IDs.
Note: SCSI drives should, in general, not be reformatted.
However, if your SCSI drive was formatted to a sector size
other than 512 bytes, you must reformat the drive before you
can use it in a RAID. Refer to the Adaptec Storage Management
Software User’s Guide for details.
2-1
R2N2 RAID IG.BOOK Page 2 Monday, September 9, 2002 12:01 PM
Adaptec SCSI RAID 2010S/2015S Installation Guide
Narrow and Wide SCSI Devices
You can attach either narrow (8-bit) or wide (16-bit) SCSI devices to
your Adaptec ZCR controller. If you use narrow and wide devices
on the same wide cable, put one of the wide devices at the end of
the cable. This ensures that the 16-bit signals are correctly
terminated.
Wide devices allow data to be transferred at twice the rate of
narrow devices. The wide bus is backward compatible with narrow
devices, allowing both types of SCSI devices to be used with the
same controller. The narrow interface is still used with some SCSI
devices, such as tape and CD drives.
LVD and SE Devices
Attaching a single-ended (SE) SCSI device to a Low Voltage
Differential (LVD) bus causes the bus to slow down to Ultra SCSI
speed (20 MHz) for all devices.
Note: Adaptec ZCR controllers cannot be used with older SCSI
5-V differential (DE) devices.
SCSI Cables
Adaptec recommends using Ultra320 SCSI devices and good
quality LVD SCSI cables.
SCSI Device IDs
A narrow SCSI bus can support up to 7 SCSI devices and a
controller connected to a single 8-bit SCSI bus. A wide SCSI bus can
support up to 15 devices and the controller connected to its 16-bit
bus.
All SCSI devices, including the controller, must be assigned a
unique SCSI ID. SCSI IDs, which are typically set using jumpers or
switches on peripheral devices, can be assigned any number from 0
to 7 for 8-bit SCSI devices or 0 to 15 for wide SCSI devices. Some
computer systems and hard disk drive towers offer intelligent
backplanes (SAF-TE / SES) that automatically assign a fixed SCSI
ID to each slot in the backplane. When using these types of
backplanes it is not necessay to assign an ID to each SCSI device.
2-2
R2N2 RAID IG.BOOK Page 3 Monday, September 9, 2002 12:01 PM
Installing Your Controller
Set the SCSI ID of each SCSI device attached to the controller to a
unique ID number between 0 and 6. The Adaptec RAID controller
is set to ID 7 by default (most SCSI controllers use ID 7). Wide SCSI
devices can also use SCSI IDs 8 through 15. SCSI IDs can only be
duplicated on the same controller if the devices using the same ID
are not attached to the same bus.
If necessary, the Adaptec ZCR controller ID can be changed to any
ID from 0 through 7. Use SMOR or the Configure Host Bus Adapter
window in Adaptec Storage Management to change the controller SCSI ID.
Note: Changing the controller ID is not recommended. You
should leave the Adaptec ZCR controller set at SCSI ID 7.
SCSI Termination
The basics of termination are:
■
■
Enable termination on the devices on each physical end of a
SCSI cable. Depending upon how you configure your system,
you would either:
■
Enable termination on two SCSI peripheral devices, or
■
Enable termination on the SCSI controller and one
peripheral SCSI device.
If using both SCSI channels, terminate each channel separately.
Note: In some cases, the termination settings may need to be
set using your motherboard’s SCSI BIOS. This would be
accomplished by removing the ZCR controller, setting the
termination as desired, and replacing the controller.
Any termination settings made or recommended in this guide
may be superseded by settings or controls designed into the
motherboard. Please review this chapter along with the
contents of your motherboard guide for a better
understanding of the settings necessary for your combination.
2-3
R2N2 RAID IG.BOOK Page 4 Monday, September 9, 2002 12:01 PM
Adaptec SCSI RAID 2010S/2015S Installation Guide
SCSI termination is configured through the SMOR utility or from
the Configure Host Bus Adapter window in Adaptec Storage
Management. The controller has only these termination settings:
Setting
Function
On
Default—Enables the controller termination built.
Off
Disables the built-in controller termination. Use only if
the controller will not be situated at one end of the cable.
The following figure shows various SCSI cabling examples for a
single bus. Terminate your SCSI devices as shown in the examples,
ensuring that the devices at the ends of the cables are terminated,
and the devices in the middle are not terminated. If only one cable
is attached, then one end is the controller, and must have its
termination enabled, as indicated in the figure where the circled T
is in the controller.
Note: Each channel being used on a multichannel ZCR adapter must
be terminated properly for its configuration. The figure shows use
with a motherboard channel having both an internal and
external connection. Your motherboard may differ.
Internal Wide SCSI
External
Wide SCSI
T
T
T
T
Internal Wide SCSI
T
External
Wide SCSI
T
T
T =Terminated
2-4
R2N2 RAID IG.BOOK Page 5 Monday, September 9, 2002 12:01 PM
Installing Your Controller
Installing the Controller
The Adaptec 2010S controller has a standard 64-bit, 3.3V PCI
interface but will only function properly when inserted into a PCI
slot supporting EMRL or Intel RAIDIOS logic.
The ASR-2015S controller also has a unique design but plugs into a
special EMRL enabled SO-DIMM socket provided on specific
motherboards.
To install your ZCR controller, insert the device into the supported
ZCR enabled slot on the motherboard (consult your system's
documentation for the supported slot(s)). Load the driver
associated with the operating system as described in this guide. To
ensure proper installation, examine the screen during system boot.
Instead of showing an Adaptec SCSI BIOS message, the system will
display an Adaptec I2O BIOS message indicating the results of its
SCSI scans and RAID device creation.
1 Locate the SCSI connectors on the motherboard and connect
any internal drive cables now, if not already connected.
2 Install the ASR-2010S controller in the appropriate ZCR slot
allocated for it and secure the controller bracket to the
motherboard case with the screw provided in the system. There
will be only one ZCR enabled slot on the motherboard. It will
often be a different color than the rest.
ASR-2015S controllers may be secured using either locking
stand-offs into the holes in the board, or via other means
available from the system manufacturer. Care should be taken
to ensure that the controller board is not pressing against any
cables or internal hardware.
2-5
R2N2 RAID IG.BOOK Page 6 Monday, September 9, 2002 12:01 PM
Adaptec SCSI RAID 2010S/2015S Installation Guide
Considerations to Adding a ZCR Controller to an Existing
Compatible System
The Adaptec ZCR controllers have unique installation
requirements. These controllers are ZCR cards and work with the
motherboard’s embedded Adaptec SCSI chip to provide advanced
RAID functionality. SCSI devices may be connected to the system
prior to installation of the ZCR. Under these conditions, the user
should back-up any data on the disk drives prior to implementing
a ZCR solution.
!
Caution: If data exists on drives before implementing RAID,
backup data prior to installing RAID controller as data will be
lost during RAID creation.
Creating an Array Using SMOR
1 If you wish to set up an array using SMOR, the controller’s onboard BIOS system, do the following:
Note: In using the following sequence to create an array, the
following conditions will be assumed. Three drives are
attached to channel 1 and will be used to set up a bootable
RAID 5. For details on setting up other arrays, or for
information about using SMOR, consult the Adaptec SCSI
RAID Software User’s Guide on the enclosed CD.
2 Restart the system. While the system is restarting, press Ctrl-A
when the controller BIOS displays on the screen.
3 When the blue-background SMOR screen displays, press Alt-R
to pull down the RAID menu.
4 Highlight Create and press Enter.
5 Select (z)RAID-5 and press Enter.
6 In the window that appears, click OK.
2-6
R2N2 RAID IG.BOOK Page 7 Monday, September 9, 2002 12:01 PM
Installing Your Controller
7 In the next window, select the three drives that will comprise
your RAID 5. Press the Insert key or Space Bar to select the
highlighted drive, and the up and down arrow keys to
highlight other drives. When finished, Tab to highlight Done,
and press Enter.
8 Press Alt-F to pull down the File menu.
9 Highlight Set System Configuration and press Return.
10 In the Configuration Changes window, press Return to select
OK. The SMOR window will indicate in the Information tab
that the array is building.
11 When through, press Alt-F again, highlight Exit, press Enter,
then OK on the window that appears. The system will restart.
Determining the Booting Controller
Adaptec ZCR controllers are shipped with a controller BIOS ROM
enabled for PCI assignment. This BIOS intercepts and processes
Int13h BIOS calls with an embedded DOS driver.
Controlling which device the system will start from may involve
two separate steps, one in the system’s Setup screen area, and the
second in the controller card’s settings.
System Setup
Consult the documentation that came with your system for
particulars on changing the Setup options. Look for an entry in the
system’s Setup area called Boot Sequence or something similar. In
it, you can set the device order that will be used for starting your
system.
Placing the CD-ROM drive first; then the hard disk drive will make
installing the operating system easier. Placing the floppy disk
drive, which might be called a floppy diskette drive, before the
hard drives might be handy, but Windows and Linux do not use
floppy disks for installation much anymore.
2-7
R2N2 RAID IG.BOOK Page 8 Monday, September 9, 2002 12:01 PM
Adaptec SCSI RAID 2010S/2015S Installation Guide
The Setup may also have another entry for controlling the hard
drive sequence to be used. This entry, which may be on the same
screen, or in a subsequent screen, will order the system’s on-board
drive, usually the IDE drive, and that of the controller that is being
added. Make the controller the first hard disk drive to be used if
you wish to start the system from the controller’s array.
Save and Exit the system’s BIOS area. Restart the system. See the
next section for details on setting up the controller.
Configuring the Controller to Boot from Channel 1
The controller defaults to enable booting from either channel when
the ZCR motherboard is fitted with an Adaptec 7902W SCSI
controller. In this case the controller will attempt to boot from the
first array found. If arrays exist on both channels; the first array
found, and therefore the boot device, will be the one with the
lowest SCSI ID on channel 0.
If you wish to boot from an array on channel 1, you will need to
disable booting for channel 0. To do this:
1 Restart the system, press Ctrl-A when the controller BIOS
displays.
2 When the blue screen of the SMOR display appears, highlight
Channel 0 on the card on the left side, and tab to switch to the
right side.
3 Highlight the [o] Bus Boot Enable and press the Spacebar to
toggle the switch off, the o will disappear. The system will now
bypass Channel 0 as a bootable channel.
4 Press the Esc key.
5 When asked to save changes, tab to yes and press Return.
6 Exit SMOR and allow the system to restart.
Controller IRQ and Address
Both the IRQ and address space used are not set by the user.
During the host system start process, the system BIOS should
automatically configure the controller BIOS Interrupt Request
(IRQ) level and memory location for all Adaptec PCI controllers in
the system.
2-8
R2N2 RAID IG.BOOK Page 9 Monday, September 9, 2002 12:01 PM
Installing Your Controller
After Setting Up your System
After your system is set up, you can use all of the advanced
features of Adaptec Storage Management to modify and improve
the RAID.
The array build/rebuild process occurs in the background and
therefore the array can be used while the array is building/
rebuilding. Once the operating system and Adaptec Storage
Management are installed, Adaptec Storage Management can be
used to monitor the array's build/rebuild progress. For additional
information, refer to Chapter 4 or the Adaptec Storage Management
Software User’s Guide.
2-9
R2N2 RAID IG.BOOK Page 10 Monday, September 9, 2002 12:01 PM
Adaptec SCSI RAID 2010S/2015S Installation Guide
2-10
R2N2 RAID IG.BOOK Page 1 Monday, September 9, 2002 12:01 PM
3
Installing the Driver
In this Chapter
Driver Disks
3-2
New Installations
3-3
Windows 2000 and XP
3-4
Windows NT 4.0
3-6
Red Hat Linux
3-8
This chapter presents several scenarios for installing the controller
driver. Identify the appropriate scenario and read the entire
procedure and related explanations before proceeding.
Instructions are provided for installing a new system, and for
upgrading an existing system by adding the ZCR.
3-1
R2N2 RAID IG.BOOK Page 2 Monday, September 9, 2002 12:01 PM
Adaptec SCSI RAID 2010S/2015S Installation Guide
Driver Disks
A system with an Adaptec SCSI RAID controller installed will need
to have an appropriate driver for the controller to operate properly.
Installation is easier when the drivers are available on a floppy
disk. Create the driver disk from the included CD.
Note: If doing an upgrade to an existing system, the drivers
may be installed directly from the CD, eliminating the need to
create individual driver disks. New installations of Windows
usually will require a driver disk. Installing the drivers from
the CD requires navigating into the CD’s hierarchy of folders.
This may be confusing.
Creating a driver disk for Red Hat Linux 7.3 is not necessary.
Drivers for this version of Linux are included in the distribution.
Creating the Driver Disk from the Bootable CD
These instructions cover creation of disks for Windows and Linux.
To start creating a driver disk:
1 Ensure your system BIOS is ready to boot from the CD-ROM
drive. See your system documentation if you need help. Insert
the CD that came with your controller, and start your system
from the CD. Follow instructions and respond to prompts as
necessary to get to the Adaptec Main Menu.
2 From the Main Menu, click the Create Driver Disk(s). . . line.
3 Review the type of installation you are doing elsewhere in this
chapter to know what type of driver disk to create. Click on the
type of driver disk desired, then click OK.
4 When the screen prompts you to insert a disk and click OK, do
so. The system will format the disk, insert a file system, if
needed, and write the appropriate information onto it. When
finished, the screen will display another OK button.
5 Remove the floppy disk and click OK. Label the disk to
represent the driver disk created.
3-2
R2N2 RAID IG.BOOK Page 3 Monday, September 9, 2002 12:01 PM
Installing the Driver
New Installations
For new installations of any of the operating systems supported, it
is possible, if not desireable, to install the operating system on an
array. This provides a more robust system, since failure of a drive
won’t cause the system to stop running.
Any such installation requires that the redundant array be created
prior to installing the operating system. Adaptec SCSI RAID
controllers provide two ways to do this, by starting (also called
booting) the system using the Adaptec CD, or by using the tools
built into the on-board firmware on the controller.
While it is beyond the scope of this guide as to which RAID type to
use for this application; you may want some guidance. The
following condensed table may offer help. For more details, consult
external resources detailing relative performance vs. desireable
characteristics for the various RAID types.
RAID
Type
Minimum
Number
of Drives
Properties
0
2
Not redundant - do not use RAID 0 for this
application if you want the protection afforded
by redundancy.
1
2 only
Fast writes and reads, equivalent to the transfer
rate of the constituent drives.
5
3
Comparable read speed but rather slow write
speed compared to constituent drives.
10
4
Requires multiples of 2, starting with 4. Provides
the speed of a RAID 0 with the redundant
protection of a RAID 1.
50
6
Requires a minimum of 6 drives. Provides greater
efficiency in drive usage than the RAID 10.
3-3
R2N2 RAID IG.BOOK Page 4 Monday, September 9, 2002 12:01 PM
Adaptec SCSI RAID 2010S/2015S Installation Guide
Windows 2000 and XP
The following sections describe procedures for installing the
Adaptec ZCR controller with Windows 2000 or Windows XP.
■
Installing the Driver in a New System on page 3-4
■
Adding the Controller to an Existing System on page 3-5
!
Caution: When adding a ZCR controller to an existing system,
backup all data from system drives prior to the installation. If
the boot device is connected to one of the on-board SCSI
channels, or you plan to use a RAID array as a boot device,
the operating system will need to be reinstalled after
installing the ZCR controller.
Note: The Adaptec driver for Windows 2000 and Windows XP
do not include a digital signature. Your system may display
warning messages about this condition. Bypass the warnings
and continue with the installation. The driver will function
normally when the upgrade or installation is complete.
Installing the Driver in a New System
In this scenario, you are installing the Adaptec RAID controller in a
new system that has no operating system. To install the driver:
1 Install and configure your Adaptec RAID controller and hard
disk drives according to the instructions in Chapter 2.
2 Create the driver disk as shown at the beginning of this chapter.
Remove the floppy disk after it is created.
3 Restart the system, during the start, press Ctrl-A when the
Adaptec BIOS message displays. Use SMOR to create an array
as shown in Creating an Array Using SMOR on page 2-6 or in the
Software User’s Guide on the CD that came with the Adaptec
SCSI RAID controller.
4 Insert the Windows 2000/XP CD and restart the system to begin
the Windows installation.
3-4
R2N2 RAID IG.BOOK Page 5 Monday, September 9, 2002 12:01 PM
Installing the Driver
5 When the Windows 2000/XP installation starts, a blue screen
appears after the hardware detection message. When prompted
to install a third-party driver, press F6.
Note: You only have 5 seconds to press the F6 key during
the installation startup. A prompt appears at the bottom of
the screen when F6 is active. Press F6 at this time;
otherwise, you must restart the Windows 2000/XP
installation process to complete this procedure correctly.
6 When prompted by the Windows text-based install routine that
appears, insert the driver disk you created, and continue with
the standard Windows installation.
7 When Windows 2000/XP starts for the first time, it launches the
Found New Hardware Wizard. Click Next. Then, select Search
for suitable driver for my device and click Next again.
8 Insert the Adaptec driver disk you created at the beginning of this
chapter, select it, and click Next. The wizard should find the
Adaptec RAID Adapter.
9 Click Next and follow the instructions. Eventually, the
installation will require that the system shut down and restart.
After the restart, respond to any further instructions as needed
to complete the installation.
Adding the Controller to an Existing System
In this scenario, you are adding an Adaptec ZCR controller to a
system that already has a Windows 2000/XP operating system. If
this system will have the operating system installed to an array
attached to the motherboard’s SCSI ports, use the preceeding
section, treating the installation as a new install, but first back up
any data you wish to save. To install the driver:
1 Backup any data that may already be on drives attached to the
motherboard’s SCSI ports.
2 Create the driver disk as shown at the beginning of this chapter.
Remove the floppy disk after it is created.
3 If necessary, install and configure your controller and any other
hard disk drives according to the instructions in Chapter 2.
3-5
R2N2 RAID IG.BOOK Page 6 Monday, September 9, 2002 12:01 PM
Adaptec SCSI RAID 2010S/2015S Installation Guide
4 Start Windows 2000/XP. Windows launches the Found New
Hardware Wizard, which searches for the controller.
5 Insert the driver disk you created at the beginning of this chapter,
select it, and click Next.
6 Click Next in the succeeding two windows that appear. Follow
the on-screen instructions to complete the installation.
7 Reinstall any applications or data that had been backup up.
Windows NT 4.0
The following sections describe procedures for installing the
Adaptec ZCR controller with Windows NT:
■
Installing the Driver in a New System on page 3-6
■
Installing the Controller in an Existing System on page 3-7
!
Caution: When adding a ZCR controller to an existing system,
backup all data from system drives prior to the installation. If
the boot device is connected to one of the on-board SCSI
channels, or you plan to use a RAID array as a boot device,
the operating system will need to be reinstalled after
installing the ZCR controller.
Note: The Microsoft I2O Operating System Module (OSM)
does not support the Adaptec ZCR controllers.
Installing the Driver in a New System
In this scenario, you are installing an Adaptec ZCR controller and
Windows NT 4.0 in a new system.
Note: If Windows NT is to coexist with another operating
system, the other operating system must be installed before
you install Windows NT.
3-6
R2N2 RAID IG.BOOK Page 7 Monday, September 9, 2002 12:01 PM
Installing the Driver
To install the driver:
1 Create the driver disk as shown at the beginning of this chapter.
Remove the floppy disk after it is created.
2 Install and configure your Adaptec ZCR controller and hard
disk drives according to the instructions in Chapter 2.
3 Start up the system. During startup, press Ctrl+A to start
SMOR. Use SMOR to create the RAID. For details, refer to
Creating an Array Using SMOR on page 2-6 or in the Software
User’s Guide on the CD that came with the Adaptec SCSI RAID
controller.
4 Insert the Windows NT setup media (floppy disk or CD) and
restart the system.
5 Press F6 when Inspecting Your Computer Hardware appears.
6 Insert the driver disk you created.
7 Press S to Specify Additional Devices.
8 Select Other, then insert the driver disk.
9 Select Adaptec I2O RAID Host Adapter Driver for NT 4.0.
10 Press Enter and continue with the installation as described in
the Windows NT documentation when the installation pauses.
Installing the Controller in an Existing System
In this scenario, you are adding an Adaptec ZCR controller to a
working Windows NT 4.0 system having an appropriate slot for
the ASR-2010S or ASR-2015S.
To install the driver:
1 Create the driver disk as indicated at the beginning of this chapter.
Remove the floppy disk after it is created.
2 Back up all data on hard disk drives attached to the
motherboard’s SCSI channels.
3 Power down the system and install the ASR-2010S or
ASR-2015S controller. Start the system again.
4 Open the Control Panel, double click on the SCSI Adapters
icon.
5 Select the Drivers tab and click the Add button.
3-7
R2N2 RAID IG.BOOK Page 8 Monday, September 9, 2002 12:01 PM
Adaptec SCSI RAID 2010S/2015S Installation Guide
6 When prompted, click Have Disk.
7 Select Adaptec I2O RAID Host Adapter Driver for NT 4.0.
8 After the driver is loaded, shut down the system and remove
the disk.
9 Restart the system.
Red Hat Linux
The following sections describe procedures for installing the
Adaptec ZCR controller with Red Hat Linux.
■
Installing the Driver in a New Linux System on page 3-9
■
Installing the Controller in an Existing Linux System on page 3-10
■
Installing a Newer Driver on page 3-12
The Adaptec ZCR controllers supports Red Hat 7.3.
Note: For the most up-to-date information on Adaptec’s
support of Linux, or to download driver sources, visit
linux.adaptec.com.
!
3-8
Caution: When adding a ZCR controller to an existing system,
backup all data from system drives prior to the installation. If
the boot device is connected to one of the on-board SCSI
channels, or you plan to use a RAID array as a boot device,
the operating system will need to be reinstalled after
installing the ZCR controller.
R2N2 RAID IG.BOOK Page 9 Monday, September 9, 2002 12:01 PM
Installing the Driver
Installing the Driver in a New Linux System
The drivers for the ASR-2010S and ASR-2015S are embedded in
version 7.3 of Red Hat. Installing the controller in a new Red Hat
Linux system doesn’t require any driver installation. This scenario
is for installing the controller into a new system, where the
operating system will be loaded to a RAID.
To install the Adaptec ZCR controller:
1 Install and configure your Adaptec ZCR controller and hard
drives according to the instructions in Chapter 2.
2 Start up the server. During startup, press Ctrl+A to start SMOR.
Use SMOR to create the RAID. For details, refer to Configuring
the Controller to Boot from Channel 1 on page 2-8 or in the
Software User’s Guide on the CD that came with the ASR-2010S
or ASR-2015S.
Note: Any partitions created on disks that are not part of an
array will be unavailable if you subsequently use the disk in a
RAID configuration. If your hard disk drives do not have
partition tables or do not contain a recognizable partition, you
will be prompted to initialize these disks. The operating
system can automatically remove the data or you can
manually partition the drives. For more information, refer to
the Red Hat documentation.
3 Insert the Red Hat CD Disk 1 in the CD-ROM drive.
4 Start up the system.
5 When the Red Hat welcome screen appears, type linux or
simply press Enter.
6 Follow the prompts to set up your preferred environment; for
example, your preferred language and keyboard type.
7 Continue with the Linux installation according to the Red Hat
documentation.
3-9
R2N2 RAID IG.BOOK Page 10 Monday, September 9, 2002 12:01 PM
Adaptec SCSI RAID 2010S/2015S Installation Guide
Installing the Controller in an Existing Linux System
Adding the controller to an existing system is essentially the same
as if the system were new. Data on any hard disk drive attached to
the SCSI channels that will be controlled by the ASR-2010S or
ASR-2015S will not be accessible after the Adaptec ZCR controller
is inserted. The following assumes you have Linux installed to a
hard disk drive that will not be affected by the installation of the
ZCR, such as an IDE drive:
1 Back up all data from the hard disk drives attached to the
motherboard SCSI channels.
2 Install and configure your Adaptec ZCR controller according to
the instructions in Chapter 2. Make any desired changes to the
SCSI connections or configurations now.
3 Start up the server. If you desire to change your system to boot
from a RAID, see the previous section, treating the installation
as a new installation. Be sure to back up your data.
Note: Any partitions created on disks that are not part of an
array will be unavailable if you subsequently use the disk in a
RAID configuration. If your hard drives do not have partition
tables or do not contain a recognizable partition, you will be
prompted to initialize these disks. The operating system can
automatically remove the data or you can manually partition
the drives. For more information, refer to the Red Hat
documentation.
4 Reboot the system after you have made all of your
configuration changes.
5 When Red Hat starts to come up, it will detect the new
hardware. Press the appropriate key to enter into Kudzu when
prompted.
6 When asked about the newly detected RAID controller, allow
Kudzu to configure the device.
Note: The ASR-2010S/2015S will be detected as a Distributed
Tech: SmartRAID V controller.
3-10
R2N2 RAID IG.BOOK Page 11 Monday, September 9, 2002 12:01 PM
Installing the Driver
7 Once the system has started, verify that an entry has been made
for the new controller in the modules configuration file by
typing:
cat\etc\modules.conf
Look for an entry similar to:
alias scsi_hostadapter dpt_i20
If the appropriate entry is not present, use an editor such as
VI to make the change.
8 For the new module to start when the system boots, a new
ramdisk will be required. An alternative to creating a new
ramdisk is to allow the Adaptec RAID module to be started
each time the system is booted by using the following
command:
modprobe dpt_i20
9 To create a new ramdisk, change to the \boot directory. Rename
the existing ramdisk to something similar to:
mv initrd-2.4.18-3.img initrd-2.4.18-3.img.old
Note: This assumes you are using kernel 2.4.18-3. If your
kernel version is different, please use the appropriate
kernel number. Consult your system documentation for
help on creating the initrd if needed.
10 To create a new ramdisk, type the following from the \boot
directory:
mkinitrd initrd-2.4.18-3.img
11 Restart the server to verify that the module will now load on
booting the system. When the system has booted, type lsmod
and look for the entry for the dpt_i20 module.
12 Finally; partition, format, and create mount points for the
attached RAID arraysor hard drives that will be used with the
system.
3-11
R2N2 RAID IG.BOOK Page 12 Monday, September 9, 2002 12:01 PM
Adaptec SCSI RAID 2010S/2015S Installation Guide
Installing a Newer Driver
While the drivers for the ASR-201S and ASR-2015S are in the Red
Hat Linux 7.3 kernel, newer drivers may be released occasionally.
For current information about newer drivers, visit
linux.adaptec.com.
Installation instructions for any newer kernel versions will be
posted with the drivers.
3-12
R2N2 RAID IG.BOOK Page 1 Monday, September 9, 2002 12:01 PM
4
Installing Storage
Management Software
In this Chapter
➤
System Requirements
4-2
➤
Installing Storage Manager
4-3
As described in Storage Management Software Overview on page 1-8,
you can use Storage Manager as your primary RAID management
utility.
4-1
R2N2 RAID IG.BOOK Page 2 Monday, September 9, 2002 12:01 PM
Adaptec SCSI RAID 2010S/2015S Installation Guide
System Requirements
To run the controller and RAID management software, you need a
system that meets the following minimum hardware requirements:
■
Pentium or equivalent CPU that is at least as fast as 200 MHz
■
64 MB of RAM
■
5 MB of disk space for Storage Manager
■
Mouse or other pointing device
■
Graphics card and monitor capable of a minimum of 800 × 600
resolution and 256 colors
These requirements are met for the 2010S and 2015S. Motherboards
designed to work with these controllers are server motherboards
having Pentium III or later processors or equivalents with ample
memory and faster than 200 MHz operating speeds.
Linux Considerations
Storage Manager for Linux requires X-Window support. Storage
Manager includes LessTif components and supports the following
environments:
■
K Desktop Environment (KDE)
■
GNU Network Object Environment (GNOME) GUI
Note: Use of more than 256 colors in your GUI can result in
Storage Manager displaying incorrect colors. If this occurs,
reset your color setting to use only 256 colors.
4-2
R2N2 RAID IG.BOOK Page 3 Monday, September 9, 2002 12:01 PM
Installing Storage Management Software
Installing Storage Manager
Operating System Compatibility
Storage Manager runs on the following operating systems:
■
Microsoft Windows 2000, Windows XP, and Windows NT 4.0
■
Red Hat Linux
Storage Manager’s remote management capabilities are only
available on your system if it contains a network card configured to
use the TCP/IP protocol.
Install the configuration application supplied on the CD by
following these steps:
1
With the system running, insert the CD. For the following
installation examples, the CD drive will be represented as F:
for Windows and as <mount point> for Linux. Linux tyically
uses /mnt/cdrom as the <mount point>.
2
Select the following for a Windows installation:
a The CD should start automatically. If it doesn’t, run
F:\autorun.exe
b On the Autorun window that appears, click the icon on the
Install Adaptec Storage Manager line.
c Storage Manager will begin installing. Follow the prompts to
finish the installation
d Restart the system when finished.
e Storage Manager will be available in the Start M Programs
display.
3 Do the following for a RedHat Linux installation:
a Type the following, or use the RPM installation utility to
install the file at the location shown in capital letters:
rpm -Uvh /<mount point>/packages/Linux/
apps/sm/dptapps-3.32-1.i386.rpm
where <mount point> is the mount point from step #1.
4-3
R2N2 RAID IG.BOOK Page 4 Monday, September 9, 2002 12:01 PM
Adaptec SCSI RAID 2010S/2015S Installation Guide
b When finished, restart the system, removing the CD during
the restart.
c An icon representing Storage Manager should be on your
desktop, if you use one. Otherwise, the file to launch the
application will be in the root/desktop directory.
4-4
R2N2 RAID IG.BOOK Page 1 Monday, September 9, 2002 12:01 PM
A
Card and Module Diagrams
In this Appendix
➤
Adaptec SCSI RAID 2010S
A-1
➤
Adaptec SCSI RAID 2015S
A-2
Adaptec SCSI RAID 2010S
AIC
7930W
J6
P1
Part
Description
J6
Flash Mode 0
P1
PCI connector
A-1
R2N2 RAID IG.BOOK Page 2 Monday, September 9, 2002 12:01 PM
Adaptec SCSI RAID 2010S/2015S Installation Guide
Adaptec SCSI RAID 2015S
A-2
Part
Description
J6
Flash Mode 0
P1
SO-DIMM connector
R2N2 RAID IG.BOOK Page 1 Monday, September 9, 2002 12:01 PM
B
Troubleshooting
This Appendix provides answers to many frequently asked
questions. If a situation occurs that is not covered in this appendix,
or if these recommendations do not correct the problem, contact
Adaptec Technical Support.
When the controller BIOS displays the hard disk drives during startup, a device fails to
appear.
The power cable or the interface cable may be loose or disconnected.
There might also be a SCSI ID conflict.
Windows NT displays a blue screen error message that references the system video
controller.
The video controller fails to properly implement Extended BIOS
Data Area (EBDA) usage rules. Use SMOR to enable the EBDA
Relocation option.
In addition to the Adaptec controller, the system contains another manufacturer’s
controller. During startup, the system hangs or one controller cannot communicate
with its attached drives.
Perhaps the other controller does not correctly implement EBDA
usage rules. Use SMOR to try a different setting for the EBDA
relocation parameter or rearrange the controller slot assignments.
Alternatively, if your system BIOS supports configuring the boot
order, you can also try changing those settings.
Pressing Ctrl+A to access SMOR does not work or the information displayed is
garbled.
Reset the NVRAM to the default settings and reconfigure the ZCR.
To reset the NVRAM, refer to Appendix C.
B-1
R2N2 RAID IG.BOOK Page 2 Monday, September 9, 2002 12:01 PM
Adaptec SCSI RAID 2010S/2015S Installation Guide
After updating the Adaptec controller firmware or BIOS and restarting, the controller
does not respond.
The update may have been unsuccessful. Reset the NVRAM to the
default settings and reconfigure the ZCR. To reset the NVRAM, refer
to Appendix C.
You want the system to boot from a drive that is not attached to an Adaptec ZCR
controller. However, during startup, the controller BIOS message appears first,
indicating that a drive attached to an Adaptec ZCR controller will be the boot drive.
Use SMOR to disable Boot Enable for that controller. This prevents
the Adaptec ZCR controller from being used as the boot controller
for the system.
The Adaptec controller BIOS reports a drive as a disk instead of a drive.
This condition can occur if SMOR is used to disable Boot Enable. If
you require access to disk drives connected to the Adaptec ZCR
controller during the boot process, set Bootable Devices to Normal.
A firmware upgrade is unsuccessful, causing the Adaptec ZCR controller to hang the
system.
You can temporarily disable the firmware, BIOS, and SMOR and
then replace them using the Flash Mode 0 procedure. For details,
refer to Appendix C.
After an upgrade of the controller BIOS only, pressing Ctrl+A at the system prompt
displays the message
Card not configurable.
Upgrade SMOR using the Flash Mode 0 procedure. For details, refer
to Appendix C.
The floppy disk drive cannot be accessed after installing an Adaptec ZCR controller.
Use SMOR to enable the EBDA Relocation option. For details, refer
to Configuring the Controller to Boot from Channel 1 on page 2-8.
B-2
R2N2 RAID IG.BOOK Page 1 Monday, September 9, 2002 12:01 PM
C
Controller Reset Procedures
In this Appendix
➤
NVRAM Reset
C-2
➤
Flash Mode 0
C-2
This Appendix describes procedures that you can use to reset your
controller in the event it becomes inoperable.
■
NVRAM Reset—The controller was improperly configured.
■
Flash Mode 0—An upgrade to the controller was attempted,
but failed.
C-1
R2N2 RAID IG.BOOK Page 2 Monday, September 9, 2002 12:01 PM
Adaptec SCSI RAID 2010S/2015S Installation Guide
NVRAM Reset
Adaptec ZCR controllers retain their setup parameters even when
powered off. These parameters are stored on the controller in an area
of nonvolatile memory called NVRAM. There is a possibility that,
through improper configuration, the controller can be put into a
state where it hangs the system. If this happens, the parameters
stored in the NVRAM can be restored to their default settings by
using SMOR’s Default command or RAIDUTIL’s -X command.
Flash Mode 0
The Adaptec controller firmware, BIOS, and SMOR are all
upgradable. There is a possibility that an unsuccessful upgrade
could render the controller inoperable. If this happens, you need to
reset the controller firmware, BIOS, and SMOR.
1
If your system hangs with the Adaptec ZCR controller
installed, shut down the system and remove the controller
from your system.
2
Using the system’s motherboard and SCSI BIOS, examine the
SCSI channels to see if they are operating.
3
Reinstall the Adaptec ZCR controller in your system.
Now, to reset the controller firmware, BIOS, and SMOR,
1
Install a jumper onFlash Mode 0 jumper connector. For the
location of the jumper connector, refer to Appendix A.
2
There are two options available for resetting, using SMOR.exe
or RAIDUTIL under DOS. A SMOR start floppy disk may be
created using instructions shown in the Software User’s Guide:
SMOR
a Insert the SMOR start floppy disk and start the system.
SMOR starts.
b Use SMOR to flash the controller firmware. The utility will
indicate when the flash has completed.
c Power down the system. Go toStep 3.
C-2
R2N2 RAID IG.BOOK Page 3 Monday, September 9, 2002 12:01 PM
Controller Reset Procedures
RAIDUTIL
a Start the system in DOS mode.
b Go to the folder having the RAIDUTIL program
c Enter the following command: RAIDUTIL -F
3
Remove the jumper you installed in Step 1.
4
Restart the system from the SMOR start floppy disk. If the
system restarts normally, the controller can now be configured
using SMOR or Storage Manager.
5
Use SMOR.exe to flash the controller BIOS and SMOR images.
If the system fails to restart, call Adaptec Technical Support.
C-3
R2N2 RAID IG.BOOK Page 4 Monday, September 9, 2002 12:01 PM
Adaptec SCSI RAID 2010S/2015S Installation Guide
C-4
R2N2 RAID IG.BOOK Page 1 Monday, September 9, 2002 12:01 PM
D
Specifications
DC Power Requirements
Voltage (all DC)
ASR-2010S/2015S
Ripple and noise
3.3 V ± .3 V
50 mV peak-to-peak maximum
Current Requirements
Adaptec ZCR Controllers (ASR-2010S/
2015S)
1.2 A
Environmental Specifications
Ambient temperature without battery
backup module
0 °C to 50 ° C
Relative humidity
10% to 90%, noncondensing
Altitude
up to 3,000 meters
Note: Forced airflow is recommended, but not required.
D-1
R2N2 RAID IG.BOOK Page 2 Monday, September 9, 2002 12:01 PM
Adaptec SCSI RAID 2010S/2015S Installation Guide
D-2
R2N2 RAID IG.BOOK Page 1 Monday, September 9, 2002 12:01 PM
R
Adaptec, Inc.
691 South Milpitas Boulevard
Milpitas, CA 95035
© 2000-2002 Adaptec, Inc.
All rights reserved. Adaptec, and the Adaptec logo
are trademarks of Adaptec, Inc. which may be
registered in some jurisdictions.
PART NUMBER: 513336-03, Rev. A BD 08/02
PRINTED IN SINGAPORE