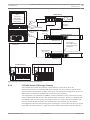
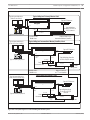
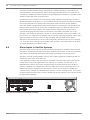
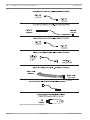
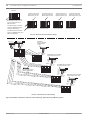
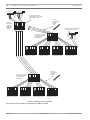
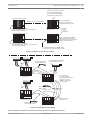
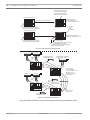
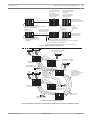
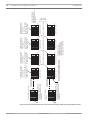
1
LTC 8900 Series
en
Installation Manual
LTC 8900 Series
Table of Contents | en
3
Table of contents
1
Safety
6
1.1
Safety precautions
7
1.2
Important safety instructions
8
1.3
Important notices
10
1.4
FCC & ICES compliance
13
1.5
UL certification
14
1.6
Bosch notices
14
2
Unpacking
15
2.1
Parts List
15
3
Introduction
16
3.1
Description
16
3.2
Features
16
4
System Components
17
4.1
LTC 8904 Series CPU Bay
17
4.2
LTC 8901 Series CPU Bay
17
4.3
LTC 8902 Series Output Bay
17
4.4
LTC 8903 Series Input Bay
17
4.5
LTC 8934/00 Video Output Modules
18
4.6
LTC 8921/00 Video Input Modules
18
4.7
LTC 8943/95 System Controller PC
18
4.8
LTC 8944/93 and LTC 8945/93 LAN Switches
18
4.9
LTC 8946/93 LAN Switches
19
4.10
LTC 8809/00 Video Ribbon Cable
19
4.11
LTC 8808/00 Video Interconnect Panel
19
4.12
LAN Cables
19
4.13
Security Key for PC-based Software
19
4.14
Miscellaneous Components
19
5
Hardware Installation Procedure for Standard Systems Utilizing LTC 8904 Series CPU
20
5.1
General Installation Considerations
20
5.2
LTC 8904 Series CPU Bay Installation
21
5.3
LAN Switch Installation
22
5.4
LTC 8902 Series Output Bay and LTC 8903 Series Input Bay Installation
22
5.5
Module Insertion
23
5.6
Data Receiver Modules
23
5.7
LTC 8916/01 Data Receiver Modules
23
5.8
LTC 8918/01 Data Receiver Modules
24
5.9
LTC 8934/00 Video Output Modules
25
5.10
LTC 8921/00 Video Input Modules
26
5.11
System Video Connections
27
5.11.1
Camera Input Connections
27
5.11.2
System Connections over 1024 Cameras
27
5.11.3
Camera Bays to Monitor Bay Video Connections
27
5.11.4
Multiple Monitor Bay Consideration
28
5.11.5
Monitor Output Connections
28
5.11.6
System Video Looping Connections
28
5.12
Termination Practices
28
5.12.1
LTC 8903 Series Terminations
28
Bosch Security Systems, Inc.
Installation Manual
2015.01 | 10.6 |
4
en | Table of Contents
LTC 8900 Series
5.12.2
Second Level LTC 8903 Series Terminations
29
5.12.3
LTC 8902 Series Terminators
29
5.13
System Data Connections
29
5.13.1
LTC 8904 Series CPU Data Connections
29
5.13.2
LTC 8902 Series and LTC 8903 Series Data Connections
29
5.13.3
Multiple LTC 8946/93 LAN Switch Connections
30
5.14
Main Power Connections
30
6
Hardware Installation Procedure for Redundant System Configuration Utilizing LTC
31
8901 Series CPU
6.1
System Redundancy Considerations
31
6.1.1
General Information
31
6.1.2
LTC 8901 Series CPU Design Features
32
6.1.3
LTC 8943/95 System Controller PC Functions
32
6.1.4
LTC 8901 Series CPU Design Features
33
6.1.5
Video Bay Redundancy Considerations
34
6.1.6
General Installation Considerations
35
6.2
Main CPU Bay Installation
37
6.3
LAN Switch Installation
38
6.4
LTC 8943/95 System Controller PC Installation
38
6.4.1
PC Installation
38
6.4.2
PC Monitor Installation
39
6.4.3
Keyboard/Mouse Rack Installation
39
6.4.4
Final Installation
39
6.5
LTC 8902 Series Output Bay and LTC 8903 Series Input Bay Installation
39
6.6
Module Insertion
40
6.7
Data Receiver Modules
41
6.8
LTC 8916/01 Data Receiver Modules
41
6.9
LTC 8918/01 Data Receiver Modules
42
6.10
LTC 8934/00 Video Output Modules
43
6.11
LTC 8921/00 Video Input Modules
44
6.12
System Video Connections
45
6.12.1
Camera Input Connections
45
6.12.2
System Connections over 1024 Cameras
45
6.12.3
System Connections over 1024 Cameras
45
6.12.4
Multiple Monitor Bay Considerations
46
6.12.5
Monitor Output Connections
46
6.12.6
System Video Looping Connections
46
6.13
Termination Practices
46
6.13.1
LTC 8903 Series Terminators
46
6.13.2
Second Level 8903 Series Terminations
47
6.13.3
LTC 8902 Series Terminations
47
6.14
System Data Connections
47
6.14.1
LTC 8901 Series CPU Data Connections
47
6.14.2
LTC 8902 Series and LTC 8903 Series Data Connections
48
6.14.3
LTC 8944/93 LAN Switch to LTC 8945/93 LAN Switch Connections
48
6.14.4
LTC 8946/93 LAN Switch Connections
48
6.14.5
LTC 8943/95 PC to LTC 8945/93 LAN Switch Connectors
48
6.15
Main Power Connections
48
6.16
LTC 8901 Series CPU Relay Outputs and Buzzers
50
2015.01 | 10.6 |
Installation Manual
Bosch Security Systems, Inc.
LTC 8900 Series
Table of Contents | en
5
6.17
LTC 8901 Series CPU Selection Switch
51
7
Camera Phasing and Accessory Installation
52
7.1
Camera Phasing Information
52
7.2
External Sync Information
52
7.3
System Keyboard Installation
52
7.4
Signal Distribution Unit Hookup
53
7.5
Alarm Interface Unit Hookup
53
7.6
External Computer Interface Connections
53
7.7
Logging Printer Option Installation
53
8
Satellite System Configuration Installations
55
8.1
Allegiant Satellite System Configuration Installations
56
8.2
Satellite Site “Trunk Line” Monitor Outputs
62
8.3
Main Site “Trunk Line” Video Inputs
62
8.4
Control Data Lines in Satellite Systems
62
8.5
Satellite Sites Programming Requirements
62
8.6
Main Site Programming Requirements
63
8.7
Special Programming for “Cascaded” Satellite System Configurations
65
8.8
Alarm Inputs in Satellite Systems
66
9
Troubleshooting Guide
10
Maintenance Information
101
10.1
Cleaning System Keyboard(s)
101
10.2
Matrix Bay AC Line Voltage Input Selection
101
10.3
Matrix Bay AC Line Fuse Replacement
102
10.4
Matrix Bay Power Supply Fuse Replacement
103
10.5
Replacing LTC 8901 or LTC 8904 Series CPU Parts
103
98
10.6
LTC 8943/95 System Controller PC
104
10.7
Replacement of Memory Backup Batteries
104
11
Pinouts
106
Bosch Security Systems, Inc.
Installation Manual
2015.01 | 10.6 |
6
en | Safety
1
LTC 8900 Series
Safety
Sicherheitshinweise
Safety Precautions
C A U T IO N : T O R E D U C E T H E R IS K O F
VORSICHT: UM EINEN ELEKTRISCHEN SCHLAG ZU
E L E C T R IC S H O C K , D O N O T R E M O V E C O V E R
VERMEIDEN, IST DIE ABDECKUNG (ODER RÜCKSEITE)
(O R B A C K ). N O U S E R S E R V IC E A B L E P A R T S
NICHT ZU ENTFERNEN. ES BEFINDEN SICH KEINE TEILE IN
IN S ID E . R E F E R S E R V IC IN G T O Q U A L IF IE D
DIESEM BEREICH, DIE VOM BENUTZER GEWARTET WERDEN
KÖNNEN. LASSEN SIE WARTUNGSARBEITEN NUR VON
S E R V IC E P E R S O N N E L .
QUALIFIZIERTEM WARTUNGSPERSONAL AUSFÜHREN.
This symbol indicates the presence of
uninsulated dangerous voltage within the
product s enclosure. This may constitute a
risk of electric shock.
The user should consult the operating and
maintenance (servicing) instructions in the
literature accompanying the appliance.
Attention: Installation should be performed by
qualified service personnel only in accordance
with the National Electrical Code or applicable
local codes.
Power Disconnect. Units with or without
ON-OFF switches have power supplied to the
Das Symbol macht auf nicht isolierte „gefährliche
Spannung" im Gehäuse aufmerksam. Dies kann zu
einem elektrischen Schlag führen.
Der Benutzer sollte sich ausführlich über Anweisungen
für die Bedienung und Instandhaltung (Wartung) in den
begleitenden Unterlagen informieren.
Achtung! Die Installation sollte nur von qualifiziertem
Kundendienstpersonal gemäß jeweils zutreffender
Elektrovorschriften ausgeführt werden.
Unterbrechung des Netzanschlusses. Geräte mit oder
ohne Netzschalter haben Spannung am Gerät anliegen,
sobald der Netzstecker in die Steckdose gesteckt wird.
Das Gerät ist jedoch nur betriebsbereit, wenn der
Netzschalter (EIN/AUS) auf EIN steht. Wenn das Netzkabel
aus der Steckdose gezogen wird, ist die
Spannungszuführung zum Gerät vollkommen
unterbrochen.
unit whenever the power cord is inserted into the
power source; however, the unit is operational
only when the ON-OFF switch is in the ON
position. The power cord is the main power
Precauciones de Seguridad
disconnect for all units.
Sécurité
ATTENTION : POUR ÉVITER TOUT RISQUE D'ÉLECTROCUTION,
N'ESSAYEZ PAS DE RETIRER LE CAPOT (OU LE PANNEAU
ARRIÈRE). CET APPAREIL NE CONTIENT AUCUN COMPOSANT
SUSCEPTIBLE D'ÊTRE RÉPARÉ PAR L'UTILISATEUR. CONFIEZ
LA RÉPARATION DE L'APPAREIL À DU PERSONNEL QUALIFIÉ.
Ce symbole signale que le produit renferme une « tension
potentiellement dangereuse » non isolée susceptible de
provoquer une électrocution.
2015.01 | 10.6 |
PRECAUCIÓN: PARA DISMINUIR EL RIESGO DE DESCARGA
ELÉCTRICA, NO RETIRE LA CUBIERTA (NI LA PARTE
POSTERIOR). NO EXISTEN PIEZAS DE RECAMBIO EN EL
INTERIOR DEL EQUIPO. EL PERSONAL DE SERVICIO
CUALIFICADO SE ENCARGA DE REALIZAR LAS
REPARACIONES.
Este símbolo indica que existen puntos de tensión peligrosos
sin aislamiento dentro de la cubierta de la unidad. Estos
puntos pueden constituir un riesgo de descarga eléctrica.
El usuario debe consultar las instrucciones de
funcionamiento y mantenimiento (reparación) en la
documentación que se suministra con el aparato.
Ce symbole invite l'utilisateur à consulter les instructions
d'utilisation et d'entretien (dépannage) reprises dans la
documentation qui accompagne l'appareil.
Atención: la instalación la debe realizar únicamente
personal cualificado de conformidad con el National
Electric Code o las normas aplicables en su país.
Attention : l'installation doit exclusivement être réalisée par du
personnel qualifié, conformément au code national
d'électricité américain (NEC) ou au code d'électricité local en
vigueur.
Coupure de l'alimentation. Qu'ils soient pourvus ou non d'un
commutateur ON/OFF, tous les appareils reçoivent de
l'énergie une fois le cordon branché sur la source
d'alimentation. Toutefois, l'appareil ne fonctionne réellement
que lorsque le commutateur est réglé sur ON. Le
débranchement du cordon d'alimentation permet de couper
l'alimentation des appareils.
Desconexión de la alimentación. Las unidades con o sin
interruptores de encendido/apagado reciben alimentación
eléctrica siempre que el cable de alimentación esté
conectado a la fuente de alimentación. Sin embargo, la
unidad sólo funciona cuando el interruptor está en la
posición de encendido. El cable de alimentación es la
principal fuente de desconexión de todas las unidades.
Installation Manual
Bosch Security Systems, Inc.
LTC 8900 Series
Safety | en
Veiligheidsmaatregelen
VOORZICHTIG: OPEN DE BEHUIZING OF DE
ACHTERKANT VAN HET APPARAAT NIET. ZO VERMINDERT
U HET RISICO OP ELEKTRISCHE SCHOKKEN. IN HET
APPARAAT BEVINDEN ZICH GEEN ONDERDELEN DIE U
ZELF KUNT REPAREREN. LAAT SERVICE EN ONDERHOUD
UITVOEREN DOOR GEKWALIFICEERD PERSONEEL.
Medidas de Segurança
CUIDADO: PARA REDUZIR O RISCO DE CHOQUE
ELÉCTRICO, NÃO RETIRE A TAMPA (OU A PARTE
POSTERIOR). NO INTERIOR, NÃO EXISTEM PEÇAS QUE
POSSAM SER REPARADAS PELO UTILIZADOR. REMETA A
ASSISTÊNCIA PARA OS TÉCNICOS QUALIFICADOS.
Dit symbool geeft aan dat er binnen in het apparaat
ongeïsoleerde, gevaarlijke spanning aanwezig is die
mogelijk elektrische schokken kan veroorzaken.
Este símbolo indica a presença de "tensão perigosa" não
isolada dentro da estrutura do produto, o que pode
constituir risco de choque eléctrico.
De gebruiker dient de bedienings- en
onderhoudsvoorschriften te raadplegen in de
documentatie die werd meegeleverd met het apparaat.
O utilizador deve consultar as instruções de
funcionamento e manutenção (assistência) nos
documentos que acompanham o aparelho.
Attentie: het apparaat mag alleen door gekwalificeerd
personeel worden geïnstalleerd. De installatie dient in
overeenstemming met de nationale elektrische richtlijnen
of de van toepassing zijnde lokale richtlijnen te worden
uitgevoerd.
Spanning uitschakelen. Apparatuur met of zonder
aan-uitschakelaar staat onder spanning zolang de stekker
is aangesloten op de wandcontactdoos. De apparatuur is
uitsluitend in werking als de aan-uitschakelaar aan staat.
Het netsnoer is de "hoofdschakelaar" voor alle apparatuur.
7
Atenção: a instalação deve ser executada apenas por
técnicos qualificados da assistência, de acordo com o
código eléctrico nacional ou os códigos locais aplicáveis.
Corte de corrente. As unidades com ou sem interruptores
ON-OFF (ligar/desligar) recebem corrente sempre que o fio
de alimentação está introduzido na fonte de alimentação;
contudo, a unidade apenas está operacional quando o
interruptor ON-OFF está na posição ON. O fio de
alimentação destina-se a desligar a corrente em todas as
unidades.
Sicurezza
ATTENZIONE: PER RIDURRE IL RISCHIO DI SCOSSE
ELETTRICHE NON RIMUOVERE LA COPERTURA (O IL
PANNELLO POSTERIORE). L'UNITÀ NON CONTIENE
COMPONENTI INTERNI RIPARABILI DALL'UTENTE. PER
QUALSIASI INTERVENTO, RIVOLGERSI A PERSONALE
TECNICO QUALIFICATO.
Questo simbolo indica la presenza di "tensione pericolosa"
non isolata all'interno del contenitore del prodotto. Ciò
comporta un potenziale rischio di scosse elettriche.
Si consiglia di consultare le istruzioni operative e di
manutenzione (interventi tecnici) contenute nella
documentazione fornita con il dispositivo.
Attenzione: l'installazione deve essere effettuata
esclusivamente da personale tecnico qualificato in
conformità con il National Electrical Code o con le
normative locali vigenti.
Scollegamento dell'alimentazione. Le unità dotate o
sprovviste di interruttori ON-OFF vengono alimentate
quando si inserisce il cavo nella presa dell'alimentazione.
L'unità è tuttavia in funzione solo quando l'interruttore ONOFF si trova nella posizione ON. Il cavo di alimentazione
costituisce il dispositivo di scollegamento dell'alimentazione
principale per tutte le unità.
1.1
Safety precautions
Danger!
High risk: This symbol indicates an imminently hazardous situation such as “Dangerous
Voltage” inside the product.
If not avoided, this will result in an electrical shock, serious bodily injury, or death.
Bosch Security Systems, Inc.
Installation Manual
2015.01 | 10.6 |
8
en | Safety
LTC 8900 Series
Warning!
!
Medium risk: Indicates a potentially hazardous situation.
If not avoided, this could result in minor or moderate bodily injury.
Caution!
!
Low risk: Indicates a potentially hazardous situation.
If not avoided, this could result in property damage or risk of damage to the unit.
Notice!
This symbol indicates information or a company policy that relates directly or indirectly to the
safety of personnel or protection of property.
Important safety instructions
1.2
Read, follow, and retain for future reference all of the following safety instructions. Heed all
warnings on the unit and in the operating instructions before operating the unit.
Warning!
!
For Indoor Use Only!
If this unit connects to outdoor equipment, ensure that the system is grounded.
1.
Cleaning - Unplug the unit from the outlet before cleaning. Follow any instructions
provided with the unit. Generally, using a dry cloth for cleaning is sufficient but a moist,
fluff-free cloth or leather shammy may also be used. Do not use liquid cleaners or aerosol
cleaners.
2.
Heat Sources - Do not install the unit near any heat sources such as radiators, heaters,
3.
Ventilation - Any openings in the unit enclosure are provided for ventilation to prevent
stoves, or other equipment (including amplifiers) that produce heat.
overheating and ensure reliable operation. Do not block or cover these openings. Do not
place the unit in an enclosure unless proper ventilation is provided, or the manufacturer's
instructions have been adhered to.
4.
Water - Do not use this unit near water, for example near a bathtub, washbowl, sink,
laundry basket, in a damp or wet basement, near a swimming pool, in an outdoor
installation, or in any area classified as a wet location. To reduce the risk of fire or
electrical shock, do not expose this unit to rain or moisture.
5.
Object and liquid entry - Never push objects of any kind into this unit through openings
as they may touch dangerous voltage points or short-out parts that could result in a fire
or electrical shock. Never spill liquid of any kind on the unit. Do not place objects filled
with liquids, such as vases or cups, on the unit.
6.
Lightning - For added protection during a lightning storm, or when leaving this unit
unattended and unused for long periods, unplug the unit from the wall outlet and
disconnect the cable system. This will prevent damage to the unit from lightning and
power line surges.
7.
Controls adjustment - Adjust only those controls specified in the operating instructions.
Improper adjustment of other controls may cause damage to the unit. Use of controls or
adjustments, or performance of procedures other than those specified, may result in
hazardous radiation exposure.
2015.01 | 10.6 |
Installation Manual
Bosch Security Systems, Inc.
Safety | en
LTC 8900 Series
8.
9
Overloading - Do not overload outlets and extension cords. This can cause fire or
electrical shock.
9.
Power supply cord and plug protection - Protect the power supply cord and plug from
foot traffic, being pinched by items placed upon or against them at electrical outlets, and
its exit from the unit. For units intended to operate with 230 VAC, 50 Hz, the power
supply cord must comply with the latest versions of IEC 60227. For units intended to
operate with 120 VAC, 60 Hz, the power supply cord must comply with the latest versions
of UL 62 and CSA 22.2 No.49.
10. Power disconnect - Units have power supplied to the unit whenever the power cord is
inserted into the power source. The power cord plug is the main power disconnect device
for switching off the voltage for all units.
11. Power sources - Operate the unit only from the type of power source indicated on the
label. Before proceeding, be sure to disconnect the power from the cable to be installed
into the unit.
–
For battery powered units, refer to the operating instructions.
–
For external power supplied units, use only the recommended or approved power
supplies.
–
For limited power source units, this power source must comply with EN60950.
Substitutions may damage the unit or cause fire or shock.
–
For 24 VAC units, voltage applied to the unit's power input should not exceed ±10%,
or 28 VAC. User-supplied wiring must comply with local electrical codes (Class 2
power levels). Do not ground the supply at the terminals or at the unit's power
supply terminals.
–
If unsure of the type of power supply to use, contact your dealer or local power
company.
12. Servicing - Do not attempt to service this unit yourself. Opening or removing covers may
expose you to dangerous voltage or other hazards. Refer all servicing to qualified service
personnel.
13. Damage requiring service - Unplug the unit from the main AC power source and refer
servicing to qualified service personnel when any damage to the equipment has occurred,
such as:
–
the power supply cord or plug is damaged;
–
exposure to moisture, water, and/or inclement weather (rain, snow, etc.);
–
liquid has been spilled in or on the equipment;
–
an object has fallen into the unit;
–
unit has been dropped or the unit cabinet is damaged;
–
unit exhibits a distinct change in performance;
–
unit does not operate normally when the user correctly follows the operating
instructions.
14. Replacement parts - Be sure the service technician uses replacement parts specified by
the manufacturer, or that have the same characteristics as the original parts.
Unauthorized substitutions may cause fire, electrical shock, or other hazards.
15. Safety check - Safety checks should be performed upon completion of service or repairs
to the unit to ensure proper operating condition.
16. Installation - Install in accordance with the manufacturer's instructions and in accordance
with applicable local codes.
This unit should not be located in the vicinity of electrical lights or power circuits, or
where it may contact such lights or circuits.
U.S.A. models only – refer to the National Electrical Code Article 820 regarding
installation of CATV systems.
Bosch Security Systems, Inc.
Installation Manual
2015.01 | 10.6 |
10
en | Safety
LTC 8900 Series
17. Attachments, changes or modifications - Only use attachments/accessories specified by
the manufacturer. Any change or modification of the equipment, not expressly approved
by Bosch, could void the warranty or, in the case of an authorization agreement, authority
to operate the equipment.
1.3
Important notices
Accessories - Do not place this unit on an unstable stand, tripod, bracket, or mount. The
unit may fall, causing serious injury and/or serious damage to the unit. Use only with the
cart, stand, tripod, bracket, or table specified by the manufacturer. When a cart is used, use
caution and care when moving the cart/apparatus combination to avoid injury from tip-over.
Quick stops, excessive force, or uneven surfaces may cause the cart/unit combination to
overturn. Mount the unit per the manufacturer's instructions.
All-pole power switch - Incorporate an all-pole power switch, with a contact separation of at
least 3 mm in each pole, into the electrical installation of the building. If it is needed to open
the housing for servicing and/or other activities, use this all-pole switch as the main
disconnect device for switching off the voltage to the unit.
Battery replacement - A lithium battery is located inside the unit enclosure. To avoid danger
of explosion, replace the battery as per instructions. Replace only with the same or equivalent
type recommended by the manufacturer. Refer all servicing to qualified service personnel.
Notice!
Batteries must not be disposed of in household waste. Dispose of batteries only at suitable
collection points and, in the case of lithium batteries, mask the poles.
For further information refer to: http://www.BoschSecurity.com/standards
Camera signal - Protect the cable with a primary protector if the camera signal is beyond 140
feet, in accordance with NEC800 (CEC Section 60).
Disposal - Your Bosch product was developed and manufactured with high-quality material
and components that can be recycled and reused. This symbol means that electronic and
electrical appliances, which have reached the end of their working life, must be collected
and disposed of separately from household waste material. Separate collecting systems are
usually in place for disused electronic and electrical products. Please dispose of these units
at an environmentally compatible recycling facility, per European Directive 2002/96/EC.
Electronic Surveillance - This unit is intended for use in public areas only. U.S. federal law
strictly prohibits surreptitious recording of oral communications.
Environmental statement - Bosch has a strong commitment towards the environment. This
unit has been designed to respect the environment as much as possible.
Electrostatic-sensitive device - Use proper CMOS/MOS-FET handling precautions to avoid
electrostatic discharge. NOTE: Wear required grounded wrist straps and observe proper ESD
safety precautions when handling the electrostatic-sensitive printed circuit boards.
Fuse rating - For protection of the unit, the branch circuit protection must be secured with a
maximum fuse rating of 16A. This must be in accordance with NEC800 (CEC Section 60).
Grounding - For mounting the unit in potentially damp environments, ensure to ground the
system using the ground connection of the power supply connector (see section: Connecting
external power supply).
Coax grounding:
–
2015.01 | 10.6 |
Ground the cable system if connecting an outside cable system to the unit.
Installation Manual
Bosch Security Systems, Inc.
Safety | en
LTC 8900 Series
–
11
Connect outdoor equipment to the unit's inputs only after this unit has had its grounding
plug connected to a grounded outlet or its ground terminal is properly connected to a
ground source.
–
Disconnect the unit's input connectors from outdoor equipment before disconnecting the
grounding plug or grounding terminal.
–
Follow proper safety precautions such as grounding for any outdoor device connected to
this unit.
U.S.A. models only - Section 810 of the National Electrical Code, ANSI/NFPA No.70, provides
information regarding proper grounding of the mount and supporting structure, grounding of
the coax to a discharge unit, size of grounding conductors, location of discharge unit,
connection to grounding electrodes, and requirements for the grounding electrode.
Grounding and polarization - This unit may be equipped with a polarized alternating current
line plug (a plug with one blade wider than the other blade). This safety feature allows the
plug to fit into the power outlet in only one way. If unable to insert the plug fully into the
outlet, contact a locally certified electrician to replace the obsolete outlet. Do not defeat the
safety purpose of the polarized plug.
Alternately, this unit may be equipped with a 3-pole grounding plug (a plug with a third pin for
earth grounding). This safety feature allows the plug to fit into a grounded power outlet only.
If unable to insert the plug into the outlet, contact a locally certified electrician to replace the
obsolete outlet. Do not defeat the safety purpose of the grounding plug.
Moving - Disconnect the power before moving the unit. Move the unit with care. Excessive
force or shock may damage the unit and the hard disk drives.
Outdoor signals - The installation for outdoor signals, especially regarding clearance from
power and lightning conductors and transient protection, must be in accordance with NEC725
and NEC800 (CEC Rule 16-224 and CEC Section 60).
Permanently connected equipment - Incorporate a readily accessible disconnect device
external to the equipment.
Pluggable equipment - Install the socket outlet near the equipment so it is easily accessible.
Rack-mount
–
Elevated Operating Ambient - If installed in a closed or multi-unit rack assembly, the
operating ambient temperature of the rack environment may be greater than room
ambient. Therefore, consideration should be given to installing the equipment in an
environment compatible with the maximum ambient temperature (Tma) specified by the
manufacturer.
–
Reduced Air Flow - Installation of the equipment in a rack should be such that the amount
of air flow required for safe operation of the equipment is not compromised.
–
Mechanical loading - Mounting of the equipment in the rack should be such that a
–
Circuit Overloading - Consideration should be given to the connection of the equipment
hazardous condition is not achieved due to uneven mechanical loading.
to the supply circuit and the effect that overloading of the circuits might have on
overcurrent protection and supply wiring. Appropriate consideration of equipment
nameplate ratings should be used when addressing this concern.
–
Reliable Earthing - Reliable earthing of rack-mounted equipment should be maintained.
Particular attention should be given to supply connections other than direct connections
to the branch circuit (e.g. use of power strips).
System ground/Safety ground
System (video) ground is indicated by the symbol
.
Safety (power) ground is indicated by the symbol
.
Bosch Security Systems, Inc.
Installation Manual
2015.01 | 10.6 |
12
en | Safety
LTC 8900 Series
The system ground is only used to comply with safety standards or installation practices in
certain countries. Bosch does not recommend connecting system ground to safety ground
unless it is explicitly required. However, if the system ground and safety ground are connected
and grounding loops are causing interference in the video signal, use an isolation transformer
(available separately from Bosch).
Caution!
!
Connecting System ground to Safety ground may result in ground loops that can disrupt the
CCTV system.
Video loss - Video loss is inherent to digital video recording; therefore, Bosch Security
Systems cannot be held liable for any damage that results from missing video information. To
minimize the risk of lost digital information, Bosch Security Systems recommends multiple,
redundant recording systems, and a procedure to back up all analog and digital information.
2015.01 | 10.6 |
Installation Manual
Bosch Security Systems, Inc.
LTC 8900 Series
1.4
Safety | en
13
FCC & ICES compliance
FCC & ICES Information
(U.S.A. and Canadian Models Only)
This device complies with part 15 of the FCC Rules. Operation is subject to the following
conditions:
–
this device may not cause harmful interference, and
–
this device must accept any interference received, including interference that may cause
undesired operation.
NOTE: This equipment has been tested and found to comply with the limits for a Class A
digital device, pursuant to Part 15 of the FCC Rules and ICES-003 of Industry Canada. These
limits are designed to provide reasonable protection against harmful interference when the
equipment is operated in a commercial environment. This equipment generates, uses, and
radiates radio frequency energy and, if not installed and used in accordance with the
instruction manual, may cause harmful interference to radio communications. Operation of
this equipment in a residential area is likely to cause harmful interference, in which case the
user will be required to correct the interference at his expense.
Intentional or unintentional modifications, not expressly approved by the party responsible for
compliance, shall not be made. Any such modifications could void the user's authority to
operate the equipment. If necessary, the user should consult the dealer or an experienced
radio/television technician for corrective action.
The user may find the following booklet, prepared by the Federal Communications
Commission, helpful: How to Identify and Resolve Radio-TV Interference Problems. This booklet
is available from the U.S. Government Printing Office, Washington, DC 20402, Stock No.
004-000-00345-4.
Informations FCC et ICES
(modèles utilisés aux États-Unis et au Canada uniquement)
Ce produit est conforme aux normes FCC partie 15. la mise en service est soumises aux deux
conditions suivantes :
–
cet appareil ne peut pas provoquer d'interférence nuisible et
–
cet appareil doit pouvoir tolérer toutes les interférences auxquelles il est soumit, y
compris les interférences qui pourraient influer sur son bon fonctionnement.
AVERTISSEMENT: Suite à différents tests, cet appareil s’est révélé conforme aux exigences
imposées aux appareils numériques de Classe A en vertu de la section 15 du règlement de la
Commission fédérale des communications des États-Unis (FCC). Ces contraintes sont destinées
à fournir une protection raisonnable contre les interférences nuisibles quand l'appareil est
utilisé dans une installation commerciale. Cette appareil génère, utilise et émet de l'energie
de fréquence radio, et peut, en cas d'installation ou d'utilisation non conforme aux
instructions, générer des interférences nuisibles aux communications radio. L’utilisation de ce
produit dans une zone résidentielle peut provoquer des interférences nuisibles. Le cas
échéant, l’utilisateur devra remédier à ces interférences à ses propres frais.
Au besoin, l’utilisateur consultera son revendeur ou un technicien qualifié en radio/télévision,
qui procédera à une opération corrective. La brochure suivante, publiée par la Commission
fédérale des communications (FCC), peut s’avérer utile : How to Identify and Resolve Radio-TV
Interference Problems (Comment identifier et résoudre les problèmes d’interférences de radio
et de télévision). Cette brochure est disponible auprès du U.S. Government Printing Office,
Washington, DC 20402, États-Unis, sous la référence n° 004-000-00345-4.
Bosch Security Systems, Inc.
Installation Manual
2015.01 | 10.6 |
14
en | Safety
LTC 8900 Series
Notice!
This is a class A product. In a domestic environment this product may cause radio
interference, in which case the user may be required to take adequate measures.
1.5
UL certification
Disclaimer
Underwriter Laboratories Inc. (“UL”) has not tested the performance or reliability of the
security or signaling aspects of this product. UL has only tested fire, shock and/or casualty
hazards as outlined in UL's Standard(s) for Safety for Closed Circuit Television Equipment, UL
2044. UL Certification does not cover the performance or reliability of the security or signaling
aspects of this product.
UL MAKES NO REPRESENTATIONS, WARRANTIES, OR CERTIFICATIONS WHATSOEVER
REGARDING THE PERFORMANCE OR RELIABILITY OF ANY SECURITY OR SIGNALING RELATED
FUNCTIONS OF THIS PRODUCT.
Disclaimer
Underwriter Laboratories Inc. (“UL”) has not tested the performance or reliability of the
security or signaling aspects of this product. UL has only tested fire, shock and/or casualty
hazards as outlined in UL's Standard(s) for Safety for Information Technology Equipment, UL
60950-1. UL Certification does not cover the performance or reliability of the security or
signaling aspects of this product.
UL MAKES NO REPRESENTATIONS, WARRANTIES, OR CERTIFICATIONS WHATSOEVER
REGARDING THE PERFORMANCE OR RELIABILITY OF ANY SECURITY OR SIGNALING-RELATED
FUNCTIONS OF THIS PRODUCT.
1.6
Bosch notices
Video loss
Video loss is inherent to digital video recording; therefore, Bosch Security Systems cannot be
held liable for any damage that results from missing video information. To minimize the risk of
lost digital information, Bosch Security Systems recommends multiple, redundant recording
systems, and a procedure to back up all analog and digital information.
Copyright
This manual is the intellectual property of Bosch Security Systems and is protected by
copyright. All rights reserved.
Trademarks
All hardware and software product names used in this document are likely to be registered
trademarks and must be treated accordingly.
NOTE:
This manual has been compiled with great care and the information it contains has been
thoroughly verified. The text was complete and correct at the time of printing. The ongoing
development of the products may mean that the content of the user guide can change without
notice. Bosch Security Systems accepts no liability for damage resulting directly or indirectly
from faults, incompleteness or discrepancies between the user guide and the product
described.
More information
For more information please contact the nearest Bosch Security Systems location or visit
www.boschsecurity.com
2015.01 | 10.6 |
Installation Manual
Bosch Security Systems, Inc.
LTC 8900 Series
2
Unpacking | en
15
Unpacking
This equipment should be unpacked and handled with care. If an item appears to have been
damaged in shipment, notify the shipper immediately.
Verify that all the parts listed in the Parts List below are included. If any items are missing,
notify your Bosch Security Systems Sales or Customer Service Representative.
The original packing carton is the safest container in which to transport the unit and must be
used if returning the unit for service. Save it for possible future use.
2.1
Parts List
This electronic equipment should be unpacked and handled carefully:
Part
LTC 8901 or LTC 8904 Series Unit
LTC 8902 Series and LTC 8903 Series Matrix Bays
LTC 8943/95 PC System Controller PC (Redundant Configurations Only)
LTC 8944/93, LTC 8945/93, LTC 8946/93 LAN Switches
Bosch Security Systems, Inc.
Installation Manual
2015.01 | 10.6 |
16
en | Introduction
3
LTC 8900 Series
Introduction
This manual covers the installation of the Allegiant® LTC 8900 Series systems. Information on
system operation and information on the PC software package (if applicable) are covered in
their own respective manuals. Keep these and other manuals which are supplied along with
the various accessory devices available for reference during system installation and
configuration.
3.1
Description
The Allegiant LTC 8900 Series is a state-of-the-art video switching and control system for
indoor use only. It is the highest-capacity system in the Allegiant family. The system can switch
and control up to 4096 cameras to 512 monitors. It is also compatible with all the existing
accessories currently available in the Allegiant product line. Various system capacity
configurations are illustratedin , page 66 through , page 66.
3.2
Features
The LTC 8900 system can be purchased in either one of two design configurations. The
standard configuration includes the LTC 8904 Series type CPU which contains a single CPU
module and a single power supply. If maximum reliability is required, the system can be
purchased to include the LTC 8901 Series CPU which contains dual CPU modules and dual
power supplies. This redundant system design option includes an industrial model PC which
enables the system to provide automatic switchover in case of primary CPU module or CPU
power supply failure. The LTC 8900 Allegiant series systems can accommodate multiple
operator keyboards and a computer system console. They can also accommodate 2048 alarm
points. All 2048 alarm points are available through RS-232 command input; up to 1024 alarm
points are available through contact closure inputs using LTC 8540/00 alarm units and LTC
8713/00 Series port expander units.In addition, the Allegiant Series have a Satellite
configuration capability through which the system can communicate with up to 256 remote
combinations of Allegiant Series switchers.In standard system configurations, the user can
add a Windows®-based PC to simplify programming of the system using either the supplied
LTC 8059 Master Control Software for Windows package or the optional LTC 8850 GUI
software package. In the redundant design configuration, the system is programmed and
continuously monitored using the supplied LTC 8943/95 System Controller Pentium® PC.
Using the PC-based software, user passwords can be utilized, providing an added measure of
system security; various lockout tables restricting user access to cameras, monitors,
keyboards, and remote camera control are easily programmed using the PC-based software
package. The PC software also supports up to 128 different time-activated events, providing
automated control of video sequencing, monitor message broadcasts, receiver/driver
functions, sophisticated alarm control, powerful system macro capabilities, and several other
functions.Even with its sophistication, the Allegiant LTC 8900 system is designed for the
novice user. The ergonomic keyboard design contains many user-friendly but powerful
functions. A user can choose from up to 256 sequences that are stored in memory, select any
of the cameras to view on any of the monitors, and take exclusive control of remote pan/tilt
camera functions right from the keyboard.Each monitor can display a system status overlay
showing alarm status, sequence conditions, time/date, and camera information.The Allegiant
LTC 8900 Series systems represent a dramatic breakthrough in CCTV switcher/controllers,
and are backed by years of expertise in designing and manufacturing closed circuit video
equipment.
2015.01 | 10.6 |
Installation Manual
Bosch Security Systems, Inc.
LTC 8900 Series
System Components | en
4
System Components
4.1
LTC 8904 Series CPU Bay
17
This unit provides central control for the entire system. It contains all the system's
configuration information such as camera tables, alarm tables, sequences, etc. It is also the
connection interface to the various external Allegiant Series accessory products such as
keyboards, alarm interfaces, signal distribution units, etc. One LTC 8904 Series CPU bay per
system is required. An LTC 8904 Series CPU bay includes one power supply (LTC 8905), one
CPU module (LTC 8910), and a relay module (LTC 8917).
4.2
LTC 8901 Series CPU Bay
(Applicable to redundant system configurations only)This unit is similar to the standard LTC
8904 Series CPU, except it utilizes a redundant design architecture. The LTC 8901 Series
provides hot standby features with redundant power supplies and CPU boards. In conjunction
with the supplied System Controller PC, the LTC 8901 Series system is capable of automatic
detection of a main power supply or CPU fault and automatic switch over to the backup. The
unit also features the patented data mirroring technology, which allows the backup CPU to
constantly maintain the same state as the main CPU. Downloaded tables into the primary CPU
are automatically transferred to the backup CPU. Unlike competitive systems, data transfers to
the backup LTC 8901 Series CPU are automatically verified to ensure accuracy. With this
feature, if a failure of the main CPU occurs, the backup CPU will be in the exact same state
that the main CPU was in prior to failure - all appropriate video will be on the monitors,
sequences will be running, alarms will be active, etc. One LTC 8901 Series CPU bay per
system is required.A LTC 8901 Series CPU bay includes two power supplies (LTC 8905), two
CPU modules (LTC 8910), and a relay module (LTC 8917).
4.3
LTC 8902 Series Output Bay
The LTC 8902 Series Output Bays generate the text overlays for the video monitors. Each bay
accepts up to 8 LTC 8934/00 Video Output Modules providing output for up to 64 monitors.
For more outputs, additional output bays can be used up to a maximum of 8 bays providing
512 monitor outputs. Each LTC 8902 Series Input Bay includes one Data Receiver module
(LTC 8916) and a power supply (LTC 8906).
4.4
LTC 8903 Series Input Bay
The LTC 8903 Series Input Bays provide the video switching functions. Each bay accepts up to
16 LTC 8921/00 Video Input Modules providing up to 256 camera inputs. Because of it’s
unique video bus design, the LTC 8903 Series bay is capable of switching 256 cameras to a
group of 32 monitors using only 8 LTC 8921/00 Video Input modules. When 16 LTC 8921/00
modules are installed in a LTC 8803 Series bay, 256 cameras can be switched to up to 64
monitors.The Input Bay provides full matrix switching – any input can be connected to any
output. Up to 4 LTC 8903 Series Input Bays can be connected directly to a LTC 8902 Series
Output Bay. This configuration can handle up to 1024 camera inputs. To handle a greater
number of cameras, a second stage of LTC 8903 Series bays can be used. In this
configuration, the outputs of up to 4 LTC 8903 Series Input Bays are connected to the camera
inputs of another LTC 8903 Series Input Bay. The outputs of this second-stage bay are then
connected to an LTC 8902 Series Output Bay. Up to 4 second-stage LTC 8903 Series Input
Bays can connect to the LTC 8902 Series Output Bay, for a total capacity of 4096 camera
inputs. When multiple LTC 8902 Series Output Bays are used in a system, the LTC 8903 Series
Input Bay configuration must be duplicated for each output bay. The camera signals to the
Bosch Security Systems, Inc.
Installation Manual
2015.01 | 10.6 |
18
en | System Components
LTC 8900 Series
first input bay configuration are looped using video ribbon cables to the next group of input
bays. This sequence continues for each LTC 8902 Series Output Bay in the system.Each LTC
8903 Series Input Bay includes one Data Receiver module (LTC 8918) and a power supply
(LTC 8805).
4.5
LTC 8934/00 Video Output Modules
The LTC 8934/00 Video Output modules are installed into LTC 8902 Series Output Bays to
provide video output to monitors and DVR/VCRs. Each output module handles 8 outputs. Up
to 8 modules can be installed in each LTC 8902 Series Output Bay.
4.6
LTC 8921/00 Video Input Modules
The LTC 8921/00 Video Input modules are installed into LTC 8903 Series Input Bays to accept
input from cameras and other video sources. Each input modules accepts 32 video inputs. Up
to 16 modules can be installed in each LTC 8903 Series Input Bay.
4.7
LTC 8943/95 System Controller PC
(Applicable to redundant system configurations only) The LTC 8943/95 Series System
Controller is an industrial grade PC system supplied in a rack-mountable enclosure and
includes a rack-mounted monitor, a rack-mounted keyboard, Windows operating system and
preloaded configuration software. The LTC 8943/95 PC is supplied only if the system is
purchased in the redundant design configuration. The PC runs the System Supervisor
Software that manages the CPU data mirroring and automatic switchover functions. Since the
PC is intended to configure and monitor the operation of the LTC 8900 system, it is strongly
recommended that it be used solely for this purpose. It should not be used as an operator’s
workstation or for any other purpose which could interfere with its ability to provide
automatic switchover functions.
4.8
LTC 8944/93 and LTC 8945/93 LAN Switches
(Applicable to redundant system configurations only)The LTC 8944/93 and LTC 8945/93 units
are 10/100Base-T Ethernet LAN switches that provide a communication link between the LTC
8901 Series main CPU bay and the system’s LTC 8902 Series and LTC 8903 Series matrix
bays. The LTC 8944/93 and LTC 8945/93 switches are factory configured to communicate
directly with the LTC 8943/95 System Controller PC in redundant system configurations.
2015.01 | 10.6 |
Installation Manual
Bosch Security Systems, Inc.
LTC 8900 Series
4.9
System Components | en
19
LTC 8946/93 LAN Switches
The LTC 8946/93 is a 10/100Base-T Ethernet LAN switch that provides a communication link
between the LTC 8904 Series main CPU bay and up to 11 of the system’s LTC 8902 Series and
LTC 8903 Series matrix bays. LTC 8946/93 switches can be cascaded together for use in large
systems to provide additional LAN ports when the number of LTC 8902 Series and LTC 8903
Series matrix bays exceed a combined quantity of 11 in standard configuration systems or 18
in redundant design system configurations.
4.10
LTC 8809/00 Video Ribbon Cable
The LTC 8809/00 are 16-channel ribbon cables used to provide video connections between
various system components. They are specifically designed for use with video signals and are
equipped with locking keyed connectors on each end.
4.11
LTC 8808/00 Video Interconnect Panel
This patch panel contains 32 BNC connectors on its front for external video connections and
two 16-contact ribbon connectors on its rear. Two LTC 8809/00 16-conductor ribbon cables
are included for interfacing the patch panel to the video input or video output connectors on
the LTC 8902 Series Output Bays and LTC 8903 Series Input Bays.
4.12
LAN Cables
Three types of LAN cables are supplied with the system. The first type has a length of 8 m (25
ft). The second type is 3 m (10 ft) long. The third type is 2 m (6 ft) long and contain reversed
data connections. These shorter LAN cables are used exclusively for crossover connections
between the LTC 8944/93, LTC 8945/93, and LTC 8946/93 LAN switches.
4.13
Security Key for PC-based Software
The Master Control Software for Windows (MCSW) or the Graphical User Interface (GUI) PCbased software programs can only be accessed when a Security Key is attached to the PC.
This key is used to prevent unauthorized access to the system software, and it should be kept
in a safe place if the need to remove it from the PC occurs.In redundant design system
configurations, a Security Key is supplied along with the preloaded MCSW software for use on
the LTC 8943/95 PC. In standard system configurations, the MCSW and its Key are included
for use on a user supplied PC.
4.14
Miscellaneous Components
The system is supplied with other miscellaneous components including power cords for both
110V and 220 V outlets. The unused cords can be discarded. Figure 31 illustrates some of
these components along with other cables noted elsewhere in this manual.
Bosch Security Systems, Inc.
Installation Manual
2015.01 | 10.6 |
20
en | Hardware Installation Procedure for Standard Systems Utilizing LTC 8904 Series
CPU
LTC 8900 Series
5
Hardware Installation Procedure for Standard Systems
Utilizing LTC 8904 Series CPU
5.1
General Installation Considerations
(Refer to Hardware Installation Procedure for Redundant System Configuration Utilizing LTC 8901
Series CPU, page 31, for Installation Procedure for redundant system configurations using
LTC 8901 Series CPU.)
Notice!
Do Not Apply power to equipment until instructed to do so.
To facilitate system installation, it is highly recommended to install the system components
using these guidelines: �
1.
The main system components are designed to be rack-mounted into standard 19in. EIA
racks. Remove the 4 rubber bumper foot pads found on the bottoms of the bays before
installing them. Four (4) holes are provided for mounting the bays in the rack. Rackmounting screws and associated hardware are NOT included.
2.
If possible, rack the LTC 8902 Series bays so they are in a central location with respect to
the LTC 8903 Series bays. This is especially important in large system configurations
where many LTC 8903 Series Input Bays will be feeding video to a single or a few LTC
8902 Series Output Bays.
NOTE: Interconnecting LTC 8902 Series bays and LTC 8903 Series bays must be located
close enough together that the supplied 2 m (6 ft) video interconnect cables can be used.
Although it is not an absolute requirement, the matrix bay video interconnect cabling will
be easier to manage if the LTC 8902 Series Bays are mounted higher up in the rack above
any LTC 8903 Series Input Bays.
3.
Camera and monitor video connections are NOT made directly to the LTC 8902 Series
and LTC 8903 Series matrix bays. All external video connections are made to LTC
8808/00 Video Interconnect Panels. Each LTC 8808/00 panel accepts up to 32 video
connections and interfaces to the various matrix bays using 2 LTC 8809/00 video ribbon
cables. The LTC 8808/00 panels can be mounted wherever convenient as long as they are
within 2 m (6 ft) of the matrix bay that they are being used with 2 m (6 ft) is the length of
the LTC 8809/00 ribbon cable).
4.
Install the LTC 8902 Series and LTC 8903Series matrix bays close enough to the systems
LTC 8946/93 LAN switch(es) so that the supplied 8 m (25 ft) LAN cables can be used. If
necessary due to unusual installation conditions, longer standard 10/100 Base-T LAN
cables should be obtained from a local computer hardware supplier.
5.
Once installed, some care is necessary to avoid damage to the connectors on the matrix
bays to which the LTC 8809/00 ribbon cables are attached. The ribbon cable connectors
contain locking hooks which can be damaged if too much strain is put on the ribbon
cables. If necessary, support the LTC 8809/00 cables to eliminate excessive loading force
on the locking hooks.
2015.01 | 10.6 |
Installation Manual
Bosch Security Systems, Inc.
Hardware Installation Procedure for Standard Systems Utilizing LTC 8904 Series CPU |
en
LTC 8900 Series
LTC 8946 LAN Switch
LTC 8904 CPU Bay
LTC 8902
Monitor Bay
LTC 8902
Monitor Bay
LTC 8903
Camera Bay
LTC 8903
Camera Bay
LTC 8903
Camera Bay
LTC 8903
Camera Bay
LTC 8903
Camera Bay
LTC 8903
Camera Bay
LTC 8903
Camera Bay
LTC 8903
Camera Bay
21
Figure 5.1: LTC 8900 1024 Camera by 128 Monitor System Installed in Two 72 in. EIA Mounting Racks
5.2
LTC 8904 Series CPU Bay Installation
The LTC 8904 Series Main CPU Bay is supplied fully assembled and requires no user
adjustments. Install the CPU bay into the mounting rack.
NOTE: Rack-mounting screws and associated hardware are NOT included.
A L L E G IA N T M a trix C P U
P ower
BOSCH
C P U A C T IV IT Y
Figure 5.2: LTC 8904 Series CPU Bay
It is recommended that the CPU bay be mountedso that a 9 cm (3-1/2 in.) rack space is
availableeither above or below the enclosure.In sites where the system can not be taken out
of operation for a period of time, this will leave a mounting space available for a replacement
CPU in the unlikely event that the original CPU must be removed for servicing.
Do not attach line cord to AC power source until instructed to do so.
Bosch Security Systems, Inc.
Installation Manual
2015.01 | 10.6 |
22
en | Hardware Installation Procedure for Standard Systems Utilizing LTC 8904 Series
CPU
LTC 8900 Series
LAN Switch Installation
5.3
The LTC 8946/93 is a standard 10/100 Base-T network switch. Disregard the original
manufacturers instructions supplied with the LAN switch(es). To use the switch(es) in the LTC
8900 system, follow the directions supplied in this manual ONLY.
The software supplied with the switch(es) is not used. The switch(es) for the LTC 8900
systems are used in a network dedicated to only the LTC 8900 system. The switch(es) must
not be connected to a computer network or any other network.
All of the LAN data cables going to the switch(es) will connect to the front panel ports. The
main AC linecord is connected to the rear panel of the switch. If desired, switch(es) can be
mounted so that the front panel is facing into the rack. Determine which orientation is most
suitable for your application, then attach the supplied racking ears to the side mounting holes
accordingly.
Attach the AC line cords to the switches, but do not attach the line cord to the AC power
source until instructed to do so.
LTC 8902 Series Output Bay and LTC 8903 Series Input Bay
Installation
5.4
The LTC 8902 Series and LTC 8903 Series bays require insertion of the power supply, data
receiver module, and the video modules.Remove the front panel of the bay (LTC 8902 Series
or LTC 8903 Series) by loosening the 4 corner fasteners.LTC 8902 Series Video Output bays
are supplied with LTC 8906 Series power supplies.LTC 8903 Series Video Input bays are
supplied with LTC 8805 Series power supplies.Install the power supply in the far right
position of the bay ensuring proper alignment and seating of the supply into the rear mating
connector. Verify that the power supply ON/OFF switch is in the OFF position.
Figure 5.3: Typical Power Supply Insertion
Install four (4) supplied screws and star washers on the rear panel of the bay(s) surrounding
the power supply line cord. This fastens the power supply securely in place. Repeat this
procedure for all LTC 8902 Series and LTC 8903 Series bays.
Caution!
!
If the LTC 8902 Series or LTC 8903 Series bays are to be transported, the main power
supplies should be removed to prevent possible damage to the bays internal parts.
Install the matrix bays into the mounting rack. Place the bays in the racks as described in
General Installation Considerations within his manual. Note that rack-mounting screws and
associated hardware are NOT included. Attach the AC line cord, but do not power up the bay
until instructed.NOTE: The LTC 8902 Series and LTC 8903 Series bays should be installed so
there is at least 4.5 cm (1-3/4 in.) of clearance above and below the bay, to allow for proper
cooling. Failure to provide proper clearance may cause the equipment to exceed its
recommended operating temperature range. DO NOT install the LTC 8934/00 Video Output
modules or the LTC 8921/00 Video Input modules into the matrix bays at this time.
2015.01 | 10.6 |
Installation Manual
Bosch Security Systems, Inc.
Hardware Installation Procedure for Standard Systems Utilizing LTC 8904 Series CPU |
en
LTC 8900 Series
5.5
23
Module Insertion
A special tool is supplied with the system components, for insertion of the Data Receiver,
Video Input Module, and Video Output Module boards into LTC 8902 and LTC 8903 Series
equipment bays. The tool is a simple lever (an angled piece of aluminum), used as
follows:Insert the board fully into the slot, ensuring proper alignment with the
connectors.Insert the short end of the lever into the groove in the front of the bay so the tool
is aligned with the card ejectors on the card, then push the lever to force the card into the
slot.
IN S R -T O L
Figure 5.4: Example of Insertion Tool Use
5.6
Data Receiver Modules
LTC 8902 Series Video Output bays are supplied with LTC 8916/01 Data Receiver
modules.LTC 8903 Series Video Input bays are supplied with LTC 8918/01 Data Receiver
modules.Data Receiver Modules are installed into the right most slot (adjacent to the power
supply) of the matrix bays as shown below:
Figure 5.5: Typical Data Receiver Module Insertion
5.7
LTC 8916/01 Data Receiver Modules
The LTC 8916/01 Data Receiver modules (installed in LTC 8902 Series bays) contain three (3)
8-position dip switches.
For system configurations of up to 2048 cameras and 512 monitors, , page 66 can be used as
a guide for setting the Data Receiver DIP switches. Otherwise, follow the procedure described
below.
Bosch Security Systems, Inc.
Installation Manual
2015.01 | 10.6 |
24
en | Hardware Installation Procedure for Standard Systems Utilizing LTC 8904 Series
CPU
LTC 8900 Series
Verify that switches located on dipswitch S1 and S3 are all OFF.On dipswitch S2 of the LTC
8916/01, verify that switches 1 to 4 are OFF. Switch 8 should be in the ON position. Switches
5 through 7 determine the monitor number range that the bay will be used for and must be set
according to the table below:
5
6
7
Monitor Range
OFF
OFF
OFF
1 to 64
OFF
OFF
ON
65 to 128
OFF
ON
OFF
129 to 192
OFF
ON
ON
193 to 256
ON
OFF
OFF
257 to 320
ON
OFF
ON
321 to 384
ON
ON
OFF
385 to 448
ON
ON
ON
449 to 512
Table 5.1: LTC 8916/01 Data Receiver Module Switch Positions (used in LTC 8902 Service Bays)
5.8
LTC 8918/01 Data Receiver Modules
The LTC 8918/01 Data Receiver modules (installed in LTC 8903 Series bays) contain three (3)
8-position dip switches.For system configurations of up to 2048 cameras and 512 monitors, ,
page 66 can be used as a guide for setting the Data Receiver DIP switches. Otherwise, follow
the procedure described below.Verify that switches 1 to 3 and 5 to 8 on dipswitch S1 are
OFF.Switch 4 on S1 should be placed in the OFF position if the LTC 8903 Series bay will be
used as a primary camera bay (one that will have cameras directly connected to it). If the LTC
8903 Series bay will be used as a secondary camera bay (one that will have other LTC 8903
Series bays connected to its inputs), place switch 4 on S1 in the ON position.If switch 4 on S1
has been set to the OFF position (for use as a primary camera bay as described previously) set
switches 1 to 4 on S2 according to the Primary Camera Bay Range in , page 24 shown below:
2015.01 | 10.6 |
1
2
3
4
Camera Number Range
OFF
OFF
OFF
OFF
1 to 256
OFF
OFF
OFF
ON
257 to 512
OFF
OFF
ON
OFF
513 to 768
OFF
OFF
ON
ON
769 to 1024
OFF
ON
OFF
OFF
1025 to 1280
OFF
ON
OFF
ON
1281 to 1536
OFF
ON
ON
OFF
1537 to 1792
OFF
ON
ON
ON
1793 to 2048
ON
OFF
OFF
OFF
2049 to 2304
ON
OFF
OFF
ON
2305 to 2560
ON
OFF
ON
OFF
2561 to 2816
Installation Manual
Bosch Security Systems, Inc.
Hardware Installation Procedure for Standard Systems Utilizing LTC 8904 Series CPU |
en
LTC 8900 Series
1
2
3
4
Camera Number Range
ON
OFF
ON
ON
2817 to 3072
ON
ON
OFF
OFF
3073 to 3328
ON
ON
OFF
ON
3329 to 3584
ON
ON
ON
OFF
3585 to 3840
ON
ON
ON
ON
3841 to 4096
25
Table 5.2: LTC 8918/01 Data Receiver Module (used in LTC 8903 Series bays) S2 positions 1 through 4
LTC 8903 Series Camera bays will always be providing video signals (either directly, or via
asecond LTC 8903 Series bay) to a specific LTC 8902 Series Monitor bay. Determine the
applicable LTC 8902 Series Monitor bay, then set switches 5 through 7 on dipswitch S2 to the
same settings as switches 5 through 7 on S2 of the Data Receiver module installed in the
corresponding LTC 8902 Series bay. These will be the same settings as listed in the Monitor
Number Range shown in , page 23.ON dipswitch S2 of the LTC 8918, verify that switch 8 is
ON.If switch 4 on S1 has been set to the ON position (for use as a secondary camera bay as
described above) set switches 3 and 4 of S2 OFF and set switches 1 and 2 of S2 according to
which primary camera bays it will be connected to per , page 24 below:
1
2
Primary Camera Bay Range
OFF
OFF
1 to 4
OFF
ON
5 to 8
ON
OFF
9 to 12
ON
ON
13 to 16
Table 5.3: LTC 8918 Data Receiver Module (used in LTC 8903 bays) S2 Positions 1 and 2
5.9
LTC 8934/00 Video Output Modules
The appropriate number of LTC 8934/00 Video Output Modules should be installed in the LTC
8902 Series main bay starting with the left most slot. Each output module handles 8 outputs.
If fewer than the maximum number of Video Output Modules are installed, they should be
installed from left to right, with empty spaces on the right.
In some system configurations, 8 or less LTC 8934/00 modules may be distributed between
two (2) LTC 8902 Series Video Output bays. This configuration assures partial system
operation in the unlikely event of an LTC 8902 Series failure. Since this creates a gap in the
monitor number order, the optional Allegiant PC-based system software allows renumbering
of the logical monitor numbers. For example, if the system was designed for 64 monitor
outputs, four LTC 8934/00 modules (handling monitors 1 to 32) would be installed in the first
LTC 8902 Series bay. Another four LTC 8934/00 modules would be installed in a second LTC
8902 Series bay. The default monitor number range for this second module would be 65 to 96.
Since this would be inconvenient to operators of the system, the logical numbers of the
monitor numbers in the second bay can be renumbered to range from 33 to 64 using the
optional Allegiant PC-based system software. , page 35 shows an example of this type of
configuration. It is also possible to number the monitors so that one bay contains the odd
numbered monitors and the other bay contains even numbered monitors. This way, a viewing
location containing an even mix of monitors from each bay would lose every other one in the
unlikely event of a LTC 8902 Series bay failure.
Bosch Security Systems, Inc.
Installation Manual
2015.01 | 10.6 |
26
en | Hardware Installation Procedure for Standard Systems Utilizing LTC 8904 Series
CPU
LTC 8900 Series
Figure 5.6: Typical Video Output Module Insertion
The LTC 8934/00 Video Output Modules contain five (5) 8-position dip switches. DIP switch
S1001 is reserved and all switches should be left in the ON position.
Dip switches S1002, S1003, S1004, and S1005 are video termination switches for each of the
video bus inputs. All of these switches should be set to ON (terminated). This is the factory
default.
All LTC 8934/00 Video Output Modules are identical and can be swapped anywhere within the
bay without changing the module.
5.10
LTC 8921/00 Video Input Modules
For the LTC 8903 Series Bays, termination switches (S1001 through S1004) on the LTC
8921/00 Video Input Modules must be set to the correct position prior to installation. Read
the Termination Practices section prior to actually installing the Video Input Modules on these
systems. As shipped from the factory, all terminated switches are in the ON (terminated)
position.
Locate and use the diagram(s) that best fit your system configuration (, page 66 to , page
66 in this manual). The appropriate number of Video Input Modules (LTC 8921/00) should be
installed in the LTC 8903 Series main bay, starting with the left most slot. Each input module
handles 32 inputs by 32 outputs.
Since the LTC 8903 Series supplies 64 outputs, two (2) LTC 8921/00 input cards are required
for each set of 32 cameras. Odd numbered slots provide video for monitors 1-32, and even
numbered slots provide video for monitors 33-64. If 32 or less monitors are being served by
the LTC 8903 Series bay, the Video Input Modules are not required in the even numbered
slots. This concept is shown in , page 66 and examples of system configurations are shown
in , page 66.
Cards in even numbered slots should have all termination switches OFF. If looping is not being
used, cards in odd numbered slots should have the termination switches ON. See Termination
Practices for more details.
Figure 5.7: Typical Video Input Module Insertion
2015.01 | 10.6 |
Installation Manual
Bosch Security Systems, Inc.
Hardware Installation Procedure for Standard Systems Utilizing LTC 8904 Series CPU |
en
LTC 8900 Series
27
All LTC 8921/00 Video Input Modules are identical and can be swapped anywhere within the
bay without making any changes to the module except to maintain proper termination
settings.
5.11
5.11.1
System Video Connections
Camera Input Connections
Camera connections to the LTC 8903 Series Input Bays require LTC 8808/00 Video
Interconnect (Patch) Panel. Each patch panel provides 32 BNCs for video input or video
looping connections to the system. Patch panels are connected to the rear of the LTC 8903
Series Input Bay using the supplied LTC 8809/00 ribbon cables. Each cable can carry video for
up to 16 cameras. Two cables can be attached to each patch panel to support up to 32
cameras per panel. Each ribbon cable should be attached to the appropriate VIDEO IN
connector on the rear of the LTC 8903 Series bays. A rear panel diagram of the LTC 8903
Series bay is shown in , page 66. Refer to , page 66 to , page 66 to review typical system
connections.
The LTC 8809/00 ribbon cables have keyed connectors on each end. Maintain correct
polarity when connecting system components.
Although attaching a ribbon cable with reversed polarity will not cause permanent damage,
it can cause all video functions within the bay to cease until corrected. Double-check ribbon
cable connections to avoid this condition.
, page 66 illustrates the polarity key orientations on the LTC 8902 and LTC 8903 Series video
matrix bays.
The LTC 8808/00 panels are typically installed on the rear of the mounting rack, behind the
applicable matrix bay. They can be mounted elsewhere as long as the 2 m (6 ft) LTC 8809/00
ribbon cables can reach the applicable matrix bay. Note that rackmounting screws and
associated hardware are NOT included.
The Video Input connectors are labeled with multiple levels. If more than 256 cameras are
used in a system, multiple levels of input bays are used. These system configurations are
shown in , page 66 through , page 66.
5.11.2
System Connections over 1024 Cameras
If more than 1024 cameras are used, a second stage of LTC 8903 Series Video Input Bays are
required. These system configurations are shown in , page 66, , page 66 to , page 66, ,
page 66 and , page 66. In this configuration, the VIDEO OUT connectors from the first stage
LTC 8903 Series bays are connected to the VIDEO IN connectors on the second stage bays
using LTC 8809/00 ribbon cables.
The LTC 8809/00 ribbon cables have keyed connectors on each end. Maintain correct
polarity when attaching between the bays.
The VIDEO OUT connectors are labeled A through D. These connectors must be connected to
corresponding VIDEO IN connectors labeled A through D.
5.11.3
Camera Bays to Monitor Bay Video Connections
The VIDEO OUT connectors from LTC 8903 Series input bays are connected to the VIDEO BUS
connectors on the LTC 8902 Series output bays using LTC 8809/00 ribbon cables. Rear panel
diagrams of the LTC 8902 Series and LTC 8903 Series bays are shown in , page 66.
The LTC 8809/00 ribbon cables have keyed connectors on each end. Maintain correct
polarity when attaching between the bays.
, page 66 shows the polarity key of the ribbon cable connectors on the LTC 8902 Series and
LTC 8903 Series matrix bays.
Bosch Security Systems, Inc.
Installation Manual
2015.01 | 10.6 |
28
en | Hardware Installation Procedure for Standard Systems Utilizing LTC 8904 Series
CPU
LTC 8900 Series
The LTC 8903 Series bay s VIDEO OUT connectors are labeled A through D, and the Monitor
Bay VIDEO BUS connectors are labeled CAMERA BAY OUTPUT A through CAMERA BAY
OUTPUT D.
The input bay A-D connectors must be connected to corresponding A-D connectors on the
output bay using LTC 8809/00 coax ribbon cables. , page 66 and , page 66 demonstrate
these connections.
5.11.4
Multiple Monitor Bay Consideration
If multiple monitor bays are used in the system, the LTC 8903 Series Input Bay configuration
must be duplicated for each output bay. This is illustrated in system configuration diagrams, ,
page 66 through , page 66. The video inputs from the first set of LTC 8903 Series Input
Bays must be looped through to the second set of input bays using LTC 8809/00 coax ribbon
cables. The LTC 8903 Series bays provide looping connectors for these connections. The
supplied ribbon cable connectors are connected from the LOOP outputs of the first set of
input bays to the corresponding VIDEO IN connectors on the next set of input bays using LTC
8809/00 ribbon cables. This looping can continue as needed. The termination switches on the
LTC 8921/00 Video Input Cards must be turned OFF in all LTC 8903 Series Input bays except
those in the last set (assuming the system will NOT have video looping connections).
5.11.5
Monitor Output Connections
For monitor connections, the LTC 8902 Series Output Bays require the LTC 8808/00 Video
Interconnect (Patch) Panel. Up to 32 monitors per panel can be connected. Each ribbon cable
should be attached to the appropriate MONITOR OUTPUT connector on the rear of the LTC
8902 Series bays.
The LTC 8809/00 ribbon cables have keyed connectors on each end. Maintain correct
polarity when attaching between system components.
Refer to , page 66 for typical system connections. The LTC 8808/00 panels are typically
installed on the rear of the mounting rack behind the applicable matrix bay. They can be
mounted elsewhere as long as the 2 m (6 ft) LTC 8809/00 ribbon cables can reach the
applicable matrix bay.
NOTE: Rack-mounting screws and associated hardware are NOT included.
5.11.6
System Video Looping Connections
LTC 8808/00 panels are also used to provide looping video outputs from the system. Each
ribbon cable should be attached to the appropriate LOOP connector on the rear of the last
group of LTC 8903 Series bays.
The LTC 8809/00 ribbon cables have keyed connectors on each end. Maintain correct
polarity when attaching between system components.
5.12
Termination Practices
Video from every camera should be terminated with a 75 ohm resistance. Each video line
should be terminated exactly once. If video from a camera is going to several devices, only the
last piece of equipment on the video line should be terminated.
See , page 66 through , page 66 for proper termination practices. Allegiant LTC 8900
systems terminate their video inputs as follows:
5.12.1
LTC 8903 Series Terminations
Each LTC 8921/00 VIM card has DIP switches (S1001 through S1004) for selecting the
termination of each video line. To terminate an input line, make sure that the appropriate DIP
switch on the VIM card is ON. If non-terminated operation is required for looping purposes,
turn the switch OFF.
2015.01 | 10.6 |
Installation Manual
Bosch Security Systems, Inc.
Hardware Installation Procedure for Standard Systems Utilizing LTC 8904 Series CPU |
en
LTC 8900 Series
29
Each LTC 8921/00 VIM card provides outputs for 32 monitors. The LTC 8903 Series bay
provides 64 outputs, two LTC 8921/00 VIM cards for each 32 inputs (when more than 32
monitors are being served by the LTC 8903 Series bay). In this case, inputs are shared by
adjacent cards. The cards in slots one and two handle inputs 1-32, the cards in slots three and
four handle inputs 33-64, etc,. Since each input goes to two cards, only one of the two cards
should be terminated. Although either card in a pair can be terminated, it is recommended
that cards in the odd number slots are terminated (dip switches ON), and cards in even
numbered slots are unterminated.
The LTC 8903 Series Input Bay provides video looping connections which use LTC 8809/00
coax type ribbon cables. Each LTC 8809/00 cable provides looping capability for up to 16
video inputs. The termination switches on the LTC 8921/00 cards should be OFF for all LTC
8903 Series Input bays except those in the last set (assuming the system will NOT have video
looping connections). In the last bay, the termination switches should be set to ON in even
numbered slots (as described in the preceding paragraph).
If the system will have some or all video inputs looped out, all termination switches
corresponding to the looped video channels should be set to OFF in all LTC 8903 Series bays.
5.12.2
Second Level LTC 8903 Series Terminations
When more than 1024 cameras are used, two levels of LTC 8903 Series bays are required. In
this case the LTC 8903 Series bays in the first level are terminated as described above. In the
second level LTC 8903 Series bay, the termination switches should be turned ON on all cards.
Note that in the secondary level, LTC 8903 Series cards are inserted only into slots 1, 4, 5, 8,
9, 12, 13, and 16 as depicted in , page 66 through , page 66, , page 66, and , page 66.
5.12.3
LTC 8902 Series Terminators
Dip switches S1002, S1003, S1004, and S1005 on the LTC 8934/00 Video Output Module are
video termination switches. All of these switches should be set to ON (terminated). This
factory default correctly terminates the outputs of the LTC 8903 Series bays into a 75 ohm
load.
Just like camera inputs, monitor outputs on the Allegiant system are designed to be
terminated. Each monitor output from the LTC 8902 Series bay expects to be connected to a
75 ohm load. This is the load typically provided by a normal monitor. If a monitor output line is
looped through several monitors or other equipment, make sure that only the last unit on the
line is terminated.
5.13
5.13.1
System Data Connections
LTC 8904 Series CPU Data Connections
The LTC 8904 Series CPU connects to the LTC 8946/93 LAN switch using a supplied standard
8m (25ft) 10/100Base-T twisted pair cable. The LAN cable can be connected to any port of the
LTC 8946/93 LAN switch.
5.13.2
LTC 8902 Series and LTC 8903 Series Data Connections
Data connections for LTC 8902 Series and LTC 8903 Series bays are shown in , page 66.
Each LTC 8902 Series bay and LTC 8903 Series bay has two LAN connectors, but either of
these connectors can be used. Only one at a time should be connected. The supplied standard
8 m (25 ft) 10/100Base-T twisted pair cable is used to connect the LAN connectors on the LTC
8902 Series and LTC 8903 Series bays to any of the ports on any of the LTC 8946/93 LAN
switch(es).
Bosch Security Systems, Inc.
Installation Manual
2015.01 | 10.6 |
30
en | Hardware Installation Procedure for Standard Systems Utilizing LTC 8904 Series
CPU
LTC 8900 Series
The number of available LAN ports can be increased by cascading multiple LTC 8946/93 LAN
switches. Each LTC 8946/93 provides 10 additional ports. Additional ports are only required in
large systems with more than a combined total of 11 LTC 8902 Series and LTC 8903 Series
bays.
5.13.3
Multiple LTC 8946/93 LAN Switch Connections
When the combined quantity of LTC 8902 Series and LTC 8903 Series matrix bays exceeds 11,
use 1 or more additional LTC 8946/93 LAN switch(s). Each additional LTC 8946/93 switch
provides 10 additional ports for connection to matrix bays.
Connect the supplied 2 m (6 ft) crossover cable from any port of the second LTC 8946/93 LAN
switch to any port located on the first LTC 8946/93 LAN switch. Connect any additional LTC
8946/93 LAN switches similarly. These data connections are illustrated in , page 66.
5.14
Main Power Connections
Install the supplied AC power cords between the various pieces of equipment and the
appropriate AC power source. Verify that the AC power switches (on applicable components)
are initially set to OFF.
The order that power is supplied to the system is not critical, but the following order is
recommended if unfamiliar with the equipment:
Apply power to the LTC 8946/93 LAN switch(es). The LAN switches do not have a main AC
power switch, and should power up as soon as the main AC power cord is connected.
Switch on the main AC power to the video bays (LTC 8902 and LTC 8903). Verify that the
LEDs associated with the fuses are lit on all of the power supplies located in the LTC 8902
Series and LTC 8903 Series matrix bays. Initially, the modules within the matrix bays should
indicate the following conditions:
1.
The CPU ACT. LEDS on all Data Receiver modules (module next to power supply)
installed in the various matrix bays should blink randomly green. The LAN LINK/ACT LED
will blink green to indicate communication with the Allegiant CPU. The LAN DUP/COL
LED illuminates yellow to indicate a full duplex network link exists with the Allegiant CPU.
All other LEDs can be ignored.
2.
Activity LEDs should be blinking on the video input and output modules installed in the
matrix bays.
Apply power to the LTC 8904 Series CPU bay. The LTC 8904 Series CPU does not have a
main AC power switch, and should power up as soon as the main AC power cord is
connected. The front panel power LED should be lit and the Activity LED should blink.
NOTE: Depending on activity and general size of the system, it may require several
seconds to fully initialize after a power-up reset.
At this point, the system should be operational. If cameras and monitors are connected to
the system, video from camera number 1 should be visible on all system monitors. The
on-screen text overlay should be visible and the clock should be running (even if no video
signal is present). If not, double-check video and data cable connections. If necessary,
refer to the Troubleshooting Guide in this manual.
To complete the installation, proceed to Camera Phasing and Accessory Installation, page
52.
2015.01 | 10.6 |
Installation Manual
Bosch Security Systems, Inc.
Hardware Installation Procedure for Redundant System Configuration Utilizing LTC 8901
Series CPU | en
LTC 8900 Series
6
31
Hardware Installation Procedure for Redundant
System Configuration Utilizing LTC 8901 Series CPU
Refer to for Installation Procedure for standard system configuration using LTC 8904 Series
CPU.
6.1
System Redundancy Considerations
6.1.1
General Information
Redundant configurations of the LTC 8900 Allegiant System are designed so that no single
point failure can disable the entire system. This is accomplished by providing redundancy for
critical system components. This section provides the information required to design truly
fault-tolerant systems.
The LTC 8901 Series CPU bay is the central point of control for the video switching system. In
the standard nonredundant system configuration, a failure of this component would disable
the entire system. To prevent this, the LTC 8901 Series was designed with redundant CPU
boards and power supplies, all contained within the LTC 8901 Series bay. If one of the primary
components fails, control is automatically switched to the backup units.
In a redundant LTC 8900 configuration, the PC software uses a patented Data Mirroring
feature. This feature maintains the backup CPU in the same state as the primary CPU. If a
switch-over to the backup CPU occurs, the system will be displaying the same cameras,
running the same sequences, and otherwise replicating the state of the primary CPU prior to
failure.
To perform Data Mirroring, the system monitors all data changes in the primary CPU, and
sends copies of this data to the backup CPU. Data Mirroring works for configuration tables,
such as camera titles, and for real time event data, such as alarm activations. The copied data
is verified by appropriate hardware handshaking and data checking mechanisms, ensuring that
the backup CPU contains valid data at the critical time of a switch-over.
In the redundant configuration of the LTC 8900 system, a supplied external computer is used
to monitor the operating condition of the primary and backup CPUs. This computer, the LTC
8943/95 System Controller, runs the System Supervisor program to perform the system
monitoring and Data Mirroring functions. Note that failure of the System Controller PC has no
affect on normal operation of the LTC 8900 system. In fact, the system can be operated
without the System Controller, with automatic switchover and Data Mirroring functions then
unavailable.
Bosch Security Systems, Inc.
Installation Manual
2015.01 | 10.6 |
32
en | Hardware Installation Procedure for Redundant System Configuration Utilizing LTC
8901 Series CPU
Primary
Power Supply
LTC 8910
Primary CPU
LTC 8900 Series
Primary Controller
Primary LAN
Keyboards 1-8
Alarm
LTC 8917
Relay Board
Biphase
Console
Comm 3
Mains
Comm 4
Switch Control
Relay Contacts
Backup
Power Supply
LTC 8910
Backup CPU
Backup Controller
Backup LAN
Figure 6.1: Automatic switchover and Data Mirroring functions then unavailable.
6.1.2
LTC 8901 Series CPU Design Features
The LTC 8901 CPU was designed to withstand failure of a CPU board or power supply with no
loss of functionality or data. A diagram of the CPU bay is shown below. The bay contains two
identical sets of power supplies and CPU boards (primary and backup). The communication
ports for external devices, such as keyboards and alarm units, can be switched to either CPU.
The LTC 8943/95 System Controller PC monitors the operation of the CPUs through the
Primary Controller and Backup Controller ports. Under normal conditions, the external devices
are connected to the primary CPU. If the primary CPU or power supply fails, this is detected
by the LTC 8943/95 System Controller PC, which then switches the communication ports to
the backup CPU using the Switch Control input.
6.1.3
LTC 8943/95 System Controller PC Functions
The System Controller uses a rack-mount, industrial grade PC to provide several important
features in redundant LTC 8900 system configurations. The System Supervisor software that
runs on this PC provides user interface and control functions for the CPU selection and Data
Mirroring features. The System Controller data connections are shown in , page 32. The
System Controller uses the Primary Controller and Backup Controller ports on the LTC 8901
Series bay to communicate with the primary and backup CPUs. If a failure is detected, the
System Controller sends a signal on the Switch Control port of the LTC 8901 Series to cause
the switch to the backup controller. The System Controller then disables the LAN port
connected to the primary CPU and enables the LAN port connected to the backup CPU.
2015.01 | 10.6 |
Installation Manual
Bosch Security Systems, Inc.
Hardware Installation Procedure for Redundant System Configuration Utilizing LTC 8901
Series CPU | en
LTC 8900 Series
LTC 8943/95
System
Controller PC
33
LTC 8901 CPU bay
Default Settings:
User: Administr ator
Password: Bosch
Comm 3
Secondary
LAN Data Line
Comm 4
Digital I/O Boar d
Primar y LAN
Data Line to
Port 1
LAN 1
LTC 8944/93 LAN Switch
P ro C u rv e
1
h
LAN 2
3
5
7
5
1 1
1 3
1 5
1 7
1 9
2 1
2 3
2 T
5
2 6 T
2 5 S
2 6 S
2 5 T a n d2 6 T a r e
S w tic h
2 5 1 0-2 4
J9 0 1 9B
P
IE E E A u to M D I
/
P o we r
D u a l- M
P D
e Ir s-X o n a lity
P o r t:s
F a u lt
1 /10 0 0 /1 0 0 0-T ( )T
L E D
U s e o n
o lyr S
o nF eP
(S () T o r
Mo d e
S )
fo r e a c h P o r t
C le a
C o n s o le
R e s e t
r
2
4
6
8
1 0
1 2
1 4
1 6
1 8
2 0
2 2
2 4
12
PC LAN Cable to
LAN Switch Port 2
H
Connect Special
2 met er LAN Crossover
Cable between Sw itches
Using Any Port
Typical Matrix
Bay LAN Line
Backup LAN Data
Line to Port 1
P ro C u rv e
1
h
P
3
5
7
5
1 1
1 3
1 5
1 7
1 9
2 1
S w tic h
2 5 1 0-2 4
J9 0 1 9B
2 3
2 T
5
2 6 T
2 5 S
2 6 S
2 5 T a n d2 6 T a r e
6
IE E E A u to M D I
/
P o we r
D u a l- M
P D
e Ir s-X o n a lity
P o r t:s
F a u lt
1 /10 0 0 /1 0 0 0-T ( )T
L E D
U s e o n
o lyr S
o n
F eP
(S () T o r
Mo d e
S )
fo r e a c h P o r t
C le a
C o n s o le
8
R e s e t
r
2
4
6
8
1 0
1 2
1 4
1 6
PC LAN Cable to
LAN Switch Port 2
LTC 8902 Monitor Ba y
10
1 8
2 0
2 2
2 4
LTC 8945/93 LAN Switch
LTC 8903 Camera Ba y
Figure 6.2: Data Connections for Redundant System Design
6.1.4
LTC 8901 Series CPU Design Features
The LAN switches provide the interbay communication for the system. Since all
systemcommunication is routed through these switches, the use of only one switch would
make the system vulnerable to a single point failure. The redundant configurations of the LTC
8900 system are therefore supplied with a minimum of two switches.
The LAN switches are standard 10/100Base-T ethernet switches. Data connections are made
using unshielded twisted pair wire with RJ-45 modular connectors. On the LTC 8944/93 and
LTC 8945/93 switches, the factory preconfigures port 1 to accept CPU communication and
port 2 to accept System Controller PC communication. The switches are also factory
preconfigured so that any data entering ports 3 through 12 is sent to all other ports. A special
LAN cable connection (shown in , page 32) provides a data path between the two switches.
Bosch Security Systems, Inc.
Installation Manual
2015.01 | 10.6 |
34
en | Hardware Installation Procedure for Redundant System Configuration Utilizing LTC
8901 Series CPU
LTC 8900 Series
With this in place, data coming from the in-use CPU will go to all other ports on both switches.
This allows the video bays to be connected to any port on either switch (except port 1 or 2,
which is reserved for the System Controller PC).
The LAN switches are extremely reliable, but the system should be designed to minimize the
impact of a switch failure. If a single port on a switch fails, only the bay connected to that port
will be lost. If an entire switch fails, all bays connected to that switch will fail.
Thus, it is advisable to divide critical cameras and monitors to bays connected to different
switches, ensuring that no more than half of these signals will be lost in the event of a switch
failure.
The LTC 8901 Series CPU bay provides separate LAN connections for the primary CPU and
backup CPU. The LTC 8900 system was designed so that each CPU board always thinks that it
is controlling the system. Thus both CPUs send control data to the LAN switches. To prevent
conflicts, the System Controller disables the LAN switch port 1 for the CPU that is not in use.
For example, when the primary CPU is controlling the system, LTC 8945/93 LAN switch port 1
for the backup CPU is disabled.
The System Controller uses LAN connections into port 2 of the switches to control and
monitor these switches. If a switch failure is detected (either a complete failure or a failure of
the CPU port, i.e., port 1), automatic switch-over will occur.
6.1.5
Video Bay Redundancy Considerations
The LTC 8900 system was designed to provide redundancy for critical components. Careful
system design ensures that tolerance of single point failures is maintained. For example, if a
single output bay is used in the system and the data receiver board in the bay fails, the entire
system will fail (this is true for the LTC 8900 system as well as the competitors systems).
When fault-tolerance is critical, the system designer should always specify at least two output
bays. This allows critical camera signals to be distributed between the bays.
To support this redundancy concept for smaller systems, the LTC 8901 Series configuration
tables may be programmed with logical camera and monitor numbering. An example of the
non-redundancy/redundancy concept is shown in the following two figures. Both figures
showa 256 x 64 system.
In the first configuration, a worst case failure in either the output or input bay could disable
the entire system.
In the second configuration, logical monitor numbering was used to unconfigure monitor
outputs 33-64, and renumber monitor outputs 65-96 as logical monitor numbers 33-64. Logical
monitor renumbering is configured using the Allegiant Server software. Refer to the software
manual for details.
2015.01 | 10.6 |
Installation Manual
Bosch Security Systems, Inc.
Hardware Installation Procedure for Redundant System Configuration Utilizing LTC 8901
Series CPU | en
LTC 8900 Series
35
Cameras 1-256
LTC 8903 Camera Bay
LTC 8902 Monitor Bay
Logical Monitor Numbers 1-64
Monitors 1-64
Figure 6.3: Non Fault-tolerant 256 Camera x 64 Monitor System
6.1.6
General Installation Considerations
To facilitate system installation, it is highly recommended to install system components using
the following guidelines:
1.
The main system components are designed to be rack-mounted into standard 19 in. EIA
racks. Remove the 4 rubber bumper foot pads found on the bottoms of the bays before
installing them. Four (4) holes are provided for mounting the bays in the rack. Rackmounting screws and associated hardware are NOT included.
2.
With redundant system configurations, install the LTC 8943/95 System Controller PC,
monitor, and keyboard so that they are easily accessible for the system installer/
programmer.
NOTE: The PC must be installed within 3 m (10 ft) of the main CPU bay and within 3 m
(10 ft) of the LAN switches so the supplied cables can be used.
Bosch Security Systems, Inc.
Installation Manual
2015.01 | 10.6 |
36
en | Hardware Installation Procedure for Redundant System Configuration Utilizing LTC
8901 Series CPU
LTC 8900 Series
Cameras 1-256
LTC 8903 Camera Bay
LTC 8903 Camera Bay
LTC 8902 Monitor Bay
LTC 8902 Monitor Bay
Monitor Outputs 1-32
Monitor Outputs 65-96
Logical Monitor Numbers 1-32
Logical Monitor Numbers 33-64
Monitors 1-32
Monitors 33-64
Figure 6.4: Fault-tolerant 256 Camera x 64 Monitor System
3.
If possible, rack the LTC 8902 Series bays so they are in a central location with respect to
the LTC 8903 Series bays. This is especially important in large system configurations
where many LTC 8903 Series Input Bays will be feeding video to a single or a few LTC
8902 Series Output Bays.
NOTE: Interconnecting LTC 8902 Series bays and LTC 8903 Series bays must be located
close enough together that the supplied 2 m (6 ft) video interconnect cables can be used.
Although not a requirement, the matrix bay video interconnect cabling will be easier to
manage if the LTC 8902 Series Bays are mounted higher up in the rack, above any LTC
8903 Series Input Bays.
4.
Camera and monitor video connections are NOT made directly to the LTC 8902 Series
and LTC 8903 Series matrix bays. All external video connections are made to LTC
8808/00 Video Interconnect Panels. Each LTC 8808/00 panel accepts up to 32 video
connections and interfaces to the various matrix bays using two (2) LTC 8809/00 video
ribbon cables. The LTC 8808/00 panels can be mounted wherever convenient, as long as
they are within 2 m (6 ft) of the matrix bay that they are being used with 2 m (6 ft) length
of the LTC 8809/00 ribbon cable).
2015.01 | 10.6 |
Installation Manual
Bosch Security Systems, Inc.
Hardware Installation Procedure for Redundant System Configuration Utilizing LTC 8901
Series CPU | en
LTC 8900 Series
5.
37
Install the LTC 8902 Series and LTC 8903 Series matrix bays close enough to the system
LAN switches (LTC 8944/93, LTC 8945/93, and LTC 8946/93) so that the supplied 8 m
(25 ft) LAN cables can be used.
If necessary due to unusual installation conditions, longer standard 10/100Base-T LAN
cables should be obtained from a local computer hardware supplier.
6.
Once installed, exercise care to avoid damaging to the connectors on the matrix bays to
which the LTC 8809/00 ribbon cables are attached. The ribbon cable connectors contain
locking hooks that can be damaged if too much strain is put on the ribbon cables.
If necessary, support the LTC 8809/00 cables to eliminate excessive loading force on the
locking hooks.
7.
Do not mix the different types of supplied LAN cables. The 3 m (10 ft) length is used
between the CPU and LAN switches. The 8 m (25 ft) length is used between the CPU and
the video matrix bays in all system configurations. The 2 m (6 ft) length has reversed data
connections and can only be used between the LTC 8944/93, LTC 8945/93, and LTC
8946/93 LAN switches.
LTC 8902
Monitor Bay
LTC 8902
Monitor Bay
LTC 8944 LAN Switch
LTC 8945 LAN Switch
LTC 8901 CPU Bay
LTC 8903
Camera Bay
LTC 8943
PC Station
LTC 8903
Camera Bay
H
LTC 8903
Camera Bay
LTC 8903
Camera Bay
Figure 6.5: LTC 8900 512 Cameras by 128 Monitors Redundant System Configuration Installed in two (2)
72-in. EIA mounting racks
6.2
Main CPU Bay Installation
The LTC 8900 Series Main CPU Bay is supplied fully assembled and requires no user
adjustments. Install CPU bay into the mounting rack. Note, rack-mounting screws and
associated hardware are NOT included.
Bosch Security Systems, Inc.
Installation Manual
2015.01 | 10.6 |
38
en | Hardware Installation Procedure for Redundant System Configuration Utilizing LTC
8901 Series CPU
P rim a ry
A L L E G IA N T M a trix C P U
BOSCH
B a ck-U p
P ower
P ower
In U s e
In U s e
C P U A ctivity
C P U A ctivity
F a ult
F a ult
P rim a ry C P U
C ontrolle r A ctivity
LTC 8900 Series
B a ck-U p C P U
A u to
Figure 6.6: LTC 8901 Series CPU Bay
It is recommended that the CPU bay be mounted so a 9 cm (3-1/2 in.) rack space is
available either above or below the enclosure. In sites where the system can not be taken
out of operation for a period of time, this will leave a mounting space available for a
replacement CPU in the unlikely event that the original CPU must be removed for servicing.
Verify that the front panel selector switch is set to AUTO.
Do not attach line cord to AC power source until instructed to do so.
6.3
LAN Switch Installation
The LTC 8944/93, LTC 8945/93, and LTC 8946/93 are 10/100Base-T LAN switches. The LTC
8944/93 and LTC 8945/93 LAN switches are used in redundant system configurations only.
Disregard the original manufacturer s instructions supplied with the LAN switches.
All three models of LAN switches are standard 10/100Base-T network switches supplied with
software (on CD-ROM) and network installation instructions by the original manufacturer. The
software supplied with the switches is not used. The switches for the LTC 8900 systems are
used in a network dedicated to only the LTC 8900 system. The switches must not be
connected to a computer network, or any other network. To use the switches in the LTC 8900
system, follow the directions in this manual ONLY.
All data cables going to the switches connect to the front panel ports. The main AC line cord is
connected to the rear panel of the switch. If desired, the switches can be mounted so that the
front panel is facing into the rack. Determine which orientation is most suitable for your
application, then attach the supplied racking ears to the side mounting holes accordingly.
Attach AC line cords to switches, but do not attach line cord to AC power source until
instructed.
6.4
6.4.1
LTC 8943/95 System Controller PC Installation
PC Installation
The LTC 8943/95 PC is supplied with all internal modules fully assembled. The rack ears can
be attached or removed depending on if the unit will be installed into an EIA 19 in. rack or
placed on desktop surface. Attach AC line cord but do not attach line cord to AC power source
until instructed.
2015.01 | 10.6 |
Installation Manual
Bosch Security Systems, Inc.
Hardware Installation Procedure for Redundant System Configuration Utilizing LTC 8901
Series CPU | en
LTC 8900 Series
39
Caution!
Important considerations related to the LTC 8943/95 System Controller PC:
This PC contains a solid state hard drive with limited storage capacity. Please refrain from
installing additional software that would reduce the remaining hard drive capacity to less than
1GB.
No anti-virus software is provided. If this PC will be connected to a network or the internet,
Bosch strongly recommends that a user-supplied anti-virus software package is installed to
provide protection.
In the inadvertent chance that a catastrophic problem or other unforeseen act corrupts the
!
operating system files, a “Recovery DVD” is provided. The DVD can be used to restore the
PC’s hard drive back to its original Factory default image. Complete instruction for use can be
found on the DVD label.
A CD/DVD reader/writer is installed in this PC. Windows XP supports reading CD/DVDs and
writing to CDs. If desired, the supplied copy of NERO CD/DVD media software can be
installed an used to write to DVDs.
The latest version of Allegiant LTC 8059 Master Control Software (MCS) is installed on this
PC. Older versions are included (but not installed) to support backward compatibility with
older Allegiant CPU firmware. If necessary, refer to the Allegiant MCS desktop folder for
additional information related to using the older MCS versions.
6.4.2
PC Monitor Installation
The monitor (UML-191-90) is a 48.3 cm (19 in.) LCD flat panel monitor that accommodates
both video and PC input simultaneously. To install the monitor into an EIA 19 in. rack, attach
the monitor to the monitor rack kit (UMM-LCDUB-RM) following the instructions supplied with
the monitor rack kit. Connect the supplied VGA cable to the PC. If desired, an available
monitor output from the Allegiant (or other composite video source) can be connected to the
video input using a coax with BNC connector. Attach AC line cord but do not attach line cord
to AC power source until instructed.
6.4.3
Keyboard/Mouse Rack Installation
The Keyboard/Mouse rack tray is designed to be installed into an EIA 19 in. rack, but a rack
having a shallow depth may require additional work. If the tray does not match up with the
rear part of the rack (too short or too long), some custom provisions at time of installation will
be needed. In some cases, the back portion of the tray may protrude from the rear of the rack.
Be sure to provide support for the rear portion of the tray unit.
6.4.4
Final Installation
Attach the mouse, keyboard, and software security dongle to the appropriate ports. These
connection points are illustrated in , page 66. If desired, the USB and PS2 ports located on
the front of the PC can also be used for external accessory connections.
6.5
LTC 8902 Series Output Bay and LTC 8903 Series Input Bay
Installation
The LTC 8902 Series and LTC 8903 Series bays require insertion of the power supply, data
receiver module, and the video modules. Remove the front panel of the bay (LTC 8902 Series
or LTC 8903 Series) by loosening the four (4) corner fasteners.
LTC 8902 Series Video Output bays are supplied with LTC 8906 Series Power Supplies.
LTC 8903 Series Video Input bays are supplied with LTC 8805 Series Power Supplies.
Bosch Security Systems, Inc.
Installation Manual
2015.01 | 10.6 |
40
en | Hardware Installation Procedure for Redundant System Configuration Utilizing LTC
8901 Series CPU
LTC 8900 Series
Install the power supply in the far right position of the bay, ensuring proper alignment and
seating of the supply into the rear mating connector. Verify that the power supply ON/OFF
switch is in the OFF position.
Figure 6.7: Typical Power Supply Insertion
Install 4 supplied screws and star washers on the rear panel of the bay(s) surrounding the
power supply line cord. This fastens the power supply securely in place. Repeat this
procedure for all LTC 8902 Series and LTC 8903 Series bays.
Caution!
!
If the LTC 8902 Series or LTC 8903 Series bays are to be transported, the main power
supplies should be removed to prevent possible damage to the bays internal parts.
Install the matrix bays into the mounting rack. Place the bays in the racks as described in
General Installation Considerations within this manual. Note, rack-mounting screws and
associated hardware are NOT included. Attach AC line cord, but do not power up the bay until
instructed to do so.
NOTE: The LTC 8902 Series and LTC 8903 Series bays should be installed so there is at
least 4.5 cm (1-3/4 in.) of clearance above and below the bay, to allow for proper cooling.
Failure to provide proper clearance may cause the equipment to exceed its recommended
operating temperature range.
DO NOT install the LTC 8934/00 Video Output modules or the LTC 8921/00 Video Input
modules into the matrix bays at this time.
6.6
Module Insertion
A special tool is supplied with the system components, for insertion of the Data Receiver,
Video Input Module, and Video Output Module boards into LTC 8902/90 and LTC 8903/90
equipment bays. The tool is a simple lever (an angled piece of aluminum), used as follows:
Insert the board fully into the slot, ensuring proper alignment with the connectors.
Insert the short end of the lever into the groove in the front of the bay so the tool is aligned
with the card ejectors on the card, then push the lever to force the card into the slot.
2015.01 | 10.6 |
Installation Manual
Bosch Security Systems, Inc.
Hardware Installation Procedure for Redundant System Configuration Utilizing LTC 8901
Series CPU | en
LTC 8900 Series
41
IN S R -T O L
Figure 6.8: Example of Insertion Tool Use
6.7
Data Receiver Modules
LTC 8902 Series Video Output bays are supplied with LTC 8916/01 Data Receiver modules.
LTC 8903 Series Video Input bays are supplied with LTC 8918/01 Data Receiver modules.
Data Receiver Modules are installed into the right most slot (adjacent to the power supply) of
the matrix bays as follows:
Figure 6.9: Typical Data Receiver Module Insertion
6.8
LTC 8916/01 Data Receiver Modules
The LTC 8916/01 Data Receiver modules (installed in LTC 8902 Series bays) contain three (3)
8-position dip switches.
For system configurations of up to 2048 cameras and 512 monitors, , page 66 can be used as
a guide for setting the Data Receiver DIP switches. Otherwise, follow the procedure described
below.
Verify that switches located on dipswitch S1 are all OFF.
On dipswitch S2 of the LTC 8916/01, verify that switches from 1 to 4 are OFF. Switch 8
should be in the ON position. Switches 5 through 7 determine the monitor number range that
the bay will be used for and must be set according to , page 41.
5
6
7
Monitor Range
OFF
OFF
OFF
1 to 64
OFF
OFF
ON
65 to 128
OFF
ON
OFF
129 to 192
OFF
ON
ON
193 to 256
Bosch Security Systems, Inc.
Installation Manual
2015.01 | 10.6 |
42
en | Hardware Installation Procedure for Redundant System Configuration Utilizing LTC
8901 Series CPU
5
6
7
Monitor Range
ON
OFF
OFF
257 to 320
ON
OFF
ON
321 to 384
ON
ON
OFF
385 to 448
ON
ON
ON
449 to 512
LTC 8900 Series
Table 6.1: LTC 8916/01 Data Receiver Module Switch Positions (used in LTC 8902 Service Bays)
6.9
LTC 8918/01 Data Receiver Modules
The LTC 8918/01 Data Receiver modules (installed in LTC 8903 Series bays) contain three (3)
8-position dip switches.
For system configurations of up to 2048 cameras and 512 monitors, , page 66 can be used as
a guide for setting the Data Receiver DIP switches. Otherwise, follow the procedure described
below.
Verify that switches 1 to 3 and 5 to 8 on dipswitch S1 are OFF.
Switch 4 on S1 should be placed in the OFF position if the LTC 8903 Series bay will be used
as a primary camera bay (one that will have cameras directly connected to it). If the LTC 8903
Series bay will be used as a secondary camera bay (one that will have other LTC 8903 Series
bays connected to its inputs), place switch 4 on S1 in the ON position.
If switch 4 on S1 has been set to the OFF position (for use as a primary camera bay as
described above) set switches 1 to 4 on S2 according to the Primary Camera Bay Range in the
table below:
2015.01 | 10.6 |
1
2
3
4
Camera Number Range
OFF
OFF
OFF
OFF
1 to 256
OFF
OFF
OFF
ON
257 to 512
OFF
OFF
ON
OFF
513 to 768
OFF
OFF
ON
ON
769 to 1024
OFF
ON
OFF
OFF
1025 to 1280
OFF
ON
OFF
ON
1281 to 1536
OFF
ON
ON
OFF
1537 to 1792
OFF
ON
ON
ON
1793 to 2048
ON
OFF
OFF
OFF
2049 to 2304
ON
OFF
OFF
ON
2305 to 2560
ON
OFF
ON
OFF
2561 to 2816
ON
OFF
ON
ON
2817 to 3072
ON
ON
OFF
OFF
3073 to 3328
ON
ON
OFF
ON
3329 to 3584
Installation Manual
Bosch Security Systems, Inc.
Hardware Installation Procedure for Redundant System Configuration Utilizing LTC 8901
Series CPU | en
LTC 8900 Series
1
2
3
4
Camera Number Range
ON
ON
ON
OFF
3585 to 3840
ON
ON
ON
ON
3841 to 4096
43
Table 6.2: LTC 8918/01 Data Receiver Module (used in LTC 8903 Series bays) S2 positions 1 through 4
LTC 8903 Series Camera bays always provide video signals (either directly, or via a second
LTC 8903 Series bay) to a specific LTC 8902 Series Monitor bay. Determine the applicable
LTC 8902 Series Monitor bay, then set switches 5 through 7 on dip switch S2 to the same
settings as switches 5 through 7 on S2 of the Data Receiver module installed in the
corresponding LTC 8902 Series bay. These will be the same settings as listed in the Monitor
Number Range shown in , page 41.
ON dip switch S2 of the LTC 8918, verify that switch 8 is ON.
If switch 4 on S1 has been set to the ON position (for use as a secondary camera bay as
described above) set switches 3 and 4 of S2 OFF and set switches 1 and 2 of S2 according to
which primary camera bays it will be connected to per , page 42.
1
2
Primary Camera Bay Range
OFF
OFF
1 to 4
OFF
ON
5 to 8
ON
OFF
9 to 12
ON
ON
13 to 16
Table 6.3: LTC 8918 Data Receiver Module (used in LTC 8903 bays) S2 Positions 1 and 2
6.10
LTC 8934/00 Video Output Modules
The appropriate number of LTC 8934/00 Video Output Modules should be installed in the LTC
8902 Series main bay starting with the left most slot. Each output module handles 8 outputs.
If fewer than the maximum number of Video Output Modules are installed, they should be
installed from left to right, with empty spaces on the right.
In some system configurations, 8 or less LTC 8934/00 modules may be distributed between
two (2) LTC 8902 Series Video Output bays. This configuration assures partial system
operation in the unlikely event of an LTC 8902 Series failure. Since this creates a gap in the
monitor number order, the system software allows renumbering of the logical monitor
numbers. For example, if the system was designed for 64 monitor outputs, four LTC 8934/00
modules (handling monitors 1 to 32) would be installed in the first LTC 8902 Series bay.
Another four LTC 8934/00 modules would be installed in a second LTC 8902 Series bay. The
default monitor number range for this second module would be 65 to 96. Since this would be
inconvenient to operators of the system, the logical numbers of the monitor numbers in the
second bay can be renumbered to range from 33 to 64 using the software on the System
Supervisor PC. , page 35 shows an example of this type of configuration. It is also possible to
number the monitors so that one bay contains the odd numbered monitors and the other bay
contains even numbered monitors. This way, a viewing location containing an even mix of
monitors from each bay would lose every other one in the unlikely event of an LTC 8902 Series
bay failure.
Bosch Security Systems, Inc.
Installation Manual
2015.01 | 10.6 |
44
en | Hardware Installation Procedure for Redundant System Configuration Utilizing LTC
8901 Series CPU
LTC 8900 Series
Figure 6.10: Typical Video Output Module Insertion
The LTC 8934/00 Video Output Modules contain five (5) 8-position dip switches. DIP switch
S1001 is reserved and all switches should be left in the ON position.
Dip switches S1002, S1003, S1004, and S1005 are video termination switches for each of the
video bus inputs. All of these switches should be set to ON (terminated), the factory default
position. All LTC 8934/00 Video Output Modules are identical and can be swapped anywhere
within the bay without making any changes to the module.
6.11
LTC 8921/00 Video Input Modules
For the LTC 8903 Series Bays, termination switches(S1001 through S1004) on the LTC
8921/00 Video Input Modules must be set to the correct position prior to installation. Read
Termination Practices section prior to actually installing the Video Input Modules on these
systems. As shipped from the factory, all terminated switches are placed in the ON
(terminated) position.
It is helpful to locate and use one or more of the diagrams that best fits your system
configuration among , page 66 to , page 66 in this manual.
The appropriate number of Video Input Modules (LTC 8921/00) should be installed in the LTC
8903 Series main bay, starting with the left most slot. Each input module handles 32 inputs by
32 outputs.
Since the LTC 8903 Series supplies 64 outputs, two (2) LTC 8921/00 input cards are required
for each set of 32 cameras. Odd numbered slots provide video for monitors 1-32, and even
numbered slots provide video for monitors 33-64. If 32 or fewer monitors are being served by
the LTC 8903 Series bay, Video Input Modules are not required in the even numbered slots.
This concept is shown in , page 66, and examples of system configurations are shown in ,
page 66.
Cards in even numbered slots should have all termination switches set to OFF. If looping is
not being used, cards in odd numbered slots should have the termination switches set to ON
(see Termination Practices for more details).
Figure 6.11: Typical Video Input Module Insertion
2015.01 | 10.6 |
Installation Manual
Bosch Security Systems, Inc.
Hardware Installation Procedure for Redundant System Configuration Utilizing LTC 8901
Series CPU | en
LTC 8900 Series
45
All LTC 8921/00 Video Input Modules are identical and can be swapped anywhere within the
bay without making any changes to the module, except to maintain proper termination
settings.
6.12
6.12.1
System Video Connections
Camera Input Connections
Camera connections to the LTC 8903 Series Input Bays require the LTC 8808/00 Video
Interconnect (Patch) Panel. Each patch panel provides 32 BNCs for video input or video
looping connections to the system. Patch panels are connected to the rear of the LTC 8903
Series Input Bay using the supplied LTC 8809/00 ribbon cables. Each cable can carry video for
up to 16 cameras. Two (2) cables can be attached to each patch panel to support up to 32
cameras per panel. Each ribbon cable should be attached to the appropriate VIDEO IN
connector on the rear of the LTC 8903 Series bays. A rear panel diagram of the LTC 8903
Series bay is shown in , page 66.
Refer to , page 66 for typical system connections.
The LTC 8809/00 ribbon cables have keyed connectors on each end. Maintain correct
polarity when attaching cables between system components.
Although attaching a ribbon cable with reversed polarity will not cause any permanent
damage, it can cause all video functions within the bay to cease until corrected. Doublecheck ribbon cable connections to avoid this condition.
, page 66 illustrates the polarity key orientations on the LTC 8902 and LTC 8903 Series video
matrix bays.
The LTC 8808/00 panels are typically installed on the rear of the mounting rack behind the
applicable matrix bay. They can be mounted elsewhere as long as the 2 m (6 ft) LTC 8809/00
ribbon cables can reach the applicable matrix bay. Note, rack-mounting screws and associated
hardware are NOT included.
The Video Input connectors are labeled with multiple levels. If more than 256 cameras are
used in a system, multiple levels of input bays are used. This type of system configuration is
shown in , page 66 through , page 66.
6.12.2
System Connections over 1024 Cameras
If more than 1024 cameras are used, then a second stage of LTC 8903 Series Video Input Bays
are required. This type of system configurations is shown in , page 66, , page 66 through ,
page 66, , page 66, and , page 66. In this configuration, the VIDEO OUT connectors from
the first stage LTC 8903 Series bays are connected to the VIDEO IN connectors on the second
stage bays using LTC 8809/00 ribbon cables.
The LTC 8809/00 ribbon cables have keyed connectors on each end. Maintain correct
polarity when attaching between the bays. The VIDEO OUT connectors are labeled A
through D. These connectors must be connected to corresponding VIDEO IN connectors
labeled A through D.
6.12.3
System Connections over 1024 Cameras
The VIDEO OUT connectors from LTC 8903 Series input bays are connected to the VIDEO
BUSconnectors on the LTC 8902 Series output bays using LTC 8809/00 ribbon cables. Rear
panel diagrams of the LTC 8902 Series and LTC 8903 Series bays are shown in , page 66.
The LTC 8809/00 ribbon cables have keyed connectors on each end. Maintain correct polarity
when attaching between the bays. See , page 66, showing the polarity key of the ribbon
cable connectors located on the LTC 8902 Series and LTC 8903 Series matrix bays.
Bosch Security Systems, Inc.
Installation Manual
2015.01 | 10.6 |
46
en | Hardware Installation Procedure for Redundant System Configuration Utilizing LTC
8901 Series CPU
LTC 8900 Series
The LTC 8903 Series bay s VIDEO OUT connectors are labeled A through D, and the Monitor
Bay VIDEO BUS connectors are labeled CAMERA BAY OUTPUT A through CAMERA BAY
OUTPUT D.
The input bay A-D connectors must be connected to corresponding A-D connectors on the
output bay using LTC 8809/00 coax ribbon cables. , page 66 and , page 66 demonstrate
these connections.
6.12.4
Multiple Monitor Bay Considerations
If multiple monitor bays are used in the system, the LTC 8903 Series Input Bay configuration
must be duplicated for each output bay. This is illustrated in the system configuration
diagrams of , page 66 through , page 66. The video inputs from the first set of LTC 8903
Series Input Bays must be looped through to the second set of input bays using LTC 8809/00
coax ribbon cables. The LTC 8903 Series bays provide looping connectors to support these
connections. The supplied ribbon cable connectors are connected from the LOOP outputs of
the first set of input bays to the corresponding VIDEO IN connectors on the next set of input
bays using LTC 8809/00 ribbon cables. This looping can continue as needed. The termination
switches on the LTC 8921/00 Video Input Cards must be turned OFF in all LTC 8903 Series
Input bays except for those in the last set (assuming the system will NOT have video looping
connections).
6.12.5
Monitor Output Connections
For monitor connections, the LTC 8902 Series Output Bays require the LTC 8808/00 Video
Interconnect (Patch) Panel. Up to 32 monitors per panel can be connected. Each ribbon cable
should be attached to the appropriate MONITOR OUTPUT connector on the rear of the LTC
8902 Series bays.
The LTC 8809/00 ribbon cables have keyed connectors on each end. Maintain correct
polarity when attaching between system components.
Refer to , page 66 for typical system connections. The LTC 8808/00 panels are typically
installed on the rear of the mounting rack behind the applicable matrix bay. They can be
mounted elsewhere as long as the 2 m (6 ft) LTC 8809/00 ribbon cables can reach the
applicable matrix bay. Note, rack-mounting screws and associated hardware are NOT included.
6.12.6
System Video Looping Connections
LTC 8808/00 panels are also used to provide looping video outputs from the system. Each
ribbon cable should be attached to the appropriate LOOP connector on the rear of the last
group of LTC 8903 Series bays.
The LTC 8809/00 ribbon cables have keyed connectors on each end. Maintain correct
polarity when attaching between system components.
6.13
Termination Practices
Video from every camera should be terminated with a 75 ohm resistance. Each video line
should be terminated exactly once. If video from a given camera is going to several different
devices, only the last piece of equipment on the video line should be terminated. Various
diagrams illustrating proper termination practices are shown in , page 66 through , page
66. Allegiant LTC 8900 systems terminate their video inputs as follows:
6.13.1
LTC 8903 Series Terminators
Each LTC 8921/00 VIM card has DIP switches (S1001 through S1004) for selecting the
termination of each video line. To terminate an input line, make sure that the appropriate DIP
switch on the VIM card is ON. If non-terminated operation is required for looping purposes,
turn the switch OFF. Each LTC 8921/00 VIM card provides outputs for 32 monitors. Since the
2015.01 | 10.6 |
Installation Manual
Bosch Security Systems, Inc.
Hardware Installation Procedure for Redundant System Configuration Utilizing LTC 8901
Series CPU | en
LTC 8900 Series
47
LTC 8903 Series bay provides 64 outputs, two LTC 8921/00 VIM cards are required for each
32 inputs (when more than 32 monitors are being served by the LTC 8903 Series bay). In this
case, inputs are shared by adjacent cards. The cards in slots one and two handle inputs 1-32;
the cards in slots three and four handle inputs 33-64, etc. Since each input goes to two cards,
only one of the two cards should be terminated. Although either card in a pair can be
terminated, it is recommended that cards in the odd number slots are terminated (dip
switches ON) and cards in even number slots are unterminated.
The LTC 8903 Series Input Bay provides video looping connections which use LTC 8809/00
coax type ribbon cables. Each LTC 8809/00 cable provides looping capability for up to 16
video inputs. The termination switches on the LTC 8921/00 cards should be set to OFF for all
LTC 8903 Series Input bays except those in the last set (assuming the system will NOT have
video looping connections). In the last bay, the termination switches should be set to ON in
even numbered slots (as described in the preceding paragraph).
If the system will have some or all video inputs looped out, all termination switches
corresponding to the looped video channels should be set to OFF in all LTC 8903 Series bays.
6.13.2
Second Level 8903 Series Terminations
When more than 1024 cameras are used, two levels of LTC 8903 Series bays are required. In
this case, the LTC 8903 Series bays in the first level are terminated as described above. In the
second level LTC 8903 Series bay, the terminations switches should be turned ON on all
cards.
NOTE: In the secondary level, LTC 8903 Series cards are inserted only into slots 1, 4, 5, 8, 9,
12, 13, and 16 as depicted in , page 66 through , page 66, , page 66 and , page 66.
6.13.3
LTC 8902 Series Terminations
Dip switches S1002, S1003, S1004, and S1005 on the LTC 8934/00 Video Output Module are
video termination switches, which should be set to ON (terminated), the factory default
position. This correctly terminates the outputs of the LTC 8903 Series bays into a 75 ohm
load.
Like camera inputs, monitor outputs on the Allegiant system are designed to be terminated.
Each monitor output from the LTC 8902 Series bay expects to be connected to a 75 ohm load.
This is the load typically provided by a normal monitor. If a monitor output line is looped
through several monitors or other equipment, ensure that only the last unit on the line is
terminated.
6.14
6.14.1
System Data Connections
LTC 8901 Series CPU Data Connections
The LTC 8901 Series CPU connects to the supplied LTC 8943/95 System Controller PC using
the supplied RS-232 cables and the Digital I/O connector. The PC COM3 port connects to the
PRIMARY CONTROLLER jack on the LTC 8901 Series bay. The PC COM4 connects to the
BACKUP CONTROLLER jack on the LTC 8901 Series bay.
The supplied Digital I/O cable connects the PC Digital I/O board (50-pin header connector on
the back of the PC) to the SWITCH CONTROL jack on the LTC 8901 Series bay.
The LTC 8901 Series CPU also makes two LAN connections to the LAN switches. The PRIMARY
LAN connector should be connected to PORT 1 of the LTC 8944/93 LAN switch (labeled
Primary IP address) using a supplied standard 3 m (10 ft) 10/100Base-T twisted pair cable.
The BACKUP LAN connector should be connected to PORT 1 of the LTC 8944/93 LAN switch
(labeled Backup IP address) also using a supplied standard 3 m (10 ft) 10/100Base- T twisted
pair cable.
Bosch Security Systems, Inc.
Installation Manual
2015.01 | 10.6 |
48
en | Hardware Installation Procedure for Redundant System Configuration Utilizing LTC
8901 Series CPU
LTC 8900 Series
Note that the LTC 8943/95 System Controller PC is supplied with a third LAN port. This port is
available for connecting the PC to the user s Ethernet network. Only those with advanced
knowledge of Windows and network installations should attempt to use this interface.
A rear panel diagram of the LTC 8901 Series CPU is shown in , page 66.
6.14.2
LTC 8902 Series and LTC 8903 Series Data Connections
Data connections for LTC 8902 Series and LTC 8903 Series bays are shown in , page 66.
Each LTC 8902 Series bay and LTC 8903 Series bay has two LAN connectors. Either of these
connectors can be used, although only one should be connected at a time. The supplied
standard 8 m (25 ft) 10/100Base-T twisted pair cable is used to connect from the LAN
connectors on the LTC 8902 Series and LTC 8903 Series bays to any of the ports on any of the
10/100Base-T switches.
The LAN connections should be spread across LAN switch #1 and LAN switch #2 in a manner
to minimize the impact of a switch failure to the system. For example, in a system with 128
monitor outputs, one LTC 8902 Series bay and all of its associated LTC 8903 Series bays can
be connected to one LAN switch. The second LTC 8902 Series bay and its associated LTC
8903 Series bays should be connected to the other LAN switch. This way, half of the system
(either monitors 1 to 64 OR monitors 65 to 128) will remain in operation in the unlikely event
of a LAN switch failure.
The number of available LAN switches in the system can be expanded using additional LTC
8946/93 LAN switches. Each LTC 8946/93 provides 10 additional ports, which are only
required in large systems having more than a combined total of 18 LTC 8902 Series and LTC
8903 Series bays.
6.14.3
LTC 8944/93 LAN Switch to LTC 8945/93 LAN Switch Connections
The LAN switches must be connected together using the supplied 2 m (6 ft) crossover LAN
cable. Connect the LAN cable between any two ports on the two LAN switches.
6.14.4
LTC 8946/93 LAN Switch Connections
When the combined quantity of LTC 8902 Series and LTC 8903 Series matrix bays exceeds 18,
1 or more expansion LTC 8946/93 LAN switches are required. Each LTC 8946/93 expansion
switch provides an additional 10 ports for connection to matrix bays.
Connect the supplied 2 m (6 ft) crossover cable from any port of the expansion LTC 8946/93
LAN switch to any port located on either the LTC 8944/93 or LTC 8945/93 LAN switch. Any
additional LTC 8946/93 LAN switches would be connected in a similar manner to any available
LTC 8944/93, LTC 8945/93, or LTC 8946/93 LAN switches. These data connections are
illustrated in , page 66.
6.14.5
LTC 8943/95 PC to LTC 8945/93 LAN Switch Connectors
The LTC 8943/95 System Controller PC connects to the LTC 8944/93 and LTC 8945/93 LAN
switches using the supplied standard 3 m (10 ft) 10/100Base-T twisted pair cables. Connect
one cable from the Primary LAN interface board on the rear panel of the PC, to port 2 of the
LTC 8944/93 LAN switch (switch labeled Primary IP address).
Connect another 3 m (10 ft) LAN cable from the Backup LAN interface board on the rear panel
of the PC to port 2 of the LTC 8944/93 LAN switch (switch labeled Backup IP address). These
data connections are illustrated in , page 66.
6.15
Main Power Connections
Install the supplied AC power cords between the equipment and the appropriate AC power
source. Verify that the AC power switches (on applicable components) are initially set to OFF.
2015.01 | 10.6 |
Installation Manual
Bosch Security Systems, Inc.
Hardware Installation Procedure for Redundant System Configuration Utilizing LTC 8901
Series CPU | en
LTC 8900 Series
49
NOTE: Before attaching the AC line cord to the LTC 8943/95 System Controller PC, verify that
the line voltage selector switch next to the AC plug is set correctly.
The order that power is supplied to the system is not critical, but the following order is
recommended if unfamiliar with the equipment:
Apply power to the LTC 894x/93 LAN switches. The LAN switches do not have a main AC
power switch, and should power up as soon as the main AC power cord is connected. Initially,
the switch models should indicate the following conditions:
1.
Power light is illuminated.
2.
The Link port indicator LEDs corresponding to the 2 m (6 ft) crossover LAN cable should
3.
Mode LEDs below the Link LEDs should blink.
be illuminated.
Switch on the main AC power to the video bays (LTC 8902 and LTC 8903). Verify that the
LEDs associated with the fuses are lit on all of the power supplies in the LTC 8902 Series and
LTC 8903 Series matrix bays. Initially, the modules within the matrix bays should indicate the
following conditions:
1.
The CPU ACT. LEDs on all Data Receiver modules (module next to power supply) installed
in the matrix bays should be blinking randomly green. The LAN LINK/ACT LED will blink
green to indicate communication with the Allegiant CPU. The LAN DUP/COL LED
illuminates yellow to indicate a full duplex network link exists with the Allegiant CPU. All
other LEDs can be ignored.
2.
Activity LEDs should be blinking on the video input and output modules installed in the
matrix bays.
Turn on the main power switches to the LTC 8943 System Controller PC and its associated PC
monitor. Continue to follow the power up procedure while the PC boots up.
Apply power to the LTC 8901 CPU bay. The LTC 8901 CPU does not have a main AC power
switch, and should power up as soon as the main AC power cord is connected. Verify that the
CPU Selector switch on the front panel is set to Auto Select mode. Initially, the front panel
LEDs of the CPU bay should indicate the following conditions:
1.
The power LEDs should be lit for both CPUs.
2.
Activity LEDs should be blinking for both CPUs.
3.
The In Use LED should be lit for the Primary CPU.
4.
Both Fault LEDs should be off.
5.
The Controller Activity LED should be off.
6.
The Auto LED should be lit.
NOTE: Based on activity and general system, the system may require several seconds to fully
initialize after a power up reset.
At this point, the system should be operational but not in its full redundant mode.
If cameras and monitors are connected to the system, video from camera number 1 should be
visible on all system monitors. The on-screen text overlay should be visible and the clock
should be running (even if no video signal is present). If not, double-check the video and data
cable connections. If necessary, refer to the Troubleshooting section of this manual.
The following steps detail the initial operation of the PC-based System Supervisor software.
Complete programming and operation of the supplied software can be found in the supplied
LTC 8059 Master Control Software for Windows manual and the System Supervisor manual. If
any difficulty is experienced, please refer to the appropriate manual.
1.
If the PC was powered up in the previous section, the Windows operating system should
already have begun running. Once the Begin login box appears, press Ctrl + Alt + Del as
indicated.
2.
When the login Information box appears, login as Administrator using the Password
Bosch (only first letter is capitalized).
Bosch Security Systems, Inc.
Installation Manual
2015.01 | 10.6 |
50
en | Hardware Installation Procedure for Redundant System Configuration Utilizing LTC
8901 Series CPU
3.
LTC 8900 Series
After the PC enters the Windows desktop screen, the Allegiant server program should
start automatically. If the automatic feature has been disabled, find and double-click the
Allegiant icon to open the Allegiant Server program.
4.
When the login Information box appears, login as Installer level using the Password 1.
5.
Select File, Open, and load the Default.Alg file. This default file automatically configures
the communication ports to their default settings.
6.
After the file has loaded, the table will appear on the screen. Click On-Online in the menu,
then select Go-Online. After 20-30 seconds, the software will go on line and the System
Supervisor selection box will appear.
7.
Select the Primary CPU, and check the enabled data mirroring checkbox, then click OK.
The System Supervisor on-screen diagram should now indicate a fully operational system and
the Controller Activity LED on the LTC 8901 CPU bay should be blinking.
NOTE: Since the LTC 8943/95 PC is intended to configure and monitor the operation of the
LTC 8900 system, it is strongly recommended that the PC be used solely for this purpose. It
should not be used as an operator s workstation, or for any other purpose that could interfere
with its ability to provide automatic switchover functions.
6.16
LTC 8901 Series CPU Relay Outputs and Buzzers
The LTC 8901 Series main CPU bay provides five relay outputs that can be connected to
devices to alert the operators if a failure is detected.
Relay Out
1 2 3 4 5 6 7 8 9 10 11 12
Figure 6.12: LTC 8901 CPU Rear Panel Relay Outputs
, page 50 defines the operations of the relay outputs. Dry contact relays with the following
specifications are used:
Maximum load
1.0 A at 24 VAC, 40 VAC peak
Contact material
Ag (Au clad)
Minimum permissible load
10 mVDC, 10 A
The last two contacts of the Relay Out connector are actually inputs to the system. These
contacts (pins 11 and 12 on the Relay Out connector) can be shorted together to disable the
front panel buzzers on the LTC 8901 Series bay. If not disabled, these buzzers will sound if a
LTC 8901 Series failure is detected. These contacts may be connected to a toggle switch to
allow switchable disabling of the buzzers.
Connector Functions
Description
Positions
1&2
Relay - Primary Power Supply Fault Normally open, closes when Primary Power
Supply failure is detected
3&4
Relay - Primary CPU Fault
Normally open, closes when Primary CPU
failure is detected
5&6
Relay - Backup Power Supply Fault Normally open, closes when Back Power
Supply failure is detected
2015.01 | 10.6 |
Installation Manual
Bosch Security Systems, Inc.
Hardware Installation Procedure for Redundant System Configuration Utilizing LTC 8901
Series CPU | en
LTC 8900 Series
Connector Functions
51
Description
Positions
7&8
Relay - Backup CPU Fault
Normal open, closes when Backup CPU
failure is detected
9 & 10
Relay - Any Fault
Normally open, closes when any LTC 8901
failure is detected
11 & 12
Input - Silence Buzzer
Connect these inputs together to silence
the LTC 8901 Series failure/warning
buzzers
Table 6.4: CPU Relay Output Functions
6.17
LTC 8901 Series CPU Selection Switch
The Switch Control input to the LTC 8901 Series can be over ridden using the front panel
switch. This switch allows manual selection of either the primary or backup CPU. This switch
should be left in the AUTO position to enable the automatic switchover functions. The AUTO
LED on the front panel illuminates to indicate proper switch position. If the LTC 8943/95
System Controller PC is not connected, the CPU cannot operate in a redundant mode even if
its front panel switch is set to AUTO. However, the system will continue to operate in a
nonredundant mode because the communication signals to the matrix bays continues to be
supplied from the primary CPU.
If the CPU bay front panel switch is used to manually select a CPU, the appropriate LAN port
enabling must still occur. The System Controller performs this action, even if the front panel
switch is used to manually override automatic CPU selection. If the System Controller is
connected and the System Supervisor software is running, the System Controller will
automatically enable and disable the appropriate ports (when the System Supervisor software
is running, the Controller Activity LED on the front of the LTC 8901 Series CPU bay will be
blinking).
If a manual selection is made when the System Controller is not connected or the System
Supervisor software is not running, the installer must manually ensure that the selected
CPU LAN connection is plugged into an active port, and that the nonselected CPU LAN
connection is either plugged into a disabled port or unplugged.
Bosch Security Systems, Inc.
Installation Manual
2015.01 | 10.6 |
52
en | Camera Phasing and Accessory Installation
LTC 8900 Series
7
Camera Phasing and Accessory Installation
7.1
Camera Phasing Information
NOTE: All cameras should be vertically phased properly with each other. The LTC 8900 system
is an analog switcher, and this is required to prevent rolling during video switching. Keyboard
User Function 44 may simplify camera phasing tasks. Refer to the LTC 8900 Series user
manual for complete details.
7.2
External Sync Information
Installations having cameras powered from an AC phase different than that of the LTC 8900
system may use the built-in EXTERNAL SYNC input or vertical PHASE ADJUST.
The EXTERNAL SYNC input accepts composite video, composite sync, or the output of a
Master Sync generator. If desired, any of the system cameras may be used as a master sync
source to the system using the EXTERNAL SYNC input.
To implement this feature, connect the incoming video source (using a BNC T connector) to
both the appropriate camera BNC input and the EXTERNAL SYNC input on the rear of the LTC
8903 Series video input bay. Any of the LTC 8903 Series bays in the system can be used for
this input. Multiple LTC 8903 Series bays can then be synchronized together by connecting
the V SYNC output from the original bay to the EXT. SYNC input of the next bay. Continue
looping the sync signals in this manner until all LTC 8903 Series bays are synchronized.
It is not necessary to connect a sync source to LTC 8902 video output bays. The LTC 8902
Series video output bays automatically become synchronized when a LTC 8903 Series bay is
connected to it via ribbon cable to its A1 connector. Alternatively, the PHASE ADJ on the front
panel of the power supply may be adjusted on the original LTC 8903 Series bay until vertical
interval switching is achieved. The PHASE ADJUST has a range of about 130 degrees.
If no external sync signal is used, the matrix bays automatically use the AC power to generate
an internal sync signal.
The EXT SYNC LED on the front panel of the power supply inside a matrix bay illuminates
whenever the bay is receiving an external sync signal. For LTC 8902 Series video output bays,
this is whenever a ribbon cable is connected to its A1 connector.
7.3
System Keyboard Installation
Connect a maximum of 8 system keyboards to any of the 8 keyboard ports (modular phone
type jacks) on the rear of the LTC 8900 Series CPU bay. Each keyboard is supplied with a 3 m
(10 ft) cable for local hookups. The LTC 8900 Series CPU bay can provide power to keyboards
up to 30 m (100 ft) away using the optional LTC 8558/00 hookup cable. For distances of up to
1.5 km (5000 ft), the optional LTC 8557/x0 Hookup Kit is required, which is supplied with a
remote power pack and requires user-supplied shielded twisted pair (Belden 9841 or
equivalent) for communication.
Note that the system contains 64 levels of user priority which can affect operator access to
various system features. These priority levels can be changed via the PC-based configuration
software, but as a factory default, keyboard port number 1 is assigned the highest level. For
the other keyboard default assignments, refer to the User Information section of the system s
User Manual.
The system can accommodate an additional 56 system keyboards using external LTC 8714/x0
and LTC 8715/x0 keyboard port expander accessory units. Instructions for these accessories
are included with the port expander units.
2015.01 | 10.6 |
Installation Manual
Bosch Security Systems, Inc.
LTC 8900 Series
7.4
Camera Phasing and Accessory Installation | en
53
Signal Distribution Unit Hookup
The LTC 8900 Series CPU bay provides a single Biphase control code output which can be
connected to a LTC 8568 or LTC 8768 Signal Distribution unit. The Signal Distribution units
are used to provide Biphase control code outputs for communicating to remote receiver/
drivers, switcher-follower accessory units, the AutoDomefi Series of cameras, and Satellite
systems. Instructions for these accessories are included with the units.
7.5
Alarm Interface Unit Hookup
The LTC 8900 Series CPU bay provides a single external alarm interface port which can be
connected to a LTC 8540/00 Alarm Interface Unit or a LTC 8713/x0 Series Alarm Port
Expander. Each LTC 8540/00 Alarm Interface unit accepts up to 64 dry contact closures or
logic levels from remote sensing devices such as door contacts, PIRs, etc. The system can
accommodate up to 1024 alarm inputs using a combination of LTC 8540/00 and LTC 8713/x0
Series accessory units. Instructions for these accessories are included with the units.
7.6
External Computer Interface Connections
The LTC 8900 Series CPU s CONSOLE port provides a single RS-232 interface port which can
be connected to an external PC, an LTC 8712 Series Console Port Expander, or another
computing device. This external interface port can be used to externally program and control
the LTC 8900 system via a PC running the LTC 8059/00 Master Control Software, LTC
8850/00 Graphical User Interface software package, or a custom program generating
Command Console Language (CCL) commands. Refer to the Allegiant Console Command
Language manual for more information.
In redundant system configurations, commands and data received by the CONSOLE port are
directed to the active CPU inside the LTC 8901 Series CPU bay. The system s mirroring feature
automatically updates the nonactive CPU to reflect the same state.
NOTE: The CONSOLE port does not provide a standardized pinout connection. An interface
cable is available by ordering part number LTC 8506/00. CPU port pinouts and cable pinout
information can be found at the end of this manual.
The system s RS-232 communication protocols can be changed using the Allegiant PC-based
configuration software package or via a system keyboard, but the factory default values are as
follows:
Baud rate
115,200
Stop bits
1
Data bits
8
Parity
None
Hardware handshaking
ON
(RTS/CTS)
The system can accommodate a total of 4 external devices using the LTC 8712 Series Console
Port Expander accessory units. Instructions for these accessories are included with the port
expander units.
7.7
Logging Printer Option Installation
NOTE: Although the installation procedure for each printer varies, the following steps are
generally required. Save the printer reference manual for procedures not covered.
Bosch Security Systems, Inc.
Installation Manual
2015.01 | 10.6 |
54
en | Camera Phasing and Accessory Installation
LTC 8900 Series
The LTC 8900 Series CPU does not provide a direct printer port. The CONSOLE interface port
of the CPU can be configured to operate as a Printer output port. Do this by connecting a
dumb terminal (or use the Windows Hyperterminal mode) to the CONSOLE port and issuing
the following Command Console Language (CCL) command at the system prompt.
TC8900 > PRT2CON1
To convert back to normal Console operation, issue the same command to the port (no echo
will be visible this time), but use a numeric value of zero.
Switch the main power to the printer OFF.
Install a ribbon cartridge and paper if necessary.
Set any configuration switches for your printer, to match the format provided by the LTC 8900
Series CPU. Note that the CPU communication protocol can be changed using the PC-based
configuration software package, but the factory default values are as follows:
Baud rate
115,200
Stop bits
1
Data bits
8
Parity
None
Hardware handshaking
ON
(RTS/CTS)
NOTE: The CONSOLE port does not provide a standardized pinout connection. An interface
cable designed for a standard serial printer connection is required. Cable pinout information
can be found at the end of this manual.
Attach the 9-pin male connector side of the cable to the LTC 8900 Series CPU bay connector
labeled CONSOLE.
Apply power to the printer.
Verify logging printer action by loading a previously stored sequence into a monitor, activating
an alarm, or performing a system reset. Any of these actions should cause a printout to occur.
The logging printer reports the following types of system status changes:
1. Incoming alarms
2. Acknowledgment of alarms by users
3. Loading of sequences
4. User logon/logoff to keyboard or console port
5. Console broadcast messages
6. Console transfer of system tables
7. Activation of time event functions
8. Power-up reset messages
9. Video loss messages
2015.01 | 10.6 |
Installation Manual
Bosch Security Systems, Inc.
LTC 8900 Series
8
Satellite System Configuration Installations | en
55
Satellite System Configuration Installations
A satellite system configuration is usually used for a medium to large distributed system, or to
obtain extremely large matrix sizes configured more conventionally. Typically, a single Main
control site can be used to view/control cameras located both locally and at various remote
satellite sites. Since up to 256 satellite sites can be linked to a single Main control site, very
large, distributed systems can be achieved. If the satellite systems are located at the same site
as the Main system, the result is a large conventional-type system.
In a satellite configuration, the Main control site can view/control any camera in the entire
system, but the remote satellite sites can only view/control cameras associated with their own
site. Satellites may be configured to operate either independently or with no local viewing/
control capability.
It is also possible to configure satellite systems where each site can view/control cameras
from anywhere in the system. For a 2 site system, this is referred to as a dual master
configuration. In the same manner, triple and quadruple master system configurations can also
be configured. Cascaded satellite systems, where a Main site has a satellite which is a master
to another satellite, is another available scenario. In fact, it is possible to configure systems
that include a mixture of any or all of the above scenarios.
C entral
C ontrol
S tation
Data
Vide
o
Satellite
System #6
ta
Da
Vdeo
a
Dat
Vid
eo
ta
Da
eo
Vid
Satellite
System #1
Data
V
o
ide
Data
Video
Satellite
System #3
Satellite
System #5
Satellite
System #2
The central station can view/control cameras located
at any site. The satellite sites can view/control
cameras located only within their own site.
Satellite
System #4
Figure 8.1: Satellite Concept Configuration
Refer to the LTC 8850/00 GUI Software manual or the LTC 8059/00 MCS package manual for
additional configuration and programming information on satellite systems.
Bosch Security Systems, Inc.
Installation Manual
2015.01 | 10.6 |
56
en | Satellite System Configuration Installations
8.1
LTC 8900 Series
Allegiant Satellite System Configuration Installations
Any Allegiant Series switcher model (LTC 8300, LTC 8500, LTC 8600, LTC 8800, or LTC 8900)
can be used as a main site or a satellite site unit. All products are standard models, and the
only special requirement is to use either the optional LTC 8059/00 Master Control Software or
the optional LTC 8850/00 GUI software package for initial programming of each Allegiant
system.
Figure 8.2: Possible Allegiant Satellite System Configurations
2015.01 | 10.6 |
Installation Manual
Bosch Security Systems, Inc.
LTC 8900 Series
Satellite System Configuration Installations | en
57
An Allegiant Biphase control data line from the code distribution unit at the Main site must be
provided to each satellite site. This data line carries all pan/tilt/zoom control commands, in
addition to the switching commands generated by the Main site switcher. The control data
line should be connected to an LTC 8780 Series Data Converter to provide address decoding
functions for the satellite site. If operators at the satellite site are permitted to control pan/
tilt/zoom-equipped cameras, an LTC 8569 Series Code Merger must be installed at the
satellite site. The Code Merger combines code generated by the main site and the satellite
site, so both sites have control over pan/tilt/zoom-equipped cameras located at the satellite
site. The LTC 8780 Series unit can then be connected to one of the data outputs of the LTC
8569 Series unit.
One or more monitor outputs from each satellite system are used as video trunk lines to link
the remote sites to the Main site. The number of trunk lines from a satellite site determines
the maximum number of cameras from that site that may be viewed simultaneously at the
Main site. A satellite switcher model must be selected so that it provides the desired number
of local monitor outputs plus the number of monitor outputs that will be used as trunk lines.
The Main site switcher must include sufficient camera inputs for local cameras plus trunk
lines. The maximum physical number of camera inputs or monitor outputs used as trunk lines
cannot exceed the capacity of the system. A single Main site switcher can control multiple
satellite sites up to its video input limit. If full matrix switching is required at the Main site, the
number of trunk lines from each satellite site must equal the number of monitors connected to
the Main site switcher. Multiple independently controlled Main site systems can be combined
to provide large numbers of monitor outputs at the Main site. System capacities are listed
below:
System Type
Max. Camera Inputs
Max. Monitor Outputs
Max. No. of Satellites
LTC 8300 Series
32
6
32
LTC 8500 Series
64
8
64
LTC 8600 Series
12
16
128
LTC 8800 Series
256
64
256
LTC 8900 Series
4096
512
256
Since Main site Allegiant Series switchers support access to a large quantity of remote
satellite cameras, they provide additional logical camera numbers for identifying the location
of the satellite camera inputs in the system. These logical camera numbers can also include
titles which would appear on the Main sites monitors for any remote cameras. Since each
camera (anywhere in the system) must have a unique camera number, logical camera numbers
together with physical camera inputs make up the total system camera capacity. Thus, there is
a trade-off between the total number of Main site cameras and the number of inputs used as
trunk lines.
The more inputs used as trunk lines, the fewer there are for use as direct camera inputs.
Model No.
Maximum Number of System Cameras1
LTC 8300 Series
288
LTC 8500 Series
320
LTC 8600 Series
1152
LTC 8800 Series
2304
Bosch Security Systems, Inc.
Installation Manual
2015.01 | 10.6 |
58
en | Satellite System Configuration Installations
LTC 8900 Series
Model No.
Maximum Number of System Cameras1
LTC 8900 Series
6144
1. Camera inputs at all sites, plus trunk lines.
The Main site system must be programmed via the Master Control Software LTC 8059/00 or
the LTC 8850/00 GUI to identify camera trunk line inputs as well as remote satellite cameras.
All systems must be configured with no duplicate camera numbers anywhere in the system.
The installer should verify that the camera numbers programmed into the ’Startup Camera’
field of the Monitor table are suitable for viewing by respective operators. If there are
Lockouts programmed into the system, specifying a neutral camera would prevent the
situation where a restricted camera could be switched to a restricted operator’s monitor when
their trunk line is stolen. For this feature to operate properly, the Start-up camera numbers
must be locally connected cameras or a local unused input (i.e., the raster generator will be
displayed when called up).
In addition, it is recommended to program Lockouts for all system keyboards so that they do
not have access to unused monitor outputs. This prevents operators from inadvertently
selecting a satellite camera on a non-existent monitor which will result in a trunk link
becoming used up, possibly making less trunk lines available for valid selections.
Keyboard User Function 41 (see Keyboard User Function section) offers additional
programming options if a multi-level cascaded Allegiant satellite system configuration is being
used.
Any alarm inputs to the Main site configured to activate satellite cameras operate normally
except when limited by the number of available trunk lines.
The software automatically determines trunk usage, depending on the priority level of
operators currently viewing satellite cameras.
Alarm inputs applied at a satellite site will NOT activate alarm video at the Main site. If the
application requires alarms located at a satellite to activate video at the Main site, the Main
site s LTC 8540/00 Alarm Interface unit must be remotely located. Multiple LTC 8540/00 Alarm
Interfaces may be remoted via the LTC 8713 Alarm Port expander accessory, located at the
Main switcher site in LTC 8800 and LTC 8900 systems. Up to 8 LTC 8540/00 Alarm Interfaces
with LTC 8713 Alarm Port Expanders can be used in a LTC 8600 system. Two LTC 8540/00
can be used in LTC 8500 systems. Since the LTC 8300 Series contains an integral alarm
interface, the remote alarm interface application does not apply. A unique time and date
synchronizing feature provided in the Time Event table of the MCS or the GUI software may be
programmed into the Main site switcher. This permits periodic synchronizing of the time and
date to all remote switchers in the system based on the Main site s clock.
A conceptual diagram of a satellite switching system is follows:
2015.01 | 10.6 |
Installation Manual
Bosch Security Systems, Inc.
Satellite System Configuration Installations | en
LTC 8900 Series
59
Figure 8.3: Conceptual Diagram of an Allegiant Satellite Switching System
Bosch Security Systems, Inc.
Installation Manual
2015.01 | 10.6 |
60
en | Satellite System Configuration Installations
LTC 8900 Series
Figure 8.4: Conceptual Diagram of a Dual Master Allegiant Satellite System
2015.01 | 10.6 |
Installation Manual
Bosch Security Systems, Inc.
LTC 8900 Series
Satellite System Configuration Installations | en
Typical Allegiant ‘Primary’ Master Site 1
Typical System Monitors
(Video from all sites)
BOSCH
61
Typical PTZ Camera
Video
Allegiant
BOSCH
ALLEGIANT Video Matrix
Biphase
Data
BOSC
H
Pro
Mo
d
n
Sh
Cl
ot
r
1
6
5
8
7
Signal Distribution Unit
3
2
4
Typical Biphase
Data lines to all local
P/T/Z cameras
9
ALLEGIANT Data Unit
0
LTC 8568
CODE
Typical IntuiKey keyboard
POWER
1 or More Video
TRUNK Lines
Typical System Monitors
(Video from sites 2 and 3)
BOSCH
Biphase Data Line to
Intermediate Master/Satellite
Typical Allegiant ‘Intermediate’ Master/Satellite, Site 2
Typical PTZ Camera
BOSCH
Video
Allegiant
ALLEGIANT Video Matrix
BOSC
H
Pro
Mo
d
n
Cl
Sh
r
ot
1
2
3
4
5
6
7
8
9
Console
Port
Biphase
Data
0
Typical IntuiKey keyboard
Typical Biphase Data line
to all local P/T/Z cameras
LTC 8780
RS-232 IN
Data
Converter Unit
CODE IN
CODE OUT
RS-232 OUT
ALLEGIANT Data Unit
LTC 8569
CODE
POWER
Code
Merger unit
Biphase
Data
Multiple Video
TRUNK Lines
Typical System Monitors
(Video from local site only)
Biphase Data Line
to 3 rd Level Satellite
Typical Allegiant Satellite, Site 3
Typical PTZ Camera
BOSCH
Allegiant
BOSCH
Video
ALLEGIANT Video Matrix
BOSC
H
Pro
Mo
d
n
Cl
Sh
r
ot
1
2
4
7
3
5
6
8
9
Biphase
Data
Typical Biphase Data
line to all local P/T/Z
cameras
Console
Port
0
Typical IntuiKey keyboard
LTC 8780
RS-232 IN
Data
Converter Unit
CODE IN
CODE OUT
RS-232 OUT
ALLEGIANT Data Unit
LTC 8569
Biphase
Data
CODE
POWER
Code Merger unit
Figure 8.5: Conceptual Diagram of a Cascaded Allegiant Satellite System
Bosch Security Systems, Inc.
Installation Manual
2015.01 | 10.6 |
62
en | Satellite System Configuration Installations
8.2
LTC 8900 Series
Satellite Site “Trunk Line” Monitor Outputs
At each of the remote satellite sites, a desired number of monitor outputs from the switcher
must be assigned as trunk lines. The number of trunk lines can range from 1 to the maximum
number of monitor outputs provided by the switcher. Note that the number of trunk lines
coming from a satellite site determines the maximum number of cameras from that site which
may be viewed simultaneously at the main site. If operators will be stationed at the satellite
site, they should be prevented from accessing the monitor outputs designated as trunk lines.
This prevention can be accomplished via the Monitor Lockout Tables in either the LTC
8059/00 MCS or the LTC 8850/00 GUI Software.
8.3
Main Site “Trunk Line” Video Inputs
At the main site, video trunk line connections coming from each of the remote site(s) should
be connected (and properly terminated) using an available video input at the main bay. There
are no programming restrictions concerning their connections, but a sense of order can be
maintained if a group of video inputs are used at the upper end of the system s designed
capacity. This technique allows the main system to be more easily expanded in the future with
additional local cameras or trunk lines. As an example, assume there are a total of eight (8)
trunk lines coming from all satellite sites which are connected to a main site system designed
for 32 inputs. Inputs 25 to 32 can be reserved for the trunk lines, leaving inputs 1 to 24 for
local camera connections. If there will be no local camera inputs, the trunk lines can start at
the first video input.
8.4
Control Data Lines in Satellite Systems
Each satellite site must be provided with an Allegiant Biphase control data line coming from
the Signal Distribution located at the main site. This data line carries all pan/tilt/zoom control
commands, in addition to the switching commands generated by the main site switcher. The
control data line should be connected to an LTC 8780 Series Data Converter unit, which
provides address decoding functions for the satellite site. An LTC 8780 Series is required for
each satellite site, and must be given a unique site address number. If operators stationed at
the satellite site are permitted to control pan/tilt/zoom-equipped cameras, an LTC 8569 Series
Code Merger unit must be installed at the satellite site. In order for each site to have control
over pan/tilt/zoom-equipped cameras, the Code Merger combines code generated by the main
and satellite sites. The LTC 8780 Series can then be connected to one of the data outputs of
the LTC 8569 Series unit.
8.5
Satellite Sites Programming Requirements
The optional LTC 8059/00 MCS or the optional LTC 8850/00 GUI Software is required to
properly program a satellite system.
Programming the satellite sites is usually limited to designating their logical camera numbers
to appropriate values via the Camera ID Table of the MCS or GUI Software. Note that no
duplicate logical camera numbers are permitted anywhere in the system. Allegiant logical
camera designations can be renumbered to any four-digit number on all Allegiant Series
systems, except the LTC 8500 Series, which is limited to three (3) digits. Few other
restrictions exist.
These camera numbers are the numbers entered at both the satellite and the main site
keyboards when camera selections are made. On any AUTODOME camera or conventional
pan/tilt/zoom-equipped camera, this logical number must also be entered as the receiver/
driver’s site address number.
2015.01 | 10.6 |
Installation Manual
Bosch Security Systems, Inc.
LTC 8900 Series
Satellite System Configuration Installations | en
63
Figure 8.6: Satellite Site Sample Program Showing Logical Camera Numbers and Titles
To maintain a sense of order, it is preferable to program a satellite for a range of camera
numbers. For example, in a three (3) Allegiant type satellite system, the first satellite can be
programmed for camera numbers 51 to 100. Satellite two can be programmed for camera
numbers 101 to 131, and satellite three can use numbers 151 to 185.
If necessary, the Keyboard-to-Monitor Lockout Table in the LTC 8059/00 MCS or the LTC
8850/00 GUI Software can be programmed in the satellite switcher to prevent any local
operators from inadvertently accessing the satellite’s monitor outputs being used as trunk
lines.
If operators will be stationed at the satellite site, camera titles should be entered into the
switcher. If desired, these titles can be selected (explained below) to appear at the main
site.The only other requirement is to ensure that the console ports of all Allegiant type
satellites have been set to the correct baud rate and the handshake option disabled (CTS =
off). This is done via a system keyboard (see Keyboard User Function 30), the ParametersSystem screen of the LTC 8059/00 MCS or the LTC 8850/00 GUI Software (make sure CPU
DIP Switch 8 on Switch S2 is set to the ON position).
8.6
Main Site Programming Requirements
At the main site, the Camera ID Table must be programmed to ensure proper satellite
operation. It is easiest to start with the trunk line inputs. For each trunk line, the satellite’s
monitor output number and its bay address must be entered (same number as the satellite’s
LTC 8780 address).
Camera numbers should be programmed next. No duplicate logical camera numbers are
allowed anywhere in the entire system. If the system will include many local cameras, it is
recommended to designate remote cameras (i.e., those located at satellite sites) using
numbers above the main bay’s physical video inputs (33+ on LTC 8300 Series, 65+ on LTC
8500, 129+ on LTC 8600, 257+ on LTC 8800 Series, 4097+ on LTC 8900 Series). Enter the
desired camera number, (the satellite bay that it is actually connected to), and select if either
a local title will be used, or if the remotely generated title will be used.
For satellite camera entries, only those numbers representing actual cameras need to be
entered. For example, all 16 cameras associated with an LTC 8200 switcher do not need to be
entered if only five cameras are actually connected to the switcher. If desired, a few extra
Bosch Security Systems, Inc.
Installation Manual
2015.01 | 10.6 |
64
en | Satellite System Configuration Installations
LTC 8900 Series
camera number lines in the table may be reserved at this time for future expansion. If a local
title is specified, the camera’s title can also be entered at this time. Designate any local
camera numbers appropriately, and enter their corresponding titles.
Figure 8.7: Main Site Sample Program Showing Local Cameras, Trunk Lines and Remote Cameras
NOTE: Either a local camera, or a remote camera programmed with a local title, will need to
be selected to view certain on-screen prompts or data during programming of the main site via
a system keyboard.
Once the system is programmed and configured, any unused monitor outputs located at the
main site should be selected to display a local camera via the system keyboard. This prevents
unused monitor outputs from using up trunk lines which may result in some confusing
operational responses.
The “Start-up” camera numbers listed in the Monitor Table of the LTC 8059/00 software
should be programmed to specify locally connected cameras or a local unused input (i.e., the
raster generator will be displayed when called up). This table defines the camera numbers
that will automatically be switched to an operator’s monitor in the event the trunk line being
used to display their original satellite camera is ’stolen’ by an operator with a higher priority.
2015.01 | 10.6 |
Installation Manual
Bosch Security Systems, Inc.
LTC 8900 Series
Satellite System Configuration Installations | en
65
Figure 8.8: Main Site Sample Program Showing Monitor Start-Up Camera Numbers
8.7
Special Programming for “Cascaded” Satellite System
Configurations
In a 3-tier cascaded satellite system, it is highly recommended for the system design to have
more trunks lines between the intermediate master/satellite system and the 3rd level satellite
system than there are between the top level master system and the intermediate system. In
systems where this is not the case, it is likely that operators at top level master and the
intermediate master/satellite will end up fighting for trunk lines coming from the 3rd level
satellite system.
There are two user configuration options available (starting in CPU firmware version 8.70) to
eliminate or at least significantly reduce conflicts between operators when this type of system
is being used.
Option 1: Using Factory default settings, previously selected satellite cameras remain on trunk
lines even after the operator switches back to a local camera view. Although this mode of
operation is more desirable in standard systems because it minimizes delays when previous
satellite cameras are reselected, it is not advantageous to use in cascaded systems. In
cascaded systems, all available trunk lines coming from the 3rd level satellite system may
become used up, making them unavailable to the operators at the intermediate system.
In this situation, keyboard User Function 41 should be set to the NO REM CAM CACHE option
at the master site location. In this mode, after the top level operator selects a locally
connected camera, the trunk line between the top level and the intermediate level system will
immediately be reset to its Start-up camera (as defined in the Monitor Table of the LTC
8059/00 MCS). This action frees the trunk line between the intermediate level system and the
3rd level system so it will be available if needed by an operator at the intermediate level
system.
For the monitors being used as trunk lines in the intermediate system, it is important for the
“Start-up” camera numbers listed in the Monitor Table of the LTC 8059/00 software to be
programmed to specify cameras connected locally or a local unused input (i.e., the raster
generator will be displayed when called up). This action ensures that no trunk line is used
when a monitor switches to the Start-up camera.
Option 2: If the top level master system and intermediate level system in a cascade
configuration can or will be set to operate as “Dual Master” systems, a priority based satellite
camera feature can be configured.
Bosch Security Systems, Inc.
Installation Manual
2015.01 | 10.6 |
66
en | Satellite System Configuration Installations
LTC 8900 Series
In default cascaded satellite system configurations, satellite switching commands are not
associated with a user priority level. When a switching command sent from a master site is
received by a satellite, the switch selection can immediately be overridden by operators at the
satellite location who have any priority level.
This situation is more likely to be encountered in 3-tier Satellite systems that do not have a
good distribution of trunk lines (i.e., more between the top level system and the intermediate
level system than there are between the intermediate system and the 3rd tier satellite).
Since dual master configurations support bi-directional communications, it is possible to set
keyboard User Function 41 to use the SAT nnn PRIORITY option for both the top level and
intermediate level master systems. The satellite number assigned to the system that is
currently being programmed must be specified here. This feature will enable use of the
operators user priority to determine if access to a desired satellite camera is provided or not.
For instance, if no trunk lines are available and an operator requesting a satellite camera has a
higher priority than at least 1 of the existing operators, the requested camera will be
switched. If the operator does not have sufficient priority, they will receive an error message
(i.e., error 81) via the satellite communication path, and their camera will switch to the Startup camera specified in the Monitor Table.
Alarm Inputs in Satellite Systems
8.8
Any alarm inputs to the main site, which have been programmed to activate cameras located
at satellites, will operate normally except when limited by the number of trunk lines available.
The software automatically determines trunk usage depending on the priority level of
operators currently viewing satellite cameras. Alarm inputs applied at a satellite site will not
activate the alarm video at the main site.
If the application requires alarms located at a satellite to activate video at the main site, the
remote alarms must be brought back to the main site. If necessary, the main site’s LTC
8540/00 Alarm Interface unit can be remotely located via an RS-232 link. Since the Alarm
Interface capability is an integral part of the LTC 8300 Series, this is not possible if an LTC
8300 Series system is being used as the main site system. If more than one satellite site
contains alarms, multiple LTC 8540/00 Alarm Interfaces can be remotely located. The number
of alarm interfaces which can be remote is limited only by the capacity of the main site system
to support this capability.
1
2
Controller
3
4 Keyboard
5
COM1
Console
COM2
Biphase
6
7
8
Alarm
LAN
Figure 8.9: Rear Panel View of LTC 8904 Series CPU Bay
2015.01 | 10.6 |
Installation Manual
Bosch Security Systems, Inc.
LTC 8900 Series
1
2
Satellite System Configuration Installations | en
3
4 Keyboard
5
6
7
Primary Controller
COM1
Console
Alarm
Back Up Controller
COM2
Biphase
Switch Control
67
8
Relay Out
LAN
Primary Back Up
Figure 8.10: Rear Panel View of LTC 8901 Series CPU Bay
Note Direction
of Polarity “Key” Slots
when installing mating
ribbon cables
LTC 8902 Monitor Bay
(All other connectors in the
row are exactly the same)
(All other connectors in the
row are exactly the same)
LTC 8903 Camera Bay
(All other connectors in the
row are exactly the same)
(All other connectors in the
row are exactly the same)
(All other connectors in the
row are exactly the same)
Figure 8.11: Ribbon Connector Key Polarity Diagram for Matrix Bays
Bosch Security Systems, Inc.
Installation Manual
2015.01 | 10.6 |
2015.01 | 10.6 |
Installation Manual
S1 - all off
S2 - 5,6,7,8 on
S1 - 4 on
S2 1,2,5,6,7,8 on
LTC 8903
(Second Level)
S1 - 4 on
S2 1,2,5,6,8 on
LTC 8903
(Second Level)
S1 - 4 on
S2 1,2,5,7,8 on
LTC 8903
(Second Level)
S1 - 4 on
S2 - 1,2,5,8 on
LTC 8903
(Second Level)
S1 - 4 on
S2 - 6,7,8 on
LTC 8903
(Second Level)
S1 - 4 on
S2 - 6,8 on
LTC 8903
(Second Level)
S1 - 4 on
S2 - 7,8 on
LTC 8903
(Second Level)
S1 - 4 on
S2 - 8 on
LTC 8903
S1 - all off
S2 - 5,6,7,8 on
LTC 8903
LTC 8903
S1 - all off
S2 4,5,6,7,8 on
LTC 8903
S1 - all off
S2 - 4,5,6,8 on
LTC 8903
LTC 8903
S1 - all off
S2 3,5,6,7,8 on
S1 - all off
S2 - 3,5,6,8 on
LTC 8903
LTC 8903
S1 - all off
S2 - 3,5,7,8 on
LTC 8903
S1 - all off
S2 - 4,5,7,8 on
S1 - all off
S2 - 3,5,8 on
LTC 8903
S1 - all off
S2 - 3,6,7,8 on
LTC 8903
S1 - all off
S2 - 3,6,8 on
LTC 8903
S1 - all off
S2 3,4,5,6,7,8 on
LTC 8903
S1 - all off
S2 3,4,5,6,8 on
LTC 8903
S1 - all off
S2 3,4,5,7,8 on
S1 - all off
S2 - 3,4,5,8 on
LTC 8903
LTC 8903
S1 - all off
S2 3,4,6,7,8 on
S1 - all off
S2 - 3,4,6,8 on
LTC 8903
S1 - all off
S2 - 3,4,7,8 on
S1 - all off
S2 - 3,7,8 on
LTC 8903
LTC 8903
LTC 8903
S1 - all off
S2 - 5,6,8 on
LTC 8903
S1 - all off
S2 - 3,4,8 on
LTC 8903
S1 - all off
S2 - 5,7,8 on
LTC 8903
S1 - all off
S2 - 4,5,8 on
LTC 8903
S1 - all off
S2 - 5,8 on
LTC 8903
S1 - all off
S2 - 4,6,7,8 on
LTC 8903
S1 - all off
S2 - 4,6,8 on
S1 - all off
S2 - 6,8 on
S1 - all off
S2 - 6,7,8 on
LTC 8903
S1 - all off
S2 - 4,7,8 on
S1 - all off
S2 - 7,8 on
LTC 8903
LTC 8903
LTC 8903
S1 - all off
S2 - 3,8 on
LTC 8903
S1 - all off
S2 - 4,8 on
LTC 8903
S1 - all off
S2 - 8 on
LTC 8808
Cameras
769 - 1024
S1 - 4 on
S2 1,2,5,6,7,8 on
LTC 8903
(Second Level )
S1 - 4 on
S2 1,2,5,6,8 on
LTC 8903
(Second Level)
S1 - 4 on
S2 1,2,5,7,8 on
LTC 8903
(Second Level)
S1 - 4 on
S2 - 2,5,8 on
LTC 8903
(Second Level)
S1 - 4 on
S2 - 2,6,7,8 on
LTC 8903
(Second Level)
S1 - 4 on
S2 - 2,6,8 on
LTC 8903
(Second Level)
S1 - 4 on
S2 - 2,7,8 on
LTC 8903
(Second Level)
S1 - 4 on
S2 - 2,8 on
LTC 8903
(Second Level)
LTC 8903
S1 - all off
S2 2,5,6,7,8 on
S1 - all off
S2 - 2,5,6,8 on
LTC 8903
S1 - all off
S2 - 2,5,7,8 on
LTC 8903
S1 - all off
S2 - 2,5,8 on
LTC 8903
S1 - all off
S2 - 2,6,7,8 on
LTC 8903
S1 - all off
S2 - 2,6,8 on
LTC 8903
S1 - all off
S2 - 2,7,8 on
LTC 8903
S1 - all off
S2 - 2,8 on
LTC 8903
LTC 8808
Cameras
1025 - 1280
LTC 8903
S1 - all off
S2 2,4,5,6,7,8 on
LTC 8903
S1 - all off
S2 2,4,5,6,8 on
LTC 8903
S1 - all off
S2 2,4,5,7,8 on
S1 - all off
S2 - 2,4,5,8 on
LTC 8903
LTC 8903
S1 - all off
S2 2,4,6,7,8 on
S1 - all off
S2 - 2,4,6,8 on
LTC 8903
S1 - all off
S2 - 2,4,7,8 on
LTC 8903
S1 - all off
S2 - 2,4,8 on
LTC 8903
LTC 8808
Cameras
1281 - 1536
LTC 8903
S1 - all off
S2 2,3,5,6,7,8 on
LTC 8903
S1 - all off
S2 2,3,5,6,8 on
LTC 8903
S1 - all off
S2 2,3,5,7,8 on
S1 - all off
S2 - 2,3,5,8 on
LTC 8903
LTC 8903
S1 - all off
S2 2,3,6,7,8 on
S1 - all off
S2 - 2,3,6,8 on
LTC 8903
S1 - all off
S2 - 2,3,7,8 on
LTC 8903
S1 - all off
S2 - 2,3,8 on
LTC 8903
LTC 8808
Cameras
1537 - 1782
LTC 8903
S1 - all off
S2 2,3,4,5,6,7,8 on
LTC 8903
S1 - all off
S2 2,3,4,5,6,8 on
LTC 8903
S1 - all off
S2 2,3,4,5,7,8 on
LTC 8903
S1 - all off
S2 2,3,4,5,8 on
LTC 8903
S1 - all off
S2 2,3,4,6,7,8 on
LTC 8903
S1 - all off
S2 2,3,4,6,8 on
LTC 8903
S1 - all off
S2 2,3,4,7,8 on
S1 - all off
S2 - 2,3,4,8 on
LTC 8903
LTC 8808
Cameras
1783 - 2048
en | Satellite System Configuration Installations
LTC 8902
Monitors 449-512
S1 - all off
S2 - 5,6,8 on
LTC 8902
Monitors 385-448
S1 - all off
S2 - 5,7,8 on
LTC 8902
Monitors 321-384
S1 - all off
S2 - 5,8 on
LTC 8902
Monitors 257-320
S1 - all off
S2 - 6,7,8 on
LTC 8902
Monitors 193-256
S1 - all off
S2 - 6,8 on
LTC 8902
Monitors 129-192
S1 - all off
S2 - 7,8 on
LTC 8902
Monitors 65-128
S1 - all off
S2 - 8 on
LTC 8902
Monitors 1-64
LTC 8903
(Second Level)
LTC 8808
Cameras
513 - 768
LTC 8808
Cameras
257 - 512
LTC 8808
Cameras
1 - 256
68
LTC 8900 Series
Figure 8.12: Graphical Summary of Data Receiver DIP Switch Settings for Systems Up to 2048 Cameras by 512 Monitors
Bosch Security Systems, Inc.
LTC 8900 Series
Satellite System Configuration Installations | en
69
Figure 8.13: Rear Panel View of LTC 8902 Series and LTC 8903 Series Video Matrix Bays
Bosch Security Systems, Inc.
Installation Manual
2015.01 | 10.6 |
70
en | Satellite System Configuration Installations
LTC 8900 Series
F01U289924
Figure 8.14: Cable and Accessory Diagrams
2015.01 | 10.6 |
Installation Manual
Bosch Security Systems, Inc.
LTC 8900 Series
Satellite System Configuration Installations | en
Comm Port 3
(To Primary
Controller of CPU)
Main AC
Line
Comm Port 4
(To BackUp
Controller of CPU)
Switch
Control
Interface
4x USB
ports
Ethernet
Port
(Spare)
Comm Port 2
(Spare)
Legacy
Parallel Port
Mouse
(USB)
Keyboard
71
BackUp LAN
Port (Connect
to BackUp IP
PC
Monitor
Primary LAN
Port (Connect
to Primary IP
Figure 8.15: Typical LTC 8943/95 System Controller PC Rear Panels (Applies to Redundant Systems Configurations Only)
Bosch Security Systems, Inc.
Installation Manual
2015.01 | 10.6 |
72
en | Satellite System Configuration Installations
LTC 8900 Series
Up to 256 System Cameras can be
Connected using 8 LTC 8808 Panels
(Continue LTC 8808 Sequence as Necessary)
Additional LTC 8808
Video Interconnect
Panels for Additional
System Cameras
Camera 9
(Continue Sequence)
Camera 8
(Continue Sequence)
Camera 15
Camera 2
Camera 16
Camera 1
Camera 32
Camera 17
Camera 31
Camera 18
Camera 25
(Continue Sequence)
Lower LTC 8809
Ribbon Cable
(Camera Group 17-32)
Ribbon Cable for the
Camera group 241-256
Connects to Video Input
Connector "D"
in Group 4
Camera 24
(Continue Sequence)
Upper LTC 8809
Ribbon Cable
(Camera Group 1-16)
Ribbon Cable for
Camera Group 1-16
Connects to the Video Input
Connector "A" in Group 1
on the LTC 8903 Bay
If applicable, the Lower Row
of Connectors is used for
Video Looping Outputs
LTC 8903 Camera Bay
Figure 8.16: System Camera Connection Concept
2015.01 | 10.6 |
Installation Manual
Bosch Security Systems, Inc.
LTC 8900 Series
Satellite System Configuration Installations | en
73
Typical Connections
for up to 64 System Monitors
33
64
32
LTC 8808 Video
Interconnect Panel
Lower
LTC 8809
Ribbon Cable
(Monitor
Group 49-64)
1
LTC 8808 Video
Interconnect Panel
Upper
LTC 8809
Ribbon Cable
(Monitor
Group 33-48)
Lower
LTC 8809
Ribbon Cable
(Monitor
Group 17-32)
Upper
LTC 8809
Ribbon Cable
(Monitor
Group 1-16)
LTC 8902 Monitor Bay
Figure 8.17: System Monitor Connection Concept
Bosch Security Systems, Inc.
Installation Manual
2015.01 | 10.6 |
74
en | Satellite System Configuration Installations
LTC 8900 Series
LTC 8904 CPU Bay
LAN Data from the CPU
to Any Available Port
P or C u rv e
h
P
1
3
2
4
5
7
5
1 1
1 3
1 5
1 7
1 9
8
1 0
1 2
1 4
1 6
1 8
2 0
2 1
2 3
2 2
2 4
2 5T
2 6 T
2 5 S
2 6 S
S w itc h
2 5 1 02- 4
J9 0 1 9B
2 5 T a n d
2 6 T a r e
E
I E E A u to M D I
/
P o we r
D u a l- P
MD
e Ir sX
- o n a tily
P o r ts:
F a u tl
1 10/ 0 0 1/ 0 0 0T
- ( T
)
L E D
U s e o no ylr S
o nF eP
S
( () T o r
Mo d e
S )
fo r e a c h P o r t
7
C el a
C o n s o el
R e s e t
r
6
LTC 8946/93 LAN Switch
LAN Data Line
Connect up to 23 LAN
Data Lines from the Matrix Bays
to Any Available Port
Typical Matrix Bay
LAN Lines
LTC 8902 Monitor Bay
LTC 8903 Camera Bay
LTC 8903 Camera Bay
Figure 8.18: Standard System Data Connection Details
LTC 8904 CPU Bay
LAN Data from CPU
to any available port
P or C u rv e
1
h
3
5
7
5
1 1
1 3
1 5
1 7
1 9
2 1
2 3
2 T
5
2 6 T
2 5 S
2 6 S
S w itc h
2 5 1 02- 4
9J 0 1 9B
P
2 5 T a n d2 6 T a r e
E
I E E A u to M D I
/
P o we r
D u a l- P
MD
e Ir sX
- o n a tily
P o r t:s
F a u tl
1 1/0 0 0 1/ 0 0 0T
- ( )T
L E D
U s e o no ylr o
S nF eP
S
( () T o r
Mo d e
S )
fo r e a c h P o r t
C el a
C o n s o el
R e s e t
r
2
4
6
8
1 0
1 2
1 4
1 6
1 8
2 0
2 2
2 4
LAN Data Line
LTC 8946/93
LAN Switch
Connect the supplied 2 m LAN
Crossover cable between the
LAN Switches using any
available port
P or C u rv e
h
P
1
3
2
4
5
7
5
1 1
1 3
1 5
1 7
1 9
1 2
1 4
1 6
1 8
2 0
2 1
2 3
2 5 T
2 T
6
2 5 S
2 6 S
S w itc h
2 5 1 02- 4
2 5 T a n d 2 6T a r e
E
I E E A u to M D I
/
9J 0 1 9B
P o we r
D u -a lP
MD
e Ir sX
- o n a tily
F a u tl
P o r t:s
1 1/0 0 0 1/ 0 0 0T
- ( T )
L E D
U s e o n
r ylS o
F n
P
S
( e() T o r
Mo d e
S )
fo r e a c h P o r t
R e s e t
C o n s o el
C el a
r
6
8
Connect an additional 23 LAN cables from the
Video Matrix Bays for each LTC 8946/93 LAN
Switch added to the system
1 0
2 2
2 4
Add this second LTC 8946/93 Expansion
Switch if the combined total of Video Matrix
Bays exceed 23
* If required, add additional LTC 8946/93 LAN Switches in a similar fashion
Figure 8.19: Data Connections for Standard Systems Having More than 1 LAN Switch
2015.01 | 10.6 |
Installation Manual
Bosch Security Systems, Inc.
LTC 8900 Series
Satellite System Configuration Installations | en
75
LTC 8901 CPU Bay
LTC 8943/95 System
Controller PC
Comm 3
Secondary
LAN Data Line
Comm 4
Digital I/O Board
LAN 1
Primary LAN
Data Line to
Port 1
LTC 8944/93 LAN Switch
P ro C u rv e
1
h
P
3
5
7
5
1 1
1 3
1 5
1 7
1 9
2 1
2 3
2 T
5
2 6 T
S w tic h
2 5 1 0-2 4
J9 0 1 9B
2 5 T a n d2 6 T a r e
IE E E A u to M D I
/
P o we r
D u a l- M
P D
e Ir s-X o n a lity
P o r t:s
F a u lt
LAN 2
1 /10 0 0 /1 0 0 0-T ( )T
L E D
U s e o no lyr S
o n
F eP
(S () T o r
Mo d e
S )
fo r e a c h P o r t
C le a
C o n s o le
R e s e t
r
2
4
6
8
1 0
1 2
1 4
1 6
1 8
9
2 0
10
11
2 2
12
2 5 S
2 6 S
2 4
PC LAN Cable to
LAN Switch Port 2
H
Typical Matrix Bay
LAN Lines to Any
Available Port on the
LAN Switches
Connect the
2m LAN Crossover
Cable between the LAN
Switches using any
Available Ports
Backup LAN
Data Line to Port 1
P ro C u rv e
h
P
1
3
2
4
5
7
5
1 1
1 3
1 5
1 7
8
1 0
1 2
1 4
1 6
1 8
1 9
2 1
2 3
2 0
2 2
2 4
2 T
5
2 6 T
2 5 S
2 6 S
S w tic h
2 5 1 0-2 4
J9 0 1 9B
2 5 T a n d
2 6 T a r e
IE E E A u to M D I
/
P o we r
D u a l- M
P D
e Ir s-X o n a lity
P o r t:s
F a u lt
1 /10 0 0 /1 0 0 0-T ( )T
L E D
U s e o no lyr S
o nF eP
(S () T o r
Mo d e
R e s e t
r
S )
fo r e a c h P o r t
9
C le a
C o n s o le
6
PC LAN Cable to
LAN Switch Port 2
LTC 8945/93
LAN Switch
LTC 8902 Monitor Bay
LTC 8903 Camera Bay
LTC 8903 Camera Bay
LTC 8902 Monitor Bay
LTC 8903 Camera Bay
LTC 8903 Camera Bay
Figure 8.20: Redundant System Configurations Data Connections Details
Bosch Security Systems, Inc.
Installation Manual
2015.01 | 10.6 |
76
en | Satellite System Configuration Installations
LTC 8900 Series
LTC 8901 CPU Bay
LTC 8943/95
System
Controller PC
Comm 3
Secondary LAN
Data Line
Comm 4
Digital I/O Board
Primary LAN
Data Line to
Port 1
LAN 1
LTC 8944/93 LAN Switch
P or C u rv e
1
h
P
3
5
7
5
1 1
1 3
1 5
1 7
1 9
2 1
2 3
2 T
5
2 6 T
S w tic h
2 5 1 02- 4
J9 0 1 9B
2 5 T a n d
2 6 T a r e
E
I E E A u to M D I
/
P o we r
D u a l- P
MD
e Ir sX
- o n a tily
P o r t:s
F a u tl
1 1/0 0 0 1/ 0 0 0T
- ( )T
LAN 2
L E D
U s e o no ylr o
S nF eP
S
( () T o r
Mo d e
S )
fo r e a c h P o r t
C el a
C o n s o el
2 5 S
R e s e t
2
r
4
6
8
1 0
1 2
1 4
1 6
1 8
2 0
2 2
2 6 S
2 4
PC LAN Cable
to LAN Switch Port 2
H
Connect the
2m LAN Crossover
Cable between LAN
Switches using any Port
Backup LAN Data
Line to Port 1
P or C u rv e
1
h
P
3
5
7
5
1 1
1 3
1 5
1 7
1 9
2 1
2 3
2 T
5
2 6 T
S w tic h
2 5 1 02- 4
J9 0 1 9B
2 5 T a n d
2 6 T a r e
E
I E E A u to M D I
/
P o we r
D u a l- P
MD
e Ir sX
- o n a tily
P o r t:s
F a u tl
1 1/0 0 0 1/ 0 0 0T
- ( )T
L E D
U s e o n
o ylr o
S nF eP
S
( () T o r
Mo d e
S )
fo r e a c h P o r t
C el a
C o n s o el
R e s e t
2 5 S
r
2
4
6
8
1 0
1 2
1 4
1 6
1 8
2 0
PC LAN Cable to
LAN Switch Port 2
2 2
2 6 S
2 4
LTC 8945/93 LAN Switch
P ro C u rv e
1
h
P
3
5
7
5
1 1
1 3
1 5
1 7
1 9
S w tic h
2 5 1 0-2 4
J9 0 1 9B
2 1
4
2 3
2 5T
2 6 T
2 5 S
2 6 S
2 5 T a n d
2 6 T a r e
E
I E E A u to M D I
/
P o we r
D u a l- P
MD
e Ir sX
- o n a ytil
P o r ts:
F a u lt
1 01/ 0 0 1/ 0 0 0T
- ( T
)
L E D
U s e o no ylr S
o nF eP
S
( )( T o r
Mo d e
S )
fo r e a c h P o r t
C le a
C o n s o le
R e s e t
r
2
4
6
8
1 0
1 2
1 4
1 6
1 8
2 0
2 2
2 4
Add one LTC 8946/93 Expansion
LAN Switch if the Combined Total
of Video Matrix Bays Exceeds 18
P or C u rv e
1
h
P
3
5
7
5
1 1
1 3
1 5
1 7
1 9
2 1
2 3
2 T
5
2 6 T
2 5 T a n d2 6 T a r e
S w tic h
2 5 1 02- 4
J9 0 1 9B
E
I E E A u to M D I
/
P o we r
D u a l- P
MD
e Ir sX
- o n a tily
P o r t:s
F a u tl
1 1/0 0 0 1/ 0 0 0T
- ( )T
L E D
U s e o n
o ylr o
S n
F eP
S
( () T o r
Mo d e
S )
fo r e a c h P o r t
C el a
C o n s o el
R e s e t
2 5 S
r
2
4
6
8
1 0
1 2
1 4
1 6
1 8
2 0
2 2
2 6 S
2 4
Add this Second LTC 8946/93 Expansion
LAN Switch if the Combined Total of Video
Matrix Bays Exceeds 28
For each Expansion
LAN Switch Added to the
System, Connect up to 10
Additional LAN Cables
from Video Matrix Bays
*If required, Add Additional LTC 8946/92 LAN Switches Similarly
Figure 8.21: Data Connections for Redundant System Configurations Having More than 2 LAN Switches
2015.01 | 10.6 |
Installation Manual
Bosch Security Systems, Inc.
LTC 8900 Series
Satellite System Configuration Installations | en
77
To Monitors via LTC 8808
V ideo Interconnect Panels
LTC 8 9 0 2 M o n i to r
B ay C o n t a i n i n g M o d u l e s
for 6 4 M o n i to r O u tp u t s
To
D4
To
C4
E a ch Li n e
Re pre se n t s
a n LTC 8 8 0 9
Ribbon Cable
D
"D "
4
3
"C "
2
1
4
3
"B "
2
1
4
3
2
"A "
1
4
3
2
To
A1
1
To
B1
To
C1
To
B4
To
D1
To
A4
C
B
A
LTC 8 9 0 3 C a m e ra B ay
fo r C a m e ra s 7 69 – 1 0 2 4
D
C
B
A
D
LTC 8903 Camera Bay
for Cameras 513–768
C
B
A
D
LTC 8903 Camera Bay
for Cameras 257–512
C
B
A
LTC 8903 Camera Bay
for Cameras 1–256
Figure 8.22: Video Interconnect Concept for Systems Having 1024 Cameras
To Monitors via LTC 8808
Video Interconnect Panels
LTC 8902 Monitor
Bay Containing Modules
for 64 Monitor Outputs
"D "
4
D
C
B
3
"C "
2
1
4
3
2
"B "
1
4
3
2
"A "
1
4
3
2
1
Group inputs 2,
3, and 4 are used
for additional
LTC 8903 Camera
Bay Connections
A
LTC 8903 Camera Bay
Containing 8 LTC 8921
Video Modules
Each Line
Represents
an LTC 8809
Ribbon Cable
Each Line
Represents
an LTC 8809
Ribbon Cable
D
C
B
LTC 8903 Camera Bay
for Cameras 769–1024
A
D
C
B
A
LTC 8903 Camera Bay
for Cameras 513–768
D
C
B
LTC 8903 Camera Bay
for Cameras 257–512
A
D
C
B
A
LTC 8903 Camera Bay
for Cameras 1–256
Figure 8.23: Video Interconnect Concept in Systems Having Greater than 1024 Cameras
Bosch Security Systems, Inc.
Installation Manual
2015.01 | 10.6 |
78
en | Satellite System Configuration Installations
User-supplied PC Running
Master Control Software
or Optional GUI Software
LTC 8900 Series
LTC 8904 Main CPU Bay
Multiple Data Cables
to Keyboards
Up To 256
Cameras
LTC 8905
Power
Supply
LTC 8910
CPU Module
LAN Data Lines
LTC 8946 Switch
LTC 8903
Video Input Bay
LTC 8902 Video Output Bay
LTC 8934 Video
Output Modules
LTC 8934 Video
Output Modules
LTC 8906
Power
Supply
LTC 8916 Data
Receiver Module
BOSCH
BOSCH
Prod
Mon
BOSCH
BOSCH
Prod
Mon
Prod
Mon
Clr
Shot
Clr
Shot
Clr
Prod
Mon
Clr
2
3
1
2
3
1
2
3
1
2
3
4
5
6
4
5
6
4
5
6
4
5
6
7
8
9
7
8
9
0
7
0
8
9
Prod
Mon
BOSCH
Prod
Mon
Mon
Shot
1
0
BOSCH
BOSCH
Mon
Prod
Shot
LTC 8921 Video
Input Modules
LTC 8905
Power
Supply
System Monitors 1–64
BOSCH
Prod
LTC 8918 Data
Receiver Module
LTC 8809 Coax
Ribbon Cables
Multiple Coax Cables
to Monitor Groups
Clr
LTC 8809 Coax
Ribbon Cables
LTC 8921 Video
Input Modules
LTC 8809 Coax
Ribbon Cables
LTC 8808 Video Panels
LTC 8808 Video Panels
7
8
Shot
Clr
Shot
Clr
Shot
Clr
Shot
1
2
3
1
2
3
1
2
3
1
2
3
4
5
6
4
5
6
4
5
6
4
5
6
7
8
9
7
8
9
7
8
9
7
8
9
9
0
0
System Keyboards
0
0
0
System Keyboards
Figure 8.24: Typical Diagram for Standard System Configuration of 256 Cameras and 64 Monitors
2015.01 | 10.6 |
Installation Manual
Bosch Security Systems, Inc.
LTC 8900 Series
Satellite System Configuration Installations | en
LTC 8943 PC
Running
Configuration
Software
LTC 8901 Main CPU Bay
LTC 8905
Main
Power
Supply
LTC 8910 Main
CPU Module
Multiple Data Cables
to Keyboards
LTC 8934 Video
Output Modules
LTC 8906
Power
Supply
LTC 8916 Data
Receiver Module
Multiple
Coax Cables
to Monitor
Groups
LTC 8809 Coax
Ribbon Cables
Multiple Coax Cables
to Monitor Groups
LTC 8805
Power
Supply
LTC 8805
Power
Supply
LTC 8903 Video Input Bay
LTC 8809
Coax Ribbon
Cables
LTC 8808 Video Panels
LTC 8918 Data
Receiver Module
LTC 8921 Video
Input Modules
LTC 8921 Video
Input Modules
LTC 8902 Video
Output Bay
LTC 8918 Data
Receiver Module
LTC 8809 Coax
Ribbon Cables
LAN
Line
LTC 8906
Power
Supply
LTC 8916 Data
Receiver Module
LTC 8809 Coax
Ribbon Cables
LTC 8921 Video
Input Modules
LTC 8921 Video
Input Modules
LAN
Line
LTC 8934 Video
Output Modules
LTC 8808 Video Panels
LTC 8903 Video
Input Bay
LTC 8809
Coax Ribbon
Cables
LTC 8808
Video Panels
LTC 8934 Video
Output Modules
Up To 256
Cameras
LTC 8905
Backup
Power
Supply
LAN Data
Lines
LTC 8945 Switch
LTC 8902 Video Output Bay
LTC 8934 Video
Output Modules
LTC 8910 Backup
CPU Module
LTC 8944 Switch
LAN Data
Lines
LTC 8809
Coax Ribbon
Cables
79
System Monitors 65–128
System Monitors 1–64
BOSCH
Prod
Shot
BOSCH
BOSCH
Prod
Mon
Clr
Prod
Mon
Clr
Shot
Shot
BOSCH
BOSCH
Prod
Mon
Clr
Prod
Mon
Clr
Shot
Shot
BOSCH
BOSCH
Prod
Mon
Clr
Prod
Mon
Clr
Shot
BOSCH
Prod
Mon
Clr
Shot
Mon
Clr
Shot
3
2
1
2
1
2
1
2
3
1
3
3
2
2
2
1
1
1
3
3
2
3
3
1
6
5
4
5
4
5
4
5
6
4
6
6
5
5
5
4
4
4
6
6
5
6
6
4
9
8
7
8
7
8
7
8
9
7
9
9
8
8
8
7
7
7
9
9
8
9
9
7
0
0
0
0
0
0
0
0
System Keyboards
System Keyboards
Figure 8.25: Typical Diagram of Redundant System Configuration for 256 Cameras by 128 Monitors
Bosch Security Systems, Inc.
Installation Manual
2015.01 | 10.6 |
80
en | Satellite System Configuration Installations
LTC 8900 Series
LTC 8943 PC
Running
Configuration
Software
LTC 8905
Main
Power
Supply
Additional
Cameras
LTC 8910 Main
CPU Module
LTC 8910 Backup
CPU Module
LTC 8905
Backup
Power
Supply
LTC 8808 Video Panels
LTC 8901
Main CPU Bay
LTC 8944 Switch
LTC 8945 Switch
LTC 8946 Switch
LTC 8808 Video Panels
LTC 8808 Video Panels
LTC 8809 Coax
Ribbon Cables
LTC 8903
LTC 8903
LAN Data Lines to All Bays
Supplied
Coax Ribbon
Cables
LTC 8903
LTC 8903
Supplied
Coax Ribbon
Cables
LTC 8903
LTC 8903
LTC 8903
LTC 8903
LTC 8903
LTC 8903
LTC 8809
Coax Ribbon
Cables
LTC 8902
To Monitors 129–192
LTC 8903
LTC 8809
Coax Ribbon
Cables
LTC 8902
To Monitors 65–128
LTC 8903
LTC 8809
Coax Ribbon
Cables
LTC 8902
To Monitors 1–64
LTC 8808 Video Panels
Supplied
Coax Ribbon
Cables
LTC 8903
LTC 8903
LTC 8903
LTC 8903
LTC 8902
To Monitors 193–256
BOSCH
Prod
Shot
BOSCH
BOSCH
Prod
Mon
Clr
Prod
Mon
Clr
Shot
BOSCH
Prod
Mon
Clr
Shot
Mon
Clr
Shot
1
2
3
1
2
3
1
2
3
1
2
3
4
5
6
4
5
6
4
5
6
4
5
6
7
8
9
7
8
9
7
8
9
7
8
9
0
0
0
0
Figure 8.26: Typical Diagram of Redundant System Configuration for 1024 Cameras by 256 Monitors
2015.01 | 10.6 |
Installation Manual
Bosch Security Systems, Inc.
LTC 8900 Series
Satellite System Configuration Installations | en
81
PC Running
Configuration
Software
Additional
Cameras
LTC 8905
Main Power
Supply
LTC 8910 Main
CPU Module
LTC 8910 Backup
CPU Module
Additional
Cameras
LTC 8808 Video Panels
LTC 8901
Main CPU Bay
Additional
Cameras
Additional
Cameras
LTC 8905
Backup
Power
Supply
LTC 8808 Video Panels
LTC 8809 Coax
Ribbon Cables
LAN Switches
LTC 8808 Video Panels
LTC 8809 Coax
Ribbon Cables
LTC 8808 Video Panels
LTC 8809 Coax
Ribbon Cables
LAN Data Lines to All Bays
LTC 8903
LTC 8902
LTC 8808
LTC 8903
LTC 8903
LTC 8903
LTC 8903
LTC 8903
LTC 8903
LTC 8903
LTC 8903
LTC 8903
LTC 8903
LTC 8903
LTC 8903
LTC 8903
LTC 8903
LTC 8903
LTC 8903
LTC 8809 Coax
Ribbon Cables
LTC 8903
LTC 8903
To Monitors 1–64
LTC 8903
LTC 8902
LTC 8808
LTC 8903
LTC 8903
LTC 8903
LTC 8903
LTC 8903
LTC 8903
LTC 8903
LTC 8903
LTC 8903
LTC 8903
LTC 8903
LTC 8903
LTC 8903
LTC 8903
LTC 8903
LTC 8903
LTC 8903
LTC 8903
LTC 8903
LTC 8903
LTC 8903
LTC 8903
LTC 8903
LTC 8903
LTC 8903
LTC 8903
LTC 8903
LTC 8903
LTC 8903
LTC 8903
LTC 8903
LTC 8903
LTC 8903
LTC 8903
LTC 8903
LTC 8903
LTC 8903
LTC 8903
LTC 8903
LTC 8903
LTC 8903
LTC 8903
LTC 8903
LTC 8903
LTC 8903
LTC 8903
LTC 8903
LTC 8903
LTC 8903
LTC 8903
LTC 8903
LTC 8903
LTC 8903
LTC 8903
LTC 8903
LTC 8903
LTC 8903
LTC 8903
LTC 8903
LTC 8903
LTC 8903
LTC 8903
LTC 8903
LTC 8903
LTC 8903
LTC 8903
LTC 8903
LTC 8903
LTC 8903
LTC 8903
LTC 8903
LTC 8903
LTC 8903
LTC 8903
LTC 8903
LTC 8903
LTC 8903
LTC 8903
LTC 8903
LTC 8903
LTC 8903
LTC 8903
LTC 8903
LTC 8903
LTC 8903
LTC 8903
LTC 8903
LTC 8903
LTC 8903
LTC 8903
LTC 8903
LTC 8903
LTC 8903
LTC 8903
LTC 8903
LTC 8903
LTC 8903
LTC 8903
LTC 8903
LTC 8903
LTC 8903
LTC 8903
LTC 8903
LTC 8903
LTC 8903
LTC 8903
LTC 8903
LTC 8903
LTC 8903
LTC 8903
LTC 8903
LTC 8903
LTC 8903
LTC 8903
LTC 8903
To Monitors 65–128
LTC 8903
LTC 8902
LTC 8808
LTC 8903
LTC 8903
LTC 8903
To Monitors 129–192
LTC 8903
LTC 8902
LTC 8808
LTC 8903
LTC 8903
LTC 8903
To Monitors 193–256
LTC 8903
LTC 8902
LTC 8808
LTC 8903
LTC 8903
LTC 8903
To Monitors 256–320
LTC 8903
LTC 8902
LTC 8808
LTC 8903
LTC 8903
LTC 8903
To Monitors 321–384
LTC 8903
LTC 8902
LTC 8808
LTC 8903
LTC 8903
LTC 8903
To Monitors 385–448
LTC 8903
LTC 8902
LTC 8808
To Monitors 449–512
LTC 8903
LTC 8903
LTC 8903
LTC 8903
Up to 512 System Monitors
Up to 64 System Keyboards (Using LTC 8714 and LTC 8715 Series Port Expanders)
Figure 8.27: Typical Diagram of Redundant System Configuration for 4096 Cameras by 512 Monitors
Bosch Security Systems, Inc.
Installation Manual
2015.01 | 10.6 |
2015.01 | 10.6 |
Installation Manual
Video
input
Module
Slots
Rear
Panel
Ribbon
Connectors
1-256
1-16
Slot
not
used
17
to
32
1-256
33-48
Slot
not
used
Bus
Lines
33
to
48
1-256
49-64
5
65
to
80
Backplane Bus
4
49
to
64
Slot
not
used
81
to
96
Slot
not
used
97
to
112
9
129
to
144
“Primary” Level
LTC 8903 Bay for
Cameras 513 to 768
Slot
not
used
145
to
160
Slot
not
used
161
to
176
12
177
to
192
513-768 513-768 513-768 513-768
1-16
17-32
33-48
49-64
Backplane Bus
8
113
to
128
257-512 257-512 257-512 257-512
1-16
17-32
33-48
49-64
“Primary” Level
LTC 8903 Bay for
Cameras 257 to 512
13
193
to
208
Slot
not
used
209
to
224
Slot
not
used
225
to
240
16
241
to
256
Camera Range
Monitor Bus
Video Bus to
LTC 8902 Bay
for Monitors 33 to 64
Video Bus to
LTC 8902 Bay
for Monitors 1 to 32
Internal Video Bus
Concept of “Secondary”
Level LTC 8903
or Cameras 1 to 1024
LTC 8809
Ribbon Cables
769-1024 769-1024 769-1024 769-1024 <-1-16
17-32
33-48
49-64
<--
“Primary” Level
LTC 8903 Bay for
Cameras 769 to 1024
Eight LTC 8921 Video Input Modules are required in an LTC 8903 Bay with a 64 Monitor Bus
Four LTC 8921 Video Input Modules (in slot numbers 1, 5, 9, 13) are required in an LTC 8903 Bay with a 32 Monitor Bus
1
1
to
16
1-256
17-32
“Primary” Level
LTC 8903 Bay for
Cameras 1 to 256
82
en | Satellite System Configuration Installations
LTC 8900 Series
Figure 8.28: Video Bus Concept Diagram
Bosch Security Systems, Inc.
Bosch Security Systems, Inc.
LTC 8903
8 LTC 8921 Video Input Modules are
Installed in odd Numbered Slots only
are Required for Camera Inputs 1 to 256
Installation Manual
LTC 8903
16 LTC 8921 Video Input Modules
Required for Camera Inputs 1 to 256
3
2
1
4
3
2
"C "
1
Monitors 33-64
2
1
4
3
2
1
To “B1”
LTC 8903
1
2
"C "
3
1
To
“D1”
4
4
3
2
"B "
1
4
1
To “B1”
To“C1”
2
"A "
3
To Video
in “B”
Lower LTC 8809
Ribbon Cable
LTC 8903
4 LTC 8809 Cables
Required for 64-Channel
Video Bus to the LTC 8902
To
“A1”
To video in “A”
Upper LTC 8809
Ribbon Cable
To Video in “A”
Upper LTC 8809
Ribbon Cable
8 LTC 8808 Panels are Required
for Camera Inputs 1 to 256
To Video
in “B”
Lower LTC 8809
Ribbon Cable
Rear view – LTC 8809 Interconnect Cable Routing
2
"D "
3
LTC 8902
4
3
"A "
Upper LTC 8809
Ribbon Cable
Monitors 1-32
Lower
LTC 8809
Ribbon Cable
4
"B "
To
“A1”
2 LTC 8809 Cables
Required for 32-Channel
Video Bus to the LTC 8902
Rear view – LTC 8809 Interconnect Cable Routing
LTC 8902
4
"D "
Upper LTC 8809
Ribbon Cable
8 LTC 8808 Panels are Required
for Camera Inputs 1 to 256
Satellite System Configuration Installations | en
Module, Termination, and Interconnect Cabling for 256 Camera by 64 Monitor System
Front view – Module Placement and Termination Settings
Set LTC 8921 Module Termination
Switches in EVEN Numbered Slots to ON
Set LTC 8921 Module Termination
switches in ODD Numbered Slots to OFF
8 LTC 8934 Video Output Modules are
Required for Monitors 1 to 64.
Set all Termination Switches to ON
Position on all Modules.
LTC 8902
Lower
LTC 8809
Ribbon Cable
Monitors 1-32
Module, Termination, and Interconnect Cabling for 256 Camera by 32 Monitor System
Front view – Module Placement and Termination Settings
All Termination Switches are set to ON
Position on all LTC 8921 Video Input Modules
4 LTC 8934 Video Output Modules
Installed in the first 4 Slots are Required for
Monitors 1 to 32. Set all Termination
Switches to ON Position on all Modules.
LTC 8902
LTC 8900 Series
83
Figure 8.29: Module, Termination, and Interconnect Cabling for 256 Cameras by 32 or 64 Monitor Systems
2015.01 | 10.6 |
2015.01 | 10.6 |
Installation Manual
LTC 8903–
Cameras 257–512
2
"D "
3
1
4
2
"C "
3
1
4
2
"B "
1
4
To
“B2”
3
2
"A "
3
1
LTC 8903–
Cameras 257–512
16 LTC 8921 Video
Input Modules are Required
for Camera Inputs 257 to 512
2
"D "
3
1
2
"C "
3
4
3
2
"B "
1
“D2”
1
4
1
“C2”
2
"A "
3
“B2”
“A2”
“C1”
To “D1”
LTC 8903
To Video In “A”
Upper
LTC 8809
Ribbon
Cable
To Video
In “B”
Lower
LTC 8809
Ribbon
Cable
LT C8903
8 903
LTC
To Video
In “A”
09
To Video
In “A”
Upper
LTC 8809
Ribbon
Cable
8 LTC 8808 Panels are Required
for Camera Inputs 257 to 512
8 LTC 8808
Panels are Required
for Camera Inputs
1 to 256
To Video
In “B”
To Video
In “B”
Lower
LTC 8809
Ribbon
Cable
8 LTC 8808 Panels
are Required for Camera
Inputs 257 to 512
LTC 8903
To Video
In “A”
Rear View – LTC 8809 Interconnect Cable Routing
4 LTC 8809 Cables
are Required for 64-channel
Video Bus to the LTC 8902
4
To
“A1”
“B1”
4 LTC 8809
Cables are Required
for 64-channel
Video Bus to
LTC 8902
Module, Termination, and Interconnect Cabling for 512 Camera by 64 Monitor System
Front View – Module Placement and Termination Settings
4
Upper
LTC 8809
Ribbon
Cable
Monitors 1–32
LTC 8902
Lower
LTC 8809
Ribbon
Cable
Monitors 33–64
LTC 8903
To Video
In “B”
2 LTC 8809 Cables are Required for
32-channel Video Bus to LTC 8902
To
“A2”
To
“B1”
To
“A1”
2 LTC 8809 Cables
are Required for 32-channel
Video Bus to LTC 8902
Rear View – LTC 8809 Interconnect Cable Routing
LTC 8902
4
Upper
LTC 8809
Ribbon
Cable
8 LTC 8808
Panels are Required
for Camera Inputs
1 to 256
en | Satellite System Configuration Installations
Set the LTC 8921 Module Termination Switches
in EVEN Numbered Slots to ON (both LTC 8903 Bays)
Set LTC 8921 Module
Termination Switches
in ODD Numbered Slots
to OFF (both LTC 8903 Bays)
Lower
LTC 8809
Ribbon
Cable
Module, Termination, and Interconnect Cabling for 512 Camera by 32 Monitor System
LTC 8903–
Cameras 1–256
16 LTC 8921 Video
Input Modules are Required
for camera inputs 1 to 256
8 LTC 8934 Video Output Modules
are Required for Monitors 1 to 64.
Set all Termination Switches to ON
Position on all Modules.
LTC 8902
LTC 8903–
Cameras 1–256
8 LTC 8921 Video Input
Modules Installed in
Odd Numbered Slots only
are Required for Camera
Inputs 257 to 512
Front View -- Module Placement and Termination Settings
4 LTC 8934 Video Output
Modules installed in First
4 Slots are Required for
Monitors 1 to 32. Set all
Termination Switches to ON
Position on all Modules
All Termination Switches
are Set to ON Position on all
LTC 8921 Video Input Modules
LTC 8902
8 LTC 8921 Video Input
Modules Installed in Odd
Numbered Slots only are
Required for Camera Inputs
1 to 256
84
LTC 8900 Series
Figure 8.30: Module, Termination, and Interconnect Cabling for 512 Camera by 32 or 64 Monitor System
Bosch Security Systems, Inc.
LTC 8900 Series
Satellite System Configuration Installations | en
85
LTC 8902
16 LTC 8921 Video Input
Modules are Required for
Camera Inputs 1 to 256
16 LTC 8921 Video Input
Modules are Required for
Camera Inputs 257 to 512
16 LTC 8921 Video Input
Modules are Required for
Camera Inputs 513 to 768
8 LTC 8934 Video Onput Modules are
Required for Monitors 1 to 64.
Set all Termination Switches to
ON for all Modules.
Set LTC 8921 Module Termination
Switches in ODD Numbered Slots
to OFF (all LTC 8902 Bays)
Set LTC 8921 Module Termination
Switches in EVEN Numbered Slots to
ON (all LTC 8903 Bays)
LTC 8903–
Cameras 1–256
LTC 8903–
Cameras 257–512
LTC 8903–
Cameras 513–768
Front View – Module Placement and Termination Settings
Monitors 1–32
Monitors 33–64
Upper
LTC 8809
Ribbon
Cable
Lower
LTC 8809
Ribbon
Cable
To
“A1”
“B1”
"D "
4
3
"C "
2
1
4
3
"B "
2
1
4
3
4 LTC 8809
Cables are Required
for 64-channel
Video Bus to
LTC 8902
1
4
3
2
8 LTC 8808 Panels are Required
for Camera Inputs 257 to 512
To Video
In “B”
"A "
2
8 LTC 8808
Panels are Required
for Camera Inputs
1 to 256
1
“C1”
To Video
In “A”
To “D1”
Lower
LTC 8809
Ribbon
Cable
LTC 8902
“B2” “A2”
“D3”
“C3”
“B3”
“D2” “C2”
“A3”
To Video
In “B”
LTC 8903
4 LTC 8809 Cables
are Required for 64-channel
Video Bus to LTC 8902
Upper
LTC 8809
Ribbon
Cable
To Video
In “A”
8 LTC 8808 Panels are Required
for Camera Inputs 513 to 768
Lower
LTC 8809
Ribbon
Cable
To Video o
In “B”
LTC 8903
Upper
LTC 8809
Ribbon
Cable
To Video
In “A”
LTC 8903
Rear View – LTC 8809 Interconnect Cable Routing
Figure 8.31: Module, Termination, and Interconnect Cabling for 768 Cameras by 64 Monitors
Bosch Security Systems, Inc.
Installation Manual
2015.01 | 10.6 |
86
en | Satellite System Configuration Installations
LTC 8900 Series
LTC 8902
16 LTC 8921 Video Input
Modules are Required for
Camera Inputs 1 to 256
16 LTC 8921 Video Input
Modules are Required for
Camera Inputs 257 to 512
16 LTC 8921 Video Input
Modules are Required for
Camera Inputs 513 to 768
16 LTC 8921 Video Input
Modules are Required for
Camera Inputs 769 to 1024
8 LTC 8934 Video Onput Modules
are Required for monitors 1 to 64.
Set all Termination Switches to
ON for all Modules.
Set LTC 8921 Module Termination
Switches in ODD Numbered Slots
to OFF (all LTC 8902 Bays)
LTC 8903–
Cameras 1–256
LTC 8903–
Cameras 257–512
LTC 8903–
Cameras 513–768
LTC 8903–
Cameras 769–1024
Set LTC 8921 Module Termination
Switches in EVEN Numbered Slots to
ON (all LTC 8903 Bays)
Front View – Module Placement and Termination Settings
8 LTC 8808
Panels are Required
for Camera Inputs
1 to 256
Monitors 1–32
Monitors 33–64
Upper
LTC 8809
Ribbon
Cable
Lower
LTC 8809
Ribbon
Cable
To
“A1”
"D "
4
3
"C "
2
1
4
3
"B "
2
1
4
3
“B1”
“C1”
"A "
2
1
4
3
2
1
To Video
In “B”
To “D1”
LTC 8902
“D4”
“A2”
To Video
In “A”
8 LTC 8808 Panels are Required
for Camera Inputs 257 to 512
“C2” “B2”
“C4”
“B4” “A4”
“D2”
“D3”
“C3”
“B3”
LTC 8903
“A3”
Lower
LTC 8809
Ribbon
Cable
To Video
In “B”
Upper
LTC 8809
Ribbon
Cable
To Video
In “A”
Each Line Represents an
LTC 8809 Ribbon Cable
8 LTC 8808 Panels are Required
for Camera Inputs 513 to 768
Lower
LTC 8809
Ribbon
Cable
To Video
In “B”
LTC 8903
Upper
LTC 8809
Ribbon
Cable
To Video
In “A”
8 LTC 8808 Panels are Required
for Camera Inputs 769 to 1024
Lower
LTC 8809
Ribbon
Cable
To Video
In “B”
LTC 8903
Upper
LTC 8809
Ribbon
Cable
To Video
In “A”
LTC 8903
Rear View – LTC 8809 Interconnect Cable Routing
Figure 8.32: Module, Termination, and Interconnect Cabling for 1024 Camera by 64 Monitor System
2015.01 | 10.6 |
Installation Manual
Bosch Security Systems, Inc.
LTC 8900 Series
Satellite System Configuration Installations | en
16 LTC 8921 Video Input
Modules are Required for
Camera Inputs 1 to 256
16 LTC 8921 Video Input
Modules are Required for
Camera Inputs 257 to 512
“Primary” LTC 8903–
Cameras 257–512
“Primary” LTC 8903–
Cameras 1–256
16 LTC 8921 Video Input
Modules are Required for
Camera Inputs 513 to 768
“Primary” LTC 8903–
Cameras 513–768
Set LTC 8921 Module Termination
Switches in EVEN Numbered Slots to
ON (all “Primary” LTC 8903 Bays)
16 LTC 8921 Video Input
Modules are Required for
Camera Inputs 769 to 1024
“Primary” LTC 8903–
Cameras 769–1024
87
16 LTC 8921 Video Input
Modules are Required for
Camera Inputs 1025 to 1280
“Primary” LTC 8903–
Cameras 1025–1280
8 LTC 8921 Video Input Modules
(in slots 1, 4, 5, 8, 9, 12, 13, and 16)
are Required for 64 Monitor Systems
Set LTC 8921 Module Termination
Switches in ODD Numbered Slots
to OFF (all “Primary” LTC 8902 Bays)
LTC 8902
Set all Termination Switches on the
LTC 8921 Modules in the Secondary
LTC 8921 Bay to ON
“Secondary” Level LTC 8903 Bay
(for Camera Range 1 to 1024)
8 LTC 8934 Video Output Modules
are Required for Monitors 1 to 64.
Set all Termination Switches to
ON for all Modules.
Front View – Module Placement and Termination Settings
Monitors 33–64
Monitors 1–32
Upper
LTC 8809
Ribbon
Cable
Lower
LTC 8809
Ribbon
Cable
Group Inputs 3 and 4 are used for additional
LTC 8903 Camera Bay Connections
LTC 8902
Monitor Bay
Containing
Modules for
64 Monitor
Outputs
"D "
4
3
"C "
2
1
4
3
2
"B "
1
4
3
Each Line
Represents an
LTC 8809
Ribbon Cable
"A "
2
1
4
“D2” “C2” “B2” “A2”
3
2
1
“D1”
“C1”
“B1”
“A1”
8 LTC 8808 Panels are Required
for Camera Inputs 1 to 256
“Secondary” LTC 8903
Camera Bay Containing
8 LTC 8921 Video
Input Modules
Each line
Represents an
LTC 8809
Ribbon
Cable
“D” “C” “B” “A”
“D” “C” “B” “A”
LTC 8903 Bay
“Primary” LTC 8903 Bay
Cameras 1025–1280
Cameras 769–1024
“D” “C”
Lower
LTC 8809
Ribbon
Cable
Upper
LTC 8809
Ribbon
Cable
To Video
In “B”
“D” “C” “B” “A”
“Primary” LTC 8903 Bay
Cameras 513–768
“B” “A”
“D” “C” “B” “A”
“Primary” LTC 8903 Bay
Cameras 257–512
“D” “C” “B”
To Video
In “A”
“A”
“Primary” LTC 8903 Bay
Cameras 1–256
Rear View – LTC 8809 Interconnect Cable Routing
Figure 8.33: Module, Termination, and Interconnect Cabling for 1280 by 64 Monitor System
Bosch Security Systems, Inc.
Installation Manual
2015.01 | 10.6 |
88
en | Satellite System Configuration Installations
16 LTC 8921
Video Input
Modules
are Required
for Camera
Inputs
257 to 512
16 LTC 8921
Video Input
Modules
are Required
for Camera
Inputs
1 to 256
“Primary” LTC 8903 Bay
Cameras 1–256
LTC 8900 Series
“Primary” LTC 8903 Bay
Cameras 257–512
16 LTC 8921
Video Input
Modules
are Required
for Camera
Inputs
769 to 1024
16 LTC 8921
Video Input
Modules
are Required
for Camera
Inputs513 to 768
LTC 8903 Bay
“Primary” LTC 8903 Bay
Cameras 769–1024 Cameras 1025–1280
“Primary” LTC 8903 Bay
Cameras 513–768
Set LTC 8921 Module
Termination Switches in
EVEN Numbered Slots to
ON (all Primary LTC 8903 Bays)
16 LTC 8921
Video Input
Modules
are Required
for Camera
Inputs
1537 to 1792
16 LTC 8921
Video Input
Modules
are Required
for Camera
Inputs
1281 to 1536
16 LTC 8921
Video Input
Modules
are Required
for Camera
Inputs
1025 to 1280
LTC 8903 Bay
Cameras 1281–1536
LTC 8903 Bay
Cameras 1537–1792
8 LTC 8921 Video Input
Modules (in Slots 1, 4, 5,
8, 9, 12, 13, and 16)
are Required for 64
Monitor Systems
Set all Termination
Switches on the LTC 8921
Modules in “Secondary”
LTC 8921 Bay to ON
Set LTC 8921 Module Termination
Switches in ODD Numbered Slots
to OFF (all Primary LTC 8902 Bays)
LTC 8902
“Secondary” Level LTC 8903 Bay
(for Camera Range 1 to 1024)
8 LTC 8934 Video Output Modules
are Required for Monitors 1 to 64.
Set all Termination Switches to
ON for all Modules.
Front View – Module Placement and Termination Settings
Monitors
1–32
Monitors
33– 64
Upper
LTC 8809
Ribbon
Cable
Lower
LTC 8809
Ribbon
Cable
LTC 8902
Monitor Bay
Containing
Modules for
64 Monitor
Outputs
“Secondary” LTC 8903 Camera Bay
Containing 8 LTC 8921 Video
Input Modules
All Group Inputs
are used up
"D "
4
3
"C "
2
1
4
3
2
"B "
1
4
3
Each Line
Represents an
LTC 8809
Ribbon Cable
"A "
2
1
4
3
2
1
“C1”
“C2”
“B2”
“D4” “C4” “B4” “A4” “D3”“C3” “B3” “A3” “D2”
“A2”
“B1” “A1”
“D1”
8 LTC 8808 Panels are Required
for Camera Inputs 1 to 256
“D” “C” “B” “A”
Lower
LTC 8809
Ribbon
Cable
Each Line
Represents an
LTC 8809
Ribbon
Cable
“D” “C” “B”
“A”
LTC 8903 Bay
Cameras 1537–1792
“D” “C” “B”
“A”
LTC 8903 Bay
Cameras 1281–1536
“D” “C” “B” “A”
“D” “C” “B”“A”
LTC 8903 Bay
“Primary” LTC 8903 Bay
Cameras 1025–1280
Cameras 769–1024
Upper
LTC 8809
Ribbon
Cable
To
Video
In “B”
“D” “C” “B”“A”
“Primary” LTC 8903 Bay
Cameras 513–768
“D” “C” “B” “A”
“Primary” LTC 8903 Bay
Cameras 257–512
To Video
In “A”
“D” “C” “B” “A”
“Primary” LTC 8903 Bay
Cameras 1–256
Rear View – LTC 8809 Interconnect Cable Routing
Figure 8.34: Module, Termination, and Interconnect Cabling for 1792 Camera by 64 Monitor System
2015.01 | 10.6 |
Installation Manual
Bosch Security Systems, Inc.
LTC 8900 Series
Satellite System Configuration Installations | en
16 LTC 8921 Video Input
Modules are Required for
Camera Inputs 1 to 256
“Primary” LTC 8903 Bay
Cameras 1–256
16 LTC 8921 Video Input
Modules are Required for
Camera Inputs 257 to 512
“Primary” LTC 8903 Bay
Cameras 257–512
16 LTC 8921 Video Input
Modules are Required for
Camera Inputs 513 to 768
“Primary” LTC 8903 Bay
Cameras 513–768
Set the LTC 8921 Module Termination
Switches in EVEN Numbered Slots to
ON (all Primary LTC 8903 Bays)
8 LTC 8934 Video Output Modules
are Required for Monitors 1 to 64.
Set all Termination Switches to
ON for all Modules.
16 LTC 8921 Video Input
Modules are Required for
Camera Inputs 769 to 1024
“Primary” LTC 8903 Bay
Cameras 769–1024
8 LTC 8921 Video Input Modules
(in Slots 1, 4, 5, 8, 9, 12, 13, and 16)
are Required for 64 Monitor Systems
Set the LTC 8921 Module Termination
Switches in ODD Numbered Slots
to OFF (all Primary LTC 8902 Bays)
LTC 8902
89
Set all Termination Switches on
LTC 8921 Modules in the “Secondary”
LTC 8921 Bay to ON
“Secondary” Level LTC 8903 Bay
(for Camera Range 1 to 1024)
“Secondary” Level LTC 8903 Bay
(for Camera Range 1025 to 2048)
8 LTC 8921 Video Input Modules
(in Slots 1, 4, 5, 8, 9, 12, 13, and 16)
are Required for 64 Monitor Systems
Set all Termination Switches on
LTC 8921 Modules in the “Secondary”
LTC 8921 Bay to ON
“Primary” LTC 8903 Bay
Cameras 1025–1280
“Primary” LTC 8903 Bay
Cameras 1281–1536
“Primary” LTC 8903 Bay
Cameras 1537–1792
“Primary” LTC 8903 Bay
Cameras 1793–2048
16 LTC 8921 Video Input
Modules are Required for
Camera Inputs 1025 to 1280
16 LTC 8921 Video Input
Modules are Required for
Camera Inputs 1281 to 1536
16 LTC 8921 Video Input
Modules are Required for
Camera Inputs 1537 to 1792
16 LTC 8921 Video Input
Modules are Required for
Camera Inputs 1793 to 2048
Front View – Module Placement and Termination Settings
Figure 8.35: Module, Replacement, and Termination Configuration for 2048 Camera by 64 Monitor System
Bosch Security Systems, Inc.
Installation Manual
2015.01 | 10.6 |
90
en | Satellite System Configuration Installations
LTC 8900 Series
Monitors 1–32
Monitors 33–64
Upper
LTC 8809
Ribbon
Cable
Lower
LTC 8809
Ribbon
Cable
LTC 8902
Monitor Bay
Containing
Modules for
64 Monitor
Outputs
"D "
4
3
"C "
2
1
4
3
2
"B "
1
4
3
2
Group Inputs 3 and 4 are
used for additional LTC 8903
Camera Bay Connections
"A "
1
4
3
2
Each Line
Represents an
LTC 8809
Ribbon
Cable
"A 1"
1
"B 1"
"C 1"
8 LTC 8808 Panels are Required
for Camera Inputs 1 to 256
"D 1"
“D2” “C2” “B2” “A2”
D
A"
B
C
Lower
LTC 8809
Ribbon
Cable
“Secondary” LTC 8903
Camera Bay Containing
8 LTC 8921 Video
Input Modules
Upper
LTC 8809
Ribbon
Cable
To Video
In “A”
To Video
In “B”
“D” “C” “B” “A”
“D” “C” “B” “A”
“Primary” LTC 8903 Bay
Cameras 769–1024
“D” “C” “B” “A”
“Primary” LTC 8903 Bay
Cameras 513–768
“Secondary” LTC 8903
Camera Bay Containing
8 LTC 8921 Video
Input Modules
“C” “B” “A”
“Primary” LTC 8903 Bay
Cameras 1793–2048
“D” “C” “B” “A”
“Primary” LTC 8903 Bay
Cameras 1537–1792
“C”
“B”
“A”
“Primary” LTC 8903 Bay
Cameras 1–256
Each Line
Represents an
LTC 8809
Ribbon
Cable
“D” “C” “B” “A”
“D”
“Primary” LTC 8903 Bay
Cameras 257–512
“D”
“D” “C” “B” “A”
“Primary” LTC 8903 Bay
Cameras 1281–1536
“D”
“C” “B”
“A”
“Primary” LTC 8903 Bay
Cameras 1025–1280
Rear View – LTC 8809 Interconnect Cable Routing
Figure 8.36: Interconnect Cabling for 2048 Camera by 64 Monitor System
2015.01 | 10.6 |
Installation Manual
Bosch Security Systems, Inc.
LTC 8900 Series
Satellite System Configuration Installations | en
91
System Cameras Connect to the First
Level LTC 8903 Video Input Bay
16 LTC 8921 Video Input Modules
are Required for Cameras 1 to 256
LTC 8902 for Monitors 1 to 64
Set all LTC 8921 Module
Termination Switches Inside
First Level LTC 8903 Bays to OFF
Video Interconnect LTC 8809 Cables
First Level LTC 8903
Cameras 1 - 256
8 LTC 8934 Video Output Modules
are Required for Monitors 1 to 64. Set all Termination
Switches to ON for all Modules.
LTC 8809
Video
Looping
Connections
LTC 8902 for Monitors 65 to 96
Only 8 LTC 8921 Video Input Modules
are Required in this Level for 256
Cameras because the LTC 8902 Output
Bay Supports only 32 Monitors
Video Interconnect LTC 8809 Cables
Second Level LTC 8903
Cameras 1 - 256
4 LTC 8934 Video Output Modules
are Required for Monitors 65 to 96. Set all Termination
Switches to ON for all Modules.
Install LTC 8921 Modules in ODD Numbered
Slots only. Set all Termination Switches to ON.
Front View – Module Placement and Termination Settings
Monitors 1–32
Monitors 33–64
Upper
LTC 8809
Ribbon
Cable
Lower
LTC 8809
Ribbon
Cable
Each Line Represents an
LTC 8809 Ribbon Cable
8 LTC 8808 Panels are Required
for Camera Inputs 1 to 256
To “A1”
"D "
4
3
"C "
2
1
4
3
2
"B "
1
4
3
"A "
2
1
4
3
2
1
“B1”
“C1”
To Video
In “B”
To Video
In “A”
To “D1”
First Level LTC 8902
Monitors 1 to 64
Monitors 65–96
LTC 8903
Upper
LTC 8809
Ribbon
Cable
Lower
LTC 8809
Ribbon
Cable
For 256 cameras,
16 LTC 8809 Ribbon
Cables are Required to Jump
from First Level “Loop”
Outputs to Second Level
“Video In” Inputs
Up to 16 LTC 8809
Ribbon Cables
To “A1”
LTC 8809 Cable for
Cameras 241 to 256
“B1”
"D "
4
3
"C "
2
1
4
3
2
"B "
1
4
3
"A "
2
1
4
3
2
1
Second Level LTC 8902
Monitors 65 to 96
LTC 8809 Cable for
Cameras 1 to 16
Each Line Represents an
LTC 8809 Ribbon Cable
LTC 8903
Rear View – LTC 8809 Interconnect Cable Routing
Figure 8.37: Module, Termination, and Interconnect Cabling for 256 Camera by 96 Monitor System
Bosch Security Systems, Inc.
Installation Manual
2015.01 | 10.6 |
92
en | Satellite System Configuration Installations
LTC 8900 Series
System Cameras Connect to First
Level LTC 8903 Video Input Bay
16 LTC 8921 Video Input Modules
are Required for Cameras 1 to 256
LTC 8902 for Monitors 1 to 64
Set all LTC 8921 Module
Termination Switches Inside
First Level LTC 8903 Bays to OFF
Video Interconnect LTC 8809 Cables
8 LTC 8934 Video Output Modules
are Required for Monitors 1 to 64. Set all
Termination Switches to ON for all Modules.
First Level LTC 8903
Cameras 1–256
LTC 8809
Video
Looping
Connections
LTC 8902 for Monitors 65 to 96
16 LTC 8921 Video Input Modules
are Required for Camera Inputs 1 to 256
Video Interconnect LTC 8809 Cables
Second Level LTC 8903
Cameras 1-256
Set the LTC 8921 Module Termination Switches
in EVEN Numbered Slots to ON
Set the LTC 8921 Module Termination Switches
in ODD Numbered Slots to OFF
4 LTC 8934 Video Output Modules
are Required for Monitors 65 to 96. Set all
Termination Switches to ON for all Modules.
Front View – Module Placement and Termination Settings
Monitors 1–32
Monitors 33–64
Upper
LTC 8809
Ribbon
Cable
Lower
LTC 8809
Ribbon
Cable
Each Line Represents an
LTC 8809 Ribbon Cable
8 LTC 8808 Panels are Required
for Camera Inputs 1 to 256
To “A1”
"D "
4
3
"C "
2
1
4
3
"B "
2
1
4
3
"A "
2
1
4
3
2
1
“B1”
“C1”
To Video
In “B”
To “D1”
Monitors 65–96
Monitors 97–128
LTC 8903
Upper
LTC 8809
Ribbon
Cable
Lower
LTC 8809
Ribbon
Cable
To “A1”
"D "
4
3
"C "
2
1
4
3
"B "
2
1
4
3
"A "
2
1
4
To Video
In “A”
For 256 Cameras,
16 LTC 8809 Ribbon
Cables are Required to Jump
from Frst Level “Loop”
Outputs to Second Level
“Video In” Inputs
First Level LTC 8902
Monitors 1 to 64
3
2
1
“B1”
“C1”
Up to 16 LTC 8809
Ribbon Cables
LTC 8809 Cable for
Cameras 241 to 256
To “D1”
Second Level LTC 8902
Monitors 65 to 128
Each Line Represents an
LTC 8809 Ribbon Cable
LTC 8809 Cable for
Cameras 1 to 16
LTC 8903
Rear View – LTC 8809 Interconnect Cable Routing
Figure 8.38: Module, Termination, and Interconnect Cabling for 256 Camera by 128 Monitor System
2015.01 | 10.6 |
Installation Manual
Bosch Security Systems, Inc.
Satellite System Configuration Installations | en
LTC 8900 Series
93
System Cameras Connect
to the First Level LTC 8903
Video Input Bay
16 LTC 8921 Video Input
Modules are Required for
Cameras 257 to 512
System Cameras Connect
to the First Level LTC 8903
Video Input Bay
16 LTC 8921 Video Input
Modules are Required for
Cameras 1 to 256
LTC 8902 for Monitors 1 to 64
Set all LTC 8921 Module
Termination Switches Inside the
First Level LTC 8903 Bays to OFF
Video Interconnect LTC 8809 Cables
LTC 8902 for
Monitors 65 to 96
First Level LTC 8903
Cameras 257–512
First Level LTC 8903
Cameras 1–256
8 LTC 8934 Video Output Modules
are Required for Monitors 1 to 64. Set all Termination
Switches to ON for all Modules.
Video Looping
Connections
16 LTC 8921 Video Input
Modules are Required for
Camera Inputs 1 to 256
Video
Looping
Connections
16 LTC 8921 Video Input
Modules are Required for
Camera Inputs 1 to 256
Video Interconnect LTC 8809 Cables
Second Level LTC 8903
Second Level LTC 8903
Cameras 1–256
Cameras 257–512
Set the LTC 8921 Module Termination Switches
in the EVEN Numbered Slots to ON (in both Second Level LTC 8903 Bays).
8 LTC 8934 Video Output Modules
are Required for Monitors 65 to 128.
Set all Termination Switches to ON
for all Modules.
Set the LTC 8921 Module Termination Switches
in the ODD Numbered Slots to OFF (in both Second Level LTC 8902 Bays).
Front View – Module Placement and Termination Settings
Monitors 33–64
Monitors 1–32
8 LTC 8808 Panels are Required
for Camera Inputs 1 to 256
Upper
LTC 8809
Ribbon
Cable
Lower
LTC 8809
Ribbon
Cable
To “A1”
"D "
4
3
"C "
2
1
4
3
2
"B "
1
4
3
“B1”
"A "
2
1
4
3
2
To Video
In “B”
1
“C1”
To “D1”
First Level LTC 8902
Monitors 1 to 64
To Video
In “A”
“A2”
8 LTC 8808 Panels are Required
for Camera Inputs 257 to 512
“C2”“B2”
“D2”
Each Line Represents an
LTC 8809 Ribbon Cable
LTC 8903
Lower
LTC 8809
Ribbon
Cable
Upper
LTC 8809
Ribbon
Cable
To Video
In “B”
Monitors
97–128
Monitors
65–96
Upper
LTC 8809
Ribbon
Cable
Lower
LTC 8809
Ribbon
Cable
For 256 Cameras,
16 LTC 8809
Ribbon Cables
are Required to Jump
from First Level
“Loop” Outputs to
Second Level
“Video In” Inputs
To Video
In “A”
LTC 8903
For 256 cameras,
16 LTC 8809 Ribbon
Cables are Required to Jump
from First Level “Loop”
Outputs to Second Level
“Video In” inputs
To “A1”
"D "
4
3
"C "
2
1
4
3
2
"B "
1
4
3
"A "
2
1
4
3
2
1
“B1”
“C1”
To “D1”
Second Level LTC 8902
Monitors 65 to 128
“A2”
“B2”
“C2”
“D2”
LTC 8809
Ribbon Cables
LTC 8903
LTC 8809 Cable for
Cameras 241 to 256
LTC 8809 Cable for
Cameras 1 to 16
Each Line Represents an
LTC 8809 Ribbon Cable
LTC 8903
Rear View – LTC 8809 Interconnect Cable Routing
Figure 8.39: Module, Termination, and Interconnect Cabling for 512 Camera by 128 Monitor System
Bosch Security Systems, Inc.
Installation Manual
2015.01 | 10.6 |
2015.01 | 10.6 |
Installation Manual
Second Level LTC 8903
Cameras 1–256
First Level LTC 8903
Cameras 1–256
Only 8 LTC 8921 Video
Input Modules are Required
in this Level for 256 Cameras
because the LTC 8902 Output
Bay Supports only 32 Monitors.
Second Level LTC 8903
Cameras 513–768
Video Looping Connections
Video Looping Connections
Second Level LTC 8903
Cameras 257–512
First Level LTC 8903
Cameras 513–768
16 LTC 8921 Video Input
Modules are Required for
Cameras 513 to 768
System Cameras Connect
to First Level LTC 8903
Video Input Bay
First Level LTC 8903
Cameras 257–512
16 LTC 8921 Video Input
Modules are Required for
Cameras 257 to 512
16 LTC 8921 Video Input
Modules are Required for
Cameras 1 to 256
Install LTC 8921 Modules in ODD Numbered
Slots only. Set all Termination Switches to ON.
Video Interconnect
LTC 8809 Cables
4 LTC 8934 Video Output Modules
are Required for Monitors 65 to 128.
Set all Termination Switches to ON
on all Modules.
LTC 8902 for Monitors
65 to 96
8 LTC 8934 Video Output Modules
are Required for Monitors 1 to 64.
Set all Termination Switches to ON
on all Modules.
Video Interconnect
LTC 8809 Cables
LTC 8902 for Monitors 1 to 64
System Cameras Connect
to First Level LTC 8903
Video Input Bay
System Cameras Connect
to First Level LTC 8903
Video Input Bay
Second Level LTC 8903
Cameras 769–1024
Video Looping Connections
First Level LTC 8903
Cameras 769–1024
Set all LTC 8921 Module
Termination Switches
Inside First Level LTC 8903
Bays to OFF.
16 LTC 8921 Video Input
Modules are Required for
Cameras 769 to 1024
System Cameras Connect
to First Level LTC 8903
Video Input Bay
Video Looping
Connections
94
en | Satellite System Configuration Installations
LTC 8900 Series
Figure 8.40: Front View, Module Placement and Termination Settings, 1024 Camera by 96 Monitor System
Bosch Security Systems, Inc.
Bosch Security Systems, Inc.
Installation Manual
16 LTC 8921 Video Input
Modules are Required for
256 Camera Inputs.
8 LTC 8934 Video Output Modules are
Required for Monitors 65 to 128.
Set all Termination Switches to ON
on all Modules.
Second Level LTC 8903
Cameras 1–256
First Level LTC 8903
Cameras 1–256
Second Level LTC 8903
Cameras 513–768
Video Looping Connections
Video Looping Connections
Second Level LTC 8903
Cameras 257–512
First Level LTC 8903
Cameras 513–768
16 LTC 8921 Video Input
Modules are Required for
Cameras 513 to 768
First Level LTC 8903
Cameras 257–512
16 LTC 8921 Video Input
Modules are Required for
Cameras 257 to 512
16 LTC 8921 Video Input
Modules are Required for
Cameras 1 to 256
System Cameras Connect
to First Level LTC 8903
Video Input Bay
Set LTC 8921 Module Termination Switches
in ODD Numbered Slots to OFF (in all Second Level LTC 8902 Bays)
Set LTC 8921 Module Termination Switches
in EVEN Numbered Slots to ON (in all Second Level LTC 8903 Bays)
Video Interconnect
LTC 8809 Cables
LTC 8902 for Monitors 65 to 128
8 LTC 8934 Video Output Modules are
Required for Monitors 1 to 64.
Set all Termination Switches to ON
on all Modules.
Video Interconnect
LTC 8809 Cables
LTC 8902 for Monitors 1 to 64
System Cameras Connect
to First Level LTC 8903
Video Input Bay
Second Level LTC 8903
Cameras 769–1024
Video Looping Connections
First Level LTC 8903
Cameras 769–1024
Set all LTC 8921 Module
Termination Switches inside
First Level LTC 8903 Bays to OFF.
16 LTC 8921 Video Input
Modules are Required for
Cameras 769 to 1024
System Cameras Connect
to First Level LTC 8903
Video Input Bay
Video Looping
Connections
System Cameras Connect
to First Level LTC 8903
Video Input Bay
LTC 8900 Series
Satellite System Configuration Installations | en
95
Figure 8.41: Front View, Module Placement and Termination Settings, 1024 Camera by 128 Monitor System
2015.01 | 10.6 |
2015.01 | 10.6 |
Installation Manual
“Secondary” Level LTC 8903 Bay
(for Camera Range 1025 to 2048)
Video Interconnect
LTC 8809 Cables
“Secondary” Level LTC 8903 Bay
(for Camera Range 1 to 1024)
Set all Termination
Switches on the LTC 8921
in “Secondary” LTC 8921
Bays to ON
4 LTC 8921 Video
Input Modules
(in slots 1, 5, 9,
and 13) are Required
Video Interconnect
LTC 8809 Cables
“Secondary” Level LTC 8903 Bay
(for Camera Range 1025 to 2048)
8 LTC 8921 Video
Input Modules
(in Slots 1, 4, 5, 8, 9,
12, 13, and 16) are Required
Video Interconnect
LTC 8809 Cables
4 LTC 8934 Video
Output Modules
are Required for
Monitors 65 to 96.
Set all Termination
Switches to ON
for all Modules.
Cameras
1–256
“Secondary” Level LTC 8903 Bay
(for Camera Range 1 to 1024)
Set all Termination
Switches on the LTC 8921
Modules in Secondary
LTC 8921 Bays to ON
Video Interconnect
LTC 8809 Cables
LTC 8902 for
Monitors 65 to 96
8 LTC 8934 Video
Output Modules
are Required for
Monitors 1 to 64.
Set all Termination
Switches to ON
for all Modules.
LTC 8902 for
Monitors 1 to 64
Set all LTC 8921 Module
Termination Switches Inside
“Primary” First Level
LTC 8903 Bays to OFF
Cameras
257–512
Cameras
513–768
Cameras
1025–1280
Install the LTC 8921 Modules
in ODD Numbered Slots
only in Second Level “Primary”
Bays. Set all Termination
Switches to ON.
Cameras
769–1024
System Cameras Connect to “Primary” First Level LTC 8903 Bays
Cameras
1281–1536
LTC 8809 Cables
Loop Video to
Second Level
Primary Bays
Cameras
1793–2048
Only 8 LTC 8921
Video Input Modules
are Required in the
Second Level Bays
because the Second
level LTC 8902 Output
Bay Supports only
32 Monitors
Cameras
1537–1792
96
en | Satellite System Configuration Installations
LTC 8900 Series
Bosch Security Systems, Inc.
Bosch Security Systems, Inc.
8 LTC 8921 Video
Input Modules
(in slots 1, 4, 5, 8, 9,
12, 13, and 16) are
Required
Set all Termination
Switches on the
LTC 8921 Modules
in “Secondary”
LTC 8921 Bays
to ON
Installation Manual
“Secondary” Level LTC 8903 Bay
(for Camera Range 1025 to 2048)
Video Interconnect
LTC 8809 Cables
Video Interconnect
LTC 8809 Cables
“Secondary” Level LTC 8903 Bay
(for Camera Range 1025 to 2048)
4 LTC 8921 Video
Input Modules
(in Slots 1, 4, 5, 8, 9,
12, 13, and 16) Required
“Secondary” Level LTC 8903 Bay
Set all Termination
(for Camera Range 1 to 1024)
Switches on
LTC 8921 in
“Secondary” LTC 8921
Bays to ON
Video Interconnect
LTC 8809 Cables
4 LTC 8934 Video
Output Modules
Required for
Monitors 65 to 128.
Set all Termination
Switches to ON
for all Modules.
LTC 8902 for
Monitors 65 to 128
Cameras
1–256
“Secondary” Level LTC 8903 Bay
(for Camera Range 1 to 1024)
Set all LTC 8921 Module
Termination Switches Inside
the Primary First Level
LTC 8903 Bays to OFF
Video Interconnect
LTC 8809 Cables
8 LTC 8934 Video
Output Modules
are Required for
Monitors 1 to 64.
Set all Termination
Switches to ON
for all Modules.
LTC 8902 for
Monitors 1 to 64
Cameras
257–512
Cameras
513–768
Cameras
1025–1280
Set the LTC 8921 Module
Termination Switches in
EVEN Numbered Slots to
ON in all “Primary” Second
Level LTC 8903 Bays
Cameras
769–1024
System Cameras Connect to “Primary” First Level LTC 8903 Bays
LTC 8809
Cables
Loop Video to
Second Level
Primary Bays
Cameras
1793–2048
16 LTC 8921 Video
Input Modules
are Required in all
Second Level Bays
Cameras
1537–1792
Set LTC 8921
Module Termination
Switches in ODD
Numbered Slots to
OFF in all “Primary”
Second Level
LTC 8903 Bays
Cameras
1281–1536
LTC 8900 Series
Satellite System Configuration Installations | en
97
Figure 8.42: Front View, Module Placement and Termination Settings, 2048 Camera by 96 Monitor System
Figure 8.43: Front View, Module Placement and Termination Settings, 2048 Camera by 128 Monitor System
2015.01 | 10.6 |
98
en | Troubleshooting Guide
9
LTC 8900 Series
Troubleshooting Guide
The LTC 8900 Allegiant system was designed to provide very high reliability. However, if a
failure does occur, the effects of the failure depend on system design and the location of the
failure.
For example, in a standard nonredundant system, an LTC 8904 Series CPU bay failure could
disable the entire system, while a monitor bay failure would disable only the monitors
connected to the failed bay.
, page 98 (below) lists the worst-case impact resulting from failure of the LTC 8900 system
components. If system troubleshooting becomes necessary, follow these guidelines:
Matrix Bay Checkout
Indication
Resolution
Main power switch is ON, but the Power LED
Check the main line fuse on the rear of the main bay. Refer to
indicator is not lit
the Maintenance Information, page 101 for replacement
instructions.
Any of the green LED indicators on the front of
Replace the blown fuses associated with any unit fuse
the matrix bay power supply are not illuminated indicators.
Intermittent video output or system operation
Verify that all circuit card modules are properly seated in their
respective rack connectors.
Power Supply LEDs are lit, but there is no
Verify proper seating of the power supply within card cage.
power indication on modules or accessory
Verify that the supplied retaining screws are installed.
devices
Keyboard Checkout
There are no keyboard display indicators
Check the interconnect cable for cut or broken wires between
the keyboard and the main CPU bay. Replace the cable if
necessary. Relocate the keyboard connector on the main CPU
bay to another keyboard input port. Replace the keyboard.
Keyboard indicators are lit but the keyboard is
Verify that the keyboard is logged-on to the system (if log-on
inoperative
feature has been enabled). Check the interconnect cable for cut
or broken wires between the keyboard and the main CPU bay.
Replace the cable if necessary. Relocate the keyboard connector
on the main CPU bay to another keyboard input port. Replace
the keyboard.
2015.01 | 10.6 |
Installation Manual
Bosch Security Systems, Inc.
LTC 8900 Series
Troubleshooting Guide | en
Limited keyboard functions
99
If possible, perform a local keyboard test to verify operation of
all keys. If a local test cannot be performed, replace the
keyboard. The installer or system administrator should review
the PC-based configuration software package s lockout tables to
determine if the problem is related to user restriction tables. If
the table settings are verified, and no discrepancies are found,
replace the keyboard.
Allegiant keyboard joystick is not centered
If the analog joystick of the keyboard becomes uncentered due
to normal wear, it can be recalibrated. If using Intuikey Series
Keyboards, calibration is done via the Keyboard Control menu. If
using LTC 8555 Series Keyboards, activate the Keyboard User
Function 1 keyboard test. Refer to the Operator s Manual for
more information.
Table 9.1: Troubleshooting Guidelines
Component Configuration
System Controller PC
Worst-case Effect of Failure
Worst-case Effect of Failure Redundant
Standard System Configuration
System
Not Applicable
Hot-switch and Data Mirroring functions are
unavailable. The System is completely
operational.
CPU or CPU Power Supply
Complete loss of all system
Automatic hot-switch to backup. System
operations and functions
completely operational. LTC 8901 Series
buzzers sound, fault LEDs illuminate, and
appropriate fault relays close. The System
Supervisor software flashes and beeps to
alert the operator.
LAN Switch, CPU Port
Not Applicable
Automatic hot-switch to backup occurs. The
System is completely operational. System
Supervisor software flashes and beeps to
alert operator.
LAN Switch, Video Bay Port
Loss of video connected to bay; the
Loss of video connected to bay; the
remainder of the system is
remainder of the system is operational.
operational.
LAN Switch, Entire Switch
Loss of video associated with all
Automatic hot-switch to backup occurs.
matrix bays connected to the switch; There is loss of video on all bays connected
Output Bay
if the system contains multiple
to defective LAN Switch. The System
switches, the remainder of the
Supervisor software flashes and beeps to
system is unaffected.
alert the operator.
Loss of video connected to the bay;
Loss of video connected to bay; the
the remainder of the system is
remainder of the system is operational.
operational.
Input Bay
Loss of video connected to the bay;
Loss of video connected to bay; the
the remainder of the system is
remainder of the system is operational.
operational.
Table 9.2: Trouble Modes
Bosch Security Systems, Inc.
Installation Manual
2015.01 | 10.6 |
100
en | Troubleshooting Guide
LTC 8900 Series
CPU and Data Receiver LED Indicators:
PCB ID
PCB Label
Color
Function
D1000
RESET
Red
Lit during reset condition
D0908
CPU ACT.
Green
Flashes to indicate processor activity
D0909
BATT LOW
Red
Lit when battery is low
D1001
Temp CRIT
Green
Lit when temperature is critical
D0800
LAN LINK/ACT
Green
Lit indicates network condition; Flashing at packet rate indicates activity
D0801
LAN 100BASET
Red
Lit indicates 100BaseT connection
D0802
LAN DUP/COL
Yellow
Lit indicates duplex mode; Flashing at paced rate indicates collisions
D0500
SDU ACT
Green
Flashes at Biphase data packet rate
D0701
CONSOLE
Green
Lit when RS-232 connection exists
D0702
PRINTER
Green
Lit when RS-232 connection exists
D0700
ALARM
Green
Lit when RS-232 connection exists
D0900
LED1
Red
Lit when flash memory is getting updates
D0901
LED2
Green
No function
D0902
LED3
Yellow
No function
D0903
LED4
Red
No function
D0904
LED5
Green
No function
D0905
LED6
Yellow
No function
D0906
LED7
Red
No function
D0907
LED8
Green
Flashing indicates keyboard polling activity
Table 9.3: LED Indicators
2015.01 | 10.6 |
Installation Manual
Bosch Security Systems, Inc.
LTC 8900 Series
10
Maintenance Information | en
101
Maintenance Information
NOTE: The LTC 8900 Allegiant system has been designed to perform for long periods of time
with little or no maintenance. Cleaning the keyboard or replacing a fuse may be necessary
occasionally. See instructions below.
10.1
Cleaning System Keyboard(s)
The keyboard may be cleaned whenever necessary by temporarily removing it from the system
and wiping it with a damp cloth. If a conventional spray cleaner is required, spray the cloth
first, then wipe the surfaces. Do not use petroleum-based cleaners, or cleaners containing
benzene, triclorethylene, ammonia, or acetone; these cleaners could damage the plastic
surfaces.
10.2
Matrix Bay AC Line Voltage Input Selection
The AC line voltage input selector is located on the rear of the equipment bay, inside the line
cord connector housing. The present input voltage selection is shown in the window of the
connector housing. Remove the AC line cord if the setting is incorrect. To change the setting,
insert a flat blade screwdriver into the slot at one end of the connector housing, as indicated
in the drawing, and rotate the screwdriver until the door to the housing opens.
Remove the voltage selector wheel from the connector housing and rotate until the desired
voltage is visible, as in , page 101.
Figure 10.1: Voltage Selector
Reinsert the wheel into the connector housing so that the selected voltage is facing out. Snap
the door closed, and verify that the correct voltage selection is visible through the window.
Reattach the AC line cord.
Bosch Security Systems, Inc.
Installation Manual
2015.01 | 10.6 |
102
en | Maintenance Information
LTC 8900 Series
Figure 10.2: Line Voltage Selector Removal
10.3
Matrix Bay AC Line Fuse Replacement
The AC line fuse on LTC 8805/60 and LTC 8906/60 Power Supply models is located on the
rear of the equipment bay, near the line cord connector. LTC 8805/50 and LTC 8906/50 Power
Supply models (220-240VAC input versions) contain a circuit breaker equipped power switch
that can be reset from the front. If the line fuse must be replaced in an LTC 8805/60 or LTC
8906/60 model, remove the line cord from the system. Insert a flat blade screwdriver into the
slot at one end of the connector housing, and rotate the screwdriver until the door to the
housing opens. Remove the fuse holder from the housing as shown below.
Figure 10.3: Fuse Removal
2015.01 | 10.6 |
Installation Manual
Bosch Security Systems, Inc.
LTC 8900 Series
Maintenance Information | en
103
Remove the fuse from the holder (as in , page 102), and replace it with a fuse of the same
rating (1.6 A, 250 V) for continued protection. Reinstall the fuse holder into the connector
housing in the same orientation as indicated by the arrow on the door cover. Snap the door
closed. After replacing the fuse, verify system start-up and operation.
10.4
Matrix Bay Power Supply Fuse Replacement
The main power supply is located in the far righthandside of the equipment bay. Remove the
front panel of the bay by loosening the four (4) fasteners. Locate the fuse to be replaced by
observing the green LED indicators. Note which LED indicators are not lit, then turn off the
main power switch on the power supply. Replace the fuses associated with the LEDs that
were not lit. Switch on the main power switch and verify that all LEDs are now illuminated.
Replace the front panel.
Fuse Value/Size
10.5
Power Supply Model
LTC 8805 (8903 Bays)
LTC 8906 (8902 Bays)
100 mA / 250v 5 mm
Yes
Yes
500 mA / 250v 5 mm
Yes
Yes
1.0 A / 250v 5 mm
Yes
Yes
2.0 A / 250v 5 mm
Yes
Yes
3.15 A / 250v 5 mm
Yes
Yes
6.3 A / 250v 5 mm
Yes
Not Used
Replacing LTC 8901 or LTC 8904 Series CPU Parts
Replacement CPU boards (LTC 8910/00) and power supplies (LTC 8905/90) can be
purchased to repair failed components. For minimum downtime however, the entire LTC 8901
or LTC 8904 Series bay can be swapped out.
In redundant system configurations, the unique Data Mirroring functions of the System
Supervisor PC software can be used to automatically configure the new LTC 8901 Series CPU
bay, making the replacement almost transparent to the system.
For example, if the primary CPU has failed in the LTC 8901 Series CPU bay, the system will
have automatically switched to the backup CPU, and continues normal operation. To replace
the LTC 8901 Series CPU bay, proceed as follows:
1.
2.
Install the new LTC 8901 Series CPU bay adjacent to the old LTC 8901 Series CPU bay.
Move the console cable, connected to the failed CPU Controller input on the old LTC
8901 Series CPU bay, to the corresponding input on the new LTC 8901 Series CPU bay.
In this example, the cable would be moved from the Primary Controller connector on the
old bay to the Primary Controller connector on the new bay.
3.
Move the LAN cable, connected to the failed CPU LAN input on the old LTC 8901 Series
CPU bay, to the corresponding input on the new LTC 8901 Series CPU bay. In this
example, the cable would be moved from the Primary LAN connector on the old bay to
the Primary LAN connector on the new bay.
4.
Apply power to the new LTC 8901 Series CPU bay.
5.
From the System Supervisor software, enable Data Mirroring. This causes the
configuration data in the old LTC 8901 Series CPU bay to be copied to the new LTC 8901
Series CPU bay.
Bosch Security Systems, Inc.
Installation Manual
2015.01 | 10.6 |
104
en | Maintenance Information
6.
LTC 8900 Series
Wait for the System Supervisor to indicate that the Data Mirroring process has
completed. This step takes a few minutes.
7.
From the System Supervisor software, change the In Use CPU to the Primary CPU. This
moves control to the new LTC 8901 Series CPU bay.
8.
Starting with the keyboard cables, move the remaining cables from the old CPU bay to
the new CPU bay.
This procedure allows the faulty LTC 8901 Series CPU bay to be replaced, with zero down
time. Operator control is momentarily disabled during Steps 5 and 6.
An alternate approach is to move several of the keyboard connections to the new bay prior to
executing Step 5. These keyboards will gain system control as soon as Step 5 has executed.
PTZ control is regained once the SDU cable is moved from the old unit to the new unit.
LTC 8943/95 System Controller PC
10.6
Periodically inspect front panel chassis air filter. Clean or replace if necessary.
10.7
Replacement of Memory Backup Batteries
General operational notes
–
Low battery conditions are indicated by LED on CPU and on-screen flashing “?? ?? ??” of
time/date fields.
–
Battery status can be check by keyboard operator using Keyboard User Function 43.
–
Batteries are checked by CPU once per day at midnight, upon power up, and after system
reset.
–
If batteries are replaced without power off/on (of at least 10 seconds) or reset of CPU,
LED and on-screen indicators will not display normal until next midnight is reached.
Caution!
!
Lithium batteries should be replaced by qualified service personnel only.
The memory backup batteries are located on the CPU card(s) inside the LTC 8900 CPU bay.
The batteries provide RAM memory backup for a period of at least one year. They are only
active when main AC power to the system has been lost. The RAM memory is used to store
system operational data which is frequently changing, including time/date and system
crosspoint data (i.e., which camera is currently being displayed on which monitor). More vital
system data such as camera titles, alarm settings, user information and passwords, etc. is
stored in non-volatile memory that is not affected by the condition of the batteries or the main
AC power.
Replacement of the batteries begins with at least partial removal of the LTC 8900 CPU bay
from the rack mount unit. If applicable, temporarily close any programs running on PC
attached to CPU unit. Remove AC power and any other interface cables from CPU as
necessary to allow the main bay to be pulled forward until the front sides of the main bay can
be accessed. Remove the 4 screws at the rear of the main bay holding the enclosure top
cover.
Slide the cover back a short distance off the enclosure to allow access to the front sides of
the unit. Remove 2 screws from both sides near front to remove front panel. Support the front
panel as necessary to minimize any stress on the electrical interface ribbon cable.
The right side of the unit will contain 2 PCB modules. The top module is the Primary CPU. In
redundant LTC 8901 series bays, the bottom module is the Backup CPU. The middle board is
the relay module.
2015.01 | 10.6 |
Installation Manual
Bosch Security Systems, Inc.
LTC 8900 Series
Maintenance Information | en
105
The two batteries are mounted on the front edge of the CPU card and are about 25 mm (1 in.)
in diameter. Insert a small flat blade screwdriver into the slot on one of the battery holder
sockets and gently pry the battery from the holder until it can be removed by your fingers.
Insert new battery by lifting the retaining clip up while inserting the battery into the socket.
Insure that the negative side of the battery contacts the socket by seating the battery until it is
somewhat flush with the level of the battery holder. Repeat procedure for other battery (plus
2 on other CPU if LTC 8901 Redundant CPU bay is in use). Reattach front cover, lid, and reinstall into rack mount unit. Re-attach power and other interface cables.
Verification of the system’s time and date and sequence programming should be made to
insure no information was lost. Refer to the appropriate section of the instruction manual if
any reprogramming is required.
Bosch Security Systems, Inc.
Installation Manual
2015.01 | 10.6 |
106
en | Pinouts
11
LTC 8900 Series
Pinouts
B.1
LTC 8900 Series CPU Bay Rear Panel
Connector Pinouts
B.1.1
Console Port RS-232 Pinouts
Pin # . . . . . . . . . . . . . . . . . . . .Designation
1 . . . . . . . . . . . . . . . . . . . . . . . .GND
2 . . . . . . . . . . . . . . . . . . . . . . . .Rx
3 . . . . . . . . . . . . . . . . . . . . . . . .Tx
4 . . . . . . . . . . . . . . . . . . . . . . . .CTS
5 . . . . . . . . . . . . . . . . . . . . . . . .RTS
6 . . . . . . . . . . . . . . . . . . . . . . . .GND
7 . . . . . . . . . . . . . . . . . . . . . . . .GND
8 . . . . . . . . . . . . . . . . . . . . . . . .GND
9 . . . . . . . . . . . . . . . . . . . . . . . .GND
B.1.2
B.1.3
Alarm Port RS-232 Pinouts
Pin # . . . . . . . . . . . . . . . . . . . .Designation
1 . . . . . . . . . . . . . . . . . . . . . . . .RTS
2 . . . . . . . . . . . . . . . . . . . . . . . .Tx
3 . . . . . . . . . . . . . . . . . . . . . . . .GND
4 . . . . . . . . . . . . . . . . . . . . . . . .GND
5 . . . . . . . . . . . . . . . . . . . . . . . .GND
6 . . . . . . . . . . . . . . . . . . . . . . . .Rx
7 . . . . . . . . . . . . . . . . . . . . . . . .CTS
8 . . . . . . . . . . . . . . . . . . . . . . . .+12 VDC
9 . . . . . . . . . . . . . . . . . . . . . . . .GND
Keyboard RS-485 Ports
Pin # . . . . . . . . . . . . . . . . . . . .Designation
1 . . . . . . . . . . . . . . . . . . . . . . . .GND
2 . . . . . . . . . . . . . . . . . . . . . . . .GND
3 . . . . . . . . . . . . . . . . . . . . . . . DATA
4 . . . . . . . . . . . . . . . . . . . . . . . . +DATA
5 . . . . . . . . . . . . . . . . . . . . . . . .GND
6 . . . . . . . . . . . . . . . . . . . . . . . . +12 VDC
B.1.6
COMM PORT 1 and COMM PORT 2
Pin # . . . . . . . . . . . . . . . . . . . . . .Designation
1 . . . . . . . . . . . . . . . . . . . . . . . . . .NC
2 . . . . . . . . . . . . . . . . . . . . . . . . . . +TXD
3 . . . . . . . . . . . . . . . . . . . . . . . . . . TXD
4 . . . . . . . . . . . . . . . . . . . . . . . . . . +RXD
5 . . . . . . . . . . . . . . . . . . . . . . . . . . RXD
6 . . . . . . . . . . . . . . . . . . . . . . . . . .GND
7 . . . . . . . . . . . . . . . . . . . . . . . . . .NC
8 . . . . . . . . . . . . . . . . . . . . . . . . . .NC
9 . . . . . . . . . . . . . . . . . . . . . . . . . .NC
B.1.7
Primary and Backup LAN Ports
Pin # . . . . . . . . . . . . . . . . . . . . . .Designation
1 . . . . . . . . . . . . . . . . . . . . . . . . . . +TD
2 . . . . . . . . . . . . . . . . . . . . . . . . . . TD
3 . . . . . . . . . . . . . . . . . . . . . . . . . . +RD
4 . . . . . . . . . . . . . . . . . . . . . . . . . .No Connection
5 . . . . . . . . . . . . . . . . . . . . . . . . . .No Connection
6 . . . . . . . . . . . . . . . . . . . . . . . . . . RD
7 . . . . . . . . . . . . . . . . . . . . . . . . . .No Connection
8 . . . . . . . . . . . . . . . . . . . . . . . . . .No Connection
B.1.8
Relay Connector (LTC 8901 only)
1 & 2 . . . . . . . . . . . . . . . . . . . . . . .Relay - Primary Power Supply Fault
3 & 4 . . . . . . . . . . . . . . . . . . . . . . .Relay - Primary CPU Fault
5 & 6 . . . . . . . . . . . . . . . . . . . . . . .Relay - Backup Power Supply Fault
7 & 8 . . . . . . . . . . . . . . . . . . . . . . .Relay - Backup CPU Fault
9 & 10 . . . . . . . . . . . . . . . . . . . . . .Relay - Any Fault
11 & 12 . . . . . . . . . . . . . . . . . . . .Input - Silence Buzzer
B.1.9
Console Cable
The LTC 8506/00 cable that connects the Allegiant s CPU
CONSOLE Port to an external PC uses the following pinouts:
9-pin Male
Allegiant
9-pin Female
(CONSOLE)
Designation
(PC Side)
1
GN
None
2
Receive Dat
3
3
Transmit Dat
2
4
CTS
1
5
RTS
8
6
GND
None
7
GND
5
8
GND
None
9
GND
None
(Pins 4 & 6 jumpered)
(Pins 1 & 7 jumpered)
B.1.4
Primary and Backup Controller Port RS-232
Pinouts
Pin # . . . . . . . . . . . . . . . . . . . .Designation
1 . . . . . . . . . . . . . . . . . . . . . . . .GND
2 . . . . . . . . . . . . . . . . . . . . . . . .Rx
3 . . . . . . . . . . . . . . . . . . . . . . . .Tx
4 . . . . . . . . . . . . . . . . . . . . . . . .CTS
5 . . . . . . . . . . . . . . . . . . . . . . . .RTS
6 . . . . . . . . . . . . . . . . . . . . . . . .GND
7 . . . . . . . . . . . . . . . . . . . . . . . .GND
8 . . . . . . . . . . . . . . . . . . . . . . . .GND
9 . . . . . . . . . . . . . . . . . . . . . . . .GND
B.1.5
Biphase Port Pinouts
Pin # . . . . . . . . . . . . . . . . . . . .Designation
1 . . . . . . . . . . . . . . . . . . . . . . . . +DATA
2 . . . . . . . . . . . . . . . . . . . . . . . . DATA
3 . . . . . . . . . . . . . . . . . . . . . . . .GND
4 . . . . . . . . . . . . . . . . . . . . . . . .GND
5 . . . . . . . . . . . . . . . . . . . . . . . .GND
6 . . . . . . . . . . . . . . . . . . . . . . . .No Connection
7 . . . . . . . . . . . . . . . . . . . . . . . .No Connection
8 . . . . . . . . . . . . . . . . . . . . . . . .GND
9 . . . . . . . . . . . . . . . . . . . . . . . . +12 VDC
2015.01 | 10.6 |
A.1.10 Printer Cable
The cable that connects the Allegiant s CPU
CONSOLE port to a standard serial printer uses the
following pinouts:
9-pin Male
(CONSOLE)
Allegiant
Designation
25-pin Female
(Printer Side)
1
2
3
4
5
6
7
8
9
GND
Receive Data
Transmit Data
CTS
RTS
GND
GND
GND
GND
1
2
3
4, 8
5
None
7
None
None
(Pins 6 & 20 jumpered)
Installation Manual
Bosch Security Systems, Inc.
Bosch Security Systems, Inc.
850 Greenfield Road
Lancaster, PA, 17601
USA
www.boschsecurity.com
© Bosch Security Systems, Inc., 2015
Bosch Sicherheitssysteme GmbH
Robert-Bosch-Ring 5
85630 Grasbrunn
Germany