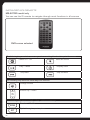
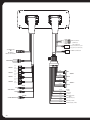
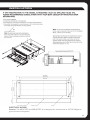
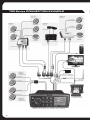
1
700 Series Manual
MARINE ENTERTAINMENT SYSTEM
MS-IP700i
True Marine Entertainment System for iPod
MS-AV700i
True Marine DVD Entertainment System
WARNINGS AND CAUTIONS
Do not attempt to open the unit’s chassis.
There are no user-serviceable parts or adjustments inside.
USING iPod
This unit has been tested with compatible authentic iPod models under normal
expected operating conditions, free from any pre-existing defects in either the unit
or the iPod.
No responsibility can be taken for use of the unit other than under normally
expected operating conditions in conjunction with fully functional and undamaged
iPod units which have been manufactured and authorized by Apple Inc.
USB Flash Drives
• Drive format: All USB flash drives used with this unit must be formatted to
either FAT32 or NTFS format. These are the most commonly used format for
USB flash drives.
• Audio track format: Audio tracks stored on USB flash drive must be in MP3/
M4A/FLAC format to play on this unit.
Handling CD or DVD disc’s (MS-AV700i model only)
• Avoid touching the surface of the disc.
• Avoid exposing the disc to direct sunlight.
• Ensure the disc is clean. If necessary, clean the disc with a clean, dry, soft,
lint-free cloth.
• Ensure the disc is not scratched or damaged.
• Ensure the disc is dry when inserted into the unit.
Care and Maintenance
As with all products exposed to the harsh marine environment, a little care will help
preserve the finish. FUSION recommends that you clean any salt water and/ or
salt residue from the stereo with a damp cloth soaked in fresh water.
Most marine Stereo’s have small vents in their cases to allow a way out for
moisture that finds its way in. In some limited instances it is possible for moist
air to be drawn into the vents when the air inside the Stereo cools down after it
is turned off. Direct sunlight on the front can draw this moisture up against the
Window, causing fogging. Turning on the Stereo will speed up moisture removal.
Fogging is not abnormal, nor will it harm your Stereo, which is built to withstand
the harsh marine environment.
1
REGISTER YOUR PRODUCT ONLINE:
For your own peace of mind, register your product purchase online at
www.fusionelectronics.com
We’ll keep you up to date with any news related to your product, any
software upgrades or new accessories to help you get the most from
your product.
All FUSION True Marine Products are backed by a 3 Year Limited
Consumer Warranty and by registering your product you can be assured
that if the unexpected occurs we’ll have your details and be ready to help.
RECORD YOUR PRODUCT DETAILS HERE:
SERIAL NUMBER
DATE OF PURCHASE
AFFIX RECEIPT HERE
2
CONTENTS
USER INTERFACE AND CONTROLS . . . . . . . . . . . . . . . . . . . . . . . . . . . . . . . . . . . . . . . . . . 5
Control Panel Layout . . . . . . . . . . . . . . . . . . . . . . . . . . . . . . . . . . . . . . . . . . . . . . . . . . . . . . . 5
Button Description . . . . . . . . . . . . . . . . . . . . . . . . . . . . . . . . . . . . . . . . . . . . . . . . . . . . . . . . . 5
ROTARY ENCODER AND MENU KEY . . . . . . . . . . . . . . . . . . . . . . . . . . . . . . . . . . . . . . . . .
Encoder Operation . . . . . . . . . . . . . . . . . . . . . . . . . . . . . . . . . . . . . . . . . . . . . . . . . . . . . . . . .
Menu Key Operation . . . . . . . . . . . . . . . . . . . . . . . . . . . . . . . . . . . . . . . . . . . . . . . . . . . . . . . .
Using the Encoder and Menu Key . . . . . . . . . . . . . . . . . . . . . . . . . . . . . . . . . . . . . . . . . . . .
6
6
6
7
GETTING STARTED . . . . . . . . . . . . . . . . . . . . . . . . . . . . . . . . . . . . . . . . . . . . . . . . . . . . . . . . 8
Powering the Unit On or Off . . . . . . . . . . . . . . . . . . . . . . . . . . . . . . . . . . . . . . . . . . . . . . . . . 8
Input Source Screens . . . . . . . . . . . . . . . . . . . . . . . . . . . . . . . . . . . . . . . . . . . . . . . . . . . . . . . 8
Adjusting Volume Level . . . . . . . . . . . . . . . . . . . . . . . . . . . . . . . . . . . . . . . . . . . . . . . . . . . . . . 9
Muting Output . . . . . . . . . . . . . . . . . . . . . . . . . . . . . . . . . . . . . . . . . . . . . . . . . . . . . . . . . . . . 10
Adjusting Sub Level and Tone . . . . . . . . . . . . . . . . . . . . . . . . . . . . . . . . . . . . . . . . . . . . . . . 11
Displaying the Clock . . . . . . . . . . . . . . . . . . . . . . . . . . . . . . . . . . . . . . . . . . . . . . . . . . . . . . . 12
Setting and Clearing the Alarm . . . . . . . . . . . . . . . . . . . . . . . . . . . . . . . . . . . . . . . . . . . . . . 13
Adjusting Screen Brightness . . . . . . . . . . . . . . . . . . . . . . . . . . . . . . . . . . . . . . . . . . . . . . . . 14
TUNER . . . . . . . . . . . . . . . . . . . . . . . . . . . . . . . . . . . . . . . . . . . . . . . . . . . . . . . . . . . . . . . . . . .
Listening to the Tuner . . . . . . . . . . . . . . . . . . . . . . . . . . . . . . . . . . . . . . . . . . . . . . . . . . . . . .
Tuner Source Screens . . . . . . . . . . . . . . . . . . . . . . . . . . . . . . . . . . . . . . . . . . . . . . . . . . . . . .
SiriusXM . . . . . . . . . . . . . . . . . . . . . . . . . . . . . . . . . . . . . . . . . . . . . . . . . . . . . . . . . . . . . . . . .
Tuning Methods . . . . . . . . . . . . . . . . . . . . . . . . . . . . . . . . . . . . . . . . . . . . . . . . . . . . . . . . . . .
Adding and Removing Presets . . . . . . . . . . . . . . . . . . . . . . . . . . . . . . . . . . . . . . . . . . . . . .
Setting up VHF . . . . . . . . . . . . . . . . . . . . . . . . . . . . . . . . . . . . . . . . . . . . . . . . . . . . . . . . . . . 15
15
15
16
16
18
18
PLAYING MUSIC CONTENT. . . . . . . . . . . . . . . . . . . . . . . . . . . . . . . . . . . . . . . . . . . . . . . . . 19
iPod, MTP, Bluetooth and USB Source Screens . . . . . . . . . . . . . . . . . . . . . . . . . . . . . . 20
Controlling iPod Playback . . . . . . . . . . . . . . . . . . . . . . . . . . . . . . . . . . . . . . . . . . . . . . . . . . 20
Controlling Bluetooth and MTP Playback . . . . . . . . . . . . . . . . . . . . . . . . . . . . . . . . . . . . . 21
Changing iPod Settings . . . . . . . . . . . . . . . . . . . . . . . . . . . . . . . . . . . . . . . . . . . . . . . . . . . . 23
Changing MTP Settings . . . . . . . . . . . . . . . . . . . . . . . . . . . . . . . . . . . . . . . . . . . . . . . . . . . 24
Changing Bluetooth Settings . . . . . . . . . . . . . . . . . . . . . . . . . . . . . . . . . . . . . . . . . . . . . . . 24
AUXILIARY INPUT . . . . . . . . . . . . . . . . . . . . . . . . . . . . . . . . . . . . . . . . . . . . . . . . . . . . . . . . 24
Listening to Auxiliary Input . . . . . . . . . . . . . . . . . . . . . . . . . . . . . . . . . . . . . . . . . . . . . . . . . 24
Auxiliary Source Screen . . . . . . . . . . . . . . . . . . . . . . . . . . . . . . . . . . . . . . . . . . . . . . . . . . . 25
ADDITIONAL FEATURES . . . . . . . . . . . . . . . . . . . . . . . . . . . . . . . . . . . . . . . . . . . . . . . . . . 25
FUSION-Link . . . . . . . . . . . . . . . . . . . . . . . . . . . . . . . . . . . . . . . . . . . . . . . . . . . . . . . . . . . . . 25
Total Audio Control via NMEA2000 . . . . . . . . . . . . . . . . . . . . . . . . . . . . . . . . . . . . . . . . . 26
FUSION MS-NRX200I Remote Control . . . . . . . . . . . . . . . . . . . . . . . . . . . . . . . . . . . . . 26
3
Ethernet Support . . . . . . . . . . . . . . . . . . . . . . . . . . . . . . . . . . . . . . . . . . . . . . . . . . . . 26
Infrared (IR) Remote . . . . . . . . . . . . . . . . . . . . . . . . . . . . . . . . . . . . . . . . . . . . . . . . . 27
INSTALLING THE 700 Series . . . . . . . . . . . . . . . . . . . . . . . . . . . . . . . . . . . . . . . . . 29
CONNECTIONS . . . . . . . . . . . . . . . . . . . . . . . . . . . . . . . . . . . . . . . . . . . . . . . . . . . . . 31
INSTALLATION . . . . . . . . . . . . . . . . . . . . . . . . . . . . . . . . . . . . . . . . . . . . . . . . . . . . . . 34
700 Series Connection Example . . . . . . . . . . . . . . . . . . . . . . . . . . . . . . . . . . . . . . .35
SETTING UP THE 700 Series . . . . . . . . . . . . . . . . . . . . . . . . . . . . . . . . . . . . . . . . . 36
Zones . . . . . . . . . . . . . . . . . . . . . . . . . . . . . . . . . . . . . . . . . . . . . . . . . . . . . . . . . . . . .36
Preparing For iPod, MTP Device or USB Connection . . . . . . . . . . . . . . . . . . . . . 39
MS-IP700i Model . . . . . . . . . . . . . . . . . . . . . . . . . . . . . . . . . . . . . . . . . . . . . . . . . . . . 40
Bluetooth Media Device . . . . . . . . . . . . . . . . . . . . . . . . . . . . . . . . . . . . . . . . . . . . . . 43
Preparing for Auxiliary Input . . . . . . . . . . . . . . . . . . . . . . . . . . . . . . . . . . . . . . . . . . 43
Clock Setting . . . . . . . . . . . . . . . . . . . . . . . . . . . . . . . . . . . . . . . . . . . . . . . . . . . . . . . . 44
SiriusXM Satellite Radio . . . . . . . . . . . . . . . . . . . . . . . . . . . . . . . . . . . . . . . . . . . . . .45
Advanced Settings . . . . . . . . . . . . . . . . . . . . . . . . . . . . . . . . . . . . . . . . . . . . . . . . . . .50
APPENDICES . . . . . . . . . . . . . . . . . . . . . . . . . . . . . . . . . . . . . . . . . . . . . . . . . . . . . . . 55
Troubleshooting . . . . . . . . . . . . . . . . . . . . . . . . . . . . . . . . . . . . . . . . . . . . . . . . . . . . . 55
Specifications . . . . . . . . . . . . . . . . . . . . . . . . . . . . . . . . . . . . . . . . . . . . . . . . . . . . . . . 59
Licensing . . . . . . . . . . . . . . . . . . . . . . . . . . . . . . . . . . . . . . . . . . . . . . . . . . . . . . . . . . . 60
Support, Sales and Service . . . . . . . . . . . . . . . . . . . . . . . . . . . . . . . . . . . . . . . . . . . 60
Index . . . . . . . . . . . . . . . . . . . . . . . . . . . . . . . . . . . . . . . . . . . . . . . . . . . . . . . . . . . . . 61
4
USER INTERFACE AND CONTROLS
CONTROL PANEL LAYOUT
BUTTON DESCRIPTION
PRIMARY SOURCE
MS-IP700i
Menu
Power
5
Tuner
source
Auxiliary
iPod
Rewind
Play/Pause
Forward
Mute
Clock
Brightness
MS-AV700i
DVD
ROTARY ENCODER AND MENU KEY
Although the controls of the 700 Series are designed to be intuitive to use, we
recommend that you familiarize yourself with the operation of the Encoder and
Menu key before using the unit.
ROTARY ENCODER OPERATION
The Encoder can be used in three ways to control the operation of the 700
Series:
1
Rotary Encoder turn
2
Encoder press
+1
3
Encoder press and hold down for at least one second
MENU KEY OPERATION
You can use the Menu key to open or to exit from menus:
Menu key
Press the Menu key to open a menu.
Menu exit
In an open menu you can use the Menu key at any time to save
changes and exit:
• Press the Menu to exit from the current menu level or control screen.
• Press and hold down the Menu key to exit from the menu
completely. Or press any other key.
Time out feature: After 10 seconds of inactivity, the menu exits
and any changes are saved automatically.
6
USING THE ROTARY ENCODER AND MENU KEY
You can use the Rotary Encoder and Menu key to adjust levels, access menus
and open control screens.
Adjusting levels
Use the Encoder and Menu key to adjust levels on the 700 Series.
For example, to adjust the volume level:
Turn Encoder to
open the Volume
screen
Turn Encoder to
adjust the level. Press
Encoder to move
highlight.
Menu exit. See “Menu
Key Operation” on page
6.
Accessing Menus
Use the Menu key and Encoder to access menus to change settings.
For example, to access the Settings menu:
Press Menu key
7
Turn Encoder to scroll
the highlight.
Press Encoder to select
Settings menu.
Highlight
Menu exit. See “Menu
Key Operation” on page
6.
Opening Control Screens
Use the Encoder to open the Sub Level and Tone control screens to adjust
levels:
+1
Press and hold
Encoder for at
least 1 second
Turn Encoder to adjust
level. Press Encoder to
move highlight.
GETTING STARTED
POWERING THE UNIT ON OR OFF
When you power on the 700 Series it will automatically start playing music
from the most recently selected input source.
To power the unit on or off.
• Momentarily press the Power key to power on the unit. As the unit starts
up, a splash screen is displayed for several seconds, followed by the current
input source.
Power
• When the unit is on, momentarily press the Power key to power off the unit.
INPUT SOURCE SCREENS
The 700 Series supports a wide range of input source types,
depending on model:
• MS-IP700i AM/FM/VHF/SiriusXM; iPod/iPhone via internal dock; USB
and iPod/iPhone/MTP devices (Android) via external dock or cable;
auxiliary; Bluetooth.
• MS-AV700i AM/FM/VHF/SiriusXM; CD/DVD; USB and iPod/iPhone/MTP
devices (Android) via external dock or cable; auxiliary; Bluetooth.
8
Both models are also SiriusXM-Ready (USA only). Requires optional SiriusXM
Connect Vehicle Tuner. For further details of setting up SiriusXM options see
“SiriusXM Satellite Radio” on page 45.
When you select one of these sources, the 700 Series displays a source
screen, similar to the AM source screen shown in Figure 1 below. The title bar
always shows the current time and source name. Other information varies
depending on the source type you have selected.
ADJUSTING VOLUME LEVEL
The 700 Series allows you to control speaker output volume level in up to four
named areas called Zones. Note: Zone 3 and 4 require additional amplification.
If you wish, you can customize the settings for each Zone by defining a volume
limit, a balance setting, a sub-woofer level and a personalized name (such as
“Saloon” or “Galley”). For further details see “Zones” on page 36.
9
To adjust the volume level:
1. Turn the Encoder.
• The Volume screen is displayed with the Current Zone Selection
Highlighted (remembered from previous use).
• The volume is adjusted in the highlighted Zone (or Zones) only.
2. If required, press the Encoder to highlight the next Zone to adjust its
volume level.
While the Volume screen is displayed, each press of the Encoder will
highlight available Zones in the following order:
Zone 1
Zone 2
Zone 3
Zone 4
All Zones
3. When finished, press the Menu key (or leave to time out) to save the
current volume level and exit.
MUTING OUTPUT
To mute and unmute the volume:
• Press the Mute key to mute the audio output. The Mute icon is displayed
over the top of the current input source screen.
Mute
• Press the Mute key again to unmute the audio output. The volume continues
at the previously set level.
10
ADJUSTING SUBWOOFER LEVEL AND TONE
Use the Sub level and Tone screens to set the sub-woofer levels and tone.
Sub-woofer level can be adjusted for each Zone individually, but tone
adjustments affect all Zones.
Menu key
Encoder
To set sub-woofer levels or tone:
1. Press and hold down the Encoder for at least one second. The Sub level
screen is displayed.
2. Turn the Encoder to adjust the sub-woofer level for the highlighted Zone, as
required.
3. Press the Encoder to highlight the next Zone, and adjust as required. When
you press the Encoder in the last Zone, the Tone screen is displayed.
11
4. Turn the Encoder to left or right to adjust the Bass level, if required.
5. Press the Encoder to highlight each tone control, and adjust as required.
When you press the Encoder on the Treble tone control, the Sub level
screen is displayed again.
6. Press any key to exit
DISPLAYING THE CLOCK
Use the Clock key to display the current time. If the time is incorrect, see
“Clock Setting” on page 44.
Note: The current time is also displayed in the title bar of each input
source screen.
• Press the Clock key to display the current time
Clock
12
SETTING AND CLEARING THE ALARM
Use alarm mode to turn on the 700 Series at a pre-defined time.
When the alarm is activated, your 700 Series will play the last selected input
source at the volume level in use when the unit was turned off.
Menu key
Encoder
To set the alarm:
1. Press the Menu key.
2. Turn and then press the Rotary Encoder to select Settings > Clock > Set alarm.
3. Do one or both of the following:
• Turn the Rotary Encoder to change the hour setting.
• Press the Rotary Encoder to move to the minutes field. Adjust the minutes
setting as required.
• Press the Rotary Encoder to move to the AM/PM field (if enabled). Turn
encoder to select AM or PM.
4. Press the Menu key to save the time settings and exit (the time out feature does
not operate here).
5. Highlight the Alarm enabled checkbox and press the Encoder to enable it ( ).
6. Press any key to exit
To clear the alarm:
1. Press the Menu key.
2. Turn and then press the Rotary Encoder to select Settings > Clock.
3. Highlight the Alarm enabled checkbox and press the Rotary Encoder to disable
it ( ).
4. Press any key to exit
13
ADJUSTING SCREEN BRIGHTNESS
Note: LCD and button backlight brightness can be linked to the ambient
lighting level. For further details, see “Installing the 700 Series” on
page 34.
Brightness
To adjust the brightness of the display screen:
1. Press the Brightness key. The Brightness screen is displayed.
2. Turn the Rotary Encoder to adjust the brightness setting.
3. Press any key to exit
14
TUNER
LISTENING TO THE TUNER
To select one of the available tuner bands:
Tuner
• Press the Tuner key to select input from each of the following in turn:
AM, FM, VHF or SiriusXM (USA only) requires optional SiriusXM Connect Vehicle Tuner. The applicable input source screen is displayed for
each band.
TUNER SOURCE SCREENS
AM/FM/VHF
An example of a typical tuner input source screen is shown in Figure 2 below.
Figure 2 – Example AM band input source screen
15
SiriusXM
An example of the SiriusXM input source screen is shown in Figure 3 below.
Figure 3 – Example SiriusXM input source screen
TUNING METHODS
You can use three methods to tune the 700 Series: manual, automatic and
preset.
Encoder
Menu key
Play /
Pause
Rewind
Fast
Forward
To tune to a required frequency, channel or preset:
Press the Play / Pause key to step through the available tuning methods for
each band:
Note: Preset function only available if 2 or more presets are saved
16
Tuning Method
Applies to… When tuning with this method…
Manual
All bands
• Press the Forward or Backward key to step through
the range of frequencies or channels one at a time.
• Press and hold down the key for rapid scanning of
frequencies or channels.
Manual
SiriusXM
• Press the Forward or Backward key to step through
all channels one at a time.
Category
SiriusXM
• Press the Play / Pause, Forward or Backward key to
step through the channels in the selected category.
• Only available when a category is selected in
the Category menu item. For further details see
“Category” on page 47.
Auto
AM/FM
• Press the Forward or Backward key to start
searching for available stations.
• Press the Play / Pause, Forward or Backward key to
stop the search.
Scan
VHF
• Scans through preset channels, pausing on a
channel while it is transmitting.
• Only available if there are two or more presets
saved.
• If there is any background noise, the scan will stop.
For further details see “Minimizing background
noise” on page 18.
• Press the Play / Pause, Forward or Backward key to
turn scan mode off. For further details see “Turning
scan mode on” on page 19.
NOTE: The Scan function is activated from the settings
menu, see ‘Setting up VHF’
Preset
All bands
• Press the Forward or Backward key to step through
available presets.
• Only available if there are two or more presets
saved.
• To tune to a specific preset:
a.Press the Menu key, and then press the
Encoder to select Presets.
b.Turn the Encoder to highlight the required
preset.
c. Press the Encoder to tune to the highlighted
preset.
For further details, see “Adding and Removing Presets”
on page 18.
17
ADDING AND REMOVING PRESETS
The 700 Series allows you to set up your favorite AM/FM stations, VHF or
SiriusXM channels as presets for easy recall.
Note: Up to 15 presets can be stored for each radio band.
Encoder
Menu key
Play /
Pause
Rewind
Fast
Forward
Tuner
To add a new preset:
Do one of the following.
1. Tune the 700 Series to the required frequency or channel.
2. Press and hold down the Play / Pause key. The message: “Preset saved” is displayed
briefly.
or
1. Press the Menu key.
2. Turn and then press the Encoder to select Presets > Save current. The message:
“Preset saved” is displayed briefly.
To remove one or more presets:
1. Press the Menu key.
2. Turn and then press the Encoder to select Presets > Remove presets.
3. Do one of the following (there is no warning or confirmation prompt before
deletion):
• Select Remove all presets and press the Encoder to remove all
current presets.
• Select a preset and press the Encoder to remove the selected preset.
4. Press any key to exit
SETTING UP VHF
Note: A marine FM antenna is required for VHF reception, DO NOT connect to a VHF
splitter.
Minimizing background noise
Use the Squelch feature to reduce background noise on VHF input. Select a VHF channel, and then adjust the squelch control while there is nothing being transmitted on the
channel.
To set the squelch level:
1. Press the Menu key.
2. Turn and then press the Encoder to select Squelch.
3. Turn the Encoder to adjust the squelch level:
• Increase the squelch level until the background noise is muted.
• Reduce the squelch level if the audio transmission is not heard.
18
4. Press any key to exit
Turning scan mode on
Scan mode allows the 700 Series to scan through preset VHF channels,
looking for active channels.
Note: If the Squelch level is adjusted so that you can hear a constant hissing sound, the
unit will not scan correctly. To correct this, see “Minimizing background noise”, above.
To turn scan mode on:
1. Press the Menu key.
2. Turn the Encoder to highlight the Scan menu item.
3. Press the Encoder to select the checkbox (
). Scan mode is turned on and the
menu exits automatically.
Note: Pressing the Play / Pause, Forward or Rewind key turns scan mode off.
PLAYING MUSIC CONTENT
Before you can use your media device as an input source you must first
connect the device to the FUSION stereo as described in the
installation section.
To listen to audio from your iPod, MTP device, Bluetooth device or USB
FLASH drive:
ANDROID (MTP) SUPPORT: MTP is a standard developed for connecting media (music) devices over
USB. It has been adopted on a number of platforms including Android. FUSION currently supports a
range of smartphones utilising MTP.
Refer to www.fusionelectronics.com for the latest list of support devices.
MS-IP700i
iPod
MS-AV700i,
MS-IP700i
• Press the Auxiliary key. Keep pressing the key until
the iPod (MS-AV700i only), USB, Bluetooth or MTP
source screen is displayed.
Auxiliary
19
• Press the iPod key. The iPod input source screen is
displayed. The most recently selected track starts
playing at the current play point.
• To appear on the iPod source screen the iPod
may be inserted either into the internal dock or
an external UNI-Dock or connected to the external
USB connector.
IPOD, MTP, BLUETOOTH AND USB SOURCE SCREENS
An example of a typical input source screen;
Note: The availability of song information such as song title, artist name, track
duration and album cover artwork is dependent on the capability of your
phone and music application. Album cover artwork and Shuffle/Repeat Status
icons are not supported over Bluetooth.
Note: For Bluetooth a FUSION Bluetooth module MS-BT200 is required.
CONTROLLING iPod PLAYBACK
Selecting tracks from a playlist
There can be thousands of tracks on an iPod, so you need to select the tracks
you wish to play from one of the groupings available (such as Playlists, Artists,
Albums). For example, to select tracks by artist:
Press
Menu key
Turn Rotary Encoder
to scroll the highlight.
Press Rotary Encoder
to select Artist.
Turn Rotary Encoder to scroll the highlight.
Press Rotary Encoder to select the artist
or track.
Note: Additional “A, B, C…” menu
may appear if FAST is enabled. See
“Searching” on page 23).
Menu exit. See
“Menu Key
Operation” on
page 6.
Controlling Playback
You can control iPod playback with the Play / Pause, Forward and Rewind keys.
The selected track starts playing automatically.
20
If you want to:
Use:
Play / Pause a
track
Notes:
• Press the key to pause the current track. The
pause icon ( ) is displayed top right in the
input source screen.
Play / Pause
Skip
• Press the key again to resume play. The play
( ) icon is displayed in the input source screen.
• Press the key to skip to the start of the
next track.
Forward
• Press the key to skip to the start of the current
track.
Rewind
Fast forward /
Rewind
Forward, or
Rewind
• Press the key twice to skip to the start of the
previous track.
• Press and hold down the key to fast forward
(or Rewind) the playback. The fast forward
(
) (or Rewind) icon is displayed in the
input source screen.
• Fast forward and rewind are not available for
the Bluetooth and MTP sources.
CONTROLLING BLUETOOTH AND MTP PLAYBACK
Initial Song Title Loading From MTP Devices
Following connection to the USB connector, the FUSION stereo will download
the full list of song names from the device to create a song title index. This
process must be completed before music playback can begin. For devices
with large music collections this may take several minutes. The song count
will be displayed during this process.
Other sources can be selected while this process is underway. The file name
download and indexing will continue as a background task.
Music Folder Structure
FUSION recommends that folders contain no more than 300 files each. Exceeding
this limitation may cause the phone to become unresponsive and the FUSION Stereo
to reset the USB link to the phone.
Music files must be located in a folder using one of the following names. The folder
must be located in the root directory of your device.
My Music
SD cards may be used on devices that support them.
My_Music
Songs may be copied to both the phone's internal
mobile
memory and the external memory. The rules regarding
Music
folder naming apply to both memory types.
21
Selecting audio tracks from a MTP media device.
Songs stored in MP3 and M4A format (see note below) can be played on the
FUSION Stereo. The FUSION Stereo will display your music collection in groupings of
Songs, Albums and Artists allowing you to browse in these categories. In addition to
the above groupings your music collection can be browsed according to the folder
structure on your device. The root folder for your device will be displayed in the
Settings menu, for example; PHONE, CARD, etc. Storage card locations on phones
are also supported.
Note: Different operating systems and phones provide varying levels of support for
MTP. Please refer to www.fusionelectronics.com for device compatibility information.
Press
Menu key
Turn Rotary Encoder
to scroll the highlight.
Press Rotary Encoder
to select Artist.
Turn Rotary Encoder to scroll the highlight.
Press Rotary Encoder to select the artist
or track.
Note: Additional “A, B, C…” menu may appear if
FAST is enabled. See “Searching” on page 23).
Menu exit. See
“Menu Key
Operation” on
page 6.
You can control playback with the Play / Pause, Next and Previous keys.
The selected track starts playing automatically.
If you want to:
Use:
Notes:
Play / Pause a
track
• Press the key to pause the current track. The
pause icon ( ) is displayed top right in the
input source screen.
Play / Pause
Skip
• Press the key again to resume play. The play
( ) icon is displayed in the input source screen.
• Press the key to skip to the start of the
next track.
Next
• Press the key to skip to the start of the current
track.
Previous
• Press the key twice to skip to the start of the
previous track.
22
Browsing Music Collections Over Bluetooth Not Supported
Browsing music collections from the FUSION Stereo is not supported over
Bluetooth. Initial song and Playlist selection must be done on the media device.
However the FUSION Stereo does provide basic playback control with the
Play / Pause, Next and Previous keys. Forward and Rewind functions are
not supported
CHANGING iPod SETTINGS
Additional iPod control features are available through the iPod settings menu.
Press
Menu key
The iPod
control menu is
displayed
Turn Encoder
to scroll the
highlight
down to iPod
settings.
Press Encoder to select
iPod settings. Change
settings as described
below.
Menu exit. See
“Menu Key
Operation” on
page 6.
To change a setting in the iPod settings menu:
Turn and then press the Rotary Encoder to select one of the following
settings to change. Then:
• Turn and then press the Rotary Encoder to select the required setting
Repeat
• Off. Repeat mode is turned off
• One. Repeat the current song
• All. Repeat all songs in the current selection
Shuffle
• Off. Random play shuffle is turned off
• Tracks. Shuffle tracks on the current album
• Albums. Shuffle albums in the current selection
Searching
If your iPod contains more than 100 artists, songs or albums, you can use
FUSION Alpha Search Technology (FAST) to quickly navigate by letter or
number. Use this option to control when to display the FAST menu.
• Off. The song/album list is displayed but not the FAST menu.
• 100–800. Display the FAST menu when your iPod contains more than
the selected number of items.
23
CHANGING MTP SETTINGS
To change a setting in the MTP settings menu:
1. Press the Menu key while the MTP Source screen is displayed.
2. Turn and then press the Rotary Encoder to select one of the following
settings to change.
• Repeat On/Off. Repeat mode is turned on/off (not supported on all devices)
• Shuffle On/Off. Random play shuffle is turned on/off (not supported on all devices)
CHANGING BLUETOOTH SETTINGS
To change a setting in the Bluetooth settings menu:
1. Press the Menu key while the BT Source screen is displayed.
2. Turn and then press the Rotary Encoder to select one of the following;
• List of Paired Bluetooth media devices.
To connect to an active device on the Paired Devices list rotate the rotary encoder
to select the device. Press the rotary encoder to tick the check box.
The device must be turned on, with Bluetooth on and not connected to another
Bluetooth device, otherwise it will not connect.
• Discoverable Off/On.
Enable this option to make the BT-200 Bluetooth module discoverable to Bluetooth
media devices. Press the encoder to tick/untick the check box.
Note: To prevent interruption to audio streaming over Bluetooth it is recommended that
the Discoverable feature is turned off after pairing your device to the FUSION Stereo.
• Remove Devices.
Select this option to display the current list of paired devices. Select the device to be
removed by rotating and pressing the rotary encoder.
AUXILIARY INPUT
LISTENING TO AUXILIARY INPUT
The 700 Series can accept audio input from a TV, games console, portable
player, computer, DVD player or any compatible device.
To listen to input from an auxiliary device:
• Press the Auxiliary key to step though the available
sources. Keep pressing the key until the Aux screen
is displayed.
Auxiliary
24
AUXILIARY SOURCE SCREEN
The input source screen displayed when you select alternate auxiliary input
will depend on how the unit has been set up. The screen to display can be
selected from one of the screens shown in Figure 6, below.
Figure 6 – Examples of auxiliary input source screens
Input level for the selected device can be adjusted if required. For further
details, see “Preparing for Auxiliary Input” on page 43.
ADDITIONAL FEATURES
FUSION-Link
FUSION-Link has the ability to fully control on-board FUSION Entertainment
systems (Supported models), by utilizing FUSION-Link capable multi-function
displays installed at the helm, flybridge or nav station of the vessel, providing
integrated entertainment control and a less cluttered console.
You can control one or more FUSION-Link capable stereo units from a single
location on the boat with the touch of a button. FUSION-Link operates over
existing industry standard networks including Ethernet, NMEA2000 and WiFi.
Link Zones or manage the entire audio system from the steering station
on the boat. The partnered multi-purpose display becomes the portal to
which all audio on the vessel is controlled, no matter where on the vessel
the stereo is installed. The FUSION-Link equipped stereo can be installed out
of sight if space is an issue and users need to visit the unit only to replace
removable media.
For a list of FUSION-Link capable products from companies that are
partnering with FUSION, please visit www.fusionelectronics.com for
further details.
25
TOTAL AUDIO CONTROL VIA NMEA 2000
NMEA 2000 is the most popular marine standard for data communication
within vessels. It has become the standard for sending navigation and engine
management data within vessels. FUSION introduces an industry-first product
by incorporating NMEA 2000 functionality in its audio remote control devices.
This will enable the user to monitor a series of available NMEA sentences.
Visit www.fusionelectronics.com for a full list of supported NMEA sentences.
FUSION MS-NRX200I REMOTE CONTROL
(SOLD SEPARATELY)
The 700 Series Marine Stereo can be controlled by MS-NRX200i wired
remote controls installed in the audio Zones throughout the vessel. The
remote Control has a full-featured user interface. To the user, operating the
entertainment system from the remote control is very similar to operating
it from the main unit. It includes a full size LCD screen and provides full
functionality for navigating iPods and iPhones.
FUSION’s MS-NRX200i wired remote controls are capable of operating
over an existing NMEA 2000 network, removing the need to wire back to
the stereo unit. Smaller or older vessels without NMEA 2000 can still have
FUSION MS-NRX200i wired remotes installed by utilising our standard
FUSION remote control network.
The remote control will also serve as an NMEA repeater displaying NMEA
navigation data or vessel performance data from other NMEA devices on an
existing NMEA 2000 network.
ETHERNET SUPPORT
Connect an All-In-One-DHCP Wireless Ethernet Router to the 700 Series
entertainment system and Apple® devices like the iPad, iPhone and iPod
touch® can wirelessly control the audio around the boat. Apps are available
as a free download to enable iPad, iPhone or iPod touch wireless control from
the iTunes app store. Android apps are available through Google Play.
For further connection details, see www.fusionelectronics.com
26
INFRARED (IR) REMOTE
MS-AV700i model only
You can use the IR remote to navigate through most functions in all sources
DVD source selected.
The following keys work the same way as the matching Head unit keys in all sources.
Power On / Off
Mute all sound
Play / Pause
Display clock
Skip back
Skip forward
The following keys work the same way in all sources.
Change source
Volume Up / Down
The following keys work for DVD / iPod / USB sources only.
27
RDM
Random / Shuffle
RPT
Cycle through repeat options
The following keys work for the SiriusXM source
Skip channels Forward /Back
Press to select Manual or Preset tuning methods.
Press to display the SiriusXM menu that provides access to control
options. Press Menu key to exit current menu screen.
Use the arrow keys to navigate through menus. Press select (SEL)
to choose the highlighted menu item.
When the DVD source is selected, use the following keys to control specific features.
Open a menu in the TV display.
Display on the TV display which CD track, DVD chapter and title you
are currently watching or listening to.
Zoom in on the picture for the currently playing DVD.
Cycle through the available subtitle languages found in the playing
DVD.
Open the DVD setup menu on the TV display.
DVD source not selected
When the DVD source is not selected, use the following keys for navigating the 700
Series menu.
Open the menu for navigation.
Use the arrow keys to navigate through menu, and press select (SEL)
to choose the highlighted menu item.
28
INSTALLING THE 700 Series
Dimensions are in millimetres (mm) and inches (”). Not to scale.
Figure 7 – Dimensions - top view
CONTENT OF BOX
1 x MS-AV700i or MS-IP700i Stereo
1 x Protective Dust Cover
1 x FUSION Drop Cable CAB000851.
See note below.
1 x Power Cable Loom
1 x Speaker Cable Loom
1 x Set of iPod/iPhone Sleeves
(MS-IP700i only)
4
2
1
1
1
1
x
x
x
x
x
x
Mounting Screws
Mounting Brackets
Mounting Gasket
User Manual
Mounting Template
Warranty Card
Note: The CAB000851 Drop Cable is required for connection to a FUSION Remote
Control Network (FRCN). Not required for connection to an existing NMEA 2000
network. Refer to the Installation Section for details.
29
Figure 8 – Dimensions - side view
Figure 9 – Dimensions - front view
30
CONNECTIONS
DESCRIPTIONCOLOUR
Battery +12VDCYellow
Accessory +12V switched
Red
Negative GroundBlack
Remote Amplifier Enable ouput
Blue/White
Dim input [12VDC active]
Orange
Telemute input [GND active]
Brown
Note: All +12V wiring MUST be fused at the power source end of your cable, with
a 15 A fuse. When the red “Accessory +12V switched” wire is not required in your
installation, it MUST be connected together with the Yellow “Battery +12V” wire at the
MS-700i head unit wiring loom.
When connecting the Dim input ensure the wire gauge used is suitable for the fuse
supplying the circuit being connected to.
ANTENNA CONNECTION
Connect an AM/FM marine antenna.
Note: Do Not Connect to a VHF splitter
AUX INPUT
Connect an Auxiliary source to the left and right RCA (White = L, Red = R).
VIDEO CONNECTION
(MS-IP700i iPod/iPhone video only, MS-AV700i DVD video only)
Connect the composite video output (Yellow = Video) to a TV / LCD monitor
(MS-IP700i iPod/iPhone video is only available if device is inserted in internal dock).
USB CONNECTION
Connect an Apple sync cable (not included), or USB Flash Drive (not included) or
connect the MS-UNIDOCK Portable Media Device Dock (not included)
NMEA2000 / WIRED REMOTE
For connection to a MS-NRX200i Remote (not included).
For connection to an existing NMEA2000 Bus a CAB000852 Drop Cable (not
supplied) and CAB000581 T-Connector (not supplied) are required.
IMPORTANT NOTE:
1. The CAB000851 drop cable supplied with the 700 Series is required for connection
to a FUSION Remote Control Network (FRCN).
Note: FUSION recommends updating all remote(s) software via the MS-700i at time
of installation to ensure compatibility. This can be done via the Update menu. Please
refer to your remote manual for more information.
31
ETHERNET CONNECTION TO PARTNERED MFD
For connection to a DHCP Ethernet Router or FUSION-Link partnered
Multi Function Displays.
SiriusXM SATELLITE RADIO
(A)
(B)
Connect to SiriusXM Connect Vehicle Tuner (not included) (For use in USA only)
Connect the MS-BT200 module (not included)
ZONECONNECTIONS
Zone 1 White = Speaker Left Positive
White / Black = Speaker Left Negative
Grey = Speaker Right Positive
Grey / Black = Speaker Right Negative
Zone 2 Green = Speaker Left Positive
Green / Black = Speaker Left Negative
Purple = Speaker Right Positive
Purple / Black = Speaker Right Negative
Note: Speaker connection (2 Ohm Stereo minimum). 2 pairs of 4 Ohm speakers per
channel can be connected in parallel to achieve 2 Ohm configuration
Zone 1 Line Out (Red wire)
Low level output
(For connection to external amplifier)
White RCA = Left Output
Red RCA = Right Output
Brown RCA = Subwoofer Output
Zone 2 Line Out (White wire)
Low level output
(For connection to external amplifier)
White RCA = Left Output
Red RCA = Right Output
Brown RCA = Subwoofer Output
Zone 3 Line Out (Grey wire)
Low level output
(For connection to external amplifier)
White RCA = Left Output
Red RCA = Right Output
Brown RCA = Subwoofer Output
Zone 4 Line Out (Black wire)
Low level output
(For connection to external amplifier)
White RCA = Left Output
Red RCA = Right Output
Brown RCA = Subwoofer Output
32
REMOTE CONTROL
(NMEA2000)
USBCONNECTION
CONNECTION
USB
(iPod,
iPhone, MTPONLY)
device, USB
(MS-AV700
storage
ordevice
FUSIONordock)
(USBdevice
storage
FUSION dock)
SiriusXM Tuner
OR
SiriusXM
MS-BT200
Bluetooth module
ETHERNET CONNECTION
ANTENNA
L (white)
ZONE 1
R (RED)
SUB (ORANGE)
WHITE
L (white)
ZONE 2
R (RED)
WHITE/BLACK
LEFT
ZONE 1
SUB (ORANGE)
GREY
L (white)
ZONE 3
R (RED)
GREY/BLACK
RIGHT
SUB (ORANGE)
GREEN
L (white)
ZONE 4
R (RED)
GREEN/BLACK
SUB (ORANGE)
PURPLE
WHITE
LEFT
ZONE 2
RIGHT
PURPLE/BLACK
LEFT
AUX INPUT
RED
YELLOW
RIGHT
RED
YELLOW
VIDEO OUTPUT
BLACK
BLUE
ORANGE
BROWN
33
BATTERY
(+12VDC)
ACCESSORY
(+12VDC)
NEGATIVE GROUND
(GND)
AMPLIFIER ON (OUT)
DIM (input) +12VDC
TELEMUTE (input) -12VDC
INSTALLATION
ELECTRICAL WIRING
Caution: The MS-IP700i and MS-AV700i are designed for vessels with a 12C DC Negative
ground electrical system.
34
700 Series CONNECTION EXAMPLE
OPTIONAL
SiriusXM TUNER OR
BLUETOOTH MODULE
MS-UNIDOCK
EXTERNAL DOCK
MS-IP700i or MS-AV700i
35
SETTING UP THE 700 Series
ZONES
Zone 1 and 2 are powered by the on board Class-D amplifier. External
amplifiers are required to utilize the 4 line outputs and 4 subwoofer outputs.
You can pre-set the balance, volume limit, sub-woofer level and name for each
of the four Zones available on the 700 Series. If required, you can also:
• Enable or disable Zones 2, 3 and 4 (Zone 1 is always enabled).
• Enable or disable volume control (Zones 3 and 4 only).
• Link Zones 1 and 2.
For further details, see instructions below.
Rotary
Encoder
Menu key
Selecting and setting up a zone
To select a Zone and modify its settings:
1. Press the Menu key.
2. Turn and then press the Encoder to select Settings > Zone.
3. Turn and then press the Encoder to select the Zone you wish to work with.
4. Use any of the following instructions to update settings for the selected Zone.
Enabled
Zones 2–4 can be disabled if required. This is useful, for example, if only two
Zones have been set up, as disabled Zones are not displayed in any screens
when setting levels.
To enable or disable the selected Zone:
a. Select the Enabled menu item.
b. Press the Encoder to enable ( ) or disable ( ) the selected Zone.
c. Press any key to exit
36
Important: If a Zone is disabled, you cannot change any of the following settings
for that Zone.
Disable Internal Amplifiers
Disable the internal amplifiers for Zones 1 and 2. For example, if external
amplifiers are used for Zones 1 and 2 the internal amplifiers can be disabled
to reduce power consumption.
To enable or disable the internal amplifiers for Zones 1 and 2:
1. Press the Menu Key.
2. Turn and press the Encoder to select Settings > Zone.
3. Select the Internal amplifier on menu item.
4. Press the Encoder to disable ( ) or enable ( ) the amplifiers
5. Press any key to exit
Volume control
Zones 3 and 4 can have volume control disabled. You should disable volume
control for a Zone that has its volume controlled from another amplifier or
Head unit. If volume control is:
• Enabled: turning the Encoder will change line level output for the
selected Zone only.
• Disabled: turning the Encoder will not change line level output for the
selected Zone.
To enable or disable volume control:
a. Select the Volume Control menu item.
b. Press the Encoder to enable ( ) or disable ( ) volume control.
c. Press any key to exit
Link to zone 1
Zones 1 and 2 can be linked so that any volume or sub-woofer level changes
are applied to both Zones. A small “+” sign is displayed on screen between
Zones 1 and 2 when this feature is enabled.
To link Zone 2 level to Zone 1 level:
a. Select the Link to zone 1 menu item.
b. Press the Encoder to link the two Zones ( ) or unlink ( ) the Zones.
c. Press any key to exit
37
Balance
To specify the balance for the selected Zone:
a. Select the Balance menu item.
b. Turn the Encoder to the left or right to adjust the Balance for the selected Zone.
c. Press any key to exit
Volume limit
This feature is useful to limit the volume level to prevent excessive noise levels
in specific Zones.
To specify the volume limit for the selected Zone:
a. Select the Volume Limit menu item.
b. Turn the Encoder to adjust the volume limit for the selected Zone.
c. Press any key to exit
Sub-woofer level
External amplifiers are required to add up to 4 subwoofers to the system
A single screen is used to set the sub-woofer level for all Zones.
You can access the screen:
• directly from any input source screen by pressing and holding down the Encoder, or
• from a selected Zone’s Sub level menu item, as described below.
To specify the sub-woofer level for the selected Zone:
a. Select the Sub level menu item. The Sub level screen is displayed with
the first Zone highlighted.
b. Turn the Encoder to adjust the sub level for the highlighted Zone.
c. If required, press the Encoder to accept the sub level and move
automatically to the next Zone.
d. Press any key to exit
Name
Initially, the Zones are named Zone 1–4, but you can give each zone a name
of your choice (up to 10 characters in length). The available characters include
all the uppercase letters, all the lowercase letters, space and numbers. While
changing the Zone name, you can:
• Exit without saving any changes: press the Menu key.
• Exit and save any changes: press and hold down the Encoder.
38
To enter the name for the selected Zone:
a. Select the Name menu item. The current Zone name is displayed with
the first character highlighted.
b. If required, press the Forward (or Backward) key to highlight the
character you wish to change.
c. Turn the Encoder to display the required value for the highlighted
character.
d. Press the Encoder to accept the displayed value and move to the next
character.
e. Repeat Steps b–d until you have worked through all the characters you
wish to change.
f. Press and hold down the Encoder to save the changes and exit.
PREPARING FOR iPod, MTP DEVICE
OR USB CONNECTION
This section describes how to prepare for iPod, MTP device and USB input for
the MS-IP700i, MS-AV700i and MS-AV700 models.
When using your music device with either model:
•
Always disconnect your device from the stereo when not in use and do not
leave in your vessel. This helps reduce risk of theft or damage as vessel cabins
can reach extreme temperatures.
• Do not remove the music device or use your stereo in a distracting manner
while operating the vessel. Check and obey all marine laws in association with use.
ANDROID (MTP) SUPPORT: MTP is a standard developed for connecting media (music) devices over
USB. It has been adopted on a number of platforms including Android. FUSION currently supports a
range of smartphones utilising MTP.
Refer to www.fusionelectronics.com for the latest list of support devices.
39
MS-IP700i MODEL
Note: If you select iPod, MTP or USB input without first connecting the device,
the message “Not connected” is displayed on the screen.
Important Note: Connecting Supported iPods and iPhones to a
MS-IP700i Stereo
The MS-IP700i provides two connection options for iPod and iPhone users.
Supported devices may be either inserted into the internal dock or connected
to the external USB connector.
Note: The internal dock does not support MTP devices and Apple devices featuring an Apple
Lightning connector. An external FUSION MS-UNIDOCK is recommended for this purpose.
The MS-IP700i Stereo does NOT support multiple iPod or iPhone devices
connected simultaneously. Correct operation is only guaranteed with a single
iPod/iPhone device connected.
Before connecting iPod
To avoid damage and ensure safe operation, please read the following
information before using your iPod.
• Please ensure iPod dock connector is clean, dry and free from damage.
• Check that the unit’s iPod dock is free from obstructions.
• Insert correct sleeve combination to match your iPod (never insert iPod
without the correct sleeve).
• Ensure iPod is inserted with display facing upwards.
• Never force your iPod into the dock, if the iPod does not mate with
reasonable ease, the sleeve/iPod combination is most likely incorrect.
• Take care when removing iPod from unit as surfaces may be warm.
• Do not use a sleeve or cover on the Apple device.
To insert your iPod:
1. Press the door catch and open the control panel door.
Press the
door catch
Open
40
2. Insert your iPod in its sleeve (see iPod compatibility sheet supplied separately).
Make sure that the device is firmly pushed onto the connector socket.
3. Close the control panel door firmly.
4. Select the audio source, as required.
MS-AV700i and MS-IP700i Models
The 700 Series stereos provide an external USB connector (rear cable
assembly) for connection to external iPods, iPhones, MTP, USB storage
devices or FUSION MS-UNIDOCK dock.
To connect your iPod, you will need:
• Marine UNI-Dock (MS-UNIDOCK), or
• Apple Sync Cable for Apple devices
or the Micro-USB cable for your MTP device.
To connect your USB flash drive, you will need:
• Marine UNI-Dock (MS-UNIDOCK), or
• Connect your USB flash drive directly to the external USB cable.
Note: If you select iPod, MTP Devices or USB input without first connecting
the device, the message “Not connected” is displayed on the screen.
41
To connect your iPod, MTP device or USB FLASH drive to the 700 Series
via a UNI-Dock:
IMPORTANT NOTE:
ONLY PHONES
AND DEVICES
THAT FEATURE
BOTTOM MOUNTED
CONNECTORS
ARE SUPPORTED.
DEVICES WITH SIDE
CONNECTORS ARE
NOT SUPPORTED.
Portable media device dock
(MS-UNIDOCK)
1. Slide the door catch and open the door of the UNI-Dock.
2. To connect your Apple or MTP device, first select the appropriate adaptor
cable, provided with the UNI-Dock. Slide out the tray and using the adaptor cable
connect your device to the internal USB connector. Place your device in the tray
and slide the tray back into the UNI-Dock. Close the door firmly.
3. To connect your USB FLASH drive insert it directly into the USB internal connector.
4. Select the source (USB, MTP or iPod) from the FUSION Stereo, as required.
To connect your iPod, MTP device or USB FLASH drive via the external USB cable:
1. Plug the Apple Sync Cable for Apple devices or the Micro-USB cable for your MTP
device into your device.
2. Connect your device to the USB Cable
at the rear of the stereo.
3. Select the source (USB, MTP or iPod) from the FUSION Stereo, as required.
IMPORTANT NOTE: The MS-IP700i Stereo (with internal dock) does NOT support
multiple iPods connected simultaneously. Correct operation is only guaranteed with
a single device connected.
42
BLUETO OTH M ED IA D EVI CE.
MS-AV700i and MS-IP700i Models
The external MS-BT200 Bluetooth module is
designed to provide Bluetooth audio streaming
from a compatible smartphone or media player
directly to your FUSION marine stereo. The
MS-BT200 is connected to the Satellite Radio
connector of your stereo.
Note: The MS-BT200 cannot be operated
simultaneously with a Satellite Radio receiver.
For installations where the Satellite
Radio socket is not available the FUSION
MS-BT100 audio onlyBluetooth module
is recommended.
The MS-BT200 supports control (Play/Pause/Next/Back) of the media device
from the FUSION Stereo. Song information such as song title, artist name and
duration are displayed, depending on the capability of your phone and music
application.
The MS-BT200 does NOT provide phone call control. Hands free operation of the
phone is not supported from the FUSION stereo.
ENABLE BLUETO OTH SO U RCE
If you have installed the MS-BT200 Bluetooth module or SiriusXM Tuner (USA
Only) you will need to enable the source. This operation will be determined by the
Tuner region you have selected.
Tuner Region - USA
When USA Tuner region is selected, press the menu button and select
Settings>Sources>Accessory then select the source to enable SiriusXM or
Bluetooth.
Tuner Region - Australasia-Europe-Japan
In these Tuner regions once the MS-BT200 is installed and connected the source
will be available.
PREPARING FOR AUXILIARY INPUT
Connecting auxiliary device
Connect the auxiliary device to the AUX
IN cable (White and Red RCA sockets)
at the rear of the 700 Series.
43
Auxiliary
Rewind
Fast
Forward
Adjusting Auxiliary input level
Many different types of auxiliary device (TV, DVD, Game Console, Media
player) can be connected to the 700 Series, and these devices will have either
a line output or headphone output jack.
To allow for the wide range of input levels from these devices, the AUX input
has adjustable input gain. This should be adjusted to achieve a similar volume
level to the other (fixed gain) input sources on the 700 Series.
To adjust auxiliary input level by changing the gain:
• Increase gain (volume) by pressing the Forward key (1dB steps up to 9dB)
• Decrease gain by pressing the Rewind key (1dB steps down to -9dB).
Recommended settings are listed below:
AUX Device
AUX gain
setting (dB)
Portable media player with headphone output
-9dB to -6dB
CD/DVD player with line output
-6dB
Portable media player with line output
0dB
Game console with line output
0dB
Older audio/visual equipment with line output (for example: VHS or
cassette deck)
6dB to 9dB
Note: When using the headphone output of a portable device, it may be
necessary to adjust the device’s own volume control for best audio quality.
CLOCK SETTING
The 700 Series unit has a built-in clock that can display the time in 12-hour
or 24-hour mode.
To set the clock:
1. Press the Menu key.
2. Turn and then press the Encoder to select
Settings > Clock > Set clock.
The Set Clock screen is displayed.
3. Turn the Encoder to change the hour setting.
4. If required, press the Encoder to move to the minutes field. Turn the
Encoder to change the minutes setting.
44
5. If required, press the Encoder to move to the AM/PM field (displayed in 12
hour clock mode only. See Step 7 below). Turn the Encoder to change the
AM/PM setting.
6. Press the Encoder to save the time and exit (the time out feature does not
operate here).
7. If you want to use the 24 hour clock display (13:09 rather than 1:09 pm,
for example), make sure the 24 hour checkbox is selected ( ). See
Steps 2–3 below.
8. Press the Menu key (or leave to time out) to save the current setting and exit.
To select 12 or 24 hour clock display mode:
1. Press the Menu key.
2. Turn and then press the Encoder to select Settings > Clock > 24 hour.
3. Press the Encoder to select the 24 hour clock display (13:09 rather than
1:09 pm, for example) ( )
4. Press any key to exit
SiriusXM SATELLITE RADIO
Everything worth listening to is on SiriusXM, getting over 130 channels,
including the most commercial-free music, plus the best sports, news,
talk and entertainment. A SiriusXM Vehicle Tuner (sold separately) and
Subscription are required. For more information, visit www.siriusxm.com.
The 700 Series is ready to connect to a SiriusXM radio receiver (USA only).
The SiriusXM tuner is an optional extra that must be purchased separately.
Enabling the SiriusXM Source
If you have installed the SiriusXM Tuner (USA Only) you will need to enable the
source. Firstly, ensure the Tuner Region is set to USA.
Select Settings>Tuner Region > USA
When USA Tuner region is selected, press the menu button and select
Settings>Sources>Accessory then select the source to enable SiriusXM.
Activating your SiriusXM tuner
You must activate the SiriusXM tuner before you can begin to receive the
SiriusXM Radio Service.
In order to activate your radio subscription, you will need the SiriusXM ID (SXID)
which uniquely identifies your tuner. The 8 digit SXID is displayed on the LCD on
initialization. MS-IP700i and MS-AV700i will display the SXID on Channel 0.
45
Power on your system and make sure that you are
receiving good signal, you are able to hear audio on
the SiriusXM Preview channel (Channel 1)
To listen to SiruisXM Satellite Radio, a subscription
is required. Activate the SiriusXM Vehicle Tuner
using one of the two methods below:
Online: Go to www.siriusxm.com/activatenow
Phone: Call 1-866-635-2349
SiriusXM menu options
Press the Menu key to display the
SiriusXM menu that provides access to
various control options. Read on to learn
more about using the Channels, Category
and Parental options.
Channels
You can use the Channels menu item to access a specific channel either
through All channels or via a specific category.
To select a channel:
1. Press the Menu key.
2. Turn and then press the Encoder to select Channels. The Channels menu is
displayed.
3. Do one of the following:
• To select a channel from the list of
all channels, press the Encoder to
select All channels.
• To select a channel in a specific
category, turn and then press the
Encoder to select a category name
(Pop, for example).
4. Turn and press the Encoder again to select the channel you wish to play.
5. Press the Menu key to exit the current menu or press and hold the Menu
key to close the menu completely.
46
Padlock icon
• The padlock icon means the channel is locked or considered
mature content. If you select this channel you will be asked to
unlock parent mode, if it is not already unlocked.
Category
You can use the Category menu item to control which categories of
channels are available (Rock, for example) when you are using the Category
tuning method (see “Tuning Methods” on page 16.
To select a Category:
1. Press the Menu key.
2. Turn and then press the Encoder to select Category.
3. Do one of the following:
• To enable the Category Tuning method, turn and then press the Encoder
to select the required category name, “Rock” for example:
The Sirius Source Screen is displayed with the
Tuning mode indicator set to ‘Category’.
47
• To disable the Category tuning method, press the Encoder to select
All channels. The SiriusXM Source Screen is displayed with the Tuning
mode indicated set to ‘Manual’.
4. Press the Menu key to exit the current menu or press and hold the Menu
key to close the menu completely.
Parental mode
Parental mode provides a way of preventing access channels marked by
SiriusXM as “Mature” or “Locked”. You must enter a 4-digit access code to
enter Parental mode. When in Parental mode you can also change the 4-digit
access code.
Note: The factory setting for the access code is 0000. You can reset the
access code to 0000 by pressing and holding down the Mute key for 15
seconds.
To enter Parental menu:
1. Press the Menu key.
2. Turn and then press the Encoder to select Parental > Unlock. The following
access screen is displayed with the first digit highlighted:
3. Enter the access code by turning the Encoder to change the highlighted
digit, then press the Encoder to select the next digit. When you have
entered all four digits correctly, Parental mode is unlocked.
To change the Parental mode access code:
1. Press the Menu key.
2. Turn and then press the Encoder to select Parental > Change code.
The following access screen is displayed with the first digit highlighted:
48
3. Enter the old (current) access code by turning the Encoder to change the
highlighted digit, then press the Encoder to select the next digit. When you
have entered all four digits correctly, you will be prompted to enter the
new access code.
4. Enter the new access code by turning the Encoder to change the
highlighted digit, then press the Encoder to select the next digit. When you
have entered all four digits correctly, you will be prompted to enter the
new access code for a second time.
5. Press the Menu key (or leave to time out) to save the new code and exit.
Channel Locking / unlocking
Any channels (not just mature content channels) can be locked. Locked
channels cannot be seen in the Sirius Source Screen or when changing
channels with the Forward and Backward keys. Locked channels can be
accessed in parental mode only.
To access a locked channel:
1. Press the Menu key.
2. Do one of the following:
a. Turn and then press the Encoder to select Parental > Unlock.
OR
a. Turn and then press the Encoder to select Parental > Channels.
b. Tune to the channel you require. This channel will display a
padlock icon, to the right of the screen.
3. Enter your access code.
4. Press the Menu key to return to the Sirius Source Screen.
49
To lock or unlock a channel:
1. Press the Menu key.
2. (if required) turn and then press the Encoder to select Parental > Unlock.
Enter your access code.
3. Select the Lock/Unlock menu item.
4. Turn the Encoder to highlight a channel then press the Encoder to
lock ( ) or unlock ( ) the channel, as required.
5. Press the Menu key (or leave to time out) to exit.
ADVANCED SETTINGS
The settings described in this section are usually set up when the unit is
installed and not changed again.
Menu key
Rotary
Encoder
Sub filter
Use the sub filter setting to control the sub-woofer cutoff frequency. Audio
signals above the selected frequency will not be passed on to the sub-woofer.
The sub filter settings apply to all sub-woofer outputs.
50
To change the sub filter setting:
1. Press the Menu key.
2. Turn and then press the Rotary Encoder to select Settings > Sub filter.
3. Turn the Rotary Encoder to select the required filter frequency.
4. Press the Rotary Encoder to save the setting and exit.
5. Press any key to exit
Key sound
The 700 Series makes a short beeping sound when any key is pressed. This
feature can be turned on or off, as required.
To enable or disable the key sound:
1. Press the Menu key.
2. Turn and then press the Rotary Encoder to select Settings > Key sound.
3. Press the Rotary Encoder to turn on key sound (audible beeps) (
)
or turn off key sound (silent) (
)
4. Press any key to exit
Language
The 700 Series can display menus and screens in English, Dutch, French,
German, Italian or Spanish.
To select the required display language:
1. Press the Menu key.
2. Turn and then press the Encoder to select Settings > Language.
3. Turn the Encoder to select the required language.
4. Press the Encoder to save the setting and exit.
5. Press any key to exit
Searching
If your music device contains more than 100 artists, songs or albums, you
can use FUSION Alpha Search Technology (FAST) to quickly navigate by letter
or number. Use this option to control when to display the FAST menu.
• Off. The song/album list is displayed but not the FAST menu.
• 100–800. Display the FAST menu when your device contains more than
the selected number of items.
Power save
If you are operating the 700 Series on battery power, you can turn on the
power save option to reduce drain on the battery. The LCD screen shuts down
automatically after 1 minute of inactivity (press any key to restore display).
To enable or disable power saving mode:
1. Press the Menu key.
2. Turn and then press the Encoder to select Settings > Power save.
3. Press the Encoder to turn on power saving (
)
or turn off power saving (
).
4. Press any key to exit
51
Tel mute
Use this option to control which action is taken when the 700 Series is
connected to a cellphone hands-free kit.
To change the Tel mute setting:
1. Press the Menu key.
2. Turn and then press the Encoder to select Settings > Tel mute.
3. Turn the Encoder to select the required option:
• Mute. Mutes the audio output from the 700 Series when a call is
received on your cellphone.
• Aux. Allows the received call to be broadcast through the Auxilary input
on the 700 Series.
Note: This feature may not operate all available hands-free kits. Hands free
kit must be connected to the TELMUTE input and
AUX input.
4. Press the Rotary Encoder to save the setting and exit.
5. Press any key to exit
Tuner region
Use this option to select the correct region .
To change the tuner region setting:
1. Press the Menu key.
2. Turn and then press the Rotary Encoder to select Settings > Tuner region.
3. Turn the Rotary Encoder to select the required region.
4. Press the Rotary Encoder to save the setting and exit.
5. Press any key to exit
VHF region
Use this option to select the correct VHF tuning region. Please refer to the
specifications section for additional channel information.
To change the VHF region setting:
1. Press the Menu key.
2. Turn and then press the Rotary Encoder to select the Settings > VHF region.
3. Turn the Rotary Encoder to select the required region.
4. Press the Rotary Encoder to save the setting and exit.
5. Press any key to exit
Sources
Use this option to turn the AM or VHF tuner source on or off, if required. This
is useful if you only listen to FM and do not wish to step through AM and VHF
when selecting a tuner source.
The Sources option also enables you to select a name for AUX input and
configure the shared SiriusXM/Bluetooth input source.
52
To enable or disable the AM of VHF tuner sources:
1. Press the Menu key.
2. Turn and then press the Encoder to select the Settings > Sources.
3. If required, press the Encoder to enable the AM source (
) or disable
the AM source (
).
4. If required, turn the Encoder to select VHF then, press the Encoder to
enable the VHF source (
) or disable the VHF source (
).
5. Press any key to exit.
Set Aux name
Select `Set Aux name’ to give the AUX input a name that is more
representative of the device connected to the AUX input. Select a name from
the available list. The name is displayed on the AUX Source screen along with
a matching graphic.
Accessory (Shared BT-200 Bluetooth & SiriusXM Source)
If you have installed the MS-BT200 Bluetooth module or SiriusXM Tuner (USA
Only) you will need to enable the source. This operation will be determined by
the Tuner region you have selected.
Tuner Region - USA
When USA Tuner region is selected, press the menu button and select
Settings>Sources>Accessory then select the source to enable SiriusXM or
Bluetooth.
Tuner Region - Australasia-Europe-Japan
In these Tuner regions once the MS-BT200 is installed and connected the
source will be available.
Set device name
Select `Set Device Name’ to give the Stereo a network name of your choice.
The name is visible to other devices (Marine Wired Remotes MS-NRX200i)
connected to the same FUSION network. Rotate the rotary encoder to
change the character. Press the rotary encoder to select. Press the `Previous’
button to delete characters. · To save changes press the `Play’ key. · To exit
without saving any changes: press the Menu key.
About
This option displays the Stereo software version, remote control version and
FUSION-Link software versions.
53
Internet Protocol (IP) Setting (700 Series Only)
FUSION has provided additional Ethernet network configuration options. A
Static IP address function has been added allowing installers to configure the
700 Series either for dynamic (DHCP) or Static IP address allocation.
WARNING: IF THE 700 SERIES STEREO IS CURRENLTY CONNECTED TO
AN ETHERNET NETWORK APPLYING INCORRECT IP SETTINGS MAY CAUSE
THE STEREO TO BECOME DISCONNECTED FROM THE NETWORK.
To change the IP Setting:
1. Press the Menu key.
2. Turn and then press the Encoder to select Settings > IP Address.
3. Press and turn the Rotary Encoder to select one of the following settings.
Static IP/DHCP
For Ethernet networks with a DHCP router installed select DHCP (default
setting). This function allows the network router to allocate a dynamic IP
address to the FUSION Stereo.
For installations requiring a Static IP address, select Static IP. A Static IP
screen will be displayed with the following fields;
Static IP Address
IP Address
000.000.000.000
Mask
000.000.000.000
Default GW (Gateway)
000.000.000.000
1. Use the Forward/Rewind keys to select the IP field.
2. Turn the Encoder to display the required value.
3. Repeat Steps 1 and 2 until you have worked through all the fields you wish
to change.
4. Press and hold down the Encoder to save the changes and exit. or press
the Menu key to exit without saving the changes.
Factory Reset
The factory reset function will return all settings in the 700 Series to the
factory default value.
Warning: All AM, FM and VHF station presents are erased. Tuner and VHF
tuner regions are reset to USA. All zones are enabled and zone settings, tone,
subwoofer filter settings, source settings and device name are returned to
default values.
To reset your 700 Series to factory default values:
1. Press the Menu Key.
2. Turn and press the Encoder to select Settings > Update.
3. Turn and press the Encoder to select Factory reset. All settings will be
restored to the factory default. At the completion of the reset process the
stereo will automatically power down and restart.
54
APPENDICES
TROUBLESHOOTING
Problem
Solution
General
The unit does not
respond to key
presses.
• Reset the unit by pressing the Reset button inside the control panel door.
What is the best
way to prevent
corrosion on
my 700 Series
chrome finish?
As with all products exposed to the harsh marine environment, a little
care will help to preserve the finish. FUSION recommends that you clean
any salt water and/or salt residue from the front panel with a damp
cloth soaked in fresh water.
Problem
Solution
SiriusXM
When I press
the tuner source
button the
SiriusXM screen is
not displayed.
Ensure you have the MS700i Tuner region set to ‘USA’. Press Menu >
Settings > Tuner region > and select ‘USA’.
Ensure the source is enabled. Select; Settings>Sources>Accessory then
select the source to enable SiriusXM.
• Ensure the SiriusXM module is plugged into the MS700i.
• Unplug the SiriusXM module and check the pins in the SiriusXM
plug are not damaged.
SiriusXM message:
‘Check Tuner’
• Ensure the SiriusXM module is plugged into the MS700i.
• Ensure the SiriusXM cable has not been damaged.
SiriusXM message:
‘Check Antenna’
• Ensure the antenna is plugged into the SiriusXM Tuner module.
• Ensure the antenna is not damaged.
• Ensure the antenna cable has not been damaged
SiriusXM message:
‘No Signal’.
• Ensure the antenna is not damaged.
• Ensure the antenna has a clear view of the sky and is not obscured.
• Ensure the antenna cable has not been damaged
SiriusXM message:
‘Channel xx Not
Available’
A SiriusXM message informing you that the current channel is unavailable.
Possible causes are SiriusXM has removed the channel or your SiriusXM
subscription has changed.
• Contact SiriusXM to update your subscription.
• Online: Go to www.siriusxm.com/subscriptions
• Phone: Call 1-866-635-2349
55
SiriusXM message:
‘Channel xx
Unsubscribed’
• Contact SiriusXM to update your subscription.
• Online: Go to www.siriusxm.com/subscriptions
• Phone: Call 1-866-635-2349
SiriusXM message:
‘Subscription
Updated’
A SiriusXM message informing you that you have either been granted access to
or unsubscribed from various channels.
For more information about your subscription:
• Online: Go to www.siriusxm.com/subscriptions
• Phone: Call 1-866-635-2349
Problem
Solution
Bluetooth
Why does my
FUSION Head Unit
not see my MSBT200 Bluetooth
Module?
If you have installed the MS-BT200 Bluetooth module or SiriusXM Tuner
(USA Only) you will need to enable the source. This operation will be
determined by the Tuner region you have selected.
Tuner Region - USA
When USA Tuner region is selected, press the menu button and select
Settings>Sources>Accessory then select the source to enable SiriusXM
or Bluetooth.
Tuner Region - Australasia-Europe-Japan
In these Tuner regions once the MS-BT200 is installed and connected the
source will be available.
Why does my
Bluetooth source
not display all song
information
The availability of song information such as song title, artist name, track
duration and album cover artwork is dependent on the capability of your
phone and music application. Album cover artwork and Shuffle/Repeat
Status icons are not supported over Bluetooth.
My Bluetooth audio Bluetooth performs best with line-of-sight operation. Ensure the music
is interrupted by
device is not covered or obstructed and is located near the Bluetooth
short breaks.
module. To prevent interruption to audio streaming over Bluetooth it is
recommended that the Discoverable feature is turned off after pairing your
device to the FUSION Stereo.
56
Problem
Solution
iPod
Why does my FUSION
Head unit keep locking
up when connected to my
iPod/iPhone?
If you are experiencing software lock-ups or your unit freezes:
• Reset the Head unit by pressing the reset button inside
the face plate.
• Reset your iPod/iPhone (see Apple website from modelspecific information). This should resume normal operation.
• Make sure you have the latest version of iTunes and the latest operating software in your iPod/iPhone. It is important
to update software when Apple releases new versions. If you
are connected via a dock, ensure you are using the correct
sleeve and the connection to the Head unit is secure.
Will my iPod/iPhone
connect to my FUSION
product if the battery is
flat?
No. It will take a number of minutes for the Apple product to get a
minimum level of charge before it can connect and become operational. Please connect and wait for the unit to initialise.
My Apple Device has gone
into thermal protection
Caution: The internal dock temperature of the MS-IP700i will be
slightly higher than the ambient temperature outside the head
unit. Should your Apple iPhone or iTouch shut down due to exceeding the operating temperature please carefully remove it from the
MS-IP700i and allow it to cool down before using again. Using your
Apple device in a low charged state will increase the heat generated
whilst it is charging. For more information relating to this please
follow the Apple support web site link below.
http://support.apple.com/kb/ht2101
Why does my MS-IP700i
Stereo not connect to my
second iPod?
The MS-IP700i Stereo (with internal dock) does NOT support
multiple iPods connected simultaneously. Correct operation is only
guaranteed with a single device connected.
My iPod/iPhone will not
connect to the Head unit
while in the dock.
If your Head unit displays “Not Connected” while using iPod as
input source:
• Check that you are using the correct sleeve combination. If
you have the incorrect sleeve combination this could prevent
the iPod connector from mating correctly. It could also damage the connector in the dock or your iPod/iPhone itself.
If you are uncertain which iPod model you have, go to
http://www.apple.com/support/ to get the correct model
information for your iPod and sleeve.
If you are still unable to connect once you know for certain
you have the correct iPod/iPhone–sleeve combination:
• Ensure that you have the latest version of operating software installed in your iPod/iPhone and the latest iTunes
version. To do this, connect your iPod/iPhone to iTunes and
it will check and, if necessary, prompt you to download the
latest version.
If you are still unable to connect once you have confirmed
that you have the latest software or you have updated your
iPod/iPhone:
• Reset the iPod/iPhone (see the user manual for your Apple
product) and also reset the Head unit (see FUSION user
manual).
If you are still unable to connect:
• Contact your FUSION dealer or contact FUSION via the
tech email on the FUSION website.
57
Problem
Solution
MTP Device
Why has my MTP
device become
unresponsive?
FUSION recommends that folders contain no more than 300 files each.
Exceeding this limitation may cause the phone to become unresponsive
and the FUSION Stereo to reset the USB link to the phone.
Note: Different operating systems and phones provide varying levels of
support for MTP. Please refer to www.fusionelectronics.com for device
compatibility information.
Why can’t the
FUSION stereo find
my music files?
Problem
Solution
Music files must be located in a folder using one of the following names.
The folder must be located in the root directory of your device.
My Music
My_Music
mobile
Music
Wireless Remote App for iPad and iPhone
My FUSIONLink Wireless
application
displays “No
stereo available”
My FUSION-Link
Wireless remote
aplication wil not
connect to my 700
Series stereo
The first thing to check is that you are connected to the correct
wireless network for the 700 Series.Once you have confirmed this
close the App on the device and restart it (consult the manufacturers
website for instructions on restarting) . If this fails check that you have
a valid IP address on the 700 Series and follow the instructions in the
below tech support item
The first thing to check is that the 700 Series is displaying a valid IP
address on the about screen. Select the settings menu then about to
confirm. If the display is “ IPNone “ the router is either not a compatible
DHCP product or not configured correctly. If the IP address starts
with the prefix 169. it is not valid, this is a default address when the
router is not sending a DHCP generated IP address or is configured
incorrectly. Please review the Router’s instruction manual or contact
the manufacturers website for technical help.
58
SPECIFICATIONS
FCC compliance statement
This device complies with part 15 of the FCC rules. Operation is subject to the
following two conditions:
• this device may not cause harmful interference, and
• this device must accept any interference received, including interference
that may cause undesired operation.
General specifications
Operating voltage.......................................10.2–16 VDC negative ground
Fuse rating......................................................15 amp
DVD player
Laser power...................................................Class I
Power output
Maximum..........................................................70 W x 4
26 WRMS per channel at 4 ohms
45 WRMS per channel at 2 ohms
Pre-output voltage.....................................3 VRMS
Auxiliary input sensitivity
The 700 Series AUX input sensitivity is 1V RMS when gain is set to
0dB.
• Increasing the gain by 6dB doubles the input sensitivity (0.5V RMS for
same volume).
Tuning range
Europe and Australasia
FM radio frequency range 87.5–
108 MHz.
Frequency step 100 kHz
AM radio frequency range 522–
1620 MHz.
Frequency step 9 kHz
59
USA
FM radio frequency range 87.5–
107.9 MHz.
Frequency step 200 kHz
AM radio frequency range 530–
1710 MHz.
Frequency step 10 kHz
Japan
FM radio frequency range 70–90 MHz.
Frequency step 50 kHz
AM radio frequency range 522–1620
MHz.
Designator Frequency step 9 kHz
USA Region VHF tuning range
All regions
Frequency range: 156–164 MHz
The following additional channels are
available within each specific VHF
tuner region (Please refer to
selecting the VHF tuner region on
pg. 56).
LICENSING
Apple, the Apple
logo, iPod and iPhone
are trademarks of
Apple Computer, Inc.,
registered in the US
and other countries.
Frequency 01 Wx 02 Wx 03 Wx 04 Wx 05 Wx 06 Wx 07 Wx Canada Region 01 Wx 02 Wx 03 Wx International Region M1 (only transmitted in Britain) M2 (only transmitted in Britain) Sirius, XM and all related
marks and logos are
trademarks of SiriusXM
Radio Inc. All rights
reserved.
162.550 162.400 162.475 162.425 162.450 162.500 162.525 162.550 162.400 162.475 157.850 161.425 NMEA 2000 -is a Registered
Trademark of the
National Marine
Electronics
Association, Inc.
SUPPORT, SALES AND SERVICE
FUSION Electronics in New Zealand
+ 64 9 369 2900
FUSION Electronics Australia + 61 1300 736 012
FUSION Electronics Europe
+31 76 572 3632
FUSION Electronics USA
+1 623 580 9000
Website: www.fusionelectronics.com
60
INDEX
INDEX
700 Series
control panel, layout........................................................................................................................................................... 5
ethernet support............................................................................................................................................................. 26
installing.................................................................................................................................................................................. 29
setting up.............................................................................................................................................................................. 36
specifications...................................................................................................................................................................... 59
troubleshooting................................................................................................................................................................. 55
disable internal amplifiers...........................................................................................................................................37
factory reset.........................................................................................................................................................................55
alarm, setting and clearing............................................................................................................................................. 13
album artwork setting on iPod, changing........................................................................................................... 20
Android (MTP)
operation................................................................................................................................................................................ 19
installation.............................................................................................................................................................................39
auxiliary input
adjusting input level....................................................................................................................................................... 44
listening to auxiliary input.......................................................................................................................................... 24
preparing for auxiliary input.................................................................................................................................... 43
source screen.................................................................................................................................................................... 25
bluetooth
operation................................................................................................................................................................................ 19
installation.............................................................................................................................................................................43
brightness of display screen, adjusting................................................................................................................. 14
channels
locking/unlocking on SiriusXM............................................................................................................................... 53
skipping on SiriusXM.................................................................................................................................................... 54
tuning to a channel.......................................................................................................................................................... 17
clock
display mode - 12 or 24 hour, changing........................................................................................................ 44
displaying the time........................................................................................................................................................... 12
setting the time................................................................................................................................................................ 44
compact disks, handling correctly................................................................................................................................ 1
connections............................................................................................................................................................................... 35
contact information for support, sales & service........................................................................................ 60
controls
control keys ............................................................................................................................................................See keys
control panel, layout.......................................................................................................................................................... 5
control screens, opening................................................................................................................................................ 8
FUSION-Link....................................................................................................................................................................... 25
infrared remote control............................................................................................................................................... 27
wired remote control.................................................................................................................................................... 30
display screen brightness, adjusting....................................................................................................................... 14
docking unit, for iPod or USB flash drive............................................................................................................ 42
encoder key, operating......................................................................................................................................................... 6
61
ethernet support on 700 Series............................................................................................................................ 26
FAST menu search feature on iPod...................................................................................................................... 23
FUSION-Link control system..................................................................................................................................... 25
gain value, adjusting for auxiliary input............................................................................................................... 44
infrared (IR) remote control....................................................................................................................................... 27
installing the 700 Series............................................................................................................................................... 34
iPod compatibility................................................................................................................................................................... 1
controlling playback...................................................................................................................................................... 20
FAST menu search feature.................................................................................................................................... 23
playing content................................................................................................................................................................. 19
preparing for iPod input............................................................................................................................................ 39
repeat setting, changing........................................................................................................................................... 23
selecting tracks from playlist............................................................................................................................... 20
settings, changing......................................................................................................................................................... 23
shuffle setting, changing........................................................................................................................................... 23
source screen.................................................................................................................................................................. 20
subtitles setting, changing...................................................................................................................................... 23
keys
control key names and symbols............................................................................................................................ 5
encoder key, operating................................................................................................................................................. 6
key sound (beep) enable/disable.......................................................................................................................... 51
menu key, operating....................................................................................................................................................... 6
language for menu display, changing.................................................................................................................... 51
linking zones 1 and 2....................................................................................................................................................... 36
menus
accessing................................................................................................................................................................................ 7
language for menu display, changing............................................................................................................... 51
menu key, operating....................................................................................................................................................... 6
MTP................................................................................................................................................................................................ 19
muting output........................................................................................................................................................................ 10
naming a zone....................................................................................................................................................................... 38
NMEA2000 data communication.......................................................................................................................... 26
noise (VHF, background), minimizing..................................................................................................................... 18
output level
adjusting ..................................................................................................................................................................................9
muting..................................................................................................................................................................................... 10
parental mode on SiriusXM........................................................................................................................................ 48
power save option............................................................................................................................................................... 51
powering the unit on and off......................................................................................................................................... 8
presets
adding and removing.................................................................................................................................................... 18
tuning to a channel........................................................................................................................................................ 16
problem solving............................................................................................................................See troubleshooting
remote controls
infrared (IR)........................................................................................................................................................................ 27
wired....................................................................................................................................................................................... 26
repeat setting on iPod, changing............................................................................................................................ 23
62
scan mode, tuning on....................................................................................................................................................... 19
settings
AM/VHF sources, enabling/disabling.............................................................................................................. 53
clock time, setting......................................................................................................................................................... 44
key sound (beep) enable/disable.......................................................................................................................... 51
language for menu display, changing............................................................................................................... 51
power save option.......................................................................................................................................................... 51
sub filter, setting............................................................................................................................................................. 51
tel mute setting.............................................................................................................................................................. 52
tuner region, setting.................................................................................................................................................... 52
VHF region, setting...................................................................................................................................................... 52
VHF, setting up................................................................................................................................................................. 19
shuffle setting on iPod, changing............................................................................................................................ 23
SiriusXM
activating the SiriusXM tuner.............................................................................................................................. 45
channel categories....................................................................................................................................................... 47
channel locking/unlocking........................................................................................................................................ 49
channels................................................................................................................................................................................ 50
parental mode.................................................................................................................................................................. 48
source screen................................................................................................................................................................... 16
source screens
auxiliary input.................................................................................................................................................................... 24
described................................................................................................................................................................................ 9
iPod.......................................................................................................................................................................................... 20
SiriusXM................................................................................................................................................................................ 16
tuner source screens.................................................................................................................................................. 15
specifications for 700 Series.................................................................................................................................... 59
squelch level, setting......................................................................................................................................................... 18
sub filter, setting................................................................................................................................................................. 50
subtitles setting on iPod, changing........................................................................................................................ 24
sub-woofer level
adjusting................................................................................................................................................................................ 11
setting in a zone............................................................................................................................................................. 38
support, sales and service, contact information......................................................................................... 60
switching the unit on and off......................................................................................................................................... 8
tel mute setting................................................................................................................................................................... 52
time, displaying...................................................................................................................................................................... 12
tone, adjusting........................................................................................................................................................................ 13
troubleshooting.................................................................................................................................................................... 55
tuner
AM/VHF sources, enabling/disabling.............................................................................................................. 53
listening to........................................................................................................................................................................... 15
region, setting.................................................................................................................................................................. 53
source screens................................................................................................................................................................ 15
tuning methods................................................................................................................................................................ 16
turning the unit on and off.............................................................................................................................................. 8
63
USB flash drive
controlling playback...................................................................................................................................................... 22
format information.......................................................................................................................................................... 1
listening to your music............................................................................................................................................... 19
preparing for input....................................................................................................................................................... 39
selecting audio tracks................................................................................................................................................. 21
settings, changing......................................................................................................................................................... 24
VHF
background noise, minimizing................................................................................................................................ 18
region, setting.................................................................................................................................................................. 52
scan mode, turning on................................................................................................................................................ 19
setting up............................................................................................................................................................................. 19
tuner source, enabling/disabling........................................................................................................................ 52
volume
control, enabling/disabling in a zone................................................................................................................ 37
level, adjusting................................................................................................................................................................... 10
limit, setting in a zone................................................................................................................................................ 38
wired remote control.................................................................................................................................................. 26
zones
enabling and disabling................................................................................................................................................ 36
for controlling balance and levels...................................................................................................................... 38
linking zones 1 and 2.................................................................................................................................................. 36
naming a zone.................................................................................................................................................................. 38
selecting and setting up........................................................................................................................................... 36
setting balance in a zone......................................................................................................................................... 38
sub-woofer level, setting.......................................................................................................................................... 38
volume control, enabling/disabling.................................................................................................................... 37
volume limit, setting..................................................................................................................................................... 38
64
NOTES
................................................................................................................................................................................................................
................................................................................................................................................................................................................
................................................................................................................................................................................................................
................................................................................................................................................................................................................
................................................................................................................................................................................................................
................................................................................................................................................................................................................
................................................................................................................................................................................................................
................................................................................................................................................................................................................
................................................................................................................................................................................................................
................................................................................................................................................................................................................
................................................................................................................................................................................................................
................................................................................................................................................................................................................
................................................................................................................................................................................................................
................................................................................................................................................................................................................
................................................................................................................................................................................................................
................................................................................................................................................................................................................
................................................................................................................................................................................................................
................................................................................................................................................................................................................
................................................................................................................................................................................................................
................................................................................................................................................................................................................
................................................................................................................................................................................................................
................................................................................................................................................................................................................
................................................................................................................................................................................................................
................................................................................................................................................................................................................
................................................................................................................................................................................................................
................................................................................................................................................................................................................
65
© Copyright 2013 by FUSION Electronics Limited. All rights reserved. Product specifications, design and
prices are subject to change without notice. Product availability may vary between sales regions. “Made for
iPod,” “Made for iPhone,” mean that an electronic accessory has been designed to connect specifically to iPod,
iPhone, respectively, and has been certified by the developer to meet Apple performance standards. Apple is not
responsible for the operation of this device or its compliance with safety and regulatory standards. Please note
that the use of this accessory with iPod or iPhone may affect wireless performance.
66
Specifications and design are subject to change without notice
67 MAN000001G
P/N