1
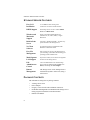
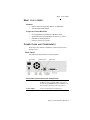
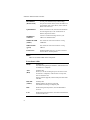
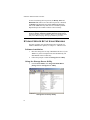
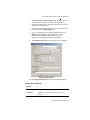
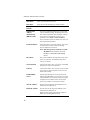
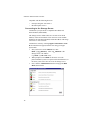
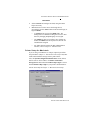
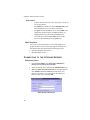
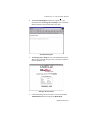
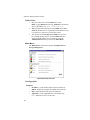
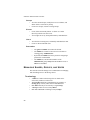
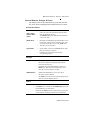
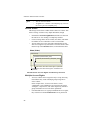
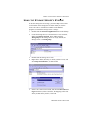
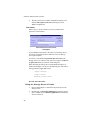
User’s Guide Plug-&-forget Network Storage Solution Copyright 2000 Castelle. All rights reserved. OfficeDirect Storage Server User’s Guide 61-1202-001 rev A. Castelle is a registered trademark of Castelle. Microsoft, Windows, and Outlook are registered trademarks of Microsoft, Inc.Windows 95/98/2000 and NT are registered trademarks of Microsoft, Inc. Macintosh is a registered trademark of Apple, Inc. All other product names or name brands are trademarks of their respective holders. This material is protected by international copyright laws. Reproduction is prohibited without permission. Castelle Corporate Headquarters 3255-3 Scott Blvd. Santa Clara, CA 95054 Phone: 408-496-0474 Toll Free: 800-289-7555 Fax: 408-492-1964 Email: [email protected] Castelle UK Headquarters Castelle Europe Ltd. Chesterton House 352 Avebury Blvd. Milton Keynes MK9 2JH United Kingdom Phone: +44 (0)1908-207-600 Fax: +44 (0)1908-207-601 Technical Support Technical support is available by mail, fax, e-mail, or phone from 6am to 6PM Pacific Standard Time. Before contacting Technical Support, please refer to Chapter 6 - Troubleshooting for possible solutions. Phone: 408.496.6966 Fax: 408.492.1338 E-mail: [email protected] Please be sure to provide Technical Support with your OfficeDirect Storage Server serial number, your name, company name, street address, and phone number. Castelle North America Sales Toll Free: (800) 289-7555 International Sales Phone: 1 (408) 496-0474 III FCC Statement: This device complies with the limits for a Class A digital device, pursuant to Part 15 of the FCC Rules. Operation is subject to the following two conditions: • • This device may not cause harmful interference. This device must accept any interference received, including interference that may cause undesired operation. CE Marking Warning This is a Class A product. In a domestic environment this product may cause radio interference in which case the user may be required to take adequate measures. Safety Information Voltage The Castelle OfficeDirect Storage Server operates only from a 90-250 volt, 60/50 Hz AC source. Do not connect to any other power source. CAUTION: Always disconnect power cord from power supply before servicing to avoid electric shock. Power Source The OfficeDirect Storage Server operates from a single-phase power source. Operation from power sources where both current-carrying conductors are live with respect to ground (e.g. phase-to-phase on a 3-wire system) is not recommended. CAUTION: Proper AC source grounding, and grounding circuit continuity are vital for safe operation Power Cord The OfficeDirect Storage Server comes with a UL listed, detachable 3-wire cord with a 3-terminal polarized plug for connection to the power source. CAUTION: Use only the 3-wire, 3-terminal power cord provided. Warning: To preclude the possibility of electrical shock, do not remove the OfficeDirect Storage Server case without first detaching the unit from the AC power source. IV Contents About your Storage Server ___________________________ 1 Storage Server Features _________________________________ 2 Package Contents ______________________________________ 2 What you’ll Need ______________________________________ 3 Connections and Components_____________________________ 3 Installation and Setup _______________________________ 7 Requirements _________________________________________ 7 Setting up the hardware _________________________________ 7 Storage Server Setup Using Windows ______________________ 8 Storage Server Setup Using Macintosh ____________________ 11 Storage Server Setup with OfficeDirect Messaging Server.100 _______________________ 14 Storage Server Setup with FaxPress Fax Servers _____________ 14 Administration ____________________________________ 15 Overview____________________________________________ 15 Connecting to the Storage Server _________________________ 16 Managing Shares, Groups, and Users ______________________ 20 Common Administrative Tasks __________________________ 23 Windows Client Setup ______________________________ 25 Overview____________________________________________ 25 Using the Storage Server's Storage ________________________ 29 Macintosh Client Setup _____________________________ 33 Requirements ________________________________________ 33 Accessing Disk Storage ________________________________ 33 Using the Storage Server's Printer ________________________ 34 Changing your Password _______________________________ 34 Troubleshooting___________________________________ 35 Windows ____________________________________________ 35 Macintosh ___________________________________________ 38 Chapter 1 About your Storage Server Castelle’s OfficeDirect Storage Server.100 is designed to offer the growing business a simplified, cost-effective way to outfit an existing small LAN with some of the more valuable features of a large enterprise network. Both Windows and Macintosh users on your local area network will now be able to access shared data stored on the Storage Server. Shared printing, too, becomes an option. Attach a printer to the Storage Server’s printer port and you’ve effectively created a new network printer. The perfect complement to Castelle’s OfficeDirect Messaging Server, the Storage Server provides all the necessary disk space for the Messaging Server’s server software, email and fax files. Together, the Messaging and Storage Servers become the equivalent of having your own email, fax and print servers--without the expense and complexity. New and existing FaxPress users (versions 6.2 and above) can also use the Storage Server as an economical alternative to current Windows NT, Linux, and Novell file servers. Visit Castelle’s website at www.castelle.com for details. Thanks for choosing Castelle. 1 S TORAGE S ERVER U SER ’ S G UIDE S TORAGE S ERVER F EATURES Easy LAN Installation A 10/100BaseT auto-sensing LAN connection--no need to set DIP switches. DHCP Support The Storage Server can act as either a DHCP Server or a DHCP Client. Windows and Macintosh Support Clients can be Microsoft Windows PCs (Windows 95, 98, NT4.0, 2000), or Apple Macintosh. Built-in Print Server LAN users - Windows and Mac - can share any printer attached to the Storage Server. No Client Software No software needs to be installed on either Windows or Macintosh clients. Easy File Management Once your PC has access to the Storage Server, you can manage your folders and files using your operating system’s familiar tools. Multi Segment LAN Support If you have a router, PCs on other LAN segments can also use the Storage Server. Full Administrator Control The LAN administrator can control Storage Server usage by defining Users, Groups, and Shares, and setting the Access Rights. Remote Management The Storage Server can be managed from a workstation anywhere on the LAN, using a web browser. P ACKAGE C ONTENTS The OfficeDirect Storage Server package contains: • • • • • 2 A Storage Server Unit. Power Adapter Category 5 UTP network cable with RJ45 connectors. CD-ROM containing PDF User Manual and the Storage Server Utility program for Windows 95/98/NT4.0/2000. Printed User Manual. W HAT YOU ’ LL N EED W HAT YOU ’ LL N EED Network • Ethernet Network employing 10BaseT or 100BaseTX. • TCP/IP installed and enabled. Supported Client Machines • PC using Windows 95/98/NT4.0 or Windows 2000. • Apple Macintosh with AppleShare and system 7.5 or later. • OfficeDirect Messaging Server • FaxPress version 6.2 or greater C ONNECTIONS AND C OMPONENTS Please take a few minutes to familiarize yourself with your new Storage Server. Rear Panel All connections and switches are on the rear panel. . Storage Server Rear Panel Rear Panel Connections and Components Power Switch This is a spring-loaded "Soft Switch". If Off, press once to turn On. If On, press once to start the Storage Shutdown sequence. Always use the Power Switch to shut down your Storage Server. Power Input Connect the supplied power adapter here. A BOUT YOUR S TORAGE S ERVER 3 S TORAGE S ERVER U SER ’ S G UIDE Reset Button (IP/Password) To reset, press and hold until you hear 1 beep, The password will be cleared, and its IP Address set to the default value of 192.168.0.2, with a Network Mask of 255.255.255.0 Uplink Button When connected to a hub, this button should be UP. If connecting directly to a PC or Macintosh via Ethernet, depress this button. 10/100BaseT connector Use this to connect the Storage Server to your 10BaseT or 100BaseTX hub. 100BaseTX LED (amber) This will be ON if the LAN connector is using 100BaseTX. 10BaseT LED (green) This will be ON if the LAN connector is using 10BaseT. Printer Port Standard parallel printer port. A printer connected here becomes a "network printer." LEDs There are six status LEDs on the front panel: Front Panel LEDs 4 Ready Normally ON. This blinks during Startup or Shutdown, and turns OFF after the shutdown is completed. Alert (Red) Normally OFF. However, it will be On during the power-on self test. Once the self-test is completed, it will turn OFF. If it stays ON, there is a hardware error. During a software upgrade, both the Ready and Alert LEDs will blink. Disk Full (Amber) Normally OFF. Blinking indicates the Storage is 98% full. ON indicates the Storage is completely full. Disk Flashes during normal operation, when the Hard Disk is accessed. LAN Flashes during normal operation, when data is transmitted or received via the LAN. C ONNECTIONS AND C OMPONENTS Buzzer • • • • The buzzer provides valuable feedback on the state of your Storage Server. 1 Beep when reset button or power switch is pressed. 2 Beeps - repeated every 5 seconds for 1 minute - when Storage Server, acting as a DHCP client, receives no DHCP Server response to a DHCP client request. 3 Beeps - repeated every 15 seconds for 3 minutes - when hard disk usage exceeds 98%. 5 Beeps - repeated every 15 seconds for 3 minutes - when overheating; automatic shutdown will start 3 minutes after 1st beep. Specifications Dimensions 228mm (W) * 228mm (D) * 66mm (H) 9" (W) * 9" (D) * 3" (H) Operating Temperature 5° C to 40° C Storage Temperature -10° C to 60° C Network Protocol TCP/IP, AppleShare, SMB Network Interface Auto-sensing Ethernet 10BaseT or 100BaseTX UTP, RJ45 connector Printer Port 1 DB25 parallel port LEDs Rear: 2 LAN connection status Front: 5 status/operation Power 12V DC maximum, 3.6 amps. 100- 240 V AC, 50-60Hz power adapter provided. A BOUT YOUR S TORAGE S ERVER 5 Chapter 2 Installation and Setup R EQUIREMENTS You’ll need a 10/100BaseT Ethernet network with TCP/IP installed and enabled. S ETTING UP THE HARDWARE Connect Network Cable Use the RJ45 socket to connect the Storage Server to your hub. The Storage Server will auto-configure for 10BaseT or 100BaseTX, and full or half duplex. Connect Printer If you wish to share a printer, use a standard printer cable to connect the printer to the Storage Server's parallel port. Connect Power Connect the supplied power adapter to a power outlet and the Storage Server. Press and release the rear-mounted power switch to begin the start-up procedure. During the initial 2 or 3 second self-test, ALL of the LEDs will 7 S TORAGE S ERVER U SER ’ S G UIDE be ON. Then, during the boot process, the Ready, Alert and Disk Full LEDs will be ON. Once the boot process is finished, the Ready LED should be ON and the Alert LED should be OFF. If the Alert LED stays ON, there is a hardware problem. Repeated beeps also indicate a failure to boot correctly. N OTE : If the Storage Server is powered on and in Ready mode DO NOT pull the power adapter without first shutting down the Storage Server. Disconnecting power prior to shutdown causes a 15 to 20 minute check disk process. Please see page 30 for proper shutdown procedures. S TORAGE S ERVER S ETUP U SING W INDOWS For basic operation, only the following setup is required. For further Administrative options, see Chapter 3 - Administration. Software Installation 1. Place the Storage Server setup CD-ROM in the drive of your Windows system. If setup does not start automatically, run SETUP.EXE in the root directory. 2. Follow the prompts to install the Storage Server Utility. Using the Storage Server Utility 1. From the Start Menu, select Programs>OfficeDirect Storage Server> Storage Server Utility . Storage Server Setup Utility 8 S TORAGE S ERVER S ETUP U SING W INDOWS 2. The Storage Server Setup Utility screen displays a list of all Storage Servers on the left; the selected Storage Server’s information is displayed on the right. (If no Storage Servers are listed, see Troubleshooting.) 3. Confirm that the desired Storage Server is selected in the left panel, then click the Quick Setup icon. 4. If you are prompted for a User Name and Password, enter admin for the user name, and the password you have assigned to the admin user (By default, there is no password, so the Password field can be left blank.) 5. The Setup Storage Server screen (below) will be displayed. Setup Storage Server Use the Setup Screen Data tables below for configuration help. Setup Screen Data Server Server Name The default ID number may be customized. Comment Comments (e.g. Location of the Storage Server) are optional. I NSTALLATION AND S ETUP 9 S TORAGE S ERVER U SER ’ S G UIDE Time Zone Select your time zone from the list. Date/Time Enter the local date (mm/dd/yyyy format) and time. TCP/IP Obtain an IP Address automatically (DHCP Client) If you have a DHCP or BootP server on your LAN, you can enable this setting. The Storage Server will then obtain its IP Address from the DHCP or Bootp server. However, because this is a Server, it is preferable to use a fixed, or static IP Address. If your LAN does not have a DHCP server, then you must select Fixed IP Address. Fixed IP Address Select this option to enter an IP Address. This option is required if you wish to enable your Storage Server’s DHCP Server function. N OTE : The Storage Server must have a static IP address to be used as a server for FaxPress or OfficeDirect Messaging Server. 10 IP Address Enter a free IP Address from the address range used by PCs on your LAN. The default Storage Server value is 192.168.0.2 Network Mask Use the same value as PCs on your LAN. The default Storage Server value is 255.255.255.0 Gateway Use the same value as PCs on your LAN. If you don't have a router or Internet Gateway, leave this at the default value (blank). Enable DHCP Server If checked, the Storage Server will provide an IP Address and related data to PCs on request. PCs will only make DHCP client requests if they are properly configured to act as DHCP clients. (See Windows Client Setup and Mac Client Setup for details.) Start IP Address The first value for the range of IP Addresses to be allocated by the DHCP Server. Finish IP Address The last value for the range of IP Addresses to be allocated by the DHCP Server. Make the range is large enough for the number of DHCP clients making DHCP requests. S TORAGE S ERVER S ETUP U SING M ACINTOSH Microsoft Networking Workgroup Name Normally, this name should match the Workgroup name used by PCs on your LAN. Enable WINS Check this if your LAN has a WINS (Windows Internet Naming Service) Server. WINS Server Enter the IP Address of the WINS Server. This is normally a system running Windows NT Server. Apple Networking Zone 6. 7. The default value is "*", giving all zones access to the Storage Server. If a zone name is shown, only Mac users in that zone can access the Storage Server Click "OK" to save and exit. The Storage Server is now operational, with the following limitations. • All Windows users will be given "Guest" access rights. This allows Printer usage, and access to the public folder. • Macintosh users can only access Storage Server storage with the guest network logon, or by logging on as admin with no password. (The admin user has access rights to ALL folders.) • Macintosh users can only access the printer if it is a LaserWriter or compatible. To overcome these limitations, use the Browser-based Administration interface. This is invoked with the Administration icon on the Storage Server Utility's main screen. See Chapter 3 for full details on using the Administration interface. S TORAGE S ERVER S ETUP U SING M ACINTOSH The CD-ROM’s setup program is designed for to be used with Windows 95/98/NT/2000. Users running Macintosh and other operating systems will connect to and configure the Storage Server with a web-based interface. The web browser used must support JavaScript V1.1. The Storage Server’s web-based administrative interface is I NSTALLATION AND S ETUP 11 S TORAGE S ERVER U SER ’ S G UIDE compatible with the following browsers: • • Netscape Navigator 4.04/4.08/4.5 Internet Explorer 4.0/5.0 Connecting to the Storage Server Confirm that your system has a compatible IP Address and Network Mask (Subnet Mask). The Storage Server's default values are 192.168.0.2 for the IP Address, with a Network mask of 255.255.255.0. Your machine should use the same Network Mask, and an IP Address in the range 192.168.0.3 to 192.168.0.254. Confirm these values by selecting Apple>Control Panel > TCP/ IP. If TCP/IP doesn’t appear, install it now using your Apple System Disk. 12 1. Start your browser. In the Address box, enter: HTTP://ip_address, where ip_address is the Storage Server’s IP Address (e.g. HTTP://192.168.0.2). 2. When prompted, enter admin for the name. Leave the password blank. If you do set a password for the admin user, in the future you’ll enter it here to access the Storage Server. 3. Next, click the Administration button to bring up the Main Menu, shown below. S TORAGE S ERVER S ETUP U SING M ACINTOSH Main Menu 4. Select Network and configure each tab, using the online help as necessary. 5. Macintosh users can now access the Storage Server, provided they use the Guest button on the Network login, or login as admin. • A guest user has access to the public share. The Storage Server Administrator can grant access to other shares by changing everyone group access rights . • The admin user has access rights to ALL folders. By default, the admin user has no password, but one can and should be assigned. • For further details on using the Web Administration interface, refer to Chapter 3 - Administration. Printer Setup for Macintosh If you’re using a LaserWriter, no setup is required--just follow the procedure in Chapter 5 - Macintosh Client Setup. If not, Mac clients must install the Storage Server's printer driver. Also, the System Configuration>Printer Port screen (below) must be correct. Select "Other" for Printer connected to Storage Server and confirm the Printer Object Type is correct. Find the Printer Object Type in your printer's documentation . You are now ready for Chapter 5 - Macintosh Client Setup. I NSTALLATION AND S ETUP 13 S TORAGE S ERVER U SER ’ S G UIDE System Configuration>Printer Port S TORAGE S ERVER S ETUP WITH O FFICE D IRECT M ESSAGING S ERVER.100 The OfficeDirect Messaging Server.100, an integrated email and fax server appliance for Microsoft Outlook, is a companion product to the OfficeDirect Storage Server.100. The OfficeDirect Messaging and Storage Servers, with their easy setup and familiar, Windows-based administration utilities, are specifically designed for small and medium size organizations that do not have a full time MIS or IT staff. An inexpensive and reliable alternative to a file server, the OfficeDirect Storage Server provides the reliable storage space required for the Messaging Server’s system software, message storage and databases. If you’re planning to use your Storage Server with a Messaging Server, set the Storage Server up first, then begin the Messaging Server setup. The OfficeDirect Messaging Server installation program will guide you through installing the Messaging Server on the Storage Server. For additional information please refer to: http://www.castelle.com/support/officedirect/ODSS_100/install/ ODMS_100 S TORAGE S ERVER S ETUP WITH F AX P RESS F AX S ERVERS The OfficeDirect Storage Server.100 can be used with Castelle’s FaxPress, a production quality plug-and-forget fax server appliance. The Office Direct Storage Server, providing all the necessary storage for incoming and outgoing fax messages, databases, and system files, eliminates the need for a file server. Storage Server installation instructions are included with FaxPress 6.2 and later versions of FaxPress software. For additional information please refer to: http://www.castelle.com/support/officedirect/ODSS_100/install/ FaxPress 14 Chapter 3 Administration O VERVIEW The Storage Server administrator controls Storage Server usage by creating and managing access-defined Users, Groups, and Shares. Users Each user is identified by their User Name and Password. The Administrator can create Users, and also limit the amount of disk storage available to a user. Groups Users are organized into user Groups. A user can belong to many Groups Shares A "Share" is a folder on the Storage Server which users can access. Only the Administrator can create Shares.Within a Share, though, users can create folders and files. Access Access to a share can be "Read-only" or "Read-Write". To Rights reduce administration workload, access to a Share is granted to a User Group, rather than to individual users. N OTE : AppleShare does not support “Read-only “ access; access is always “Read-Write.” 15 S TORAGE S ERVER U SER ’ S G UIDE Remember: • A Share can be accessed by only 1 Group, but a Group can access many Shares. • The admin user, and all users in the administrator group, have Read/Write access to all shares and folders. • The guest user has Read/Write access to the public share. Change this, and grant access to additional shares, by changing the access rights for the everyone group. • Users who do not have a User Name on the Storage Server are automatically given the guest login. Web Interface You’ll use a web-based interface to create and manage users, groups and shares. Your browser must support JavaScript V1.1 The interface has been tested with the following browsers: • Netscape Navigator 4.04/4.08/4.5 • Internet Explorer 4.0/5.0 C ONNECTING TO THE S TORAGE S ERVER Windows Users 1. From the Start Menu, select Programs> OfficeDirect Storage Server>Storage Server Utility. 2. Select the Storage Server and click the Administration icon. 3. When the Enter Network Password screen (below) appears, enter admin for the User Name. By default, there is no password; if you have set a password for the admin user, however, enter it here, and click OK. Enter Network Password 16 C ONNECTING TO THE S TORAGE S ERVER 4. This JavaScript Support window may appear for a few moments before the Storage Server Setup screen is launched, and may either be closed or allowed to stay open. JavaScript Support 5. The Storage Server Setup screen, your administrative portal, allows you to select the Storage Server you’d like to connect to from the pulldown list. Storage Server Setup 6. Confirm the Storage Server selected is correct, and click the Administration button to bring up the Main Menu. A DMINISTRATION 17 S TORAGE S ERVER U SER ’ S G UIDE Other Users 1. Start your web browser. In the Address box, enter: HTTP://ip_address, where ip_address is the Storage Server’s IP Address (e.g. HTTP://192.168.0.2). 2. When prompted for the password, enter admin for the User Name. By default, there is no password for the admin user, but if you have set a password, you must enter it here. 3. You will then see the Storage Server Setup screen. If you have multiple Storage Servers, use the Connect button to switch to another Storage Server. Otherwise, click the Administration button to proceed to the Main Menu. Main Menu The Main Menu is divided into 2 groups: Configuration and Storage Management. Main Menu Web Interface Configuration Network • IP Address - Set IP Address, Subnet mask, and Gateway. • DHCP - Enable and configure the DHCP Server function. • DNS - (DNS) Domain Name Server IP Addresses. • AppleTalk - Set the AppleTalk Zone. The default value is "*", which allows access by all zones. 18 C ONNECTING TO THE S TORAGE S ERVER • Microsoft - Configure Microsoft networking; set Workgroup Name, Code Page (alphabet) and WINS (Windows Internet Naming System). System • General - Set the Storage Server name, date and time. • E -Mail - Configure the Storage Server to send E-Mail messages when there is a problem. • Printer Port - Configure the Printer. This is helpful but not essential for Windows users. It is essential for Macintosh users when the printer connected to the Storage Server is NOT a LaserWriter or compatible. • Shutdown - Shutdown the Storage Server, or create a shutdown schedule. Utilities These utilities are not required for normal operation. • • • Disk - Check the Storage for errors, similar to ScanStorage. If multiple Storages are fitted, you can also format a new Storage. Log - Check the system log. This is provided only for troubleshooting. Upgrade - Upgrade the Storage Server software. Status • Disk - Check disk usage. This data is read-only. • Printer - Check the printer status, and delete the current print job, or all print jobs. • System - Check System status. This data is read-only. Storage Management Group Use these options to manage Shares, Users, Groups, and access to shares. See the later section Managing Shares, Groups and Users for details. Browse Browse the Shares and folders on the Storage Server. This allows you to: • • See the relationship between Shares and folders on the hard disk. View the directory structure on the Storage Server. A DMINISTRATION 19 S TORAGE S ERVER U SER ’ S G UIDE Groups • View the current Groups, modify their access to Shares, and add or delete Users from any Group. • Create new Groups, or delete existing Groups. Shares • Create, delete and modify Shares. A "Share" is a folder (directory) which Users can access. • Access rights are set by Group rather than by individual user. Users • View the list of existing users, and modify individual user data. • Create or delete individual users. Remember: • The guest and admin users cannot be deleted. • The admin user cannot be removed or moved from its existing group, "administrator”. • By default, the admin user has no password. Assigning a password is recommended. • The admin user, and all other members of the administrator group, always have Read/Write access to all shares and folders. M ANAGING S HARES , G ROUPS , AND U SERS This section assists the Storage Server administrator in managing and controlling access to the Storage Server. Terminology • • • • • 20 A Share is a folder on the Storage Server which can be accessed by client PCs on the LAN. Access rights (Read-only or Read-Write) are granted to a Group (group of users), rather than to individual users. Each Share can only be accessed by a single Group. A Group can have access to many Shares. Each individual User can belong to many Groups. M ANAGING S HARES , G ROUPS , AND U SERS Special Shares, Groups & Users The Storage Server has pre-defined shares, groups and users that may not be deleted, although limited modifications may be made. Shares & Folders HDD1 • (Share name matches Drive Name) • • public share • • spool folder • Each disk drive has a share which matches the drive name. This is the root folder. Backing up this share backs up all data on the drive. The administrator group ALWAYS has Read/Write access to this share. By default, the everyone group has Read/Write access to this folder. This can not be changed, so ALL users always have Read/Write access to the public share. This share can not be deleted. System folder, accessed via the Browse menu, holds print jobs waiting to be printed. Deleting a file in this folder will cancel the corresponding print job. Groups everyone • • • administrator • • • This group cannot be deleted. All users are members of this group, and cannot be removed from this group. By default, this group has Read/Write access to the public share. This can not be changed, but access to other shares can be granted or revoked. ALWAYS has Read/Write access to ALL shares. This group cannot be deleted. The admin user cannot be removed from this group, but other users may be added or deleted. Users admin • • • This user cannot be deleted. The admin user is a member of the administrator group, and has Read/Write access to all shares. By default, the admin user has no password, but a password can be assigned. Assigning a password is recommended. A DMINISTRATION 21 S TORAGE S ERVER U SER ’ S G UIDE guest • • This user cannot be deleted. The guest user is a member of the everyone group, and so has the access rights of the everyone group. Nested Shares The Storage Server allows a folder inside a share to be a share. This allows "nesting" of shares to any depth. Remember, though: • • • In Windows' Network Neighborhood, all shares are listed on the same level - the "nesting" is completely invisible. Users accessing shares will see folders, not shares, and cannot tell whether or not a sub-folder is in fact a nested share. Anyone with access to the outer share automatically has the same access rights to any inner shares. The most sensitive data must be kept in the outermost share, not the innermost share. . Share (folder) secret (/secret) confidential (/secret/sensitive_data) published (/secret/sensitive_data/publish_data) If have access, have same access rights to "published" If have access, have same access rights to "confidential" and "published" Nested Shares: Access Rights and Directory Structure Multiple Access Rights • • 22 Access to a Share can be assigned to only 1 Group, but using nested Shares may result in multiple groups being able to access a Share. In the example above, if access to the shares "secret", "confidential", and "published" were assigned to the groups "managers", "supervisors", and "staff" respectively, then all 3 groups would have access to the share "published". If an individual user is in 2 groups with different access rights, they would receive the Least Restrictive access permission. C OMMON A DMINISTRATIVE TASKS C OMMON A DMINISTRATIVE TASKS Task Procedure Protect Server configuration Assign a password to the Admin user. Select Users, then select the Admin user, and click Modify. Create Users Users menu option. Click New User. Edit User Details Users menu option. Select the desired user, then click Modify. Create Groups Groups menu. Click New Group. Change Group Membership Either: Select the Group on the Groups screen, and click Members. OR, Select the User on the Users screen, and click Groups. Create Shares Shares menu option. Click New Share. Set Access to Shares Groups menu. Select the Group, then click the Shares button. On the Group/Share Relationship screen, you can select the Share(s) and the type of access for this Group. File Management Within any Share to which you have access, you can use Windows Explorer to perform file management. Users in the Administrator group can access any share, and can also access the share "HDD1", which is the root directory on the Storage Server. Note: You may sometimes see the following files, which have been generated by AppleTalk clients: .Apple Desktop .Apple Double Network Trash Folder Do NOT delete these files! A DMINISTRATION 23 S TORAGE S ERVER U SER ’ S G UIDE Task Procedure Backup data on the Server Use your backup program to backup any folder. To backup all files, users in the Administrator group can backup the HDD1 folder. Shutdown the Server Use either of the following methods: 1. Press the rear-mounted power switch ONCE. 2. Use the System>Shutdown menu option to perform a remote or scheduled shutdown. N OTE : Configure the Printer Port 24 The Ready LED blinks during shutdown. Windows Clients: The correct printer name should be entered on the System>Printer screen. This has no effect on operation, but helps uses identify the printer when they browse the network. Macintosh Clients: See Chapter 5 - Macintosh Client Setup. Chapter 4 Windows Client Setup O VERVIEW The Storage Server supports Windows clients running Windows 95/ 98/2000, Windows NT 4.0 or 2000 Professional Edition. This chapter will help you check and configure TCP/IP settings and access to the Storage Server’s storage. TCP/IP Setup 1. Open the Network control panel. (Start Menu>Settings> Control Panel>Network.) Network Control Panel 25 S TORAGE S ERVER U SER ’ S G UIDE 2. If a line like the one highlighted (TCP/IP -> Network card) is not listed, then you need to install the TCP/IP by selecting Add> Protocol>Microsoft>TCP/IP>OK. 3. With the TCP/IP entry highlighted, click on the Properties button to bring up the TCP/IP Properties window. The IP Address tab will be selected. TCP/IP Properties DHCP Client Configuration: • • Select the Obtain an IP address automatically radio button, as shown above. If the DHCP Server in the Storage Server has been enabled, it will now provide an IP Address and related data to your PC when it boots. Restart your PC. (The DHCP client request is sent when your PC starts.) Static IP Address Configuration: If your PC is already configured, no changes are required. If you have just installed TCP/IP, select the Specify an IP Address radio button, and enter: • IP Address and Subnet mask (IP Address tab selected.) • Default Gateway Address (on the Gateway tab). These values need to be compatible with other devices on your LAN. Each PC requires a unique IP Address (usually only the last field is different), and the same Subnet Mask. The IP Address range commonly used is 192.168.0.1 to 192.168.0.254, with a subnet mask of 255.255.255.0. The Gateway IP Address of your Router or Internet Gateway. If you don't have either of these, leave the address at 0.0.0.0. 26 O VERVIEW N OTE : If you have a router on your LAN, ask your network administrator what values to use. If you have made any changes, restart your PC. Network Logon To use the Storage Server, you must log on to the Network correctly: 1. N OTE : Check your Window logon by going to the Network control panel. (Start>Settings>Control Panel>Network.) Confirm the Primary Network Logon is set to Client for Microsoft Networks, as shown below. If this is already set, there is no need to make any changes. Network Control Panel 2. N OTE : Windows will prompt you to Logon to the Network when it boots. You must logon. If you press ESC, or click Cancel, no network resources will be available. 3. Always log on with a valid User Name and Password. • If the Storage Server administrator has defined users on the Storage Server, use the user name and password supplied. • A user name and password not recognized by the Storage W INDOWS C LIENT S ETUP 27 S TORAGE S ERVER U SER ’ S G UIDE Server may still be used, but will be limited to guest access rights. By default, guest access allows read/write access to the "public" share; the administrator, however, may customize the guest access rights. Changing your Storage Server Password Once the Storage Server Administrator has given you a valid user name on the Storage Server, use the following procedure to change your password. N OTE : The admin user’s password can NOT be changed using this method; the Administrator interface must be used. 1. Start your web browser. In the Address box, enter: HTTP://ip_address/user.pl where ip_address is the IP Address of the Storage Server. (e.g. HTTP://192.168.0.2/user.pl) If you do not know the Storage Server’s IP Address, ask the Storage Server administrator. 2. Enter your existing user name and password. 3. On the next screen, enter your new password. 4. Save, then close your browser. Password Management Keeping your user name the same on Windows, the Storage Server, and any other servers will allow you the convenience of logging on one time only, rather than once for each server. Only the administrator can create or change Storage Server users, but you can change your Windows logon: Changing your Windows Logon • Log on to Windows with any User Name. A new user profile will be created if the user name is unrecognized. • Go to Settings>Control Panel>Passwords>Change Windows Password to change your Windows password. 28 U SING THE S TORAGE S ERVER ' S S TORAGE U SING THE S TORAGE S ERVER ' S S TORAGE To use the Storage Server's storage, you must "Map" a drive letter to each folder on the Storage Server folder which you wish to access. The "Drive" will then be available to all Windows programs. To enable the Storage Server’s storage: 1. Double-click the Network Neighborhood icon on the desktop. 2. Locate the Storage Server, as shown below. If it is not listed, double-click Entire Network. Then, double-click the Workgroup that the Storage Server is in. (By default, the Storage Server is in Workgroup.) 3. Double-click the Storage Server icon 4. Right-click a folder (directory) to which you have access, and select Map Network Drive, as shown below . 5. Select a drive letter for this folder, and check the Reconnect at Logon checkbox. (If this is not done, the mapping will be lost when you shut down your PC.) Click OK. W INDOWS C LIENT S ETUP 29 S TORAGE S ERVER U SER ’ S G UIDE 6. This drive will now be available in Windows Explorer, and from the File>Open or File>Save As dialog box in all Windows applications. Remember: When you try to access a folder, you may be prompted for a password, as shown below: Network Resource Password Dialog Box If your Windows logon name is the same as your Storage Server user name, but the passwords are different, enter your Storage Server password here. If, however, your Windows logon name does not exist on the Storage Server, you will have only guest access rights, and there is no password which you can enter in this dialog box. When browsing the Storage Server using Windows Explorer or another file manager, you may see the following files, which have been generated by AppleTalk clients: .Apple Desktop .Apple Double Network Trash Folder Do NOT delete these files! Using the Storage Server's Printer 30 1. Find out what printer is connected to the printer port on the Storage Server. 2. Double-click on Network Neighborhood. Locate the Storage Server. Double-click on Entire Neighborhood if the Storage Server is not listed. U SING THE S TORAGE S ERVER ' S S TORAGE 3. Double-click the Storage Server icon. A printer icon should be shown. 4. Right-click the printer icon, and select Install. The Add Printer wizard will start. 5. Select the manufacturer and printer matching the printer connected to the Storage Server. 6. Follow the prompts to complete the installation. 7. The new printer will then appear in your printer list, and can be used from any Windows application • Use the normal Windows commands to manage the printer: • Use Start>Settings>Printers to list all your printers. • Double-click the printer to view or delete the documents in the print queue. • Use File>Set as Default to make the selected printer the default printer. • Use File>Properties to view or modify the properties of the selected printer. W INDOWS C LIENT S ETUP 31 Chapter 5 Macintosh Client Setup R EQUIREMENTS • • Macintosh OS Version 7.5 or later, with AppleShare. The Administrator must create a valid User Name on the Storage Server for each Mac user. Otherwise, Mac users must always log in as “guest” to the Storage Server TCP/IP Changes are required only if you previously used a fixed (static) IP Address, and would now like to use the Storage Server’s DHCP Server function. To make your MAC a DHCP Client: 1. Select Apple>Control Panel>TCP/IP. 2. Select Ethernet, then Setup, then DHCP. A CCESSING D ISK S TORAGE 1. Select Chooser from the Apple menu. 2. Click the AppleShare icon. 3. If necessary, select the appropriate zone. (By default, the Storage Server is accessible from any zone.) 4. Select the Storage Server from the file server list. Click OK. 33 S TORAGE S ERVER U SER ’ S G UIDE 5. In the Enter Network Password dialog box, enter your name and password. These must match the values stored on the Storage Server, or you will be denied access. If the Storage Server administrator has not created a user name for you, click the Guest button. This will allow access to the “public” share. 6. A list of "Shares" (Storage Server folders) will be displayed. Use the checkbox to indicate which Shares you wish to access. If you select a Share to which you do not have access permission, you will see an error message. 7. Click OK to finish. An icon for each Share will appear on your desktop. You can use these like any other folders. U SING THE S TORAGE S ERVER ' S P RINTER N OTE : 1. In Chooser, select the printer type matching the printer connected to the Storage Server. 2. From the list on the right, select the Storage Server, then click Create. (Refer to Troubleshooting if the Storage Server’s printer is not listed.) 3. The new printer created can be used like any other printer. The Printer Object Type and LaserWriter/Other setting on the Printer tab of the System menu option must be correct. See Printer Setup for Macintosh on page 12 for more details. C HANGING YOUR P ASSWORD Once you have a valid user name on the Storage Server, follow these steps if you’d like to change your password. 34 1. Open a web browser and, in the Address box, enter: HTTP://ip_address/user.pl where ip_address is the IP Address of the Storage Server (e.g. HTTP://192.168.0.2/user.pl). If you do not know the IP Address of the Storage Server, ask the Storage Server administrator. 2. Enter your existing user name and password. 3. On the next screen, enter your new password. 4. Save, then close your Browser. Chapter 6 Troubleshooting W INDOWS Problem 1: The Storage Server Utility doesn't list any Storage Servers. Recommendation 1: Check the following: 1. The Storage Server is properly installed, LAN connections are OK, power is ON. 2. If your LAN has a router, confirm that your PC and the Storage Server are on the same network segment. 3. Confirm that your PC has the TCP/IP network protocol loaded. From the Start Menu, select Settings>Control Panel>Network. If an entry for TCP/IP -> Network card is not listed, add by selecting Add>Protocol >Microsoft >TCP/ IP. You then need to select the new entry (TCP/IP -> Network card), click Properties, and configure the IP Address tab. If your LAN has a DHCP Server, select Obtain an IP Address automatically. Otherwise, select Specify an IP Address, and enter values for IP Address and Subnet Mask. The IP Address range commonly used is 192.168.0.1 to 35 S TORAGE S ERVER U SER ’ S G UIDE 192.168.0.254, with a Subnet Mask of 255.255.255.0. (The Storage Server's default IP Address is 192.168.0.2, with a Subnet Mask of 255.255.255.0). Remember that each device needs a unique IP Address, and the same Subnet Mask. Problem 2: Using the Storage Server Utility, the Storage Server is listed, but the Admin button doesn't work. Recommendation 2: The Storage Server's IP Address is not compatible with your PC’s. Use the Quick Setup button to assign a compatible IP Address and Network Mask (Subnet Mask) to the Storage Server, then click Refresh. Problem 3: The Storage Server is configured, but I can't find it in Network Neighborhood. Recommendation 3: Try using Start>Find>Computer, and enter the Storage Server's name. Or, use Control Panel>Network to check the following: 1. TCP/IP protocol is installed. If not, use Add>Protocol> Microsoft>TCP/IP to install it. 2. Check the network Bindings: 3. 36 • Ensure the TCP/IP protocol is bound to your Network card (NIC). Select your Network card, click Properties, and then the Bindings tab. If TCP/IP is not bound (checked), check it. • Ensure the TCP/IP -> Network card entry is bound to the Client for Microsoft Networks service. Select the TCP/IP entry for your Network Card, click Properties, and then the Bindings tab. If Client for Microsoft Networks is not bound (checked), check it. If you don't have a router, check that your IP Address is compatible with the Storage Server's. This means it needs to be from the same address range (e.g. 192.168.0.3 to 192.168.0.254) and using the same Subnet Mask (e.g. 255.255.255.0) W INDOWS 4. If you DO have a router, check that your Gateway IP Address is set correctly. Ask your LAN administrator for the correct value. Problem 4: When I click on the Storage Server icon in Network Neighborhood, I get prompted for a password. Recommendation 4: This can happen in the following situations: N OTE : 1. The Logon name you use on your PC is recognized by the Storage Server, but the password is not. Simply enter your Storage Server password, or make your Windows password the same as the Storage Server password. 2. The logon name you used on your PC is NOT recognized by the Storage Server, and was converted to guest, with guest access rights. Ask the Storage Server Administrator to create a user name for you. (Use the same name as on your PC.) 3. You do NOT have access permission for this share. Ask the Storage Server Administrator to grant you access. Windows uses the Computer name, as shown on Control Panel> Network>Identification, as the default Login Name. Problem 5: When using the Web interface, some of the data will not fit on the screen, and there is no scrollbar. Recommendation 5: This will only happen if you use extra large fonts, either in your Browser or in Windows. You must reduce the font size: 1. In your Browser, select View>Fonts to change the font size. 2. In Windows, use Control Panel>Display>Settings> Advanced to change the font size. Either of the 2 standard settings - Small or Large (125%) - should work. Problem 6: A print job does not print. No error message is diplayed. Recommendation 6: TROUBLESHOOTING 37 S TORAGE S ERVER U SER ’ S G UIDE This can happen if the amount of free disk space is not sufficient to spool (queue) the print job. Storage Usage can be checked using the Status> Storage screen on the Administrator interface. If this is the problem, you must delete some print jobs: 1. Using the Administrator interface, select Status>Printer. 2. Use the Delete current job to delete the current print job, or Delete all jobs to delete all print jobs. These options can also be used if for some reason a print job or jobs does not print correctly. M ACINTOSH Problem 1: I can’t connect to the Storage Server to configure it. Recommendation 1: Check the following: 1. The Storage Server is properly installed, LAN connections are OK, and it is powered ON. 2. If your LAN has a router, ensure that your Mac and the Storage Server Device are on the same network segment. 3. If any PC or device on the LAN is already using the Storage Server's default IP Address of 192.168.0.2, that PC or device must be turned OFF until the Storage Server is allocated a new IP Address. 4. Ensure that your Mac is using an IP Address within the range 192.168.0.3 to 192.168.0.254 and thus compatible with the Storage Server's default IP Address of 192.168.0.2. Also, the Subnet Mask should be 255.255.255.0. This can be checked using Apple>Control Panel>TCP/IP. Problem 2: The Storage Server's printer is not listed on my Mac. Recommendation 2: There are two things to try: 38 M ACINTOSH 1. On the Storage Server's System>Printer screen, check the Printer Object Type. If this is not correct, the Storage Server's printer will not be listed on the Macintosh. Check the Printer's User Manual for this data, or contact the printer supplier. 2. On each Mac, check that the Printer Driver is installed. If not using a LaserWriter, each Mac must have the printer driver for the printer installed. Otherwise, the correct printer type can not be selected, so the Storage Server will not be listed. Problem 3: The printer does not work at all, or does not work properly. Recommendation 3: On the Storage Server System Printer screen, check the following: 1. Printer Connected to the Storage Server is set correctly ("LaserWriter" or "Other"). 2. Printer Object Type is set correctly. If this is incorrect, then Mac clients may be able to select an incorrect printer. Problem 4: The printer was working, but now it doesn't. The printer seems OK, and no error message is displayed. Recommendation 4: This can happen if the amount of free Storage space is not sufficient to spool (queue) the print job. Storage Usage can be checked using the Status>Storage screen on the Administrator interface. If this is the problem, you must delete some print jobs, as follows: 1. Using the Administrator interface, select Status>Printer. 2. Use the Delete current job to delete the current print job, or Delete all jobs to delete all print jobs. Also try this if for some reason a print job or jobs does not print correctly. Problem 5: When using the Web interface, some of the data will not fit on the screen, and there is no scrollbar. Recommendation 5: You must reduce the font size. In your browser, select View>Fonts to change the font size. TROUBLESHOOTING 39