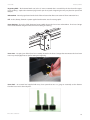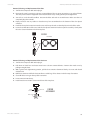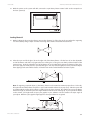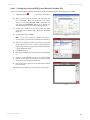
1
User Guide
www.ulsinc.com
©2008 Universal Systems, Inc. All Rights Reserved. The Universal Laser Systems logo and name, and VersaLASER are registered trademarks, and High Power Density Focusing Optics, Quick Change, Rapid Reconfiguration, SuperSpeed are trademarks of Universal
Laser Systems, Inc. All other company and product names are trademarks or registered trademarks of their respective companies.
Universal’s laser systems are protected under one or more of U.S. Patents: 5,051,558; 5,661,746; 5,754,575; 5,867,517; 5,881,087; 5,894,493; 5,901,167;
5,982,803; 6,181,719; 6,313,433; 6,342,687; 6,423,925; 6,424,670; 6,983,001; 7,060,934. Other U.S. and international patents pending.
The VersaLASER system has been awarded U.S. Design Patent No. D517,474 for the unique design of its external cabinet, which also functions as a
Class 1 laser safety enclosure.
2
Thank you for choosing Universal Laser Systems®. We appreciate innovative customers like you who
have made Universal Laser Systems an integral part of their business.
Universal Laser Systems is committed to providing the highest level of customer satisfaction and
support. To ensure your satisfaction, we urge you to read the documentation contained within the
Reference Guide and User Guide CD.
Since 1988, Universal Laser Systems has been committed to continually improving our technology
and customer-driven laser solutions. Your satisfaction is very important to us and we welcome your
feedback. Tell us about your experience with Universal Laser Systems and our systems at
[email protected]
Should you have any questions during your installation, please contact your local representative or
Universal Laser Systems’ Customer Service Team at 480-609-0297 (USA), +43 1 402 22 50 (Austria),
+81 (45) 224-2270 (Japan) or e-mail us at [email protected].
Again, thank you for choosing Universal Laser Systems.
Your Universal Laser Systems Team
3
Table of Contents
USER GUIDE CD
Chapter 1 - Laser System Specifications
VersaLASER VLS2.30, VLS3.50…………………………………………………………………………………………………………………………7
VersaLASER VLS3.60, VLS4.60 and VLS6.60…………………………………………………………………………………………………………9
Professional Laser System PLS3.75, PLS4.75, PLS6.75 and PLS6.150D……………………………………………………………………………11
Industrial Laser System ILS9.75, ILS9.150D, ILS12.75 and ILS12.150D………………………….…………………………………………………13
Chapter 2 - Glossary of Terms…………………………………………………………………………………………………………………………16
Chapter 3 - User Manual
Laser System Operation
The Universal Control Panel (UCP)……………………………………………………………………………………………………………24
VLS2.30, VLS3.50, VLS3.60, VLS4.60 and VLS6.60 System Tab…………………………………………………………………………29
PLS3.75, PLS4.75, PLS6.75 and PLS6.150D System Tab…………………………………………………………………………………31
ILS9.75, ILS9.150D, ILS12.75 and ILS12.150D System Tab………………………………………………………………………………33
Material Database Printer Driver………………………………………………………………………………………………………………39
The VersaLASER Keypad………………………………………………………………………………………………………………………42
The PLS Keypad..………………………………………………………………………………………………………………………………43
The ILS Keypad..………………………………………………………………………………………………………………………………45
Advanced Laser System Operation
Manual Control Printer Driver…………………………………………………………………………………………………………………48
Raster
Sub-Tab…………………………………………………………………………………………………………………………51
Vector Sub-Tab…………………………………………………………………………………………………………………………59
Engraving Field Sub-Tab…………………………………………………………………………………………………………………60
Third-Party Graphic Software Configuration
Adobe Illustrator CS or CS2……………………………………………………………………………………………………………………62
Adobe Illustrator CS3…………………………………………………………………………………………………………………………63
AutoCAD 2000i, 2002, and 2004………………………………………………………………………………………………………………65
AutoCAD LT 2007 and 2008……………………………………………………………………………………………………………………66
CorelDRAW X3 or X4……………………………………………………………………………………………………………………………68
Graphic Page Configuration for Rotary (CorelDRAW)………………………………………………………………………………………70
General Software Set-up………………………………………………………………………………………………………………………72
Chapter 4 - Accessories - Installing and Operating
VersaLASER VLS2.30, VLS3.50
Air Assist Back Sweep…………………………………………………………………………………………………………………………77
Air Assist Cone……………………………………………………………………………………………………………………………79
Computer Controlled Air Cleaner Cart……………………………………………………………………………………………………80
Computer Controlled Compressed Air Unit………………………………………………………………………………………………83
Cutting Table…………………………………………………………………………………………………………………………………85
Rotary Fixture…………………………………………………………………………………………………………………………………88
VersaLASER VLS3.60, VLS4.60 and VLS6.60
Air Assist Back Sweep………………………………………………………………………………………………………………………95
Air Assist Compressor………………………………………………………………………………………………………………………97
Air Assist Cone………………………………………………………………………………………………………………………………99
Cutting Table…………………………………………………………………………………………………………………………………100
High Power Density Focusing Optic (HPDFO)……………………………………………………………………………………………103
Lens Kits………………………………………………………………………………………………………………………………………103
4
Manual Air Assist……………………………………………………………………………………………………………………………104
Rotary Fixture…………………………………………………………………………………………………………………………………106
Professional Laser System PLS3.75, PLS4.75, PLS6.75 and PLS6.150D
Air Assist Back Sweep………………………………………………………………………………………………………………………111
Air Assist Compressor………………………………………………………………………………………………………………………113
Air Assist Cone………………………………………………………………………………………………………………………………115
Computer Controlled Air Assist……………………………………………………………………………………………………………116
Cutting Table…………………………………………………………………………………………………………………………………118
Dual Head……………………………………………………………………………………………………………………………………121
High Power Density Focusing Optic (HPDFO)……………………………………………………………………………………………126
Lens Kits………………………………………………………………………………………………………………………………………126
Manual Air Assist……………………………………………………………………………………………………………………………127
Rotary Fixture…………………………………………………………………………………………………………………………………129
Industrial Laser System ILS9.150D and ILS12.150D
Air Assist Back Sweep………………………………………………………………………………………………………………………134
Air Assist Compressor………………………………………………………………………………………………………………………137
Air Assist Cone………………………………………………………………………………………………………………………………139
Automation Kit………………………………………………………………………………………………………………………………140
Class 4 Module………………………………………………………………………………………………………………………………143
Computer Controlled Air Assist……………………………………………………………………………………………………………148
Cutting Table…………………………………………………………………………………………………………………………………152
Heavy-Duty Use Air Kit……………………………………………………………………………………………………………………155
High Power Density Focusing Optic (HPDFO)……………………………………………………………………………………………156
Lens Kits………………………………………………………………………………………………………………………………………156
Manual Air Assist……………………………………………………………………………………………………………………………157
Rotary Fixture…………………………………………………………………………………………………………………………………159
Traveling Exhaust……………………………………………………………………………………………………………………………165
Chapter 5 - Basic Maintenance
VersaLASER VLS2.30 and VLS3.50………………………………………………………………………………………………………………………170
VersaLASER VLS3.60, VLS4.60 and VLS6.60……………………………………………………………………………………………………………177
Professional Laser System PLS3.75, PLS4.75, PLS6.75 and PLS6.150D…………………………………………………………………………………184
Industrial Laser System ILS9.150D and ILS12.150D……………………………………………………………………………………………………191
ULS REFERENCE GUIDE BOOKLET
Your Universal Laser Systems Reference Guide Booklet contains the following documentation:
Software Installation CD
Your Reference Guide contains the Software Installation CD. Please follow the instructions for proper installation.
Installation & Set-up Guide
VersaLASER VLS2.30, VLS3.50……………………………………………………………………………………………………………………199
VersaLASER VLS3.60, VLS4.60 and VLS6.60………………………………………………………………………………………………………216
Professional Laser System PLS3.75, PLS4.75, PLS6.75 and PLS6.150D………………………………………………………………………240
Industrial Laser System ILS9.150D and ILS12.150D……………………………………………………………………………………………266
Safety
ULS Safety Guide……………………………………………………………………………………………………………………………………291
Warranty
Your Reference Guide contains Warranty documents pertaining to your purchase. Should you require a copy of the warranty please contact
ULS at 1-800-859-7033 or email [email protected].
5
User Guide
Laser System Specifications
Chapter 1 - Laser System Specifications
Link to Table of Contents
6
User Guide
Laser System Specifications
VersaLASER VLS3.60, VLS4.60 and VLS6.60
System Operating Environment Requirements (User Provided)
VLS3.60
VLS4.60
VLS6.60
Operating
Environment
Well-ventilated office (recommended) or clean, light-duty manufacturing
Operating
Temperature
50ºF (10ºC) to 95ºF (35º C) capable
73ºF (22ºC) to 77ºF (25º C) for best performance
Storage Temperature
50ºF (10ºC) to 95ºF (35º C)
Operating Humidity
Non-condensing
Power Consumption
up to:
Single Phase 110/240V AC, 10/5 Amp, 50/60 Hz
Grounded (earthed) and stable (surge and spike protected)
High-pressure vacuum blower capable of:
Particulate/Odor
Outside Ventilated
Exhaust System
Computer
Requirements
(See the Installation & Set-up
Guide for more information)
Software
Requirement
Link to Table of Contents
250 CFM (cubic feet per minute) @ 6 inches static pressure
(425m3/hr at 1.5kPa)
500 CFM (cubic feet per
minute) @ 6 inches
static pressure (850m3/hr at
1.5kPa)
Windows XP or Windows Vista (32-bit versions only)
2.0 GHz Processor (minimum)
1 GB of RAM (minimum)
40 GB Hard Drive (minimum)
Graphics or CAD based (See page 61 for recommendations)
9
User Guide
Laser System Specifications
Model System Specifications
VLS3.60
Laser Safety
VLS4.60
VLS6.60
CO2 Laser, Interlocked Safety Enclosure = Class 1
Red Diode Pointer = Class 3R
Work Area*
24 x 12 in
(609.6 x 304.8 mm)
24 x 18 in
(609.6 x 457.2 mm)
32 x 18 in
(812.8 x 457.2 mm)
Table
29 x 17 in
(737 x 432 mm)
29 x 23 in
(737 x 584 mm)
37 x 23 in
(940 x 584 mm)
Maximum Part
(WxHxD)
29 x 17 x 9 in
(737 x 432 x 229 mm)
29 x 23 x 9 in
(737 x 584 x 229 mm)
37 x 23 x 9 in
(940 x 584 x 229 mm)
Resolutions
1000, 500, 333, 250, 200, 83 dpi/lpi
Control
Requires a dedicated PC to operate; requires Windows XP or Windows Vista
(32-bit versions only)
Interconnection
USB 2.0 High Speed port only
Cabinet Style
Floor Standing
Laser Options
10, 25, 30, 35, 40, 45, 50 and 60 watts
Power Consumption
up to:
110V/10A
230V/5A
Overall Dimensions
(WxHxD)
36 x 38 x 30 in
(914 x 965 x 762 mm)
36 x 39 x 36.5 in
(914 x 991 x 927 mm)
44 x 39 x 37.5 in
(1118 x 991 x 953 mm)
Weight (uncrated)
235 lbs (107 kg)
270 lbs (122 kg)
325 lbs (147 kg)
Exhaust Hookup
One 4-inch (10.16 cm) port
Two 4-inch (10.16 cm) ports
Laser Cartridge
Weight
10 Watt = 13 lbs (6kg)
25/30 Watt = 20 lbs (9 kg)
35/40 Watt = 23 lbs (10 kg)
45/50/60 Watt = 26 lbs (12 kg)
Available Options
Standard Air Assist, Air Assist Cone, Air Assist Back Sweep, Air Compressor (desiccant or
refrigerated dryer options), Honeycomb Cutting Table, Rotary Fixture, Lens Kits
Specifications subject to change without notice
*Work area various by speeds and thruput.
Link to Table of Contents
10
User Guide
Glossary of Terms
Chapter 2 - Glossary of Terms
Link to Table of Contents
15
User Guide
Glossary of Terms
#2 Mirror – A mirror located at the far left side of the X-Axis Arm (within the #2 mirror cover) used to direct the
horizontal laser beam from the Beam Window into the Focus Carriage.
#3 Mirror – A mirror (part of the focus lens assembly) (1) located in the Focus Carriage used to direct the horizontal
laser beam downward onto the work piece.
Air Assist Cone (Coaxial Air Assist) – An accessory that attaches to the Focus Carriage to direct compressed air vertically
downward, in line with the laser beam, onto the surface of the work piece. On some materials, air assist can be used to
reduce the burning effects of the material from the laser beam’s intense heat. It also can help disperse smoke and gasses
created by processing some materials.
Air Dryer – A refrigerated device or a desiccant moisture trap that reduces the moisture content of air going to the
laser system for air assist. Air assist requires oil-free, clean, dry air with no water droplets. Water on optics can damage
them. The refrigerated dryer uses a Freon cooler to chill the air and remove moisture. The desiccant type uses replaceable
desiccant crystals that must be changed when they become filled with moisture.
Back Sweep – An accessory that attaches to the Focus Carriage to aim a jet of compressed air onto the surface of the
work piece at an adjustable angle. On some materials it can be used to reduce the burning effects of the material from the
laser beam’s intense heat. It also can help disperse smoke and gasses created by processing some materials.
Beam Alignment – A procedure that is performed on the laser system by adjusting the #2 Mirror to produce optimal
laser engraving/cutting.
Link to Table of Contents
16
User Guide
Glossary of Terms
Beam Window – An optic (1) mounted in the left hand rear of the enclosure through which the laser beam enters the
enclosure.
Belt – A toothed belt with high-strength, stretch-free Kevlar construction, driven by a motion system motor. Belts included: X belt for left-right movement of the lens carriage; two Y belts that move the Arm forward and backward; and a Z
belt that moves the engraving table up and down.
Class 1, Class 3R, Class 4 (Laser Classification) – Definitions created by the laser industry council to indicate degrees of
laser emission and safety requirements.
•
Class 1 laser has a beam that is fully contained in an interlocked enclosure. A Class 1 laser is designed for safe use
in office and production environments without the need for special eyewear or other protective measures. Universal Laser Sysetms builds systems with Class 1 enclosures for their CO2 lasers.
•
Class 3R laser requires caution (must not stare into the beam) and is the rating for the red diode pointer used in
Universal’s laser systems.
•
Class 4 laser has a beam that is not fully contained and that can result in direct or reflected beam exposure to the
user or others. Class 4 laser users must utilize laser safety eyewear and must take other precautions to ensure safe
operation. Universal offers a Class 4 compliant option for its ILS Series models and requires a signed agreement
of understanding from the prospective Class 4 user.
For further information, please refer to the Universal Laser Systems’ Safety Manual.
Computer Controlled Air Cleaner/Cart – An accessory for VersaLASER models VLS2.30 and VLS3.50 that provides a
self-contained, computer-controlled exhaust filtration system when used with the Materials Database driver only.
Computer Controlled Compressed Air Unit – An accessory that provides dry, oil-free compressed air for use with
the Air Assist Cone and Back Sweep Accessories. With Computer Controlled air assist, the laser system turns the
compressor on and off automatically.
CPU – A Circuit Board in the laser system that communicates with the PC to drive the Motion System, pulse the Laser
Cartridge, monitor interlocks and sensors, etc.
Cutting Table – An accessory with a honeycomb insert used to support the work piece when
vector cutting. Also provides downdraft to pull smoke and debris away from the bottom of materials being cut. The
cutting table can be used as a vacuum base for holding thin sheet stock flat while cutting.
Engraving Table – The solid, flat metal plate that supports the work piece.
Link to Table of Contents
17
User Guide
Glossary of Terms
Engraving Field – The horizontal work area (24” x 12” or 610 x 305mm) that is accessible by the laser beam for engraving and cutting – equal to the maximum “page” size for your laser system. Engraving area may vary based on speeds and
thruput.
Exhaust Port – Round spigot located on the back of the enclosure that allows connection of a fume extraction hose.
Fill – A color, bitmap, fountain or pattern applied to the interior area of a vector graphic.
Focus Carriage – The red or black aluminum housing which houses the Focus Lens and #3 Mirror. The Focus Carriage
moves back and forth along the X-Axis arm when rastering or vectoring.
Focus Lens – An optic (part of the focus lens assembly) located in the Focus Carriage that concentrates the laser beam
into a very small, highly intense spot for cutting and engraving.
Focus Tool – An essential tool supplied with every laser system that acts as a gauge to accurately set the distance
from the Focus Lens to the work piece.
Link to Table of Contents
18
User Guide
Glossary of Terms
Fume Extraction (Exhaust) Blower – A radial-vane motorized blower that generates high vacuum to pull exhaust air
through the enclosure. Must be properly installed and connected with ducting.
Gear – A toothed pulley that is secured to the motor drive shaft. The gear drives a belt.
Graphics Program – The software used to create bitmap and vector artwork executed by the laser system. CorelDRAW
and Adobe Illustrator are examples of graphics programs. Engineering software packages, such as AutoCAD, SolidWorks
and DesignCad, and engraving software programs, such as LaserType and EngraveLab, can also be used to drive a laser
system. A ULS laser system can also be driven as a printer from virtually any Windows software (word processing programs,
for example).
Home – The initial reference position of the lens carriage at one corner of the engraving field. When the system is
powered on, the motion system “homes” the lens carriage to the upper right hand corner by moving it to engage
sensors in the X and Y directions. The home location is a reference point for the motion system to know the location
of the beam precisely. The user can “home” the system at any time from the print driver control screen. The system can
also “home” the Z-Axis.
Interlock – The safety mechanism that prevents the laser beam from being emitted when any enclosure door is opened.
Laser (Cartridge or Tube) – The CO2 laser device that generates the beam used to cut and engrave the work piece.
Leveling – A procedure in which the feet of the laser system are adjusted in order to have the engraving table parallel to
the focus carriage for optimal engraving. This procedure is performed with a Focus Tool or calipers to accurately gauge the
distance from the lens carriage to the engraving table at all four corners. The distance should be the same.
Main Enclosure – The “box” in which the X-Y-Z motion system moves and the work piece is engraved or cut. The enclosure
has interlocks and viewing window designed for laser safety, as well as air inlet and exhaust ports for fume extraction.
Motion System – The mechanical/electrical system that receives commands from the CPU and moves the lens carriage
in X – Y raster or vector fashion. The motion system also controls the Z-Axis vertical location and turns the Rotary Fixture
when it is in use.
Operating System – The software that runs your computer. ULS laser systems are compatible only with a 32-bit Windows
operating system such as XP or Vista.
Optic – Any optical element such as a beam window, mirror or lens.
Link to Table of Contents
19
User Guide
Glossary of Terms
Outline – The line that defines the shape of a vector graphic. In order for an outline to be recognized as a vector, it
must be of minimum thickness – a “hairline” – less than 0.003 inches or 0.076 mm.
PC – Personal Computer. The laser system requires a Windows-based operating systems as an integral part of its operation.
Power Supply – An electrical component that converts wall-plug electricity into voltages required for electronics and
CO2 laser operation.
Pulley – A mechanisim composed of a wheel with groves that a belt runs across to change the direction of the focus
carriage.
Print Driver – Software that is the link between a computer and the laser system. The Print Driver for a ULS laser system
is proprietary software written by Universal Laser Systems. It has screens to allow selection of laser settings and to show
system status and configuration. When the user prints a job, the Print Driver issues software commands to the laser
system.
Raster Engraving – A method of engraving whereby the laser beam is scanned back and forth,
engraving horizontal lines in the work piece as it steps down the work piece vertically. At each pass
a series of laser pulses are applied to create the engraved image—similar in action to an inkjet or
laser printer.
Red Diode Pointer – The red beam used to indicate the path and position of the laser beam and focused spot. It is very
effective for correctly positioning work pieces and is also a beam alignment aid for maintenance. The red diode pointer
turns on whenever an interlock is open and turns off when all interlocks are closed.
Rotary Fixture – An accessory used to engrave or cut cylindrical objects.
Link to Table of Contents
20
User Guide
Glossary of Terms
Universal Control Panel (UCP) – The software supplied by Universal Laser Systems used to operate the laser system.
This software program allows the user to view, store and execute jobs. Accessed by clicking the diamond-shaped
Icon in the System Tray.
USB 2.0 – Universal Serial Bus version 2.0 for high speed two-way communication. A standardized cable connection and
communications protocol used to connect external devices (such as the laser system) to a computer. USB connections are
very efficient and transmit information even faster than a network connection.
USB Port – A connector on the laser system into which the USB cable is connected.
Vector Cutting / Marking – A method whereby the laser beam is made to follow a path to cut or
engrave a desired outline—similar in action to a pen plotter or hand tracing lines and curves.
X-Arm or X-Axis – The black metal rail that moves front to back in the Main Enclosure during rastering or vectoring. The
Focus Carriage moves right and left along this rail. The rail has precision-honed V-shaped tracks that are pathways for the
bearings of the Focus Carriage. These tracks are designed to keep bearings properly centered and also allow debris to
move away from the bearing contact surfaces.
X-Axis Bearings – The three/four bearings on the X-Axis Arm which guide the Focus Carriage along the arm.
Link to Table of Contents
21
User Guide
Glossary of Terms
Y-Axis – The front to back direction in the Main Enclosure. Also, the mechanical system used to move the X-Axis Arm front
to back in the enclosure.
Y-Axis Bearings – The bearings on the ends of the X-Axis Arm that guide it along the Y-rails.
Y-Rails – The two parallel rails that guide the X-Arm front and back inside the Main Enclosure.
Z-Axis – The up and down direction in the Main Enclosure. Also, the mechanical system used to raise and lower the
table on which the work piece is placed.
Link to Table of Contents
22
User Guide
User Manual
Chapter 3 - User Manual
Link to Table of Contents
23
User Guide
User Manual
LET’S GET STARTED!
The User Guide is designed to provide you with information on how to operate your Universal laser system. The Users
Guide section will walk you through System Operation, Accessories, and Basic Maintenance.
Laser System Operation
From the Universal Control Panel menus and buttons to the laser system keypad and basic printer driver features, this
section describes many of the features of the laser system. If you have not done so already, power ON your computer
and let it boot up completely. You do not need to turn on your exhaust system at this time.
CAUTION: Please refer to the Safety Manual before operating the laser system.
The Universal Control Panel (UCP)
The Universal Control Panel (UCP) on the computer provides a convenient interface for
interacting with and controlling your laser system. Once you have installed the UCP using the
installation disk, a red diamond-shaped icon (Figure 1) will appear in the lower right corner of
your Windows taskbar. If for any reason the UCP is deactivated, you can reactivate it by
double-clicking on the shortcut (Figure 2) found on your computer’s desktop screen. The UCP is
organized into three convenient tabs: Viewer, System and Diagnostics. The following describes the
features of each tab of the UCP.
Figure 1
Figure 2
Viewer Tab (page 25)
You send jobs to your laser system by printing to it. Anytime you print to the laser system, a job is created and inserted
into the laser systems job queue. Selecting the viewer tab allows you to navigate through and manage the jobs in
the laser system job queue. The viewer tab also allows you to operate your laser system right from your computer.
System Tab (page 29)
The System Tab allows you to configure certain features of the laser system. If your laser system needs to be calibrated,
you will need to do so from this tab.
Diagnostics Tab (page 35)
The Diagnostics Tab gives you important information about your laser system for troubleshooting purposes. When
calling the Customer Service Department, please have the laser system serial number available.
Link to Table of Contents
24
User Guide
User Manual
Viewer Tab
System Controls
• The green START button begins the engraving process.
•
Clicking the PAUSE button stops the engraving process and clicking the PAUSE button again resumes the
engraving process where it was last stopped.
•
The four Navigation buttons move the focus carriage back and forth or left and right.
•
The two up and down buttons move the Z-Axis engraving table up or down.
•
The Home XY button re-homes/moves the focus carriage to the upper right hand corner.
•
The Home Z button re-homes/moves the Z-Axis table towards the bottom of the laser system.
Basic View (drop down list)
• The Basic View shows a preview window of the job currently selected.
•
The cursor becomes a magnifying glass (Zoom Tool) if you pass it over the preview window. Left-clicking the
mouse zooms in and right-clicking zooms out.
•
Clicking the Settings button takes you back to the printer driver. If mistakes were made or you would like
to make additional changes, clicking this button allows for those changes. Further information about the
printer driver can be found on page 39 of this guide.
Link to Table of Contents
25
User Guide
User Manual
Focus View (drop down list)
The Focus View allows you to move the focus carriage to a desired position on the laser system table.
•
To have a full range of motion of the X-Axis arm, verify that you are zoomed out in the preview window by
right-clicking on the mouse before entering the manual focus window.
•
Moving the cursor over the preview window once the focus button has been clicked changes your cursor
to a blue target with dashed vertical and horizontal lines. Clicking once on the preview window moves the
focus carriage to that position. Selecting another feature from the drop down list terminates the focus
feature and moves the focus carriage to the home position.
•
To move the focus carriage to a specific location, click the GO button. Type in the X and Y coordinates. Once
you have finished typing in the coordinates, press the GO button within the Focus window and the focus
carriage will move to the specified location. You can also move the engraving table to a specific Z-height by
entering the height in the Z box.
Focus window
Estimate View (drop down list)
The “estimate” feature approximately calculates the amount of time it will take the laser system to finish
the engraving or vector cutting job. The more complex the engraving job is, the longer it will take to finish.
The less complex the engraving job is, the less time it will take to finish.
Link to Table of Contents
26
User Guide
User Manual
Relocate View (drop down list)
The Relocate feature gives you the opportunity to move the image on the UCP into another area of the
engraving field. This feature does not modify your original file’s image location.
When this feature is activated, the image is surrounded by nine small white squares (anchor points) allowing
you to move it around the basic view screen. The current anchor point selected, in blue, is the axis of movement.
If you would like to move the graphic back to its original location, click on the Undo button under the X and Y
cordinates until the grahic is in the desired location.
Relocation Types
1. You can click on any anchor point available to move the graphic within the basic view area.
2. If you would like to move the graphic to the upper left hand corner, select the top left hand anchor
point and type in your desired X Y coordinates into the boxes that appear on the right hand side. This
process can be done with any available anchor point.
3. Using your Navigation buttons, move the focus carriage to the desired location where you would
like the image to be placed. Use the red LED as a reference point. Click on the TO CARRIAGE button.
According to the anchor point you have selected, the image on the Relocate View will move to
the location of the focus carriage’s red LED.
Link to Table of Contents
27
User Guide
User Manual
File Management
File Management displays the name of the current job, the number of jobs stored, the date and time the job
was stored on your hard drive and the run time near the top of the window. Once the Print Cache reaches the
maximum number of jobs, the printer driver deletes the oldest jobs as newest jobs enter the cache.
•
The print job navigation buttons allow you to preview the print jobs stored on your hard drive.
•
The “open folder” button displays and allows you to select your print jobs in a file management style. It also
allows you to delete print jobs stored from your hard drive and save print jobs as .efm files.
•
The PURGE button deletes ALL cached print jobs stored on your hard drive.
•
If the Permanent box is marked, this indicates that the selected file will not be deleted from your hard
drive even after clicking the PURGE button.
Link to Table of Contents
28
User Guide
User Manual
VLS2.30, VLS3.50, VLS3.60, VLS4.60 and VLS6.60 SYSTEM TAB
The System Tab allows you to configure certain features of the laser system. Not all features will appear on the System
Tab.
•
The PRINT CACHE number is adjustable. It indicates the maximum number of print jobs that you would like to
be stored on your hard drive. If you exceed the number shown, the software will automatically begin deleting
the oldest jobs as newest jobs enter the cache, unless “Permanent” is checked in the File Managment window.
•
LANGUAGE allows you to switch between available languages according to your preference.
•
UNITS allow you to choose between Metric or Inches.
•
AUTO Z should be enabled if you would like the device to focus the laser beam by automatically adjusting
the height of the Z-Axis table. This operating principle is based on the material thickness that you specify in the
laser system printer driver. If it is disabled, you will need to set focus manually by using the included Focus Tool.
•
The TUNING (UNIVERSAL) number is a value set by the ULS factory for your particular machine. In the future, as your laser system is used, it may be necessary to change this value to sharpen the resulting
image. Do not change this number unless instructed to do so by our Customer Service Department.
•
The LENS SIZE selected from the list should be the same as the number printed on the lens assembly on the front
of your Focus Carriage. If you change lens (available accessory) and use something other than the standard 2.0
lens, then you MUST select the value that matches your installed lens. You will need to calibrate the focus lens
to the top surface of the table by clicking the red CALIBRATE button, otherwise the system will not focus
the laser beam properly. Contact the Customer Service Department if you have any question about lens
calibration.
•
The ALIGNMENT Launch button opens the Alignment Mode window. The Alignment feature should only be
used if instructed by our Customer Service Department at ULS.
•
CUTTING TABLE allows you to calibrate a new Z-height to the top surface of Cutting
Table.
You need to have the Cutting Table installed in the system to activate the
CALIBRATE button.
•
ROTARY is activated once the rotary accessory is installed. Rotary calibration should be done once when the
rotary is installed for proper engraving. For more information about the rotary, read the Accessories section of
this manual.
•
PULSE CALIBRATION manipulates the laser beam to be tuned for finer pulsing. Do not use this feature unless you
have been ULS factory trained or with factory approval.
•
If the SOUNDS box is checked, the computer will play the sound shown indicated once the file has finished
engraving. Be sure that your computer speakers are on and at an appropriate volume.
•
HOMING OPTIONS disable or enable certain homing features from the laser system.
•
Normally after the engraving job is complete it will return home after engraving. If you would like to keep
the focus carriage from going home, check the ‘Don’t Return Home After Engraving’ box.
Link to Table of Contents
29
User Guide
•
User Manual
•
If the laser machine was improperly shut down, the engraving table will home at start up. To have this
feature turned off, check the ‘Disable Automatic Z-Homing.’ Disabling this feature can also be helpful when
troubleshooting Z-Axis problems.
•
If you would like the laser system to re-home before it engraves a job, select ‘Home XY Before Engraving.’
Universal laser systems contains an Air Pressure detection switch. This feature is only present when you use Manual
Air Assist. To enable this feature, check the DETECT AIR PRESSURE box. If sufficient air pressure (1.5 psi) is not
present, then an error message is displayed. If you use Computer Controlled Air Assist, this feature is not present
because our laser system automatically detects if sufficient air pressure is present.
Link to Table of Contents
30
User Guide
User Manual
VLS3.60, VLS4.60 and VLS6.60 DIAGNOSTICS TAB
The Diagnostics Tab displays important information about your laser system and personal computer. This information
can be used for troubleshooting purposes.
•
ENGRAVER shows the current Firmware and FPGA version being used. It also displays the Serial Number of
your laser system. The Serial Number is needed when calling the Customer Service Department at ULS.
•
SOFTWARE displays the current Materials Database, Language Database and Printer Settings Library versions
being used.
•
OTHER DEVICES displays the current firmware version for the devices listed.
•
LASER displays the watts being produced by the laser cartridge. It also displays the current version firmware
being used. If a red ‘x’ appears, this indicates that the laser tube is not functioning properly or a door is opened
on the laser system.
•
If you press the Test button under USB LATENCY, it displays the time it takes for information to travel on the
USB cable. Avg USB should be below 10 msec and Max USB should be below 100 msec.
•
SYSTEM displays information about your personal computer.
•
ALARMS alerts you if the inside of the laser system is above the recommended temperature or if the Thermal
Sensor battery is low in power. If the Thermal Sensor inside the laser system is triggered, an alarm will sound
and shut down your laser system.
•
FIXTURES indicates if a Engraving Table, Cutting Table or Rotary is installed and properly communicating.
•
INTERLOCKS shows you if the Top, Front or Rear Doors are opened or closed.
•
COMPRESSOR displays the current device being used, shown by a green check mark, to supply compressed air to
the laser system. If a ULS compressor is connected, it will show the current firmware version.
•
The RUNTIME DIAGNOSTICS box is for ULS Engineering use only.
•
The PRINT button gathers the information displayed on the Diagnostics Tab into a PDF file. This PDF file can be
emailed to the Customer Service Department for troubleshooting.
Link to Table of Contents
36
User Guide
User Manual
Materials Database Printer Driver
This tab of the printer driver is for the beginning user and
automatically calculates the appropriate power and speed
settings according the material selected.
Category List
This section allows you to choose from eight original types
of material categories.
Material List
Once you select a category, a variety of material types will
appear to the right of the category section.
Intensity Adjustments
Intensity Adjustments allows you to change the intensity of your Raster Engraving, Vector Marking and Vector
Cutting. The default settings are set to 0%, but they can be changed from -50% to +50%. Increasing the settings
increases the intensity of the engraving process, giving you deeper results. Decreasing the setting decreases the
intensity of the engraving and gives you shallower results. Always start at 0% on a scrap piece of material and
make any appropriate changes accordingly. There is no need to make changes to these controls unless undesired
results are produced.
Which Laser? (Dual laser systems only)
If you would like to only use the top or bottom laser tube to engrave or vector cut, select from TOP or BOTTOM. If
you only purchased one laser tube, select the appropriate laser tube according to the set-up of your laser system. If
you would like to use both laser tubes for your project, select both boxes.
Air Assist (Computer Controlled Air Assist systems only)
If you have the Air Assist accessory on the laser system, you can activate it through this option. You are able to turn
on Air Assist for Raster Engraving, Vector Marking and Vector Cutting. If you activate this feature, adjust the air flow
according to the desired results. If the laser system does not come equipped with Air Assist, turn the feature OFF.
Material (Only available when Manual Control Tab is activated)
The NEW button allows you to add a custom Category and Material to the printer driver. The EDIT button gives you
the opportunity to modify the selected Material by creating a copy of the original.
Note: This part of the Materials Database requires knowledge of the Manual Control features. Learn more
about the Manual Control Tab in the Manual Control section of the User Guide.
Material Editing
This feature gives you further control over the
Materials Database and has similar features to the
Manual Control Tab in the printer driver. Custom
categories and materials can be added and deleted.
They can also be modified to your specific requirements.
Once you have added the new material, the printer
driver will add the new material to the list. This new
material will be available for you to use in future jobs.
To access this window, you will need to select a current
category or material and click the NEW or EDIT button.
The Materials Editing window and the Manual Control
Tab have similar features. You can refer to the Manual Control section for further explanation of these features.
Link to Table of Contents
39
User Guide
User Manual
Material Code
The Material Code box will automatically display a new material code number when making a new
material and category. You can add a custom Material Code from 9000-9999 if desired.
Taper
This drop down menu is activated when Print Mode is set to Rubber Stamp. This feature is similar to the one
in the Raster sub-tab for Rubber Stamping.
3D Power
This button can be activated by setting the Print Mode to 3D. This feature can be modified similarly to the
Raster sub-tab for 3D.
Vector Marking - Blue Pen
These settings are similar to the settings on the Raster Sub-Tab under the Manual Control Tab.
Vector Cutting - Red Pen
This section of the Material Editor window allows the user to input preliminary numbers for the Material
Editor to properly calculate future power and speed settings. To properly configure the Vector Cutting - Red
Pen section, you will need to vector cut two materials in the laser system so the Material Editor can calculate
the appropriate percentage amounts for different thicknesses.
If the material being added to the Material Editor can be vector-cut, check the empty box called “Material
Can Be Vector Cut” and input the percentages.
The Shallow Cut Settings and Deep Cut Settings sections are similar to one another. First measure two
identical material types, but with different thicknesses. For example, test a 1/8” piece of acrylic and a ½” of
acrylic. Input the thinnest material measurement in the Cut Depth box of the Shallow Cut Settings. Next,
type in the thickest material measurement in the Cut Depth box of the Deep Cut Settings section. The
Power and Speed in both settings refer to the least amount of percentage power required to cut through
the material without causing undesired results. You may have to experiment with this section several times
to get the exact results you desire.
Max Depth
The number input in this box refers to the maximum material thickness that the laser system is able to
cut.
PPI
Available settings are 1 to 1000. For further explanation about this setting, read the Manual Control
section of the User Guide.
Shallow Cut Settings
These parameters set the starting point for the Printer Driver’s Material Editor.
Deep Cut Settings
These parameters set the ending point for the Printer Driver’s Material Editor.
Link to Table of Contents
40
User Guide
User Manual
How to create a new Category and Material
1. Select one of the existing Categories on the left and click on the NEW button.
2. From the Category drop down menu list on the left, select ‘**New Category.’
3. The Material Category window appears allowing you to type a name of the new category in the blank
space. A Category ID (900-999) will automatically be assigned once a new category is made.
4. Click the OK button.
5. Once a category is made, you can add a material name to the new category by typing in a name in the
Material Name blank area.
6. Once that is done you can make your necessary modifications to each area in the Material Editing
window.
7. To save your new category and material, you must click the APPLY button, then click the CLOSE button.
If you click the CLOSE button, without first clicking APPLY, your changes will not be saved in the
Materials Database Tab.
Material Thickness
In order for the laser system to properly vector cut and/or engrave on the material, the printer driver needs to know
the thickness of the material before it starts engraving. Using a caliper or similar measuring device, measure the
thickness of your material and enter it into the Material Thickness box.
Units
This section allows you to switch between Metric and Inches.
Fixture Type
None
If you are not using any type of fixture, set the drop down menu to NONE.
Rotary
If you have purchased this accessory, read how to install and operate this fixture in the Accessories section of
the User Guide.
Custom
If you use a prop (other piece of material) to adjust the height of the material you want to process, you need
to compensate for that additional height by using the Custom Height field.
Link to Table of Contents
41
User Guide
User Manual
The VersaLASER Keypad
The Keypad on the laser system provides limited access to controls necessary for cutting and engraving operations. When
the laser system has finished initializing and homing, and if all the doors are closed, the red light on the keypad will be
illuminated and ready to run a file.
The Green or Red LED (Light Emitting Diode) will display differently depending on the current state of the laser system.
Please refer to the chart below.
CONDITION
RED LED
GREEN LED
Off
The doors are closed
The VersaLASER is off
On
The front, top or back door is open
The VersaLASER is on
VLS2.30
and
VLS3.50
VLS3.60,
VLS4.60 and
VLS6.60
POWER: This button turns the VersaLASER on, only if the computer is powered on,
booted into Windows, the Universal Control Panel is running and the USB cable is
connected from the computer to the VersaLASER. Holding the key down for about five
seconds will power the VersaLASER off.
START: Begins laser processing of the current file displayed on the UCP. If any of the doors
are opened when you press this button, the motion system will start to move as if it is
processing the file, however, the CO2 laser beam is disabled and the red diode pointer will
be enabled to simulate the laser process.
PAUSE: If a file is running, the PAUSE button halts the engraving or cutting process and
the focus carriage will move to its home position in the upper right corner of the
engraving area. If the PAUSE button is pressed again after the initial pause it will resume
cutting or engraving again at the location where the motion system was paused. Please
wait for the motion system to stop and move to the home position before opening any
door otherwise the laser beam will not resume from the position it stopped at.
UP and DOWN: These buttons allow you to move the table up and down.
Link to Table of Contents
42
User Guide
User Manual
Advanced Laser System Operation
From the PPI and speed settings to Rubber Stamp and Image Enhancement settings, this section covers how each
feature of the Manual Control Printer Driver funtions for the advanced user.
Note: When adjusting the printer driver settings in the Manual Control Tab, it is highly recommended that you
practice engraving or cutting on a scrap portion of that material in case the settings need to be re-adjusted to
obtain the desired results.
Manual Control Printer Driver
The Manual Control Tab in the printer driver gives you full control
of the engraving and vector settings. This tab of the printer driver
is meant for the advanced user.
Color, Power, Speed, and PPI
To change the % Power, % Speed and/or PPI of a color, position
the mouse arrow on the color name and click once. This will
highlight the color’s parameters and will allow you to change
the settings by using the scroll bars, plus (+) or minus (-)
buttons or by typing in each setting in the appropriate
control box. It is possible to click on more than one color to
set them to the same setting at the same time.
% Power
Available settings are from 0 to 100%. This setting is directly related to how deep the engraving will be. The higher
the setting, the deeper it engraves, marks or cuts, and vice-versa.
% Speed
Available settings are from 0 to 100%. This setting determines the maximum rate of travel of the motion system.
Actual engraving time (throughput) is not only dependent on the % Speed setting, but is also dependent on
the size and the placement of the graphic in the engraving field. The motion system will accelerate/decelerate
as fast as it can up to the chosen speed. If the motion system cannot achieve the chosen speed based on the
size of the graphic or graphical placement in the field, it will automatically adjust its speed internally to the
maximum speed it can achieve. This is evident when you see the motion system automatically slow down while
cutting curves or circles as opposed to straight lines. Automatic proportional pulsing (see PPI) of the laser beam
will ensure that there is no difference in the depth of cut from straight lines to curves. We will discuss how to
optimize the throughput of the system later in this manual.
% Power and % Speed work together in determining how deep the engraving or cutting will be. Higher power and
slower speeds produce deeper results. Lower power and higher speeds produce shallower results.
Note: 100% raster speed is different than 100% vector speed. Due to the inertia of the X-Axis arm, movements
in the Y-direction, and also depending on which model you have, vector speeds will range from one-third
to one-half the maximum raster speed.
Link to Table of Contents
48
User Guide
User Manual
PPI
Available settings are 1 to 1000. The laser beam is always pulsing and never “on” continuously even though it
may appear that way. The PPI setting indicates how many laser pulses, per linear inch, the laser cartridge
will emit. The pulsing of the laser beam is electronically linked to the motion system. These pulses will always
fire, equally spaced, from one to the next, regardless of changes in speed.
In raster mode, dot positioning is determined by the driver based on image dark areas. The
print driver has the ability to place dots at any resolution up to 1000 PPI according to the
image composition. For solid filled areas (solid black for example) the machine places dots
at 1000 PPI because all pixels are completely filled with color. For halftones, the print driver
determines laser pulse location based on whether image pixels are black or white (and edge
threshold decisions). For grayscale, the print driver determines laser pulse location and
power based on image pixel color value (and edge threshold decisions).
In vector mode, laser pulsing follows the path of the outline of the object. Imagine the
laser system working like a sewing machine where the stitching always remains
consistent whether you sew fast, slow or around curves. The setting you use will be
application material dependent. Using less than 150 PPI may result in the pulses being
spread so far apart that they may or may not touch one another. Perforated paper has this
characteristic. Higher PPI settings may cause more of a melting or burning effect on the
edges whereas lower PPI settings may reduce the burning, melting or charring, but may result in a serrated
or perforated-looking edge. Increasing or decreasing the PPI setting does not affect engraving speed, only the
frequency of the pulses.
Mode (Drop Down Menu)
The driver uses the word “MODE” because the laser system works similarly to the operation of a pen plotter
output device. A pen plotter physically selects a colored pen that matches the same colored objects in your
graphic, called “color mapping,” and draws the graphic, on paper, in that color. The laser system, however, applies
a Mode, % Power, % Speed and PPI setting, to the individually colored objects in your graphic. Up to eight (8) sets
of user-adjustable parameters, which control laser beam delivery to your application material, can be “mapped” to
the respectively color filled or outlined objects in your graphic.
Note: Black and white, grayscale and color bitmaps are all mapped to the black color’s settings.
Selecting the appropriate color and clicking the drop down menu button toggles through the following laser beam
delivery modes for the each of the eight respective pen colors.
•
RAST/VECT (default) raster fills and vector marks or cuts proper outlines.
•
RAST rasters all fills AND outlines regardless of outline thickness.
•
VECT only vector marks or cuts proper outlines. It will skip all fills and will skip all outlines with line weights
thicker than a hairline.
•
SKIP ignores all fills and outlines.
Laser (Dual laser cartridge system only)
If your laser system comes equipped with more than one laser cartridge, you are given the choice of using either
both laser cartridges or a single laser cartridge (Top or Bottom.) If your laser system has one laser tube, select the
appropriate laser cartridge according to your laser system set-up.
Z-Axis
This control on the Printer Driver lets you offset the Z-Axis table from the current focal point. When the feature is
turned on and a height is set, the table lowers to the height entered and starts engraving. This feature can be used as
a Material Thickness focusing method.
Link to Table of Contents
49
User Guide
User Manual
Flow (Computer Controlled Air Assist only)
This feature will not appear if you do not have the Computer Controlled Air Assist option. If you do have Computer
Controlled Air Assist, but are not using it, you MUST leave the setting to OFF, otherwise your system will hesitate
up to 10 seconds after you press the start button on the machine. If you purchased the Computer Controlled Air
Assist option, please refer to the Accessories Guide for detailed instructions on how to use the printer driver controls
properly.
Flow Rate (Computer Controlled Air Assist only)
To control the Flow Rate of the Computer Controlled Air Assist accessory, select from the percentage rates available.
Set Button
After making % Power, % Speed, PPI and any other adjustments for the Pen parameters, you must click the SET button
to register the changes. The changes will not be saved until the OK or APPLY buttons are clicked.
Save Button
By clicking Save, the “Save Engraving Setup” dialog box will appear and will allow you to enter in a file name. All
settings will be stored in this file that has a “.LAS” extension. These files can be stored in any directory on your hard
drive and you can have as many setting files as your disk can hold. Verify that you have clicked the SET button before
you save any .LAS files to ensure you have properly saved your settings.
Load Button
To recall printer driver settings that have been previously saved, click on the “Load” button and choose the desired
.LAS settings file. The settings that are currently on screen will be replaced by the settings from the .LAS file. You may
abort this change by clicking Cancel; clicking OK will approve the change.
Default Button
The Default button will reset the driver settings to the original manufacturer values.
Cancel Button
The Cancel button closes the printer driver window and takes you back to the previous window. If the SET, OK or
APPLY buttons were not clicked, the changes will not be saved by the Printer Driver.
Apply Button
The APPLY button saves all changes made to the Manual Control Tab. These changes include any modifications made
to the Raster, Vector or Engraving Field sub-tabs.
Link to Table of Contents
50
User Guide
User Manual
Raster Sub-Tab
Print Special Effects
In this dropdown list, you can choose from four
different printing modes, Normal (default), Clip art,
3D and Rubber Stamp.
Clip Art
This control simulates laser printer output and
is very useful if using a drawing with many
colors, shades of gray or many outlines. It is
recommended to turn this control ON when
using DRAWN clip art because there may be
some underlying cutting lines hiding behind filled areas. Having this control ON gives a what-you-seeis-what-you-get output very similar to laser printer output. The entire drawing will be raster engraved,
including all outlines, and only the Black color setting is used. The driver automatically turns OFF its
color-mapping feature and all colors are engraved as different shades of gray, represented by a halftone
pattern. The type of halftone pattern is based upon the “Quality” setting of the driver the same way
grayscale bitmaps are interpreted. Since clip art images use a wide variety of colors, shades and outlines,
the only effective way to engrave these images is to have this control turned ON. Clip art mode also
provides greater compatibility with Windows software that does not work well with vector devices such
as the laser system. Do not activate this control when printing photographs or bitmapped images; use it
only with DRAWN clip art.
3D
There are two ways to use the 3D feature. The first method is used to produce an engraving that has a
contoured depth, giving it a three dimensional feel. It is used in combination with grayscale bitmaps
by automatically assigning laser power levels to the shades of gray of the bitmap without converting
the image to a halftone. These power settings are based on the setting you entered for the color black
in the printer driver. The darkest shades of gray (black) will be assigned the value of the setting for the
black color. The lightest shade of gray (white) will automatically be assigned a 0% power. All other
shades of gray that fall between black and white will automatically be assigned an appropriate power
level that matches the darkness of the color. The engraving will appear “3D” because the depth of the
engraving will vary according to the image. Sometimes it takes several passes to create enough relief in the
engraving to get the desired results.
Special 3D software is required to produce the type of grayscale images that are compatible with
this mode. You cannot simply use ANY grayscale bitmap to produce a “3D” effect. Please contact our
Applications Department for the latest 3D software recommendations.
The second way to use the 3D feature is to engrave any photograph lightly onto the surface of hard
materials, such as black marble, anodized aluminum, painted brass, micro-surface engravers plastic, etc.,
to produce exceptional photographic quality. Using the appropriate materials and settings, the end
result is an engraving that looks more like a photograph than a halftoned or diffusion dithered image
does. To use the 3D feature in this method you must first follow the steps below.
Choose Your Material
The best material to use is one that has the highest contrast, such as black anodized aluminum, black
marble or black cored engravers plastic with a white micro surfaced coating. While other materials
may work okay, they may not produce the highest quality.
Establishing Nominal Power
Choose your % Speed and your Image Density settings. Set the PPI to 1000, but don’t set the %
Power setting just yet. The objective is to use the LOWEST % Power setting that produces the
most contrast such as the whitest (as in black anodized aluminum) or the darkest (as in black cored
engravers plastic with a white micro surfaced coating) results.
Link to Table of Contents
51
User Guide
User Manual
This is what we call the “nominal” power setting. Over-powering the material will produce poor
results.
In your graphics software, create a series of five rectangles that are about ¼ inch high and 6 inches
wide as in the following diagram:
Starting with the top rectangle, set the power setting to a value that you know will be too low. For
example, engrave the first rectangle at 5% power, increasing the power for each subsequent
rectangle in 5% increments, finishing the series off at 25% power and note the results. Choose the
rectangle that uses the lowest % Power setting to achieve the most contrast. If 25% is not enough
power, then engrave the rectangles once again, this time starting at 25% and increasing in 5%
increments as above.
In this particular example, we’ll say that 20% power looks over-burned, but 15% appears
under-burned. Since the material may be sensitive to small power changes, you may need to
narrow it down a bit further. Engrave a new series of rectangles, but this time start the top rectangle
at 15% then add 1% for the next rectangle, and so forth, until you find the best setting between 15%
and 20%.
The setting that produces the highest contrast using the least amount of % Power is called the
“nominal power setting.”
Engraving a Calibration Scale
Now that you have established the nominal power setting, you will need to engrave a grayscale
calibration scale. You can create one of your own or use the one provided for you which can be
found on the Software Installation CD-ROM called “3D Calibration Scale.cdr.” This is a CorelDRAW 8
file so using versions 8 and higher will open the file.
The scale looks like this:
00
01
02
03
04
05
06
07
08
09
10
11
12
13
14
15
Each rectangle is 0.5 inches wide (12.7 mm) and 0.25 inches tall (6.35 mm). Each successive shade
of gray is incremental by 16 levels starting at 0 and ending at 255. The numbers below the scale
are there as a reference to the 16 levels of power control (explained later) and do not need to be
engraved if you do not want to.
Engrave the calibration scale, onto your material, using the nominal power setting you established
earlier. Compare it to the actual calibration scale that you see on screen or in this manual. If the
response of your material to the laser beam was perfectly linear, then the result should look exactly
like the calibration scale. Most likely you will find that several rectangles appear to have the same
appearance of shading. The objective would be to engrave the calibration scale and produce a
result that would appear as if each rectangle would have its own distinguishable level of gray,
starting from white all the way to black. To help you achieve those results, the printer driver gives
you the ability to calibrate the power level of each one of the rectangles. To access the feature, click
on the “Setup” button.
Link to Table of Contents
52
User Guide
User Manual
Setup Button
When you click this button, the ULS 3D Power Calibration screen will appear. Notice that there are
16 slider bars representing the 16 shades of gray of the calibration scale. The 00 and the 15 are not
adjustable as they represent white and black. The other 14 can be adjusted. The objective is to go
back and forth between adjusting the corresponding slider bars and re-engraving the calibration
scale until you can duplicate the appearance of the calibration scale as best as possible. As you are
progressing, make sure you keep saving your settings in an LAS file just in case your computer
crashes, etc. This is a lengthy procedure so you do not want to have to do it twice.
Once you have duplicated the 3D Calibration Scale onto your material, calibration is now complete.
You only need to do this calibration one time for each material you intend on using to produce
photographs.
Note: If you are using a type of material that becomes lighter when you engrave, such as
black marble, you will need to invert the photograph first (make a negative image) in your
photo editing software, otherwise when you engrave the image, it will appear like a negative
image.
APPLY Button
Click Apply to enable the settings that you just set.
CLOSE Button
The Close button closes the 3D Power Calibration settings window and cancels any changes
you made to the scale if you didn’t click the APPLY button.
DEFAULTS Button
The Defaults button applies the factory default settings to the 3D Power Calibration settings.
Rubber Stamp
Rubber Stamp mode causes a “shouldering” effect when raster
engraving rubber stamp material or any other material that
requires a “shouldered” engraving. The effect looks as if the
laser beam engraved the material on an angle, but in
actuality it is the precise control of laser power that creates
this appearance. This is a “raster only” feature that only works
with black colored graphics and uses the power setting of
the black color in the printer driver. Vectors are processed
normally and can be used for vector engraving or cutting by
assigning any of the seven other printer driver colors to the
outline desired.
This image..
...turns into this
image by the driver...
...turns into this
...and the engraved
image looks like this.
...and the engraved
This image..
image by the driver...
image looks like this.
To obtain a “raised” engraving such as a rubber stamp, simply
create a “negative” graphic so that the background is black
and the text or graphic objects are white. This way, the background engraves and the text or objects
remain untouched, producing a “pyramid” effect.
To obtain a “chiseled” or “sunken” engraving, create a “positive” graphic so that the background is white
and the text or objects are black. This way, the text or graphic engraves and the background remains
untouched, producing a “chiseled” effect.
Setup Button
Selecting the Setup button opens a pop-up window so you can choose from the following
settings:
Taper Selection
Choose from various types of shoulder angles. Experiment with each setting and note the
result.
Link to Table of Contents
53
User Guide
User Manual
Image Options
Invert Page
This converts all black objects into white and all white objects into black for the entire page.
This is very useful for engraving a full sheet of rubber stamps.
CAUTION:
When using the “Invert Page” feature you
reduce your page size so that the entire work area is not engraved.
may
need
to
Mirror Page
This mirrors the entire page from left to right (horizontally). It will not mirror individual
objects or selections. This is very useful for engraving full sheets of rubber stamps because
the graphics on screen are non-mirrored and can be proof-read easily.
Power
Notice that when you click on different Taper Selections that the power table changes. This is
because the laser applies power in different profiles to produce different styles of taper. You
will notice that you cannot adjust the pre-defined Taper; however, if you would like to create
a custom taper of your own, first select the Taper Selection that you would like to start with
and then click the “NEW” button. This will copy the taper as a “Custom Shoulder” that you can
rename by typing a new name in the dialog box and clicking “Rename.” You can also adjust
the profile however you desire. Each slider bar controls the laser’s power for that step. The
numbers at the bottom of that slider bar define the width of the step in 0.001 inches (mils). The
square at the top of each slider bar is the activate/deactivate button. Always deactivate the
steps you are not using so that it will apply 100% power to that level.
0
8
20
31
39
49
59
100
Step Power %
Material
.002”
Step Width
Normal Rubber Stamp Setting
...will give you these results
The diagram on the previous page is an example of the Normal Rubber Stamp Taper Selection.
You can see that there are 8 steps used to create the shoulder. The surface of the material is
considered the first step and the bottom of the engraving is considered the last step. You can
define as many as 16 steps, but the first or the last steps are not definable because they are
fixed at a power setting of 0% and 100% respectively. You can only define the parameters for
the 14 steps in between.
Note: The maximum shoulder width is 0.056 inches (1.42 mm).
Reduction
Raster Block Reduction (also known as Print Growth Management) reduces the number of pixels of a
raster image only in the X and Y directions. Raster Block Reduction does not affect vector images.
Sliding the bar to the right will remove pixels from the image that is being engraved, practically
thinning the raster image. This feature does not affect your original file, only the file that is in cache
storage. This feature is useful for bar code labels with thin lines.
Image Density
The Image Density setting determines how many raster strokes per vertical inch of travel the motion
system steps down to produce the engraving. It can also be referred to as the vertical lines per inch or fill
spacing. In the Windows XP driver it is termed Image Density and there are six Image Density choices in
all models. Higher Image Density (DPI) settings produce better quality raster images, but reduce
productivity by increasing engraving time. Lower Image Density (DPI) settings produce lower quality raster
images, but increase productivity by decreasing engraving time.
Link to Table of Contents
54
User Guide
User Manual
Image Density (DPI) settings will also have an effect on vector quality and vector speeds when
vectoring lines other than straight horizontal or vertical lines. For example, a circle is made up of very small
straight-line segments linked together at very small angles. If you choose a high quality setting such as
6 (1000 DPI), then these segments are as small as possible and they are high in quality. The result is
the smoothest looking circle, but it will take longer to vector engrave or cut because the focus carriage
must start and stop at the ends of each line segment. Since there are many segments, it will take longer
to process, but the quality will be the highest that the machine can produce. If using a low quality
setting such as 1 (DRAFT), these segments become longer, but there are less of them, resulting in more
flat-edged looking curves that will process faster.
By running samples on scrap materials and practicing with different settings, you can find a compromise
between throughput and engraving quality.
Print Direction
The default direction is Down which begins engraving at the top of the field and finishes at the bottom.
On some materials you may get better results by starting at the bottom and engraving towards the top
of the field (Up). This is because the engraving smoke is being drawn towards the top of the field. On
some materials engraving Down causes the smoke or debris from the engraving to be deposited onto
the previously engraved surface, possibly damaging the engraved area. Experiment with the different
directions using different materials and choose the best method for your application.
Note: The Up direction is especially useful when engraving rubber stamps and utilizing the Back
Sweep Air Assist option.
Dithering
Dithering settings are used when printing grayscale or color bitmapped images such as TIF, JPG and
BMP formatted images. Since the laser system is essentially a black and white printer (black turns the laser
ON and white turns the laser OFF), and if you choose the correct settings, the driver will automatically
convert the grayscale or color bitmap into a 1-bit “halftoned” black and white image. This process is very
similar to how newspaper photographs, as well as laser printer photographs, are printed. For a more
detailedexplanation of the terms “grayscale,” “bitmap,” “halftone” or “dither,” please refer to the “Graphic
Software Setup” section in this manual.
Halftone
This halftone pattern generator converts grayscale bitmaps into a halftoned image based on your Image
Density choice in the driver.
Image Density
Angle
Shape
Lines Per Inch
6
45 Degrees
Round
180
5
45 Degrees
Round
90
4
45 Degrees
Round
60
3
45 Degrees
Round
45
2
45 Degrees
Round
36
Error Diffusion
Unlike halftone, error diffusion scatters the black pixels in a random pattern to represent shading. It
uses the quantity of black dots instead of the size of the black dots to represent the different shades of
gray. The pattern created will be dependent on the quality setting that you choose in the driver with the
exception that there is no chart to reference. Higher quality settings, such as 5, will produce a more
densely packed, higher dot quantity pattern, whereas a lower resolution setting, such as 2, will produce
a loosely packed, lower quantity dot pattern.
Note: Do not use Error Diffusion when engraving rubber stamps, otherwise dots will appear in
the background. Choose only Halftone.
Link to Table of Contents
55
User Guide
User Manual
Black and White Mode
The Black and White mode thresholds the image at 50% black. Each pixel that is greater than 50% black
will be converted into white and each pixel that is 50% black or less will be converted into black. This
effect is very similar to trying to duplicate a photograph using a photocopier.
Helpful Tip
Engraving grayscale bitmaps using a dithering pattern requires some practice and a bit of trial and
error to achieve perfection. It also requires some knowledge of bitmap editing software. These images
will visually appear different on one material as opposed to another material even if you use the same
driver settings. As a rule of thumb, use an Image Density setting of 5 using halftone or diffusion pattern
on harder materials, such as marble, anodized aluminum or microsurfaced engraver's plastic. Use an
Image Density setting of 3 using the halftone or diffusion pattern for softer materials, such as wood or
materials that you intend to engrave very deeply.
Image Enhancement
The Image Enhancements controls allow the user to “fine tune” the image to enable the laser system to
produce the highest quality, highest detailed images at high or low speeds. Image Enhancement may be
used at any engraving speed and with any material.
Note: Image Enhancement will cause files to take longer to print. Since most materials do not require
the use of Image Enhancement, use this feature only as needed. Image Enhancement and 3D Effects
cannot be selected at the same time. The printer driver will automatically notify you if you attempt
to do so. Image Enhancements work best for low power, high speed applications such as marking
anodized aluminum, etc.
The following procedure may appear lengthy, but when you learn how to use the controls, establishing
the correct parameters is easy and quick. Once you have established those parameters you can “SAVE”
them in the ULS printer driver as .LAS settings and recall them when needed. Many users choose to name
these saved settings according to the application material’s name.
Note: The Image Enhancement settings are designed to work with the BLACK pen color in the printer
driver. However, the other seven pen colors of the printer driver will use the same Image Enhancement
settings. Keep in mind that those settings will have a different resulting effect on if the other colors’ %
power, % speed and PPI are different than the black pen color’s setting.
Texturize
The Texturize feature adds random textured laser pulse patterns to an engraving job while using
Image Enhancements. It reduces motion system marks like banding from appearing on some materials
like tile and marble.
Definitions
CONTRAST: Contrast adjusts the difference between the unengraved and engraved areas in the high density
part of the graphic or where there is the most concentration of graphic pixels (in between the dotted lines),
as the following diagram illustrates:
Universal Laser Systems, Inc.
Within this effective area, using too little CONTRAST may cause some parts of the letters to appear thin,
faint, fuzzy or even non-existent. Having too much CONTRAST will cause the effective area to appear thick,
bold or over-powered.
Link to Table of Contents
56
User Guide
User Manual
DEFINITION: Definition adjusts the difference between low density and the high density part of the
graphic. The low density parts of the graphic are typically the ascenders and descenders of text, single
pixels that may be horizontally spaced far from other pixels or the start of the graphic in the direction of
the raster stroke. Refer to the following diagram:
Universal Laser Systems, Inc.
Setting this parameter too low may cause the effective part of the graphic to appear thin, faint, fuzzy or
non-existent. Too high of a parameter will cause these objects to appear thicker, bolder or more powered
than the high density areas of the graphic.
DENSITY: Density adjusts the difference between the entire unengraved and engraved areas. If the
parameter is too high, then the entire engraved image may appear thick, bold or over-powered. Too
low of a setting may cause the image to appear thin and pixels or parts of characters may disappear
altogether. The opposite effect would occur on inverted images such as white text on a black background.
TUNING: Tuning adjusts the image so that the pixels vertically line up with each other during the left
and right bidirectional raster strokes. A misadjusted TUNING value will cause the image to appear doubleimaged or inadvertently bolder than normal. A typical non-Image Enhanced TUNING value can be from -4
up to 0, whereas a typical Image Enhanced TUNING value generally averages around +4. TUNING will be
different if you have Image Enhancements enabled or disabled. Saving the printer driver settings will also
save the TUNING value.
Procedure
The following procedure assumes that you have some experience working with the laser system and have
a general idea of the Power, Speed, PPI and Image Density settings that you intend to use for the chosen
application material.
In the following example, we will be engraving painted brass choosing 100% speed for good throughput,
and Image Density 5 for good quality.
Step 1: Establish the nominal power setting.
In your graphics software, create a series of five rectangles that are about ¼ inch high (6.35 mm) and 6 inches
wide (152.4 mm) as in the following diagram:
Starting with the top rectangle, set the power setting to a value that you know will be too low. For example,
set it to 5% power and the rest of the parameters to 100% speed, 1000 PPI and Image Density 5. At this
time, ensure that Image Enhancement is NOT enabled. Engrave the first rectangle at 5% power,
increasing the power for each subsequent rectangle in increments of 5%, finishing the series off at 25%
power and note the results. Look for the LOWEST power setting that has the cleanest removal of material.
This would be the nominal power setting. While higher than nominal settings may also produce clean
engraving, it will overpower the material and may cause highly detailed engraving, unlike these rectangles,
to appear too thick, bold or washed-out. If 25% is not enough power, then engrave the rectangles again,
this time starting at 25% and increasing in 5% increments and so on. In our particular example, let’s say
that 20% power looks good, but 15% appears underpowered. Since we know that this material
happens to be sensitive to small power changes, we’ll need to narrow it down a bit further. Engrave the
rectangles once again, but this time start the top rectangle at 15% then add 1% for the next rectangle
and so on until you reach 20%. The results now indicate that the nominal power setting of 17% power
looks as if it is the LOWEST power setting that produces the cleanest results at 100% Speed, 1000 PPI
and Image Density 5.
Link to Table of Contents
57
User Guide
User Manual
Step 2: Using text to set the CONTRAST parameter.
Type in a random line of text, using the Times New Roman font, set at 8 or 10 points in size. Make sure
that the text string is at least 6 inches long and that the string includes punctuation marks, spaces and
lower and upper case letters as in the following example:
Universal Laser Systems, Inc. produces the “BEST” laser systems in the world!
Engrave the sample text with the settings determined in step 1, but this time ENABLE Image
Enhancement and set CONTRAST to 0, DEFINITION to 0, DENSITY to 100 and the TUNING value to +4. You
should expect the results to appear fuzzy, some of the characters will be missing and overall engraving
quality will not be as good as expected. This is normal. Move the line of text slightly downward in your
graphics software so that you will engrave a clean part of the material, but keep it close enough to the
previous engraving so that you have something to compare it to. Keep engraving samples and
adjusting the CONTRAST upward in increments of 5 and note the results. The objective is to adjust the
CONTRAST just enough to cause the high density areas of the text to be sharp and clear. Ignore the
appearance of the ascenders (like quotation marks or the tops of h’s) and descenders (like commas or
the bottom of lower case p’s) as they will appear faint and unclear. This is to be expected. DO NOT
adjust the CONTRAST setting to try to force these to appear; use the DEFINITION adjustment for those
characters. Right now, ONLY concentrate on the high density part of the characters. Setting CONTRAST
too high can cause the characters to appear “fat” or “bold.” Adjusting the CONTRAST by just one number
can make a big difference in appearance, so continue adjusting the setting by first increasing by 5 points
until you get close, but then fine tune the setting by increasing or decreasing by 1 point until the exact
setting is achieved.
Step 3: Adjusting DEFINITION to enhance the ascenders and descenders.
Now, increase the DEFINITION in increments of 5 at a time until the ascenders, descenders, commas,
quotation marks and any other low density area characters begin to appear. The objective is to increase
the setting just enough to cause these parts of the graphic to match the appearance of the high density
areas. Setting the DEFINITION too high will result in ascenders and descenders appearing too “fat” or “bold”
compared to the rest of the graphic.
Step 4: Reducing DENSITY as needed.
Once CONTRAST and DEFINITION have been set to the appropriate levels, the graphic may or may not
appear to be “fat” or “bold.” In most cases, the appearance will look great without making any more
adjustments. However, if everything appears overpowered or bold, try reducing the DENSITY down from
100 in increments of 5 and note the results. If the characters begin appear to be “chunky” or appear as if
pixels have been eliminated, then you have reduced it too much. Normally you can leave the DENSITY at
100. However, there may be cases where you need to reduce it. Reducing DENSITY can be very useful when
the image is inverted, such as white text with a black background. In this case, if the engraved area (the
background) is overpowering the text (foreground), then reducing the DENSITY may help thicken the text.
Step 5: Fine tuning the raster strokes.
At this point, you are finished with Image Enhancements. Make sure that you save your settings, but your
graphic may need a little more “fine tuning.” The typical TUNING setting is +4 when Image Enhancement
is enabled. However, this may or may not be the best setting for your system. To check this setting, you
should perform this last test. Engrave the same text with all your Image Enhancement settings, but this
time set the TUNING value to 0. Then move the graphic down and engrave it again with TUNING setting
+1, then +2 and so on all the way to +8. Compare each one to the other and find the one that is the
sharpest and clearest. Go back and set the TUNING value to the appropriate number and SAVE your settings
once again.
The Image Enhancement settings for that material are now complete. If you feel that you can fine tune it a
little more, go back to step 2 and try again, but this time start with the current Image Enhancement
settings that you saved. It is not necessary to reset your nominal power setting and we recommend that
you leave it the same as the value you determined in step 1.
Setting the Image Enhancement parameters using this procedure will cause all of your graphics, whether
big or small, inverted or not, dense or highly detailed, to appear better than ever. We suggest that you run
Link to Table of Contents
58
User Guide
User Manual
this procedure for all your materials and save your parameters. This may sound like a big job, but the
additional productivity and engraving quality that your system is capable of producing is well worth the
small amount of time spent.
Vector Sub-Tab
Vector Optimizer
The four available selections apply to vector
output only and have no effect on raster images.
Regardless of which of the following selections
you choose, vectors are grouped by pen color
and will always output in the color order listed in
the printer driver.
Enhance and Sort
Enchance and Sort turns on both features
simultaneously.
Enhance Only
The printer driver collects all the vectors from the application software and reconstructs them (so
to speak) by removing start and stop points within the vector curves so that they run smoother with
less jitter. It has no effect on straight, horizontal or vertical lines.
Sort Only
The printer driver collects all the vectors from the application software, stores them in temporary
memory, sorts them and then outputs them in the following order:
•
All open path vectors are output first (not closed path vectors like circles and squares) beginning
with the end point of the vector path that is closest to the current position of the focus carriage.
All subsequent open vector paths are output using the same “nearest neighbor” starting point
method which eliminates the random “vector hopping” that causes longer processing times.
•
Closed paths will follow, beginning with the innermost closed path and ending with the
outermost closed path. This is particularly useful in an elevated cutting application to prevent the
outer piece from falling first. The beginning point of a closed path is automatically selected by
the printer driver by the “nearest neighbor” vector path that has the steepest angle in the Y-Axis
direction.
None
This selection turns off Vector Optimizer. Vectors will be ordered exactly as sent from the user’s graphics
program and ordered by pen color.
Vector Scaling
This feature allows you to calibrate vector cutting or vector engraving to your particular application. To
calibrate the system, as an example, draw a precise 5” x 5” (127 x 127 mm) square in your graphics software.
In the printer driver, set the laser power and speed setting to vector mark (do not cut through) this square
onto some scrap material. After marking, remove the material and with a precision measuring device,
such as a caliper, measure the square in both the horizontal (X) and vertical (Y) directions. Let’s say that the
measurement was 4.997”x (126.92 mm) and 4.996”y (126.89 mm). Use the formula (desired length/measured
length) and enter the result into the X-axis and Y-axis boxes respectively. In this example, the result would
be X-axis = 1.0006 to 1.0000 and Y-axis = 1.0008 to 1.0000. The printer driver will scale the images larger for
numbers greater than 1.0000 and will scale the image smaller for numbers less than 1.0000. After changing
the numbers, repeat the marking procedure and verify that the square is scaled correctly. We used a 5” by 5”
(127 x 127 mm) square just as an example, but you can use any size object that is smaller than the maximum
size of the engraving field. Using the Vector scaling feature with larger images produces more accurate results.
Keep in mind that this feature DOES NOT scale raster images so if you combine raster and vector images in one
file, the raster image may not align with your vectors. You will need to manually position your raster images
in their desired positions.
Link to Table of Contents
59
User Guide
User Manual
CAUTION: Do not attempt to use the vector-scaling feature when your graphic
extends out to the absolute edge of the engraving field. You may accidentally cause
the driver to attempt to print past the edge of the maximum allowable page size.
Unexpected results may occur. If you use this feature, the actual allowable page
size decreases by the same amount that you are attempting to offset.
Engraving Field Sub-Tab
Units
Units allows you to change between Metric and
Inches.
Language
Select from many different languages in this drop
down list. Some language changes will not take
effect until the printer control panel is closed and
then re-opened.
Engraving Field
Width and Height
The page size that you enter in Width and Height must match the page size in your graphics software
program EXACTLY and it is up to the operator to enter in the correct settings. Select the metric box if
metric units are desired.
Note: Incorrect use of this feature may cause no graphics, partial graphics, erroneous graphics or
a misaligned graphics output relative to the application material to occur. To avoid problems,
we recommend that you set the Width and Height to the maximum field size of your laser system
(click the Max Size button) and also set your graphics software programs page size to match.
Max Size Button
Clicking on the Max Size button restores the driver back to the default maximum page size that your
model can accept.
Dual Head (PLS Only)
Dual Head is also an optional accessory. If you have purchased this option, please refer to the
ACCESSORIES section of the manual for more information.
Rotary
This option is available for all models. Please refer to the Accessories section of this manual on how to
install and use the Rotary Fixture.
Diameter
The diameter of the cylindrical object being engraved will be entered in this field.
Rotation Factor
If you have purchased the optional Rotary fixture, you may need to calibrate your fixture if your
application requires you to engrave or cut completely around the cylinder precisely 360 degrees. Only
use this option if you completely understand and have used the Rotary Fixture in the past. If you are
familiar with the operation of the Rotary Fixture and in your application you create a vector line or
raster graphic that extends from the top of the page (in your graphic software) all the way to the
bottom of the page, you should expect that the Rotary Fixture would rotate a full 360 degrees. If the
fixture comes up short or long by a few degrees, you can compensate for this in the driver. If your
application comes up short, increase the number past 1.0000 as much as you need to and run your
sample again. If your application rotates past 360 degrees, then decrease the number of degrees
below 1.0000 to get the ends to line up. You can calculate the exact number (refer to the Vector
Scaling technique on the previous page), but it may be difficult to measure circumference.
Link to Table of Contents
60
User Guide
User Manual
Third-Party Graphic Software Configuration
Choosing the right graphics software program to run the laser system is essential for maximum usage and control of
the laser system. Not all software can be used to run the laser system because many have limitations. Setting up your
software correctly is essential to running the laser system properly.
The following examples assume that you are configuring the software for a VersaLASER system. If you have a different
laser system, substitute the correct maximum page size.
We have provided specific instructions for setting up CorelDRAW X3/X4, AutoCAD 2000i/2002/2004/LT 2007 & 2008,
and Adobe Illustrator CS/CS2/CS3 in order for these programs to work well with the laser system.
Specific Software Setup
Some graphics software programs require a special setup procedure in order for the software to function correctly
with the ULS printer driver. In the following pages, you will find setup instructions for the most popular software
programs that our customers use. As a reminder, ULS provides no warranties whatsoever on any software used in
connection with a ULS Laser Engraving System, express or implied. Neither does it guarantee software compatibility
with any off-the-shelf software package or any software program that has not been written by ULS.
The following suggested programs are widely used by ULS customers and are considered to be the most functional
and compatible programs to use with the laser system.
•
Vector Graphics Programs (User Supplied)
CorelDRAW X3/X4*, Adobe Illustrator CS3
•
Bitmap / Scanning Software (User Supplied)
Corel PHOTO-PAINT or Adobe Photoshop
•
Raster to Vector Conversion Software (User Supplied)
CorelTRACE
•
CAD Software (User Supplied)
AutoCAD for Windows
•
Fonts (User Supplied)
Use True Type fonts only. Do not use PostScript or bitmapped fonts.
*Earlier versions of CorelDRAW, such as 8 or 9, have problems with the XP Operating System, which in turn, causes problems with the operation of
the laser system. As a result, ULS recommends CorelDRAW X3/X4 over earlier versions. While ULS has made reasonable efforts to ensure the laser
system as compatible as possible with graphics and CAD software written for the Windows XP operating system, ULS cannot guarantee complete
compatibility with any software.
Link to Table of Contents
61
User Guide
User Manual
Adobe Illustrator CS or CS2
Note: Adobe Illustrator CS or CS2, in combination with the new ULS printer driver version 5.24.38 or later,
is now capable of both raster and vector output as well as full-field engraving capability. The following
procedure assumes that you are familiar with the use and operation of Windows XP and Adobe Illustrator CS or
CS2.
1. Close all Windows programs.
2. Upgrade to Adobe Illustrator CS, but do not launch it yet.
3. Upgrade to ULS printer driver version 5.24.38 or later.
4. Set your Windows default printer to the ULS printer driver.
5. Launch Adobe Illustrator CS and start a new graphic.
6. You will now need to set the Page Setup, in Adobe, to the largest square page that is equal to the width
of your laser system’s field. For example, if your laser system has a 24 x 12 inch (610 x 305 mm) field,
then set the page in Adobe to 24 x 24 inch (610 x 305 mm) Portrait mode (not Landscape). If you laser system
has a 32 x 18 inch (813 x 457 mm) inch field, set the page in Adobe to 32 x 32 (813 x 813 mm) Portrait.
7. Now, place your graphics ONLY within the top portion of your page in Adobe. Don’t use the bottom portion
that extends below the physical size of the engraving area of your laser system. Since your laser system truly
doesn’t have a usable area as big as the page size you created, the only way to make Adobe work is to trick
it into thinking it is outputting to a larger, square-fielded, device.
8. If you would like vector output, set your stroke weight to either 0.001 inches (0.025 mm) or 0.1 points. You
will have to type in this setting because it is not available from the dropdown list.
Link to Table of Contents
62
User Guide
User Manual
Adobe Illustrator CS3
Part 1: Setting the Default Workspace
1. Start Illustrator CS3 from your Windows XP/Vista compatible PC.
• Illustrator CS3 Preferences box will open.
2. Select FILE CREATE NEW BASIC RGB DOCUMENT.
• The new document options box will open. Make the following settings:
a. Set Units to inches.
b. Set the Height and Width to match the size of your laser system’s work table.
c. Set the Color Mode to RGB.
d. Click “OK”.
Part 2: Setting the Stroke
1. Next, change the weight of your Stroke to 0.001” (0.025 mm). This is essential for vector cutting and scoring.
Link to Table of Contents
63
User Guide
User Manual
Part 3: Editing the Swatch Palette
1. Open your Swatch Palette as follows:
• Main Menu
Window
Swatches
Left Click “OK”
• Delete all swatches that are not basic RGB or gray scale by left clicking to select them and then clicking
the “Delete Swatch” garbage can icon is the lower right-hand corner of the swatch box. Keep RGB
BLACK, RED, GREEN, BLUE, YELLOW, MAGENTA, CYAN.
• If you wish to use the color ORANGE for full palette cutting and engraving operations, you can create a
swatch for it using the following settings:
R = 255
G = 102
B=0
Part 4: Saving the Template
1. Illustrator CS3 is now correctly configured to work with your Universal Laser System. Be sure to save the
document as a template for future documents as follows:
SAVE AS TEMPLATE
(ENTER FILE NAME)
CLICK “OK”
• FILE
Part 5: Some notes about printing
1. When you are ready to print to your laser system, disregard the print preview dialog box and select the
following from the Main Menu:
PRINT
SETUP
PREFERENCES
• FILE
2. Prepare the file for printing using the Universal Laser System print driver.
3. When your settings are complete, choose print. The image in the print preview box will appear sideways,
but the placement of your images will be correct.
4. Print as usual from the Universal Laser System Universal Control Panel.
Link to Table of Contents
64
User Guide
User Manual
AutoCAD 2000i, 2002 and 2004
Note: AutoCAD version 2000 is not compatible with ULS laser systems. You must upgrade to version 2000i or
higher. Also, we recommend installing ULS printer driver version 5.24.38 or higher.
1. Make sure the ULS Printer driver is installed prior to setting up AutoCAD.
2. If AutoCAD is already installed and you are simply upgrading ULS printer drivers:
• Close all open programs.
• In Windows, Click Start>Printers & Faxes.
• Delete ALL ULS drivers from the Printers (Printers and Faxes) folder.
• With the Printers and Faxes folder still open, click File>Server Properties>Drivers and remove ALL ULS
printer drivers from the list. Close Printers & Faxes.
• Using Windows Explorer, search for all files and folders with a .pc3 extension, then delete all ULS Printer
pc3 files (i.e. VLS360.pc3).
• Next, search for files with a .pmp extension and delete all ULS Printer .pmp files (i.e. VLS360.pmp).
• Reboot the PC.
3. Start AutoCAD and open a new drawing.
4. Click File>Plotter Manager and double-click Add a Plotter Wizard. If the Autodesk Hardcopy System window
appears, select the version of AutoCAD you are using, and then click Continue.
5. Click Next. Select System Printer and then click Next.
6. Select the appropriate ULS Printer Driver and then click Next.
7. DO NOT click the Import file button, simply click Next.
8. You may edit the plotter name, if desired, and then click Next.
9. Click on Modify Standard Paper Sizes (Printable Area) in the Device and Document Settings Tab window,
and then click the Modify button. Change ALL margins to 0.00, and then click Next.
10. Edit the PMP file name if you desire then click Next. DO NOT click the Print a Test Page button, instead click
Finish. Click OK to exit the Plotter Configuration Editor window and then click Finish.
11. Click File>Page Setup and then select the Plotter Configuration name and pc3 name (not the driver)
from the dropdown list.
12. If you would like to change the drivers settings, click the Properties button, then click the Custom
Properties button. Make your changes and then click OK and then OK again.
13. Click New to create a new Plot Style table to set your pen widths. As a default, the ULS print driver
produces vector output when pen widths are set to 0.001 inches (0.025 mm). If the pen widths are set
between 0.002 – 0.008 inches (0.050 – 0.20 mm), then the ULS print driver may or may not convert the
lines to raster images. This will depend on the image being plotted, therefore it is recommended that
for colors requiring vector output, set the pen widths to 0.001 inches (0.025 mm) and for colors requiring
raster output, set pen widths greater than 0.008 inches (0.20 mm).
14. Now, select Start from Scratch, and then click Next. Enter a name and then click Next. Click the Plot Style
Table Editor button. Click Color one, hold the shift key on your keyboard and click colors two through seven.
You can only use colors one through seven with the ULS printer driver. With all seven colors highlighted, click
the Edit Lineweights button and then select the units desired. Add a lineweight of 0.001 inches (0.025 mm)
to the Value column by clicking on Edit Lineweight and entering 0.001 (or 0.025 for metric settings). Click OK,
click Save & Close and then click Finish.
15. Click the Layout Settings tab and set the Plot Scale to 1:1.
16. AutoCAD is now set up properly to work with the ULS printer driver.
Link to Table of Contents
65
User Guide
User Manual
AutoCAD LT 2007 & 2008
Note: These instructions are for plotting from “Model Space.” Also, we recommend installing ULS printer driver
version 5.24.38 or higher.
1. SET DRAWING LIMITS
a. From the Main Menu select FORMAT
DRAWING LIMITS
This will allow you to enter the model space limits of your Universal laser system work table size. For
example, if your work table size is 32”x18” (813 x 457 mm), you would set the following drawing limits:
i. For the lower left position type in 0, -18 at the command line and press ENTER.
ii. For the upper right position type in 32, 0 at the command line and press ENTER.
iii. Objects to be plotted should be located within these set drawing limits.
2. ADD NEW PLOT STYLE
a. From the Main Menu select FILE
PLOT STYLE MANAGER
b. From the Explorer Window double-click Add-A-Plot Style Wizard. The Start from Scratch Wizard will
pop up.
c. Select Start from Scratch and click NEXT.
d. Select Color-Dependent Plot Style Table and click NEXT.
e. Enter a file name (i.e. “Laser”) and click NEXT.
f. Click on the Plot Style Table Editor.
g. Select Edit Line weights and click inches.
h. Click Edit Line Weights button and enter a VALUE of 0.001 inches (0.025mm) and click OKAY.
i. Hold down the Control Key and select Colors 1-7 with the left button of your mouse.
j. Click the Save and Close button.
k. Check the box “Use this Plot Style for New and pre-AutoCAD LT 2007 Drawings” and click FINISH.
l. Close out the PLOT STYLES pop up.
Note: For colors requiring Vector output, pen widths should
be set to 0.001 inches (0.025mm), and for colors requiring
Raster output, set pen widths to greater than 0.008 inches
(0.203mm). VersaLASER can only plot Black, Blue and Red.
Link to Table of Contents
66
User Guide
User Manual
3. ADD NEW PLOTTER
a. Select FILE
PLOTTER MANAGER
b. Select ADD-A-PLOTTER WIZARD and click NEXT.
c. Select System Printer and click NEXT.
d. Select your Universal Laser System (i.e. VLS6.60) and click NEXT.
e. Click the Edit Plotter Configuration button and select Modify Standard Paper Size (Printable Area).
f. Select User-Defined LANDSCAPE (Modify) and change the margin values to zero.
Top = 0.0
Bottom = 0.0
Left = 0.0
Right = 0.0
g. Click NEXT
YOUR SYSTEM (i.e. VLS6.60)
h. Close out the PLOT STYLES pop up.
Next
Finish
OKAY
FINISH
4. PLOTTING TO LASER
Select drawing to plot. Objects should be located within specific drawing limits/area for best results.
a. Click FILE
PLOT
b. Set Printer/Plotter to your laser system (i.e. VLS6.60)
c. Set Paper Size to User-Defined LANDSCAPE.
d. Set Plot Area
What to Plot
Limits
e. Set Plot Scale
Scale
1:1
f. Set Plot Offset
X = 0.0
Y = 0.0
Note: Always preview before outputting to laser system.
Link to Table of Contents
67
User Guide
User Manual
CorelDRAW X3 or X4
Note: CorelDRAW X3 or X4 is compatible with Windows XP and Windows Vista. We also suggest not running it
with Windows 95/98. Therefore, we have only included setup instructions for Windows XP and Windows Vista.
1. Make sure that you have installed all Service Packs and software patches from Microsoft. Please contact
Microsoft if you have any questions regarding these upgrades. ULS is not responsible for any problems
as a result from the usage of these patches.
2. If you have not already done so, install CorelDRAW on your computer, but do not open it yet.
3. It is important that your version of CorelDRAW is updated with the latest patches and service releases. For
the latest patches and updates go to CorelDRAW’s website at www.corel.com. Please contact CorelDRAW
if you have any questions regarding these upgrades. ULS is not responsible for any problems as a result
from the use of these patches.
4. The ULS Windows Printer Driver must be loaded before continuing. Please refer to the Installation and Setup
Guide for your specific laser system, starting on page 200, for instructions on installing the driver. If you
have already installed the printer driver, you will need to re-insert the Software Installation CD-ROM back
into your CD drive at this time.
5. Using Windows Explorer, locate the file named “ADVANCED COLOR PALETTE.CPL” and “MD COLOR
PALETTE.CPL” in the folder named “Color Palette” on the Software Installation CD-ROM and copy these
files over to the C:\Program Files\Corel\Corel Graphics SUITE X3 (13)\Languages\EN\Custom Data\Palettes
folder or C:\Program Files\Corel\Corel Graphics SUITE X4 (14)\Languages\EN\CustomData\Palettes folder.
Note: ADVANCED COLOR PALETTE.CPL may not show up with a .CPL file extension. It may be listed as ULS
with “Control panel extension” shown as a detail.
6. Open CorelDRAW and start a new graphic.
7. In the main menu at the top of the screen, click on “Window,” then “Color Palettes” and then click on “None.”
Once again click on “Window,” then “Color Palettes” and then click on “Open Palette.”
• If you have a VLS2.30, 3.50, 3.60, 4.60 or 6.60, double-click on "MD COLOR PALETTE.CPL." The color palette
will now appear on the right side of the screen.
• If you have a PLS3.75, 4.75, 6.75, 6.150D or ILS9.150D, 12.150D, double-click on “ADVANCED COLOR
PALETTE.CPL.” The color palette will now appear on the right side of the screen.
8. On the property bar, click on the landscape orientation (1). If you would like the drawing units in metric,
choose millimeters from the drop down list (2). Now type in the page width and height that matches your
laser system (3).
9. Now you need to adjust the vertical ruler on the left side of the screen to match the rulers in the laser
system. Double-click directly on the vertical (side) ruler. The “Options” dialog box will appear. In the
vertical origin box, type in the same height value as you did when you set up the page height in the
previous step. For example, 12 inches (305 mm) for a VLS3.60. If you would like the scale to be displayed
in tenths, choose “10 per Tick” in the “Tick Division” drop-down list box.
Link to Table of Contents
68
User Guide
User Manual
10. While still in the “Options” dialog box, double-click on “Global” to expand the list. Double-click on “Printing”
to expand the list. Now click on “Driver Compatibility.” Make sure that the laser system name is displayed
in the printer drop-down list. In the “Settings specific for this driver” dialog box, make sure that ALL the
check boxes are UNCHECKED. Now click on “OK” to close the “Options” dialog box.
11. Click on the outline tool (1), then the outline pen (2) in the flyout. With “Graphic” being the only one
selected, click “OK.” Click the down arrow in the Color dropdown box to expand the list and click on the
color red. Click the down arrow in the “Width” dropdown box to expand the list and click “Hairline.” The
units can be “Inches,” “millimeters” or anything else you prefer. Click OK to close the Outline Pen dialog box.
12. In the top menu, click “Tools” and then click “Color Management.” Click on the down arrow to expand
the “Settings” dropdown list. Click “Color Management Off” and then click “OK.”
13. Finally, at the top of the screen, click on “Tools,” then “Save settings as Defaults.”
14. The setup defaults for CorelDRAW X3/X4 are now complete. Whenever you start a new document, all of
the default settings that you set up will automatically apply to the new document.
Remove the Software Installation CD-ROM from your CD-ROM drive and store it either back into its sleeve or in
a safe place.
Link to Table of Contents
69
User Guide
User Manual
Graphic Page Configuration for Rotary (CorelDRAW)
Note: If you are using the Material Database printer driver to engrave on an object, you do not need to
change the page size of your graphic software.
If you are using the Manual Control printer driver, please follow the steps below.
1. With your graphics software open, proceed immediately to “Printer” setup
“Properties” button.
and then click on the
2. When the printer driver appears, click on the Manual Control tab, then on the Engraving Field sub-tab.
3. Click on the “Max Size” button.
Link to Table of Contents
70
User Guide
User Manual
4. Activate the Rotary feature on the printer drive, by clicking on “Enable” box. Type the diameter of the object
under “Diameter.”
5. Notice that while typing the diameter, the height dimension changes automatically. Remember or write
down this new dimension.
6. Click on “OK” on the printer driver and go back to the graphic software page setup and change the
height to EXACTLY match the dimension that was calculated in the previous step.
7. Position the graphic on screen so that it will fit vertically within the new vertical page height and
horizontally. Since the Rotary Fixture will not turn more than 360 degrees, make sure that the graphic lies
within the page limits.
8. Once you are done laying out the artwork on the new page size, proceed to the printer driver and set up
the power, speed and Rotary settings to begin engraving.
Link to Table of Contents
71
User Guide
User Manual
General Software Set-up
There are many software programs that you can purchase off-the-shelf that will work with the laser system. Some of
them can access more features of the laser system than others may. Whichever program you choose, it must be set up
to work with the laser system, otherwise unexpected results may occur. Use the following GENERAL guidelines when
configuring your software program.
Page Setup
To properly generate and position artwork, most graphics software will permit the customization of the page size
and orientation. Set the page orientation in the graphics software to Landscape and the page size to match the
maximum engraving area of your laser system. The driver’s orientation and page size MUST then be set to match
these specifications EXACTLY, otherwise the artwork may not print correctly. When setting page orientation and
driver orientation to Landscape mode, the laser system will operate in the horizontal direction, left to right. If page
orientation and driver orientation is set to Portrait mode, the laser system will operate in the vertical direction,
front to back. The laser system is designed to operate best in the Landscape mode and this orientation is highly
recommended. The page size may also be reduced to match the size of the engraving material, but remember to
adjust the page size in the driver to correspond to the graphics software’s page size. Note that in production
situations it is often more efficient to leave the page size at its maximum page size and engrave or cut more
than one object at a time. This is accomplished by duplicating the image on screen as many times as possible to fill
up the entire page.
Ruler Setup
Usually the graphics software will provide on-screen rulers, which can be configured to match the rulers in the
laser system. Using rulers in the software and matching them with the ones provided in the laser system
optimizes the alignment of the graphic on the screen with the material in the laser system. For now, assume that
the laser system’s origin is fixed in the upper left corner of the engraving area and cannot be altered. Later on you
will learn how to relocate the origin. Change the ruler position on screen to match the laser system with the origin
(0,0) in the upper left corner. It is also possible to use a page size smaller than the maximum engraving area. For
example, if you desire an 8-inch (203.2 mm) x 10-inch (254 mm) page size, set this page size in the graphics
software as well as in the printer driver. The laser system will automatically move the engraving area to the origin,
so place the object all the way up into the left-hand corner against the rulers in the laser system.
Power Control through Color Selection
COLORS
The laser system allows the use of eight different colors to access eight different power settings when cutting and
engraving. When using this power change feature, the driver colors used MUST exactly match the colors listed in
the driver. The colors are black, red, green, yellow, blue, magenta, cyan and orange. Some programs will provide
pre-defined basic colors and other programs may require the creation of each of the colors by defining them in
RGB. If you are using CorelDRAW, we have made our own custom palette and placed the file on the Software
Installation CD-ROM. Please refer to the software setup instructions for your specific version of CorelDRAW. If you
are using other graphics software and need to mix your own colors, use the chart below to create them.
Link to Table of Contents
RED (R)
GREEN (G)
BLUE (B)
BLACK
0
0
0
RED
255
0
0
GREEN
0
255
0
YELLOW
255
255
0
BLUE
0
0
255
MAGENTA
255
0
255
CYAN
0
255
255
ORANGE
255
102
0
72
User Guide
User Manual
If using a color other than the exact colors listed above, the driver will attempt to match it to a color in the
driver that it most closely resembles. The driver will then use that color’s power setting and apply a halftone
pattern to represent the original color’s shade. For example, if using a color like pink to fill a rectangle, the driver
takes a reading of the percentage of different colors used to create that color and will use the power setting
assigned to one of the eight colors of the driver that it most closely resembles. It might be expected that the driver
will use the power setting assigned to the color red, but instead the driver may choose the magenta setting and
halftone the rectangle as a representation of the pink color’s lighter shade. To prevent the incorrect assignment of
laser power, be sure to use the correct colors. If using graphics with colors other than the eight listed above or to
simplify the assignment of power settings, try using the Clipart Mode feature in the driver. This feature will cause
the system to only use the power setting assigned to the color black and halftone all of the other colors.
Outlines and Fills
The driver distinguishes between raster mode (engraving) and vector mode (cutting) by the type of graphic artwork
being used. All graphics, other than outlines of very thin line widths will be interpreted as engraved images and
the raster mode will be used for output. If laser cutting is desired, set the line thickness of the lines that are drawn
in the graphics software to 0.001 inches (0.025 mm) or the smallest possible line thickness available. The printer
driver will interpret these objects as vectors and will cut them out providing that your software has the capability
of vector output. Basically, all software programs have the ability to provide raster output. However, not all
programs have the ability to provide vector output even if you set the line width to the smallest thickness
possible. Check page 61 of this guide for software that can vector output. The use of color fills or bitmaps will cause
the laser system to engrave. The combination of engraving and cutting is available in most graphics software. We
suggest that when combining engraving and cutting objects, use different colors for the fills and outlines since
engraving requires different power settings than cutting objects. One thing to keep in mind when creating cutting
objects is that if the outline thickness is set too thick, the driver might interpret the outline as a filled object and
will engrave the outline instead of vector. This might be desirable if engraving thick outlines is necessary. The
outline thickness at which the driver will interpret cut lines as filled objects is dependent on the software used.
Usually, any line thickness 0.008 inches (0.2 mm) or greater will engrave. The only way to determine the cross-over
point for line thickness is to experiment with different line widths. Software programs that do not have outline
capabilities definitely will not have the ability to cut.
Image Processing Order
When cutting or engraving a graphic image, the laser system will perform all engraving first, and then proceed to
vector cutting. Raster engraving will proceed in the exact order of the colors listed in the driver. For example, all
black filled objects will engrave first, then all red filled objects, then all green filled objects and so on. When all
engraved objects have been completed, the laser system will proceed to vector cut any outlines present in the
artwork. Vector output order is dependent on the “Soft” feature of the printer driver. Refer to the printer driver
controls for more details.
Overlapping Fills
If the artwork created has overlapping filled areas, the driver will automatically filter these fills to prevent the
overlapped area from being engraved twice. This is similar to color separation in the printing industry. The entire
filled area of the object on top will be engraved and only the visible part of the underlying filled area will be
engraved. The final result is a what-you-see-is-what-you-get output. This way the color white can be used as an
effective drawing tool. Since the laser system will not engrave the color white (this is the background color), it can
be used to block out the undesired engraving areas of filled regions and/or bitmaps. However, you cannot use a
white fill to cover an outline, the outline will vector cut even though you cannot see it on screen.
Overlapping Outlines
The driver does not filter outlines that overlap each other. If you are placing one outline on top of another, both
outlines will be cut by the laser system. This is a useful feature that will allow deeper cutting by passing the laser
over a single outline path twice or more. To take advantage of this feature, duplicate the outline on top of itself.
Link to Table of Contents
73
User Guide
User Manual
Hidden Vector Lines in Artwork
The driver does not automatically filter out outlines that are overlapped by engraved objects such as fills. If there
are filled objects with some hidden outlines underneath, the laser system will engrave the fill and cut the hidden
outline on top of the fill. This is a common occurrence when using pre-drawn clipart designed for laser printers. To
prevent this from happening, turn on the Clipart Mode feature in the driver. This feature disables the cutting mode
and converts all visible outlines to engraved objects and ignores all hidden outlines.
Speed Optimizing
It is advantageous to engrave an object in its longest direction because total engraving time will be reduced when
the motion system has to make fewer stops and starts. If the engraving object is taller than it is wide, rotating the
graphic 90 degrees and placing the material in the laser system sideways can achieve a greater engraving speed. Be
aware that some graphics programs do not allow the rotation of bitmaps. In this case, it may be necessary to use a
bitmap image processing software to first rotate the bitmap before importing the bitmap into the graphics program.
If the artwork contains engraved objects of the same color with a great deal of space between them in the engraving
direction, processing time can be longer since the laser must make long strokes to engrave both objects at the same
time. To reduce engraving time in cases like these, use different colors for each of the objects, but assign the same
power setting to both colors. This will cause the laser to engrave one object at a time, skipping over all blank space,
which in many cases will reduce engraving time. On the other hand, if the objects are relatively close together in the
engraving direction, then leave them the same color because it will be quicker to engrave them both at the same
time. Experiment with these techniques to optimize the speed of engraving.
Bitmapped / Scanned Images
There are primarily three types of bitmaps available: monochrome (black and white), grayscale and color. Bitmaps
are patterns of dots (pixels) blended to form pictures. Scanning artwork into a computer through a scanner creates
most bitmaps. Drawing them in a bitmap image-processing program creates others.
The laser system can print all three types of bitmaps providing that either the driver or the bitmap image-processing
program converts the grayscale and/or color bitmaps into a monochrome bitmap. Essentially, the laser system is a
monochromatic printer, either it fires the beam to burn a dot or it does not fire the beam to leave an empty dot on
the material.
There are several different bitmap storage formats available: TIF, JPG, BMP, PCX and others. The format makes no
difference to the laser system. The difference in formats involves how they are stored on your computer’s hard disk.
Bitmaps cannot be edited in most graphics software. Some basic functions such as cropping, scaling or mirroring
might be possible. It is usually necessary to use a bitmap image processing software to perform a dot by dot editing,
rotation or scaling of the bitmap.
Monochrome Bitmaps
If you scan the image in monochrome (black and white) mode, set your scanner to at least 600 DPI. The
higher the DPI, the smoother the image will be. Scanning monochrome images at 300 DPI is the minimum
recommended resolution, but scanning them at 600 DPI will provide a significant improvement in image
quality. You can either print the image directly from your bitmap image processing program or import the
bitmap into a graphics program and print it from there. Monochrome bitmaps are engraved in the same manner
as black filled text. The black area will turn the laser on and the white area turns the laser off.
Grayscale Bitmaps
When scanning an image in grayscale mode, you should scan the image at no more than 300 DPI. Scanning
at a higher DPI does not improve image quality and it consumes more memory and will take longer to print.
Grayscale images cannot be printed directly to the laser system. Since the laser system actually works like a black
and white printer, grayscale images must be converted into black and white images. To do this, the driver will
do it automatically or you can convert the grayscale image to a black and white image in your bitmap
image-processing program.
The two primary grayscale image conversion techniques are Halftone or Error Diffusion. The printer driver
can print either one and it is selected in the driver under the Raster Sub-Tab. Please refer to the printer driver
section for more details on how to set these parameters. Since the driver has a fixed method of conversion,
Link to Table of Contents
74
User Guide
User Manual
you may want to experiment by using your bitmap image-processing program to make the conversion. These
software programs usually have more options for controlling the size, angle, shape and the amount of black
and white dots (pixels) created when converting the image. Experiment with all of the controls to see which
looks the best. Big dots look good on some materials and small dots look better on others. Once the image is
converted by your program, save and print it directly from that program or import it into your graphics
program and print it. Essentially, a Halftone image and an Error Diffusion image are monochrome images and
can be treated as such. If you decide not to convert the grayscale image to a monochrome image in your bitmap
image editing program, then the driver will do it automatically and will use settings based on the Resolution
settings in the driver.
Color Bitmaps
The printer driver handles color bitmaps the same as grayscale bitmaps. Since color bitmaps use more memory,
they are unnecessary and therefore not recommended, however, you can still use them.
Encapsulated Postscript (EPS) Images
Bitmap images cannot be cut by the laser system, only engraved. The only way to have the laser system cut out
or vector a bitmap is to first convert it to a vector file format such as an EPS. Raster to vector conversion programs
are available that trace the bitmap (this only works well with monochrome bitmaps) and create a separate EPS
vector file. These EPS files can then be imported into the graphics program and printed out from there. Since tracing
programs have many adjustments, some practice may be necessary to produce desirable results.
The laser system does not support Encapsulated PostScript (EPS) printing directly. EPS files can only be edited and
printed if they are first imported into a graphics program. However, since EPS files support engraving and cutting
objects, they are useful for transferring artwork from one graphics program to another. Once an EPS file has been
imported into a graphics program, the objects can be outlined, stretched, rotated, mirrored, filled with different
colors or anything else desired as long as your graphics software can edit EPS images. Be careful when using EPS
files in layout software as opposed to true graphics software. Layout software may allow the placement of EPS files
in the artwork, but may not actually import and convert the EPS file to a useful format for the printer driver and
therefore may not print correctly. Please refer to your graphics softwares documentation on whether or not it can
edit and print EPS images to a non-Postscript printer.
Postscript (PS) Images
The laser system is not a postscript device. This means that postscript fills, postscript textures and especially
Postscript fonts will not be able to print to the laser system. Sometimes using Adobe Type Manager (ATM) will
allow postscript fonts to print correctly, but the majority of the time it does not work properly.
Helpful Tip
If you are having any problems printing a font and you cannot figure out what is going on, select the font and
“convert to curves” or “convert to paths” in your graphics software. This will convert the font into a bitmapped
image and will print correctly to the laser system. Refer to your graphics software on how to convert fonts. However,
postscript textures and postscript fills cannot be converted and will not print to the laser system.
Link to Table of Contents
75
User Guide
Accessories - Installing and Operating
Chapter 4 - Accessories - Installing and Operating
Link to Table of Contents
76
User Guide
VLS3.60, VLS4.60 and VLS6.60 Accessories
VersaLASER VLS3.60, VLS4.60 and VLS6.60
There are optional accessories, not included with the basic laser system, that are available at additional cost. Instructions
on how to use these accessories are included in this section. The user can purchase and install all accessories, except
Air Assist, which is a factory installed option only.
CAUTION: Before attempting to use any accessory, make sure that you have read the entire
manual up to this point. It is vital that you have a complete understanding of how the laser system
works before attempting to use an accessory. Incorrect or inappropriate usage of an accessory
may be a safety hazard and may cause severe damage to the system.
Air Assist Back Sweep
The Air Assist Back Sweep directs debris and smoke to the back of the laser system. When using the back sweep adjust
the large thumbscrew so the air flow pushes any debris or smoke to the back, not directly down towards the material.
1. Remove both thumbscrews (if present) and set them aside. You will be using one of the thumbscrews later.
2. Insert the Back Sweep’s brass tube into the right side hole where the thumbscrew was removed.
Link to Table of Contents
95
User Guide
VLS3.60, VLS4.60 and VLS6.60 Accessories
3. Use a thumbscrew (1) to hold the Back Sweep in place. Adjust the Back Sweep’s height by loosening the thumbscrew
(2) and adjusting it up or down. Tighten the thumbcrew once it is at the correct height. To adjust the angle of the air
flow, turn the screw (3) in small increments to direct the air to the desired position over the material.
Link to Table of Contents
96
User Guide
VLS3.60, VLS4.60 and VLS6.60 Accessories
Air Assist Compressor
The Air Assist Compressor option is a 60 PSI @ 2.5 cfm (4.1 bar @ 4.25 cubic meters/hour) source for oil-free, water-free
and particulate free compressed air. It contains a sound insulated air compressor, water dryer (desiccant) and
coalescent particulate filter. This compact and custom designed unit is a great complement to the Air Assist System
option.
Installation
1. Make sure the laser system is turned off.
2. Plug one end of the blue coiled hose into the compressor fitting (push in the fitting lever until it clicks
before inserting) and the other end into the Air inlet fitting in the laser system.
3. Plug the compressor into a wall outlet.
requirements.
Please check the rating on your air compressor for the power
4. The compressor has a three way switch: ON, OFF and AUTO. Push the switch to the left and it will leave the
compressor on all the time. This mode is for Manual Air Assist controlled models. OFF is off. The AUTO
position allows the compressor to turn on and off only when it receives a signal from the laser system that
has the computer controlled option. If you have selected the Air or Gas setting in the printer driver, the Air
Compressor will automatically turn ON when the file runs and OFF when the file is complete.
Standard
Air Assist Model
FITTING
LEVER
FILTER
BLUE COILED HOSE
DRYER
ON OFF AUTO
SWITCH
FUSES
Maintenance
The filter and desiccant should be inspected every 8 hours of use. It may be necessary to clean out the filter and
change the desiccant that is inside the dryer assembly.
To inspect the filter, you must remove it. To inspect the desiccant, you can observe the color of the crystals through
the slots in the metal enclosure without having to remove it. If you start to see water droplets or moisture
coming through the air lines, you will definitely need to change the desiccant inside of the dryer assembly, but it
should never get to that point. An indication that the desiccant needs changing is the lack of blue color pigments
in the desiccant. The desiccant can be regenerated.
Link to Table of Contents
97
User Guide
VLS3.60, VLS4.60 and VLS6.60 Accessories
Removal, Cleaning and Replacement of the Filter
1. Turn the Air Compressor OFF and unplug it.
2. Unscrew the cover by turning it 1/8 turn counterclockwise like you were unscrewing a jar, and pull down.
The clear plastic container might still remain attached to the top. Gently pull this part straight down.
3. You will see a red colored foam filter. Unscrew the filter and wash it out with water. Make sure that it is
completely dry, then reinstall.
4. Empty and clean out any residue or dust that may have accumulated on the bottom of the clear plastic
container.
5. Install the clear plastic container into the cover and line up the tabs so that they fit one inside of the other.
6. Insert the combination of the cover and the clear plastic container into the top of the assembly. Gently twist
the cover 1/8 turn clockwise to lock it into place.
FILTER
TOP VIEW
CORRECT
INCORRECT
Removal, Cleaning and Replacement of the Desiccant
1. Turn the Air Compressor OFF and unplug it.
2. Pull down on black lever and rotate metal cover 1/8 turn counterclockwise. Remove the metal cover by
pulling it straight down.
3. With a gentle and slight twisting motion, pull the clear container downward slowly. Pour out and discard
old desiccant.
4. Refill clear container with fresh desiccant from a sealed bag. Fill to about ¼ inch from top of container.
5. Clean off rubber o-ring on the top of the container.
6. Insert container into the top.
7. Install metal cover and turn 1/8 turn until lever clicks into place.
TOP
CLEAR
CONTAINER
DESICCANT
DRYER
ASSEMBLY
METAL COVER
LATCH
Link to Table of Contents
98
User Guide
VLS3.60, VLS4.60 and VLS6.60 Accessories
Air Assist Cone
To install the cone, insert the cone (1) into the cone base completely until it bottoms out. Tighten the setscrew on the
side of the cone base (2) until it is snug. To remove the cone, simply loosen the setscrew (2) and pull the cone straight
down. Do not remove or loosen the cone base mounting screws (3) & (4) to mount or dismount the cone. These screws
keep the cone base aligned with the laser beam.
CAUTION: Do not install the cone unless you plan on using Air Assist and never use the Air
Assist Cone without proper airflow and air presure. Leaving the cone attached to the cone
base and running the laser system without either air or gas flowing through the cone will
destroy the focus lens within a few seconds. If you are not using Air Assist, remove the
cone. Damage of this nature will not be covered under warranty.
Cone Alignment Check and Adjust
1. Power the laser system ON and start the UCP.
2. Open the top door.
3. Position the focus carriage in the middle of the field.
2.0
4. Place a piece of paper (1) underneath the cone and observe
the position of the red beam (2) in relation to the center of the
bottom of the cone (3).
5. If the red beam is not centered, remove and reinstall the cone.
6. If the red beam is still not centered, check all your optics for
looseness or mechanical misalignment.
7. If still not centered, loosen the two base mounting screws (4)
slightly (1/4 turn) and slide the base (5) around until the red
diode laser comes out of the centered of the cone.
8. Tighten the base mounting screws (4) gently and re-check the
cone’s alignment.
Link to Table of Contents
4
5
3
1
2
99
User Guide
VLS3.60, VLS4.60 and VLS6.60 Accessories
Cutting Table
The purpose of the Cutting Table is to support the material that you are cutting above the
engraving table’s surface to minimize surface contact area. It also redirects exhaust airflow below and above the
material for efficient smoke removal. The cutting table is installed directly on top of the engraving table. The cutting table
material is reflective only in the area that contacts your material to minimize laser beam reflection.
Installation
1. Turn on your laser system.
2. Lower the table all the way down.
3. Remove the strip(s) from the exhaust plenum(s) (1) with an Allen wrench. There is one exhaust plenum on the
VLS3.60 and VLS4.60 and two on the VLS6.60 laser system (as the diagram indicates).
1
4. Before installing the cutting table in the laser system, loosen the screws on the side of the cutting table just
enough to allow the adjustable manifold to slide in and out. Extend the adjustable manifold out as far as it can
go.
5. Open the front door of the laser system and carefully slide the cutting table into the laser system, so that
its body is squarely pushed up against the engraving table rulers on the top ruler and flush left of the table. The
rulers of the cutting table should now overlap the rulers on the engraving table.
1
2
3
4
5
6
7
8
9
10
11
12
13
14
15
16
17
18
19
20
21
22
23
24
ADJUSTABLE MANIFOLD
1
2
1
2
3
4
5
6
7
8
9
10
11
12
13
14
15
16
17
18
19
20
21
22
23
24
3
4
5
6
7
8
9
10
11
12
1
2
3
4
5
CUTTING TABLE
6
7
8
9
10
11
12
ENGRAVING TABLE
Link to Table of Contents
100
User Guide
VLS3.60, VLS4.60 and VLS6.60 Accessories
6. Slide the adjustable manifold squarely up against the exhaust plenum and tighten the four screws on the side
of the cutting table. Be careful not to move the cutting table while tightening the screws. The objective is to
have the cutting table fit snugly up against the rulers of the engraving table and the adjustable manifold fit
tightly against the exhaust plenum.
EXHAUST PLENUM
ADJUSTABLE MANIFOLD
1
2
3
4
5
6
7
8
9
10
11
12
13
14
15
16
17
18
19
20
21
22
23
24
1
SCREWS
SCREWS
2
3
4
5
6
7
8
9
10
11
12
7. Now adjust the rulers of the cutting table so that they match the engraving field of the laser system. Using the
focus tool method, adjust the Z-Axis and focus directly onto the surface of the honeycomb.
8. Loosen slightly, but do not remove, the five screws that hold down the rulers.
SCREWS
1
2
3
4
5
6
7
8
9
10
11
12
13
14
15
16
17
18
19
20
21
22
23
24
1
2
3
4
5
6
7
8
9
10
11
12
SCREWS
9. Activate the red diode pointer by opening the top door. Position the focus carriage at (0,0). With the red diode
pointer still ON, slide the X-Axis ruler so that its zero point lines up with the red diode pointer. Tighten down the
left side screw.
10. Now position the red diode pointer at the:
a. (32 in, 0 in) (813 mm, 0 mm) position for the VLS6.60 or
b. (24 in, 0 in) (610 mm, 0 mm) position for the VLS3.60 and VLS4.60.
11. Adjust the right side of the X-Axis ruler until it is lined up with the diode. Tighten down the right side screw of
the X-Axis ruler. Now tighten down the middle screw.
12. Line up the right edge of the Y-Axis ruler with the zero line of the X-Axis ruler and tighten down the top screw
of the Y-Axis ruler.
Link to Table of Contents
101
User Guide
VLS3.60, VLS4.60 and VLS6.60 Accessories
13. Finally, position the red diode pointer at the:
a. (0 in, 18 in) (0 mm, 457 mm) position for the VLS4.60 and VLS6.60 or
b. (0 in, 12 in) (0 mm, 305 mm) position for the VLS3.60.
1) POSITION DIODE HERE
2) THEN HERE
X-AXIS RULER
1
2
3
4
5
6
7
8
9
10
11
12
13
14
15
16
17
18
19
20
21
22
23
1
2
Y-AXIS RULER
3
4
5
6
7
8
9
10
11
12
3) AND FINALLY HERE
14. Align the bottom of the Y-Axis ruler with the red diode pointer and tighten down the bottom screw of the
Y-Axis ruler.
15. The cutting table is now installed, but you must perform lens calibration.
Cutting Table Lens Calibration
CAUTION: To properly use the Downdraft Honeycomb Cutting Table, you need to calibrate
your focus lens to the top of the Cutting Table surface. If you do not calibrate the focus lens,
the focus carriage may cause damage to your Cutting Table.
1. After you have installed the Downdraft Honeycomb Cutting Table
into the VersaLASER, manually focus to the Cutting Table surface with
the Focus Tool.
2. Verify that the proper lens is selected from the Lens Size list.
3. Once focused, go directly to your System Tab of the UCP and you will
notice that the red CALIBRATE button for the Cutting Table box will
be activated.
4. Click on the CALIBRATE button. A window will appear.
5. Accept the new Z-height and click on SAVE.
6. You are now done calibrating the new Z-height for engraving or
cutting on the Downdraft Honeycomb Cutting Table.
Link to Table of Contents
102
User Guide
VLS3.60, VLS4.60 and VLS6.60 Accessories
HPDFO
High Power Density Focusing Optics (HPDFO) produces a smaller, focused laser beam “spot”
than a standard laser beam delivery optical system. Depending on the type of material being
processed, and the desired effect, the effective spot size produced by this option can be as
small as 1/4th the size of a standard 2.0 focusing lens.
With a smaller spot size (higher power density), and depending on your application material,
you can engrave smaller text, produce higher resolution graphics and photographs, vector
mark and cut thinner lines with the same laser power. It is possible to scribe and/or etch some
uncoated metals, such as stainless steel, directly without the assistance of chemicals or coatings.
The HPDFO consists of two parts: the Beam Expander, which is mounted in place of the Beam
Window, and the High Resolution Optics (HROS), which replaces the Focus Lens Kit. Through
specialized optics, the HROS expands the diameter of the laser beam and concentrates that
expanded energy at the focus point to produce a smaller focused spot that has a much higher power density.
Installation
1. Turn off the laser system.
2. Bring the X-Arm forward.
3. Remove the three thumbscrews that hold the lens kit in place and slide the lens kit out.
4. Replace the standard lens kit with the HPDFO lens kit.
5. Before running a file, select HPDFO from the lens size list on the UCP’s System Tab.
Lens Kits
There are four optional Focus Lens Kits available other than the standard
2.0: 1.5, 2.5, 4.0 and the High Power Density Focusing Optics (HPDFO)
kits. Included in these kits are the focus lens (A), #3 mirror (B), front plate
(C), thumbscrews (D) and a focus tool (E).
Different lenses produce different spot sizes and have different focal
ranges. For example, the 1.5 lens produces a spot size of 0.003” (0.076
mm) and has an effective focal range of +/- 0.075” (1.91 mm). This lens can
engrave very fine detail, but can only be used on very flat materials.
D
B
A
C
E
On the opposite end, the 4.0 lens has a spot size of 0.013” (0.330 mm), but has an effective focal range of +/- 0.2”
(5.08 mm). Although this lens cannot engrave very fine detail, its focal range allows you to engrave on slightly rounded
or curved objects without the need for rotation.
Using a baseball as an example, focus the beam halfway between the
highest point and the lowest point of the engraving. Since a 4.0 lens has a
greater focal range than a shorter lens, you can engrave a considerable
distance around the ball without having to rotate it. Attempting to
engrave further around the ball will result in a loss of engraving power
and a distorted image.
Link to Table of Contents
Effective Engraving Area
Focus Here
High Point
0.2” (5.08 mm)
0.2” (5.08 mm)
Low Point
103
User Guide
VLS3.60, VLS4.60 and VLS6.60 Accessories
Manual Air Assist
Manual Air Assist consists of a nozzle that attaches to the focus carriage, Optics protection adapters, tubing,
mounting brackets, needle valve and pressure gauge. The purpose of this system is to force air or other types of
gases directly onto the surface of your material to reduce the burning effects of the laser beam and help disperse the
smoke and gases created when cutting or engraving materials. The optics protection parts assist in helping keep the
optics cleaner from flying debris created from the pressurized nozzle. Use of this system requires a minimum
compressed air source capable of 60 PSI @ 2.5 cfm (4.1 bar @ 4.25 cubic meters/hour). This supply must be free of oil,
water and particulate matter. Another accessory called the “Air Assist Compressor” is available as a compressed air source.
Air Assist is not intended to decrease maintenance of the laser system. The use of Air Assist has been known to
increase the frequency of cleaning maintenance due to debris being blown around inside the engraving area during
laser processing.
Manual Air Assist does not have solenoids, is not computer controlled and can only deliver one air pressure per file.
It is also not gas compatible.
Requirements
The Air Assist option requires compressed air supplied from the Air Assist Compressor Unit (optional) or from a
user-supplied compressed air source. If you choose to provide your own source, it must be capable of supplying
50 PSI (pounds per square inch) (4.1 bar) at a constant rate of 2.5 CFM (cubic feet per minute) (4.25 cubic meters/hour).
The air supply must be oil-free, moisture-free and particulate filtered.
CAUTION: A contaminated air supply will cause severe damage to the laser system. Air or
gas supply pressures higher than 50 PSI (4.1 bar) can rupture the internal hoses of the
control box and can possibly damage the valves. Damage to the VersaLASER system from
contaminated or improper air or gas supply is not covered under warranty.
Making the Connections
In the left rear part of the system you will find the pressure gauge (1), flow adjustment valve (2), quick release
coupling (3) and release lever (4).
Push in the release lever and pull down on the quick release coupling to remove it from the machine. Attach
the compressed air supply hose to this fitting (1/4 NPT threads) and use Teflon tape on the threads to prevent
leaks. Re-insert the fitting until it “clicks” into place.
If you are not using the ULS Compressor, ULS recommends you configure your supply line (5) to a particulate filter
(6), desiccant/dryer (7) and then to an oil-free compressed air source (8).
8
Link to Table of Contents
7
6
5
104
User Guide
VLS3.60, VLS4.60 and VLS6.60 Accessories
How it Works
The Quick Release Fitting (1) is the entry point into the rear enclosure of the laser system. From there, the air lines
branch off into two paths: the optics protection path and the cone path. The optics protection path is a direct path
from the quick release fitting (1) to the #2 mirror (4) and the #3 mirror (5). Since this is a direct path, the amount
of air pressure and flow that is coming from your compressed air source will be applied to the optics to help keep
them clean from flying debris. The cone/backsweep path goes through the flow adjustment valve (2) and then
to the cone (3). The amount of air flowing through the cone is adjusted using the flow adjustment valve (2). The
cone path protects the focus lens and provides a downward flow directly into the beam path at the focus point.
5
4
2
3
or
1
Note: Air will always be flowing through the system as long as the compressed air source is turned ON.
We recommend installing a shut off valve in between your compressed air supply and the laser system.
Before you run your material, we suggest that you adjust the air and/or gas flow. To do this, you must first turn on
your compressed air source so that there is flow through the system. Now, either turn the laser system ON or leave it
OFF.
With the top door of the laser system open, pass a piece of paper underneath the cone and use it to note the
amount of air flowing through the cone and against the paper or place your finger underneath the cone to try to
feel the pressure.
CAUTION: As a safety precaution, you should place your finger underneath the cone only
when power to the system has been turned OFF. If the power is ON, you should use the
paper method.
Turn the adjustment valve knob clockwise or counterclockwise until either the desired airflow or PSI reading on
the gauge is achieved. Clockwise adjustments reduce flow while counterclockwise adjustments increase flow.
Air Flow Setting Guidelines
Use as much or as little air flow necessary to produce the desired results. As a rule of thumb, start with low flow
and adjust upward until flaming is suppressed. Setting the flow too high can result in excessive particulate matter
being blown around, causing faster system contamination. It can also push smoke back onto the material or into
the cut line and cause contamination of the surface or side edges of the material. The Air Assist option is intended
to suppress flaming and/or melting of the material during laser processing.
Maintenance
•
Keep your air supply and/or gas supply moisture free. Check your desiccant (water dryer) frequently. Replace
desiccant when saturated or use the manufacturer’s recommendation to remove water moisture from the
desiccant crystals. Water moisture may contaminate the Air Assist system and cause malfunction as well as
damage to the unit.
•
Clean your laser system as required when using Air Assist.
•
Periodically check the cone alignment with the laser beam, especially if you have replaced or adjusted the laser
systems optics. A misaligned cone will cause the beam to make contact with the inside of the cone, possibly
splitting the beam and/or reducing the power at the focus point.
Link to Table of Contents
105
User Guide
VLS3.60, VLS4.60 and VLS6.60 Accessories
Rotary Fixture
The Rotary Fixture is designed to engrave cylindrical
objects. Two attachments come with the fixture: a cone shaped
disk attached to the motorized end of the fixture and an inverted
cone shaped disk attached to the adjustable end of the fixture.
These attachments are used to hold wine glasses, mugs, cups,
baseball bats, etc.
Note: If the rotary is installed and mounted on the table in
any other manner than the one mentioned below, please
contact the Customer Service Department at 480-609-0297 (USA), +43 1 402 22 50 (Austria), +81 (45) 224-2270
(Japan) or [email protected] for further instructions.
Installation
1. Turn the UCP and laser system ON.
2. Remove any materials that may be underneath the engraving table and lower the table all the way down to
the bottom or at least far enough down so that the focus carriage will clear the top of the Rotary Fixture when
it is installed on the table.
3. Now turn the laser system OFF.
4. Open the top door. Place the bracket on the table (1). Insert the thumbscrews and washers (2) into the screw
holes, but do not tighten completely. Leave the thumbscrews loose enough so that the bracket can slide.
1
2
3
4
5
6
7
8
9
10
11
12
13
14
15
16
17
18
19
20
21
22
23 24
1
2
2
1
3
4
5
6
7
8
9
10
11
12
5. Place the Rotary Fixture on a flat surface. Using an Allen wrench, attach the two socket head shoulder screws (3)
to the side of the base plate.
3
6. Place the Rotary Fixture on top of the bracket so that its pivot bolts set into the forks in the bracket. Gently
push the fixture (4) flat up against the top ruler. Now tighten down the thumbscrews (5).
1
2
3
4
5
6
7
8
9
10
11
12
13
14
15
16
17
18
19
20
21
22
23
24
1
5
2
3
4
5
6
7
8
9
4
10
11
12
Link to Table of Contents
106
User Guide
VLS3.60, VLS4.60 and VLS6.60 Accessories
7. With the power to the system still OFF, connect the 7-pin Rotary Fixture control cable to the receptacle on
the laser system (6).
1
2
3
4
5
6
7
8
9
10
11
12
13
14
15
16
17
18
19
20
21
22
23
24
1
2
3
4
5
6
7
8
9
10
11
12
6
Loading Material
1. Before loading the glass into the fixture, measure the diameter (1) of the glass in the area where the engraving
is to be located by using a caliper or similar measuring device. Make a note of the measurement.
1
2. Place the open end of the glass (4) on the right side of the Rotary Fixture. Lift the lever (2) on the adjustable
end of the fixture and slide it up against the base of the glass so the glass rests firmly centered inside of the
inverted cone. Push the adjustable end of the fixture (3) to the right firmly against the bottom of the glass.
Do not to apply too much pressure, especially with glass. You only need enough pressure to prevent the object
from slipping on the cone while it rotates. Lower the lever on the end of the fixture to lock it in place.
4
3
2
Note: If engraving a tapered object (1), the Rotary Fixture can be rotated to maintain proper focus. To do this,
lift up the left end of the fixture and place a spacer underneath the fixture (2) to prop it up. Slide the spacer left
and right until the surface of the object is parallel (3) to the Focus Carriage. Be careful not to raise the Rotary
Fixture too high (5), otherwise parts of it might interfere with the Focus Carriage (4). If you operate the fixture
in this manner, you might need to taper your graphic in your software so that it matches the taper angle of
your object. Otherwise your graphic might appear to be tapered when it is engraved.
5
4
3
1
2
Link to Table of Contents
107
User Guide
VLS3.60, VLS4.60 and VLS6.60 Accessories
3. Power ON the laser system. The rotary will run through a self test and will slightly rotate. This movement is
normal. If you are using the rotary for the first time or replaced the laser system’s CPU, rotary calibration is
needed, so proceed to the next step. If rotary calibration is not needed proceed to the next page and see
“Determining Graphic Placement.”
Rotary Calibration
1. Select the System Tab and click on the CALIBRATE button in the Rotary box.
2. In the Y Position box, use the Y-Axis buttons to move the focus carriage back and forth. Place the focus carriage
exactly at 2.625” (66.675 mm).
3. Next, use the X-Axis buttons to move the focus carriage left and right and place the red dot pointer over the
flat part of the concave metal fixture normally located on the left hand side of the rotary.
4. Now use the Z-Axis buttons or the Z-Axis buttons on your keypad (recommended) to move the table up and
down and continue to the next step.
Link to Table of Contents
108
User Guide
VLS3.60, VLS4.60 and VLS6.60 Accessories
5. Use the Focus Tool to focus on top of the flat surface of the concave metal fixture with the focus tool. Do not
focus on top of the black metal cover that is located on the left hand side of the rotary.
6. After focusing is complete, click both SAVE buttons on the Rotary Calibration window. If asked to overwrite an
existing position, accept the new value by clicking on YES.
7. Once complete, click the CLOSE button and the focus carriage will re-home once you exit the window.
8. Calibration is now complete.
Determining Graphic Placement
Now you need to determine where the engraving should appear on the glass. You can use the top ruler as a visual
aid in referencing the engraving area of the glass or you can use the Red Diode Laser and the X-Y coordinate system
to precisely place the graphic in your graphics program. To be more precise, use the Red Diode Laser Pointer.
1. Open the top door.
2. Using the Navigation buttons on the UPC, position the Focus Carriage above the glass.
3. Stop movement where you would like the top of the graphic (the right dotted line in the
engraving area) to begin. Look at the X and Y positions on the UCP and read the “X” position. Make a note of this
number.
4. Now, position the red dot at the lowest point (the left dotted line in the engraving area) on the glass where you
would like the engraving to end. Make a note of this “X” coordinate.
1
2
3
4
5
6
7
8
9
10
11
12
13
14
15
16
17
18
19
20
21
22
23
24
1
2
3
4
5
6
7
8
9
10
11
12
5. Close all doors of the laser system, go to your computer and open your graphics software and proceed to the
next page.
Link to Table of Contents
109
User Guide
VLS3.60, VLS4.60 and VLS6.60 Accessories
Printer Driver Settings
1. With your graphics software open, proceed immediately to “Printer Setup” and open the printer driver.
2. In the printer driver, click on the Engraving Field sub-tab within the Manual Control Tab.
3. Click on the “Max Size” button.
4. Then click on the “Enable” selection box in the Rotary section.
5. Type in the diameter of the glass that was measured.
6. Notice that while typing in the diameter, the size of the height dimension changes automatically. Make a note of
this new page size.
7. Once you have the new height, exit the printer driver.
8. Go back to the graphics software and change the page height to the exact number the printer driver established.
9. This new vertical page size is now the actual circumference of the object that is going to be engraved.
10. Position the graphic on screen so that it will fit vertically within the new vertical page height and
horizontally within the upper and lower engraving limits that we earlier determined with the Red Diode Laser
Pointer.
11. Once you are ready to engrave, proceed to the printer driver.
12. Enable the Rotary under the Engraving Field sub-tab.
13. Type in the diameter of the glass that was measured.
14. Then set the appropriate power and speed settings in the printer driver before engraving the object.
15. You are now ready to print to the laser system. Make sure that your system is ready to engrave and then begin the
process.
Link to Table of Contents
110
User Guide
Maintenance
Chapter 5 - Basic Maintenance
Link to Table of Contents
169
User Guide
Maintenance
VersaLASER VLS3.60, VLS4.60 and VLS6.60
Keeping the laser system clean will ensure the highest quality engraving. A clean laser system is the best performing
laser system. The frequency of cleaning will depend on the type of material being engraved, your exhaust system, the
operating environment and the amount of laser system usage over a given period of time.
Dirt or debris build-up on the motion system components will cause uneven or rough engraving, or loss of engraving
position, as well as component failure. Smoke or dirt build-up can cause damage to the optics, result in loss of laser power
or result in premature failure of these components. Always turn the laser engraving system OFF and unplug it before
performing any cleaning procedures.
Motion System Components Diagram
Note: #2 Mirror Cover
and X-Axis Motor Cover
have been removed for
visibility.
1. Focus carriage
2. X-Axis bearing (3)
3. #3 mirror (inside cover plate)
4. Focus lens (inside cover plate)
5. X-Axis rail (arm)
6. X-Axis bearing track (2)
7. X-Axis belt
8. X-Axis home sensor flag
9. X-Axis idler pulley
10. #2 mirror and holder
Link to Table of Contents
11. X-Axis motor and drive gear
12. X-Y home sensor board (upper flex board)
13. Y-Axis belt (2)
14. Y-Axis bearing (4) (2 on right side Y-Axis rail, 2
on left side Y-Axis rail)
15. Y-Axis rail (2)(one right side and one left side)
16. Y-Axis rail bearing track (2) (one on right side,
one on left side)
17. Y-Axis drive gear (2) (one on right side, one on
left side)
18. Y-Axis shaft (2) (one on right side, one
on left side)
19. Y-Axis shaft flex coupler (one on right
side, one on left side)
20. Y-Axis motor
21. Y-Axis idler pulley (2) (one on right
side, one on left side)
22. Y-Axis home sensor flag
23. Flex cable (not shown)
177
User Guide
Maintenance
Cleaning and Maintenance Supplies
• Mild soap solution mixture of 1 tablespoon (14.78 ml) liquid soap and 1 quart (liter) of water in a spray bottle
• Window cleaner
• Paper towels
• Cotton cloth
• Denatured alcohol (do not use on any painted surface, plastic or the Top Window)
• Acetone (can be used on the engraving table, but nowhere else)
CAUTION: When using acetone or denatured alcohol, please follow the instructions on the
printed label of these materials for safe handling procedures.
• Cotton swabs (supplied)
• Lens cleaner (supplied)
• Vacuum cleaner
• Set of Allen wrenches sized from 0.050 to 3/16 inch
System Cleaning and Maintenance
Motion System
•
Turn off and unplug the laser system.
•
Open the top door and thoroughly remove all loose dirt and debris from inside the laser system with a vacuum
cleaner.
•
Clean the engraving table surface with either a soap solution, or alcohol or acetone, and paper towels. Never
pour or spray any solution directly into the laser system. Always dampen your paper towel or cloth outside of the
laser system with the cleaning solution and then wipe down the parts you are cleaning with the dampened
cloth.
•
Clean X-rail and Y-rails by using either the cotton swabs or paper towels and soap solution. Pay close attention
to the bearing tracks since any debris left to build up in these bearing tracks will cause the bearings to wear and
the engraving quality to become uneven.
•
After the rails and tracks are cleaned, use a clean swab or paper towel and soap solution to clean all of the bearings
by holding the swab against each bearing and moving the motion system by hand to roll the bearings against
the swab. There are seven bearings in the system, three on the focus carriage, two on the left side of the X-rail
and two on the right side of the X-rail.
The Main Enclosure
•
Clean the top window with a cotton cloth or paper towel and window cleaner. The top window is made out
of glass; therefore, do not use abrasive cleaning cloths because they will scratch the glass. Also, do not use
abrasive chemicals as these chemicals will damage the glass. Only use cleaners compatible with glass.
•
Use a soft cloth or paper towels and the soap solution to clean the enclosure. Do not use alcohol, acetone or
any other harsh chemical as these will damage the paint.
Link to Table of Contents
178
User Guide
Maintenance
Optics
A visual inspection of the #2 and #3 mirrors, beam window and focus lens should be performed at least once a day.
CAUTION: Do not clean an optic that is visually clean. Excessive cleaning can damage the
optic. To prevent contamination, wash your hands thoroughly before cleaning any optic.
Never touch any optic with your fingers. The acids from your skin can destroy the optical
coatings.
Never clean any optic right after engraving or cutting because the optic may be hot and
the cool lens cleaning solution may thermally shock the optic and crack it.
#2 Mirror
To gain access to the #2 mirror, the mirror cover must be removed. Remove the thumbscrew and slide the
cover to the right and then lift the cover straight up.
Inspect the #2 mirror and clean it only if there is debris present. To clean the #2 mirror with a cotton swab,
moisten the cotton swab with the lens cleaning solution supplied with the laser system. Do not use other types
of cleaners or solutions. Gently roll the cotton swab across the mirror once. Do not drag the swab or roll it
back and forth as this can scratch the mirror. If the mirror did not come clean, use a fresh cotton swab and
repeat the procedure.
Do not be concerned about small pieces of lint that come off of the cotton swab. You can cause more damage to
the mirror by trying to remove the lint than by leaving it alone.
#3 Mirror and Focus Lens
1. The #3 mirror and the focus lens are both mounted to the front cover.
2. To gain access to the #3 mirror (3) and the focus lens (4), hold the front cover (2) with one hand and
remove the three thumbscrews with the other hand. Pull the front cover straight out.
3
1
4
Link to Table of Contents
2
179
User Guide
Maintenance
3. Tilt the front cover enough to enable you to apply the lens cleaning solution directly to the #3 mirror and
to the focus lens.
4. Flood the reflective surface of the #3 mirror with the solution. If heavy debris is present, let the solution soak
in for a minute.
5. Roll a fresh cotton swab across the mirror in one direction. Use a fresh swab for each pass. Be gentle when
cleaning the optic to avoid scratching the surface. Repeat this procedure for the focus lens, but make sure
you clean both sides of the lens.
Beam Window
The beam window is where the laser beam enters into the engraving area. It is located in the upper left hand
corner of the engraving area against the back wall and is yellow in color. It is only necessary to clean the front
side of the beam window. Do not remove the optic to clean it; simply clean it in the same manner as the #2
mirror.
Air Assist
If your system is equipped with Air Assist, using your fingers, rotate the beam window cover counter-clockwise
(2) and then off at a 45-degree angle (3). If the beam window cover is stuck, use a 1/16 Allen wrench to loosen
or remove the screw (1) and try again. Set the cover off to the side and clean the optic, if necessary. Reinstall the
beam window cover opposite of removal, being careful not to scratch the optic.
Link to Table of Contents
180
User Guide
Maintenance
Exhaust Plenum
1. Power on the laser system and UCP.
2. Using the Z-Axis buttons on the laser system or UCP, raise the Z-Axis table as high as possible.
3. Power the system OFF.
4. Open the front door.
5. Locate and remove the two socket head cap screws found on the inside of the laser system.
6. Using both hands, reach in and grasp the exhaust plenum.
7. Lift the plenum straight up until the tabs (1) of the plenum clear the two flat head screws (2) on which they
are resting. Tilt the bottom of the plenum towards you and remove it from the system.
1
2
8. Using the soap and water solution, clean the inside of the plenum as well as the inside rear wall of the laser
system.
9. Installation is opposite of removal. Verify that the plenum tabs (1) rest on the two flat head screws (2).
Note: The VLS6.60 exhaust plenums are removed in the same fashion, but is equipped with two exhaust
plenums.
Link to Table of Contents
181
User Guide
Maintenance
Cooling Fan Filters
This air-cooled laser system will require periodic cleaning of the cooling fan filters. Since ambient air is used to cool
the laser cartridge, the air must be filtered before it enters the inside of the laser system. Dirt or dust
contamination may reduce the cooling fan’s ability to keep the laser cartridge, as well as the CPU and power supply,
from overheating. An overheated laser cartridge will lose laser power during engraving and will eventually shut
down completely.
To service the filters, first turn OFF and unplug the laser system. To remove the filter(s), simply snap off the black
cover and remove the foam element. Wash the element in a soap and water solution, dry and re-install.
VLS3.60 and VLS4.60
Note: The VLS6.60 has a total of three large filters: two located on the back and one filter located on the side
near the power switch.
CAUTION: Never operate the laser system with the cooling fan filters removed. This can
permanently damage the laser system. Damage to the laser system due to inadequate or
improper operating environment is not covered under the ULS Warranty.
Adjustments and Lubrication
Periodic adjustments are not normally required. The bearings in the motion system will self-adjust to take up any
clearances as they begin to wear. The belts are fiber-reinforced and will not stretch under normal use so periodic
tension adjustment is not necessary. Optical alignment is not necessary because the laser and the #2 mirror are fixed.
All bearings in the system are sealed and do not require lubrication. Do not lubricate the tracks that the bearings
ride in. The only lubrication that may be required is the screw threads for the table lifting mechanism. As time
passes, contaminants may adhere to the lubricant which can cause the engraving table to bind up or sound squeaky.
If this is the case, wipe off the contaminated grease with a soft cloth dampened with alcohol and apply fresh white
lithium grease to the screw threads. Never spray any degreasing solutions directly onto the threads. Run the table
up and down to work in the fresh grease. Repeat if necessary.
Link to Table of Contents
182
User Guide
Maintenance
Maintenance Schedule
Since the maintenance requirements of the laser system are dependent on the type of material being run, the quantity
of material being removed, the hours of operation and the quality of the exhaust blower, you should define your own
schedule.
As a starting point, we recommend the following schedule:
As necessary
• Clean engraving table
Every month
• Clean cooling fan filters
• Clean main enclosure
• Clean Z-Axis lead screws with white lithium grease
• Clean top door window
• Check for X-Axis and Y-Axis belt wear. Replace as
necessary.
Every 8 hours of engraving
• Clean X-Axis and Y-Axis bearings
• Check and/or clean X-Axis and Y-Axis drive gears
• Clean X-Axis and Y-Axis rails and bearing tracks
• Clean X-Axis belt
• Check beam window, #2 mirror, #3 mirror and
focus lens for debris. Clean ONLY if dirty.
• Check for X-Axis and Y-Axis bearing wear. Replace
as necessary.
• Inspect system for loose screws and mechanical
parts. Tighten as necessary.
Every 6 months
• Clean exhaust plenum
Note: If you are noticing a considerable build-up of debris on the optics and the motion system, clean the system
at more frequent intervals. If your system has remained relatively clean, you can extend your cleaning intervals. Keep
in mind that a clean laser system is a better performing laser system and can extend the life of the parts as well as
reduce down time. If you have any questions about maintaining the laser system, please contact our Customer
Service Team.
Link to Table of Contents
183
User Guide
ULS Reference Guide Book
Chapter 6 - ULS Reference Guide Books
Link to Table of Contents
198
User Guide
ULS Reference Guide Book
Installation & Set-up Guide:
VersaLASER VLS3.60, VLS4.60 and VLS6.60
Link to Table of Contents
216
User Guide
ULS Reference Guide Book
The Installation & Set-up Guide is designed to provide you with step-by-step instructions for proper installation and
set-up of your Universal laser system. Before getting started, you should become familiar with each section of the
Installation & Set-Up Guide: Proper Operating Environment Procedures, Software Installation and Requirements,
Assembling Your System and Running Your First Job.
Proper Operating Environment
This section will give you step-by-step instructions for site preparation and computer and software setup. Follow the
instructions in the order shown.
1. Establishing a Proper Operating Environment
2. Software Installation and Operating System Requirements
3. Assembling Your VersaLASER System
4. Running Your First Job
CAUTION: Damage to the VersaLASER system due to inadequate or improper operating
environment is not covered under the Universal Laser Systems (ULS) Warranty. See the ULS
Warranty for additional information. The ULS Warranty can be found in your Reference Guide
booklet. Should you require a copy of the Warranty, please contact your local Customer Service at 480-609-0297 (USA), +43 1 402 22 50 (Austria), +81 (45) 224-2270 (Japan) or e-mail us
at [email protected].
Please refer to the Safety Manual before operating your laser system.
Environment (User Supplied)
1. The laser system must be installed in an office, laboratory, workshop or light duty manufacturing environment.
Dusty or dirty environments can damage the laser system. Keep the laser system isolated from any processes
hat produce airborne particles such as sandblasting, sanding, machining, etc. Also, keep the VLS system
isolated from any equipment requiring mists of oil or water for lubrication. Airborne dust and liquids can coat and
damage optics and motion system components.
2. Avoid small, enclosed, non-ventilated areas. Some materials, after laser engraving or cutting, continue emitting
fumes for several minutes after processing. Having these materials present in a confined, unventilated room can
create a health hazard.
3. For best results, since the lasers are air-cooled, we recommend operating the laser system between the ambient
temperatures of 73ºF (22ºC) and 77ºF (25º C).
4. Avoid storing the laser system outside the temperatures of 50ºF (10ºC) and 95ºF (35º C) as excessively cold or
hot temperatures can damage the laser cartridge or reduce its lifetime.
5. Ambient humidity levels must be non-condensing to protect optics.
6. The laser system should be at least 2 feet (610 mm) away from any wall or obstruction.
Link to Table of Contents
217
User Guide
ULS Reference Guide Book
Electrical Power Source (User Supplied)
1. For your system’s electrical requirements, please refer to the “INPUT POWER” label near the power inlet.
2. CAUTION: Never remove the ground lead to the electrical cord and plug the VLS
system into a non-grounded outlet. A laser system that is not properly grounded is hazardous and
has the potential to cause severe or fatal electrical shock. Without proper grounding, the laser system may exhibit
sporadic or unpredictable behavior. Always plug the system into a properly grounded (earthed) outlet.
3. Noisy or unstable electricity and voltage spikes may cause interference and possible damage to the
electronics of the laser system. If electrical power fluctuations, brown outs or constant power outages are a
problem in your area, please contact your local Electrician to supply a power isolation and regulation module.
Electrically noisy equipment, such as equipment with large motors, can also cause interference if plugged into
the same outlet. It may be necessary to attach the laser system to a dedicated electrical line to resolve the
problem.
4. The laser system is designed as a Class I, Group A, pluggable device. It is also designed for connection to IT
power systems which provide the most flexibility to the user.
Exhaust System (User Supplied)
1. We recommend you consult with a licensed contractor to meet local safety and building code requirements.
2. The exhaust system must be capable of supplying a minimum of:
• VersaLASER VLS3.60 and VLS4.60 - 250 CFM (cubic feet per minute) of airflow while under a load of 6 inches
of static pressure (425m3/hr at 1.5kPa)
• VersaLASER VLS6.60 - 500 CFM (cubic feet per minute) of airflow while under a load of 6 inches of static
pressure (850m3/hr at 1.5kPa)
3. Do not install forward incline, backward incline, in-line or ventilator fans because these types of air handlers
are inadequate and inappropriate for this type of installation. A high-pressure blower must be used to meet
minimum airflow requirements.
4. For personal safety and noise control, we recommend that the exhaust blower be mounted outside the building.
5. Rigid tubing should be used for the majority of the connection between the blower and the laser system. The
tubing should be smooth-walled and have as few 90-degree bends as possible.
6. Install an exhaust gate to adjust airflow and to close off the exhaust when the laser is not in use. Place this gate
near the laser system within 5 to 10 feet (1.50 to 3.00 meters).
7. Use a short piece of industrial grade, wire-reinforced rubber tubing to connect the laser system’s exhaust port
to the exhaust gate and secure with a hose clamp. This will provide some mobility for your laser system and will
isolate exhaust blower vibrations from your laser system.
8. Wire the exhaust blower electrically to a wall switch in the same room for easy ON/OFF control.
Link to Table of Contents
218
User Guide
ULS Reference Guide Book
Note: The following diagram shows a typical exhaust system layout. Use this as a guideline for proper exhaust
system installation. Although this diagram serves as an example, we recommend you consult with a licensed
contractor to meet local safety and building code requirements and to also calculate the correct size blower
required for your particular installation. Length of exhaust pipe, exhaust pipe diameter, number of 90-degree
angles and other restrictions must be calculated when determining the correct exhaust blower unit. Installing an
undersized or oversized blower is not only unsafe, but can also lead to excessive wear and tear to the laser system
and premature failure.
2
1
8
7
4
3
5
6
1. Exhaust blower mounted outside* (User Supplied)
2. Weatherproof shield (User Supplied)
3. Rigid ducting matching the diameter of the blower inlet (User Supplied)
4. Shut-off or air-flow gate (User Supplied)
5. Adapter to the hose reduces from 4” to 3” (User Supplied)
6. Flexible, wire-reinforced, industrial grade rubber hose (User Supplied)
7. Exhaust On/Off swtich (User Supplied)
8. Computer (User Supplied)
*Exhaust blower illustration my differ according to your region.
Link to Table of Contents
219
User Guide
ULS Reference Guide Book
Software Installation and Requirements
Your computer is a critical component in the operation of the VLS system. In fact, you cannot operate the VLS system if
your computer is not connected, powered on, running Windows and running the Universal Control Panel (UCP) software.
You can only run one VLS system per computer at a time. You will need to have a separate computer for each VLS system
you own. The VLS system is not designed to be a network printer. You must operate the VLS system using the computer
that is directly attached to it via the provided 6-foot USB cable (1.82 meters). USB cables longer than 6 feet (1.82 meters)
may cause the VLS system to malfunction.
Computer and Operating System Requirements
Minimum Computer Requirements (User Supplied)
• 2.0 GHz processor (minimum)
• Windows XP or Windows Vista*
• 1 GB of RAM (minimum); 2 GB of RAM (minimum) for Vista
operating systems
• 40 GB hard drive (15 GB free space) (minimum)
• VGA monitor (minimum 1024 x 768 resolution)
• CD-ROM drive/burner
• Mouse and keyboard
• Available USB 2.0 Hi-Speed compliant port only
• Computer speakers (optional)
• 600 DPI scanner (optional)
• Internet connection and e-mail address (optional)
*The VLS system is only compatible with a 32-bit Windows Operating
System. See www.microsoft.com for the minimum computer requirements to
run Windows Vista. The VLS system is not designed to run on the Macintosh
Operating System.
Note: Some computer manufacturers’ USB ports do not comply with USB 2.0 Hi-Speed standards. This may cause
the VLS system to exhibit erratic behavior. Confirm that your computer complies with USB 2.0 Hi-Speed by checking your
computer manual. For more information on USB 2.0 Hi-Speed compatibility, please visit www.usb.org.
Other USB peripheral devices that demand a large amount of computer processing power may slow down the
operation and productivity of the VLS system. If you experience problems with operation, we recommend you
disconnect other USB peripheral devices while the laser system is off. Do not connect or disconnet devices while the laser
system is running a job.
Link to Table of Contents
220
User Guide
ULS Reference Guide Book
Optimizing Windows
XP Performance
Windows XP, by default, displays many “visual
effects” that slow down the computer.
We
recommend that you turn off these effects by
right-clicking on the “My Computer” icon on your
desktop, then click “Properties” and then click the
“Advanced” tab. In the Performance section, click
“Settings,” then click “Adjust For Best Performance”
and then click “Apply.”
Vista Performance
Windows Vista, by default, displays many “visual
effects” that slow down the computer.
We
recommend that you turn off these effects by clicking
the “Start” button, right-clicking on “Computer,”
then
click “System Properties” and then click on
“Advanced System Settings” link. In the Performance
section, click “Settings,” then click “Adjust For Best
Performance” and then click “Apply.”
Computer Power Management
Power management is a configuration setting in Windows XP and Windows Vista that reduces the energy
consumption of computers and monitors by shutting them down after a period of inactivity. However, since your
computer is a critical component in the operation of the VLS system, you do not want your computer to go into
the Standby or Hibernate modes while your laser system is operating. Contact your IT Department if you need help
in configuring your computer.
XP
Vista
For the Power Scheme in use, select “Never” for all the
setting options: Turn off display and Put the computer to
sleep.
For the Power Scheme in use, select “Never” for all the
setting options: Turn off monitor, turn off hard disks,
system standby and system hibernates.
Link to Table of Contents
221
User Guide
ULS Reference Guide Book
Universal Control Panel (UCP) Installation CD-ROM
At this point you need to install the Windows XP/Vista Universal Control Panel (UCP) and printer driver. In order to
install the software, you need to have administrative privileges on the computer before starting installation. The Software
Installation CD-ROM can be found on the inside of this manual reference guide.
1. Insert the Software Installation CD-ROM into your PC’s CD drive. It should automatically launch the “Universal
Control Panel Installation” window. Select the laser series you are installing on the computer.
Note: If the setup window does not automatically launch, you can launch it manually. Locate your CD or
DVD drive using Windows Explorer and click on the Setup.exe application to launch the setup window.
2. Select the components you would like to install on your computer, then select the “Next” button.
Note: If you choose to only install the “Universal Control Panel,” you will need to proceed to step 4.
3. If you have selected to install the Printer Driver, you will then be prompted to select the laser system you
would like to install on the computer. Once selected, click the “Next” button.
Link to Table of Contents
222
User Guide
ULS Reference Guide Book
4. The installation process will proceed as indicated by a progress bar. Be patient. Loading the files can take a few
minutes depending on your computer’s processor speed.
5. When the installation process is finished, the “Completing the ULS Software Setup Wizard” window will
appear. Read the instructions and make your desired selection. If you Reboot Now, save all your work prior to
rebooting. If you decide to reboot later remember that you must reboot before connecting the VLS system to
your computer. Click on the “Finish” button to complete installation. The window will automatically close.
Remove the Software Installation CD-ROM. All the files required to operate your machine have been loaded
onto your computer.
Link to Table of Contents
223
User Guide
ULS Reference Guide Book
Assembling Your VersaLASER System
Familiarize yourself with the instructions before getting started.
Depending on which model VersaLASER system you have purchased, assembly of your laser system may be
required. Once the system has been assembled, it is necessary to install the laser cartridge on the back of the machine
and perform a beam alignment check. Do not power up your laser system until the final step, “Checking Beam
Alignment.”
CAUTION: Do not attempt to move or lift this system alone. Obtain assistance from three or four
additional people when lifting or carrying (secure motion system and doors before lifting). Bodily
injury may occur if improper lifting techniques are used or the system is dropped.
System Assembly - VersaLASER VLS3.60 and VLS4.60 systems: Page 226
System Assembly - VersaLASER VLS6.60 system: Page 228
System Assembly - VersaLASER VLS3.60 and VLS4.60 Systems
Cart Assembly
1. Unpack the laser system from its packaging.
2. Remove the unassembled cart from the top of the laser system.
3. Assemble the cart as it appears in the diagram below, but leave all of the screws slightly loose, except for
the casters which should be tightened as far as possible into the cart leg.
7
7
6
2
1
5
7
7
5
2
5
3
4
3
1.Back panel
2.Legs (both are identical)
3.Nuts (4)
4.Locking casters (4 are identical)
5.1/4-20 x ½, socket head screws w/lock &
flat washers (8)
6.10-32 x 3/8 socket head screws w/lock &
flat washers (2)
7.Connect to main enclosure
4
Link to Table of Contents
224
User Guide
ULS Reference Guide Book
4. With the assistance of three or four other people, place the system on top of the cart and
loosely install the provided screws that attach the machine to the cart. Be careful not to
pinch your fingers.
5. Open front door all the way to ensure that it does not come in contact with the cart legs. If the door should
come in contact with the cart legs, gently pull the cart legs apart to ensure there is non-contact between
the door and the cart legs. Securely tighten all the screws and re-check.
6. Attach your exhaust system’s wire-reinforced rubber tubing to the exhaust port at the rear of the laser
system and secure with a hose clamp.
7. Place the VersaLASER system in the desired location for operation.
Proceed to page 229 “Laser Cartridge Installation.”
Link to Table of Contents
225
User Guide
ULS Reference Guide Book
System Assembly - VersaLASER VLS6.60 System
1. Unpack the laser system from its packaging.
2. Place the laser system in the desired location for operation.
a. If a doorway is not wide enough to pass the laser system through, the system can be detached from the cart
stand and carried through the door on it’s side.
b. If you do not need to detach the laser system from the cart to move it to the desired location for operation,
you can proceed to “Laser Cartridge Installation” on page 229.
Detaching laser system from cart to fit through small doors (Optional)
1. Remove any packing materials or accessories inside the laser system.
2. Using strong shipping tape or rope, tape the top and front door closed so that they do not open up
when tilted.
3. Remove the eight screws that attach the cart stand to the laser system from the bottom (See below.)
4. Lift the laser system straight up.
5. Place the laser system front door down on a dolly and roll it through the doorway. Lift and rotate the cart to
move it through the doorway.
6. Carefully line up the laser system and place it back on top of the cart stand. Be careful not to pinch your
fingers.
7. Reassemble the laser system and proceed to “Laser Cartridge Installation” on page 229.
Link to Table of Contents
226
User Guide
ULS Reference Guide Book
Laser Cartridge Installation
1. Make sure that your power cord to the system is not plugged in at this time. Place your finger in the slotted
hole and gently pull back on both sliding latches. Gently fold back the rear cover. Note: some laser systems are
shipped with keyed locks.
Note: Access latches for the laser cover are lockable. However, all systems are shipped from the factory
with latches unlocked. If you need to lock the latches please contact our Customer Service Team at 480-609-0297
(USA), +43 1 402 22 50 (Austria), +81 (45) 224-2270 (Japan) or e-mail us at [email protected] for keys.
2. Visually locate the two mounting blocks (1), the laser latch (2), alignment fork (3) and power connector (7). Notice
that the alignment fork has two plates, one small (4) and one large (5). Locate the gap between the two plates
(6).
Link to Table of Contents
227
User Guide
ULS Reference Guide Book
3. Observe the “V” groove along the upper (3) and lower (2) part of the laser cartridge base plate and the
alignment plate (1) at the end of the base plate.
4. Pick up the laser cartridge by the ends and tilt it at a 30 degree angle as shown (1). Mount the cartridge onto
the mounting blocks shown in step 2 (page 229) by placing the upper “V” groove on top of the mounting
blocks. Slide the cartridge to the right until the outer edge (2) of the alignment plate contacts the inside edge of
the large plate of the alignment fork.
Link to Table of Contents
228
User Guide
ULS Reference Guide Book
5. Slowly rotate the laser cartridge, making sure that the alignment plate is centered in the gap in the alignment
fork. As you slowly release the weight of the laser, you should feel it lock itself smoothly into place. Never force
the laser into position. If the laser does not install smoothly, check for obstructions such as pinched wires or
hoses or a binding laser latch. Once installed, verify that the alignment plate is centered within the alignment
fork.
6. Plug in the power connector (1). Close the rear cover, making sure that wires or hoses do not become pinched
when the cover is closed. Gently close the rear cover until the sliding latches lock into place.
7. Once the laser cartridge has been installed, proceed to “Laser System Leveling” on page 232.
Link to Table of Contents
229
User Guide
ULS Reference Guide Book
Laser System Leveling
1. Place a bubble level (1) across the front (2) and rear cart legs (3). Adjust the caster height using the adjustment
screw (4) until both the rear part and the front part of the cart legs are level with respect to each other. Once
the system is level, secure all casters by tightening the nut (5) up against the cart leg.
2. Open the top door and remove the rubber band that is securing the arm in place.
3. Remove any remaining packing materials and accessories or any other items that may be located inside the
cabinet or on top of the engraving table.
3
5
4
2
1
4. Manually move the Focus Carriage by hand to the upper left corner.
Link to Table of Contents
230
User Guide
ULS Reference Guide Book
5. Place the focus tool* against the black lens plate (focus carriage) so that the flat edge of the focus tool rests
against the front side of the focus carriage as illustrated. Take note of the fit of the focus tool (it should look like
the diagram to the right) in the upper left corner of the system. This corner will be your reference point.
*Alternate leveling method available. See page 234.
6. Using the upper left corner as a reference point, move the focus carriage by hand to each corner and take note
of any differences between the fit of the focus tool in the upper left corner of the field and the fit of the focus
tool in each of the other corners.
Perfect Fit
Gap to big
Link to Table of Contents
Gap to big
231
User Guide
ULS Reference Guide Book
7. If one or more of the other corners does not match the upper left corner, adjust the caster directly underneath
that corner up or down until the focus tool fit at that corner matches the fit at the upper left corner. First loosen
the lock nut (1), then turn the adjusting screw (2) in 1/8 turns. Once the foot is at the correct height, tighten
the lock nut (1). When you are done the focus tool fit at all four corners should be the same.
1
2
8. Once properly leveled proceed to page 235.
*Alternate leveling method
For the best leveling results, use a digital caliper and adjust the caster directly under each corner that does not match
the height of the upper left corner until that corner matches the upper left corner’s height. Verify that you zero
out the caliper before taking any measurements. The height at each corner should be within 0.010” (0.254 mm) of
the height at the upper left corner.
Link to Table of Contents
232
User Guide
ULS Reference Guide Book
Finalizing the Connections
Make the following connections in the order described, otherwise static electricity can potentially damage the
computer and/or the laser systems electronics.
1. Connect the 3-inch (76.5 mm) flexible rubber exhaust system to the rear of the laser system if you have not
already done so.
2. Connect the laser system’s power cord and your computer’s power cord to a grounded electrical outlet.
3. Do not power on the laser system at this time.
Note: International users may need to connect an adapter to the power cord to be able to plug it into their
power source.
CAUTION: Make sure that you attach the adapter correctly to the power cord and that your
power source is properly grounded (Earthed).
4. Install the provided 9-volt Thermal Sensor battery into the VersaLASER system.
Note: A properly installed 9-volt battery is necessary to operate the laser system. The laser system will not
function without a charged battery installed. Keep a spare 9-volt battery on hand at all times.
a. Gently push up on the Thermal Sensor battery holder drawer as indicated. Pull the battery holder drawer
out.
b. Insert the 9-volt battery provided into the battery holder drawer.
c. Reinsert the battery holder drawer into the cavity until it latches in place.
Link to Table of Contents
233
User Guide
ULS Reference Guide Book
5. USB 2.0 Hi-Speed (Only)
The laser system comes equipped with a high quality, 6-foot (1.82 meters) USB 2.0 certified cable. We
recommend you use this provided cable.
CAUTION: Do not use any adapters, extension cables, USB cable longer than 6 feet (1.82
meters), or other devices between the computer’s USB port and the port on the laser system,
or sporadic or unpredictable behavior may result.
a. Connect the USB cable provided between the USB port of the computer and the USB port on the back
of the VersaLASER system. Do not use a USB cable longer than 6 feet (1.82 meters).
b. After connecting the USB cord, the Found New Hardware Wizard will open and offer to connect to
“Windows Update” to search for software. Select “No, not at this time.” Then click “Next” to continue.
Link to Table of Contents
234
User Guide
ULS Reference Guide Book
c. Select “Install the software automatically.” Then Click “Next” to continue. You do not need to insert the
Software Installation CD-ROM.
d. A warning message will appear. Select “Continue Anyway.” Do not be concerned. Installing the ULS
Firmware will not harm your computer in any way. The firmware will begin to load.
e. Click “Finish” to close the Wizard.
f. Another set of New Hardware Wizard windows may appear after the initial USB connection. Follow the same
instructions as mentioned previously. Once completed, your new hardware is installed and ready to use.
Link to Table of Contents
235
User Guide
ULS Reference Guide Book
Checking Beam Alignment
Note: You will not engrave anything at this time.
1. Open the top door.
2. Place a small piece of masking tape across the 3/4” (19 mm) hole in the focus carriage (1). Gently rub the tape
around the edge of the hole so that you can see the outline of the hole through the tape (2) .
3. Power on your computer and verify that the Universal Control Panel (UCP) icon is present on the taskbar. If not,
activate it by double-clicking on the “Universal Control Panel” icon on your desktop.
4. Power on the laser system by pressing the Power Button
on the VersaLASER system keypad.
5. With the top door open, a red dot will appear on the masking tape (3). The red dot should appear centered,
within 1/8 inch (3.18 mm). If not, turn off the laser system, remove and re-install the laser cartridge and try
again. If the red dot still does not appear centered, please contact our Customer Service Department at
480-609-0297 (USA), +43 1 402 22 50 (Austria), +81 (45) 224-2270 (Japan) or e-mail us at [email protected].
6. Laser beam alignment is now complete. Power off the laser system and remove the masking tape.
Focus Carriage Beam Alignment
Link to Table of Contents
236
User Guide
ULS Reference Guide Book
Running Your First Job
We will now illustrate how to use your laser system to engrave on a piece of anodized aluminum from start to
finish. In this example, you will raster engrave a Test Card on a 2 x 3.5 inch (50.8 x 89 mm), 0.0195 inch (0.49 mm)
thick piece of anodized aluminum.
Note: For this example we will be using CorelDRAW X3 and the CorelDRAW sample file provided on the software
CD. Install CorelDRAW, but do not start a new project.
Step 1 – Loading and Positioning the Material
Open the top door and position the piece of anodized aluminum (1) into the upper left corner of the table, against
the rulers.
1
Step 2 – Creating the Graphic
Using CorelDRAW, open the sample graphic file found on the software installation CD that came with the VLS
system. The file is named ULSTest.cdr. The Software Installation CD contains test files in .cdr, .eps, and .dxf.
Link to Table of Contents
237
User Guide
ULS Reference Guide Book
Step 3 – Printing to your VersaLASER System (Materials Database Tab)
You are using the Materials Database Tab in the printer driver. Other graphic software programs may differ.
1. Verify that the UCP
is running in the taskbar.
2. When you are ready to print the job, click FILE and
then click PRINT. Make sure that your laser system
appears in the DESTINATION NAME dropdown list,
and then click PROPERTIES (Figure 4) to display the
VersaLASER system printer driver settings (Figure 5).
3. Choose your material, in this case metal, and then
select the correct material type, Aluminum Anodized
(Figure 5).
4. Set the Fixture Type to NONE.
Figure 4
Note: If you were using an optional accessory or
custom fixture, you would choose it from the fixture list.
5. Measure the thickness of the material (we recommend
using calipers) and enter it in the material thickness
field. In the example, the provided anodized aluminum
is 0.019” (0.483 mm) thick.
6. Click OK when done.
7. Now click on PRINT in the Print dialog window (Figure
4).
8. Click on the VersaLASER system icon on the taskbar
and the current print job will appear in the Viewer Tab
of the Universal Control Panel (Figure 6).
Figure 5
9. Now click on the System Tab and verify that the Auto Z
box is checked.
10. Return to the Viewer Tab and proceed to the next step.
Figure 6
Link to Table of Contents
238
User Guide
ULS Reference Guide Book
Step 4 – Starting the Process
1. Turn on the exhaust and VersaLASER system.
Note: Laser system cooling fans are variable speed and may speed up and slow down during operation
as needed to cool the lasers.
2. Make sure the material is positioned correctly within the engraving area.
3. Close the top door.
4. Click the green START button on the UCP to begin laser processing (Figure 6 on previous page).
CAUTION: Observe that the laser system is functioning as desired. If any abnormalities occur,
including, but not limited to, flaming, sparking, melting or excessive smoking of the material
you are engraving, stop the engraving process immediately by either pressing the pause
button or opening the top door. Re-check the settings in the printer driver as well as the
laser system. If everything seems to be correct, check focus manually as described in the User
Manual located in the Reference Guide booklet and adjust if necessary. If you cannot resolve
the issue, please contact your distributor or the ULS Customer Service Team. Never leave the
laser system unattended during the engraving or cutting process.
Step 5 – Material Removal and Reloading
Once the laser system has completed processing the material, the laser beam will turn off and the focus carriage
will move to the home position in the upper right hand corner.
Before opening the top door, wait a few seconds to allow any remaining fumes that are left over from the laser
engraving or cutting process to evacuate through the exhaust system.
Congratulations! You have just completed your first engraving project with your new VersaLASER system. Below
is an image of the sample engraving job. If your results are not satisfactory, please contact the Customer Service
Department at 480-609-0297 (USA), +43 1 402 22 50 (Austria), +81 (45) 224-2270 (Japan) or e-mail us at support@
ulsinc.com.
Link to Table of Contents
239
User Guide
ULS Reference Guide Book
ULS Safety Guide
Link to Table of Contents
291
User Guide
ULS Reference Guide Book
Safety
Description of Appropriate Use
This device is designed for laser cutting and engraving in an office, laboratory, workshop or light duty manufacturing
environment. Materials to be processed must fit completely inside the system for proper operation.
CAUTION: This device is not designed, tested, intended or authorized for use in any medical
applications, surgical applications, medical device manufacturing or any similar procedure
or process requiring approval, testing or certification by the United States Food and Drug
Administration or other similar governmental entities.
General Safety
Use of the equipment in a manner other than described in this manual or failure to follow the operational requirements
and safety guidelines listed in this manual can result in injury to yourself and others and may cause damage to the
equipment and your facility.
EXPOSURE TO THE LASER BEAM MAY CAUSE PHYSICAL BURNS AND CAN CAUSE SEVERE EYE
DAMAGE. Proper use and care of this system are essential to safe operation. Use of controls or adjustments or performance of procedures other than those specified herein may result in hazardous radiation exposure.
NEVER OPERATE THE LASER SYSTEM WITHOUT CONSTANT SUPERVISION OF THE CUTTING
AND ENGRAVING PROCESS. Exposure to the laser beam may cause ignition of combustible materials
which can lead to a fire. A properly maintained fire extinguisher should be kept on hand at all times.
NEVER LEAVE MATERIALS IN THE LASER SYSTEM AFTER LASER PROCESSING HAS FINISHED.
Always remove all material including scrap material from the machine after use.
Scrap material left in the laser system including materials that collect in the optional cutting table can be a fire hazard. It is also recommended you allow scrap
materials to cool prior to leaving the work area. A properly maintained fire extinguisher should be
kept on hand at all times.
A PROPERLY CONFIGURED, INSTALLED, MAINTAINED AND OPERATIONAL PARTICULATE AND
FUME EXHAUST SYSTEM IS MANDATORY WHEN OPERATING THE LASER SYSTEM. Fumes and
smoke from the engraving process must be extracted from the laser system and exhausted outside.
SOME MATERIALS, WHEN ENGRAVED OR CUT WITH A LASER, CAN PRODUCE TOXIC AND
CORROSIVE FUMES. We recommend that you obtain the Material Safety Data Sheet (MSDS) from
the manufacturer of the particular material. The MSDS discloses all of the hazards when handling or
processing a particular material. DISCONTINUE processing any material that causes chemical
deterioration of the laser system such as rust, metal etching or pitting, peeling paint, etc. Damage to
the laser system from corrosive fumes is NOT covered under warranty.
DO NOT ATTEMPT TO MOVE OR LIFT THIS SYSTEM ALONE. Obtain assistance from three or four
additional people when lifting or carrying (secure motion system and doors before lifting). Bodily
injury may occur if improper lifting techniques are used or the system is dropped.
Link to Table of Contents
292
User Guide
ULS Reference Guide Book
DANGEROUS VOLTAGES ARE PRESENT WITHIN THE ELECTRONICS ENCLOSURES
OF THIS SYSTEM. Access to these areas is not necessary during normal operation. If it becomes
necessary to open one of these enclosures for service reasons, please remember to disconnect the
power cord from your electrical supply.
NEVER REMOVE THE GROUND LEAD TO THE ELECTRICAL CORD AND PLUG THE SYSTEM
INTO A NON-GROUNDED OUTLET. A laser system that is not properly grounded is hazardous
and has the potential to cause severe or fatal electrical shock. Without proper grounding, the laser
system may exhibit sporadic or unpredictable behavior. Always plug the system into a properly
grounded (earthed) outlet.
THE POWER SUPPLY CORD IS THE MAINS DISCONNECT DEVICE; THE EQUIPMENT SHOULD
BE LOCATED CLOSE TO AN EASILY ACCESSIBLE POWER OUTLET.
To disconnect the
equipment from the supply mains, the power cord should be unplugged from the power outlet or
main power inlet (appliance coupler) of the unit.
THE LASER SYSTEM IS DESIGNED AS A CLASS I, GROUP A, PLUGGABLE DEVICE. It is also
designed for connection to IT power systems which provide the most flexibility to the user.
THIS DEVICE IS SPECIFICALLY DESIGNED TO COMPLY WITH CDRH PERFORMANCE REQUIREMENTS UNDER 21 CFR
1040.10 AND 1040.11 AND TO COMPLY WITH EUROPEAN LASER SAFETY REGULATIONS UNDER EN60825-1. CDRH
is the Center for the Devices of Radiological Health division of the Food and Drug Administration (FDA) in the USA. No
guarantees of suitability or safety are provided for any use other than those specified by Universal Laser Systems, Inc.
Laser Safety
The device contains a sealed carbon dioxide (CO2) laser that produces intense invisible laser radiation at a wavelength
of 10.6 microns in the infrared spectrum. For your protection, the laser is contained within a Class 1* enclosure designed
to completely contain the CO2 laser beam. CAUTION: Use of controls or adjustmens or performance of proce-
dures other than those specified herein may result in hazardous radiation exposure.
•
The intense light that appears during the engraving or cutting process is the product of material combustion
or vaporization. DO NOT STARE AT THIS INTENSE LIGHT OR VIEW DIRECTLY WITH OPTICAL INSTRUMENTS
SUCH AS BINOCULARS OR MICROSCOPES.
•
This device may contain a visible Red Diode Pointer (Class 3R) to aid in positioning material to be cut or engraved.
DO NOT LOOK DIRECTLY INTO THE RED LASER BEAM OR USE A REFLECTIVE SURFACE TO REDIRECT OR
VIEW THE RED LASER BEAM. NEVER ATTEMPT TO VIEW THE RED LASER BEAM USING OPTICAL
INSTRUMENTS SUCH AS BINOCULARS OR MICROSCOPES.
•
The user door(s) are safety interlocked which will prevent the CO2 laser beam from firing when the user door(s)
are opened. The Red Diode Pointer is NOT safety interlocked and can be automatically activated with the door(s)
either open or closed.
•
DO NOT OPERATE THE LASER SYSTEM IF ANY SAFETY FEATURES HAVE BEEN MODIFIED, DISABLED OR
REMOVED. This may lead to accidental exposure to invisible CO2 laser radiation which may cause severe eye
damage and/or severe burns to your skin.
•
Always use caution when operating a laser system.
*An enclosure which does not permit human access to laser radiation in excess of the accessible emission limits of Class 1 for the applicable wavelength
and emission duration.
Tamper Proof Labels
All laser cartridges are equipped with tamper proof labels. There are NO field serviceable parts inside a Universal
Laser System, Inc. (ULS) laser cartridge. If your laser cartridge needs service, please contact the Customer Service Team
at 480-609-0297 (USA), +43 1 402 22 50 (Austria), +81 (45) 224-2270 (Japan) or e-mail us at [email protected].
Link to Table of Contents
293
User Guide
ULS Reference Guide Book
Laser Safety When Using the Optional Class 4 Module (ILS Only)
The Industrial Laser Series (ILS) laser system is equipped with interlocked access doors on either side of the unit. An
optional device is available to allow the user to operate the laser system with the side doors open. This device
bypasses the safety interlocks on the side doors of the ILS laser system. With this optional device in place, the protective
system housing will not fully contain the infrared laser radiation produced by the carbon dioxide laser, creating the potential
for exposure.
Use of this optional device redefines the safety classification of the ILS
laser system from Class 1, which is considered safe for use under all conditions of normal use, to Class 4, which is considered
potentially hazardous. Additionally, the system housing will not contain flames or by-products from potential ignition of
materials within the system housing. It should also be noted that damage or ignition of flammable materials in the immediate or remote vicinity can be caused by infrared laser radiation escaping the housing of a system equipped with the Class 4
Laser Option.
There are many mandatory safety measures set by national standards and laws and European standards which
must be complied with when operating a Class 4 laser system. Certain safety measures are provided by the manufacturer through incorporation into the optional Class 4 laser device, including the following:
1. Remote Interlock Connection – A means of remotely connecting to the interlock circuit of the laser system
allowing connection of remote switches to the laser system for deactivating the laser. This feature must be used
to connect an interlock switch to the doors of the designated room in which the laser system will be operated
so that the laser is automatically deactivated when the doors are open.
2. Key Control – A removable key that prevents unauthorized operation of the laser.
3. Laser Radiation Emission Warning Device – A visible warning light that indicates when the laser is capable of
emitting laser radiation.
4. Attenuator – A mechanical device to block emission of laser radiation. This device takes the form of a shutter
which is manually operated.
5. Class 4 Warning Label – A Class 4 warning label to indicate the laser system is classified as Class 4.
In addition to a properly installed exterior exhaust connected to the laser system equipped with the Class 4 Laser Option,
the laser system must be operated only in a continuously well-ventilated area. Certain operational safety measures are
the responsibility of owners of the ILS laser system with the optional Class 4 laser device installed. These safety measures
are mandatory for operation of Class 4 laser devices under Federal and State law in the United States as well as under the laws of most foreign countries. Many of these safety measures are outlined in ANSI Standard Z136.1 “American
National Standard for the Safe Use of Lasers” or in equivalent standards available in most foreign countries, such as the
European Standard EN 60825-1. Other safety measures may be required by state and/or local authorities, for example, the
Regulation BGV B2 on laser beams of the German Employer’s Liability Insurance Association, and will be the responsibility
of the Owner to understand and adhere to these laws.. A brief synopsis of the most common safety requirements addressed to Owners of a Class 4 laser is outlined below:
A. In any facility in which a Class 4 laser system is to be operated, an individual must be designated as a Laser
Safety Officer (“LSO”) who will assume the authority and responsibility to monitor and enforce the control of
laser hazards. The individual designated as the LSO should be trained in laser safety and aware of all safety
measures set by law. There are many avenues available to acquire this training. Recognized sources of this training
are the Laser Institute of America (www.laserinstitute.org), the Employer’s Insurance Liability Associations in the
European countries or, laser safety associations within Owner’s country or territory.
B. The Owner of the Class 4 laser system will be responsible for creation of a controlled area in which a Class 4 laser
system will be operated. A controlled area is an area designed to fully contain the laser radiation potentially escaping from a Class 4 laser system. and with measures in place to prevent unauthorized personnel from entering the
area including lighted warning signs outside the designated and controlled area and interlocks on entryways.
C. The LSO will be responsible for designating and training all personnel authorized to operate, maintain or
service a Class 4 laser system. It will also be the responsibility of the LSO to take measures to inform and restrict
all unauthorized personnel from access to a Class 4 laser system.
D. The Owner of the Class 4 laser system will be responsible for identifying and providing to all authorized personnel
Link to Table of Contents
294
User Guide
ULS Reference Guide Book
any protective equipment such as specially designed eyewear, protective equipment and clothing needed when
operating, maintaining or servicing a Class 4 laser system. Further, the Owner will ensure that no juveniles operate
the laser, and that mirrors, lenses and other reflecting materials are fixed and are only moved in a controlled manner if the last is in use.
E. The LSO will be responsible for auditing all safety measures on a regular basis. This includes regular retraining
of authorized personnel, serialization and regular inspection (and replacement when necessary) of all special
eyewear and clothing and regular inspection of all safety measures surrounding the controlled area in which a
Class 4 laser systemis operated. The LSO may be required to maintain records as necessary to prove compliance.
F. The LSO will be responsible for regular medical surveillance of all authorized personnel operating a Class 4
laser system. This can include but is not restricted to mandatory annual eye exams, for example.
G. Class 4 lasers must not be used at tradeshows or exhibitions.
The above list is not to be considered all inclusive. Other mandatory safety measures may be applicable and will vary
from state to state and country to country. It is the responsibility of the owners of a Class 4 laser system and the
owners of the facility in which it will be operated to identify and comply with all regulations pertinent to their
locale. In some states, for example, anyone wishing to operate a Class 4 laser device must register with the state
radiation regulatory agency, pay annual fees and submit to annual inspections. There may be penalties involved for
non-compliance. The United States Occupational Safety and Health Administration (“OSHA”) has also adopted rules for
safe use of lasers in the workplace. The LSO must comply with all Rules and Regulations set by law.
To reiterate, the safety measures relating to operation of a Class 4 laser system are mandatory under Federal
and State law in the United States as well as in most foreign countries. This optional Class 4 laser device must not
be used if you are unable or unwilling to comply with all safety measures required for safe operation of a Class 4 laser
system.
Link to Table of Contents
295
User Guide
ULS Reference Guide Book
Safety Labels
CDRH and CE regulations require that all laser manufacturers affix warning labels in specific locations throughout
the equipment. The following warning labels are placed on the laser system for your safety. Do not remove these labels
for any reason. If the labels become damaged or have been removed for any reason, do not operate the laser system
and immediately contact Universal Laser Systems, Inc. at 480-609-0297 (USA), +43 1 402 22 50 (Austria), +81 (45) 224-2270
(Japan) or e-mail us at [email protected] for a free replacement.
THIS LASER MANUFACTURED BY
UNIVERSAL LASER SYSTEMS, INC.
16008 N. 81ST ST
SCOTTSDALE, AZ 85260 USA
IS DESIGNED FOR USE ONLY AS A COMPONENT IN A
ULS LASER SYSTEM. THIS LASER IS A CLASS 4 DEVICE AND
DOES NOT COMPLY WITH U.S. CODE 21 CFR SUBCHAPTER J
OR EUROPEAN STANDARD EN 60825-1:1994.
THIS LASER PRODUCT IS MANUFACTURED UNDER ONE
OR MORE OF U.S. PATENTS 5,661,746; 5,754,575; 5,867,517;
5,881,087; 5,894,493; 5,901,167; 5,982,803; 6,181,719; 6,983,001
OTHER U.S. AND INTERNATIONAL PATENTS PENDING.
221-0086-0
221-0087-0
221-0088-0
221-0089-0
221-0031-0
CAUTION
CLASS 4 INVISIBLE LASER
RADIATION WHEN OPEN
AVOID EYE OR SKIN EXPOSURE TO
DIRECT OR SCATTERED RADIATION
221-0017-0
SERIAL #: XXXXX
DATE: XXXXX
221-0007-0
221-0018-0
AVOID EXPOSURE
INVISIBLE LASER RADIATION IS
EMITTED FROM THIS APERTURE
ULS Laser Cartridge Labels
Laser cartridge and labels are not to scale
Link to Table of Contents
296
User Guide
ULS Reference Guide Book
VLS3.60, VLS4.60 and VLS6.60
CAUTION LASER RADIATION
DO NOT STARE INTO BEAM OR VIEW
DIRECTLY WITH OPTICAL INSTRUMENTS
CLASS 3R LASER PRODUCT
LASER DIODE
WAVELENGTH: 630-680 nm
MAX. OUTPUT: 5 mW
221-0033-0
or
CAUTION
CLASS 4 INVISIBLE LASER RADIATION
WHEN OPEN AND INTERLOCK FAILED OR
DEFEATED AVOID EYE OR SKIN EXPOSURE
TO DIRECT OR SCATTERED RADIATION
221-0016-0
WARNING
NEVER OPERATE THE LASER SYSTEM
WITHOUT CONSTANT SUPERVISION
EXPOSURE TO THE LASER BEAM MAY
CAUSE IGNITION OF COMBUSTIBLE
MATERIALS WHICH CAN CAUSE SEVERE
DAMAGE TO THE EQUIPMENT
221-0012-0
DANGER
LASER RADIATION - AVOID
DIRECT EYE EXPOSURE
LASER DIODE
WAVELENGTH: 630-680 nm
MAX. OUTPUT: 5 mW
CLASS 3R LASER PRODUCT
221-0034-0
AVOID EXPOSURE
INVISIBLE LASER RADIATION IS
EMITTED FROM THIS APERTURE
!
221-0018-0
WARNING
THIS LASER SYSTEM CONTAINS A
CO2 LASER IN A CLASS I ENCLOSURE.
THE LASER SYSTEM HAS BEEN
CLASSIFIED AS CLASS 3R DUE
TO THE PRESENCE OF A
VISIBLE LASER DIODE.
221-0013-0
INPUT POWER:
110 VAC; 50/60 Hz; 10 A
221-0022-0
or
CAUTION
CLASS 4 INVISIBLE LASER RADIATION
WHEN OPEN AND INTERLOCK FAILED OR
DEFEATED AVOID EYE OR SKIN EXPOSURE
TO DIRECT OR SCATTERED RADIATION
221-0016-0
INPUT POWER:
230 VAC; 50/60 Hz; 5 A
221-0036-0
VersaLASER VLS3.60, VLS4.60 and VLS6.60 Front View
Laser system and labels are not to scale
Link to Table of Contents
299
User Guide
ULS Reference Guide Book
WARNING
TO AVOID RISK OF ELECTRIC SHOCK
ALWAYS DISCONNECT POWER CORD
BEFORE REMOVING THIS COVER
221-0020-0
221-0021-0
(Main grounding point)
CAUTION
CLASS 4 INVISIBLE LASER RADIATION
WHEN OPEN AND INTERLOCK FAILED OR
DEFEATED AVOID EYE OR SKIN EXPOSURE
TO DIRECT OR SCATTERED RADIATION
221-0016-0
WARNING
THIS SYSTEM IS DESIGNED FOR
USE WITH INERT AND
NON-OXIDIZING GASES ONLY
(i.e. DRY CLEAN AIR, CARBON
DIOXIDE, HELIUM, NITROGEN).
CONNECTING FLAMMABLE OR
OXIDIZING GASES TO THIS
SYSTEM CREATES A SERIOUS
SAFETY AND/OR FIRE HAZARD.
DO NOT CONNECT ANY GAS
SOURCES EXCEEDING 75 PSI
(5 ATM) PRESSURE.
UNIVERSAL LASER SYSTEMS
ASSUMES NO RESPONSIBILITY
ARISING FROM THE IMPROPER
USE OF THIS SYSTEM.
221-0037-0
(Note: If Air Assist present, this label will be on the system.)
VersaLASER VLS3.60, VLS4.60 and VLS6.60 Back View with Rear Door Open
Laser system and labels are not to scale
Link to Table of Contents
300
User Guide
ULS Reference Guide Book
CAUTION
WARNING
CLASS 4 INVISIBLE LASER RADIATION
WHEN OPEN AND INTERLOCK FAILED OR
DEFEATED AVOID EYE OR SKIN EXPOSURE
TO DIRECT OR SCATTERED RADIATION
TO AVOID RISK OF ELECTRIC SHOCK
ALWAYS DISCONNECT POWER CORD
BEFORE REMOVING THIS COVER
221-0016-0
221-0020-0
!
WARNING
Do NOT use in medical or surgical
applications or to manufacture
medical devices. See the Safety,
Installation, Operation, and Basic
Maintenance Manual, or the OEM
Laser Integration Manual for
further information.
221-0081-0
THIS EQUIPMENT CONFORMS
TO PROVISIONS OF
US 21 CFR 1040.10
AND 1040.11
ULR301234507010800016
MANUFACTURED: JANUARY 2008
www.ulsinc.com
Made in USA
© 2008 Universal Laser Systems, Inc. All rights reserved. VersaLASER is a
registered trademarks of Universal Laser Systems, Inc.
221-0015-0
THIS PRODUCT IS MANUFACTURED UNDER ONE
OR MORE OF U.S. PATENTS 5,051,558; 5,661,746; 5,754,575;
5,867,517; 5,881,087; 5,894,493; 5,901,167; 5,982,803; 6,181,719;
6,313,433; 6,342,687; 6,423,925; 6,424,670; 6,983,001;
D517,474; 7,060,934
OTHER U.S. AND INTERNATIONAL PATENTS PENDING.
221-0065-0
221-0002-0
VersaLASER VLS3.60, VLS4.60 and VLS6.60 Back View
Laser system and labels are not to scale
Link to Table of Contents
301
User Guide
ULS Reference Guide Book
EU Declaration of Conformity
Product Identification:
VLS2.30, VLS 3.50, VLS3.60, VLS4.60, VLS6.60, PLS3.75, PLS4.75, PLS6.75, PLS6.150D, ILS9.75, ILS9.150D, ILS12.75 and ILS12.150D
Laser Engraving and Cutting Systems
Manufacturer:
Universal Laser Systems, Inc.
16008 N. 81st St.
Scottsdale, AZ 85260
USA
European Office:
Universal Laser Systems GmbH
Lerchenfelder Guertel 43
A-1160 Vienna/Austria
The manufacturer hereby declares that the equipment specified below
is in conformity with the following directives:
89/336/EEC
73/23/EEC
98/37/EEC
2002/95/EEC
2002/96/ECC
(EMC Directive)
(Low Voltage Directive)
(Machinery Directive)
(ROHS Directive)
(WEEE Directive)
based on the standards listed.
Standards Used:
Safety:
EN 60950: 2002
EN 60825-1: 2002 (Class 3R)
EMC:
EN 55024 1998 (Class A)
EN 55022: 2003 (Class A)
EN 61000-3-2: 2001 (class A)
EN 61000-3-3: 2002
EN 61000-4-2: 2001 (4kV CD, 8kV AD)
EN 61000-4-3: 2003 (3 or 10 V/m)
EN 61000-4-4: 2002 (1 or 2 kV power line)
EN 61000-4-5: 2001 (class 3)
EN 61000-4-6: (3 or 10Vrms)
EN 61000-4-8
EN 61000-4-11
Note: This is not a declaration of conformity. The importer of this
equipment supplies the declaration of conformity.
CAUTION: This is a Class A product. In a domestic environment,
this product may cause radio interference, in which case the
user may be required to take adequate measures.
Link to Table of Contents
309
User Guide
ULS Reference Guide Book
FCC Compliance
This ULS laser system has been tested and found to comply with Federal Communication Commission (FCC) directives
regarding Electromagnetic Compatibility (EMC). In accordance with these directives, ULS is required to provide the
following information to its customers.
FCC Compliance Statement and Warnings
This device complied with FCC Rules Part 15. Operation is subject to the following two conditions:
1. This device may not cause harmful interference, and
2. This device must accept any interference received, including interference that may cause undesired operation.
This equipment has been tested and found to comply with the limits for a Class A digital device as set forth in Part 15 of
the FCC Rules. These limits are designed to provide reasonable protection against harmful interference when the
equipment is operated in a commercial environment. This equipment generates, uses and can radiate radio frequency
energy and, if not installed and used in accordance with manufacturer’s instructions, may cause harmful interference
to radio communications. Operation of this equipment in a residential area is likely to cause harmful interference, in
which case the user will be required to correct the interference at his or her own expense.
Users should be aware that changes or modifications to this equipment not expressly approved by the manufacturer
could void the user’s authority to operate the equipment.
This equipment has been type tested and found to comply within the limits for a Computing Device per FCC part 15,
using shielded cables. Shielded cables must be used in order to insure compliance with FCC regulations.
Recycling
By placing the above symbol on our products and accessories, Universal Laser Systems is indicating that we are
committed to helping reduce the amount of waste electronics ending up in municipal landfills. Therefore, Universal
Laser Systems urges consumers to recycle this product and its accessories. Universal Laser Systems is equipped to
recycle any of its electronic products and accessories and will assist our customers with their recycling options. To
arrange for recycling of your ULS product or accessory, please contact Universal Laser Systems for more information
at 480-609-0297 (USA), +43 1 402 22 50 (Austria), +81 (45) 224-2270 (Japan) or e-mail us at [email protected].
Link to Table of Contents
310
www.ulsinc.com
050-3220-00-A REV0709