1
APRS©
Set up instructions for:
Kenwood TM-D710 A/E
Kenwood TM-D700 A/E
Kenwood TH-D7 A/E
Set up instructions for:
Geosat 5 APRS
Geosat 5 blu APRS
with the following devices:
Kenwood TM-D710 A/E
Kenwood TM-D700 A/E
Kenwood TH-D7 A/E
1.
Introduction
APRS is a method for sending and receiving position and other information over a radio transceiver.
The Geosat 5 is ready to accept APRS inputs from a radio transceiver, and to provide fix position
output data to the transceiver in order to transmit your current position.
The Geosat 5 comes with a cable that is pre-wired for use with designated Kenwood radios. The
input/output port used for APRS is the same port that is used for TMC, and is labeled TMC on the
back of the Geosat 5. Due to the multi-use of the TMC port, it is not possible to operate APRS and
TMC simultaneously.
Set-up for Kenwood TM-D710 A/E
with the AvMap Geosat 5
1.
Kenwood TM-D710 A/E Radio set-up
NOTE: These instructions assume you have basic familiarity with operation of both the TM-D710 A/E
and the AvMap Geosat 5.
a.
b.
c.
d.
e.
Turn the radio ON.
Press the “F” key to access the Setup Menu.
Press the MHZ knob.
Turn knob to select APRS.
Press the MHZ knob again enter the menu selection mode
Basic Setting Menu #600
a. Enter your call sign.
b. Set Beacon Type to APRS.
c. Turn the MHZ knob to scroll through menus.
Internal TNC Menu # 601
a. Do not make any changes. Leave all settings at “Default.” Be sure that 1200 Bps is selected
GPS Port Menu #602
a. Change the Baud Rate to “9600”
b. Set the Input to “GPS”
c. Set the Output to “Waypoint”
Waypoint Format Menu # 603
a. Set Format to “Kenwood”
b. Change NAME to “9-CHAR”
c. The Output setting should be set to “ALL”
Beacon Information Menu # 606
a. Speed setting should be turned ON
b. Altitude setting should be turned ON
c. Position Ambiguity should be turned OFF
Beacon TX Algorithm Menu # 611
a. Set the Method to “Auto”
b.
c.
d.
e.
Press ESC to return to the main page
Change the APRS Frequency to: 144.390
Select TNC and press to turn on APRS 12
Press “BCON” to turn on -- BCON will appear in the upper right corner The Kenwood Radio is
now ready to interface with the Geosat 5.
2.
Geosat 5 Setup
3.
Making it all work!
a.
b.
c.
d.
e.
f.
Turn your Geosat 5 ON and press the MENU key
Select “Settings” at the bottom of the menu
Select “User Preferences”
Touch the blue NEXT arrow to proceed to USER PREFERENCES 2/2
Touch the INTERFACE button to go to the INTERFACE page
On the INTERFACE page Select APRS 9600. It is highly recommended that you CYCLE the APRS
9600 to APRS 4800 then back to APRS 9600 to insure that the Interface is locked to APRS 9600.
This is highly recommended after any software updates.
g. Select “OK” at the bottom right of the page The Geosat 5 is now setup and ready to interface with
the Kenwood.
a. Make sure both the Kenwood TM-D710 and AvMap Geosat 5 are turned OFF!
b. Connect the four pole 2.5mm communication cable end to the Geosat 5’s TMC receptacle and
the three pole 2.5 mm end to the D710’s GPS receptacle. IMPORTANT! These are easily reversed
and hooked up backwards…also…when connecting to the Geosat 5 make sure you plug into the
TMC receptacle…not the ANT receptacle which is right next to it and the same size! Check for a
good click into the unit.
c. NOW POWER UP BOTH UNITS!
CAUTION! If you interface the units and do not see a flashing “GPS” signal on the upper right hand
corner of the Kenwood, then the APRS cable may not be plugged-in all the way or correctly. Please
check that the cord is plugged into the proper ports and plugged-in all the way. To ensure the APRS
is plugged-in to the Geosat 5 all the way, press the cord again (may make a clicking noise 2 times).
Also verify that the Geosat 5 is receiving a GPS fix.
Once your Geosat 5 and radio are working properly together, you will see an indication on the radio
(if it provides such) that it is receiving GPS position data. In addition, as the radio provides position
information to the Geosat 5, stations will be plotted on the screen. Depending upon the location of
plotted stations, you may need to expand the scale of the map, or translate the map to a different
location in order to see them. You can also verify this in the CONTACTS folder, subfolder APRS. The
Geosat 5 will detect whether a station is moving based on the data received from that station.
If the Geosat 5 computes that a station is moving, it will be plotted as a red triangle with a call sign
label. Stationary stations are plotted as a blue circle with a call sign label. To remove all APRS marks,
enter the APRS folder you will have the option then to delete the folder. Once the folder is deleted,
all APRS marks will be removed and the folder will be gone. When the first APRS mark is created,
the Geosat 5 will create a new APRS labeled folder. To navigate to an APRS mark, select the desired
APRS mark from the list and then press GO. You will get new routing instructions from the selected
APRS mark when a new reposition packet is received.
Set-up for Kenwood TM-D700 A/E
with the AvMap Geosat 5
1.
Kenwood TM-D700 A/E set-up
NOTE: These instructions assume you have basic familiarity with operation of both the TH-D700 A/E
and the AvMap Geosat 5.
a. While programming the Kenwood TM-D700 and/or the AvMap Geosat 5, the communication cable
should be disconnected. Strange and/or bad things can occur if you fail to head this warning!
b. Starting with the Kenwood TM-D700. Note: Items in [ ] are buttons and { } are items you enter
and/or ‘see’ on the radio screen.
c. Turn on the radio.
d. Make sure that {T}, {CT} and {DCS} do not appear at the top of your Kenwood TM-D700 screen,
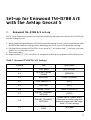
Table 1. Kenwood TM-D700 A/E Settings
Screen #
Item
Select/Enter
3-1
CALL SIGN
{your call sign}
3-2
GPS UNIT- NEMA
FORMAT
{NEMA96}
3-3
WAYPOINT
{9 DIGITS NEMA}
3-5
POS AMBIGUITY
{OFF}
3-7
POS LIMIT
{OFF}
3-B
PACKET PATH
{WIDE1-1,WIDE2-2}
3-C
PACKET TRANSMIT
METHOD
{AUTO}
3-D
PACKET TRANSMIT
INTERVAL
{3 MIN.} NOTE: Smaller times
(<5min) are for mobile units while
stationary stations will use longer
times (~10 min. and up)
3-J
PACKET TRANSFER
RATE
{1200 bps}
if they do press the [TONE] button until none of these appear.
e. Press the menu button [MNU] and use the control knob to get to the APRS setup menu {APRS
3-X} (the X here can be any letter or number) and press the [OK] button to select/enter.
f. Use the [é] and [ê] buttons to go to different screens in the APRS menu and the [OK] button to
select/enter that particular screen.
g. Once you make your selection and/or entry push the [OK] button again to save the selection/
entry. Then go back to ‘f.’ above to get to the next APRS screen and enter all the Table 1 settings
below.
h. Press the [ESC] button to leave the APRS setup screen and return the D700 user screen.
i. You can now power down the radio and it will keep your settings.
2.
AvMap Geosat 5 set-up
3.
Making it all work!
a. While programming the AvMap Geosat 5 and/or the Kenwood TM-D700, the communication
cable should be disconnected. Strange and/or bad things can occur if you fail to head this
warning!
b. Items in [ ] are buttons and/or knobs and { } are items you enter/see on the Geosat 5 screen.
c. Begin by pressing the [Page] button to turn the Geosat 5 on.
d. After the “Welcome on board” On the {WARNING} page press [Accept] auto selects accept after
5 seconds
e. On the {MAIN MENU} page press [SETTINGS]
f. On the {SETTNGS} page press [User Preferences]
g. On the {USER PREFERENCES} page press [Interface]
h. Press [=>] to go to 2/2 page.
i. On the {INTERFACE} page press [APRS 9600] radial button 9600 seems to work best for the
Kenwood APRS radios
j. On the {INTERFACE} page press [OK]
k. On the {USERPREFERENCES} page press [OK]
l. On the {SETTINGS} page press [MAP]
a. Make sure both the Kenwood TM-D700 and AvMap Geosat 5 are turned OFF!
b. Connect the four pole 2.5mm communication cable end to the Geosat 5’s TMC receptacle and
the three pole 2.5 mm end to the D700’s GPS receptacle. IMPORTANT! These are easily reversed
and hooked up backwards; also when connecting to the Geosat 5 make sure you plug into the
TMC receptacle, not the ANT receptacle which is right next to it and the same size! Check for a
good click into the unit.
c. NOW POWER UP BOTH UNITS!
d. If your Kenwood D700 powers up in VFO mode (voice communications) push and hold the [F] button
for 1 second and then push the [TNC] button. This will place your D700 in {TNC APRS} mode.
e. GEOSAT 5. After the “Welcome on board” greeting use the [cursor knob] to select {YES} when
asked about the {Would you like to drive in Passenger Mode?}.
f. DOES IT WORK?? You will know you have done it right when you see {GPS} blinking at the top
of your D700 screen and {1200} just to the right of that constantly on. The blinking GPS means
that your GEOSAT 5 is ‘TALKING’ to your D700!
g. To begin transmitting your position push and hold the [F] button for 1 second and then push the
[Beacon] button.
Set-up for Kenwood TH-D7 A/E
with the AvMap Geosat 5
1.
Kenwood TH-D7 A/E set-up
NOTE: These instructions assume you have basic familiarity with operation of both the TH-D7 A/E
and the AvMap Geosat 5.
a. While programming the Kenwood TH-D7 and/or the AvMap Geosat 5, the communication cable
should be disconnected. Strange and/or bad things can occur if you fail to heed this warning!
b. Starting with the Kenwood TH-D7. Note: Items in [ ] are buttons and { } are items you enter
and/or ‘see’ on the radio screen.
c. Push the [Power] button to turn the radio on.
Table 1. Kenwood TH-D7 A/E Settings
The following APRS menu
selections must be selected and/
or filled in for proper TH-D7A/E
- Geosat 5 operations. Screen #
Item
Select/Enter
2-1
CALL SIGN
{your call sign}
2-2
GPS UNIT
{NEMA96}
2-3
WAYPOINT
{9digits NEMA}
2-5
POS AMBIGUITY
{OFF}
2-7
POS LIMIT
{OFF}
2-B
PACKET PATH
{WIDE1-1,WIDE2-2}
2-C
DATA TX
{AUTO}
2-D
PACKET TRANSMIT
INTERVAL
{3 MIN.} NOTE: Smaller times
(<5min) are for mobile units while
stationary stations will use longer
times (~10 min. and up)
2-N
PACKET SPEED
{1200 bps}
d. Make sure that {T} and {CT} do not appear at the top of your D7A screen, if they do press the [F]
button then [BAL] button to turn [T] off or the [F] button then [POS] button to turn off [CT].
e. Press the [MENU] button and use the [Control Pad] (the top or bottom of the large round key
pad on the left middle side of the D7A) to get to the APRS setup menu {APRS 2-X} (the X here
can be any letter or number) and press the [OK] button (the right side of the [Control Pad]) to
select/enter. Then use the [Control Pad] again to choose the APRS screen you desire and press
[OK] to select/enter.
f. Press the [ESC] button twice to leave the APRS setup screen and return the D7A user screen.
g. You can now power down the radio and it will keep your settings.
2.
AvMap Geosat 5 set-up
3.
Making it all work!
a. While programming the AvMap Geosat 5 and/or the Kenwood TH-D7, the communication cable
should be disconnected. Strange and/or bad things can occur if you fail to head this warning!
b. Items in [ ] are buttons and/or knobs and { } are items you enter/see on the Geosat 5 screen.
c. Begin by pressing the [Page] button to turn the Geosat 5 on.
d. After the “Welcome on board” greeting, on the {WARNING} page, press [Accept] (the navigator
automatically selects accept after 5 seconds).
e. On the {MAIN MENU} page press [SETTINGS].
f. On the {SETTINGS} press [User Preferences]
g. On the {USER PREFERENCES} page, press [Interface]
h. Press [è] to go to page 2/2
i. On the {INTERFACE} page, press the [APRS 9600] radial button. 9600 seems to work best for the
Kenwood APRS radios
j. On the {INTERFACE} page, press [OK].
k. On the {USER PREFERENCES} page pres [OK].
l. On the {SETTINGS} page press {MAP}.
a. Make sure both the Kenwood TH-D7 and AvMap Geosat 5 are turned OFF!
b. Connect the four pole 2.5mm communication cable end to the Geosat 5’s TMC receptacle and
the three pole 2.5mm end to the D7A’s GPS receptacle. IMPORTANT! These are easily reversed
and hooked up backwards; also when connecting to the Geosat 5 make sure you plug into the
TMC receptacle, not the ANT receptacle which is right next to it and the same size!
c. NOW POWER UP BOTH UNITS!
d. Make sure the D7A is on the two meter band and the channel is set to 144.390.
e. OK here we go! Press the [TNC] button on the D7A. This will open the {TNC} of your D7A and
communications between the Geosat 5 and D7A should now begin. NOTE: Make sure that the
radio isn’t in [TNC PACKET] mode.
f. DOES IT WORK?? Press the [POS] button. This will bring up the coordinates screen. IF the
Geosat 5 is talking to the D7A you should see the (degrees, periods and commas) blinking…if
they are not blinking you are NOT communicating. Press the [POS] button again to return to the
normal user screen.
10
AvMap s.r.l.
Via Caboto, 9 - 54036
Marina di Carrara (MS) - Italia
[email protected]