1
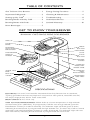
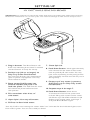
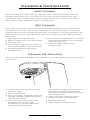
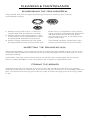
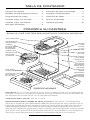
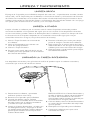
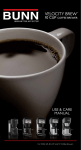
MY CAFÉ
SINGLE SERVE
POD BREWER
USE & CARE
MANUAL
For use with MC
®
MY CAFÉ
SINGLE SERVE
®
POD BREWER
BREW BETTER WITH PODS AND MY CAFÉ
Every BUNN ® brewer is designed to brew better, not bitter.
The BUNN My Café Single Serve Pod Brewer brings you the coffee experience
you expect from BUNN, plus the added benefit of pods!
fresh coffee aroma
Open a pod and enjoy fresh coffee aroma
even before brewing begins.
better taste
Unlock rich coffee flavor from your pods with our
Patented Jet Action Sprayhead.
incredible variety
Select from hundreds of coffee and tea pods.
better for the environment
Feel good about pods – they’re compostable and they use
less packaging than other single serve formats.
Find pods and accessories at
bunn.com & mycafe.com
TABLE OF CONTENTS
Get To Know Your Brewer........................ 1
Energy Saving Functions............................ 5
Important Safeguards................................ 2
Cleaning & Maintenance........................... 6
Setting up My Café®.................................. 3
Troubleshooting.......................................... 8
Brewing Better with My Café................... 4
Authorized Service..................................... 9
Brewing Better with Pods......................... 5
Limited Warranty......................................10
More Beverages......................................... 5
GET TO KNOW YOUR BREWER
BUNN MY CAFÉ SINGLE SERVE POD BREWER
spin lid
POUR-IN
BOWL
BREW
BUTTON
PATENTED
JET ACTION
sprayhead
INDICATOR
LIGHT
POD DRAWER
snap-in
screen
PULSE
BUTTON
DRAWER
GUIDES
STAINLESS
STEEL HOT
WATER TANK
STAINLESS
STEEL
BACK SPLASH
TRAVEL MUG
BASE
DRIP TRAY
COVER
removable
drip tray
specifications
electrical : UL and C-UL Listed for Household Use Only. Brewer has an attached,
3-prong grounded cord set and requires 2-wire service with ground, rated 120 volts AC,
11.9 amps, single phase, 60 Hz. Total watts 1425.
brew capacity : 4 to 14 oz. cup.
high altitude programming : Water boils at a lower temperature in high altitude
environments (over 4,000 feet). To program My Café for use at high altitude, push the
Pulse Button 5 times (in under 10 seconds). The Indicator Light will flash green 5 times,
indicating that the brewer is programmed for high altitude use. To return My Café to normal
operation, push the Pulse Button 5 times (in under 10 seconds). The Indicator Light will now
flash red 5 times, indicating that the brewer is programmed for normal use.
1
IMPORTANT SAFEGUARDS
Follow basic safety precautions when using electrical appliances to reduce the risk of fire,
electric shock, and/or personal injury:
• Do not use brewer for any purpose other
than its intended use.
• Do not insert or remove Pod Drawer
while brewing. Press brew button to stop
or cancel a brew cycle.
• Do not pour any liquid into the water tank
other than water or vinegar for cleaning,
as specified in this manual.
• Do not clean brewer with cleansers, steel
wool pads, or other abrasive materials.
• When brewer is not in use, keep lid in the
closed position.
• To avoid cup overflow, empty cup before
each brew cycle.
• Never place hands directly under Pod
Holder. Hot water and steam can be
present.
• Always use a cup that is larger than the
amount of water poured into the brewer.
• Keep hands away if cup overflows.
• Pour in cold water only.
• Do not place torn pods, coffee grounds or
loose tea in Pod Drawer.
• Do not place objects in Pod Drawer other
than coffee or tea pods or tea bags.
• READ ALL INSTRUCTIONS.
• Do not touch hot surfaces. Use handles.
• Do not place cord, plugs, or brewer in
water or other liquids.
• Do not open lid during brewing.
• Close supervision is necessary when
brewer is used by or around children.
• Unplug brewer when not in use for
extended periods and before cleaning.
Let brewer cool before removing or
replacing parts, and before cleaning.
• Do not operate brewer with a damaged
cord or plug or if the brewer malfunctions
or is damaged in any way. Return brewer
to an Authorized Service Facility for
examination, adjustment or repair (see
page 9).
• Using an accessory not evaluated for use
with this brewer may cause injury.
• For indoor household use only.
• Do not let cord hang over edge of table
or counter or touch hot surfaces.
• Do not place brewer on or near a hot gas
or electric burner or in a heated oven.
note : The short power-supply cord supplied reduces the risk of becoming entangled in or tripping
over a longer cord. If an extension cord is used, its marked electrical rating must be at least as great
as the electrical rating of the brewer. Make sure the extension cord does not hang over the edge of a
table or counter and that it cannot be pulled on by children or tripped over. The extension cord must
be a 3-wire cord of the 3-prong, 3-socketed, grounding type (including grounding conductor).
save these instructions
Record the Date Code before using (located
on the lower back of your brewer).
WARNING
RISK OF FIRE OR ELECTRICAL SHOCK
date code : TO REDUCE RISK OF FIRE OR ELECTRIC SHOCK
DO NOT DISASSEMBLE THE BREWER
NO USER-SERVICEABLE PARTS INSIDE
REPAIR SHOULD BE DONE BY AUTHORIZED
SERVICE PERSONNEL ONLY
Questions?
Visit www.bunn.com or call
USA 1-800-352-BUNN (2866)
Canada 1-800-263-2256
This symbol alerts
you to important
operating and
service instructions.
Please have your Model and Date Code
ready when calling for service.
2
This symbol alerts
you to the risk of fire
or electric shock in the
accompanying message.
SETTING UP
MY CAFÉ® SINGLE SERVE POD BREWER
important : My Café has an internal hot water tank that must be filled with water before brewing.
Fill the Pour-in Bowl and run 2-3 brew cycles. The machine will begin to heat and be ready to brew.
1. Plug in brewer. The Brew Button will
flash red, indicating that water is needed
and the brewer is ready for set-up.
7. Close Spin Lid.
8. Push Brew Button. Wait approximately
two minutes for the internal hot water
tank to partially fill with water. You may
hear some squeaking as the pump primes.
This is perfectly normal and will only occur
during setup.
2. Position cup (14 oz. or larger) on
Drip Tray under Pod Drawer.
Do not brew directly into untempered
glass or plastic cups/glasses. Use only
heat-resistant vessels.
9. Empty cup if any water is present,
then place cup on Drip Tray under
Pod Drawer.
3. Place empty Pod Drawer into
Drawer Guides and push in to
lock into place. The Pod Drawer must
be locked into place before brewer
will operate.
10. Repeat steps 4 through 7.
11. Push Brew Button. Wait about
2 minutes for internal hot water tank
to finish filling with water. Excess water
will fill the cup. If the Brew Button is still
flashing red, repeat steps 4 through 7
and push Brew Button again.
4. Fill a container with 14 oz. of
cold water.
5. Open Spin Lid on top of brewer.
6. Fill Pour-in Bowl with water.
Your My Café is now heating the water. Wait 2 to 3 minutes for the indicator light to turn
from red to green. You are now ready to brew!
3
BREWING BETTER
MY CAFÉ® SINGLE SERVE POD BREWER
1. Press down on the button located on top of Pod Drawer
handle and pull Pod Drawer out along the Drawer Guides.
2. Place coffee or tea pod in Pod Drawer cavity.
Center pod in holder and gently press the pod completely into the
Pod Drawer cavity. Ensure that pod is fully seated.
3. Slide Pod Drawer into Drawer Guides and push in to lock
into place.
Pod Drawer must be locked into place before brewer will operate.
4. Open Spin Lid on top of brewer.
5. Using your preferred cup, fill Pour-In-Bowl with desired
amount of water (minimum 4 oz., maximum 14 oz.).
Note: the cup positioned on Drip Tray and under the Pod Drawer
must be larger than the amount of water used.
6. Close Spin Lid on top of brewer and position cup on
Drip Tray under Pod Drawer.
Note: be sure cup is heat resistant.
7. For regular brew, push the Brew Button.
For bolder brew or for tea, push the Pulse Button to set the pulse
feature and then push the Brew Button.
8. At end of brew cycle, remove cup from Drip Tray.
Dispose of used pod by removing the Pod Drawer (see #1) and
flipping the pod into a waste container. Do not touch hot pod!
IMPORTANT: Distilled water is not recommended for brewing coffee as it lacks the minerals to bring out the
natural flavors of coffee. Some common bottled water may also be too purified. If you want to use bottled water,
look for words like “filtered”, “spring water”, “mineral water” or “drinking water”. Avoid using bottled water with
words like “purified”, “distilled” or “mineral free”. Your BUNN My Café brewer may not function with water that
has insufficient mineral content.
4
BREWING BETTER
WITH PODS
The My Café® Single Serve Pod Brewer precisely controls brewing temperature and
time to extract superior flavor from your favorite coffee and tea pods. Pods typically
range in weight from 6 to 12 grams or more, so experiment with different amounts of
water and a variety of pod weights to create your perfect cup.
• Start with your favorite pod and 8 ounces of water.
• For a bolder cup, use less water or a heavier pod.
• For a weaker cup, use more water or a lighter pod (it contains less coffee) with the same
amount of water.
note : Too much water and too little coffee can lead to over-extraction of the grounds
and a bitter taste.
• Use the Pulse Button to steep tea pods or for bolder coffee flavor.
For more information on pods, visit mycafe.com
MORE BEVERAGES
• Use My Café to dispense hot water for hot cocoa and other beverages. Just leave the pod
or tea bag out of the Pod Drawer and press Brew. Use caution, the dispensed water will be
approximately 200°F.
• Brew iced coffee and tea by brewing over a cup filled with ice (make sure cup is resistant
to both hot and cold). After brewing, add milk and/or your favorite sweetener.
ENERGY SAVING FUNCTIONS
• After 6 hours idle, the temperature inside the stainless steel hot water tank drops to 140°F.
It takes about 1 minute to get back to an optimal brewing temperature of about 200°F.
• After 26 hours idle, My Café enters sleep mode. It takes about 2 minutes to return to
optimal brewing temperature (about 200°F).
• When Pod Drawer is removed or inserted, or if any button is pushed, the brewer exits
energy saver/sleep mode and begins to heat up to optimal brewing temperature. When
the indicator light is green, your brewer is ready to use.
5
CLEANING & MAINTENANCE
basic cleaning
Rinse the Pod Drawer after each use – especially when switching between coffee and
tea pods. Pod Drawer, Drip Tray and Drip Tray Cover are top rack dishwasher safe.
Occasionally wipe outside of the brewer, including the Drip Tray and Drip Tray Cover,
with a mild, no citrus added dish soap and a damp cloth.
deep cleaning
Deep clean your brewer at least every 3 months. Mineral deposits may accumulate due
to impurities in the water used to brew. If deposits are not removed, they can impair the
operation of the brewer and reduce product life. The frequency of cleaning depends on the
mineral content of your water (the higher the mineral content, the more often you should
deep clean).
1. Open Spin Lid on top of brewer.
6. Run at least two additional 14 oz. cycles of
water through brewer to flush remaining
vinegar from brewer.
7. Follow the steps below to clean
the Sprayhead.
2. Fill Pour-in Bowl with 14 oz. white vinegar.
3. Close Spin Lid.
4. Place empty cup (greater than 14 oz.) on
the Travel Mug Base or Drip Tray Cover.
5. Push Brew Button to cycle vinegar
through brewer.
cleaning the sprayhead
Mineral deposits and loose coffee or tea granules may clog the Sprayhead, causing the brew
cycle to slow.
1. Unplug the brewer and allow it to cool
CAUTION: If the Sprayhead and seal are
separated, they must be reassembled.
Improper reassembly could result in injury
from scalding water
5. With your fingers, rotate Sprayhead
counter-clockwise until finger tight.
6. Replace Pod Drawer.
7. Plug in brewer to restore power.
(minimum 1 hour).
2. Remove Pod Drawer.
3. Using your fingers, rotate the Sprayhead
assembly clockwise until the Sprayhead
and seal are removed.
4. Clean Sprayhead and seal with mild
detergent and rinse thoroughly.
A toothpick may also be used to clear
debris from Sprayhead holes.
6
CLEANING & MAINTENANCE
reassembling the sprayhead/seal
If Sprayhead and seal are separated during removal or cleaning, they must be
reassembled properly.
1. Identify the top of the seal – it will have
Make sure it is completely in the channel.
When properly assembled, the Sprayhead
will slide easily into the channel of the
seal and will not cause any buckles in the
surface of the seal.
rough ridges and the bottom is smooth
2. Identify the top of the Sprayhead – it has
a star pattern and a threaded hole where
the Sprayhead attaches to the brewer.
3. While carefully stretching the seal, guide
the Sprayhead into the channel of the seal.
CAUTION: Improper reassembly could
result in personal injury from hot water.
inspecting the sprayhead seal
When disassembling your brewer for cleaning, inspect the Sprayhead seal for cracks, tears
and holes. Although the seal should last for an extended period of time, damage can occur
through handling.
CAUTION: The seal confines hot liquid to the Pod Drawer. If damaged, call Customer
Service at 800-352-2866 or visit www.bunn.com to obtain a replacement seal.
storing the brewer
Unplug the brewer and wait for it to cool. It must be stored above 32°F/0°C to prevent
damage to the internal water tank. If you do not use your brewer for an extended period of
time, we recommend running two to three cycles of water through prior to brewing coffee
or tea.
7
TROUBLESHOOTING
problem
suggestions
Brew Button
Flashes Red
• Internal hot water tank must be filled with water. See Setting up
My Café® on page 3.
Brew Button
is Red
• Your machine is brewing. Press the Brew Button again to stop the
brew process.
Indicator Light
is Green
• Water is hot and ready to brew.
Indicator Light
is Red
• Water is heating.
Indicator Light
Flashes Red
• The Brew Button was pressed but the water is heating. Wait
for indicator light to turn green and press Brew Button again.
Indicator Light
Flashes Green
• Add water. NOTE: Make sure that a cup is positioned on the Drip Tray
under the Pod Drawer prior to pushing Brew Button.
• If water with low mineral content such as distilled water is used, the
sensors may not detect the water. Tip the brewer to drain the water
out of the Pour-In Bowl and add tap water, drinking water or bottled
water with a higher mineral content. Refer to page 4 for more information on water used for brewing.
Indicator Light
Flashes Red
and Green
• Pod Drawer is not fully inserted. Press in the Pod Drawer to lock
into place.
Pulse Button
is Red
• The Pulse option is activated. Press the Pulse Button again
to deactivate.
Brewer doesn’t
turn on
• Make sure brewer is plugged into a working outlet.
• Press Brew Button to begin brew (Brew Button will be illuminated).
Coffee/tea is
not brewing
• Make sure brewer is plugged into a working outlet.
• Make sure brewer is filled with water. The hot water tank needs to be
filled to begin brewing (indicator light will flash green). See Setting up
My Café on page 3.
• Make sure Pod Drawer is fully inserted (the indicator light will
alternately flash red and green if it is not fully inserted).
• If indicator light flashes red, brewer is heating water to proper brew
temperature in approximately 2 minutes. When the light is green, press
Brew Button.
• Press Brew Button to begin brew (Brew Button will be illuminated).
Brew is weak
• Pod should be fully seated in Pod Drawer cavity for maximum
flavor extraction.
• The amount of water used for brewing may be too large for the pod’s
weight. Try using a heavier pod or less water.
• Try using the Pulse Button to extend the water to coffee contact time.
8
TROUBLESHOOTING
problem
suggestions
Takes too long
to brew
• Mineral deposits may be present in your brewer. See Deep Cleaning
and Cleaning the Sprayhead on page 6.
Brewer only
brews water
• Make sure a pod is in the Pod Drawer.
Water speed
varies during
brew
• The Pulse Brew Button has been pressed. During the brew, water
flow will vary to properly steep tea or for stronger coffee.
Water leaks
out around the
Sprayhead
• The Sprayhead may be clogged, loose or the seal may be damaged.
Please refer to Cleaning the Sprayhead, Reassembling the Sprayhead/
Seal and Inspecting the Sprayhead Seal on pages 6 and 7.
The Pod Holder • The pod in the Pod Drawer may be swelled to a point where the
will not come out drawer does not slide out easily. Wait 10 minutes for the pressure to
drop and try carefully removing the Pod Drawer again.
of the brewer
Water leaks
out around the
Pod Drawer
• Make sure the pod is fully seated in the Pod Drawer cavity.
Off taste is
detected
• Perform Basic Cleaning and Deep Cleaning on page 6.
• Remove used pods from pod drawer after each brew. Do not leave
used pods in the pod drawer for extended periods of time.
note : Do not disassemble. There are no user serviceable parts inside the brewer.
AUTHORIZED SERVICE
www.bunn.com
bunn - o - matic ® corporation
in the united states :
1400 Stevenson Drive, Springfield, IL 62703
900 E. Townline Rd., Creston, Iowa 50801
1-800-352-BUNN (2866)
in canada :
280 Industrial Parkway S., Aurora, Ontario L4G 3T9
1-800-263-2256
To receive full assistance, have the Model and Date Code
(located on the back of your brewer) ready when calling.
9
LIMITED WARRANTY
Bunn-O-Matic® warrants the My Café® Single Serve Pod Brewer to be free from defects in
materials and workmanship existing at the time of manufacture and appearing within one of
the following warranty periods:
a) Two (2) years from the date of original purchase of a NEW BREWER.
b) The later of two (2) years from the date of original purchase or one (1) year from the
date REPAIRED OR REPLACEMENT BREWER is received by the customer when
returned to Bunn-O-Matic before the new Brewer warranty has expired.
c) One (1) year from the date REPAIRED OR REPLACEMENT BREWER is received by
the customer when returned to Bunn-O-Matic after the new Brewer warranty
has expired.
d) One (1) year from the date of purchase of a REMANUFACTURED BREWER.
If such a defect appears during the warranty period, we will (at our sole option) repair
or replace the defective Brewer with no charge for service or parts, provided Brewer is
delivered at the customer’s expense to one of the authorized service centers listed on page
9 of this booklet.
Warranty does not cover claims resulting from misuse, failure to follow instructions on
installation and use, equipment failure due to poor water quality, neglect, use of
unauthorized attachments, commercial use, use on a current or voltage other than
specified on the Brewer, or unauthorized service during the warranty period on conditions
otherwise covered by warranty.
THIS WARRANTY SHALL BE EXCLUSIVE AND SHALL BE IN LIEU OF ANY OTHER
EXPRESS WARRANTY, WRITTEN OR ORAL, INCLUDING BUT NOT LIMITED TO
ANY EXPRESS WARRANTY OF MERCHANTABILITY OR FITNESS FOR A PARTICULAR
PURPOSE. THE DURATION OF ANY IMPLIED WARRANTIES, INCLUDING BUT NOT
LIMITED TO ANY IMPLIED WARRANTIES OF MERCHANTABILITY OR FITNESS FOR A
PARTICULAR PURPOSE, IS EXPRESSLY LIMITED TO THE PERIOD OF DURATION OF
THIS LIMITED WARRANTY.
Some states do not allow time limitations on how long implied warranty lasts, so the above
limitation may not apply to you.
THE CUSTOMER’S EXCLUSIVE REMEDY FOR BREACH OF THIS WARRANTY OR OF
ANY IMPLIED WARRANTY OR OF ANY OTHER OBLIGATION ARISING BY OPERATION
OF LAW OR OTHERWISE SHALL BE LIMITED AS SPECIFIED HEREIN TO REPAIR OR
REPLACEMENT, AT OUR SOLE OPTION. IN ANY EVENT, RESPONSIBILITY FOR SPECIAL,
INCIDENTAL, AND CONSEQUENTIAL DAMAGES IS EXPRESSLY EXCLUDED.
Some states do not allow the limitation or exclusion of incidental or consequential damages,
so the above limitation or exclusion may not apply to you.
This warranty gives you specific legal rights; you may have other rights, which vary from
state to state.
The UL rating applies to use in a residential environment only. Warranty is void if machine is
used in a commercial setting.
The BUNN logo is a trademark of Bunn-O-Matic Corporation.
43460.0000B 03/11©2010 BUNN-O-MATIC CORPORATION
www.bunn.com
10
MY CAFÉ
®
CAFETERA DE
PORCIÓN INDIVIDUAL
Manual de uso
y cuidado
Para uso con MC
MY CAFÉ
®
CAFETERA DE
PORCIÓN INDIVIDUAL
CUELE MEJOR CON BOLSITAS Y MY CAFÉ
Cada cafetera BUNN ® está diseñada para colar mejor, sin amargar.
¡La cafetera BUNN My Café Porción Individual, te da la experiencia con café
esperada de BUNN, con el beneficio extra de las bolsitas!
fresco aroma a café
Abra una bolsita y disfrute del fresco aroma a café,
inclusive antes de comenzar a colar.
mejor sabor
Libere el delicioso sabor a café de sus bolsitas con nuestra
Cabeza Roceadora de Presión Patentada.
una increíble variedad
Escoja entre cientos de bolsitas de té y café.
mejor para el medioambiente
Se sentirá bien respecto a las bolsitas – son biodegradables y usan
menos empaque que otros formatos de porciones individuales.
Encuentre bolsitas y accesorios en
bunn.com y mycafe.com
TABLA DE CONTENIDO
Conozca su cafetera................................... 1
Funciones de ahorro de energía.............. 5
Medidas de Seguridad Importantes........ 2
Limpieza y Mantenimiento........................ 6
Programando My Café®........................... 3
Detección de Fallas.................................... 8
Colando mejor con My Café.................... 4
Servicio Autorizado................................... 9
Colando mejor con bolsitas...................... 5
Garantía Limitada.....................................10
Más tipos de bebidas................................. 5
CONOZCA SU CAFETERA
BUNN MY CAFÉ CAFETERA PARA BOLSITAS DE PORCIÓN INDIVIDUAL
TAPA giratoria
contenedor
para verter
BOTÓN
PARA
COLAR
CABEZA
ROCEADORA
DE PRESIóN
PATENTADA
LUZ
IDICADORA
cajoncillo
para bolsita
BOTÓN
A PULSO
Colador
ajustado
LíNEAS
GUíA PARA
CAJONCILLO
TANQUE
DE ACERO
INOXIDABLE
PARA AGUA
CALIENTE
Pared de
acero
inoxidable
Base para
taza portátil
PROTECTOR
DE CHAROLA
DE GOTEO
CHAROLA
REMOVIBLE
PARA GOTEO
especificaciones
eléctrico: UL y C-UL son sólo para uso en casa. La cafetera viene con una extensión de
3 clavijas y requiere un enchufe de 3 agujeros que haga conexión a tierra de 120 voltios AC,
11.9 amperios, de una fase 60 Hz, con un total de 1425 Watts.
capacidad para colar : Taza de 4 a 14 oz.
programación para lugares de gran altitud: El agua hierve a una temperatura
más baja en lugares de gran altitud (sobre 4,000 pies). Para programar a My Café para uso en
lugares de gran altitud presione el botón 5 veces (por menos de 10 segundos cada vez). La luz
indicadora brillará verde 5 veces, indicando que la cafetera está programada para usarse en
sitios de gran altitud. Para regresar My Café a su estado normal de operación, presione el botón
de a pulso 5 veces (por menos de 10 segundos cada vez). La Luz Indicadora va a parpadear de
color rojo 5 veces, indicando que la cafetera ha sido programada para su uso normal.
1
INTRUCCIONES IMPORTANTES DE SEGURIDAD
Siga las medidas básicas de seguridad al utilizar aparatos electrodomésticos para reducir el
riesgo de incendio, choque eléctrico y/o lesiones personales.
• LEA TODAS LAS INSTRUCCIONES.
• No toque las superficies calientes.
Utilice las asas.
• No coloque el cable, enchufes o la cafetera
en agua u otros líquidos.
• No abra la tapa mientras este colando.
• Supervise de cerca cuando la cafetera este
funcionando y haya niños en el área.
• Desconecte la cafetera cuando no se
este usando por periodos largos y antes
de lavarse. Deje la cafetera enfriarse antes
de remover o reemplazar partes, y antes
de limpiarla.
• No use la cafetera si el cable o la conexión
a la luz esta dañada. Regrese la cafetera
a una de las Facilidades de Servicio
Autorizadas para su evaluación, ajuste o
reparación (véase página 9).
• El uso de accesorios no diseñados para
esta cafetera, podría resultar en daños
o lesiones.
• Exclusivamente para uso en casa.
• No permita que el cable cuelgue sobre el
borde de una mesa o cubierta prefabricada
o toque superficies calientes.
• No coloque la cafetera en o cerca de
un quemador eléctrico, gas caliente u
horno caliente.
• No use esta cafetera para cualquier
•
•
•
•
•
•
•
•
•
•
•
otro propósito distinto a aquél para el
cual fue destinada.
No meta o saque el Cajoncillo para la
Bolsita mientras este colando. Presione
el Botón de Colar (Brew) para detener o
cancelar el ciclo de colado.
No vierta en el tanque para agua líquidos
distintos a agua o vinagre para su limpieza,
tal como se especifica en este manual.
No limpie la cafetera con limpiadores, jergas
de acero u otros materiales abrasivos.
Cuando la cafetera no este en uso, la tapa
deberá estar cerrada.
Para evitar que la taza se desborde, vacíe
la taza antes de cada ciclo.
Nunca ponga las manos directamente
debajo del contenedor de la bolsita. Agua
caliente y vapor pueden estar presentes.
Siempre utilice una taza que sea más
grande que la cantidad de agua que se le
sirvió a la cafetera.
Mantenga las manos alejadas si la taza
se desborda.
Vierta agua fría solamente.
No meta bolsitas rotas, granos de café o
té suelto en el Cajoncillo para la Bolsita.
No ponga objetos dentro del Cajoncillo
para la Bolsita, que no sean el sobre de
café o de té.
nota : El cable eléctrico proporcionado es corto para reducír el riesgo de que se enrede. Si se usa
un cable de extensión, el régimen nominal del cable deberá de ser como mínimo igual al del régimen
nominal de la cafetera. Asegúrese que el cable de extensión no cuelgue del mostrador o de la mesa
para evitar que los niños lo jalen o se tropiecen. El cable de extensión deberá de ser del tipo con tres
clavijas, enchufe de 3 agujeros, con conexión a tierra de 3 alambres, (Incluyendo conductor a tierra).
conserve este instrucciones
Registre la fecha código antes de usar la
cafetera (localizada en la parte trasera baja
de la cafetera)
ADVERTENCIA
RIESGO DE FUEGO O DESCARGA ELÉCTRICA
PARA REDUCIR EL RIESGO DE FUEGO
O DESCARGA ELÉCTRICA
NO DESARME LA CAFETERA
NO CONTIENE PIEZAS QUE EL USUARIO PUEDA REPARAR
LA REPARACIÓN DEBERÁ SER EFECTUADA POR
PERSONAL AUTORIZADO SOLAMENTE
fecha código: ¿Preguntas?
Visite www.bunn.com en inglés o llame al
EUA 1-800-352-BUNN (2866)
Este símbolo le
advierte de importantes
instrucciones operativas
y de servicio.
Canadá 1-800-263-2256
Para recibir asistencia integral, por favor
tenga listo su número de Modelo y Fecha
Código cuando llame para solicitar servicio.
2
Este símbolo le advierte
del riesgo de incendio o
descarga eléctrica en el
mensaje que lo acompaña.
PROGRAMACIÓN
MY CAFÉ® CAFETERA DE BOLSITA DE PORCIÓN INDIVIDUAL
importante : My Café tiene un tanque interior para agua caliente que deberá llenarse de agua
antes de colar. Llene la tanque y deje correr de 2 a 3 ciclos de colado. Comenzará a calentarse y a
alistarse para colar.
1. Conecte la cafetera. El Botón para
Colar (Brew) va a parpadear rojo
indicando que se necesita agua y la
cafetera esta lista para programarse.
7. Cierre la Tapa Giratoria.
8. Presione el Botón de Colar (Brew).
Espere un aproximado de dos minutos
para que el tanque para agua caliente
interno se llene parcialmente. Quizás se
escuchen sonidos o chirridos en lo
que la pompa se prepara. Estos son
perfectamente normales y solamente se
escucharán en lo que esta lista la máquina.
2. Posicione la taza (14 oz. o más) en la
Charola de Goteo bajo el Cajoncillo
para la Bolsita. No cuele directamente
en envases de vidrio común o vasos de
plástico. Utilice solamente contenedores
resistentes al calor.
9. Vacíe la taza si es que hay algo
de agua dentro de ella, después
acomode la taza en la Charola de
Goteo bajo el Cajoncillo para la
Bolsita de té o café.
3. Acomode el Cajoncillo para la Bolsita
en las guías para el cajoncillo y empuje
hasta que se acomode en su sitio.
El Cajoncillo para la Bolsita deberá estar
acomodado en su sitio antes de que la
cafetera comience a funcionar.
10. Repita del paso 4 al 7.
11. Presione el Botón para Colar (Brew).
Espere alrededor de 2 minutos para que
el tanque interno para agua caliente
termine de llenarse con agua. El exceso
de agua va a llenar la taza. Si el Botón
para Colar (Brew) sigue parpadeando
rojo, repita los pasos del 4 al 7 y presione
el Botón de Colar (Brew) de nuevo.
4. Llene un contenedor de 14 oz. con
agua fría.
5. Abra la Tapa Giratoria al borde de
la la cafetera.
6. Llene el Contenedor para Verter
con agua.
¡Su My Café esta ahora calentando el agua. Espere de 2 a 3 minutos para que la luz
indicadora cambie de rojo a verde. Ahora esta listo para colar!
3
COLANDO MEJOR
MY CAFÉ® CAFETERA DE BOLSITA DE PORCIÓN INDIVIDUAL
1. Presione el botón localizado en el borde del asa del
Cajoncillo para la Bolsita y jale del cajoncillo hacia afuera
junto con sus guías.
2. Acomode la bolsita de café o té en la cavidad del Cajoncillo
para la Bolsita.
Centre la bolsita en el contenedor ajustado y suavemente
presionela hasta que entre por completo en la cavidad del cajoncillo.
Asegúrese de que la bolsita este completamente acomodada.
3. Deslice el Cajoncillo para la Bolsita por las guías y presione
para que se acomode en su lugar.
El Cajoncillo para la Bolsita debe de estar asegurado en su lugar
antes de que la cafetera este en funcionamiento.
4. Abra la Tapa Giratoria en el borde de la cafetera.
5. Usando su taza preferida, llene el Contenedor para Verter con
la cantidad deseada de agua (mínimo 4 oz., máximo 14 oz.).
Nota: La taza que este sobre la Charola de Goteo y bajo el
Cajoncillo para la Bolsita debe de ser más grande que la cantidad
de agua que se utilizó para colar.
6. Cierre la Tapa Giratoria de la cafetera y posicione la taza
sobre la Charola de Goteo bajo el Cajoncillo para la Bolsita.
Nota: Asegúrese de que su taza sea resistente al calor.
7. Para colar, presione el Botón de Colar (Brew).
Para colar un café más cargado o para té, presione el Botón de
"a Pulso" (Pulse) para activar la función a pulso y después presione
el botón de Colar (Brew).
8. Al finalizar el cliclo de colado remueva la taza de la Charola
de Goteo.
Deseche las bolsitas usadas sacandolos del Cajoncillo para Bolsitas
(véase #1) y echandola en la basura. ¡No toque el bolsita ya que
está caliente!
IMPORTANTE: No se recomienda usar agua destilada para la preparación de café debido a que le faltan los
minerales que hacen resaltar los sabores naturales del café. Algunas aguas embotellas también pueden estar
demasiado purificadas. Si usted quiere usar agua embotellada, busque palabras como “filtrada”, “agua de
manantial”, “agua mineral” o “agua potable”. Evite el uso de agua embotellada con palabras como “purificada”,
“destilada” o “libre de minerales”. Su cafetera BUNN My Café puede que no funcione con agua con un contenido
de minerales insuficiente.
4
COLANDO MEJOR
CON BOLSITAS
La cafetera de Porción Individual My Café® controla la temperatura y tiempo para extraer
el sabor más delicioso de su bolsita de café o té. Las bolsitas varían en tamaño desde 6 a 12
gramos, por lo que se sugiere experimente con diferentes cantidades de agua y pesos de
bolsita para crear su taza perfecta.
• Comience con su bolsita de café o té favorita y añada 8 oz. de agua.
• Para una taza más cargada, use menos agua o una bolsita más grande.
• Para una taza más ligera, use más agua o una bolsita más pequeña (contiene menos café)
con la misma cantidad de agua.
nota : Mucha agua y poco café puede resultar en una sobre extracción de los granos de café y
por ende en un sabor amargo.
• Use el Botón de a Pulso (Pulse) para colar las bolsitas de té o para un sabor más cargado
del café.
Para más información respecto a las bolsitas, visite mycafe.com
MÁS TIPOS DE BEBIDAS
• Usted puede usar My Café para servir agua caliente para chocolate o cualquier otra
bebida. Simplemente no ponga la bolsita de té o café y presione el Botón de Colar
(Brew). Tome precaución el agua que salga de la cafetera estará a un aproximado
de 93°C (200°F).
• Prepare café o té helado colando en un vaso con hielo (asegúrese de que el contenedor
que use sea resistente a ambos estados, frío y calor). Después de colar, agregue leche y/o
su endulzante favorito.
FUNCIONES DE AHORRO DE ENERGÍA
• Después de 6 horas de reposo, la temperatura del agua dentro del tanque de acero
inoxidable baja a 60°C (140°F). Toma cerca de un minuto para establecerse de nuevo en
la temperatura óptima para colar de 93°C (200°F).
• Después de 26 horas de reposo, My Café entra en la modalidad de “dormir.” Le toma
cerca de 2 minutos el volver a la temperatura óptima para colar (alrededor de 93°C).
• Cuando el Cajoncillo para la Bolsita es removido, insertado, o cuando cualquier botón
es presionado, la cafetera sale del modo de ahorro de energía o dormido y comienza a
calentarse hasta llegar a la temperatura óptima para colar. Cuando la luz indicadora está
verde significa que su cafetera esta lista para usarse.
5
LIMPIEZA Y MANTENIMIENTO
limpieza básica
Enjuague el Cajoncillo para la Bolsita después de cada uso – especialmente cuando cambia
entre café y té. El Cajoncillo para la Bolsita, la Charola de Goteo y el Protector de Charola
de Goteo son resistentes a la lavadora de trastes. Ocasionalmente limpie el exterior de la
cafetera incluyendo la Charola de Goteo y el Protector de Charola de Goteo con una jerga
con jabón para trastes suave sin cítricos y con un trapo húmedo.
limpieza a fondo
Limpie a fondo su cafetera por lo menos cada 3 meses. Depósitos minerales pueden
encontrarse debido a la impureza del agua que se usa al colar. Si los depósitos minerales
no son removidos, pueden alterar el desempeño de la cafetera y reducir su tiempo de vida.
La frecuencia de su limpieza depende en el contenido mineral del agua (con mayor
contenido mineral en el agua, mayor frecuencia de lavado).
1. Abra la Tapa Giratoria en el borde de
5. Presione el botón para colar para dejar
su cafetera.
2. Llene el Contenedor para Verter con
14 oz. de vinagre blanco.
3. Cierre la Tapa Giratoria.
4. Ponga la taza vacía (de más de 14 oz.) en
la base para taza portátil o en el Protector
de Charola de Goteo.
pasar al vinagre a través de la cafetera.
6. Deje correr por lo menos otros dos ciclos
adicionales de 14 oz. de agua a través de la
cafetera para sacar los restos del vinagre.
7. Siga los pasos a continuación para limpiar
la Cabeza Roceadora.
limpiando la cabeza roceadora
Los depósitos minerales y los gránulos de café o té pueden tapar la cabeza roceadora,
causando que el ciclo de colado se alente.
1. Desconecte la cafetera y permitale
PRECAUCIÓN: Si la Cabeza Roceadora y
el sello se separan, deben de ensamblarse
de nuevo. De ensamblarse de manera
equivocada podría resultar en heridas por
el contacto con el agua caliente.
5. Con los dedos, rote la Cabeza Roceadora
en contra de las manecillas del reloj hasta
que se apriete.
6. Reemplace el Cajoncillo para la Bolsita.
7. Conecte la cafetera para que corra
corriente de nuevo.
enfriarse (mínimo una hora).
2. Remueva el Cajoncillo para la Bolsita.
3. Usando los dedos, rote la Cabeza
Roceadora en el sentido de las manecillas
del reloj hasta que la cabeza roceadora
y el sello se hayan removido.
4. Limpie la Cabeza Roceadora y el sello con
un detergente suave y enjuague a fondo.
Un palillo dental también podría utilizarse
para limpiar residuos en los hoyos de la
Cabeza Roceadora.
6
LIMPIEZA Y MANTENIMIENTO
reensamblando la cabeza roceadora /el sello
Si la Cabeza Roceadora y el sello se separan para su limpieza, deberá asegurarse de
reensamblarlos de la manera apropiada.
1. Identifique el borde del sello – tendrá
completamente en el canal. Cuando está
ensamblada propiamente, la Cabeza
Roceadora se deslizará fácilmente en el
canal del sello y no producirá arrugas en
el borde del sello.
orillas redondas y la parte superior suave.
2. Identifique la parte superior de la Cabeza
Roceadora – tiene un patrón de estrellas y
un agujero de rosca en donde se ensambla
la Cabeza Roceadora de la cafetera.
3. Mientras de manera cuidadosa estira el
sello, guíe la Cabeza Roceadora en el
canal del sello. Asegúrese de que este
PRECAUCIÓN: El ensamblado hecho de
manera errónea puede resultar en heridas
debidas al agua caliente.
inspeccionando el sello de la cabeza roceadora
Cuando desarme su cafetera para limpiarla, inspeccione que el sello de la Cabeza Roceadora
este libre de rasgaduras, quebraduras, y agujeros. Aunque el sello debería de durar por un
periodo largo, puede igualmente dañarse con el uso.
PRECAUCIÓN: El sello envía líquido caliente al Cajoncillo para la Bolsita. Si se daña, favor
de llamar a Servicio al Cliente al 800-352-2866 o visite www.bunn.com para que se le envíe
un reemplazo del sello.
almacenando la cafetera
Desconecte la cafetera y espere a que se enfríe. Esta deberá guardarse en un sitio que
este a una temperatura sobre los 0°C/32°F para prevenir daño al tanque interno para agua.
De no hacer uso de su cafetera por periodos largos de tiempo, le recomendamos deje
correr dos o tres ciclos de agua antes de poner el café o té que desea colar.
7
DETECCIÓN DE FALLAS
problema
El Botón
para Colar
Parpadea Rojo
sugerencias
• El tanque interno para agua caliente deberá llenarse con agua.
Véase Programando My Café® en la página 3.
Botón para Colar • Su cafetera esta colando. Presione el Botón de Colar (Brew) de nuevo para
detener el proceso.
brilla Rojo
Luz Indicadora
brilla Verde
• El agua esta caliente y lista para colar.
Luz Indicadora
esta Rojo
• El agua se esta calentando.
Luz Indicadora
parpadea Rojo
• El Botón para Colar (Brew) estaba presionado pero el agua se esta
calentando. Espere a que la luz indicadora se torne verde y presione
el Botón de Colar (Brew) de nuevo.
Luz Indicadora
parpadea Verde
• Agregue agua. NOTA: Asegúrese de que la taza este en la Charola
de Goteo bajo el Cajoncillo para la Bolsita antes de presionar el Botón para
Colar (Brew).
• Si se usa agua con un bajo contenido de minerales como agua destilada, los
sensores pueden no detectar el agua. Empine la cafetera para vaciar el agua
de la Taza de Llenado y agregue agua del grifo, agua potable o agua embotellada con un mayor contenido de minerales. Refiérase a la página 4 para
más información acerca del agua usada para la preparación.
Luz Indicadora
parpadea Rojo
y Verde
• El Cajoncillo para la Bolsita no está completamente insertado.
Presionelo para acomodarlo en su lugar.
El Botón de a
Pulso brilla Rojo
• La opción de a Pulso esta activada. Presione el Botón de a Pulso (Pulse)de
nuevo para desactivar.
La cafetera
no enciende
• Asegúrese de que la cafetera este conectada a un enchufe con
corriente (que funcione).
• Presione el Botón de Colar (Brew) para empezar a colar (el botón se
encenderá de color rojo).
No se está
colando el
café/té
• Asegúrese de que la cafetera esté conectada a un enchufe con
corriente (que funcione).
• Asegúrese que la cafetera esté llena de agua. El tanque para agua
caliente necesita estar lleno para comenzar a colar (una luz verde
comenzará a brillar). Véase Programando My Café en la página 3.
• Asegúrese que el Cajoncillo para la Bolsita esté completamente
insertado (la luz indicadora brillará de manera intermitente entre
verde y rojo si el cajoncillo no esta bien acomodado).
• Si la luz indicadora brilla rojo, la cafetera está calentando el agua a
la temperatura apropiada y toma aproximadamente 2 minutos.
Cuando la luz este verde, presione el Botón de Colar (Brew).
• Presione el Botón para Colar (Brew) para que comience a colar
(el botón se encenderá de color rojo).
El colado
esta ralo
• La bolsita deberá estar bien posicionada en la cavidad del Cajoncillo para la
Bolsita para una máxima extracción de sabor.
• La cantidad de agua utilizada para colar puede que sea demasiada para el
peso de la bolsita que se esta usando para colar. Intente colar ya sea con una
bolsita con mayor contenido o con menos agua.
• Intente usando el Botón de a Pulso (Pulse) para extender el tiempo que están
en contacto el agua y el café.
8
DETECCIÓN DE FALLAS
problema
sugerencias
• Depósitos minerales pueden estar presentes en su cafetera.
Toma
Véase Limpieza a Fondo y Limpieza de la Cabeza Roceadora en
demasiado
la página 6.
tiempo en colar
La cafetera sólo • Asegúrese de que haya una bolsita de café o té en el Cajoncillo para
la Bolsita.
cuela agua
La velocidad
del agua varía
mientras cuela
• El Botón de Colar a Pulso (Pulse) ha sido presionado. Durante la fase
de colado, el agua que fluya variará para permitir asentar el té
propiamente o hacer el café más cargado
Agua se escurre • La Cabeza Roceadora podría estar tapada, suelta o el sello dañado.
alrededor
Favor de referirse a Limpieza de Cabeza Roceadora, Reensamble
de la cabeza
de Cabeza Roceadora/Sello e Inspeccionando el Sello de la Cabeza
roceadora
Roceadora en las páginas 6 y 7.
El contenedor
de la bolsita no
se podrá sacar
de la cafetera
• La bolsita en el Cajoncillo para la Bolsita puede que se haya hinchado
a un punto en que no deja abrir fácilmente el cajoncillo. Espere 10
minutos a que baje la presión e intente cuidadosamente removiendo
el Cajoncillo para la Bolsita de nuevo.
Agua gotea
alrededor del
cajoncillo para
la bolsita
• Asegúrese de que la bolsita este bien acomodada en la cavidad
del cajoncillo.
Se detecta un
mal sabor
• Ejecutar Limpieza Básica y Limpieza a Fondo en la página 6.
• Quite las bolsitas usadas del Cajoncillo para Bolsita después de cada
preparación. No deje bolsitas usadas en el Cajoncillo para Bolsita por
períodos de tiempo extendidos.
nota : No la desarme. No hay partes amigables para el usuario dentro de la cafetera.
SERVICIO AUTORIZADO
www.bunn.com
bunn - o - matic ® corporation
en los estados unidos :
1400 Stevenson Drive, Springfield, IL 62703
900 E. Townline Rd., Creston, Iowa 50801
1-800-352-BUNN (2866)
en canadá :
280 Industrial Parkway S., Aurora, Ontario L4G 3T9
1-800-263-2256
Para recibir mejor asistencia cuando llame tenga a la mano el Modelo y el Código de Fecha
(ubicado en la parte posterior de su cafetera).
9
GARANTÍA LIMITADA
Bunn-O-Matic® garantiza que La cafetera My Café® de Porción Individual se encuentra
libre de defectos en materiales y mano de obra al momento de su (manufactura) producción
como se menciona en el siguiente apartado de periodos de garantía:
a) Dos (2) años de la fecha de la compra original como CAFETERA NUEVA.
b) Después de dos (2) años desde del día de la compra original o un (1) año de la fecha
en que fue REPARADA O REEMPLAZADA, es recibida por el cliente cuando se
regresa a Bunn-O-Matic antes de que haya expirado la garantía de la nueva cafetera.
c) Un (1) año de garantía desde la fecha en que el cliente recibió la cafetera REPARADA
O REMPLAZADA, cuando se haya devuelto a Bunn-O-Matic después que la nueva
garantía de la cafetera haya vencido.
d) Un (1) año a partir de la fecha de compra de una cafetera REMANUFACTURADA.
Si tal defecto aparece durante el periodo que cubre la garantía, nosotros (como única
opción) repararemos, reemplazaremos o cambiaremos la cafetera, sin cargo alguno por
el servicio o las partes necesarias, tal cafetera deberá llevarse a alguno de los centros de
servicio autorizados enlistados en la página 9 de este mismo folleto.
La garantía no cubre daños hechos por mal uso, falta de seguimiento de instucciones
al momento de la instalación y uso, falla de equipo debido a la pobre calidad del agua,
negligencia, uso con accesorios (aditamentos) no autorizados, uso comercial, uso con otra
corriente o voltage a la especificada en la cafetera o si se le dio mantenimiento con otra
compañía distinta a la cubierta por la garantía.
ESTA GARANTÍA SERÁ EXCLUSIVA Y SUSTITUYE CUALQUIER OTRA GARANTÍA
EXPRESA, ESCRITA U ORAL, INCLUYENDO PERO SIN LIMÍTE A CUALQUIER GARANTÍA
EXPRESA DE IDONEIDAD PARA UN FIN DETERMINADO O ADECUACIÓN PARA UN
PRÓPOSITO PARTICULAR. LA DURACIÓN DE CUALQUIER GARANTÍA IMPLÍCITA
INCLUYENDO, PERO SIN LIMITARSE A CUALQUIER GARANTÍA IMPLÍCITA DE
IDONEIDAD PARA UN FIN DETERMINADO O ADECUACIÓN PARA UN FIN
PARTICULAR ESTÁ EXPRESAMENTE LIMITADA AL PERIODO DE DURACIÓN DE
ESTA GARANTÍA LIMITADA.
Algunos Estados no permiten garantías que impliquen limitantes de tiempo, por lo que la
anteriormente mencionada puede no aplicar a su caso.
EL RECURSO EXCLUSIVO DEL CLIENTE POR EL INCUMPLIMIENTO DE ESTÁ
GARANTÍA O DE CUALQUIER GARANTÍA IMPLÍCITA O DE CUALQUIER OTRA
OBLIGACIÓN QUE SURJA CONFORME A LA LEY ESTARÁ LIMITADO SEGÚN LO
ESPECIFICADO ANTERIORMENTE PARA REPARAR O REEMPLAZAR, A NUESTRA
ÚNICA DISCRECCIÓN. EN CUALQUIER CASO SE EXCLUYE EXPRESAMENTE LA
RESPONSABILIDAD POR DAÑOS INCIDENTALES O CONSECUENCIALES.
Algunos Estados no permiten la exclusión o limitación de daños accidentales o consecuenciales,
de modo que la limitación o exclusión anteriormente expresada puede que no sea aplicable
en su caso.
Esta garantía le otorga derechos legales específicos, pero también podría tener otros
derechos que varían de Estado a Estado.
La clasificación UL sólo aplica al uso en entornos residenciales. La garantía se anula si la
máquina se usa en un entorno comercial.
The BUNN logo is a trademark of Bunn-O-Matic Corporation.
43460.0000B 02/11©2010 BUNN-O-MATIC CORPORATION
www.bunn.com
10