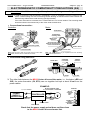
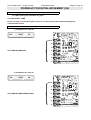
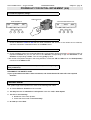
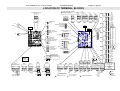
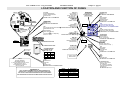
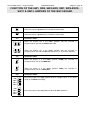
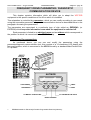
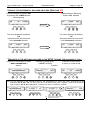
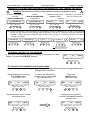
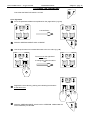
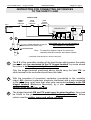
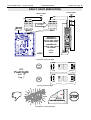
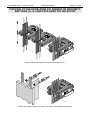
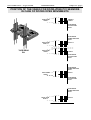
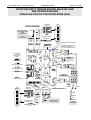
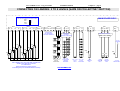
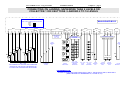
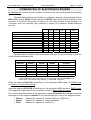
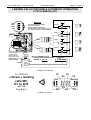
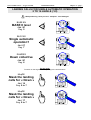
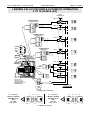
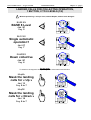
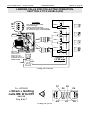
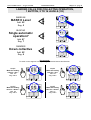
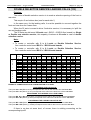
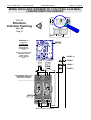
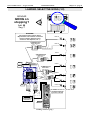
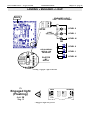
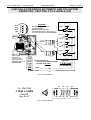
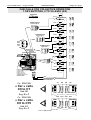
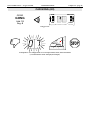
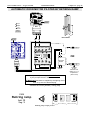
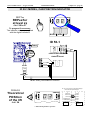
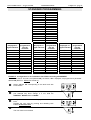
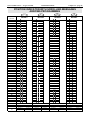
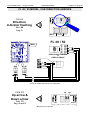
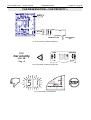
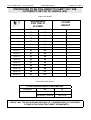
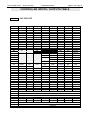
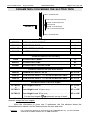
1
7138 AUTINOR Installation Manual SERIE 32 MLIFT VECTOR Programmation Vectorielle Programme: B-HB32 Programme: VSC-V02 Version of 29 November 2000 WARNING This manual is deemed correct on going to press. The information contained has been scrupulously checked. However AUTINOR declines all responsibility for error or omission. Should you notice any discrepancy or unclear description, or if you have any suggestions, we would appreciate your written comments (by mail fax or Email) to: Société AUTINOR - Service Documentation Z.A. Les Marlières 59710 AVELIN [33] 03-20-62-56-00 ¬ [33] 03-20-62-56-41 [email protected] This manual is the property of AUTINOR, from whom it may be bought (at the above address). It may however by freely copied in order to communicate information to those who might need it. We can only authorise a complete copy, without neither addition nor removal of information Where quotations are taken, the following at least must be noted: - The company name of AUTINOR, - The date of the original edition. ELECTROMAGNETIC COMPATIBILITY Since the 1st January 1996 all lift installations are obliged to respect the essential requirements of the European Directive 89/336/CEE concerning Electromagnetic Compatibility (EMC). The equipment is only one component of an installation; it is therefore not obliged to show the marking as stated in this directive. However in order to allow you to write your declaration of conformity, and according to professional rules, all AUTINOR controllers are supplied with an engagement of conformity. Your declaration of conformity can rest on this engagement, only if the equipment has been installed exactly as advised in this manual. © Copyright 2000 AUTINOR All rights reserved. PREAMBLE Handling advice for equipment: Whatever the load, handling operations can be dangerous (collision, dropping, crushing,…). Whenever possible use mechanical handling rather than manual handling. When manual handling can not be avoided, respect the rules. At European level, these rules are set out in the Directive 90/269/CEE, Council Directive dated 19 May 1990 "concerning minimal heath and safety instructions for manual load handling with risks, to the worker, notably in the lower spinal area". En France, la réglementation de la manutention manuelle est constituée des textes suivants : • Code du travail article R 231-72 (Décret n° 92-958 du 3 septembre 1992 transposant en droit français la directive européenne 92/269/CEE) « Lorsque le recours à la manutention manuelle est inévitable… un travailleur ne peut être admis à porter d’une façon habituelle des charges supérieures à 55 kilogrammes qu’à condition d’y avoir été reconnu apte par le médecin du travail, sans que ces charges puissent être supérieures à 105 kilogrammes. » • Décret n° 95-826 du 30 Juin 1995, Titre 1er - article 8 « fixant les prescriptions particulières de sécurité applicables aux travaux effectués sur les ascenseurs » + Circulaire de mise en œuvre DRT 96/3 du 25 Mars 1996 « … Les travaux comportant le port manuel d'une masse supérieure à 30 kilogrammes, ou comportant la pose ou la dépose manuelle d'éléments d'appareils d'une masse supérieure à 50 kilogrammes, … doivent être effectués par au moins deux travailleurs ; » complétée par la norme française NF X 35-109 qui donne des recommandations plus précises qui prennent en compte les paramètres suivants : âge du travailleur, nature de la tâche (occasionnelle ou répétitive), charge unitaire, distance parcourue : Load permitted (occasional carrying) Load permitted (constant carrying) Man 18 / 45 years 30 kg 25 kg Man 45 / 60 years 25 kg 20 kg Safety measures: Follow the instructions which were given to you by your management when using individual protection equipment (gloves, shoes, glasses, restraint harness, etc). TABLE OF CONTENTS Chapter I - Generalities ......................................................................................................................... 11 How to install the controller cabinet ........................................................................................... Controller position and electromagnetic compatibility ............................................................... Minimum connections necessary for initial movement ................................................................ Location of terminal blocks .......................................................................................................... Location and function of fuses ..................................................................................................... Location of led, jumpers and relay .............................................................................................. Frequency drive parameter / diagnostic communication device................................................... Controller parameter / diagnostic communication device ........................................................... 12 13 18 22 23 24 26 31 Concerning the illustrations (☺, ) ........................................................... 37 Chapter II - Installation & connecting the safety ........................................................................... 1 Connecting the safety lane with automatic doors and machine room inspection box .................. Instruction for wiring any devices to the safety lane .................................................................... Measurement of the insulation of the safety chain ....................................................................... Connecting the doors safety contacts between 6 and 10 .............................................................. 2 3 4 5 Chapter III - Installation & connecting in Machine room ........................................................... 1 Connecting in machine room ....................................................................................................... Motor screening cable ................................................................................................................. Motor ventilation detection by thermo-contact ............................................................................ Thermal protection of the motor & control of the machine room temperature ............................ Emergency electrical operation ................................................................................................... Viewing of the unlocking zone ...................................................................................................... Delayed departure ....................................................................................................................... Fault light (indicator) .................................................................................................................. Intercom ....................................................................................................................................... 2 3 4 5 6 8 9 10 11 Chapter IV - Installation & connecting in Shaft ............................................................................. 1 Fixing the slotted-tape brackets ................................................................................................... Fixing the brackets for control of the door-zone .......................................................................... Position of the door-zone P01 sensor or proximity switches (I.L.S.) and tape head O03 selector ......................................................................................................................................... Position of the vanes for door-zone P01 sensors in case of movement door open ....................... Position of the magnets for the door-zone read by proximity switches ........................................ Door security bridge board relevelling pre-opening board, Visualisation of the door-zone (N62) ........................................................................................... Door security bridge board relevelling pre-opening board, Visualisation of the door-zone (N57) ........................................................................................... 2 3 , , , , , 4 5 6 7 8 Chapter V - Installation & connecting on Landing ........................................................................ 1 Connecting on landing: 2 to 8 levels (Sapb or collective 1 button) ............................................. Connecting on landing: Sapb more than 8 levels or collective 1 or 2 buttons / landing to 16 levels maxi .................................................................................................................................... Combination of electronics boards .............................................................................................. Landing calls for single automatic operation, 2 to 8 levels ......................................................... 2 3 4 5 TABLE OF CONTENTS Chapter V - Installation & connecting on Landing (continued) Landing calls for single automatic operation, 2 to 16 levels ....................................................... Landing calls for collective operation, 1 button, 2 to 8 levels ..................................................... Landing calls for collective operation, 1 button, 2 to 16 levels ................................................... Landing calls for full collective operation, 2 to 16 levels ............................................................ Double selective service landing calls ......................................................................................... Id 30 model, landing position indicator ....................................................................................... Id 50-1 model, landing position indicator .................................................................................... Id 50 model, landing position indicator ....................................................................................... Idfl 30 / 50 model, landing position indicator with arrows .......................................................... Standard programming ................................................................................................................ Idfl 30 / 50 md model, landing position indicator with scrolling messages arrows ..................... Position indicator with scrolling messages arrows programming ............................................... Fl 30 / 50 model, landing direction arrows ................................................................................. Model with light less than to 1, 2 W (total 2,4 W max), landing direction arrows ...................... Model with light superior to 1, 2 W (total 2,4 W max), landing direction arrows ....................... Next departure arrows ................................................................................................................. Landing selective gong ................................................................................................................. Landing out of service light ......................................................................................................... Landing « Engaged » light ........................................................................................................... 7 9 11 13 15 18 19 20 21 22 23 24 25 26 27 28 31 33 35 Chapter VI - Installation & connecting in Car ................................................................................ 1 Connecting in car: 2 to 8 levels (Sapb or collective 1 button) ..................................................... Connecting in car: Sapb more than 8 levels or collective 1 or 2 buttons / landing, 2 to 16 levels ............................................................................................................................................ Car calls for single automatic and collective operation, 1 button, 2 to 8 levels .......................... Car calls for collective operation 1 or 2 button(s), 2 to 16 levels ................................................ Double selective service car calls ................................................................................................ Connecting of tape head O03-1 & O03-2 for counting with slotted tape .................................... Car alarm button .......................................................................................................................... Car stop button ............................................................................................................................ Car gong ...................................................................................................................................... Unlocking retiring ramp with direct current ................................................................................ Front door three phase motor ...................................................................................................... Rear door three phase motor ....................................................................................................... Automatic door motor piloted by retiring ramp ........................................................................... Electronic door control unit OP06 or OP11 ................................................................................ Electronic door control unit OP15 .............................................................................................. Id 30 model, car position indicator .............................................................................................. Id 50-1 model, car position indicator ........................................................................................... Id 50 model, car position indicator .............................................................................................. Idfl 30 / 50 model, car position indicator with arrows ................................................................ Standard programming ................................................................................................................ Idfl 30 / 50 md model, car position indicator with scrolling messages arrows ............................ Position indicator with scrolling messages arrows programming ............................................... Fl 30 / 50 model, car direction arrows ........................................................................................ 2 3 4 6 8 10 12 13 14 16 17 18 19 20 21 23 24 25 26 27 28 29 30 TABLE OF CONTENTS Chapter VI - Installation & connecting in Car (continued) Model with light less than to 1, 2 W (total 2,4 W max), car direction arrows ............................. Model with light superior to 1, 2 w (total 2,4 w max), car direction arrows ............................... Inspection mode ........................................................................................................................... Inspection limit switch ................................................................................................................. Fast speed inspection ................................................................................................................... Full load (« Non stop ») ............................................................................................................... Car overload ................................................................................................................................ Car reservation « Car priority » .................................................................................................. Fireman service light ................................................................................................................... Automatic car light time (BH07) .................................................................................................. 31 32 33 36 37 38 39 40 41 42 Chapter VII - Commissioning procedures ....................................................................................... 1 Procedure to be followed to carry out the automatic set-up of levels ............................................... What to know before starting off at full speed .................................................................................. To programme the slow down distance on the Vectorial Frequency drive .................................. To programme the thermal protection ......................................................................................... Address 00E details (hardware option) ....................................................................................... About the controller drive ............................................................................................................ Parameter adjustment at full speed ................................................................................................... Adjustment of the synchronous speed ........................................................................................... Automatic adjustment of the up stopping precision ..................................................................... Automatic adjustment of the down stopping precision ................................................................. Adjustment of the direct approach precision ............................................................................... Automatic adjustment of the hysterisis zone ................................................................................ Positioning of EM magnet at top floor ......................................................................................... Positioning the EM magnets on the slotted tape (tape head O03-2) ............................................ Parameters to be adjusted on site and conversion table ................................................................... Reminder of parameters to be checked and improved on site ...................................................... Conversion table .......................................................................................................................... Frequency drive parameters, inputs / outputs and fault codes list ................................................... Controller parameters, inputs / outputs and fault codes list ............................................................. Parameters concerned the slotted tape .............................................................................................. Electric diagrams ............................................................................................................................... Model 2 ........................................................................................................................................ Model 3 - 4 ................................................................................................................................... Model 5 ........................................................................................................................................ Model 6 ........................................................................................................................................ Model 7 ........................................................................................................................................ Three phases or single phase door operator, front and rear doors ............................................. Traction motor fan ....................................................................................................................... 2 6 6 7 7 8 9 9 9 9 10 10 10 11 12 12 12 17 39 101 102 102 103 104 105 106 107 108 CHAPTER I GENERALITIES Série 32 Mlift Vector - Prog.Vectorielle Installation manual Chapter I - page 12 HOW TO INSTALL THE CONTROLLER CABINET For model 2 to 6 FURTHER BASE For resistive resistors (RR) SUPPORT BAR fixing with 2 screws Ø 6,3 x 38 and wall plug Ø 8 (supplied). Screws for fixing on the wall 500 mm For controller with RR>4 Socket Cabinet Hinged door (Left or right) Controller dimensions : L = 750 mm, H = 1050 mm, D = 300 mm Controller dimensions with a lot of Extra Items : L = 900 mm, H = 1050 mm, D = 300 mm Separate Box for more than 4 Breaking Resistors : L = 320 mm, H =600 mm, D = 250 mm. Protection against electrical shocks : IP 31 Don’t forget than the EN-81-1 Standard § 6.3.2.1: The dimensions of machine rooms shall be sufficient to permit easy and safe working on 6.3.2.1 equipment, especially the electrical equipment. In particular there shall be provided at least a clear height of 2 m at working areas, and : a) a clear horizontal area in front of the control panels and the cabinets. This area is defined as follows : 1) depth, measured from the external surface of the enclosures, at least 0,70 m ; 2) width, the greater of the following values : 0,50 m or the full width of the cabinet or panel ; b) a clear horizontal area of at least 0,50 m x 0,60 m for maintenance and inspection of moving parts at points where this is necessary and, if need be, manual emergency operation (12.5.1). Série 32 Mlift Vector - Prog.Vectorielle Installation manual Chapter I - page 13 CONTROLLER POSITION AND ELECTROMAGNETIC COMPATIBILITY (1/4) When the machine room supports or is near a radio or television reception aerial, do not put the controller cabinet in the aerial receiving zone (figure 1). BAD ! GOOD ! Aerial receiving zone Aerial receiving zone Reception Aerial Reception Aerial Placing the frequency drive outside the aerial receiving zone If you can not find a suitable place for the frequency drive cabinet, get the aerial moved! If that is not possible, contact AUTINOR who will decide along with the building owner, what measures need to be taken according to the EN 12015 and EN 12016 Standard for lifts, escalators and passengers conveyors. PRÉCAUTIONS TO TAKE. 1. The power supply arrival L1, L2, L3 and Earth (Yellow/Green) must all pass through the same cable. L1 L2 PE N L3 2. The power link between the MB32 Vector drive and the motor (11, 12, 13 + Earth) must go through the same cable. In order to reduce disturbances a screened cable (LIYYCY type, minimal length of cable: 3m50) must be used, even if the motor cable is mechanically protected by a tube or metal trunking. This screening should consist of at least one flat cable, the greater the number of flat cables the greater the efficiency of the screening. The cable should be supple for ease of installation in the machine room and should comply with EN 81 standards. To be completely efficient the screening must be connected at the same time to the controller metal casing and to the motor metal housing. In order to reduce any coupling effects, it is advisable to maximise the distance between the motor cable and the three phase power supply cable, both inside and outside the controller; for the same reason, you should keep the cables carrying high current as far apart from those carrying low current as possible. These two types of cable should not be placed in the same trunking, nor go through the controller casing via the same hole. Série 32 Mlift Vector - Prog.Vectorielle Installation manual Chapter I - page 14 ELECTROMAGNETIC COMPATIBILITY PRECAUTIONS (2/4) At not time should the screening cable replace the yellow-green earthing cable. ADVICE: In order to ensure the electromagnetic compatibility, it may be necessary to use to connect to the motor, a metal stuffing box with a screening contact allowing an efficient electrical link between the flat screening cable and the metal housing (see figure below). If the motor terminal box is isolated, then a metal stuff box is of course useless. The screening cable should be linked in the shortest way to the motor earth terminal block. • Conventional connection : Controller: Motor: W2 U2 V2 U1 V1 W1 Terminal box PE 11 12 13 Yellow/Green earthing cable Yellow/Green earthing cable USING A SCREWDRIVER LOWER THE MOBILE PLATE TO INSERT THE SCREENING CABLE Motor earth terminal Phase cables Screening flat cable linked in the shortest way to the earth terminal Screening cable Phase cables Screened cable Screened cable Note: The cables should only be separated from the screening once inside the terminal box. Note: Keep the motor cable as far apart from the power cable as possible, inside as well as outside the controller. • Connection using stuff-box : CURVED SEAL TERMINAL BOX WALL SCREENING FLAT CABLE TUBING FLAT SEAL 3. The other links between the MB32 Vector drive and the motor, i.e. .the brake (+BR and -BR), the motor thermistor (0V, STH) can run together but kept at least 10 cm from the power cables. EXAMPLE: MOTOR SCREENED CABLE 11,12,13 AND EARTH + SCREENING L1, L2, L3 + EARTH POWER SUPPLY ARRIVAL BOX CONTROLLER 10 cm min M TRUNKING MOTOR SCREENED CABLE ONLY 10 cm min L1, NEUTRAL MOTOR THERMISTOR BRAKE HANGING CABLE THERMISTOR, BRAKE, INCREMENTAL ENCODER, SHAFT WIRING Check that the power supply arrival does not flow close to the MB32 Vector drive and motor link. Série 32 Mlift Vector - Prog.Vectorielle Installation manual Chapter I - page 15 ELECTROMAGNETIC COMPATIBILITY PRECAUTIONS (3/4) CONCERNING THE SET OF WIRING IN THE LANDING COLUMN SEPARATION. 3 SET OF WIRING LIGHTING - POWER SOCKET (High current) WARNING: SAFETY LANE (Safety current) We recommend to separate in the landing column, the 3 sets of wiring in 3 rows: LOW VOLTAGE (Low current) Lighting - Power sockets Safety lane and Low Voltage, in order for ease of maintenance and taking EMC* regards into account * EMC : ElectroMagnetic Compatibility CONCERNING TRAILING CABLE SEPARATION. The devices controlled by the contactors are powered by wires which go into the trailing cable The trailing cable's other conductor wires do not transport strong currents to activate power devices, but electrical "DATA" via weak currents. This data could be, for example, the state of the door limits necessary to control the automatic doors, or the car calls. To show you the difference in importance between the two types of current, here is an example: Certain door motors can use 3 amps whereas the current used for the data concerning the state of the door limits is only 3 mA. There is, in this typical example, a ratio of 1 to 1000. This ratio is often even greater, especially when you consider the starting current of a power device when it is first switched on. It is clear that the big currents will influence the little ones if care is not taken to separate them. IF THESE CURRENTS IN THE TRAILING CABLE ARE NOT SEPARATED: • FALSE DATA WILL BE SENT TO THE CONTROLLER, • THERE WILL BE GRADUAL DETERIORATION OF THE ELECTRONIC COMPONENTS (ANYTHING FROM 3 DAYS TO A FEW MONTHS). THE SHORT OR MEDIUM TERM CONSEQUENCES WILL BE SOME "STRANGE" FUNCTIONING BY THE CONTROLLER, EVENTUALLY CAUSING BREAKDOWNS! ! ! TO SUM UP, IT IS ESSENTIAL THAT THE CONDUCTOR WIRES FROM THE TRAILING CABLE CARRYING STRONG CURRENTS FOR THE RETIRING RAMP, DOOR MOTOR, BRAKING INJECTION, ANTI-CREEPS AND THE CAR VENTILATION MOTOR, NOT TO MENTION THE CAR LIGHT AND SAFETY CHAIN, ARE SEPARATED FROM THE OTHER CONDUCTORS CARRYING WEAK CURRENTS. MECANICAL ATTACHMENTS ONE OR SEVERAL "WEAK CURRENT" TRAILING CABLE THE TRAILING CABLES MUST BE SEPARATED AS FAR APART AS POSSIBLE AND SHOULD BE ARRANGED IN THE SHAFT AS SHOWN BELOW: IF YOU ARE USING HALF-WAY BOXES, YOU SHOULD ALSO TAKE CARE TO SEPARATE THE WIRES. The precautions carried out above should be taken in the controller as well. In fact, you should avoid crossing wires in all directions behind the controller and should leave a little slack to aid maintenance. Série 32 Mlift Vector - Prog.Vectorielle Installation manual Chapter I - page 16 USE OF DIFFERENTIAL CIRCUIT BREAKERS WITH AUTINOR FREQUENCY DRIVES (4/4) First of all as a reminder : • The low voltage directive explicitly states that electrical lift installations are excluded from its field of application and so the standards relating to electrical installations only applies as far as the input terminals of the main lift installation switch (cf EN 81 § 13.1.1.2) ; • Nevertheless the safety of all people must be ensured, and so to do this, we rely as much as possible on the detail of C 15-100 taking into account the imperatives concerning lifts. The standard C 15-100 § 532.2.1.3 states that : « Les dispositifs de protection à courant différentiel-résiduel doivent être choisis et les circuits électriques divisés de telle manière que tout courant de fuite à la terre susceptible de circuler durant le fonctionnement normal des appareils ne puisse provoquer la coupure intempestive du dispositif. » AUTINOR frequency drives have a normal current leakage when loaded around 100 mA. We therefor recommend the Lift installation be supplied through a differential circuit breaker with a differential current (= « sensitivity ») Iδn = 300 mA. What is more, C 15-100 states that for electrical installations cabled conform to the TT diagrams (installations powered by the public electricity network), people should be protected against indirect contacts by differential residual current circuit breaker which implies the following of the relation ship which links the circuit breaker differential current Iδn to the maximum conventional voltage of the UL contact and of the earthing socket resistance : Iδn * RA ≤ UL (NF C 15-100 § 532.2.4.2) If the earthing socket resistance exceeds 100 Ω, the electrician may use an S type differential circuit breaker with a differential current of 300 mA, which will ensure protection against indirect contact for an earthing socket resistance of up to 167 Ω. You should nevertheless ensure that a « full load » movement does not break the circuit at the wrong moment. Série 32 Mlift Vector - Prog.Vectorielle Installation manual Chapter I - page 17 Série 32 Mlift Vector - Prog.Vectorielle Installation manual Chapter I - page 18 MINIMUM CONNECTIONS NECESSARY FOR INITIAL MOVEMENT (1/4) GD 1 INCREMENTAL ENCODER HENGSTLER +24 RED 0V BLACK CAI WHITE CBI GREEN 3 GM To be installed in the safety lane Θ 0V STH GD GM 0V 0V 2 INS Cut the wires which are not used. Screening cable do not connect. Wires CAI and CBI should be crossed in dependance of your configuration. KM11 KM12 KC23 0V VEC05 BG15 VEC01 KA13 CS1 7 0V KA16 (BG19) CS2 6 810 BG19 8 KC22 +24 Red 13 FUVE STATE OF THE SAFETY LANE Bottom CBI 0V CAI 6 810 White Green Black 11 THE 3 LED'S (6, 8, 10) NEED TO BE LIT UP BEFORE THE LIFT WILL MOVE CONTROLLER TERMINAL RAIL 12 Incremental encoder L1PA L2PA L3PA Device of bridging of the safety measures of doors FREQUENCY DRIVE TERMINAL RAIL 13 PE FILTRE SECTEUR TRIPHASE 3 x 400Vac 50 / 60Hz 20 A à 40°C L1' L2' L3' CHARGE LOAD LIGNE AUTINOR Modèle : 0130-20 Made in France LINE FRV1 +BR FRV2 L3 RS 11 -BR L1 CV 1B 2 3 4C 6 8A N PE L2 12 1S 1C 2A 4 5 8 10 L L1 L2 L3 5 6 Minimum connections necessary for initial movement 4 Série 32 Mlift Vector - Prog.Vectorielle Installation manual Chapter I - page 19 MINIMUM CONNECTIONS NECESSARY FOR INITIAL MOVEMENT (2/4) During the construction phase, you can temporarily use the 0V, GM and GD inputs on the KM12 connector for running up and down respectively. CONNECT AS FOLLOWS: (See on page 18 for where to make these connections) 1 Connect the thermistor and/or the motor safety thermo-contact between the STH and 0V terminals on the KM11 connector 2 Temporarily bridge 0V and INS on the KC23 connector. 3 The "up" and "down" push buttons on the inspection box on the car roof to the GM, GD and 0V terminals on the KM12 connector. 4 The safety circuits 1S, 6, 8 and 10 on the electromechanical terminal rail. 5 The traction motor to 11, 12 ,13 on the electromechanical terminal rail and the EARTH to the earth collecting bar, as well as the brake power supply +BR & -BR 6 The power supply to L1, L2, L3 and the Earth. ! WARNING: DO NOT CONNECT THE L1, L2, L3 POWER SUPPLY TO 11, 12, 13 OR YOU RISK DAMAGING THE TRANSISTORS. CONNECT POINTS , , FOLLOWING THE ELECTROMAGNETIC COMPATIBILITY RECOMMENDATIONS AS SHOWN ON PAGE 13. 7 Temporarily bridge CS1 and 0V on KA13 and possibly CS2 and 0V on KA16 of the BG19 board (when there are 2 door operators). 8 Connect the four wires on the incremental encoder to the KC22 (Bottom) connector on the VEC01 board. Série 32 Mlift Vector - Prog.Vectorielle Installation manual Chapter I - page 20 POWER-UP FOR INITIAL MOVEMENT (3/4) Switch on the power: − The LEDs showing the transistors are green. CUT THE SAFETY LANE Please see page 26 for the description of how to use the frequency drive parameter/diagnostic communication device Checking the transistor control: 1) At address 041, write 55 041 TEST 55 VEC01 RECUP X2 X1 THE LEDS BECOME RED. Y2 Y1 Z2 Z1 2) At address 041, write 00 041 TEST 00 VEC01 RECUP X2 X1 THE LEDS BECOME GREEN AGAIN. Y2 Y1 Z2 Z1 Série 32 Mlift Vector - Prog.Vectorielle Installation manual Chapter I - page 21 POWER-UP FOR INITIAL MOVEMENT (4/4) To check the capacitor voltage: CUT THE SAFETY LANE! PRESS CONTACTOR L SELECT ADDRESS 104 104 Tcont 1000 100 10V 10 1 MODIF. CLEAR VALID. THE VOLTAGE READ IS ABOUT 600V 104 Tcont 1000 100 600V 10 1 MODIF. CLEAR VALID. To check the VEC12 current measuring device: • Check at addresses 12A and 12E that the value is between 500 and 524. If the values are not coherent, check the connection of the K8 connector of the VEC01 board. To check the incremental encoder connection: • Check at address 116 on the parameter/diagnostic communication device (see page 28) that the number of impulses increases as you turn the rotor in the direction corresponding to up, and decreases in the direction corresponding to down. Turn the rotor gently by hand. If the number of impulses changes in the wrong direction, inverse the CAI and CBI wire on the KC22 (bottom) connector of the VEC01 board. Check that the parameters are coherent (see Chapter VII Frequency drive parameters): RECONNECT THE SAFETY LANE! Try an up movement and then a down movement, and check that the lift starts off in the required direction. Possible faults: The system might come up with one or more of the following fault codes: • 17: Phase failure or inversion of the controller. • 102: Gap between the advised and real speed of more than 15% in Slow Speed. • 100: Motor over-intensity. ♦ Cross two of the motor phases. ♦ Check that the encoder is wired correctly. • 62: O03 tape head fault. Série 32 Mlift Vector - Prog.Vectorielle Installation manual Chapter I - page 22 LOCATION OF TERMINAL BLOCKS To VEC01 board K4 connector, and to tape head O03. Towards power supply transformer 0V 18V MTH 0V CAB CAA 0V +24 24R DEF CL 0V STH SUSD GD GM MAN 0V 0V GD GM INS Parameter/ Diagnostic J2 K5 Temperature sonde K1 0VF K10 +550VF K9 VEC01 KM17 Towards the BG19 2nd automatic door board J1 connecteur Motor current measuring device VEC12 J3 CR KC22 KM11 J7 KM12 KC23 K27 EPG4 EPG3 EPG2 EPG1 + KC21 Extension from 5 to 16 floors BG18 board J1 connector D3 D2 D1 M0 C7 C6 C5 C4 KP27 M3 M2 M1 E/SX P3 P2 P1 P0 KP34 NF3 NF2 NF1 NF0 P7 P6 P5 P4 KP23 POS3 POS2 POS1 POS0 J5 Towards electro-mecanical rail 10 8 K30 6 RS RS Lift controller connector To BG15 board J8 connector J1 OPTION MLIft J8 K4 ! * 24 / 48 V ** 110 / 220 V K12 K14 0V MAN K30 K15 TOP 10 * ** * ** MO VISO * DE COM1 S L VISO ** From BG15 board K28 connector COM2 VENT COM3 FR +24 MAN KC28 PRIC NS SU MHS KP22 DEF 24R CL 0V K13 CAB CAA KC22 KS21 +24 SH8 0V ZONE To VEC01 board J1 connector From BG15 board KC22 connector and from tape head O03. K28 K29 KA14 K23 K25 KP29 KP24 K24 KC29 KC24 24R +5V 0V 0V K62 K26 TOP INS/ MAN/ BOTTOM +24 0V CAA CAB 0V CCS CCL +24 COM3 FE1 OU1 DE BOTTOM +24 CBI 0V MO CAI 1 To VEC01 board K12 connector 4 FLOORS COLLECTIVE 24R 0V 24R SPG2 0V FD 24R CAM CREP FM COMB +24 0V To the contactors 2 UP TO 8 FLOORS SPG1 SPG3 SPG4 24R 0V THV PH 3 NOTHING TO BE CONNECTED 0V C3 C2 C1 C0 0V FF1 COI1 CS1 FCFE1 FCOU1 2 1 C3 C2 C1 C0 KP21 KT2 - Serial link connector (Ex : Parameter/ diagnostic tool KA13 N70 Towards power supply transformer 19 VDC J2 0V ED POM BG17 board J1 connector BG15 K8 KP26 3 To the BG18 floor extension board K1 connector or the BG19 2nd automatic door board K1 connector Input Output Spare therminal Série 32 Mlift Vector - Prog.Vectorielle Installation manual Chapter I - page 23 LOCATION AND FUNCTION OF FUSES NOTCH FU2, FU3 DC CURRENT PROTECTION (brake, retiring ramp, electrovalves ...) 250V dim: 5 X 20 TIME LAG For type 1 or 2 transformer T1=5A / T2= 2A FU1 (2A) ELECTRONIQUE AND SIGNAL POWER SUPPLY PROTECTION 2A-250 V dim: 5 X 20 TIME LAG PROGRAMME E2ROM (FAULTS) SPARE FUSE for FU1 2A-250V dim: 5x20 TIME LAG MICROPROCESSOR FU1 EQUIPMENT POWER SUPPLY PROTECTION 5A-250 V dim: 5 X 20 TIME LAG SPARE FUSE for FU2 and FU5 2,5A-250V dim: 5x20 QUICK ACTING BG15 FU+ R DC PROTECTION BY PROTISTOR DEPENDING ON THE DRIVE MODEL. FU4 (SEE TABLE BELOW) SAFETY LANE ! POWER SUPPLY The position of FU+ is depending PROTECTION of the V.F. Model 2A-250 V dim: 5 X 20 TIME LAG E2ROM (PARAMETERS) VEC01 RED LED ELECTRONIC RECTIFIED CURRENT PRESENT (MAIN BOARD) BRAKE CONTACTOR POWER CONTACTORS SPARE FUSE for FU4. for FU2 & FU3 if Type 2 transformer 2A-250V dim: 5x20 TIME LAG 3 PHASE NETWORK CURRENT FILTER 380 V dim: 6 X 32 L1P L2P L3P VEC12 MOTOR CURRENT MEASURING DEVICE If you should replace the motor current measuring device VEC12 It is IMPERATIVE to followed the same path wire GE 32 LA 32 TB 191 6A 6A 2A 4A 4A 2A ATTENTION !!! R MODEL N°2 N°3 N°4 N°5 N°6 / N°7 PROTISTOR 25 A (10x38) 40 A (14x51) 50 A (14x51) 63 A (22x58) 80 A (22x58) FU1 ELECTRONIC AND SIGNAL POWER SUPPLY PROTECTION 5A-250V dim: 5 x 20 TIME LAG FU5 24RB, PROTECTION WIRE FOR CALL PANEL BUTTONS 2,5A-250V dim: 5 x 20 QUICK ACTING FU2 COMB, PROTECTION WIRE FOR CALL PANEL BUTTONS 2,5A-250V dim: 5 x 20 QUICK ACTING SPARE FUSE for FU1 & FU7. for FU2 & FU3 if Type 1 transformer 5A-250V dim: 5x20 TIME LAG BG22 YELLOW LED RECTIFIED CURRENT PRESENT (brake, retiring ramp, electrovalves, anti-creep ...) FU7 RECTIFIED CURRENT PROTECTION TYPE A 5A-250V dim: 5 x 20 TIME LAG FU1 BH07 BOX PROTECTION 5A-250V dim: 5 x 20 TIME LAG SAFETY LANE PROTECTION FuVe TRANSISTOR COOLING FAN PROTECTION 0,5A-250 V dim: 5 X 20 QUICK ACTING ONLY USE PROTISTORS CAPABLE OF WHITHSTANDING 600V AND SPECIALLY CONCEIVED TO PROTECT SEMI-CONDUCTORS. THE USE OF OTHER FUSES IS DANGEROUS AND COULD DAMAGE THE TRANSISTORS IF THERE IS A POWER SURGE OR SHORT CIRCUIT. SPARE FUSE for FU1 5A-250V dim: 5x20 TIME LAG R L1PA-L2PA-L3PA DOOR 1 AND DOOR 2 PROTECTION OF THE INPUT PHASES FOR THE DOOR MOTOR OPERATOR 1 2A-380V dim: 8,5 x 31,5 Série 32 Mlift Vector - Prog.Vectorielle Installation manual Chapter I - page 24 LOCATION OF LED, JUMPERS AND RELAY OF THE BG15 BOARD TEST 0V 24V Program reference TEST SW7 E2rom CA SW4 CB SW5 Controller reference CS1 Board reference TEST 8 6 10 BG15 SW12 SW11 SW10 SW9 SW1 SW2 DE D MO Y GV/PV L OU1 FE1 CL COMB CREP DEF Série 32 Mlift Vector - Prog.Vectorielle Installation manual Chapter I - page 25 FUNCTION OF THE SW1, SW2, SW4-SW5, SW7, SW9-SW10SW11 & SW12 JUMPERS OF THE BG15 BOARD SW1 SW2 SW3 3 3 2 2 1 1 SW4 SW5 3 3 2 2 1 1 SW4 SW5 When the jumper is present, 24V increase the mass relays. When the jumper is present, 0V increases the mass relays. DOES NOT EXIST. When the jumpers are in the lower (position 1-2) the controller is programmed for use with the P202U tape-head. When the jumpers are in the upper (position 2-3) the controller is programmed for use with the O03 tape-head or the I.L.S proximity switches. SW6 DOES NOT EXIST. 3 2 1 SW7 When the jumper is in the lower (position HYDR) the controller is programmed for use as a HYDRAULIC. 3 2 1 SW7 When the jumper is in the upper (position TRAC) the controller is programmed for use as a TRACTION. SW8 DOES NOT EXIST. 1 2 3 SW9 SW10 Place the jumper to the right (position 2-3) for a single button - 2 to 8 floors using on the BG15 board only. SW11 SW12 1 2 3 SW9 SW10 SW11 SW12 Place the jumper to the left (position 1-2) for all other situations. Série 32 Mlift Vector - Prog.Vectorielle Installation manual Chapter I - page 26 FREQUENCY DRIVE PARAMETER / DIAGNOSTIC COMMUNICATION DEVICE This chapter contains information which will allow you to adapt the VECTOR equipment to the specific conditions of the lift on which it is installed. This adaptation is controlled by parameters, which you can modify according to your needs using the removable parameter / diagnostic communication device as described below in the paragraph Accessing the parameters. The parameters are memorised in a particular type of chip called an EEPROM 1 (or E2PROM) which keeps the information even when the equipment is switched off. Each parameter is linked to an abridged name and an address which corresponds to the position at which it is memorised in the EEPROM chip. Accessing the parameters As mentioned above, you can see and modify the parameters using the parameter/diagnostic communication tool; this consists of a 16 characters LCD display with four push buttons, which is connected to the VEC01 board by a standard Male/Female SubD 9 pt cable. VEC01 Standard Male/Female Sub-D9 pt cable AUTINOR 1000 THOUSANDS 100 10 1 MODIF. CLEAR VALID. UNITS HUNDREDS TENS TO MODIFY THE VALUES TO VALIDATE THE DATA RESET TO ZERO 1 EEPROM stands for Electrically Erasable Programable Read Only Memory. Série 32 Mlift Vector - Prog.Vectorielle Installation manual Chapter I - page 27 TO ACCESS THE PARAMETERS AND THE INPUT-OUTPUT INFORMATION Power-up the equipment, the display shows: VEC-Vxx 1000 xx/xx/xx 100 10 000 THEN V0 1000 1 100 0,150m/s 10 1 MODIF. CLEAR VALID. MODIF. CLEAR VALID. Each time you press 1 the value shown will increase by 1. Each time you press 10 the value shown will increase by 10. Each time you press 100 the value shown will increase by 100. Each time you press 1000 the value shown will increase by 1000. CHOOSING THE LANGUAGE The parameter/diagnostic communication device is preset to the language of the destination country. There are four options which appear at address 027 as follows: FRANCE, ENGLISH, DEUTSCH, ESPAGNOL. Press twice button 10, then 7 times button 1, for address 027 027 Country 1000 100 FRANCE 10 Press both MODIF buttons at the same time MDF 1000 1 100 FRANCE 10 1 MODIF. CLEAR VALID. MODIF. CLEAR VALID. 2x Country Press button 1 and choose the required language. MDF Country ENGLISH 1000 100 10 MODIF. CLEAR VALID. 7x Register the required language by pressing both VALID buttons at the same time 027 Country 1000 100 ENGLISH 10 1 MODIF. CLEAR VALID. The language in our example is English 1 Série 32 Mlift Vector - Prog.Vectorielle Installation manual Chapter I - page 28 Other example: VIEWING THE INCREMENTAL ENCODER IMPULSES (SEE PAGE 21). Reset the display to address 000 by pressing the CLEAR buttons simultaneously 000 V0 1000 Display address 116 using buttons 100, 10 and 1 0,150m/s 100 10 116 1 Codeur 1000 MODIF. CLEAR VALID. 100 The value displayed at address 116 increases when the rotor turns in the upwards direction Codeur 1000 100 1 1x 6x The value displayed at address 116 decreases when the rotor turns in the downwards direction 0975 10 10 MODIF. CLEAR VALID. 1x 116 0635 116 1 Codeur 1000 MODIF. CLEAR VALID. 100 0328 10 1 MODIF. CLEAR VALID. TRANSFER OF THE SETTINGS INCLUDED IN THE VVVF TOWARD THE DIAGNOSTIC TOOL. Press the 2 end buttons to make « READ PARAMETERS » appear. Validate by pressing the « VALID » buttons ..... Transfert READ PARAMETERS 1000 100 10 READ Adr. 1 1000 MODIF. CLEAR VALID. 100 Press the 2 end buttons to return to normal mode F8xx 10 000 1 V0 1000 MODIF. CLEAR VALID. 0,150m/s 100 10 1 MODIF. CLEAR VALID. Note: You can memorise in the E²ROM of the box, the parameters of 4 VVVF door drive, respectively at the addresses 00, 40, 80 or C0. For that, press the 2 end buttons than press « MODIF » button and modify the right number to 00, 40, 80 or C0 with the 10 button than press « VALID » to validate. READ PARAMETERS 1000 100 10 MODIF. CLEAR VALID. 1 40 Octets 1000 100 <- 00 10 MODIF. CLEAR VALID. 1 40 Octets 1000 100 40 <- 80 C0 00 10 1 MODIF. CLEAR VALID. x8 Ex: Copy the VVVF parameters at address 80 in the box READ Add. 1000 100 F8xx 10 MODIF. CLEAR VALID. 1 Série 32 Mlift Vector - Prog.Vectorielle Installation manual Chapter I - page 29 TRANSFER OF THE SETTINGS INCLUDED IN THE DIAGNOSTIC TOOL TOWARD THE VVVF. ! ! WARNING: this operation overwrite on the parameters included in the VVVF door drive Press the 2 end buttons, you read, « READ PARAMETERS » Display « WRITE PARAMETERS » using button 1 READ PARAMETERS WRITE PARAMETERS 1000 100 10 1 1000 MODIF. CLEAR VALID. 100 10 Validate by pressing the « VALID » button ..... Transfert WRITE Ad. 1 1000 MODIF. CLEAR VALID. Press the 2 end buttons to return to normal mode F8xx 100 10 000 1 V0 1000 MODIF. CLEAR VALID. 0,150m/s 100 10 1 MODIF. CLEAR VALID. x1 Note: You can transmit the VVVF parameters in the E²ROM of the box at addresses 00, 40, 80 or C0 in the box VEC03. For that, press the 2 end buttons, than on the button 1 to pass on « WRITE » mode than press the 2 « MODIF » buttons and than modify the right number at 00, 40, 80 or C0 with the 10 button than press « VALID » to validate. READ PARAMETERS 1000 100 10 WRITE PARAMETER 1 1000 MODIF. CLEAR VALID. 100 10 40 Octets 1 1000 MODIF. CLEAR VALID. 100 -> 00 10 40 Octets 1 1000 MODIF. CLEAR VALID. 100 40 -> 80 C0 READ Add. 00 10 1000 1 F8xx 100 10 1 MODIF. CLEAR VALID. MODIF. CLEAR VALID. x8 Ex: Copy the Parameters memorised at address 80 in the box to the VVVF TO REMIND YOURSELF OF THE ADDRESS If you forget the address you are changing, or the previous value shown, just press both MODIF buttons. 004 V2 1000 100 2,00m/s 10 1 MODIF. CLEAR VALID. TO CHANGE THE PARAMETERS IN DECIMAL MODE After selecting the required language (see previous page) you can access the parameters and change them if required. Reset the display by pressing both CLEAR buttons at the same time 000 V0 1000 100 0,150m/s 10 1 MODIF. CLEAR VALID. To change the V2 speed for example, display address 004 by pressing button 1 004 V2 1000 100 2,00m/s 10 Press both MODIF buttons at the same time MDF 1 V2 1000 MODIF. CLEAR VALID. 100 2,00m/s 10 1 MODIF. CLEAR VALID. 4x Press button 10 5 times to obtain the desired speed MDF V2 1000 100 2,50m/s 10 MODIF. CLEAR VALID. 5x 1 Register the new speed by pressing both VALID buttons at the same time 004 V2 1000 100 2,50m/s 10 MODIF. CLEAR VALID. 1 Série 32 Mlift Vector - Prog.Vectorielle Installation manual Chapter I - page 30 TO CHANGE THE PARAMETERS IN SEGMENT MODE You can access the options using segments and change them if so desired. Seg0 : IG, Seg1 : NOBAND, Seg2 : BATTERY, Seg3 : MLI, Seg4 : RETSEC, Seg5 : APPDIR, Seg6 : D65°, Seg7 : ML220V Reset the display by pressing both CLEAR buttons at the same time 000 V0 1000 100 0,150m/s 10 1 Display address 00E by pressing button 1 00E Opt 1000 MODIF. CLEAR VALID. 100 00000000 10 1 Press both MODIF buttons at the same time MDF Bt1 1000 MODIF. CLEAR VALID. 100 0 10 1 MODIF. CLEAR VALID. 11 x Press button 10 to obtain the required segment example: Direct approach. MDF Bt5 1000 100 AP-DIR 0 10 MODIF. CLEAR VALID. 5x 1 Press button 1 to activate segment 5. MDF Bt5 1000 100 AP-DIR 1 10 1 MODIF. CLEAR VALID. 1x Register the new data in the memory by pressing both VALID buttons at the same time. MDF Bt5 1000 100 AP-DIR 1 10 MODIF. CLEAR VALID. 1 Série 32 Mlift Vector - Prog.Vectorielle Installation manual Chapter I - page 31 CONTROLLER PARAMETER / DIAGNOSTIC COMMUNICATION DEVICE RAM PAR ADR/DON BG17 MODIF Indicator parameter access ECRIT Figure 1 Position of the sliding switches for parameter mode BG17 BG15 Figure 2 Position of the communication device Série 32 Mlift Vector - Prog.Vectorielle Installation manual Chapter I - page 32 THE PARAMETERS AND THEIR MYSTERIES This chapter contains information which will allow you to adapt MB32 VECTOR equipment to the specific conditions of the lift on which it is installed. the This adaptation is controlled by parameters, which you can modify according to your needs using the removable parameter / diagnostic2 communication device as described below in the paragraph Accessing the parameters. The parameters are memorised in a particular type of memory called an EEPROM (or E2PROM) which keeps the information even when the equipment is switched off. Each parameter is linked to an abridged name and an address which corresponds to the position at which it is memorised in the EEPROM chip. As computers are strange creatures, the addresses are expressed in a particular numbering system, called an hexadecimal system (= a numbering system in base 16), which is made up of numbers (from 0 to 9) as well as letters (A to F). This peculiarity aside, you only need to consider the address as a marker (think of the game of battleships). Accessing the parameters As mentioned above, you can see and modify the parameters using the parameter/diagnostic communication tool; this consists of a BG17 circuit board, which is plugged into the BG15 (figure 2, page 31). The BG17 board is made up of 2 displays with 7 segments, 2 push buttons and 2 sliding switches (figure 1, page 31). To access the parameters, the left-hand sliding switch must be at the bottom; this position is shown as PAR (as in PARAMETER) on the board. When the sliding switch is in this position, the decimal point on the right-hand display lights up to remind you that you are looking at or modifying the parameters. 2 Note for those used to using our previous manuals : The term "parameter/diagnostic communication device" replaces the old term "communication tool" to avoid any risk of confusion with the equipment used to communicate (directly or by telephone link) with the computer system (telesurveillance and/or telediagnostic). Série 32 Mlift Vector - Prog.Vectorielle Installation manual Chapter I - page 33 DISPLAY MODES Depending on the information to be displayed, the MB32 VECTOR uses the most appropriate method of showing the information. Digit Mode The digit mode is useful to read or programme times, or the number of floors, or the number of doors for example. Example: If we have 2 door operators, we program 02 at address 03. Segment Mode The segment mode uses the individual vertical segments on the display as shown below. Segment 6 Segment 5 Segment 7 Segment 4 Segment 3 Segment 0 Segment 2 Segment 1 This mode is useful to activate or deactivate different functions: Example: To activate the "flashing direction arrows" option, segment 5 at address 08 must be ON. The segment mode is also useful to view the state of inputs and outputs: Example: To check that the C0 input (car call to level 0) is correctly read by the MB32 VECTOR, you need to look at segment 0 at address 00. To change from digit to segment mode and vice-versa, slide the ADR-DON-MODIF switch to ADR/DON and press both buttons at the same time, and release. Série 32 Mlift Vector - Prog.Vectorielle Installation manual Chapter I - page 34 To change the address or to view the inputs, outputs and parameters ADR/DON Check that the ADR/DON-MODIF switch is on ADR/DON. MODIF 1 Scroll to the desired address (eg 03) by pressing the push buttons below the display. Press either button and the address will be displayed. Each time you press a button the value displayed will be increased by 1. RAM PAR RAM ADR/DON BG17 MODIF Press the right hand button 10 times to change PAR ADR/DON BG17 MODIF from address 09 to address 03 ECRIT ECRIT Leave the buttons for 1 second, and the contents of the selected address will be displayed indefinitely. RAM PAR ADR/DON BG17 MODIF RAM 1 second later ... PAR ECRIT ADR/DON BG17 MODIF ECRIT To remind yourself of the current address If you forget the address you are at, ADR/DON 1 Slide the ADR/DON-MODIF switch to MODIF. MODIF ADR/DON Then slide it back to ADR/DON. This will show you the address for 1 second, and then the contents. MODIF 2 Série 32 Mlift Vector - Prog.Vectorielle Installation manual Chapter I - page 35 TO CHANGE THE PARAMETERS RAM Check that the RAM-PAR switch is to PAR. PAR A) In digit mode Go to the parameter address as explained on the page before (e.g. 03). RAM PAR ADR/DON BG17 RAM MODIF PAR 1 second later ... ECRIT ADR/DON BG17 MODIF ECRIT ADR/DON 2 Slide the ADR/DON-MODIF switch to MODIF. MODIF Use the push buttons to increase/decrease to the new value (e.g. 02). RAM PAR ADR/DON BG17 MODIF RAM Push once on the right-hand button to change the value from 01 to 02. PAR ECRIT ADR/DON BG17 MODIF ECRIT 3 RAM PAR ADR/DON BG17 MODIF Register the new value by pushing and releasing both buttons at the same time. ECRIT 4 ADR/DON Slide the ADR/DON-MODIF switch back to ADR/DON. Address 03 will show followed by its value 02. MODIF 5 Série 32 Mlift Vector - Prog.Vectorielle Installation manual Chapter I - page 36 B) In segment mode Go to the parameter address as previously explained (e.g. 08). If the contents are displayed as a figure (82 in the example below), check that the right hand switch is in the upper position, and press both buttons at the same time; this will pass you into segment mode. The current address will be displayed followed by the contents shown in segments. If not pass onto stage . RAM RAM ADR/DON PAR BG17 MODIF 1 PAR BG17 ADR/DON RAM MODIF PAR ADR/DON MODIF BG17 Press ECRIT ECRIT and release ... 1' • The left-hand button acts on the TOP ROW of segments (4 to 7), ADR/DON RAM } } PAR MODIF • The right-hand button acts on the BOTTOM ROW of segments (0 to 3). BOTTOM ROW TOP ROW ECRIT BG17 Slide the ADR/DON-MODIF switch to MODIF. ADR/DON In our example we want to activate the "flashing direction arrow" function (address 08 segment 5). 2 MODIF We have to light up segment 5 while keeping on all other segments in their present state RAM PAR flashing direction arrow Seg 5 ADR/DON BG17 MODIF RAM Press once PAR flashing direction arrow Seg 5 ADR/DON BG17 ... ECRIT MODIF RAM Press once PAR flashing direction arrow Seg 5 ADR/DON BG17 MODIF ... ECRIT ECRIT Repeat stages and 2 2 shown on the previous page. Série 32 Mlift Vector - Prog.Vectorielle Installation manual Chapter I - page 37 CONCERNING THE ILLUSTRATIONS (1/2) Each connection that you will have to carry out is accompanied by an explication and an illustration. The illustrations try to summarise in one page all the important elements which will be necessary for you to carry out the corresponding function; i.e.: • • • • The PARAMETERS which you need to check or adjust, The CONNECTIONS themselves, The corresponding VARIABLES or INPUTS/OUTPUTS, The CONSEQUENCES of any possible ANOMALY connected with the function in question. In order to achieve this goal (or at least to try to) this manual uses the following symbols: RAM ADR/DON PAR MODIF OU ECRIT RAM ADR/DON PAR MODIF XXXXXX Add. YY Seg. Z View of the parameter/diagnostic tool when you should check or modify a parameter's value. Note that the push buttons are shown in this case. The figure also specifies the position of the sliding switches on the BG17 board. View of the parameter/diagnostic tool when you should check the state or value of a variable. Note that the push buttons are not shown in this case. The figure also specifies the position of the sliding switches on the BG17 board. Name, address and possible segment number, for the variable or parameter shown in one of the 2 preceding figures. You should check the value or state of the parameter indicated, and of course changes the parameter if it does not correspond to the value or state indicated. You should adjust the value of the parameter indicated. The unit used (second, 1/10 second, millimetre, etc...) and the base (decimal or hexadecimal) are displayed. Note: You will find all useful information about the bases and the conversions between bases in the chapter dedicated to the parameters. ☺ Don't worry, be happy! The parameter shown is at the right value, or the variable shown reflects a normal operation of the function in question. Now worry! The parameter shown is the wrong value, or the variable shown reflects a breakdown of the function in question. Série 32 Mlift Vector - Prog.Vectorielle Installation manual Chapter I - page 38 CONCERNING THE ILLUSTRATIONS (2/2) Keep an eye on this! This symbol indicates that you can see the state of the function in question. It is used instead of the "smilies" when there is no correct or incorrect state strictly speaking. This would be the case for example with the contact authorising movements when in full speed inspection mode. Fault! The wiring of the current function has caused a fault code to be displayed on the parameter/diagnostic tool. Permanent fault! This symbol accompanies the above symbol, when the wiring of the current function causes the permanent stop of the lift. In this case, the only way of putting the lift into service is by an intervention of you (or by cutting the power supply). Fault code! The fault code when there is a problem with the wiring of the current function. CHAPTER II INSTALLATION & CONNECTING THE SAFETY WARNING! Every intervention, connecting, on site maintenance, in the controller must justified a systematic cut of the main machine room switch provided by the EN 81 standard § 13.1.1.1. Série 32 Mlift Vector - Prog.Vectorielle Installation manual Chapter II - page 2 CONNECTING THE SAFETY LANE WITH AUTOMATIC DOORS AND MACHINE ROOM INSPECTION BOX S Maxi 250V GV SAFETY LANE POWER SUPPLY PV MO ( K29 ) FU4 - BG22 PROTECTION (§ 14.1.1.3) GV/PV DE MO 10 DE ( K28 ) ( K12 ) S MO DE L ( K14 ) S S L R 68 R 67 SAFETY LANE DISCONNECTION SWITCH R 63 R 62 RS ISOLATING TERMINAL BLOCKS CV RS 1S 1B 1C BG15 RS VEC01 MAIN BOARD 2 2A FRV1 TOP OVER TRAVEL LIMIT (§ 10.5.3.1.b.2) ELECTRO-MECHANICAL RAIL FRV2 3 (§ 14.2.1.3) INSPECTION BOX BOTTOM OVER TRAVEL LIMIT (§ 10.5.3.1.b.2) INSPECTION SAFETY GEAR SWITCH (§ 9.8.8) GM TRANSMISSION OF THE CAR POSITION TO THE FINAL LIMIT SWITCH (§ 10.5.2.3.b) OVERSPEED GOVERNOR TRIPPING (§ 9.9.11.1) IN ABSENCE OF MACHINE ROOM INSPECTION BOX SHUNT 2A & 3 GD COM1 VECTOR FREQUENCY DRIVE INSPECTION FINAL LIMIT SWITCH P 82.211 (§ 5.7.2.2.b) DECRET 95-826 (§ I.1.1) DISSIPATION BUFFER (§ 10.4.3.4) L L ( K30 ) 4 4C 6 5 8 8A 10 If you haven't a Doors Security Bridge Board, schunt the Terminal 5&6 NORMAL INS STOP IN INSPECTION BOX PULLEY ROOM STOP (§ 6.4.5) CAR GATE CONTACT (§ 8.9.2), (§ 7.7.6.2) (§ 7.7.4) LANDING LOCKS (§ 5.4.3.2.2) (§ 7.7.3.1) Used OVERSPEED GOVERNOR RELEASE (§ 9.9.11.2) Not used MAN/ MACHINE ROOM INSPECTION BOX (§ 14.2.1.4) GM OPTION GD EMERGENCY STOP ON CAR ROOF (§ 8.15.b) EMERGENCY DOOR (§ 8.11.5.2) + SECURITY I.G.H. (Art. GH33) SHAFT EMERGENCY EXIT (§ 5.2.2.2.2) CAR SAFETY TRAP SWITCH (§ 8.12.5.2) CAR STOP BUTTON (§ 14.2.2.2) PIT BOTTOM SWITCH (§ 5.7.3.4) CONTACT OF THE TENSION IN THE COMPENSATION ROPES Vn > 2.5 m/s. (§ 9.6.1.b) GOVERNOR RETURN PULLEY SWITCH (§ 9.9.11.3) Visa Responsable Normalisation Date H. MARY 10 / 07 / 97 Série 32 Mlift Vector - Prog.Vectorielle Installation manual Chapter II - page 3 INSTRUCTION FOR CONNECTING ANY DEVICES TO THE SAFETY LANE SAFETY LANE DOOR CLOSED CONTACTS PRIMARY SAFETY CONTACTS 250 V 6 8 DOOR LOCKED CONTACTS Protection 10 (BG15 Main board) (K30) 10 8 6 RS RS 0V 1 2 CV RS 3 CV & RS : HINGED TERMINALS TO TEST THE INSULATION OF THE SAFETY LANE 2 SEPARATE WIRES PE R Contactors R R Relays 2 MAKE SURE THAT ALL OF THE TERMINALS ARE CORRECTLY TIGHTENED ! Note : To make this diagram clearer, the electronic interfaces and the controller have been omitted. Connection of the interfaces to he lift’s safety lane 1 The 0 V of the secondary winding of the transformer which powers the safety lane must only be connected to the CV hinged terminal, by a wire whose the colour is neither green and yellow, nor blue. Only the hinged terminal mentioned above should carry the label CV; no other terminal in the controller should have this label. 2 With the exception of movement contactors (connected to the controller relays) ALL devices (contactors, electronic interfaces) with a pole connected to the safety lane, must have their other pole connected uniquely to the RS hinged terminal (Reference Securities), by a wire whose the colour is neither green and yellow, nor blue. 3 The hinged terminals RS and CV must never be wired together; they must be linked to the protection conductor PE by 2 separate wires, whose colours must be neither green and yellow, nor blue. Série 32 Mlift Vector - Prog.Vectorielle Installation manual Chapter II - page 4 MEASUREMENT OF THE INSULATION OF THE SAFETY CHAIN EN 81 standard § 13.1.3 a), state that the minimum insulation resistance of the safety chain shall be 500 000 Ω 1: 13.1.3 Insulation resistance of the electrical installation (CENELEC HD 384.6.61 S1) The insulation resistance shall be measured between each live conductor and earth. Minimum values of insulation resistance shall be taken from table 5. Nominal circuit voltage V Test voltage (D.C.) V Insulation resistance MΩ SELV ≤ 500 > 500 250 ≥ 0,25 ≥ 0,5 ≥ 1,0 500 1000 When the circuit includes electronic devices, phase and neutral conductors shall be connected together during measurement. In order to facilitate the measurement of the insulation resistance of the safety chain ask by EN 81-1 Annex D § D.2 f) 1) for electric lifts and EN 81-2 Annex D § D.2 e) 1) for hydraulic lifts, AUTINOR controllers are provided with switching terminals named CV and RS. These two are Weidmüller model WTR 2.5, reference 101110 which electrical characteristics, according IEC 947-7-1 are: Tension 500 V, Intensity 16 A, Section 2,5 mm² For an easy work, the terminals are installed close together on the electromechanical rail and each terminal have a yellow switching lever; when the two levers are in the off position, all elements of the controller related to the safety chain are disconnected from the earth. TO AVOID DAMAGE TO ELECTRONICS, PUT THE LEVERS OF THE 2 TERMINALS CV AND RS IN THE OFF POSITION BEFORE MEASURING INSULATION! RS CV CV & RS : SWITCHING TERMINALS FOR INSULATION OF THE SAFETY CHAIN CV RS L1 N Factory Wiring U1 L2 U2 V1 L3 V2 W1 w2 2 switching levers (EXAMPLE OF ELECTROMECHANICAL RAIL) EARTH CONNECTION BAR Measurement of the insulation resistance of the safety chain: example for MB32 controller. 1 These values are the same to those indicated in table 61 A of standard NF C 15-100, identical to the values indicated in publication CEI 364-6, not yet harmonised on the level of CENELEC (but which were the subject of the project of harmonisation PrHD 384-6 in Mars 1990). Série 32 Mlift Vector - Prog.Vectorielle Installation manual Chapter II - page 5 CONNECTION OF THE DOORS SAFETY CONTACTS BETWEEN 6 AND 10 (1/2) 8 10 6 8A (*) The EN 81Norm (§ 7.7.4.2) authorize the using of a unique contact for the landing in case of simultaneaous mechanic training of the car and landing doors Door closing contact and/or locking of the hinged doors (*) Door Closing Contact Level n Level m In case of Car and Landing Automatics doors Connecting 8 10 6 8A Door closing contacts of the hinged doors Door locking contacts of the hinged doors Door Closing Contact In case of hinged doors and automatic car door Série 32 Mlift Vector - Prog.Vectorielle Installation manual Chapter II - page 6 CONNECTION OF THE DOORS SAFETY CONTACTS BETWEEN 6 AND 10 (2/2) 8 10 6 8A (*) The EN 81Norm (§ 7.7.4.2) authorize the using of a unique contact for the landing in case of simultaneaous mechanic training of the car and landing doors Door Locking Contacts of the hinged doors Door closing contacts of the hinged doors Level n Level m Door Closing Contact Level n Level m Door closing contacts and/or locking of the hinged doors (*) Level n In case of mixed service automatic car door, hinged doors or automatic at some levels 8 10 6 8A Door closing contacts of the hinged doors Door locking contacts of the hinged doors In case of hinged door without car door (flush shaft) Level m CHAPTER III INSTALLATION & CONNECTING IN MACHINE ROOM Série 32 Mlift Vector - Prog.Vectorielle Installation manual Chapter III - page 2 CONNECTING OF MACHINE ROOM INCREMENTAL ENCODER HENGSTLER +24 RED 0V BLACK CAI WHITE CBI GREEN Cut the wires which are not used. Screening cable do not connect. Wires CAI and CBI should be crossed in dependance of your configuration. Input voltage 220 or 380 V L1 L2 L3 N Phase fail Incremental encoder Safety thermo-contact Thermal control of the ventilation L2 L3 L3P L2P L2P L1P L1P 3 PHASE NETWORK CURRENT FILTER PE L1' L2' L3' PE 12 13 +BR -BR ELECTROMECHANICAL RAIL L3P L2P L1P MAN/ Brake 11 PE L1 L2 L3 Bridge GM Delayed departure GD Screened Cable L1 * OPTION θ TCS BH08 M 3~ Fault indicator 24V / 1,2W Motor Thermostat Traction Motor In use indicator +19.5V KT1 KT2 -19.5V BG22 L2 L1 KC22 (bottom) +19 V Main board -19 V VEC01 KT2 ELECTROMECHANICAL RAIL L3 +24 0V CAI CBI PH 0V THV K62 MAIN BOARD BG15 STH SUSD 0V KM11 CL DEF 24R GD GM MAN 0V KM12 * MTH 0V KM17 Série 32 Mlift Vector - Prog.Vectorielle Installation manual Chapter III - page 3 MOTOR SCREENING CABLE RAM ADR/DON PAR MODIF RECAV1 RE positioning in speed V1? ☺ Add. 08 Seg. 7 ON BG17 ECRIT CONTROLLER: PE 11 12 13 Yellow/Green earthing cable USING A SCREWDRIVER LOWER THE MOBILE PLATE TO INSERT THE SCREENING CABLE S L Phase cables Screening cable Screened cable 11 L1 L2 13 Note: Keep the motor cable as far apart from the power cable as possible, inside as well as outside the controller. 12 L3 MOTOR: Y U1 W2 V1 U2 W2 U2 V2 U1 V1 W1 Terminal box Yellow/Green earthing cable Motor earth terminal CONNECTION W1 V2 Screening flat cable linked in the shortest way to the earth terminal Motor earth terminal Phase cables Screened cable Star connection Motor 220 V / 380 V Mains 380 V Note: The cables should only be separated from the screening once inside the terminal box. Connectin of traction motor MLIft Série 32 Mlift Vector - Prog.Vectorielle Installation manual Chapter III - page 4 MOTOR VENTILATION DETECTION BY THERMO-CONTACT BG15 1S TCV Motor ventilation command Motor over heating Detection by thermo-contact - Thermal control of the ventilation θ K62 Input Connection diagram « Chapter VII Electric diagrams » Output Free Terminal 0V THV Factory Connected From relay of thermal protection 98 97 THV Fan THermistor Add. 0d Seg. 4 THV ☺ RAM ADR/DON PAR MODIF RAM ADR/DON PAR MODIF Viewing the fan thermistor state DEF BG15 Consequences of the ventilation motor starting Série 32 Mlift Vector - Prog.Vectorielle Installation manual Chapter III - page 5 THERMAL PROTECTION OF THE MOTOR & CONTROL OF THE MACHINE ROOM TEMPERATURE 0V STH CTP RESISTANCE KM11 TCS θ θ MACHINE ROOM TEMPERATURE TRACTION MOTOR Motor protection against overloads: Connection of embedded thermistor and /or thermo-contact & control of the machine room temperature by thermo-contact BG15 STH THermic probe Add. 12 Seg. 3 ☺ RAM ADR/DON PAR MODIF RAM ADR/DON PAR MODIF Viewing motor thermal protection state or thermic probe state DEF BG15 Consequences of an over heating of the motor or machine room Série 32 Mlift Vector - Prog.Vectorielle Installation manual Chapter III - page 6 EMERGENCY ELECTRICAL OPERATION (1/2) RAM ADR/DON PAR MODIF OptMan Homing control option? Add. 07 Seg. 4 BG17 ECRIT FREVD 1S GD GM 2 1B 1C 2A FREVM 3 4C 4 MAN 0V 1 BG15 KM12 GD GM 2 3 GD 4 GM 3 MAN MAN 0V 2 Normal Emergency Rappel 1 Connection of the emergency electrical switches. MINIBLOC Emergency operation Add. FF Seg. 5 RAM PAR Viewing of emergency electrical operation MAN ADR/DON MODIF Série 32 Mlift Vector - Prog.Vectorielle Installation manual Chapter III - page 7 EMERGENCY ELECTRICAL OPERATION (2/2) EUROPEAN STANDARD EN 81-1 Notices, markings and operating instructions 15.1 General provisions All labels, notices, markings and operating instructions shall be indelible, legible and readily understandable (if necessary aided by signs or symbols). They shall be untearable, of durable material, placed in a visible position, and written in the language of the country where the lift is installed (or, if necessary, in several languages). § 15.4.3 In the machine room, there shall be detailed instructions to be followed in the event of lift breakdown, particularly concerning the use of the device for manual or electrical emergency movement, and the unlocking key for landing doors. Emergency electrical operation switches box MAN, GM & GD Emergency operation Up Down Add. 0C Seg. 4, 2 & 1 RAM PAR GM MAN ADR/DON GD MODIF Viewing of emergency electrical operation switches DEF BG15 Consequences of simultaneity of emergency electrical operation and inspection operation Série 32 Mlift Vector - Prog.Vectorielle Installation manual Chapter III - page 8 VIEWING OF THE UNLOCKING ZONE P309 BATTERY CHARGER BOARD 12V - 0,5 / 1,2 Ah Life cycle of battery is between 5 and 7 years K37 Battery charger 220V Supply K17 VZAS Viewing of the position of the car in unlocking zone only in the case of emergency power Magnet N 0V L Standard EN 81.2 § 12.9.3 12P + FU1 Protection of emergency power against overcurrent 0,5A 250V dim: 5 X 20 QUICK ACTING - + - KS15 N57 Input Output Free terminal Factory Connected Viewing of the unlocking zone in emergency power. Série 32 Mlift Vector - Prog.Vectorielle Installation manual Chapter III - page 9 DELAYED DEPARTURE 0V SUSD BG15 DELAYED DEPARTURE CONTACT KM11 Connection of the delayed departure contact. SUSD Delayed departure ☺ RAM ADR/DON PAR MODIF RAM ADR/DON PAR MODIF Add. 0E Seg. 2 Viewing of the delayed departure DEF BG15 Consequence of the delayed departure Série 32 Mlift Vector - Prog.Vectorielle Installation manual Chapter III - page 10 FAULT LIGHT (INDICATOR) FAULT LIGHT 24V FAULT LIGHT 24V 24R DEF 24R DEF If + of 60 mA per light BG15 3 2 1 KM11 KM11 KP22 WARNING !!! CONSUMPTION OUTPUT "DEF" (KM11) IN MACHINE ROOM + CONSUMPTION OUTPUT "DEF" (KP22) ON LANDING = 100 mA MAXI 22 21 24 12 11 14 P217 Connection of the fault light DEF Fault light Add. 15 Seg. 7 ☺ RAM ADR/DON PAR MODIF RAM ADR/DON PAR MODIF Viewing of the fault light DEF BG15 Consequences of the fault light Série 32 Mlift Vector - Prog.Vectorielle Installation manual Chapter III - page 11 INTERCOM VOLUME CONTROLE INTERCOM P310 P309 _ KP26 0V + POM K39 0V 12P 0V BG15 KM14 KP31 HPM EPM 0V ITM 12P KC30 HPP EPP 0V HPC 0V FREE TERMINAL IPP K17 K37 0V 12P N L BATTERY CHARGER POWER SUPPLY 220V 1 1 2 MACHINE ROOM LOUDSPEAKER P266 3 4 FIRE LANDING LOUDSPEAKER P266 CAR LOUDSPEAKER P266 INTERCOM SWITCHED ON BETWEE THE CAR AND THE MACHINE ROOM To respect the standard EN 81-1 § 14.2.3.5 2 PUSH BUTTON "TO SPEAK" IN PHONIC LIAISON BETWEEN THE CAR AND THE MACHINE ROOM 3 FIREMAN SERVICE CONTACT SWITCH INTERCOM BETWEEN THE CAR AND THE FIRE LANDING. 4 PUSH BUTTON "TO SPEAK" IN PHONIC LIAISON BETWEEN THE CAR AND THE FIRE LANDING. CHAPTER IV INSTALLATION & CONNECTING IN SHAFT Série 32 Mlift Vector - Prog.Vectorielle Installation manual Chapter IV - page 2 FIXING THE SLOTTED-TAPE BRACKETS M8 x 20 2 x M8 x 20 2 x M8 x 20 4 x M5 x 15 2 x M12 x 30 M8 x 20 PL M6 2 x M8 x 20 Série 32 Mlift Vector - Prog.Vectorielle Installation manual FIXING THE BRACKETS FOR CONTROL OF THE DOOR-ZONE Chapter IV - page 3 Série 32 Mlift Vector - Prog.Vectorielle Installation manual Chapter IV - page 4 POSITION OF THE DOOR-ZONE P01 SENSOR OR PROXIMITY SWITCHES (I.L.S.) AND TAPE HEAD O03 SELECTOR Position of door-zone P01 sensors and tape-head O03 selector Position of proximity switches (I.L.S) door-zone sensors and tape-head O03 selector Série 32 Mlift Vector - Prog.Vectorielle Installation manual Chapter IV - page 5 POSITION OF THE VANES FOR DOOR-ZONE P01 SENSORS IN CASE OF DOORS OPEN MOVEMENTS DOOR- ZONE LEVEL L HIGHEST LEVEL L SLOW SPEED UP LEVELLING ZONE SLOW SPEED DOWN LEVELLING ZONE TAPE-HEAD P01 DOOR- ZONE LEVEL L-1 LEVEL L-1 DOOR- ZONE LEVEL 2 LEVEL 2 SLOW SPEED UP LEVELLING ZONE SLOW SPEED DOWN LEVELLING ZONE DOOR- ZONE LEVEL 1 LEVEL 1 SLOW SPEED UP LEVELLING ZONE SLOW SPEED DOWN LEVELLING ZONE DOOR- ZONE LEVEL 0 LEVEL 0 Série 32 Mlift Vector - Prog.Vectorielle Installation manual Chapter IV - page 6 POSITION OF THE MAGNETS FOR THE DOOR-ZONE READ BY PROXIMITY SWITCHES DOOR- ZONE LEVEL L HIGHEST LEVEL L SLOW SPEED UP LEVELLING ZONE SLOW SPEED DOWN LEVELLING ZONE DOOR- ZONE LEVEL L-1 LEVEL L-1 DOOR- ZONE LEVEL 2 LEVEL 2 PROXIMITY SWITCHES SLOW SPEED UP LEVELLING ZONE SLOW SPEED DOWN LEVELLING ZONE DOOR- ZONE LEVEL 1 LEVEL 1 SLOW SPEED UP LEVELLING ZONE SLOW SPEED DOWN LEVELLING ZONE DOOR- ZONE LEVEL 0 LEVEL 0 Série 32 Mlift Vector - Prog.Vectorielle Installation manual Chapter IV - page 7 DOOR SECURITY BRIDGE BOARD RELEVELLING PRE-OPENING BOARD VISUALISATION OF THE DOOR-ZONE (N62) Tape-head for B zone Visualisation of the presence of the car in a unlocking zone only in case of battery supply From the safety battery charger board P309 K37 terminal VZAS P01 +24 OR 0V CAZB + - + - Norme EN 81.2 § 12.9.3 + a b Proximity switch for B door-zone SW2 KS15 KS19 Visualisation of the relay state N62C Visualisation of the presence of the car in a door-zone only in case of battery supply ZONE C KC32 KS7 to the 6 electromechanical terminal On site control switch EN 81 § D.2 b) Norme SH8 Normal position The relay always sticks SW2 B 6E INS2 KS20 The relay never sticks SW4 'B' relay command 5E/5S INS1 INS2 5 SW1 to the 10 electromechanical terminal SW3 A RZONE 'A' relay command KS14 ISO INS SW1 Tape-head for A zone P01 KS13 KS12 Normal b a + OR Proximity switch for A door-zone Insp Visualisation of the presence of the car in a door-zone Input Output CAZA+ CAZACAZA RKISO RZONE ZOMI +24 0V SH8 From the Mainboard KS21 terminal Free terminal Factory connected Série 32 Mlift Vector - Prog.Vectorielle Installation manual Chapter IV - page 8 DOOR SECURITY BRIDGE BOARD RELEVELLING PRE-OPENING BOARD VISUALIZATION OF THE DOOR-ZONE (N57) From the safety battery charger board P309 K37 terminal Norme EN 81.2 § 12.9.3 Visualisation of the presence of the car in a unlocking zone only in case of battery supply VZAS Input Output + - + - Free terminal Factory wiring N57A KS5 / KS15 KC12 / KC32 4S 5E/5S To the safety chain 4S KS7 / KS17 C A KS10 / KS20 B Visualisation of the relay state « 6E Factory Shunt SH8 KS4 / KS14 KS3 / KS13 Proximity switch for B door-zone KS2 / +24 10 to the 10 electromechanical terminal KS12 CAZB CAZCAZ+ CAZA 0V SH8 RZONE RKISO From the Mainboard KS21 terminal Proximity switch for A door-zone For each N57 you can find attached a specific documentation (Directive relating to lift (95/16/EC) Annex 1 § 6.1.) concerning this safety component. CHAPTER V INSTALLATION & CONNECTING ON LANDING Série 32 Mlift Vector - Prog.Vectorielle Installation manual Chapter V - page 2 CONNECTING ON LANDING: 2 TO 8 LEVELS (SAPB OR COLLECTIVE 1 BUTTON) WARNING! MAIN BOARD BG15 SW9 TO SW12 JUMPER POSITION ON BG15 SW12 : SW11 : SW10 : SW9 : KP27 E/SX M1 M2 KP34 M3 NF0 NF1 NF2 KP29 NF3 COMB 24R KP23 KP24 POS0 POS1 POS2 POS3 CREP 24R 0V NOTHING WILL BE CONNECTED ON THESE TERMINAL! FM 0V FD KP26 KP22 K24 24R DEF CL 0V POM 0V ELECTRONIC OUTPUTS MUST BE INTERFACED K26 ED SPG3 24R KC28 SPG1 MHS ELECTRONIC OUTPUTS VPMP - VHS - GONG 0V ON LANDING 0V P3 P7 P2 P6 P1 P0 P5 POM/ MHS P4 24V / 1.2W VPMP 24V / 1.2W THE LANDING CALL BUTTONS ARE CONNECTED SAPB or COLLECTIVE 1 BUTTON 8 FLOORS MAX. (Without Positionning outputs, Duplex, Level damaged by Fire and double selective service) DIGITAL INDICATORS 24V / 1.2W UP OR DOWN ARROWS DESCENTE PROGRAMMATION: 24V / 1.2W FAULT LIGHT 24V / 1.2W IN USE INDICATOR * FIRE SERVICE KEY FIRE SERVICE LIGHT VHS OUT OF SERVICE LIGHT * OUT OF SERVICE KEY Série 32 Mlift Vector - Prog.Vectorielle Installation manual Chapter V - page 3 CONNECTING ON LANDING: SAPB MORE THAN 8 LEVELS OR COLLECTIVE 1 OR 2 BUTTONS / LANDING 2 TO 16 LEVELS WARNING! MAIN BOARD BG15 SW9 TO SW12 JUMPER POSITION ON BG15 SW12 : SW11 : SW10 : SW9 : KP21 M0 D1 D2 KP27 D3 M1 M2 M3 KP24 KP29 KP34 KP23 COMB 24R NF1 NF2 NF3 NF4 POS0 POS1 POS2 POS3 K24 CREP 24R 0V ELECTRONIC OUTPUTS 24V / 1.2W FM 0V FD KP26 KP22 24R DEF CL 0V POM 0V ELECTRONIC OUTPUTS MUST BE INTERFACED K26 ED SPG3 24R KC28 SPG1 MHS ELECTRONIC OUTPUTS VPMP - VHS - GONG 0V ON LANDING 0V 0V ON LANDING 0V D3 M3 D2 D1 M2 M1 POM/ MHS M0 24V / 1.2W VPMP 24V / 1.2W THE LANDING CALL BUTTONS ARE CONNECTED DOWN OR UP COLLECTIVE. FOR MORE THAN 4 FLOORS ADD THE NECESSARY BG18 BOARD DAMAGED LEVELS DIGITAL INDICATORS 24V / 1.2W UP OR DOWN ARROWS DESCENTE 24V / 1.2W FAULT LIGHT 24V / 1.2W IN USE INDICATOR * FIRE SERVICE KEY FIRE SERVICE LIGHT VHS OUT OF SERVICE LIGHT * OUT OF SERVICE KEY PROGRAMMATION: - IN COLLECTIVE 2 BUTTONS: Add 07-Seg 7-UNLIT ; Add 5C-Seg 5-UNLIT, Bat 6-UNLIT (SEE THE MASK AT ADDRESSES 13, 14 AND 16, 17) Série 32 Mlift Vector - Prog.Vectorielle Installation manual Chapter V - page 4 COMBINATION OF ELECTRONICS BOARDS In function of: number of level, number of button at the each landing and the controller type. The table below indicates the different combination between the electronics boards BG15 (Main board), BG18 (Levels boards) and BG19 (2nd service board) includes in your controller, in function of the number of levels (2 to 16 Levels), buttons at each landing (1 or 2 buttons) and your controller type (collective 1 button, Full collective, double selective service). BG15 Single automatic operation 2 to 8 level Single automatic operation 9 to 12 level Single automatic operation 13 to 16 level Collective operation 1 button 2 to 8 level Collective operation 1 button 2 to 16 level Full collective operation 2 to 4 level Full collective operation 5 to 8 level Full collective operation 9 to 12 level Full collective operation 13 to 16 level Double selective service 2 to 4 level Double selective service 5 to 8 level X X X X X X X X X X X BG18 (1) X X X X X X X X BG18 (2) X X X X X X BG18 (3) X X X X BG19 X X Drawing page 5 7 7 9 11 13 13 13 13 15 15 The table below indicates which interception direction at a given landing, in function of the different parameter state. In any case, the segment Base 8N light on ! Segment Segment Segment Segment Interception direction Ramdes on landing BLOCAG MsqDE MsqMo Lit indifferent indifferent indifferent Single automatic Unlit Unlit indifferent indifferent in Down for all levels Unlit Lit Unlit Unlit No interception Unlit Lit Lit Unlit in Down Unlit Lit Unlit Lit in Up Unlit Lit Lit Lit In both direction (*) (*) When the both segments Base 8N and Ramdes are lit, the sofware of the controller MB32 forced the switching on of the Parameter-segment EFFNSEL (Call cancel option / EFFacement Non Sélectif ?) -address 08, segment 3. When the segment Base 8N is switching on, the equipment MB32 works on SAPB mode or Collective 1 button per landing. When the segment BLOCAG is switching on, the equipment MB32 works on SAPB mode, if the segment is switching off, the equipment works on Down collective mode. For reasons describes above at the parameter-segment Base 8N, the software forced the switching off of the segment Ramdes if you have switching on, one of the segment below: • DServS • NivSin • DPLX - address 02, segment 2. (Double Selective SERVice?) - address 02, segment 3, (Level damaged?) - address 02, segment 6. (DuPLeX?) Série 32 Mlift Vector - Prog.Vectorielle Installation manual Chapter V - page 5 LANDING CALLS FOR SINGLE AUTOMATIC OPERATION 2 TO 8 LEVELS (1/2) ! : Without positioning 1 wire per level-without multiplex-without level damaged BASE 8N BASE 8 level RAM ADR/DON PAR MODIF Add. 5C Seg. 5 BG17 BLOCAG Single automatic operation? Add. 07 Seg. 7 RAMDES Down collective ECRIT RAM ADR/DON PAR MODIF BG17 ECRIT RAM ADR/DON PAR MODIF Add. 5C Seg. 6 BG17 ECRIT For the mask: To switch on the segment corresponding to the active buttons. MsqDE Mask the landing calls for « Down » Add. 16 Seg. 0 to 7 RAM PAR BG17 P7 P6 P5 P4 ADR/DON P3 P0 MODIF P2 P1 ECRIT Série 32 Mlift Vector - Prog.Vectorielle Installation manual Chapter V - page 6 LANDING CALLS FOR SINGLE AUTOMATIC OPERATION 2 TO 8 LEVELS (2/2) WARNING! SW12 This operating mode forbids any selective light : position indicator with light, next departure arrows, selective gong, etc. and so the option «levels damaged». SW11 SW10 SW9 LEVEL 7 * LEVEL 2 BG15 FU5 24RB KP27 P3 P2 P1 P0 * LEVEL 1 * FU2 COMB KP34 FU5 / FU2 24RB / COMB PROTECTION WIRE FOR CALL PANEL BUTTONS 2,5A-250V dim: 5 x 20 QUICK ACTING KP29 COMB * 24R * P7 P6 P5 P4 LEVEL 0 THE LANDINGS CALLS ACCEPTANCE ARE OPTIONAL IN CASE OF S.A.P.B. * Light 24 V 1,2 W max per output Px Landing calls connection P7 Px - APPALD « Down » landing calls M0, D1 to D15 P6 P5 RAM Add. 06 Seg. 0 to 7 PAR P3 Landing calls preview P4 ADR/DON P2 MODIF P1 P0 Série 32 Mlift Vector - Prog.Vectorielle Installation manual Chapter V - page 7 LANDING CALLS FOR SINGLE AUTOMATIC OPERATION 2 TO 16 LEVELS (1/2) ! : With positioning 1 wire per level - multiplex - level damaged BASE 8N BASE 8 level RAM ADR/DON PAR MODIF Add. 5C Seg. 5 BG17 BLOCAG Single automatic operation? Add. 07 Seg. 7 RAMDES Down collective ECRIT RAM ADR/DON PAR MODIF BG17 ECRIT RAM ADR/DON PAR MODIF Add. 5C Seg. 6 BG17 ECRIT For the mask: To switch on the segment corresponding to the active buttons. MsqDE Mask the landing calls for « Down » Add. 16 Seg. 0 to 7 PAR Add. 17 Seg. 0 to 7 RAM P6 P5 P4 ADR/DON P3 P0 MODIF P2 P1 BG17 MsqDE Mask the landing calls for « Down » P7 RAM ECRIT P13 P14 P12 P15 ADR/DON PAR BG17 P11 P8 MODIF P10 P9 ECRIT Série 32 Mlift Vector - Prog.Vectorielle Installation manual Chapter V - page 8 LANDING CALLS FOR SINGLE AUTOMATIC OPERATION 2 TO 16 LEVELS (2/2) DOWN LANDING CALLS LEVEL 15 3rd BG18 board Level 12 to 15 D15 D14 D13 D12 KPDX LEVEL 12 KPMX 2nd BG18 board Level 8 to 11 LEVEL 9 D11 D10 D9 D8 KPDX KPMX SW12 1st BG18 board Level 4 to 7 SW11 SW10 SW9 KPDX LEVEL 7 D7 D6 D5 D4 BG18 KPMX LEVEL 2 BG15 KP21 FU5 24RB D3 D2 D1 M0 LEVEL 1 FU2 COMB LEVEL 0 KP27 FU5 / FU2 24RB / COMB PROTECTION WIRE FOR CALL PANEL BUTTONS 2,5A-250V dim: 5 x 20 QUICK ACTING KP29 24R COMB Light 24 V 1,2 W max per output Px Landing calls connection Px - APPALD « Down » landing calls M0, D1 to D15 Add. 06 Seg. 0 to 7 P7 P6 P5 RAM PAR P3 P4 ADR/DON P2 P1 P0 MODIF Px - APPALD « Down » landing calls M0, D1 to D15 Add. 07 Seg. 0 to 7 Landing calls preview P15 P14 P13 RAM PAR P11 P10 P12 ADR/DON P9 P8 MODIF Série 32 Mlift Vector - Prog.Vectorielle Installation manual Chapter V - page 9 LANDING CALLS FOR COLLECTIVE OPERATION, 1 BUTTON, 2 TO 8 LEVELS (1/2) ! : Without positioning 1 wire per level, without Duplex, without level damaged BASE 8N BASE 8 Level RAM ADR/DON PAR MODIF Add. 5C Seg. 5 BG17 BLOCAG Single automatic operation? Add. 07 Seg. 7 RAMDES Down collective ECRIT RAM ADR/DON PAR MODIF BG17 ECRIT RAM ADR/DON PAR MODIF Add. 5C Seg. 6 BG17 ECRIT For the mask: To switch on the segment corresponding to the active buttons and direction. MsqMo Mask the landing calls for « Up » Add. 13 Seg. 0 to 7 RAM PAR Add. 16 Seg. 0 to 7 RAM PAR BG17 P6 P5 P4 ADR/DON P3 P0 MODIF P2 P1 BG17 MsqDE Mask the landing calls for « Down » P7 ECRIT P7 P6 P5 P4 ADR/DON P3 P0 MODIF P2 P1 ECRIT Série 32 Mlift Vector - Prog.Vectorielle Installation manual Chapter V - page 10 LANDING CALLS FOR COLLECTIVE OPERATION, 1 BUTTON, 2 TO 8 LEVELS (2/2) WARNING! SW12 This operating mode forbids any selective light : position indicator with light, next departure arrows, selective gong, etc. and so the option «levels damaged». SW11 SW10 SW9 LEVEL 7 LEVEL 2 BG15 FU5 24RB KP27 P3 P2 P1 P0 LEVEL 1 FU2 COMB KP34 FU5 / FU2 24RB / COMB PROTECTION WIRE FOR CALL PANEL BUTTONS 2,5A-250V dim: 5 x 20 QUICK ACTING KP29 COMB P7 P6 P5 P4 LEVEL 0 Light 24 V 24R 1,2 W max * per output Px Landing calls connection P7 Px - APPALD « Down » landing calls M0, D1à D15 P6 P5 RAM Add. 06 Seg. 0 to 7 PAR P3 Landing calls preview P4 ADR/DON P2 MODIF P1 P0 Série 32 Mlift Vector - Prog.Vectorielle Installation manual Chapter V - page 11 LANDING CALLS FOR COLLECTIVE OPERATION, 1 BUTTON, 2 TO 16 LEVELS (1/2) BASE 8N BASE 8 Level RAM ADR/DON PAR MODIF Add. 5C Seg. 5 BG17 BLOCAG Single automatic operation? Add. 07 Seg. 7 RAM ADR/DON PAR MODIF BG17 RAMDES Down collective ECRIT ECRIT RAM ADR/DON PAR MODIF Add. 5C Seg. 6 BG17 ECRIT For the mask: To switch on the segment corresponding to the active buttons and direction. P6 RAM MsqMo Mask the landing calls for « Up » Add. 13 Seg. 0 to 7 PAR P3 BG17 MsqDE Mask the landing calls for « Down » Add. 16 Seg. 0 to 7 PAR BG17 P4 P14 RAM ADR/DON P2 P0 MODIF P1 MsqMo Mask the landing calls for « Up » Add. 14 Seg. 0 to 7 P5 P7 P3 RAM ECRIT MsqDE Mask the landing calls for « Down » Add. 17 Seg. 0 to 7 PAR BG17 P12 P13 ADR/DON P10 P9 P8 MODIF ECRIT P14 P0 MODIF P1 P11 P4 ADR/DON P2 PAR P15 BG17 ECRIT P6 RAM P5 P7 P15 P11 P12 P13 ADR/DON P10 P9 ECRIT P8 MODIF Série 32 Mlift Vector - Prog.Vectorielle Installation manual Chapter V - page 12 LANDING CALLS FOR COLLECTIVE OPERATION, 1 BUTTON, 2 TO 16 LEVELS (2/2) DOWN LANDING CALLS LEVEL 15 3rd BG18 board Level 12 to 15 D15 D14 D13 D12 KPDX UP LANDING CALLS LEVEL 12 KPMX 2nd BG18 board Level 8 to 11 LEVEL 9 D11 D10 D9 D8 KPDX KPMX SW12 1st BG18 board Level 4 to 7 SW11 SW10 SW9 LEVEL 7 D7 D6 D5 D4 KPDX BG18 KPMX BG15 LEVEL 2 D3 D2 KP21 FU5 24RB M0 LEVEL 1 FU2 COMB KP27 FU5 / FU2 24RB / COMB PROTECTION WIRE FOR CALL PANEL BUTTONS 2,5A-250V dim: 5 x 20 QUICK ACTING LEVEL 0 M1 KP29 24R COMB Light 24 V 1,2 W max per output Dx or Ux Landing calls connection Add 06 : P7 P6 P5 P4 RAM Px - APPALD « Down » landing calls M0, D1 to D15 Add. 06 & 07 Seg. 0 to 7 PAR P3 Add 07 : P15 Add 03 : ADR/DON P2 P14 P13 RAM PAR P11 P10 P0 MODIF P1 P12 ADR/DON P9 P7 P6 P5 RAM Px - APPALM « Up » landing calls M0 to M15 Add. 03 & 04 Seg. 0 to 7 P8 MODIF Landing calls preview PAR P3 Add 04 : P15 P4 ADR/DON P2 P14 P1 P13 RAM PAR P11 P10 P0 MODIF P12 ADR/DON P9 P8 MODIF Série 32 Mlift Vector - Prog.Vectorielle Installation manual Chapter V - page 13 LANDING CALLS FOR FULL COLLECTIVE OPERATION, 2 TO 16 LEVELS (1/2) BASE 8N BASE 8 Level? RAM ADR/DON PAR MODIF Add. 5C Seg. 5 BG17 BLOCAG Single automatic operation? Add. 07 Seg. 7 RAM ADR/DON PAR MODIF BG17 RAMDES Down collective ECRIT ECRIT RAM ADR/DON PAR MODIF Add. 5C Seg. 6 BG17 ECRIT For the mask: To switch on the segment corresponding to the active buttons and direction. P6 MSQMO Mask the landing calls for « Up » Add. 13 Seg. 0 to 7 RAM PAR P3 BG17 MSQDE Mask the landing calls for « Down » Add. 16 Seg. 0 to 7 PAR BG17 P14 P4 ADR/DON P2 P0 MODIF P1 RAM MSQMO Mask the landing calls for « Up » Add. 14 Seg. 0 to 7 P5 P7 P3 ECRIT RAM MSQDE Mask the landing calls for « Down » Add. 17 Seg. 0 to 7 PAR BG17 P12 P13 ADR/DON P10 P9 P8 MODIF ECRIT P14 P0 MODIF P1 P11 P4 ADR/DON P2 PAR P15 BG17 ECRIT P6 RAM P5 P7 P15 P11 P12 P13 ADR/DON P10 P9 ECRIT P8 MODIF Série 32 Mlift Vector - Prog.Vectorielle Installation manual Chapter V - page 14 LANDING CALLS FOR FULL COLLECTIVE OPERATION, 2 TO 16 LEVELS (2/2) DOWN LANDING CALLS LEVEL 15 3rd BG18 board Level 12 to 15 D15 D14 D13 D12 KPDX UP LANDING CALLS LEVEL 12 M14 M13 M12 KPMX 2nd BG18 board Level 8 to 11 KPDX D11 D10 D9 D8 KPMX M11 M10 M9 M8 SW12 LEVEL 9 1st BG18 board Level 4 to 7 SW11 SW10 SW9 KPDX D7 D6 D5 D4 KPMX M7 M6 M5 M4 BG18 LEVEL 7 LEVEL 2 BG15 D3 D2 D1 M0 KP21 FU5 24RB LEVEL 1 FU2 COMB M3 M2 M1 KP27 FU5 / FU2 24RB / COMB PROTECTION WIRE FOR CALL PANEL BUTTONS 2,5A-250V dim: 5 x 20 QUICK ACTING LEVEL 0 KP29 24R COMB Light 24 V 1,2 W max per output Dx or Ux Landing calls connection Add 06 : P7 P6 P5 RAM Px - APPALD « Down » landing calls Add. 06 & 07 Seg. 0 to 7 PAR P3 Add 07 : P15 P4 Add 03 : ADR/DON P2 P14 P13 RAM PAR P11 P10 P0 MODIF P1 P12 ADR/DON P9 P7 P6 P5 RAM Px - APPALM « Up » landing calls Add. 03 & 04 Seg. 0 to 7 P8 MODIF Landing calls preview PAR P3 Add 04 : P15 P4 ADR/DON P2 P14 P1 P13 RAM PAR P11 P10 P0 MODIF P12 ADR/DON P9 P8 MODIF Série 32 Mlift Vector - Prog.Vectorielle Installation manual Chapter V - page 15 DOUBLE SELECTIVE SERVICE LANDING CALLS (1/3) Principe: The notion of double selective service is to made a selective opening of the front or rear door. This require 2 car buttons box (one for each side !). In the same way, for the landing calls, it must be possible to connect together the front and rear door for a same floor When the 32 serie is meant to drive 2 selective service, it is necessary to 'split' the car and landings calls. The 32 serie can delivered 16 levels maxi. (BG15 + 3 BG18 floor boards) on Single or Double non selective service, this capacity is reduce at 8 Levels in case of double selective service. Note: • To create a controller with 2 to 4 Levels on Double Selective Service, You needs the main board BG15 + 1 BG18 levels boards; • To create a controller with 5 to 8 Levels on Double Selective Service, You needs the main board BG15 + 3 BG18 levels boards. LEVEL F A C E 1 F A C E 2 7 6 5 4 3 2 1 0 7 6 5 4 3 2 1 0 BG15 CAR BG18 BG18 (1) (2) C7 C6 C5 C4 BG18 (3) BG15 DOWN LANDING BG18 BG18 BG18 (1) (2) (3) D7 D6 D5 D4 D3 D2 D1 M0 C3 C2 C1 C0 UP LANDING BG18 BG18 (1) (2) X M6 M5 M4 BG18 (3) M3 M2 M1 X C7 C6 C5 C4 C7 C6 C5 C4 BG15 D7 D6 D5 D4 D7 D6 D5 D4 X M6 M5 M4 M7 M6 M5 X EXAMPLE: CONNECTION FOR A CONFIGURATION OF 4 LEVEL CONCERNING THE CAR CALLS: The inputs C0 to C3 (BG15, KC21) correspond at the calls for the level 0 to 3 of the front door. The inputs C4 to C7 (BG18 (1), KCx) correspond at the calls for the level 0 to 3 of the rear door. CONCERNING THE LANDING CALLS FOR DOWN: The inputs M0, D1 to D3 (BG15, KP21) correspond at the calls for the level 0 to 3 of the front door. The inputs D4 to D7 (BG18 (1), KPDx) correspond at the calls for the level 0 to 3 of the rear door. CONCERNING THE LANDING CALLS FOR UP: The inputs M1 to M3 (BG15, KP27) correspond at the calls for the level 1 to 3 of the front door. The inputs M5 to M7 (BG18 (1), KPMx) correspond at the calls for the level 1 to 3 of the rear door. If there is no door at some level, of course, there is nothing connecting on the corresponding input!!! Série 32 Mlift Vector - Prog.Vectorielle Installation manual Chapter V - page 16 DOUBLE SELECTIVE SERVICE LANDING CALLS (2/3) FRONT DOOR N°1 N°2 REAR DOOR For the mask, to switch on the segment corresponding to the active buttons and Direction MSQMO Mask the landing calls for « Up » Add. 13 Seg. 0 to 3 & FRONT DOOR - BG15 RAM ADR/DON PAR M3 M2 M0 MODIF M1 FRONT DOOR - 2 nd BG18 Add. 14 Seg. 4 to 6 PAR & M6 M4 MODIF M5 FRONT DOOR - BG15 ADR/DON RAM PAR D3 D2 MODIF D1 FRONT DOOR - 2 nd BG18 Px - APPALM « Up » landing calls Add. 03 Seg. 0 to 3 MSQDE Mask the landing calls for « Down » Add. 16 Seg. 5 to 7 D6 D5 D4 MODIF FRONT DOOR - BG15 RAM PAR P3 ADR/DON P2 P1 P0 MODIF Add. 04 Seg. 0 to 3 Px - APPALD « Down » landing calls Add. 06 Seg. 0 to 3 RAM PAR P7 Px - APPALM « Up » landing calls Add. 03 Seg. 4 to 7 P6 P5 FRONT DOOR - BG15 RAM PAR P3 ADR/DON P2 P1 P0 MODIF Add. 04 Seg. 4 to 7 Px - APPALD « Down » landing calls Add. 06 Seg. 4 to 7 FRONT DOOR - 2 nd BG18 & Add. 07 Seg. 0 to 3 RAM PAR P7 P5 P4 MODIF M0 MODIF ADR/DON M6 M5 M4 MODIF REAR DOOR - 1 st BG18 ADR/DON RAM D3 PAR D2 MODIF D1 ADR/DON RAM D7 D6 D5 D4 MODIF REAR DOOR - 1 st BG18 RAM PAR P3 ADR/DON P2 P1 P0 MODIF RAM PAR P7 ADR/DON P6 P5 P4 MODIF REAR DOOR - 1 st BG18 RAM PAR P3 ADR/DON P2 P1 P0 MODIF REAR DOOR - 3 rd BG18 & ADR/DON P6 M1 REAR DOOR - 3 rd BG18 & ADR/DON P4 MODIF M2 RAM PAR FRONT DOOR - 2 nd BG18 & PAR M3 REAR DOOR - 3 rd BG18 & Add. 17 Seg. 4 to 7 PAR D7 ADR/DON RAM PAR ADR/DON RAM Add. 17 Seg. 0 to 3 REAR DOOR - 1 st BG18 REAR DOOR - 3 rd BG18 & ADR/DON RAM Add. 14 Seg. 0 to 2 MSQDE Mask the landing calls for « Down » Add. 16 Seg. 1 to 3 MSQMO Mask the landing calls for « Up » Add. 13 Seg. 4 to 7 Add. 07 Seg. 4 to 7 Landing calls preview RAM PAR P7 ADR/DON P6 P5 P4 MODIF Série 32 Mlift Vector - Prog.Vectorielle Installation manual Chapter V - page 17 DOUBLE SELECTIVE SERVICE LANDING CALLS (3/3) Ø 3rd BG18 board Level 4 to 7 KPDX D7 D6 D5 D4 KPMX M6 M5 M4 F.D 1 × Ø R.D 2 × Light 24 V 1,2 W max per output Dx or Ux LEVEL 7 D7 D6 D5 D4 KPMX M6 M5 M4 SW12 Double Selective SERVice? Add. 02 Seg. 2 LEVEL 6 2nd BG18 board Level 4 to 7 KPDX DSERVS LEVEL 5 SW11 SW10 LEVEL 4 SW9 1st BG18 board Level 0 to 3 BG19 BG18 KPDX D7 D6 D5 D4 KPMX M7 M6 M5 BG15 RAM ADR/DON PAR MODIF LEVEL 3 FU5 24RB KP21 FU2 COMB FU5 / FU2 24RB / COMB PROTECTION WIRE FOR CALL PANEL BUTTONS 2,5A-250V dim: 5 x 20 QUICK ACTING D3 D2 D1 M0 KP29 KP27 24R COMB M3 M2 M1 LEVEL 2 LEVEL 1 LEVEL 0 BG17 ECRIT Double selective service landing calls connection Série 32 Mlift Vector - Prog.Vectorielle Installation manual Chapter V - page 18 ID 30 MODEL, LANDING POSITION INDICATOR REPTxx REPeaTer at level xx RAM ADR/DON PAR MODIF Add. 28 to 37 To program if necessary. The indicator codes are supplied with the digital indicators. BG17 ECRIT ID 30 BG15 (E3) (COM) (ALIM) CREP 0V 24R FIXED IN BOTTOM BOX or FIXED IN FRONT CREP CREP 0V (ALIM) 24R (E3) (COM) KP24 CREP 24R 0V ID 30 model, position indicator connection POSLOG Theoretical POSition of the lift Ex : The car is at 1st level, the car indicator display 1 but the theoretical position display 3. RAM PAR ADR/DON MODIF Add. 24 3rd Level Level 5 2nd Level Level 4 1st Level Level 3 Ground Level Level 2 1st Basement Level 1 2nd Basement Level 0 Car « Theoretical position » preview Theoretical Position Série 32 Mlift Vector - Prog.Vectorielle Installation manual Chapter V - page 19 ID 50-1 MODEL, LANDING POSITION INDICATOR REPTxx REPeaTer at level xx RAM ADR/DON PAR MODIF Add. 28 to 37 To program if necessary. The indicator codes are supplied with the digital indicators. BG17 ECRIT ID 50-1 BG15 (E3) (COM) (ALIM) CREP 0V 24R FIXED IN BOTTOM BOX or FIXED IN FRONT CREP CREP 0V (ALIM) 24R (E3) (COM) KP24 CREP 24R 0V ID 50-1 model, position indicator connection POSLOG Theoretical POSition of the lift Ex : The car is at 1st level, the car indicator display 1 but the theoretical position display 3. RAM PAR ADR/DON MODIF Add. 24 3rd Level Level 5 2nd Level Level 4 1st Level Level 3 Ground Level Level 2 1st Basement Level 1 2nd Basement Level 0 Car « Theoretical position » preview Theoretical Position Série 32 Mlift Vector - Prog.Vectorielle Installation manual Chapter V - page 20 ID 50 MODEL, LANDING POSITION INDICATOR REPTxx REPeaTer at level xx RAM ADR/DON PAR MODIF Add. 28 to 37 To program if necessary. The indicator codes are supplied with the digital indicators. BG17 BG15 ECRIT ID 50 (ALIM) 24R (COM) 0V (E1) CREP FIXED IN BOTTOM BOX CREP KP24 CREP 24R 0V ID 50 model, position indicator connection POSLOG Theoretical POSition of the lift Ex : The car is at 1st level, the car indicator display 1 but the theoretical position display 3. RAM PAR ADR/DON MODIF Add. 24 3rd Level Level 5 2nd Level Level 4 1st Level Level 3 Ground Level Level 2 1st Basement Level 1 2nd Basement Level 0 Car « Theoretical position » preview Theoretical Position Série 32 Mlift Vector - Prog.Vectorielle Installation manual Chapter V - page 21 IDFL 30 / 50 MODEL, LANDING POSITION INDICATOR WITH ARROWS REPTxx REPeaTer at level xx RAM ADR/DON PAR MODIF Add. 28 to 37 To program if necessary. The indicator codes are supplied with the digital indicators. BG17 ECRIT IDFL 30 / 50 24R (ALIM) 0V (COM) CREP (E5) BG15 (E1) FD (E3) FM FIXED IN BOTTOM BOX or FIXED IN FRONT CREP 24R FD (ALIM) (E1) FM CREP (E3) K25 FM FD 0V (COM) (E5) KP24 CREP 24R 0V FD FM 24R IDFL 30 / 50 model, position indicator connection POSLOG Theoretical POSition of the lift Ex : The car is at 1st level, the car indicator display 1 but the theoretical position display 3. RAM PAR ADR/DON MODIF Add. 24 3rd Level Level 5 2nd Level Level 4 1st Level Level 3 Ground Level Level 2 1st Basement Level 1 2nd Basement Level 0 Car « Theoretical position » preview Theoretical Position Série 32 Mlift Vector - Prog.Vectorielle Installation manual Chapter V - page 22 STANDARD PROGRAMMING Level 15 14 13 12 11 10 9 8 7 6 5 4 3 2 1 0 Displayed on digital indicator 0 1 2 3 4 5 6 7 8 9 10 11 12 Code to be programmed into the controller 00 01 02 03 04 05 06 07 08 09 0A 0b 0C Displayed on digital indicator 13 14 15 16 17 18 19 -0 -1 -2 -3 -4 -5 Address 37 36 35 34 33 32 31 30 2F 2E 2d 2C 2b 2A 29 28 Code to be programmed into the controller 0d 0E 0F 10 11 12 13 14 15 16 17 18 19 Displayed on digital indicator ES RJ RC RH RB SS P0 P1 P2 P3 RS ME Code to be programmed into the controller 1A 1b 1C 1d 1E 1F 20 21 22 23 24 25 EXAMPLE: Configuration for an installation of 8 LEVELS including 2 BASEMENT. If at Level 2 - Ground Level (Address 2A), we desire « RC » displayed, we program 1C to parameter address 2A (REPTxx : REPeaTer at level xx). n Select address 2A corresponding to the 2nd level with Push buttons. RAM PAR o p q 1 second later, a value is displayed, if this value suits you (our example 1C) Don’t change it, if not, slide the ADR/DON - MODIF switch to MODIF Modify the value to obtain 1C with push buttons to increase/decrease to the new value. Register the new value by pushing and releasing both buttons at the same time. Slide the ADR/DON - MODIF switch to ADR/DON The new value is memorised. ADR/DON 1 ADR/DON MODIF 2 MODIF RAM PAR ADR/DON 3 MODIF ADR/DON MODIF 4 Série 32 Mlift Vector - Prog.Vectorielle Installation manual Chapter V - page 23 IDFL 30 / 50 MD MODEL, LANDING POSITION INDICATOR WITH SCROLLING MESSAGES ARROWS REPTxx REPeaTer at level xx RAM ADR/DON PAR MODIF Add. 28 to 37 To program if necessary. The indicator codes are supplied with the digital indicators. BG17 ECRIT IDFL 30 / 50 MD 24R (ALIM) 0V (COM) CREP (E3) BG15 FIXED IN BOTTOM BOX or FIXED IN FRONT CREP 24R KP24 CREP 0V 24R WARNING! The command of the indicator with scrolling messages arrows needs the 'V15' programm or posterior Program (E3) (ALIM) CREP 24R (COM) 0V IDFL 30 / 50 MD model, position indicator connection POSLOG Theoretical POSition of the lift Ex : The car is at 1st level, the car indicator display 1 but the theoretical position display 3. RAM PAR ADR/DON MODIF Add. 24 3rd Level Level 5 2nd Level Level 4 1st Level Level 3 Ground Level Level 2 1st Basement Level 1 2nd Basement Level 0 Car « Theoretical position » preview Theoretical Position Série 32 Mlift Vector - Prog.Vectorielle Installation manual Chapter V - page 24 POSITION INDICATOR WITH SCROLLING MESSAGES ARROWS PROGRAMMING D G B MDCREP3 MDCREP4 F Repère du graphisme 40 41 42 43 44 45 46 47 48 49 4A 4B 4C 4D 4E 4F 50 51 52 53 54 55 56 57 58 59 5A 5B 5C 5D 5E 5F 60 61 62 63 64 65 66 67 68 69 6A 6B 6C 6D 6E 6F 70 71 72 73 74 MDCREP1 Ú Ú Ú Ú Ú Ú Ú Ú Ú Ú Ú Ú Ú Ú Ú Ú Ú Ú Ú Ú Ú Ú Ú Ú Ú Ú Ú Ú Ú Ú Ú Ú Ú Ú Ú Ú Ú Ú Ú Ú Ú Ú Ú Ú Ú Ú Ú Ú Ø 1 2 3 4 5 6 7 8 9 1Ø 11 12 13 14 15 16 17 18 19 -Ø -1 -2 -3 -4 -5 ES RJ RC RH RB SS P0 P1 P2 P3 RS ME P4 P5 P6 P7 P8 P9 2Ø 21 22 23 Ú Ú Ú Ú Ú Ú Ú Ú Ú Ú Ú Ú Ú Ú Ú Ú Ú Ú Ú Ú Ú Ú Ú Ú Ú Ú Ú Ú Ú Ú Ú Ú Ú Ú Ú Ú Ú Ú Ú Ú Ú Ú Ú Ú Ú Ú Ú Ú Ø 1 2 3 4 5 6 7 8 9 1Ø 11 12 13 14 15 16 17 18 19 -Ø -1 -2 -3 -4 -5 F H U B E G K LG M OG P UG W EG DG SG U1 U2 O1 O2 O3 O4 MDCREP7 Ú Ú Ú Ú Ú Ú Ú Ú Ú Ú Ú Ú Ú Ú Ú Ú Ú Ú Ú Ú Ú Ú Ú Ú Ú Ú Ú Ú Ú Ú Ú Ú Ú Ú Ú Ú Ú Ú Ú Ú Ú Ú Ú Ú Ú Ú Ú Ú Ø 1 2 3 4 5 6 7 8 9 1Ø 11 12 13 14 15 16 17 18 19 -Ø -1 -2 -3 -4 -5 ES RJ RC RH RB SS P0 P1 P2 P3 RS ME P4 P5 P6 P7 P8 P9 2Ø 21 22 23 HORS SERVICE AUSSER BETRIEB OUT OF SERVICE SIN SERVICIO SERVICE INCENDIE BRANDFALLSTEUERUNG FIRE CONTROL BOMBEROS CABINE RESERVEE SONDERFAHRT SPECIAL SERVICE PRIORIDAD CABINA IN SERVICE ELECTRA VITORIA MDCREP3-P 75 Ø 1 2 3 4 5 6 7 8 9 1Ø 11 12 13 14 15 16 17 18 19 -Ø -1 -2 F UB B E G LG M LB A C D B1 B2 OS 2Ø 21 22 23 -3 UG P H K L B3 S P LIBRE MDCREP3-C ÜBERLAST Série 32 Mlift Vector - Prog.Vectorielle Installation manual Chapter V - page 25 FL 30 / 50 MODEL, LANDING DIRECTION ARROWS RAM ADR/DON PAR MODIF FLCLIG Direction indicator flashing Add. 08 Seg. 5 BG17 ECRIT FL 30 / 50 BG15 FD FM (COM) 0V (ALIM) 24R (E1) (E3) FIXED IN BOTTOM BOX or FIXED IN FRONT FD FM (COM) 0V (ALIM) 24R (E1) (E3) K25 FM KP29 0V FD 24R FL 30 / 50 model, direction arrows connection FD FM & FD Up arrow & Down arrow Add. 15 Seg. 4 and 5 FM RAM ADR/DON PAR MODIF FL 30 / 50 model, direction arrows state preview Série 32 Mlift Vector - Prog.Vectorielle Installation manual Chapter V - page 26 MODEL WITH LIGHT LESS THAN TO 1,2 W (TOTAL 2,4 W MAX), LANDING DIRECTION ARROWS RAM ADR/DON PAR MODIF FLCLIG Direction indicator flashing Add. 08 Seg. 5 BG17 ECRIT WARNING !!! BG15 Light 24 V 2,4 W max. PER SENS Dont forget the possible arrows in car In case of overload of the admissible nominal power (2,4 W) Connect 1 P217 box PER SENS K25 0V FD FM Direction arrows connection FD FM & FD Up arrow & Down arrow Add. 15 Seg. 4 to 5 FM RAM ADR/DON PAR MODIF Direction arrows state preview Série 32 Mlift Vector - Prog.Vectorielle Installation manual Chapter V - page 27 MODEL WITH LIGHT SUPERIOR TO 1,2 W (TOTAL 2,4 W MAX), LANDING DIRECTION ARROWS RAM ADR/DON PAR MODIF FLCLIG Direction indicator flashing Add. 08 Seg. 5 BG17 WARNING !!! Light 24 V ECRIT BG15 2,4 W max. PER SENS Dont forget the possible arrows in car In case of overload of the admissible nominal power (2,4 W) See the drawing below LEVEL 15 K26 K25 LEVEL 7 LEVEL 1 LEVEL 0 0V FM THE TERMINAL BLOCK 2 & 1 ARE INTERCONNECTED ON THE P217 BOARD 3 2 1 24R FD 3 2 1 P217 22 21 24 12 11 14 22 21 24 12 11 14 Direction arrows connection Série 32 Mlift Vector - Prog.Vectorielle Installation manual Chapter V - page 28 IDFL 30/50 MD MODEL, NEXT DEPARTURE ARROWS WITH SCROLLING MESSAGES (1/3) 3rd BG18 board Level 12 to 15 FLPDP & FLCLIG POS15 POS14 POS13 POS12 KPOSX 24R POSx Next departure arrows & Direction indicator flashing FIXED IN FRONT 24R 2nd BG18 board Level 8 to 11 BG18 POS11 POS10 POS9 POS8 KPOSX (E2) POSx (E3) Add. 08 Seg. 4 and 5 (ALIM) CREP 24R (COM) 0V BG15 IDFL 30 / 50 MD 1st BG18 board Level 4 to 7 POS7 POS6 POS5 POS4 FIXED IN BOTTOM BOX 24R (ALIM) 0V (COM) CREP(E3) (E2) POSx (E1) 24R RAM KPOSX CREP BG15 (E1) 24R 24R (ALIM) 0V (COM) CREP(E3) (E2) POSx 24R (ALIM) 0V (COM) CREP(E3) (E2) POSx (E1) 24R FLPDP FCLIG MODIF PAR POS3 POS2 POS1 POS0 KP24 KP23 CREP 0V 24R (E1) 24R Next departure arrows with scrolling messages connection BG17 ADR/DON ECRIT Série 32 Mlift Vector - Prog.Vectorielle Installation manual Chapter V - page 29 NEXT DEPARTURE ARROWS WITH LIGHT (2/3) FLPDP & FLCLIG Next departure arrows & Direction indicator flashing RAM FLPDP FCLIG MODIF PAR Add. 08 Seg. 4 and 5 BG17 WARNING ! ECRIT NEXT DEPARTURE IN DOWN 100 mA per position outputs POS x. May attention of all elements connected on these outputs, (Selective gong, arrows for next departure, etc ...). ADR/DON NEXT DEPARTURE IN UP LEVEL 15 3rd BG18 board Level 12 to 15 LEVEL 12 POS15 POS14 POS13 POS12 KPOSX LEVEL 9 2nd BG18 board Level 8 to 11 POS11 POS10 POS9 POS8 KPOSX LEVEL 7 1st BG18 board Level 4 to 7 KPOSX POS7 POS6 POS5 POS4 LEVEL 2 KP23 BG15 K25 THE OUTPUTS FM AND FD POS3 POS2 POS1 POS0 LEVEL 1 LEVEL 0 PRODUCE 24R. FD DIODE 1N400x FM Next departure arrows connection Série 32 Mlift Vector - Prog.Vectorielle Installation manual Chapter V - page 30 NEXT DEPARTURE ARROWS (3/3) FD FM & FD Up arrow & Down arrow Add. 15 Seg. 4 to 5 FM RAM ADR/DON PAR MODIF Direction arrows preview POS5 POS7 POS0-7 POSition outputs POS0 to POS7 Add. 1F Seg. 0 to 7 POS6 RAM PAR POS3 POS4 ADR/DON POS2 POS1 MODIF POS0 Level 0 to 7, position outputs preview POS15 POS8-15 POSition outputs POS8 to POS15 Add. 20 Seg. 0 to 7 POS13 POS14 RAM PAR POS11 Level 8 to 15, position outputs preview POS12 ADR/DON POS10 POS9 MODIF POS8 Série 32 Mlift Vector - Prog.Vectorielle Installation manual Chapter V - page 31 LANDING SELECTIVE GONG (1/2) RAM ADR/DON PAR MODIF GONGAR GONG on stopping? Add. 09 Seg. 7 BG17 ECRIT WARNING ! 100 mA per position outputs POS x. May attention of all elements connected on these outputs, (Selective gong, arrows for next departure, etc ...). LEVEL 15 3rd BG18 board Level 12 to 15 LEVEL 12 POS15 POS14 POS13 POS12 KPOSX LEVEL 9 2nd BG18 board Level 8 to 11 POS11 POS10 POS9 POS8 KPOSX BG18 LEVEL 7 BG15 1st BG18 board Level 4 to 7 POS7 POS6 POS5 POS4 KPOSX POS3 POS2 POS1 POS0 KP23 BG15 K23 SPG2 K26 3 2 LEVEL 2 LEVEL 1 LEVEL 0 1 THE TERMINAL BLOCK 2 & 1 ARE INTERCONNECTED ON THE P217 BOARD SPG1 SPG3 SPG4 24R WARNING !!! PROGRAMMABLE OUTPUTS (SPGX) PRODUCE 0V P217 22 21 24 12 11 14 Landing « Selective gong » DIODE 1N400x Série 32 Mlift Vector - Prog.Vectorielle Installation manual Chapter V - page 32 LANDING SELECTIVE GONG (2/2) GONGx RAM GONG on Programmable outputs xx PAR on on SPG4 SPG2 ADR/DON on SPG3 on MODIF SPG1 Add. 79 Seg. 0 to 3 BG17 ECRIT DEF BG15 Consequences of a configuration error of outputs SPG1, SPG2, SPG3 and SPG4 (several functions at the same physical output) Série 32 Mlift Vector - Prog.Vectorielle Installation manual Chapter V - page 33 LANDING OUT OF SERVICE LIGHT (1/2) on on SPG4 SPG2 ADR/DON RAM VHS Out of service light on SPGx on SPG3 PAR on SPG1 MODIF Add. 79 Seg. 4 to 7 BG17 ECRIT BG15 MHS KC28 OUT OF SERVICE CONTACT from 0V ON LANDING K23 K26 FAULT LIGHT 24V OUT OF SERVICE LIGHT 24V 3 2 1 Above 60 mA per light SPG2 SPG1 SPG3 SPG4 24R SPG 24R WARNING!!! THE OUTPUTS SPGx PRODUCE 0V 22 21 24 12 11 14 P217 « Out of service » contact and light connection VHS RAM ADR/DON PAR MODIF Out of service light Add. 15 Seg. 1 Out of service light state preview Série 32 Mlift Vector - Prog.Vectorielle Installation manual Chapter V - page 34 LANDING OUT OF SERVICE LIGHT (2/2) RAM NIVMHS Out of service level PAR ADR/DON 8 4 2 1 MODIF Add. 43 BG17 ECRIT Out of service level choice (in hexadecimal mode) MHS RAM ADR/DON PAR MODIF Out of service Add. 0E Seg. 1 Out of service contact state preview RAM ADR/DON PAR MODIF MHSPF Out of service door closed? Add. 09 Seg. 2 BG17 ECRIT Out of service door closed choice DEF BG15 Consequences of a configuration error of outputs SPG1, SPG2, SPG3 and SPG4 (several functions at the same physical output) Série 32 Mlift Vector - Prog.Vectorielle Installation manual Chapter V - page 35 LANDING « ENGAGED » LIGHT BG15 ENGAGED LIGHT 24V / TOTAL 2A MAX 0V CL LEVEL 0 KP22 LIGHT 24V / 1,2W LEVEL 1 LEVEL N OR LEVEL 0 CL LED IN SERIAL WITH A 1,5K RESISTOR LEVEL 1 LEVEL N PILOTED BY RELAY Landing « engaged » light connection CL Engaged light (Flashing) Add. 28 Seg. 5 RAM ADR/DON PAR MODIF « Engaged » light state preview CHAPTER VI INSTALLATION & CONNECTING IN CAR Série 32 Mlift Vector - Prog.Vectorielle Installation manual Chapter VI - page 2 CONNECTING IN CAR: 2 TO 8 LEVELS (SAPB OR COLLECTIVE 1 BUTTON) WARNING! MAIN BOARD BG15 SW9 TO SW12 JUMPER POSITION ON BG15 KC23 GM INS KC22 KA13 CABCAA 0V +24 FCOU1 FF1 COI1 FCFE1 0V CS1 0V GD KC21 C0 C1 KP21 C2 C3 M0 D1 KC29 D2 D3 KC24 KP23 0V 24R POS0 POS2 COMB POS1 POS3 CREP 24R FM K24 KC28 K26 K23 0V NS MHS PRIC SU SPG4 SPG1 24R SPG3 SPG2 FD NOTHING WILL BE CONNECTED ON THESE TERMINAL! ELECTRONIC OUTPUTS ELECTRONIC OUTPUTS O03 Tape head 0V IN CAR SAFETY LANE CONNECTIONS STOP IN INSPECTION BOX INSPECTION UP END LIMIT INSPECTION BOX 24V / 1.2W 24V / 1.2W PRIC: CAR PRIORITY KEY NS: NON STOP CONTACT EXAMPLE FOR CONNECTING UP OR DOWN AUTOMATIC DOOR AROWS SU: OVERLOAD CONTACT OF 4 PROGAMMABLE THE CAR CALLS ARE CONNECTED ON UP OR DOWN COLLECTIVE 1 BUTTON OR ON SAPB 8 FLOORS MAX. OUTPUTS MHS: OUT OF SERVICE CONTACT FCFE1: CLOSE END LIMIT (Without Positionning outputs, Duplex, Level damaged by Fire and double selective service) VSU: OVERLOAD LIGHT FCOU1: OPEN END LIMIT Recommendations : VPMP: FIRE SERVICE LIGHT FF1: DOOR CLOSE BUTTON GONG: GONG OUTPUT CS1: PHOTOCELL CONTACT 24V / 1.2W DIGITAL INDICATOR * COI1: SAFETY KNUCKLE CONTACT OR DOOR RE-OPEN BUTTON VHS: OUT OF SERVICE LIGHT nor when the tape head bistable passes the magnet. Série 32 Mlift Vector - Prog.Vectorielle Installation manual Chapter VI - page 3 CONNECTING IN CAR: SAPB MORE THAN 8 LEVELS OR COLLECTIVE 1 OR 2 BUTTONS / LANDING 2 TO 16 LEVELS WARNING! BG18 BOARD SW9 TO SW12 JUMPER POSITION ON BG15 MAIN BOARD BG15 FOR MORE THAN 4 FLOORS ADD ONE OR MORE BG18 FLOOR EXTENSION BOARD KCX KC23 GM INS KC22 KA13 CABCAA 0V +24 FCOU1 FF1 COI1 FCFE1 0V CS1 0V GD KC21 C0 C1 C4 C2 C5 C6 C7 C3 KC29 KC24 KP23 0V 24R POS0 POS2 COMB POS1 POS3 CREP 24R SEE WIRING DIAGRAMS FOR HALL LANTERNS SELECTIVE GONG ... O03 Tape head FM K24 KC28 K26 K23 0V NS MHS PRIC SU SPG4 SPG1 24R SPG3 SPG2 FD ELECTRONIC OUTPUTS ELECTRONIC OUTPUTS 0V IN CAR C7 C6 C5 C4 SAFETY LANE CONNECTIONS STOP IN INSPECTION BOX INSPECTION UP END LIMIT FCFE1: CLOSE END LIMIT INSPECTION BOX 24V / 1.2W AUTOMATIC DOOR THE CAR CALLS ARE CONNECTING ON UP AND DOWN COLLECTIVES 2 BUTTONS FCOU1: OPEN END LIMIT FF1: DOOR CLOSE BUTTON CS1: PHOTOCELL CONTACT COI1: SAFETY KNUCKLE CONTACT OR DOOR RE-OPEN BUTTON * Recommendations : nor when the tape head bistable passes the magnet. DIGITAL INDICATOR 24V / 1.2W 24V / 1.2W PRIC: CAR PRIORITY KEY NS: NON STOP CONTACT EXAMPLE FOR CONNECTING UP OR DOWN AROWS SU: OVERLOAD CONTACT OF 4 PROGAMMABLE OUTPUTS MHS: OUT OF SERVICE CONTACT VSU: OVERLOAD LIGHT VPMP: FIRE SERVICE LIGHT GONG: GONG OUTPUT VHS: OUT OF SERVICE LIGHT Série 32 Mlift Vector - Prog.Vectorielle Installation manual Chapter VI - page 4 CAR CALLS FOR SINGLE AUTOMATIC AND COLLECTIVE OPERATION, 1 BUTTON, 2 TO 8 LEVELS (1/2) ! : Without positioning 1 wire per level, without Duplex, without level damaged RAM ADR/DON PAR MODIF BASE 8N BASE 8 Level Add. 5C Seg. 5 BG17 ECRIT For the mask: To switch on the segment corresponding to the active buttons. C6 RAM C5 C4 ADR/DON C7 MSQCAB Mask the « Car » calls PAR C3 C2 C0 MODIF C1 Add. 10 Seg. 0 to 7 BG17 ECRIT Série 32 Mlift Vector - Prog.Vectorielle Installation manual Chapter VI - page 5 CAR CALLS FOR SINGLE AUTOMATIC AND COLLECTIVE OPERATION, 1 BUTTON, 2 TO 8 LEVELS (2/2) WARNING! SW12 This operating mode forbids any selective light : position indicator with light, next departure arrows, selective gong, etc. and so the option «levels damaged». SW11 SW10 SW9 LEVEL 7 * LEVEL 2 BG15 KC21 FU5 24RB C3 C2 C1 C0 * LEVEL 1 * FU2 COMB KP21 FU5 / FU2 24RB / COMB PROTECTION WIRE FOR CALL PANEL BUTTONS 2,5A-250V dim: 5 x 20 QUICK ACTING KC29 * C7 C6 C5 C4 THE CAR CALLS ACCEPTANCE ARE OPTIONAL IN CASE OF S.A.P.B. 24R LEVEL 0 * Light 24 V 1,2 W max per output Cx * COMB « Car » calls connection C7 Cx - ENVCAB C6 C5 RAM « Car » calls Add. 00 Seg. 0 to 7 PAR C3 « Car » calls visualisation C4 ADR/DON C2 C1 C0 MODIF Série 32 Mlift Vector - Prog.Vectorielle Installation manual Chapter VI - page 6 CAR CALLS FOR COLLECTIVE OPERATION 1 OR 2 BUTTONS, 2 TO 16 LEVELS (1/2) RAM ADR/DON PAR MODIF BASE 8N BASE 8 Level Add. 5C Seg. 5 BG17 ECRIT For the mask: To switch on the segment corresponding to the active buttons. C6 MSQCAB RAM Mask the « Car » calls PAR C5 C4 ADR/DON C7 C3 C2 C0 MODIF C1 Add. 10 Seg. 0 to 7 BG17 MSQCAB RAM Mask the « Car » calls PAR ECRIT C14 C13 C15 C12ADR/DON C11 C10 C9 Add. 11 Seg. 0 to 7 BG17 ECRIT C8 MODIF Série 32 Mlift Vector - Prog.Vectorielle Installation manual Chapter VI - page 7 CAR CALLS FOR COLLECTIVE OPERATION 1 OR 2 BUTTONS, 2 TO 16 LEVEL (2/2) Light 24 V 1,2 W max LEVEL 15 per output Cx LEVEL 12 3rd BG18 board Level 12 to 15 C7 C6 C5 C4 KCX LEVEL 11 2nd BG18 board Level 8 to 11 LEVEL 8 C7 C6 C5 C4 KCX SW12 LEVEL 7 SW11 SW10 1st BG18 board Level 4 to 7 SW9 LEVEL 4 C7 C6 C5 C4 KCX LEVEL 3 BG15 FU5 24RB C3 C2 C1 C0 KC21 LEVEL 1 FU2 COMB LEVEL 0 FU5 / FU2 24RB / COMB PROTECTION WIRE FOR CALL PANEL BUTTONS 2,5A-250V dim: 5 x 20 QUICK ACTING KC29 24R COMB « Car » calls connection Cx - ENVCAB C7 « Car » calls C0 to C7 C6 C5 RAM Add. 00 Seg. 0 to 7 PAR C3 Cx - ENVCAB C15 « Car » calls C8 to C15 ADR/DON C2 C1 C14 C13 RAM Add. 01 Seg. 0 to 7 PAR C11 C10 C9 « Car » calls preview C4 C0 MODIF C12 ADR/DON C8 MODIF Série 32 Mlift Vector - Prog.Vectorielle Installation manual Chapter VI - page 8 DOUBLE SELECTIVE SERVICE CAR CALLS (1/2) FRONT DOOR N°1 REAR DOOR N°2 For the mask: To switch on the segment corresponding to the active buttons. MSQCAB Mask the « Car » calls ADR/DON RAM PAR C3 C2 C1 C0 MODIF Add. 10 Seg. 0 to 3 Mask the « Car » calls Add. 11 Seg. 0 to 3 Cx - ENVCAB « Car » calls Add. 00 Seg. 0 to 3 ADR/DON RAM PAR C3 Rear door - 3 rd BG18 ADR/DON RAM PAR C7 C6 C5 C4 MODIF Front door - BG15 RAM PAR C3 ADR/DON C2 C1 C0 MODIF & ADR/DON RAM Add. 11 Seg. 4 to 7 PAR C7 « Car » calls Add. 00 Seg. 4 to 7 Add. 01 Seg. 0 to 3 RAM PAR C7 & ADR/DON C6 C5 C4 MODIF Add. 01 Seg. 4 to 7 « Car » calls preview C6 C5 C4 MODIF Rear door - 1 st BG18 C3 C2 C1 C0 Cx - ENVCAB RAM ADR/DON PAR MODIF Rear door - 3 rd BG18 C7 C6 C5 C4 Front door - 2 nd BG18 & C2 C1 C0 MODIF Add. 10 Seg. 4 to 7 Front door - 2 nd BG18 & Rear door - 1 st BG18 MSQCAB Front door - BG15 RAM ADR/DON PAR MODIF Série 32 Mlift Vector - Prog.Vectorielle Installation manual Chapter VI - page 9 DOUBLE SELECTIVE SERVICE CAR CALLS (2/2) 3rd BG18 board Level 4 to 7 FRONT DOOR REAR DOOR n°1 n°2 Double Selective service? C7 C6 C5 C4 KCX LEVEL 7 SW12 SW10 C7 LEVEL 4 C7 C6 C5 C4 KCX LEVEL 4 C4 BG19 BG18 1st BG18 board Level 0 to 3 BG15 KCX Add. 02 Seg. 2 LEVEL 7 2nd BG18 board Level 4 to 7 SW11 SW9 DServS RAM ADR/DON PAR MODIF C7 C6 C5 C4 LEVEL 3 FU5 24RB LEVEL 3 BG17 KC21 FU2 COMB FU5 / FU2 24RB / COMB PROTECTION WIRE FOR CALL PANEL BUTTONS 2,5A-250V dim: 5 x 20 QUICK ACTING KC29 24R COMB C3 C2 C1 C0 ECRIT C7 LEVEL 0 LEVEL 0 C4 Light 24 V 1,2 W max per output Cx Double selective service « Car » calls connection Série 32 Mlift Vector - Prog.Vectorielle Installation manual Chapter VI - page 10 CONNECTING OF TAPE HEAD O03-1 & O03-2 FOR COUNTING WITH SLOTTED TAPE (1/2) + a b +24 0V CAA CAB ! WARNING !!! CONNECT NOTHING ON 0V & + 24 OF THE TAPE-HEAD TAPE HEAD O03-1 +-ab +-ab VEC01 CAB CAA 0V +24 Used in case of extreme up contact K4 O03-2 BG15 CAA 0V PL OR CAA CAA CAB CAB CAB O03-1 ED EM SW1 N70B WARNING STATE OF BEAM A BG15 The tape head must be placed at least at 20 cm of a source magnetic ! KC22 STATE OF BEAM B 3 2 1 B32 JUMPER UP POSITION ( 2-3) HB32 Connecting of tape head O03-1 or O03-2 MINIBLOC CA & CB Tape head beam A Tape head beam B Add. FF Seg. 7 & 6 CA CB RAM ADR/DON PAR MODIF Beam CA & CB of tape head O03-1 or O03-2 preview Série 32 Mlift Vector - Prog.Vectorielle Installation manual Chapter VI - page 11 CONNECTING OF TAPE HEAD O03-1 & O03-2 For COUNTING WITH SLOTTED TAPE 2/2 CAA, CAB, EXD (& EXM (003-2)) Tape head beam A Tape head beam B Extreme Down contact RAM ADR/DON PAR MODIF (& Extreme Up contact) Add. 11 Seg. 0, 1, 3 (& 2 (EXM)) CAA EXM EXD (O03-2) CAB Tape head beam state (O03-1 or O03-2) and the magnetic switch preview DEF BG15 Inversion of the car movement DEF BG15 Consequence of an incorrect reading by CA & CB signal DEF BG15 Consequence of the tape head O03 fault DEF BG15 Tape head O03 not powered Série 32 Mlift Vector - Prog.Vectorielle Installation manual Chapter VI - page 12 CAR ALARM BUTTON BATTERY CHARGER BOARD 12V - 0,5 / 1,2 Ah Life cycle of battery is between 5 and 7 years P309 KM13 BAL 12P KC26 K17 ECS 0V BAL N L BATTERY CHARGER 220V SUPPLY ALARM ALARM BUTTON EMERGENCY LIGHTING Car alarm button connection Série 32 Mlift Vector - Prog.Vectorielle Installation manual Chapter VI - page 13 CAR STOP BUTTON BATTERY CHARGER BOARD 12V - 0,5 / 1,2 Ah Life cycle of battery is between 5 and 7 years JUNCTION BOX P309 SECU3 SECU2 Car stop button (14.2.2.2) KM13 12P BUZZER Car stop button connection KC26 0V K17 N L Battery charger 220V supply Série 32 Mlift Vector - Prog.Vectorielle Installation manual Chapter VI - page 14 CAR GONG 1/2 on SPG2 on RAM SPG4 GONG GONG on Programmable outputs xx PAR on SPG3 ADR/DON on MODIF SPG1 Add. 79 Seg. 0 to 3 BG17 ECRIT BG15 WARNING! PROGRAMMABLE OUTPUTS (SPGX) PRODUCE 0V GONG 24V / 1,2W K23 SPG2 K26 SPG1 SPG3 SPG4 24R « Non selective gong» (in car) SW2 SW1 SW2 SW1 SW2 SW1 K1 P262 Série 32 Mlift Vector - Prog.Vectorielle Installation manual Chapter VI - page 15 CAR GONG (2/2) GONG RAM ADR/DON PAR MODIF GONG Add. 15 Seg. 6 Gong preview DEF BG15 Consequences of a configuration error of outputs SPG1, SPG2, SPG3 and SPG4 (several functions at the same physical output) Série 32 Mlift Vector - Prog.Vectorielle Installation manual Chapter VI - page 16 UNLOCKING RETIRING RAMP WITH DIRECT CURRENT RAM ADR/DON PAR MODIF TFR8 Filtering of « 8 » 1/100 s Add. 45 BG17 Input BG15 Output Hex ECRIT Factory Connected +RD -RD 1L1 3 L2 5 L3 7 L4 + + - RETIRING RAMP TENSION SUPPLY A1 Telemecanique 24V 01 I O CAM LP4K 09004 2 T1 4 T2 6 T3 8 T4 _ A2 K23 BY255 DIODE (1300V/3A) ONLY IN DIRECT CURRENT +CAM -CAM CAM +24 RETIRING RAMP « Retiring ramp » connection CAM RAM ADR/DON PAR MODIF Retiring ramp Add. 13 Seg. 3 Retiring ramp output state preview Série 32 Mlift Vector - Prog.Vectorielle Installation manual Chapter VI - page 17 FRONT DOOR THREE PHASE MOTOR VERSTF1 CARPO1 RGPT Front door mechanical characteristics PMAFCP1 P1SFCOU P1SFCFE MSTPRP1 MSTPMP1 AMPSEC1 Add. 40 Seg. 0 to 7 BG17 ECRIT BG15 CLOSED ACCELERATION FF1 0V KA13 FF1 CS1 FCOU1 REOPENING BY NORMALLY OPEN CONTACTS (Eg: Door re-open button) COI1 COI1 FCFE1 REOPENING BY NORMALLY CLOSED CONTACTS (Eg: Sensor) CS1 CLOSED END-LIMIT CONTACT FCFE1 IF1 -RD UT1 VT1 IO1 WT1 IR1 OPEN END-LIMIT CONTACT FCOU1 * BRAKE : OPTIONAL IN ACCORDANCE WITH DOOR MOTOR TYPE. P253M * ** DOOR MOTOR M 1 Vit 3~ - INJECTOR'S ADJUSTMENT RESISTOR ** RAOU BY255 DIODE (1300V/3A) + E.M.C. ** INJECTOR : BRAKING BY INJECTION WITH DIRECT CURRENT OPTIONAL IN ACCORDANCE WITH DOOR MOTOR TYPE. Front door three phase motor connection PAUTO FCOU1, FCFE1, CS1, COI1, FF1 Automatic front door Add. 0F Seg. 0 to 4 FF1 RAM ADR/DON MODIF CS1 COI1 FCFE1 FCOU1 PAR BG17 ECRIT ** RAFE Série 32 Mlift Vector - Prog.Vectorielle Installation manual Chapter VI - page 18 REAR DOOR THREE PHASE MOTOR P2SFCOU VERSTF2 P2SFCFE CARPO2 Rear door mechanical characteristics PMAFCP2 MSTPRP2 MSTPMP2 AMPSEC2 Add. 60 Seg. 0 to 6 BG17 ECRIT CLOSED ACCELERATION FF2 0V FF2 KA16 CS2 FCOU2 REOPENING BY NORMALLY OPEN CONTACTS (Eg: Door re-open button) COI2 COI2 FCFE2 REOPENING BY NORMALLY CLOSED CONTACTS (Eg: Sensor) CS2 CLOSED END-LIMIT CONTACT FCFE2 OPEN END-LIMIT CONTACT FCOU2 BG19 IF2 -RD UT2 VT2 IO2 WT2 IR2 * BRAKE : OPTIONAL IN ACCORDANCE WITH DOOR MOTOR TYPE. P253M * BG15 DOOR MOTOR M 1 Vit 3~ + INJECTOR'S ** ADJUSTMENT RESISTOR ** RAOU BY255 DIODE (1300V/3A) E.M.C. BRAKING BY INJECTION WITH DIRECT CURRENT ** INJECTOR : OPTIONAL IN ACCORDANCE WITH DOOR MOTOR TYPE. Rear door three phase motor connection PAUTO FCOU2, FCFE2, CS2, COI2, FF2 Automatic rear door Add. 10 Seg. 0 to 4 FF2 RAM ADR/DON MODIF CS2 COI2 FCFE2 FCOU2 PAR BG17 ECRIT ** RAFE Série 32 Mlift Vector - Prog.Vectorielle Installation manual Chapter VI - page 19 AUTOMATIC DOOR MOTOR PILOTED BY RETIRING RAMP BG22 Input Output KT3 Free terminal Factory connected __ + DOOR ZONE BG15 +RD -RD ZPCAM 1L1 3 L2 5 L3 7 L4 + A1 Telemecanique +CAM -CAM 24V 01 I O CAM OR LP4K 09004 K23 2 T1 4 T2 6 T3 8 T4 _ CAR DOOR MOTOR A2 CAM +24 220 V INPUT SUPPLY Forbiden to open between level (EN 81 § 7.7.3) Explaination (CEN n°227) The operator's power supply MUST BE CUT by the principal switch in the machine room. IT MUST NOT therefore be supplied by the lighting circuit and / or by the car's electrical plug. Automatic door motor piloted by retiring ramp CAM RAM ADR/DON PAR MODIF Retiring ramp Add. 13 Seg. 3 Retiring ramp output preview Série 32 Mlift Vector - Prog.Vectorielle Installation manual Chapter VI - page 20 ELECTRONIC DOOR CONTROL UNIT OP06 OR OP11 Presentation of VVVF door card OP06 or OP11. The Electronic Door Control Unit OP06 or OP11 has been designed to control 3 Phase AC motor or D.C. motor - 0,3 kW (OP06) and 0,6 kW (OP11). 3 Phase AC motor: Programme OP11 / OP06B - V07 14 MHz - 25/10/95 DC motor: Programme OP11 / OP06B - V07 CC - 10/02/95 The frequency drive regulates the doors' acceleration and deceleration, which can be individually adjusted to suit the requirements of the application in both opening and closing directions. Connection Diagram of the Electronic Card. CONNECTED IN DELTA 3 PHASE AC MOTOR 240V 240 VAC SUPPLY NOTE : Position VVVF card as close to door gear motor as possible DO NOT CONNECT A P253 UNIT TO THIS MOTOR TO S/EDGE CIRCUIT TERMINALS DC MOTOR COM FC COM FC OU OU FE FE OV +12 CB CA +16 J2 J5 J1 - + PH3 - + PH1 J3 - + PH2 J4 OP06 or OP11 Open signal from the controller, should be connected to Terminal connector J4 on PH2+ and PH2-. Close signal from the controller, should be connected to Terminal connector J4 on PH1+ and J3 on PH1-. Open Slow Down Limit should be connected to Terminal connector J2 on 0V and CA. Close Slow Down Limit should be connected to Terminal connector J2 on 0V and CB. Door Nudging will be given from the controller and should be connected to Terminal connector J3 on PH3+ and PH3-. It is also required to give a door close signal. Door re-opening is created due to an over-current which will energise the on-board relay. The relay contact should be connected to the safety edge circuit to open the doors. The terminals to connect to are marked COM FC and FCFE (normally open) of the J1 connector. NOTE: The V.V.V.F. / Motor link should be as short as possible. IMPERATIVE Separate the conductors carrying large current and those carrying electric information at low current. For more information refer you at the documentation [ref AUTINOR: 7276) Série 32 Mlift Vector - Prog.Vectorielle Installation manual Chapter VI - page 21 ELECTRONIC DOOR CONTROL UNIT OP15 1/2 Presentation of the VVVF door card OP15. The Electronic Door Control Unit OP15 has been designed to control 3 Phase AC motor up to 0,3 kW. 3 Phase Motor: • Programme Slow down contacts: ............ OP15 R xx – xx/xx/xx • Programme Incremental Encoder: ........... OP15 I xx – xx/xx/xx The VVVF door drive only independently runs the slow down contact, due to the contact which are connected directly or to the incremental encoder. The opening and closing command are given from the controller which receive directly the end limit contacts or by the intermediately of the encoder which knows the exact position of the leaves. Connection diagram of Electronic Box. INCREMENTAL ENCODER [OV-16V-CA-CB] OU OP15 SLOW DOWN LIMIT ON CLOSING [OV-CA] + SLOW DOWN LIMIT ON OPENING [OV-CB] K5 OPENING SIGNAL 0V 2 3 16V CA CA CB CB 0V CA CB 4 16V K4 WARNING !!! DO NOT CONNECT A SUPPRESSOR ON THE MOTOR DEFAUT FAULT FEHLER 2 3 + 4 5 + 6 7 + 8 1 RE-OPENING SIGNAL SEE BELOW (*) FAULT SIGNAL 1 + SCREEN CABLE (0,75 mm² [ref AUTINOR : 3444] CLOSING NUDGING SIGNAL DIAGNOSTIC PLUG DIAG. 0V 1 CLOSING SIGNAL DOOR MOTOR 300W K3 - 230 VAC SUPPLY RISQUE DE CHOC ELECTRIQUE PENDANT UNE MINUTE APRES MISE HORS TENSION EN L'ABSENCE DU COUVERCLE RISK OF ELECTRIC SHOCK DURING ONE MINUTE WHEN THE ELECTRICITY SUPPLY HAS BEEN CUT, IN THE ABSENCE OF THE COVER BEI FEHLENDER ABDECKUNG BLEIBEN DIE TEILE EINE MINUTE NACH ABSCHALTUNG DER STROMZUFUHR SPANNUNGSFÜHREND 2 3 4 AUTINOR The Open signal should be connected to Terminal connector K4 on – [2] and + [1]. (24V ~ or =) The Close signal should be connected to Terminal connector K4 on – [4] and + [3]. (24V ~ or =) The re-opening signal should be connected to Terminal connector K4 on – [6] and + [5]. (24V ~ or =) The Fire Service signal to do the Set-up speed on closing should be connected to Terminal K4 on – [8] and + [7]. (24V ~ or =). Série 32 Mlift Vector - Prog.Vectorielle Installation manual Chapter VI - page 22 VVVF DOOR DRIVE OP15 2/2 (*) For the Slow limit contacts, 2 choices: A Slow down limit on opening which is connected to K5 on 0V [1] and CB [4]. A Slow down limit on closing which is connected to K5 on 0V [1] and CA [3]. Programme: And a relay which give the re-opening, to K3 between [1] and [2]. OP15 R xx The box give equally 1 contact (NO) available on the terminal K3. OR An Incremental Encoder mounted on the door motor which is connected to K5 on 0V [1], 16V [2], CA [3] and CB [4]. The OP15 deliver to the controller a simulation of the: • OPening End Limit contact (ELOP [FCOU]) between [1] and [2] to the K3 terminal, Programme: OP15 I xx • And CLosing End Limit contact (ELCL [FCFE)) between [3] and [4] to the K3 terminal. NOTE: The VVVF / Motor link should be made with a SCREEN CABLE and as short as possible. (The screen cable is not delivered but available as a spare part [ref AUTINOR: 3444]) IMPERATIVE Separate the conductors carrying large current and those carrying electric information at low current. For more information refer you at the documentation [ref AUTINOR: ????) Série 32 Mlift Vector - Prog.Vectorielle Installation manual Chapter VI - page 23 ID 30 MODEL, CAR POSITION INDICATOR REPTxx REPeaTer at level xx RAM ADR/DON PAR MODIF Add. 28 to 37 To program if necessary. The indicator codes are supplied with the digital indicators. BG17 ECRIT ID 30 BG15 (E3) (COM) (ALIM) CREP CREP 0V 24R FIXED IN BOTTOM BOX or FIXED IN FRONT CREP 0V (ALIM) 24R (E3) (COM) KC24 CREP 24R 0V ID 30 model, position indicator connection POSLOG Theoretical POSition of the lift Ex : The car is at 1st level, the car indicator display 1 but the theoretical position display 3. RAM PAR ADR/DON MODIF Add. 24 3rd Level Level 5 2nd Level Level 4 1st Level Level 3 Ground Level Level 2 1st Basement Level 1 2nd Basement Level 0 Car « Theoretical position » preview Theoretical Position Série 32 Mlift Vector - Prog.Vectorielle Installation manual Chapter VI - page 24 ID 50-1 MODEL, CAR POSITION INDICATOR REPTxx REPeaTer at level xx RAM ADR/DON PAR MODIF Add. 28 to 37 To program if necessary. The indicator codes are supplied with the digital indicators. BG17 ECRIT ID 50-1 BG15 (E3) CREP (COM) 0V (ALIM) 24R CREP FIXED IN BOTTOM BOX or FIXED IN FRONT (E3) (COM) KC24 (ALIM) CREP 0V 24R CREP 24R 0V ID 50-1 model, position indicator connection POSLOG Theoretical POSition of the lift Ex : The car is at 1st level, the car indicator display 1 but the theoretical position display 3. RAM PAR ADR/DON MODIF Add. 24 3rd Level Level 5 2nd Level Level 4 1st Level Level 3 Ground Level Level 2 1st Basement Level 1 2nd Basement Level 0 Car « Theoretical position » preview Theoretical Position Série 32 Mlift Vector - Prog.Vectorielle Installation manual Chapter VI - page 25 ID 50 MODEL, CAR POSITION INDICATOR REPTxx REPeaTer at level xx RAM ADR/DON PAR MODIF Add. 28 to 37 To program if necessary. The indicator codes are supplied with the digital indicators. BG17 ECRIT ID 50 BG15 (ALIM) 24R (COM) 0V (E1) CREP CREP FIXED IN BOTTOM BOX KC24 CREP 24R 0V ID 50 model, position indicator connection POSLOG Theoretical POSition of the lift Ex : The car is at 1st level, the car indicator display 1 but the theoretical position display 3. RAM PAR ADR/DON MODIF Add. 24 3rd Level Level 5 2nd Level Level 4 1st Level Level 3 Ground Level Level 2 1st Basement Level 1 2nd Basement Level 0 Car « Theoretical position » preview Theoretical Position Série 32 Mlift Vector - Prog.Vectorielle Installation manual Chapter VI - page 26 IDFL 30 / 50 MODEL, CAR POSITION INDICATOR WITH ARROWS REPTxx REPeaTer at level xx RAM ADR/DON PAR MODIF Add. 28 to 37 To program if necessary. The indicator codes are supplied with the digital indicators. BG17 ECRIT IDFL 30 / 50 24R (ALIM) 0V (COM) CREP (E5) BG15 (E1) FD (E3) FM FIXED IN BOTTOM BOX or FIXED IN FRONT CREP 24R (ALIM) FD FM (E1) (E3) K24 FM FD 0V (COM) CREP (E5) KC24 CREP 24R 0V FD FM 24R IDFL 30 / 50 model, position indicator connection POSLOG Theoretical POSition of the lift Ex : The car is at 1st level, the car indicator display 1 but the theoretical position display 3. RAM PAR ADR/DON MODIF Add. 24 3rd Level Level 5 2nd Level Level 4 1st Level Level 3 Ground Level Level 2 1st Basement Level 1 2nd Basement Level 0 Car « Theoretical position » preview Theoretical Position Série 32 Mlift Vector - Prog.Vectorielle Installation manual Chapter VI - page 27 STANDARD PROGRAMMING Level 15 14 13 12 11 10 9 8 7 6 5 4 3 2 1 0 Displayed on digital indicator 0 1 2 3 4 5 6 7 8 9 10 11 12 Code to be programmed into the controller 00 01 02 03 04 05 06 07 08 09 0A 0b 0C Displayed on digital indicator 13 14 15 16 17 18 19 -0 -1 -2 -3 -4 -5 Address 37 36 35 34 33 32 31 30 2F 2E 2d 2C 2b 2A 29 28 Code to be programmed into the controller 0d 0E 0F 10 11 12 13 14 15 16 17 18 19 Displayed on digital indicator ES RJ RC RH RB SS P0 P1 P2 P3 RS ME Code to be programmed into the controller 1A 1b 1C 1d 1E 1F 20 21 22 23 24 25 EXAMPLE: Configuration for an installation of 8 LEVELS including 2 BASEMENT. If at Level 2 - Ground Level (Address 2A), we desire « RC » displayed, we program 1C to parameter address 2A (REPTxx : REPeaTer at level xx). n Select address 2A corresponding to the 2nd level with Push buttons. PAR o p q 1 second later, a value is displayed, if this value suits you (our example 1C) Don’t change it, if not, slide the ADR/DON - MODIF switch to MODIF Modify the value to obtain 1C to display « RC » at the 2nd level. Register the new value by pushing and releasing both buttons at the same time. Slide the ADR/DON - MODIF switch to ADR/DON The new value is memorised. ADR/DON RAM 1 ADR/DON MODIF 2 MODIF RAM PAR ADR/DON 3 MODIF ADR/DON MODIF 4 Série 32 Mlift Vector - Prog.Vectorielle Installation manual Chapter VI - page 28 IDFL 30 / 50 MD MODEL, CAR POSITION INDICATOR WITH SCROLLING MESSAGES ARROWS REPTxx RAM ADR/DON REPeaTer at level xx PAR MODIF Add. 28 to 37 To program if necessary. The indicator codes are supplied with the digital indicators. BG17 ECRIT IDFL 30 / 50 MD 24R (ALIM) 0V (COM) CREP (E3) BG15 FIXED IN BOTTOM BOX or FIXED IN FRONT CREP 24R KC24 CREP 24R 0V WARNING! The command of the indicator with scrolling messages arrows needs the 'V15' programm or posterior Program (E3) (ALIM) CREP 24R (COM) 0V IDFL 30 / 50 MD model, position indicator connection POSLOG Theoretical POSition of the lift Ex : The car is at 1st level, the car indicator display 1 but the theoretical position display 3. RAM PAR ADR/DON MODIF Add. 24 3rd Level Level 5 2nd Level Level 4 1st Level Level 3 Ground Level Level 2 1st Basement Level 1 2nd Basement Level 0 Car « Theoretical position » preview Theoretical Position Série 32 Mlift Vector - Prog.Vectorielle Installation manual Chapter VI - page 29 POSITION INDICATOR WITH SCROLLING MESSAGES ARROWS PROGRAMMING Repère du graphisme 40 41 42 43 44 45 46 47 48 49 4A 4B 4C 4D 4E 4F 50 51 52 53 54 55 56 57 58 59 5A 5B 5C 5D 5E 5F 60 61 62 63 64 65 66 67 68 69 6A 6B 6C 6D 6E 6F 70 71 72 73 74 75 Ú Ú Ú Ú Ú Ú Ú Ú Ú Ú Ú Ú Ú Ú Ú Ú Ú Ú Ú Ú Ú Ú Ú Ú Ú Ú Ú Ú Ú Ú Ú Ú Ú Ú Ú Ú Ú Ú Ú Ú Ú Ú Ú Ú Ú Ú Ú Ú F D GB SP MDCREP1 MDCREP3 MDCREP4 MDCREP7 Ø 1 2 3 4 5 6 7 8 9 1Ø 11 12 13 14 15 16 17 18 19 -Ø -1 -2 -3 -4 -5 ES RJ RC RH RB SS P0 P1 P2 P3 RS ME P4 P5 P6 P7 P8 P9 2Ø 21 22 23 Ú Ú Ú Ú Ú Ú Ú Ú Ú Ú Ú Ú Ú Ú Ú Ú Ú Ú Ú Ú Ú Ú Ú Ú Ú Ú Ú Ú Ú Ú Ú Ú Ú Ú Ú Ú Ú Ú Ú Ú Ú Ú Ú Ú Ú Ú Ú Ú Ø 1 2 3 4 5 6 7 8 9 1Ø 11 12 13 14 15 16 17 18 19 -Ø -1 -2 -3 -4 -5 F H U B E G K LG M OG P UG W EG DG SG U1 U2 O1 O2 O3 O4 Ø 1 2 3 4 5 6 7 8 9 1Ø 11 12 13 14 15 16 17 18 19 -Ø -1 -2 F UB B E G LG M LB A C D B1 B2 OS 2Ø 21 22 23 -3 UG P H K L B3 Ú Ú Ú Ú Ú Ú Ú Ú Ú Ú Ú Ú Ú Ú Ú Ú Ú Ú Ú Ú Ú Ú Ú Ú Ú Ú Ú Ú Ú Ú Ú Ú Ú Ú Ú Ú Ú Ú Ú Ú Ú Ú Ú Ú Ú Ú Ú Ú Ø 1 2 3 4 5 6 7 8 9 1Ø 11 12 13 14 15 16 17 18 19 -Ø -1 -2 -3 -4 -5 ES RJ RC RH RB SS P0 P1 P2 P3 RS ME P4 P5 P6 P7 P8 P9 2Ø 21 22 23 AUSSER BETRIEB OUT OF SERVICE SIN SERVICIO SERVICE INCENDIE BRANDFALLSTEUERUNG FIRE CONTROL BOMBEROS CABINE RESERVEE SONDERFAHRT SPECIAL SERVICE HORS SERVICE PRIORIDAD CABINA MDCREP1-P MDCREP1-C MDCREP3-P MDCREP3-C MDCREP4-P MDCREP4-C LIBRE SURCHARGE IN BETRIEB ÜBERLAST IN SERVICE OVERLOAD MDCREP7-P MDCREP7-C ELECTRA VITORIA Série 32 Mlift Vector - Prog.Vectorielle Installation manual Chapter VI - page 30 FL 30 / 50 MODEL, CAR DIRECTION ARROWS RAM ADR/DON PAR MODIF FLCLIG Direction indicator flashing Add. 08 Seg. 5 BG17 ECRIT FL 30 / 50 BG15 FD FM (COM) 0V (ALIM) 24R (E1) (E3) FIXED IN BOTTOM BOX or FIXED IN FRONT FD FM (COM) 0V (ALIM) 24R (E1) (E3) K24 FM KC29 0V FD 24R FL 30 / 50 model, direction arrows connection FD FM & FD Up arrow & Down arrow Add. 15 Seg. 4 and 5 Direction arrows preview FM RAM ADR/DON PAR MODIF Série 32 Mlift Vector - Prog.Vectorielle Installation manual Chapter VI - page 31 MODEL WITH LIGHT LESS THAN TO 1,2 W (TOTAL 2,4 W MAX), CAR DIRECTION ARROWS RAM ADR/DON PAR MODIF FLCLIG Direction indicator flashing Add. 08 Seg. 5 BG17 ECRIT BG15 WARNING !!! Light 24 V 1,2 W max. PER SENS Dont forget the possible arrows on landing In case of overload of the admissible nominal power (1,2 W) Connect 1 P217 box PER SENS K24 (see page 2/2) 0V FD FM Direction arrows connection FD FM & FD Up arrow & Down arrow Add. 15 Seg. 4 and 5 Direction arrows preview FM RAM ADR/DON PAR MODIF Série 32 Mlift Vector - Prog.Vectorielle Installation manual Chapter VI - page 32 MODEL WITH LIGHT SUPERIOR TO 1,2 W (TOTAL 2,4 W MAX), CAR DIRECTION ARROWS RAM ADR/DON PAR MODIF FLCLIG Direction indicator flashing Add. 08 Seg. 5 BG17 ECRIT WARNING !!! Light 24 V 1,2 W max. BG15 PER SENS Dont forget the possible arrows on landing In case of overload of the admissible nominal power (1,2 W) Connect 1 P217 box PER SENS (see page 1/2) K24 0V FM THE TERMINAL BLOCK 2 & 1 ARE INTERCONNECTED ON THE P217 BOARD 3 2 1 K26 24R FD 3 2 1 P217 22 21 24 12 11 14 22 21 24 12 11 14 Direction arrows connection Série 32 Mlift Vector - Prog.Vectorielle Installation manual Chapter VI - page 33 INSPECTION MODE (1/3) FREVD 1B 2 1S 1C 3 2A PARA GD 5 6 8 8A INS3 FREVD FREVM GD INS/ 4C OTHER CAR'S SAFETY CONTACT 0V GM 4 FREV INS0 0V FREVM STOP GD INS4 GM BG15 GM KC23 Normal INS/ INS Inspection KA13 FE 0V FF1 COI1 GM FF1 OPTIONAL DOOR CONTROL BUTTONS EN 81 § 14.2.1.3 LAST ALINEA OU COI1 Inspection box MINIBLOC RAM INSpection operation Add. FF Seg. 5 PAR « Inspection mode » preview INS «6» ADR/DON MODIF 10 Série 32 Mlift Vector - Prog.Vectorielle Installation manual Chapter VI - page 34 INSPECTION MODE FOR STANDARD XP P82-511 (2/3) 1B 2 1S 1C FREVD 3 FREVM CFREV 2A PARA GD FREVD CFREV 8A INS4 INS3 FREVM STOP GD INS/ 8 GD GM BG15 GM KC23 Normal INS/ INS Inspection KA13 GD FE 0V FF1 COI1 10 OTHER CAR'S SAFETY CONTACT 0V GM 5 6 FREV INS0 0V 4C 4 GM FF1 OU OPTIONAL DOOR CONTROL BUTTONS EN 81 § 14.2.1.3 LAST ALINEA COI1 Inspection box for STANDARD XP P82-511 MINIBLOC RAM INSpection operation Add. FF Seg. 5 PAR Viewing « Inspection mode » INS «6» ADR/DON MODIF Série 32 Mlift Vector - Prog.Vectorielle Installation manual Chapter VI - page 35 INSPECTION MODE (3/3) Inspection box Inspection box with door control buttons, EN 81 § 14.2.1.3 INS, GM & GD INSpection mode Up (GM) Down (GD) RAM PAR Add. 0C Seg. 3, 2 & 1 ADR/DON INS GM GD MODIF Viewing inspection box TINS INSpection time RAM ADR/DON PAR MODIF Add. 0D BG17 ECRIT 1s Hex Adjustment of the « Inspection time » Consequences of inspection movement too long DEF Consequences of Inspection and emergency mode engaged at the same time BG15 Série 32 Mlift Vector - Prog.Vectorielle Installation manual Chapter VI - page 36 INSPECTION LIMIT SWITCH In France, to fulfil decree n° 95-826 of 30 June 1995, it is advised to install a limit switch for inspection. Distances to fulfil when this device goes on are illustrated below. TOP OF THE SHAFT MATERIAL IN SHAFT Standard NF P 82-211: 1 m + 0,035 v² Decree 95-826: 1,50 m min Standard NF P 82-211: no specified Decree 95-826: 1,80 m min ACCESSIBLE SURFACE Standard: no specified Decree 95-826 : 0,80 m max > 0,25 m CAR AND > 0,12 m² Surface considered accessible Standard EN 81 § 8.13.1 b) Sling (*) (*) The cross head are not considered as work surface because they must not be used during the movement of the car (interpretation CEN n° 139) FAST SPEED INSPECTION RAM ADR/DON PAR MODIF IGV Fast speed inspection Add. 09 Seg. 5 BG17 ECRIT IN PROGRAMMING « IGV », THE CAR START INSTANTLY IN FAST SPEED (GV) WHEN PUSHING ON THE PUSH BUTTONS « GM » OR « GD » Série 32 Mlift Vector - Prog.Vectorielle Installation manual Chapter VI - page 37 FULL LOAD (« NON STOP ») BG15 KC28 NS FROM 0V IN CAR FULL LOAD CONTACT Connection of the « Full load » contact NS RAM ADR/DON PAR MODIF Non stop Add. 0E Seg. 3 Viewing the « Full load » contact DEF BG15 Consequences of the « Full load » Série 32 Mlift Vector - Prog.Vectorielle Installation manual Chapter VI - page 38 CAR OVERLOAD (1/2) VSU : VSU RAM Overload light on programmable outputs on on SPG4 SPG2 PAR on on SPG3 SPG1 BG17 ECRIT ADR/DON MODIF Add. 78 Seg. 0 to 3 RF : RF Overload buzzer on programmable outputs RAM PAR Add. 78 Seg. 4 to 7 BG17 on on SPG4 SPG2 ADR/DON on SPG3 on SPG1 MODIF ECRIT OVERLOAD CONTACT KC28 SU FROM 0V IN CAR BG15 THE OVERLOAD BUZZER AND LIGHT DON'T CONNECTED TOGETHER ON THE SAME OUTPUT BG15 K23 SPG2 ATTENTION !!! PROGRAMMABLE OUTPUTS (SPGX) PRODUCE 0V K26 AND/OR BUZZER 24V / 1,2W LIGHT 24V / 1,2W SPG1 SPG3 SPG4 24R « Car overload » contact, light and buzzer connection K23 SPG2 K26 SPG1 24R SPG3 SPG4 Série 32 Mlift Vector - Prog.Vectorielle Installation manual Chapter VI - page 39 CAR OVERLOAD (2/2) SU SU RAM ADR/DON Overload Add. 0C Seg. 7 PAR MODIF RAM ADR/DON VSU & RF Overload light & Overload buzzer Add. 15 Seg. 2 & 3 PAR VSU RF « Car overload » contact, light and buzzer preview DEF BG15 Consequences of a configuration error of outputs SPG1, SPG2, SPG3 and SPG4 (several functions at the same physical output) DEF BG15 « Car overload » consequences MODIF Série 32 Mlift Vector - Prog.Vectorielle Installation manual Chapter VI - page 40 CAR RESERVATION « CAR PRIORITY » BG15 PRIC KC28 FROM 0V IN CAR CAR PRIORITY KEY « Car reservation » contact connection PRIC RAM ADR/DON PAR MODIF Car priority Add. 0E Seg. 4 « Car reservation » contact state preview DEF BG15 « Car reservation » consequences Série 32 Mlift Vector - Prog.Vectorielle Installation manual Chapter VI - page 41 FIREMAN SERVICE LIGHT VPMP Fireman service light on programmable outputs RAM PAR Add. 7A Seg. 0 to 3 sur sur SPG4 SPG2 ADR/DON sur SPG3 BG17 sur SPG1 MODIF ECRIT BG15 K23 SPG2 K26 FIREMAN SERVICE LIGHT 24V / 1,2W SPG1 SPG3 SPG4 24R Fireman service light connection DEF BG15 Consequences of a configuration error of outputs SPG1, SPG2, SPG3 and SPG4 (several functions at the same physical output) Série 32 Mlift Vector - Prog.Vectorielle Installation manual Chapter VI - page 42 AUTOMATIC CAR LIGHT TIME (BH07) (1/2) LU Automatic light on programmable outputs RAM PAR Add. 7B Seg. 0 to 3 BG17 sur sur SPG4 SPG2 ADR/DON sur SPG3 sur MODIF SPG1 ECRIT RAM ADR/DON PAR MODIF TPLU Automatic light time 10 s Add. 0C BG17 BG15 PERMANENT CAR LIGHT OUTPUT +24V LU/ (G) (H) LC N (F)(E) K23 SPG2 Input Factory connected TIME LAG FUSE dim : 5x20 - 5A K26 SPG1 24R SPG3 SPG4 Output Free terminal Hex ECRIT (A) LT (C)(D) L N (B) N SUPPLY 220V PROTECTED ATTENTION !!! PROGRAMMABLE OUTPUTS PRODUCE 0V GEMOV 250V " 5213 " (P213) Automatic car light time connection RC FILTER SINGLE-PHASE Série 32 Mlift Vector - Prog.Vectorielle Installation manual Chapter VI - page 43 AUTOMATIC CAR LIGHT TIME (BH07) (2/2) LU RAM ADR/DON PAR MODIF Automatic light Add. 13 Seg. 6 Automatic light state preview DEF BG15 Consequences of a configuration error of outputs SPG1, SPG2, SPG3 and SPG4 (several functions at the same physical output) CHAPTER VII COMMISSIONING PROCEDURE Série 32 Mlift Vector - Prog.Vectorielle Installation manual Chapter VII - page 2 PROCEDURE TO BE FOLLOWED TO CARRY OUT THE AUTOMATIC SET-UP OF LEVELS (1/4) BEFORE STARTING: This levelling adjustment is done in INSPECTION (INS) mode and not in MAN. For this connect the inspection wire coming from the car roof to INS, and bridge MAN and 0V. Do not put the magnets on the tape, but take them with you, as well as this installation manual. This automatic relevelling procedure allows you to measure and register directly in the controller the landing heights of each corresponding floor. Each level corresponds to an altitude on the slotted tape. The lowest level is 00 00. PROCEDURE TO FOLLOW : 1) Turn the switch to INS. 2) Switch the MB32 VECTOR power off and then on again. 3) With the left-hand switch of the BG17 communication tool on PAR, programme 80 at address E0. 4) Climb onto the car roof and take the lift down to the lowest level. Stop exactly at the floor level! 5) Press the « STOP » button on the car roof. 6) Press GM and GD at the same time for 5 seconds. You can always correct the last registered height, as long as you have not moved by more than 20 centimetres. 7) Position the ED magnet above the O03 tape-head at a height (D) corresponding to the slow down distance required (see graph on next page). Vn : Nominal speed in metres per second. D : Slow down distance in metres Example: If the lift speed is 1.60 m/s, the graph page 3 recommends a slow down distance (D) between 2 m 00 and 3 m 00, in our example: 2.50 m. Série 32 Mlift Vector - Prog.Vectorielle Installation manual Chapter VII - page 3 PROCEDURE TO BE FOLLOWED TO CARRY OUT THE AUTOMATIC SET-UP OF LEVELS (2/4) SLOW DOWN DISANCE IN METRES 9 9 8 7 6 6 6 5 4 4 D maxi 4.2 D mini 3 3 2.7 1.6 2 2 0.7 1 1 0.5 0 0 0.5 1 1.5 2 2.5 3 SPEED IN METRES PER SECOND Figure 1 Slow down distance D in relation to the nominal speed RED D BLUE FLOOR LEVEL 0 Figure 2 Positioning of "ED" magnet Série 32 Mlift Vector - Prog.Vectorielle Installation manual Chapter VII - page 4 PROCEDURE TO BE FOLLOWED TO CARRY OUT THE AUTOMATIC SET-UP OF LEVELS (3/4) 8) Release the « STOP » button on the car roof and go up to level 1 on inspection, stopping exactly at floor level! 9) Press the « STOP » button on the car roof. 10)Press GM and GD at the same time for 5 seconds. The software will memorise the height corresponding to level 1. 11) Repeat steps 7) to 9) until you reach the highest level. 12) Come back down to the lowest level. By passing the ED magnets coming down, you automatically load the slow-down distance used by all levels going up or coming down. In addition the value 80 programmed at address E0 will reset to 00 to exit the automatic level set-up procedure. 13) Move the lift towards the machine room on inspection, and leave the car roof, leaving the switch still on inspection. 14) Turn the MB32 VECTOR power off and then back on again. If fault code 61 is shown on the communication tool, a mistake has been made during the level set-up procedure, and the whole procedure needs to be done again ... 15) If the fault code 61 does not appear, cut the safety lane. Copy down each floor height at addresses 80 to 9F in the table on page 5, so that later on you can check the lift's stopping precision (table 1) and the slow down distance read at addresses d0 and d1 (table 2). 16) Turn the inspection switch on the car roof to Normal. 17) Return to the machine room. 18) Read the chapter « What to know before starting of at full speed » before reconnecting the safety lane. In this way you can check that the lift carries out correctly its reset sequence. Série 32 Mlift Vector - Prog.Vectorielle Installation manual Chapter VII - page 5 PROCEDURE TO BE FOLLOWED TO CARRY OUT THE AUTOMATIC SET-UP OF LEVELS (4/4) Table 1 floor heights RAM PAR ADDRESSES FOR THE 16 FLOORS Level 0 : 81 80 Level 1 : 83 82 Level 2 : 85 84 Level 3 : 87 86 Level 4 : 89 88 Level 5 : 8b 8A Level 6 : 8d 8C Level 7 : 8F 8E Level 8 : 91 90 Level 9 : 93 92 Level 10 : 95 94 Level 11 : 97 96 Level 12 : 99 98 Level 13 : 9b 9A Level 14 : 9d 9C Level 15 : 9F 9E FLOOR HEIGHT Table 2 slow down distance SLOW DOWN DISTANCE IN MILLIMETRES Addresses d0 d1 thousands, hundred tens, units CHECK THAT THE SLOW DOWN DISTANCE "D" CORRESPONDS TO THE HEIGHT AT WHICH YOU HAVE POSITIONED THE MAGNETS. Série 32 Mlift Vector - Prog.Vectorielle Installation manual Chapter VII - page 6 WHAT TO KNOW BEFORE STARTING OFF AT FULL SPEED (1/3) 1) To programme the slow down distance on the vectorial frequency drive. a) Slow down distance including relevelling speed V0. Example: you have positioned your magnet at 2.5m, during the level height set-up phase and the controller shows at addresses D0 and D1: 2512. In the drive Address 008, Ex : 2362mm ~ 150mm Reduce the D0D1 distance by 150mm and programme this value at address 008 on the frequency drive. These 150mm represent the distance travelled in V0 and the final stopping distance programmed at addresses D2 and D3. In our example you should programme 2362 at address 008 in the frequency drive. In the controller Address D0, D1, Ex : 2512mm b) Slow down distance with direct approach. Segment 5 at address 00E must be ON. Example: you have positioned your magnet at 2.5m, during the level height set-up phase and the controller shows at addresses D0 and D1: 2512. Programme the same value at address 008 in the vector drive. In the drive Address 008, Ex : 2512mm In the controller Address D0, D1, Ex : 2512mm Série 32 Mlift Vector - Prog.Vectorielle Installation manual Chapter VII - page 7 WHAT TO KNOW BEFORE STARTING OFF AT FULL SPEED (2/3) 2) To programme the Thermal Protection. Read the nominal current written on the motor faceplate and copy the value at address 00D of the drive. 3) Address 00E details (Hardware Option) Segment 0: Intégrator. Segment 3: MLi. Segment 5: Direct approach. Segment 6: 65°Défault temperature. Segment 7: Mlift 220V. Série 32 Mlift Vector - Prog.Vectorielle Installation manual Chapter VII - page 8 WHAT TO KNOW BEFORE STARTING OFF AT FULL SPEED (3/3) ABOUT THE CONTROLLER DRIVE: You need to know in which direction the car will go as soon as you turn on the power! ! ! When using the tape and O03 tape head, the magnet which was placed at the bottom during the automatic level set-up plays the role of the special slow-down vane and contact ED. This magnet acts upon the bistable ED mounted on the O03 tape head. • When the contact is open, the car is below the magnet. After power up, the MB32 VECTOR sends the lift up to cross the magnet which will reset the tape head. The lift will stop at the next floor where it can slow down before returning to the main floor. You can check that the ED contact is open by measuring the DC between the “ - ” and “ b ” terminals on the O03 tape head. The voltage measured should be 0V or 24V (depending on whether beam B is broken or not). b a - + 24V 0V 0 30 Contact ED is open when the DC voltage measured between " - " and " b " is 0V or 24V . ED • When the contact is closed, the car is above the magnet. After power up, the MB32 VECTOR sends the car down to cross the magnet which will reset the tape head. The lift will stop at the next floor where it can slow down before returning to the main floor. You can check that the ED contact is closed by measuring the DC voltage between the “ - ” and “ b ” terminals on the O03 tape head. The voltage measured should be 6V or 18V (depending on whether beam B is broken or not). b a 18V - + 6V 0 ED 30 Contact ED is close when the DC voltage measured between " - " and " b " is 6V or 18V . If all values seem coherent, you can carry out your first full speed test runs by closing the safety lane. Série 32 Mlift Vector - Prog.Vectorielle Installation manual Chapter VII - page 9 PARAMETER ADJUSTMENT AT FULL SPEED (1/3) I. Adjustment of the Synchronous Speed At the moment, V2 and the synchronous speed (VSy) are the same value. 1) 2) Select address 114 on the frequency drive communication device. Carry out a full speed movement, and read the synchronous speed displayed. Copy this value into parameter Vsy, address 006. I. Automatic adjustment of the up stopping precision This procedure only works in the case of a slow down distance including the relevelling speed V0. 1) Send the lift to the lowest level. 2) With the left-hand switch of the BG17 communication tool on PAR, programme 40 at address E0. Warning: When you slide the switch back up, E0 will be displayed followed by 42. 3) Send the car up one floor on normal. When the car stops, the value 42 programmed at E0 will reset to 00 to exit the automatic adjustment procedure. Warning: The lift may perhaps not be exactly at floor level. This is normal it will be at floor level after the next journey. III.Automatic adjustment of the down stopping precision This procedure only works in the case of a slow down distance including the relevelling speed V0. 1) Send the lift to the highest level. 2) With the left-hand switch of the BG17 communication tool on PAR, programme 20 at address E0. Warning: When you slide the switch back up, E0 will display followed by 21. 3) Send the car down one floor on normal. When the car stops, the value 21 programmed at E0 will reset to 00 to exit the automatic adjustment procedure. Warning: The lift may perhaps not be exactly at floor level. This is normal..., it will be at floor level after the next journey. To find out the stopping precision at each level, with the left-hand switch of the BG17 on RAM, check the height counter at 23 and 22. The value is given in impulses and in hexadecimal. 1 impulse = 2 millimetres. RAM PAR Ad 23 = 00 Height counter at addresses 23 and 22 Ad 22 = 03 Example: Sending the car to the very bottom, if you read 00 at 23 and 03 at 22, this means that the car stopped 3 impulses (about 6mm) from the target (00 03). Série 32 Mlift Vector - Prog.Vectorielle Installation manual Chapter VII - page 10 PARAMETERS ADJUSTMENT AT FULL SPEED (2/3) IV.Adjustment of the direct approach precision At address 00E, segment 5 should be on. 1) Select address 22, with the little left-hand red switch in the RAM (upper) position, and send the lift to the bottom floor. The tape head may show a positive value e.g. 09 (i.e. 9 impulses x 2mm = 18mm), which means that the car has stopped 18mm above floor level. Increase the value programmed at address 008 (DV2) by this 18mm. If the lift stops after floor level, reduce the value programmed at address 008 (DV2) by these 18mm. V. Automatic adjustment of the hysterisis zone This must be done if the lowest level is not the main floor. 1) Position the lift above the ED magnets. 2) With the left-hand switch of the BG17 communication tool on PAR, programme 10 at address E0. 3) Send the car up one floor and then down one floor, so that the tape-head passes the ED magnets in both directions. VI.Positioning of EM magnet at top floor Position the EM magnet at the slow-down point for the top floor, this may be useful if the lift does not cross the bottom magnets very often. To carry out this operation, you will need the following elements: • An O03-2 tape-head. • An N70 interface board for an O03-2 tape-head. • A pair of magnets to position as shown on page 11. 1) During normal operation, when the lift stops exactly at the desired floor, send the lift up to the top floor and position the EM magnets to obtain the desired slowdown distance (the position of the EM magnets is roughly the same as that of the ED magnets). 2) If afterwards when coming back to the top floor, the lift does not stop at floor level, move the EM magnets to the value corresponding to the reset heigt. Série 32 Mlift Vector - Prog.Vectorielle Installation manual Chapter VII - page 11 POSITIONING THE EM MAGNETS ON THE SLOTTED TAPE (O03-2 TAPE HEAD) (3/3) TOP FLOOR N ZONARM UP STOPPING ZONE ZDEVER UP DOOR UNLOCKING ZONE UP SLOW SPEED ZONE EM ZONE PV UP SLOW SPEED ZONE BLUE MAGNET RED MAGNET EM DOWN SLOW SPEED ZONE O03-2 Tape-head ZONE PV DOWN SLOW SPEED ZONE ZDEVER DOWN DOOR UNLOCKING ZONE ZONARD DOWN STOPPING ZONE FLOOR F-1 FLOOR 2 ZONARM UP STOPPING ZONE ZDEVER UP DOOR UNLOCKING ZONE UP SLOW SPEED ZONE ED ZONE PV UP SLOW SPEED ZONE RED MAGNET BLUE MAGNET ED DOWN SLOW SPEED ZONE O03-2 Tape-head ZONE PV DOWN SLOW SPEED ZONE ZDEVER DOWN DOOR UNLOCKING ZONE BOTTOM FLOOR 0 ZONARD DOWN STOPPING ZONE Série 32 Mlift Vector - Prog.Vectorielle Installation manual Chapter VII - page 12 PARAMETERS TO BE ADJUSTED ON SITE AND CONVERSION TABLE Reminder of parameters to be checked and improved on site. • Door 1 timer: Address 41 for door 1 (From 2 to 255 seconds). • Reopen timer: Address 42 for door 1 (From 1 to 255 seconds). • Door 2 timer: Address 61 for door 2 (From 2 to 255 seconds). • Reopen timer: Address 62 for door 2 (From 1 to 255 seconds). These parameters are programmed in seconds and in hexadecimal, for conversion see the table below. Conversion table Hexadecimal ⇔ Decimal Right hand figure 0 Left hand figure 1 2 1 2 0 0 1 16 17 18 2 32 33 34 3 48 49 50 4 64 65 66 5 80 81 82 6 96 97 98 7 112 113 114 8 128 129 130 9 144 145 146 3 4 5 6 7 8 9 A B C D E F 3 19 35 51 67 83 99 115 131 147 4 20 36 52 68 84 100 116 132 148 5 21 37 53 69 85 101 117 133 149 6 22 38 54 70 86 102 118 134 150 7 23 39 55 71 87 103 119 135 151 8 24 40 56 72 88 104 120 136 152 9 25 41 57 73 89 105 121 137 153 10 26 42 58 74 90 106 122 138 154 11 27 43 59 75 91 107 123 139 155 12 28 44 60 76 92 108 124 140 156 13 29 45 61 77 93 109 125 141 157 14 30 46 62 78 94 110 126 142 158 15 31 47 63 79 95 111 127 143 159 A 160 161 162 163 164 165 166 167 168 169 170 171 172 173 174 175 B 176 177 178 179 180 181 182 183 184 185 186 187 188 189 190 191 C 192 193 194 195 196 197 198 199 200 201 202 203 204 205 206 207 D 208 209 210 211 212 213 214 215 216 217 218 219 220 221 222 223 E 224 225 226 227 228 229 230 231 232 233 234 235 236 237 238 239 F 240 241 242 243 244 245 246 247 248 249 250 251 252 253 254 255 Using the table: To convert a hexadecimal number to a decimal number, find the left hand hexadecimal digit in the left hand column of the table. Follow along the line until it intersects with the right hand digit to be found in the top row of the table. This value is the decimal equivalent of the hexadecimal number required. Example: to convert the hexadecimal number A4 into decimal, follow the row A in the left hand column until it intersects with the column 4 in the top row. This is the decimal equivalent of A4, i.e. 164. To convert a decimal number to a hexadecimal number, find the decimal number in the table. The first figure of the hexadecimal number is the digit shown in the left hand column of that line, and the second digit is the digit shown at the top of that column. Example: to find the hexadecimal equivalent of 206, find that value in the table. The hexadecimal equivalent is CE. Série 32 Mlift Vector - Prog.Vectorielle Installation manual Chapter VII - page 13 Hexadecimal addition table Result in hex 0 1 2 3 4 5 6 7 8 9 A B C D E F 0 1 2 3 4 5 6 7 8 9 A B C D E 0 1 2 3 4 5 6 7 8 9 A B C D E F 1 2 3 4 5 6 7 8 9 A B C D E F 10 2 3 4 5 6 7 8 9 A B C D E F 10 11 3 4 5 6 7 8 9 A B C D E F 10 11 12 4 5 6 7 8 9 A B C D E F 10 11 12 13 5 6 7 8 9 A B C D E F 10 11 12 13 14 6 7 8 9 A B C D E F 10 11 12 13 14 15 7 8 9 A B C D E F 10 11 12 13 14 15 16 8 9 A B C D E F 10 11 12 13 14 15 16 17 9 A B C D E F 10 11 12 13 14 15 16 17 18 A B C D E F 10 11 12 13 14 15 16 17 18 19 B C D E F 10 11 12 13 14 15 16 17 18 19 1A C D E F 10 11 12 13 14 15 16 17 18 19 1A 1B D E F 10 11 12 13 14 15 16 17 18 19 1A 1B 1C E F 10 11 12 13 14 15 16 17 18 19 1A 1B 1C 1D F F 10 11 12 13 14 15 16 17 18 19 1A 1B 1C 1D 1E Result in decimal 0 1 2 3 4 5 6 7 8 9 A B C D E F 0 1 2 3 4 5 6 7 8 9 A B C D E F 0 1 2 3 4 5 6 7 8 9 10 11 12 13 14 15 1 2 3 4 5 6 7 8 9 10 11 12 13 14 15 16 2 3 4 5 6 7 8 9 10 11 12 13 14 15 16 17 3 4 5 6 7 8 9 10 11 12 13 14 15 16 17 18 4 5 6 7 8 9 10 11 12 13 14 15 16 17 18 19 5 6 7 8 9 10 11 12 13 14 15 16 17 18 19 20 6 7 8 9 10 11 12 13 14 15 16 17 18 19 20 21 7 8 9 10 11 12 13 14 15 16 17 18 19 20 21 22 8 9 10 11 12 13 14 15 16 17 18 19 20 21 22 23 9 10 11 12 13 14 15 16 17 18 19 20 21 22 23 24 10 11 12 13 14 15 16 17 18 19 20 21 22 23 24 25 15 16 17 18 19 20 21 22 23 24 25 26 27 28 29 30 11 12 13 14 15 16 17 18 19 20 21 22 23 24 25 26 12 13 14 15 16 17 18 19 20 21 22 23 24 25 26 27 13 14 15 16 17 18 19 20 21 22 23 24 25 26 27 28 14 15 16 17 18 19 20 21 22 23 24 25 26 27 28 29 Using the table: To add 2 hexadecimal figures, locate one of these figures in the left-hand column. Follow the corresponding row along to the right until the intersection with the column of the upper part where the second figure is found. The value at the intersection is the desired sum. For example, to add the hex numbers A and 4, find the intersection of the row which contains A in the first column, with the column that contains 4 in the upper part. The sum of A and 4 is the value at the intersection, i.e. E. If you have to add 2 figure hex numbers, proceed figure by figure from right to left, and do not forget the equivalent remainders. For example, to add the hex numbers1A and B2, add A to C (result: 16 in hex), which thus gives a remainder of to 1, then add 1 and B (result equal to C), to which add the remainder 1 to get the final result of D6. The upper table gives the result in hex, the lower table gives the result in decimal. Série 32 Mlift Vector - Prog.Vectorielle Installation manual Chapter VII - page 14 Hexadecimal multiplication table Result in hex 0 1 2 3 4 5 6 7 8 9 A B C D E F 0 1 2 3 4 5 6 7 8 9 A B C D E F 0 0 0 0 0 0 0 0 0 0 0 0 0 0 0 0 0 1 2 3 4 5 6 7 8 9 A B C D E F 0 2 4 6 8 A C E 10 12 14 16 18 1A 1C 1E 0 3 6 9 C F 12 15 18 1B 1E 21 24 27 2A 2D 0 4 8 C 10 14 18 1C 20 24 28 2C 30 34 38 3C 0 5 A F 14 19 1E 23 28 2D 32 37 3C 41 46 4B 0 6 C 12 18 1E 24 2A 30 36 3C 42 48 4E 54 5A 0 7 E 15 1C 23 2A 31 38 3F 46 4D 54 5B 62 69 0 8 10 18 20 28 30 38 40 48 50 58 60 68 70 78 0 9 12 1B 24 2D 36 3F 48 51 5A 63 6C 75 7E 87 0 A 14 1E 28 32 3C 46 50 5A 64 6E 78 82 8C 96 0 B 16 21 2C 37 42 4D 58 63 6E 79 84 8F 9A A5 0 C 18 24 30 3C 48 54 60 6C 78 84 90 9C A8 B4 0 D 1A 27 34 41 4E 5B 68 75 82 8F 9C A9 B6 C3 0 E 1C 2A 38 46 54 62 70 7E 8C 9A A8 B6 C4 D2 0 F 1E 2D 3C 4B 5A 69 78 87 96 A5 B4 C3 D2 E1 Result in decimal 0 1 2 3 4 5 6 7 8 9 A B C D E F 0 1 2 3 4 5 6 7 8 9 A B C D E F 0 0 0 0 0 0 0 0 0 0 0 0 0 0 0 0 0 1 2 3 4 5 6 7 8 9 10 11 12 13 14 15 0 2 4 6 8 10 12 14 16 18 20 22 24 26 28 30 0 3 6 9 12 15 18 21 24 27 30 33 36 39 42 45 0 4 8 12 16 20 24 28 32 36 40 44 48 52 56 60 0 5 10 15 20 25 30 35 40 45 50 55 60 65 70 75 0 6 12 18 24 30 36 42 48 54 60 66 72 78 84 90 0 7 14 21 28 35 42 49 56 63 70 77 84 91 98 105 0 8 16 24 32 40 48 56 64 72 80 88 96 104 112 120 0 9 18 27 36 45 54 63 72 81 90 99 108 117 126 135 0 10 20 30 40 50 60 70 80 90 100 110 120 130 140 150 0 11 22 33 44 55 66 77 88 99 110 121 132 143 154 165 0 12 24 36 48 60 72 84 96 108 120 132 144 156 168 180 0 13 26 39 52 65 78 91 104 117 130 143 156 169 182 195 0 14 28 42 56 70 84 98 112 126 140 154 168 182 196 210 0 15 30 45 60 75 90 105 120 135 150 165 180 195 210 225 Using the table: To multiply 2 hex figures, locate one of these figures in the left-hand column of the table. Follow the corresponding row along to the right until the intersection with the column at the upper part to that where the second figure is located. The value at the intersection is the product sought. The upper table gives the result in hex, the lower table in decimal. For example, the product of the hex number A and 6 is 3C hex and 60 decimal. Série 32 Mlift Vector - Prog.Vectorielle Installation manual Chapter VII - page 15 Conversion table for segment displays Hexadecimal Decimal Hexadecimal Decimal 0 0 0 0 10 16 1 1 20 32 2 2 30 48 3 3 40 64 4 4 50 80 5 5 60 96 6 6 70 112 7 7 80 128 8 8 90 144 9 9 A0 160 A 10 B0 176 B 11 C0 192 C 12 D0 208 D 13 E0 224 E 14 F0 240 F 15 + To get the equivalent decimal value for a segment configuration, pick out from the table the equivalent value to the upper segments and add to it the equivalent lower segments. For example : = = + 176 + 6 = 182 Série 32 Mlift Vector - Prog.Vectorielle Installation manual Chapter VII - page 16 Série 32 Mlift Vector - Prog.Vectorielle Installation manual Chapter VII - page 17 AUTINOR List of • PARAMETERS • INPUTS • OUTPUTS • FAULT CODES in VECTOR DRIVE VSC-V02 of 07/03/2000 8 november 2000 Série 32 Mlift Vector - Prog.Vectorielle Installation manual Chapter VII - page 18 Série 32 Mlift Vector - Prog.Vectorielle Installation manual Chapter VII - page 19 WARNING This manual is deemed correct on going to press. It is linked to the program version shown on the front page, however this version may evolve without influencing the contents of this manual, which may in itself be changed without prior warning. The information contained has been scrupulously checked. However AUTINOR declines all responsibility for error or omission. Should you notice any discrepancy or unclear description, or if you have any suggestions, we would appreciate your written comments (by mail or fax) to : Société AUTINOR - Service Documentation Z.A. Les Marlières 59710 AVELIN [33] 03-20-62-56-00 ¬ [33] 03-20-62-56-41 [email protected] This manual is the property of AUTINOR, from whom it may be bought (at the above address). It may however by freely copied in order to communicate information to those who might need it. We can only authorise a complete copy, without addition nor removal of information Where quotations are taken, the following at least must be noted : - The company name of AUTINOR, The program version to which it refers, The number and date of the original edition. © Copyright 2000 AUTINOR All rights reserved. Série 32 Mlift Vector - Prog.Vectorielle Installation manual Chapter VII - page 20 Série 32 Mlift Vector - Prog.Vectorielle Installation manual Chapter VII - page 21 CONTENTS EXPLANATION OF PARAMETERS (1/7)................................................................. 23 EXPLANATION OF INPUTS (1/2) ............................................................................ 30 EXPLANATION OF OUTPUTS................................................................................. 32 EXPLANATION OF VARIABLES (1/2)...................................................................... 33 LIST OF VECTOR PARAMETERS AND FINAL VALUES ........................................ 35 LIST OF VECTOR INPUTS/OUTPUTS .................................................................... 37 LIST OF VECTOR FAULT CODES .......................................................................... 38 Série 32 Mlift Vector - Prog.Vectorielle Installation manual Chapter VII - page 22 Série 32 Mlift Vector - Prog.Vectorielle Installation manual Chapter VII - page 23 EXPLANATION OF PARAMETERS (1/7). • Address 000 : V0, V0. At this address is programmed V0 which can also be used as a relevelling speed. Units : Mini : metres per second (m/s) 0,001 m/s Maxi : 0,199 m/s 1/10 of V2 Factory value : • Address 001 : ISO, Relevelling speed. At this address is programmed the relevelling speed. Unit : Mini : metres per second (m/s) 0,000 m/s < V0 Maxi : 0,020 m/s Factory value : • Address 002 : INS, Inspection speed. At this address is programmed the Inspection speed which can also be used as an intermediate speed if V1 is not used. This speed is taken into account when the inspection input (INS/ on K30) is activated (VINS Led lit). Unit : Mini : metres per second (m/s) 0,20 m/s Maxi : 0,60 m/s 0,50 m/s Factory value : • Address 003 : V1, Intermediate speed V1. At this address is programmed the Intermediate speed V1. Unit : Mini : Factory value : metres per second (m/s) 0,61 m/s Maxi : 0,61 m/s < V2 Série 32 Mlift Vector - Prog.Vectorielle Installation manual Chapter VII - page 24 EXPLANATION OF PARAMETERS (2/7). • Address 004 : V2, Full speed V2. At this address is programmed the Full speed. metres per second (m/s) Unit : > V1 Mini : Maxi : 04,00 m/s Clients specification Factory value : • Address 006 : VSy, Synchronous speed. At this address is programmed the movement speed of the car when the motor turns at its synchronous speed. • 1500 t/min for a 4 pole motor • 1000 t/min for a 6 pole motor metres per second (m/s) Unit : 0,000 m/s Mini : Maxi : 9,999 m/s Clients specification Factory value : Formula : Calculation of the synchronous speed for a 1500 t/min motor : VSy = 1500 ×π d 60 Reductor ration x roping π = 3,14 - d = diameter of the pulley - Roping = 1 or 2 or 4 • Address 008 : DV2, Slow-down distance on V2. At this address is programmed the slow-down distance necessary when in full speed V2. metre (m) Unit : 0,000 m Mini : Maxi : 9,999 m Clients specification Factory value : 9 9 DISTANCES EN METRE 8 7 6 6 5 4 4 1.6 2 0.7 0.5 1 0 0 2 D maxi D mini 4.2 3 3 6 2.7 1 0.5 1 1.5 2 2.5 VITESSES EN METRE PAR SECONDE 3 Figure 3 Slow-down distance value (DV2) in fact of the full speed (V2) Série 32 Mlift Vector - Prog.Vectorielle Installation manual Chapter VII - page 25 EXPLANATION OF PARAMETERS (3/7). • Address 00A : Acce, Acceleration. At this address is programmed the time to reach V2 speed. second (s) Unit : Mini : 02,0 s Maxi : 25,5 s 03,0 s Factory value : • Address 00B : FrArr, Brake time on stopping. At this address is programmed the time to stabilise the rotor before the brake is dropped. second (s) Unit : Mini : 0,30 s Maxi : 0,80 s 0,5 s Factory value : • Address 00C : FrDem, Brake time on start-up. At this address is programmed the time during which the rotor is stabilised to allow the brake to lift correctly before start-up. second (s) Unit : Mini : 0,00 s Maxi : 0,60 s 0,5 s Factory value : • Address 00D : Thermi, Motor thermistor. At this address is programmed the current at which the electronic thermical relay is activated. (since programme V02) Ampere (A) Unit : Mini : Factory value : ....... A Maxi : ....... A Clients specification The thermal relay switches switch off if the motor intensity (Imot) is higher than the thermal intensity (Ith) for longer than 3,5 seconds or if the motor intensity (Imot) is 1,5 A higher than the termal intensity (Ith). Imot can be seen at the address 108, page 33. Série 32 Mlift Vector - Prog.Vectorielle Installation manual Chapter VII - page 26 EXPLANATION OF PARAMETERS (4/7). • Address 00E : Opt, Option. Segment 7 : ML220V, MLIft 220V. 00E Opt 10000000 Segment 7 is programmed ON when the Vector drive is on a three phase 220V network. Segment 7 is programmed OFF when the Vector drive is on a three phase 400V network. Segment 6 : D65°, Fault T°>65°. 00E Opt 01000000 Segment 6 is programmed ON to increase the radiator temperature detection threshold from 60°C to 65°C. Segment 6 is programmed OFF to keep the detection threshold at 60°C. Segment 5 : APPDIR, Direct Approach. 00E Opt 00100000 Segment 5 is programmed ON to remove V0 so that the car can level with direct approach. Segment 5 is programmed OFF if this is not desired. Segment 4 : RETSEC, Delay on safety contactor. 00E Opt 00010000 Segment 4 is programmed ON to filter the rebound of the S contactor contacts on startup, and when these contacts are used to cut the motor power supply. Segment 4 is programmed OFF when the S contacts are not used to control the motor. Segment 3 : MLI, V.F. + « NON AUTINOR » Controller. 00E Opt 00001000 Segment 3 is programmed ON when the B32 is associated to an other controller than AUTINOR. Segment 3 is programmed OFF when the B32 is associated to an AUTINOR controller using the slotted tape. Segment 2 : BATERI, Battery. 00E Opt 00000100 Option available later in 1999 Segment 2 is programmed ON to activate the emergency return to floor level using battery power supply. This option requires an extra, emergency power supply. Segment 1 : NOBAND, No slotted tape. 00E Opt 00000010 Segment 1 is programmed ON when there is no tape or O03 tape-head. In this case, a high speed tachometer is required. Segment 1 is programmed OFF when the speed information cames from the slotted tape and O03 tape-head. Série 32 Mlift Vector - Prog.Vectorielle Installation manual Chapter VII - page 27 EXPLANATION OF PARAMETERS (5/7). Segment 0 : IG, Integrator. 00E Opt 00000001 Segment 0 is programmed ON when the B32 slip integrator is to be activated. Segment 0 is programmed OFF if this is not desired . • Address 010 : Modele, B32 Model. At this address is programmed the B32 model number. See the sticker on the Plexiglas or on the current measuring device label (VEC02M). None Unit : Mini : 2 Maxi : 9 Clients specification Factory value : • Address 012 : IFlux, Maximum flux current. At this address is programmed the maximum flux current. Normally, this current is measured with no load at 1500 tr/mn. This measurement is rarely possible on site, so the « empirical » method is to program the number of horsepower as found on the motor plaque. Example : If the motor plaque says 12 HP ⇒ Program 12,0 If the motor plaque says 12 kW, transform into HP, 12 / 0,736 = 16,3 ⇒ program 16,3 Ampere (a) Unit : Mini : 000,1 A Maxi : 999,9 a Clients specification Factory value : • Address 014 : IFmin, minimum flux current. At this address is programmed the minimum flux current, which is approximately one half of the maximum flux current (see address 012). This parameter decreases the motor vibrations at low frequency. Ampere (a) Unit : Mini : Factory value : 000,1 A Maxi : IFlux / 2 = (A) 999,9 a Série 32 Mlift Vector - Prog.Vectorielle Installation manual Chapter VII - page 28 EXPLANATION OF PARAMETERS (6/7). • Address 016 : Gliss, Motor Slip. At this address is programmed the motor slip. Example of the slip calculation : For a 4 pole motor, 50 Hz, which without slip would turn at 1500 rpm, yet the motor plaque states 1380 rpm, the slip will be 1500 − 1380 1500 = 0,08 ie 8% ⇒ Program 08,0 % percent (%) Unit : Mini : 02,0 % Factory value : Maxi : 1500 − 1380 1500 20,0 % = 0,08 soit 8% If the RPM is not shown, use the table below once you have calculated the Id / In ratio (starting current / nominal current) Id In Gliss Ad 016 2,5 3,5 4 5 10 % 8% 5% 3% • Address 024 : NCode, Number of encoder impulses. At this address is programmed the number of incremental encoder impulses. None Unit : Mini : 500 Maxi : 2500 500 (500 < x < 2500) Factory value : • Address 026 : NPole, Number of motor pole. At this address is programmed the number of motor pole. None Unit : Mini : Factory value : 004 Maxi : 006 4 or 6 poles, if 6 poles, Ncode = 750 min Série 32 Mlift Vector - Prog.Vectorielle Installation manual Chapter VII - page 29 EXPLANATION OF PARAMETERS (7/7). • Address 027 : Country, Language. At this address can be programmed the language to be used on the VEC03 programming tool. Possible choice : France, English, Deutsch *, Español * In Germany, the Inspection speed can go up to 0,80 m/s and the levelling speed up to 0,50 m/s. • Address 034 : Dem, Number of starts. . => 0 0 0 0 x x x x At this address, can be read the number of starts carried out by the lift and the 4 strong weight bits can be modified. • Address 036 : Dem, Number of starts. => x x x x 0 0 0 0 At this address, can be read the number of starts carried out by the lift and the 4 light weight bits can be modified. • Address 041 : Test, Transistor test. At this address, can be written 55 to check the transistors. All of the LEDs turn red if all of the transistors are working properly. • Address 042 : Prog, Type of Programme. At this address, the selected programme can be read. VEC (VECtoriel) Vector, SCA (SCAlaire), ARB (ARBre lent) Gear Less. • Address 043 : TMan, Type of Controller. At this address, the type of controller associated with the B32 can be read. Normal (AUTINOR Controller or with a VEC06 interface board), 1Vit (1 speed controller), 2Vit (2 speed controller) • Address 044 : Mcode, Memorisation of a personal code number. At this address can be memorised a personal code number to program against all chance intervention. The equipment set with the factory code 0000 allowing complete and permanent access to the set of settings. After programming your code (Don’t forget to take note of it), the address 044 disappears. If you want to modify the settings, enter your Code at the address 046. • Address 046 : Code, Access Code. At this address, enter your Code to unlock the address 044 in order to modify the setting and/or change the memorised code. Série 32 Mlift Vector - Prog.Vectorielle Installation manual Chapter VII - page 30 EXPLANATION OF INPUTS (1/2) • Address 100 : En1, Inputs 0 to 7. Segment 7 : NOT USED. 100 En1 10000000 Segment 6 : V2, Speed V2. (Full speed) 100 En1 01000000 Indicates the State of the input for speed V2. Segment 6 lights up when the lift is required to move at speed V2. Segment 6 is not lit otherwise. Segment 5 : V1, Speed V1. (Intermediate speed) 100 En1 00100000 Indicates the State of the input for speed V1. Segment 5 lights up when the lift is required to move at speed V1. Segment 5 is not lit otherwise. Segment 4 : V0, Speed V0. 100 En1 00010000 Indicates the State of the input for speed V0. Segment 4 lights up when the lift is required to move at speed V0. Segment 4 is not lit otherwise. Segment 3 : INS, Inspection speed. 100 En1 00001000 Indicates the State of the inspection input. Segment 3 lights up when the lift is required to move on inspection. Segment 3 is not lit otherwise. Segment 2 : VISO, Relevelling speed. 100 En1 00000100 Indicates the State of the relevelling input. (VISO+ & VISO-) Segment 2 lights up when the lift is required to relevel. Segment 2 is not lit otherwise. Segment 1 : DE, Down. Indicates the State of the Down input. Segment 1 lights up when the lift is required to go down. Segment 1 is not lit otherwise. 100 En1 00000010 Série 32 Mlift Vector - Prog.Vectorielle Installation manual Chapter VII - page 31 EXPLANATION OF INPUTS (2/2) Segment 0 : MO, Up. 100 En1 00000001 Indicates the State of the Up input. Segment 0 lights up when the lift is required to go up. Segment 0 is not lit otherwise. • Address 102 : En2, Inputs 0 to 7. Segment 7 : NOT USED. 102 En2 10000000 Segment 6 : NOT USED. 102 En2 01000000 Segment 5 : CCL, L Contactor Check. 102 En2 00100000 Indicates the State of the Line Contactor. Segment 5 lights up when the Line contactor is de-energised. Segment 5 it is not lit when the Line contactor is energised. Segment 4 : CCS, S Contactor Check. 102 En2 00010000 Indicates the State of the Safety Contactor. Segment 4 lights up when the Safety contactor is de-energised. Segment 4 it is not lit when the Safety contactor is energised. Segment 3 : NOT USED. 102 En2 00001000 Segment 2 : NOT USED. 102 En2 00000100 Segment 1 : CAA, Tape-head O03 - Beam A. 102 En2 00000010 Indicates the State of the Beam A (Top Beam) on the O03 tape-head. Segment 1 lights up when the Beam A is cut. Segment 1 is not lit otherwise. Segment 0 : CAB, Tape-head O03 - Beam B. Indicates the State of the Beam B (Bottom Beam) on the O03 tape-head. Segment 0 lights up when the Beam B is cut. Segment 0 is not lit otherwise. 102 En2 00000001 Série 32 Mlift Vector - Prog.Vectorielle Installation manual Chapter VII - page 32 EXPLANATION OF OUTPUTS • Address 101 : Sor, Outputs 0 to 7. Segment 7 : RISO, Re-levelling Fault Relay. 101 Sor 10000000 Indicates the State of the re-levelling fault relay output (RISO on VEC06 board or controller input). Segment 7 lights up when the re-levelling fault relay output is activated. Segment 7 is not lit otherwise. Segment 6 : FR, Brake relay. 101 Sor 01000000 Indicates the State of the Brake relay output (BR). Segment 6 lights up when the brake relay output is activated. Segment 6 is not lit otherwise. Segment 5 : DFP, Fault Relay (Temporary). 101 Sor 00100000 Indicates the State of the Fault relay output (DEF on VEC06 board or controller input). Segment 5 lights up when the fault relay output is activated. Segment 5 is not lit otherwise. Segment 4 : DFI, Fault Relay (Definitive). 101 Sor 00010000 Indicates the State of the Fault relay output (DEF on VEC06 board or controller input). Segment 4 lights up when the fault relay output is activated. Segment 4 is not lit otherwise. Segment 3 : STOPR, Stop VVVF. 101 Sor 00001000 Indicates the State of the Frequency Drive. Segment 3 lights up when the Frequency drive is OFF. Segment 4 is not lit otherwise. Segment 2 : VENT, Fan relay. 101 Sor 00000100 Indicates the State of the Fan relay output. (VENT). Segment 2 lights up when the fan relay output is activated. Segment 2 is not lit otherwise. Segment 1 : S, Safety relay. 101 Sor 00000010 Indicates the State of the Safety relay output (S). Segment 1 lights up when the safety relay output is activated. Segment 1 is not lit otherwise. Segment 0 : L, Line relay. Indicates the State of the Line relay output (L). Segment 0 lights up when the line relay output is activated. Segment 0 is not lit otherwise. 101 Sor 00000001 Série 32 Mlift Vector - Prog.Vectorielle Installation manual Chapter VII - page 33 EXPLANATION OF VARIABLES (1/2) • Address 103 : T°, Radiator Temperature in degrees Celsius (°) At this address can be read the power transistors cooling radiator temperature. • Address 104 : TCont, Capacitor Current in Volts (V) At this address can be read the D.C. net capacitor terminal current. • Address 108 : Imot, Motor Current in Amps (A) At this address can be read the current in each phase of the motor. • Address 10A : DV0, V0 stopping distance in metres (m) At this address can be read the distance necessary to smooth V0 into zero speed. • Address 10B : Diso, Relevelling stopping distance in metres (m) At this address can be read the distance necessary to smooth VISO into zero speed. • Address 10C : DIns, Inspection slow-down distance in metres (m) At this address can be read the slow-down distance associated with the inspection speed VINS. • Address 10E : DV1, V1 slow-down distance in metres (m) At this address can be read the slow-down distance associated with the intermediate speed V1. • Address 110 : Fre, Frequency sent to the motor in Hertz (Hz) At this address can be read the instantaneous frequency applied to the motor. • Address 112 : Con, reference in Hertz (Hz) At this address can be read the reference/Ideal frequency to be followed. Série 32 Mlift Vector - Prog.Vectorielle Installation manual Chapter VII - page 34 EXPLANATION OF VARIABLES (2/2) • Address 114 : Vt, Lift speed in metres per second (m/s) At this address can be read the car speed. • Address 116 : Codeur, Incremental encoder no Unit At this address can be read the counting of the incremental encoder mounted on the motor. • Address 118 : Recup, Energy regeneration in percent (%) At this address can be read the percentage of energy consumed in the x regenerative resistors. (x = number of regenerative resistors depending of the drive model) • Address 11A : Tmot, motor power supply current in percent (%) At this address can be read the power current applied to the motor. • Address 120 : GD, Deceleration Gradient in V2 speed in metre per second squared (m/s²) At this address can be read the deceleration slope associated with the different speed. • Address 122 : DRal, Slow-down distance in metre (m) At this address can be read the slow-down distance still to run. • Address 12A : I Cap1, Current measuring device 1 no Unit At this address can be read the information given by the current measuring device 1 Note : At Stop the information should be between 500 and 524. • Address 12C : I Cap2, Current measuring device 2 no Unit At this address can be read the information given by the current measuring device 2. Note : At Stop the information should be between 500 and 524. • Address 12E : I Cap3, Current measuring device 3 no Unit At this address can be read the information given by the current measuring device 3. Note : At Stop the information should be between 500 and 524. Série 32 Mlift Vector - Prog.Vectorielle Installation manual Chapter VII - page 35 LIST OF VECTOR PARAMETERS AND FINAL VALUES Address Name Designation Min values Max values Factory values Finals Values 000 V0 Set-up speed 0,001 0,199 1/10 de V2 23 001 Iso Re-levelling speed 0,000 < V0 0,020 m/s 23 002 Ins Inspection speed 0,20 0,60 0,50 m/s 23 003 V1 Intermediary speed 0,61 < V2 0,61 m/s 23 004 V2 Full speed > V1 03,00 Clients specification (m/s) 24 006 VSy Synchronous speed 0,000 9,999 Clients specification (m/s) 24 008 DV2 V2 Slow down distance 0,000 9,999 Clients specification (m) 24 00A Acce Acceleration 02,0 25,5 3,0 s 25 00B FrArr Brake stopping time 0,30 0,80 0,5 s 25 00C FrDem Brake starting time 0,00 0,60 0,5 s 25 00D Thermi Motor thermistor (A) Clients specification (A) 25 00E Opt Hardware option Clients specification (m/s) 26 00F RgT° Temperature Sonde Calibration 0 10 4 °C 010 Model Vector model 2 9 Clients specification 011 Tmor Transistor pause time 012 IFlux Flux current max 000,1 999,9 Number of horse power (A) 27 014 IFmin Flux current min 000,1 999,9 IFlux / 2 = (A) 27 016 Gliss Motor slip 02,0 20,0 017 ETFDM0 Up starting brake time difference 0,00 2,55 018 Jreg Inertia 005 % 019 GP max Max Proportional Gain > 12 Hz 015 01A GP min Min Proportional Gain < 12 Hz 004 01B GI max Max integral Gain 010 01C GI min Min integral Gain 001 01D AFLuD Additional starting Flux 00,0 A 01E GI Dep Start up integral Gain 005 01F GP Dep Start up Proportional Gain 005 020 T Dema Start up Voltage 006 % 021 G Stabi Stabilisation Gain 015 022 FTmax Max Voltage Frequency 050 Hz 023 FMinD Min Starting Frequency 0,10 Hz 024 NCode N° Encoder Teeth 0500 2500 500 (500 < x < 2500) 28 026 NPole N° of motor Poles 004 006 4 or 6 poles (if 6 poles, NCode=750mini) 28 027 Country Country Language Page 27 1,5 µs 1500 − RPM 28 × 100 = % 1500 0,00 s F , * Opt parameter Detail - OPTion - Address 00E : GB , , D 29 SP page 26. Address Name Seg 7 Seg 6 Seg 5 Seg 4 Seg 3 Seg 2 Seg 1 Seg 0 00E Opt ML220V D65° APPDIR RETSEC MLI BATERI NOBAND IG 0 0 0 0 0 or 1 0 1 0 FACTORY VALUE FINAL VALUE Série 32 Mlift Vector - Prog.Vectorielle Installation manual Chapter VII - page 36 LIST OF VECTOR PARAMETERS AND FINAL VALUES Min Values Max Values Factory Values Number of starts (Full load) 0000 9999 0000xxxx 29 Dem Number of starts (Empty) 0000 9999 xxxx0000 29 038 Visu1 * VISU n° 1 Address PROGRAMMATION F912 039 Visu2 * VISU n° 2 Address OF THE CURVES F910 03A Visu3 * VISU n° 3 Address VISUALISED F904 03B Visu4 * VISU n° 4 Address ON COMPUTER F908 040 HinTen Disable of voltage control 00 041 Test Transistor Test (Program 55 for test) 00 29 042 Prog Programme Type VEC, SCA, ARB 29 043 TMan Controller Type Normal, 1 speed, 2 speed 29 044 Mcode Code no memory 0000 29 046 Code Code no entry 0000 29 Address Name Designation 028 PileDef Fault 1 029 PileDef Fault 2 02A PileDef Fault 3 02B PileDef Fault 4 02C PileDef Fault 5 02D PileDef Fault 6 02E PileDef Fault 7 02F PileDef Fault 8 030 PileDef Fault 9 031 PileDef Fault 10 034 Dem 036 Finals Values Page * You can visualise the parameters, inputs/outputs, variables as well as the function graphs on a P.C., using the P313 interface board and the VISU P.C. programme. To do this, connect the P313 set and push the 2 end buttons of the integrated diagnostic tool VEC03. In order to make « READ PARAMETERS » appear on the display. At the end on the P.C. visualisation, push the 2 end buttons. VEC01 P313 AUTINOR P.C. READ PARAMETERS 1000 100 10 MODIF. CLEAR VALID. 1 + If the diagnostic tool is integrated in the VVVF, it is ESSENTIAL to press the 2 end buttons. SOFTWARE VISUPC (LOCAL) You can visualise : • The theoretical graph : ................................................ • The real graph :........................................................... • The capacitor voltage :................................................ • The efficient motor current : ........................................ F912 F910 F904 F908 Série 32 Mlift Vector - Prog.Vectorielle Installation manual Chapter VII - page 37 LIST OF VECTOR INPUTS/OUTPUTS Address Name Seg 7 Seg 6 Seg 5 Seg 4 Seg 3 Seg 2 Seg 1 Seg 0 Page VISO DE MO 30 VENT S L 32 CAA CAB 31 Inputs 1 100 V2 En1 V1 V0 INS Outputs 101 Sor RISO BR DFP DFI STOPR Inputs 2 CCL CCS 102 En2 103 T° Radiator Temperature (°C) 33 104 TCond Capacitor voltage (v) 33 108 Imot Motor Intensity (A) 33 10A DV0 V0 Stopping distance (m) 33 10B Diso ISO Relevelling Stopping distance (m) 33 10C DIns Slow down distance in inspection speed (m) 33 10E DV1 Slow down distance in speed V1 (m) 33 110 Fre Frequency serf by the motor (Hz) 33 112 Con Theoretical / reference (Hz) 33 114 Vt Lift Speed (m/s) 34 116 Codeur Incremental encoder 34 118 Recup Energy recovery (%) 34 11A TMot Motor power voltage (%) 34 120 GD V2 Speed slow down gradient (m/s²) 34 122 DRal Slow down distance (m) 34 12A I Cap1 Intensity measurement device 1 (VEC12) 34 12C I Cap2 Intensity measurement device 2 (If VEC02M) 34 12E I Cap3 Intensity measurement device 3 (VEC12) 34 Série 32 Mlift Vector - Prog.Vectorielle Installation manual Chapter VII - page 38 LIST OF VECTOR FAULT CODES FAULTS DISPLAYED BY THE VECTOR DRIVE (VEC01 Board) The B32 fault code stack is found at Address 28, 29, 2A, 2B, 2B, 2C, 2D, 2E, 2F, 30 and 31. At Address 28 the most recent fault and at Address 31 the oldest recorded fault. BEFORE LEAVING THE SITE, SET THE FAULT LIST BACK TO 00. IN THIS WAY YOU CAN KEEP BETTER TRACK OF ANY BREAKDOWNS. FAULT N° DESIGNATION VISUALISATION -00-10- No fault Phase inversion -22-52- FUNCTIONING CORRECTLY. INVERSION IN THE ROTATION DIRECTION (DETECTED BY THE TAPE HEAD) CONSEQUENCE OF A AND B SIGNALS CHANGING STATE AT THE SAME TIME SLIP INTEGRATOR. « 10 » CUT WHILE IN MOTION. -62- FAULT WITH THE O03 TAPE HEAD. -77-78-80-81-82- -87-88- “S” CONTACTOR NOT DROPPED. “S” CONTACTOR NOT ENERGISED POWER SUPPLY CAPACITOR (tc) MISSING AT START-UP. AVERAGE CURRENT HIGHER THAN ALLOWED CURRENT. REAL SPEED 15% HIGHER THAN PROGRAMMED NOMINAL SPEED Vn. INSPECTION SPEED EXCEEDS 0,6 M/S. RELEVELLING SPEED EXCEEDS 0,3 M/S. REGENERATIVE POWER EXCEEDS 650V (BRAKE CIRCUIT FAULT) MISSING POWER SUPPLY DURING MOVEMENT COMMAND (FUSE BLOWN OR CONTACTOR NOT ENERGISED. “LINE” CONTACTOR NOT DROPPED. SIMULTANEOUS « UP » AND « DOWN » COMMAND. -89-90-91-92-93-94-95-96-97-98-99-100-101-102-103- RADIATOR TEMPERATURE EXCEEDS 40 °. AC CURRENT EXCEEDS MAX TRANSISTOR CURRENT. TRANSISTOR N°1 FAULT. (TOP) TRANSISTOR N°2 FAULT. TRANSISTOR N°3 FAULT. TRANSISTOR N°4 FAULT. TRANSISTOR N°5 FAULT. TRANSISTOR N°6 FAULT. (BOTTOM) REGENERATIVE TRANSISTOR FAULT. PARAMETER FAULT EEROM WRITING FAULT. MOTOR INTENSITY > MAXI INTENSITY. INCREMENTAL ENCODER FAULT. INCREMENTAL ENCODER SPEED +/- 15% FAULT. DIRECT APPROACH FAULT. -11- -83-84-85-86- CURRENT MEASURING DEVICE NOT CONNECTED -104-AUTRE- NON PROGRAMMED FAULT. Tape head fault Integrator 10 cut while in motion Tape head counting irrational Contactor not realising Not programmed Current < 450 v at start-up Thermistor Speed > 115% of the nominal speed Inspection speed > 0.6 m/s Relevelling speed > 0.3 m/s Regeneration No power while in motion Contactor not realising Simultaneous up and down Radiator T° Power supply too high Transistor N°1 (Top) Transistor N°2 Transistor N°3 Transistor N°4 Transistor N°5 Transistor N°6 (Bottom) Regenerative Transistor fault Parameter fault Eerom writing fault Motor intensity > Max Encoder fault Encoder speed +/- 15% Advised MLIFT stop on V0 movement Not programmed Not programmed WARNING : PLEASE TAKE PRECAUTIONS WHEN YOU SEND US YOUR ELECTRONIC BOARDS (USE ANTI-STATIC BAGS) Série 32 Mlift Vector - Prog.Vectorielle Installation manual Chapter VII - page 39 AUTINOR List of • PARAMETERS • INPUTS • OUTPUTS • FAULT CODES in PA-VA-DE.DGB Series 32 21 December 2000 Série 32 Mlift Vector - Prog.Vectorielle Installation manual Chapter VII - page 40 Série 32 Mlift Vector - Prog.Vectorielle Installation manual Chapter VII - page 41 WARNING This manual is deemed correct on going to press. It is linked to the program version shown on the front page, however this version may evolve without influencing the contents of this manual, which may in itself be changed without prior warning. The information contained has been scrupulously checked. However AUTINOR declines all responsibility for error or omission. Should you notice any discrepancy or unclear description, or if you have any suggestions, we would appreciate your written comments (by mail or fax) to: Société AUTINOR - Service documentation Z.A. Les Marlières 59710 AVELIN [33] 03-20-62-56-00 ¬ [33] 03-20-62-56-41 [email protected] This manual is the property of AUTINOR, from whom it may be bought (at the above address). It may however by freely copied in order to communicate information to those who might need it. We can only authorise a complete copy, without addition nor removal of information Where quotations are taken, the following at least must be noted: - the company name of AUTINOR, the program version to which it refers, the number and date of the original edition. © Copyright 2000 AUTINOR All rights reserved. Série 32 Mlift Vector - Prog.Vectorielle Installation manual Chapter VII - page 42 Série 32 Mlift Vector - Prog.Vectorielle Installation manual Chapter VII - page 43 CONTENTS PARAMETER DEFINITIONS.................................................................................... 44 INPUTS DEFINITIONS ............................................................................................. 77 OUTPUTS DEFINITIONS ......................................................................................... 87 CONVERSION TABLE HEXADECIMAL ⇔ DECIMAL .................................. 94 CONTROLLER PARAMETERS TABLE (1/2) ........................................................... 95 CONTROLLER INPUTS / OUTPUTS TABLE........................................................... 97 FAULT CODES LIST (1/3)........................................................................................ 98 Série 32 Mlift Vector - Prog.Vectorielle Installation manual Chapter VII - page 44 PARAMETER DEFINITIONS To read and modify the parameters, it is necessary to put the little switch on the left to the down position, called PAR. Before the word ADDRESS, the little PAR switch must be down, and RAM must be up. Now we can define the contents of the parameters. It is then necessary to put the little switch down. The small dot at the bottom to the right of the display is now lit. • Par Address 00: CDDEF (Last Fault Code). Best displayed in hexadecimal mode. At this address, the Series 32 displays the code of the last fault. • Par Address 01: CADDEF (Last but-one-fault code). Best displayed in hexadecimal mode. At this address, the Series 32 displays the last-but-one fault code. • Par Address 02: Best displayed in segment mode. Best displayed in hexadecimal mode. At this address, the Series 32 displays the last-but-one fault code. See the addresses 5D and 63 to change the values. The segments of address N°2 cannot be changed directly!!! Segment 7: REGUL (Control System). We program segment 7 to " 1 " if the Series 32 is to drive an independent speed control system. We program segment 7 to " 0 " in the reverse case. Segment 6: DPLX (DuPLeX). We program segment 6 to " 1 " if the Series 32 is to be switched into a MULTIPLEX battery. We program segment 6 to " 0 " if the Series 32 is to work in SIMPLEX. Segment 5: ISO (Re-levelling). We program segment 5 to " 1 " if the Series 32 is to drive the RE-LEVELLING option (Open doors and Closed doors). We program segment 5 to " 0 " in the reverse case. Série 32 Mlift Vector - Prog.Vectorielle Installation manual Chapter VII - page 45 PARAMETER DEFINITIONS Segment 4: RMLIFT (Control System MLIFT). We program segment 4 to " 1 " if the Series 32 is to drive a variable frequency speed control system. We program segment 4 to " 0 " in the reverse case. Segment 3: NIVSIN (Levels damaged by fire). We program segment 3 to " 1 " if the Series 32 is to manage levels damaged by fire. We program segment 3 to " 0 " in the reverse case. Segment 2: DSERVS (Double Selective SERVice). We program segment 2 to " 1 " if the Series 32 is to manage 2 service selective. Segment 1: OUAVAR (Open Before Stop). We program Segment 1 to " 1 " if the Series 32 is to carry out the OPEN BEFORE STOP function and therefore to control a bridging device from the safety chain. We program Segment 1 to " 0 " in the reverse case. Segment 0: Not used. • Par Address 03: NBOPER (Number of Door Operators). Best displayed in hexadecimal mode. At this address, we program the number of door operators to be operated. As the Series 32 can only control 2 automatic doors, only the values 00, 01 or 02 can be programmed. • Par Address 04: NIVSUP (Upper Level). Best displayed in hexadecimal mode. At this address, we program the UPPER LEVEL of the installation (total number of levels minus 1, thus 1 to 15). Here are the conversions between the decimal and hexadecimal numbers 00 to 15 ...... 00 to 0F. 00 decimal = 00 hex 01 decimal = 01 hex 02 decimal = 02 hex 03 decimal = 03 hex 04 decimal = 04 hex 05 decimal = 05 hex 06 decimal = 06 hex 07 decimal = 07 hex 08 decimal = 08 hex 09 decimal = 09 hex 10 decimal = 0A hex 11 decimal = 0B hex 12 decimal = 0C hex 13 decimal = 0D hex 14 decimal = 0E hex 15 decimal = 0F hex Série 32 Mlift Vector - Prog.Vectorielle Installation manual Chapter VII - page 46 PARAMETER DEFINITIONS • Par Address 05: NIVINF (Bottom Level). Best displayed in hexadecimal mode. At this address, we program the BOTTOM LEVEL. (from 00 to 14). For SIMPLEX, we program 00. For MULTIPLEX, it is possible for one of the cars not to decsend as slow as the others and serves 2 levels less, for example. In this case, we program the upper level to the same value as the others (if all serve the same height level) and the BOTTOM LEVEL to 02 for one car and to 00 for the second car. Example: 8 levels multiplex for the simplex 0 and 6 levels for simplex 1. Simplex 0 serves Level 7, Simplex 1 serves Level 7. Simplex 0 serves Level 6, Simplex 1 serves Level 6. Simplex 0 serves Level 5, Simplex 1 serves Level 5. Simplex 0 serves Level 4, Simplex 1 serves Level 4. Simplex 0 serves Level 3, Simplex 1 serves Level 3. Simplex 0 serves Level 2, Simplex 1 serves Level 2. Simplex 0 serves Level 1, Simplex 1 does not serve Level 1. Simplex 0 serves Level 0, Simplex 1 does not serve Level 0. • Par Address 06: NIVPRIM (Main Level). Best displayed in hexadecimal mode. At this address, we program the MAIN LEVEL or RESET LEVEL (from 00 to 15). The reset level is the same as the main level as well as the fireman service level. Remember that in Autinor jargon, the lowest level is level 0. - if the reset level is at level 0, then program 0. - if the reset level is at level 1, then program 1. - if the reset level is at level 2, then program 2. - etc... - etc... - etc... - if the reset level is at level 15, then program 0F. See pages 94 for the (00 to 15 ...... 00 to 0F). conversion between decimal and hexadecimal mode Série 32 Mlift Vector - Prog.Vectorielle Installation manual Chapter VII - page 47 PARAMETER DEFINITIONS • Par Address 07: Best displayed in segment mode. Segment 7: BLOCAG (Single Automatic Operation). We program segment 7 to " 1 " if the Series 32 is to work in single automatic operation. We program segment 7 to " 0 " if the Series 32 is to work in collective. Segment 6: DCOPRO (Temporary Fault Contactor). We program segment 6 to " 1 " if we want the Series 32 to give us the TEMPORARY FAULT CONTACTORS. If this is the case, when a contactor fault appears, the Series 32 waits 6 seconds then tries to leave again on a new order. We program segment 6 to " 0 " if we want the Series 32 to give out the definitive fault contactors. Segment 5: OPTSP (Landing Suspension Option). We program segment 5 to " 1 " if the provisional landing suspension is requested. Reminder: This device is for a systematic storage of action on the emergency stop device (cutting of 6) during the travel of the car. In the case of flush shaft, it allows the use of a spring-return button as an in-car stopping device. This is also the only effective means of control from the light beam threshold protection device. Only new action on a car call button will cause the departure and thus make subsequent calls possible. This storage, diagnosed by fault 23, is not carried out when the the car stops at a floor. We program segment to " 0 " if the provisional landing suspension is not requested. Segment 4: OPTMAN (Homing Control Option). We program segment 4 to " 1 " when we want the Series 32 to process the homing control in machinery mode. We program segment 4 to " 0 " in the reverse case. Segment 3: OPREVM (Service Up Option ?). We program segment 3 to " 1 " when we want the Series 32 to allow a movement UP for direct inspection after a Reset, while the car is situated above ED. Do not shim the selector if the coded screen is encountered. Do not program segment 3 to " 0 " in the reverse case. Segment 2: MPVHZ (Calls in the slow zone). We program segment 2 to " 1 " when we want to allow a call outside the release zone. This possibility is useful in regulation mode leaving the car roof inspection and when a landing call is made to go up. If the car is stopped in the Slow Speed Zone at the moment when the call is made and when the option is programmed, then it will rejoin the level which sometimes causes problems, depending on the type of control system. If the option is not programmed, the car will not move and only movement which begins by GV will be allowed. We program segment 2 to " 0 " if we do not want such behaviour. Série 32 Mlift Vector - Prog.Vectorielle Installation manual Chapter VII - page 48 PARAMETER DEFINITIONS Segment 1: OPED (ED Option). We program segment 1 to " 1 " when we want to use the contact ED in the case of reduced gaps. We program segment 2 to " 0 " in the reverse case. Segment 0: OUVPRE (Opening upon PREsence). We program segment 0 to " 1 " when we want the door which is in the process of closing to re-open on the landing call of the level where the car is located. This however, only if the call button corresponding to the direction has been pressed. (Re-open upon presence). We program segment 0 to " 0 " in the reverse case. • Par Address 08: best displayed in segment mode. Segment 7: 2V (2 speeds). We program segment 7 to " 1 " if the A/H 32 is to drive a 2-speed motor. We program segment 7 to " 0 " if the A/H 32 is to drive a 1-speed motor. Segment 7: RECAV1 (Re-positionning in Speed 1) for HB/B 32. We program segment 7 to " 1 " if we want the Series 32 to re-position in speed 1. We program segment 7 to " 0 " if we want the Series 32 to re-position in speed 2. Segment 6: APCL (Landing Calls Flashing). Programming segment 6 to " 1 "results in flashing hall call registration lights. Programming segment 6 to " 0 " results in the reverse. Segment 5: FLCLIG (Direction Indicator Flashing). Programming segment 5 to " 1 " results in the flashing of the direction or next departure indicators. Programming segment 5 to " 0 " results in the reverse. Segment 4: FLPDP (Next Departure Arrows). Programming segment 4 to " 1 " results in the Next Departure Arrows. Programming segment 4 to " 0 " results in the reverse. Segment 3: EFFNSEL (Call Cancel Option). Progamming segment 3 to " 1 " cancels the hall calls independent of direction, i.e. both up and down calls are cancelled. This programming is essential when connecting-up the 1 main landing button to the Up and Down when there is a down collective with basement. Programming segment 3 to " 0 " results in the reverse. Série 32 Mlift Vector - Prog.Vectorielle Installation manual Chapter VII - page 49 PARAMETER DEFINITIONS Segment 2: MASMPX (Multiplex Mass). Programming segment 2 to " 1 " results in the Series 32 SLAVE not taking any notice of a Mass Fault. Programming segment 2 to " 0 " results in the reverse. Segment 1: IPF (Re-Levelling with Door Closed). Programming segment 1 to " 1 "results in re-levelling with closed doors. This function is programmed in relation to address parameter 02 or 63, segment 5. Programming segment 1 to " 0 " results in the reverse. Segment 0: IPO (Re-Levelling with Door Open). Programming segment 0 to " 1 " results in re-levelling with the door open and can thus control a bridging device from the safety chain. This function is programmed in relation to the address parameter 02 or 63, segment 5. Programming segment 0 to " 0 " results in the reverse. • Par Address 09: best displayed in segment mode. Segment 7: GONGAR (GONG on stopping). Programming segment 7 to " 1 " results in the GONG exit operating when the apparatus is immobilised. Programming segment 7 to " 0 " results in the GONG exit operating in the Slow Speed Distance passage. Segment 6: IGPPRO (Temporary Door Integrator). Programming segment 6 to " 1 " renders the door integrator fault temporary. Programming segment 6 to " 0 " results in the reverse. Segment 5: IGV (High Speed Inspection). Programming segment 5 to " 1 " results in high speed inspection. Programming segment 5 to " 0 " results in the reverse. Segment 4: PFLSGV (No Fast Speed Direction Indicator). Programming segment 4 to " 1 " results in the direction arrows being turned off at high speed. Programming segment 4 to " 0 " results in the reverse. Série 32 Mlift Vector - Prog.Vectorielle Installation manual Chapter VII - page 50 PARAMETER DEFINITIONS Segment 3: OPTOM (Fireman Service Option). Programming segment 3 to " 1 " selects the fireman service option. Programming segment 3 to " 0 " disables this option. In this case, the Series 32 ignores the state of the fireman service input. Segment 2: MHSPF (Out of Service Door Closed). Arriving at the Out of Service Level, the doors will open and close indefinitely until this function is left. Programming segment 2 to " 0 " results in the car parking with the door open, after the Out of Service sign is shown. Segment 1 and 0: TYPOMP (Type of Fire man Service) We program in these 2 segments the code of the type of fireman service required. Call code of the different types of fireman service: ENGLISH FIRE SERVICE SWISS FIRE SERVICE FRENCH FIRE SERVICE ...code 01. ...code 10. ...code 00. • Par Address 0A: TIG (Time Integrator). Best displayed in hex mode. At this address, we program the integrator timing in seconds and in hex. We can program a value from 02 to 45 seconds. If we program a value under 2 seconds, a value of 02 seconds will be imposed (Norm). If we program a value over 45 seconds, a value of 45 seconds will be imposed (Norm). See page 94 for conversion between hex and decimal from 00 to 255 ....... 00 to FF. • Par Address 0C: TPLU (Automatic Light Timing). Best displayed in hexadecimal mode. At the address 0C, we program the timing of the automatic light in seconds and in hex. We can program a value from 02 to 255 seconds. See page 94 for conversion between decimal and hex, from 00 to 255 ....... 00 to FF. Série 32 Mlift Vector - Prog.Vectorielle Installation manual Chapter VII - page 51 PARAMETER DEFINITIONS • Par Address 0D: TINS (Inspection Time). Best displayed in hexadecimal mode. At the address 0D, we program the maximum time, in seconds and hex, allowed to run on inspection. We can program a value from 01 to 255 seconds. If we stop and then start again, we use this maximum time length again. If the Series 32 interrupts the movement because we have exceeded the allowed time, it is necessary to wait this length of time before re-starting the inspection. The same applies for homing control mode. If the service timing is programmed to 00 then the inspection travelling limitation does not exist. See page 94 for conversion between hex and decimal, from 00 to 255 ....... 00 to FF. • Par Address 0E: TCAPGV (Tape Head Beam Broken Time in Fast Speed). Best displayed in hexadecimal mode. At this address, we program the maximum allowed during which a tape head beam can be interrupted in fast speed. We can program a value from 02 to 25.5 seconds at intervals of 0.1 seconds. If we program a value under 2 seconds (20 tenths of seconds), a 2 second value will be imposed. See page 94 for the conversion of hex to decimal from 00 to 255 ....... 00 to FF. • Par Address 0F: TCAPPV (Tape Head Beam Broken Time in Slow Speed). Best displayed in hexadecimal mode. At address 0F, we program the maximum allowed time during which a tape head beam can be interrupted in Slow Speed. We can program a value from 3 to 25.5 seconds at intervals of 0.1 seconds. If we program a value under 3 seconds (30 tenths of seconds) , a 3 second value will be imposed. See page 94 for the conversion between decimal and hex, from 00 to 255 ....... 00 to FF. • Par Address 10: best displayed in segment mode. Segment 0 to 7: OPTOM (Car Calls Masking 0 to 7). We program the corresponding segments to " 1 " when we want the Series 32 to reply to the corresponding landing calls. We program the corresponding segments to " 0 " when we do not want the Series 32 to reply to the corresponding landing calls. Série 32 Mlift Vector - Prog.Vectorielle Installation manual Chapter VII - page 52 PARAMETER DEFINITIONS • Par Address 11: best displayed in segment mode. Segment 0 to 7: OPTOM (Car Calls Masking 08 to 15). • Par Address 12: Not used. • Par Address 13: best displayed in segment mode. Segment 0 to 7: (Mask the Landing Calls for Up, from levels 0 to 7). We program the corresponding segments to " 1 " when we want the Series 32 to respond to the corresponding landing calls for up. We program the corresponding segments to " 0 " when we do not want the Series 32 to respond to the corresponding landing calls for up. • Par Address 14: best displayed in segment mode. Segment 1 to 7: (Mask the Landing Calls for Up, from levels 8 to 15). • Par Address 15: Not used. • Par Address 16: best displayed in segment mode. Segment 1 to 7: (Mask the Landing Calls for Down, from levels 1 to 7). We program the corresponding segments to " 1 " when we want the Series 32 to respond to the corresponding landing calls for down. We program the corresponding segments to " 0 " when we do not want the Series 32 to respond to the corresponding landing calls for down. Série 32 Mlift Vector - Prog.Vectorielle Installation manual Chapter VII - page 53 PARAMETER DEFINITIONS • Par Address 17: best displayed in segment mode. Segment 0 to 7: (Mask the Landing Calls for Down, from levels 8 to 15). • Par Address 18: Not used. • Par Address 19: (Only with vanes) best displayed in segment mode. Segment 7: not used. Segment 6: not used. Segment 5: not used. Segment 4: not used. Segment 3: not used. Segment 2: not used. Segment 1: PVCRH (Slow Speed Distance crossed at Upper Level). We program segment 1 to " 1 " when the set up of the site is such that it is necessary to cross the Slow Speed Distance of the last upper in-between-level. We program segment 1 to " 0 " when the set up of the site does not impose into the Crossed Slow Speed Distance of the last upper in-between level. Additionally, see the addresses 1A and 1B. Segment 0: PVCRB (Slow Speed Distance crossed at Lower Level). We program segment 0 to " 1 " when the set up of the site is such that it is necessary to cross the Slow Speed Distance Zones of the last lower in-between level. We program segment 0 to " 0 " when the set up of the site does not impose into the Crossed Slow Speed Distance of the last lower in-between level. Additionally, see addresses 1A and 1B. • Par Address 19: TPISO (Only with a slotted tape) (Re-Levelling Timing). Best displayed in hexadecimal mode. At address 19, we program the maximum time for a re-levelling movement. We can program a value from 2 to 10 seconds at intervals of 1 second. If we program a value under 2 seconds, a 2 seconds value will be imposed. If we program a value over 10 seconds, a 10 seconds value will be imposed. See page 94 for the conversion between decimal and hex, from 0 to 255 ... 00 to FF. Série 32 Mlift Vector - Prog.Vectorielle Installation manual Chapter VII - page 54 PARAMETER DEFINITIONS • Par Address 1A: best displayed in segment mode. Segment 0: Programming of the Crossed Slow Speed Distance for inbetween levels 0 to 1. We program segment 0 to " 1 " when the set up of the site is such that it is necessary to cross the Slow Speed distance zones between levels 0 and 1. We program segment 0 to " 0 " when the set up of the site does not impose into the Crossed Slow Speed Distance between levels 0 and 1. Segment 1: programming of the crossed slow speed distance for between levels 1 and 2. Segment 2: programming of the crossed slow speed distance for between levels 2 and 3. Segment 3: programming of the crossed slow speed distance for between levels 3 and 4. Segment 4: programming of the crossed slow speed distance for between levels 4 and 5. Segment 5: programming of the crossed slow speed distance for between levels 5 and 6. Segment 6: programming of the crossed slow speed distance for between levels 6 and 7. Segment 7: programming of the crossed slow speed distance for between levels 7 and 8. • Par Address 1B: best displayed in segment mode. Segment 0: programming of the crossed slow speed distance for between levels 8 and 9. Segment 1: programming of the crossed slow speed distance for between levels 9 and 10. Segment 2: programming of the crossed slow speed distance for between levels 10 and 11. Segment 3: programming of the crossed slow speed distance for between levels 11 and 12. Segment 4: programming of the crossed slow speed distance for between levels 12 and 13. Segment 5: programming of the crossed slow speed distance for between levels 13 and 14. Segment 6: programming of the crossed slow speed distance for between levels 14 and 15. Segment 7: not used. • Par Address 1C: Not used. • Par Address 1D: NUSPLX (SimPLeX NUmber). best displayed in hexadecimal. At this address, we program the simplex number in case of Multiplex. As the number of apparatus that can be put into an interconnected group is 2, the simplex number will go from 00 to 01. • Par Address 1E: TFR10 (Filtering of 10). Best displayed in hex mode. At this address, we program the time that runs between the moment where 10 of the safety chain is good, and the moment when movement occurs. This timing is to filter the mechanical jumps on 10 and can last up to 500 milliseconds. This timing is programmable at intervals of 10ms and in hex. See page 94 for the conversion between decimal and hex, from 00 to 255 ....... 00 to FF. Série 32 Mlift Vector - Prog.Vectorielle Installation manual Chapter VII - page 55 PARAMETER DEFINITIONS • Par Address 1F: TPRAU (Homing Time) best displayed in hexadecimal. At this address, we program the time it takes from the moment the apparatus is no longer sought and its automatic return to a particular level. This time is programmed in seconds and hex. We can program a value from 1 to 255 seconds. If we program 00, there is no homing. See page 94 for the conversion between decimal and hex, from 00 to 255 ....... 00 to FF. As concerns this timing, it is necessary to program the level to which the apparatus must return to address 20. • Par Address 20: NIVRAU (Homing Level) best displayed in hexadecimal. At this address, we program, in hex, the address to which a cabin will return, if it is not sought after a certain delay which is contained in address 1F. See page 94 for the conversion between decimal and hex, from 0 to 255 ....... 00 to FF. Segment 5: TRAPM (Lengthened Homing Time). We program segment 5 to " 1 " if we want the base units of the door timings to extend from 1 to 2.5 seconds, thus allowing times from 5 seconds to 10 minutes. We program segment 5 to " 0 " in the reverse case. • Par Address 21: TGONG (GONG Time) best displayed in hexadecimal. At this address, we program the length of time during which the GONG (SPG1 to 3) exit is activated. This time is programmed at intervals of 0.1 seconds and in hex. We can program a value from 0.1 to 10 seconds. See page 94 for the conversion between decimal and hex, from 00 to 255 ....... 00 to FF. • Par Address 22: COMDEM (Trip Counter) best displayed in decimal. The Series 32 has a 6 figure trip counter, and so can memorise 999999 movements. Address 22 changes the 2 right-hand figures. • Par Address 23: COMDEM (Trip Counter) best displayed in decimal. Address 23 increments the 2 middle figures. • Par Address 24: COMDEM (Trip Counter) best displayed in decimal. Address 24 increments the 2 left-hand figures. Série 32 Mlift Vector - Prog.Vectorielle Installation manual Chapter VII - page 56 PARAMETER DEFINITIONS • Par Address 25: NUMARO (Cabinet Number) best displayed in decimal. The Series 32 has an " identity card ", formatted in the following way: YEAR / MONTH / POSITION NUMBER. E.G.: a cabinet with the number 93 / 09 / 57 is a cabinet made in the year 1993, the month of September and the 57th produced that month. At address 25, we program the position number. • Par Address 26: NUMAR1 (Cabinet Number) best displayed in decimal. At address 26, we program the production month. • Par Address 27: NUMAR2 (Cabinet Number) best displayed in decimal. At address 27, we program the production year. • Par Address 28: REPT00 (REPeater at level 00) best displayed in hexadecimal. At this address, we program the selection code of the character (among those contained in the REF displays are ID30, ID50, IDFL30, IDFL50) which we want to display at level 0. See the table for the conversion between the different characters it is possible to display. • Par Address 29: Same for level 01. • Par Address 2a: Same for level 02. • Par Address 2b: Same for level 03. • Par Address 2c: Same for level 04. • Par Address 2d: Same for level 05. • Par Address 2e: Same for level 06. • Par Address 2f: Same for level 07. • Par Address 30: Same for level 08. • Par Address 31: Same for level 09. • Par Address 32: Same for level 10. • Par Address 33: Same for level 11. • Par Address 34: Same for level 12. • Par Address 35: Same for level 13. • Par Address 36: Same for level 14. • Par Address 37: Same for level 15. Série 32 Mlift Vector - Prog.Vectorielle Installation manual Chapter VII - page 57 PARAMETER DEFINITIONS • Par Address 38 to 3F: best displayed in segment mode. We will see later, at address 5B (programmed has 04), that we can program the Series 32 driven hydraulic type. It could be that a new kind of hydraulic unit which functions differently appears and does not correspond 100% with the pre-programmed types. From addresses 38 to 3F, it is possible to define a particular function for a particular hydraulic unit. Each address to be defined corresponds to the STATE of the valves and contactor for each stage of a movement. This sequence is the same whatever type of hydraulic, but the way in which to carry out each stage differs depending on the unit (number of different types of valves, different procedures etc...). Each address, from 38 to 3F represents a stage and we assign the contactors and the valves to an address which must be activated by it. We program the segment to " 1 " when we wish to activate a part in this stage. EXAMPLE OF SPECIAL DEFINITION FOR HYDRAULIC SEQUENCE Address V4 V3 V2 38 1 1 1 1 39 1 1 1 1 3A 1 1 1 3B 1 1 1 1 Up slow speed L, ∆ 1 1 1 Complete stop, up 3C 3D 1 3E V1 L ∆ Y 1 1 Up high speed L, ∆ 1 Up slow speed L, Y 1 1 1 1 Down, high speed, L 1 1 1 1 1 Down, low speed, L 1 1 1 1 Complete stop, down L Down direction Up direction Valve for slow speed Segment Seg 7 Seg 6 Seg 5 Seg 4 Seg 3 Seg 2 Seg 1 Seg 0 Valve for high speed Up high speed L, Y 1 3F Valve Stage Série 32 Mlift Vector - Prog.Vectorielle Installation manual Chapter VII - page 58 PARAMETER DEFINITIONS Segment 7: V4 (Valve 4). Programming segment 7 to " 1 " activates valve N° 4 at this stage. Programming segment 7 to " 0 "results in the reverse case. Segment 6: V3 (Valve 3). Programming segment 6 to " 1 " activates valve N° 3 at this stage. Programming segment 6 to " 0 "results in the reverse case. Segment 5: V2 (Valve 2). Programming segment 5 to " 1 " activates valve N° 2 at this stage. Programming segment 5 to " 0 "results in the reverse case. Segment 4: V1 (Valve 1). Programming segment 4 to " 1 " activates valve N° 4 at this stage. Programming segment 4 to " 0 "results in the reverse case. Segment 3: Not used. Segment 2: LINE (Line Contactor). Programming segment 2 to " 1 " activates the line contactor at this stage. Programming segment 2 to " 0 "results in the reverse case. Segment 1: DELTA (Delta Contactor). Programming segment 1 to " 1 " activates the delta contactor at this stage. Programming segment 1 to " 0 "results in the reverse case. Segment 0: STAR (Star Contactor). Programming segment 0 to " 1 " activates the STAR contactor at this stage. Programming segment 0 to " 0 "results in the reverse case. • Par Address 39: best displayed in segment mode. Same address 38 for stage: • Par Address 3A: best displayed in segment mode. Same address 38 for stage: • Par Address 3B: best displayed in segment mode. Same address 38 for stage: Série 32 Mlift Vector - Prog.Vectorielle Installation manual Chapter VII - page 59 PARAMETER DEFINITIONS • Par Address 3C: best displayed in segment mode. Same address 38 for stage: • Par Address 3D: best displayed in segment mode. Same address 38 for stage: • Par Address 3E: best displayed in segment mode. Same address 38 for stage: • Par Address 3F: best displayed in segment mode. Same address 38 for stage: • Par Address 40: best displayed in segment mode. At this address, we program the mechanical characteristics of DOOR 1 which the Series 32 will operate. Segment 7: RGPT Segment 6: VERSTF1 (Door Forced when Closed). We program segment 6 to " 1 " when we want to give a close signal in the case where a movement is desired. A message is given stating that the closure limit switch of Door 1 is open but that 8 from the safety chain has not been closed. If there is a mechanical problem, in spite of 8 from the safety chain remaining closed, the closure relay will be activated when the door integrator time has run out. We program segment 6 to " 0 " in the reverse case. Segment 5: P1SFCOU (Door 1 without Opening). We program segment 5 to " 1 " when we want to operate automatic door 1 without an opening limit (FCOU). Segment 4: P1SFCFE (Door 1 without Closure Limit). We program segment 4 to " 1 " when we want to operate automatic door 1 without a closing limit (FCFE). We program segment 4 to " 0 "when we want to operate an automatic door fitted with a closing limit (FCFE). Segment 3: PMAFCP1 (Door 1 Extended Close Time). We program segment 3 to " 1 " to hold the door close signal an additional 300ms after the closed limit has been reached. We program segment 3 to " 0 " when we want to stop the movement from when door 1 reaches the close limit. Série 32 Mlift Vector - Prog.Vectorielle Installation manual Chapter VII - page 60 PARAMETER DEFINITIONS Segment 2: MSTPMP1 (Door 1 Forced Closure when Moving). We program segment 2 to " 1 " when we want to give a door close signal while the car is moving. We program segment 2 to " 0 " in the reverse case. Segment 1: AMPSEC1 (Door 1 Drift OK). If we program this segment to " 1 " and door 1 does not have a close limit , the Series 32 will provide a close signal until 8 is closed. If the door drifts open and 8 is open, the door close signal is NOT given again. Only if a call is made is the door close signal given. With this type of door, we always program the option Forced Door Closure when Moving. We program segment 1 to " 0 " when this option is not required. Segment 0: MSTPRP1 (Permanent Door 1 Signal). We program segment 0 to " 1 " to keep the door 1 open or close signal even if the open or closed limit has been reached. We program segment 0 to " 0 " in the reverse case. • Par Address 41: TPO1 (Door 1 Timing) best displayed in hexadecimal. At this address, we program the timing of door 1 in seconds and hex. We can program a value of 1 to 255 seconds. See page 94 for the conversion between decimal and hex, 0 to 255 ....... 00 to FF. • Par Address 42: TREP1 (Door 1 Re-Open Time) best displayed in hexadecimal. At this address we program the time the door stays open when a re-open signal has been given (COI or CS). This time is programmed in seconds and hex (from 1 to 255 seconds). See page 94 for the conversion between decimal and hex, 0 to 255 ....... 00 to FF. • Par Address 43: NIVMHS (Floor Out of Service) best displayed in hexadecimal. At this address, we program the floor where the car parks when we use the " out of service " function. If we wish the car to stay where it is the moment we activate the function, program " 0 " to segments 6 and 7. If we wish the car to park door(s) open or closed, we do this by switching on segment 7 for door 1 and segment 6 for door 2. Segment 2 at address 09 (MHSPF) will thus be switched off. Série 32 Mlift Vector - Prog.Vectorielle Installation manual Chapter VII - page 61 PARAMETER DEFINITIONS • Par Address 44: TIRP1 (Re-Open Door 1 Delay) best displayed in hexadecimal. At this address, we program the desired time delay between reversing the direction of the door movement when re-opening . This may be necessary if the inertia of the door is high. Time is adjustable between 00ms and 2.55 seconds at intervals of 0.01 seconds. See page 94 for the conversion between decimal and hex, 0 to 255 ....... 00 to FF. • Par Address 45: TFR8 (Filtering of 8) best displayed in hexadecimal. At this address, we program the time allowed for contact bounce of the car gate switch (input 8). Time is adjustable between 00ms and 2.55 seconds. Values are entered at intervals of 10ms. E.G.: If a time delay of 500ms is desired, this would correspond to 50 × 10 ms. Consulting page 94, we can see that this equals 32 in hex, so the value programmed would be 32. • Par Address 46: TVP1/2 (Maximum time between 8 and 10) best displayed in hex. At this address, we program the maximum time allowed between inputs 8 and 10 when a call has been made. E.G.: Flush shaft ascent fitted with swing landing doors and a mobile retiring ramp. The safety chain circuit is such that when the lift does not move and all the doors are shut, 8 will appear. Making a call, combined with the fact that 8 is present, activates the mobile retiring ramp. If all goes well, 10 will appear almost instantly. We will program a small interlock time of 3 seconds. If, by contrast, the interlock is not done, once the time has passed, the retiring ramp is de-activated to avoid it remaining under tension - permanently! The timing is the same for doors 1 and 2. We can program a value from 0 to 255 seconds. See page 94 for the conversion between decimal and hex, 0 to 255 ....... 00 to FF. • Par Address 47: TIGP01 (Door 1 Integrator Time) best displayed in hexadecimal. At this address, we program the maximum time allowed for the door 1 integrator time in seconds and hex. See page 94 for the conversion between decimal and hex, 0 to 255 ....... 00 to FF. If we program 00, there is no door integrator. Série 32 Mlift Vector - Prog.Vectorielle Installation manual Chapter VII - page 62 PARAMETER DEFINITIONS • Par Address 48: best displayed in segment mode. At this address, we define the operation of door 1 for level 0. Segment 7: RCAME (Retiring Ramp Delay). If we program segment 7 and the " single car door " segment 4 to 1, there is a delay of 1.5 seconds when arriving at the level before the retiring ramp is de-energised. This limits the risk of getting fingers trapped in the car door which will barely start its opening movement, insofar as we do not know how to open swing door before 1.5 seconds have elapsed. If we program segment 7 to " 1 " in the case of totally automatic doors the retiring ramp is de-energised 1 second before initiating the door opening on arriving at a level. This can be useful in the case of the totally automatic doors interlocked with a retiring ramp. Indeed, problems of things getting stuck can occur if the doors are opened at the same time as the de-energising of the retiring ramp. Segment 6: Not used Segment 5: Not used Segment 4: (Car Door 1 at Level 0). We program segment 4 to " 1 " when a car is fitted with an automatic door commanded by the Series 32 relays, the landing doors being of the swinging type. We program segment 4 to " 0 " when a flush shaft, an automatic car door driven by one retiring ramp or an automatic car and hall door is used. Segment 3: OUAVAP1N0 (Opening Door 1 Before Stop at Level 0). We program segment 3 to " 1 " when we want the Series 32 to Open Door 1 Before Stopping at Level 0. We program segment 3 to " 0 " in the reverse case. Segment 2: STP1OUN0 (Parking with Door 1 Open at level 0). We program segment 2 to " 1 " when we want the car to park with door 1 open at level 0. We program segment 2 to " 0 " in the reverse case. Segment 1: SER1INO (Service 1 not allowed at Level 0). We program segment 1 to " 1 " when we wish to prevent door 1 opening at level 0. We program segment 1 to " 0 " when we authorise the opening of door 1 at level 0. Série 32 Mlift Vector - Prog.Vectorielle Installation manual Chapter VII - page 63 PARAMETER DEFINITIONS Segment 0: OUNSIMN0 (Non-Simultaneous Door Opening at Level 0). We program segment 0 to " 1 " when we wish to prevent the simultaneous opening of doors 1 and 2 at level 0 (Locking effect). We program segment 0 to " 0 " when we authorise the simultaneous opening of doors 1 and 2 at level 0. This function can only be used with the double service selective. • Par Address 49: best displayed in segment mode. At this address, we define the operation of door 1 for level 1. • Par Address 4a: .. Same for level 02. • Par Address 51: .. Same for level 09. • Par Address 4b: .. Same for level 03. • Par Address 52: .. Same for level 10. • Par Address 4d: .. Same for level 05. • Par Address 54: .. Same for level 12. • Par Address 4e: .. Same for level 06 • Par Address 55: .. Same for level 13. • Par Address 4f: .. Same for level 07. • Par Address 56: .. Same for level 14. • Par Address 50: .. Same for level 08. • Par Address 57: .. Same for level 15. • Par Address 58: TDEMYD (Start-up time Star Delta) best displayed in hexadecimal. At this address, we program the time during which we want the STAR contactor to be on. We can program a time from 0 to 25.5 seconds at intervals of 0.1 seconds. See page 94 for the conversion between decimal and hex, from 0 to 255 ....... 00 to FF. • Par Address 59: TARMVT (Movement Stop Time) best displayed in hexadecimal. At this address, we program the time during which the ascent Slow Speed distance valve continues to be fed after the stopping point. We can program a time from 0 to 2.55 seconds at intervals of 0.01 seconds. See page 94 for the conversion between decimal and hex, from 0 to 255 ....... 00 to FF. • Par Address 5A: TPMPVM (Movement Extension time for the Ascent Slow Speed Distance) best displayed in hexadecimal. At this address, we program the extra time we need to feed the motor. We can program a time from 0 to 2.55 seconds at intervals of 0.01 seconds. See page 94 for the conversion between decimal and hex, from 0 to 255 ....... 00 to FF. Série 32 Mlift Vector - Prog.Vectorielle Installation manual Chapter VII - page 64 PARAMETER DEFINITIONS • Par Address 5B: TYPHYD (Hydraulic Type) best displayed in hexadecimal. At this address, we program the type of hydraulic that the Series 32 will drive. See in the list below the number which has been attributed to the main types of hydraulics currently known: 0 = GMV-MARTINI 3 Valves. 0 = MORRIS. 0 = OMAR. 1 = HAMMOND-CHAMPNESS. 1 = ALGI. 2 = DOVER. 3 = BERINGER ELECTRONIQUE. 4 = Can be defined in addresses 38 to 3F. • Par Address 5C: best displayed in segment mode. Segment 7: Not used. Segment 6: RAMDES (Down Collective). We program segment 6 to " 1 " when we want to carry out the Down Collective. We program segment 6 to " 0 " in the reverse case. Segment 5: BASE 8N (Base 8 Level). We program segment 5 to " 1 " when we want to set up a single automatic operation or a 1 button collective up and down. All this up to level 8 just by using using the BG15 (without addition of the BG18). We program 5 to " 0 " in the reverse case. Segment 4: Not used. Segment 3: DNH (Oil Level Fault). We program segment 3 to " 1 " when we want to operate the Oil Level Fault Contact. We program segment 3 to " 0 " in the reverse case. Segment 2: Not used. Segment 1: DEMDIR (Direct Start-Up). We program segment 1 to " 1 " when we want to carry out a direct start-up. We program segment 1 to " 0 " when we want to carry out a Star-Delta start-up. Série 32 Mlift Vector - Prog.Vectorielle Installation manual Chapter VII - page 65 PARAMETER DEFINITIONS Segment 0: TAQUET (Pawl). We program segment 0 to " 1 " when we want to operate the pawls. We program segment 0 to " 0 " in the reverse case. • Par Address 5D: best displayed in segment mode. Segment 7: Not used. Segment 6: DPLX (Multiplex). We program segment 6 to " 1 " if we want to use a multiplex interconnected group. We program segment 6 to " 0 " if we want the Series 32 to work in simplex. Segment 5: Not used. Segment 4: Not used. Segment 3: NIVSIN (Levels Damaged by Fire). We program segment 3 to " 1 " if we want to control Levels Damaged by Fire. We program segment 3 to " 0 " in the reverse case. Segment 2: DSERVS (Double Selective Service). We program segment 2 to " 1 " if we want to operate 2 Service Selective. We program segment 2 to " 0 " in the reverse case. Segment 1: Not used. Segment 0: Not used. • Par Address 5E: TRAUN0 (Automatic Homing Time to Level 0) best displayed in hexadecimal. At this address, we program the time that runs between the moment when the apparatus is being called and its automatic homing to level 0. We can program a time from 1 to 15 minutes at intervals of 1 minute. See page 94 for the conversion between decimal and hex, from 0 to 255 ....... 00 to FF. By programming 00, this function will not be used. Série 32 Mlift Vector - Prog.Vectorielle Installation manual Chapter VII - page 66 PARAMETER DEFINITIONS • Par Address 5F: TRAUN0 best displayed in segment mode. Segment 7: Not used. Segment 6: Not used. Segment 5: Not used. Segment 4: STPREG (thermostat Regulation). We program segment 4 to " 1 " if we want to operate a thermostat for the SLOW SPEED DISTANCE IN RELATION TO THE OIL TEMPERATURE IN THE HYDRAULIC UNIT function. See the parameters to addresses 5F, segment 1, C0 TO C7 AND C8 TO CF. We program segment 4 to " 0 " in the reverse case. Segment 3: DCTQET (Doubling the Pawl Control Speed). We program segment 3 to " 1 " when we want to double the time allowed for the pawl control. We program segment 3 to " 0 " in the reverse case. Segment 2: Not used. Segment 1: REGDRAL (Slow Speed Distance Regulation). We program segment 1 to " 1 " if we want to operate the SLOW SPEED IN RELATION TO THE OIL TEMPERATURE IN THE HYDRAULIC UNIT function. See the parameters to addresses 5F, segment 4, C0 to C7 and C8 to CF. We program segment 0 to " 1 " in the reverse case. Segment 0: Not used. • Par Address 60: best displayed in segment mode. At this address, we set out the desired mechanical characteristics of DOOR 2: The relays which drive door 2 are those mounted outside the door. Segment 7: Not used. Segment 6: VERSTF2 (Door Forced when Closed). We program segment 6 to " 1 " when we want to provide a door close signal even if the closed limit has been reached, but 8 has not yet been closed. If a mechanical problem means that in spite of everything 8 from the safety chain is not closed, the closure relay will drop when the door integrator time has elapsed. We program 6 to " 0 " in the reverse case. Série 32 Mlift Vector - Prog.Vectorielle Installation manual Chapter VII - page 67 PARAMETER DEFINITIONS Segment 5: P2SFCOU (Door 2 without Open Limit). We program segment 5 to " 1 " when we wish to operate Door 2 in the open direction without looking for a door open limit (FCOU). We program segment 5 to " 0 " when we want to operate an automatic door equipped with a close limit switch (FCOU). Segment 4: P2SFCFE (Door 2 without Closed Limit). We program segment 4 to " 1 " when we want to operate Door 2 in the close direction without looking for a door close limit (FCFE). We program segment 4 to " 0 " when we want to operate an automatic door equipped with a closure limit switch (FCFE). Segment 3: PMAFCP2 (Door 2 Extended Close Time). We program segment 3 to " 1 " when we want to maintain movement for an additional 300 ms after the closed limit has been reached. We program segment 3 to " 0 " when we want to stop the movement from when door 2 has reached the closed limit. Segment 2: MSTPMP2 (Keep Power On whilst Door 2 in Operation). We program segment 2 to " 1 " when we want to keep door 2 motor on during operation. We program segment 2 to " 0 " in the reverse case. Segment 1: AMPSEC2 (Stopping of Door 2 Movement on arrival of Safety Chain). We program segment 1 to " 1 " when we want to operate a door without having reached the closed limit and which has a tendency to re-open when the motor is no longer fed. Having lost 8 from the safety chain, we once more give a close signal to re-gain 8. The door will continue to bang if this option is not programmed. Indeed, the motor ceases to be fed the first time 8 appears. With this type of door, we always program the Closing Forced when Moving option. We program 0 to " 0 " when this option is not required. Segment 0: MSTPRP2 (Keep Door 2 Power Permanently On). We program segment 0 to " 1 " when we want to keep the door 2 motor operator permanently on when opening and closing. We program segment 0 to " 1 " in the reverse case. • Par Address 61: TP02 (Timing of Door N° 2) best displayed in hexadecimal. At this address, we program the timing of door 2 in seconds and hex. We can program a value from 2 to 255 seconds. See page 94 for the conversion between decimal and hex, from 0 to 255 ....... 00 to FF. Série 32 Mlift Vector - Prog.Vectorielle Installation manual Chapter VII - page 68 PARAMETER DEFINITIONS • Par Address 62: TREP2 (Re-Opening Time of Door 2) best displayed in hexadecimal. At this address, we program the time during which door 2 stays open after having caused a RE-OPENING. This timing is programmed into seconds and hex. Its value must be between 1 and 255 seconds. See page 94 for the conversion between decimal and hex, from 0 to 255 ....... 00 to FF. • Par Address 63: best displayed in segment mode. Segment 7: CABVID (Empty Car Option). We program segment 7 to " 1 " when we want the A191 to operate the EMPTY CAR option. This option consists of erasing all the requests for the car if after 3 stops the light cell has not been broken. We program segment 7 to " 0 " in the reverse case. Segment 6: SHTCS (CS Nudging Option). We program segment 6 to " 1 " when we want the A191 to nudge the CS option after the time programmed into address 62 has elapsed and if a request has been registered. Furthermore, we activate output " INH1 " which feeds a buzzer to inform passengers that the door will be re-closing. (See output position - parameter address 7A, segments 4 to 7 on page 88). We program segment 6 to " 0 " in the reverse case. Segment 5: ISO (Re-Levelling). We program segment 5 to " 1 " if we want the RE-LEVELLING option (open AND closed doors). We program segment 5 to " 0 " in the reverse case. Segment 4: RMLIFT (MLift Regulator). We program segment 4 to " 1 " if we want to drive an MLift variable frequency speed regulator We program segment 4 to " 0 " in the reverse case. Segment 3: Not used. Segment 2: REGUL (REGULator). We program segment 2 to " 1 " when we want to drive an independent speed regulator. We program segment 2 to " 0 " in the reverse case. Série 32 Mlift Vector - Prog.Vectorielle Installation manual Chapter VII - page 69 PARAMETER DEFINITIONS Segment 1: OUAVAR (Open Before Stop). We program segment 1 to " 1 " if we want to carry out the Open Before Stop function and thus operate the safety chain N66 nudging device. We program segment 1 to " 0 " in the reverse case. Segment 0: TPRAL (Door Lengthening Time). We program segment 0 to " 1 " if we want the base unit of the door timings to go from 1 to 2.5 seconds, thus allowing us to have times from 5 seconds to 10 minutes. We program segment 0 to " 0 " in the reverse case. • Par Address 64: TIRP2 (Reversal Time of the Door 2 Relays) best displayed in hex. At this address, we program the time which runs from the instant the Serie 32 releases the closure relay to when it activates the door 2 open relay . This timing is programmed at intervals of between 10 ms and 2.55 seconds. See page 94 for the conversion between decimal and hex, from 0 to 255 ....... 00 to FF. • Par Address 67: TIGPO2 (Door 2 Integrator Time) best displayed in hexadecimal. At this address, we program the timing of the door 2 integrator in seconds and in hex. We can program a value from 1 to 255 seconds. See page 94 for the conversion between decimal and hex, from 0 to 255 ....... 00 to FF. If we program 00, there will be no Door Integrator. • Par Address 68: TIGPO2 best displayed in segment mode. At this address, we define the door 2 functioning for level 0. Segment 7: Not used. Segment 6: Not used. Segment 5: Not used. Segment 4: PORCAB2N0 (Car Door 2 at Level 0). We program segment 4 to " 1 " when a car equipped with an automatic door commanded by the Series 32 relays (the landing doors are of the swing variety). We program segment 4 to " 0 " with a flush shaft or with an automatic car driven by just 1 retiring ramp or with an automatic car and landing. Série 32 Mlift Vector - Prog.Vectorielle Installation manual Chapter VII - page 70 PARAMETER DEFINITIONS Segment 3: OUAVAP2N0 (Open Before Stop of Door 2 at Level 0). We program segment 3 to " 1 " when we want to carry out an opening before stop of door 2 at level 0. We program segment 3 to " 0 " in the reverse case. Segment 2: STPOU0 (Parking Door 2 Open at Level 0). We program segment 2 to " 1 " when we want to park the car with door 2 open at level 0. We program segment 2 to " 0 " in the reverse case. Segment 1: SER2IN0 (Service 2 Not Allowed at Level 0). We program segment 1 to " 1 " when the opening of door 2 at level 0 is not allowed. We program segment 1 to " 0 " when we allow the opening of door 2 at level 0. Segment 0: OUNSIM0 (Non Simultaneous Opening at Level 0). We program segment 0 to " 1 " when the simultaneous opening of doors 1 and 2 at level 0 is not allowed (locking effect). We program segment 0 to " 0 " when we allow the simultaneous opening of doors 1 and 2 at level 0. This function can only be used in the double service selective. • Par Address 69: best displayed in segment mode. At this address, we define the functioning of door 2 for level 1. • Par Address 6a: ..... same for level 02. • Par Address 6b: ..... same for level 03. • Par Address 6c: ..... same for level 04. • Par Address 6d: ..... same for level 05. • Par Address 6e: ..... same for level 06. • Par Address 6f: ..... same for level 07. • Par Address 70: ..... same for level 08. • Par Address 71: ..... same for level 09. • Par Address 72: ..... same for level 10. • Par Address 73: ..... same for level 11. • Par Address 74: ..... same for level 12. • Par Address 75: ..... same for level 13. • Par Address 76: ..... same for level 14. • Par Address 77: ..... same for level 15. Série 32 Mlift Vector - Prog.Vectorielle Installation manual Chapter VII - page 71 PARAMETER DEFINITIONS • Par Address 78: best displayed in segment mode. Segment 7: We program segment 7 to " 1 " when we want to use programmable output 4 (SPG4) for the overload buzzer (RF). We program segment 7 to " 0 " in the reverse case. Segment 6: We program segment 6 to " 1 " when we want to use the programmable output 3 (SPG3) for the overload buzzer (RF). We program segment 6 to " 0 " in the reverse case. Segment 5: We program segment 5 to " 1 " when we want to use programmable output 2 (SPG2) for the overload buzzer (RF). We program segment 5 to " 0 " in the reverse case. Segment 4: We program segment 4 to " 1 " when we want to use programmable output 1 (SPG1) for the overload buzzer (RF). We program segment 4 to " 0 " in the reverse case. Segment 3: We program segment 3 to " 1 " when we want to use programmable output 4 (SPG4) for the OVERLOAD LIGHT (VSU). We program segment 3 to " 0 " in the reverse case. Segment 2: We program segment 2 to " 1 " when we want to use programmable output 3 (SPG3) for the overload light (VSU). We program segment 2 to " 0 " in the reverse case. Segment 1: We program segment 1 to " 1 " when we want to use programmable output 2 (SPG2) for the overload light (VSU). We program segment 1 to " 0 " in the reverse case. Segment 0: We program segment 0 to " 1 " when we want to use programmable output 1 (SPG1) for the overload light (VSU). We program segment 0 to " 0 " in the reverse case. Série 32 Mlift Vector - Prog.Vectorielle Installation manual Chapter VII - page 72 PARAMETER DEFINITIONS • Par Address 79: best displayed in segment mode. Segment 7: We program segment 7 to " 1 " when we want to use programmable output 4 (SPG4) for the Out of Service light (VHS). We program segment 7 to " 0 " in the reverse case. Segment 6: We program segment 6 to " 1 " when we want to use programmable output 3 (SPG3) for the Out of Service light (VHS). We program segment 6 to " 0 " in the reverse case. Segment 5: We program segment 5 to " 1 " when we want to use programmable output 2 (SPG2) for the Out of Service light (VHS). We program segment 5 to " 0 " in the reverse case. Segment 4: We program segment 4 to " 1 " when we want to use programmable output 1 (SPG1) for the Out of Service Light (VHS). We program segment 4 to " 0 " in the reverse case. Segment 3: We program segment 3 to " 1 " when we want to use the programmable output 4 (SPG4) for the GONG (GONG). We program segment 3 to " 0 " in the reverse case. Segment 2: We program segment 2 to " 1 " when we want to use the programmable output 3 (SPG3) for the GONG (GONG). We program segment 2 to " 0 " in the reverse case. Segment 1: We program segment 1 to " 1 " when we want to use the programmable output 2 (SPG2) for the GONG (GONG). We program segment 1 to " 0 " in the reverse case. Segment 0: We program segment 0 to " 1 " when we want to use the programmable output 1 (SPG1) for the GONG (GONG). We program segment 0 to " 0 " in the reverse case. Série 32 Mlift Vector - Prog.Vectorielle Installation manual Chapter VII - page 73 PARAMETER DEFINITIONS • Par Address 7A: best displayed in segment mode. Segment 7: We program segment 7 to " 1 " when we want to use the programmable output 4 (SPG4) to inhibit (INH1). (See parameter address 63, segments 4 to 7). We program segment 7 to " 0 " in the reverse case. Segment 6: We program segment 6 to " 1 " when we want to use the programmable output 3 (SPG3) to INHIBIT (INH1). (See parameter address 63, segments 4 to 7). We program segment 6 to " 0 " in the reverse case. Segment 5: We program segment 5 to " 1 " when we want to use the programmable output 2 (SPG2) to INHIBIT (INH1). (See parameter address 63, segments 4 to 7). We program segment 5 to " 0 " in the reverse case. Segment 4: We program segment 4 to " 1 " when we want to use the programmable output 1 (SPG1) to INHIBIT (INH1). (See parameter address 63, segments 4 to 7). We program segment 4 to " 0 " in the reverse case. Segment 3: We program segment 3 to " 1 " when we want to use the programmable output 4 (SPG4) for the fire service light (VPMP). We program segment 3 to " 0 " in the reverse case. Segment 2: We program segment 2 to " 1 " when we want to use the programmable output 3 (SPG3) for the fire service light (VPMP). We program segment 2 to " 0 " in the reverse case. Segment 1: We program segment 1 to " 1 " when we want to use the programmable output 2 (SPG2) for the fire service light (VPMP). We program segment 1 to " 0 " in the reverse case. Segment 0: We program segment 0 to " 1 " when we want to use the programmable output 1 (SPG1) for the fire service light (VPMP). We program segment 0 to " 0 " in the reverse case. Série 32 Mlift Vector - Prog.Vectorielle Installation manual Chapter VII - page 74 PARAMETER DEFINITIONS • Par Address 7B: best displayed in segment mode. Segment 7: Not used. Segment 6: Not used. Segment 5: Not used. Segment 4: Not used. Segment 3: We program segment 3 to " 1 " when we want to use the programmable output 4 (SPG4) for the AUTOMATIC LIGHT (LU). We program segment 3 to " 0 " in the reverse case. Segment 2: We program segment 2 to " 1 " when we want to use the programmable output 3 (SPG3) for the AUTOMATIC LIGHT (LU). We program segment 2 to " 0 " in the reverse case. Segment 1: We program segment 1 to " 1 " when we want to use the programmable output 2 (SPG2) for the AUTOMATIC LIGHT (LU). We program segment 1 to " 0 " in the reverse case. Segment 0: We program segment 0 to " 1 " when we want to use the programmable output 1 (SPG1) for the AUTOMATIC LIGHT (LU). We program segment 0 to " 0 " in the reverse case. • Par Address 7E: CAADDEF (Last But One Fault Code) best displayed in hexadecimal. At this address, the Series 32 gives the fault code 3. • Par Address 7F: CDEFPA (Oldest Fault Code) best displayed in hexadecimal. At this address, the Series 32 gives the fault code 4. Série 32 Mlift Vector - Prog.Vectorielle Installation manual Chapter VII - page 75 PARAMETER DEFINITIONS • Par Address CO: Temperature up to which the distance C8 is chosen, best displayed in hexadecimal. At this address, in the context of the SLOW SPEED DISTANCE VARIATION OF THE OIL TEMPERATURE IN THE HYDRAULIC UNIT function, we program the temperature to which we will use the slow speed distance programmed into address C8 (in %). • Par Address C1: Temperature up to which the distance C9 is chosen, best displayed in hexadecimal. We program the temperature up to which we will use the slow speed distance programmed into address C9 (in %). • Par Address C2: Temperature up to which the distance CA is chosen, best displayed in hexadecimal. We program the temperature up to which we will use the slow speed distance programmed into address CA (in %). • Par Address C3: Temperature up to which the distance CB is chosen, best displayed in hexadecimal. We program the temperature up to which we will use the slow speed distance programmed into address CB (in %). • Par Address C4: Temperature up to which the distance CC is chosen, best displayed in hexadecimal. We program the temperature up to which we will use the slow speed distance programmed into address CC (in %). • Par Address C5: Temperature up to which the distance CD is chosen, best displayed in hexadecimal. We program the temperature up to which we will use the slow speed distance programmed into address CD (in %). • Par Address C6: Temperature up to which the distance CE is chosen, best displayed in hexadecimal. We program the temperature up to which we will use the slow speed distance programmed into address CE (in %). • Par Address C7: Temperature up to which the distance CF is chosen, best displayed in hexadecimal. We program the temperature up to which we will use the slow speed distance programmed into address CF (in %). Série 32 Mlift Vector - Prog.Vectorielle Installation manual Chapter VII - page 76 PARAMETER DEFINITIONS • Par Address C8: Slow speed distance chosen up to the temperature programmed into C0, best displayed in hexadecimal. At this address, in the context of THE SLOW SPEED DISTANCE VARIATION OF THE OIL TEMPERATURE IN THE HYDRAULIC UNIT function, we program the slow speed distance (in %) chosen up to the temperature programmed into C0. • Par Address C9: Slow speed distance chosen up to the temperature programmed into C1, best displayed in hexadecimal. We program the slow speed distance (in %) chosen up to the temperature programmed into C1. • Par Address CA: Slow speed distance chosen up to the temperature programmed into C2, best displayed in hexadecimal. We program the slow speed distance (in %) chosen up to the temperature programmed into C2. • Par Address CB: Slow speed distance chosen up to the temperature programmed into C3, best displayed in hexadecimal. We program the slow speed distance (in %) chosen up to the temperature programmed into C3. • Par Address CC: Slow speed distance chosen up to the temperature programmed into C4, best displayed in hexadecimal. We program the slow speed distance (in %) chosen up to the temperature programmed into C4. • Par Address CD: Slow speed distance chosen up to the temperature programmed into C5, best displayed in hexadecimal. We program the slow speed distance (in %) chosen up to the temperature programmed into C5. • Par Address CE: Slow speed distance chosen up to the temperature programmed into C6, best displayed in hexadecimal. We program the slow speed distance (in %) chosen up to the temperature programmed into C6. • Par Address CF: Slow speed distance chosen up to the temperature programmed into C7, best displayed in hexadecimal. We program the slow speed distance (in %) chosen up to the temperature programmed into C7. Série 32 Mlift Vector - Prog.Vectorielle Installation manual Chapter VII - page 77 INPUTS DEFINITIONS In order to make the inputs visible, we must put the little switch on the left up in the " RAM " position. • Ram Address 00: best displayed in segment mode. Segments 0 to 7: C0 - 7 (Car Calls 0 to 7). They indicate to us respectively the state of the car call contacts C0 to C7 with the common COMB button. The corresponding segments are on when contacts are closed to make a call. The corresponding segments are off in the reverse case. • Ram Address 01: best displayed in segment mode. Segments 0 to 7: C8 - 15 (Car Calls 8 to 15). They show us respectively the state of the car calls contacts C8 to C15 with the common COMB button. The corresponding segments are on when the contacts are closed to make a call. The corresponding segments are off in the reverse case. • Ram Address 03: best displayed in segment mode. Segments 0 to 7: MO - 7 (Landing Calls for Up, 0 to 7). They show us respectively the state of the contacts of the landing calls for UP. M0 to M7 with the common COMB button. The corresponding segments are on when the contacts are closed to make a call. The corresponding segments are off in the reverse case. • Ram Address 04: best displayed in segment mode. Segments 0 to 7: M8 - 15 (Landing Calls for Up, 8 to 15). They show us respectively the state of the contacts of the landing calls for UP. M8 to M15 with the common COMB button. The corresponding segments are on when the contacts are closed to make a call. The corresponding segments are off in the reverse case. Série 32 Mlift Vector - Prog.Vectorielle Installation manual Chapter VII - page 78 INPUTS DEFINITIONS • Ram Address 06: best displayed in segment mode. Segments 1 to 7: D1 - 7 (Landing Calls for Down, 1 to 7). They show us respectively the state of the contacts of the landing call for Down D1 to D7 with the common COMB button. The corresponding segments are on when the contacts are closed to make a call. The corresponding segments are off in the reverse case. Segment 0: M0 (Landing Calls for Up, 0). • Ram Address 09: best displayed in segment mode. Segments 0 to 7: NF0 - 7 (Levels Damaged by Fire, 0 to 7). They show us respectively the state of the levels damaged by fire contacts NF7 to NF0 with 0V. The corresponding segments are on when the contacts are closed to indicate levels damaged by fire and thus not to serve them. The corresponding segments are off in the reverse case. • Ram Address 0A: best displayed in segment mode. Segments 0 to 7: NF8 - 15 (Levels Damaged by Fire, 8 to 15). They show us respectively the state of the levels damaged by fire contacts NF7 to NF0 with 0V. The corresponding segments are on when the contacts are closed to indicate the levels damaged by fire and thus not to serve them. The corresponding segments are off in the reverse case. • Ram Address 0C: best displayed in segment mode. Segment 7: SU (Overload) This shows us the state of the overload contact (SU and 0V). Segment 7 is on when the contact is closed, i.e., in overload. Segment 7 is off in the reverse case. Segment 6: Not used Segment 5: ED (Extreme Down Contact). This shows us the state of the Extreme Down contact (ED and 0V). Segment 5 is off when the contact is closed, i.e., when the car is not on ED. Segment 5 is on when the car is on ED. Série 32 Mlift Vector - Prog.Vectorielle Installation manual Chapter VII - page 79 INPUTS DEFINITIONS Segment 4: MAN (Emergency Operation). This shows us the state of the contact which switches to emergency operation (MAN and 0V). Segment 4 is off when the contact is closed, i.e.; normal. Segment 4 is on when the contact is open, i.e., when in emergency operation. Segment 3: INS (Inspection). This shows us the state of the contact which switches to inspection (INS and 0V). Segment 3 is off when the contact is closed, i.e., normal. Segment 3 is on when the contact is open, i.e., when being inspected. Segment 2: GM (Up). This shows us the state of the request movement contact in Up (GM and 0V). Segment 2 is on when the contact is closed for an upward travel request. (GM and 0V). Segment 2 is off in the reverse case. Segment 1: GD (Down). This shows us the state of the movement request contact in Down (GD and 0V). Segment 1 is on when the contact is closed for a downward travel request. Segment 1 is off in the reverse case. Segment 0: MASS (MASS Relay). This shows us the state of the MASS relay. Segment 0 is on if there is a mass fault. Segment 0 is off in the reverse case. • Ram Address 0D: best displayed in segment mode. Segment 7: Not used Segment 6: Not used Segment 5: PH (Phase Failure Input). This shows us the state of the Phase Failure Input (PH and 0V). Segment 5 is on when there is no phase. Segment 5 is off in the reverse case. Segment 4: THV (Fan thermistor) TRACTION. This shows us the state of the Fan thermistor (THV and OV). Segment 4 is on when the contact is closed in case of a fault. Segment 4 is off in the reverse case. Série 32 Mlift Vector - Prog.Vectorielle Installation manual Chapter VII - page 80 INPUTS DEFINITIONS Segment 4: DNH (Oil Level Fault) HYDRAULIC. This shows us the state of the contact detecting the minimum oil level rendering further travel dangerous for the equipment. Segment 4 is on when the contact is closed in the case of a fault. Segment 4 is off in the reverse case. Segment 3: RP (Low Velocity Contactor Control) TRACTION. This shows us the state of the low velocity contactor control (PV). Segment 3 is on when the PV contactor is on. Segment 3 is off in the reverse case. Segment 3: NHM (Minimum Oil Level) HYDRAULIC. This shows us the state of the contact detecting the minimum oil level which is no longer dangerous for the equipment, but which still needs a little oil. Segment 3 is on when the contact is closed due to a lack of oil. Segment 3 is off in the reverse case. Segment 2: RG (High Velocity Contactor Control) TRACTION. This shows us the state of the high velocity contactor control (GV). Segment 2 is on when the GV contactor is on. Segment 2 is off in the reverse case. Segment 2: RL (Ligne Contactor Control) HYDRAULIC. This shows us the state of the path contactor (L). Segment 2 is on when the contactor is on. Segment 2 is off in the reverse case. Segment 1: RM (Up Contactor Control) TRACTION. This shows us the state of the up contactor (MO). Segment 1 is on when contactor MO is on. Segment 1 is put off in the reverse case. Segment 1: RY (Star Contactor Control) HYDRAULIC. This shows us the state of the star contactor (Y). Segment 1 is lit when contactor Y is on. Segment 1 is off in the reverse case. Segment 0: RD (Down Contactor Control) TRACTION. This shows us the state of the down contactor (DE). Segment 0 is lit when contactor DE is on. Segment 0 is off in the reverse case. Segment 0: R∆ (Delta Contactor Control) HYDRAULIC. This shows us the state of the Delta contactor (∆). Segment 0 is on when the ∆ contactor is on. Segment 0 is off in the reverse case. Série 32 Mlift Vector - Prog.Vectorielle Installation manual Chapter VII - page 81 INPUTS DEFINITIONS • Ram Address 0E: best displayed in segment mode. Segment 7: Not used. Segment 6: ZONE (Door Zone Relay). This shows us whether the shunting device DONNE the door zone or not. Segment 6 is on if the device is in the zone. Segment 6 is off in the reverse case. Segment 5: Not used. Segment 4: PRIC (Car Priority). This shows us the state of the car priority contact. (PRIC and 0V). Segment 4 is on when the contact is closed to command the car priority function. Segment 4 is off in the reverse case. Segment 3: NS (Non-Stop). This shows us the state of the Non-stop contact (NS and 0V). Segment 3 is on when the contact is closed to command the Non-Stop function. Segment 3 is off in the reverse case. Segment 2: SUSD (Delayed Departure). This shows us the state of the delayed departure contact (SUSD and 0V). Segment 2 is on when the contact is closed to command the delayed departure. Segment 2 is off in the reverse case. Segment 1: MHS (Out of Service). This shows us the state of the Out of Service contact (MHS and 0V). Segment 1 is on when the contact is closed to command the Switch to out of Service function. Segment 1 is off in the reverse case. Segment 0: POM (Fireman Service). This shows us the state of the Fireman Service contact (POM and 0V). Segment 0 is on when the contact is closed, i.e., when the Fireman Service function is commanded. Segment 0 is off in the reverse case. Série 32 Mlift Vector - Prog.Vectorielle Installation manual Chapter VII - page 82 INPUTS DEFINITIONS • Ram Address 0F: best displayed in segment mode. Segment 7: Not used. Segment 6: Not used. Segment 5: Not used. Segment 4: FF1 (Front Door Close Button). This shows us the state of the Front Door Close Button. Segment 4 is on when the contact is closed for a command to force the door closed. Segment 4 is off in the reverse case. Segment 3: COI1 (Front Door Safety Knuckle Input). This shows us the Front Door Safety Knuckle Input (COI1 and 0V). Segment 3 is on when the contact is closed. Segment 3 is off in the reverse case. Segment 2: CS1 (Front Door Photocell Input). This shows us the state of the Front Door Photocell Input (CS1 and 0V). Segment 2 is off when the contact is closed, i.e., when the photocell is unbroken. Segment 2 is on when the photocell detects something. Segment 1: FCFE1 (Front Door Close End Limit). This shows us the Front Door Close End Limit (FCFE1 and 0V). The segment 1 is off when the Front Door Close End Limit is closed, i.e., when Door 1 is not completely closed. The segment 1 is on when the Front Door Close End Limit is open, i.e., when Door 1 is completely closed. Segment 0: FCOU1 (Front Door Open End Limit). This shows us the state of the Front Door Open End Limit (FCOU1 and 0V). Segment 0 is off when the Front Door Open End Limit is closed, i.e., when the door 1 is not completely opened. Segment 0 is on when the Front Door Open End Limit is open, i.e., when Door 1 is completely opened. Série 32 Mlift Vector - Prog.Vectorielle Installation manual Chapter VII - page 83 INPUTS DEFINITIONS • Ram Address 10: best displayed in segment mode. Segment 7: Not used. Segment 6: Not used. Segment 5: Not used. Segment 4: FF2 (Rear Door Close Button). This shows us the state of the Rear Door Close Button (FF2 et 0V). Segment 4 is on when the contact is closed for a forced closure command.. Segment 4 is off in the reverse case. Segment 3: COI2 (Rear Door Safety Knuckle Input). This shows us the state of the Rear Door Safety Knuckle Input (CO12 and 0V). Segment 3 is on when the contact is closed. Segment 3 is off in the reverse case. Segment 2: CS2 (Rear Door Photocell Input). This shows us the state of the Rear Door Photocell Input (CS2 and 0V). Segment 2 is off when the contact is closed, i.e., when the photocell is unbroken. Segment 2 is on when the photocell detects something. Segment 1: FCFE2 (Rear Door Close End Limit). This shows us the state of the Rear Door Close End Limit (FCFE2). Segment 1 is off when the Rear Door Close End Limit is closed, i.e., when the door is not completely shut. Segment 1 is on when the Rear Door Close End Limit is open, i.e., when the door is completely closed. Segment 0: FCOU2 (Rear Door Open End Limit). This shows us the state of Rear Door Open End Limit (FCOU2). Segment 0 is off when the Rear Door Open End Limit is closed, i.e., when the door is not completely open. Segment 0 is on when the Rear Door Open End Limit is open, i.e., when the door is completely open. Série 32 Mlift Vector - Prog.Vectorielle Installation manual Chapter VII - page 84 INPUTS DEFINITIONS • Ram Address 11: best displayed in segment mode. Segment 7: Not used. Segment 6: Not used. Segment 5: Not used. Segment 4: Not used. Segment 3: EXD (Extreme Down Contact). This shows us the state of the Extreme Down Contact. Segment 3 is on when the contact is open, i.e., when the car is below the bottom ED magnet ED. Segment 3 is off when the contact is closed, i.e., when the car is above the bottom ED magnet ED. Segment 2: EXM (Extreme Up Contact). This shows us the state of the Extreme Up Contact. Segment 2 is on when the contact is open, i.e., when the car is above the top EM magnet. Segment 2 is off when the contact is closed, i.e., when the car is below the top EM magnet. Segment 1: CAB (Tape head, Harness B). This shows us the state of Harness B. Segment 1 is on when harness B is open. Segment 1 is off when harness B is closed. Segment 0: CAA (Tape head, Harness A). This shows us the state of Harness A. Segment 0 is on when harness A is open. Segment 0 is off when harness A is closed. Série 32 Mlift Vector - Prog.Vectorielle Installation manual Chapter VII - page 85 INPUTS DEFINITIONS • Ram Address 12: best displayed in segment mode. Segment 7: Not used. Segment 6: Not used. Segment 5: Not used. Segment 4: MTH (Oil Temperature Measure). Segment 4 is on when the MTH 0V contact is open or when the temperature probe has reached a certain value. Segment 4 is off in the reverse case. Segment 3: STH (Thermic Probe). This shows us the state of the thermostat (STH and 0V). Segment 3 is off when the contact is closed in normal operating mode. Segment 3 is on in the reverse case. Segment 2: 10 (Level 10 of the Safety Lane). This shows us the state of the safety lanes at level 10 of the safety lane. Segment 2 is on when the safety lane connection is closed up to level 10. Segment 2 is off in the reverse case. Segment 1: 8 (Level 8 of the Safety Lane). This shows us the state of the safety lanes at level 8 of the safety lane. Segment 1 is on when the safety lane connection is closed up to level 8. Segment 1 is off in the reverse case. Segment 0: 6 (Level 6 of the Safety Lane). This shows us the state of the safety lanes at level 8 of the safety lane. Segment 0 is on when the safety lane connection is closed up to level 6. Segment 0 is off in the reverse case. Série 32 Mlift Vector - Prog.Vectorielle Installation manual Chapter VII - page 86 INPUTS DEFINITIONS • Ram Address 62: best displayed in segment mode. Segment 7: Not used. Segment 6: Not used. Segment 5: Not used. Segment 4: Not used. Segment 3: Not used. Segment 2: IGV (Fast Speed Inspection). This shows us the state of the Fast Speed Inspection contact. Segment 2 is on when the contact is closed to request the Fast Speed Inspection. Segment 2 is off in the reverse case. Segment 1: TACQ2 (Anti-creep 2). This shows the state of Anti-creep 2. Segment 1 is on if the contact is closed when Anti-creep 2 has drawn back in. Segment 1 is off in the reverse case. Segment 0: TACQ1 (Anti-creep 1). This shows us the state of Anti-creep 1. Segment 0 is on if the contact is closed when Anti-creep 1 had drawn back in. Segment 0 is off in the reverse case. Série 32 Mlift Vector - Prog.Vectorielle Installation manual Chapter VII - page 87 OUTPUTS DEFINITIONS In order to make the outputs visible, we must put the little switch on the left up in the " RAM " position. NOTE CONCERNING THE OUTPUTS: Certain Outputs are ELECTRONIC and can only give out 50 mA under 24V (1.2W max). We will indicate this by putting (S ELEC) with their definition. Certain Outputs are DRY relay CONTACTS whose common connection is accessible. We will indicate this by putting (S CONT) with their definition. Certain Outputs are DRY relay CONTACTS whose common connection is not accessible because it is already linked internally to the 24R potential. We will indicate this by putting (S CONT 24R) with their definition. It is suitable therefore to interface the outputs in accordance with the component to command. • Ram Address 13: best displayed in segment mode. Segment 7: CREP (Common Position Repeater) (S ELEC). This shows us the state of the Common Position Repeater (CREP). If segment 7 blinks, the CREP is " ALIVE". If segment 7 is off or remains on, the CREP is "DEAD". Segment 6: LU (Automatic Car Light) (S ELEC). This shows us the state of the Automatic Car Light (LU). Segment 6 is on when the LU output is activated and gives out 0 Volt. Segment 6 is off when the LU output is de-activated and gives out 24 Volts. Segment 5: FE1 (Front Door Close Signal Output) (S CONT). This shows us the state of the Front Door Close Signal Output (FE1). Segment 5 is on if the Front Door Close Signal Output is fed. Segment 5 is off in the reverse case. Segment 4: OU1 (Front Door Open Signal Output) (S CONT). This shows us the state of the Front Door Open Signal Output (OU1). Segment 4 is on if the Front Door Open Signal Output is fed. Segment 4 is off in the reverse case. Segment 3: CAM (Retiring Ramp). This shows us the state of the Retiring Ramp output (CAM). Segment 3 is on if the Retiring Ramp output is activated. Segment 3 is off in the reverse case. Série 32 Mlift Vector - Prog.Vectorielle Installation manual Chapter VII - page 88 OUTPUTS DEFINITIONS Segment 2: GV/PV (Fast Speed / Slow Speed relay) (S CONT), or V2 (for Freq.Drive). This shows us the state of the Fast Speed / Slow Speed Relay (GV / GP). Segment 2 is on if relay GV / PV is supplied to command contactor GV. Segment 2 is off if the relay GV / PV is not supplied to command contactor PV. Segment 1: DE (Down Relay) (S CONT). This shows us the state of the Down Relay (DE). Segment 1 is on if the DE relay is fed. Segment 1 is off in the reverse case. Segment 0: MO (Up Relay) (S CONT). This shows us the state of the Up Relay (MO). Segment 0 is on if the MO relay is fed. Segment 0 is off in the reverse case. • Ram Address 14: best displayed in segment mode. Segment 7: V1 (Speed 1) (S ELEC). This shows us the state of Speed 1 output. Segment 7 is on if Speed 1 output is activated. Segment 7 is off in the reverse case. Segment 6: V0 (Speed 0) (S ELEC). This shows us the state of the Speed 0 output. Segment 6 is on if Speed 0 output is activated. Segment 6 is off in the reverse case. Segment 5: Not used. Segment 4: SH8 (Bridge 8) (S ELEC). This gives us the state of the SH8 output. Segment 4 is on when SH8 output is activated and gives 0 V. Segment 4 is off in the reverse case. Segment 3: INH2 (Rear Door Inhibition) (S ELEC). This shows us the state of the INH2 output which is activated when the anti-skating integrator is dropped. Segment 3 is on when INH2 output is activated and gives 0 V. Segment 3 is off in the reverse case. Série 32 Mlift Vector - Prog.Vectorielle Installation manual Chapter VII - page 89 OUTPUTS DEFINITIONS Segment 2: INH1 (Front Door Inhibition) (S ELEC). This shows us the state of INH1 output which depends on the option SHTCS (CS Bridge) address 63 segment 6. Segment 2 is on when INH1 output is activated and gives 0 V. Segment 2 is off in the reverse case. Segment 1: FE2 (Rear Door Close Signal Output) (S CONT). This shows us the state of the Rear Door Close Signal Output (FE2). Segment 1 is on if the Rear Door Close Signal Output is fed. Segment 1 is off in the reverse case. Segment 0: OU2 (Rear Door Open Signal Output) (S CONT). This shows us the state of the Rear Door Open Signal Output (OU2). Segment 0 is on if the Rear Door Open Signal Output is fed. Segment 0 is off in the reverse case. • Ram Address 15: best displayed in segment mode. Segment 7: DEF (Fault Light) (S ELEC). This shows us the state of the Fault Light Output. (DEF). Segment 7 is on when the Fault Output is activated and gives out 0 V. Segment 7 is off when the Fault Output is de-activated and gives out 24V. Segment 6: GONG (GONG) (S ELEC). This shows us the state of the GONG Output (GONG). Segment 6 is on when the Gong Output is activated and gives out 24 Volts. Segment 6 is off when the Gong Output is de-activated and gives out 0 Volts. Segment 5: FD (Down Arrow) (S ELEC). This shows us the state of the Down Arrow (FD). Segment 5 is on when the FD Output is activated and gives out 24 Volts. Segment 5 is off when the FD Output is de-activated and gives out 0 Volts. Segment 4: FM (Up Arrow) (S ELEC). This shows us the state of the Up Arrow (FM). Segment 4 is on when the FM Output is activated and gives out 24 Volts. Segment 4 is off when the FM Output is de-activated and gives out 0 Volts. Série 32 Mlift Vector - Prog.Vectorielle Installation manual Chapter VII - page 90 OUTPUTS DEFINITIONS Segment 3: VSU (Overload Light) (S ELEC). This shows us the state of the Overload Light Output (VSU). Segment 3 is on when the VSU Output is activated and gives out 0 Volts. Segment 3 is off when the VSU Output is de-activated and gives out 24 Volts. Segment 2: RF (Buzzer) (S ELEC). This shows us the state of the Overload Buzzer (RF). Segment 2 is on when the RF Output is activated and gives out 0 Volts. Segment 2 is off when the RF Output is de-activated and gives out 24 Volts. Segment 1: VHS (Out of Service Light) (S ELEC). This shows us the state of the Out of Service Light Output. (VHS). Segment 1 is on when the VHS Output is activated and gives out 0 Volts. Segment 1 is off when the VHS Output is de-activated and gives out 24 Volts. Segment 0: VPMP (Fireman Service Light) (S ELEC). This shows us the state of the Fireman Light Output (VPMP). Segment 0 is on when the VPMP Output is activated and gives out 0 Volts. Segment 0 is off when the VPMP Output is de-activated and gives out 24 Volts. • Ram Address 16: best displayed in segment mode. Segment 0 to 7: QC0-7 (Car Registration Lights 0 - 7) (S ELEC). These show us respectively the state of the Car Registration Lights QC0 to QC7. Outputs QC0 to QC7 are the terminals C0 to C7. The corresponding segments are on when the Outputs are activated and give out 0 Volts. The corresponding segments are off when the Outputs are de-activated and give out 24 Volts. • Ram Address 17: best displayed in segment mode. Segment 0 to ELEC). 7: QC8-15 (Car Registration Lights 8 - 15) (S They show us respectively the state of the Car Registration Lights QC8 to QC15. Outputs QC8 to QC15 are the terminals C8 to C15. Série 32 Mlift Vector - Prog.Vectorielle Installation manual Chapter VII - page 91 OUTPUTS DEFINITIONS • Ram Address 19: best displayed in segment mode. Segment 0 to 7: to 7) (S ELEC). QM0-7 (Hall Call Registration Lights for Up 0 They show us respectively the state of the Hall Call Registration Lights for Up, QM0 to QM7. Outputs QM0 to QM7 are the terminals MX to M7. The corresponding segments are on when the Outputs are activated and give out 0 Volts. The corresponding segments are off when the Outputs are de-activated and give out 24 Volts. • Ram Address 1A: best displayed in segment mode. Segment 0 to 7: to 15) (S ELEC). QM8-15 (Hall Call Registration Lights for Up 8 They show us respectively the state of the Hall Call Registration Lights for Up, QM8 to QM15. Outputs QM8 to QM15 are the terminals M8 to M15. • Ram Address 1C: best displayed in segment mode. Segment 1 to 7: to 7) (S ELEC). QD1-7 (Hall Call Registration Lights for Down 1 They show us respectively the state of the Hall Call Registration Lights for Down, QD1 to QD7. Outputs QD1 to QD7 are the terminals D1 to D7. The corresponding segments are on when the Outputs are activated and give 0 Volts. The corresponding segments are off when the Outputs are de-activated and give 24 Volts. Segment 0: Not used • Ram Address 1D: best displayed in segment mode (S ELEC). Segment 0 to 7: QD8-15 (for Down 8 to 15). They show us respectively the state of the Hall Call Registration Lights for down QD8 to QD15. Outputs QD8 to QD15 are the terminals D8 to D15. Série 32 Mlift Vector - Prog.Vectorielle Installation manual Chapter VII - page 92 OUTPUTS DEFINITIONS • Ram Address IF: best displayed in segment mode. Segment 0 to 7: POS0-7 (Positioning 0 to 7) (S ELEC). They show us respectively the state of the Positioning Outputs POS0 to POS7. The corresponding segments are on when the Outputs are activated and give out 0 Volts. The corresponding segments are off when the Outputs are de-activated and give out 24 Volts. • Ram Address 20: best displayed in segment mode. Segment 0 to 7: POS8-15 (Positioning 8 to 15) (S ELEC). They show us respectively the state of the Positioning Outputs POS8 to POS15. • Ram Address 61: best displayed in segment mode. Segment 7: V4 (Valve 4) (S CONT). This shows us the state of Valve Relay 4. Segment 7 is on when Valve Relay 4 is fed in order to drive Valve 4. Segment 7 is out in the reverse case. Segment 6: V3 (Valve 3) (S CONT). This shows us the state of Valve Relay 3. Segment 6 is on when Valve Relay 3 is fed in order to drive Valve 3. Segment 6 is off in the reverse case. Segment 5: V2 (Valve 2) (S CONT). This shows us the state of Valve Relay 2. Segment 5 is on when the Valve Relay 2 is fed in order to drive Valve 2. Segment 5 is off in the reverse case. Segment 4: V1 (Valve 1) (S CONT). This shows us the state of Valve Relay 1. Segment 4 is on when Valve Relay 1 is fed in order to drive Valve 1. Segment 4 is off in the reverse case. Segment 3: Not used Segment 2: L (Line Relay) (S CONT). This shows us the state of the Line Relay (L). Segment 2 is on if Relay L is fed. Segment 2 is off in the reverse case. Série 32 Mlift Vector - Prog.Vectorielle Installation manual OUTPUTS DEFINITIONS Segment 1: ∆ (Delta Relay) (S CONT). This shows us the state of the Delta Relay. Segment 1 is on when the Delta Relay is fed. Segment 1 is off in the reverse case. Segment 0: Y (Star Relay) (S CONT). This shows us the state of the Star Relay. Segment 0 is on if the Star Relay is fed. Segment 0 is off in the reverse case. Chapter VII - page 93 Série 32 Mlift Vector - Prog.Vectorielle Installation manual Chapter VII - page 94 CONVERSION TABLE HEXADECIMAL ⇔ DECIMAL Right hand figure 0 Left hand figure 1 2 1 2 0 0 1 16 17 18 2 32 33 34 3 48 49 50 4 64 65 66 5 80 81 82 6 96 97 98 7 112 113 114 8 128 129 130 9 144 145 146 3 4 5 6 7 8 9 A B C D E F 3 19 35 51 67 83 99 115 131 147 4 20 36 52 68 84 100 116 132 148 5 21 37 53 69 85 101 117 133 149 6 22 38 54 70 86 102 118 134 150 7 23 39 55 71 87 103 119 135 151 8 24 40 56 72 88 104 120 136 152 9 25 41 57 73 89 105 121 137 153 10 26 42 58 74 90 106 122 138 154 11 27 43 59 75 91 107 123 139 155 12 28 44 60 76 92 108 124 140 156 13 29 45 61 77 93 109 125 141 157 14 30 46 62 78 94 110 126 142 158 15 31 47 63 79 95 111 127 143 159 A 160 161 162 163 164 165 166 167 168 169 170 171 172 173 174 175 B 176 177 178 179 180 181 182 183 184 185 186 187 188 189 190 191 C 192 193 194 195 196 197 198 199 200 201 202 203 204 205 206 207 D 208 209 210 211 212 213 214 215 216 217 218 219 220 221 222 223 E 224 225 226 227 228 229 230 231 232 233 234 235 236 237 238 239 F 240 241 242 243 244 245 246 247 248 249 250 251 252 253 254 255 Using the table: To convert a hexadecimal number to a decimal number, find the left hand hexadecimal digit in the left hand column of the table. Follow along the line until it intersects with the right hand digit to be found in the top row of the table. This value is the decimal equivalent of the hexadecimal number required. Example: to convert the hexadecimal number A4 into decimal, follow the row A in the left hand column until it intersects with the column 4 in the top row. This is the decimal equivalent of A4, i.e. 164. To convert a decimal number to a hexadecimal number, find the decimal number in the table. The first figure of the hexadecimal number is the digit shown in the left hand column of that line, and the second digit is the digit shown at the top of that column. Example: to find the hexadecimal equivalent of 206, find that value in the table. The hexadecimal equivalent is CE. Série 32 Mlift Vector - Prog.Vectorielle Installation manual Chapter VII - page 95 CONTROLLER PARAMETERS TABLE (1/2) Add 00 01 02 03 04 05 06 07 08 09 0A 0B 0C 0D 0E 0F 10 11 12 13 14 15 16 17 18 19 1A 1B 1C 1D 1E 1F 20 21 22 23 24 25 26 27 28 29 to 36 37 38 39 3A 3B 3C 3D 3E 3F 40 41 42 43 44 45 46 47 Seg. 7 Seg. 6 REGUL DPLX SAPB 2S/RECA V1 CONFAL LCF Seg. 5 Seg. 4 Seg. 3 Seg. 2 CLF - CODE FOR LAST FAULT CFBL - CODE OF FAULT BEFORE LAST ISO RMLIFT NIVSIN DSERVS NBDOR - NUMBER OF DOOR OPERATORS TOPLEV - TOP LEVEL BOTLEV -BOTTOM LEVEL LOBBY - MAIN FLOOR NODOOR MAN INS SPL INS CALSLZ DIF ALLAN CALCAN GFD Seg. 1 Seg. 0 OUAVAR FACTORY EDOP RLVDC DRODD RLVDO GONGLEV DORFALT FSINS NOFSDI FIRESV OSDC FIRETYP TIG - INTEGRATOR’S DURATION (2 TO 45 SECONDS [IN SECONDS]) TPV - SLOW SPEED DURATION (3 TO 255 SECONDS [IN SECONDS]) TPLU - AUTOMATIC LIGHT DURATION (2 TO 255 SECONDS [IN SECONDS]) TINS - INSPECTION DURATION (1 TO 255 SECONDS [IN SECONDS]) TCAPGV - TAPE HEAD FAST SPEED TIME (2 TO 25,5 SECONDS [IN 1/10 SECONDS]) TCAPPV - TAPE HEAD SLOW SPEED TIME (3 TO 25,5 SECONDS [IN 1/10 SECONDS]) MSQCAB - MASK FOR CAR CALLS FROM 7 TO 0 MSQCAB - MASK FOR CAR CALLS FROM 15 TO 8 MSQMO - MASK FOR ASCENDING FLOOR CALLS FOR LEVEL FROM 7 TO 1 MSQMO - MASK FOR ASCENDING FLOOR CALLS FOR LEVEL FROM 15 TO 8 MSQDE - MASK FOR DECENDING FLOOR CALLS FOR LEVEL FROM 7 TO 0 MSQDE - MASK FOR DECENDING FLOOR CALLS FOR LEVEL FROM 15 TO 8 TPISO - RELEVELLING TIMING (2 TO 10 SECONDS [IN SECONDS]) PVCRH PVCRB (with slotted tape) (with vanes) (with vanes) Not used with slotted tape { CROSSED VANES FOR SHORT INTERFLOOR 7-8 / 0-1 CROSSED VANES FOR SHORT INTERFLOOR 15-16 / 8-9 } Only with vanes NUSPLX - NUMBER OF SIMPLEX (00 or 1) TFR10 - FILTERING OF « 10 » (0 TO 0,5 SECONDS [IN 1/100 SECONDS]) TPRAU - HOMING TIME (1 TO 255 SECONDS [IN SECONDS]) RAUFAC1 RAUFAC2 TRAPM NIVRAU - HOMING FLOOR 1 TGONG - GONG DURATION (0,1 TO 10 SECONDS [IN /10 SECONDES]) COMDEM - NUMBER OF CAR TRIPS : 2 RIGHT HAND DIGITS COMDEM - NUMBER OF CAR TRIPS : 2 MIDDLE HAND DIGITS COMDEM - NUMBER OF CAR TRIPS : 2 LEFT HAND DIGITS NUMAR0 - ID NUMBER OF THE CONTROLLER (UNITS/DIZAINES) NUMAR1 - MONTH OF PRODUCTION OF THE CONTROLLER (IN HEXADECIMAL) NUMAR2 - YEAR OF PRODUCTION OF THE CONTROLLER REPT00 - POSITION INDICATOR AT LEVEL 00 REPTxx - POSITION INDICATOR AT LEVEL xx REPT15 - POSITION INDICATOR AT LEVEL 15 ADAPTATION FOR A SPECIFIC NON-CLASSED HYDRAULIC POWER UNIT ( CYHYD ) V4 V3 V2 V1 LINE DELTA STAR V4 V3 V2 V1 LINE DELTA STAR V4 V3 V2 V1 LINE DELTA STAR V4 V3 V2 V1 LINE DELTA STAR LINE DELTA STAR V4 V3 V2 V1 V4 V3 V2 V1 LINE DELTA STAR V4 V3 V2 V1 LINE DELTA STAR V4 V3 V2 V1 LINE DELTA STAR RGPT VERSTF1 P1SFCOU P1SFCFE PMAFCP1 MSTPMP1 AMPSEC1 MSTPRP1 TP01 - FRONT DOOR TIME (2 TO 255 SECONDS [IN SECONDS]) TREP1 - FRONT DOOR RE-OPEN TIME (1 TO 255 SECONDS [IN SECONDS]) FRONT REAR NIVMHS - OUT OF SERVICE FLOOR TIRP1 - FRONT DOOR RELAY INVERSION TIME (0 TO 2,55 S. [IN 1/100 SEC]) TFR8 - FILTERING OF « 8 » (0 TO 2,55 S. [IN 1/100 SEC]) TVP1/2 - FRONT AND REAR DOOR LOOK TIME (1 TO 255 S. [IN SEC]) TIGPO1 - FRONT DOOR INTEGRATOR TIME (1 TO 255 SECONDS [IN SECONDS]) Série 32 Mlift Vector - Prog.Vectorielle Installation manual Chapter VII - page 96 CONTROLLER PARAMETERS TABLE (2/3) Add 48 49 to 56 57 58 59 5A 5B 5C 5D 5E 5F 60 61 62 63 64 67 68 69 to 76 77 78 79 7A 7B 7E 7F C0 C1 C2 C3 C4 C5 C6 C7 C8 C9 CA CB CC CD CE CF A8 A9 AA AB AC AD AE AF FF Seg. 7 RCAME1 N00 RCAME1 Nxx RCAME1 N15 Seg. 6 Seg. 5 Seg. 4 Seg. 3 Seg. 2 Seg. 1 Seg. 0 PORCAB1 OUAVAP1 STP1OU SER1I OUNSIM1 N00 N00 N00 N00 N00 PORCAB1 OUAVAP1 STP1OU SER1I OUNSIM1 Nxx Nxx Nxx Nxx Nxx PORCAB1 OUAVAP1 STP1OU SER1I OUNSIM1 N15 N15 N15 N15 N15 TDEMYD - STAR/DELTA (Y/D ) START TIME (0 TO 6 SECONDS [IN 1/10 SEC]) TARMVT - MOVEMENT STOP TIME (0 TO 2,55 S. [IN 1/100 SEC]) TPMPVM - SLOW SPEED MOVEMENT PROLONGATION TIME (0 TO 0,5 SEC. [IN 1/100 SEC]) TYPHYD - TYPE OF HYDRAULIC POWER UNIT RAMDES BASE8N DNH DEMDIR TAQUET DPLX NIVSIN DSERVS TRAUN0 - AUTOMATIC HOMING TIME TO LEVEL 0 (0 TO 15 MINUTS. [IN MINUT]) STPREG DCTQET REGDRAL VERSTF2 P2SFCOU P2SFCFE PMAFCP2 MSTPMP2 AMPSEC2 MSTPRP2 TP02 - REAR DOOR TIME (2 TO 255 SECONDS [IN SECONDS]) TREP2 - REAR DOOR RE-OPEN TIME (1 TO 255 SECONDS [IN SECONDS]) OuAvARCli CABVID SHTCS/ ISOCLI RMLIFT REGUL TPRAL TIRP2 - REAR DOOR RELAY INVERSION TIME (0 A 2,55 S. [IN 1/100 SEC]) TIGPO2 - REAR DOOR INTEGRATOR TIME (1 TO 255 SECONDS [IN SECONDS]) RCAME2 PORCAB2 OUAVAP2 STP2OU SER2I OUNSIM2 N00 N00 N00 N00 N00 N00 RCAME2 PORCAB2 OUAVAP2 STP2OU SER2I OUNSIM2 Nxx Nxx Nxx Nxx Nxx Nxx PORCAB2 OUAVAP2 STP2OU SER2I OUNSIM2 RCAME2 N15 N15 N15 N15 N15 N15 SPG4 SPG3 SPG2 SPG1 SPG4 SPG3 SPG2 SPG1 RF - OVERLOAD BUZZER VSU - OVERLOAD INDICATOR VHS - OUT OF SERVICE INDICATOR GONG - GONG OUTPUT INH1 - DOOR CELL OVER-RIDE OUTPUT VPMP - FIRE SERVICE INDICATOR LU - AUTOMATIC CAR LIGHT DEF N-2 - FAULT CODE 3 DEF N-3 - FAULT CODE 4 SLOW DOWN DISTANCE AS A FUNCTION OF THE OIL TEMPERATURE TEMPERATURE AT WHICH THE DISTANCE C8 IS CHOSEN TEMPERATURE AT WHICH THE DISTANCE C9 IS CHOSEN TEMPERATURE AT WHICH THE DISTANCE CA IS CHOSEN TEMPERATURE AT WHICH THE DISTANCE CB IS CHOSEN TEMPERATURE AT WHICH THE DISTANCE CC IS CHOSEN TEMPERATURE AT WHICH THE DISTANCE CD IS CHOSEN TEMPERATURE AT WHICH THE DISTANCE CE IS CHOSEN TEMPERATURE AT WHICH THE DISTANCE CF IS CHOSEN SLOW DOWN DISTANCE AS A FUNCTION OF THE OIL TEMPERATURE Ã SLOW DOWN DISTANCE (EN %) CHOSEN UNTIL TEMPERATURE C0 Ã SLOW DOWN DISTANCE (EN %) CHOSEN UNTIL TEMPERATURE C1 Ã SLOW DOWN DISTANCE (EN %) CHOSEN UNTIL TEMPERATURE C2 Ã SLOW DOWN DISTANCE (EN %) CHOSEN UNTIL TEMPERATURE C3 Ã SLOW DOWN DISTANCE (EN %) CHOSEN UNTIL TEMPERATURE C4 Ã SLOW DOWN DISTANCE (EN %) CHOSEN UNTIL TEMPERATURE C5 Ã SLOW DOWN DISTANCE (EN %) CHOSEN UNTIL TEMPERATURE C6 Ã SLOW DOWN DISTANCE (EN %) CHOSEN UNTIL TEMPERATURE C7 SLOW DOWN DISTANCE AS A FUNCTION OF THE OIL TEMPERATURE Ä SLOW DOWN DISTANCE (EN %) CHOSEN UNTIL TEMPERATURE C0 Ä SLOW DOWN DISTANCE (EN %) CHOSEN UNTIL TEMPERATURE C1 Ä SLOW DOWN DISTANCE (EN %) CHOSEN UNTIL TEMPERATURE C2 Ä SLOW DOWN DISTANCE (EN %) CHOSEN UNTIL TEMPERATURE C3 Ä SLOW DOWN DISTANCE (EN %) CHOSEN UNTIL TEMPERATURE C4 Ä SLOW DOWN DISTANCE (EN %) CHOSEN UNTIL TEMPERATURE C5 Ä SLOW DOWN DISTANCE (EN %) CHOSEN UNTIL TEMPERATURE C6 Ä SLOW DOWN DISTANCE (EN %) CHOSEN UNTIL TEMPERATURE C7 MINIBLOC CA CB INS POMP NIV 10 8 6 Série 32 Mlift Vector - Prog.Vectorielle Installation manual Chapter VII - page 97 CONTROLLER INPUTS / OUTPUTS TABLE = ON / REC OFF Add 00 01 02 03 04 05 06 07 08 09 0A 0B 0C 0D 0E 0F 10 11 12 Seg. 7 C7 C15 Seg. 6 C6 C14 Seg. 5 C5 C13 Seg. 4 C4 C12 Seg. 3 C3 C11 Seg. 2 C2 C10 Seg. 1 C1 C9 Seg. 0 C0 C8 M7 M15 M6 M14 M5 M13 M4 M12 M3 M11 M2 M10 M1 M9 M0 M8 D7 D15 D6 D14 D5 D13 D4 D12 D3 D11 D2 D10 D1 D9 M0 D8 NF7 NF15 NF6 NF14 NF5 NF13 NF4 NF12 NF3 NF11 NF2 NF10 NF1 NF9 NF0 NF8 ED PH/ MAN/ MTH/ INS/ RP/NHM NS COI1 COI2 EXD STH/ GD RM/RY MHS FCFE1/ FCFE2/ CAB «8» MASS/ RD/R∆ POMP/ FCOU1/ FCOU2/ CAA «6» FE1 OU1 CAM DE MO INH2 VSU QC3 QC11 GM RG/RL SUSD CS1/ CS2/ EXM « 10 » GV/PV or V2(VF) INH1 RF QC2 QC10 FE2 VHS QC1 QC9 OU2 VPMP QC0 QC8 SU RKISO RZONE THV/DNH PRIC FF1 FF2 13 CREP LU/ 14 15 16 17 18 19 1A 1B 1C 1D 1E 1F 20 21 22 23 24 28 61 62 65 V1(VF) DEF QC7 QC15 V0(VF) GONG QC6 QC14 FD QC5 QC13 SH8 FM QC4 QC12 QM7 QM15 QM6 QM14 QM5 QM13 QM4 QM12 QM3 QM11 QM2 QM10 QM1 QM9 QM0 QM8 QD7 QD15 QD6 QD14 QD5 QD13 QD4 QD12 QD3 QD11 QD2 QD10 QD1 QD9 QD0 QD8 POS7 POS15 POS6 POS14 POS5 POS13 POS4 POS12 POS3 POS11 POS2 POS10 POS1 POS9 POS0 POS8 FF V4(H) V3(H) CA CB WEIGHT WEAK - ALTITUDE OF THE CAR WEIGHT STRONG - ALTITUDE OF THE CAR POSLOG - POSITION OF THE CAR CL V2(H) V1(H) ECOTAQ L ∆ IGV TACQ2 T°HUILE - OIL TEMPERATURE MINIBLOC « 10 » «8» INS/ POMP/ NIV/ZDEVR Y TACQ1 «6» Série 32 Mlift Vector - Prog.Vectorielle Installation manual Chapter VII - page 98 FAULT CODES LIST (1/3) Faults displayed by the 32 series. (BG15 board) The letter shown in brackets signifies the type of fault. • (A) Signifies that the fault is permanent and that the power supply needs to be turned off and back on again to RESET. • (B) Signifies that the fault is temporary and that if the cause of the fault disappears, the controller will work again as normal. • (C) Signifies that the fault is temporary, asked for by the technician when programming "provisional fault". (DCOPRO - Ad.07 - Bât.06) • (D) Signifies that the fault can be ignored if the technician so requires. • (*) Signifies that the fault is not registered in the fault list. The fault list on the Series 32 can be found at addresses 00, 01, 7E, 7F (left hand switch in lower position). Address 00 shows the last fault and address 7F the oldest fault. BEFORE LEAVING THE SITE, SET THE FAULT LIST BACK TO 00. IN THIS WAY YOU CAN KEEP BETTER TRACK OF ANY BREAKDOWNS. FAULT N° DESIGNATION -01- 0V CONNECTED TO EARTH. (B) -02- SLOW SPEED TIME EXCEEDED. (A) -03- INSPECTION TIME EXCEEDED. (D) -04- SAFETY LANE CUT BEFORE « 6 ». (B) -05- FAN THERMISTOR (THV). (B) -06- CONTINUAL ABSENCE OF « 10 » WHEN RETURNING TO GROUND. (A) -07- ERROR IN THE PROGRAMMING OF THE SPG1 TO SPG4 OUTPUTS. (A) -08- DEPARTURE DELAY (SUSD). ( B,*) -09- MOTOR THERMISTOR (STH). (B) -10- INVERSION IN THE ROTATION DIRECTION (DETECTED BY THE TAPE HEAD) (A) -11- INCORRECT READING BY THE TAPE HEAD OR PROBLEM WITH FUSES FU3 AND FU4. (A) -12- ONE OF THE CONTACTORS NOT DROPPED ON ARRIVAL. (C) -13- FAST SPEED CONTACTOR NOT DROPPED IN SLOW SPEED (C) -14- SLOW SPEED CONTACTOR NOT ENERGISED WHEN REQUIRED (C) -15- MO OR DE CONTACTOR NOT ENERGISED WHEN REQUIRED OR FU9 OUT OF SERVICE (24R). (C) -16- UP END LIMIT ON TEST (FREV). ( B,*) WARNING : PLEASE TAKE PRECAUTIONS WHEN YOU SEND US YOUR ELECTRONIC BOARDS (USE ANTI-STATIC BAGS) Série 32 Mlift Vector - Prog.Vectorielle Installation manual Chapter VII - page 99 FAULT CODES LIST (2/3) FAULT N° DESIGNATION -17- PHASE FAILURE OR INVERSION (PH). (B) -18- RESET IMPOSSIBLE DUE TO FALSE INFORMATION FROM THE TAPE HEAD. (A) -19- « 8 » HAS BEEN CUT WHILE LIFT IN MOTION. (B) -20- OIL TEMPERATURE CONNECTED. -21- « 10 » MISSING. (B) -22- SLIP INTEGRATOR. (A) -23- « 6 » CUT WHILE LIFT IN MOTION OR SEE BRIDGE 0V, CS FOR NO CAR DOORS. (B) -26- TAPE HEAD FAULT BEAM A. (A) -27- TAPE HEAD FAULT BEAM B. (A) -28- ONE OF THE CONTACTORS NOT DROPPED BEFORE MOTION. (C) -29- FAST SPEED « GV » CONTACTOR NOT ENERGISED WHEN REQUIRED. (C) -30- SLOW SPEED « PV » CONTACTOR NOT DROPPED WHEN FAST SPEED « GV » REQUIRED. (C) -31- OVERLOAD FAULT (SU). ( B,*) -36- MAIN FLOOR IS SET HIGHER THAN HIGHEST LEVEL. (A) -37- MORE THAN 16 LEVELS ARE PROGRAMMED (8 IF SELECTIVE ACCESS). (A) -38- RESET, HOMING, OR OUT OF SERVICE FLOOR IS ABOVE HIGHEST FLOOR. (A) -39- MAINS POWER IS TOO WEAK. (B) -40- MAINS POWER IS TOO STRONG. (B) -41- « 8 » IS CUT, ORIENTATION. DURING (B) -42- ERROR IN THE PROGRAMMING OF THE NUMBER OF DOOR OPERATORS (EXCEED 2). (A) -43- END LIMIT NECESSARY FOR CAR DOOR OPERATOR (A) -44- « 10 » NOT ESTABLISHED FOR OPERATOR 1 OR 2. (B) -46- DOOR 1 OPEN LIMIT NOT REACHED. (C) -47- DOOR 2 OPEN LIMIT NOT REACHED. (C) -48- DOOR 1 CLOSE LIMIT NOT REACHED. (C) -49- DOOR 2 CLOSE LIMIT NOT REACHED (C) -50- OUT OF SERVICE MODE (MHS). ( B,*) -51- GOODS CONTROL MODE (PRIC). ( B,*) -52- « 10 » CUT WHILE IN MOTION. (B) -53- FIRE SERVICE MODE (POM). ( B,*) -54- NON STOP OR FULL MODE (NS). ( B,*) -55- « ISO » RELEVELLING CONTACTOR NOT DROPPED. (A) EXCEEDS AUTOMATIC 100°C DOOR IS OR GAUGE CLOSED NOT (B) WARNING : PLEASE TAKE PRECAUTIONS WHEN YOU SEND US YOUR ELECTRONIC BOARDS (USE ANTI-STATIC BAGS) Série 32 Mlift Vector - Prog.Vectorielle Installation manual Chapter VII - page 100 FAULT CODES LIST (3/3) FAULT N° DESIGNATION -56- « ISO » RELEVELLING REQUIRED. CONTACTOR NOT ENERGISED WHEN (B) -57- LIFT HAS GONE PAST RELEVELLING ZONE DURING RELEVELLING MOVEMENT. (A) -58- MORE THAN 6 RELEVELLING MOVEMENTS. (B) -59- RELEVELLING MOVEMENT EXCEEDS RELEVELLING TIME. (A) -60- MAXIMUM PROGRAMMED HEIGHT IS TOO HIGH. (A) -61- ERROR IN THE FLOOR PROGRAMMING. (A) -62- FAULT WITH THE O03 TAPE HEAD. (A) -63- CAR IS AT THE TOP AND THE BOTTOM AT THE SAME TIME, OR O03 TAPE HEAD NOT POWERED. (A) -64- CAR INSPECTION AND MACHINE ROOM INSPECTION SWITCHED ON AT THE SAME TIME. (B) -65- PERMANENT FAULT ON THE VF. CHECK THE FAULT CODE ON THE MLIFT. -66- TEMPORARY FAULT CODE ON THE VF. CHECK THE FAULT CODE ON THE MLIFT. -69- MOVEMENTS AFTER SAFETY LANE LIMITS HAVE BEEN CUT. (A) -70- ANTI-CREEP NOT DROPPED WHEN REQUIRED. (A) -71- ANTI-CREEP DROPPED WHILE CAR IN MOTION. (B) -72- ANTI-CREEP NOT DROPPED WHEN CAR AT REST. (A) -73- OIL LEVEL FAULT. (A) -74- MINIMUM OIL LEVEL. (A) -75- STAR CONTACTOR NOT ENERGISED WHEN REQUIRED. (C) -76- DELTA CONTACTOR NOT ENERGISED WHEN REQUIRED. (C) -77- LIGNE CONTACTOR NOT ENERGISED WHEN REQUIRED. (C) -78- STAR OR DELTA CONTACTOR NOT DROPPED. (C) -79- OIL TEMPERATURE TOO HIGH. (C) WARNING: PLEASE TAKE PRECAUTIONS WHEN YOU SEND US YOUR ELECTRONIC BOARDS (USE ANTI-STATIC BAGS) Série 32 Mlift Vector - Prog.Vectorielle Installation manual Chapter VII - page 101 PARAMETERS CONCERNED THE SLOTTED TAPE ZONEPV = SLOW SPEED ZONE ZDEVER = DOWN DOOR UNLOCKING ZONE ZONARD = DOWN STOPPING ZONE STOPPING POINT LEVEL L ZONARM = UP STOPPING ZONE ZDEVER = UP DOOR UNLOCKING ZONE ZONEPV = SLOW SPEED ZONE Name Designation Address ZDEVER DOOR UNLOCKING ZONE ............................................... d4 and d5 ZONARM UP STOPPING ZONE ....................................................... d2 ZONARD DOWN STOPPING ZONE ................................................. d3 ZONYST HYSTERISIS ZONE ........................................................... b6 Parameters linked to the relevelling TPISO RELEVELLING TIMING 19 BNDISO RELEVELLING JUMP ....................................................... bC ZONARI RELEVELLING STOPPING ZONE .................................... d7 Parameters linked to the slow-down distance DMINV2 MINIMUM DISTANCE FOR V2........................................... d8 and d9 ZONPV1 SLOW SPEED ZONE 1 = V1 SLOW DOWN DISTANCE .. dA and db ZONPV2 SLOW SPEED ZONE 2 = V2 SLOW DOWN DISTANCE .. d0 and d1 Parameters linked to the floor heights ALTNIV00 to ALTNIV11 … ALTNIV15 Floor Height Level 00 ....................................................... to Floor Height Level 11 (Alpha Serie) ..................................... … Floor Height Level 15 (32 Serie).......................................... 81 and 80 to 8F and 8E … 9F and 9E automatic set-up of levels For the floor heights All of the information shown in the above table is shown in millimetres and in decimal, except the floor heights. When the information is given over 2 addresses, the first address shows the thousands and hundreds, and the second shows the tens and units. Example: For a slow-down distance (or slow speed zone) of 800 mm (80 cm), you will read 08 at address d0, and 00 at address d1, i.e. 0800 millimetres. Série 32 Mlift Vector - Prog.Vectorielle Installation manual Chapter VII - Page 102 ELECTRIC DIAGRAMS (1/5) L3 Fuse : 380 V dim: 6 X 32 L2 6A 6A LA 32 TB 191 4A 4A 2A 2A GE 32 L1 L1P L2P L3P PE N°2 8 kW / 11 HP / 20 A PE L1 L2 L3 L3 L2 L1 PE N BG22 L3P L2P KT1 L1P PE GE32 LA32 Terminals VF SIDE L1P A L2 P D C RPH H C PH 0V BH08 Phasefail detector Board MODEL 2 G 3 PHASE NETWORK CURRENT FILTER PE N L1 L2 L3 PE L1' L2' L3' 400 0 6 4 2 5 3 1 L 220 (0051) KT3 Main Board BG15 K62 KT2 +24 KC22 12 18 VAC VAC J1 ~ VEC07 - ~ ~ +19 CURRENT MEASURING DEVICE SUPPLY 12 VAC + PROTISTOR FU+ * -19 - + KT2 CAB KM12 MAN BRAKE POWER SUPPLY 48 VDC / 180 VDC KC23 INS A RS 3 4 2 18 +550VF K5 K10 0VF 8 10 MO 0V ST SAFETY LANE DISCONNECTION SWITCH VEC05 X2 CURRENT MEASURING DEVICE K8 HEAD DISSIPATOR TEMPERATURE SONDE VEC05 Y2 6 8 SAFETY LANE DOOR CLOSED CONTACT T3 A2 A2 BR ~ RC VENT 22 FR S ~ COM3 A1 To isolating terminal block RS 54 L 21 COM2 RC A1 S Parameter/ diagnostic tool A2 L ~ RC A1 53 L S 10 COM1 K14 K15 BR 7 5 4 2 3 1 - + BR BRAKE POWER SUPPLY TR 0VMAN K4 INS MAN vent fr l s KC22(Bottom) RR CAB CAA +24 +24 RED S DE K30 Z1 +BR MO K12 Z2 VEC05 CAB CAA DOOR LOCKED CONTACT VEC05 A 6 +24 CAB CAA 0V 10 14 point flat cable Y1 8 KC22 0V +24 O03 TAPE-HEAD VENT VEC05 SCREENED CABLE RS FuVE 500mA Motor current measuring device X1 T2 -BR DE K1 K9 RECUP VEC05 L K28 CASING EARTH 0 VEC05 T1 CV VEC14 VEC01 CR 3 PHASE MOTOR CURRENT FILTER 12 VAC SUPPLY 1S 1S 18 K1 0 EARTH CONNECTION WITH A METAL SPACER BRAKE K30 6 Isolating terminal blocks S 1 M 3~ 0V CAA K30 0V CAI CBI GREEN BLACK WHITE RR = Regenerative Resistors 61 INCREMENTAL ENCODER CCL 0V CCS 61 S L 62 62 Série 32 Mlift Vector - Prog.Vectorielle Installation manual Chapter VII - Page 103 ELECTRIC DIAGRAMS (2/5) N°3 L3 Fuse : 380 V dim: 6 X 32 L2 L1 L1P L2P L3P PE 32 GE 32 LATB 191 6A 4A 6A 4A 2A 2A 12 kW / 16,5 HP / 30 A PE L1 L2 L3 L3 L2 L1 PE N N°4 BG22 L3P L2P KT1 L1P PE GE32 LA32 Terminals VF SIDE L1P A L2 P D C BH08 15,5 kW / 21 HP / 40 A Phasefail detector Board RPH H C PH 0V MODELS 3 / 4 G 3 PHASE NETWORK CURRENT FILTER PE N L1 L2 L3 PE L1' L2' L3' 400 0 6 4 2 5 3 1 L 220 (0051) KT3 Main Board BG15 K62 KT2 +24 KC22 12 18 VAC VAC J1 ~ VEC07 - ~ ~ CURRENT MEASURING DEVICE SUPPLY 12 VAC + PROTISTOR FU+ -19 - + KT2 KM12 MAN * KC23 INS A RS 1S 18 K1 0 18 +550VF EARTH CONNECTION WITH A METAL SPACER K5 K10 0VF 3 PHASE MOTOR CURRENT FILTER VEC05 0V ST 10 MO X2 K8 HEAD DISSIPATOR TEMPERATURE SONDE VEC05 Y2 6 8 DOOR CLOSED CONTACT A2 A2 BR ~ RC 22 VENT Parameter/ diagnostic tool FR S ~ COM3 A1 To isolating terminal block RS 54 L 21 VENT COM2 RC A1 53 L S 10 COM1 K14 K15 BR 7 5 4 2 3 1 - + RR BR BRAKE POWER SUPPLY TR RR = Regenerative Resistors CAB CAA 0VMAN K4 +24 INS MAN vent fr l +24 RED S DE K30 s KC22(Bottom) +BR MO K12 Z2 VEC05 CAB CAA A2 L ~ RC A1 Z1 6 +24 CAB CAA 0V DOOR LOCKED CONTACT VEC05 T3 A 8 KC22 10 14 point flat cable Y1 -BR DE 0V +24 O03 TAPE-HEAD SAFETY LANE S VEC05 SCREENED CABLE RS FuVE 500mA Motor current measuring device X1 T2 L K28 K1 K9 VEC05 12 VAC SUPPLY 8 CASING EARTH SAFETY LANE DISCONNECTION SWITCH VEC05 CURRENT MEASURING DEVICE CV 0 RECUP T1 1S VEC14 VEC01 CR BRAKE K30 6 Isolating terminal blocks S 1 M 3~ CAB BRAKE POWER SUPPLY 48 VDC / 180 VDC 3 4 2 0V CAA +19 K30 0V CAI CBI GREEN BLACK WHITE 61 INCREMENTAL ENCODER CCL 0V CCS 61 S L 62 62 Série 32 Mlift Vector - Prog.Vectorielle Installation manual Chapter VII - Page 104 ELECTRIC DIAGRAMS (3/5) L3 Fuse : 380 V dim: 6 X 32 L2 GE 32 L1 PE L1 L2 L3 L3 L2 L1 PE N 6A 6A 2A L1P L2P L3P PE N°5 LA 32 TB 191 4A 4A 2A 20,6 kW / 28 HP / 50 A BG22 L3P L2P KT1 L1P PE GE32 LA32 Terminals VF SIDE L1P A L2 P D C BH08 Phasefail detector Board RPH H C PH 0V MODEL 5 G 3 PHASE NETWORK CURRENT FILTER PE N L1 L2 L3 PE L1' L2' L3' 400 0 6 4 2 5 3 1 L 220 (0051) KT3 Main Board BG15 K62 KT2 +24 KC22 12 18 VAC VAC J1 ~ VEC07 - ~ ~ +19 CURRENT MEASURING DEVICE SUPPLY 12 VAC + PROTISTOR FU+ * -19 - + KT2 CAB KM12 MAN BRAKE POWER SUPPLY 48 VDC / 180 VDC KC23 INS A RS 3 4 2 18 +550VF K5 K10 0VF 8 10 MO 0V ST SAFETY LANE DISCONNECTION SWITCH VEC05 X2 CURRENT MEASURING DEVICE K8 HEAD DISSIPATOR TEMPERATURE SONDE VEC05 Y2 6 8 SAFETY LANE DOOR CLOSED CONTACT T3 A2 A2 BR ~ RC VENT 22 FR S ~ COM3 A1 To isolating terminal block RS 54 L 21 COM2 RC A1 S Parameter/ diagnostic tool A2 L ~ RC A1 53 L S 10 COM1 K14 K15 BR 7 5 4 2 3 1 BR TR RR = Regenerative Resistors vent fr l s K30 0V CAI CBI GREEN BLACK WHITE + BRAKE POWER SUPPLY 61 S INCREMENTAL ENCODER CCL 0V CCS 62 - 0VMAN K4 INS MAN KC22(Bottom) RR CAB CAA +24 +24 RED S DE K30 Z1 +BR MO K12 Z2 VEC05 CAB CAA DOOR LOCKED CONTACT VEC05 A 6 +24 CAB CAA 0V 10 14 point flat cable Y1 8 KC22 0V +24 O03 TAPE-HEAD VENT VEC05 SCREENED CABLE RS FuVE 500mA Motor current measuring device X1 T2 -BR DE K1 K9 RECUP VEC05 L K28 CASING EARTH 0 VEC05 T1 CV VEC14 VEC01 CR 3 PHASE MOTOR CURRENT FILTER 12 VAC SUPPLY 1S 1S 18 K1 0 EARTH CONNECTION WITH A METAL SPACER BRAKE K30 6 Isolating terminal blocks S 1 M 3~ 0V CAA 61 L 62 Série 32 Mlift Vector - Prog.Vectorielle Installation manual ELECTRIC DIAGRAMS (4/5) L3 Fuse : 380 V dim: 6 X 32 L2 L1P L2P L3P PE N°6 LA 32 TB 191 4A 4A 2A GE 32 L1 6A 6A 2A 25 kW / 34 HP / 70 A PE L1 L2 L3 L3 L2 L1 PE N Chapter VII - Page 105 BG22 L3P L2P KT1 L1P PE GE32 LA32 Terminals VF SIDE L1P A L2 P D C BH08 Phasefail detector Board RPH H C PH 0V MODEL 6 G 3 PHASE NETWORK CURRENT FILTER PE N L1 L2 L3 PE L1' L2' L3' 400 0 6 4 2 5 3 1 L 220 (0051) KT3 Main Board BG15 K62 KT2 +24 0V KC22 12 18 VAC VAC J1 ~ VEC07 - ~ ~ +19 CURRENT MEASURING DEVICE SUPPLY 12 VAC + PROTISTOR FU+ * -19 - + CAA KT2 CAB KM12 MAN BRAKE POWER SUPPLY 48 VDC / 180 VDC KC23 INS A RS 3 4 2 18 +550VF K5 K10 0VF 3 PHASE MOTOR CURRENT FILTER 10 MO 0V ST SAFETY LANE DISCONNECTION SWITCH VEC05 X2 X1 CURRENT MEASURING DEVICE VEC05 T2 Y2 K8 HEAD DISSIPATOR TEMPERATURE SONDE SCREENED CABLE RS 6 8 SAFETY LANE T3 A2 A2 BR ~ RC Motor current measuring device 22 FR COM3 A1 To isolating terminal block RS L 21 COM2 S ~ 54 S VENT RC A1 VENT Parameter/ diagnostic tool A2 L ~ RC A1 53 L S 10 COM1 K14 K15 BR 7 5 4 2 3 1 - + BR BRAKE POWER SUPPLY TR RR = Regenerative Resistors 0VMAN K4 INS MAN vent fr l s KC22(Bottom) RR CAB CAA +24 +24 RED S DE K30 Z1 +BR MO K12 Z2 VEC05 CAB CAA DOOR LOCKED CONTACT DOOR CLOSED CONTACT VEC05 A 6 +24 CAB CAA 0V 10 14 point flat cable Y1 8 KC22 0V +24 O03 TAPE-HEAD FuVE 500mA VEC05 -BR DE K1 K9 RECUP VEC05 L K28 CASING EARTH 0 VEC05 T1 CV VEC14 VEC01 CR 12 VAC SUPPLY 1S 1S 18 K1 0 EARTH CONNECTION WITH A METAL SPACER BRAKE 8 Isolating terminal blocks S 1 M 3~ K30 6 K30 0V CAI CBI GREEN BLACK WHITE 61 INCREMENTAL ENCODER CCL 0V CCS 61 S L 62 62 Série 32 Mlift Vector - Prog.Vectorielle Installation manual Chapter VII - Page 106 ELECTRIC DIAGRAMS (5/5) L3 Fuse : 380 V dim: 6 X 32 L2 6A 6A 2A L1P L2P L3P PE N°7 LA 32 TB 191 4A 4A 2A GE 32 L1 34,6 kW / 47 HP / 81 A PE L1 L2 L3 L3 L2 L1 PE N BG22 L3P L2P KT1 L1P PE GE32 LA32 Terminals VF SIDE L1P A L2 P D C BH08 Phasefail detector Board RPH H C PH 0V MODEL 7 G 3 PHASE NETWORK CURRENT FILTER PE N L1 L2 L3 PE L1' L2' L3' 400 0 6 4 2 5 3 1 L 220 (0051) KT3 Main Board BG15 K62 KT2 +24 0V KC22 12 18 VAC VAC J1 ~ VEC07 ~ ~ - +19 CURRENT MEASURING DEVICE SUPPLY 12 VAC + * -19 - + CAA KT2 CAB KM12 MAN BRAKE POWER SUPPLY 48 VDC / 180 VDC KC23 INS A PROTISTOR FU+ RS 3 4 2 6 x 2200µF 18 +550VF K5 K10 0VF VEC14 0V ST VEC05 SAFETY LANE DISCONNECTION SWITCH VEC05 T1 X2 K8 VEC05 CURRENT MEASURING DEVICE VEC05 T2 HEAD DISSIPATOR TEMPERATURE SONDE Y2 -BR BR 6 7 5 4 2 3 1 T3 - + BRAKE POWER SUPPLY DE KC22 +24 CAB CAA 0V VEC05 3 DOOR CLOSED CONTACT A2 DOOR LOCKED CONTACT A2 BR ~ RC VENT 22 FR S ~ COM3 A1 To isolating terminal block RS 54 L 21 COM2 RC A1 S Parameter/ diagnostic tool A2 L ~ RC A1 53 L S 10 COM1 K14 K15 DE CAB CAA 0VMAN K4 +24 INS MAN vent fr l s Z1 KC22(Bottom) RR MO K12 K30 +24 RED TR CAB CAA 0V +24 O03 TAPE-HEAD SAFETY LANE Z2 2 S BR K28 10 VEC05 +BR 8 8 14 point flat cable Y1 L 6 VENT VEC05 SCREENED CABLE RS FuVE 500mA Motor current measuring device X1 A MO K1 K9 RECUP 12 VAC SUPPLY 10 CASING EARTH 0 VEC01 CR 3 PHASE MOTOR CURRENT FILTER CV 1S 1S 18 K1 0 EARTH CONNECTION WITH A METAL SPACER BRAKE 8 Isolating terminal blocks S 1 M 3~ K30 6 K30 0V CAI CBI GREEN BLACK WHITE RR = Regenerative Resistors in separte cabinet 61 1 INCREMENTAL ENCODER CCL 0V CCS 61 S L 62 62 Série 32 Mlift Vector - Prog.Vectorielle Installation manual Chapter VII - Page 107 THREE PHASES OR SINGLE PHASE DOOR OPERATOR, FRONT AND REAR DOORS L3 L2 L1 L3PA 2A L2PA 2A L1PA 2A N N PE Earth L3 L3PA L2 L1 BG15 Main board BG19 Board 2A L2PA 2A L1PA 2A N N PE Earth 2°nd automatic door board 1 3 5 1 3 1 5 OU1 2 4 6 2 4 3 5 1 3 5 OU1 FE1 FE1 2 6 4 6 2 4 1 3 5 1 3 5 2 4 6 2 4 6 OU2 6 FE2 KA15 KA14 UT1 VT1 WT1 UT1 VT1 WT1 P253MV RC+ECRETEUR 430V maxi. U1 V1 FROM COM4 Connector (KA15) BG19 board P253MV RC+ECRETEUR 430V maxi. OU1 W1 3 PHASE FRONT DOOR MOTOR M1 3~ UT2 VT2 WT2 TO COM3 Connector (KA14) BG15 Main board 1S FE1 OU2 FE2 U1 ISOLATING TERMINAL BLOCKS RS V1 P253MV RC+ECRETEUR 430V maxi. W1 U2 PH1 L6 PH2 L5 M2 3~ FRONT DOOR REAR DOOR L4PA 2A L6PA 2A 48VDC INJECTION FOR AUTOMATIC DOOR L5PA 2A 1 3 5 1 3 5 2 4 6 2 4 6 OU1 POWER INJECTION FE1 FU "INJ" 1.6 A Phase displacement Capacitor A SINGLE-PHASE FRONT DOOR MOTOR A = Auxiliairy P = Principal P 6 1 3 8 P251 FE2 FE1 UT1 VT1 WT1 FRONT DOOR REAR DOOR OU2 OU1 -RD IO1 IR1 W2 M1 3~ CASING EARTH L4 V2 IF1 IO2 WIRING FOR CLIENTS IR2 IF2 Série 32 Mlift Vector - Prog.Vectorielle Installation manual Chapter VII - Page 108 TRACTION MOTOR FAN TRIPHASE SUPPLY SINGLE PHASE SUPPLY MAIN BOARD Lift Command 0V 1 3 5 2 4 6 VENT + RTH (optional) 1 3 5 2 4 6 95 96 THV K62 THV 98 THV 97 CLIENT WIRING THV1 THV2 THV1 THV2 THV3 VENT U V M 1~ U2 V2 W2 OR TRACTION MOTOR FAN SINGLE OR TRIPHASE M2 3~ RS CASING EARTH TCV θ 1S FAN THERMO-CONTACT