1
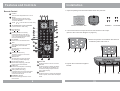
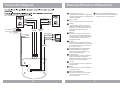
9.2 TFT-LCD DVD COMBO MONITOR
OWNER S MANUAL
Contents
Caution
4
Features and Controls
Monitor/DVD Player
Remote Control
6
6
8
Power and Mode Selection
Releasing The Monitor
Turning on The Monitor
Mute Function
10
10
10
10
Selecting an AV mode
11
Picture Control
Contrast/Brightness/Color
12
12
13
13
14
14
14
14
15
15
15
DVD Setup
Setup Menu
General Setup
TV Aspect Ratio
Angle Viewing
OSD Language
Captions
Screen Saver
Last Position memory
Audio Setup
Dolby Digital Setup
Equalizer Settings
Video Setup
Quality
Preferences Setup
TV Type
PBC
Audio
Subtitle
Disc Menu
Parental
Country Region
Default
Password Setup
Password Mode
Password Change
DVD Functions
Eject
Vol+/Vol-
15
16
16
18
18
21
21
21
21
21
22
22
22
22
23
23
23
24
24
24
3
Mute
Play or Pause
Audio
Stop
Arrows
Setup
Menu
Display
Number Buttons
Subtitle
Title
Slow
Fast Reverse Searching
Fast Forward Searching
Previous
Next
Repeat A-B
Repeat
NTSC/PAL
Angle
PBC
Zoom
Go To
24
24
24
25
25
25
25
26
26
27
27
27
28
28
29
29
Connection Diagram
32
Installation
33
Disc Information
34
Troubleshooting
35
Specifications
36
29
30
30
30
31
31
31
Caution
Please read and observe all warnings and instructions in this manual
and those marked on the unit. Retain this booklet for future reference.
There are two kinds of alarm symbols as follows:
The lightning bolt with arrowhead inside in an equilateral
triangle is intended to alert the user to the presence of
,
dangerous voltage within the product s enclosure that may be
of sufficient magnitude to constitute a risk of electric shock to
WARNING people.
CAUTION
The exclamation point inside an equilateral triangle is intended
to alert the user to the presence of important operating and
maintenance (servicing) instructions in the literature accompanying
the product.
WARNING
P OWER
AV
MEN U
Do not mount the product where
it will obstruct the deployment of
the airbag or in an area where it
would affect the driver s ability
to control the vehicle. Also be
careful to avoid mounting the
product where it can become
hazardous during sudden stops
or in the event of an accident.
Installation of all TV monitors
¬
must be out of the driver ,s
field of vision.
Do not try and service these
products yourself, locale a
qualified service center or
factory service center for all
repairs.
Use extra caution with any liquids
in your car. If you or your child
spills any liquid on these products,
pull your vehicle to the roadside
and turn the key off to disconnect
or wipe the products with a towel. Do not
operate the equipment until all liquids have
either evaporated or you have had the monitor
inspected at a service center by a qualified
technician. Severe harm or danger can result.
Be careful not to drop or
apply under pressure to the
front panel of your video
monitor. If the screen cracks
due to misuse, your warranty
will be void!
Use only a damp cloth to clean
the screen and use only purified
water on the cloth. wring out all
excess water prior to wiping the
screen. Do not use any cleaners
or chemicals to clean the screen.
In most cases a dry cloth will do!
Be careful not to overload your
cigarette lighter plug by adding
more than one device at a time.
4
SPECIFICATIONS
Caution
CAUTION
Power
DC 12V
Screen Format
16:9
Resolution Pixel
1024
11 5 2 xx2600
34
Color System
N T S C / PA L A u t o S e l e c t
A/V Input
D V D - AV 1 - AV 2
A/V Output
1 EA
Dimension
12.1(L)X10.8(W)X2.3(H)inch
Watching the monitor for an
extended period of time
without the engine running
may deplete the vehicle s
battery charge.
Quality installations are best
performed by qualified and
certified installers.
This product is designed for
operation with a 12 Volt DC,
negative ground vehicle. It
is not suitable for operation
under other conditions or
voltages.
Don t touch the unit if there is
a flash of lightning. You may
receive an electric shock.
Note: This equipment has been tested and has been found to comply
with the limits for a Class A digital device, pursuant to part 15 of the
FCC Rules. These limits are designed to provide reasonable protection
against harmful interference when the equipment is operated in a
commercial environment. This equipment generates, uses, and can
radiate radio frequency energy and, if not installed and used in
accordance with the instruction manual, may cause harmful interference
to radio communications. Operation of this equipment in a residential
area is likely to cause harmful interference. In some cases, the user will
be required to correct the interference at his own expense.
Do not cover or stop up heater
ducts or vents. It may cause a
fire or receive an electric shock.
Do not bring magnetic devices
such as credit card or magnetic
card near the magnets.
Operating Notes
1. The operating temperature of this product is limited to 14 ~+140 F.
2. If your vehicle is extremely hot or cold you must allow time for your air
conditioner or heater to cool or heat the vehicle until operating temperatures
have returned to normal operating ranges.
3. Optimal picture quality is achieved when viewed from directly front of the
monitor (+/-30degrees).
4. Do not open the housing and attempt to make any repairs yourself. Refer
servicing to qualified personnel.
5. DVD Players use an invisible laser beam which can cause hazardous radiation
exposure. Be sure to operate the unit correctly as instructed.
6. Do not cut the car power supply off while a disc is playing. It can cause
damage to the DVD Player.
36
5
Monitor / Player System Components
Troubleshooting
Symptom
Items to Check
Actions to be Taken
Buttons do not work.
Is the power turned on?
Check the car battery capacity.
No sound
Is the audio which is connected with
the audio cable set to receive
the DVD signal output?
Is audio cable is connected securely?
Is the monitor which is connected
with the audio cable turned on?
Is the digital audio output set
in the correct position?
Select the correct input mode for the audio receiver.
Connect the audio cable into the jacks securely.
Turn on the monitor connected with the audio cable.
Set the Digital Audio Output to the correct position,
and then turn on the DVD player again by pressing
the POWER button.
Remote control does
not work properly.
Is the remote control facing
the remote sensor?
Is the distance too far?
Is there any obstacle in the middle?
Is the battery weak?
Point the remote control toward the remote sensor of
the product.
Use the remote control within 15 feet.
Remove the obstacle.
Replace with new battery.
Unable to receive TV
broadcast.
Is the antenna connected properly?
Remote Control
Check antenna connection.
Moisture or condensation on lens
Monitor/DVD Player
When a disc is brought from a cold environment to a warm one, there may be moisture
on the the disc, or condensation on the pickup lens. It will affect disc playback.
1. Remove the disc from the DVD player.
2. Turn on the power and leave it on for an hour to vaporize the condensation.
Wireless Headphones
Not included
6
35
Features And Controls
Disc Information
DVD features
MENU Button
DVD discs provide high-resolution images with high-quality sound and surround
sound effects. This DVD player can play not only DVD discs of various versions, but
also S-VCD, VCD, audio CD and MP3 discs.
POWER Button
PLAY/PAUSE Button
Discs that cannot be played
DVD-RW, DVD-REM, CD-ROM, CD-EXTRA discs cannot be played on this unit. In
addition, a CD or a CD-RW which was recorded on special software cannot be played.
Region code
Your DVD player is designed and manufactured to region management information
that is recorded on a DVD disc. Please check the region code.
1: North America
2: Japan
3: Korea and Southeast Asia
4: Australia, Mid & South America
5: Russia
6: China
Dome Light Button
+/- Buttons
AV Select Button
Copyright protection
This product incorporates copyright protection technology that is protected by
methods claims of certain U.S. Patents and other intellectual property rights owned
by the Macrovision Corporation and other rights. Owner s use of this copyright
protection technology must be authorized by the Macrovision Corporation, and is
intended for home and other limited viewing uses only unless otherwise authorized
by the Macrovision Corporation.
EJECT Button
How to handle the disc
Don t touch the shiny side of the disc (the side with the embedded information).
Don t stick a label or a glue-based note on either side of the disc.
Don t use discs that have glue or a damaged label with exposed adhesive reside.
It might result in damage to your DVD player.
Don t put discs in the sunshine.
Park your car in the shade.
AUX Input Jack
How to handle the discs
Only use round discs. Discs with other shapes like a star, a heat, etc. may cause
damage to the player.If a disc is dirty, wipe softly with a wet cloth and then with a dry
one. Before playback, wipe the disc outward from the center with a clean cloth. Do not
use any type of solvent such as thinner, benzene, commercially available cleaners or
antistatic spray. To avoid damaging your DVD player, don t use a scratched disc.
.X... Caution
Do not bring magnetic devices
such as credit cards or magnetic
cards near the monitor.
34
7
Disc loading slot
Installation
Features and Controls
Remote Control
1. Open the package and check that these items are presents.
2
POWER
Turns the DVD Player/Monitor on or off.
MUTE
Press this button to switch off the
audio during playback. Press again
to restore the audio.
3
Auto
1
TV
(not function in this unit)
UP/DOWN/RIGHT/LEFT ARROWS
(not function in this unit)
UNIT
INSTALLATION PLATE
SCREW A
SCREW B
A/V SELECT
DVD AV1 AV2
2. Connect the external compoments to the RCA cable or AV output.
(Refer to the connection diagram on page 32)
MENU (OSD on monitor)
Press this button to open the onscreen menu system to setup and
control various parameters of the
monitor and DVD player.
UP/DOWN
Use to move to the desired menu.
3.Match the position of installation bracket and
installation plate with screw A.
P/N
This button permits you to choose
among Multi, PAL and NTSC.
MODE
Use this button to switch between
three modes
DVD SD USB
MENU (DVD menu)
This button permits you to view the
menu on the DVD.
SUBTITLE
Use this button to select the menu
for choosing a subtitle language.
TITLE (Title menu)
When a DVD is playing, press this
button to view the Title Menu.
DISPLAY
Press to show elapsed or remaining
time of a chapter or a title.
PBC (Video CD only)
Press this button to access the special
Playback Control functions for VCD
2.0 format Video CD S.
NUMERIC button
Use when making a selection on the
menu screen.
8
RETURN
Press this button to return root menu.
SETUP
Press this button to display the Setup
menu. The Setup menu enables you
to enter the settings required for the
unit to work properly.
4. Tighten the unit with the supplied
screw B.
REPEAT
Press this button to change the playback
mode to repeat, and to select the repeat
mode.
33
Connection Diagram
Red AUDIO(R)
GAME
White AUDIO(L)
Yellow VIDEO
Name And Function Of Each Part
White AUDIO(L)
GAME
VOL-/+ button
Use to incease or decrease volume level.
Red AUDIO(R)
Yellow VIDEO
CAMCORDER
Chassis Ground
ACC
RED
AV Input
(AV 2)
BLACK
AUDIO
Use this button to select one of the
audio soundtracks programmed on a
DVD disc. It is alse used to select the
audio output mode for the DVD
playback.
CAMCORDER
+ 12 V DC Battery
FAST FORWARD/REVERSE PLAY
Use these buttons to select either fast
forward or fast reverse playback.
A-B (repeat from A to B)
Use this button to select the beginning
and end of a track which you wish to have
repeat in playback.
AV Input
(AV 1)
YELLOW
White AUDIO(L)
Car dome lamp (-)
GREEN
Red AUDIO(R)
WHITE
Car dome lamp (+)
Yellow VIDEO
AMP
MONITOR
POWER
AV
Output
AV
MENU
VOL-
VOL+
ENTER
Press this button to confirm the item
you have found and highlighted using
the arrow buttons. Usually this is done
to confirm a selection or item to be
played on the DVD.
ZOOM
If your DVD disc supports zooming in
to see the program differently, pressing
this button will enable you to change
the amount of zoom.
UP/DOWN/RIGHT/LEFT ARROWS
Use thes buttons to navigate the
various menus and screens for the
monitor and DVD systems.
PLAY/PAUSE
To start playback of a disc, press this
button. Press again to pause the
playback. If playback is paused, press
this button to resume playback.
GO TO
Use to search for a title or a chapter on
your DVD disc.
STOP
Press this button to stop the playback
of the current disc.
SKIP FORWARD/BACK
Use these buttons to skip to the next
or last track, chapter or file on the
disc in the player.
32
9
Power And Mode Selection
DVD Functions
PBC
Releasing The Monitor
[DVD]/[AUDIO]/[MP3]
Push the release button (located on the front edge of the screen housing) and
l o w e r t h e m o n i t o r. Yo u c a n a l s o a d j u s t t h e s w i v e l a n g l e .
This button does not function in PBC mode.
[VCD]
You can turn the PBC (Play Back Control) function on or off by pressing this button.
When PBC is loaded, the PBC function is enabled automatically. This function is
similar to selection of DVD title. Please note that this function does not work with
MP3 dics.
RELEASE BUTTON
Make this arrow in DOWN
direction only.
Zoom
[DVD]
OSD
2X
Some DVDs are programmed to allow you to zoom into
the image, magnifying it. Pressing the ZOOM button
does this in steps, according to the chart to the right.
Turning on The Monitor
1. Connect the monitor to external devices.
[VCD]/[AUDIO]/[MP3]
CONDITION
3X
ZOOM X 2
ZOOM X 3
4X
1/2
ZOOM X 4
ZOOM X 1 / 2
1/3
ZOOM X 1 / 3
1/4
ZOOM X 1 / 4
This button does not function in this mode.
2. Press the POWER button on either the remote control or the unit once to turn
the power on.
Press the same POWER button to turn the power off.
POWER
Off
GO TO
The GO TO function allows you to begin playback at a specific location on the disc. To
do this, press GO TO and navigate the screen which follows to select this playback
location.
Title
Move to the desired title.
POWER
Chapter
UNIT
REMOTE CONTROLLER
3.Power on the external devices and play.
Move to the desired chapter.
Audio
Selects the desired audio output.
Subtitle
Mute Function
Menu
Title
Chapter
Audio
Subtitle
Select the desired subtitle.
1. Press the MUTE button on the remote control to mute the audio.
2. Press the MUTE button again on the remote control to return to the
previous volume level.
Angle
Watch the different view angle.
TT Time
Bitrate 31
Total time.
CH Time
Chapter time.
Repeat
Sets the repeat play.
Time Display
Watch play time.
10
31
01 / 02
06 / 61
5.1CH Chinese
OFF
Title Elapsed 0:20:02
Power and Mode Selection
DVD Functions
Selecting an AV mode
Repeat
1. Turn the power ON on the unit and on the external devices.
[DVD]
[AUDIO]
Pressing REPEAT button changes
the play mode as follows:
Pressing REPEAT button changes
the play mode as follows:
OSD
Chapter
Title
All
CONDITION
OSD
CONDITION
Repeat chapter
Track
Repeat single
Repeat title
All
All
2. Select the DVD, AV1 or AV2 mode by pressing the AV Select button on the unit
or on the remote control.
3. Play the external device.
Repeat off
All
Repeat off
[VCD]
[MP3]
The REPEAT button does not function
when a VCD disc is being played.
Pressing REPEAT button changes
the play mode as follows:
OSD
CONDITION
Repeat One
Single
Repeat Folder
Repeat folder
Folder
Repeat folder one time
Shuffle
All
Random
Random play
Single
Single play
NTSC/PAL
This button is used to select the video standard for the DVD mode between NTSC
and PAL formats.
Angle
Some DVD s are recorded with additional footage which allows you to view a scene
from a different camera angle. If the ANGLE feature is enabled in the Setup Menu
(see page 14) and the disc has this option,an angle mark will be displayed on
the screen. When that occurs, press the ANGLE button to see these alternate viewing
angles.
30
11
Picture Control
DVD Functions
Contrast/Brightness/Color
Prev(
To adjust CONTRAST, BRIGHTNESS, or COLOR press the MENU button until you
arrive at the screen for that item. Use the arrow buttons to adjust the value.
Press the MENU button to make another adjustment or leave the MENU system.
[DVD]/[VCD]
1. Bring up the on-screen function menu by pressing the MENU button on the unit
or the remote control.
2. Press the MENU button on the unit or the remote control of monitor until you see
the screen you wish to adjust.
)
Press this button to advance the player from the current chapter to the previous
chapter.
[AUDIO]/[MP3]
Press this button to move to the previous track.
3. Use the arrow buttons to adjust the value.
4. Press the MENU button to make another adjustment or leave the MENU system.
Next(
CONTRAST
)
42
[DVD]/[VCD]
55
[AUDIO]/[MP3]
Press this button to advance the player from the current chapter to the next chapter.
BRIGHTNESS
Press this button to move from the current track to the next track .
COLOR
50
Repeat(A-B)
[DVD]/[VCD]/[AUDIO]
You can set the player to repeat a segment over and over until you cancel it. To do
this, you mark the beginning of the desired segment (A) and the end of segment (B).
The selected segment will be
repeated automatically until canceled.
OSD
CONDITION
A
A
12
29
Start point of repeat
B
Ending point repeat function
DVD Setup
DVD Functions
Fast Reverse Searching( )
Setup Menu-Main Page
[DVD]
[AUDIO]
Pressing FR button repeatedly changes
the play mode as follow:
Pressing FR button repeatedly
changes the play mode as follow:
OSD
CONDITION
FR 2X
2X rewind search
FR 4X
4X rewind search
FR 8X
8X rewind search
FR 16X
16X rewind search
FR 32X
32X rewind search
PLAY
Play
OSD
CONDITION
FR 2X
2X rewind search
FR 4X
4X rewind search
FR 8X
8X rewind search
FR 16X
16X rewind search
FR 32X
32X rewind search
PLAY
Play
OSD
CONDITION
FR 2X
2X rewind search
FR 4X
4X rewind search
FR 8X
8X rewind search
FR 16X
16X rewind search
FR 32X
32X rewind search
PLAY
Play
[AUDIO]/[VCD]
Pressing FF button repeatedly
changes the play mode as follow:
FF 2X
2X forward search
FF 4X
4X forward search
FF 8X
8X forward search
FF 16X
16X forward search
FF 32X
32X forward search
PLAY
Play
2. Press the SETUP button to display setup menu.
Pressing FR button repeatedly
changes the play mode as follows:
Pressing FF button repeatedly changes
the play mode as follow:
CONDITION
1. Press the STOP button if the disc is playing.
[MP3]
Fast Forward Searching( )
[DVD]
OSD
When the SETUP button is pressed, the setup menu will be displayed as shown
below. Select the menu category and make changes according to charge your
preferences.
OSD
CONDITION
FF 2X
2X forward search
FF 4X
4X forward search
FF 8X
8X forward search
FF 16X
16X forward search
FF 32X
32X forward search
PLAY
Play
[MP3]
General Setup Page
TV Display
Angle Mark
OSD Lang
Captions
Screen Saver
Last Memory
PS
On
ENG
On
On
On
Go To General Setup Page
3. Use the (arrow and ENTER) buttons to select and set desired settings.
4. Press the SETUP button again to turn off the setup menu.
Pressing FF button repeatedly
changes the play mode as follows:
28
OSD
CONDITION
FF 2X
2X forward search
FF 4X
4X forward search
FF 8X
8X forward search
FF 16X
16X forward search
FF 32X
32X forward search
PLAY
Play
13
DVD Setup
DVD Functions
General Setup
Subtitle(SUB-T)
1. TV Aspect Ratio
In the Setup function called TV Display, you set the player to output the video signal at the
same aspect ratio as your monitor. If the monitor is widescreen format, select WIDE.
If it is as normal screen (4:3), choose NORMAL/PS (Pan and Scan) or NORMAL L/B
(Letterbox).
Normal / PS 4:3 PAN SCAN
Choose this setting if you want the movie to fill the entire screen.
(This might mean that the left and right edges won t be seen)
Normal / LB 4:3
Choose this setting if you want to see the movie in its original aspect ratio.
(The movie might appear with black bars at the top and bottom of the screen.)
Wide 16:9 WIDE SCREEN
Choose this setting if your DVD Player is connected to a widescreen TV.
(This opition is available only if the disc has a 16:9 display aspect ratio.)
Wide 16:9 SQUEEZE (Justified)
Choose this setting if your DVD Player is connected to a widescreen TV.
(This opition is available only if the disc has a 16:9 display aspect ratio.)
[DVD]
This button is used to select the language for the on-screen display system.
(This title menu may vary, depending on the particular DVD.)
Title
[DVD]
Used to display the title menu of the loaded DVD disc.
This function is only present on discs which support it.
General Setup Page
TV Display
Angle Mark
OSD Lang
Captions
Screen Saver
Last Memory
PS
On
ENG
On
On
On
Normal/PS
Normal/LB
Wides
wide Squeeze
[DVD]/[VCD]
2.Angle Viewing
Some DVD discs contain programming which allows you
to view a scene from a few different camera angles. You
can tell when a scene is so recorded when an Angle Mark
is displayed on the screen. This mark will only appear if you
have enabled the Angle Mark feature
in the DVD Setup menu.
On: When selected, the screen will be shown with
angle mark.
Off: When selected, no angle mark is shown on
the screen.
General Setup Page
PS
On
ENG
On
On
On
OSD
Use this button to play a disc in slow-forward or
slow-reverse. Slow playback can be done at five
different speeds. Pressing this button repeatedly
decreases the speed in steps. Pressing a sixth
time returns playback to the normal speed.
Set TV Display Mode
TV Display
Angle Mark
OSD Lang
Captions
Screen Saver
Last Memory
Slow( )
On
Off
2X slow forward
1/4
4X slow forward
1/8
8X slow forward
1 / 16
16X slow forward
1 / 32
32X slow forward
1/2
2X slow rewind
1/4
4X slow rewind
1/8
8X slow rewind
1 / 16
16X slow rewind
1 / 32
32X slow rewind
Set Angle Mark
Play
3.OSD Language
General Setup Page
Use this option to set the OSD language.
When selected, change to set the on-screen display
language.
TV Display
Angle Mark
OSD Lang
Captions
Screen Saver
Last Memory
PS
On
ENG
On
On
On
English
Set OSD Language
14
CONDITION
1/2
27
Play
DVD Setup
DVD Functions
4. Captions
Display
General Setup Page
[DVD]
[AUDIO]
Pressing the DISPLAY button on the
remote control changes the play mode as
follows:
Pressing the display button displays
information about the current CD on the
screen as follows:
OSD
CONDITION
OSD
CONDITION
Display the single elapsed
Title Elapsed
Display the Title Elapsed
Single Elapsed
Title Remain
Display the Title Remain
Single Remain
Display the single remain
Chapter Elapsed
Display the Chapter Elapsed
Total Elapsed
Display the total elapsed
Chapter Remain
Display the Chapter Remaining
Total Remain
Display the total remaining
Display Off
[VCD]
[MP3]
Whenever press the button,title chapter
will be displayed as follows:
Your DVD player will display the counter
automatically when you play the MP3 disc.
Display time
Single Remain
Left display time
The screen saver is useful to prevent your display
from becoming damaged. The screen saver picture
appears when you leave the DVD player in stop mode
for about two minutes.
General Setup Page
TV Display
Angle Mark
OSD Lang
Captions
Screen Saver
Last Memory
PS
On
ENG
On
On
On
The DVD player is capable of remembering the moment
in the DVD playback you were viewing at the time you
turned off the player. If Last Memory is set ON, when you
start your car the DVD player will automatically begin
playback at this point in the program.
No sign
General Setup Page
Number Buttons
[DVD]
The 0 through 9 number buttons are used to enter the number of the track, the number
of the DVD chapter, the time, the date, etc.
[AUDIO]
OSD
Select a track by pressing the
corresponding number button.
Select Track:__
[DVD]
OSD
You can select a track in the folder by
pressing the corresponding number button.
__:__
CONDITION
Select track no
Speaker Setup
Spdif Setup
Dolby Digital Setup
Channel Delay
Equalier
3D Prosessing
HDCD
CONDITION
Select track no
Go To Speaker Setup
26
On
Off
Screen Saver
General Setup Page
TV Display
Angle Mark
OSD Lang
Captions
Screen Saver
Last Memory
PS
On
ENG
On
On
On
Set Last Memory State
Display Off
On
Off
Closed Gaption
Audio Setup
CONDITION
Single Elapsed
PS
On
ENG
On
On
On
5. Screen Saver
6. Last Position Memory
No sign
OSD
TV Display
Angle Mark
OSD Lang
Captions
Screen Saver
Last Memory
15
On
Off
DVD Functions
DVD Setup
Stop(
Show below are two examples of Audio Setups.
)
[DVD]/[AUDIO]
In DVD mode, Press STOP to stop playback.
To resume playback, press PLAY/PAUSE. If
you press STOP and then PLAY/PAUSE twice,
the player will begin playback at the first
scene of the movie.
1. Dolby Digital Setup
OSD
1 Time Press Play Key To Continue
2 Time
[MP3]
General Setup Page
Dolby Digital Setup
Speaker Setup
Spdif Setup
Dolby Digital Setup
Channel Delay
Equalizer
3D Prosessing
HDCD
Dual Mono
Dynamic
Go To Dolby Digital Setup
Dual Stereo Setup
Mix
Stereo
L-Mono
R-Mono
Mix-Mono
Stop
Stop
[DVD]
In addition to navigating the various menus, you can use the arrow buttons to define the area
of the screen you want to enlarge in ZOOM mode.
Dynamic
Use this function to set the input audio
signal to match your speaker setup.
Use this function to change the setting
from the factory.
[MP3]
After pressing STOP button, select the desired folder and set the condition by pressing
ENTER button.
Dolby Digital Setup
Dolby Digital Setup
Mix
CONDITION
Arrows( / / / )
Dual Mono
Dual Mono
Dynamic
1 Time
Stop
Disc Stop
OSD
In MP3 mode, Pressing STOP will stop the
audio playback. Press PLAY/PAUSE to begin
playback of the first title on the disc.
CONDITION
Dual Mono
Dynamic
Stereo
L-Mono
R-Mono
Mix-Mono
Mix
FULL
3/4
1/2
Setup
Pressing the SETUP button opens the Setup Menu, where you can make and adjust DVD
settings to suit your equipment and preferences.
1/4
OFF
Set DRC Off
Dual Stereo Setup
Menu
2. Equalizer Settings
[DVD]
Pressing the SETUP brings up the DVD disc menu. The content of this menu varies,
depending on the programming of the disc.
Equalizer Page
General Setup Page
Speaker Setup
Spdif Setup
Dolby Digital Setup
Channel Delay
Equalizer
3D Prosessing
HDCD
EQ Type
Bass Boost
Super Bass
Treble Boost
Go To Dolby Digital Setup
Select Equalizer Type
16
None
Off
Off
Off
None
Rock
Pop
Live
Dance
Techno
Classic
Soft
25
DVD Functions
DVD Setup
Eject
EQ Egualizer Type
When this button is pressed, the disc is ejected. When this button is pressed for more
than 3 seconds, the disc is unconditionally ejected. So, you can use this function when
you encounters not ejected situation due to unknown reasons.
In this menu you can choose the desired preset
equalizer mode.
(Choose from Rock, Pop, Live,Dance, Techno,
Classic or Soft)
Vol+/Vol-
Equalizer Page
EQ Type
Bass Boost
Super Bass
Treble Boost
None
Off
Off
Off
None
Rock
Pop
Live
Dance
Techno
Classic
Soft
Select Equalizer Type
Use these buttons to adjust the audio output level of the speaker from 0 to 20.
Bass Boost
The Bass Boost function increases the volume
level of the bass frequencies.
Mute
OSD
Press MUTE to turn off the audio part of the
currently playing program. Press it again to
return the audio volume to the level at which
you were last listening.
Play or Pause(
CONDITION
Mute
Mute
Mute off
Mute off
)
Equalizer Page
EQ Type
Bass Boost
Super Bass
Treble Boost
None
Off
Off
Off
On
Off
Boss Boost
Super Bass
OSD
Whenever this button is pressed, the mode
switches from pause to play or play to pause.
CONDITION
Super Bass Boost further increases the volume
level of the bass frequencies.
Play Disc
Equalizer Page
EQ Type
Bass Boost
Super Bass
Treble Boost
None
Off
Off
Off
On
Off
Pause
Super Boost
Audio
[DVD]
Change the audio output format.
(A vailable only if the disc supports available audio
type.)
[VCD]/[AUDIO]
Changes the audio output format.
(Available only of the disc supports available audio
type.)
[MP3]
OSD
CONDITION
1 / 2 : Ac3 2CH English
2 Channel
2 / 2 : Ac3 5.1CH English
5.1 Channel
OSD
CONDITION
Stereo
Stereo
Mono Left
Mono Left
Mono Right
Mono Right
Mix Mono
Mix Mono
Treble Boost
Equalizer Page
Treble Boost increases the volume level of the upper
frequencies.
Truble Boost
An invalid button press.
24
EQ Type
Bass Boost
Super Bass
Treble Boost
17
None
Off
Off
Off
On
Off
DVD Setup
DVD Setup
Video Setup
Password Setup
Picture Quality
In the Video Setup, you can make adjustments to various elements of the picture quality.
Video Setup Page
Component
TV Mode
Quality
1. Password Mode
Password Setup, which is required for using the Parental Controls settings,
is divided into two modules: Turning on the Password function, and setting
a Password. The first step is to turn it on in the Password Mode setting.
Video Quality Setup
off
Sharpness
Brightness
Contrast
Gamma
Hue
Saturation
Luma Delay
Go TO Video Setup Page
Low
00
00
None
00
00
1T
High
Medium
Low
Password Setup Page
Password Mode On
Password
On
Off
Sharpness
Sharpness can be adjusted by highlighting it in the menu and then using the
UP/DOWN arrow buttons to increase or decrease the sharpness.
Password Mode
2. Password Change
In the Password setup, you must first enter the current 6-digit passcode, and
then you have the opportunity to change it. The factory default passcode is 000000.
Once you have changed and confirmed the password, press the ENTER button.
Video Quality Setup
Sharpness
Brightness
Contrast
Gamma
Hue
Saturation
Luma Delay
Low
00
00
None
00
00
1T
High
Medium
Low
Password Setup Page
Sharpness
Password Mode On
Password
On
Change
Old Password
New Password
Confirm PWD
OK
Change Password
18
23
DVD Setup
DVD Setup
5.Disc Menu
Brightness
Use the Disc Menu option to select the display
language for a DVD s disc menu display language.
(not the same as the players menu)
1. Press the SETUP button during stop mode.
2. Press the / buttons to move to Preference.
3. Press the / buttons to move to Disc Menu.
4. Press the ENTER button.
5. Press the / buttons to select Disc Menu.
Use this option to adjust the display brightness. When you reach desired
brightness level, use the / buttons and press the ENTER button.
Preference Page
TV Type
PBC
Audio
Subtitle
Disc Menu
Parental
Country Region
Default
PAL
On
ENG
ENG
00
USA
English
French
Spanish
Chinese
Japanese
Korean
Russian
Thai
Preferred Menu Language
6.Parental
The Parental Control settings limit the player to only play content at or below a certain
movie rating. The ratings systems in different countries vary. In the USA, the Motion
Picture Association of America(MPAA) rates movies as G, PG, PG-13, etc.
In this menu item, you can set what is the highest level of rating you wish to allow the
unit to play.
1. Press the SETUP button when stop mode.
2. Press the / buttons to move to Preference.
3. Press the / buttons to move to Parental.
4. Press the ENTER button.
5. Press the /
buttons to select desired
parental level.
7.Country Region
Preference Page
TV Type
PBC
Audio
Subtitle
Disc Menu
Parental
Country Region
Default
PAL
On
ENG
ENG
00
USA
1 KID SAF
2G
3 PG
4 PG 13
5 PGR
6R
7 Nc17
8 ADULT
1. Press the SETUP button when stop mode.
2. Press the / buttons to move to Preference.
3. Press the / buttons to move to Country
Region.
4. Press the ENTER button.
5. Press the
/ buttons to select desired
Country Region.
8.Default
If you select RESET when in the DEFAULT settings
mode, all the settings of the Setup Menu will be
returned to the factory defaut settings, except for
Parental Level, Region and Password values.
1. Press the SETUP button when stop mode.
2. Press the / buttons to move to Preference.
3. Press the / buttons to move to Default.
4. Press the ENTER button to select Reset.
22
Preference Page
TV Type
PBC
Audio
Subtitle
Disc Menu
Parental
Country Region
Default
PAL
On
ENG
ENG
USA
Low
00
00
None
00
00
1T
Brightness
Brightness
Brightness
Use this option to adjust the contrast level.
Use the / buttons and press the ENTER button, when you reach the
desired contrast level. The contrast control increases or decreases the ratio of
bright and dark screen sections.
Video Quality Setup
Low
00
00
None
00
00
1T
Contrast
Contrast
Contrast
China
France
Hongkong
Japan
Taiwan
GBR
USA
PG Country Region Gods
Preference Page
TV Type
PBC
Audio
Subtitle
Disc Menu
Parental
Country Region
Default
0
Contrast
Sharpness
Brightness
Contrast
Gamma
Hue
Saturation
Luma Delay
Preferred Menu Language
The Country Region setting is important because
in order to set the Parental Controls, you must
identify the country whose rating system your
DVD disc is using.
Video Quality Setup
Sharpness
Brightness
Contrast
Gamma
Hue
Saturation
Luma Delay
PAL
On
ENG
ENG
USA
Reset
Load Factory Setting
19
0
DVD Setup
DVD Setup
Gamma
Preference
In some systems, you might experience a loss in the strength of the dark sections of
the displayed picture. This can be helped by changing the Gamma setting, which
boosts the dark level but leaves the other levels unchanged.
1.TV Type
Choose the proper TV format appropriate to the
monitor you have connected to the player from
the following: NTSC, PAL or Multi type.
Video Quality Setup
Sharpness
Brightness
Contrast
Gamma
Hue
Saturation
Luma Delay
Low
00
00
None
00
00
1T
1. Press the SETUP button during stop mode.
2. Press the / buttons to move to Preference.
3. Press the / buttons to move to TV Type.
4. Press the ENTER button.
5. Press the / buttons to select TV Type.
High
Medium
Low
None
Preference Page
TV Type
PBC
Audio
Subtitle
Disc Menu
Parental
Country Region
Default
PAL
On
ENG
PAL
Multi
NTSC
ENG
USA
Set TV Standard
Gamma
2.PBC (Play Back Control)
Hue
Select screen hue level using the direction
/
buttons and press the ENTER button.
This feature is only available when a SVCD disc
is loaded. It allows you to disable or enable the
PBC (Play Back Control) menu of VCD discs.
Video Quality Setup
Sharpness
Brightness
Contrast
Gamma
Hue
Saturation
Luma Delay
Low
00
00
None
00
00
1T
Hue
Hue
1. Press the SETUP button during stop mode.
2. Press the / buttons to move to Preference.
3. Press the / buttons to move to PBC.
4. Press the ENTER button.
5. Press the / buttons to select TV TypeOn/Off.
0
On
Off
ENG
USA
Set PBC State
3.Audio
Select screen saturation level using the direction
ENTER button.
/
buttons and press the
Use the audio language menu to select the subtitle
language that you prefer. If the disc you are playing
has that language available, it will display subtitles
in that language.
Video Quality Setup
Low
00
00
None
00
00
1T
Saturation
Saturation
0
Saturation
1. Press the SETUP button during stop mode.
2. Press the / buttons to move to Preference.
3. Press the / buttons to move to Audio.
4. Press the ENTER button.
5. Press the / buttons to select desired
audio language.
Preference Page
TV Type
PBC
Audio
Subtitle
Disc Menu
Parental
Country Region
Default
PAL
On
ENG
ENG
USA
English
French
Spanish
Chinese
Japanese
Korean
Russian
Thai
Preferred Menu Language
4.Subtitle
Luma Delay
Select the Luma Delay menu and select the preferred video image quality.
Video Quality Setup
Sharpness
Brightness
Contrast
Gamma
Hue
Saturation
Luma Delay
PAL
On
ENG
Hue
Saturation
Sharpness
Brightness
Contrast
Gamma
Hue
Saturation
Luma Delay
Preference Page
TV Type
PBC
Audio
Subtitle
Disc Menu
Parental
Country Region
Default
Low
00
00
None
00
00
1T
In the Subtitle menu, you can select a subtitle
language. Please note that subtitle will only
appear in this language if the disc programming
has included it.
1. Press the SETUP button during stop mode.
2. Press the / buttons to move to Preference.
3. Press the / buttons to move to Subtitle.
4. Press the ENTER button.
5. Press the / buttons to select desired
subtitle.
00
1T
Luma Delay
20
21
Preference Page
TV Type
PBC
Audio
Subtitle
Disc Menu
Parental
Country Region
Default
PAL
On
ENG
ENG
USA
Preferred Menu Language
English
French
Spanish
Chinese
Japanese
Korean
Russian
Thai