1
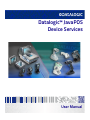
Datalogic™ JavaPOS
Device Services
User Manual
Datalogic ADC, Inc.
959 Terry Street
Eugene, OR 97402
USA
Telephone: (541) 683-5700
Fax: (541) 345-7140
©2006-2014 Datalogic ADC, Inc.
An Unpublished Work - All rights reserved. No part of the contents of this documentation or the
procedures described therein may be reproduced or transmitted in any form or by any means
without prior written permission of Datalogic ADC, Inc. or its subsidiaries or affiliates ("Datalogic"
or "Datalogic ADC"). Owners of Datalogic products are hereby granted a non-exclusive, revocable
license to reproduce and transmit this documentation for the purchaser's own internal business
purposes. Purchaser shall not remove or alter any proprietary notices, including copyright
notices, contained in this documentation and shall ensure that all notices appear on any reproductions of the documentation.
Should future revisions of this manual be published, you can acquire printed versions by contacting your Datalogic representative. Electronic versions may either be downloadable from the Datalogic website (www.datalogic.com) or provided on appropriate media. If you visit our website
and would like to make comments or suggestions about this or other Datalogic publications,
please let us know via the "Contact Datalogic" page.
Disclaimer
Datalogic has taken reasonable measures to provide information in this manual that is complete
and accurate, however, Datalogic reserves the right to change any specification at any time without prior notice.
Datalogic and the Datalogic logo are registered trademarks of Datalogic S.p.A. in many countries,
including the U.S.A. and the E.U. All other brand and product names may be trademarks of their
respective owners.
Table of Contents
DATALOGIC™ JAVAPOS DEVICE SERVICES ............................................................................................................................................... 1
Introduction ...............................................................................................................................................................................................................1
Document Conventions ..................................................................................................................................................................................1
About Datalogic JavaPOS Device Services .....................................................................................................................................................1
Datalogic Products Supported ........................................................................................................................................................................2
Limitations ........................................................................................................................................................................................................3
Installation .................................................................................................................................................................................................................4
Introduction .......................................................................................................................................................................................................4
Windows Installation .......................................................................................................................................................................................4
Linux Installation ..............................................................................................................................................................................................8
Verification ........................................................................................................................................................................................................9
Example - Configuring a Scanner .................................................................................................................................................................................. 10
JER Editor ................................................................................................................................................................................................................................ 11
Technical Details .............................................................................................................................................................................................13
“Update CLASSPATH” ........................................................................................................................................................................................................ 14
SuSE .......................................................................................................................................................................................................................................... 15
Fedora ...................................................................................................................................................................................................................................... 15
PATH — WINDOWS ONLY ................................................................................................................................................................................................ 16
Device Service Control ............................................................................................................................................................................................ 16
dls.properties file ............................................................................................................................................................................................16
Device Service Logging and Debug Capabilities ................................................................................................................................................. 17
Device Service Logging ...................................................................................................................................................................................17
Logging control – how to control logging ................................................................................................................................................................ 17
Logging levels ...................................................................................................................................................................................................................... 17
Standard JavaPOS Scanner Operations ............................................................................................................................................................... 18
Power Reporting Property .............................................................................................................................................................................18
Check Health Method .....................................................................................................................................................................................18
Bar Code Data .................................................................................................................................................................................................18
ScanData property .............................................................................................................................................................................................................. 18
ScanDataLabel property ................................................................................................................................................................................................... 18
ScanDataType property .................................................................................................................................................................................................... 18
Statistics ..........................................................................................................................................................................................................19
CapStatisticsReporting Property = True ..................................................................................................................................................................... 19
CapUpdateStatistics = False ............................................................................................................................................................................................ 19
Firmware Update ............................................................................................................................................................................................19
Standard JavaPOS Scale operations ..................................................................................................................................................................... 22
Power Reporting Property .............................................................................................................................................................................22
Check Health Method .....................................................................................................................................................................................22
Display .............................................................................................................................................................................................................22
Live Weight Display ........................................................................................................................................................................................22
Scanner Direct IO Commands ............................................................................................................................................................................... 24
Scale Direct IO Commands .................................................................................................................................................................................... 25
Scanner and Device Service Configuration .......................................................................................................................................................... 25
REMOTE MANAGEMENT SUPPORT........................................................................................................................................................ 27
Sequence Diagram .........................................................................................................................................................................................28
JMX MBeans Browser using jconsole ..........................................................................................................................................................29
WMI/JMX MBeans Properties ......................................................................................................................................................................31
Avalanche Support .........................................................................................................................................................................................34
DLSJavaPOS Properties .................................................................................................................................................................................35
JavaPOS Registry ............................................................................................................................................................................................37
Product Reference Guide
i
Contents
AUTO INSTALLATION SCRIPT .................................................................................................................................................................. 39
Creation and use of auto-installation script .......................................................................................................................................................39
Contents of install.bat ....................................................................................................................................................................................................... 42
Contents of auto-install.xml file .................................................................................................................................................................................... 42
DLSJAVAPOS COMMAND-LINE HOST DOWNLOAD UTILITY ................................................................................................................ 43
About the Command-Line Host Download Utility ...............................................................................................................................................43
Help output ........................................................................................................................................................................................................................... 44
Examples ................................................................................................................................................................................................................................ 44
ii
Datalogic™ JavaPOS Device Services
Chapter 1
Datalogic™ JavaPOS Device Services
Introduction
Document Conventions
Formatting conventions are used throughout this guide to provide a consistent method for representing screen shots and command entries.
Notes contain additional information of interest to the reader.
Filenames, paths, field selections, and data or keystrokes entered by the
user are shown in this monospaced typeface.
Controls including command bar sequences, prompts, fields, checkboxes
and radio-buttons are printed in this bold typeface.
About Datalogic JavaPOS Device Services
These Device Services are current to UPOS version 1.13, published in January 2004. These Device Services provide support for all functionality
described in the Unified POS Retail Peripheral Architecture, version 1.13 and
the JavaPOS appendix to that spec. It is available online from the National
Retail Federation at http://www.javapos.com/.
In addition, Direct IO support is provided for all commands documented in
IBM’s Universal Serial Bus OEM Point-of-Sale Device Interface Specification,
Version 1.29., and for limited commands in the RS-232 and RS-232 Single
Cable interfaces. Instructions for accessing Direct IO commands are provided later in this document.
User Manual
1
Introduction
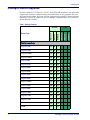
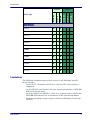
Datalogic Products Supported
Products with RS-232 Std, RS-232 SC, and OEM USB interfaces are generally
supported. Products released after the publication of this manual may not
be listed in this table, but may still be supported by JavaPOS. Please contact
Datalogic Technical support or your Datalogic representative for questions
about specific models.
Table 1. Datalogic Products
Scanner
RS232 Std
RS232 SC
OEM USB
RS232 Std
RS232 SC
OEM USB
Device Type
Scale
Magellan 3200
Magellan 3300
Magellan 2200VS
Magellan 2300HS
Magellan 800i
Magellan 8100
Magellan 8200
Magellan 8300
Magellan 8400
Magellan 8500
Magellan 8500xT
Magellan 9500
Magellan 9800
Magellan 1000i
Magellan 1100i
Magellan 1400i
Duet
VS800
Table Top Scanner/Scales
2
Datalogic™ JavaPOS Device Services
Introduction
OEM USB
RS232 SC
RS232 Std
Scale
OEM USB
RS232 SC
Device Type
RS232 Std
Scanner
Handheld Scanners
GD41XX
GM41XX
GBT41XX
GD44XX
GBT44XX
GM44XX
QS6000+
QS2500
QS6500
QS6500BT
QD23XX
QD21XX
PD71XX
Limitations
The following limitations apply to this version of the Datalogic JavaPOS
Device Services:
•
•
•
•
User Manual
For an RS-232 Standard scale device, only the SASI scale interface is
supported.
For the QS2500 and Gryphon, the only supported interface is OEM/IBM
USB (no serial interface).
For Duet, VS800, and QS6000+, there is no support under Linux for the
OEM/IBM USB interface due to limitations of the interface hardware.
Windows operating system support is limited to Windows XP and later
versions.
3
Installation
Installation
Introduction
Datalogic JavaPOS is a set of Java based drivers that allow Java application
developers to communicate with Datalogic based Point of Sale Scales and
Scanners. As long as the Java application adheres to the JavaPOS specification up to 1.13, it does not need to be written with the Datalogic drivers in
mind, but rather should work with any JavaPOS 1.13 or less compliant drivers. The Datalogic JavaPOS drivers can be installed on any system with a
pre-existing Java based Point of Sale application, and (with some limited
configuration) the Point of Sale application should have no problems interacting with Datalogic scales and scanners.
These drivers were written, tested and verified to work on the following
operating systems:
•
•
•
Microsoft Windows XP SP3, Vista, Windows 7
Fedora Core Linux versions 5 through 9
SuSE Linux Professional 9.3, CentOS 5, OpenSuSE 11, Ubuntu
For a specific list of Datalogic scale and scanner brands known to work
under Windows and Linux, please contact Datalogic Technical Support or
your representative.
This document discusses three topics related to installation of the Datalogic
JavaPOS drivers:
1. "Installation" of the software under both Windows and Linux.
2. Quick demonstration of a test application in "Verification" on page 9.
3. "Technical Details" on page 13 — a detailed description of what happens
during the installation process.
Windows Installation
Datalogic JavaPOS has the following requirements for installation on a Windows system:
•
Sun Java runtime environment version 1.4 or later (available from
•
Administrator privileges for the current user
http://www.oracle.com/technetwork/java/index.html)
If Datalogic JavaPOS is already installed on your computer, you must uninstall it before installing again.
To install Datalogic JavaPOS, perform the following steps:
4
Datalogic™ JavaPOS Device Services
Installation
1. Double-click the setup.jar file. The installer starts and a Welcome
dialog is displayed.
2. Click Next. You must click to indicate you accept the terms of the End
User License Agreement (EULA) in order to continue with the installation.
3. Click Next. You are prompted to enter an installation path (the default
is C:\Program Files\Datalogic\JavaPOS).
User Manual
5
Installation
If Datalogic JavaPOS is already present on your computer, a warning is
displayed.
CAUTION
Click No to halt the installation. Uninstall Datalogic JavaPOS, then
return to step 1 of this procedure.
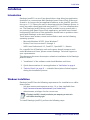
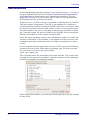
4. Available packages for the current version are displayed. Only the Base
Datalogic Drivers are absolutely required. If installing on a system for
the first time to test the functionality of the drivers, it is recommended
that all packages be installed. It is important to realize that these drivers are dependant on many of these files. If some packages are
unchecked, it may render the drivers unusable, unless the required
files are already installed on the system.
6
Datalogic™ JavaPOS Device Services
Installation
5. Click Next. An installation progress dialog is displayed.
When the Installation Completed message is displayed, click Done.
A message appears to remind that a system reboot is required for the
changes to take effect.
6. Click OK, then re-log onto your computer.
User Manual
7
Installation
Linux Installation
As with the Windows operating system, Linux requires version 1.5 or later of
the Java Runtime Environment. Visit http://www.oracle.com/technetwork/
java/index.html for downloading and installation instructions. The Java
application must exist in your system path in order for the Datalogic JavaPOS application links to function properly.
If Fedora Core 3, CentOS or Ubuntu is installed as a Workstation, it installs a
GNU java runtime environment. This JRE is not adequate for installing or
running Datalogic JavaPOS. Install the SUN JRE. After this is complete, it will
be necessary to ensure that the SUN version of Java is in the system execution path ahead of the one in /usr/bin. It may even be desirable to delete
the “/usr/bin/java” file prior to installing the SUN JRE, then ensuring the
SUN Java executable is in the system execution path.
Under the Linux operating system, the installation procedure is exactly the
same as for Windows. If the installer is not logged on as the root user, the
installation procedure terminates with a message reminding you to log on
as root.
From a terminal window under either Gnome or KDE, execute the following
command from the same folder where the setup.jar file exists (remember, Java must be found in the system path):
java –jar setup.jar
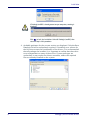
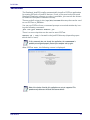
This command starts the automated Java-based installer. The screens and
prompts are the same as for windows, with the exception of the “packages”
window. It resembles the following window:
After running the installer, you must log off and log back on for the settings
to take effect.
8
Datalogic™ JavaPOS Device Services
Installation
Verification
The Datalogic JavaPOS installer automatically installs a POSTest application
for testing all kinds of JavaPOS devices. If one of the previously discussed
Datalogic/Datalogic scanners or scales is available, you can test the drivers
to make sure they were installed correctly.
There are shell scripts in the /opt/dls/JavaPOS directory that can be used
to run POSTest or JEREditor.
You can run POSTest from a command prompt or terminal window by issuing the following command:
java com.jpos.POStest.POStest.jar
There is a new script that can be used to start POSTest:
POStest.sh (.csh) is located in the JavaPOS directoy (depending upon
which shell is used).
If this command does not launch the application, the CLASSPATH is
probably not configured properly. Restart your computer and try again.
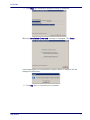
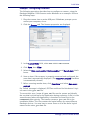
After POSTest starts, the following screen is displayed:
Most of the devices listed by this application are not yet supported. This
procedure only addresses the Scale and Scanner devices.
User Manual
9
Installation
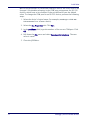
Example - Configuring a Scanner
The following procedure describes how to configure a scanner, using the
Datalogic Magellan 1000i Scanner under Windows as an example. Perform
the following steps:
1. Plug the scanner into an active USB port. If Windows prompts you to
restart your computer, do so.
2. Click the Scanner tab. The Scanner properties are displayed.
3. In the Logical Name field, select DLS-1000i-USB-Scanner
4. Click Open, then Claim.
5. Select the Data event enabled, Device enabled, and Decode data checkboxes.
6. Scan an item. If the scanner is properly connected and configured, the
scan data is automatically displayed. (The Data event enabled checkbox
is automatically cleared.)
7. Before scanning another item, click Clear Data and select Data event
enabled.
If a “Failed” message is displayed, POSTest could not find the device’s logical name in the jpos.xml file.
To correct this error, locate all jpos.xml files on the system and identify
the one that is picked up by the application during execution. A file is in the
same directory where the application is launched (or listed first in the
CLASSPATH) takes priority. The installer creates a jpos.xml file in the
installation folder. This file contains the logical names for many different
Datalogic devices. You may have to move some or all of the these logical
names to the active jpos.xml file.
10
Datalogic™ JavaPOS Device Services
Installation
JER Editor
The JER Editor helps you configure the devices listed in the jpos.xml file.
You can edit this file manually, but JER Editor provides an easier mechanism
for editing the devices’ configuration properties. You can use it to add new
devices or change COM port assignments.
The Datalogic JavaPOS installer places a shortcut to JER Editor in your Start
menu.
If under Linux there is no shortcut link, you may have to log back onto the
GUI desktop as the root user. The “root” user must create shortcut links for
any other user who will need to run the Datalogic JavaPOS applications. The
Linux installer only creates menu shortcut links under KDE, but desktop
links are created under both KDE and Gnome.
You can also run POSTest from a command prompt or terminal window by
issuing the following command:
java com.Datalogic.jpos.editor.DeviceEditor
There is a new script that can be used to start JER Editor:
JEREditor.sh (.csh) is located in the JavaPOS directory (depending upon
which shell is used).
If this command does not launch the application, the CLASSPATH is
probably not configured properly. Restart your computer and try again.
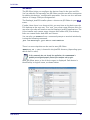
After JER Editor starts, a list of device types is displayed. Each device is
identified by its logical name, as shown below:
User Manual
11
Installation
Most of the properties of predefined Datalogic devices will never need to be
changed. One notable exception is the COM port assignments for RS-232
devices, which have to be modified if they are different from the default
value. To change the COM port for an RS-232 device, perform the following
steps:
1. Select the device’s logical name (for example, Datalogic-6000-RS232-Scanner for a scanner device).
2. Select the Bus Properties tab. Click Edit.
3. In the portName field, type the number of the correct COM port. Click
OK.
4. Pull down the File menu and select Save JposEntryRegistry. The new
value is saved.
5. Close the JER Editor.
12
Datalogic™ JavaPOS Device Services
Installation
Technical Details
Support Jars
The installation procedure for these drivers provides everything that is
required to completely run the drivers with a standalone test application
that uses JavaPOS. This may mean that on an actual POS system, some of
these files may already exist in different folders. There is always a possibility that conflicts could result because of this, so it is important to remember
that the CLASSPATH and PATH required by the Datalogic drivers is appended
to the end of the current CLASSPATH and PATH. If there are older versions of
some of these jar files in the CLASSPATH ahead of the ones required by the
Datalogic drivers, it may be necessary to rearrange the CLASSPATH accordingly. Every situation will have to be looked at uniquely.
The Datalogic drivers were written to the JavaPOS 1.13 specification, so
some of the support jar files are a result of the runtimes required to make
this function under JavaPOS 1.13. Other support jar files are used for RS232 and USB communications. If conflicts result it may be important to
know what these files are. This is a list of files that get copied, and to which
“package” they belong:
“.” = Install PATH
“Base Datalogic Drivers”
./DatalogicJavaPOS
./Win32Hid.dll (Windows ONLY)
./Win64Hid.dll (Windows ONLY)
./jpos.xml
“javax.comm. Libraries”
./SupportJars/nrjavaserial-3.9.3.jar
./SupportJars/javax.comm.properties
“javax.usb Libraries”
./SupportJars/javax.usb.properties
./SupportJars/jsr80_linux-1.0.3.jar
./SupportJars/jsr80_ri-1.0.2.jar
./SupportJars/jsr80-1.0.2.jar
./SupportJars/libJavaxUsb-1.0.3.so
“POSTest”
/SupportJars/POStest.jar
“javapos.com”
./SupportJars/jcl.jar
./SupportJars/jcl_editor.jar
./SupportJars/jpos.properties
./SupportJars/jpos113-controls.jar
./SupportJars/xercesImpl.jar
./SupportJars/xml-apis.jar
User Manual
13
Installation
“Update CLASSPATH”
Windows
A new system environment variable DLS_CLASSPATH is created that contains
the following string:
.;C:\Program Files\Datalogic\JavaPOS;C:\Program
Files\Datalogic\JavaPOS\SupportJars;C:\Program
Files\Datalogic\JavaPOS\DLSJavaPOS.jar;C:\Program
Files\Datalogic\JavaPOS\SupportJars\jsr801.0.2.jar;C:\WINDOWS\system32\comm.jar;C:\Program
Files\Datalogic\JavaPOS\SupportJars\jsr80_linux1.0.3.jar;C:\Program
Files\Datalogic\JavaPOS\SupportJars\jsr80_ri1.0.2.jar;C:\Program
Files\Datalogic\JavaPOS\SupportJars\POStest.jar;C:\Program
Files\Datalogic\JavaPOS\SupportJars\xml-apis.jar;C:\Program
Files\Datalogic\JavaPOS\SupportJars\jcl.jar;C:\Program
Files\Datalogic\JavaPOS\SupportJars\jpos113controls.jar;C:\Program
Files\Datalogic\JavaPOS\SupportJars\xercesImpl.jar;C:\Progra
m Files\Datalogic\JavaPOS\SupportJars\jcl_editor.jar;
This environment variable is then appended to the end of the system environment variable “CLASSPATH”.
Linux
A new variable, DLS_CLASSPATH is created in /etc/profile file, that contains the following string:
DLS_CLASSPATH=.:/opt/DLS/JavaPOS:/opt/Datalogic/
JavaPOS/SupportJars:/opt/DLS/JavaPOS/DLSJavaPOS.jar:/
opt/DLS/JavaPOS/SupportJars/jsr80-1.0.2.jar:/opt/DLS/
JavaPOS/SupportJars/nrjavaserial-3.9.3.jar:/opt/DLS/
JavaPOS/SupportJars/jsr80_linux-1.0.3.jar:/opt/DLS/
JavaPOS/SupportJars/jsr80_ri-1.0.2.jar:/opt/DLS/
JavaPOS/SupportJars/POStest.jar:/opt/DLS/JavaPOS/
SupportJars/xml-apis.jar:/opt/DLS/JavaPOS/SupportJars/
jcl.jar:/opt/DLS/JavaPOS/SupportJars/jpos113controls.jar:/opt/DLS/JavaPOS/SupportJars/
xercesImpl.jar:/opt/DLS/JavaPOS/SupportJars/
jcl_editor.jar:C
This variable is then appended to the end of any existing classpath, then
exported. As in the following:
CLASSPATH=$CLASSPATH:$DLS_CLASSPATH
Export CLASSPATH
“Update COM port Access”- LINUX ONLY
Under Linux there are a couple of changes that need to be done to the com
ports in order for the Datalogic serial devices to function properly.
All users must be granted access to use the comports.
By default the installation program will only change the authorization for
the first four com ports on the system. This is done by adding lines to the /
etc/rc.d/rc.local or /etc/rc.d/boot.local file.
chmod a+rw /dev/ttyS0
chmod a+rw /dev/ttyS1
14
Datalogic™ JavaPOS Device Services
Installation
chmod a+rw /dev/ttyS2
chmod a+rw /dev/ttyS3
If need be these changes can be manually undone after the installation process has completed. It is also just as easy to add more com ports to the list,
if required.
The com ports are changed to “raw” mode.
The default behavior for com ports under Linux is for them to act as remote
terminals. This means that certain binary data is converted — this needs to
be turned off. The first four com ports are changed to “raw” mode in the /
etc/rc.d/rc.local or /etc/rc.d/boot.local file.
stty
stty
stty
stty
–file=/dev/ttyS0
–file=/dev/ttyS1
–file=/dev/ttyS2
–file=/dev/ttyS3
raw
raw
raw
raw
If additional com ports need to be turned into raw mode, or some need to
be changed back to non raw mode, the /etc/rc.d/rc.local (fedora) or /
etc/rc.d/boot.local (SuSE) file can be edited as required.
“Update USB Access”- LINUX ONLY
Under Fedora and SuSE the default behavior is to grant limited access to the
USB ports. The access to these ports is changed by modifying the /etc/
fstab file under SuSE, and the /etc/rc.d/rc.sysinit file under Fedora.
SuSE
The following line in the /etc/fstab file:
usbfs
/proc/bus/usb
usbfs
noauto 0 0
is changed to:
usbfs
/proc/bus/usb
noauto,devmode=0666
0 0
usbfs
Or for SuSE 11 SP2 and other Linux distributions that use Kernel versions
greater than 2.6.31-18
/sys/bus/usb/drivers
auto.devmode=0666 0 0
/proc/bus/usb
usbfs
Fedora
The following line in the /etc/rc.d/rc.sysinit file:
[ -d /proc/bus/usb ] && mount –n –t usbfs /proc/bus/usb
/proc/bus/usb
is changed to:
[ -d /proc/bus/usb ] && mount –n –t usbfs –o
devmode=0666 /proc/bus/usb /proc/bus/usb
“Update LD_LIBRARY_PATH”- LINUX ONLY
The LD_LIBRARY_PATH variable needs to be defined because some the the
low level Java IO uses JNI to talk to the devices. The LD_LIBRARY_PATH helps
Java find any shared objects that need to be loaded at the appropriate times.
A new variable DLS_LD_LIBRARY_PATH is created in the /etc/profile file,
User Manual
15
Device Service Control
then appended to the LD_LIBRARY_PATH variable, as in the following
example lines:
DLS_LD_LIBRARY_PATH=/opt/dls/JavaPOS/SupportJars
LD_LIBRARY_PATH=$LD_LIBRARY_PATH:$DLS_LD_LIBRARY_PATH
export LD_LIBRARY_PATH
Any JavaPOS app must use the java command line option:
-Djava.library.path=/opt/dls/JavaPOS/SupportJars
to ensure proper libraries are used
PATH — WINDOWS ONLY
During the installation process a new system environment variable by the
name of DLS_PATH is created that contains the following string:
c:\Program Files\Datalogic\JavaPOS;c:\Program
Files\Datalogic\JavaPOS\SupportJars.
This environment variable is then appended to end of the system environment variable PATH. This is required so the runtime libraries of
Win32Hid.dll and Win64Hid.dll will be found.
Device Service Control
The Datalogic Device Controls use a properties file to control certain
optional operations, and to control trace logging. This file is named
dls.properties. Upon initial service startup, if the service does not find
the dls.properties file, it extracts a default version from the JAR file and
places it in the same folder as the Java application started from. The user
can now change the default settings, but the file must remain in the application directory.
dls.properties file
Several of the entries are related to trace logging — see next section for
details. The two remaining entries are described here:
com.Datalogic.jpos.service.ScaleService.ThrowExceptionOnScaleMotion
Defaults to False. If set True, the service will throw an exception when a
weight request times out due to Scale In Motion (112) or Scale At Zero
(114). If set False, the service reports a timeout.
com.Datalogic.jpos.interpretation.autoLoadConfig
Default is True. When True, the service will attempt to configure the scanner/scale as per settings in the jpos.xml file upon startup. If False, the
service will not send configuration data to the scanner/scale upon startup.
This must be set True if jpos.xml settings are changed by the user.
16
Datalogic™ JavaPOS Device Services
Device Service Logging and Debug Capabilities
Device Service Logging and Debug Capabilities
The Datalogic Device Services provide the ability to turn on logging of certain events and to control the level of detail associated with the log. Events
are logged to a file named dlstrace.log, which is created in the directory
from which the user’s JavaPOS application is launched. To ensure that data
is retained for a reasonable period of time, up to 5 logs can be maintained,
with the size and verbosity of the log configured by settings in a control file.
The control file is a text editable file named Datalogic.properties, which
exists in the same directory. Configurable settings are:
•
•
•
•
log name (defaults to jpostrace.log)
log size (defaults to 10 MB)
number of logs to keep (defaults to 5)
logging trace level (defaults to High)
Device Service Logging
Logging control – how to control logging
The user can control the Device Service logging by editing the dls.properties file. User controllable properties are:
Table 2. Device Service logging
Source file:
Property
Description
TraceSourceName = True
Puts the name of the source .java file in the trace
log
Trims path name for log
Default is 1, this controls how much log data is
buffered by Windows before a write is done to
the log. In production, a higher number (e.g. 50)
may improve system performance.
Default to DatalogicTrace.log
Source path: TrimSourceName = True
NumberOfWritesBeforeFlush
= <1>
When to log:
Name:
Size:
Log Levels:
LogFile = <filename>
MaxFileSizeInMegabytes =
<1 to 10>
TraceLevel = <0 to 4, see
below>
Defaults to 10 megabytes
Defaults to 4
Logging levels
•
•
•
•
•
User Manual
0 = OFF – no logging (not recommended)
1 = Errors – errors and exceptions logged
2 = Errors and Some Diagnostics – errors plus additional diagnostic
data
3 = Errors, Diagnostics, and Trace – above plus developer trace messages
4 = Errors, Diagnostics, Trace, and Method entry/exit – most detailed
for debug
17
Standard JavaPOS Scanner Operations
Standard JavaPOS Scanner Operations
See the Unified POS Retail Peripheral Architecture v1.13 for details on Properties and Methods
Power Reporting Property
Scanner CapPowerReporting is STANDARD. Power reporting is supported
by some USB COM Datalogic scanners.
Check Health Method
The scanner supports health check. Possible replies include:
•
•
Internal Hcheck: Successful
Internal Hcheck: Not successful, <subsystem> Fail;
Subsystems may include the following:
The Scanner is model dependent, not all scanners have all the following
subsystems
• Motor
• Horizontal Laser
• Vertical Laser
• Internal Scale
• Remote Display
• EAS system
Interactive Hcheck: Complete
Bar Code Data
ScanData property
Always has bar code data when DataEvent is fired.
ScanDataLabel property
•
•
Contains data if DecodeData = True
Computes check digit for UPC labels if not present from scanner.
ScanDataType property
•
•
18
Contains label type if DecodeData = True
Label type as reported on scanner interface – the scanner assigns a
label type identifier and sends this with the label data across the OEM
USB and RS-232 Single Cable interfaces. The Device Service translates
this into one of the UPOS defined label types.
Datalogic™ JavaPOS Device Services
Standard JavaPOS Scanner Operations
Statistics
CapStatisticsReporting Property = True
Scanner supports retrieveStatistics method. This method returns a
pointer to an XML data buffer.
Supported statistics are:
•
•
•
•
•
•
•
•
Device category
Manufacturer
Model number
Serial Number
Firmware revision
Interface type
Power on time
Number of label scans
CapUpdateStatistics = False
Statistics cannot be updated or reset. Datalogic scanners do not support the
ResetStatistics( ) or UpdateStatistics( ) methods.
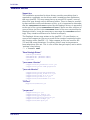
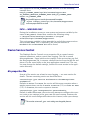
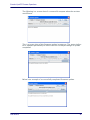
Firmware Update
Upon selecting the “Firmware” update button, the following dialog will be
presented. The user can then browse to the required update firmware.
There are two separate firmware file types: USB or RS-232. Each has the
.DAT or .S37 extension, respectively.
User Manual
19
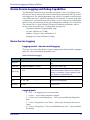
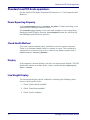
Standard JavaPOS Scanner Operations
The dialog box will let the user compare or update the firmware. The following is a screen shot of a successful compare when the versions are
equal.
20
Datalogic™ JavaPOS Device Services
Standard JavaPOS Scanner Operations
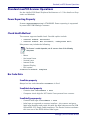
The following is a screen shot of a successful compare when the versions
are different.
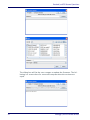
This is a screen shot of the firmware update in progress. The status indicator is updated periodically to inform the user of the percentage of update
completed.
Below is an example of a successfully completed firmware update.
User Manual
21
Standard JavaPOS Scale operations
Standard JavaPOS Scale operations
See the Unified POS Retail Peripheral Architecture v1.13 for Properties and
Methods.
Power Reporting Property
Scale CapPowerReporting is JavaPOS_PR_NONE:0. Power reporting is not
supported by Datalogic scanner/scales.
The PowerNotify property is not used, and changes to it are ignored by
Datalogic JavaPOS Device Services. StatusUpdate events are not fired by
the Datalogic JavaPOS Device Services.
Check Health Method
The scale supports health check, included as part of scanner response.
There is no separate health check for scanner or scale. The command is
supported on a scale as long as it is claimed, but always reports back a
ResultCode of “JavaPOS_SUCCESS”.
Display
Scale supports a remote display, but does not support text display. The POS
application cannot send data to the scale’s remote display (CapDisplayText = FALSE).
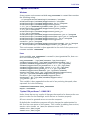
Live Weight Display
The live weight display can be enabled by selecting the following check
boxes in this specific order:
1. Check “Status Notify enabled.”
2. Check “Data Event enabled.”
3. Check “Device enabled.”
22
Datalogic™ JavaPOS Device Services
Standard JavaPOS Scale operations
1
2
3
After this sequence has been performed, the Live Weight and Live Status
fields in the Scale tab will be automatically updated as items are added or
removed from the attached scale.
User Manual
23
Scanner Direct IO Commands
Scanner Direct IO Commands
The scanner supports a number of Direct IO commands that allow access to
the commands available on the interface which are not directly supported
by UPOS. Applications may utilize the Direct IO commands by accessing the
Direct IO Method (see the Unified POS Retail Peripheral Architecture, version 1.13
for details) with the appropriate arguments, as detailed below. For a complete list of commands and implementation details, see DR90000351, Datalogic UPOS DirectIO Commands (available at www.datalogic.com).
Table 3. OEM USB Direct IO Scanner Commands
Scanner Command
Cmd
int[] data
Object object
Reset
1
None
None
Beeper enable
2
None or Input: Config String
Output: Status string
Beeper disable
3
None or Input: Config String
Output: Status string
Configure scanner
4
None or Input: Config String
Report configuration
5
None or Input: Config String
Configure 2-label flags
6
None or Input: Config String
Report 2-label config
7
None or Input: Config String
Output: 8 byte 2-label config
string
Report Information
8
None or Input: Config String
Output: Variable length string
Report Health
9
None or Input: Config String
Output: Variable length string
Report Statistics
10
None or Input: Config String
Output: Variable length string
Input: 9 byte config string
Output: Status string
Output: 9 byte config string
Input: 8 byte 2-label config string
Output: Status string
Table 4. RS-232 Standard Scanner Direct IO Commands
Scanner Command
Cmd
int[] data
Object object
Reset
1
None
None
Beep
11
None
None
Table 5. RS-232 Single Cable Direct IO Scanner/Scale Commands
Scanner Command
24
Cmd
int[] data
Object object
Hard Reset
21
None
None
Scale Monitor
26
Output: Status
Output: None
Scale Status
27
None
Output: Scale status
Display Status
28
None
Output: Display status
Soft Power Down
29
None
None
Datalogic™ JavaPOS Device Services
Scale Direct IO Commands
Scale Direct IO Commands
The scale supports a number of Direct IO commands that allow access to
the commands available on the OEM/IBM USB interface which are not
directly supported by UPOS. Applications may utilize the Direct IO commands by accessing the Direct IO Method with the appropriate arguments,
as detailed below. For a complete list of commands and implementation
details, see DR90000351, Datalogic UPOS DirectIO Commands (available at
www.datalogic.com).
Table 6. OEM/IBM USB Direct IO Scale Commands
Scale Command
Cmd
int[] data
Object object
Reset
21
None
None
Enable extended status
22
Output: 3 byte status
Output: Status string
Disable extended status
23
Output: 2 byte status
Output: Status string
Configure scale
24
Output: 2 or 3 byte status
Report configuration
25
Output: 2 or 3 byte status
Input: Configuration string
Output: Status string
Output: Configuration string
Scanner and Device Service Configuration
For the JavaPOS device services to work properly with a Datalogic scanner, it
is crucial that interface-specific configuration items in the device service
and scanner match. This restriction does not apply for the OEM USB interface, as there are no user-configurable items specific to this interface.
However, the RS-232 Standard and RS-232 Single Cable have many configuration items that must be coordinated. The listing below for each of these
interfaces describes the specific items and their relationships.
Scanner configuration is controlled through the scanner’s configuration file,
which is loaded into the scanner at the factory. Specific configuration items
can be changed by using special programming label barcodes available in
the product manual.
Device Service configuration is controlled through the jpos.xml file, accessible in the Program files\Datalogic\JavaPOS directory under Windows.
Default values are shown in the table below. These values can be edited
using the JER Editor to conform to the scanner values.
Table 7. RS-232 Standard Configuration
User Manual
Scanner configuration item
JavaPOS XML configuration item
Baud rate
Parity
Data bits
Stop bits
Baudrate
Parity
Databits
Stopbits
25
Scanner and Device Service Configuration
Table 8. RS-232 Single Cable Configuration
Scanner configuration item
JavaPOS XML configuration item
Baud rate
Parity
Data bits
Stop bits
Prefix value, prefix enable/disable
Suffix value, suffix enable/disable
BCC
Baudrate
Parity
Databits
Stopbits
rxPrefix, txPrefix (note: 0 = disable)
rxTrailer, txTrailer (note: 0 = disable)
UseBCC
Table 9. Scale Configuration
26
Scale configuration item
JavaPOS XML configuration item
Baud rate
Parity
Data bits
Stop bits
Baudrate
Parity
Databits
Stopbits
Datalogic™ JavaPOS Device Services
Appendix A.
Remote Management Support
This section describes Remote Management support features included in
the DLSJavaPOS version 1.13 and above. Remote Management consists of
methods to retrieve statistical data about connected devices and the ability
to update firmware through the JavaPOS interface. This update feature is
also known as Host Download.
The current methods for statistical data retrieval use either the WMI (Windows Management Interface) or the Java JMX (Java Management Extension)
using Managed Beans or MBeans. Each interface uses the root/CIMV2/
UPOS_Scanner or root/CIMV2/UPOS_Scale structure. The following screen
shots show the WMI & MBeans data using the Windows Management Information Tools and jconsole, respectively.
User Manual
27
Remote Management Support
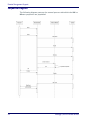
Sequence Diagram
The following diagram portrays the normal process with which the WMI or
MBeans properties are populated.
28
Datalogic™ JavaPOS Device Services
Remote Management Support
WMI Browser
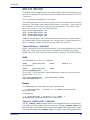
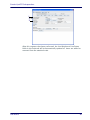
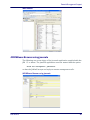
JMX MBeans Browser using jconsole
The following are screen shots of the jconsole application supplied with the
JDK 1.5 or above. The JavaPOS application must be started with the option:
-Dcom.sun.management.jmxremote
so that the JVM will accept and reply to remote management calls.
JMX MBeans Browser using jconsole
User Manual
29
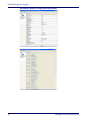
Remote Management Support
JMX MBeans Browser using jconsole (continued)
30
Datalogic™ JavaPOS Device Services
Remote Management Support
WMI/JMX MBeans Properties
This data is also returned by the getStatistics command. Some items are
either null or 0 depending on the connected device. Scale-relevant information will not be valid for a scanner-only device. Items listed below are
unique to Datalogic's implementation and differ from the properties listed
in the UPOS specification. Some of the following properties may be omitted
for configurations where they are not applicable.
Property: DeviceID
Description: A unique number used to identify the attached device
Device Category: Scanner, Scale, Portal Scanner
Property: ModelName
Description: Model number of attached device
Device Category: Scanner, Scale, Portal Scanner
Property: SerialNumber
Description: Serial number of attached device
Device Category: Scanner, Scale, Portal Scanner
Property: ScaleHealth
Device Category: Scale
Property: RemoteDisplayHealth
Device Category: Scale
Property: ConfigurationFileID
Device Category: Scanner, Portal Scanner
Property: ApplicationRevisionLevel
Device Category: Scanner, Portal Scanner
Property: BootloaderROMID
Device Category: Scanner, Portal Scanner
Property: UniversalInterfaceApplicationROMID
Device Category: Scanner, Portal Scanner
Property: UniversalInterfaceBootloaderROMID
Device Category: Scanner, Portal Scanner
User Manual
31
Remote Management Support
Property: MotorHealth
Device Category: Scanner, Portal Scanner
Property: HorizontalLaserHealth
Device Category: Scanner, Portal Scanner
Property: VerticalLaserHealth
Device Category: Scanner, Portal Scanner
Property: CameraHealth
Device Category: Scanner, Portal Scanner
Property: MotorOnTime
Device Category: Scanner, Portal Scanner
Property: LaserTime
Device Category: Scanner, Portal Scanner
Property: EASSystemHealth
Device Category: Scanner, Portal Scanner
Property: EASDeactivateCount
Device Category: Scanner, Portal Scanner
Property: EASManualCount
Device Category: Scanner, Portal Scanner
Property: EASVersion
Device Category: Scanner, Portal Scanner
In addition to the items above there can also be Hand Held specific information. The following are only available for Hand Held scanners and includes
wireless units.
Property: RadiolHealth
Device Category: Scanner
Property: RadiolHardwareVersion
Device Category: Scanner
32
Datalogic™ JavaPOS Device Services
Remote Management Support
Property: RadioSoftwareVersion
Device Category: Scanner
Property: BaseSoftwareVersion
Device Category: Scanner
Property: BaseModelNumber
Device Category: Scanner
Property: BaseSerialNumber
Device Category: Scanner
Property: BaseHoursPoweredCount
Device Category: Scanner
Property: BatteryChargeCycles
Device Category: Scanner
Property: TriggerPulls
Device Category: Scanner
Property: KeyPresses
Device Category: Scanner
Property: LaserTime
Device Category: Scanner
Property: LabelsScanned
Device Category: Scanner
User Manual
33
Remote Management Support
Avalanche Support
The following are the contents of the scanner_info.txt file as well as the
scanner_info.prf file. The scanner_info.prf file is used by Avalanche to populate its database for remote management.
# Raw data from scanner
# Info command
# bytes received[87] 0x1 0x2 0x41 0x36 0x31 0x30 0x30
0x30 0x32 0x36 0x30 0x37 0x3 0x2 0x52 0x30 0x32 0x33
0x34 0x3 0x2 0x43 0x44 0x52 0x39 0x36 0x31 0x30 0x58
0x58 0x58 0x20 0x3 0x2 0x42 0x36 0x31 0x30 0x30 0x30
0x32 0x37 0x30 0x35 0x3 0x2 0x53 0x47 0x42 0x30 0x30
0x31 0x34 0x30 0x30 0x36 0x3 0x2 0x4D 0x47 0x42 0x54
0x34 0x34 0x30 0x30 0x2D 0x42 0x4B 0x4B 0x31 0x30 0x2D
0x43 0x31 0x39 0x38 0x3 0x2 0x6D 0x3 0x2 0x49 0x34 0x35
0x3 0x4
# Stats command
# bytes received[65] 0x15 0x50 0x1 0x8 0x0 0x1 0x2 0x4C
0x34 0x32 0x3 0x2 0x43 0x3 0x2 0x50 0x35 0x37 0x35 0x3
0x4 0x0 0x0 0x0 0x0 0x0 0x0 0x0 0x0 0x0 0x0 0x0 0x0 0x0
0x0 0x0 0x0 0x0 0x0 0x0 0x0 0x0 0x0 0x0 0x0 0x0 0x0 0x0
0x0 0x0 0x0 0x0 0x0 0x0 0x0 0x0 0x0 0x0 0x0 0x0 0x0 0x0
0x0 0x0 0x0
# Health command
# bytes received[65] 0x7 0x50 0x1 0x8 0x0 0x1 0x4 0x0
0x0 0x0 0x0 0x0 0x0 0x0 0x0 0x0 0x0 0x0 0x0 0x0 0x0 0x0
0x0 0x0 0x0 0x0 0x0 0x0 0x0 0x0 0x0 0x0 0x0 0x0 0x0 0x0
0x0 0x0 0x0 0x0 0x0 0x0 0x0 0x0 0x0 0x0 0x0 0x0 0x0 0x0
0x0 0x0 0x0 0x0 0x0 0x0 0x0 0x0 0x0 0x0 0x0 0x0 0x0 0x0
0x0
#
Below is the same data, displayed differently.
# Parsed data
#
Vendor = GBT4400
# UPOS
ManufacturerName = Datalogic ADC INC
DeviceCategory = Scanner
ScaleMode = English
# info
ApplicationROM = 610002607
ApplicationRevisionLevel = 0234
ConfigurationFileID = DR9610XXX
BootloaderROMID = 610002705
SerialNumber = GB0014006
TopModelNumber = GBT4400-BKK10-C198
MainBoardNumber =
Interface = USB-OEM
# health
# statistics
ScanCount = 42
LastScaleCalibrationTime =
PowerOnHours = 575
# Creation date: Wed Sep 05 16:41:45 2012
# Copyright 2012, Datalogic ADC, Inc.
# EOF
34
Datalogic™ JavaPOS Device Services
Remote Management Support
DLSJavaPOS Properties
The following are the contents of the properties file, dls.properties, and
property descriptions.
Property: com.dls.jpos.service.ScannerService.convertBCDtoASCII
Default Value: true
Description: When true the data from the scanner is converted to ASCII for
numbers 0 thru 9
Property: com.dls.jpos.interpretation.autoLoadConfig
Default Value: true
Description: When true the configuration items available to the OEM USB
interface are read from the JavaPOS registry and sent to the attached scanner.
Property: com.dls.jpos.service.ScaleService.ThrowExceptionOnScaleMotion
Default Value: false
Description: Exception thrown when scale is in motion
Property: com.dls.jpos.common.ScannerService.AvalancheEnabled
Default Value: true
Description: When true the .prf file is created for use with Avalanche
Property: com.dls.jpos.common.ScannerService.generateStatsOnEveryClaim
Default Value: true
Description: When true every time the Claim method is called the i, h, s commands are sent to the attached device and responses are parsed and the
internal WMI, MBeans data is populated. If false then the WMI and MBeans
data is populated on the first Claim.
Property: com.dls.jpos.common.ScannerService.ScannerInfoFilename
Default Value: scanner_info.txt
Description: used as the suffix to the information file. The device class is
prefixed to this name. Example RS232Scanner_scanner_info.txt
Property: com.dls.jpos.service.ScannerService.sendCookedData
Default Value: false
Description: When true the data that is in the scanDataLabel property is copied into the scanData property
Property: com.dls.jpos.common.LogManager.MaxFileSizeInMegabytes
Default Value: 10
User Manual
35
Remote Management Support
Property: com.dls.jpos.common.LogManager.LogFilesToKeep
Default Value: 5
Property: com.dls.jpos.common.LogManager.TraceLevel
Default Value: 4
Property: com.dls.jpos.common.LogManager.TraceSourceName
Default Value: true
Description: When true the module name is prepended to messages written
to the log file
Property: com.dls.jpos.common.LogManager.NumberOfWritesBeforeFlush
Default Value: 1
Property: com.dls.jpos.common.LogManager.UpdatePercentage
Default Value: 5
Description: Used as a percentage event
Property: com.dls.jpos.common.LogManager.TrimSourceName
Default Value: true
Property: com.dls.jpos.common.LogManager.LogFile
Default Value: jpostrace.log
The following are additional properties:
Property: com.dls.jpos.service.ScannerService.poleRateForPortChange
Default Value: 1000
Property: com.dls.jpos.service.ScannerService.enablePole
Default Value: false
Property: com.dls.jpos.service.ScannerService.PostRemovalErrorEvents
Default Value: false
Property: com.dls.jpos.service.ScannerService.enablePoleRate
Default Value: 1
36
Datalogic™ JavaPOS Device Services
Remote Management Support
Property: com.dls.jpos.service.ScannerService.useClaimLockFile
Default Value: false
Property: com.dls.jpos.service.ScannerService.suppressErrors
Default Value: false
Property: com.dls.jpos.service.ScannerService.FirmwareSendNulls
Default Value: false
Property: com.dls.jpos.service.ScannerService.FirmwareSendReset
Default Value: true
JavaPOS Registry
The contents of the jpos.xml file are used to make decisions on how JavaPOS behaves when the Datalogic devices are attached. The following is a
listing of the Datalogic-specific custom properties along with a brief
description.
Property: useVirtualPort
Default Value: False
Description: When true under Windows causes the USB COM ports to be
searched first before using the portName in the jpos.xml file
Property: deviceClass
Default Value: RS232Scanner
Description: Used to uniquely identify the scanner info file name and Avalanche prf file name.
Property: useCOMxOnLinux
Default Value: False
Description: When true JavaPOS will search for ports with the prefix of COM
under the Linux operating system. Example:
COM1 under Linux is /dev/COM1
Property: ipPort
Default Value: 26666
Description: Port number used to communicate with the PortalScanner
User Manual
37
Remote Management Support
Property: ipAddress
Default Value: 192.168.0.2
Description: Address number used to communicate with the PortalScanner
Property: laneNumber
Default Value: 0
Description: lane number used to identify location of PortalScanner
Property: imageBuffers
Default Value: 1
Description: number of buffers the connected application maintains
Property: serviceVersion
Default Value: 1.13.43 (current service version number)
Description: used for messages to and from PortalScanner
Property: MBeansEnabled
Default Value: False
Description: Enables the MBeans interface. Must be used with the java virtual
machine command line option -Dcom.sun.management.jmxremote
Property: WMIEnabled
Default Value: False
Description: Enables WMI data store population
Property: decodeType
Default Value: standard
Description: Used to determine the label ID sent from the attached scanner.
Three types may exist, standard, Warhol/European, or AIM.
38
Datalogic™ JavaPOS Device Services
Appendix B.
Auto Installation Script
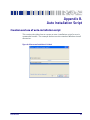
Creation and use of auto-installation script
This section describes how to create an auto-installation script for use in
unattended installs. The example below uses the standard Windows install
directories.
Figure 10. After normal installation is finished
User Manual
39
Auto Installation Script
Creation and use of auto-installation script
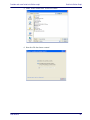
1. Click the "Generate an automatic installation script" button
2. A "Save As" dialog pops up
40
Datalogic™ JavaPOS Device Services
Creation and use of auto-installation script
Auto Installation Script
3. Enter "auto-install.xml" as the file name
4. Now the file has been created
User Manual
41
Auto Installation Script
Creation and use of auto-installation script
5. The "auto-install.xml" file is now located in the installation directory
Use this file along with the install.bat and setup.jar to perform command line installation, as the contents of the install.bat imply.
Contents of install.bat
@echo off
java -jar setup.jar auto-install.xml
Contents of auto-install.xml file
<AutomatedInstallation langpack="eng">
<com.izforge.izpack.panels.DLSHelloPanel/>
<com.izforge.izpack.panels.LicencePanel/>
<com.izforge.izpack.panels.TargetPanel>
<installpath>C:\Program
Files\Datalogic\JavaPOS</installpath>
</com.izforge.izpack.panels.TargetPanel>
<com.izforge.izpack.panels.PacksPanel>
<selected>
<pack index="0"/>
<pack index="1"/>
<pack index="2"/>
<pack index="3"/>
<pack index="4"/>
<pack index="5"/>
</selected>
</com.izforge.izpack.panels.PacksPanel>
<com.izforge.izpack.panels.InstallPanel/>
<com.izforge.izpack.panels.FinishPanel/>
</AutomatedInstallation>
42
Datalogic™ JavaPOS Device Services
Appendix C.
DLSJavaPOS Command-Line
Host Download Utility
About the Command-Line Host Download Utility
DLSJavaPOS provides the ability to update scanners using a command-line
utility that is written in Java and uses the DLSJavaPOS drivers. Shell scripts
and batch files are provided below as examples.
Command line invocation:
From a command prompt or shell, the following command may be invoked
from the JavaPOS directory after the CLASSPATH environment variable has
been set to include these jar files:
DLSJavaPOS.jar
jargs.jar
jcl.jar
jcl_editor.jar
jna.jar
jpos113-controls.jar
jpos113.jar
jsr80-1.0.2.5.jar
jsr80_linux-1.0.3.jar
jsr80_ri-1.0.2.5.jar
nrjavaserial-3.9.3.jar
xercesImpl.jar
xml-apis.jar
cmdfw.jar
Then the java executable can be invoked with the following command line
options:
java -Djava.ext.dirs=.:SupportJars Djava.library.path=.:SupportJars cmdfw.UpdateScanner -v
-s DLS-Magellan-9800i-USB-Scanner-Scale -c -f
DR9610414_CFG_ONLY.DAT
Please note the different options for the java executable versus the
cmdfw.UpdateScanner jar options!
User Manual
43
DLSJavaPOS Command-Line Host Download Utility
About the Command-Line Host Download Utility
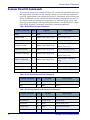
Help output
cmdfw version: 1.0.0
Usage: cmdfw.UpdateScanner [-verbose] [-help] [-hilc] scanner <ScannerName> -filename <fileName>
The default behavior is to update the firmware using the -scanner <ScannerName> -filename <filename> options:
Options:
-h
-i
-c
-l
-v
-help print this information
print info to screen and to scannerinfo.txt file, -scanner <ScannerName> is required
compare <filename> with firmware in <ScannerName>, -scanner
<ScannerName> & -filename <fileName> are required
list all available ScannerNames in jpos.xml file
verbose
Examples
There are 8 shell scripts/batch files that are examples of the info, compare,
list, and update options.
Compare:
cmdfwc.bat
cmdfwc.sh
Info:
cmdfwi.bat
cmdfwi.sh
List:
cmdfwl.bat
cmdfwl.sh
Update
cmdfwu.bat
cmdfwu.sh
44
Datalogic™ JavaPOS Device Services
www.datalogic.com
©2006-2014 Datalogic ADC, Inc. All rights reserved.
Datalogic and the Datalogic logo are registered trademarks of
Datalogic S.p.A. in many countries, including the U.S.A. and the E.U.
Datalogic ADC, Inc.
959 Terry Street | Eugene |OR 97402 | USA
Telephone: (1) 541-683-5700 | Fax: (1) 541-345-7140
820044114
(Rev D)
January 2014