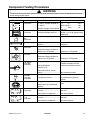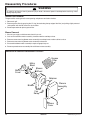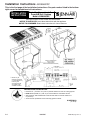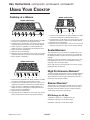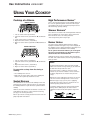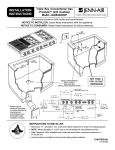
1
Service This manual is to be used by qualified appliance technicians only. Maytag does not assume any responsibility for property damage or personal injury for improper service procedures done by an unqualified person. Gas Cooktops This Base Manual covers general information Refer to individual Technical Sheet for information on specific models This manual includes, but is not limited to the following: JGD8348CDP JGC8430BDB/Q/S/W JGC8645BDB/Q/S/W JGCP430CDP JGCP636CDP JGCP648CDP 16023565 November 2004 ©2004 Maytag Services Important Information Pride and workmanship go into every product to provide our customers with quality products. It is possible, however, that during its lifetime a product may require service. Products should be serviced only by a qualified service technician who is familiar with the safety procedures required in the repair and who is equipped with the proper tools, parts, testing instruments and the appropriate service information. IT IS THE TECHNICIANS RESPONSIBILITY TO REVIEW ALL APPROPRIATE SERVICE INFORMATION BEFORE BEGINNING REPAIRS. Important Notices for Servicers and Consumers ! WARNING To avoid risk of severe personal injury or death, disconnect power before working/servicing on appliance to avoid electrical shock. To locate an authorized servicer, please consult your telephone book or the dealer from whom you purchased this product. For further assistance, please contact: Customer Service Support Center CAIR Center Web Site Telephone Number WWW.JENNAIR.COM ............................................. 1-800-536-6247 CAIR Center in Canada ........................................... 1-800-688-2002 Recognize Safety Symbols, Words, and Labels ! DANGER DANGER—Immediate hazards which WILL result in severe personal injury or death. ! WARNING WARNING—Hazards or unsafe practices which COULD result in severe personal injury or death. ! CAUTION CAUTION—Hazards or unsafe practices which COULD result in minor personal injury, product or property damage. 2 16023565 ©2004 Maytag Services Table of Contents Important Information .................................................. 2 Safety Information ....................................................... 4 Safety Practices for Servicer .................................. 5 Servicing ................................................................ 5 Before Installing ..................................................... 5 Receiving Cooktop ................................................. 5 Unpacking .............................................................. 5 Gas Connection ..................................................... 6 Electrical Requirements ......................................... 6 Electrical Connections ........................................... 6 Product Safety Devices .......................................... 7 General Information Model Identification Rating Label and Ordering Relacement Parts .................................................. 8 Cooking Nomenclature ................................................ 8 Specifications ........................................................ 9 Placement of the Cooktop ...................................... 9 Do Not Block Air Vents .......................................... 9 Location of Model Number ...................................... 9 Model Identification ................................................ 9 Service ................................................................... 9 Parts and Accessories ........................................... 9 Extended Service Plan ........................................... 9 Grounding .............................................................. 9 Cooktop Description ............................................. 10 Troubleshooting Procedures ..................................... 11 Component Testing Information ................................. 13 Disassembly Procedures Disassembly Procedures for Models Listed ........... 16 JGC8430BDB/W/Q/S JGC8645BDS Main Top Removal ................................................ 16 Spark Module Removal Bottom Access ............... 16 Spark Module Removal ........................................ 16 Surface Ignitor Removal ........................................ 16 Burner Switch Removal ........................................ 16 Manifold Pipe Removal ......................................... 16 Orifice Holder Removal ......................................... 16 Burner Tubing Removal ........................................ 16 ©2004 Maytag Services Disassembly Procedures for Models Listed ........... 18 JGD8348CDP JGCP430ADP JGCP636ADP JGCP648ADP Main Top Removal ................................................ 18 Spark Module Removal ........................................ 18 Surface Ignitor Removal ........................................ 18 Burner Switch Removal ........................................ 18 Manifold Pipe Removal ......................................... 18 Orifice Holder Removal ......................................... 18 Burner Tubing Removal ........................................ 18 E-Burner Removal ................................................ 18 Grease Filter Removal .......................................... 20 Blower Removal ................................................... 20 Appendix A: Installation Instructions Models JGCP430ADP, JGCP636ADP, JGCP648ADP .................................................... A–2 Model JGD8348CDP .......................................... A–4 Ducting Instructions, Model JGD8348CDP ......... A–6 Model JGC8430BD* ........................................... A–9 Model JGC8645BDS ........................................ A–10 Appendix B: Use and Care Models JGCP430ADP, JGCP636ADP, JGCP648ADP .................................................... B–2 Model JGD8348CDP .......................................... B–4 Model JGC8430BD* ........................................... B–6 Model JGC8645BDS .......................................... B–8 Care and Cleaning ............................................ B–10 Appendix C: LP/Natural Gas Conversion Models JGD8348CDP, JGCP430ADP, JGCP636ADP, JGCP648ADP ............................ C–2 Models JGD8430BD*, JGD8645BDS .................. C–4 16023565 3 Safety Information As with all appliances, there are certain rules to follow for safe operation. Verify everyone who operates the cooktop is familiar with the operations and with these precautions. Use appliance only for its intended purpose as described. Pay close attention to the safety sections of this manual. Recognize the safety section by looking for the following symbol or the word safety. ! WARNING This gas appliance contains or produces a chemical or chemicals which are known to the state of California to cause cancer, birth defects or other reproductive harm. To reduce the risk from substances in the fuel or from fuel combustion make sure this appliance is installed, operated, and maintained according to the instructions in this manual. Recognize this symbol as a safety precaution. Due to the nature of cooking, fires can occur as a result of overcooking or excessive grease. Although a fire is unlikely, if one occurs proceed as follows: ! ! WARNING If the information in this manual is not followed exactly, a fire or explosion may result causing property damage, personal injury or death. Do not store or use gasoline or other flammable vapors and liquids in the vicinity of this or any other appliance. WHAT TO DO IF YOU SMELL GAS • Extinguish any open flame. • Do not try to light any appliance. • Do not touch any electrical switch; do not use any phone in your building. • Immediately call your gas supplier from a neighbor’s phone. Follow the gas supplier’s instructions. • If you cannot reach your gas supplier, call fire department. Installation and service must be performed by an authorized installer, service agency or gas supplier. ! Cooktop Fires 1. Do not turn on any ventilation system above the cooktop. 2. Turn all controls to the OFF position. 3. As an added precaution turn off the electricity at the main circuit breaker or fuse box and the gas at the main supply valve. 4. Cover the food or grease to smother fire. If smoke or fire persist call the local fire department. To avoid the risk of property damage or personal injury do not obstruct the flow of combustion or ventilation air. To avoid the risk of electrical shock, serious personal injury or death: Make sure your cooktop has been properly grounded and always disconnect the electrical supply before servicing the unit. NOTE: The maximum gas supply pressure for these models must not exceed 14 inches W.C.P. WARNING To avoid risk of electrical shock, property damage, personal injury or death; verify wiring is correct, if components were replaced. Verify proper and complete operation of unit after servicing. 4 16023565 ©2004 Maytag Services Safety Information Safety Practices for Servicer Before Installing Safe and satisfactory operation of gas cooktops depend upon its design and proper installation. However, there is one more area of safety to be considered: Installing the gas cooktop in compliance with local electrical and gas building codes results in proper operation and consumer satisfaction with the cooktop. Servicing Receiving Cooktop Listed below are some general precautions and safety practices which should be followed in order to protect the service technician and consumer during service and after service has been completed. Inspect cooktop thoroughly at time of delivery. Immediately report any visible damage to carrier. Damage not discovered until after accepting delivery can still be claimed by using a concealed damage report form, available from the carrier's agent. 1. Gas smell—Extinguish any and all open flames and open windows. 2. Turn gas off—Service cooktop with gas turned off unless testing requires it. 3. Checking for gas leaks—Never check for leaks with any kind of open flame. Soap and water solution should be used for this purpose. Apply solution to suspected area and watch for air bubbles which indicates a leak. Correct leaks by tightening fittings, screws, connections, applying approved compound, or installing new parts. 4. Using lights—Use a hand flashlight when servicing cooktops or checking for gas leaks. Electric switches should not be operated where leaks are suspected. This will avoid creating arcing or sparks which could ignite the gas. If electric lights are already turned on, they should not be turned off. 5. Do not smoke—Never smoke while servicing gas cooktops, especially when working on piping that contains or has contained gas. 6. Check cooktop when service is completed—After servicing, make visual checks on electrical connection, and check for gas leaks. Inform consumer of the condition of cooktop before leaving. 7. Adhere to all local regulations and codes when performing service. ©2004 Maytag Services All shipments, i.e., complete cooktop or parts, are shipped at the buyer's risk. Maytag's responsibility ends when the consignment is accepted by the carrier in "good order." Maytag supports damage claims by supplying invoices, bills of laden, and other documentation as needed. providing this assistance, however, does not imply any responsibility for settling claims. Do not deduct claims for loss or damage from the invoice and do not withhold payment pending adjustment of claims. Do not return any units or parts for credit without written consent. Unpacking • Open the carton and slide cooktop out of packing. • Remove all literature packed with the cooktop and place cooktop onto a protective flat surface. • Avoid countertop damage by NOT sliding cooktop across the countertop. • Remove grates, burner caps, and pressure regulator from the carton. ! WARNING Do not store items of interest to children in cabinets above cooktop. Children may climb on cooktop to reach these items and become seriously injured. 16023565 5 Safety Information Gas Connection Electrical Requirements Verify the cooktop installation meets local codes or current American Gas Association (CGA) requirements in the absence of local codes. When installing CGA units, verify that installation meets local codes or in absence of local codes, current Natural Gas Installation Code CAN/ CGA-B149.1 or current Propane Installation Code, CAN/ CGA-B149.2 before connecting to the gas supply system. 120-volt, 60 Hertz, 20 amp, individual circuit which is properly grounded, polarized and protected by a circuit breaker or fuse. Installation in manufactured homes must conform with the standard CAN/CSA-Z240 Mobile Homes, Manufactured Home Construction and Safety Standards, Title 24CFR, Part 3280, or with local codes is applicable. ! WARNING To avoid risk of personal injury or property damage. Use only new flexible connectors design certified by AGA or CGA. Do not reuse an old connector. Do not reuse an old connector when moving the appliance. Electrical Connections Models with automatic pilotless (spark) ignition require an external electrical source that must be grounded and polarized in accordance with local codes. use National Electrical Code, ANSI/NFPA No. 70-Latest Edition in the absence of local codes. The wall receptacle must be placed within easy reach of the power cord without interfering with the gas supply line Cooktops must be properly grounded. Cooktop power cords are equipped with a three-prong ground plug. They fit standard three-prong wall receptacles. ! WARNING To avoid risk of electrical shock or property damage. Do not cut or remove the third (ground) prong from the power cord. Access to Gas Connection Install manual shut-off valve in an accessible location outside the cooktop. Be aware of the location of the shut-off valve. Shut-off valve is not supplied with the cooktop. The consumer is responsible for replacing any standard two-prong wall receptacle with a grounded and polarized three-prong wall receptacle. A qualified electrician should check any receptacle the customer doubts is properly grounded. The wiring diagram is on the bottom of the cooktop. Use a pipe joint compound resistant to the action of propane gas on all male threads. Connect the gas supply line either using hard piping or a properly-certified flexible connector. The pressure regulator supplied with cooktops have a 1/2 inch NPT female connection. Check local codes before choosing a method. ! WARNING Do not over tighten the fitting on the pressure regulator. Overtightening may crack the regulator. 6 16023565 ©2004 Maytag Services Safety Information Product Safety Devices Safety devices and features have been engineered into the product to protect consumer and servicer. Safety devices must never be removed, bypassed, or altered in such a manner as to defeat the purpose for which they were intended. Listed below are various safety devices together with the reason each device is incorporated in the gas ranges. Pressure Regulator Maintains proper and steady gas pressure for operation of oven controls. Regulator must be set for the type of gas being used Natural or LP. After servicing regulator, make certain it is set properly before completing service. Gas Burner Orifices Universal orifices are used on most valves. They must be adjusted or set for the type of gas being used Natural or LP. After servicing a valve or orifice verify it is adjusted properly before completing service. Grounded Cooktop Frame Ground prong on power cord is connected to the frame, usually a green lead fastened by a screw. In addition, any part or component capable of conducting an electric current is grounded by its mounting. If any ground wire, screw, strap, nut, etc. is removed for service, or any reason, it must be reconnected to its original position with original fastener before the appliance is put into operation again. Failure to do so can create a possible shock hazard. ©2004 Maytag Services 16023565 7 General Information This manual provides basic instructions and suggestions for handling, installing and servicing gas cooktops. Model Identification Rating Label and Ordering Replacement Parts The directions, information, and warnings in this manual are developed from experience with, and careful testing of the product. If the unit is installed according to this manual, it will operate properly and will require minimal servicing. A unit in proper operating order ensures the consumer all the benefits provided by clean, modern gas cooking. Model numbers are recorded on the rating label. Rating label is located on the bottom of the burner box. Before ordering parts, write down the correct model and serial number from rating label. This avoids incorrect shipments and delays. Please refer to parts reference material when ordering replacement parts. This manual contains information needed by authorized service technicians to install and service gas cooktops. There may be, however, some parts which need further explanation. Refer to the Technical Sheets or toll-free technical support line to recieve technical assistance from authorized service technicians. Cooking Nomenclature J G C 8 4 3 0 B D W Color A B C H L P Q S T W F N Brand A C G H J M N U Y Amana Magic Chef Graffer & Sattler Hardwick Jenn-Air Maytag Norge Universal Crosley Listing Fuel B D E/J G L M P X W Almond on Almond Black Brushed Chrome Traditional White Traditional Almond Prostyle Monochromatic Bisque Stainless Traditional Bisque White on White Frost White (True Color White) Natural Bisque (True Color Bisque) A C D G M P Butane Dual Fuel Electric Gas, Natural Liquid Propane Microwave Standing Pilot No Fuel Warming Drawer X UL/AGA CSA/CGA/CUL Dual Listed 220-240 V / 50-60 Hz Military Model PSB Approved (Singapore) Export 120 V / 60 Hz Production Code This identifies the production version. Product Type A C D E G L M P Q R S T V W Y Z 8 Accessory/Cartridge Cooktop Updraft/Countertop Downdraft Cooktop or Warming Drawer Eyelevel Range Grill Range (20") Range (36") Drop In (24") Wall Oven (27") Range, Free-Standing (30") Slide-In (30") Range Hood OTR Wall Oven RV Range RV Top Feature Content 1000-3999 4000-6999 7000-9999 16023565 Brands Maytag/Amana Jenn Air ©2004 Maytag Services General Information Specifications Parts and Accessories Refer to individual Technical Sheet for specification information. Purchase replacement parts and accessories over the phone. To order accessories for your product call: Placement of the Cooktop • For Jenn-Air product call 1-800-688-1100 or visit the Web Site at www.jennair.com • For product in Canada call 1-866-587-2002 or visit the Web Site at www.jennair.com This cooktop must be placed in the kitchen or comparable room. All safety guidelines must be followed and free air flow around the cooktop is essential. Extended Service Plan We offer long-term service protection for this new oven. Do Not Block Air Vents All air vents must be kept clear during cooking. If air vents are covered during operation, the oven may overheat. If this occurs, a sensitive, thermal safety device automatically removes power to the oven, rendering the oven inoperable. The oven will remain in this state until it has sufficiently cooled. • Dependability PlusSM Extended Service Plan is specially designed to supplement Jenn-Air’s strong warranty. This plan covers parts, labor, and travel charges. Call 1-800-925-2020 for information. Grounding Location of Model Number NOTE: This appliance must be properly grounded, for personal safety. To request service information or replacement parts, the service center will require the complete model, serial, and manufacturing number of your cooktop. The number can be found in the burner box. Lift the cooktop surface to view the data. Power cord on this appliance is equipped with a threeprong grounding plug. This matches standard three-prong grounding wall receptacle to prevent possibility of electric shock from this appliance. Consumer should have wall receptacle and circuit checked by qualified electrician to verify receptacle is properly grounded. Model Identification Complete enclosed registration card and promptly return. If registration card is missing: • For Jenn-Air product call 1-800-536-6247 or visit the Web Site at www.jennair.com • For product in Canada call 1-866-587-2002 or visit the Web Site at www.jennair.com When contacting provide product information located on rating plate. Record the following: Model Number: ___________________ Manufacturing Number: ___________________ Serial or S/N Number: ___________________ Date of purchase: ___________________ Dealer’s name and address: ___________________ Service Keep a copy of sales receipt for future reference or in case warranty service is required. To locate an authorized servicer: Where standard two-prong wall receptacle is encountered, it is consumers responsibility and obligation to have it replaced with a properly grounded three-prong wall receptacle. DO NOT, UNDER ANY CIRCUMSTANCES, CUT OR REMOVE THE THIRD (GROUND) PRONG FROM POWER CORD. • For Jenn-Air product call 1-800-688-1100 or visit the Web Site at www.jennair.com • For product in Canada call 1-866-587-2002 or visit the Web Site at www.jennair.com Warranty service must be performed by an authorized servicer. We also recommend contacting an authorized servicer, if service is required after warranty expires. ©2004 Maytag Services 16023565 9 General Information For 15 amp circuits only. Do not use an adapter on 20 amp. circuit. Where local codes permit, a TEMPORARY CONNECTION may be made to properly grounded twoprong wall receptacle by the use of a UL listed adapter available at most hardware stores. When disconnecting power cord from adapter, always hold adapter with one hand. If this is not done, adapter ground terminal is very likely to break with repeated use. Should this happen, DO NOT USE appliance until a proper ground has been established. Larger slot on adapter must be aligned with larger slot in the wall receptacle to provide proper polarity. Neutral Wire Ground ! WARNING Attaching adapter ground terminal to wall receptacle cover screw does not ground appliance unless the cover screw is metal and not insulated, and wall receptacle is grounded through the house wiring. Consumer should have circuit checked by a qualified electrician to verify receptacle is properly grounded. Hot Line NOTE: Circuit tester can be use to verify voltage is present at the outlet, connect one lead to hot line and the other lead to ground, circuit tester should light. Cooktop Description Burner Caps and Assemblies Grates Main Top Burner Knobs 10 16023565 ©2004 Maytag Services Troubleshooting Procedures ! WARNING To avoid risk of electrical shock, personal injury or death; disconnect power and gas to cooktop before servicing, unless testing requires power and/or gas. ! CAUTION • Verify proper grounding before checking for trouble. • Be careful of any high voltage circuit. • Do not touch any part of the circuit on the printed circuit board, since static electric discharge may damage the control panel. Always touch ground while working on this panel to discharge the static electricity, which may be resting on your body. Problem Burners will not ignite; no spark at top burner. Burner will not ignite. No spark to burner ignitors when burner knob is rotated to “LITE” position. No spark or only random spark at one ignitor. Unit continues to spark after knob is turned to OFF position. ©2004 Maytag Services Possible Cause Correction Poor ground on burner cap ......................... • Clean burner cap. Weak or failed spark module ...................... • Replace spark module. Low gas pressure ........................................ • Verify pressure 5” WCP for natural, 10” WCP for LP. No 120 VAC to range .................................. • Verify voltage at wall outlet. Micro switch contacts not closing ................ • Check wiring against appropriate wiring diagram. Verify all terminals and connections are correct and tight. Check micro switch Faulty wiring. Bad connection at burner contacts. electrode and electrode socket ................... • Check wiring against appropriate wiring diagram. Verify all terminals and connections are correct and tight. Inoperative spark module ............................ • Check module according to testing procedures information. Electrode dirty. Burner cap dirty .................. • Clean electrode or burner cap. Cracked or broken electrode, electrode wire or electrode socket .............................. • Replace electrode. Check for cracked ignitor or pinched ignitor wire .................................................. • Replace ignitor lead or electrode. Poor continuity to burner cap....................... • Clean burner cap and lead. Bad ground connection or lack of continuity to ground or ignitor ...................... • Tighten ground connection and correct any breaks in ground path from ignitor path to unit ground path. Cracked or broken ignitor extension lead.... • Replace ignitor lead. Shorted valve switch/harness...................... • Replace switch/harness. If sparking is caused by excessive spillovers, customer education is advised. Switch has slipped off the valve .................. • Carefully reposition switch on valve and rotate from OFF to high, several times to verify switch is not broken. 16023565 11 Troubleshooting Procedures ! WARNING To avoid risk of electrical shock, personal injury or death; disconnect power and gas to cooktop before servicing, unless testing requires power and/or gas. Problem No gas flows to burner. Fan motor does not operate. 12 Possible Cause Correction Gas pressure too high .............................. • Check for correct gas pressure. Natural gas pressure should be 5" WCP and LP gas pressure should be 10" WCP. Failed gas valve........................................ • Check gas valve for continuity. Loose wire connection or broken wire ...... • Verify all connections are clean and tight, replace broken wire. No power to fan motor .............................. • Check for 120 VAC supplied at fan motor. If no voltage is present, check for broken or loose wiring between fan motor and relay board. If voltage is present at fan motor, go to the next step. Failed fan motor or winding/frozen shaft .. • Check motor winding for continuity. Check for a frozen motor shaft. Check for broken wiring between motor and neutral terminal block. 16023565 ©2004 Maytag Services Component Testing Procedures ! WARNING To avoid risk of electrical shock, personal injury or death; disconnect power and gas to cooktop before servicing, unless testing requires power. Illustration Component Burner valve, top, 360° Test Procedure Verify gas is supplied. JGD8348CDP Orifice adjusted for Natural or LP. Burner valve, left and right, 360° JGD8348CDP Snap switch Results To replace burner valve(s), complete assembly must be replaced (manifold and valves). 1650 BTU per hour minimum. Adjust set screw for simmer control............................................ See conversion section. Verify gas is supplied. To replace burner valve(s), complete assembly must be Orifice adjusted for replaced (manifold and valves). Natural or LP. Adjust set screw for simmer control............................................ See conversion section. Test for voltage at terminals .......... 120 VAC JGD8348CDP Dreefs spark switch Disconnect wiring and check for continuity in LITE position.............. Continuity in LITE position. Test for voltage at terminals .......... 120 VAC JGD8348CDP Disconnect wiring and check for continuity in LITE position.............. Continuity in LITE position. Burner ignition electrode Test for resistance of spark lead ... Continuity JGD8348CDP Test ignitor to chassis.................... No continuity from ignitor to chassis. Sealed surface burner Verify gas is supplied..................... Check for obstructions in burner ports. JGD8348CDP, JGC8430BD*, JGC8645BDS L A N L N A1 A Spark module 2+0 B B1 A1 JGD8348CDP Spark module 4+0 B B1 Test for voltage at terminals L and N .......................................... 120 VAC Check polarity and ground............. See wiring diagram Test for voltage at terminals L and N .......................................... 120 VAC JGD8348CDP Blower motor assembly JGD8348CDP Rotary switch Check polarity and ground............. See wiring diagram 115 VAC, 60 Hz, 2.4 amps Verify resistance between white 1550 RPM, 1/10 HP, CWLE and black wires.............................. Approx. 48 Ω Test for voltage at terminals .......... 120 VAC JGD8348CDP Disconnect wiring, reference wiring diagram and check for continuity in Lo and Hi positions .... Continuity in Lo and Hi positions. ©2004 Maytag Services 16023565 13 Component Testing Procedures ! WARNING To avoid risk of electrical shock, personal injury or death; disconnect power and gas to cooktop before servicing, unless testing requires power. Illustration Component Venturi, front (short) Test Procedure Nominal air shutter setting............ .375 Tolerance...................................... .030 3/8" 1/32" Results Nominal air shutter setting............ .375 Tolerance...................................... .030 3/8" 1/32" Nominal air shutter setting............ .250 Tolerance...................................... .031 1/4" 1/32" (approx.) Nominal air shutter setting............ .585 Tolerance...................................... .031 19/32" (approx.) 1/32" (approx.) JGD8348CDP Venturi, rear (long) JGD8348CDP Tube, front (short) JGD8348CDP Tube, rear (long) JGD8348CDP E-burner grill assembly Verify gas is supplied.................... Check for obstructions in burner ports. JGD8348CDP E-burner ignitor Test for resistance of spark lead .. Continuity JGD8348CDP Pressure regulator All 270° Switch JGCP430ADP, JGCP636ADP, JGCP648ADP Valve switch JGCP430ADP, JGCP636ADP, JGCP648ADP L A B L N 14 A1 A Orifice adjusted for Natural or LP. To replace burner valve(s), complete assembly must be replaced (manifold and valves). Adjust set screw for simmer control ........................................... See conversion section. Test for voltage at terminals ......... 120 VAC Disconnect wiring and check for continuity in LITE position............. Continuity in LITE position. Test for resistance of spark lead Continuity JGCP430ADP, JGCP636ADP, JGCP648ADP Test ignitor to chassis................. No continuity from ignitor to chassis. Spark B module Test for voltage at terminals A and N......................................... 120 VAC B1 Spark module 4+0 B A1 Verify gas is supplied. Spark ignition electrode JGCP636ADP, JGCP648ADP N Test ignitor to chassis................... No continuity from ignitor to chassis. Verify gas pressure (W.C.P.)........ 5" Natural, 10" LP/propane If on LP service, verify proper gas supply conversion. B1 Check polarity and ground............ See wiring diagram Test for voltage at terminals A and N......................................... 120 VAC JGCP430ADP Check polarity and ground............ See wiring diagram 16023565 ©2004 Maytag Services Component Testing Procedures ! WARNING To avoid risk of electrical shock, personal injury or death; disconnect power and gas to cooktop before servicing, unless testing requires power. Illustration Component Infinite switch JGCP648ADP Griddle assembly JGCP648ADP Surface indicator light Test Procedure Remove wiring from terminals P1 and P2, connect voltmeter to P1 and P2. Results Time On Time Off LO 5% 95% MED (5-6) 50% 50% HI 100% 0% Measure voltages at each setting.. 120 VAC Measure cold (room temperature) resistance between terminals ........ 10.41 Ω to 11.51 Ω, approximately 1300 Watts Measure voltage at light ................ 120 VAC JGCP648ADP Power cord 3-wire All Spark switch Verify resistance of wires to terminals ........................................ Continuity Test for voltage at terminals ........ 120 VAC JGC8645BDS Spark switch Disconnect wiring and check for continuity in LITE position............ Continuity in LITE position. Test for voltage at terminals .......... 120 VAC JGC8430BD* Disconnect wiring and check for continuity in LITE position.............. Continuity in LITE position. 270° Switch JGC8430BD*, JGC8645BDS Spark ignition electrode JGC8430BD*, JGC8645BDS A N L N A1 A Spark module 4+0 Check polarity and ground............. See wiring diagram Test for voltage at terminals A and N.......................................... 120 VAC B1 B A1 Adjust set screw for simmer control............................................ See conversion section. Test for resistance of spark lead ... Continuity JGC8645BDS Spark B module B Orifice adjusted for Natural or LP. To replace burner valve(s), complete assembly must be replaced (manifold and valves). Test ignitor to chassis.................... No continuity from ignitor to chassis. Verify gas is supplied..................... Check for obstructions in burner ports. Verify burner cap is positioned correctly. Test for voltage at terminals A and N.......................................... 120 VAC Surface burner L Verify gas is supplied. B1 ©2004 Maytag Services JGC8430BD* Check polarity and ground............. See wiring diagram 16023565 15 Disassembly Procedures ! WARNING To avoid risk of electrical shock, personal injury or death, disconnect power to cooktop before servicing, unless testing requires power. Disassembly Procedures for Models Listed Surface Ignitor Removal • JGC8430BDB/W/Q/S • JGC8645BDS 1. Remove screws securing burner base to orifice holder. Main Top Removal 2. Lift upward on burner base and disconnect ignitor wire. 1. Shut off gas supply and disconnect electricity to unit. 3. Remove screw securing ignitor to burner base. 2. Remove grates, caps, and knobs. 4. Replace ignitor and reverse procedure to reinstall. NOTE: To remove knob(s), slide a rag under the knob and pull upward. Burner Switch Removal 3. Remove cooktop from installation position and place on protected surface. 1. Remove main top, see "Main Top Removal" procedure. 4. Remove screws securing burner base to orifice holder. 2. Disconnect and label wire from burner switch. 5. Lift upward on burner base, disconnect ignitor wire, and remove burner base. 4. Replace burner switch and reverse procedure to reinstall. 3. Slide burner switch up and off burner valve stem. 6. Remove main top by lifting off. NOTE: Top is secured with double-sided tape in front. 7. Reverse procedure to reinstall. Manifold Pipe Removal 1. Remove main top, see "Main Top Removal" procedure. 2. Slide burner switch up and off burner valve(s). Spark Module Removal Bottom Access 3. Disconnect gas burner tubing from burner valve(s). 1. Gain access to the bottom of the cook top. 4. Remove screws securing manifold pipe to burner box bottom. 2. Remove screws securing spark module to access panel. 5. Disconnect gas supply line and remove regulator from manifold pipe. 3. Remove screws securing spark module to access panel. 4. Disconnect and label wire leads from spark module. 6. Replace manifold pipe assembly and reverse procedure to reinstall. NOTE: Mark wires for exact replacement on module. 5. Replace spark module and reverse procedure to reinstall. Orifice Holder Removal Spark Module Removal 2. Disconnect gas burner tubing from orifice holder. 1. Remove main top, see "Main Top Removal" procedure. 3. Replace orifice holder and reverse procedure to reinstall. 2. Remove screws securing spark module cover to burner box. Burner Tubing Removal 3. Remove screws securing spark module to burner box. 1. Remove main top, see "Main Top Removal" procedure. 4. Disconnect and label wire leads from spark module. 2. Disconnect burner tubing from orifice holder and burner valve. NOTE: Mark wires for exact replacement on module. 5. Replace spark module and reverse procedure to reinstall. 16 1. Remove main top, see "Main Top Removal" procedure. 3. Remove burner tubing from the unit. 4. Replace burner tubing and reverse procedure to reinstall. 16023510 ©2004 Maytag Services Disassembly Procedures ! WARNING To avoid risk of electrical shock, personal injury or death, disconnect power to cooktop before servicing, unless testing requires power. JGC8430BD*, JGC8645BDS BODY breakdown Grates Igniter Burner Caps Burner Base Venturi Main Top Knobs JGC8430BD*, JGC8645BDS BURNER BOX breakdown Regulator Spark Module Burner Tube Ignitor Burner Brackets Valve Orifice Valve Burner Tube Burner Box Ignitor Ignitor Ignitor Valve Valve Valve Manifold Pipe ©2004 Maytag Services Burner Tube Burner Tube 16023510 Power Cord 17 Disassembly Procedures ! WARNING To avoid risk of electrical shock, personal injury or death, disconnect power to cooktop before servicing, unless testing requires power. Disassembly Procedures for Models Listed Manifold Pipe Removal • • • • 1. Remove main top, see "Main Top Removal" procedure. JGD8348CDP JGCP430ADP JGCP636ADP JGCP648ADP 2. Disconnect gas supply line and remove regulator from manifold pipe. 3. Slide burner switch up and off burner valve(s). Main Top Removal 1. Shut off gas supply and disconnect electricity to unit. 4. Disconnect burner tubing from burner valve(s). 2. Remove grates, caps, and knobs. 5. Remove screws securing manifold pipe to burner box bottom. NOTE: To remove knob(s), slide a rag under the knob and pull upward. 6. Replace manifold pipe assembly and reverse procedure to reinstall. 3. Remove cooktop from installation position and place on protected surface. 4. Remove screws securing burner base to orifice holder. Orifice Holder Removal 1. Remove main top, see "Main Top Removal" procedure. 5. Lift upward on burner base, disconnect ignitor wire, and remove burner base, (auto re-ignition models only). 6. Remove main top by lifting off burner box. 2. Disconnect burner tubing from orifice holder. 3. Remove screws securing orifice holder bracket to burner box. 4. Remove orifice holder bracket from burner box. NOTE: Top is secured with double-sided tape in front. 7. Reverse procedure to reinstall. 5. Remove screws securing orifice holder to orifice holder bracket. Spark Module Removal 6. Replace orifice holder and reverse procedure to reinstall. 1. Remove main top, see "Main Top Removal" procedure. Burner Tubing Removal 2. Remove spark module from bracket. 3. Disconnect and label wire leads from spark module. 1. Remove main top, see "Main Top Removal" procedure. NOTE: Mark wires for exact replacement on module. 2. Disconnect burner tubing from burner valve and orifice holder. 4. Replace module and reverse procedure to reinstall. Surface Ignitor Removal 3. Replace burner tubing and reverse procedure to reinstall. 1. Remove main top, see "Main Top Removal" procedure. E-Burner Removal 2. Disconnect ignitor wire from ignitor. 1. Shut off gas supply and disconnect electricity to unit. 3. Remove screw securing ignitor to orifice holder and remove ignitor. 2. Remove E-Burner grate. 4. Replace ignitor and reverse procedure to reinstall. 3. Disconnect E-Burner burner module from orifices/ orifice holders. Burner Switch Removal 4. Remove screws securing E-Burner module to cooktop frame. 1. Remove main top, see "Main Top Removal" procedure. 2. Slide burner switch up and off burner valve stem. 5. Move E-Burner module by sliding toward the rear of the cooktop until the tubing clears the orifices/orifice holders. 3. Disconnect and label wires from spark module and incoming power supply. 6. Reverse procedure to install optional Two-Burner Module accessory or to reinstall E-Burner. 4. Replace burner switch and reverse procedure to reinstall. 18 16023510 ©2004 Maytag Services Disassembly Procedures ! WARNING To avoid risk of electrical shock, personal injury or death, disconnect power to cooktop before servicing, unless testing requires power. JGD8348CDP, JGCP430ADP, JGCP636ADP, JGCP648ADP BODY breakdown Grates Air Grill Snap Switch Control Panel Top Rotary Switch Fan Switch Knob Pan Seal Knob Grill Pans JGD8348CDP, JGCP430ADP, JGCP636ADP, JGCP648ADP BURNER BOX breakdown Burner Top E-burner Spark Switch Igniter Cartridge Housing E-burner Igniter Gas Valve Large Small Venturi Venturi Regulator Manifold Pipe Drain Jar ©2004 Maytag Services Burner Box Bottom 16023510 19 Disassembly Procedures ! WARNING To avoid risk of electrical shock, personal injury or death, disconnect power to cooktop before servicing, unless testing requires power. Grease Filter Removal The grease filter rests against the vent opening and plenum ventilation chamber. 1. Remove air grill. 2. Remove grease filter by grasping the “D“ ring (located along the top edge of the filter) and pulling slightly outward and upward until the filter clears the air chamber. 3. Reverse procedure to replace grease filter. Blower Removal 1. Shut off gas supply and disconnect electricity to unit. 2. Gain access to blower motor assembly, located under the cooktop surface. 3. Remove screws securing blower motor assembly to cooktop frame or other cabinet surface. 4. Remove screws securing blower motor assembly to ductwork. 5. Disassemble blower motor assembly to replace appropriate part. 6. Reverse procedures to reassembly/reinstall blower motor assembly. JGD8348CDP BLOWER MOTOR ASSEMBLY breakdown Grease Filter Motor Band Blower Wheel Motor Cover Retainer Plenum Assembly Blower Fan Relay Access Cover 20 16023510 ©2004 Maytag Services Appendix A ©2004 Maytag Services 16023565 A–1 Installation Instructions JGCP430ADP, JGCP636ADP, JGCP648ADP This is the first page of the Installation Instructions. See part number listed in the bottom right corner for complete set of instructions. ! "# "# $%& - Improper installation, adjustment, alteration, service, maintenance or use of appliance can result in serious injury or property damage. ),*85( : ' ( ( ) * : + Leave these instructions with the appliance. : + Retain these instructions for future reference. (12-03-01) A–2 16023565 ©2004 Maytag Services Installation Instructions JGCP430ADP, JGCP636ADP, JGCP648ADP " 35 1/16² (89.06 cm) 36 1/16² (91.6 cm) ),*85( " 28 15/16² (72.34 cm) 30² (76.20 cm) ),*85( ©2004 Maytag Services 16023565 A–3 Installation Instructions JGD8348CDP This is the first page of the Installation Instructions. See part number listed in the bottom right corner for complete set of instructions. ,! '$ %-%,%$ $ J , ! & " - a ~ + Leave these instructions with the appliance. + Retain these instructions for future reference. SELECT APPROPRIATE DUCT CUTOUT (SEE DUCTING INSTALLATION INSTRUCTIONS.) * Blower may be rotated for horizontal or vertical direction by loosening nuts around blower inlet. Accessible inside ventilation chamber. + : Dimension “A” - provide 2² min. (5.08 cm) cabinet clearance to motor for cooling purpose. : + Where possible, 6² (15.54 cm) is recommended for motor/blower service. : Side Clearance: Grills installed near a side wall must allow a minimum clearance of 8² (20.32 cm). : Access must be provided to remove and empty grease container. . (11-03-00) A–4 16023565 ©2004 Maytag Services Installation Instructions ©2004 Maytag Services Ducting Instructions JGD8348CDP 16023565 A–5 Installation Instructions A–6 Ducting Instructions JGD8348CDP 16023565 ©2004 Maytag Services Installation Instructions ©2004 Maytag Services Ducting Instructions JGD8348CDP 16023565 A–7 Installation Instructions A–8 Ducting Instructions JGD8348CDP 16023565 ©2004 Maytag Services Installation Instructions JGC8430BD* This is the first page of the Installation Instructions. See part number listed in the bottom right corner for complete set of instructions. INSTALLATION MANUAL SEALED GAS COOKTOP JGC8430 & JGC8536 403 WEST FOURTH STREET, NORTH · NEWTON, IA 50208 IMPORTANT: Dimensions Shown in Both Inches and Centimeters. IMPORTANT: Be sure the appliance being installed is equipped for the gas to be supplied. Refer to serial plate on underside of burner box for this information. Do not attempt to convert this appliance for use with a gas other than the type specified. E 30² MODEL A B C D E F G H I J JGC8430 Inches cm 28 3/4 + 1/16 73.03 + .2 20 5/8 + 1/16 52.39 + .2 2 MIN 5.08 MIN 5 1/16 12.9 30 76.2 21 3/4 55.2 3 11/16 9.4 12 7/16 31.6 1 3/4 4.4 1 3/4 4.4 F J MANIFOLD ENTRANCE B A C G D I H 36² MODEL A B C D E F G H I J JGC8536 Inches cm 34 7/8 + 1/16 88.58 + 1/16 20 13/16 + 1/16 52.86 + 1/16 2 MIN 5.08 MIN 4 9/16 11.6 36 91.4 21 9/16 54.8 3 13/16 9.6 15 1/2 39.4 1 3/4 4.4 1 3/4 4.4 E F J MANIFOLD ENTRANCE G D I CUTOUT DIMENSIONS ARE CRITICAL H SPECIAL WARNING IMPROPER INSTALLATION, ADJUSTMENT, ALTERATION, SERVICE, MAINTENANCE OR USE OF RANGE CAN RESULT IN SERIOUS INJURY OR PROPERTY DAMAGE. NOTICE TO INSTALLER: LEAVE THESE INSTRUCTIONS WITH THE APPLIANCE. NOTICE TO CONSUMER: RETAIN THESE INSTRUCTIONS FOR FUTURE REFERENCE. 8101P643-60 (05-04-00) ©2004 Maytag Services 16023565 A–9 Installation Instructions JGC8645BDS This is the first page of the Installation Instructions. See part number listed in the bottom right corner for complete set of instructions. INSTALLATION MANUAL SEALED GAS COOKTOPS JGC8645 403 WEST FOURTH STREET, NORTH · NEWTON, IA 50208 IMPORTANT: Dimensions Shown in Both Inches and Centimeters. IMPORTANT: Be sure the appliance being installed is equipped for the gas to be supplied. Refer to serial plate on underside of burner box for this information. Do not attempt to convert this appliance for use with a gas other than the type specified. 45² MODEL 21:² 55.2 cm 7 13/16² 19.8 cm 43 3/4² + 1/16² 111.13 cm 20e² + 1/16² 52.39 cm 2² Min. 5.08 cm 12² Min. Clearance 3.81 cm CUTOUT DIMENSIONS ARE CRITICAL SPECIAL WARNING IMPROPER INSTALLATION, ADJUSTMENT, ALTERATION, SERVICE, MAINTENANCE OR USE OF APPLIANCE CAN RESULT IN SERIOUS INJURY OR PROPERTY DAMAGE. NOTICE TO INSTALLER: LEAVE THESE INSTRUCTIONS WITH THE APPLIANCE. NOTICE TO CONSUMER: RETAIN THESE INSTRUCTIONS FOR FUTURE REFERENCE. 8101P644-60 (05-04-00) A–10 16023565 ©2004 Maytag Services Appendix B ©2004 Maytag Services 16023565 B–1 Use Instructions JGCP430ADP, JGCP636ADP, JGCP648ADP USING YOUR COOKTOP Surface Controls Operating During a Power Failure 1. Hold a lighted match to the desired surface burner head. CAUTION 2. Push in and turn the control knob slowly to the desired setting. • If flame should go out during a cooking operation, turn the burner off. If a strong gas odor is detected, open a window and wait five minutes before relighting the burner. • Be sure all surface controls are set to the OFF position prior to supplying gas to the cooktop. • NEVER touch cooktop until it has cooled. Expect some parts of the cooktop, especially around the burners, to become warm or hot during cooking. Use potholders to protect hands. CAUTION • When lighting the surface burners, be sure all of the controls are in the OFF position. Strike the match first and hold it in position before turning the knob. • Do not leave the cooktop unattended when cooking during a power failure. The automatic re-ignition feature will not operate during a power failure. Suggested Heat Settings Surface Control Knobs The size and type of cookware will affect the heat setting. For information on cookware and other factors affecting heat settings, refer to “Cooking Made Simple” booklet. OFF USES HIGH Use HIGH to bring liquid to a boil, or reach pressure in a pressure cooker. Always reduce setting to a lower heat when liquids begin to boil or foods begin to cook. HIGH SETTINGS Setting the Controls Your cooktop has sealed gas burners with automatic re-ignition. If the burner flame should go out, OFF the system will automatically spark to re-ignite the burner. HIGH OFF HIGH HIGH LOW LOW HIGH OFF LOW LOW Pilotless ignition eliminates the need for a constant standing pilot light. Each surface burner has a spark ignitor. Use care when cleaning around the surface burner. LOW Pilotless Ignition An intermediate flame size is used to continue cooking. Food will not cook any faster when a higher flame setting is used than needed to maintain a gentle boil. Water boils at the same temperature whether boiling gently or vigorously. Use LOW to simmer foods, keep foods warm and melt chocolate or butter. OFF HIGH HIGH OFF LOW 2. Push in knob and turn immediately counterclockwise to the desired setting. • A clicking (spark) sound will be heard and the OFF burner will light. (All ignitors will spark when any surface burner knob is turned on. However, only the selected burner will light.) LOW HIGH OFF LOW 1. Place a pan on the burner grate. (To preserve the grate finish, do not operate the burners without a pan on the grate to absorb the heat from the burner flame.) LOW HIGH OFF LOW Use to turn on the surface burners. An infinite choice of heat settings is available from LOW to HIGH. Some cooking may take place on the LOW setting if the pan is covered. It is possible to reduce the heat by rotating the knob toward OFF. Be sure flame is stable. If the surface burner does not light, check if ignitor is broken, soiled or wet. 4 B–2 16023565 ©2004 Maytag Services Use Instructions JGCP430ADP, JGCP636ADP, JGCP648ADP USING YOUR COOKTOP Cooktop at a Glance MODEL JGCP430ADP MODEL JGCP648ADP 1 1 2 3 4 5 6 2 3 4 1. Left rear burner (5,000 BTUs on HIGH, 600 BTUs on LOW). This burner is designed for cooking delicate items. 2. Left front burner (17,000 BTUs). This burner may be used to quickly bring water to a boil for large quantity cooking. 3. Right rear burner (9,200 BTUs). 4. Right front burner (17,000 BTUs). This burner may be used to quickly bring water to a boil for large quantity cooking. 7 1. Left rear burner (5,000 BTUs on HIGH, 600 BTUs on LOW). This burner is designed for cooking delicate items. 2. Left front burner (17,000 BTUs). This burner may be used to quickly bring water to a boil for large quantity cooking. 3. Center rear burner (5,000 BTUs on HIGH, 600 BTUs on LOW). This burner is designed for cooking delicate items. 4. Center front burner (9,200 BTUs). 5. Right rear burner (9,200 BTUs). 6. Right front burner (17,000 BTUs). This burner may be used to quickly bring water to a boil for large quantity cooking. 7. Electric griddle (1,300 Watts.) Sealed Burners The sealed burners are secured to the cooktop and are not designed to be removed. Since the burners are sealed into the cooktop, boilovers or spills will not seep underneath the cooktop. However, the burners should be cleaned after each use. The head portion of the burner is easily removed for cleaning. (See page 7 for cleaning directions.) MODEL JGCP636ADP Burner caps must be correctly placed on the burner base for proper operation of the burner. High Performance Burners* 1 2 3 4 5 There are two high speed burners on your cooktop, located in the left and right front positions. These burners offer higher speed cooking that can be used to quickly bring water to a boil and for large-quantity cooking. 6 1. Left rear burner (5,000 BTUs on HIGH, 600 BTUs on LOW). This burner is designed for cooking delicate items. 2. Left front burner (17,000 BTUs). This burner may be used to quickly bring water to a boil for large quantity cooking. 3. Center rear burner (5,000 BTUs on HIGH, 600 BTUs on LOW). This burner is designed for cooking delicate items. 4. Center front burner (9,200 BTUs). 5. Right rear burner (9,200 BTUs). 6. Right front burner (17,000 BTUs). This burner may used to quickly bring water to a boil for large quantity cooking. Simmer Burners* These burners are located in the left and center rear (select models) or the left rear position. The simmer burner offers a lower BTU flame for delicate sauces or melting chocolate. * BTU ratings will vary when using LP gas. BTU Ratings for LP Gas 17,000 BTUs natural gas = 15,000 BTUs LP gas 9,200 BTUs natural gas = 9,100 BTUs LP gas 5,000 BTUs natural gas = 4,000 BTUs LP gas 5 ©2004 Maytag Services 16023565 B–3 Use Instructions JGD8348CDP USING YOUR COOKTOP SURFACE CONTROLS CAUTIONS: • If flame should go out during a cooking operation, turn the burner off. If a strong gas odor is detected, open a window and wait five minutes before relighting the burner. • Be sure all surface controls are set to the OFF position prior to supplying gas to the cooktop. • NEVER touch cooktop until it has cooled. Expect some parts of the cooktop, especially around the burners, to become warm or hot during cooking. Use potholders to protect hands. or notch may be felt. The knobs can be set on or between any of the settings. 3. After ignition, turn knob clockwise to desired setting. Graphics next to the knob identify which burner the knob controls. For example, the graphic at right shows the right front burner location. • The ignitor will continue to spark until the knob is turned past the Lite position. SETTING THE CONTROLS 1. Place a pan on the burner grate. (To preserve the grate finish, do not operate the burners without a pan on the grate to absorb the heat from the burner flame.) 2. Push in knob and turn immediately counterclockwise to the Lite setting until burner ignites. • A clicking (spark) sound will be heard and the burner will light. All ignitors will spark when any surface burner knob is turned to the Lite position. PILOTLESS IGNITION If the surface burner does not light, check if ignitor is broken, soiled or wet. If clogged, clean the small port beneath the ignitor using straight pin. Settings 3. Adjust the flame to the desired level. CAUTION: •When lighting the surface burners, be sure all of the controls are in the OFF position. Strike the match first and hold it in position before turning the knob to Lite. Uses Hi ed Use Hi to bring liquid to a boil, or reach pressure in a pressure cooker. Always reduce setting to a lower heat when liquids begin to boil or foods begin to cook. Hi Li te An intermediate flame size is used to continue cooking. Food will not cook any faster when a higher flame setting is used than needed to maintain a gentle boil. Water boils at the same temperature whether boiling gently or vigorously. PORTS IGNITOR PORT BELOW IGNITOR Lo Lo Use Lo to simmer foods, keep foods warm and melt chocolate or butter. M Of f Hi Li te Med i te Hi L ed SURFACE CONTROL KNOBS 2. Push in and turn the control knob slowly to Lite. The size and type of cookware will affect the heat setting. For information on cookware and other factors affecting heat settings, refer to “Cooking Made Simple” booklet. Lo CAP 1. Hold a lighted match to the desired surface burner head. SUGGESTED HEAT SETTINGS M Pilotless ignition eliminates the need for a constant standing pilot light. Each surface burner has a spark ignitor. When cleaning around the surface burner use care. If cleaning cloth should catch the ignitor, it could damage it preventing ignition. OPERATING DURING A POWER FAILURE Some cooking may take place on the Lo setting if the pan is covered. It is possible to reduce the heat by rotating the knob toward OFF. Be sure flame is stable. Lo Use to turn on the surface burners. An infinite choice of heat settings is available from Lo to Hi. At the Hi setting a detent 4 B–4 16023565 ©2004 Maytag Services Use Instructions JGD8348CDP USING YOUR COOKTOP, CONT. CONTROL LOCATIONS COOKTOP To prevent the cooktop from discoloring or staining: • Clean cooktop after each use. • Wipe acidic or sugary spills as soon as the cooktop has cooled as these spills may discolor the porcelain. SEALED BURNERS 1 2 Fan 1. Left rear surface burner or grill. 2. Left front surface burner or grill. 3. Center rear surface burner. 4. Center front surface burner. 5. Right rear surface burner. 6. Right front surface burner. 3 4 6 5 NOTE: When using a JGA8100 surface burner assembly with control locations #1 and #2, the control knob may be turned to a position lower than the Lo setting. (The Lo setting is set for the grill burner.) The sealed burners of your cooktop are secured to the cooktop and are not designed to be removed. Since the burners are sealed into the cooktop, boilovers or spills will not seep underneath the cooktop. However, the burner heads should be cleaned after each use. (See page 9 for cleaning directions.) NOTES: BURNER GRATES • A properly adjusted burner with clean ports will light within a few seconds. If using The grates must be properly positioned before cooking. Improper installation of the grates may result in chipping of the cooktop. natural gas, the flame will be blue with a deeper blue inner cone. If the burner flame is yellow or is noisy, the air/gas mixture may be incorrect. Contact a service technician to adjust. (Adjustments are not covered by the warranty.) With LP gas, some yellow tips on the flames are acceptable. This is normal and adjustment is not necessary. • With some types of gas, you may hear a “popping” sound when the surface burner is turned off. This is a normal operating sound of the burner. • If the control knob is turned very quickly from hi to lo, the flame may go out, particularly if the burner is cold. If this occurs, turn the knob to the OFF position, wait several seconds and relight the burner. Do not operate the burners without a pan on the grate. The grate’s porcelain finish may chip without a pan to absorb the heat from the burner flame. Although the burner grates are durable, they will gradually lose their shine and/or discolor, due to the high temperatures of the gas flame. • Leave a minimum of 11/2" between side of pan and surrounding surfaces such as countertop, back splashes or side walls, to allow heat to escape and avoid possible damage to these areas. • To improve cooking efficiency and to prevent possible damage to the cooktop or pan, the flame must be adjusted so it does not extend beyond the edge of the pan. 5 ©2004 Maytag Services 16023565 B–5 Use Instructions JGD8430BD* USING YOUR COOKTOP Operating During a Power Failure Surface Controls CAUTION 1. Hold a lighted match to the desired surface burner head. • If flame should go out during a cooking operation, turn the burner off. If a strong gas odor is detected, open a window and wait five minutes before relighting the burner. 2. Push in and turn the control knob slowly to the desired setting. • Be sure all surface controls are set to the OFF position prior to supplying gas to the cooktop. CAUTION • When lighting the surface burners, be sure all of the controls are in the OFF position. Strike the match first and hold it in position before turning the knob. • NEVER touch cooktop until it has cooled. Expect some parts of the cooktop, especially around the burners, to become warm or hot during cooking. Use potholders to protect hands. • Do not leave the cooktop unattended when cooking during a power failure. The automatic re-ignition feature will not operate during a power failure. Surface Control Knobs Suggested Heat Settings Use to turn on the surface burners. An infinite choice of heat settings is available from Lo to Hi. At the Hi setting a detent or notch may be felt. The size and type of cookware will affect the heat setting. For information on cookware and other factors affecting heat settings, refer to “Cooking Made Simple” booklet. SETTINGS Pilotless Ignition Hi Pilotless ignition eliminates the need for a constant standing pilot light. Each surface burner has a spark ignitor. Use care when cleaning around the surface burner. USES Use Hi to bring liquid to a boil, or reach pressure in a pressure cooker. Always reduce setting to a lower heat when liquids begin to boil or foods begin to cook. An intermediate flame size is used to continue cooking. Food will not cook any faster when a higher flame setting is used than needed to maintain a gentle boil. Water boils at the same temperature whether boiling gently or vigorously. If the surface burner does not light, check if ignitor is broken, soiled or wet. Lo Use Lo to simmer foods, keep foods warm and melt chocolate or butter. Some cooking may take place on the Lo setting if the pan is covered. It is possible to reduce the heat by rotating the knob toward OFF. Be sure flame is stable. Setting the Controls Your cooktop has sealed gas burners with automatic reignition. If the burner flame should go out, the system will automatically spark to re-ignite the burner. 1. Place a pan on the burner grate. (To preserve the grate finish, do not operate the burners without a pan on the grate to absorb the heat from the burner flame.) 2. Push in knob and turn immediately counterclockwise to the desired setting. • A clicking (spark) sound will be heard and the burner will light. (All ignitors will spark when any surface burner knob is turned on. However, only the selected burner will light.) 5 B–6 16023565 ©2004 Maytag Services Use Instructions JGD8430BD* USING YOUR COOKTOP Cooktop at a Glance High Performance Burner* MODEL JGC8536 There is one high speed burner on your cooktop, located in the center or right front position. This burner offers higher speed cooking that can be used to quickly bring water to a boil and for large-quantity cooking. Simmer Burners* 1 2 3 4 5 These burners are located in the left front position and/or the right rear position. The simmer burner offers a lower BTU flame for delicate sauces or melting chocolate. 1. Left rear surface burner (9,200 BTUs). 2. Left front surface burner (5,000 BTUs on Hi, 650 BTUs on Lo). 3. Center surface burner (15,000 BTUs). 4. Right front surface burner (12,500 BTUs). 5. Right rear surface burner (5,000 BTUs on Hi, 650 BTUs on Lo). * BTU ratings will vary when using LP gas. Burner Grates The grates must be properly positioned before cooking. Improper installation of the grates may result in chipping of the cooktop. To ensure proper positioning, align bumpers on grate bottom with the indentations in the cooktop. MODEL JGC8430B Do not operate the burners without a pan on the grate. The grate’s porcelain finish may chip without a pan to absorb the heat from the burner flame. 1 2 Although the burner grates are durable, they will gradually lose their shine and/or discolor, due to the high temperatures of the gas flame. 3 4 1. Left rear surface burner (10,500 BTUs). 2. Left front surface burner (5,000 BTUs on Hi, 650 BTUs on Lo). 3. Right front surface burner (15,000 BTUs). 4. Right rear surface burner (9,200 BTUs). Notes : • A properly adjusted burner with clean ports will light within a few seconds. If using natural gas, the flame will be blue with a deeper blue inner cone. To prevent the cooktop from discoloring or staining: If the burner flame is yellow or is noisy, the air/gas mixture may be incorrect. Contact a service technician to adjust. (Adjustments are not covered by the warranty.) • Clean cooktop after each use. • Wipe acidic or sugary spills as soon as the cooktop has cooled as these spills may discolor the surface. With LP gas, some yellow tips on the flames are acceptable. This is normal and adjustment is not necessary. Sealed Burners • With some types of gas, you may hear a “popping” sound when the surface burner is turned off. This is a normal operating sound of the burner. The sealed burners are secured to the cooktop and are not designed to be removed. Since the burners are sealed into the cooktop, boilovers or spills will not seep underneath the cooktop. • To improve cooking efficiency and to prevent possible damage to the cooktop or pan, the flame must be adjusted so it does not extend beyond the edge of the pan. However, the burners should be cleaned after each use. The head portion of the burner is easily removed for cleaning. (See page 7 for cleaning directions.) Burner caps must be correctly placed on the burner base for proper operation of the burner. 6 ©2004 Maytag Services 16023565 B–7 Use Instructions JGG8645BDS USING YOUR COOKTOP Surface Controls Operating During a Power Failure CAUTION 1. Hold a lighted match to the desired surface burner head. • If flame should go out during a cooking operation, turn the burner off. If a strong gas odor is detected, open a window and wait five minutes before relighting the burner. 2. Push in and turn the control knob slowly to the desired setting. • Be sure all surface controls are set to the OFF position prior to supplying gas to the cooktop. CAUTION • When lighting the surface burners, be sure all of the controls are in the OFF position. Strike the match first and hold it in position before turning the knob. • NEVER touch cooktop until it has cooled. Expect some parts of the cooktop, especially around the burners, to become warm or hot during cooking. Use potholders to protect hands. • Do not leave the cooktop unattended when cooking during a power failure. The automatic re-ignition feature will not operate during a power failure. Surface Control Knobs Suggested Heat Settings Use to turn on the surface burners. An infinite choice of heat settings is available from Lo to Hi. At the Hi setting a detent or notch may be felt. The knobs can be set on or between any of the settings. The size and type of cookware will affect the heat setting. For information on cookware and other factors affecting heat settings, refer to “Cooking Made Simple” booklet. SETTINGS Hi Setting the Controls Your cooktop has sealed gas burners with automatic reignition. If the burner flame should go out, the system will automatically spark to re-ignite the burner. 1. Place a pan on the burner grate. (To preserve the grate finish, do not operate the burners without a pan on the grate to absorb the heat from the burner flame.) USES Use Hi to bring liquid to a boil, or reach pressure in a pressure cooker. Always reduce setting to a lower heat when liquids begin to boil or foods begin to cook. An intermediate flame size is used to continue cooking. Food will not cook any faster when a higher flame setting is used than needed to maintain a gentle boil. Water boils at the same temperature whether boiling gently or vigorously. 2. Push in knob and turn immediately counterclockwise to the desired setting. • A clicking (spark) sound will be heard and the burner will light. (All ignitors will spark when any surface burner knob is turned on. However, only the selected burner will light.) Lo Use Lo to simmer foods, keep foods warm and melt chocolate or butter. Some cooking may take place on the Lo setting if the pan is covered. It is possible to reduce the heat by rotating the knob toward OFF. Be sure flame is stable. 5 B–8 16023565 ©2004 Maytag Services Use Instructions JGG8645BDS USING YOUR COOKTOP Burner Grates Cooktop at a Glance The grates must be properly positioned before cooking. Improper installation of the grates may result in chipping of the cooktop. MODEL JGC8645 Do not operate the burners without a pan on the grate. The grate’s porcelain finish may chip without a pan to absorb the heat from the burner flame. 1 2 3 4 Although the burner grates are durable, they will gradually lose their shine and/or discolor, due to the high temperatures of the gas flame. 56 1. Left rear surface burner (10,500 BTUs). 2. Left front surface burner (9,100 BTUs). 3. Center rear surface burner (6,500 BTUs on Hi, 850 BTUs on Lo). 4. Center front surface burner (6,500 BTUs on Hi, 850 BTUs on Lo). 5. Right front surface burner (15,000 BTUs). 6. Right rear surface burner (9,100 BTUs). To prevent the cooktop from discoloring or staining: Notes: • Clean cooktop after each use. • A properly adjusted burner with clean ports will light within a few seconds. If using natural gas, the flame will be blue with a deeper blue inner cone. • Wipe acidic or sugary spills as soon as the cooktop has cooled as these spills may discolor the porcelain. If the burner flame is yellow or is noisy, the air/gas mixture may be incorrect. Contact a service technician to adjust. (Adjustments are not covered by the warranty.) Sealed Burners The sealed burners are secured to the cooktop and are not designed to be removed. Since the burners are sealed into the cooktop, boilovers or spills will not seep underneath the cooktop. With LP gas, some yellow tips on the flames are acceptable. This is normal and adjustment is not necessary. However, the burners should be cleaned after each use. The head portion of the burner is easily removed for cleaning. (See page 7 for cleaning directions.) • With some types of gas, you may hear a “popping” sound when the surface burner is turned off. This is a normal operating sound of the burner. High Performance Burner • To improve cooking efficiency and to prevent possible damage to the cooktop or pan, the flame must be adjusted so it does not extend beyond the edge of the pan. (15,000 BTUs*) There is one high speed burner on your cooktop, located in the right front position. This burner offers higher speed cooking that can be used to quickly bring water to a boil and for large-quantity cooking. Simmer Burners (850 BTUs*) These burners are located in the center positions. The simmer burners offer a lower BTU flame for delicate sauces or melting chocolate. * BTU ratings will vary when using LP gas. 6 ©2004 Maytag Services 16023565 B–9 Care and Cleaning C ARE & CLEANING CLEANING PROCEDURES CAUTION: • Be sure appliance is off and all parts are cool before handling or cleaning. This is to avoid damage and possible burns. • To prevent staining or discoloration, clean appliance after each use. • If a part is removed, be sure it is correctly replaced. CONTROL KNOBS • Remove knobs in the OFF position by pulling up. • Wash, rinse and dry. Do not use abrasive cleaning agents as they may scratch the finish. • Turn on each burner to be sure the knobs have been correctly replaced. SEALED BURNER CARTRIDGE PORCELAIN ENAMEL STAINLESS STEEL • DO NOT USE ANY CLEANING PRODUCT CONTAINING CHLORINE BLEACH. • ALWAYS WIPE WITH THE GRAIN WHEN CLEANING. • Daily Cleaning/Light Soil –– Wipe with one of the following - soapy water, white vinegar/water solution, Formula 409 Glass and Surface Cleaner* or a similar multisurface cleaner - using a sponge or soft cloth. Rinse and dry. To polish and help prevent fingerprints, follow with Stainless Steel Magic Spray (Jenn-Air Model A912, Part No. 20000008)**. • Moderate/Heavy Soil –– Wipe with one of the following - Bon Ami*, Smart Cleanser*, or Soft Scrub* - using a damp sponge or soft cloth. Rinse and dry. Stubborn soils may be removed with a damp Scotch-Brite* pad; rub evenly with the grain. Rinse and dry. To restore luster and remove streaks, follow with Stainless Steel Magic Spray. • Discoloration –– Using a damp sponge or soft cloth, wipe with Cameo Stainless Steel Cleaner*. Rinse immediately and dry. To remove streaks and restore luster, follow with Stainless Steel Magic Spray. Porcelain enamel is glass fused on metal and may crack or chip with misuse. It is acid resistant, not acid proof. All spillovers, especially acidic or sugary spillovers, should be wiped up immediately with a dry cloth. • When cool, wash with soapy water, rinse and dry. RILL SSEMBLY • Never wipe off a warm or hot surface with a damp cloth. This may cause cracking or chip- BASIN – PORCELAIN ping. The basin is located under the grill burner and/ • Never use oven cleaners, abrasive or caustic or cartridges. Clean after each use of the grill. cleaning agents on exterior finish of range. • To remove light soil, clean with soapy water or spray with cleansers such as Fantastik* or SEALED GAS BURNERS/GRATES Formula 409*. For easier cleanup: a) spray • Allow burner and grates to cool. Wash with with a household cleanser; b) cover with soapy water and a plastic scouring pad. For paper towels; c) add small amount of hot stubborn soils, clean with a soap-filled, non- water to keep the paper towels moist; d) abrasive pad or a sponge and a commercial cover and wait 15 minutes; and e) wipe clean. Cooktop Cleaning Creme (Part #20000001)**. • To remove moderate soil, scrub with Bon • Clean gas ports with a soft bristle brush or a Ami*, a soft scrub cleanser or plastic scrubstraight pin especially the port below the ber. ignitor. Do not enlarge or distort holes. Note: Check the grease drain after each use • Be careful not to get water into burner ports. of the grill. To clean: Pour about 1/3 cup of • When cleaning, use care to prevent damage to very hot tap water mixed with 1 teaspoon the ignitor. If the ignitor is soiled, wet or dish detergent down the drain. G A – damaged the surface burner will not light. GRATES – CAST ALUMINUM COATED WITH NON-STICK FINISH • Wash cool grates (DO NOT IMMERSE HOT GRILL GRATES IN WATER) with detergent in hot water in the sink or wash them in the dishwasher. Be sure to remove all food residue before cooking on the grill grates again. • Remove stubborn soils with a plastic mesh puff or pad. Use only those cleaning products which state they are recommended for use when cleaning nonstick surfaces. • If grates were washed in the dishwasher, season with oil prior to grilling. • Do not use metal brushes or abrasive scouring pads or other scrubbers intended to clean outdoor charcoal grills. These will remove the finish as well as scratch the grates. Do not clean in self-cleaning oven or use oven cleaners on the grates. GRILL BURNER • Follow instructions on page 6 for removing the grill burner. • The grill burner should be cleaned after each use with a soapy S.O.S.* pad. Rinse and dry thoroughly before using again. NOTE: Check to be sure all burner ports are open. To open clogged ports, insert a straight pin into each port. GREASE DRAIN JAR • A drain jar is located below the grill basin pan under the countertop. Check periodically to prevent spillovers. Unscrew to remove. • If jar is broken, replace with any heat tempered jar, such as a canning jar, which has a standard screw neck. * Brand names for cleaning products are registered trademarks of the respective manufacturers. ** To order direct, call 1-800-688-8408. 9 B–10 16023565 ©2004 Maytag Services Appendix C ©2004 Maytag Services 16023565 C–1 LP/Natural Gas Conversion JGD8348CDP, JGCP430ADP, JGCP6**ADP Converting from Natural Gas to L.P. Gas ! WARNING To avoid risk of electrical shock, personal injury or death; disconnect power to cooktop before servicing, unless testing requires power. Converting Pressure Regulator for LP/Propane 1. Remove pressure regulator cap using a wrench. 2. Apply sideward finger pressure to remove pin from cap. Converting from Natural Gas to LP Gas Converting the Burner Orifice Spuds 1. Remove the grates and burner caps. 2. Remove burner base by removing 2 screws. 3. Trim a small piece of masking tape to the size of a dime and place it over the end of a 9/32" (or 7mm) nut driver. 4. Firmly press the nut driver over the orifice spud and loosen spud by turning counterclockwise. Carefully lift the nut driver out of the burner throat. Orifice spud should be captured in the recess. Repeat this step for each burner. 5. Locate the LP orifice spud packet taped to the underside of the burner box. The spuds have small numbers stamped on the side. This number codes the orifice diameter and its correct burner location. Apply sideways finger pressure to remove pin from cap 3. Apply downward finger pressure at the disc edges to place pin into the cap. NOTE: See chart and graphics below for location of components. Natural NAT 6. With the masking tape still in place in the recess of the nut driver, press an LP orifice spud into the recess so that it is snugly captured. 7. Carefully install the orifice spud in the appropriate burner throat by turning clockwise to tighten. 8. Tighten to a torque of orifice 15 to 20 inch-lbs. 9. Replace burner base. Tighten screws to 25-30 inchlbs. 10. Repeat steps 2 through 9 for each burner. 11. Replace burner caps and grates. 12. Save orifices removed from appliance for future use. LP (burner) 9K (CF) 9K (RF) 6.5K (CR) 6.5K (RR) 7.5K (LF) 7.5K (LR) Model JGD8348CDP Orifice Spuds Orifice Natural Gas (burner) color (#) Blue (#63) 10K (CF) Blue (#63) 10K (RF) Red (#68) 10K (CR) Red (#68) 10K (RR) Zinc (#66) 8K (LF) Zinc (#66) 8K (LR) LP L.P. 4. Place pressure regulator cap on pressure regulator and tighten. Low Flame Adjustment Properly adjusted burner flames are clean and blue with a distinct inner cone approximately ½ inch long. 1. Light burner and set control knob for low flame. 2. Remove control knob from valve stem. 3. Insert a slender thin bladed screwdriver into the recess at center of valve stem and engage blade with slot in adjusting screw. 4. Turn adjusting screw clockwise until tight. Do not over tighten. • Clockwise to decrease • Counterclockwise to increase 5. Repeat process for remaining burners. Orifice color (#) Brass (#53) Brass (#53) Brass (#53) Brass (#53) Green (#55) Green (#55) After adjusting the screw, the burner should produce a stable, steady blue flame of minimum size. The setting should be checked by turning the knob from high to low several times without extinguishing the flame. This operation will automatically provide the proper flame size at medium setting. After conversion steps have been completed, check the appearance of each burner flame at high and low settings. If the flames appear too large or small, review each step to verify it was completed correctly. Models JGCP430ADP, JGCP636ADP, JGCP648ADP Orifice Spuds Orifice LP Natural Gas Orifice # (burner) (burner) color 9.1K (CF) #94 9.2K (CF) Red 15K (RF) #117 17K (RF) Gold 9.1K (RR) #94 9.2K (RR) Red 15K (LF) #117 17K (LF) Gold 4K (LR) #64 5K (LR) Blue November 2004 5 16023566 ©2004 Maytag Services C–2 16023565 ©2004 Maytag Services LP/Natural Gas Conversion JGC8430BD*, JGC8645BDS Converting from Natural Gas to L.P. Gas ! WARNING To avoid risk of electrical shock, personal injury or death; disconnect power to cooktop before servicing, unless testing requires power. Converting Pressure Regulator for LP/Propane 1. Remove pressure regulator cap using a wrench. 2. Apply sideward finger pressure to remove pin from cap. Converting from Natural Gas to LP Gas Converting the Burner Orifice Spuds 1. Remove the grates and burner caps. 2. Remove venture tube or burner base by removing 2 screws. 3. Trim a small piece of masking tape to the size of a dime and place it over the end of a 5/16" or a 9/32" (7mm) nut driver. 4. Firmly press the nut driver over the orifice spud and loosen spud by turning counterclockwise. Carefully lift the nut driver out of the burner throat. Orifice spud should be captured in the recess. Repeat this step for each burner. 5. Locate the LP orifice spud packet taped to the underside of the burner box. The spuds have small numbers stamped on the side. This number codes the orifice diameter and its correct burner location. Apply sideways finger pressure to remove pin from cap 3. Apply downward finger pressure at the disc edges to place pin into the cap. Natural NOTE: See chart and graphics below for location of components. NAT 6. With the masking tape still in place in the recess of the nut driver, press an LP orifice spud into the recess so that it is snugly captured. 7. Carefully install the orifice spud in the appropriate burner throat by turning clockwise to tighten. 8. Tighten to a torque of orifice 15 to 20 inch-lbs. 9. Replace burner base. Tighten screws to 25-30 inchlbs. 10. Repeat steps 2 through 9 for each burner. 11. Replace burner caps and grates. 12. Save orifices removed from appliance for future use. Model JGC8645BDS Orifice Spuds LP Natural Gas Orifice (burner) (burner) color or # 6.5K (CF) Silver 5K (CF) 15K (RF) # 49 8.5K (RF) 6.5K (CR) Silver 5K (CR) 9.1K (RR) Green 5.5K (RR) 9.1K (LF) Green 5.5K (LF) 10.5K (LR) Yellow 8.5K (LR) Natural Gas (burner) 15K (RF) 9.2K (RR) 5K (LF) 10.5K (LR) Model JGC8430BD* Orifice Spuds LP Orifice # (burner) # 190 14K (RF) # 145 9.1K (RR) # 107 4K (LF) # 155 9K (LR) November 2004 LP L.P. 4. Place pressure regulator cap on pressure regulator and tighten. Low Flame Adjustment Properly adjusted burner flames are clean and blue with a distinct inner cone approximately ½ inch long. 1. Light burner and set control knob for low flame. 2. Remove control knob from valve stem. 3. Insert a slender thin bladed screwdriver into the recess at center of valve stem and engage blade with slot in adjusting screw. 4. Turn adjusting screw clockwise until tight. Do not over tighten. • Clockwise to decrease • Counterclockwise to increase 5. Repeat process for remaining burners. Orifice # # 70 # 65 # 70 # 69 # 65 # 69 After adjusting the screw, the burner should produce a stable, steady blue flame of minimum size. The setting should be checked by turning the knob from high to low several times without extinguishing the flame. This operation will automatically provide the proper flame size at medium setting. After conversion steps have been completed, check the appearance of each burner flame at high and low settings. If the flames appear too large or small, review each step to verify it was completed correctly. Orifice # # 114 # 91 # 64 # 91 3 16023568 ©2004 Maytag Services ©2004 Maytag Services 16023565 C–3