1
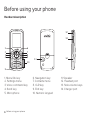
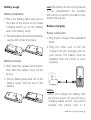
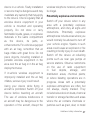
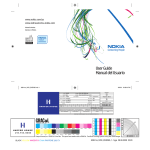
A100 User Guide
CricKet
Table of contents
Safety.................................................4
About your device........................... 4
Before using your phone.................6
Handset description........................ 6
Battery usage.....................................7
Battery charging................................7
Battery handling information........ 8
Basic operation.................................9
Turning the phone on/off............... 9
Accessing the menu........................ 9
Accessing the menu map.............10
Basic functions.................................10
During a call......................................12
Outgoing calls..................................16
Call timers.......................................... 17
Messages......................................... 17
Send message................................. 17
Inbox.................................................... 17
Outbox................................................18
Drafts...................................................18
Voicemail............................................18
Settings...............................................19
Contacts.......................................... 20
Find.................................................... 20
Add new entry................................ 20
Speed dials..................................... 20
Group..................................................21
Service number...............................22
My phone number..........................22
Memory function............................. 14
Storing a phone number............... 14
Entering letters, numbers &
symbols.............................................. 14
Making a call through the
contact list..........................................15
Browser........................................... 22
Browser menu.................................22
Recent calls..................................... 16
All calls................................................16
Missed calls.......................................16
Incoming calls...................................16
Tools................................................ 24
Schedule...........................................24
Alarm..................................................25
2
Table of contents
Multimedia...................................... 22
My images........................................22
My sounds........................................22
Games & Apps................................ 23
World time.........................................25
Memo pad........................................25
Calculator..........................................26
Tip calculator...................................26
Stop watch........................................27
Unit converter..................................27
Voice service...................................27
Voice command..............................27
V.Cmd settings................................28
Voice memo.....................................29
Settings........................................... 29
Display...............................................29
Sounds................................................ 31
Call......................................................32
Security..............................................33
Others................................................35
Phone info........................................36
Care and maintenance...................37
Warranty......................................... 38
One (1) year Limited
Warranty (U.S.).................................38
Vehicles.............................................46
Potentially explosive
environments................................... 47
Emergency calls.............................48
Certification information (SAR)...48
Safety information for fixed
wireless terminals potentially
explosive atmospheres................49
Interference to medical
divices............................................... 50
Exposure to RF energy................ 50
Body-worn operation................... 50
FCC Compliance Information.... 50
U.S.A.
U.S.Federal communications
commission radio frequency
interference statement..................51
FCC Hearing-Aid Compatibility
(HAC) Regulations For Wireless
Devices...............................................51
Additional safety information...... 44
Small children..................................44
Operating environment................44
Medical devices..............................44
Table of contents
3
Safety
Read these simple guidelines. Not
following them may be dangerous or
illegal. Read the complete user guide
for further information.
Switch on safely
Must be in the Do not switch the
device on when wireless phone use
is prohibited or when it may cause
interference or danger.
Road safety comes first
Obey all local laws. Always keep your
hands free to operate the vehicle
while driving. Your first consideration
while driving should be road safety.
Interference
All wireless devices may be susceptible
to interference, which could affect
performance.
Switch off in restricted areas
Follow any restrictions. Switch the device off in aircraft, near medical equipment, fuel, chemicals, or blasting
areas.
4
Safety
Qualified service
Only qualified personnel may install or
repair this product.
Enhancements and batteries
Use only approved enhancements
and batteries. Do not connect
incompatible products.
Water-resistance
Your device is not water-resistant.
Keep it dry.
About your device
The wireless device described in
this guide is approved for use on
the CDMA 800, 1700, 1900 and 2100
MHz networks. Contact your service
provider for more information about
networks.
When using the features in this
device, obey all laws and respect local
customs, privacy and legitimate rights
of others, including copyrights.
Copyright protection may prevent
some images, music, and other
content from being copied, modified,
or transferred.
Warning: To use any features in this
device, other than the alarm clock, the
device must be switched on. Do not
switch the device on when wireless
device use may cause interference
or danger.
Remember to make back-up copies or
keep a written record of all important
information stored in your device.
When connecting to any other device,
read its user guide for detailed
safety instructions. Do not connect
incompatible products.
Safety
5
Before using your phone
Handset description
12
13
1
6
2
3
4
7
8
9
11
14
10
5
1. Menu/Ok key
2. Settings menu
3.Voice command key
4. Send key
5. Microphone
6
Before using your phone
6. Navigation key
7. Contacts menu
8. CLR key
9. End key
10. Numeric keypad
11. Speaker
12. Headset port
13. Side volume keys
14. Charger port
Battery usage
Battery installation
1. Place the battery (label side up) on
the back of the phone so the metal
contacts match up on the battery
and in the battery cavity.
2. Slide the battery down into the battery
cavity until it locks into place.
Battery removal
note If the battery is not correctly placed
in the compartment, the handset
will not turn on and/or the battery may
detach during use.
Battery charging
Power connection
1. Plug the AC Charger into a standard
outlet.
2. Plug the other end of the AC
Charger into the charging port on
your phone. The battery must be
installed onto the phone to work
properly.
1. Push down the release latch button,
then slide the battery cover off the
phone.
2. Pull up battery strap and out of the
battery cavity from the top of the
battery.
hot key
• When you charge the battery with
the phone power off, you will see a
charging status screen. You cannot
operate the phone until it is
Before using your phone
7
powered on.
• The battery is not charged at the
time of purchase.
• Fully charge the battery before use.
• It is more efficient to charge the battery
with the handset powered off.
• The battery must be connected to
the phone in order to charge it.
• Battery operating time gradually
decreases over time.
• If the battery fails to perform
normally, you may need to replace
the battery.
Battery handling information
Do’s
• Only use the battery and charger
approved by the manufacturer.
• Only use the battery for its original
purpose.
• Try to keep batteries in a temperature
between 41oF (5oC ) and 95oF (35oC).
• If the battery is stored in temperatures
above or below the recommended
range, give it time to warm up or cool
down before using.
8
Before using your phone
• Completely drain the battery before
recharging. It may take one to four
days to completely drain.
• Store the discharged battery in a
cool, dark, and dry place.
• Purchase a new battery when its
operating time gradually decreases
after fully charging.
• Properly dispose of the battery
according to local laws.
Don’ts
• Don’t attempt to disassemble the
battery – it is a sealed unit with no
serviceable parts.
• Don’t accidentally short circuit the
battery by carrying it in your pocket
or purse with other metallic objects
such as coins, clips and pens. This
may critically damage the battery.
• Don’t leave the battery in hot or cold
temperatures. Otherwise, it could
significantly reduce the capacity and
lifetime of the battery.
• Don’t dispose of the battery into a
fire.
Basic operation
Turning the phone on/off
Turning the phone on
1. Press the END Key until your
“cricKet” logo appears and the tone
sounds.
note
• If “Password” appears on the display
enter your 4-digit password to unlock your phone.
• The default password is the last 4
digits of your phone number.
Turning the phone off
1. Press and hold the END Key until
your “cricKet” logo appears.
note
• Immediately change or recharge
the battery when “Powering down
phone now. Please recharge” appears on the display. Memory may
possibly be damaged if the phone
turns off due to the battery completely draining.
• Turn the phone off before removing
or replacing the battery. If the phone
is on, unsaved data may be lost.
Accessing the menu
Your phone can be customized via the
menu. Each function can be accessed
by scrolling with the Navigation
Key or by pressing the number that
corresponds with the menu item.
1. To access the menu in the idle
mode, press the OK Key Menu.
2. P
ress the Navigation Key left or
right to scroll through the menu
items. Press the Navigation Key
up or down to scroll through the
submenus for each menu item.
3. T
o return to the previous page, press
the Clear Key. To exit the current
menu and return to the idle mode,
press the END Key.
4. P
ress the OK Key to enter a function
when its main page is displayed or
press its assigned number to have
direct access to the function.
Basic operation
9
note
• Navigation Key up : Messages
• Navigation Key down : Multimedia
• Navigation Key left : Browser
• Navigation Key right : Games&Apps
Accessing the menu map
1. Recent Calls
1. All Calls
2. Missed Calls
3. Incoming Calls
4. Outgoing Calls
5. Call Timers
4. Multimedia
1. My Images
2. My Sounds
2. MESSAGES
1. Send Message
2. Inbox
3. Outbox
4. Drafts
5. Voicemail
6. Settings
7. Tools
1. Schedule
2. Alarm
3. World Time
4. Memo Pad
5. Calculator
6. Tip Calculator
7. Stop Watch
8. Unit Converter
3. Contacts
1. Find
2. Add New Entry
3. Speed Dials
4. Group
5. Service Number
6. My Phone
Number
10
Basic operation
9. Settings
1. Display
2. Sounds
3. Call
4. Security
5. Others
6. Phone Info
Basic functions
Making a call
5. Browser
1. Enter a phone number.
6. Games & Apps
note
8. Voice Service
1. Voice Command
2. V.Cmd Settings
3. Voice memo
To modify the phone number you
have entered :
• To erase one digit at a time press the
Clear Key.
• To erase the entire number, press
and hold the Clear Key.
2. Press the SEND Key.
note
• If “CALL FAILED” appears on the
display or the line is busy, press the
SEND Key or the END Key.
• If you activate the “AUTO RETRY”
function, the phone will automatically
retry for the number until you select
the End key.
• When you place or receive a call
from stored phone numbers, only
the name will be displayed.
• If “Please enter lock code” appears
on the display enter your 4-digit
password to unlock your phone.
• Your default password is the last 4
digits of your phone number.
3. To end a call, press the END Key.
Call Answer
1. When your phone rings or vibrates,
press the SEND Key to answer the
incoming call. (Depending on your
phone’s settings, you may also
answer incoming calls by pressing
any digit key. See page 32 for
details.)
To reject incoming calls, press
the Right Soft Key Reject.
note
2. To end a call, press the END Key.
a pause after a phone number then
enter another group of numbers.
The second set of numbers is dialed
automatically after the pause. This
feature is useful for dialing into
systems that require a code.
1. To insert a wait/pause, enter a
phone number then press the Right
Soft Key Options. Select either a
Type ‘P‘ (“P” appears) or a Type ‘T‘
(“T” appears).
note
• Type “P“: A hard pause stops the
calling sequence until further input
from you.
• Type “T“: A two second pause stops
the calling sequence for two seconds
and then automatically send the
remaining digits.
2. P
ress the SEND Key to dial or Left
Soft Key Save to save the number.
Wait/pause feature
Pauses are used for automated systems
(i.e., Voicemail, calling cards). Insert
Basic operation
11
3-way calling
With 3-Way Calling, you can talk to
two people at the same time. When
using this feature, the normal airtime
rates will be applied for each of the
two calls.
1. Enter a number you wish to call then
press the SEND Key.
2. Once you have established the
connection, enter the second
number you wish to call then press
the SEND Key.
3. When you’re connected to the
second party, press the SEND Key
again to begin your 3-Way call.
3-way calling is a system
dependent feature. Please contact
your service provider for details.
note
Caller ID function
Identifies caller by displaying their
phone number. If the caller’s name
and number are already stored in your
phone book, their name will appear.
This is a system dependent feature.
12
Basic operation
Please contact your service provider
for details.
Call waiting function
Notifies you of an incoming call when
you are already on a call by sounding
a beep tone and displaying the caller’s
phone number.
1. To answer another call while on
the phone, press the SEND Key.
This places the first call on hold. To
switch back to the first caller, press
the SEND Key again.
Call Waiting is a system
dependent feature. Please contact
your service provider for details.
note
Adjusting volume
1. During a call, press Side Volume Key
up or down to adjust the earpiece
volume.
During a call
1. Press the Left Soft Key Mute.
• Mute (Unmute) : If you press Mute
during a call, the person you are
speaking with cannot hear you or
any sounds from your side of the
conversation. However, you can still
hear them. To activate Mute during
a call.
note
• To deactivate, press the Left Soft Key
Unmute.
• The phone will automatically
unmute in Emergency Call or Callback
Mode.
2. Press the Right Soft Key Options.
• 3 Way Calls : To call a second
party during a call, dial the number
or select it from the directory by
accessing the menu during a call.
• Voice Memo : To record a voice
memo during a call.
• Call History : To select a phone
number from your Recent Calls
List during a call.
• Contacts : To view a phone number
from your Contact list during a
call.
• Messaging : To send a text
message (SMS) during a call.
Making an emergency call
The 911 feature puts the phone in the
Emergency Call Mode when you dial the
preprogrammed emergency number,
911. It also operates in Lock Mode and
outside the service area.
911 in lock mode
The 911 call service is available even
in Lock Mode.
1. Enter “911”, then press the SEND
Key.
2. T
he call connects.
3. W
hen the call ends, the phone
returns to Lock Mode.
911 using any available system
1. Enter “911”, then press the SEND
Key.
2. T
he call connects.
3. T
he phone maintains the Emergency
Mode and the phone can receive
an incoming call from any available
system. However, it can’t make a
call.
Basic operation
13
Memory function
Storing a phone number
The phone book stores up to 500
entries.
1. Enter phone number then press the
Left Soft Key Save.
2. Select “New entry“ or “Existing
entry“.
3. If “Existing entry” is selected, your
contact list is displayed. Choose the
entry to add the number, then press
Left Soft Key Done. Select the type
of Phone you are adding from the
icon list, then press Left Soft Key
Select. Press Left Soft Key Save.
Press the Navigation Key up or down
to select primary phone number,
then press Left Soft Key Select to
save contact.
If “New entry“ is selected, the
New entry icon list appears. Press
the Navigation Key up or down to
choose the type of Phone you are
adding. Press Left Soft Key Select
14
Memory function
to select. Enter a name. To change
the input mode, press Right Soft
Key Options. Press the Navigation
Key down to enter information in
other fields for the contact. Fields
include “Name”, “Mobile”, “Phone
number”, “Email address”, “URL”,
“Group”, “Ringtone”, “Msg alert”,
“Secret”, “Memo”.
4. T
o store the entry in your contact
list, press the Left Soft Key Save.
“Saved“ will be displayed.
Entering
symbols
letters,
numbers
&
The input mode will automatically be
activated when it is necessary to enter
letters and numbers. There are 5
available modes: Standard Alphabet
mode [Abc], T9 Mode [T9Word],
Numeric mode [123], Symbol mode
[Symbols] and Emoticon mode
[Emoticon]. The input mode indicator
appears on the lower portion of the
display when letters and numbers
are entered. To select the desired
input mode, press the Right Soft Key
Options, then choose from the list on
screen.
• Standard input mode : Use the digit
keys to enter letters, numbers and
characters.
• T9 input mode : T9 mode incorporates
a built-in-dictionary to determine a
word based on the entered characters.
A word can be entered more quickly
by pressing each key once per
character.
• Number mode : Allows you to enter
numbers.
• Symbol mode : Allows you to enter
symbols.
• Emoticon mode: Allows you to enter
Emoticon.
Making a call through the contact
list
One-touch/two-touch dialing
Ideal for frequently dialed numbers, this
feature allows entries in your contact
list to be dialed via the keypad with
only one or two key presses. In order
for One-Touch/Two-Touch Dialing to
properly work, it must be enabled.
One-touch dialing
2-9: Press and hold the corresponding
memory number for more than 1
second.
Two-touch dialing
10-99: Press and the first digit and
second digits of the memory number
short and long respectively.
note
• If no phone number is stored in
the location entered, “Speed dial is
empty“ will appear on the screen.
• If One Touch Dial is set to Off: Enter
the speed dial location number then
press the SEND Key.
• Location 1 is reserved for voicemail.
Location 2-99 are unassigned. To
assign a speed dial location, please
see page 20.
Memory function
15
Recent calls
call will be automatically erased from
the history.
All calls
Incoming calls
1. Press the OK Key Menu > Recent
Calls > All Calls. If the number is
already stored in your contact list,
only the name appears. If the number
is not stored, the number appears.
1. Press the OK Key Menu > Recent
Calls > Incoming Calls. If the number
is already stored in your contact
list, only the name appears. If the
number is not stored, the number
appears.
2. To view details, press the OK Key.
note After the 240th missed, incoming
or outgoing calls, the oldest call will
automatically be erased from the
history.
Missed calls
1. P
ress the OK Key Menu > Recent
Calls > Missed Calls. If the number
is already stored in your contact list,
only the name appears. If the number
is not stored, the phone number
appears.
2. To view missed call details, press
the OK Key.
note
16
After 80 missed calls, the oldest
Recent calls
2. To view incoming call details, press
the OK Key.
note After 80 incoming calls, the oldest
call will automatically be erased from
the history.
Outgoing calls
1. Press the OK Key Menu > Recent
Calls > Outgoing Calls. If the number
is already stored in your contact
list, only the name appears. If the
number is not stored, the number
appears.
2. T
o view outgoing call details, press
the OK Key.
note After 80 outgoing calls, the oldest
call will automatically be erased from
the history.
Call timers
Checks the usage time and manages
your calls within the limit you set. The
11 timers include (Last Call, Dialed
Calls, Received Calls, Home Calls,
Roam Calls, All Calls, Lifetime Calls,
Transmit Kb, Received Kb, Total Kb,
Lifetime Data Counter, Last Reset):
1. Press the OK Key Menu > Recent
Calls > Call Timers.
2. To reset all timers, press the Right
Soft Key Reset All. “Reset all?” will
be displayed. Select ”Yes” and
press the OK Key.
2. U
nder “Send To”, input the phone
number. Press the Left Soft Key
Next.
• Press Right Soft Key Options.
(Recent Calls, Contacts, Group
Lists, Entry Mode)
3. U
nder “Enter Msg.”, input your
message.
• Press Right Soft Key Options.
(Preset Msgs., Entry Mode, Save
As Draft, Save As Preset, Add To
Contacts, Delivery, Cancel Msg.)
4. T
o send the message, press the Left
Soft Key Send.
Inbox
The Inbox manages received text/
web alert messages. To access:
Messages
1. Press the OK Key
Messages > Inbox.
Send message
2. T
o delete a message, press the Left
Soft Key Erase, then select “Yes”
and press the OK Key. To delete
all messages, press the Right Soft
Key Erase All, then select “Yes” and
To send a new message:
1. Press the OK Key Menu
Messages > Send Message.
>
Menu
Recent calls / Messages
>
17
press the OK Key.
3. Select a message, then press the
OK Key. The message is displayed.
Press the Left Soft Key Reply, to
send the reply message.
Outbox
Manages sent messages.
1. Press the OK Key
Messages > Outbox.
Menu
>
2. To delete a message, press the Left
Soft Key Erase, then select “Yes”
and press the OK Key. To delete
all messages, press the Right Soft
Key Erase All, then select “Yes” and
press the OK Key.
3. Select a message, then press the
OK Key. The message is displayed.
Press the Left Soft Key Erase to
erase the selected message.
• Press Right Soft Key Options.
(Forward, Save As Draft, Save
Contact)
Drafts
18
Messages
Draft Folder contains any draft
messages or saved messages. If
message composition is interrupted
by a voice call or other interrupting
event, the text of the current
composition is automatically saved in
the drafts folder.
1. Press the OK Key
Messages > Drafts.
Menu
>
2. S
elect a message then press the
OK Key.
• Press Right Soft Key Options.
(1. Forward, 2. Save Contact,
3. Erase, 4. Edit)
3. T
o send the message, press the Left
Soft Key Send.
Voicemail
Voicemail allows callers to leave voice
messages in your voice mailbox, and
lets you review, play, and delete your
voice messages any time you are in
your Carrier’s network coverage area.
1. Press the OK Key Menu > Messages
> Voicemail. Call Voicemail.
or
Press the OK Key Send to dial voicemail.
From the idle screen, press then
the SEND Key Send to direct dial
voicemail. If the feature “Speed Dial”
is enabled you can press and hold to
speed dial voicemail.
Call Voicemail
Place a call to the number (*99) the
voicemail was sent to.
1. Press the OK Key Menu > Messages
> Voicemail > Call Voicemail.
Details
View last voicemail information.
1. Press the OK Key Menu >
Messages > Voicemail > Details.
Clear Notification
Delete the voicemail icon.
1. Press the OK Key Menu > Messages
> Voicemail > Clear Notification.
Settings
1. Press the OK Key
Messages > Settings.
Menu
>
• Notification : To set a notification.
Select ”Msg. & Icon” or ”Icon Only”.
• Auto Save : Select if you want to
automatically save a message
after sending it. Select ”Auto Save”,
“Prompt” or ”Do Not Save”.
• Auto Erase : Automatically erases
Inbox messages when new messages
arrive. Select ”On” or ”Off”.
• Auto View : To set Auto View. Select
”On” or ”Off”.
• Entry Mode : To change the text
input mode. Select ”T9Word”, “Abc”,
”ABC” or “123”.
• Callback # : Allows you to input a
specific callback number. Callback
numbers are used in text messaging
so the other party knows how to get
back to you. Select ”None”, ”MDN”or
“Custom” .
• Voicemail # : To set your voicemail
number. Enter the desired voicemail
access number. (Default setting is
*99)
• Signature : To create a signature
Messages
19
that can be automatically inserted
at the end of a text message. Select
“None” or “Custom” then press Left
Soft Key Set to save the setting. If
you select “Custom”, the signature
input screen appears.
• Preset Msgs. : The preset messages
are displayed.
Contacts
Find
Retrieves an entry by name and calls
the primary number by simply pressing
the SEND Key. You can review all the
entries stored in your contacts list or
quickly find an entry by entering a
name or its character string.
1. Press the OK Key Menu > Contacts
> Find.
2. The list of names in your contacts is
displayed alphabetically.
3. Enter a name or its character string
or scroll through the list by pressing
the Navigation Key up or down.
20
Messages / Contacts
Add new entry
You can add new entry when you
need. Please check next process.
1. Press the OK Key Menu > Contacts
> Add New Entry.
2. F
ill in the fields as they are selected.
Press the Navigation Key up or
down to select a field.
• Phone book fields : Name , Phone
number (Mobile, Office, Home,
Pager, Other), Email address, URL,
Group (No Group, Family, Friends,
Work), Ringtone, Msg alert,
Secret, Memo
note See page 14 for more detailed
information about storing a number.
Speed dials
In idle mode, calls can be placed
to numbers stored in speed dial
by pressing & holding the location
number on the key pad. For a 2-digit
location number, press the first number,
then press and hold the second
number.
note
Speed Dial must be activated.
Add new group
1. Press the OK Key Menu > Contacts
> Speed Dials.
1. Press the OK Key Menu > Contacts
> Group.
2. T
o assign a phone number to a
location, select the location then
press the Left Soft Key Assign.
2. Press the Left Soft Key Add to add a
new group name.
“empty” appears if the location is
available.
4. T
o save it, press the Left Soft Key
OK.
note
3. Scroll to the contact in the list.
4. If more than one number exists for
the contact, press the Navigation
Key left or right to select the phone
number for the speed dial location.
The numbers will be displayed
above the contact list.
5. Press the Left Soft Key Done to set
the speed dial location.
• Press Right Soft Key Options.
(Send msg., Prepend, Erase)
Group
Allows you to classify phone entries
into groups. Existing groups include
No Group, Family, Friends, Work.
3. Input a new group name.
• Press Right Soft Key Options.
(Ringtone, Add Member, Rename,
Remove Member, Remove All,
Erase)
Change group name
1. Press the OK Key Menu > Contacts
> Group.
2. S
elect an existing group name.
Only groups you created can be
renamed.
3. P
ress the Right Soft Key Options,
then scroll to ”Rename,” press the
OK Key.
4. Input a new group name.
5. P
ress the Left Soft Key OK to save
Contacts
21
the setting.
downloaded still images.
Service number
1. Press the OK Key Menu
Multimedia > My Images.
>
Your Contacts list is preprogrammed
with contact numbers for various
services.
2. S
croll through the downloaded
images to display the image.
1. Press the OK Key Menu > Contacts
> Service Number.
My sounds
2. Select the number (Info ”411“ / Cust.
Svc. ”611“ / Cust. Care ”*611“ / *PAY
”*729“) then press the OK Key.
3. Press the SEND Key to call.
This menu displays the
downloaded ringtones.
list
of
1. Press the OK Key Menu
Multimedia > My Sounds.
>
2. S
croll through the downloaded
ringtones to display the ringtone
you want .
My phone number
Displays your phone number.
1. Press the OK Key Menu > Contacts
> My Phone Number.
Browser
2. Your phone
displayed.
The browser menu lists the actions
necessary to operate the browser. To
access the browser menu.
number
will
be
1. Press the OK Key Menu > Browser.
Multimedia
Browser menu
My images
This
22
menu
displays
the
Contacts / Multimedia / Browser
list
of
• Home : When the “Home” item is
selected from the Browser Menu,
the phone displays the homepage.
• Back : When the “Back” item is
selected from the Browser Menu,
the phone displays the previous
page in the history.
• Forward : When the “Forward” item
is selected from the Browser Menu,
the phone displays the next page in
the history. This is only available if
the user has navigated backward in
the history.
• Reload : Selecting the “Reload” item
from the Browser Menu refreshes
the current page.
• Mark Page : To save the page as a
bookmark. Press the OK soft key to
save current website address.
• Go To URL : Allows you to manually
enter the URL address of a WAP site.
After entering an address, press the
OK soft key to go there directly.
• Search : Takes user to the
OPENWAVE Search page.
• Exit : When the “Exit” item is selected
from the Browser Menu, the user
exits out of the browser and is
returned to the phone idle mode.
Games & Apps
Games & Apps is a fun collection of
features which you can access directly
from your phone - download games
and more. Charges apply.
1. Press the OK Key Menu > Games
& Apps.
2. Y
ou will see 3 icons - “Games &
Apps“, “Settings“, “Help“. If you want
to download games or etc., select
“Games & Apps“ and press the OK
Key.
3. S
elect from “Catalog“ and press
the OK Key. The server will launch.
Browse through the catalog and
press the OK Key to select an
application and price plan. Then
follow the prompts to download the
application. Repeat this process for
each additional application.
4. T
o exit “Games & Apps“, press the
END Key.
Browser / Games & Apps
23
Tools
Schedule
Sets an event and reminds you of that
event.
Add new calendar
1. Press the OK Key Menu > Tools >
Schedule.
2. Press the Navigation Key to choose
a date in the calendar, then press
the Left Soft Key Add.
3. The ”Add New” screen will be
displayed.
• Title : Enter the event name.
• Start date : You can edit the start
date for the event.
• Start time : Enter the start time.
Press the Right Soft Key for am
or pm.
• End date : You can edit the end
date for the event.
• End time : Enter the end time.
Press the Right Soft Key for am
or pm.
24
Tools
• Contents : Enter any notes for the
event.
• Notice : Enter when the alert
should sound for the event (On
time, Before 10min, Before 20min,
Before 1 hour, Before one day).
• Snooze” field, set the snooze time
(5 min, 10 min, 15 min, 20 min).
• Ring Type : Press the OK Key to
select a ringer for the event. Press
the Left Soft Key Set when the
ringer is selected.
4. P
ress the Left Soft Key Save to save
the event or the Clear Key to return
to the calendar.
5. T
he date of the event will be
marked on your calendar.
View added calendar
1. Press the OK Key Menu > Tools >
Schedule.
2. S
croll to a date in the calendar and
press the OK Key to view the event
for that day.
3. P
ress the OK Key View to see the
details for the event.
• Press Right Soft Key Options.
(Add new, Go to Date, Erase,
Erase All)
Press the Left Soft Key Edit to edit
the event, then press the Left Soft
Key Save to save the event.
Alarm
1. Press the OK Key Menu > Tools >
Alarm.
2. Select Alarm #1, 2 or 3 to set a new
alarm. To edit an existing alarm,
select the alarm name. Press the
OK Key.
3. To save an alarm setting press the
Left Soft Key Save.
• Set: Press the Navigation Key left
or right to select alarm ”On” or
”Off”.
• Time: Use the keypad to set a
time for the alarm and the Right
Soft Key to select am or pm.
• Repeat: Press the Navigation
Key left or right to select “Daily“,
“Once“, “Mon to Fri“ or “Sat to
Sun“.
• Snooze: Press the Navigation Key
left or right to select “5 min“, “10
min“, “15 min“ or “20 min“.
• Ring Type: Press the OK Key to
select a ringtone for the alarm
sound.
World time
1. Press the OK Key Menu > Tools >
World Time.
2. T
he world map appears with the
city, its date and time. Press the
Navigation Key left or right to select
another city.
• DST: Press the Left Soft Key DST,
specifies whether the current time
of the selected place is adjusted
to Daylight Savings Time.
• Dual: Press the Right Soft Key
Dual to set dual time.
Memo pad
Your phone includes an internal
Memopad that can be used to
Tools
25
compose and store reminders and
Memos.
Add new memo
To compose a memo:
1. Press the OK Key Menu > Tools >
Memo Pad.
2. To add a new memo, press the
Left Soft Key Add. Input a new text
memo.
3. T
o save memo, press the Left Soft
Key Save.
View memo
To view a saved memo:
1. Press the OK Key Menu > Tools >
Memo Pad.
2. The Memopad list of memos is
displayed in the order they were
saved. To add a new memo, press
the Left Soft Key Add.
• Highlight a memo and press the
Right Soft Key Options. (Erase,
Erase All)
3. T
o view a memo, highlight it and
press the OK Key. Press the Right
Soft Key Erase to erase the memo
or press the Left Soft Key Edit to
edit the text, then press the Left Soft
Key Save to save the changes.
Calculator
To access the calculator:
1. Press the OK Key Menu > Tools >
Calculator.
2. E
nter the number using your
keypad and perform one of the
following functions:
3. E
nter the numerical formula and
then press the OK Key for Equals
(=).
4. T
o reset, press the Clear Key or
press the Right Soft Key Clear.
Tip calculator
To access the Tip calculator:
1. Press the OK Key Menu > Tools >
Tip Calculator.
2. E
nter the amount of your “Bill” and
26
Tools
move the next field “Rate”.
• Press the Left Soft Key Point(.) for
to enter a decimal point.
3. Enter the percentage amount to
“Rate” and move the next field “#
of people”.
4. Enter the amount of “# of people”
number. Press the OK Key to calculate
the result.
• Press the Right Soft Key Erase.
Stop watch
the stopwatch.
Unit converter
To access the Tip calculator:
1. Press the OK Key Menu > Tools >
Unit Converter.
2. S
elect the desired type of
measurement, and then press the
Down Key. (Length, Weight, Volume,
Area, Temperature, Speed)
To access the Tip calculator:
Voice service
1. Press the OK Key Menu > Tools >
Stop Watch.
Voice command
2. Press Left Soft Key Start to start the
stopwatch.
3. Press Left Soft Key Lap to save Lap
time and start counting another.
Recently twenty Laps can be
record.
4. P
ress Right Soft Key Stop to stop
the stopwatch.
5. Press Right Soft Key Reset to reset
To use Voice Command:
1. Press the OK Key Menu > Voice
Service > Voice Command.
• CALL <NAME OR #> : Use the
Call command to voice dial a
name from your Phonebook list
or a phone number. When dialing
a number, pronounce each digit,
but do not pause noticeably
between the digits.
Voice service / Tools
27
• LOOKUP <NAME> : Use the
Lookup command to retrieve and
display information for any name
stored in your Phonebook Entry
list.
• CHECK <ITEM> : The Check
command lets you check status
information for your phone. You
can say “Check“ or “Check Status“
to see and hear all status
information.
• Press the Left Soft Key Tutorial.
Voice
Commands
menu
information appears. To return to
the previous page, press the Left
Soft Key Skip.
• Press the Right Soft Key Settings.
(Confirmation, Adaptation, Audio
Modes, About)
V.Cmd settings
1. P
ress the OK Key Menu > Voice
Service > V.Cmd settings.
• Confirmation : You can control when
the system asks you to confirm a
name or number. You can adapt
28
Voice service
the system to your voice for optimal
recognition
accuracy.
During
adaptation, the system will prompt
you to speak a series of short phrases.
If you need to erase adaptation
data and set the system back to the
factory default, select Reset Voice.
• Adaptation : You can adapt the
system to your voice for optimal
recognition
accuracy.
During
adaptation, the system will prompt
you to speak a series of short phrases.
If you need to erase adaptation
data and set the system back to the
factory default, select Reset Voice.
• Audio Modes : You can control the
level of audio guidance provided
by the system. In prompt mode (the
default), the system prompts for
required information. In readout
mode, the system prompts for
required information and reads out
the contents of the screen. In expert
mode, audio guidance is provided
by beeps only.
• About : It’s shown a Vsuite
information.
Voice memo
Display
Voice Memo allows you to record a
reminder message that can be up to
4 minutes.
Menu style
1. Press the OK Key Menu > Voice
Service > Voice Memo.
2. To record a voice memo, press the
Left Soft Key Record.
3. T
o start recording a voice memo,
press the OK key Record button
and if you want to stop recording,
press the OK Key Stop button and
to save your voice memo, press
the OK Key Save button one more
time.
4. To play voice memo, select the
voice tag you want to play then
press the OK Key.
• Press the Left Soft Key Options.
(Rename, Erase, Erase All,
Information)
Settings
To select how the Menu appears on
your phone:
1. Press the OK Key Menu > Settings
> Display > Menu Style.
2. Select “Icon” or “List”.
3. Press the Left Soft Key Set to save
the setting.
Wallpaper
1. P
ress the OK Key Menu > Settings
> Display > Wallpaper.
2. S
elect “Preset Images” or “My
Images”.
3. P
ress the Navigation Key up or
down to scroll through the images.
4. Press the Right Soft Key View to
view the image full screen. Press
the Left Soft Key Set to save the
image as your wallpaper.
Voice service / Settings
29
Clock Format
2. S
elect “On” or “Off”.
1. Press the OK Key Menu > Settings
> Display > Clock Format.
3. P
ress the Left Soft Key Set to save
the setting.
2. Select “Analog Clock”, “Dual Time
Clock”, “Calendar” or “Digital
Clock”.
Backlight
3. P
ress the Left Soft Key Set to save
the setting.
Incoming Calls
1. Press the OK Key Menu > Settings >
Display > Incoming Calls.
2. Select “Preset Images” or “My
Images”.
3. Press the Navigation Key up or
down to scroll through the images.
4. P
ress the Right Soft Key View to
view the image full screen. Press
the Left Soft Key Set to save the
image as your images.
1. Press the OK Key Menu > Settings
> Display > Backlight.
2. S
elect “Display”,
“Charger”.
“Keypad”
or
• Display : 7 Sec, 15 Sec, 30 Sec,
Always On, Always Off
• Keypad : 7 Sec, 15 Sec, 30 Sec,
Always On, Always Off
• Charger : 7 Sec, 15 Sec, 30 Sec,
Always On, Always Off
3. P
ress the Left Soft Key Set to save
the setting.
Contrast
1. Press the OK Key Menu > Settings
> Display > Contrast.
Banner
2. S
elect “1”, “2”, “3”, “4” or “5”.
1. Press the OK Key Menu > Settings
> Display > Banner.
3. P
ress the Left Soft Key Set to save
the setting.
30
Settings
Sounds
Ring tone
To select how the Menu appears on
your phone:
1. Press the OK Key Menu > Settings
> Sounds > Ring Tone.
2. Select “Voice Call”, “Messages” or
“Voice Mail”.
• Preset Sounds: Select ring tone.
• My Sounds: Select download
Ringer.
3. Press the Left Soft Key Set to save
the setting.
Volume
To select how the Menu appears on
your phone:
1. Press the OK Key Menu > Settings
> Sounds > Volume.
• Voice Calls : To adjust voice calls
volume.
• Speakerphone : To adjust
Speakerphone volume.
• Earpiece : To adjust earpiece
volume.
• Headset : To adjust Headset
volume.
• Message : To adjust message
volume.
• Alarms & Schedule : To adjust
alarms & schedule volume.
• Key Tone : To adjust key tone
volume.
2. S
elect one of the following settings
by pressing the Navigation Key left
or right .
3. P
ress the Left Soft Key Select > set
to save the setting.
Alerts
1. Press the OK Key Menu > Settings
> Sounds > Alerts.
• Minute Beep : Sounds an alert
every minute during a call.
• Roaming : Sounds an alert when
leaving a service area and entering
a roaming service area.
• Call Connect : Notifies you that
a call has been successfully
placed.
Settings
31
• Power On/Off : To set phone to
sound a tone when the phone is
powered on/off.
2. Select “On” or “Off”.
3. Press the Left Soft Key Select > set
to save the setting.
Tone length
1. Press the OK Key Menu > Settings
> Sounds > Tone Length.
2. Select “Short” or “Long”.
> Call > Contacts Match.
2. Select “On” or “Off”.
3. P
ress the Left Soft Key Set to save
the setting.
Call answer
To select an answer mode:
1. Press the OK Key Menu > Settings
> Call > Call Answer.
2. Select “Talk Key” or “Any Key”.
3. Press the Left Soft Key Select > set
to save the setting.
3. P
ress the Left Soft Key Set to save
the setting.
Call
Auto retry
Contacts match
This function will match your
abbreviated dialed number with an
entry from your phone’s contact list.
So when you press a Send key after
you dial the 4 digits, your phone will
show the name of the contact you are
dialing as well as the phone number.
1. Press the OK Key Menu > Settings
32
Settings
Automatically redials a call up to 5
times after a set time interval.
1. Press the OK Key Menu > Settings
> Call > Auto Retry.
2. Select “On” or “Off”.
3. P
ress the Left Soft Key Set to save
the setting.
TTY mode
Your phone is able to operate with a
TTY (Teletypewriter) device in digital
modes. This feature is system dependent and may not be available in all
areas.
1. Press the OK Key Menu > Settings
> Call > TTY Mode.
4 digits of your phone number.
2. S
elect “Lock Now”, “Unlock” or “On
Power Up”.
3. P
ress the Left Soft Key Set to save
the setting.
2. Read the message, then press the
Left Soft Key Next.
Change lock code
3. S
elect “TTY + Full”, “TTY + Talk”, “•
TTY + Hear” or “TTY Off”.
1. Press the OK Key Menu > Settings
> Security > Enter your password. >
Change Lock Code.
4. P
ress the Left Soft Key Set to save
the setting.
Security
Prevents unauthorized use of your
phone. The following settings can be
restricted:
Phone lock
Prevents the phone from being used
without entering the password first.
1. Press the OK Key Menu > Settings
> Security > Enter your password. >
Phone Lock.
note
The default Lock code is the last
Changes your 4-digit password.
The default Lock code is the last
4 digits of your phone number.
note
2. E
nter your lock code.
3. “ Create your new lock code”
screen appears. Enter your new
lock code.
4. “ Re-enter your new lock code”
screen appears. Enter your new
lock code again.
Special number
This features allows you to set 3
phone numbers that can be called
Settings
33
even when the phone is locked.
1. Press the OK Key Menu > Settings
> Security > Enter your password. >
Special Number.
The default Lock code is the last
4 digits of your phone number.
note
2. Select a location(1. 911, 2. *911,
3. #911) and press the Left Soft Key
Add/Edit. Enter the phone number
and press Left Soft Key Save to
save it to that location.
3. Press the Right Soft Key Erase to
erase the Special Number. Select
“No“ and press the OK Key.
Restriction
You can restrict incoming or outgoing
calls, and international calls. When
calls are restricted, calls still may be
possible to the official emergency
number programmed into your
device.
1. Press the OK Key Menu > Settings
> Security > Enter your password. >
Restriction.
34
Settings
The default Lock code is the last
4 digits of your phone number.
note
2. S
elect “Allow All” or ”Restricted All”,
then press the Left Soft Key Set to
save the setting.
Erase
To erase all data in your phone:
1. P
ress the OK Key Menu > Settings
> Security > Enter your password. >
Erase.
The default Lock code is the last
4 digits of your phone number.
note
2. S
elect“Contacts”,“Messages”,“Voice
Memo” or “Download Contents”,
then press the OK Key.
3. “ Erase all?” will be displayed. Select
“1. Yes“ and press the OK Key.
4. “ Really?” will be displayed. Select
“1. Yes” and press the OK Key.
Reset phone
All saved contents and preference
setting will be reset to factory
defaults.
1. Press the OK Key Menu > Settings
> Security > Enter your password. >
Reset Phone.
Others
note
The default Lock code is the last
4 digits of your phone number.
Selects the language in which letters
are displayed on the screen.
2. “Reset phone?” will be displayed.
Select “1. Yes“ and press the OK
Key.
1. Press the OK Key Menu > Settings
> Others > Language.
3. “Really?” will be displayed. Select
“1. Yes” and press the OK Key.
3. Press the Left Soft Key Set to save
the setting.
Erase all entries
Airplane Mode
All saved contents and preference
setting will be reset to factory
defaults.
Airplane Mode deactivates the wireless
connectivity of your phone but
allows you to continue using
non-network functions like the Calendar
and games.
1. Press the OK Key Menu > Settings
> Security > Enter your password. >
Erase All Entries.
The default Lock code is the last
4 digits of your phone number.
note
2. “Erase all entries?” will be
displayed. Select “1. Yes“ and press
the OK Key.
3. “Really?” will be displayed. Select
“1. Yes” and press the OK Key.
Language
2. Select “English” or “Spanish”.
1. Press the OK Key Menu > Settings
> Others > Airplane Mode.
2. Select “On”, “Off”.
3. Press the Left Soft Key Set to save
the setting.
You cannot make or receive
calls or text messages when Airplane
Mode is On.
note
Settings
35
Location
To set the location function:
1. Press the OK Key Menu > Settings
> Others > Location.
2. Select “Location On” or “E911 Only”.
3. P
ress the Left Soft Key Set to save
the setting.
System select
To set the location function:
1. Press the OK Key Menu > Settings
> Others > System Select.
2. Select “Home Only” or “Automatic”.
3. Press the Left Soft Key Set to save
the setting.
Phone info
Displays the information of your
phone:
My phone number
Displays your MDN and MIN.
1. Press the OK Key Menu > Settings >
Phone Info > My Phone Number.
36
Settings
2. T
he “MDN“ and “MIN“ will be
displayed along with your service
provider’s name.
3. T
o return to the previous page,
press the Right Soft Key Close or
OK Key.
Version
Displays the S/W Version, H/W
Version, PRL Version, Browser Name,
Browser Version, Brew Version, PRI,
ERI:
1. Press the OK Key Menu > Settings
> Phone Info > Version.
2. T
he S/W Version, H/W Version, PRL
Version, Browser Name, Browser
Version, Brew Version, PRI, ERI
information is displayed.
3. T
o return to the previous page,
press the Right Soft Key Close or
OK Key.
ESN/MEID
Displays your ESN(Dec), ESN(Hex),
MEID (Dec) and MEID(Hex).
1. Press the OK Key Menu > Settings
> Phone Info > ESN/MEID.
2. To return to the previous page,
press the Right Soft Key Close or
OK Key.
Icon glossary
Displays the icons.
1. Press the OK Key Menu > Settings >
Phone Info > Icon Glossary.
2. Your phone’s indicator icons are
displayed.
3. Press the OK Key, your phone’s
indicator icons information are
displayed.
Care
and
maintenance
Your device is a product of superior
design and craftsmanship and should
be treated with care. The following
suggestions will help you protect your
warranty coverage.
• Keep the device dry. Precipitation,
humidity, and all types of liquids or
moisture can contain minerals that
will corrode electronic circuits. If
your device does get wet, remove
the battery, and allow the device to
dry completely before replacing it.
• Do not use or store the device in
dusty, dirty areas. Its moving parts
and electronic components can be
damaged.
• Do not store the device in hot areas.
High temperatures can shorten the
life of electronic devices, damage
batteries, and warp or melt certain
plastics.
• Do not store the device in cold
areas. When the device returns to
its normal temperature, moisture can
form inside the device and damage
electronic circuit boards.
• Do not attempt to open the
device other than as instructed in
this guide.
• Do not drop, knock, or shake the
device. Rough handling can break
internal circuit boards and fine
Settings / Care and maintenance
37
mechanics.
• Do not use harsh chemicals, cleaning
solvents, or strong detergents to
clean the device.
• Do not paint the device. Paint can
clog the moving parts and prevent
proper operation.
• Use only the supplied or an
approved replacement antenna.
Unauthorized
antennas,
modifications, or attachments could
damage the device and may violate
regulations
governing
radio
devices.
• Use chargers indoors.
• Always create a backup of data you
want to keep, such as contacts and
calendar notes.
• To reset the device from time to time
for optimum performance, power off
the device and remove the battery.
These suggestions apply equally to
your device, battery, charger, or any
enhancement. If any device is not
working properly, take it to the nearest
authorized service facility for service.
38
Care and maintenance / Warranty
Warranty
One (1) year Limited Warranty (U.S.)
For products purchased from Cricket
or its authorized dealers Cricket
warrants that this device (“Product”)
is free from defects in material and
workmanship that result in Product
failure during normal usage, according
to the following terms and conditions
(the “Limited Warranty”):
1. This Limited Warranty for the
Product extends for onE (1) year
beginning on the date of the
purchase of the Product.
2. The Limited Warranty extends
only to the original purchaser
(“Consumer”) of the Product and
is not assignable or transferable
to any subsequent purchaser/
end-user.
3. T
he Limited Warranty extends
only to Consumers who purchase
the Product from Cricket or its
authorized dealers.
4. D
uring the Limited Warranty period,
Cricket will repair or replace, at
Cricket’s sole option, any defective
parts, or any parts that will not
properly operate for their intended
use with new or refurbished
replacement items if such repair or
replacement is needed because
of product malfunction or failure
during normal usage. the Limited
Warranty does not cover defects in
appearance, cosmetic, decorative
or structural items, including
framing, and any non-operative
parts. Cricket’s limit of liability under
the Limited Warranty shall be the
actual cash value of the Product
at the time the Consumer returns
the Product for repair, determined
by the price paid by the Consumer
for the Product less a reasonable
amount for usage. Cricket shall not
be liable for any other losses or
damages. these remedies are the
Consumer’s exclusive remedies for
breach of the Limited Warranty.
5. Upon request from Cricket, the
Consumer must prove the date of
the original purchase of the Product
by a dated bill of sale or dated
itemized receipt.
6. The Consumer shall bear the cost
of shipping the Product to Cricket.
Cricket shall bear the cost of shipping
the Product back to the Consumer
after the completion of service
under this Limited Warranty.
7. The Consumer shall have no coverage
or benefits under this Limited
Warranty if any of the following
conditions are applicable:
a. the Product has been subjected
to abnormal use, abnormal
conditions, improper storage,
exposure
to
moisture
or
dampness,
unauthorized
modifications,
unauthorized
connections, unauthorized repair,
misuse, neglect, abuse, accident,
alteration, improper installation,
or other acts which are not the
fault of Cricket, including damage
caused by shipping.
b. the Product has been damaged
from external causes such as
Warranty
39
collision with an object, or
from fire, flooding, sand, dirt,
windstorm, lightning, earthquake
or damage from exposure to
weather conditions, an act of
God, or battery leakage, theft,
blown fuse, or improper use of
any electrical source, damage
caused by computer or internet
viruses, bugs, worms, trojan
Horses, cancelbots or damage
caused by the connection to
other products (including but not
limited to hardware and software)
not
recommended
for
interconnection by Cricket.
c. the Product serial number plate
or the enhancement data code
has been removed, defaced or
altered.
d. the defect or damage was caused
by the defective function of the
cellular system or by inadequate
signal reception by the external
antenna, or viruses or other
software problems introduced
into the Product.
40
Warranty
8. C
ricket
does
not
warrant
uninterrupted or error-free operation
of the Product. If a problem develops
during the Limited Warranty period,
the Consumer shall take the
following step-by-step procedure:
a. T
he Consumer shall return the
Product to the place of purchase
for repair or replacement
processing.
b. The Consumer shall include a
return address, daytime phone
number and/ or fax number,
complete description of the
problem, proof of purchase and
service agreement (if applicable).
Expenses related to removing the
Product from an installation are
not covered under this Limited
Warranty.
c. T
he Consumer will be billed for
any parts or labor charges not
covered by this Limited Warranty.
the Consumer will be responsible
for any expenses related to
reinstallation of the Product.
d. Cricket will repair the Product
under the Limited Warranty within
30 days after receipt of the
Product. If Cricket cannot perform
repairs covered under this
Limited Warranty within 30 days,
or after a reasonable number
of attempts to repair the same
defect, Cricket at its option, will
provide a replacement Product
or refund the purchase price of
the Product less a reasonable
amount for usage.
e. If the Product is returned during
the Limited Warranty period, but
the problem with the Product
is not covered under the terms
and conditions of this Limited
Warranty, the Consumer will be
notified and given an estimate of
the charges the Consumer must
pay to have the Product repaired,
with all shipping charges billed
to the Consumer. If the estimate
is refused, the Product will be
returned freight collect. If the
Product is returned after the
expiration of the Limited Warranty
period, Cricket’s normal service
policies shall apply and the
Consumer will be responsible for
all shipping charges.
9. You (the Consumer) understand
that the Product may consist of
refurbished
equipment
that
contains used components, some
of which have been reprocessed.
the used components comply with
Product performance and reliability
specifications.
10. Disclaimer of Warranty. EXCEPt
aS SEt fortH In tHIS EXPrESS
LImItED WarrantY, ConSUmEr
taKES tHE ProDUCt “aS
IS,” anD CrICKEt maKES no
WarrantY or rEPrESEntatIon
anD tHErE aEr no ConDItIonS,
EXPrESS or ImPLIED, StatUtorY
or otHErWISE, of anY KInD
WHatSoEVEr WItH rESPECt
to tHE ProDUCt, InCLUDInG
BUt not LImItED to anY
ImPLIED
WarrantY
of
mErCHantaBILItY, or fItnESS
for a PartICULar PUrPoSE or
Warranty
41
USE; WarrantIES of tItLE or
non-InfrInGEmEnt;
DESIGn,
ConDItIon,
QUaLItY,
or
PErfromanCE of tHE ProDUCt;
tHE WorKmanSHIP of tHE
ProDUCt or tHE ComPonEntS
ContaInDED
tHErEIn;
or
ComPLIEnt of tHE ProDUCt
WItH tHE rEQUIrEmEntS of
anY LaW, rULE, SPECIfICatIon
or ContraCt PErtaInInG
tHErEto.
11. CrICKEt SHaLL not BE LIaBLE
for
SPECIaL,
InCIDEntaL,
PUnItIVE or ConSEQUEntIaL
DamaGES, InCLUDInG BUt not
LImItED to LoSS of antICIPatED
BEnEfItS or ProfItS, LoSS of
SaVInGS or rEVEnUE, LoSS of
Data, PUnItIVE DamaGES, LoSS
of USE of tHE ProDUCt or
anY aSSoCIatED EQUIPmEnt,
CoSt of CaPItaL, CoSt of anY
SUBStItUtE EQUIPmEnt or
faCILItIES,
DoWntImE,
tHE
CLaImS of anY tHIrD PartIES,
InCLUDInG CUStomErS, anD
42
Warranty
InJUrY to ProPErtY, rESULtInG
from tHE PUrCHaSE or USE of
tHE ProDUCt or arISInG from
BrEaCH of tHE WarrantY,
BrEaCH
of
ContraCt,
nEGLIGEnCE, StrICt tort, or
anY otHEr LEGaL or EQUItaBLE
tHEorY, EVEn If CrICKEt KnEW
of tHE LIKELIHooD of SUCH
DamaGES. CrICKEt SHaLL not BE
LIaBLE
for
DELaY
In
rEnDErInG SErVICE UnDEr tHE
LImItED WarrantY, or LoSS of
USE DUrInG tHE PErIoD tHat
tHE ProDUCt IS BEInG rEPaIrED.
notHInG ContaInED In tHE
InStrUCtIon manUaL SHaLL
BE ConStrUED to CrEatE
an EXPrESS WarrantY of
anY KInD WHatSoEVEr WItH
rESPECt to tHE ProDUCt.
aLL ImPLIED WarrantIES anD
ConDItIonS tHat maY arISE BY
oPEratIon of LaW, InCLUDInG
If aPPLICaBLE tHE ImPLIED
WarrantIES
of
mErCHantaBILItY anD fItnESS
for a PartICULar PUrPoSE,
arE HErEBY LImItED to tHE
SamE DUratIon of tImE aS tHE
EXPrESS WrIttEn WarrantY
StatED HErEIn.
12. Some states do not allow limitation
of how long an implied warranty
lasts, so the one (1) year warranty
limitation may not apply to you (the
Consumer). Some states do not
allow the exclusion or limitation
of incidental and consequential
damages, so certain of the above
limitations or exclusions may not
apply to you (the Consumer).
this Limited Warranty gives the
Consumer specific legal rights
and the Consumer may also have
other rights which vary from state
to state.
13. Cricket neither assumes nor
authorizes any authorized service
center or any other person or
entity to assume for it any other
obligation or liability beyond that
which is expressly provided for in
this Limited Warranty including the
provider or seller of any extended
warranty or service agreement.
14. T
his is the entire warranty between
Cricket and the Consumer,
and supersedes all prior and
contemporaneous
agreements
or understandings, oral or written,
relating to the Product, and no
representation,
promise
or
condition not contained herein
shall modify these terms. the
agents, employees, distributors,
and dealers of Cricket are not
authorized to make modifications
to this Limited Warranty, or make
additional warranties binding on
Cricket. accordingly, additional
statements such as dealer
advertising
or
presentation,
whether oral or written, do not
constitute warranties by Cricket
and should not be relied upon.
15. T
his Limited Warranty allocates
the risk of failure of the Product
between the Consumer and Cricket.
the allocation is recognized by the
Consumer and is reflected in the
Warranty
43
purchase price.
16. If anY PortIon of tHIS LImItED
WarrantY IS HELD ILLEGaL
or
UnEnforCEaBLE
BY
rEaSon of anY LaW, SUCH
PartIaL
ILLEGaLItY
or
UnEnforCEaBILItY SHaLL not
affECt tHE EnforCEaBILItY
for tHE rEmaInDEr of tHIS
LImItED WarrantY WHICH
PUrCHaSEr aCKnoWLEDGES
IS anD WILL aLWaYS BE
ConStrUED to BE LImItED BY
ItS tErmS or aS LImItED aS
tHE LaW PErmItS.
Additional safety
information
Small children
Your device and its enhancements
may contain small parts. Keep them
out of the reach of small children.
Operating environment
This device meets RF exposure
44
Warranty / Additional safety information
guidelines when used either in the
normal use position against the ear or
when positioned at least 2.2 centimeters
(7/8 inches) away from the body.
When a carry case, belt clip, or holder
is used for body-worn operation, it
should not contain metal and should
position the device the above-stated
distance from your body.
To transmit data files or messages, this
device requires a quality connection
to the network. In some cases,
transmission of data files or messages
may be delayed until such a connection
is available. Ensure the above
separation distance instructions are
followed until the transmission is
completed.
Parts of the device are magnetic.
Metallic materials may be attracted to
the device. Do not place credit cards
or other magnetic storage media
near the device, because information
stored on them may be erased.
Medical devices
Operation of any radio transmitting
equipment,
including
wireless
devices, may interfere with the
functionality of inadequately protected
medical devices. Consult a physician
or the manufacturer of the medical
device to determine if they are
adequately shielded from external RF
energy or if you have any questions.
Switch off your device in health care
facilities when any regulations posted
in these areas instruct you to do so.
Hospitals or health care facilities may
be using equipment that could be
sensitive to external RF energy.
Implanted medical devices
Manufacturers of medical devices
recommend that a minimum separation
of 15.3 centimeters (6 inches) should
be maintained between a wireless
device and an implanted medical
device, such as a pacemaker or
implanted cardioverter defibrillator, to
avoid potential interference with the
medical device. Persons who have
such devices should:
• Always keep the wireless device
more than 15.3 centimeters (6 inches)
from the medical device when the
wireless device is turned on.
• Not carry the wireless device in a
breast pocket.
• Hold the wireless device to the
ear opposite the medical device to
minimize
the
potential
for
interference.
• Turn the wireless device off
immediately if there is any reason to
suspect that interference is taking
place.
• Read and follow the directions from
the manufacturer of their implanted
medical device.
If have any questions about using your
wireless device with an implanted
medical device, consult your health
care provider.
Hearing aids
Some digital wireless devices may
interfere with some hearing aids. If
Additional safety information
45
interference occurs, consult your
service provider.
Hearing aid compatibility
Your mobile device model complies
with FCC rules governing hearing aid
compatibility. These rules require an
M3 microphone or higher value. The
M-value, shown on the device box,
refers to lower radio frequency (RF)
emissions. A higher M-value generally
indicates that a device model has a
lower RF emissions level, which may
improve the likelihood that the device
will operate with certain hearing aids.
Some hearing aids are more immune
than others to interference. Please
consult
your
hearing
health
professional to determine the M-rating
of your hearing aid and whether your
hearing aid will work with this device.
This device includes a setting for
direct connection to telecoilequipped
hearing aids. When both the telecoil
hearing aid (T switch) and the phone
telecoil are activated, using the
46
Additional safety information
device with the aided ear will provide
a direct connection for audio through
your hearing aid. The quality of sound
depends on the type of hearing aid
used. You should test the device
with the telecoil setting activated to
determine whether your audio
performance improves. Using the
telecoil hearing-aid setting consumes
additional battery power.
More information on accessibility can
be found at.
Vehicles
RF signals may affect improperly
installed
or
inadequately
shielded electronic systems in motor vehicles such as electronic
fuel injection systems, electronic
antiskid (antilock) braking systems,
electronic speed control systems, and
air bag systems. For more information,
check with the manufacturer, or its
representative, of your vehicle or any
equipment that has been added.
Only qualified personnel should
service the device or install the
device in a vehicle. Faulty installation
or service may be dangerous and may
invalidate any warranty that may apply
to the device. Check regularly that all
wireless device equipment in your
vehicle is mounted and operating
properly. Do not store or carry
flammable liquids, gases, or explosive
materials in the same compartment
as the device, its parts, or
enhancements. For vehicles equipped
with an air bag, remember that air
bags inflate with great force. Do not
place objects, including installed or
portable wireless equipment in the
area over the air bag or in the air bag
deployment area.
If in-vehicle wireless equipment is
improperly installed and the air bag
inflates, serious injury could result.
Using your device while flying in
aircraft is prohibited. Switch off your
device before boarding an aircraft.
The use of wireless teledevices in
an aircraft may be dangerous to the
operation of the aircraft, disrupt the
wireless telephone network, and may
be illegal.
Potentially explosive environments
Switch off your device when in any
area with a potentially explosive
atmosphere, and obey all signs and
instructions. Potentially explosive
atmospheres include areas where you
would normally be advised to turn off
your vehicle engine. Sparks in such
areas could cause an explosion or fire
resulting in bodily injury or even death.
Switch off the device at refuelling
points such as near gas pumps at
service stations. Observe restrictions
on the use of radio equipment
in fuel depots, storage, and
distribution areas; chemical plants;
or where blasting operations are in
progress. Areas with a potentially
explosive atmosphere are often, but
not always, clearly marked. They
include below deck on boats, chemical
transfer or storage facilities and areas
where the air contains chemicals or
particles such as grain, dust, or metal
Additional safety information
47
powders. You should check with
the manufacturers of vehicles using
liquefied petroleum gas (such as
propane or butane) to determine if
this device can be safely used in their
vicinity.
Emergency calls
2. P
ress the end key as many times
as needed to clear the display and
ready the device for calls.
3. E
nter the official emergency
number for your present location.
Emergency numbers vary by
location.
Important: This device operates using
radio signals, wireless networks,
landline
networks,
and
userprogrammed
functions.
Connections in all conditions cannot
be guaranteed. You should never
rely solely on any wireless device for
essential communications like medical
emergencies.
4. Press the send key.
To make an emergency call:
This mobile device meets guidelines
for exposure to radio waves.
1. If the device is not on, switch it on.
Check for adequate signal strength.
Depending on your device, you
may also need to complete the
following:
• Remove certain call restrictions you have activated in your
device.
48
Additional safety information
When making an emergency call,
give all the necessary information as
accurately as possible. Your wireless
device may be the only means of
communication at the scene of an
accident. Do not end the call until
given permission to do so.
Certification information (SAR)
Your mobile device is a radio
transmitter and receiver. It is designed
not to exceed the limits for exposure
to radio waves recommended by
international
guidelines.
These
guidelines were developed by the
independent scientific organization
ICNIRP and include safety margins
designed to assure the protection of
all persons, regardless of age and
health.
testing requirements and the network
band. Additional SAR information may
be provided under product information
at.
The exposure guidelines for mobile
devices
employ
a
unit
of
measurement known as the Specific
Absorption Rate or SAR. The SAR limit
stated in the ICNIRP guidelines is 1.6
watts/kilogram (W/kg) averaged over
1 grams of tissue. Tests for SAR are
conducted using standard operating
positions with the device transmitting
at its highest certified power level in
all tested frequency bands. The actual
SAR level of an operating device can
be below the maximum value because
the device is designed to use only the
power required to reach the network.
That amount changes depending on a
number of factors such as how close
you are to a network base station.
Your mobile device is also designed
to meet the requirements for
exposure to radio waves established
by the Federal Communications
Commission (USA) and Industry
Canada. These requirements set a
SAR limit of 1.6 W/kg averaged over
one gram of tissue. The highest SAR
value reported under this standard
during product certification for use
at the ear is 1.29 W/kg and when
properly worn on the body is 0.311 W/
kg.
Use of device accessories and
enhancements may result in different
SAR values. SAR values may vary
depending on national reporting and
SAFETY
INFORMATION
FOR
FIXED
WIRELESS
TERMINALS
POTENTIALLY
EXPLOSIVE
ATMOSPHERES
Turn your phone OFF when in any
area with a potentially explosive
atmosphere and obey all signs and
instructions. Sparks in such areas
could cauls e an explosion or fire
Additional safety information
49
resulting in bodily injury or even
death.
INTERFERENCE
DIVICES
TO
MEDICAL
Certain electronic equipment may
be shielded against RF signal from
you wireless phone. (pacemakers,
Hearing Aids, and so on) Turn your
phone OFF in health c are facilities
when any regulations posted in these
areas instruct you to do so. RF signals
may affect improperly installed or
inadequately shielded electronic
system in motor vehicles.
EXPOSURE TO RF ENERGY
Use only the supplied or an approved
replacement antenna. Do not touch
the antenna unnecessarily when the
phone is in use. Do not move the
antenna close to, or couching any
exposed part of the body when
making a call.
BODY-WORN OPERATION
This device was tested for typical
body-worn operations with the back of
50
Additional safety information
the phone kept 2.0 cm from the body.
To maintain compliance with FCC
RF exposure requirements, use only
belt-clips,
holsters
or
similar
accessories that maintain a .2.0 cm
separation distance between the
user’s body and the back of the
phone, including the antenna. The
use of belt-clips, holsters and similar
accessories should not contain
metallic components in its assembly.
The use of accessories that do not
satisfy these requirements may not
comply with FCC RF exposure
requirements, and should be avoided.
For more information about RF
exposure, please visit the FCC website at www.fcc.gov.
FCC Compliance Information
This device complies with Part 15 of
FCC Rules. Operation is subject to the
following two conditions:
(1) This device may not cause harmful
interference, and
(2) This device must accept any
interference received.
Including interference that may cause
undesired operation.
U.S.A.
U.S.FEDERAL COMMUNICATIONS
COMMISSION RADIO FREQUENCY
INTERFERENCE STATEMENT
INFORMATION TO THE USER
This equipment has been tested
and found to comply with the limits for
a Class B digital device pursuant to
Part 15 of the FCC Rules. These limits
are designed to provide reasonable
protection
against
harmful
Interference
in
a
residential
installation. This equipment generates,
uses, and can radiate radio frequency
energy and, if Not installed and used in
accordance with the instructions, may
cause harmful Interference to radio
communications. However, there is
no guarantee that interference will
not occur in a particular Installation.
If this equipment does cause harmful
interference to radio or television
reception, which can be determined
by turning the equipment off and
note
on, the user is encouraged to try to
correct the interference by one or
more of the following measures:
*- Reorient or relocate the receiving
antenna. Increase the separation
between the equipment and
receiver.
*- Connect the equipment into an
outlet of a circuit different from that
to which the receiver is connected.
*- Consult the dealer or an
experienced radio/TV technician for
assistance.
Changes
or
modification
not
expressly approved by the party
responsible for Compliance could
void the user’s authority to operate
the equipment. Connecting of
peripherals requires the use of
grounded shielded signal cables.
FCC Hearing-Aid Compatibility (HAC)
Regulations For Wireless Devices
On July 10, 2003, the U.S. Federal
Communications Commission (FCC)
Report and Order in WT Docket
Additional safety information
51
01-309 modified the exception of
wireless phones under the Hearing
Aid Compatibility Act of 1988 (HAC
Act) to require digital wireless phones
be compatible with hearing-aids. The
intent of the HAC Act is to ensure
reasonable
access
to
telecommunications services for
persons with hearing disabilities.While
some wireless phones are used near
some hearing devices (hearing aids
and cochlear implants), users may
detect a buzzing,humming, or whining
noise. Some hearing devices are
more immune than others to this
interference noise, and phones also
vary in the amount of interference
they generate.The wireless telephone
industry has developed a rating
system for wireless phones, to assist
hearing device users find phones
that may be compatible with their
hearing devices. Not all phones have
been rated. Phones that are rated
have the rating on their box or a label
located on the box. The ratings are not
guarantees. Results will vary depending
52
Additional safety information
on the user’s hearing device and
hearing loss. If your hearing device
happens to be vulnerable to
interference, you may not be able to
use a rated phone successfully. Trying
out the phone with your hearing
device is the best way to evaluate it
for your personal needs.
M-Ratings: Phones
rated M3 or M4 meet
FCC requirements
and are likely to
generate
less
interference to hearing devices
than phones that are not labeled.
M4 is the better/higher of the two
ratings. Hearing devices may also
be rated. Your hearing device
manufacturer or hearing health
professional may help you find this
rating. Higher ratings mean that the
aring device is relatively immune to
interference noise. The hearing aid
and wireless phone rating values
are then added together.A sum of 5
is considered acceptable for normal
use. A sum of 6 is considered for
best use. In the above example, if
a hearing aid meets the M2 level
rating and the wireless phone meets
the M3 level rating, the sum of the two
values equal M5. This should provide
the hearing aid user with “normal
usage” while using their hearing aid
with the particular wireless phone.
“Normal usage” in this context is
defined as a signal quality that is
acceptable for normal operation.
The M mark is intended to be
synonymous with the U mark. The T
mark is intended to be synonymous
with the UT mark. The M and T marks
are recommended by the Alliance
for Telecommunications Industries
Solutions (ATIS). The U and UT marks
are referenced in Section 20.19 of
the FCC Rules. The HAC rating and
measurement procedure are described
in the American National Standards
Institute (ANSI) C63.19 standard.
Additional safety information
53