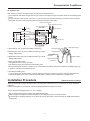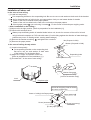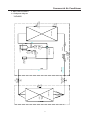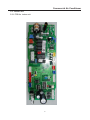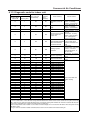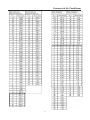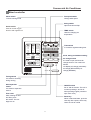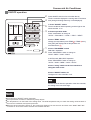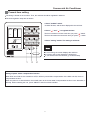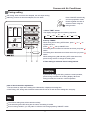
1
SERVICE MANUAL YUDA060 / CAD060 Outdoor unit YUDA060 Indoor unit CAD060 >_]]VbTZR\ <Zb >_^UZdZ_^Vb CONTENTS Contents……………………………………………………….....2 1. Description of products & features………………………….3 2. Specification…………………………………………………...5 3. Dimensions…………………………………………………....7 4. Pipe and wiring installation…..……………………………....9 5. PCB photo, wiring diagram and function description……..32 6. Diagnostic code and troubleshooting.……………………... 47 7. Outdoor performance curves………..……………………....52 8. Indoor air velocity and temperature distribution curves......53 9. Noise level…………………………………………………...54 10. Sensor characteristic….………………………………….....58 11. Controller functions…...………………………………….....62 2 .9773:1506 -5: .9825;5983: 1.Description of products & features 1.1. Products code explanation 1 U 36 H S 1 E R A Climate type: T1 (see table 1) Frequency type: DC inverter Product type: A stands for heat pump type, refrigerant is R22 B stands for heat pump type, refrigerant is R407C E stands for heat pump type, refrigerant is R410A N stands for cool only type, refrigerant is R407C Design edition Product series: S stands for EASY STOCK Product appearance Cooling / Heating capacity,36=36000BTU/h Product type : “B” stands for cassette type, “C” stands for convertible type, “D” stands for duct, “S” stands for wall mounted type, "F" stands for console type, “U” stands for outdoor of split unit "1" stands for one by one,"2" stands for one by two, max. one by eight. 1.2 Brief Introduction for T1 working condition Climate type Type of Conditioner Cooling Only T1˄ć˅ Cooling Only 18ć~46ć Heat Pump —15ć ~46ć ~46 ć Electricity Heating 1.3 Operating Range of Air Conditioners Working temperature range Cooling Heating rated maximum minimum DBć 27 32 18 WBć 19 23 14 DBć 35 46 18 WBć 24 24 — DBć 20 27 15 WBć 14.5 — — DBć 7 24 ʊ15 WBć 6 18 — 3 Commercial Air Conditioner 1.4 Product features By integrating intelligential technology of Airwell Residential, with universal indoor and outdoor units, make more intelligent and flexible choices on purchasing, easier inventory management to every customer. Good for choice Multi-choice of capacity and appearance of indoor unit according to various rooms. DC scroll compressor The highly efficient scroll compressor is equipped with a “flexible Mechanism” that allows movement in the axial direction of the frame supporting the cradle scroll. This greatly reduces both leakage and friction loss, ensuring very high efficiency throughout the speed range. DC inverter technology Powerful startup: Airwell DC inverter system can startup and running at maximum frequency very quickly in order to reach the set temperature in the shorter time, which brings you great comfort experience. Minimum running: Airwell DC inverter system will reduce the frequency and running smoothly according to the real load after reach the set temperature. The system funning cost reduced drastically which brings you real benefit of money saving. Automatic control Precise control: The temperature sensor can measure the temperature precisely with only 0.5℃ tolerance, which transfers the exact requirement to the system to adjust the compressor frequency accordingly. Once reach the set temperature, the system adjust the frequency smoothly according to the real time request and always maintain the temperature without fluctuation. Wider operation range Airwell DC inverter system provide much wider working range that is suitable for special cooling, heating requirement. The Unitary Smart DC inv. outdoor unit default production with AC fan motor, DC fan motor is for optional choice with additional cost. 4 Item M YUDA060 Power cable H07RN-F 5G 4.0mm2 Communication cable / Connecting cable H05RN-F 4G 0.75mm2 Power source 3N~,380∼400, 50Hz N, V, Hz Unit model (color) YUDA060(WHITE) LNB42FUAMC(MITSUBISHI ELECTRIC COMPRESSOR CO.,LTD) Model / Manufacture/place Compressor OIL model FV50S Oil charging 1400CM3 Type Rotary Type × Number axial×2 r/min 930±40 kW 0.80×2 Fan motor output power kW 0.150×2 Air-flow(H-M-L) m³/h 6500 Type / Diameter mm TP2M/Φ7.94 Speed Outdoor unit Fan Heat exchanger Fan motor input power Row/Fin pitch 2 Total area Dimension External Package Drainage pipe (material, ID/OD) Refrigerant control method Defrosting (L×W×H) (L×W×H) mm×mm×mm 948×340×1250 mm×mm×mm 1095×410×1400 mm / ELECTRONIC VALVE mm/mm 4.0 L Noise level 60 dB(A) Type of Four way valve material of reduce noise crankcase heater power PIPING SHF-20A-46 XPE 38 W Weight(Net / Shipping) Pipe Type / Charge kg / kg 96/106 g R410A/3300 Recharge quantity g/m 45 Liquid mm 9.52 Gas mm 19.05 Connecting Method Between I.D &O.D 3.0MM auto Volume of Accumulator Refrigerant 1.5 1.17 m² flared MAX.Drop m 30 MAX.Piping length m 50 Norminal condition: indoor temperature (cooling): 27 DB/19 WB, indoor temperature (heating): 20 DB Outdoor temperature(cooling): 35 DB/24 WB, outdoor temperature(heating): 7 DB/6 WB The noise level will be measured in the third octave band limited values, using a Real Time Analyser calibrated sound intensity meter. It is a sound pressure noise level. 5 >_]]VbTZR\ <Zb >_^UZdZ_^Vb Item Function Capacity Sensible heat ratio Total power input Max. power input EER or COP M kW kW W W/W Dehumidifying capacity Power cable Power source Running /Max.Running current Start Current Circuit breaker CAD060(AIRWELL) cooling heating 14.0(4.0~15.5) 15.0(4.0~17.5) 0.73 4.4(2.0----6.5) 4.36(2.0---6.5) 6500 3.21(A) 10‐³×m³/h 5.0 N, V, Hz A/A A A / 1, 220~230, 50 7.3(2.9-10.5)/10.5 7.3(2.9-10.5)/10.5 / 3.15A CAD060 Unit model (color) Type × Number Speed(H-M-L) Fan 6500 3.41(B) CENTRIFUGALX1 670/550/460±50 r/min 0.19 Fan motor input power kW Fan motor output power kW Air-flow(H-M-L) m³/h 1980/1750/1500 Type / Diameter mm inner grooved pipe/φ7.0 Total Area m² 0.576 0.06 Indoor unit Heat exchanger External (L×W× H) mm×mm× mm 1230×840×280 Package (L×W× H) mm×mm× mm 1325×920×370 Dimension Drainage pipe (material , I.D./O.D.) Controller (O-Optional,S-Standard) Fresh air hole dimension Electricity Heater Noise level (H-M-L) Weight (Net / Shi Panel PIPING Refrigerant Pipe Between I.D &O.D PVC 26/32 mm Wired Infrared mm kW dB(A) kg / kg YR-E14(option) YR-H71(standard) / 0 50/45/42 46/53 Model PB-1340IA External dimensions(W/D/H) Shipping dimensions(W/D/H) Net weight/Shipping weight Type / Charge Recharge quantity Liquid Gas MAX.Drop MAX.Piping length 1340/950/80 mm 1400/995/115 mm 8.4/12.0 kg R410A/3300 45 9.52 19.05 30 50 g g/m mm mm m m Norminal condition: indoor temperature (cooling): 27℃DB/19℃WB, indoor temperature (heating): 20℃DB Outdoor temperature(cooling): 35℃DB/24℃WB, outdoor temperature(heating): 7℃DB/6℃WB The noise level will be measured in the third octave band limited values, using a Real Time Analyser calibrated sound intensity meter. It is a sound pressure noise level. 6 >_]]VbTZR\ <Zb >_^UZdZ_^Vb 3. Dimension YUDA060 25 1250 948 340 380 580 7 >_]]VbTZR\ <Zb >_^UZdZ_^Vb CAD060 ov er ov er ov er ov er 780 (hanging position) 860 - 890 (ceiling hole) 8 1250~1280 (ceiling hole) 1070 (hanging position) over 1000 >_]]VbTZR\ <Zb >_^UZdZ_^Vb 4. Outdoor Unit Installation Safety Precautions Carefully read the following information in order to operate the air conditioner correctly. Below are listed three kinds of Safety Precautions and Suggestions. WARNING Incorrect operations may result in severe consequences of death or serious injuries. CAUTION Incorrect operations may result in injuries or machine damages; in some cases may cause serious consequences. INSTRUCTIONS: These information can ensure the correct operation of the machine. Symbols used in the illustrations :Indicates an action that must be avoided. ! :Indicates that important instructions must be followed. :Indicates a part which must be grounded. :Beware of electric shock (This symbol is displayed on the main unit label.) After reading this handbook, hand it over to those who will be using the unit. The user of the unit should keep this ma n ual at hand and make it available to those who will be performing repairs or relocating the unit. Also, make it available to the new user when the user changes hands. Be sure to conform with the following important Safety Precautions. WARNING If any abnormal phenomena is found (e. g.smell of firing), please cut off switch off the power supply immediately, and contact the dealer to find out the handling method. In such case, to continue using the conditioner will damage the conditioner, and may cause electrical shock or fire hazard. Don't dismantle the outlet of the outdoor unit. The exposure of fan is very dangerous which may harm human beings. When need maintenance and repairment, call dealer to handle it. Incorrect maintenance and repairment may cause water leak, electrical shock and fire hazard. After a long time use of air-conditioner the base should be checked for any damages. If the damaged base is not repaired, the unit may fall down and cause accidents. WARNING No goods or nobody is permitted to placed on or stand on outdoor unit.The falling of goods and people may cause accidents. Air-conditioner can't be installed in the environment with inflammable gases because the inflammable gases near air-conditioner may cause fire hazard. Please let the dealer be responsible for installing the conditioner. Incorrect installation may cause water leak, electrical shock and fire hazard. Don't operate the air-conditioner with damp hands.Otherwise it will be shocked. Call the dealer to take measures to prevent the refrigerant from leaking. If conditioner is installed in a small room, be sure to take every measure in order to prevent suffocation accident even in case of refrigerant leakage. Only use correctly-typed fuse. May not use wire or any other materials replacing fuse, otherwise it may cause faults or fire accidents. When conditioner is installed or reinstalled, the dealer should be responsible for them. Incorrect installation may cause water leaking, electrical shock and fire hazard. Use discharge pipe correctly to ensure efficient discharge. Incorrect pipe use may cause water leaking. Connect earthing wire. Earthing wire should not be connected to the gas Earthing pipe, water pipe, lightning rod or phone line, incorrect earthing may cause shock. Installed electrical-leaking circuit breaker. It easily cause electrical shock without circuit breaker. 9 >_]]VbTZR\ <Zb >_^UZdZ_^Vb WARNING Have the unit professionally installed. Improper installation by an unqualified person may result in water leak, electric shock, or fire. Place the unit on a stable, level surface that withstands the weight of the unit to prevent the unit from tipping over or falling causing injury as a result. Only use specified cables for wiring. Securely connect each cable, and make sure that the cables are not straining the terminals. Cables not connected securely and properly may generate heat and cause fire. Be sure to carefully follow each step in this handbook when installing the unit. Improper installation may result in water leak, electric shock, smoke or fire. Have all electrical work performed by a licensed electrician according to the local regulations and the instructions given in this manual. Secure a circuit designated exclusively to the unit. Improper installation or a lack of circuit capacity may cause the unit to malfunction or present a risk of electric shock, smoke,and fire. Take necessary safety measures against typhoons and earthquakes to prevent the unit from falling over. Securely attach the terminal cover(panel) on the unit. If installed improperly, dust and/or water may enter the unit and present a risk of electric shock, smoke or fire. Do not make any changes or modifications to the unit. In case of problems, consult the dealer. If repairs are not made properly, the unit may leak water and present a risk of electric shock, or it may produce smoke or cause fire. Only use refrigerant R410A as indicated on the unit when installing or relocating the unit. The use of any other refrigerant or an introduction of air into the unit circuit may cause the unit to run an abnormal cycle and abnormal cycle and cause the unit to burst. WARNING Do not touch the fins on the heat exchanger with bare hands, for they are sharp and dangerous. In the event of a refrigerant gas leak, provide adequate ventilation to the room. If leaked refrigerant gas is exposed to a heat source, noxious gases may form. With All-Fresh type air conditioners, outdoor air may be directly blown into the room upon thermo off. Take this into consideration when installing the unit. Direct exposure to outdoor air may present a health hazard, and it may also cause food items to deteriorate. Do not try to defeat the safety features of the devices, and do not change the settings. Defeating the safety features on the unit such as the pressure switch and temperature switch or using parts other than the dealer or specialist may result in fire or explosion. This appliance is not intended for use by persons (including children) with reducedphysical, sensory or mental capabilities, or lack of experience and knowledge, unless they have been given supervision or instruction concerning use of the appliance by a person responsible for their safety. 10 When installing the unit in a small room, safeguard against hypoxia that results from leaked refrigerant reaching the threshold level. Consult the dealer for necessary measures to take. When relocating the air conditioner, consult the dealer or a specialist. Improper installation may result in water leak, electric shock, or fire. After completing the service work, check for a refrigerant gas leak. If leaked gas refrigerant is exposed to a heat source such as fan heater,stove,and electric grill, noxious gases may form. Only use specified parts. Have the unit professionally installed. Improper installation may cause water leak, electric shock,smoke, or fire. Children should be supervised to ensure that they do not play with the appliance. >_]]VbTZR\ <Zb >_^UZdZ_^Vb Precautions for Handling Units for Use with R410A Caution Do not use the existing refrigerant piping Use a vacuum pump with a reverse-flow check valve. If other types of valves are used, the vacuum pump oil will The old refrigerant and refrigerator oil in the existing piping flow back into the refrigerant cycle and cause the refrigerator contain a large amount of chlorine, which will cause the oil to deteriorate. refrigerator oil in the new unit to deteriorate. R410A is a high-pressure refrigerant, and the use of the Do not use the following tools that have been used with the existing piping may result in bursting. conventional refrigerants. Prepare tools that are for exclusive use with R410A. (Gauge manifold, charging hose, gas leak detector, reverse-flow check valve, refrigerant charge base,vacuum gauge, and refrigerant recovery equipment.) If refrigerant and/or refrigerant oil left on these tools are Keep the inner and outer surfaces of the pipes clean and mixed in with R410, or if water is mixed with R410A, it will free of contaminants such as sulfur, oxides, dust/dirt shaving cause the refrigerant to deteriorate. particles,oils,and moisture. Since R410A does not contain chlorine, gas-leak detectors Contaminants inside the refrigerant piping will cause the for conventional refrigerators will not work. refrigerant oil to deteriorate. Caution Store the piping to be used during installation indoors, and Do not use a charging cylinder. keep both ends of the piping sealed until immediately before The use of charging cylinder will change the composition brazing.(keep elbows and other joints wrapped in plastic.) of the refrigerant and lead to power loss. If dust, dirt, or water enters the refrigerant cycle, it may cause the oil in the unit to deteriorate or may cause the compressor to malfunction. Exercise special care when handling the tools. An introduction of foreign objects such as dust, dirt or Use a small amount of ester oil, ether oil, or alkylbenzene water into the refrigerant cycle will cause the refrigerating to coat flares and flange connections. machine oil to deteriorate. A large amount of mineral oil will cause the refrigerating machine oil to deteriorate. Use liquid refrigerant to charge the system. Charge the unit with gas refrigerant will cause the refrigerant Only use R410A refrigerant. in the cylinder to change its composition and will lead to The use of refrigerants containing chlorine(i.e. R22) will a drop in performance cause the refrigerant to deteriorate. Before Installing the Unit Caution Do not install the unit in a place where there is a possibility When installing the unit in a hospital, take necessary measures of flammable gas leak. against noise. Leaked gas accumulated around the unit may start a fire. High-frequency medical equipment may interfere with the normal operation of the air conditioning unit or the air Do not use the unit to preserve food, animals, plants, artifacts, conditioning unit may interfere with the normal operation or for other special purposes. of the medical equipment The unit is not designed to provide adepuate conditions to preserve the quality of these items. Do not use the unit in an unusual environment The use of the unit in the presence of a large amount of oil, steam, acid, alkaline solvents or special types of sprays Do not place the unit on or over things that may not get wet. may lead to a remarkable drop in performance and/or malfunction and presents a risk of electric shock, smoke, When humidity level exceeds 80% or when the drainage or fire. system is clogged, indoor units may drip water. The presence of organic solvents, corroded gas (such as Installation of a centralized drainage system for the outdoor ammonia,sulfur compounds,and acid may cause gas or unit may also need to be considered to prevent water drips water leak.) from the outdoor units. 11 >_]]VbTZR\ <Zb >_^UZdZ_^Vb Before Installing (Relocating) the Unit or Performing Electric Caution Ground the unit. Do not connect the grounding on the unit to gas pipes,water pipes, lightning rods, or the grounding terminals of telephones. Improper grounding presents a risk of electric shock, smoke, fire, or the noise caused by improper grounding may cause the unit to malfunction. Do not spray water on the air conditioners or immerse the air conditioners in water. Water on the unit presents a risk of electric shock. Periodically check the platform on which is placed for damage to prevent the unit from falling. If the unit is left on a damaged plarform, it may topple over, causing injury. Make sure the wires are not subject to tension. If the wires are too taut, they may break or generate heat When installing draining pipes, follow the instructions in the and/or smoke and cause fire. manual, and make sure that they properly drain water so as Install a breaker for current leakage at the power source to avoid dew condensation. to avoid the risk of electric shock. If not installed properly, they may cause water leaks and Without a breaker for current leakage, there is a risk of damage the furnishings. electric shock, smoke or fire. Properly dispose of the packing materials. Use breakers and fuses (electrical current breaker, remote Things such as nails may be included in the package. switch<switch+Type-B fuse>,molded case circuit breaker) Dispose of them properly to prevent injury. with a proper current capacity. Plastic bags present a choking hazard to children. Tear up the plastic bags before disposing of them to prevent The use of large-capacity fuses, steel wire, or copper wire accidents. may damage the unit or cause smoke or fire. Before the Test Run Caution Do not operate switches with wet hands to avoid electric. Do not touch the refrigerant pipes with bare hands during and immediately after operation. Depending on the state of the refrigerant in the system, certain parts of the unit such as the pipes and compressor may become very cold or hot and may subject the person to frost bites or burning. Do not operated the unit without panels and safety guards in their proper places. They are there to keep the users from injury from accidentally touching rotating, high-tempreture or highvoltage parts. 12 Do not turn off the power immediately after stopping the unit. Allow for at least five minutes before turning off the unit, otherwise the unit may leak water or experience other problems. Do not operate the unit without air filters. Dust particles in the air may clog the system and cause malfunction. >_]]VbTZR\ <Zb >_^UZdZ_^Vb Read Before Installation Items to Be Checked (1). Verify the type of refrigerant used by the unit to be serviced. Refrigerant Type: R410A (2). Check the symptom exhibited by the unit to be serviced. Look in this service handbook for symptoms relating to the refrigerant cycle. (3). Be sure to carefully read the safety precautions at the beginning of this document. (4). If there is a gas leak or if the remaining refrigerant is exposed to an open flame, a noxious gas hydrofluoric acid may form. Keep workplace well ventilated. CAUTION Install new pipes immediately after removing old ones to keep moisture out of the refrigerant circuit. Chloride in some types of refrigerants such as R22 will cause the refrigerating machine oil to deteriorate. Necessary Tools and Materials Prepare the following tools and materials necessary for installing and servicing the unit. Necessary tools for use with R410A(Adaptability of tools that are for use with R22 and R407C). 1. To be used exclusively with R410A ( Not to be used if used with R22 or R407C ) Tools/Materials Use Notes Gauge Manifold Evacuating,refrigerant charging 5.09MPa on the High-pressure side. Charging Hose Evacuating, refrigerant charging Hose diameter larger than the concentional ones. Refrigerant Recovery Equipment Refrigerant recovery Refrigerant Cylinder Refrigerant charging Refrigerant Cylinder Charging Port Refrigerant charging Hose diameter larger than the conventional ones. Flare Nut Connecting the unit to piping Use Type-2 Flare nuts. Write down the refrigerant type. Pink in color at the top of the cylinder. 2. Tools and materials that may be used with R410 with some restrictions Tools/Materials Use Gas leak detector Detection of gas leaks Notes The ones for HFC type refrigerant may be used. Vacuum Pump Vacuum drying May be used if a reverse flow check adaptor is attached. Flare Tool Flare machining of piping Chages have been made in the flare machining dimension.Refer to the next page. Refrigerant Recovery Equipment Recovery of refrigerant May be used if designed for use with R410A. 3. Tools and materials that are used with R22 or R407C that can also be used with R410A Tools/Materials Use Vacuum Pump with a Check Valve Vacuum drying Bender Bending pipes Torque Wrench Tightening flare nuts Pipe Cutter Cutting pipes Welder and Nitrogen Cylinder Welding pipes Refrigerant Charging Meter Refrigerant charging Vacuum Gauze Checking vacuum degree Notes Only 12.70 (1/2'') and 15.88(5/8'') have a larger flare machining dimension. 4. Tool and materials that must not used with R410A Tools/Materials Charging Cylinder Use Notes Refrigerant Charging Must not be used with R410-type units. Tools for R410A must be handled with special care, and keep moisture and dust from entering the cycle. 13 >_]]VbTZR\ <Zb >_^UZdZ_^Vb Piping Materials Types of Copper Pipes (Reference) Maximum Operation Pressure Applicable Refrigerants 3.4MPa R22, R407C 4.15MPa R410A Use pipes that meet the local standards. Piping Materials/Radial Thickness Use pipes made of phosphorus deoxidized copper. Since the operation pressure of the units that use R410A is higher than that of the units for use with R22, use pipes with at least the radial thickness specified in the chart below. (Pipes with a radial thickness of 0.7mm or less may not be used.) Size(mm) 6.35 Size(inch) 1/4'' Radial Thickness(mm) 0.8t 9.52 3/8'' 0.8t 12.7 1/2'' 0.8t 15.88 5/8'' 1.0t 19.05 3/4'' 1.0t Type Type-O pipes Type-1/2H or Hpipes Although it was possible to use type-O for pipes with a size of up to 19.05(3/4") with conventional refrigerants, use type1/2H pipes for units that use R410A.(Type-O pipes may be used if the pipe size is 19.05 and the radial thickness is 1.2t.) The table shows the standards in Japan. Using this table as a reference, choose pipes that meet the local standards. Flare Machining (type-O and OL only) The flare machining dimensions for units that use R410A is larger than those for units that use R22 in order to increase air tightness. Flare Machining Dimension(mm) Size Dimension A R410A R22 6.35 1/4" 9.1 9.0 9.52 3/8" 13.2 13.0 12.7 1/2" 16.6 16.2 15.88 5/8" 19.7 19.4 19.05 3/4" 24.0 23.3 Dimension A External dimension of pipes If a clutch type flare tool is used to machine flares on units that use R410A, make the protruding part of the pipe between 1.0 and 1.5mm. Copper pipe gauge for adjusting the length of pipe protrusion is useful. Flare Nut Type-2 flare nuts instead of type-1 nuts are used to increase the strength. The size of some of the flare nuts have also been changed. Flare nut dimension(mm) External dimension of pipes Size Dimension B R410A(Type2) R22(Type1) 6.35 1/4" 17.0 17.0 9.52 3/8" 22.0 22.0 12.7 1/2" 26.0 24.0 15.88 5/8" 29.0 27.0 19.05 3/4" 36.0 36.0 Dimension B The table shows the standards in Japan. Using this table as a reference, choose pipes that meet the local standards. 14 >_]]VbTZR\ <Zb >_^UZdZ_^Vb Air Tightness Test No changes from the conventional method. Note that a refrigerant leakage detector for R22 or R407C cannot detect R410A leakage. NO NO Halide torch R22 or R407C leakage detector Items to be strictly observed : 1.Pressurize the equipment with nitrogen up to the design pressure and then judge the equipment's air tightness, taking temperature variations into account. 2.When investigating leakage locations using a refrigerant, be sure to use R410A. 3.Ensure that R410A is in a liquid state when charging. Reasons: Use of oxygen as the pressurized gas may cause an explosion. 1. 2. Charging with R410A gas will lead the composition of the remaining refrigerant in the cylinder to change and then this refrigerant can not be used. Vacuuming 1.Vacuum pump with check valve A vacuum pump with a check valve is required to prevent the vacuum pump oil from flowing back into the refrigerant circuit when the vacuum pump power is turned off (power failure). It is also possible to attach a check valve to the actual vacuum pump afterwards. 2.Standard degree of vacuum for the vacuum pump Use a pump which reaches 65Pa or below after 5 minutes of operation. In addition, be sure to use a vacuum pump that has been properly maintained and oiled using the specified oil. If the vacuum pump is not properly maintained, the degree of vacuum may be too low. 3.Required accuracy of the vacuum gauge Use a vacuum gauge that can measure up to 650Pa. Do not use a general gauge manifold since it cannot measure a vacuum of 650Pa. 4.Evacuating time Evacuate the equipment for 1 hour after 650Pa has been reached. After envacuating, leave the equipment for 1 hour and make sure the that vacuum is not lost. 5.Operating procedure when the vacuum pump is stopped In order to prevent a backflow of the vacuum pump oil, open the relief valve on the vacuum pump side or loosen the charge hose to drawn in air before stopping operation.The same operating procedure should be used when using a vacuum pump with a check valve. Charging Refrigerant R410A must be in a liquid state when charging. Reasons: R410A is a pseudo-azeotropic refrigerant (boiling point R32= -52 C, R125= -49 C) and can roughly be handled in the same way as R22; however, be sure to fill the refrigerant from the liquid side, for doing so from the gas side will somewhat change the composition of the refrigerant in the cylinder. Note In the case of a cylinder with a syphon, liquid R410A is charged without turning the cylinder up side down. Check the type of cylinder before charging. Remedies to be taken in case of a refrigerant leak When refrigerant leaks, additional refrigerant may be charged. (Add the refrigerant from the liquid side) Characteristics of the Conventional and the New Refrigerants Because R410A is a simulated azeotropic refrigerant, it can be handled in almost the same mammer as a single refrigerant such as R22. Howerver, if the refrigerant is removed in the vapor phase, the composition of the refrigerant in the cylinder will somewhat change. Remove the refrigerant in the liquid phase. Additional refrigerant may be added in case of a refrigerant leak. 15 >_]]VbTZR\ <Zb >_^UZdZ_^Vb Name of Parts YUDA060 Air inlet Air outlet Compressor (Inside of unit) 16 >_]]VbTZR\ <Zb >_^UZdZ_^Vb Installation of Outdoor Unit 1. Selection of the place of installation Select the place of installation satisfying the following conditions and, at the same time, obtain a consent from the client or user. Place where air circulates. Place free from heat radiation from other heat sources. Place where drain water may be discharged. Place where noise and hot air may not disturb the neighborhood. Place where there is not heavy snowfall in the winter time. Place where obstacles do not exist near the air inlet and air outlet . Place where the air outlet may not be exposed to a strong wind. Place surrounded at four sides are not suitable for installation. A 1m or more of overhead space is needed for the unit. Avoid mounting guide-louvers to the place where short-circuit is a possibility. When installing several units, secure sufficient suction space to avoid short circuiting. Open space requirement around the unit Air inlet L2 Air inlet Distance L1 L2 L3 L3 500 (Servicing space) Case I open 300 mm 150 mm Case II open 300 mm 300 mm Case III 500 mm open 150 mm Note : (1) Fix the parts with screws. (2) Don't intake the strong wind directly to NO the outlet air-flow hole. (3) A one meter distance should be Wind direction kept from the unit top. (4) Don't block the surroundings of the unit with sundries. (5) If the outdoor unit is installed in a place that is exposed to the wind, install the unit so that the outlet grid is NOT pointing in the direction of the wind. Air outlet L1 2. Installation of outdoor unit Fix the unit on the foundation in a proper way according to the condition of the installation place, referring to the following information. Give enough room for the concrete foundation to fix by anchor bolts. Place the concrete foundation deep enough. Install the unit so that the angle of inclination must be less than 3 degrees. (a) Concrete foundation (b) Foundation anchor Unit Anchor bolt Unit Concrete foundation Concrete foundation To fix by bolts Anchor bolt 17 >_]]VbTZR\ <Zb >_^UZdZ_^Vb 3. Installation dimension (Unit:mm) YUDA060 25 1250 948 340 380 580 18 >_]]VbTZR\ <Zb >_^UZdZ_^Vb Piping Connection 1. Piping diagram YUDA060 Flare connection Gas pipe Indoor unit 3-way stop valve Outdoor unit Liquid pipe 3-way stop valve 2. Piping size 90+0.5 YUDA060 Liquid pipe 9.52x0.8mm Gas pipe 19.05x1.0mm Install the removed flare nuts to the pipes to be connected, then flare the pipes. 3. Limitations for one way piping length and vertical height difference Model YUDA060 One way piping length less than 50 m Vertical height difference (between indoor and outdoor) less than 20 m Precautions for refrigerant piping Do not twist or crush piping. Be sure that no dust is mixed in piping. Bend piping with as wide angle as possible. Keep insulating both gas and liquid piping. Check flare-connected area for gas leakage. Sppanner Joint Sppanner Nut 4. Piping connection method Apply refrigerant oil to the joint and the flange. To bend a pipe, give the roundness as possible not to crush the pipe. When connecting pipe, hold the pipe centre to centre and then screw nut on by hand, refer to Fig. Be careful not to let foreign matters, such as sands enter the pipe. Pipe diameter Liquid pipe 6.35mm 14.2-17.2 Liquid pipe 9.52mm 32.7-39.9 Gas pipe 12.7mm 49.5-60.3 Gas pipe 15.88mm 61.8-75.4 Gas pipe 19.05mm 97.2-118.6 Forced fastening without centering may damage the threads and cause a gas leakage. 19 Fastening torque (N.m) >_]]VbTZR\ <Zb >_^UZdZ_^Vb Air Tightness Test After finishing connection of refrigerant pipe, it shall perform air tightness test. The air tightness test adopts nitrogen tank to give pressure according to the pipe connection mode as the following figure shown. The gas and liquid valve are all in close state. In order to prevent the nitrogen entering the circulation system of outdoor unit, tighten the valve rod before giving pressure (both gas and liquid valve rods). Low pressure piezometer High pressure piezometer Indoor Outdoor stop valve totally closed (Gas side) Completely tightened Flare part VL VH Meter separator Discharging valve Completely tightened Flare part Manhole Indoor units Dropping valve Nitrogen tank Outdoor units stop valve totally closed (Liquid side) 2 Line pressure gauge 1) Pressurize for over 3 minutes at 0.3MPa (3.0 kg/cm g). 2 2) Pressurize for over 3 minutes at 1.5MPa (15 kg/cm g). A large leakage will be found. 2 3) Pressurize for about 24 hours at 3.0MPa (30 kg/cm g). A small leakage will be found. Cylinder pressure gauge Tubing bring brazed Sweat joint Cylinder of nitrogern Large slip-on connector Service hose Check if the pressure drops If the pressure does not drop, then pass. If the pressure drops, then please check the leaking point. 2 When pressurizing for 24 hours, a variation of 1 C in the ambient temperature will cause a variation of 0.01MPa(0.1kg/cm g) in pressure. It shall be corrected during test. Checking the leaking point In 1) to 3) steps, if the pressure drops, check the leakage in each joint by listening, touching and using soap water etc. to identify the leaking point. After confirming the leaking point, welding it again or tighten the nut tightly again. Installation Procedure Additional Refrigerant Charge When the total length (L) of the two indoor units' connecting pipe is less than 5m, it is unnecessary to charge additional refrigerant. If the connecting pipe (L) exceeds 5m, it shall charge M(g) additional refrigerant per meter. That is: Refrigerant charging amount = (L-5m) x 45 (g/m) Only in COOLING operation can charge the additional refrigerant. When charging, the refrigerant shall be charged from the charging nozzle of low pressure valve. Be carefull when charging refrigerant, do not let the air mix into the system, and must charge the additional refrigerant in liquid state. 20 >_]]VbTZR\ <Zb >_^UZdZ_^Vb Vacuuming Piping vavuum method: to use vacuum pump Liquid stop valve Gas stop valve 1. Detach the service port's cap of gas stop valve, the valve rod's cap for liquid stop valve and gas stop valve, and connect the service port into the projection of charge hose (low) for gaugemanifold. Then connect the projection of charge hose (center) for gaugemanifold into vacuum pump. Gauge manifold(R410A) Vacuum pump(R410A) 2. Open the handle at low in gaugemanifold, and operate vacuum pump. If the scale-moves of gause (low) reach vacuum condition in a moment, check the step 1 again. 3. Vacuumize for over 15min. And check the level gauge which should read 0.1MPa (-76 cm Hg) at low pressure side. After the completion of vacuumizing, close the handle 'Lo' in the vacuum pump. Check the condition of the scale and hold it for 1-2min. If the scale-moves back in spite of tightening, make flaring work again, then return to the beginning of the step 3. 4. Open the valve rod for the liquid stop valve to an angle of anticlockwise 90 degree. After 6 seconds, close the liquid stop valve and make the inspection of gas leakge. Open Close Liquid stop valve 90 Gas stop valve Service port 90 for 6 sec. 5. No gas leakage? In case of gas leakage, tighten parts of pipe connection. If leakage stops, then proceed the step 6. If it does not stop gas leakage, discharge whole refrigerants from the service port. After flaring work again and vacuumize, fill up prescribed refrigerant from the gas cylinder. 6. Detach the charge hose from the service port, open liquid stop valve and gas stop valve. Turn the valve rod anticlockwise until hitting lightly. 7. To prevent the gas leakage, turn the service ports cap, the valve rodis cap for liquid stop valve and gas stop valve a little more than the point where the torque increases suddenly. Liquid stop valve Gas stop valve Valve rod cap Valve rod cap Service port cap CAUTION: If the refrigerant of the air conditioner leaks, it is necessary to make all the refrigerant out. Vacuumize first, then charge the liquid refrigerant into air conditioner according to the amount marked on the nameplate. 21 >_]]VbTZR\ <Zb >_^UZdZ_^Vb Electrical Wiring WARNING! DANGER OF BODILY INJURY OR DEATH TURN OFF ELECTRIC POWER AT CIRCUIT BREAKER OR POWER SOURCE BEFORE MAKING ANY ELECTRIC CONNECTIONS. GROUND CONNECTIONS MUST BE COMPLETED BEFORE MAKING LINE VOLTAGE CONNECTIONS. Precautions for Electrical wiring Electrical wiring work should be conducted only by authorized personnel. Do not connect more than three wires to the terminal block. Always use round type crimped terminal lugs with insulated grip on the ends of the wires. Use copper conductor only. Selection of size of power supply and interconnecting wires Select wire sizes and circuit protection from table below. (This table shows 20 m length wires with less than 2% voltage drop.) Item Model YUDA060 Phase Switch breaker (A) Overcurrent protector rated capacity (A) Power source wire size (minimum) (mm2) 3 30 20 4.0 Circuit breaker Earth leakage breaker Switch breaker(A) Leak current(mA) 30 30 If the supply cord is damaged, it must be replaced by the manufacturer or itsservice agent or a similar qualified person. If the fuse of control box is broken, please change it with the type of T25A/450VAC; If the fuse of control PC board is broken, please change it with the type of T3.15A/250VAC. The wiring method should be in line with the local wiring standard. The power cable and connecting cable should be self-provided. All the cables shall have got the European authentication certificate. During installation, when the connecting cables break off, it must be assured that the grouding wire is the last one to be broken off. The breaker of the air conditioner should be all-pole switch; and the distance between its two contacts should not be no less than 3mm. Such means for disconnection must be incorporation in the fixed wiring. The distance between its two terminal blocks of indoor unit and outdoor unit should not be over 5m. If exceeded, the diameter of the wire should be enlarged according to the local wiring standard. A leakage breaker must be installed. The specification of power cable The power cable should be H07RN-F 5G 4.0mm2. 22 >_]]VbTZR\ <Zb >_^UZdZ_^Vb Wiring procedure 1) Remove set screws on the side before taking off the front panel toward the direction. 2) Connect wires to the terminal block correctly and fix the wires with a wire clamp equipped nearby the terminal block. 3) Route the wires in a proper way and penetrate the wires through the opening for electrical wiring on the side panel. WARNING: INTERCONNECTING WIRES MUST BE WIRED ACCORDING TO FIGURE BELOW. INCORRECT WIRING MAY CAUSE EQUIPMENT DAMAGE. YUDA060 Indoor unit terminal block Outdoor unit R S terminal block T N 1 2 3 Y/G 1 2 3 Y/G Power supply:380-400V, 3N~,50Hz 23 Installation 5. Installation CAUTIONS: To ensure proper installation, read "Cautions" carefully before working. After installation, start the unit correctly and show customers how to operate and maintain the unit. Meanings of Warning and Cautions: Warning! Serious injury or even death might happen, if it is not observed. Caution! Injury to people of damages to machine might happen, if it is not observed. WARNING! Installation shall be done by professional people, don't install unit by yourself. Incorrect installation will cause water leakage, electric shock or fire. Install unit as per the Manual. Incorrect installation will cause water leakage, electric shock or fire accident. Be sure to use specified accessaries and parts. Otherwise, water leakage, electric shock, fire accident or unit falling down may happen. Unit should be placed on a place strong enough to hold the unit. Or, unit will fall down causing injuries. When install the unit, take in consideration of storms, typhoom, earthquake. Incorrect installation may cause unit to fall down. All electric work shall be done by experienced people as per eocal code, regulations and this Manual. Use exclusive wire for the unit. Incorrect installation or undersized electric wire may cause electric shock or fire accident. All the wires and circuit shall be safe. Use exclusive wire firmly fixed. Be sure that external force will not affect terminal bolck and electric wire. Poor contact and installation may cause fire accident. Arrange wire correctly when connectin indoor and outdoor power supply. Fix terminal cover firmly to avoid overheat, electric shock or even fire accident. In case retrigerant leakage occurred during unit installation, keep a good ventilation in the room. Poisonous gas will occur when meet with fire. Check the unit upon installation. Be sure there is no leakage. Refrigerant will induce poisonous gas when meet heat source as heater, oven, etc. Cut power supply before touching terminal bolck. CAUTION! Unit shall be grounded. But grounding shall not be connected to gas pipe water pipe, telephone line. Poor grounding will cause electric shock. Earthing Be sure to install a leakage breaker to avoid electric shock. Arrange water drainage according to this Manual. Cover pipe with insulation materials in case dew may occur. Unproper installation of water drainage will cause water leakage and wer your furniture. To maintain good picture or reduce noise, keep at least 1 m from T.V. radio, when install indoor and ou tdoor unit, connecting wire and power line. (If the radio wave is relatively strong, 1 m is not enough to reduce noise). Don't install unit in following places: (a) Oil mist or oil gas exists, such as kitchen, or, plastic parts may got aged, or water leakage. (b) Where there is corrosive gas. Copper tube and welded part may be damaged due to corrosion, causing leakage. (c) Where there is strong radiation. This will affect unit's control system, causing malfunction of the unit (d) Where flamable gas, dirt, and volatile matter (thinner, gasoline) exist, These matter might cause fire accident. Refer to paper pattern when installing unit. Cautions for the installation personnel Don't fail to show customers how to operate unit. 24 Installation Before installation <Don't discard any accessories until comp> Determine the way to carry unit to installation place. Don't remove packing until unit reaches installation place. If unpacking is unkavoidable, protect unit properly. Selection of installation place (1) Installation place shall meet the following and agreed by customers: Place where proper air flow can be ensured. No block to air flow. Water drainage is smpoth. Place strong enough to support unit weight. Place where inclination is not evident on ceiling. Enough space for mainenance. Indoor and outdoor unit piping length is within limit. (Refer to Installation Manual for outdoor unit.) Indoor and outdoor unit, power cable, inter unit cable are at least 1 m away fromT.V. radop. This is helpful to avoid picture disturbance and noise. (Even if 1 m iskept, noise can still appear if radio wave is strong) (2) Ceiling height Indoor unit can be installed on ceiling of 2.5-3m in height. (Refer to Foeld setting and Installation Manual of ornament panel.) (3) Install suspending bolt. Check if the installation place is strong enough to hold weight. Take necessary measures in case it is not safe. (Distance between holes are marked on paper pattern. Refer to paper pattern for place need be reinforced) H Installation space Air outlet Air inlet 2500 Over 1500 Over Model H CAD060 310 Air outlet 1500 Over Preparation for the installation (1) Position of ceiling opening between unit and suspending bolt. Please refer to the dimension part. (2) Cut an opening in ceiling for installation if necessary. (when ceiling already exists.) Refer to paper pattern for dimension of ceiling hole. Connect all pipings (refrigerant, water drainage), wirings (inter unit cable) to indoor unit, before installation. Cut a hole in ceiling, may be a frame should be used to ensure a smooth surface and to prevent vibration. Contact your real estate dealer (3) Install a suspending bolt. (Use a M10 bolt) To support the unit weight, anchor bolt shall be used in the case of already exists ceiling. For new ceiling, use built-in type bolt or parts prepared in the field. Before going on installing adjust space between ceiling. <Installation example> 50~100 Roof Anchor bolt Long nut Suspending bolt Ceiling Note: All the above mentioned parts shall be prepared in field. 25 Installation Installation of indoor unit In the case of new ceiling (1) Install unit temporally Put suspending bracket on the suspending bolt. Be sure to use nut and washer at both ends of the bracket. (2) As for the dimensions of ceiling hole, see paper pattern. Ask your real estate dealer for details. Center of the hole is marked on the paper pattern. Center of the unit is marked on the card in the unit and on the paper pattern. Mount paper pattern 5 onto unit using 3 screws 6 . Fix the corner of the drain pan at piping outlet. < After installation on the ceiling > (3) Adjust unit to its right position. (Refer to preparation for the installation-(1)) (4) Check unit's horizontal level. Watert pump and flating switch is installed inside indoor unit, check four corners of the unit for its level using horizontal compartor or PVC tube with water. (If unit is tilting against the direction of water drainage, problem may occur on floating switch, causing water leakage.) (5) Remove the washer mounlting 2 , and tighten the nut above. Nut (Prepare in feild) (6) Remove the paper pattern. Washer (Prepared in feild) In the case of ceiling already exists (1) Install unit temporally Put suspending bracket on the suspending bolt. Be sure to use nut and washer at both ends of the bracket. Fix the bracket firmly. (2) Adjust the height and position of the unit. (Refer to preparation for the installation (1) ). (3) Proceed with "In the case of new ceiling". Suspending bolts Fasten (double nuts) Insert Washer fixing pad (prepared in feild) [ secure the washer firmly] Level Polythene pipe Screws at the piping outlet is fixed at the corner of drain pan. Center of ceiling hole Paper pattern Screw (accessory) [Fix the paper pattern] 26 Paper pattern 5 Screw (accessory) Installation Refrigerant piping (As for outdoor piping, please refer to installation of outdoor unit) Outdoor is precharged with refrigerant. Be sure to see the Fig.1, when connecting and removing piping from unit. For the size of the flare nut, please refer to Table 1. Apply refrigerant oil at both inside and outsid of lflare nut. Tighten it band tight 3-4 turns then tighten it. Use torque specified in Table 1. (Too much force may damage flare nut, causing gas leakage). Check piping joints for gas leakage. Insulate piping as shown in Fig. below. Cover joint of gas piping and insulator 7 with seal. Table 1 Pipe size Medium size seal pad 11 (accessory) (Cover the piping joint with seal pad.) Torque spanner 9.52 3270~3990N.cm 12.0~12.4 (333~407kgf.cm) Insulator (accessory) 8 (For liquid pipe) Insulator (accessory) 7 Gas pipe (For gas pipe) Liquid pipe Piping joing Flare nut Flare shape A(mm) 6.35 1420~1720N.cm 8.3~8.7 (144~176kgf.cm) Clamp 3 spanner Tighten torque 6180~7540N.cm 18.6~19.0 15.88 (630~770kgf.cm) 19.05 90 0.5 45 2 A Apple refrigerant oil R0.4 ~ 0.8 9720~11860N.cm 22.9~23.3 (990~1210kgf.cm) Installation of water drainage pipe (1) Install water drainage pipe Pipe dia, shall be equal or larger than that of unit piping.(pipe of polyethylent; size: 25mm; O.D:32mm) Drain pipe should be short, with a downward slope at least 1/100 to prevent air bag from happening. If downward slope can't be made, take other measures to lift it up. Keep a distance of 1-1.5m between suspending brackets, to make water hose straight. 1-1.5m Slope over 1/100 Use the self-provided stiff pipe and clamp 1 with unit. Insert water pipe into water plug until it reaches the white tape. Tighten the clip until head of the screw is less than 4mm from hose. Wind the drain hose to the clip using seal pad 9 . Large size seal pad 10 Insulate drain hose in the room. (accessory) Clamp Clamp (accessory) Tape (White) Self-provided stiff pipe <Cautions for the drain water lifting pipe> Installation height shall be less than 280mm. There should be a right angle with unit, 300mm from unit. 500 below drain water lifting pipe Self-provided stiff pipe (accessory) 75 below Suspending bracket 500 below 1~1.5m 220 280 below 300mm below Drain hose (accessory) 4mm below Clamp (accessory) (Note) Over 100 The slope of water drain hose (1) shall be within 75mm, don't apply too much force on it. If several water hoses join together, do as per following proceedures. Connect water hoses with a T joint. Specifieations of the water hoses shall meet the requirements for the unit running. 27 Installation (2) Check if water drainage is smooth after installation. Charge, through air outlet or inspecting hole, 1200ccd water to see water drainage. After wiring Check water drainage in cooling operation. When wiring is not complete Remove cover of control box, connect 1PH power to terminal 1 and 2 on terminal block, use remote controller to operate the unit. Note, in this operation, fan will be running. Upon confirmation of a smooth water drainage, be sure to cut off power supply. 1 D Water drainage port for maintenance Maintenance 3 Self-provided stiff pipe Connect with outdoor unit 2 Method of water charging Terminal block Inspecting hole PCB on indoor unit (Drain water from this hole) Terminal block 100mm Watering can of plastic pipe should be about 100 mm long Charge water from inspecting hole Charge water from air outlet Cover of controll box INDOOR UNIT TERMINAL BLOCK OUTDOOR UNIT TERMINAL BLOCK 1 2 3 R ST N 1 2 3 Y/G Y/G POWER SUPPLY: 380-400V,3N~,50Hz Wiring All supplied parts. materials and wiring operation must in appliance with local code and regulations. Use copper wire only. When make wiring, please refer to wiring diagram also. All wiring work must be done by qualified electricians. A circuit breaker must be installed, which can cut power supply to all system. See Installation Manual of outdoor unit for specifications of wires, circuit breaker, switches and wiring etc. Connecting of unit Remove cover of switch box (1) , drag wires into rubber tube A, then, after proper wiring with other wires, tighten clamp A. Connect wires of correct pole to the terminal block inside. Wind seal 12 around wires. (Be sure to do that, or, dew may occur). Upon connecting, replace control box cover (1) and (2). 28 Installation Terminal block Cover of control box(2) Don't fail to seal it, or water may come in. Grounding lead Rubber tube A Cover of control box(1) Rubber Note: Have it sealed, leaving no space. tube Seal pad (small size 12 ) (Wind around wire) In Out <<WARNING>> Attach seal pad Field wiring Connect wires of the Don't connect wires of Don't connect wires Obscrve the following when connecting power supply same specifications the same specifications of the different specifications. at two sides. at one side. terminal block: Don't connect wires of different specifications to the same terminal block. (Loose wire may cause overheating of circuit) Connect wires of same specifications as shown in right Fig. Wiring example As for outdoor unit circuit, please see Installation Manual of outdoor unit. Note: All electric wires have their own poles, poles must match that on terminal block. Installation of ornament panel Bar Fig. 1 Cautions for the installation Be sure to show customers Operation Manual and guide them how to operate unit correctly. Before installation. read also the Installation Manual of indoor unit. With this ornament , 2 or 3 air flow direction is not available. Suitable height is 3 m. Accessory Pad Pad 1. Prepare ornament panel Handling of ornament panel Ornament panel shall not be placed face down or against wall, neither on an uneven object. Don' t bend carelessly the swing flap, or, problem may occur. Adbesive tape 45 Fig. 2 (1) Remove air inlet grill from ornament panel: 1 Push in the bar on inlet grill and lift it up. (Refer to Fig. 1) 2 Lift it up for about 45 degree and remove it from ornament. Tear off adhesive tape fixing air filter on the back of the air inlet grill. (Refer to Fig. 2) (2) Remove cover plate at corner Tear off the adhesive tape, and slide it off. (Refer to Fig. 3) 2. Mounting on high ceiling (1) Ornament panel can be mounted on ceiling as high as 3 m. Slide Fig. 3 (2) Please install pad as accessary. 1 Cut open the pad along cutting ling. Use part a only and discard part b . (Refer to Fig. 4) 2 Install part a of the pad on the place shown in Fig. 5. Refer to Fig. 6. Cutting line a Leave no space. Place it on the frame. b Fig. 4 Fig. 6 29 Installation Part a of the pad Swing flap motor Fig. 5 Side of ornament panel (3)Wiring on ornament panel Connecting of wiring of the swing flap motor on ornament panel. (2 places) (Refer to Fit . 10) If connecting is not made, error code (A7) appears on remote controller. So, make proper connecting. Side of indoor unit Fig. 10 Wiring diagram 3. Install ornament panel on indoor unit. Hook (1) As shown in Fig.7,match the position of swing 1 Holding ring flap motor with that of the indoor unit piping hole , 2 Piping hole position so that ormament panel can be placed on to indoor unit. (2) Installation of ornament panel 2 1 Place the holding ring on swing flao motor side teporarily on hooks of the indoor unit. (2 pcs) Swing flap motor 2 Put the other two holding rings on the hooks at both side of the indoor unit. (Care should be 3 taken not to push wiring of swing flap motor into seals). 3 Screw in all 4 screws under holding ring for 4 about 15mm. (Pancl will rise). Fig. 7 4 Adjust the ornament panel as per Fig. 7 to Seal Indoor unit cover opening on the ceiling. Ceiling material 5 Tighten screws to redrce the thickness of seals 5 _ 8mm between ornament and indoor unit to 5-8mm. Ornament panel Caution If screws are not tighten tight, If indoor unit is at horizontal level and water If there are still space problems in Fig, 8 might occur. after tightening of screws, drainage is smooth, then, indoor unit height Tighten screws properly. can be adjusted throrgh holes at corners of please readjust the height ornament panel. of indoor unit. Gas leakage. (Refer to Fig. 9) Gas leakage from roof. Contamination Mist exists and drop down. Fig. 8 Leave no space. Fig. 9 4. Installation of inlet grill and cover plate (1) Installation of inlet grill Install in reversed order of "Prepare ornament pandl". Inlet grill can be adjusted into four directions by turning inlet grill. Inlet grill position can be adjusted as per customers request. When installing inlet grill, take care not to twist wiring of swing flap motor. 30 Installation (2) Install cover plate on the corner 1 As shown in Fig. 11 tie the 2 cover plate onto the bolt on ornament plate. Install cover plate onto ornament plate. (Refer to Fig. 12) Slide all five hold rings to let them drop in holes Fig. 11 on ornament plate, Fig. 12 Pay special care to the following and check after installation Item to the checked Unproper installation may cause Check Is indoor unit firmly installed? Unit might fall down, make vibration or noise. Is gas leakage check performed? This may lead to gas shortage. Is unit properly insulated? Dew or water drop may occur. Is water drainage smooth? Dew or water drop may occur. Is power voltage meet that stipulated on the nameplate? Problem may occur or parts got burned. Is wiring and piping correctly arranged? Problem may occur or parts got burned. Is unit safely grounded? There might be a danger of electric shock. Is wire size correct? Problem may occur or parts got burned. Are there any obstacles on air inlet and outlet grill of indoor and outdoor unit? This may cause poor cooling. Is record made for piping length and refrigerant charging amount? It is hard to control refrigerant charging amount. ATTENTION: after finishing installation,confirm no refrigerant leakage. 31 >_]]VbTZR\ <Zb >_^UZdZ_^Vb 5. PCB photo,Wiring diagram and function description 5.1 Outdoor unit 5.1. 1. Outdoor PCB photo YUDA060 PCB 32 DC FAN MOTOR 33 N capacitor L M H CN14 M ON SW1-4 ON SW1-5 ON SW1-5 SIGNLE FAN DOUBLE FAN NOTE: 1.DESHAED FRAMES ARE OPTIONAL, AND IN SOME MODELS ARE NOT AVAILABLE. 2.USER SHOULD NOT TO CHANGE THE DIP SWITCH SW1,SW6. R:RED B : BLACK BL : BLUE Y/G : YELLOW/GREEN R : RED W : WHITE ON SW1-4 AC FAN MOTOR SW1-2 ON SW1-1 60000 BTU DC FAN MOTOR SW1-2 SERIAL ON SW1-1 TO ISPM LED1 ALARM Y/G N PMV TC CN7 SW1 1 234 5678 M CN8 ON CN16 Y/G SW3 TD CN6 SW6 1234 SW4 SW2 TE CN4 FAN FA CON2 N PTC CN19 SW7 1234 CON1 SIG TA LP B R W TO INDOOR UNIT 1 2 3 HP CN18 CON3 L CN17 SPRAY VALVE CN3 CN2 CN1 ON POWER SUPPLY R S T N TS CN5 ON SW5 DOWN UP CN20 4-WAY CRANKCASE UNLOAD VALVE HEATER VALVE FUSE1 220VAC T6.3A L M H CN15 M LED2 COM capacitor DOWN AC FAN MOTOR CONTROL BOARD CN11 CN10 CN9 M M 48000 BTU DC FAN MOTOR UP AC FAN MOTOR CN13 CN12 Y/G R Y/G BL B W E N L3 L2 L1 SCP1 SCP2 SW7 SW7 TC: MIDDLE PIPE TEMPERATURE SENSOR TS: COMPRESSOR INHALE SENSOR TD: COMPRESSOR VENT SENSOR TE: DEFROST TEMPREATURE SENSOR TA: AMBIENT TEMPERATURE SENSOR OLD PROTOCOL NEW PROTOCOL ON SW1-6 OLD PROTOCOL W W B W N W CN607 ON SW1-6 E’ N’ L3’ W W U V V R W U SCN 0150509027 NEW PROTOCOL NOTE: FILTER L2’ L1’ COMPRESSOR REACTOR W W W W W B B B R S T DC- L1 L2 DC+ P MODULE DC+ DC1+ DC2+ CAPACITY DC- DC1- DC2- CIRCUIT DIAGRAM OF OUTDOOR UNIT >_]]VbTZR\ <Zb >_^UZdZ_^Vb 5.1.2. Wiring diagram YUDA060 >_]]VbTZR\ <Zb >_^UZdZ_^Vb 3. Main control functions 3.1 Refrigerant diagram YUDA060 defrosting sensor T middle sensor of condenser T condensor FILTER capillary gas-liquid segerator FILTER EEV COOLING suction sensor Ts service valve low pressure switch 4- WAY VALVE high pressure switch service valve discharging sensor T compressor heater HEATING 3- way stop valve(liquid side) 3- way stop valve (gas side ) indoor coil sensor T evaporator Tai indoor ambient sensor 34 >_]]VbTZR\ <Zb >_^UZdZ_^Vb 3.2 Outdoor frequency control 3.2.1 Compressor running frequency range: 30-91RPS. 3.3 Electronic expansion valve (EEV) control: 3.3.1 Electronic characteristic: Max. open angle 500 Pulse Driving speed PPS 3.3.2 Initialization of EEV EEV driving speed: open direction: 32MS; close direction: 32MS 3.3.3 Open angle limit of EEV Unit stop Adjustable upper limit Cool/dry 250(E) 480(E) heat 250(E) 480(E) 3.3.4 6、Standard open angle control In Cool/Dry mode, standard open angle: outdoor ambient temp.≥22℃, 260pulse (E) Outdoor ambient temp.≤22℃, 210pulse (E) In heat mode, standard open angle: outdoor ambient temp.≥6℃, 240pulses (E) Outdoor ambient temp. ≤6℃, 160pulse (E) 3.3.5 When discharging temp. Td is too high or too low, modify the EEV angle mode Cooling Cooling Heating Heating Modification process Max. modification If TD>106 degree and -1 degree /2 minutes, open -3 angle keeps between 106-50 . If TD<50 degree and +1 degree /2 minutes, open +3 angle keeps between 50-106. If TD>100 degree and -1 degree /2 minutes, open -3 angle keeps between 100-50 . If TD<50 degree and +1 degree /2 minutes, open +3 angle keeps between 50-100 3.4 4-way valve control in heating 50s later after compressor start up, the 4-way valve start to operate. When compressor stops or unit is not in heating mode, the 4-way valve is closed after compressor stop for 2 minutes and 55s. compressor ON OFF 4-way valve ON OFF 50 秒(E) 2 minutes and 55s 3.5 Control of defrosting in heating In heating mode, defrosting temp. sensor Te will check the frosting condition of outdoor heat 35 >_]]VbTZR\ <Zb >_^UZdZ_^Vb exchanger and make defrosting control. 3.5.1 Enter condition: After the unit is in heating for 10 minutes and compressor run for 45 minutes in all , according to check the defrosting temp. sensor Te and outdoor ambient temp. sensor Tao, if they can meet the following condition, entering in defrosting operation. 1、 5℃(E)<Tao,Te<=-6℃(E); 2、 -6℃(E)<=Tao<=5℃,Te≤C×Tao-α; Herein :α=8(E);C:Tao<0℃,C=0.8; Tao≥0℃,C=0.6 3.Tao<-6℃,Te≤-15℃(E)and defrosting compressor run for 48 minutes in all。 3.5.2 Cancel condition: It will take max. 10minutew from beginning defrosting to quit it. Te sensor will measure the condition of outdoor heat exchanger, if the temp. is over 10℃ for 60s or is up to 14℃ for 30s, the defrosting will be over. 3.5.3 Defrosting operation flow chart: Beginning End 60s 60s 30s inverter compressor indicated FQY defrosting FQY 85 Hz(E) 50HZ soft startup 32HZ 10s outdoor fan motor ON send signal to indoor unit auto OFF 4-way valve ON OFF ON Unload valve SV1 OFF auto 250pulse(E) PMV auto open angle Indoor fan motor auto open angle ON OFF anti-cold air function 36 >_]]VbTZR\ <Zb >_^UZdZ_^Vb 3.6 Frequency control when Td is too high Purpose : make compressor frequency control if the discharging temp. is too high, to low the discharging temp. efficiency and ensure the system can run normally. If keeps for 10s, the unit stops. 3 minutes later, the Discharging temp. Td unit can re-startup. If in 60 minutes the unit occurs 118℃ alarm for 3 times, the failure can be eliminated 115℃ Reduce FQY rapidly 2HZ/S 112℃ Reduce FQY rapidly 1HZ/S 109℃ Reduce FQY slowly 1HZ/10S 105℃ Remain FQY 95℃ Increase FQY slowly 1HZ/10S 3.7、 Frequency control when there is CT over current 1.00I 0.95I 0.93I 0.90I 0.88I 0.85I Stop immediately, if abnormal stop 3 times in an hour, the unit will be stop and alarm . Reduce FQY rapidly 2HZ/S Reduce FQY rapidly HZ/S Reduce FQY slowly 1HZ/10S Remain FQY Increase FQY slowly 1HZ/10S 3.8 Oil return operation control 3.8.1 Entering condition When the compressor running frequency is lower than 58Hz continuously in all and outdoor unit Tcm is lower than 50 degree for 5 hours, the system will enter oil return operation. In the course of mode changeover, manual unit stop or protective unit stop, the time will be accumulative. After compressor restarts up, the time will counted continuously. In counting time for 5 hour, if the compressor running frequency is over 80Hz for 10 minutes continuously, the time will be cleared. Also after the heating defrosting , the time will be cleared. 37 >_]]VbTZR\ <Zb >_^UZdZ_^Vb 3.8.2 Procedure Cooling mode: refer to “the oil return procedure in cooling mode” Heating mode: refer to “the oil return procedure in heating mode” 3.8.3 The protection treatment in oil return operation: In the course of cooling oil return, because of all kinds of protection or abnormal unit stop, after the unit restart, the time will not be cleared, the system need another oil return operation. In the refrigerant flow course in oil return of cooling mode or after oil return, and within 5 minutes after the refrigerant being eliminated is over, the anti-freeze protection and low pressure protection are invalid, other protection is valid. In the course of heating oil return ,because of all kinds of protection or abnormal unit stop, the system need not another oil return operation after the unit stop for 3 minutes and enter in heating mode directly. In the course of changing to cooling oil return, the anti-freeze protection and low pressure protection are invalid, other protection is valid. Oil return procedure in cooling mode: Send oil return signal oil return beginning 60 秒 oil return over ref.eliminated 30s 80 Hz(E) 40HZ(E) Inverter compressor auto FQY 300pulse(E) outdoor unit PMV auto open angle auto open angle 120pulse(E) Outdoor fan motor auto operation auto(TC or ambient control) auto operation running indoor motor auto operation auto(set fan speed) auto operation stop indoor motor stop 4-way valve OFF stop OFF Quit condition of oil return: 1 minute later after oil return is over Td‐Tcm>30℃ OR Ts‐Tc>30℃ Tc<‐35℃ Max. 10 minutes & OR Oil return procedure in heating mode: 38 stop OFF >_]]VbTZR\ <Zb >_^UZdZ_^Vb Send oil return signal Inverter compressor indicated FQY 60s oil return beginning oil return over oil return frequency 120s Soft startup 0HZ 0HZ 5s outdoor motor auto auto auto(TC control) 4-way valve ON OFF 15s 450pulse 450 pulse 300pulse(E) PMV auto open angel auto open angle all indoor motor ON OFF anti-freeze startup Quit condition of oil return OR Max. 9 minutes(E) OR Td‐Tcm<20℃ for 30s(5 minutes later, begin to count) & Ts‐Tc<15℃ for 30 秒(5 minutes later, begin to count) Running for min. 5 minutes(E) 39 >_]]VbTZR\ <Zb >_^UZdZ_^Vb 5.2 Indoor unit 5.2.1 PCB for indoor unit 40 41 Y/G S T POWER SUPPLY R R B BL W R TD TS TC CN17 TO INDOOR UNIT N 1 2 3 Y/G CN4 S L3 FUSE CN16 L2 L1 T6.3A/250VAC N CN6 CN3 CN2 CN7 LP TA CN5 HP CT1 NO OFF CT2 transformer CN12 1234 5678 CN13 CN14 CN10 CN11 OR CIRCUIT DIAGRAM OF OUTDOOR UNIT R W B M capacity W:WHITE B:BLACK R:RED BL:BLUE Y/G:YELLOW/GREEN crankcase heater compressor R(U) Y/G S(V) T(W) R ac contactor W B 4-way vavle M M capacity 0150509028 >_]]VbTZR\ <Zb >_^UZdZ_^Vb 5.2.2. YUDA060 >_]]VbTZR\ <Zb >_^UZdZ_^Vb 2. Sign definition: Indoor Tai Ambient temp. outdoor Tc1 Tc2 Tm Outlet Inlet mid pipe pipe coil temp. temp. temp. Tcomp1,2 Temp. compensation Tao Ambient temp. Toci Tc Thick pipe mid of heat condenser exchanger temp. Te Defrost temp. Ts Td Compressor Compressor suction discharging temp. temp. Tset Set temp. 3. Dry operation Tai<16℃, indoor unit stops running and sends stop-unit signal to outdoor. Tai≤Tset, indoor motor runs at low speed and sends stop-unit signal to outdoor. 4. Fan operation Indoor fan motor will run as the fan speed set on the remote controller or the wired controller and indoor unit will send the stop-unit signal to outdoor. 5. Auto operation 5.1 If the unit enters Auto mode for the first time, the system will adjust the operation mode according to the room temp. and the set temp. When Tai≥Tset, entering auto cooling mode; When Tai<Tset, entering auto heating mode. 5.2 Auto cooling mode is as the same as the cooling mode. After the thermostat is OFF for 15 minutes, if Tai+ 1+Tcomp2<Tset, the unit will enter auto heating mode, or the unit will still stay at auto cooling mode and stop when it reaches the set temperature; while the indoor motor will be at low speed. 5.3 Auto heating mode is as the same as the heating mode. After the thermostat is OFF for 15 minutes, if Tai≥Tset+1 +Tcomp1, the unit will enter auto cooling mode, or the unit will still stay at auto heating mode; 5.4 In this mode, the Sleep function is available, run as cooling sleep in cooling mode and as heating sleep in heating mode. Once sleep mode is set, the mode will not change after the unit stops for 15 minutes when it arrives Tset. 5.5 Mode conversion will be confirmed after compressor has stopped for 10 minutes. 6. Abnormal operation 6.1 When outdoor modes from the request of indoor unit conflict, the one entering firstly will take priority. 6.2 After indoor receives the ON command from wired controller, it will firstly confirm the outdoor current operation mode. If they are the same modes, indoor unit will run as the request of remote controller. If they are different modes, the system will forbid to operate, and indoor will keep the OFF mode and send the “standby” signal to wired controller until outdoor stops or outdoor mode the requested mode of wired controller are the same, the unit will run as the requested mode of wired controller. 6.3 After indoor receives the ON command from remote controller, it will firstly confirm the outdoor current operation mode. If they are the same mode, indoor unit will run as the request of remote controller. If they are different modes, the system will forbid to operate, and indoor will keep the OFF mode. After setting on remote controller, if the buzzer sounds two times, that shows abnormal operation. Indoor will run until the outdoor mode and the requested mode of remote controller are the same. 42 >_]]VbTZR\ <Zb >_^UZdZ_^Vb 6.4 In AUTO mode, when the indoor unit occurs abnormal operation, the indoor unit will keep OFF state, and the buzzer will not sound until the outdoor mode and the requested mode of indoor unit are the same. 6.5 COOL (included AUTO COOL), DRY, FAN are not abnormal mode. 6.6 HEAT and FAN are not abnormal mode. 7. Control for discontinuous operation After the unit starts up in cooling/heating mode, in 5 minutes, the compressor run/stop will not be controlled by the room temp., but after changing the set temp., if compressor stop condition can be met, the system will stop compressor immediately. 8. Anti-cold air control In heating mode, after compressor startup, the system will control indoor fan motor according to indoor coil temperature. Detailed operation is as below: Tc2(℃) 30(32) set speed 26(30) low speed 22(26) off 20(20) Note: 1) The data in the parentheses is the control point when Tao>10℃; 2) Indoor unit will send “pre-heat” signal to wired controller in anti-cold air period. 9. Fan motor control in defrosting 9.1 On receiving outdoor defrosting signal, indoor unit will stop after blowing remaining heat at slow speed for 20 seconds. 9.2 In defrosting period, indoor fan motor stops running. 9.3 Defrosting is over, and indoor motor will run as anti-cold air state. 10. Blowing remaining heat operation When the unit shuts off in heating mode or the thermostat is OFF, indoor motor will stop running after running at low speed for 30 seconds. 11. Swing motor control Indoor unit will control the swing motor according to the swing signal from the wired controller. Full OFF 54º 54° Swing range Standard position HEAT, COOL mode 0° 43 in >_]]VbTZR\ <Zb >_^UZdZ_^Vb 12. Water pump control 12.1 Water pump will be electrified when indoor unit enters non-heating mode until indoor unit stops. 5 minutes later after indoor unit stops, water pump will stop. 12.2 When indoor unit is in heating mode, water pump will not operate. 12.3 In OFF state and in any mode, once float switch signal is measured, indoor unit will send OFF signal to outdoor and send the failure code of drainage system to the wired controller, then the water pump will work until the float switch signal is cancelled. After water pump is forced to run for 5 minutes, indoor unit will be back to normal state. 13. Compulsory defrosting operation 13.1 After indoor receives the compulsory defrosting signal, it will send continously the signal to outdoor for 10 times, in this period, indoor unit will work normally and it will enter defrosting operation until it receives the enter-defrost signal from outdoor unit. 13.2 Wired control type: In heating mode, make a jumper for D2 to enter compulsory defrosting. 13.3 Remote control type: In heating mode, high speed, 30℃, press SLEEP button 6 times, and the buzzer will sound 3 times, then enter the manual defrosting. 14. Trial operation 14.1 Enter condition A. Wired control type: In OFF state of COOL or HEAT mode, press ON/OFF button for over 5 seconds to enter the cooling or heating trial operation; B. Remote control type: In OFF state, keep pressing ON/OFF button until 5 seconds later, the buzzer sounds twice, then enter the cooling or heating trial operation; 14.2 Response in trial operation A. Cooling trial operation: indoor sends S-CODE=SD to outdoor, indoor: at high speed, set temp: 16℃; B. Heating trial operation: indoor sends S-CODE=SF to outdoor, indoor: at high speed, set temp: 30℃; C. In this period, anti-freezed and overheat functions are invalid. 14.3 Quit condition A. Receiving the signal of cancelling trial operation from wired controller or remote controller; B. After trial operation has run for 20 minutes, it will quit trial operation automatically and enter the normal mode with the set temp.: 24℃. 15. Timer operation 15.1 Wired control type: wired controller will control the unit ON/OFF; 15.2 Remote control type: indoor unit will confirm the unit ON or OFF according to the current clock and the timer clock set by remote controller. When setting timer function, the timer LED will be ON. 16. SLEEP function 16.1 Wired control type unit is without sleep function; 16.2 Remote control type unit consists of cooling sleep and heating sleep, after the sleep is set, the unit will change mode; the sleep will begin to count. A. In cooling/dry mode, after running for 1 hour, the set temp. will increase 1℃, another 1 hour later, the set temp. will increase 1℃ again, then 6 hours (or set time-2) later , it will stop. B. In heating mode, after running for 1 hour, the set temp. will reduce 2℃, another 1 hour later, the set temp. will reduce 2℃ again, then 3 hours later, the set temp. will increase 1℃, and another 3 hours(or set time-5), it will stop. C. When setting sleep function, indoor motor is forced at low speed. 44 >_]]VbTZR\ <Zb >_^UZdZ_^Vb 17. Healthy negative ion function When receiving the healthy signal from the wired controller or remote controller, if fan motor is running, the negative ion will work; If the fan motor stops, the negative ion generator will stop. 18. Auto-restart function 18.1 Wired control type: jumper J07 at high level, auto-restart is available, if at low level, auto-restart is cancelled; when out of factory, the unit is with auto-restart function. 18.2 Remote control type: In 5 seconds, press SLEEP button(press SWING if without SLEEP button) 10 times continuously, the buzzer will sound 4 times and enter auto-restart function. In 5 seconds, press SLEEP 10 times continuously, the buzzer will sound twice and quit auto-restart function. 18.3 Memory information: ON/OFF state, mode, fan speed, set temp., health, swing position; 18.4 If the memory includes timer or sleep function, when being electrified again, timer and sleep will be cancelled; 18.5 If the memory includes auto mode, when the jumper shows cooling only type, auto mode will change to cooling mode. 19. Room card function The unit adopts room card function(220VAC input), which only make ON/OFF control. When it is connected, the unit is ON; when it is disconnected, the unit is OFF, and the other parameters will be as default or the data in memory. 19.1 When room card function is available The central control, remote control/wired control and the room card are “AND” logical relationship. On the condition that the room card is connected, the unit can be controlled by remote controller or wired controller; indoor unit will run at the set state by the central controller, remote controller or wired controller; otherwise, if room card is not connected, the unit can not be controlled. 19.2 When room card function is not available The unit will be controlled by the remote controller, the wired controller or the central controller. 45 >_]]VbTZR\ <Zb >_^UZdZ_^Vb 20. Setting method of temperature compensation Tcomp A. Wired control type unit: this function is not available B. Remote control type unit: In cooling or heating mode, there is always with the temp. compensation. In heating mode: In 24℃ heating mode, press SLEEP(or SWING) button 7 times continuously within 5 seconds, indoor buzzer sounds twice, that shows temp. compensation works. Switch on the unit in heating mode by the remote controller, press TEMP button to set the set temp., so temperature compensation=the current set temp. - 24℃. For example, if the set temp. is 24℃, the temp. compensation is 0℃; if the set temp. is 25℃, the temp. compensation is 1℃. The max. compensation temp. is 6℃ (the set temp. is 30℃). If you want to cancel it, set the temp. as 24℃. In cooling mode: In 24℃ cooling mode, press SLEEP(or SWING) button 7 times continuously within 5 seconds, indoor buzzer sounds twice, that shows temp. compensation works. Switch on the unit in heating mode by the remote controller, press TEMP button to set the set temp., so temperature compensation=24℃-the current set temp. . For example, if the set temp. is 24℃, the temp. compensation is 0℃; if the set temp. is 23℃, the temp. compensation is -1℃. The max. compensation temp. is -8℃ (the set temp. is 16℃). If you want to cancel it, set the temp. as 24℃. So the temp. compensation range is +8℃~-6℃. 21. Anti-freezed protection When compressor has run for over 5 minutes, to prevent indoor evaporator freezing (in cooling/dry mode), if indoor mid-coil temp. is below -1 degree for over 5 minutes, indoor EEV will close, and compressor will stop. When indoor mid-coil temp. is over about 10 degree, the unit will be normal. 22. Overload protection in heating mode It is valid only in heating mode, if indoor mid-coil temp. is over about 65 degree continuously for 10 seconds, indoor will stop; while when indoor mid-coil temp. is below 52 degree for 3 seconds, indoor will resume. 46 >_]]VbTZR\ <Zb >_^UZdZ_^Vb 6. Diagnostic code and trouble shooting 6.1.1. Diagnostic code for outdoor unit YUDA060 PRODUCT DIAGNOSIS PROCEDURE Malfunction Code Analyze and diagnose Trouble Description Remark Non-resumable EEPROM faulty Over current protection in course of If it occurs 3 times in 1 hour, confirm the failure, the former twice will Non-resumable compressor frequency going down not alarm resumable detected by software protection of over current in course Module abnormal, if it occurs 3 times in 1 hour, confirm the failure of compressor fixed speed operation Communication abnormal between It can not get the feedback from module after communicating for 4 connecting board and module minutes If it occurs 3 times in 1 hour, confirm the failure, the former Compressor overcurrent twice will not alarm If it occurs 3 times in 1 hour, confirm the failure, the former twice will Compressor blocked or abnormal not alarm operation After compressor starts up, if TD is over 115 , 10 seconds later Protection of discharging temp. too compressor stops, if it occurs 3 times in 1 hour, confirm the failure high If it occurs 3 times in 1 hour, confirm the failure, the former DC fan motor faulty twice will not alarm Outdoor defrosting temp. sensor abnormal Sensor is detected below 20 or over 1000 for 60 seconds, but in cooling mode,this sensor failure will not be dealt with,and in defrosting or within 6 minutes after defrosting,it will not alarm. Non-resumable resumable Non-resumable Non-resumable Non-resumable Non-resumable resumable Suction temp.sensor abnormal If it occurs 3 times in 1 hour, confirm the failure, the former twice will resumable not alarm Sensor is detected below 20 or over 1000 for 60 seconds, but in Ambient temp. sensor abnormal resumable frosting or within 6 minutes after defrosting, it will not alarm resumable Discharging temp. sensor abnormal After compressor running for 3 minutes, Sensor is detected below 20 or over 1000 for 60 seconds communication between indoor Indoor unit can not be inspected for 4 minutes continuously resumable and outdoor abnormal Lack of refrigerant or discharging Non-resumable If it occurs 3 times in 1 hour, confirm the failure. pipe blocked 4-way vavle converse abnormal If it occurs 3 times in 1 hour, confirm the failure. Over current in course of compressor frequency going down If it occurs 3 times in 1 hour, confirm the failure, the former twice will Non-resumable not alarm Over current protection in course of compressor fixed speed operation detected by software If it occurs 3 times in 1 hour, confirm the failure, the former twice will Non-resumable not alarm Module temp. too high or module temp.sensor abnormal Over current protection in course of compressor frequency going up down detected by software Without connection to compressor If it occurs 3 times in 1 hour, confirm the failure, the former twice will Non-resumable not alarm If it occurs 3 times in 1 hour, confirm the failure, the former twice will Non-resumable not alarm If it occurs 3 times in 1 hour, confirm the failure, the former twice will Non-resumable not alarm From moudle board resumable High voltage protection for module Low voltage protection for module From module board Communication abnormal among modules Mid-condenser temp. sensor abnormal Low pressure switch abnormal High pressure switch abnormal Non-resumable It can not detect the input signal for 2 minutes Sensor is detected below 20 or over 1000 for 60 seconds, but in defrosting or within 6 minutes after defrosting, it will not alarm After compressor running for 3 minutes, if switch is detected unconnected for 30seconds, it alarms, if it occurs 3 times in 1 hour, confirm this failure, if it occurs 3 times in 1 hour, confirm the failure, but in defrosting or within 6 minutes after defrosting, it will not alarm resumable Non-resumable resumable Non-resumable After compressor running for 3 minutes, if switch is detected unconnected for 30seconds, it alarms, if it occurs 3 times in 1 hour, confirm Non-resumable this failure, or if Tcm is over 68 degree for 10 seconds for 3 times Note: The flash times of outdoor mainboard(ECU) LED1 indicates the malfuction code. for example, LED1 flash 3 times, the malfuction code is 3. The flash times or malfuction code of indoor unit can also indictes the malfuction code too.the method to confirm please refer to indoor unit manul. 47 >_]]VbTZR\ <Zb >_^UZdZ_^Vb 6.1.2. Diagnostic code for indoor unit Failure code(from receive board) Flash times of Flash times of timeing LED(or Running LED indoor PCB Failure code(from wired controller) Failure code(from panel controller ) 0 1 01 E1 0 2 02 E2 0 4 04 F8 0 7 07 E9 0 8 08 E8 trouble shooting Possible reasons Sensor disconected,or broken,or at wrong position,or short circuit Sensor disconected,or temperature sensor Te broken,or at wrong faulty position,or short circuit EEPROM WRONG Faulty indoor unit PCB Wrong connection,or the wires be Abnormal communication disconected,or wrong between indoor and address setting of indoor outdoor units unit,or faulty power supply or faulty PCB temperature sensor Ta faulty Abnormal Abnormal communication communication between between indoor wired indoor wired controller and indoor unit PCB 0 12 0C E0 Drainage system abnormal 0 13 0D EF zero cross sigal wrong 0 16 10 F3 indoor mode abnormal controller and indoor unit PCB Pump motor disconnected,or at wrong position,or the float switch broken down,or the float switch disconected,or at wrong zero cross sigal detected wrong different from outdoor unit mode 2 1 15 / outdoor unit abnormal 2 2 16 / outdoor unit abnormal 2 4 18 / outdoor unit abnormal 2 5 19 / outdoor unit abnormal 2 7 1B / outdoor unit abnormal 2 8 1C / outdoor unit abnormal 2 9 1D / outdoor unit abnormal 3 0 1E / outdoor unit abnormal 3 1 1F / outdoor unit abnormal 3 2 20 / outdoor unit abnormal 3 3 21 / outdoor unit abnormal 3 5 23 / outdoor unit abnormal refer to the outdoor unit 3 6 24 / outdoor unit abnormal trouble shooting 3 7 25 / outdoor unit abnormal list 3 8 26 / outdoor unit abnormal 3 9 27 / outdoor unit abnormal 4 3 2B / outdoor unit abnormal 4 4 2C / outdoor unit abnormal 4 7 2F / outdoor unit abnormal 4 8 30 / outdoor unit abnormal 4 9 31 / outdoor unit abnormal 5 8 3A / outdoor unit abnormal 5 9 3B / outdoor unit abnormal 6 3 3F / outdoor unit abnormal 6 4 40 / outdoor unit abnormal 1. For the indoor failure,only running LED of remote receiver will indicate. 2. For the outdoor failure,timer LED and running LED will indicate.timer LED of remote receiver stands for ten's place,and running LED stands for one's place.timer LED will flash firstly,2 seconds later,running LED will flash too. Afer that,4 seconds later,they will flash in turns again.Flash times equals to the failure code of outdoor plus 20.For example,failure code of outdoor is 2,the indoor unit should display 22.As a result,timer LED flashes twice firstly,then running LED flashes twice. 3.To get much more details of outdoor unit failure,Please refer to the the outdoor unit trouble shooting list 48 >_]]VbTZR\ <Zb >_^UZdZ_^Vb 6.2. Trouble Shooting: Trouble 1: No display on the operation panel start check if display panel and the unit matched well no replace display panel and check again yes if the red diode and green diode on indoor PCB flash in turn no if the power terminal block is 220V input yes no PCB is faulty, replace it no yes check if display panel is 12V power supply check if power wiring is in open circuit yes no yes display panel circuit is damaged, replace it replace power wiring and check again Trouble 2: Sensor failure start as per the wiring diagram,check the connection between sensor and PCB is correct no re-fix the sensor and check again yes check if sensor is in open circuit or PCB port is not in good condition yes replace sensor and check again no check the terminal block and the power supply check if sensor resistor value is correct no replace sensor and check again yes PCB is faulty and repalce it, check again 49 check if fuse is burnt yes replace the fuse and check again no PCB is faulty, replace >_]]VbTZR\ <Zb >_^UZdZ_^Vb Trouble 3: Communication failure between indoor and outdoor start as per the wiring diagram, check if communication wiring is correct no re-wiring, and check again yes check if the communication port connecting to the indoor/outdoor PCB is in open circuit no if the power cable and the communication wire are too close, resulting in the wrong commission data no PCB is faulty, replace and check again yes yes adjust the distance and check again replace the communication connection wire, check again Trouble 4: Indoor PCB EEPROM data is wrong 1.If the failure occurs when being electrified for the first time, that shows EEPROM (8-bit pin) not fixed firmly or damaged. 2.If the failure occurs when running, that shows EEPROM is faulty and need to be replaced. Trouble 5: Indoor repeated unit number Trouble 5: Outdoor unit failure Check the failure code on outdoor indicator board (5-lamp) Trouble 6: Outdoor unit alarms sensor failure start as per the wiring diagram, check if connection port between sensor and PCB is correct no re-fix the sensor and check again yes check if the sensor is in open circuit or the connection port to PCB is in good condition yes replace sensor and check again no check if the sensor resistor value is correct no yes PCB is faulty and repalce it, check again 50 replace sensor and check again >_]]VbTZR\ <Zb >_^UZdZ_^Vb Trouble 7: AC current over current protection or current transducer damaged, or compressor blocked rotor, compressor great vibration, compressor abnormal startup, state detecting curcuit abnormal or compressor damaged. The former twice failure can be resumed automatically, if outdoor board occurs this failure always, and can not be resumed for a long time, that shows: 1. Power module (SPDU) damaged, please replace the power module, then re-wiring as per the wiring diagram (70% possibility) 2. Short circuit in power board results in the power module damaged (15% possibility) 3. Damaged compressor results in this failure (10% possibility) 4. Main control board is faulty, replace it (5% possibility) Trouble 10: High pressure failure Reasons: 1. Over high system pressure results that the unit stop, and the compressor protection will work. The failure can be resumed. 2. Pressure switch wire is not fixed well or in open circuit. start check if the connector between pressure switch and PCB is fixed badly or damaged yes replace pressure switch connector, shut off and be electrified again, re-check no check if the 2 straight lugs on the pressure switch are in good condition no yes if outdoor fan motor cannot startup normally in cooling mode no replace main control board and check again yes replace pressure switch connector, shut off and be electrified again, re-check check if the outdoor motor has power input 51 no replace outdoor motor and check again >_]]VbTZR\ <Zb >_^UZdZ_^Vb 7. Outdoor performance curves YUDA060 cooling capacity curves 19000 ‐6/‐7 heating capacity ‐6/‐7 power input ‐4/‐5 heating capacity ‐4/‐5 power input ‐1/‐2 heating capacity ‐1/‐2 power input 1/0 heating capacity 1/0 power input 18000 17000 16000 15000 14000 13000 12000 11000 10000 9000 6/5 heating capacity 6/5 power input 8000 7000 6000 7/6 heating capacity 7/6 power input 5000 4000 3000 2000 1000 0 16/10 18/12 20/14.5 21/15 22/16 Outdoor DB(℃) 24/17 26/18 YUDA060 heating capacity curves 17000 12/10 heating capacity 12/10 power input 27/18 heating capacity 27/18 power input 20/15 cooling capacity 16000 15000 20/15 power input 14000 13000 25/18 cooling capacity 12000 11000 25/18 power input 10000 9000 32/23 cooling capacity 8000 7000 32/23 power input 6000 5000 35/24 cooling capacity 4000 3000 35/24 power input 2000 1000 40/26 cooling capacity 0 18/12 20/14 22/16 25/18 27/19 Ourdoor DB(℃) 52 30/22 32/23 40/26 power input $LU9HORFLW\'LVWULEXWLRQ 8. Indoor air velocity and temperature distribution curves 8.1 AB D&RROLQJ$LU9HORFLW\'LVWULEXWLRQ &RROLQJ %ORZ\ DQJOH $LU9HORFLW\'LVWULEXWLRQ PV PV E&RROLQJ7HPSHUDWXUH'LVWULEXWLRQ &RROLQJ %ORZ\DQJOH 7HPSHUDWXUH'LVWULEXWLRQ 53 >_]]VbTZR\ <Zb >_^UZdZ_^Vb 9. Noise level a. Casset type indoor unit .7/ V`nodib dggpnom\o`@ .8/ V`nodib ^ji_dodji@ \4 Wido mpiidib di oc` ijhdi\g ^ji_dodji ]4 V`no di oc` n`hd3\i`^cjd^ ^c\h]`m ^4 Pjdn` g`q`g q\md`n amjh oc` \^op\g a\^ojmn np^c \n mjjh nomp^opm`2 `o^4 (3) Test method According to the testing illustrator, the microphones wearing sponge style cover should be placed in the right position 54 58 54 50 46 42 38 34 30 26 22 18 14 third octave band frequency Hz noise level-CAD060 sound pressure level DB cooling high 55 fan low fan med fan high heating high heating med heating low cooling low cooling med >_]]VbTZR\ <Zb >_^UZdZ_^Vb >_]]VbTZR\ <Zb >_^UZdZ_^Vb .7/ Wbpqfkd fiirpqo^qflk@ 7j .8/ Wbpqfkd `lkafqflk@ ^4 Xkfq orkkfkd fk qeb kljfk^i `lkafqflk _4 Wbpq fk qeb pbjf3^kb`elf` `e^j_bo `4 Qlfpb ibsbi s^ofbp colj qeb ^`qr^i c^`qlop pr`e ^p ollj pqor`qrob2 bq`4 .9/ Test method 1. Set the unit: 1) the unit is placed on the rubber whose thickness is 5mm; 2) if the height between the air outlet and ground is less than 1m, block the unit up to 1m.far from ground 2. Test position: After setting the unit ,the test position for the noise is 1m far from the front panel 56 78 74 70 66 62 58 54 50 46 42 38 34 30 26 22 18 14 10 6 2 third octave band frequency Hz noise level-YUDA060 heating high cooling high >_]]VbTZR\ <Zb >_^UZdZ_^Vb 57 sound pressure level DB >_]]VbTZR\ <Zb >_^UZdZ_^Vb 10. Sensor characteristic 1. Sensor characteristic model YUDA060 name code Outdoor ambient temperature sensor 0010450192 Defrost temperature sensor 0010450194 Discharge temperature sensor 0010451303 Suction sensor S ti temperature t t 0010451307 Piping temperature sensor 0010451329 58 characteristic R25℃=10KΩ±3% B25/50=3700K±3% R25℃=10KΩ±3% B25/50=3700K±3% R80℃=50KΩ±3% B25/50=4450K±3% R25=10KΩ±3%, B25/50=3700K±3% R25=10KΩ±3%, B25/50=3700K±3% >_]]VbTZR\ <Zb >_^UZdZ_^Vb 59 >_]]VbTZR\ <Zb >_^UZdZ_^Vb R25=23KΩ±3% B25/50=4200K±3% T(℃) -20℃ -19℃ -18℃ -17℃ -16℃ -15℃ -14℃ -13℃ -12℃ -11℃ -10℃ -9℃ -8℃ -7℃ -6℃ -5℃ -4℃ -3℃ -2℃ -1℃ 0℃ 1℃ 2℃ 3℃ 4℃ 5℃ 6℃ 7℃ 8℃ 9℃ 10℃ 11℃ 12℃ 13℃ 14℃ 15℃ 16℃ 17℃ 18℃ 19℃ 20℃ 21℃ 22℃ 23℃ Rnom(KΩ 266.905 250.866 235.895 221.911 208.838 196.609 185.163 174.443 164.399 154.983 146.153 137 87 137.87 130.096 122.799 115.946 109.51 103.462 97.779 92.437 87.415 82.691 78.248 74.067 70.133 66 43 66.43 62.943 59.659 56.566 53.651 50.904 48.314 45.872 43.569 41.395 39.343 37.406 35.577 33 848 33.848 32.215 30.671 29.21 27.828 26.521 25.283 T(℃) 31℃ 32℃ 33℃ 34℃ 35℃ 36℃ 37℃ 38℃ 39℃ 40℃ 41℃ 42℃ 43℃ 44℃ 45℃ 46℃ 47℃ 48℃ 49℃ 50℃ 51℃ 52℃ 53℃ 54℃ 55℃ 56℃ 57℃ 58℃ 59℃ 60℃ 61℃ 62℃ 63℃ 64℃ 65℃ 66℃ 67℃ 68℃ 69℃ 70℃ 71℃ 72℃ 73℃ 74℃ 60 Rnom(KΩ 17.442 16.674 15.943 15.249 14.588 13.96 13.362 12.794 12.252 11.736 11.244 10 776 10.776 10.329 9.904 9.497 9.11 8.74 8.387 8.05 7.728 7.421 7.127 6.846 6.578 6 322 6.322 6.077 5.842 5.618 5.404 5.199 5.003 4.815 4.636 4.464 4.3 4.143 3.992 3 848 3.848 3.71 3.578 3.452 3.331 3.215 3.104 >_]]VbTZR\ <Zb >_^UZdZ_^Vb 24℃ 25℃ 26℃ 27℃ 28℃ 29℃ 30℃ 24.111 23 21.947 20.949 20.003 19.104 18.252 75℃ 76℃ 77℃ 78℃ 79℃ 80℃ 81℃ 61 2.997 2 895 2.895 2.798 2.704 2.614 2.528 2.446 >_]]VbTZR\ <Zb >_^UZdZ_^Vb 11. Controller functions <[TRcaXRP[ WTPcX]V Xb ]^c PePX[PQ[T| wIWXb \^ST[ WPb ]^c cWXb Ud]RcX^]|x wIWXb \^ST[ WPb ]^c cWXb Ud]RcX^]|x =P] ^][h Ud]RcX^] 62 >_]]VbTZR\ <Zb >_^UZdZ_^Vb 63 >_]]VbTZR\ <Zb >_^UZdZ_^Vb wIWXb \^ST[ WPb ]^c cWXb Ud]RcX^]|x 64 >_]]VbTZR\ <Zb >_^UZdZ_^Vb Wired controller Fan speed switch Change wind speed Mode switch Choose running mode Swing switch Open and close air flap Health switch Used to control oxygen function and negative ion TEMP switch Used for changing set temperature MODE MODE AUTO FAN ONLY COOL DRY FAN AUTO HIGH MED LOW CENTRAL OPERATION STANDBY PRE-HEAT DEFROST HEAT FIX FILTER HEALTH CHECK SWING UNIT NO. DEMAND TES CEN. ADD. SYS. ADD. C F FAN SWING HEALTH TEMP CLOCK TIME Time switch It is used to regulate setting time. MANUAL ROOM TEMP. SET TEMP. TIMER SET RECOVERY TIMER CLOCK UP DOWN VENTILATION ON AUTO OFF RECOVERY DAILY NORMAL CHECK ON/OFF FILTER RESET Clock, timing and address setting Air change switch It is used to open and close air change function. The mode is as follows: No display-air change (automatic)air change (RECOVERY)-air change (NORMAL) Timing switch It is used for choosing timing running Self-inspection switch It is used for inspection service ON/OFF switch Do on and off function. The unit is on when pressing it; and is off when pressing it again (needn't to open front cover) Filter reset After cleaning air inlet and filter, press this switch. The unit begins to run Reset key When in abnormal state, push the reset key with a spike, which may return the unit to normal 65 >_]]VbTZR\ <Zb >_^UZdZ_^Vb ON/OFF operation 2 MODE MODE FAN OPERATION HIGH 4 The line controller displays the running state in the latest time (timing and swing state may not be displayed). 5 1. Press "ON/OFF" switch. The air conditioner starts operating, and the light on the wired controller is on. SWING FAN HEALTH TEMP CLOCK TIME COOL C ROOM TEMP. TIMER SET 3 RECOVERY FILTER RESET 1 ON/OFF 2.Choose operation mode. Press "mode"switch to change to "AUTO"---"FAN ONLY"---"COOL"---"DRY"---"HEAT". 3.Press "TEMP" switch Change set temperature:press TEMP or TEMP time, [SET] will display,and set temperature will increase/reduce CLOCK CHECK Press ON/OFF switch on line controller directly 6 every 4.Press "FAN SPEED" switch FAN ONLY Operation: Press "FAN SPEED" switch to change to "HIGH"--"MED"--"LOW"--"HIGH" In AUTO,COOL,DRY,HEAT Operation: Press "FAN SPEED" switch to change to "AUTO"--"HIGH"--"MED"--"LOW"--"AUTO" 5.Press "swing" switch on the line controller to swing the wind screen. 6.Press "ON/OFF"switch, off. The light on the line controller is off. Note Several seconds after the operation of the line controller, the setting of the unit will change. Remarks Avoid pressing "ON/OFF" switch frequently. Do not press line controller or switches by sharp objects. The temperature is on the basis of the setting value. The wind temperature may not reach the setting value because of the outer air conditioner and system protection. When the wired controller is power on, the screen fully displays it for two seconds. and clock zone "8888"-"888"-"88""8" flicker for 30 seconds. All the switches are invalid at the time. 66 >_]]VbTZR\ <Zb >_^UZdZ_^Vb Present time setting The timing is based on the real time. Thus, the real time should be regulated in advance. The clock regulation steps are as follows: 1.Press "CLOCK" switch MODE MODE FAN SWING "CLOCK" flickers, and the time displayed is the real time. FAN OPERATION HIGH TEMP HEALTH 2.Press " C ROOM TEMP. TIME TIMER SET CHECK FILTER " to regulate the time. The time increases a minute each time you press " " switch. The time decreases a minute each time you press " " switch. HEAT CLOCK " and " RECOVERY 3.Press "setting" switch. The setting is achieved. CLOCK UP RESET If not in timing, the screen displays the real time. If in timing, the screen displays the timing time. If you want to know the real time, go to the first step. ON/OFF 1 Notes 3 2 Setting of power failure compensation function When SW1-6 on PCB of wire controller is OFF, it will be in power failure compensation. If the SW1-6 is ON, it has no compensation function. When the power is on after blackout, the unit will return to the former state if compensation function is set. Otherwise, it will stop. When restarting the unit, press "ON/OFF" switch on wired controller. 67 >_]]VbTZR\ <Zb >_^UZdZ_^Vb Timing setting OFF timing: when a set time has elapsed, the unit stops running. ON timing: when a set time has elapsed, the unit starts. MODE MODE FAN SWING FAN HIGH OPERATION TEMP HEALTH 1.Press "TIME" switch. COOL CLOCK C ROOM TEMP. The display changes with the following sequence: on on no display CYCLE ON OFF OFF OFF TIME TIMER SET CHECK FILTER RECOVERY TIMER ON Press "ON/OFF"switch firstly, and set up operation mode. Please regulate the clock in advance before using the timing function. RESET ON/OFF 1 3 2 2.Set up "TIMER" When timing ON or timing OFF flickers, press " " or " " to regulate the time Press" "or " "set up ON/OFF time. The setting time increases ten minutes each time you press " " switch. The setting time decreases ten minutes each time you press " " switch. When setting timing ON and timing OFF at the same time, press "timing" switch to change the setting item. 3.Time setting is achieved. Press"setting"switch. Cancel timing If you want to change the timing mode to normal operation, press "timing" until there is no timing display. When the timing is invalid, the mode is in normal operation. parts of wired controller explanation : 1.The unit starts or stops at the setting time. Meanwhile, it displays the timing time. 2."ON Timing, OFF timing and circulation"means that the unit is on and off at the setting time everyday. Notes The shorter setting time will be carried out firstly. If the ON timing and OFF timing are the same, the setting is invalid. Even in timing condition, you may start or close the unit through pressing "ON/OFF" switch. 68 >_]]VbTZR\ <Zb >_^UZdZ_^Vb Query indoor malfunction history: In the state of power on or power off, press [CHECK] button, enter the malfunction-querying mode of all indoor units in the group. Then [CHECK] and [UNIT NO.] will display, and the actual indoor numbers will be displayed in some sequence (unit number is in decimals). At the same time, in the time region, there will be the current malfunction and the latest time malfunction, the displaying format is [XX:YY], in which XX stands for the current malfunction, if normal, it will display "--"; YY stands for the latest time malfunction. The failure code of every unit will display for 3 seconds. After the failure codes of all indoor units in the whole group are displayed, the mode will quit automatically. How to change the function switches? No. Type State of switch Function description SW1-1 Select the master or the slave controller ON set as the slave controller OFF set as the master controller Select the controller mode ON standard controller OFF air handler controller ON visible room temperature OFF invisible room temperature ON Unavailable 26 lock OFF available 26 lock ON Sensor of the controller OFF Sensor in the unit ON unavailable OFF available SW1-2 SW1-3 SW1-4 Room temperature display option o 26 lock SW1-5 Temperature sensor position option SW1-6 Auto restart o o SW1-7 Factory Seting ON default setting SW1-8 Factory Setting OFF default setting Notes 1. Switches or jumper wire must be adjusted when the wire controller is powered off. If the wire controller is powered on, the above operations will be invalid. 2. Function difference between master wire controller and slave one: Contrastive items Master wire controller Slave wire controller Function All of functions Only with below functions: ON/OFF, MODE, FAN SPEED, SET TEMP., SWING 69 >_]]VbTZR\ <Zb >_^UZdZ_^Vb Installation Manual For Wire Controller 1. Take down wire controller from the holder MODE CENTRAL OPERATION STANDBY PRE-HEAT DEFROST FIX CHECK DEMAND SWING C F SYS. ADD. SWING Wire controller 52¡ 0.2 TEMP HEALTH FILTER TES HEALTH UNIT NO. CEN. ADD. FAN CLOCK TIME MANUAL ROOM TEMP. SET TEMP. TIMER SET CHECK FILTER RECOVERY TIMER CLOCK UP DOWN VENTILATION ON AUTO OFF RECOVERY DAILY NORMAL Bracket RESET 5.3 HEAT FAN AUTO HIGH MED LOW 10.45 MODE AUTO FAN ONLY COOL DRY Screw holes ON/OFF 2. Install the controller holder According to the position of 2 screw holes on the holder, drill 2 holes on the wall, and strike the wood stopper to the holes respectively. Then align the 2 screw holes of wired controller holder to the wood stopper, fix the holder on the wall with wood screw. Note:Try a wall as flat as possible for installation. Don't use excessive force to tighten screws, otherwise, the holder will be damaged. 3.Wiring instruction Use shielded wire between indoor and wire controller.And be earthed on one side, or the unit will not work normally because of interference. Note:Confirm the terminal connection firmly, and do not get in tough with shielded wire. 4.Place wire controller on the holder, and pay attention not to pressing any wires. 5. Wiring connections of wire controller: A Indoor 1 Wire controller Indoor 2 Indoor N Indoor 15 Wire controller Wire controller Wire controller ABC B ABC C Indoor 1 Wire controller Polar wire A B C ABC Indoor 16 (master unit) ABC Indoor 1 Wire controller Polar wire A B C Polar wire Wire controller ABC Control wiring ABC of wire Wire controller controller, polar. ABC ABC ABC Wire controller Wire controller Wire controller There are three methods to connection wire controller and the indoor units: A.One wired controller can control max. up to 16 sets of indoor units, and 3 pieces of polar wire must connect the wire controller and the master unit (the indoor unit connected with wire controller directly), the others connect with the master unit through 2 pieces of polar wire. B. One wire controller controls one indoor unit, and the indoor unit connects with the wire controller through 3 pieces of polar wire. C. Two wired controllers control one indoor unit. The wire controller connected with indoor unit is called master one, the other is called slave one. Master wire controller and indoor unit; master and slave wire controllers are all connected through 3 pieces of polar wire. 6. Communication wiring: The wire controller is equipped with special communication wiring in the accessories. 3-core terminal (1-white 2-yellow 3-red) is connected with the terminal A, B, C of wire controller respectively. The communication wiring is 5 meter long; if the actual length is more than it, please distribute wiring according to below table: Communication wiring length(m) Dimensions of wiring < 100 0.3mm2x3-core shielded wire 100 and <200 0.5mm2x3-core shielded wire 200 and <300 0.75mm2x3-core shielded wire 300 and <400 1.25mm2x3-core shielded wire 400 and <600 2mm2x3-core shielded wire *One side of the shielded sheet of communication wire 70 must be earthed.