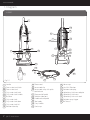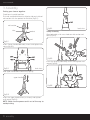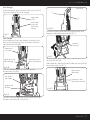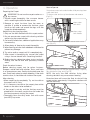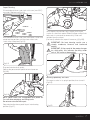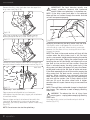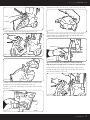
1
Vax careline
0870 6061248
Vax model number:
V-028CC
AAA
instruction manual
Carpet washer
SOLUTION
www.vax.co.uk
Please read carefully before using this cleaner.
Always fully extend the mains cable before use.
Retain for future reference.
www.vax.co.uk
1. Diagram
V-028CC
1
20
19
2
10
18
11
3
12
13
4
17
5
9
16
8
14
15
7
6
22
AAA
23
27
21
24
SOLUTION
Fig.1/1
1
2
3
4
5
6
7
8
9
10
Handle
Clean water tank latch
Clean water tank
Dirty water tank latch
Dirty water tank handle
Brushbar
Dirty water tank
Dirty water tank door
Dirty water tank lid
Solution tube clip
2 parts overview
25
26
11 Power cord
12 Lower cord clip
13 Lower cord wrap with quick
cord release
14 Power on/off pedal
15 Solution tube port
16 Handle release pedal
17 Tool caddy
18 Carry handle
19 Cord wrap
20
21
22
23
24
25
26
27
Hose wrap
Vax AAA Solution
Solution tube plug
Upholstery/stair hose adaptor
Upholstery/stair hose
Upholstery/stair wash tool
Solution spray trigger
8x Screws
Vax Careline 0870 606 1248
2. Safety Information
FOR HOUSEHOLD USE ONLY.
When using the vacuum cleaner, basic safety precautions
should always be observed, including the following:
21. Using improper voltage may result in damage to the
motor and possible injury to the user. The correct
voltage is listed on the rating label.
22. A hazard may occur if the carpet washer runs over
the power supply cord.
1.
Do not leave the carpet washer unattended when
plugged in. Unplug it from socket when not in use.
23. To prevent dirty water from running into motor, do
not hold the appliance upside-down or lay on its side.
Use appliance in normal carpet washing position.
2.
To prevent electric shock do not use outdoors.
24. Use extra care when cleaning on stairs.
3.
Not to be used as a toy. Children should be supervised to
ensure that they do not play with the appliance.
25. Do not carry appliance while motor is running.
4.
This appliance is not intended for use by persons
(including children) with reduced physical, sensory or
mental capabilities, or lack of experience and knowledge,
unless they have been given supervision or instruction
concerning the use of the appliance by a person
responsible for their safety.
NOTE: Carpets should be dry vacuumed thoroughly
before washing.
5.
Use only as described in this manual.
6.
Do not use with a damaged cord or plug. If the supply
cord and/or plug is damaged, they must be replaced
by the manufacturer, a Vax Service Agent or similarly
qualified persons in order to avoid hazard.
7.
Do not pull or carry by the cord, use the cord as a
handle, allow the cord to come into contact with hot
or sharp surfaces or close a door on the cord.
8.
Do not unplug by pulling on the cord.
9.
Do not handle the plug or carpet washer with wet
hands.
NOTE: The unit must be unplugged from the mains
socket outlet after use, and before cleaning or
maintaining the unit.
!
IMPORTANT: This unit is not intended for
commercial use.
PLEASE KEEP THESE INSTRUCTIONS
FOR FURTHER USE.
10. Do not put any objects into openings or operate with
openings blocked, keep them free of anything that
may reduce airflow.
11. Keep hair, loose clothing, fingers and all parts of the
body away from openings and moving parts.
12. Do not use the carpet washer on any glowing,
burning or smoking particles.
13. Do not use without the solution tank and dirty water
tank in place.
14. Do not use the vacuum without the dust bag in place.
15. Turn off all controls before unplugging.
16. Do not use to pick up flammable or combustible
liquids such as petrol, or use in areas where they may
be present.
17. Keep the unit on the floor.
18. Do not use an extension cord.
19. Do not attempt to remove blockages with sharp
objects as they may cause damage.
20. Store indoors put away after use to prevent tripping
accidents.
safety information
3
www.vax.co.uk
3. Assembly
Putting your cleaner together
Stand base in upright position.
Push mid-section onto base by aligning tabs on inside of
mid-section with the pockets on the base (Fig.3/1)
mid-section
Fig.3/4
tabs
back view
Caddy Assembly
pockets
Align tool caddy with screw holes on mid-section and
base (Fig.3/5).
base
Fig.3/1
cord
Insert 4 lower handle/tool caddy screws and tighten until
secure (Fig.3/2).
Fig.3/5
Insert the three (3) tool caddy screws and tighten until
secure (Fig.3/6).
back view
Fig.3/2
Slide upper handle down onto unit (Fig.3/3).
upper handle
Fig.3/6
Fig.3/3
Insert the upper handle screw (as shown) and tighten
until secure (Fig.3/4).
NOTE: Make sure the power cord is out of the way to
avoid pinching.
4 assembly
Vax Careline 0870 606 1248
Cord Storage
hose clips
Wrap cord around upper and lower cord wraps (Fig.3/7).
Clip plug to cord to secure for storage.
A
upper cord
wrap
lower cord
wrap with
quick cord
release
B
Fig.3/10
Continue wrapping hose clockwise, aligning hose into
groove on the bottom hose clip (Fig.3/11).
Fig.3/7
Tool Storage
Place Upholstery/Stair hose adaptor, Upholstery/Stair
hose, and the Upholstery/Stair attachment into their
storing locations (Fig.3/8).
bottom
hose clip
upholstery/
stair hose
upholstery/stair
hose adaptor
upholstery/stair
hose attachment
Fig.3/11
Wrap hose back to the upper hose wrap and press into
hose clip B (Fig.3/10).
Slide upholstery tool attachment handle into the right clip
of the tool caddy (Fig.3/12).
Fig.3/8
Slide the adaptor end of hose into the left clip
on tool caddy (Fig.3/9).
Right clip on
Tool caddy
left clip on
tool caddy
adaptor end
of hose
Upholstery tool
attachment handle
Fig.3/12
Fig.3/9
Run hose from the tool caddy to the upper hose wrap
and press into hose clip A (Fig.3/10).
assembly
5
www.vax.co.uk
4. Operation
Preparing the Carpet
!
IMPORTANT: Do not use the carpet washer as a
dry vacuum.
How to Operate
Grasp clean water tank under handle while pressing clean
water tank latch.
Tilt clean water tank away from cleaner and remove
(Fig.4/1).
1. Vacuum carpet thoroughly. Use a vacuum cleaner
with a revolving brushbar for best results.
clean water
tank latch
2. Remove as much furniture from the room as
possible. If unable to remove the furniture, place
plastic or foil under and around the legs until the
carpet has dried completely.
clean water
tank handle
Helpful hints for cleaning carpet:
1. Only use Vax AAA Sloution with this carpet washer.
2. Do not oversaturate carpet with cleaning solution
while using the carpet washer.
3. For heavily soiled areas, additional applications may
be necessary.
4. Allow plenty of time to dry carpet thoroughly.
Fig.4/1
Unscrew measuring cap from back side of clean water
tank (Fig.4/2).
5. Wipe cleaning solution from woodwork and wood to
prevent any damage.
6. Try not to walk on carpet until it is completely dry.
7. After carpet is thoroughly dry, vacuum the carpet
using a vacuum cleaner with a revolving brushbar.
8. Before cleaning, determine where to start and end,
making sure not to walk over previously cleaned
areas.
Check for colour fastness:
Before cleaning carpet, test for colour fastness.
Dampen a white cloth with solution. Test a small area
in an inconspicuous area. Gently rub the cloth over the
area. Check each colour for colour bleeding. If the cloth
remains clean, it should be safe to clean the carpet.
After cleaning:
• Allow carpet to dry completely. Try not to walk on
the carpet until it is dry.
Fig.4/2
Fill measuring cap with solution (approximately 5 capfuls).
Pour into clean water tank (Fig.4/3).
NOTE: Use only Vax AAA solution. Using other
cleaning solutions may cause excess foaming.
Excessive foam will cause the float to shut off the
carpet washer prematurely. Using other solutions will
void the warranty.
• If it is necessary to walk on the carpet, place white
towels on the areas to be walked on.
• If the carpet is not dry and the furniture must be
placed back in the room, use plastic or foil under the
furniture to prevent staining the carpet.
• Thoroughly clean the dirty water tank with warm
(max 40 C) tap water.
o
Fig.4/3
6 operation
Vax Careline 0870 606 1248
Carpet Cleaning
Fill remainder of clean water tank with warm (max 50ºC)
tap water. Replace cap (Fig.4/4).
Fig.4/7
Fig.4/4
Place bottom of clean water tank into carpet washer and
rotate top into position until the clean water tank.
Latch snaps into place (Fig.4/5).
Whilst depressing solution spray trigger, push carpet
washer in a forwards motion. Release trigger and pull unit
backwards in same path to remove dirty water and
solution from the carpet.
(For heavily soiled areas, repeat if necessary) (Fig.4/8).
!
IMPORTANT: For best cleaning results use a
steady, moderate, forward and backward
motion.
!
IMPORTANT: If the sound of the motor changes
to a high pitch, this indicates the dirty water
tank is full and must be emptied.
Fig.4/5
Plug cord into electrical socket.
Step on the power on/off pedal to turn cleaner on
(Fig.4/6).
Fig.4/8
cleaning upholstery and stairs
Put carpet washer in its upright position, then turn off
(Fig.4/9).
Fig.4/6
NOTE: Never leave unit unattended with power on.
Turn off when emptying and filling tanks.
Do not oversaturate the carpet.
Step onto handle release pedal to put into cleaning
position (Fig.4/7) .
Fig.4/9
operation
7
www.vax.co.uk
Remove the dirty water tank door from the top of the
dirty water tank (Fig.4/10).
!
IMPORTANT: For best cleaning results use
steady, moderate, forward and backward
motion. Make sure upholstery is dry before use.
NOTE: If the dirty water tank door is not replaced,
there will be no suction through the nozzle and the
unit will not operate properly.
Fig.4/10
IInsert the up-holstery/stair hose adaptor into the
opening on top of the dirty water tank (Fig.4/11).
Fig.4/13
Emptying and cleaning the dirty water tank and filter
The carpet washer is equipped with a shut off valve
within the dirty water tank. When the dirty water tank
becomes full, the float will rise, shutting off the air flow
through the nozzle.
Fig.4/11
Connect the hose solution tube into the fitting on the
lower left side of handle facing carpet washer (Fig.4/12).
back view
Fig.4/12
Upholstery / stair attachment
Step on power on/off pedal to turn cleaner on.
While depressing solution spray trigger, pull attachment
in backward motion.
Release trigger and push attachment forward in the
same path to remove dirty water and solution from
upholstery. (For heavily soiled areas, repeat if necessary.)
(Fig.4/13).
NOTE: Do not oversaturate the upholstery.
8 operation
NOTE: The float in the carpet washer will shut off the
suction when the dirty water tank is full. For best
results, use smooth, steady motion keeping the nozzle
flat against the carpet. Tipping the carpet washer and
breaking the seal of the nozzle and carpet will cause
the float to rise and shut off the suction. Once the
float is activated, empty the dirty water tank. If the
dirty water tank does not appear full, press the Power
on/off pedal and wait for the float to settle and reset.
If the float repeatedly shuts off the suction, empty the
dirty water tank. For best results, use only Vax AAA
solution. Other solutions may generate excessive
foam which will cause the float to rise prematurely
and shut off the suction. Use 5 (five) capfuls of Vax
AAA per fill up of the clean water tank. A higher
concentration of carpet cleaner may cause excessive
foaming.
NOTE: There will be a noticeable change in the pitch of
the cleaner. This indicates a need to empty the dirty
water tank.
WARNING: To reduce the risk of injury from
moving parts - unplug before emptying the dirty
water tank.
!
Grasp top of dirty water tank handle and push latch to
release (Fig.4/14).
Vax Careline 0870 606 1248
Remove filter from rear of dirty water tank lid (Fig.4/18)
latch
handle
Fig.4/14
Grasp handle and pull tank out of base (Fig.4/15).
Fig.4/18
Rinse dirty water tank and filter with warm tap water.
Wipe and let dry thoroughly before storing to prevent
mildew from forming (Fig.4/19).
Fig.4/15
Remove dirty water tank lid (Fig.4/16).
Fig.4/19
NOTE: Do not use any chemicals when cleaning.
Replacing dirty water tank in base of carpet washer
While making sure the front of the dirty water tank is
resting on the base, place the rear of the tank into the
base of the cleaner (Fig.4/20).
Fig.4/16
To empty dirty water tank, grasp handle with one hand
and nozzle with the other and empty into sink.
To clean, rinse tank thoroughly with clean water and let
dry (Fig.4/17).
Fig.4/20
Fig.4/17
operation
9
www.vax.co.uk
Push handle down until it latches (Fig.4/21).
NOTE: Do not store cleaner with solution in reservoir
or dirty water in dirty water tank. Mineral deposits and
mildew can form which will affect the performance of
the carpet washer.
Fig.4/21
5. Maintenance
Transporting & storing carpet washer
Put handle in upright locked position (Fig.5/1).
Fig.5/1
Turn unit off. Store cord and above floor cleaning
attachments if used.
Tilt unit back on rear wheels and push forward (Fig.5/2).
Fig.5/2
NOTE: The unit can also be transported between
rooms or floors using the carry handle.
Before storing carpet washer:
1. Empty and rinse clean water tank and dirty
water tank.
2. Replace empty clean water tank and dirty water
tank.
3. Ensure that brushes and underside of unit are fully
dry prior to storing on a carpeted or
wood surface.
NOTE: Do not store unit with a full clean water tank or
dirty water tank.
IMPORTANT: Do not transport the carpet washer
with either the clean water tank or dirty water
tank full.
!
10 operation / maintenance
Vax Careline 0870 606 1248
6. Troubleshooting
!
7. UK Service & Help
WARNING: To reduce the risk of personal injury,
unplug the vacuum cleaner before performing
maintenance or troubleshooting checks.
PROBLEM: The cleaner won't run.
Cause:
Not properly plugged into electrical outlet.
Solution: Plug in firmly.
Cause:
No electricity in electrical outlet.
Solution: Check fuse or breaker.
Cause:
ON/off switch not turned on.
Vax Care 0870 6061248
Monday-Friday
8.30am to 6.30pm
Saturday-Sunday
9.00am to 5.00pm
Any queries or concerns about using the Vax, call the
Vax Careline. Calls are charged at the UK national rate.
Please make a note of the serial number and model
number of the carpet cleaner before calling. There are
over 400 approved Vax Service Agents in the UK. For the
nearest Service Agent, please call the Vax Careline.
www.vax.co.uk
Solution: Push on/off switch to ‘on’.
Cause:
Blown fuse/tripped breaker.
Solution: Reset circuit breaker or replace fuse.
PROBLEM: Cleaner won’t pick up/loss of suction.
Cause:
Dirty water tank is full.
Solution:
Cause:
Switch off and unplug cleaner. Empty dirty
water tank as shown in Section 4.
Dirty water tank not installed correctly.
Solution:
Cause:
Refer to page 9 for fitting information.
Obstruction in hose/nozzle.
Solution:
Cause:
Remove hose and clear obstruction.
Broken or worn belt.
Solution:
Cause:
Replace the belt. See page 10.
Brushbar is worn.
Solution:
Replace the brush bar. See page 10.
8. Technical Specification
Voltage:
Wattage:
Capacity:
Cord length:
Weight:
220-240V ~50Hz
900W
Clean water tank - 4 litres
Dirty water tank - 2.3 litres
7.5 metres
8.9kg
Subject to technical change without notice.
PROBLEM: Liquid escaping from the carpet washer.
Cause:
Dirty water tank is full.
Solution:
Cause:
Switch off and unplug cleaner. Empty dirty
water tank as shown in Section 4.
Dirty water tank not installed correctly.
Solution:
Cause:
Refer to page 9 for fitting information.
Solution tank not installed correctly.
Solution:
Make sure the tank is securely locked in place
PROBLEM: Clean solution won’t dispense.
Cause:
Solution tank not installed correctly.
Solution:
Cause:
Make sure the tank is securely locked in place.
Solution tank empty.
Solution:
Refill tank. Refer to page 6 for instructions.
troubleshooting / uk service & help / technical specification
11
-
EEC STATEMENT OF COMPLIANCE
Manufacturer/EEC importer: Vax Limited, hereby on our own responsibility, declare that the
Vax V-028CC is manufactured in compliance with the following Directives:
Safety: 2006/95/EC Low Voltage Directive
EMC: 2004/108/EC Electromagnetic Compatibility Directive
Waste electrical products should not be disposed of with household waste. Please recycle where
facilities exist. Check with your Local Authority or retailer for recycling advice.
Vax Ltd., Kingswood Road, Hampton Lovett, Droitwich, Worcestershire, WR9 OQH, UK
email: [email protected] - website: www.vax.co.uk