1
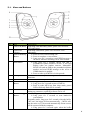
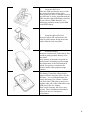
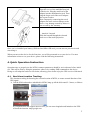
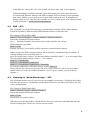
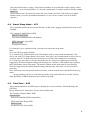
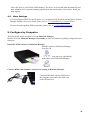
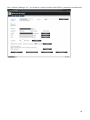
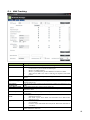
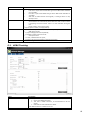
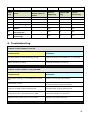
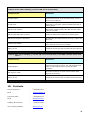
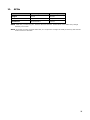
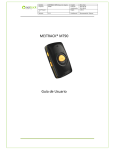
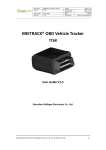
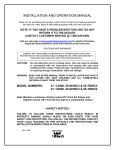
MT90 Applications & Manual Guide Version 1.0 Table of Contents PRODUCT OVERVIEW .......................................................................................... 1 1. PRODUCT FEATURES .................................................................................. 1 1.1. 1.2. 2. HEALTH & SAFETY PRECAUTIONS .............................................................. 2 2.1. 2.2. 2.3. 3. View and Buttons ......................................................................................... 4 LED Indications ............................................................................................ 5 First Use ....................................................................................................... 5 QUICK OPERATION INSTRUCTION ............................................................. 7 4.1. 4.2. 4.3. 4.4. 4.5. 4.6. 5. Battery Leakage ........................................................................................... 2 Radio Frequency Interference ...................................................................... 2 Hardware Precautions / Maintenance .......................................................... 3 MT90 AND ACCESSORIES ........................................................................... 3 3.1. 3.2. 3.3. 4. Features ....................................................................................................... 1 Specifications ............................................................................................... 2 Real-time Location Tracking ........................................................................ 7 SOS – A71 .................................................................................................... 8 Listening-in (Voice Monitoring) – A72 ......................................................... 8 Smart Sleep Mode – A73 .............................................................................. 9 Time Zone – B35 .......................................................................................... 9 More Settings ............................................................................................. 10 CONFIGURE BY COMPUTER....................................................................... 10 5.1. 5.2. SMS Tracking ............................................................................................. 12 GPRS Tracking ........................................................................................... 13 6. USING SMS COMMAND ............................................................................. 15 7. TRACKING ................................................................................................ 20 7.1. 7.2. Track by SMS ............................................................................................. 20 Google Earth and Google Maps ................................................................... 20 8. EVENT CODES TABLE ................................................................................ 22 9. TROUBLESHOOTING ................................................................................. 23 10. CONTACTS ................................................................................................ 24 11. APNS ........................................................................................................ 25 Product Overview MT90 is a GPS/GSM/GPRS tracking device specially developed and for pets, children, personal safety and even vehicles. With superior GPS and GPRS modules, MT90 has good sensitivity and stable performance. It could also get an accurate GPS location fix even in remote places with AGPS Module embedded into the set. Through GPS and GSM or GPRS communications, MT90 can get its position and send the position data back to your mobile phone or server to be displayed on maps. 1. Product Features 1.1. Features MT90 has the following functions and features: SiRF IV GPS and Quad Band GSM 850/900/1800/1900Mhz Small in size (77mm x 47mm x 20mm) and lightweight (65g) Waterproof IP65 Low Power Consumption and Long Standby Time GPS and GSM base station of bi-module positioning Track by SMS/GPRS (MEITRACK Protocol) Track on Demand Track by Time Interval Track by Distance Interval Track on Mobile Phone Listen-in (Voice Monitoring) Internal 8MB Memory for Logging Inbuilt Accelerometer Sensor Inbuilt Battery SOS Alarm Geo-fence Alarm GPS Fake Zone Alarm Low Battery Alarm Speeding Alarm Mileage Report 1 1.2. Specifications Items Dimension Weight Charging Voltage Back-up Battery Power Consumption Operating Temperature Humidity Work Time LED Button Microphone/Speaker Memory Sensor GSM Frequency GPS Chip GPS Sensitivity Positioning Accuracy Specification 77 x 47 x 20mm 65g Mini USB charging interface, DC4.2V~5.5V/400mA 1100mAh/3.7V rechargeable and replaceable lithium-ion battery(NokiaBL-5C compatible) 65mA standby current -20℃~55℃ 5%~95% 60 hours in power-saving mode and 16 hours in normal mode 2 LED lights to show power, GPS, GSM and otherstatus 5 buttons for making phone call and sending SMS Internal microphone and speaker 8MB Byte Accelerometer GSM850/900/1800/1900MHz Latest GPS SIRF-Star IV chipset -159dB 10 meters, 2D RMS 2. Health & Safety Precautions 2.1. Battery Leakage The MT90 contains a rechargeable lithium ion battery pack. Leakage of ingredients contained within the battery pack, or the combustion products of the ingredients, can cause personal injury as well as damage to your MT90. If battery leakage occurs, avoid contact with skin. If contact occurs, immediately wash thoroughly with soap and water. If liquid leaking from a battery pack comes into contact with your eyes, immediately flush thoroughly with water and seek medical attention. To avoid battery leakage: 2.2. Do not expose battery to excessive physical shock, vibration, or liquids. Do not disassemble, attempt to repair or deform the battery. Do not dispose of battery pack in a fire. Do not touch the terminals of the battery, or cause a short between the terminals with a metal object. Do not peel or damage the battery label. Radio Frequency Interference The MT90 can emit radio-waves that can affect the operation of nearby electronics, including cardiac pacemakers. Observe and follow all regulations and rules regarding use of wireless devices in locations such as hospitals, airports, and on board aircraft. Operation in those locations may interfere with or cause malfunctions of equipment, with resulting injuries to persons or damage to property. 2 2.3. Hardware Precautions / Maintenance Do not disassemble, tamper or attempt to repair the tracker, components or accessories. Doing so voids your warranty. Always power OFF the tracker before loading or removing its battery or SIM Card. Do not drop, hit or otherwise abuse the tracker, components or accessories. This may damage the precision components of the tracker. Make sure all connections to the tracker are plugged in properly into the correct locations only. When disconnecting any plugs from the tracker or wall outlet, first turn the tracker OFF. Then carefully pull by the plug itself rather than by the cord. Do not step on, sharply pull or bend any wires or cables. Do not expose the tracker, components or accessories to extreme heat or cold. Do not expose the tracker to direct sunlight for extended periods of time. Connect ONLY accessories designed and licensed for use with the tracker to any external connectors. Do not spill liquid on the tracker, other components or accessories. If the tracker comes into contact with liquid, wipe clean with a soft cloth (slightly damp). Remove the battery cover and battery. If liquid comes into contact with the battery, do not reuse it. Call Unico Tracker Customer Service (Refer to 10. Contacts) for further instructions on battery replacement and possible service to your tracker. When using AC adapter, make sure you are using the correct model specified for your MT90. Always unplug the AC Adapter from the wall outlet when not in use. Do not use the AC adapter if the cable or plug is damaged. 3. MT90 and Accessories MT90 device Battery USB data cable Travel adapter (charger) Mini screwdriver Lanyard User manual, warranty card and CD Reminder: use only Unico-approved software. Pirated or illegal software may cause damage or malfunctions that are not covered by Unico’s warranty. The supplied accessories perform best for your device. 3 3.1. View and Buttons No. 1 2 3 4 5 6 7 8 9 Item GPS LED (Blue) Description Indicating GPS and battery status, please refer to below LED indications. GSM LED Indicating GSM status, please refer to below LED (Green) indications. Answer/Hand-up Press to receive an incoming call. Button Press to complete a conversation. Long press for 2 seconds to send GPRS message to the server when no incoming call or conversation. SOS Button Long press for 2 seconds, MT90 will dial 3 preauthorized phone numbers in turn. It will stop dialing when one number answers. Meanwhile, MT90 will send an SMS to the preauthorized phone number and send GPRS message to the server if GPRS function is enabled. Press to wake up if MT90 is in sleep mode. Microphone It will run automatically when using listen-in and call functions. Speaker It will run automatically when using call function. Power On/Off Long press for 2 seconds to turn on MT90. Button Long press for 2 seconds to turn off MT90. Press to wake MT90 up from sleep mode, power LED will slowly flash for 10 seconds. Mini USB Mini USB is used for charging, connecting to computer for setting up parameters, updating software and so on. Volume+/Logger Long press to turn up the volume. Button Long press for 2 seconds to start hands-free conversation. In standby mode, long press for 2 seconds, when the buffer “BI” once, the logger will run automatically. (MT90 will log the route every 30 seconds automatically. Route record can be exported with the computer. Long press for 2 seconds again, when the buffer 4 10 Volume-/GPRS Button 11 12 Lanyard Loop Battery Cover “BI” twice, and the logger will stop automatically. Note: you can make turn on/off function of logger (default: valid) invalid through Meitrack Manager to avoid operating failure. Light press to turn down the volume. In standby mode, long press for 2 seconds, when the buzzer “BI” once, GPRS function will be enabled automatically. ( Precondition: GPRS parameter must be set in advance, default GPRS message interval is 10 minutes) Long press for 2 seconds again, when the buzzer “BI” twice, GPRS function will be disabled automatically. Note: you can make turn on/off function of logger (default: valid) invalid through Meitrack Manager to avoid operating failure. For connecting lanyard. Install the battery, SIM card and Micro SD card by removing the battery cover. 3.2. LED Indications Long press the switch for 2 seconds to turn on/off MT90. GPS LED (Blue) On Charging Flashing (every 5 secs.) Sleeping Flash (1 sec on, 1 sec off) No GPS fix or initializing Off GPS fix Fast flash (0.3 sec on, 0.3 Low battery sec off) GSM LED (Green) On A call is coming in or busy Flashing (every 5 secs.) Sleeping Flash (1 sec on, 1 sec off) No GSM signal or initializing Off MT90 is connected to GSM network 3.3. First Use 1. Remove the Battery Cover With the device turned off, place your MT90 with the front facing down. Use the mini screwdriver to remove the two screws to release the back cover. Lift up the back cover from the notch at the bottom of the device. 5 2. Insert the SIM Card Place the SIM card into the device with the gold-colored side facing down. Note: make sure there is enough credit on the SIM card. It is also important that the SIM card has Called ID Display function. If you will use GPRS function, you should pay attention to the current SIM card GPRS charge. 3. Insert the Micro SD Card Insert the Micro SD card into the slot with its gold contacts facing down and push it until it clicks into place. 4. Insert the Battery Insert the contacts side of the battery first and then gently push the battery cover into place. Note: battery performance depends on many factors, including signal strength, the temperature of the environment in which you operate your phone, the features and/or other program usage patterns. 5. Charge the Battery The battery is partially charged when shipped. Before using the device for the first time , it’s recommended that you charge the battery for 8 hours. Connect one end of the USB cable to the device, and the other end of the USB cable to the USB port of the AC adapter. Note: while charging, the device may heat up. This is normal and should not affect your device’s lifespan or performance 6 6. Charge with the Travel Adapter Open the cover of the multifunction jack of the device. Plug the small end of the adapter into the multifunction jack. Then plug the larger end of the travel adapter into a power outlet. Note: improperly connecting the travel adapter can cause serious damage to the device. Any damage caused by misuse is not covered by the warranty. 7. Attach A Lanyard Slide the lanyard through the slot and hook it over the small projection. Once you’ve installed your battery, SIM card and Micro SD card, you can turn on your device and start using it. When you turn on the device for the first time, you will be promoted to set your device. For more information on how to set your device, please read the following instructions. 4. Quick Operation Instruction Operation tips: to properly use the MT90, common parameters should be set in advance before initial use. This can be done by using the parameter editor or by sending SMS commands to the device. Doing so will adapt the tracker to local time, allowing you to better enjoy the GPS service of Meitrack. 4.1. Real-time Location Tracking This location-tracking for knowing the current location of MT90, to ensure normal function of the GPS signal. Call the SIM card number embedded in MT90, hang up till the dial sound 2-3 times, as follows: If your phone does not support direct access, you can enter longitude and latitude to the URL to check the location. maps.google.com 7 In the SMS, the values after “lat” is the latitude, the values after “lng” is the longitude. *Meitrack Manager and SMS command. The default password is 0000, password can be revised through Meitrack Manager and SMS command. MT90 will only accept commands from a user with the correct password and report SMS report to the user. If preauthorized phone number was set, only this phone number can receive SMS reports. The common format of SMS command is: password,command,parameter 4.2. SOS – A71 This command is to set the SOS emergency communications number, call the phone number, inform the location by SMS and other SMS additional features at the same time. The content of Mobile Phone SMS: 0000,A71,Function Number 1, Function Number 2, Function Number 3 Sent to the embedded SIM card numbers. (tips: “,” should be English comma and no space before and after the comma) MT90 automatic reply SMS: IMEI,A71,OK Prompts successful, successfully set SOS emergency communications number. When you press the SOS emergency button, MT90 will dial 3 preauthorized phone numbers. It will stop dialing when one number answers. Note: the default value is empty. The function numbers should be added “,” to avoid setting failure. The last function number doesn’t need a “,”. For example: 0000,A71,13500000000,, 0000,A71,13500000000,13600000000, 0000,A71.13500000000,13600000000,13700000000 To clear the combination of functions directly sending 0000,A71 (If this function can’t be achieved, please add your Country and Area Code before your phone number when you set the preauthorized numbers, or you can also consult your local mobile operator.) 4.3. Listening-in (Voice Monitoring) – A72 This command enables users to listen-in to the surrounding environment. Configuring this feature will allow the devices to confidentially and automatically answer and allow listening-in, one-way voice communication. The Content of Mobil Phone SMS: 0000,A72,Monitor Number 1,Monitor Number 2 Sent to the embedded SIM card numbers. IMEI,A72,OK Successfully set monitor number. When the preset monitor number calls the MT90, the device will answer automatically and enter into the listening state. The device will not emit any sound. 8 Note: the default value is empty, if the function numbers are less than three while setting, it must be added “,” to avoid setting failure. To clear the combination of monitor numbers directly sending 0000,A72 (If this function can’t be achieved, please add your Country and Area Code before your phone number when you set the preauthorized numbers, or you can also consult your local mobile operator.) 4.4. Smart Sleep Mode – A73 This command enables the sleep mode function. In this mode, logging, timing and location are all disabled. The Content of Mobile Phone SMS: 0000,A73,sleep levels Sent to the embedded SIM card numbers. MT90 automatic reply SMS: IMEI,A73,OK Prompt successfully. To restart the Log or regular position, you must first cancel the sleep mode. Note: X=0, turn off sleep mode (default) X=1, normal sleep. GSM module work, GPS module work by sleep mode intermittently. The device can work 25% longer than no sleep mode. Note: this is not recommended for users who set “track by interval” or short time interval, because it will affect the completeness of tracking. X=2, deep sleep, the tracker will enter this mode after it is inactive or stationary(No SOS/any triggered by the button/input/incoming calls/message) for 5 minutes. GPS module stops working and GSM module enters sleep mode. The tracker remains in this mode until it is activated by SOS/any triggered by the button/input/incoming calls/message. After that, it will repeat above processes. Note: MT90 can enter sleep mode under movement , and movement can't wake MT90 from sleep mode. In any condition, the device will directly quit the sleep mode and back to normal working mode by SMS or GPRS command to turn off the sleep mode. 4.5. Time Zone – B35 This command modifies the SMS report to display the correct local time. Default Beijing time, GMT480. Please follow below instructions for time zone modification. The Content of Mobile Phone SMS: 0000,B35,480 Sent to the embedded SIM card numbers. MT90 Automatic Reply SMS: IMEI,B35,OK Set the time zone successfully. 9 Note: this value is your MT90’s IMEI number. The device will send this data automatically and these numbers don’t represent anything significant to the functionality of the tracker. Below the same applies. 4.6. More Settings You can configure MT90 by mobile phone or by computer using the Meitrack Manager to Setting Multiple Software. For more details, please refer to 5. Configuration by Computer below For more details regarding SMS commands, please refer to 6.1 Using SMS command. 5. Configure by Computer This part mainly shows you how to use the Meitrack Manager. Please refer to the Meitrack Manager User Guide for more information regarding configuration and functions. Install the MT90 software of Meitrack Manager Find the software of Meitrack Manager from the CD. Install it following the steps, and find the application icon of Meitrack Manager. Connect MT90 with computer, and sync the setting of Meitrack Manager. Connect USB cable with the USB port in the computer, and connect the other end to the MT90 device. 10 Run “Meitrack Manager.exe”, it will detect Comm port and read all MT90’s parameters automatically: 11 5.1. SMS Tracking Items Descriptions SMS Password SMS Time Zone The defaulted value 0000 of SMS password for sending SMS commands Default time of the tracker is GMT0, you can use this to correct the trackers time to your local time for SMS report. Minute = 0, GMT0 (default)’ Minute = [-32768,32767], set time difference in minutes to GMT. Time zone for SMS is the same as GPS log, but separate from GPRS packet. A phone number to receive SMS reports, incoming call and selected event reports. Press SOS button and make a call to authorized phone no. Hang up automatically when an incoming call is received from correspondent authorized phone no. Auto answer incoming call from authorized phone numbers and enable two-way audio. Report SMS location after receiving an incoming call. Report to authorized phone number when SOS button is pressed. SMS header defaulted as “SOS”. Report when MT90 speeds higher than the preset value. SMS header defaulted as “Speeding”. Enter alarm: report when MT90 enters GPS blind area. SMS header defaulted as “No Fix”. Exit alarm: report when MT90 exits GPS blind area. SMS header defaulted as “Fix”. Enter alarm: report when MT90 enters sleep mode. SMS header defaulted as “Enter Sleep”. Exit alarm: report when MT90 exits sleep mode. SMS header defaulted as “Exit Sleep”. Report when MT90’s journey reaches preset distance. Distance is in meters. SMS header defaulted as “Distance”. Authorization No. SOS Call Reject Incoming Call Auto Answer Incoming Call Report SMS Location SOS Alarm Low Battery Alarm GPS Blind Area Alarm Sleep Alarm Distance Interval Alarm 12 Reboot Geo-fence Alarm Monitor Phone No. SMS Track No. Save Report when MT90 reboots. SMS header defaulted as “Reboot”. Geo-fence is circle with preset radius. Max 8 geo-fence waypoints can be set. Enter alarm: report when MT90 enters geo-fence. SMS header defaulted as “Enter GEO”. Exit alarm: report when MT90 exits geo-fence. SMS header defaulted as “Exit GEO”. Add new: set radius latitude and longitude, or draw geo-fence on map directly in circle. Authorize a phone number to make a silent call to the tracker. The tracker will answer the call automatically which allows the caller to listen to what is happening around the tracker. There is no voice indication during the call. Phone number: max 2, 16 characters. If no preset phone number, it’s empty (default). Authorize a phone number to receive SMS report by time interval. SMS report interval: = 0, stop tracking by time interval (default); = [1,65535], track by interval in minute. Auto report times: = no limit, unlimited times for report; = [1,255], it will stop reporting when reaching preset times. Save above settings to the tracker. 5.2. GPRS Tracking Items GPRS IP/Domain and Port Descriptions Select TCP/UDP to enable GPRS communication. Close: Close GPRS upload time. TCP: TCP is a stable connection, it’s recommended to use this model. UDP: UDP can save traffic but less stable. Note: GPRS connection is default as turn off. Input main server’s IP address and port number. 13 Backup IP/Domain and Port APN APN user name APN password GPRS Time Interval GPRS Report Times GPRS Time Zone Save Note: main IP:210.193.55.36, main port: 8500. Input backup server’s IP address and port number to avoid losing data when main server is down. The backup server will receive data automatically. APN, APN username, APN password: max 32 bytes. If no username and password required, leave them blank. Track by time interval via GPRS. Set time interval for GPRS tracking. Interval is in unit of 10 secs. (fill in “6” means 60 secs) Interval = 0, stop tracking by time interval. Max time interval = 65535 * 10 secs. = 0, no limit, unlimited times for report. = [1,65535], set report times, MT90 will stop reporting when reaching the preset times. Note: GPRS upload interval is default as 60 seconds. Default time of the tracker is GMT0, you can use this to correct the trackers time to your local time for SMS report. Minute = 0, GMT0 (default)’ Minute = [-32768,32767], set time difference in minutes to GMT. Save above settings to the tracker. 14 6. Using SMS Command NOTE: **** is user’s password and the default password is 0000. The tracker will only accept SMS commands from a user with correct password. SMS commands with wrong password will be ignored. Password is in 4 digits. Description SMS Command Example Set GPRS ****,A21,X,IP,Port,APN,APN Username,APN Password 0000,A21,1,210.193.55.46,8500,internet,, Function: To set the GPRS setting. X = 0, Close GPRS X = 1, Open TCP X = 2, Open UDP IP = IP address or domain name of your server. (Default = 210.193.55.46) Port = Communication port of your server. (Default = 8500) APN = Access Point Name (Refer to 11. APNs) APN Username/APN Password = if any, otherwise blank. (Refer to 11. APNs) SMS Response: TrackerID,A21,OK Set GPRS Interval ****,A12,X,T 0000,A12,6,0 Function: To set the GPRS tracking interval. X = 0, turn OFF GPRS X = 1 ~ 65535, set the GPRS Interval. (in unit of 10 seconds). T = 0, turn OFF number of times report within the GPRS interval T = 1 ~ 65535, set number of SMS reports to be received within the GPRS interval SMS Response: TrackerID,A12,OK Change User’s Password ****,F20,#### 0000,F20,1234 Function: To change user’s password. #### is the new password. Password should be in 4 digits. SMS Response: TrackerID,F20,OK Reboot GSM ****,F01 0000,F01 Function: To reboot the GSM module of the tracker. SMS Response: TrackerID,F01,OK Reboot GPS ****,F02 0000,F02 Function: To reboot the GPS module of the tracker. SMS Response: TrackerID,F02,OK 15 Description SMS Command Example Initialization ****,F11 0000,F11 Function: To reset all the setting (except for the password) back to factory default. SMS Response: TrackerID,F11,OK Reset Password 8888,FAB 8888FAB Function: To reset password back to default factory password. Only authorized phone number is authorized to send the command. Default Factory Password: 0000 SMS Response: TrackerID,FAB,OK Firmware Version and Serial Number ****,E91 0000,E91 Function: This is to retrieve firmware version and serial number of the tracker. SMS Response: TrackerID,E91,FirmwareVersion,SerialNo Get Authorized Phone Number and SMS Event ****,B00,P 0000,B00,1 Function: To retrieve the SMS Event that set to the authorized phone number P = 1, First phone number P = 2, Second phone number P = 3, Third phone number. SMS Response: TrackerID,B00,1,91234567,0000000000000F0A00000000 NOTE: 0000000000000F0A00000000 is representing Event Code. Please refer to 7. Event Codes Table for more details on Event Code. Set Authorize Phone Number and SMS Event ****,B01,P,X,E 0000,B01,1,91234567,1 Function: To authorize phone numbers for receiving location reports or SMS alert messages. P = 1, program first authorized phone number. P = 2, program second authorized phone number. P = 3, program third authorized phone number. X = Authorize phone number. E = Event Code. If no codes stipulated, default event codes will be applied. SMS Response: TrackerID,B01,OK NOTE: Please refer to 7. Event Codes Table for more details on Event Code. 16 Description SMS Command Example Add New SMS Event to Authorize Phone Number ****,B02,P,E 0000,B02,1,17 Function: To add new SMS event report to an authorized phone number P = 1, first authorized phone number. P = 2, second authorized phone number. P = 3, third authorized phone number. E = Event Code. SMS Response: TrackerID,B02,OK NOTE: Please refer to 7. Event Codes Table for more details on Event Code. Delete SMS Event to Authorize Phone Number ****,B03,P,E 0000,B03,1,17 Function: To delete SMS event report from an authorized phone number P = 1, first authorized phone number. P = 2, second authorized phone number. P = 3, third authorized phone number. E = Event Code. If no codes stipulated, all SMS event will be removed. SMS Response: TrackerID,B03,OK NOTE: Please refer to 7. Event Codes Table for more details on Event Code. Geo-fence Alert ****,B05,W,LT,LO,R,I,O 0000,B05,1,22.91319,114.07988,1000,0,1 Function: To set a SMS alert when the tracker exits/enters a preset boundary. SMS Response: TrackerID,B05,OK W = 1 to 8 Waypoint. LT = Latitude: Latitude in decimal degrees of a centre waypoint. LO = Longitude: Longitude in decimal degrees of a centre waypoint. R = Radius (in meters), Set the radius of the geo fence from the centre waypoint. I = 0, Turn OFF the alert when tracker enters the preset boundary. I = 1, Turn ON the alert when tracker enters the preset boundary. O = 0, Turn OFF the alert when tracker exits the preset boundary. O = 1, Turn ON the alert when tracker exits the preset boundary. 17 Delete Geo-fence Alert ****,B06,X 0000,B06,1 Function: To delete a set of Geo fence alert. SMS Response: TrackerID,B06,OK X = 1 to 8 Waypoint. Speeding Alert ****,B07,X 0000,B07,80 Function: To set a SMS alert when the tracker exceeds the preset speed limit. SMS Response: TrackerID,B07,OK X = Preset Speed limit. X = 0, Turn OFF the alert. X = 1~255, set the speed limit (in km/h). Description SMS Command Example Sleep Mode ****,B32,L ****,B32,1 Function: To set Sleep Mode SMS Response: TrackerID,B32,OK L = 0, Turn OFF the function L = 1, Level I L = 2, Level II In Level I (1) The GPS module will be working for first 3 minutes and shut down for 1 minute and working again for another 3 minutes. It will repeat the cycle until Sleep Mode is turn OFF. In Level II (2) The GPS will be working for first 1 minute and shut down for 2 minutes and working again for another 1 minute. It will repeat the cycle until Sleep Mode is turn OFF. Power Saving ****,B33,X 0000,B33,15 Function: To set Power Saving mode when the tracker is inactive or stationary for a period of time. SMS Response: TrackerID,B33,OK In Power Saving mode, GPS stops working, GSM enters standby mode and stop sending out message until it is activated by message, movement or triggered by any buttons. X = 0, to turn OFF the function. X = 1~255, to turn ON Power Saving after tracker is inactive or stationary for a period of time (in minute). Logging Interval ****,B34,X 0000,B34,5 Function: To set the logging interval for storing GPS data into tracker’s internal memory SMS Response: TrackerID,B34,OK X = 0, to turn OFF the function. X = 1~65535, to set the interval (in seconds). Time Zone Setting (SMS Reporting) ****,B35,X 0000,B35,120 18 Function: Tracker default time zone is GMT. You may use this command to correct the time that for SMS reporting. SMS Response: TrackerID,B35,OK X = to set time difference in minute to GMT If time is ahead of GMT, input the time difference in minute directly. E.g. 0000,B35,120 If time is behind of GMT, ‘-’ is required. E.g. 0000,B35,-120 Time Zone Setting (GRPS Reporting) ****,B36,X 0000,B36,120 Function: Tracker default time zone is GMT. You may use this command to correct the time that for GPRS reporting. SMS Response: TrackerID,B36,OK X = to set time difference in minute to GMT If time is ahead of GMT, input the time difference in minute directly. E.g. 0000,B35,120 If time is behind of GMT, ‘-’ is required. E.g. 0000,B35,-120 Description SMS Command Example SMS Header (Event) ****,B91,X,Char 0000,B91,1,SOS Alert Function: To set the SMS message header. SMS Response: TrackerID,B91,OK X = Event Code Char = the SMS message send out from tracker NOTE: Please refer to 7. Event Codes Table for more details on Event Code. Protocol Control ****,C03,X 0000,C03,1 Function: To set the reporting uploading method. SMS Response: TrackerID,C03,OK X = 0, Auto Event Report (default) X = 1, Event report need server’s confirmation by AFF command 19 7. Tracking 7.1. Track by SMS Description SMS Command Example Track on Demand Summarised ****,A00 0000,A00 Function: Tracker sends SMS location report to the mobile phone number that sent the SMS command. Track on Demand – Google Link ****,A01 0000,A01 Function: Tracker sends SMS location report with an http link. Click on the link and it will direct to Google Map on your mobile phone. E.g. http://maps.google.com/maps?f=q&hl=en&q=22.540103,114.082329&ie=UTF8&z=16&iwloc=addr&om=1 NOTE: Only smart phones and PDA support this function. Track by Time Interval via SMS ****,A02,X,T 0000,A02,10,5 Function: Set an interval for the tracker to send SMS location report constantly SMS Response: A02,OK X = 0, turn OFF tracking function X = to set interval (in minute). T = Set the number of SMS location reports to be received from the tracker within the SMS Report Interval. 7.2. Google Earth and Google Maps You may find Google Earth provided in the Application/Manual Guide CD. Start Google Earth (for more information about Google Earth, please refer to http://earth.google.com) or Go to http://maps.google.com from your Internet browser. Enter the latitude and longitude that you have received from the tracker by SMS and click Search button. Google Earth or Google Maps will search and display the location. E.g. When you receive: Latitude = 22 32 40.05N Longitude = 114 04 57.74E. Type as the following picture shows: NOTE: you should input the latitude and longitude as: 22 32 40.05N 114 04 57.74E Google Earth and Google Maps will locate and display your location: 20 Google Earth: Google Maps: 21 8. Event Codes Table Event Code Event 1 SOS/Input 1 Active Default SMS Header (max 16 bytes) SOS 2 Input 2 Active 3 Default GPRS Flag Default SMS Flag Default Picture Flag Y Y (First authorized phone number only) Y In2 Y N N Input 3 Active In3 Y N N 4 Input 4 Active In4 Y N N 5 Input 5 Active In5 Y N N 9 SOS/Input 1 Inactive N N N 10 Input 2 Inactive N N N 11 Input 3 Inactive N N N 12 Input 4 Inactive N N N 13 Input 5 Inactive N N N 17 Low Battery Low Battery N N N/A 18 Low External Power Low Power N N N/A 19 Speeding Speeding Y Y N 20 Enter Geo-fence Enter GEO Y Y N 21 Exit Geo-fence Exit GEO Y Y N 22 External Power On Power On N N N 23 External Power Off Power Off N N N/A 24 No GPS Signal No Fix N N N/A 25 Get GPS Signal Fix N N N/A 26 Enter Sleep Enter Sleep N N N/A 27 Exit Sleep Exit Sleep N N N/A 28 GPS Antenna Cut Antenna Cut N N N 29 Device Restart Reboot N N N/A 30 Impact Impact Y N N 31 Heartbeat Report (only for GPRS) Y N/A N/A 32 Direction Change Report Heading Change Y N N/A 33 Distance Interval Report Distance Y N N/A 34 Current Location Report Now A/A A/A N/A 35 Time Interval Report Interval A/A A/A N/A 36 Tow Alert Tow Y N N 37 RFID (only for GPRS) Y N/A N 65 Press Input 1 (SOS) to Call / N/A N N/A 22 66 Press Input 2 to Call / N/A N N/A Event Code Event Default SMS Header (max 16 bytes) Default GPRS Flag Default SMS Flag Default Picture Flag 67 Press Input 3 to Call / N/A N N/A 68 Press Input 4 to Call / N/A N N/A 69 Press Input 5 to Call / N/A N N/A 70 Reject Incoming Call / N/A Y N/A 71 Call for SMS Location Report / N/A Y N/A 72 Auto Answer Incoming Call / N/A N N/A 73 Listen-in (voice monitoring) / N/A N N/A 9. Troubleshooting Problem: Tracker unable to turn ON Possible Cause: Resolution: The power button is not pressed long enough Press and hold the power button for 3 -5 seconds. Battery needs to be charge Recharge the battery for 3 hours. Problem: Tracker unable to reply with SMS Possible Cause: Resolution: Green LED is flashing (1 second ON and 2 seconds OFF). Tracker is not having GSM network. GSM network is slow. Some GSM networks slow down during peak period or when they have technical problems. Tracker is in Sleep or Power Saving mode. Turn OFF Sleep or Power Saving mode. Wrong password or commands send by SMS. Correct the password or command. SIM card in the tracker has run out of credit. Replace or top up the SIM card. 23 Problem: Green LED is Flashing (1 second ON and 2 seconds OFF) Possible Cause: Resolution No GSM Signal. Check with a mobile phone to see if there is GSM signal in the area or try to call the tracker to see if there is any response. No SIM card. Insert a working SIM card. Ensure the SIM card lock (PIN code) is turn OFF. Check the SIM card using a mobile phone. SIM card has expired. Check the SIM card using a mobile phone. Replace SIM card if needed. Ensure the SIM card lock (PIN code) is turn OFF. SIM card has PIN code set (lock). Delete the PIN code by insert to a mobile phone. SIM card is warped or damaged. If reinserting the SIM card does not help, replace the SIM card. Roaming not enable. If you are in a different country, the SIM card must have roaming access service enable. Battery is low. Recharge the tracker and the GSM will start working. Problem: Blue LED is Flashing (1 second ON and 2 seconds OFF) or the SMS received starts with ‘Last….’ Possible Cause: Resolution: No GPS Signal Move the tracker to an open area for better GPS signal & connectivity. Heavy rain, tall buildings and indoor areas might disrupt or terminate GPS reception. GPS signal is weak Move the tracker to an open area for better GPS signal & connectivity. Battery is low Recharge the tracker and the GPS will start working. 10. Contacts Technical support : +65 6298 0571 Email : [email protected] Corporate Sales : +65 6298 0571 Email : [email protected] JustBuy (Show Room) : +65 6339 2921 Unico Tracker Website : www.unico.sg 24 11. APNs Local Telecom APN - Prepaid APN - Postpaid Singtel hicard internet Starhub shppd shwap MobileOne miworldmcard sunsurf NOTE: APNs are provided by your Telecom Service Provider. Information in the table may change without prior notice. NOTE: If tracker is using overseas SIM card, it is required to change the APN provided by the abroad Telecom Service Provider. 25