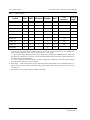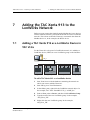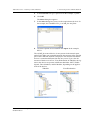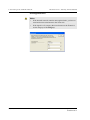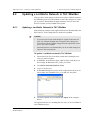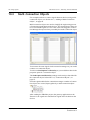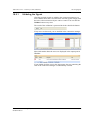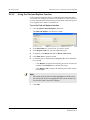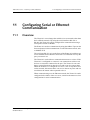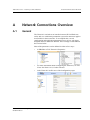
1
TAC Vista
TAC Pangaea
WorkStation
TAC Xenta Server – Gateway
Technical Manual
TAC Vista
TAC Xenta Server – Gateway
Technical Manual
Copyright © 2009-2011 Schneider Electric Buildings AB. All rights reserved.
This document, as well as the product it refers to, is only intended for licensed users. Schneider Electric Buildings AB owns the copyright of
this document and reserves the right to make changes, additions or deletions. Schneider Electric Buildings AB assumes no responsibility for
possible mistakes or errors that might appear in this document.
Do not use the product for other purposes than those indicated in this document.
Only licensed users of the product and the document are permitted to use the document or any information therein. Distribution, disclosure,
copying, storing or use of the product, the information or the illustrations in the document on the part of non-licensed users, in electronic or
mechanical form, as a recording or by other means, including photo copying or information storage and retrieval systems, without the express
written permission of Schneider Electric Buildings AB, will be regarded as a violation of copyright laws and is strictly prohibited.
Trademarks and registered trademarks are the property of their respective owners.
TAC Xenta Server – Gateway, Technical Manual
Contents
Contents
INTRODUCTION
1
About this Manual
11
1.1
1.2
1.3
1.4
1.5
1.6
11
13
14
14
14
15
Product Features.........................................................................................................
Structure .....................................................................................................................
Typographic Conventions ..........................................................................................
Prerequisites ...............................................................................................................
New in This Edition ...................................................................................................
Related Documents ....................................................................................................
GETTING STARTED
2
3
4
Planning the Project
19
2.1
2.1.1
2.1.2
2.2
2.3
2.3.1
2.3.2
2.4
2.4.1
2.4.2
2.4.3
2.5
2.5.1
2.5.2
2.6
2.6.1
19
19
19
20
21
21
21
22
23
24
25
26
26
26
27
27
The Function of the TAC Xenta 913..........................................................................
Gateway......................................................................................................................
TAC Xenta Server in TAC Vista ...............................................................................
The Target System .....................................................................................................
Surveying the Target System Installation ..................................................................
Surveying the Target Equipment ...............................................................................
Checking the Operation of the Target Devices ..........................................................
Understanding the Example System ..........................................................................
Units ...........................................................................................................................
Devices .......................................................................................................................
The Example in the Manual .......................................................................................
Developing the Project ...............................................................................................
TAC XBuilder ............................................................................................................
TAC Xenta 913 Folder Structure ...............................................................................
Creating a Project Folder on the Hard Disk ...............................................................
Folder Structure..........................................................................................................
Creating a Project
29
3.1
3.2
3.3
3.4
29
30
33
34
The User Interface......................................................................................................
Creating a Project .......................................................................................................
Configuring the TAC Xenta 913 Object ....................................................................
Saving the Project ......................................................................................................
Configuring Modbus Communication
35
4.1
4.1.1
4.2
4.2.1
36
36
37
38
Adding a Modbus Master Interface............................................................................
Adding a Modbus Master Interface............................................................................
Creating a Device Template.......................................................................................
Creating a Device Template.......................................................................................
Schneider Electric Buildings AB, June 2011
04-00124-06-en
5 (184)
Contents
4.2.2
4.2.3
5
6
7
8
9
TAC Xenta Server – Gateway, Technical Manual
Adding Signals for a Device.......................................................................................
Adding a Device to a Communications Interface.......................................................
39
41
Creating the Logical Structure
43
5.1
5.1.1
5.1.2
43
44
45
Creating the Folder Structure .....................................................................................
Renaming the Root Folder..........................................................................................
Adding a Folder..........................................................................................................
Visualizing Signals
47
6.1
6.2
6.2.1
6.3
6.3.1
6.4
6.5
47
48
50
51
51
54
54
Workflow for Visualizing Signals..............................................................................
Adding a Signal ..........................................................................................................
Changing the Unit of a Signal ....................................................................................
Adding a Values Page ................................................................................................
Adding a Values Page ................................................................................................
Verifying the Modbus Communication......................................................................
Monitoring the Communication .................................................................................
Adding the TAC Xenta 913 to the LonWorks Network
55
7.1
55
Adding a TAC Xenta 913 as a LonWorks Device in TAC Vista...............................
Connecting to the LonWorks Network
59
8.1
8.1.1
8.2
8.2.1
8.3
8.3.1
8.3.2
8.3.3
8.4
8.4.1
8.4.2
59
60
63
63
64
65
66
68
71
71
71
Inserting a LonWorks Network in TAC XBuilder .....................................................
Inserting a LonWorks Network in TAC XBuilder .....................................................
Updating a LonWorks Network in TAC XBuilder ....................................................
Updating a LonWorks Network in TAC XBuilder ....................................................
Connecting Signals to and from LON ........................................................................
Adding Signal Objects for RTU4 ...............................................................................
Adding a Connection Object ......................................................................................
Adding a Multi-Connection Object ............................................................................
Verifying the Gateway Application............................................................................
Monitoring the LonWorks Communication ...............................................................
Verifying the Gateway Application............................................................................
Creating SNVTs
73
9.1
9.1.1
9.1.2
73
74
76
Adding a Controller Object and a SNVT ...................................................................
Adding a Controller Object and a SNVT ...................................................................
Connecting a Signal to an Output SNVT ...................................................................
REFERENCE
10 Using Signals
10.1
10.1.1
10.1.2
10.1.3
10.2
10.2.1
10.3
10.3.1
10.3.2
81
Defining SNVTs and Controller Objects ...................................................................
Adding SNVTs in the TAC Xenta 913.......................................................................
Output SNVTs ............................................................................................................
Input SNVTs...............................................................................................................
Connection Objects ....................................................................................................
Adding more Output Signals ......................................................................................
Multi-Connection Objects ..........................................................................................
Validating the Signals.................................................................................................
Using the Find and Replace Function ........................................................................
11 Configuring Serial or Ethernet Communication
11.1
6 (184)
81
81
83
85
87
87
88
89
90
91
Overview ....................................................................................................................
91
Schneider Electric Buildings AB, June 2011
04-00124-06-en
TAC Xenta Server – Gateway, Technical Manual
11.2
11.3
11.4
11.5
11.5.1
11.6
11.7
11.8
11.9
11.9.1
11.9.2
Contents
The Communications Interface ..................................................................................
The Device Templates................................................................................................
Device Template File Format.....................................................................................
Working with Existing Device Templates .................................................................
Opening an Existing Device Template ......................................................................
Updating the Devices in a TAC XBuilder Project .....................................................
Replacing a Device Template File .............................................................................
Device Template Not Found ......................................................................................
Enumerations..............................................................................................................
Creating enumeration .................................................................................................
Using enumeration .....................................................................................................
12 Working with Third-party Communication Diagnostics
12.1
12.2
12.2.1
12.3
92
93
94
95
95
96
97
97
98
98
98
99
Connecting a Diagnostics Terminal ........................................................................... 99
Testing Target Communications ................................................................................ 100
Value Exchange Commands ...................................................................................... 100
Diagnosing Incorrect Target Communications .......................................................... 104
APPENDIX
A
Network Connections Overview
A.1
A.2
A.3
A.4
B
109
General .......................................................................................................................
Basic TCP/IP Settings ................................................................................................
Application Server Setting – HTTP ...........................................................................
Network Management Settings – SNMP ...................................................................
Protocols
B.1
B.1.1
B.1.2
B.1.3
B.1.4
B.1.5
B.2
B.2.1
B.2.2
B.2.3
B.2.4
B.3
B.3.1
B.3.2
B.3.3
B.3.4
B.3.5
B.4
B.4.1
B.4.2
B.4.3
B.5
B.5.1
B.5.2
117
Modbus Serial Line Master ........................................................................................
Modbus Master Networks ..........................................................................................
Modbus Master Interface ...........................................................................................
Modbus Slave Device ................................................................................................
Modbus I/O Signals....................................................................................................
The Modbus Device Editor ........................................................................................
Modbus Serial Line Slave ..........................................................................................
Modbus Slave Networks ............................................................................................
Modbus Slave Devices ...............................................................................................
Pseudo Slave Devices ................................................................................................
Modbus I/O Signals....................................................................................................
Modbus TCP Client....................................................................................................
Modbus TCP Networks..............................................................................................
Modbus TCP Interface ...............................................................................................
Modbus Slave Devices ...............................................................................................
Modbus I/O Signals....................................................................................................
The Modbus Device Editor ........................................................................................
BACnet IP (Internet Protocol) ...................................................................................
BACnet IP Networks..................................................................................................
BACnet IP Interface ...................................................................................................
BACnet Object I/O Signals ........................................................................................
BACnet MS/TP (Master Slave/Token Passing) .........................................................
BACnet MS/TP Networks..........................................................................................
BACnet MS/TP Interface ...........................................................................................
Schneider Electric Buildings AB, June 2011
04-00124-06-en
109
112
114
115
117
118
119
120
122
123
127
128
129
130
132
136
137
138
139
140
141
145
146
147
150
152
152
153
7 (184)
Contents
B.5.3
B.5.4
B.6
B.6.1
B.6.2
B.6.3
B.6.4
B.7
B.7.1
B.7.2
B.7.3
B.7.4
B.8
B.8.1
B.8.2
B.8.3
B.8.4
B.8.5
B.8.6
B.8.7
TAC Xenta Server – Gateway, Technical Manual
BACnet Target Devices..............................................................................................
BACnet Object I/O Signals ........................................................................................
BACnet PTP (Point To Point) ....................................................................................
BACnet PTP Networks...............................................................................................
BACnet PTP Interface................................................................................................
BACnet Target Devices..............................................................................................
BACnet Object I/O Signals ........................................................................................
M-Bus Metering .........................................................................................................
M-Bus Metering Networks.........................................................................................
M-Bus Metering Interface ..........................................................................................
M-Bus Meters.............................................................................................................
M-Bus I/O Signals......................................................................................................
Clipsal C-Bus Lighting Control..................................................................................
C-Bus Lighting Networks...........................................................................................
C-Bus Lighting Interface............................................................................................
C-Bus Application Pseudo-Devices ...........................................................................
C-Bus I/O Signals.......................................................................................................
Multiple Write-Only Signals Per Group Variable......................................................
Multiple Read-Only Signals Per Group Variable.......................................................
Read/Write Signal For A Group Variable ..................................................................
155
156
158
159
160
162
163
165
166
167
169
171
174
175
176
177
178
179
180
180
Index
181
8 (184)
Schneider Electric Buildings AB, June 2011
04-00124-06-en
INTRODUCTION
1
About this Manual
TAC Xenta Server – Gateway, Technical Manual
1
1 About this Manual
About this Manual
This manual describes a particular process. For information on certain
products, we refer you to the manual for the product in question.
For information on how to install software, we refer you to the instructions delivered with the software.
For information on third party products, we refer you to the instructions
delivered with the third party product.
If you discover errors and/or unclear descriptions in this manual, please
contact your Schneider Electric representative.
Notes
1.1
•
We are continuously improving and correcting our documentation. This manual may have been updated.
•
Please check ExchangeOnline at http://extranet.tac.com for the
latest version.
Product Features
The Xenta Server family consists of different products:
•
TAC Xenta 511,
•
TAC Xenta 527,
•
TAC Xenta 527-NPR,
•
TAC Xenta 555,
•
TAC Xenta 701,
•
TAC Xenta 711,
•
TAC Xenta 721,
•
TAC Xenta 731, and
•
TAC Xenta 913.
Xenta Servers are equipped with several features; the major features are
defined in the following table:
Schneider Electric Buildings AB, June 2011
04-00124-06-en
11 (184)
1 About this Manual
TAC Xenta Server – Gateway, Technical Manual
Table 1.1: Major features
Product
LON
Xenta 511
x
Xenta 527
x
Xenta 527-NPR
I/NET
MicroNet
x
Xenta 701
Xenta
Supp.b
Weba
x
C
x
x
C
x
x
x
Xenta 555
I/O
Modules
ModBus
S
x
x
C
x
x
ST
10
Xenta 711
x
x
C
10
x
Xenta 721
x
x
ST
20
x
Xenta 731
x
x
x
C
20
x
Xenta 913c
x
x
x
S
x
x
a. S – Service. Means that the web interface is automatically generated in XBuilder and only contains values
in value pages and is aimed for commissioning and service. It is not possible to have any end-user web
content, such as graphics, trend viewers, alarm viewers or value pages.
T – Time Object Pages. Means that Time Object Pages can be added to the XBuilder project. These will
only appear for Xenta Servers 701/721 in TAC Vista Workstation and can be used to control Xenta Server
time charts from Vista Workstation
C – Custom. Means that the web interface is totally configurable in XBuilder; navigation and all features
for creating a full end-user web are available.
b. Xenta Supp. – Xenta 280/300/401 support. Means that Xenta 280/300/401 can be installed on the LonWorks network beneath a Xenta 700 and are fully supported by both the Xenta 700 and TAC Vista on top
of Xenta 700.
c. The Xenta 913 also supports BacNet, M-Bus, and C-Bus.
12 (184)
Schneider Electric Buildings AB, June 2011
04-00124-06-en
TAC Xenta Server – Gateway, Technical Manual
1.2
1 About this Manual
Structure
The manual is divided into the following parts:
•
Introduction
The Introduction section contains information on how this manual
is structured and how it should be used to find information in the
most efficient way.
•
Getting Started
The Getting Started section contains a step-by-step description of
how to engineer or carry out different tasks. It also gives you
guided instructions on how to complete a sample project. If you
want more information, see the corresponding chapter in the Reference section of the manual.
•
Reference
The Reference section contains more comprehensive information
about various parts of the Getting Started section. It also provides
you with information on alternative solutions not covered by the
Getting Started section.
Schneider Electric Buildings AB, June 2011
04-00124-06-en
13 (184)
1 About this Manual
1.3
TAC Xenta Server – Gateway, Technical Manual
Typographic Conventions
Throughout the manual the following specially marked texts may occur.
!
Warning
•
Alerts you that failure to take, or avoid, a specific action might
result in physical harm to you or to the hardware.
Caution
•
Alerts you to possible data loss, breaches of security, or other
more serious problems.
Important
•
Alerts you to supplementary information that is essential to the
completion of a task.
Note
•
Alerts you to supplementary information.
Tip
•
1.4
Alerts you to supplementary information that is not essential to
the completion of the task at hand.
Prerequisites
To be able to profit from the contents in this manual, you are recommended to read the following manuals:
1.5
•
Classic Networks, Technical Manual, and/or
•
LNS Networks, Technical Manual
•
TAC Xenta Server – TAC Networks, Technical Manual, and
•
TAC Xenta Server – Web Server, Technical Manual.
New in This Edition
•
14 (184)
The chapter about configuring the TAC Xenta 913 has been
moved to TAC Xenta 500/700/911/913, Product Manual.
Schneider Electric Buildings AB, June 2011
04-00124-06-en
TAC Xenta Server – Gateway, Technical Manual
1.6
1 About this Manual
Related Documents
•
Classic Networks, Technical Manual
Part No.: 04-00015
•
LNS Networks, Technical Manual
Part No.: 04-00016
•
TAC Software, Installation Manual
Part No.: 04-00001
•
TAC Xenta 500/700/911/913, Product Manual
Part No.: 04-00071
•
TAC Xenta Server – TAC Networks, Technical Manual
Part No.: 04-00121
•
TAC Xenta Server – Web Server, Technical Manual
Part No.: 04-00122
•
TAC Xenta Server – Controller , Technical Manual
Part No.: 04-00123
Schneider Electric Buildings AB, June 2011
04-00124-06-en
15 (184)
1 About this Manual
16 (184)
TAC Xenta Server – Gateway, Technical Manual
Schneider Electric Buildings AB, June 2011
04-00124-06-en
GETTING STARTED
2
Planning the Project
3
Creating a Project
4
Configuring Modbus
Communication
5
Creating the Logical Structure
6
Visualizing Signals
7
Adding the TAC Xenta 913 to the
LonWorks Network
8
Connecting to the LonWorks
Network
9
Creating SNVTs
TAC Xenta Server – Gateway, Technical Manual
2
Planning the Project
2.1
The Function of the TAC Xenta 913
2.1.1
Gateway
2 Planning the Project
The TAC Xenta 913 can act as a gateway between LonWorks and
I/NET systems and the targeted third party system. Using the applicable
communications protocol, the Xenta 913 can read values from the target
system and make them available to the LonWorks and I/NET systems.
Similarly, LonWorks and I/NET variables can be written to the target
system. Data can also be exchanged between devices on the LonWorks
and I/NET network.
The Ethernet connection is used for configuring the Xenta 913, for diagnosing target communications, and may also be used to exchange variables with other IP devices.
2.1.2
TAC Xenta Server in TAC Vista
The TAC Xenta 913 can also act as a Xenta Server and as such provide
TAC Vista with all information available on a LonWorks network, an I/
NET network and a targeted third party system network. Using the
applicable communications protocol, the Xenta 913 can read values
from the target system and make them available to TAC Vista. Similarly, variables can be written to the target systems.
The procedures for configuring communications to third party systems
when running the Xenta 913 as a Xenta Server in TAC Vista are the
same as when you use the Xenta 913 as a gateway. For more information about configuring a Xenta Server in TAC Vista, see TAC Xenta
Server – TAC Networks, Technical Manual.
Schneider Electric Buildings AB, June 2011
04-00124-06-en
19 (184)
2 Planning the Project
2.2
TAC Xenta Server – Gateway, Technical Manual
The Target System
The TAC Xenta 913 includes interface drivers for a number of serial or
Ethernet communication protocols. Any target equipment that can communicate by means of an RS-232/485 serial network or Ethernet using
one of the supported protocols can be used with the Xenta 913.
The available types of target networks are outlined in Fig. 2.1.
Modbus Master
Slave
Slave
Xenta 913
RS-485 A
RS-232 A
Master
10Base-T Ethernet
BACnet IP Device Network
BACnet MS/TP Network
Device
BACnet or other Network
Slave
M-Bus
Slave
Slave
Device
Clipsal C-Bus
LON or I/NET Control System
LON or I/NET Control System
Xenta 913
RS-232 A
M-Bus Serial
Interface
M-Bus Network
RS-232 A
Clipsal C-Bus
PC Interface
C-Bus Network
Device
Device
LON-I/NET
LON Control System
Xenta 913
Value exchange
Value exchange
Xenta 913
Value exchange
Value exchange
LAN
Slave
LON or I/NET Control System
Xenta 913
10Base-T Ethernet
Xenta 913
I/NET Control System
RTU or ASCII
RTU or ASCII
Meter
Slave
BACnet PTP
LON or I/NET Control System
Device
Slave
BACnet MS/TP
LON or I/NET Control System
Device
10Base-T Ethernet
RTU or ASCII
Master
BACnet IP
LAN
Modbus Network
RTU or ASCII
Slave
10Base-T Ethernet
Value exchange
Slave
RS-485 A
Modbus Network
RS-485
Extender
RTU or ASCII
Value exchange
Value exchange
Value exchange
Modbus Network
Xenta 913
Xenta 913
RS-485 A
Value exchange
LON or I/NET Control System
LON or I/NET Control System
Xenta 913
Slave
Modbus TCP
Modbus Slave
LON or I/NET Control System
Meter
Meter
Fig. 2.1: Overview of the available target networks.
The protocols used for the networks in Fig. 2.1 are described in detail in
Appendix B, “Protocols”, on page 117.
Note
•
20 (184)
In addition to the networks described in Fig. 2.1, other combinations are possible. For example, you can have a LonWorks network, a Modbus master and a Modbus TCP client connected to
the Xenta 913 at the same time.
Schneider Electric Buildings AB, June 2011
04-00124-06-en
TAC Xenta Server – Gateway, Technical Manual
2.3
2 Planning the Project
Surveying the Target System Installation
Normally, the target system is installed and commissioned before you
install the Xenta 913. Of course, it is possible to install the Xenta 913
first, but it cannot be fully commissioned until the target equipment is
operational. So, in most cases, the first step is to survey an existing
installation and verify the operation of the target devices.
2.3.1
Surveying the Target Equipment
A site survey should be carried out to locate and identify all of the target
devices. Where applicable, the type and address of each slave device
should be identified and a suitable name assigned. For target systems
containing multiple devices, it may be necessary to change each
device’s network address to ensure it can be uniquely identified by the
Xenta 913. Furthermore, any device communications parameters, such
as baud rate, must be set to the same value on each target device, and
recorded for applying to the serial channel of Xenta 913.
Determine the signals that are available by using the available target
device documentation, as well as their associated addresses within the
device. You should also identify other value parameters, such as units
and data format.
2.3.2
Checking the Operation of the Target Devices
Important
•
Many of the problems normally attributed to the Xenta 913 are in
fact caused by incorrect configuration or operation of the target
equipment itself.
Before connecting the Xenta 913, it is important to verify that each of
the target devices is operating correctly.
It is not necessary at this stage to test the target communications. This
can be left until later when the communications cables have been wired
to the Xenta 913.
Schneider Electric Buildings AB, June 2011
04-00124-06-en
21 (184)
2 Planning the Project
2.4
TAC Xenta Server – Gateway, Technical Manual
Understanding the Example System
We are going to create a system for a fictitious company, ACME Inc.,
which has one office bulding as illustrated in Fig. 2.2. The building is a
typical, small two-storey office building, served by packaged roof-top
equipment. The first floor area serves the Entrance Lobby, Accounts,
Marketing, and Senior Management. The second floor area serves Customer Support and Engineering.
Lobby
Engineering
Accounts
Conference Room
Support
Marketing and Management
Fig. 2.2: The ACME building.
22 (184)
Schneider Electric Buildings AB, June 2011
04-00124-06-en
TAC Xenta Server – Gateway, Technical Manual
2.4.1
2 Planning the Project
Units
The building is divided into 2 floors:
First Floor
•
Lobby: Served by a roof-top air handling unit with a constant volume controlling a single zone.
•
Accounts: Served by a roof-top air handling unit with a constant
volume. The roof-top unit has central cooling and heating.
Nine dump dampers control the return air plenum. The space is
divided into control zones – the Accounts area and a conference
room with a secondary air handling.
•
Marketing and Senior Management: Served by a roof-top air handling unit with 9 variable air volume (VAV) units and terminals.
Second Floor
•
Customer Support: Served by a roof-top air handling unit with a
constant volume controlling a single zone.
•
Engineering: Served by a roof-top air handling unit with 6 variable
air volume (VAV) units and terminals.
Lighting control is provided to the entire second floor using a Lonbased lighting controller. In the second floor conference room, the dimmable incandescent lights and the window blinds are under automatic
control. In the Engineering area, there is a compressed air system that is
monitored and controlled. There is also a neon sign on the roof controlled by a Lon-based push button.
Schneider Electric Buildings AB, June 2011
04-00124-06-en
23 (184)
2 Planning the Project
2.4.2
TAC Xenta Server – Gateway, Technical Manual
Devices
In the example, we have simplified the ACME Inc. building as follows:
RTU4
Energy Meter
ACME_Gateway
Fig. 2.3: Simplified ACME building
In the example, the gateway system ACME_Gateway (that is
Xenta 913) works with the following devices.
Modbus
Energy meter
PM710
LonWorks (Second Floor)
RTU4
Xenta 401
I/O-Modules
Xenta 422
Xenta 452
Fig. 2.4: The devices.
24 (184)
•
The energy meter is a PM710 and measures the energy usage of
the compressors.
•
The roof-top unit RTU4 is illustrated by a Xenta 401 with I/O
modules.
Schneider Electric Buildings AB, June 2011
04-00124-06-en
TAC Xenta Server – Gateway, Technical Manual
2 Planning the Project
TAC Vista Device Structure
The LonWorks network is called ACME_Inc after the company. The
device structure is created in TAC Vista. Since the building has two
floors, the network is designed with its devices divided into two Xenta
groups named 1st_Floor and 2nd_Floor. The device RTU4 is located on
the second floor and belongs to the Xenta group 2nd_Floor.
For instructions on how to create this device structure see Classic Networks, Technical Manual.
A device structure can also be created using LNS Networks, Technical
Manual. LNS networks are used when the LonWorks network communication uses bound SNVTs.
TAC Xenta 913
The Xenta 913 includes a gateway application that allows various values to be transferred between the devices. A presentation of the values
is accessed through a standard web browser, provided by a built-in web
server in the Xenta 913.
Energy Meter PM710
The energy meter PM710 communicates with the Xenta 913 using the
Modbus communications protocol. The Xenta 913 is the communications master and the energy meter is a slave. For more information about
configuring the energy meter, see the PM710 documentation.
2.4.3
The Example in the Manual
To help demonstrate the TAC Xenta 913 configuration process, a simple example system is described throughout this document. In the example, the Xenta 913 is configured as a Modbus Master and it
communicates to the energy meter which runs as a Modbus slave.
The devices are connected to each other as follows:
TCP/IP
TCP/IP
ACME_Gateway
Modbus
Energy_Meter
LON
RTU4
M1
M3
2nd_Floor
Fig. 2.5: The device structure.
The Xenta 913 will be added as a LonWorks device (LWD) on the LonWorks network, as described in Chapter 7, “Adding the TAC Xenta 913
to the LonWorks Network”, on page 55.
Schneider Electric Buildings AB, June 2011
04-00124-06-en
25 (184)
2 Planning the Project
TAC Xenta Server – Gateway, Technical Manual
2.5
Developing the Project
2.5.1
TAC XBuilder
TAC XBuilder is a programming tool for creating the gateway application for the Xenta 913. Connections between signals in the device structure are created using XBuilder. The signals can also be displayed on
different web pages in a web browser. The gateway application is subsequently sent to Xenta 913 and the transferring of data between the
devices is then handled by the Xenta 913.
2.5.2
TAC Xenta 913 Folder Structure
For the Xenta 913, the folder structure for the gateway application and
the web pages is created using XBuilder. The folder structure contains
the connections between the devices’ signals and the presentation part
of the system, that is the web pages. In this manual, we use the sample
project ACME and add the folder structure for the presentation. To be
able to create the gateway application and the web pages, the device
structure (see Fig. 2.5) is assumed to be in place. This is however not
necessary. The gateway application can be made in advance, that is
before the devices and the LonWorks network are in place. For more
information about developing a project without a network in place, see
TAC Xenta Server – TAC Networks, Technical Manual.
26 (184)
Schneider Electric Buildings AB, June 2011
04-00124-06-en
TAC Xenta Server – Gateway, Technical Manual
2 Planning the Project
2.6
Creating a Project Folder on the Hard Disk
2.6.1
Folder Structure
A project for a complete system is best placed in a directory containing
the folders and subfolders similar to the figure below.
Fig. 2.6: The folder structure on the hard disk.
This structure should be prepared when the device structure of the
project is created, as described in Classic Networks, Technical Manual
or LNS Networks, Technical Manual. The whole structure, or parts of it,
should be in place at this point.
In the text that follows, we use C:\ProjectACME as the project folder.
The Vista database (containing the network structure) requires a folder
of its own. The folder is a subfolder to ProjectACME, and it is called
VistaDb.
In the course of the project, the folder structure is enlarged, as new folders are added when setting up an XBuilder project.
A short description follows of the intended use for the folders and their
contents:
•
DeviceDescr – .mta files and .xif files for the LonWorks devices.
•
Documentation – general information, for example, useful manuals, data sheets, functional descriptions, I/O lists and so on.
•
VistaDb – the Vista database.
•
Graphics – .ogc files (graphics). Not used by the Xenta 913.
•
BackupLM – backup files of the LonMaker database, in case an
LNS network is in use (not included in Fig. 2.6).
The XBuilder project requires a folder of its own. The folder is automatically created when a new XBuilder project is created.
Schneider Electric Buildings AB, June 2011
04-00124-06-en
27 (184)
2 Planning the Project
28 (184)
TAC Xenta Server – Gateway, Technical Manual
Schneider Electric Buildings AB, June 2011
04-00124-06-en
TAC Xenta Server – Gateway, Technical Manual
3
3 Creating a Project
Creating a Project
The connections between signals in the different devices are made using
XBuilder, the programming tool for creating the Xenta 913 gateway
application. The XBuilder project for the Xenta 913, in the example
ACME_Gateway, is stored in the C:\ProjectACME folder.
3.1
The User Interface
Read the User Interface chapter in the TAC XBuilder Help to learn more
about the TAC XBuilder user interface and terminology.
Fig. 3.1: the User Interface chapter in the TAC XBuilder Help.
Schneider Electric Buildings AB, June 2011
04-00124-06-en
29 (184)
3 Creating a Project
3.2
TAC Xenta Server – Gateway, Technical Manual
Creating a Project
Ensure that XBuilder is installed according to TAC Software, Installation Manual.
To create a project
30 (184)
1
On the Start menu, point to Programs, point to Schneider Electric, point to TAC Tools, and then click XBuilder.
2
On the File menu, click New Project.
3
In the Project name box, type the name of the project. In the
example “ACME_Gateway”.
4
In the Project Location box, browse to the required folder. In the
example, C:\ProjectACME.
5
Click OK.
Schneider Electric Buildings AB, June 2011
04-00124-06-en
TAC Xenta Server – Gateway, Technical Manual
3 Creating a Project
6
In the Project template list ensure that the required project template is selected. In the example, Xenta 913 Project.
7
Click OK.
The Settings dialog box appears.
8
In the Description box, type a descriptive text. In the example,
“Project for ACME Gateway”.
9
In the Measurement system list, click the required measurement
system. In the example, U.S.
Schneider Electric Buildings AB, June 2011
04-00124-06-en
31 (184)
3 Creating a Project
TAC Xenta Server – Gateway, Technical Manual
10 Select the Send Project backup file to target device check box.
11 Click OK.
The project has now been created. In the project folder on the hard disk,
C:\ProjectACME, a new subfolder, ACME_Gateway, is present.
ACME_Gateway in turn contains several subfolders.
32 (184)
Schneider Electric Buildings AB, June 2011
04-00124-06-en
TAC Xenta Server – Gateway, Technical Manual
3.3
3 Creating a Project
Configuring the TAC Xenta 913 Object
The gateway application created in XBuilder is sent to the Xenta 913.
As the communication takes place on the TCP/IP network, XBuilder
needs to know where to send the project. This information, that is, the
IP address of the Xenta 913 and other relevant information, is entered
in the XBuilder project. In this event, the Xenta 913 is also referred to
as the target system.
When you start a new project, the network pane is supplied with a
default network, consisting of an IP Backbone channel and a
TAC Xenta 913 object.
To configure the TAC Xenta 913 object
1
In XBuilder, in the network pane, click IP BackboneTAC_Xenta_913.
2
In the properties pane, under General, in the IP Address/DNS
Name box, type the IP address of the Xenta 913. In the example,
“11.158.12.211”.
3
In the Password box, type the password set in the Xenta 913. In
the example, “root”.
Important
•
The user name must always be “root”. The password must be the
same as in the Xenta 913. If the password is changed using the
configuration page on the Xenta 913 web site, the same information must be typed in the Password box, if it is not it is not possible to send the project from XBuilder to the Xenta 913.
4
Under TCP/IP Settings, in the Web Site Description box, type
the name of the web site. In the example “ACME Gateway”.
The name of the web site appears when you access the Xenta 913
through the web browser. Therefore it is important to have unique
names for each and every Xenta 913.
Schneider Electric Buildings AB, June 2011
04-00124-06-en
33 (184)
3 Creating a Project
TAC Xenta Server – Gateway, Technical Manual
Notes
3.4
•
Other parameters for the Xenta 913 are configured at later stages
in the project.
•
For more information about the Xenta 913 configuration, see
TAC Xenta 500/700/911/913, Product Manual.
Saving the Project
In XBuilder you can now continue to develop the project and its presentation for the Xenta 913. Before you continue, save the project.
To save the project
•
On the File menu, click Save.
Important
•
34 (184)
To prevent loss of data if the computer should fail, save the
project from time to time in the course of the project.
Schneider Electric Buildings AB, June 2011
04-00124-06-en
TAC Xenta Server – Gateway, Technical Manual
4
4 Configuring Modbus Communication
Configuring Modbus Communication
The Xenta 913 can exchange data with devices on different networks.
A gateway application within the Xenta 913 enables exchange of data
between devices on the different networks. For example, by using the
serial interfaces RS-232 or RS-485, the Xenta 913 can be configured for
communicating using a serial protocol such as Modbus. Data from the
Modbus device can then be sent to a LonWork device and vice versa.
The signals that are to be exchanged between the Xenta 913 and the
remotely controlled device are specified using TAC Device Editor. This
is included in the XBuilder installation and creates template files that
represent the device. These files are then used in the XBuilder project.
A new folder is installed together with the device editor, and is located
at C:\Program files\TAC\Device Library. The folder is for storing template files created by the device editor for various devices.
In the following example, a PM710 energy meter is connected to the
Xenta 913 (to the RS-485 A serial port) so that the energy usage can be
inspected. For more information about the devices, see Chapter 2,
“Planning the Project”, on page 19.
The PM710 energy meter is controlled remotely by using the Modbus
protocol. The Xenta 913 is configured as a Modbus master which means
that the Xenta 913 requests data from the energy meter. The meter acts
as a Modbus slave, which means that it sends the required data to the
master at the request of the master.
For more information about configuring serial communication, see
Chapter 11, “Configuring Serial or Ethernet Communication”, on
page 91.
Schneider Electric Buildings AB, June 2011
04-00124-06-en
35 (184)
4 Configuring Modbus Communication
TAC Xenta Server – Gateway, Technical Manual
4.1
Adding a Modbus Master Interface
4.1.1
Adding a Modbus Master Interface
You enable the serial communication on the RS-485 A port on the
Xenta 913 by adding a communications interface in your XBuilder
project, in the example, a Modbus Master interface.
To add a Modbus Master interface
36 (184)
1
In XBuilder, in the network pane, right-click RS232-485 A.
2
Point to Add, point to Interface, and then click Modbus Master.
3
Type the name of the Modbus Master interface. In the example,
“Modbus_Master”.
4
In the properties pane, under Link, in the Baud Rate list, ensure
that the baud rate for the Modbus interface is correct. In the example, 9600.
Schneider Electric Buildings AB, June 2011
04-00124-06-en
TAC Xenta Server – Gateway, Technical Manual
4 Configuring Modbus Communication
Important
•
4.2
To enable Ethernet communication to a remotely controlled
device you add an interface to the TCP-IP port in XBuilder, for
example a Modbus TCP Client.
Creating a Device Template
A device template is created for every type of device that the Xenta 913
communicates with. Knowledge of the information that is exchanged,
such as boolean signals or registers, must be readily available.
The device template makes the signals you want to use available in your
XBuilder project.
Once the template is created it can be used in any other project that communicates with the same type of device. For more information about
using existing device templates, see Section 11.5, “Working with Existing Device Templates”, on page 95.
Important
•
Read the User Interface chapter in the TAC Device Editor Help
to learn more about the device editor user interface and terminology.
Schneider Electric Buildings AB, June 2011
04-00124-06-en
37 (184)
4 Configuring Modbus Communication
4.2.1
TAC Xenta Server – Gateway, Technical Manual
Creating a Device Template
In the PM710 energy meter, a number of values are to be read and later
be sent to the RTU4 device on the LonWorks network. The Xenta 913
collects this information using the Modbus serial communications interface. Some configuration parameters are also to be sent to the meter.
To create a device template
1
In the network pane, right-click the serial communications interface. In the example, Modbus_Master.
2
Click Create Device Template.
3
In the Specific Data pane, in the Name box, type the name. In the
example, “PM710”.
4
In the Description box, type a descriptive text. In the example,
“Energy meter”.
5
In the general data pane, type information about the device in
question.
6
On the File menu, click Save.
7
In the Save As dialog box, type the name. In the example,
“PM710”.
8
Click Save.
Note
•
38 (184)
[Modbus Ext] is automatically added to the file name for a
device created for a Modbus Master interface.
Schneider Electric Buildings AB, June 2011
04-00124-06-en
TAC Xenta Server – Gateway, Technical Manual
4.2.2
4 Configuring Modbus Communication
Adding Signals for a Device
In the protocol specific pane, signals are configured according to communication needs. The following signals are used in the example and
the manual for the energy meter provides the information about each
signal.
Note
•
This example shows only the signals required for one of the
phases.
Fig. 4.1: The required signals from the PM710 energy meter.
Schneider Electric Buildings AB, June 2011
04-00124-06-en
39 (184)
4 Configuring Modbus Communication
TAC Xenta Server – Gateway, Technical Manual
To add signals for a device
1
In the device editor, in the protocol specific area, on row 3, click
the Name cell, and type the name of the first signal. In the example, “Total_real_power”.
2
In the Description cell, type a descriptive text. In the example,
“Total real power”.
3
In the Number cell, type the register number. In the example,
“44006”.
4
In the Type cell list, click the register type. In the example, 16 bit
Unsigned.
5
In the Gain cell, type the coefficent gain. In the example, “0.01”.
6
In the IO cell list, click the I/O signal direction. In the example, R.
7
In the DataType cell list, click the signal data type. In the example, REAL.
8
In the Category cell list, click the category. In the example,
power.
9
In the Unit cell list, click the required unit. In the example, W.
10 In the Prefix cell list, click the required prefix. In the example, k.
The device editor now appears as follows:
11 In the example, repeat the procedure to add signals for all the signals in Fig. 4.1.
12 Save the device template.
Tip
•
Communications are improved if the signals (register addresses)
are added in sequence in the device editor starting with the lowest number.
13 Quit Device Editor.
For more information on Modbus I/O signals, see Chapter B.1.4, “Modbus I/O Signals”, on page 122.
40 (184)
Schneider Electric Buildings AB, June 2011
04-00124-06-en
TAC Xenta Server – Gateway, Technical Manual
4.2.3
4 Configuring Modbus Communication
Adding a Device to a Communications Interface
After the device template is created, you add a device of that type to the
communications interface in the network pane.
To add a device to the communications interface
1
In the network pane, right-click the communications interface. In
the example, Modbus_Master.
2
Click Add Device.
3
In the Open dialog box, specify device template. In the example,
[Modbus Ext]PM710.dev.
4
Click Open.
The device is inserted in the Network pane with an initial name
suggestion.
5
Type the name of the device. In the example “PM710”.
Note
•
The survey of the target system made during planning of the
project provides the name and address of the device.
6
In the properties pane, in the Description box. type a description
for the device. In the example, “Energy measuring cooling compressors”.
7
In the properties pane, under Link, in the Address box, type the
address of the device. In the example, “1”.
Schneider Electric Buildings AB, June 2011
04-00124-06-en
41 (184)
4 Configuring Modbus Communication
TAC Xenta Server – Gateway, Technical Manual
The signals created for the device appears in the network pane and are
now ready for use.
For widely used equipment, such as the PM710 energy meter, template
files may already be available in the device library.
For more information about the device library and how to use existing
device templates, see Section 11.5, “Working with Existing Device
Templates”, on page 95.
42 (184)
Schneider Electric Buildings AB, June 2011
04-00124-06-en
TAC Xenta Server – Gateway, Technical Manual
5
5 Creating the Logical Structure
Creating the Logical Structure
Once the serial communications interface and the Modbus device have
been inserted into the XBuilder project, it is time to add a folder structure that facilitates the work of the engineer, as well as a logical presentation structure. The latter is visible on the Xenta 913 web site you
connect to using a web browser and is used for communication diagnostics.
The presentation structure consists of folders in which different pages
are placed to provide the user with information.
5.1
Creating the Folder Structure
In the XBuilder project, the gateway application is created in the system
pane. Signals from one device are connected to signals from another
device. The presentation folders for the Xenta 913 web site are also
added, if required. However, in XBuilder more folders are added than
are visible to the user. Folders are also used to create a structure that
facilitates the work of the engineer.
In the following example a folder structure is already in place, as
described in the TAC Xenta Server – TAC Networks, Technical Manual.
Fig. 5.1:
Schneider Electric Buildings AB, June 2011
04-00124-06-en
43 (184)
5 Creating the Logical Structure
5.1.1
TAC Xenta Server – Gateway, Technical Manual
Renaming the Root Folder
The name of the root folder (by default “The site name”) should reflect
what the system displays, such as the name or the function of the
Xenta 913.
To rename the root folder
44 (184)
1
In XBuilder, in the system pane, right-click “The site name” and
click Rename.
2
Type the name. In the example, “ACME_Gateway”.
3
In the properties pane, under General, in the Description box,
type a descriptive text. In the example, “Root folder for
ACME_Gateway”.
Schneider Electric Buildings AB, June 2011
04-00124-06-en
TAC Xenta Server – Gateway, Technical Manual
5.1.2
5 Creating the Logical Structure
Adding a Folder
To add a folder
1
In the system pane, right-click the root folder. In the example,
ACME_Gateway.
2
Point to New and click Folder.
3
Type a name for the new folder. In the example, “Engineering”.
4
In the properties pane, under Page, in the Visible list, click visibility option. In the example, False.
Note
•
By setting Visible to False, the folder will not be visible in the
navigator display on the Xenta 913 web site.
5
Repeat the steps above to create a folder structure as shown.
Tip
•
Each object that is added in XBuilder has a description property.
We recommend that you fill in a descriptive text for each object.
The descriptive text is shown in the Description box of the
object in the properties pane. However, in the following examples there are not always explicit instructions for you to follow
when you fill in the descriptions.
Notes
•
The screen captures in this manual reflect a system where the
folders and objects have been set up for our case study. The folders and objects have been displayed logically.
•
However, as instruction on how to move the folders or objects
have not been given for each procedure, the screen captures may
differ from what you see in your XBuilder project.
•
Use the Move Up and Move Down commands to rearrange the
folders and objects so that they agree with the screen captures.
Now that the folder structure has been created, it is possible to add the
objects needed to perform the required Xenta 913 gateway functionality.
Schneider Electric Buildings AB, June 2011
04-00124-06-en
45 (184)
5 Creating the Logical Structure
46 (184)
TAC Xenta Server – Gateway, Technical Manual
Schneider Electric Buildings AB, June 2011
04-00124-06-en
TAC Xenta Server – Gateway, Technical Manual
6
6 Visualizing Signals
Visualizing Signals
To easily view signal values on the web site, the signals in the system
can be made available. The signals are available on values pages, which
present the values as tables on web pages. Values pages are displayed
in the status viewer when a values page is clicked in the navigator.
After the values pages are created, they are downloaded to the
Xenta 913 and are used for verifying the communication on the serial
connection interface. It is not necessary, or even advisable, to configure
the connections to the LonWorks network at this stage.
6.1
Workflow for Visualizing Signals
The workflow for visualizing signals is as follows:
•
Add signals in the system pane in the XBuilder project by dragging signals from the network pane.
•
Add the values pages.
•
Create the connections between the signals and the values pages.
After the signals have been added and used on the values pages, the signals can be reused for the gateway application, that is, make the connections between the devices.
Note
•
Connecting signals between devices on different networks does
not require signals in the system pane in XBuilder. Signals from
the network pane can be connected directly to values pages and
connection objects. However, to make the examples in this manual easier to follow signals are created in the system pane.
Schneider Electric Buildings AB, June 2011
04-00124-06-en
47 (184)
6 Visualizing Signals
6.2
TAC Xenta Server – Gateway, Technical Manual
Adding a Signal
In the following example, you add the signals from the Modbus device,
that is, the energy meter PM710.
To add a signal
1
In the network pane, drag the required signals to the destination
folder in the system pane.
In the example, drag the following signals from IP BackboneTAC_Xenta_913-Modbus_Master:
•
ComsFail
•
OutsFail
•
InsFail
•
online
to the destination folder ACME_Gateway-Engineering in the system pane.
Tip
•
48 (184)
If you want to add multiple signals, press and hold SHIFT while
you click the required signals.
Schneider Electric Buildings AB, June 2011
04-00124-06-en
TAC Xenta Server – Gateway, Technical Manual
2
6 Visualizing Signals
In the example, drag the signals IP Backbone-TAC_Xenta_913Modbus_Master-PM710-ComsFail and all other signals in the
PM710 in the network pane to the folder ACME_Gateway-Engineering-PM710_Signals in the system pane.
Schneider Electric Buildings AB, June 2011
04-00124-06-en
49 (184)
6 Visualizing Signals
6.2.1
TAC Xenta Server – Gateway, Technical Manual
Changing the Unit of a Signal
The ACME_Gateway project uses the U.S. system of measurement. If
required, any individual signal can be changed to display an SI unit. For
example, the Tot_real_power is displayed in Btu/s but can easily be
changed to display kW instead.
To change the unit of a signal
50 (184)
1
In the system pane, click the required signal. In the example,
ACME_Gateway-Engineering-PM710_Signals-Tot_real_power.
2
In the properties pane, under Measurement System, in the Unit
list, click the required unit. In the example, W.
3
In the properties pane, under Measurement System, in the Unit
Prefix list, click the required prefix. In the example, k.
Schneider Electric Buildings AB, June 2011
04-00124-06-en
TAC Xenta Server – Gateway, Technical Manual
6.3
Adding a Values Page
6.3.1
Adding a Values Page
6 Visualizing Signals
In the following example, you add values pages that display the signals
from the energy meter. These pages can be used for monitoring the
communications.
To add a values page
1
In the system pane, right-click the root folder. In the example,
ACME_Gateway.
2
Point to New, point to Page, and then click Values Page.
3
Type the name of the values page. In the example “Communications”.
4
Select the required signals. In the example, the signals in the
ACME_Gateway-Engineering folder:
•
ComsFail
•
OutsFail
•
InsFail
•
online.
5
Drag the signals to the values page. In the example, the Communications values page.
6
In the example, repeat the procedure to create additional shortcuts.
In the folder ACME_Gateway-Engineering-PM710_Signals,
select ComsFail and online and drag them to the Communications
values page.
Schneider Electric Buildings AB, June 2011
04-00124-06-en
51 (184)
6 Visualizing Signals
TAC Xenta Server – Gateway, Technical Manual
7
In the properties pane, in the description box for the ComsFail_2
shortcut, type “PM710 is offline or incorrectly addressed” and in
the description box for the online_2 shortcut, type “PM710 is
online”.
In the Xenta 913, after sending the project, the values page appears as
follows.
Note
•
52 (184)
The text displayed in the Name column of a value is taken from
the Description property of the signal’s shortcut in XBuilder. If
no text is present in the Description box of the signal when you
drag the signal to the values page, the signal’s name is automatically copied into the description of the shortcut.
Schneider Electric Buildings AB, June 2011
04-00124-06-en
TAC Xenta Server – Gateway, Technical Manual
6 Visualizing Signals
To add more values pages
1
In the example, in the system pane, right-click ACME_Gateway.
2
Point to New, point to Page, and then click Values Page.
3
Type the name of the values page, in the example
“PM710_Values”.
4
Select the following signals in the folder ACME_GatewayPM710_Signals and drag them to the PM710_Values values page.
•
Tot_real_power
•
Frequency
•
Inst_current_phase_1§
•
Voltage_ph1_to_N
•
Prim_current_tr
•
Sec_current_tr
•
System_Type
In the example, the project appears as follows.
Schneider Electric Buildings AB, June 2011
04-00124-06-en
53 (184)
6 Visualizing Signals
6.4
TAC Xenta Server – Gateway, Technical Manual
Verifying the Modbus Communication
After the project is sent to the Xenta 913, the communication on the
Modbus network can be verified. Open the web pages containing the
signals from the energy meter and verify that they appear as expected.
Important
•
To verify communication, generate the project and send it to the
Xenta 913.
In the Xenta 913, the web site appears as follows.
6.5
Monitoring the Communication
By logging into the Xenta 913 web site, the communication status can
be monitored on the Communications page. The data from the energy
meter can be inspected on the PM710_Values page.
However, if the pages do not update or appear incorrect a diagnostic log
in the Xenta 913 can be inspected. For more information about monitoring communication, see Chapter 12, “Working with Third-party Communication Diagnostics”, on page 99.
54 (184)
Schneider Electric Buildings AB, June 2011
04-00124-06-en
TAC Xenta Server – Gateway, Technical Manual
7
7 Adding the TAC Xenta 913 to the LonWorks Network
Adding the TAC Xenta 913 to the
LonWorks Network
Before you can connect the signals from the Modbus devices to devices
on the LonWorks network, you install the Xenta 913 on the LonWorks
network. This is done so that the Xenta 913 can transfer data from the
Modbus device to, in the example, the RTU4 device.
7.1
Adding a TAC Xenta 913 as a LonWorks Device in
TAC Vista
For the Xenta 913 to be part of a LonWorks network, it is added as a
LonWorks device (LWD) in a new LonWorks group on the 2nd floor.
Vista
LTA_1
LON
Conf_Room
1st_Floor
Lobby
Energy_Meter
1st_Floor_LW
RTU4
M1
M3
ACME_Gateway
2nd_Floor
2nd_Floor_LW
To add a TAC Xenta 913 as a LonWorks device
1
Start Vista Server with the database containing the network on
which you want to add the Xenta 913.
2
Start and log in to Vista Workstation.
3
In the folders pane, right-click the LonWorks network object. In
the example, TAC Vista-VistaSRV1-LTA_1-ACME_Inc.
4
Point to New, point to Device, and then click LonWorks Group.
5
Type the name of the new LonWorks group. In the example,
“2nd_Floor_LW”
6
Right-click the new LonWorks group. In the example,
2nd_Floor_LW.
Schneider Electric Buildings AB, June 2011
04-00124-06-en
55 (184)
7 Adding the TAC Xenta 913 to the LonWorks Network
7
TAC Xenta Server – Gateway, Technical Manual
Point to New, point to Device, and then click LonWorks Device.
Important
•
Adding devices can only be made in engineering mode
8
Click OK.
The Add a LonWorks device wizard appears.
9
Click Next.
10 Type the name of the LonWorks device. In the example,
“ACME_Gateway”.
11 Select the The device type is TAC Xenta 511/527555//701/711/
721/731/913 check box.
12 Click Next.
13 Under Neuron ID, click the SP button.
56 (184)
Schneider Electric Buildings AB, June 2011
04-00124-06-en
TAC Xenta Server – Gateway, Technical Manual
7 Adding the TAC Xenta 913 to the LonWorks Network
14 On the Xenta 913, press the service pin button.
Note
•
If the Xenta 913 has yet to be installed on the LonWorks network, the Neuron ID for the Xenta 913 can be typed in.
15 Under Load XIF file from, use the .xif file created in your
XBuilder project or leave the box empty.
Note
•
By selecting the device type X511/527/913 the Xenta 913 automatically becomes a member of the TAC group. In this case
Vista allows the Xenta 913 to be installed without defining the
.xif file.
16 Click Finish and close the wizard.
17 In the folders pane, right-click the LonWorks device. In the example, VistaSRV1-LTA_1-ACME_Inc-2nd_Floor_LWACME_Gateway.
18 Click Commission and Download.
19 Click OK.
20 In the TAC Vista Load dialog box, click Commission and
Download
.
21 Click Continue.
22 When the operation is completed, click Close.
23 In the folders pane, click Refresh and verify that the Xenta 913 is
online.
The Xenta 913 is now added to the LonWorks network and signals from
the Modbus device can now be set up to be transferred to, for example,
the RTU4 device.
Schneider Electric Buildings AB, June 2011
04-00124-06-en
57 (184)
7 Adding the TAC Xenta 913 to the LonWorks Network
58 (184)
TAC Xenta Server – Gateway, Technical Manual
Schneider Electric Buildings AB, June 2011
04-00124-06-en
TAC Xenta Server – Gateway, Technical Manual
8
8 Connecting to the LonWorks Network
Connecting to the LonWorks
Network
Once communication to the energy meter is set up and verified and the
Xenta 913 is installed on the LonWorks network, you can connect the
signals through the Xenta 913 to another device, in the example RTU4.
In XBuilder, the signals from the energy meter are connected to signals
in RTU4. The connections are made using connection objects or multiconnection objects added in XBuilder. After sending the XBuilder
project (the gateway application) to the Xenta 913, the signals are transferred at regular intervals between the devices.
8.1
Inserting a LonWorks Network in TAC XBuilder
At this stage you insert the part of the LonWorks network you need, in
the example RTU4.
The network is described in Chapter 2, “Planning the Project”, on
page 19, and the database is located in the folder
C:\ProjectACME\VistaDb.
Schneider Electric Buildings AB, June 2011
04-00124-06-en
59 (184)
8 Connecting to the LonWorks Network
8.1.1
TAC Xenta Server – Gateway, Technical Manual
Inserting a LonWorks Network in TAC XBuilder
The TAC Xenta 913 object in XBuilder has a LON object which is used
when the physical network is inserted.
The Vista server must be running before it is possible to insert the network.
To insert a LonWorks network in TAC XBuilder
1
Start Vista Server with the network you want to insert.
2
In XBuilder, in the network pane, right-click the LON object to
which you want to insert a network. In the example, IP BackboneTAC_Xenta_913-LON.
3
Click Insert Network from TAC Vista.
Notes
•
Use Insert Network from TAC Vista to insert both LNS networks and classic networks from TAC Vista.
•
The command Insert Network from LNS is used to insert an
LNS network that only uses SNVT communication and that is
created without using TAC Vista.
The Log in to TAC Vista Server dialog box appears.
4
60 (184)
In the Username box type a user name. In the example, “system”.
Schneider Electric Buildings AB, June 2011
04-00124-06-en
TAC Xenta Server – Gateway, Technical Manual
8 Connecting to the LonWorks Network
5
In the Password box type a password. In the example, “system”.
6
Click OK.
The Select dialog box appears.
7
In the Select dialog box, browse to the required network level. In
the example, the VistaSRV1-LTA_1-ACME_Inc-2nd_floor.
8
Click the required device and then click Open. In the example,
RTU4.
The ACME_Inc network device is now present in the network pane,
under LON. When you expand the network, the structure of the selected
part of the LonWorks network is displayed. The structure beneath the
devices is somewhat different from the one you see if you view the
structure of the devices in TAC Vista Workstation. In XBuilder, the signals in the devices are present in different subfolders: SNVT, Public
Signals, Time Schedules, and IO Modules, depending on the applications in the devices.
XBuilder
Schneider Electric Buildings AB, June 2011
04-00124-06-en
Vista Workstation
61 (184)
8 Connecting to the LonWorks Network
TAC Xenta Server – Gateway, Technical Manual
Unrecognized Units
!
62 (184)
Notes
•
If the inserted network contains unrecognized units, you have to
associate them to units known to the Xenta 913.
•
If the signal is of a category that is not known to the Xenta 913,
set the category to No Category.
Schneider Electric Buildings AB, June 2011
04-00124-06-en
TAC Xenta Server – Gateway, Technical Manual
8.2
8 Connecting to the LonWorks Network
Updating a LonWorks Network in TAC XBuilder
After you have made changes to the devices in the LonWorks network,
the XBuilder project must be updated to reflect the changes; for example, if you have downloaded an application from Vista to one of the
devices to which you have added some signals.
8.2.1
Updating a LonWorks Network in TAC XBuilder
In the following example a new application has been downloaded to the
RTU4 device, so the changed device needs to be updated.
Caution
•
If you have previously made changes to signals in the network
pane, for example changed units of signals, these changes are
overwritten with the original settings from the application in the
device you want to update.
•
Schneider Electric recommends that you do not make changes to
objects in the network pane.
To update a LonWorks network in TAC XBuilder
1
Ensure that Vista server has been started and is running the network you want to update.
2
In XBuilder, in the network pane, right-click the LON object. In
the example, IP Backbone-TAC_Xenta_913-LON.
3
Click Insert Network from TAC Vista.
4
Log in to Vista server.
5
In the Select dialog box, browse to the required network level. In
the example, the VistaSRV1-LTA_1-ACME_Inc-2nd_floor.
6
Click the required device and then click Open. In the example,
RTU4.
The signals in the device, including the new ones, are now available in
your XBuilder project.
Schneider Electric Buildings AB, June 2011
04-00124-06-en
63 (184)
8 Connecting to the LonWorks Network
8.3
TAC Xenta Server – Gateway, Technical Manual
Connecting Signals to and from LON
Once the serial communication network and the LonWorks network are
in place, the Xenta 913 is used to transfer values between the devices on
the networks. The physical signals from the networks are connected to
connection objects or multi-connection objects in XBuilder.
The following example connects signals from the energy meter to public signals in the RTU4 Xenta device. The workflow is the same if signals are to be connected to SNVTs in a device on a LonWorks network
or to any other connected network, such as I/NET or BACnet.
64 (184)
Schneider Electric Buildings AB, June 2011
04-00124-06-en
TAC Xenta Server – Gateway, Technical Manual
8.3.1
8 Connecting to the LonWorks Network
Adding Signal Objects for RTU4
Signal objects can be created in the system pane for the LonWorks signals that are to be used in XBuilder.
To add signal objects for RTU4
1
In XBuilder, in the network pane, drag the required signals to the
destination folder in the system pane. In the example, drag the IP
Backbone-TAC_Xenta_913-LON-ACME_Inc-2nd_Floor-RTU4online signal to the ACME_Gateway-Engineering-RTU4_Signals
folder in the system pane.
2
In the example, drag the following signals from the IP BackboneTAC_Xenta_913-LON-ACME_Inc-2nd_Floor-RTU4Public Signals-Cooling folder to the destination folder
ACME_Gateway-Engineering-RTU4_Signals in the system pane:
•
Usage_Dev_ComsFail
•
Usage_Dev_online
•
Usage_Frequency
•
Usage_Inst_curr_ph_1
•
Usage_Link_ComsFail
•
Usage_Link_online
•
Usage_Prim_curr_tr
•
Usage_Sec_curr_tr
•
Usage_Total_real_power
•
Usage_Volt_ph_1_to_N
Schneider Electric Buildings AB, June 2011
04-00124-06-en
65 (184)
8 Connecting to the LonWorks Network
TAC Xenta Server – Gateway, Technical Manual
Tip
•
8.3.2
If required, change the unit of the Usage_Tot_real_power signal
to kW.
Adding a Connection Object
Now it is possible to transfer various values from one device to another
by connection objects.
As ComsFail and online signals are used for generating alarms in
RTU4, these signals from the Modbus network and the energy meter are
transferred to RTU4.
To add a connection object
1
In the system pane, right-click the folder where you want to add a
connection object. In the example, ACME_Gateway-EngineeringConnection_Objects.
2
Point to New, point to Object, and then click Connection Object.
3
Right-click the new connection object, click Rename, and then
type the name. In the example “Link_ComsFail”.
4
Expand the connection object. In the example, Link_ComsFail.
5
In the system pane, drag the sending signal to the From signal in
the connection object. In the example, drag the ACME_GatewayEngineering-ComsFail signal to the ACME_Gateway-Engineering-Connection_Objects-Link_ComsFail-From signal.
Note
66 (184)
•
By using connection objects you can connect signals of
No Category to signals of any other category and vice versa.
6
In the system pane, drag the receiving signal to the To signal in the
connection object. In the example, ACME_Gateway-EngineeringRTU4_Signals-Usage_Link_ComsFail signal to the
Link_ComsFail-To signal in the connection object.
7
In the system pane, click the required connection object. In the
example, Link_ComsFail.
Schneider Electric Buildings AB, June 2011
04-00124-06-en
TAC Xenta Server – Gateway, Technical Manual
8
8 Connecting to the LonWorks Network
In the properties pane, under General, in the Period (s) box, type
the required transfer period in seconds. In the example, “10”.
The value of the From signal is now transferred to the To signal at
the specified interval. In the example, the Modbus Link ComsFail
signal is transferred to Usage_Link_ComsFail in RTU4 every 10
seconds.
In the example, repeat the procedure above to add more connection
objects to ACME_Gateway-Engineering-Connection_Objects..
Table 8.1: Status signals transferred from PM710 to RTU4.
Connection Object
names
PM710_Signals
RTU4_Signals
Link_ComsFail
ACME_GatewayEngineering-ComsFail
ACME_Gateway-EngineeringRTU4_SignalsUsage_Link_ComsFail
Link_online
ACME_GatewayEngineering-online
ACME_Gateway-EngineeringRTU4_Signals-Usage_Link_online
Device_ComsFail
ACME_GatewayEngineeringPM710_Signals-ComsFail
ACME_Gateway-EngineeringRTU4_SignalsUsage_Dev_ComsFail
Device_online
ACME_GatewayEngineeringPM710_Signals-online
ACME_Gateway-EngineeringRTU4_Signals-Usage_Dev_online
Your project should now appear as follows:
The status signals for the Modbus link and the PM710 device are
transferred to RTU4 every 10 seconds.
Schneider Electric Buildings AB, June 2011
04-00124-06-en
67 (184)
8 Connecting to the LonWorks Network
8.3.3
TAC Xenta Server – Gateway, Technical Manual
Adding a Multi-Connection Object
To simplify the engineering process of connecting signals between the
devices multi-connection objects can be used. These objects act as containers of many connection objects and they allow you to make several
connections in one dialog box. Multi-connection objects are modified
using Connection Manager which supports the use of drag-and-drop
operations of signals from both system pane and network pane.
For more information about working with the connection manager, see
Section 10.3, “Multi-Connection Objects”, on page 88.
To add a multi-connection object
1
In the system pane, right-click the folder where you want to add a
multi-connection object. In the example, ACME_Gateway-Engineering-Connection_Objects.
2
Point to New, point to Object, and then click MultiConnection Object.
The connection manager appears.
3
68 (184)
In XBuilder, in the system pane, drag the sending signal to the
From column in the connection manager. In the example, the
ACME_Gateway-Engineering-PM710_SignalsInst_current_phase_1 signal to the first row of the From column
in the connection manager.
Schneider Electric Buildings AB, June 2011
04-00124-06-en
TAC Xenta Server – Gateway, Technical Manual
8 Connecting to the LonWorks Network
4
In XBuilder, in the system pane, drag the receiving signal to the To
column in the connection manager. In the example,
ACME_Gateway-Engineering-RTU4_SignalsUsage_Inst_curr_ph_1 to the first row of the To column in the
connection manager.
5
In the connection manager, in the Send Option list, click Write
initially and on change.
6
In the example, connect the signals using the procedure above for
the following signals in ACME_Gateway-EngineeringPM710_Signals and ACME_Gateway-EngineeringRTU4_Signals.
Table 8.2: Signals transferred from PM710 to RTU4.
PM710_Signals
RTU4_Signals
Send Option
Inst_current_phase_1
Usage_Inst_curr_ph_1
Write initially and on change
Voltage_ph1_to_N
Usage_Volt_ph1_to_N
Write initially and on change
Frequency
Usage_Frequency
Write initially and on change
Tot_real_power
Usage_Tot_real_power
Write initially and on change
Prim_current_tr
Usage_Prim_curr_tr
Write initially and on change
Sec_current_tr
Usage_Sec_curr_tr
Write initially and on change
The connection manager should now appear as follows:
Tip
•
If you do not select anything in the Send Option list or do not
type a a value in the Period (s) box, the connection is automatically set to Periodically and 10 s.
Schneider Electric Buildings AB, June 2011
04-00124-06-en
69 (184)
8 Connecting to the LonWorks Network
TAC Xenta Server – Gateway, Technical Manual
Before you close the connection manager, verify the connections to
ensure that the connections are valid.
7
In the Connection Manager dialog box, click Validate.
8
Click OK.
9
In the system pane, right-click the new multi-connection object. In
the example, 1.
10 Click Rename.
11 Type the name. In the example, “PM710_to_RTU4”, and then
press ENTER.
Your project should now appear as follows:
12 Generate the project and send it to the Xenta 913.
The gateway application is now in place in the Xenta 913.
For more information about working with the connection manager, see
Section 10.3, “Multi-Connection Objects”, on page 88.
70 (184)
Schneider Electric Buildings AB, June 2011
04-00124-06-en
TAC Xenta Server – Gateway, Technical Manual
8.4
8 Connecting to the LonWorks Network
Verifying the Gateway Application
After the signals are connected between the energy meter and RTU4,
and the project has been sent to the Xenta 913, you have to verify that
the result is as expected. Adding the signals to values pages is one way
of verifying that the communication functions as expected.
8.4.1
Monitoring the LonWorks Communication
The communication on the networks can be monitored from the Communications values page.
To monitor the LonWorks communication
8.4.2
1
In XBuilder, in the system pane, drag the online signal to the values page where you want to display it. In the example, drag
ACME_Gateway-Engineering-RTU4_Signals-online to the
ACME_Gateway-Communications values page.
2
In the properties pane, under General, in the Description box for
the shortcut, type “RTU4 node status”.
Verifying the Gateway Application
One way of verifying that the values are transferred correctly to the
receiving device is to display the signals from the receiving device on a
values page. When the values page is displayed in a web browser the
values are read back from the device; they should be the same as the values on the values page for the Modbus signals.
To verify the gateway application
1
In XBuilder, in the system pane, right-click the folder where you
want to add a values page. In the example, ACME_Gateway.
2
Point to New, point to Page, and then click Values Page.
3
Type the name of the values page. In the example “RTU4_Values”.
4
In the system pane, drag the required signals to the values page
where you want to display them. In the example, drag all the
ACME_Gateway-Engineering-RTU4_Signals signals, except for
the ComsFail and the online signals, to the ACME_GatewayRTU4_Values values page.
Schneider Electric Buildings AB, June 2011
04-00124-06-en
71 (184)
8 Connecting to the LonWorks Network
TAC Xenta Server – Gateway, Technical Manual
5
If required, rearrange the shortcuts.
6
Generate the project and send it to the Xenta 913.
7
Open the Communications values page in a web browser and verify that all values appear as expected.
8
Open the RTU4 values page in a web browser and verify that all
values appear as expected.
Of course you must also verify that the values appear in the RTU4
device, for example using Vista Workstation, to ensure that the communication functions as expected all the way from the energy meter,
through the Xenta 913, to RTU4.
72 (184)
Schneider Electric Buildings AB, June 2011
04-00124-06-en
TAC Xenta Server – Gateway, Technical Manual
9
9 Creating SNVTs
Creating SNVTs
For more information about SNVTs and controller objects, see
Section 10.1, “Defining SNVTs and Controller Objects”, on page 81.
9.1
Adding a Controller Object and a SNVT
In the following example, you create a SNVT in the Xenta 913 that
propagates a value, in the example Tot_real_power, from the energy
meter on the Modbus interface.
This requires that you add a controller object, this is like a container for
SNVTs, and a network variable (SNVT).
After you have added the SNVTs to XBuilder and generated the project,
a new .xif file for the Xenta 913 is generated. The new .xif file is used
by the LNS database to make the new SNVTs in the Xenta 913 available for binding in LonMaker.
Schneider Electric Buildings AB, June 2011
04-00124-06-en
73 (184)
9 Creating SNVTs
9.1.1
TAC Xenta Server – Gateway, Technical Manual
Adding a Controller Object and a SNVT
To add a Controller Object and a SNVT
74 (184)
1
In the network pane, right-click IP Backbone-TAC_Xenta_913SNVTs-LonMarkObjects and click Add Controller Object.
2
Type the name. In the example “Energy_Meter”.
3
Right-click NetworkVariables and click New SNVT.
4
In the Name box, type the name of the SNVT. In the example
“nvo_Tot_real_pow”.
5
In the Type list, click power_kilo.
6
In the Direction list, click Output.
Schneider Electric Buildings AB, June 2011
04-00124-06-en
TAC Xenta Server – Gateway, Technical Manual
7
In the Period (s) box, type the required value.
8
In the Delta box, type type the required value.
9
Click OK.
9 Creating SNVTs
The controller object and its SNVT are now created and the SNVT
can be used in the XBuilder project.
Schneider Electric Buildings AB, June 2011
04-00124-06-en
75 (184)
9 Creating SNVTs
9.1.2
TAC Xenta Server – Gateway, Technical Manual
Connecting a Signal to an Output SNVT
An output SNVT created in the Xenta 913 is given its value by using a
connection object. For more information about connection objects, see
Section 10.2, “Connection Objects”, on page 87.
To connect a signal to an output SNVT
1
In the system pane, in the example, expand ACME_GatewayEngineering-Connection_Objects.
2
Right-click Connection_Objects, point to New, and then click
Folder.
3
Type the name. In the example “SNVTs”.
4
Right-click SNVTs, point to New, point to Object, and then click
Connection Object.
5
Type the name. In the example, “Tot_real_power”.
6
Expand the connection object.
7
In the system pane, from ACME_Gateway-EngineeringPM710_Signals, drag Tot_real_power to the From signal in the
Tot_real_power connection object.
8
In the network pane, from IP Backbone-TAC_Xenta_913-SNVTsLonMarkObjects-Energy_Meter-NetworkVariables, drag
nvo_Tot_real_pow to the To signal in the Tot_real_power connection object.
9
In the system pane, click the Tot_real_power connection object.
10 In the properties pane, in the Send Option list, click Write on
change.
11 Generate and send the project to the Xenta 913.
76 (184)
Schneider Electric Buildings AB, June 2011
04-00124-06-en
TAC Xenta Server – Gateway, Technical Manual
9 Creating SNVTs
The .xif file for the Xenta 913 is created when you generate the
project. It is automatically downloaded to the Xenta 913 when you
send the project to the Xenta 913.
Tips
•
In this example, you will find the .xif file in the following location:
C:\Project_ACME\ACME_Gateway\TargetImage\configdb\lon\TAC_Xenta_913.xif.
•
You can generate a new .xif file without generating the project:
•
In the network pane, right-click TAC_Xenta_913 and click
Generate XIF File.
•
You can update the Vista database with the new .xif file and
make the SNVTs available in Vista by replacing the .xif file for
the LonWorks device.
•
You can update the LNS database with the new .xif file and bind
the new SNVTs before you send the project to the Xenta 913. By
doing so the Xenta 913 receives the new values as soon as the
project is sent from XBuilder.
For more information about replacing the .xif file in a classic Vista network, see Classic Networks, Technical Manual.
Use the Vista System Plug-in to replace the. xif file for the Xenta 913
in the LNS database. For more information about replacing the .xif file
using the Vista System Plug-in, see LNS Networks, Technical Manual.
Schneider Electric Buildings AB, June 2011
04-00124-06-en
77 (184)
9 Creating SNVTs
78 (184)
TAC Xenta Server – Gateway, Technical Manual
Schneider Electric Buildings AB, June 2011
04-00124-06-en
REFERENCE
10
Using Signals
11
Configuring Serial or Ethernet
Communication
12
Working with Third-party
Communication Diagnostics
TAC Xenta Server – Gateway, Technical Manual
10
Using Signals
10.1
Defining SNVTs and Controller Objects
10 Using Signals
Public signals on the network are always polled when they are used in
the Xenta 913. SNVTs from devices on the network can also be used for
display in values pages and transferring to other devices. These are also
polled.
SNVTs can be added to the Xenta 913 to make them available on the
LonWorks network. Using LonMaker, you can bind these to other
devices on the network. The SNVTs can also be made available in
Vista, for example, when the Xenta 913 is installed as a LonWorks
device in a classic network.
10.1.1
Adding SNVTs in the TAC Xenta 913
Beneath the TAC_Xenta_913 object in the network pane in XBuilder is
a SNVTs folder. The SNVTs folder contains two objects: ConfigProperties and LonMarkObjects. The latter always contains a Controller
Object (Node_Object_0) with two network variables; SNVT_ObjReq
and SNVT_ObjState.
Additional Controller Objects and SNVTs can be added in the SNVTs
folder of the Xenta 913. A Controller Object is like a container for
SNVTs, that is, it you can create several SNVTs within each Controller
Object.
In each device on a LonWorks network there is an .xif file that contains
information about the SNVTs in the device. Adding SNVTs to the
device requires that you create a new .xif file. Using the information in
the .xif files you can bind the SNVTs using LonMaker.
Schneider Electric Buildings AB, June 2011
04-00124-06-en
81 (184)
10 Using Signals
TAC Xenta Server – Gateway, Technical Manual
You can have either input or output SNVTs; this is set in the device to
which the SNVT is added. You can add both input and output SNVTs
to the Xenta 913.
Tip
•
You can add several controller objects containing SNVTs with
the same name. This is very useful when your system communicates with many devices of the same type.
For an example on how to add a controller object and a SNVT, see
Section 9.1, “Adding a Controller Object and a SNVT”, on page 73.
82 (184)
Schneider Electric Buildings AB, June 2011
04-00124-06-en
TAC Xenta Server – Gateway, Technical Manual
10.1.2
10 Using Signals
Output SNVTs
Output SNVTs are used for sending (propagating) information from
devices on a LonWorks network. The value of the SNVT can be sent
regularly or it can be sent upon change, that is when the signal the
SNVT represents changes.
When you add a SNVT to XBuilder the following dialog box appears
(the Direction has been changed to Output).
The dialog box has a number of controls:
•
Name – Output SNVTs are usually called nvo_”XYZ”, to indicate
the direction of the signal, for example nvo_RoomTempSP. A
maximum of 16 characters can be used.
•
Type – There are many different types of SNVTs. You select the
type you want from the Type list.
•
Direction – When you add an output SNVT you set the Direction
to Output.
•
Send – The SNVT is sent regularly from the device if you select
the Send check box.
The value is sent:
•
regularly if a time greater than 0 is typed in the Period (s) box
•
when the value between the new value and the last value sent
is greater than the value typed in the Delta box and the number you enter in the Period (s) box is 0.
•
on either of the two previous conditions if the values of both
the Period (s) and Delta are greater than 0.
If the Send check box is not selected, the SNVT can only be polled
by other devices; this is not common practice.
•
Period (s) – The number you enter in the Period (s) box is the
number of seconds you want to lapse between the SNVT transmissions.
•
Backup – By selecting the Backup check box, the momentary
value of the SNVT is stored in the memory of the Xenta 913. If the
Xenta 913 is restarted, the stored value is used until a new value is
detected.
Schneider Electric Buildings AB, June 2011
04-00124-06-en
83 (184)
10 Using Signals
TAC Xenta Server – Gateway, Technical Manual
•
Members – You use the Members list to inspect the signals contained by the SNVT, if the SNVT you selected in the Type list is
structured.
•
Initial Value – If you want the output SNVT to have an initial
value you type the value required in the Initial Value box. This
value is kept until the signal the SNVT represents changes.
•
Unit – If the SNVT has a unit you enter that unit in the Unit box.
The unit can be used for presentation by a receiving device.
•
Delta – If you want the SNVT to send its value when the signal it
represents changes, you must type the minimum change value in
the Delta box.
An example of an output SNVT
In the following example, an output SNVT is added which sends a temperature value every time the outside air temperature changes by more
than 0.5 °C.
84 (184)
Schneider Electric Buildings AB, June 2011
04-00124-06-en
TAC Xenta Server – Gateway, Technical Manual
10.1.3
10 Using Signals
Input SNVTs
Input SNVTs are used for collecting information from devices on the
LonWorks network.
An input SNVT can be used in two ways, either as an:
•
Update, that is, the SNVT that supplies the value to the input
SNVT decides when to send an updated value,
or
•
Poll, that is, the Xenta 913 asks for the signal value at regular
intervals.
The advantage of updating is that network traffic is reduced, since the
value is only sent at a status change: “you get it when it happens”. The
disadvantage is that the programming time is a little longer. When you
add an input SNVT the setting default is Update, that is the Poll check
box is cleared.
When you add a SNVT in XBuilder the following dialog box appears.
The dialog box has a number of controls:
•
Name – Input SNVTs are usually called nvi_”XYZ”, to indicate
the direction of the signal, for example nvi_RetAirTemp. A maximum of 16 characters can be used.
•
Type – There are many different types of SNVT. You select the
type you want from the Type list.
•
Direction – When you add an input SNVT you set the Direction
to Input.
•
Poll – If the Poll check box is not selected the input SNVT
receives a new value when a change is received from the sending
device.
If the Poll check box is selected, the SNVT is updated at the interval specified by the Period (s) value.
•
Period (s) – The number you enter in the Period (s) box is the
number of seconds you want to lapse before the Xenta 913 polls
the SNVT. Polling only occurs if the Poll check box is selected.
Schneider Electric Buildings AB, June 2011
04-00124-06-en
85 (184)
10 Using Signals
TAC Xenta Server – Gateway, Technical Manual
•
Backup – By selecting the Backup check box, the momentary
value of the SNVT is stored in the memory of the Xenta 913. If the
Xenta 913 is restarted, the stored value is used until a new value is
propagated on the network or until the Xenta_913 polls the value.
•
Members – You use the Members list to inspect the signals contained by the SNVT, if the SNVT you selected in the Type list is
structured.
•
Initial Value – If you want the input SNVT to have an initial value
before value is received over the network you type the value
required in the Initial Value box.
•
Unit – If the SNVT has a unit you enter that unit in the Unit box.
The unit can be used for presentation by the Xenta 913.
•
Delta – The Delta box is used only when you add an output
SNVT.
An example of an input SNVT
In the following example, an input SNVT that receives the occupancy
status in a room is added.
86 (184)
Schneider Electric Buildings AB, June 2011
04-00124-06-en
TAC Xenta Server – Gateway, Technical Manual
10.2
10 Using Signals
Connection Objects
Setting up the transfer of signal values from one device to another is carried out in XBuilder. This is made using connection objects or multiconnection objects. After sending the XBuilder project (the gateway
application) to the Xenta 913, the signals are transferred at regular intervals between the devices.
For examples on how to connect signals between devices using connection objects, see Section 8.3.2, “Adding a Connection Object”, on
page 66.
Conditions for Sending Values
In the properties pane for the connection object there is a Send Option
property.
The connection object can be configured to send the connected signal
under any of the following conditions:
10.2.1
•
Periodically – the signal is always sent at a regular interval set in
seconds in the Period (s) box.
•
Periodically if changed – The signal is sent if the value of the signal has changed. The signal is then sent during the next cycle of
the time period, as set in the Period (s) box.
•
Initially and periodically if changed – The same as for Periodically if changed but the signal is also sent once when the device
first starts communicating.
Adding more Output Signals
Connection objects are used for reading one signal and transferring its
value to another signal. It is possible to transfer the same signal to several other signals, by adding more output signals to the connection
object.
To add more output signals
1
In the system pane, right-click a connection object and click
Add Output Signal.
2
Type the name of the output, in the example
“Device2_Outdoor_Temp”.
3
Connect another signal to receive the transferred value.
Schneider Electric Buildings AB, June 2011
04-00124-06-en
87 (184)
10 Using Signals
10.3
TAC Xenta Server – Gateway, Technical Manual
Multi-Connection Objects
For examples on how to connect signals between devices using multiconnection objects, see Section 8.3.3, “Adding a Multi-Connection
Object”, on page 68.
Multi-connection objects are used to simplify the engineering process
of connecting signals between the devices. The signals whose values are
to be read and the signals to receive the values are dragged to Connection Manager that opens when you modify the multi-connection object.
You connect the same signals in the connection manager as you would
connect to a connection object.
You also set Send Option and Period (s) as you would have done in the
properties pane for a connection object.
The Send Option and Period (s) settings work exactly as described for
the connection object in Section 10.2, “Connection Objects”, on
page 87.
From the signals added in the connection manager a number of connection objects are created, kept together by a multi-connection object.
After sending the XBuilder project (the gateway application) to the
Xenta 913, the signals are transferred at regular intervals between the
devices.
88 (184)
Schneider Electric Buildings AB, June 2011
04-00124-06-en
TAC Xenta Server – Gateway, Technical Manual
10.3.1
10 Using Signals
Validating the Signals
After the required signals are added to the connection manager you
must validate them, that is check that the selected signals comply with
the rules so that connection objects can be created. You can click the
Validate button at any time.
The result of the validation is presented in the box beside the button:
If any errors are detected, you are notified in the connection manager..
More information about the errors are displayed in the output pane in
XBuilder.
If you double-click the error in the output pane, the row containing the
error in the connection manager is automatically selected.
Schneider Electric Buildings AB, June 2011
04-00124-06-en
89 (184)
10 Using Signals
10.3.2
TAC Xenta Server – Gateway, Technical Manual
Using the Find and Replace Function
In the connection manager there is a find and replace function that is
very useful, for example, if you have several devices of the same kind
on your communication interface and you only need to rename a part of
every signal name to make a second device.
To use the Find and Replace function
1
Click the Show Find and Replace check box.
The Find and Replace area becomes visible.
2
In the Find what box, type the text you want to locate.
3
In the Replace with box, type the replacement text.
4
If required, click Match case and/or Match whole word.
5
Click Find Next to start the search.
6
A matching text is displayed by highlighting the cell in which the
text is found.
•
Click Replace to replace the matching text in the current cell
and then click Find Next to continue the search.
•
Click Replace All to replace all matching texts in the connection manager.
Note
90 (184)
•
The search starts from the currently highlighted cell and continues downwards. Ensure to highlight the first cell on the first row
to search the whole connection manager.
7
Click OK.
Schneider Electric Buildings AB, June 2011
04-00124-06-en
TAC Xenta Server – Gateway, Technical Manual
11 Configuring Serial or Ethernet Communication
11
Configuring Serial or Ethernet
Communication
11.1
Overview
The Xenta 913 can exchange data with devices on networks other than
the LonWorks network. By using the serial interfaces RS-232 or
RS-485, the Xenta 913 can be configured for communication using a
serial protocol such as Modbus.
The Xenta 913 can also communicate by using the 10Base-T port on the
front and protocols that communicate over the Ethernet network, such
as Modbus TCP.
The serial port RS-232 A is on the front of the Xenta 913 and there are
screw terminals for the RS-485 connection. Use XBuilder to set up the
port you want to use.
The Xenta 913 can be either a communication master or a slave. If the
Xenta 913 is configured as a master it can communicate with several
devices on a network connected to the port. The Xenta 913 can send
data to control functions in other devices and it can also request data.
When the Xenta 913 is configured as a slave, it acts as any other slave
on the network; this means that it can receive data at any time and can
send data to the master when requested to do so.
When communicating over the Ethernet network, the Xenta 913 can be
configured to be either a client or a server, similar to the master or slave
configuration for serial communication.
Schneider Electric Buildings AB, June 2011
04-00124-06-en
91 (184)
11 Configuring Serial or Ethernet Communication
11.2
TAC Xenta Server – Gateway, Technical Manual
The Communications Interface
You enable the communication on the RS-232/485 A port or the
10Base-T port on the Xenta 913 by adding an interface in your
XBuilder project. The interface specifies which protocol is used, which
port to use and parameters controlling the communication.
Important
•
To enable Ethernet communication to a remotely controlled
device you add an interface to the TCP-IP port in XBuilder, for
example a Modbus TCP Client.
For more information about adding a communications interface, see
Section 4.1, “Adding a Modbus Master Interface”, on page 36.
92 (184)
Schneider Electric Buildings AB, June 2011
04-00124-06-en
TAC Xenta Server – Gateway, Technical Manual
11.3
11 Configuring Serial or Ethernet Communication
The Device Templates
TAC Device Editor is used to configure the data that is to be exchanged
using the communication protocol selected for the port on the
Xenta 913.
The device editor is included in the XBuilder installation. A new folder
is installed together with the device editor, and is located at
C:\Program files\TAC\Device Library. The folder is for storing template files created by the device editor for various devices.
You use the template files in XBuilder to add objects representing the
physical devices on the network that are connected to the communication port; they can be reused in projects that communicate with the same
kind of devices.
A device template is created for every type of device that the Xenta 913
communicates with on the serial port. A knowledge of the information
that is exchanged, such as boolean signals or registers, must be readily
available.
The device editor can be started in two ways:
•
from the TAC Tools program group on the Start menu which
allows you to create device template files without starting
XBuilder
•
from XBuilder after a serial communication interface is added.
For more information about creating a device template, see Section 4.2,
“Creating a Device Template”, on page 37.
Schneider Electric Buildings AB, June 2011
04-00124-06-en
93 (184)
11 Configuring Serial or Ethernet Communication
11.4
TAC Xenta Server – Gateway, Technical Manual
Device Template File Format
A file saved using the device editor has the extension .dev. The file
name is automatically in the format [<Protocol>].<file name>.dev, for
example [Modbus Ext].My_File.dev. The maximum number of characters for the file name, including the protocol name and the file name
extension, is 31 characters.
If you try to save a device template file and the name has too many characters, a warning appears:
Table 11.1: The number of unused characters that can be entered for the file name for the different
protocols.
Protocol type
Create this type
of device
Automatic protocol
name
Number of
unused
characters
Modbus Master
Modbus serial
line master
Modbus External
Slave
[Modbus Ext] + .dev
15
Modbus Slave
Modbus serial
line slave
Modbus Internal
Proxy
[Modbus Int] + .dev
15
Modbus TCP
Client
Modbus TCP
client
Modbus External
Slave
[Modbus Ext] + .dev
15
Bacnet MS/TP
BACnet MS/TP
master
BACnet Device
[BACnet] + .dev
19
BacNet PTP
BACnet point to
point client
BACnet Device
[BACnet] + .dev
19
BACnet IP Client
BACnet IP client
BACnet Server
[BACnet IP] + .dev
16
M-Bus Meter
Client
M-Bus Metering
M-Bus Meter
[Mbus] + .dev
21
C-Bus Lighting
Client
Clipsal C-Bus
C-Bus Lighting
Application
[Cbus] + .dev
21
Interface in
XBuilder
94 (184)
Schneider Electric Buildings AB, June 2011
04-00124-06-en
TAC Xenta Server – Gateway, Technical Manual
11.5
11 Configuring Serial or Ethernet Communication
Working with Existing Device Templates
If you are working with equipment that is used widely, such as the
PM710 energy meter, it is generally a good idea to create a device template with all the signals for the device. If you then store the template
file on a server, other users can access that template as it is or, if
required, you can remove unused signals and save the template under a
new name.
Caution
•
11.5.1
If you intend to use a device template located on a server, copy
the device template file to the device library,
C:\Program files\TAC\Device Library, on your local computer
before you create the device in your XBuilder project.
Opening an Existing Device Template
An existing device template can be opened for editing in two ways.
Either the device editor is started from the start menu and any template
file can be opened, or a specific device is selected in XBuilder and the
corresponding device file is opened for editing.
To open an existing device template
1
In the device editor, on the File menu, click Open.
The folder Device Library is the default folder.
2
In the list, click the required device, and then click Open.
Tip
•
You can also open an existing device template from XBuilder: in
the network pane, under the serial or TCP/IP interface,
right-click a device and click Edit Device Template.
Schneider Electric Buildings AB, June 2011
04-00124-06-en
95 (184)
11 Configuring Serial or Ethernet Communication
11.6
TAC Xenta Server – Gateway, Technical Manual
Updating the Devices in a TAC XBuilder Project
After you have modified a device template file, you save it in the device
library, C:\Program files\TAC\Device Library.
When you quit the device editor after making changes to a template file,
its behaviour varies depending on how it was started. If it was started
from the Program menu, it simply quits.
If the device editor was started from XBuilder, using the command
Edit Device Template, you are asked if you want to update the project
with the changes made when you quit the device editor. If you click Yes,
all devices in the project using this device template are updated.
If changes are made to a device template file that is in use in an
XBuilder project, you are asked by XBuilder if you want to update the
project with the changes made when you open the XBuilder project.
•
If Yes is clicked, the device(s) in the project is updated with the
template file that is present in the device library, which means that
the device used in the project is identical to the device in the
library.
•
If No is clicked, the device(s) in the project is left unchanged,
which means that the information in the library and the project are
different. This is equivalent to having another type of device in the
project than the one already stored in the library. However, the
device names are the same. Any changes made to the device using
the device editor, either from within XBuilder or from the program
menu, try to update your project. You must then decide if you want
to keep your “local” device and not benefit from the changed
device or if you want to discard the changed device in order to
keep your “local” device.
Caution
•
96 (184)
Schneider Electric strongly recommends that you never create
“local” devices as any updates overwrite these devices. Instead,
create a new device using the Save As command for a deviating
device and use it in your project.
Schneider Electric Buildings AB, June 2011
04-00124-06-en
TAC Xenta Server – Gateway, Technical Manual
11.7
11 Configuring Serial or Ethernet Communication
Replacing a Device Template File
If the physical device connected to the serial or TCP-IP communication
port is replaced with another kind of device, you must also replace the
device template file for the device in XBuilder.
To replace a device template file
1
In the network pane, right-click the device you want to replace,
and click Replace Device Template.
2
In the Open dialog box, click the required device template file,
and click Open.
Notes
11.8
•
If you replace the device template file for a device, a connection
between the device and a signal in XBuilder remains if the signal
names in the old and the new device template files are the same.
•
The name, description and address of the device are not changed
when you replace a device.
Device Template Not Found
You can open an XBuilder project on another computer than the one
you used when you developed the project. But since all device template
files, by default, are stored in the library folder
C:\Program Files\TAC\Device Library, it is likely that the device template files used in your project are missing on the other computer. This
situation is detected by XBuilder if you choose to modify the device
template used in the project using the Edit Device Template command.
A message similar to the following appears:
•
If the file is stored elsewhere, click Browse and locate the file.
•
If the file is not stored on the computer, click Use Project.
If you choose to use the project’s local device file, a device template file
is automatically created and stored in the folder
C:\Program Files\TAC\Device Library on the computer.
Schneider Electric Buildings AB, June 2011
04-00124-06-en
97 (184)
11 Configuring Serial or Ethernet Communication
11.9
TAC Xenta Server – Gateway, Technical Manual
Enumerations
Instead of displaying a figure to describe the state of a signal texts can
be used on, for example, values pages. These texts are defined using
enumeration.
11.9.1
Creating enumeration
By creating enumeration in the device editor for the signal you can let
the status of a signal be displayed in clear text, rather than as a number.
To create enumeration
•
In the device editor, on the row for the required signal, double-click in the Enumeration cell and then click Create Enumeration.
For more information about creating enumeration, see TAC Xenta
Server – TAC Networks, Technical Manual or the XBuilder Help.
11.9.2
Using enumeration
The enumeration can now be used for the signal.
To use enumeration
98 (184)
1
On the row for the required signal, click in the Enumeration cell
and then click the required enumeration.
2
Press ENTER.
3
Save the device template.
4
Quit the device editor.
Schneider Electric Buildings AB, June 2011
04-00124-06-en
TAC Xenta Server – Gateway, Technical Manual
12
12 Working with Third-party Communication Diagnostics
Working with Third-party
Communication Diagnostics
The communications for the protocols that use the serial interfaces (RS232 and RS-485) on the Xenta 913 can be monitored using HyperTerminal or on the Xenta 913 web site.
To monitor the communications for the protocols that use the Ethernet
network, you connect a network listener.
12.1
Connecting a Diagnostics Terminal
Due to differences in the implementation of the protocols in third-party
products, it is very unusual for the communication between a Xenta 913
and another device to work properly when first tested, so a diagnostics
test is most probably required.
A web browser such as Internet Explorer can be connected to the
Xenta 913 web server and used to monitor and control the target I/O
values using the previously-created values pages. If, however, the values do not update, or appear incorrect, it can be very difficult to diagnose the problem from the Values pages alone. For this reason the
Xenta 913 includes a communications log that can be used to monitor
the actual communications traffic with the target system.
The web browser can be used to control and view the communications
log. However, this process is generally not as easy or as effective as
using a PC terminal program like HyperTerminal. So if diagnostics are
necessary, and it is possible, connect a PC to the RS-232 B channel of
the Xenta 913 using the appropriate cable from cable kit 007309200.
This connection is only required during initial diagnostics, and can be
removed when completed.
•
Once the terminal is connected, power up the Xenta 913 and associated equipment. If the terminal has been correctly connected,
then the boot-up and Xenta 913 startup messages should appear on
the terminal. If not, then refer to the documentation of both the terminal program and the Xenta 913 to try and locate and correct the
problem. However, terminal connection problems are unlikely at
this stage because the terminal program was probably used to set
the Xenta 913’s initial IP address. For more information about
using HyperTerminal, see TAC Xenta 500/700/911/913, Product
Manual.
Schneider Electric Buildings AB, June 2011
04-00124-06-en
99 (184)
12 Working with Third-party Communication Diagnostics
12.2
TAC Xenta Server – Gateway, Technical Manual
Testing Target Communications
To test a Xenta 913, target communications should be monitored using
the diagnostics log using either HyperTerminal or a web page. Several
commands are provided to support testing, as described below. These
commands are activated using either a web browser or HyperTerminal.
From a web browser, the commands are activated from the UtilitiesTarget System-VXI Web Shell Commands page.
12.2.1
Value Exchange Commands
The commands typed in are identified by vx (Xenta 913 value exchange
commands), a character for each command, and an optional parameter
for the command.
100 (184)
•
Using HyperTerminal, just type in vx and the available commands
are listed on the screen.
•
On the web page, click Submit.
Schneider Electric Buildings AB, June 2011
04-00124-06-en
TAC Xenta Server – Gateway, Technical Manual
12 Working with Third-party Communication Diagnostics
Driver Selection
The command vx D prints a numbered list of the configured drivers in
the system together with the version number of the driver.
•
•
Using HyperTerminal, just type in vx D and the available drivers
are listed on the screen.
•
In a system without any configured drivers all drivers available are listed.
•
In a configured system, only the configured drivers are listed.
On the web page, type vx D and then click Submit.
•
In a system without any configured drivers all drivers available are listed.
•
In a configured system, only the configured drivers are listed.
Schneider Electric Buildings AB, June 2011
04-00124-06-en
101 (184)
12 Working with Third-party Communication Diagnostics
TAC Xenta Server – Gateway, Technical Manual
Start/Stop Target Communication
The Xenta 913 target communications can be started and stopped at any
time without restarting the whole gateway application. When the
Xenta 913 is first started, there is a ten second pause before the gateway
application starts up, allowing you to prevent it from running when conducting a separate test.
The Xenta 913 is started and stopped using the following command format:
vx S s
where S selects the start/stop command, and s is the required Stop/Start
mode (0 for stop, 1 for Start). Simply typing vx s toggles the Xenta 913
communications on or off. The communications log activity is immediately printed on the HyperTerminal screen.
On the Xenta 913 web site, there is a web page for starting and stopping
the communication.
Enable/Disable Target Communication Log
Normally, the communications log activity is only shown on the terminal screen, so older messages are lost. However, it is possible to enable
or disable logging to file by using the following command format.
vx L h
where L selects the log-to-file command, and h is the maximum number
of hours the log should be enabled (0 to 25).
Simply typing vx L toggles logging to file on or off.
Typing vx L 0 immediately turns off logging to file, whereas an h value
greater than 0 enables logging to file for up to the requested number of
hours.
Verbosity
The amount of information recorded by the diagnostics log is controlled
by the verbosity level. The default verbosity level of 1 shows only communications error messages. A medium verbosity level of 6 or 7 generally shows I/O value activity, which can be very useful for finding
configuration errors.
102 (184)
Schneider Electric Buildings AB, June 2011
04-00124-06-en
TAC Xenta Server – Gateway, Technical Manual
12 Working with Third-party Communication Diagnostics
At a verbosity level of 9, the log records all communications activity
between the Xenta 913 and the target system. However, the large volume of messages resulting may obscure simple configuration problems,
so this is normally only used in short bursts to locate protocol faults.
Verbosity is set using the following command format:
vx V n
where V selects the verbosity command, and n is the required verbosity
level (0 to 9). Simply typing vx v reports the current verbosity level.
Output log file
The log file is printed using the following command format:
vx O
Simply typing vx O (letter O) prints the log file on the screen.
Schneider Electric Buildings AB, June 2011
04-00124-06-en
103 (184)
12 Working with Third-party Communication Diagnostics
12.3
TAC Xenta Server – Gateway, Technical Manual
Diagnosing Incorrect Target Communications
Run the diagnostics log at the appropriate verbosity level and monitor
the resulting communications activity. If necessary, record the log to
file for later playback.
The type of log data is dependent on the target system. However, the
basic form should resemble the following log excerpts from the Modbus
Master example.
Example log: Correct Operation
Messages prefixed by REQ indicate the type of request that was sent out
to the target system (in the example, the first REQ message retrieved a
range of Modbus registers from the power meter slave device at address
1). The XVAL-prefixed messages indicate a change to an I/O value (in
the above example, the third XVAL message indicates that Plant:Volts
P1 was read from the meter as 258.305 volts). Obviously, the types and
formats of messages are dependent on the target, but should be reasonably self-explanatory.
104 (184)
Schneider Electric Buildings AB, June 2011
04-00124-06-en
TAC Xenta Server – Gateway, Technical Manual
12 Working with Third-party Communication Diagnostics
Example log: Modbus Timeout Error
The messages prefixed by !MBM in this log indicate that a Modbus
device has not responded. The most likely cause of such errors depends
on how many target devices are affected. Consider, therefore, the following:
•
If the fault is to a single unit only, then this indicates a fault in that
particular device, or possibly the wiring to it. Alternatively, it may
indicate an address mismatch in the Xenta 913 configuration.
•
If all units have failed, this is an indication of a fault in the
Xenta 913 equipment, or possibly the serial connection to it. Alternatively, it may indicate the incorrect setting of the Xenta 913
communications parameters.
In any case, it is important to check all cabling and the configuration of
the Xenta 913 and associated slave devices whenever communication
errors occur. The likely importance of errors depends on how regularly
they occur. Consider, therefore, the following:
•
Infrequent errors may indicate a noisy cable, but can often be
ignored. However, if the error frequency is such that one or more
devices are falsely flagged as failed, then corrective action is
required.
•
If errors such as “checksum mismatch” or “bad data” occur regularly, then this most probably indicates a software bug or protocol
implementation error. Such errors need to be reported to Schneider
Electric for correction, preferably accompanied by a representative log file.
The following screen capture shows the example values page containing communication status values for the Modbus Master example. For
a log containing the same number of time-out as the preceding example,
it is quite common for all status values to show FAILED. Of course, if
the interface was working previously, then the FAILED status values
would indicate that a hardware fault had just arisen on the target system.
Schneider Electric Buildings AB, June 2011
04-00124-06-en
105 (184)
12 Working with Third-party Communication Diagnostics
106 (184)
TAC Xenta Server – Gateway, Technical Manual
Schneider Electric Buildings AB, June 2011
04-00124-06-en
APPENDIX
A
Network Connections Overview
B
Protocols
TAC Xenta Server – Gateway, Technical Manual
A Network Connections Overview
A
Network Connections Overview
A.1
General
The Xenta 913 acts both as an interface between IP/LonWorks networks and as a coordinator/presentation system for numerous application facilities in these networks. To accomplish this, several
configuration and application parameters have to be set, web pages
designed and user authorities defined. These settings are described in
the sections below.
Most of the parameters can be defined in either of two ways:
•
in XBuilder as TAC Xenta 913 Properties:
•
For more information about configuring the Xenta 913, see TAC
Xenta 500/700/911/913, Product Manual.
•
in the Xenta 913 itself in one of the Configuration pages:
Schneider Electric Buildings AB, June 2011
04-00124-06-en
109 (184)
A Network Connections Overview
TAC Xenta Server – Gateway, Technical Manual
Upon sending the project to the Xenta 913, parameters from XBuilder
may overwrite parameters set directly in the Xenta 913; a warning is
displayed before this occurs, however.
Tip
•
110 (184)
Parameters set in the Xenta 913 should be uploaded to XBuilder
so they are saved in the XBuilder project.
Schneider Electric Buildings AB, June 2011
04-00124-06-en
TAC Xenta Server – Gateway, Technical Manual
A Network Connections Overview
The configuration and application parameters relate to the network connections in accordance with the following schematic overview.
Other
Xenta Server
RS485 A
TAC Xenta 913
RS485 C
I/NET
Schneider Electric Buildings AB, June 2011
04-00124-06-en
111 (184)
A Network Connections Overview
A.2
TAC Xenta Server – Gateway, Technical Manual
Basic TCP/IP Settings
Ask the network administrator for the basic IP address information.
TCP/IP
The Ethernet interface includes the IP Address, Subnet Mask, Default
Gateway, DNS (Domain Name System) and DHCP (Dynamic Host
Configuration Protocol). These properties can be set using the setip
command from the terminal interface.
If you are planning to use DHCP, please read the DHCP section below
to understand how DHCP works and when to use it.
Static IP Address
•
For more information about configuring an IP address, see TAC
Xenta 500/700/911/913, Product Manual.
Dynamic IP Address, DHCP
While the Xenta 913 supports DHCP (Dynamic Host Configuration
Protocol) to retrieve its IP address, subnet mask, default gateway and
DNS, manual configuration of these values provides several advantages
over using DHCP. Consider the following:
112 (184)
Schneider Electric Buildings AB, June 2011
04-00124-06-en
TAC Xenta Server – Gateway, Technical Manual
A Network Connections Overview
•
DHCP IP address Server Failure. If the DHCP server fails, the
Xenta 913 cannot retrieve its addresses, and as a result will use a
temporary IP address.
•
Maintenance. Each Xenta 913 may require an individual address
reservation in the DHCP server. Creating these address reservations typically includes collecting the MAC IDs from each
Xenta 913. Replacing an Xenta 913 requires changing the DHCP
reservation as well. The use of redundant DHCP servers requires
replicating DHCP reservations.
•
Address lease (without reservation). The DHCP server delivers IP
addresses for a certain period of time, that is, an address is leased
by the Xenta 913. When the lease time runs out, the Xenta 913
tries to renew the address lease. If the address is not reserved for
the Xenta 913 with a certain MAC ID, the device might receive a
different IP address.
If you decide to use DHCP, you must decide whether your Xenta 913
should have a statically or a dynamically DHCP-provided IP address.
A static address does not change every time the Xenta 913 restarts and
is manually configured. DHCP servers typically do not provide static
addresses, but they can generally be configured to do so.
If your Xenta 913 needs a static address, your network administrator
must create an individual address reservation in the DHCP server, using
the Ethernet MAC ID of the Xenta 913.
Note
•
If a dynamic reservation is made by the DHCP IP address server,
it has to update the DNS with the address leased to the
Xenta 913.
To use DHCP on the Xenta 913, you must enable it from either the terminal connection using the setip command or from the TCP/IP configuration page in the web interface.
The DHCP server must be configured to provide at least the following
information:
•
IP address
•
Subnet
and preferably:
•
Default gateway
•
DNS (optional)
Schneider Electric Buildings AB, June 2011
04-00124-06-en
113 (184)
A Network Connections Overview
A.3
TAC Xenta Server – Gateway, Technical Manual
Application Server Setting – HTTP
HTTP
The Xenta 913 is an HTTP (Hypertext Transfer Protocol) server. Several users can view the web pages at the same time, but they are limited
by the number of HTTP sessions allowed.
•
Max. simultaneous HTTP sessions, choose a number from the list.
The default setting is 15. Several users can view files at the same
time.
•
HTTP port, define a port number. The default setting is 80. When
port 80 for some reason could not be used it is possible to use
another port. Valid values for the HTTP port are 80 and between
1024 and 65535. If the port is changed, the new port must be specified in the URL. For example, http://172.20.4.74:8080
•
HTTPS port, define a port number. The default setting is 443.
Valid values for the HTTPS port are 443 and between 1024 and
65535.
What is an HTTP Session?
Your web browser is an HTTP client, sending requests to the Xenta 913.
The HTTP server in the Xenta 913 receives the request and, following
any necessary processing, the requested file is returned. An HTTP session is the connection that exists during data communication between
the web browser and the Xenta 913. The session ends when all the data
has been received.
Rules of Thumb
Each web page of the status viewer, the alarm viewer and the graphics
viewer, sets up a full HTTP session.
When loading a web page, a number of sessions may be used simultaneously, depending on the number of sessions available.
114 (184)
Schneider Electric Buildings AB, June 2011
04-00124-06-en
TAC Xenta Server – Gateway, Technical Manual
A.4
A Network Connections Overview
Network Management Settings – SNMP
The Simple Network Management Protocol is a set of protocols for
managing complex networks. SNMP works by sending messages,
called protocol data units (PDUs), to different parts of a network.
These messages can be picked up and analyzed by a network supervisor.
To utilize this function (SNMP v 1), a number of parameters must be set
in the Xenta 913.
Select Configuration-Network-SNMP:
The following parameters are used.
Schneider Electric Buildings AB, June 2011
04-00124-06-en
115 (184)
A Network Connections Overview
TAC Xenta Server – Gateway, Technical Manual
SNMP Agent (requesting information from the Xenta 913)
•
Management Station IP Address – The IP address of the network supervisor. IP 0.0.0.0 means that messages can be picked up
at any point in the network.
•
SNMP Port Number – Port no. used for SNMP access, not to be
changed.
•
Community Name – As set up with the Agent.
•
System Contact – Optional descriptive text.
•
System Location – Optional descriptive text.
SNMP Trap Configuration (information transfer initiated by
the TAC Xenta 913)
116 (184)
•
SNMP Trap Target IP Address – The IP address of the network
trap target.
•
SNMP Trap Port Number – Port no. used for the SNMP trap target.
•
Trap Community Name – As set up with the Agent.
Schneider Electric Buildings AB, June 2011
04-00124-06-en
TAC Xenta Server – Gateway, Technical Manual
B Protocols
B
Protocols
B.1
Modbus Serial Line Master
The Xenta 913 can be configured to act as the sole master on a Modbus
and/or J-Bus serial network to allow monitoring and control of one or
more slave devices through an I/NET or LON control system. Both the
RTU and ASCII protocol formats are supported.
Modbus Master
LON or I/NET Control System
Value exchange
Xenta 913
RS-485 A
Modbus Network
RS-485
Extender
RTU or ASCII
Slave
Slave
Slave
Fig. B.1: Modbus serial line master
A number of Modbus Registers can be connected to a corresponding set
of LON Network Variables or I/Net Points to allow one or more Slave
devices to be monitored and controlled. The Xenta 913 can act as the
sole network Master, exchanging the required register values with the
targeted slave devices.
Schneider Electric Buildings AB, June 2011
04-00124-06-en
117 (184)
B Protocols
B.1.1
TAC Xenta Server – Gateway, Technical Manual
Modbus Master Networks
A Modbus Master Network consists of a single master and one or more
independent slaves interconnected by an RS-485 serial link. While the
Xenta 913 is attached to the network it continuously polls the attached
slaves to read the required register values. It can also write the necessary
control system values out to the slaves. All devices on the network must
use the same Modbus framing mode (RTU or ASCII).
Each slave device must have a unique numeric address on the network.
Slave addresses can be in the range 1 to 247 (address 0 is reserved for
broadcasts so is not normally applicable to a single device). However,
not all 247 addresses can be used since a maximum of 32 slave devices
can be physically connected to a Modbus serial line. If more than 32
slaves are required one or more RS-485 Network extenders can be fitted.
Some Modbus routers can represent multiple slave devices on a sub-network. In this case, the connection to the router can be RS-232 but the
Xenta 913 will still be able to address the slave devices as if they were
directly connected to it. Some routers use a device address of 0 to access
values within the router itself rather than the slave devices on its
sub-network.
Note
•
118 (184)
Regardless of the Modbus network configuration, all connected
slave devices must be assigned a unique numeric address.
Schneider Electric Buildings AB, June 2011
04-00124-06-en
TAC Xenta Server – Gateway, Technical Manual
B.1.2
B Protocols
Modbus Master Interface
The Modbus Master interface is added into the network pane of
XBuilder, as shown for a Modsim example network in the following
screenshot.
Interface Properties
•
Port Type – In most cases the RS-485 port option will be selected.
The RS-232 option may be suitable for connecting to a single network device such as a router or simulator, but RS-485 will be
required if more than one device is directly connected to the Xenta
913’s serial port.
•
Baud Rate, Parity, #Data Bits, #Stop Bits – All the communication parameters, such as baud rate and parity, must be the same for
all devices on the network.
•
Framing Mode – Allows the applicable Modbus framing mode to
be selected (RTU or ASCII). Most Modbus networks use RTU
mode, which is a compact binary form suitable for local area networks. The ASCII mode is less compact because it uses 2 characters per byte, but may be better suited to wider area networks (such
as through modems).
Interface Status Signals
The Modbus Master interface driver generates several network specific
communication status signals, as described below.
•
ComsFail – Flags a complete communications failure. Activated
only if communication has failed to all slaves on the Modbus network. Normally caused by incorrect communication property settings, or by faulty wiring of the RS-485 network between the
Xenta 913 and the slave devices.
•
OutsFail – Flags if writing to one or more output values has failed
on the Modbus network. Normally a write fails because an incorrect register address has been entered.
•
InsFail – Flags if reading of one or more input values has failed
on the Modbus network. Normally a read fails because an incorrect register address has been entered.
Schneider Electric Buildings AB, June 2011
04-00124-06-en
119 (184)
B Protocols
TAC Xenta Server – Gateway, Technical Manual
•
B.1.3
online – Flags ONLINE during normal network communications,
and will change to OFFLINE only if communication has failed to
all slaves on the Modbus network. An OFFLINE condition normally indicates incorrect communication property settings, or
faulty wiring of the network between the Xenta 913 and the slave
devices.
Modbus Slave Device
One or more slave devices are added to the Modbus Master interface
node in the network pane of XBuilder, as shown for the “Panel” slave
device of the Modsim example network in the following screenshot.
Device Template
Device templates having a [Modbus_Ext] filename prefix are used to
create Modbus Slave devices in XBuilder. Subsequently, each device
node is used to configure communications with the physical slave it represents on the Modbus network.
Device Properties
120 (184)
•
Address – Allows the required slave address to be entered. The
entered number should correspond to the unique address of the target slave on the Modbus network (1 to 247). An address of 0 may
be entered if the target device is a router to a Modbus network.
•
Max Range Size – Sets the maximum number of registers to be
polled in a single request (1 to 100). Lower values increase the
number of messages needed to poll all the required register values,
whereas higher settings may reduce the number (if supported by
the device). Most devices support at least the default value of 20,
but a few may support less.
Schneider Electric Buildings AB, June 2011
04-00124-06-en
TAC Xenta Server – Gateway, Technical Manual
B Protocols
Device Status Signal
For each device the Modbus Master driver generates a communication
status signal.
•
ComsFail – Flags if communications with the slave device have
failed. May be caused by an incorrect device address having been
entered, or by incorrect wiring of the RS-485 network connection
to it.
•
online – Flags ONLINE during normal device communications,
and will change to OFFLINE if communications with the slave
device have failed. An OFFLINE condition normally indicates an
incorrect device address having been entered, or by incorrect wiring of the network connection to it.
Schneider Electric Buildings AB, June 2011
04-00124-06-en
121 (184)
B Protocols
B.1.4
TAC Xenta Server – Gateway, Technical Manual
Modbus I/O Signals
Each Modbus Slave device represents a specific type of hardware
device. There are two main ways to work with Modbus I/O signals,
Fixed Address Block and Full Address Range register.
Fixed Address Blocks
When Fixed Address Blocks is used for the device all data types have
to adhere to the fixed address number according to Table B.1, “Fixed
Address Blocks number ranges”
Full Address Range register
When Full Address Range register is used for the device, the table type
(Coil, Discrete Input, Input Register or Holding Register) has to be
specified in the Register Table. See Table B.2, “Full Address number
ranges”
Note
•
122 (184)
It is not possible to mix Fixed Address Blocks register table type
with Full Address Range register table types in the same device
template.
Schneider Electric Buildings AB, June 2011
04-00124-06-en
TAC Xenta Server – Gateway, Technical Manual
B.1.5
B Protocols
The Modbus Device Editor
The device editor is used to create new slave types, or to modify existing
types, as shown in the following screenshot.
Each signal can be used to read or write the value of one or more Modbus registers within any slave devices of the type being defined.
•
Register Number – Allows the base number of each required
Modbus register set to be selected. The entered number should
contain 5 characters in one of the following forms.
For Fixed Address Blocks see: Table B.1, “Fixed Address Blocks
number ranges”.
For Full Address range see: Table B.2, “Full Address number
ranges”.
Table B.1: Fixed Address Blocks number ranges
Fixed Address Blocks
number ranges
Functions
codes
Description
00001–10000
1, 5
Read and write a single-bit coil state. (Coil)
10001–20000
2
Read a single-bit input status. (Discrete Input)
Schneider Electric Buildings AB, June 2011
04-00124-06-en
123 (184)
B Protocols
TAC Xenta Server – Gateway, Technical Manual
Table B.1: Fixed Address Blocks number ranges (Contd.)
Fixed Address Blocks
number ranges
Functions
codes
Description
30001–40000
4
Read one or more 16-bit input registers. (Input Register)
40001–50000
3, 6, 10
Read and write one or more 16-bit holding registers.
(Holding Register)
X0001–XFFFF (hex)
3, 6, 10
Read and write one or more 16-bit J-Bus registers.
Table B.2: Full Address number ranges
Full Address number
ranges
Functions
codes
Description
00001– 65536
1, 5
Read and write a single-bit coil state. (Coil)
00001– 65536
2
Read a single-bit input status. (Descrete Input)
00001– 65536
4
Read one or more 16-bit input registers. (Input Register)
00001– 65536
3, 6, 10
Read and write one or more 16-bit holding registers.
(Holding Register)
X0001–XFFFF (hex)
3, 6, 10
Read and write one or more 16-bit J-Bus registers.
Most Modbus device documents list their registers by number, but
some list them by the equivalent address that is 1 less than the register number. Similarly, many documents do not clearly state what
type of register it is (coil, holding and so on), in which case the
function codes from the table above may be required to determine
what number range to enter.
J-Bus is a derivative sub-set of Modbus that only supports a single
register address space compared to the standard 4. And most J-Bus
slaves list their register numbers in hexadecimal form hence the X
address prefix is used to denote a J-Bus address.
124 (184)
•
Register Table – If Full Address range is used, select the table
type Discrete Input, Coil, Input Register or Holding Register in
this column. If Fixed Address Blocks is used, all types have to be
set to Fixed Address Blocks.
•
Register Data Type – Selects the format of the value within the
slave’s memory. Most register values are 16-bit signed or unsigned
integers, or 1 bit switch/coil status flags. But two registers can be
combined into one 32-bit integer or floating-point value. And in
some cases 2, 3 or 4 registers are combined into a single integer
Schneider Electric Buildings AB, June 2011
04-00124-06-en
TAC Xenta Server – Gateway, Technical Manual
B Protocols
value using the special MOD10k format. The registers can also be
reversed, in these cases they are specified as:
32 bit MOD10k Reverse, 48 bit MOD10k Reverse, or 64 bit
MOD10k Reverse.
•
Bit Mask Start and Stop – Allows several signals to be split off
from the applicable N-bit subsets of a single register. The mask
should be left blank to utilize all 16 bits of the register, or the
applicable start and stop bits entered to match the required sub-set
of bits within it. Several different bit masks can be applied to the
same register to monitor different parts of it.
•
I/O Signal Direction – Most Modbus Slave device signals are
used to monitor a register’s value, in which case the I/O column
parameter should be set to Read-only (R). In a few cases it may be
necessary to control a coil or holding register’s value, in which
case I/O should be set to Write-only (W).
Setting a coil or holding register’s signal to Read/Write (R/W)
allows both monitoring of its value as well as control of it. However, this means that the Xenta 913 will continuously read the register to fetch the latest value even though it is expecting to have
control of it. This is either a waste of network bandwidth because
the value will not be changed externally, or it presents a potentially
dangerous conflict of control because it can be. In nearly all cases
the Write-only option is preferable because this will cause the
Xenta 913 to read the register’s value once at start-up before it
assumes control of it.
Note
•
The W and R/W I/O options should only be selected for the register types that are described as having read and write capability
in the preceding Register Number table.
•
Coefficient Gain and Offset – Allow the raw register value to be
converted into the desired absolute units. If the raw register value
is a real number then normally no conversion is necessary and the
default gain and offset of 1 and 0 can be used. But if the raw register value is an integer then it often needs to have a gain and offset
applied.
As an example, a power meter might generate voltage values as
unsigned integers with the actual voltage multiplied by 10. In this
case the Xenta 913’s gain should be set to 0.1 to convert the raw
units (10*V) into the required absolute units (V).
•
Signal DataType – Is set to a default of BOOL, INTEGER or
REAL based on the selected register type. But the default data
type may subsequently need to be changed to suit the applied conversion coefficient. For example, if a gain of 0.1 is applied to an
Schneider Electric Buildings AB, June 2011
04-00124-06-en
125 (184)
B Protocols
TAC Xenta Server – Gateway, Technical Manual
integer it will produce a real value, so the default DataType would
be changed to REAL in this case.
•
Signal Measurement System – The measurement system parameters need to be manually set to match the absolute form of the
register value after conversion by the coefficient gain and offset,
being either an enumeration or analogue engineering unit as applicable..
Note
•
126 (184)
For the Modbus Master protocol, communications are improved
if the signals (register addresses) are added in sequence in the
device editor starting with the lowest register number.
Schneider Electric Buildings AB, June 2011
04-00124-06-en
TAC Xenta Server – Gateway, Technical Manual
B.2
B Protocols
Modbus Serial Line Slave
The Xenta 913 can be configured to act as one or more slaves on a Modbus and/or J-Bus serial network to allow an external master to read and
write values from an I/NET or LON control system. Both the RTU and
ASCII protocol formats are supported.
Modbus Slave
LON or I/NET Control System
Value exchange
Xenta 913
RS-485 A
Modbus Network
RTU or ASCII
Master
Slave
Slave
Fig. B.2: Modbus serial line slave
A number of Modbus Registers can be connected to a corresponding set
of LON Network Variables or I/Net Points to allow the Master device
to exchange values with the BMS through the Xenta 913, which acts as
one or more slaves to reflect BMS values as Modbus registers
Schneider Electric Buildings AB, June 2011
04-00124-06-en
127 (184)
B Protocols
B.2.1
TAC Xenta Server – Gateway, Technical Manual
Modbus Slave Networks
A Modbus Slave Network consists of a single master and one or more
independent slaves interconnected by an RS-485 serial link. While the
Xenta 913 is attached to the network it appears as one or more pseudo
slave devices to an external master. Through these pseudo slaves the
master can write values to the corresponding inputs within the control
system, and can also read output values from it. The master and all
slaves on the network must use the same Modbus framing mode (RTU
or ASCII).
Each physical or pseudo slave device must have a unique numeric
address on the network. Slave addresses can be in the range 1 to 247
(address 0 is reserved for broadcasts so it is not normally applicable to
a single device). A maximum of 32 physical slave devices can be physically connected to a Modbus serial line (the I/Link represents 1 physical slave regardless of how many pseudo slaves it represents). If more
physical slaves are required one or more RS-485 Network extenders can
be fitted.
The Xenta 913 can be directly connected to the master as the sole slave
device, in which case the connection between them can be RS-232 or
RS-485.
Note
•
128 (184)
Regardless of the Modbus network configuration, all connected
slave devices must be assigned a unique numeric address.
Schneider Electric Buildings AB, June 2011
04-00124-06-en
TAC Xenta Server – Gateway, Technical Manual
B.2.2
B Protocols
Modbus Slave Devices
The Modbus Slave interface is added into the network pane of
XBuilder, as shown for an XLink example network in the following
screenshot.
Interface Properties
•
Port Type – In most cases the RS-485 port option will be selected.
The RS-232 option may be suitable for connecting directly to a
master or simulator, but RS-485 will be required if additional slave
devices are attached to the Modbus serial line.
•
Baud Rate, Parity, #Data Bits, #Stop Bits – All the communication parameters, such as baud rate and parity, must be the same for
all devices on the network.
•
Framing Mode – Allows the applicable Modbus framing mode to
be selected (RTU or ASCII). Most Modbus networks use RTU
mode, which is a compact binary form suitable for local area networks. The ASCII mode is less compact because it uses 2 characters per byte, but may be better suited to wider area networks (such
as through modems).
Interface Status Signals
The Modbus Slave interface driver generates several network specific
communication status signals, as described below.
•
ComsFail – Flags a complete communications failure. Activated
only if there is no detectable communications with the Modbus
master. Normally caused by incorrect communication property
settings, or by faulty wiring of the RS-485 network between the
Xenta 913 and the master.
•
WdogTgl – Toggles state periodically. May be used by the control
system to check that the interface to the external master is operating.
•
WdogFail – Indicates that at least one I/O signal has been defined
as “Toggled” but is not being updated by the master at the required
rate. Normally indicates that, although the master is connected and
communicating, either it or the interface is incorrectly configured
and so essential values are not being exchanged.
Schneider Electric Buildings AB, June 2011
04-00124-06-en
129 (184)
B Protocols
TAC Xenta Server – Gateway, Technical Manual
•
B.2.3
online – Flags ONLINE during normal network communications,
and will change to OFFLINE only if communication has failed to
the master on the Modbus network. An OFFLINE condition normally indicates incorrect communication property settings, or
faulty wiring of the network between the Xenta 913 and the master.
Pseudo Slave Devices
One or more pseudo devices are added to the Modbus Slave interface
node in the network pane of XBuilder, as shown for the Master pseudo
device of the XLink example network in the following screenshot.
Device Template
Device templates having a [Modbus_Int] filename prefix are used to
create Modbus Pseudo Slave devices in XBuilder. Subsequently, each
device node is used to configure its communications so that it can
appear as a physical slave to the master.
Device Properties
•
Address – Allows the required slave address to be entered. The
entered number should correspond to the unique address that the
pseudo slave will respond to on the Modbus network (1 to 247).
Often only one pseudo slave will be required, although it may be
preferable to break a larger number of signals into logical groups
represented by their own pseudo slave type.
Device Status Signal
For each device the Modbus Slave driver generates a communication
status signal.
130 (184)
•
ComsFail – Flags if the master is not communicating with the
pseudo slave. May be caused by an incorrect device address having been entered resulting in the master not polling or writing the
pseudo slave device.
•
online – Flags ONLINE during normal device communications,
and will change to OFFLINE if communications with the pseudo
slave have failed. An OFFLINE condition normally indicates an
Schneider Electric Buildings AB, June 2011
04-00124-06-en
TAC Xenta Server – Gateway, Technical Manual
B Protocols
incorrect device address having been entered, or by incorrect wiring of the network connection to it.
Schneider Electric Buildings AB, June 2011
04-00124-06-en
131 (184)
B Protocols
B.2.4
TAC Xenta Server – Gateway, Technical Manual
Modbus I/O Signals
Each Pseudo Slave device represents a logical group of I/O signals
within the LON or I/Net control system. The device editor is used to create new pseudo-slave types, or to modify existing types, as shown in the
following screenshot.
Each signal can be used to allow the Modbus master to access a LON or
I/Net value as if it was a register within a slave device. Values written
by the master can be read by the interface, and values written by the
interface can be read by the master.
132 (184)
Schneider Electric Buildings AB, June 2011
04-00124-06-en
TAC Xenta Server – Gateway, Technical Manual
•
B Protocols
Register Number– Allows the base number of each required
Modbus register set to be selected. The entered number should
contain 5 characters in one of the following forms:
Table B.3: Register numbers.
Number
Range
Format
Functions
Description
00001–10000
Decimal
1, 5
Read and write a single-bit coil state.
10001–20000
Decimal
2
Read a single-bit input status.
30001–40000
Decimal
4
Read one or more 16-bit input registers.
40001–50000
Decimal
3, 6, 10
Read and write one or more 16-bit holding registers.
X0001–XFFFF
Hex
3, 6, 10
Read and write one or more 16-bit J-Bus registers.
Notes
•
J-Bus is a derivative sub-set of Modbus that only supports a single register address space compared to the standard 4. And J-Bus
register addresses are normally entered using hexadecimal numbers, hence the X address prefix is used denote a J-Bus address.
•
It may be necessary to enter register numbers to match the expectation of the master. But in most cases any register numbering
scheme may be used and the master configured to suit.
•
Register Type – Selects the format of the value within the slave’s
memory. Most register values are 16-bit signed or unsigned integers, or 1 bit switch/coil status flags. The Modbus Slave driver
does not support 32-bit integer or floating point registers.
•
Bit Mask Start and Stop – Allows several signals to be split off
from the applicable N-bit subsets of a single register. The mask
should be left blank to utilize all 16 bits of the register, or the
applicable start and stop bits entered to match the required sub-set
of bits within it. Several different bit masks can be applied to the
same register to monitor different parts of it.
•
I/O Signal Direction – Most Modbus Slave device signals are
used to monitor a register’s value, in which case the I/O column
parameter should be set to Read-only (R). This setting allows the
master to write to the pseudo registers within the Xenta 913, effectively allowing these to be read from the master by the LON or
I/Net control system.
Schneider Electric Buildings AB, June 2011
04-00124-06-en
133 (184)
B Protocols
TAC Xenta Server – Gateway, Technical Manual
Notes
134 (184)
•
The R and R/W I/O options should only be selected for the register types that are described as having read and write capability in
the preceding Register Number table.
•
In a few cases it may be necessary to control a coil or holding
register’s value, in which case I/O should be set to Write-only
(W) or Read/Write (R/W). These settings allow the master to
read to the pseudo registers within the Xenta 913, effectively
allowing these to be written out to the master by the LON or
I/Net control system.
•
The Modbus Slave driver does not distinguish between
Write-only and Read/Write signals, so normally Write only
would be selected to indicate that one-way data flow is expected.
However, Read/Write can be selected to indicate that bi-directional data flow is possible.
Schneider Electric Buildings AB, June 2011
04-00124-06-en
TAC Xenta Server – Gateway, Technical Manual
•
B Protocols
Coefficient Gain and Offset – Allow the raw register value to be
converted into the desired absolute units. If the raw register value
is a real number then normally no conversion is necessary and the
default gain and offset of 1 and 0 can be used. But if the raw register value is an integer then it often needs to have a gain and offset
applied.
As an example, to pass a control system value representing voltage
to the master through an unsigned integer register requires the
actual voltage to be multiplied by 10 if 1 digit of resolution is
required. In this case the Xenta 913’s gain should be set to 0.1 to
convert the raw units (10*V) into the required absolute units (V).
•
Signal DataType – Is set to a default of BOOL, INTEGER or
REAL based on the selected register type. But the default data
type may subsequently need to be changed to suit the applied conversion coefficient. For example, if a gain of 0.1 is applied to an
integer it will produce a real value, so the default DataType would
be changed to REAL in this case.
•
Signal Measurement System – The measurement system parameters need to be manually set to match the absolute form of the
register value after conversion by the coefficient gain and offset,
being either an enumeration or analogue engineering unit as applicable.
Schneider Electric Buildings AB, June 2011
04-00124-06-en
135 (184)
B Protocols
B.3
TAC Xenta Server – Gateway, Technical Manual
Modbus TCP Client
The Xenta 913 can be configured to act as a client to a Modbus TCP
server to allow monitoring and control of one or more slave devices
through an I/NET or LON control system. Both the RTU and ASCII
protocol formats are supported.
Modbus TCP
LON or I/NET Control System
Value exchange
Xenta 913
10Base-T Ethernet
LAN
10Base-T Ethernet
Modbus Network
RTU or ASCII
Slave
Slave
Slave
Fig. B.3: Modbus TCP client
A number of Modbus Registers can be connected to a corresponding set
of LON Network Variables or I/Net Points to allow one or more Slave
devices to be monitored and controlled. The Xenta 913 acts as a network Client, exchanging the required register values with the slaves
through a Modbus TCP Server.
136 (184)
Schneider Electric Buildings AB, June 2011
04-00124-06-en
TAC Xenta Server – Gateway, Technical Manual
B.3.1
B Protocols
Modbus TCP Networks
A Modbus TCP Network consists of one or more clients connected to a
server. The server may act as device containing one or more virtual
slaves, or as a router to a separate RS-485 serial sub-network containing
one or more independent slaves.
While connected to the server over TCP the Xenta 913 acts as a client
to continuously poll the slaves through the server to read the required
data values for use within a control system. It can also write the necessary control system values out to the slaves if applicable. A router, and
all slaves on its sub-network, must use the same protocol mode (RTU or
ASCII).
Each slave device must have a unique numeric address within the
server. Slave addresses on a serial sub-network can be in the range 1 to
247, whereas virtual slave addresses within a Modbus TCP device can
be in the range 0 to 254.
The Xenta 913 and the Modbus TCP server is connected using
10Base-T Ethernet. However, the connection need not be direct, but
may be through any number of routers or bridges on a LAN. It is only
necessary for the IP address of the server to be accessible to the Xenta
913, and for the Modbus TCP port number (normally 502) to be open
for client connections on the server.
Note
•
Regardless of the Modbus network configuration, all connected
slave devices must be assigned a unique numeric address.
Schneider Electric Buildings AB, June 2011
04-00124-06-en
137 (184)
B Protocols
B.3.2
TAC Xenta Server – Gateway, Technical Manual
Modbus TCP Interface
The Modbus TCP interface is added into the network pane of XBuilder,
as shown for an IPSim example network in the following screenshot.
Interface Properties
•
Server IP Address – Numeric IP address of the applicable Modbus TCP server. The IP address must uniquely identify the server
on the network, and be directly accessible to any Xenta 913 clients
through their 10Base-T Ethernet connections.
•
Server TCP Port# – The default port number of 502 is the value
specified in the Modbus TCP protocol standard. In very rare cases
the Modbus TCP port number may be reassigned on the server, in
which case the new TCP Port# must be entered in place of the
default.
Interface Status Signals
The Modbus TCP interface driver generates several network specific
communication status signals, as described below.
138 (184)
•
ComsFail – Flags a complete communications failure. Activated
only if the connection to the Modbus TCP server has failed. Normally caused by an incorrect IP address or port number being
entered for the server, but may be caused by incorrect LAN
cabling or security settings.
•
OutsFail – Flags if writing to one or more output values has failed
on the Modbus network. Normally a write fails because an incorrect register address has been entered.
•
InsFail – Flags if reading of one or more input values has failed
on the Modbus network. Normally a read fails because an incorrect register address has been entered.
•
online – Flags ONLINE during normal network communications,
and will change to OFFLINE only if communication has failed to
all slaves on the Modbus network. An OFFLINE condition normally indicates incorrect communication property settings, or
faulty wiring of the network between the Xenta 913 and the Modbus TCP server.
Schneider Electric Buildings AB, June 2011
04-00124-06-en
TAC Xenta Server – Gateway, Technical Manual
B.3.3
B Protocols
Modbus Slave Devices
One or more slave devices are added to the Modbus TCP interface node
in the network pane of XBuilder, as shown for the Panel slave device of
the IPSim example network in the following screenshot.
Device Template
Device templates having a [Modbus_Ext] filename prefix are used to
create Modbus Slave devices in XBuilder. Subsequently, each device
node is used to configure communications with the physical slave it represents on the Modbus network.
Device Properties
•
Address – Allows the required slave address to be entered. The
entered number should correspond to the unique address of the target slave on the Modbus network (1 to 247). An address of 0 may
be entered to access values from the Modbus TCP server.
•
Max Range Size – Sets the maximum number of registers to be
polled in a single request (1 to 100). Lower values increase the
number of messages needed to poll all the required register values,
whereas higher settings may reduce the number (if supported by
the device). Most devices support at least the default value of 20,
but a few may support less.
Device Status Signal
For each device the Modbus TCP driver generates a communication status signal.
•
ComsFail – Flags if communications with the slave device have
failed. May be caused by an incorrect device address having been
entered, or by incorrect connection between the device and server.
•
online – Flags ONLINE during normal device communications,
and will change to OFFLINE if communications with the slave
device have failed. An OFFLINE condition normally indicates an
incorrect device address having been entered, or by incorrect wiring of the network connection to it.
Schneider Electric Buildings AB, June 2011
04-00124-06-en
139 (184)
B Protocols
B.3.4
TAC Xenta Server – Gateway, Technical Manual
Modbus I/O Signals
Each Modbus Slave device represents a specific type of hardware
device. There are two main ways to work with Modbus I/O signals,
Fixed Address Block and Full Address Range register.
Fixed Address Blocks
When Fixed Address Blocks is used for the device all data types have
to adhere to the fixed address number according to Table B.1, “Fixed
Address Blocks number ranges”
Full Address Range register
When Full Address Range register is used for the device, the table type
(Coil, Discrete Input, Input Register or Holding Register) has to be
specified in the Register Table. See Table B.2, “Full Address number
ranges”
Note
•
140 (184)
It is not possible to mix Fixed Address Blocks register table type
with Full Address Range register table types in the same device
template.
Schneider Electric Buildings AB, June 2011
04-00124-06-en
TAC Xenta Server – Gateway, Technical Manual
B.3.5
B Protocols
The Modbus Device Editor
Each Modbus Slave device represents a specific type of hardware
device. The device editor is used to create new slave types, or to modify
existing types, as shown in the following screenshot.
Each signal can be used to read or write the value of one or more Modbus registers within any slave devices of the type being defined.
•
Register Number – Allows the base number of each required
Modbus register set to be selected. The entered number should
contain 5 characters in one of the following forms.
For Fixed Address Blocks see: Table B.4, “Fixed Address Blocks
number ranges”
For Full Address range see: Table B.5, “Full Address number
ranges”
Table B.4: Fixed Address Blocks number ranges
Fixed Address Blocks
number ranges
Functions
codes
Description
00001–10000
1, 5
Read and write a single-bit coil state. (Coil)
10001–20000
2
Read a single-bit input status. (Discrete Input)
Schneider Electric Buildings AB, June 2011
04-00124-06-en
141 (184)
B Protocols
TAC Xenta Server – Gateway, Technical Manual
Table B.4: Fixed Address Blocks number ranges (Contd.)
Fixed Address Blocks
number ranges
Functions
codes
Description
30001–40000
4
Read one or more 16-bit input registers. (Input Register)
40001–50000
3, 6, 10
Read and write one or more 16-bit holding registers.
(Holding Register)
X0001–XFFFF (hex)
3, 6, 10
Read and write one or more 16-bit J-Bus registers.
Table B.5: Full Address number ranges
Full Address number
ranges
Functions
codes
Description
00001– 65536
1, 5
Read and write a single-bit coil state. (Coil)
00001– 65536
2
Read a single-bit input status. (Descrete Input)
00001– 65536
4
Read one or more 16-bit input registers. (Input Register)
00001– 65536
3, 6, 10
Read and write one or more 16-bit holding registers.
(Holding Register)
X0001–XFFFF (hex)
3, 6, 10
Read and write one or more 16-bit J-Bus registers.
Most Modbus device documents list their registers by number, but
some list them by the equivalent address that is 1 less than the register number. Similarly, many documents do not clearly state what
type of register it is (coil, holding and so on), in which case the
function codes from the table above may be required to determine
what number range to enter
J-Bus is a derivative sub-set of Modbus that only supports a single
register address space compared to the standard 4. And most J-Bus
slaves list their register numbers in hexadecimal form hence the X
address prefix is used to denote a J-Bus address.
Fixed Address Blocks should be selected in the Register Table if
the device supports fixed address blocks registers. The first number
in the Register Number will specify the register type (see Table
B.1). If the device supports full address range registers, the Register
Table has to specify the type of register (Coil, Discrete Input, Input
142 (184)
Schneider Electric Buildings AB, June 2011
04-00124-06-en
TAC Xenta Server – Gateway, Technical Manual
B Protocols
Register or Holding Register). The first number in the Register
Number will not be used for identifying the register type.
Note
•
It is not possible to mix Fixed Address Blocks register table type
with Full Address Range register table types in the same device
template.
•
Register Table – If Full Address range is used, select the table
type Discrete Input, Coil, Input Register or Holding Register in
this column. If Fixed Address Blocks is used, all types have to be
set to Fixed Address Blocks.
•
Register Data Type – Selects the format of the value within the
slave’s memory. Most register values are 16-bit signed or unsigned
integers, or 1 bit switch/coil status flags. But two registers can be
combined into one 32-bit integer or floating-point value. And in
some cases 2, 3 or 4 registers are combined into a single integer
value using the special MOD10k format. The registers can also be
reversed, in these cases they are specified as:
32 bit MOD10k Reverse, 48 bit MOD10k Reverse, or 64 bit
MOD10k Reverse.
•
Bit Mask Start and Stop – Allows several signals to be split off
from the applicable N-bit subsets of a single register. The mask
should be left blank to utilize all 16 bits of the register, or the
applicable start and stop bits entered to match the required sub-set
of bits within it. Several different bit masks can be applied to the
same register to monitor different parts of it.
•
I/O Signal Direction – Most Modbus Slave device signals are
used to monitor a register’s value, in which case the I/O column
parameter should be set to Read-only (R). In a few cases it may be
necessary to control a coil or holding register’s value, in which
case I/O should be set to Write-only (W).
Setting a coil or holding register’s signal to Read/Write (R/W)
allows both monitoring of its value as well as control of it. However, this means that the Xenta 913 will continuously read the register to fetch the latest value even though it is expecting to have
control of it. This is either a waste of network bandwidth because
the value will not be changed externally, or it presents a potentially
dangerous conflict of control because it can be! In nearly all cases
the Write-only option is preferable because this will cause the
Schneider Electric Buildings AB, June 2011
04-00124-06-en
143 (184)
B Protocols
TAC Xenta Server – Gateway, Technical Manual
Xenta 913 to read the register’s value once at start-up before it
assumes control of it.
Note
•
The W and R/W I/O options should only be selected for the register types that are described as having read and write capability
in the preceding Register Number table.
•
Coefficient Gain and Offset – Allow the raw register value to be
converted into the desired absolute units. If the raw register value
is a real number then normally no conversion is necessary and the
default gain and offset of 1 and 0 can be used. But if the raw register value is an integer then it often needs to have a gain and offset
applied.
As an example, a power meter might generate voltage values as
unsigned integers with the actual voltage multiplied by 10. In this
case the Xenta 913’s gain should be set to 0.1 to convert the raw
units (10*V) into the required absolute units (V).
•
Signal DataType – Is set to a default of BOOL, INTEGER or
REAL based on the selected register type. But the default data
type may subsequently need to be changed to suit the applied conversion coefficient. For example, if a gain of 0.1 is applied to an
integer it will produce a real value, so the default DataType would
be changed to REAL in this case.
•
Signal Measurement System – The measurement system parameters need to be manually set to match the absolute form of the
register value after conversion by the coefficient gain and offset,
being either an enumeration or analogue engineering unit as applicable.
Note
•
144 (184)
For the Modbus TCP protocol, communications are improved if
the signals (register addresses) are added in sequence in the
device editor starting with the lowest register number.
Schneider Electric Buildings AB, June 2011
04-00124-06-en
TAC Xenta Server – Gateway, Technical Manual
B.4
B Protocols
BACnet IP (Internet Protocol)
The Xenta 913 can be configured to connect to one or more target BACnet IP devices to allow values within them to be monitored and controlled through an I/NET or LON control system.
BACnet IP
LON or I/NET Control System
Value exchange
Xenta 913
10Base-T Ethernet
LAN
10Base-T Ethernet
BACnet IP Device Network
Device
Device
Device
Fig. B.4: BACnet IP
A number of BACnet Objects can be connected to a corresponding set
of LON Network Variables or I/Net Points to allow one or more target
devices to be monitored and controlled. The Xenta 913 acts as a network Client, exchanging the required I/O values with the target devices
on a TCP/IP network. Each target device acts as a Server to one or more
BACnet IP clients, including the Xenta 913.
Schneider Electric Buildings AB, June 2011
04-00124-06-en
145 (184)
B Protocols
B.4.1
TAC Xenta Server – Gateway, Technical Manual
BACnet IP Networks
The BACnet IP protocol allows one or more clients to communicate
with one or more server devices over a TCP/IP network. Any client can
poll a set of devices to read their data values, or can write data values to
them if applicable.
The Xenta 913 operates as the client. While connected to the network it
continuously polls the targeted BACnet IP devices to read the required
data values for use within a control system. It can also write the necessary control system values out to the devices. However, although the
Xenta 913 communicates using BACnet IP, it does not itself act as a
device on the BACnet network (that is, other BACnet devices or host
applications cannot access the Xenta 913 directly).
The Xenta 913 and the BACnet IP network is connected using
10Base-T Ethernet. However, the connection need not be direct, but
may be through any number of routers or bridges on a LAN. It is only
necessary for the IP addresses of the target devices to be accessible to
the Xenta 913, and for the BACnet IP port number to be open for client
connections on each device. The standard port number is 47808 decimal, which is BAC0 in hexadecimal.
Each target device must have a unique IP address on the network. The
maximum number of devices that can be attached to the target network
is only limited by the number of interface driver instances that can be
run simultaneously on the Xenta 913.
146 (184)
Schneider Electric Buildings AB, June 2011
04-00124-06-en
TAC Xenta Server – Gateway, Technical Manual
B.4.2
B Protocols
BACnet IP Interface
One or more BACnet IP interface drivers are added into the network
pane of XBuilder, as shown for the single IPSim example network in the
following screenshot.
Interface Properties
•
IP Address – Sets the IP address that uniquely identifies the
server device on the network. The selected address must be
directly accessible by the Xenta 913 client through its 10Base-T
Ethernet connection. If more than one BACnet IP device exists on
a network then a interface driver instance must be added for each
one that is to be accessed by the Xenta 913.
•
BACnet Port – Can normally be left as the default of 47808,
which is the value specified in the BACnet IP protocol standard.
However, in very rare cases the BACnet IP port number may be
reassigned on a sub-set of devices on the network, in which case
the new port number must be entered into the applicable interface’s BACnet Port property.
•
Write Priority – Allows an optional write priority to be entered
(3–16, with 3 being the highest priority and 16 the lowest). Can be
used to assign the gateway application’s priority versus other
applications should they also write a value to a single object. Normally left at the default write priority of 12.
The entered priority is sent with all object value write requests. If the
target object is not commendable then the priority is ignored and the last
written value is applied. However, if the target object is commendable
then the highest priority written value is applied, while lower priority
values are ignored.
Schneider Electric Buildings AB, June 2011
04-00124-06-en
147 (184)
B Protocols
TAC Xenta Server – Gateway, Technical Manual
Interface Status Signals
The BACnet IP interface driver generates several network specific communication status signals, as described below.
•
ComsFail – Flags a complete communications failure. Activated
only if communications has failed to the target device. This is
likely to be because of a network configuration or security problem, or because an incorrect IP address has been entered for the
target device
•
ObjsFail – Flags if communications has failed to one or more
objects on the target BACnet device. Normally objects fail
because an incorrect object instance number has been entered.
However, output objects may also fail as a result of attempting to
write an out-of-range value to it.
•
online – Flags ONLINE during normal network communications,
and will change to OFFLINE only if communication has failed to
the target device. An OFFLINE condition normally indicates
incorrect communication property settings, or faulty wiring of the
network between the Xenta 913 and the target device.
BACnet Target Devices
Normally only one slave device is added to each BACnet IP interface
node in the network pane of XBuilder, as shown for the Panel device of
the IPSim example network in the following screenshot.
148 (184)
Schneider Electric Buildings AB, June 2011
04-00124-06-en
TAC Xenta Server – Gateway, Technical Manual
B Protocols
Device Template
Device templates having a [BACnetIP] filename prefix are used to create BACnet IP network devices in XBuilder. Subsequently, each device
node is used to configure communications with a logical group of values within the host server device.
Note
•
The Xenta 913 does not use value grouping when communicating with the target device. Grouping is only provided because it
can be useful for a target device that contains a large number of
I/O values, or where its I/O values fit within a number of logical
or functional groups. Subsequently, each group can appear as a
separate node in Xbuilder.
Device Properties
•
Group# – Allows a numeric identifier to be assigned to a group of
values to assist in logging, but is not used for addressing on the
BACnet IP network. A suitable number may be entered if preferred, or the box left blank to use an automatically generated
sequence number.
Device Status Signal
For each device the BACnet IP driver generates a communication status
signal.
•
online – Flags ONLINE during normal device communications,
and will change to OFFLINE if communications with the device
have failed. An OFFLINE condition normally indicates an incorrect device address having been entered, or by incorrect wiring of
the network connection to it.
Schneider Electric Buildings AB, June 2011
04-00124-06-en
149 (184)
B Protocols
B.4.3
TAC Xenta Server – Gateway, Technical Manual
BACnet Object I/O Signals
Each BACnet IP device represents a specific group of I/O signals within
a server device. The device editor is used to create new pseudo device
types, or to modify existing types, as shown in the following screenshot.
Each signal can be used to read or write the present value a BACnet
object within any device signal groups of the type being defined.
•
BACnet Type – Selects the type of the required BACnet object
(AI, AV, BI and BV are shown in the above example). The selected
type must match that of the underlying BACnet object (AI for an
Analogue Input, BV for a Binary Value and so on).
•
Object Instance# – Sets the object identifier or instance number
of the required BACnet object. Normally this will be provided in
the documentation for the target device. Instance numbers can
range from 0 to 65565.
•
I/O Signal Direction – Most BACnet device signals are used to
monitor an object’s present value, in which case the I/O column
parameter should be set to Read-only (R). In a few cases it may be
necessary to control an object’s present value, in which case I/O
should be set to Write-only (W).
Setting an object’s present-value signal to Read/Write (R/W)
allows both monitoring of its value as well as control of it. How-
150 (184)
Schneider Electric Buildings AB, June 2011
04-00124-06-en
TAC Xenta Server – Gateway, Technical Manual
B Protocols
ever, this means that the Xenta 913 will continuously read the register to fetch the latest value even though it is expecting to have
control of it. This is either a waste of network bandwidth because
the value will not be changed externally, or it presents a potential
conflict of control because it can be! In nearly all cases the
Write-only option is preferable because this will cause the Xenta
913 to read the register’s value once at start-up before it assumes
control of it.
Notes
•
The W and R/W I/O options should only be selected for output
object types (for example, AO, BO, MO, AV, BV and MV).
•
If the W or R/W option is selected then the Write Priority property of the interface should be set to resolve any conflict of control with an external device. If the Xenta 913 is to be guaranteed
control then its Write Priority may need to be increased to
above that of the conflicting control device. Conversely, it the
external device is to be guaranteed control then the Xenta 913
can probably be left with its default Write Priority of 12.
•
Coefficient Gain and Offset – Allow the raw object’s value to be
converted into the desired absolute units. If the raw register value
is a real number then normally no conversion is necessary and the
default gain and offset of 1 and 0 can be used. But if the raw register value is an integer then it often needs to have a gain and offset
applied.
As an example, a power meter might generate voltage values as
unsigned integers with the actual voltage multiplied by 10. In this
case the Xenta 913’s gain should be set to 0.1 to convert the raw
units (10*V) into the required absolute units (V).
•
Signal DataType – Is set to a default of BOOL, INTEGER or
REAL based on the selected BACnet object type. But the default
data type may subsequently need to be changed to suit the applied
conversion coefficient. For example, if a gain of 0.1 is applied to
an integer it will produce a real value, so the default DataType
would be changed to REAL in this case.
•
Signal Measurement System – The measurement system parameters need to be manually set to match the absolute units of the
object’s value after conversion by the coefficient gain and offset,
being either an enumeration or analogue engineering unit as applicable.
Schneider Electric Buildings AB, June 2011
04-00124-06-en
151 (184)
B Protocols
B.5
TAC Xenta Server – Gateway, Technical Manual
BACnet MS/TP (Master Slave/Token Passing)
The Xenta 913 can be configured to connect to a BACnet MS/TP serial
network to allow monitoring and control of one or more devices through
an I/NET or LON control system.
BACnet MS/TP
LON or I/NET Control System
Value exchange
Xenta 913
RS-485 A
Master
BACnet MS/TP Network
Slave
Slave
Slave
Fig. B.5: BACnet MS/TP
A number of BACnet Objects can be connected to a corresponding set
of LON Network Variables or I/Net Points to allow one or more Master
or Slave devices to be monitored and controlled. The Xenta 913 acts a
master, but is designed to coexist with other masters on the MS/TP network if present.
B.5.1
BACnet MS/TP Networks
Each BACnet MS/TP Network consists of a number of independent
masters and slaves interconnected by an RS-485 serial link. A master
can poll slaves to read their data values, or can write data values to the
slaves if applicable. Some masters may also operate as a slave on the
network.
The Xenta 913 operates as a master only. Once it has successfully
joined the MS/TP Network it continuously polls the attached devices to
read the required data values for use within a control system. It can also
write the necessary control system values out to the slaves. Other masters can operate independently on the network, although each master is
required to share access using token passing.
Each master and slave device must have a unique numeric address on
the network. Slave addresses can be in the range 0 to 254, but master
addresses must be in the range 0 to 127. Furthermore, to minimize the
time taken to establish network communications, master addresses
should be restricted to less than 127 wherever practical.
A maximum of 32 master and/or slave devices can be physically connected to an MS/TP Network. If more devices are required one or more
RS-485 Network extenders can be fitted.
152 (184)
Schneider Electric Buildings AB, June 2011
04-00124-06-en
TAC Xenta Server – Gateway, Technical Manual
B.5.2
B Protocols
BACnet MS/TP Interface
The BACnet MS/TP interface driver is added into the network pane of
XBuilder, as shown for a SrlSim example network in the following
screenshot.
Interface Properties
•
Port Type – In most cases the RS-485 port option will be selected.
The RS-232 option may be suitable for connecting to a single
device such as a router or simulator, but RS-485 will be required if
more than one device is directly connected to the Xenta 913’s
serial port.
•
Baud Rate, Parity, #Data Bits, #Stop Bits – All the communication parameters, such as baud rate and parity, must be the same as
that of the target half-router.
•
This Master’s Address – Allows the Xenta 913’s master address
to be entered (0–127). The entered number should correspond to
the unique address of the Xenta 913 on the MS/TP network. Any
address not in use by another master can be used.
•
Maximum Master Address – Allows the maximum expected
address of any master to be entered (0–127). The entered number
should be set to just include the maximum number of masters
expected on the network, as this will reduce the amount of time
required to establish network communications on start-up. Setting
a lower number also reduces the token passing overhead during
normal operation.
Note
•
All master devices that allow it should have the same maximum
master address setting.
•
Write Priority – Allows an optional write priority to be entered
(3–16, with 3 being the highest priority and 16 the lowest). Can be
used to assign the gateway application’s priority versus other
applications should they also write a value to a single object. Normally left at the default Write Priority of 12.
Schneider Electric Buildings AB, June 2011
04-00124-06-en
153 (184)
B Protocols
TAC Xenta Server – Gateway, Technical Manual
The entered priority is sent with all object value write requests. If the
target object is not commendable then the priority is ignored and the last
written value is applied. However, if the target object is commendable
then the highest priority written value is applied, while lower priority
values are ignored.
Interface Status Signals
The BACnet MS/TP interface driver generates several network specific
communication status signals, as described below.
154 (184)
•
ComsFail – Flags a complete communications failure. Activated
only if communications has failed to all slaves on the MS/TP network.
•
ObjsFail – Flags if communications has failed to one or more
objects on the MS/TP network. Normally objects fail because an
incorrect device address or object instance number has been
entered. However, output objects may also fail as a result of
attempting to write an out-of-range value to it.
•
online – Flags ONLINE during normal network communications,
and will change to OFFLINE only if communication has failed to
all slaves on the MS/TP network. An OFFLINE condition normally indicates incorrect communication property settings, or
faulty wiring of the network between the Xenta 913 and the slaves
on the MS/TP network.
Schneider Electric Buildings AB, June 2011
04-00124-06-en
TAC Xenta Server – Gateway, Technical Manual
B.5.3
B Protocols
BACnet Target Devices
One or more slave devices are added to the BACnet MS/TP interface
node in the network pane of XBuilder, as shown for the Panel device of
the SrlSim example network in the following screenshot.
Device Template
Device templates having a [BACnet] filename prefix are used to create
BACnet MS/TP network devices in XBuilder. Subsequently, each
device node is used to configure communications with the physical
slave it represents on the target network.
Device Properties
•
Address – Allows the required device address to be entered. The
entered number should correspond to the unique address of a slave
device on the MS/TP network (0 to 254).
Device Status Signal
For each device the BACnet MS/TP driver generates a communication
status signal.
•
online – Flags ONLINE during normal device communications,
and will change to OFFLINE if communications with the slave
device have failed. An OFFLINE condition normally indicates an
incorrect device address having been entered, or by incorrect wiring of the network connection to it.
Only slave devices should be added into the XBuilder tree (master
devices are completely independent of each other). However, if a master
node can also act as a slave then it can be added to XBuilder so that the
Xenta 913 will be able to exchange data values with it.
Note
•
The same device address can be used for multiple devices to
allow splitting of a large set of I/O values into smaller pseudo
device types. This can be useful for target devices that contain
several logical data value “groups” because each group can
appear as a separate node in XBuilder.
Schneider Electric Buildings AB, June 2011
04-00124-06-en
155 (184)
B Protocols
B.5.4
TAC Xenta Server – Gateway, Technical Manual
BACnet Object I/O Signals
Each BACnet MS/TP device represents a specific type of hardware
device. The device editor is used to create new slave types, or to modify
existing types, as shown in the following screenshot.
Each signal can be used to read or write the “present value” a BACnet
object within any network devices of the type being defined.
156 (184)
•
BACnet Type – Selects the type of the required BACnet object
(AI, AV, BI and BV are shown in the above example). The selected
type must match that of the underlying BACnet object (AI for an
Analogue Input, BV for a Binary Value and so on).
•
Object Instance# – Sets the object identifier or instance number
of the required BACnet object. Normally this will be provided in
the documentation for the target device. Instance numbers can
range from 0 to 65565.
•
I/O Signal Direction – Most BACnet device signals are used to
monitor an object’s present value, in which case the I/O column
parameter should be set to Read-only (R). In a few cases it may be
necessary to control an object’s present value, in which case I/O
should be set to Write-only (W).
Schneider Electric Buildings AB, June 2011
04-00124-06-en
TAC Xenta Server – Gateway, Technical Manual
B Protocols
Setting an object’s present-value signal to Read/Write (R/W)
allows both monitoring of its value as well as control of it. However, this means that the Xenta 913 will continuously read the register to fetch the latest value even though it is expecting to have
control of it. This is either a waste of network bandwidth because
the value will not be changed externally, or it presents a potential
conflict of control because it can be! In nearly all cases the
Write-only option is preferable because this will cause the Xenta
913 to read the register’s value once at start-up before it assumes
control of it.
Notes
•
The W and R/W I/O options should only be selected for output
object types (for example, AO, BO, MO, AV, BV and MV).
•
If the W or R/W option is selected then the Write Priority property of the interface should be set to resolve any conflict of control with an external device. If the Xenta 913 is to be guaranteed
control then its Write Priority may need to be increased to
above that of the conflicting control device. Conversely, it the
external device is to be guaranteed control then the Xenta 913
can probably be left with its default Write Priority of 12.
•
Coefficient Gain and Offset – Allow the raw object’s value to be
converted into the desired absolute units. If the raw register value
is a real number then normally no conversion is necessary and the
default gain and offset of 1 and 0 can be used. But if the raw register value is an integer then it often needs to have a gain and offset
applied.
As an example, a power meter might generate voltage values as
unsigned integers with the actual voltage multiplied by 10. In this
case the Xenta 913’s gain should be set to 0.1 to convert the raw
units (10*V) into the required absolute units (V).
•
Signal DataType – Is set to a default of BOOL, INTEGER or
REAL based on the selected BACnet object type. But the default
data type may subsequently need to be changed to suit the applied
conversion coefficient. For example, if a gain of 0.1 is applied to
an integer it will produce a real value, so the default DataType
would be changed to REAL in this case.
•
Signal Measurement System – The measurement system parameters need to be manually set to match the absolute units of the
object’s value after conversion by the coefficient gain and offset,
being either an enumeration or analogue engineering unit as applicable.
Schneider Electric Buildings AB, June 2011
04-00124-06-en
157 (184)
B Protocols
B.6
TAC Xenta Server – Gateway, Technical Manual
BACnet PTP (Point To Point)
The Xenta 913 can be configured to connect to a target network through
a BACnet PTP half router to allow monitoring and control of one or
more devices through an I/NET or LON control system.
BACnet PTP
LON or I/NET Control System
Value exchange
Xenta 913
RS-232 A
BACnet or other Network
Device
Device
Device
Fig. B.6: BACnet PTP
A number of BACnet Objects can be connected to a corresponding set
of LON Network Variables or I/Net Points to allow one or more target
devices to be monitored and controlled. The target devices can be connected to the router using another type of BACnet protocol such as
MS/TP or IP, or through any other type of network supported by the
router and target devices.
158 (184)
Schneider Electric Buildings AB, June 2011
04-00124-06-en
TAC Xenta Server – Gateway, Technical Manual
B.6.1
B Protocols
BACnet PTP Networks
The BACnet Point To Point protocol allows two nodes to communicate
over either a dedicated RS-232 serial connection or a modem. In either
case, each node is termed a half-router because together they are able to
route messages between 2 BACnet networks using the RS-232 or
modem link. In practice, however, even nodes that do not connect to a
BACnet network can still exchange values using the PTP protocol.
Note
•
The target half-router need not be physically connected to a
device network. It can instead be a stand-alone device, or can
appear as multiple pseudo devices, so that it can exchange values
using the BACnet Point To Point protocol.
Although the Xenta 913 communicates using the PTP link, it does not
itself act as a device on the BACnet network (that is, other BACnet
devices or host applications cannot access the Xenta 913 directly). But
once the Xenta 913 has successfully connected to the target half router
it continuously polls the target devices to read the required object values
for use within a control system. It can also write the necessary control
system values out to the target devices.
Each target device must have a unique numeric address on the network.
Device addresses can be in the range 1 to 255. The maximum number
of devices that can be attached to the target network varies according to
its type (see the documentation supplied with the target half-router and
devices for more information).
Schneider Electric Buildings AB, June 2011
04-00124-06-en
159 (184)
B Protocols
B.6.2
TAC Xenta Server – Gateway, Technical Manual
BACnet PTP Interface
The BACnet PTP interface driver is added into the network pane of
XBuilder, as shown for a SrlSim example network in the following
screenshot.
Interface Properties
•
Port Type – In most cases the RS-232 port option will be selected.
The RS-485 option should only be used in the rare case of a target
half-router using either RS-422 or RS-485.
•
Baud Rate, Parity, #Data Bits, #Stop Bits – All the communication parameters, such as baud rate and parity, must be the same as
that of the target half-router.
•
Subnet# – Allows the target BACnet network number to be
entered (0–65535). The entered number should correspond to the
unique number of the BACnet network that contains the target
devices. Normally the target BACnet network should be the same
as the one that is physically connected to the target half-router.
•
Message delay (mS) – Allows an optional interval to be interspersed between poll messages. Normally left blank or set to zero
to minimize the time the Xenta 913 takes to read all the required
input values.
Some slower half-routers may generate an excessive number of
response time-outs when being polled at the maximum rate. In
these cases a non-zero delay may be required, but some experimentation will be required to determine the smallest practical delay. In
severe cases a delay of up to 500mS may be entered, but this will
significantly reduce the rate at which the Xenta 913 can read values
from the target devices.
•
160 (184)
Write Priority – Allows an optional write priority to be entered
(3–16, with 3 being the highest priority and 16 the lowest). Can be
used to assign the gateway application’s priority versus other
applications should they also write a value to a single object. Normally left at the default write priority of 12.
Schneider Electric Buildings AB, June 2011
04-00124-06-en
TAC Xenta Server – Gateway, Technical Manual
B Protocols
The entered priority is sent with all object value write requests. If
the target object is not commendable then the priority is ignored
and the last written value is applied. However, if the target object
is commendable then the highest priority written value is applied,
while lower priority values are ignored.
Interface Status Signals
The BACnet PTP interface driver generates several network specific
communication status signals, as described below.
•
ComsFail – Flags a complete communications failure. Activated
only if communications has failed to the target half-router.
•
ObjsFail – Flags if communications has failed to one or more
objects on the target BACnet network. Normally objects fail
because an incorrect device address or object instance number has
been entered. However, output objects may also fail as a result of
attempting to write an out-of-range value to it.
•
online – Flags ONLINE during normal network communications,
and will change to OFFLINE only if communication has failed to
one or more objects on the target BACnet network. An OFFLINE
condition normally indicates incorrect communication property
settings, or faulty wiring of the network between the Xenta 913
and one or more objects on the target BACnet network.
Schneider Electric Buildings AB, June 2011
04-00124-06-en
161 (184)
B Protocols
B.6.3
TAC Xenta Server – Gateway, Technical Manual
BACnet Target Devices
One or more slave devices are added to the BACnet PTP interface node
in the network pane of XBuilder, as shown for the Panel device of the
SrlSim example network in the following screenshot.
Device Template
Device templates having a [BACnet] filename prefix are used to create
BACnet PTP network devices in XBuilder. Subsequently, each device
node is used to configure communications with the physical slave it represents on the target network.
Device Properties
•
Address – Allows the required device address to be entered. The
entered number should correspond to the unique address of a
device on the target network (1 to 255).
Device Status Signal
For each device the BACnet PTP driver generates a communication status signal.
•
online – Flags ONLINE during normal device communications,
and will change to OFFLINE if communications with the target
device have failed. An OFFLINE condition normally indicates an
incorrect device address having been entered, or by incorrect wiring of the network connection to it.
Notes
162 (184)
•
Target devices must all be connected to a single BACnet network. This network should normally be the one directly connected to target half-router, as this minimizes the network traffic
that must be routed to a remote BACnet network.
•
The same device address can be used for multiple devices to
allow splitting of a large set of I/O values into smaller pseudo
“device types”. This can be useful for target devices that contain
several logical data value groups because each group can appear
as a separate node in XBuilder.
Schneider Electric Buildings AB, June 2011
04-00124-06-en
TAC Xenta Server – Gateway, Technical Manual
B.6.4
B Protocols
BACnet Object I/O Signals
Each BACnet PTP device represents a specific type of hardware device.
The device editor is used to create new slave types, or to modify existing
types, as shown in the following screenshot.
Each signal can be used to read or write the “present value” a BACnet
object within any network devices of the type being defined.
•
BACnet Type – Selects the type of the required BACnet object
(AI, AV, BI and BV are shown in the above example). The selected
type must match that of the underlying BACnet object (AI for an
Analogue Input, BV for a Binary Value and so on).
•
Object Instance# – Sets the object identifier or instance number
of the required BACnet object. Normally this will be provided in
the documentation for the target device. Instance numbers can
range from 0 to 65565.
•
I/O Signal Direction – Most BACnet device signals are used to
monitor an object’s present value, in which case the I/O column
parameter should be set to Read-only (R). In a few cases it may be
necessary to control an object’s present value, in which case I/O
should be set to Write-only (W).
Schneider Electric Buildings AB, June 2011
04-00124-06-en
163 (184)
B Protocols
TAC Xenta Server – Gateway, Technical Manual
Setting an object’s present-value signal to Read/Write (R/W)
allows both monitoring of its value as well as control of it. However, this means that the Xenta 913 will continuously read the register to fetch the latest value even though it is expecting to have
control of it. This is either a waste of network bandwidth because
the value will not be changed externally, or it presents a potential
conflict of control because it can be! In nearly all cases the
Write-only option is preferable because this will cause the Xenta
913 to read the register’s value once at start-up before it assumes
control of it.
Notes
•
The W and R/W I/O options should only be selected for output
object types (for example, AO, BO, MO, AV, BV and MV).
•
If the W or R/W option is selected then the Write Priority property of the interface should be set to resolve any conflict of control with an external device. If the Xenta 913 is to be guaranteed
control then its Write Priority may need to be increased to
above that of the conflicting control device. Conversely, it the
external device is to be guaranteed control then the Xenta 913
can probably be left with its default Write Priority of 12.
•
Coefficient Gain and Offset – Allow the raw object’s value to be
converted into the desired absolute units. If the raw register value
is a real number then normally no conversion is necessary and the
default gain and offset of 1 and 0 can be used. But if the raw register value is an integer then it often needs to have a gain and offset
applied.
As an example, a power meter might generate voltage values as
unsigned integers with the actual voltage multiplied by 10. In this
case the Xenta 913’s gain should be set to 0.1 to convert the raw
units (10*V) into the required absolute units (V).
164 (184)
•
Signal DataType – Is set to a default of BOOL, INTEGER or
REAL based on the selected BACnet object type. But the default
data type may subsequently need to be changed to suit the applied
conversion coefficient. For example, if a gain of 0.1 is applied to
an integer it will produce a real value, so the default DataType
would be changed to REAL in this case.
•
Signal Measurement System – The measurement system parameters need to be manually set to match the absolute units of the
object’s value after conversion by the coefficient gain and offset,
being either an enumeration or analogue engineering unit as applicable.
Schneider Electric Buildings AB, June 2011
04-00124-06-en
TAC Xenta Server – Gateway, Technical Manual
B.7
B Protocols
M-Bus Metering
The Xenta 913 can be configured to communicate with an M-Bus serial
adaptor to allow meter monitoring through an I/NET or LON control
system.
M-Bus
LON or I/NET Control System
Value exchange
Xenta 913
RS-232 A
M-Bus Serial
Interface
M-Bus Network
RTU or ASCII
Meter
Meter
Meter
Fig. B.7: M-Bus metering
A number of M-Bus Metered Values can be connected to a corresponding set of LON Network Variables or I/Net Points to allow one or more
M-Bus meters to be monitored. The Xenta 913 is able to cooperate with
either a temporary or permanent M-Bus application master.
Schneider Electric Buildings AB, June 2011
04-00124-06-en
165 (184)
B Protocols
B.7.1
TAC Xenta Server – Gateway, Technical Manual
M-Bus Metering Networks
Each M-Bus Network consists of a number of independent meters that
record data on behalf of a master metering application. Each meter may
capture and store a number of metered values such as power or water
consumption. The master application can then read each metered value
as required to record consumption for billing purposes, and so on. The
master application may also write configuration data to the meters as
part of its recording cycle, such as by changing storage intervals, setting
tariff patterns, and so on.
The SP9122 MBUS M-Bus Xenta 913 does not act as the master application. Instead, it continuously polls the attached meters for their values
so that they may be utilized within a control system. However, a master
can also be connected to the M-Bus in which case the Xenta 913 will
simply hold-off polling whenever the master communicates on the network
.
Note
•
166 (184)
Currently the SP9122 MBUS Xenta 913 does not allow writing
to the M-Bus meters. This is to avoid the risk of losing vital
metering data due to incorrect usage or operation. However, the
Xenta 913 will attempt to cooperate with any separate master
application that connects to the M-Bus either permanently or
periodically.
Schneider Electric Buildings AB, June 2011
04-00124-06-en
TAC Xenta Server – Gateway, Technical Manual
B.7.2
B Protocols
M-Bus Metering Interface
The Meter Bus interface is added into the network pane of XBuilder, as
shown for a PW3 example network in the following screenshot.
Interface Properties
•
Port Type – In most cases the RS-232 port option will be selected.
The RS-485 option should only be needed in the rare case of an
M-Bus adaptor using either RS-422 or RS-485.
•
Baud Rate, Parity, #Data Bits, #Stop Bits – All the communication parameters, such as baud rate and parity, must be the same as
that of the target M-Bus serial adaptor.
•
Poll interval (min) – Allows the required meter polling-rate to be
entered. The entered number should correspond to the number of
minutes between polling cycles (1 to 60). Because metered values
normally only change slowly, a fast poll cycle is generally not
required, although setting a 1 minute poll rate may be useful when
first commissioning a system to help detect problems. Once a system has been successfully commissioned the poll rate should be
set to correspond to the fastest updating metered value of interest.
Note
•
Some M-Bus systems include tampering detection that can be
activated by “excessive” polling. In such cases the use of the
Meter Bus interface may not be possible.
Schneider Electric Buildings AB, June 2011
04-00124-06-en
167 (184)
B Protocols
TAC Xenta Server – Gateway, Technical Manual
Interface Status Signals
The Meter Bus interface generates a number of general and meter specific communication status values, as described below.
168 (184)
•
ComsFail – Flags a complete communications failure. Activated
only if communications have failed to all meters on the M-Bus.
•
MetersFail – Flags if communications have failed to one or more
meters on the M-Bus. Will always show FAILED before ComsFail.
•
IsHeldOff – Flags if meter polling is temporarily suspended
because an external master’s communications has been detected
on the M-Bus network.
•
online – Flags ONLINE during normal network communications,
and will change to OFFLINE only if communication has failed to
one or more meters on the M-Bus. An OFFLINE condition normally indicates incorrect communication property settings, or
faulty wiring of the network between the Xenta 913 and one or
more meters on the M-Bus.
Schneider Electric Buildings AB, June 2011
04-00124-06-en
TAC Xenta Server – Gateway, Technical Manual
B.7.3
B Protocols
M-Bus Meters
One or more meter devices are added to the M-Bus interface node in the
network pane of XBuilder, as shown for the Wh and kWh metering
devices of the PW3 example network in the following screenshot.
Device Template
Device templates having a [MBus] filename prefix are used to create
M-Bus Meter devices in XBuilder. Subsequently, each device node is
used to configure communications with the physical meter it represents
on the M-Bus network.
Device Properties
•
Meter Address – Allows the required meter primary or secondary
address to be entered based on the selected Mode The number
should match either the Primary address of a meter on the M-Bus
network (0–250), or its secondary ID number (0–99999999).
In many cases each physical M-Bus device will occupy a single
address, in which case device and meter are the same. However, a
single device may occupy more than one M-Bus address, in which
case the device represents multiple sub-meters. For example, the
Relay PadPuls M2 operates as 2 independent meters, each with its
own M-Bus address/ID.
Notes
•
XBuilder contains one node per meter or sub-meter, regardless of
how many physical devices exist on the M-Bus network.
•
A Primary address of 0 should only be used for preliminary testing of a newly installed device or address clashes may occur with
another meter on the network.
•
Communications Timeout – Selects the maximum number of
seconds that the meter is allowed to respond to a request (5–15).
The default value of 5 is acceptable for most meters, but it may be
necessary to increase the time-out for slower meters.
Schneider Electric Buildings AB, June 2011
04-00124-06-en
169 (184)
B Protocols
TAC Xenta Server – Gateway, Technical Manual
Note
•
Time-outs should be minimized where possible to reduce the
amount of time it takes for the Xenta 913 to detect any failed
meters.
Device Status Signal
For each metering device the M-Bus interface driver generates several
status signals.
170 (184)
•
ComsFail – Flags if communications with the meter have failed.
May be because of a meter or cable fault, or because of an address
mismatch.
•
ValuesFail – Flags if one or more metered values expected from
the meter are not being received. Most likely caused by an incorrect signal definition in the device template.
•
IdentNum – Indicates the identification number being reported by
the meter. May be used as the meter’s secondary address rather
than using primary addressing.
•
Medium – Indicates the physical medium being metered. This is
an enumerated value of Unknown, Oil, Electricity, Gas, Heat,
Steam, Water, Air, CoolingLoad or Pressure.
•
online – Flags ONLINE during normal device communications,
and will change to OFFLINE if communications with the meter
have failed. An OFFLINE condition normally indicates an incorrect device address having been entered, or by incorrect wiring of
the network connection to it.
Schneider Electric Buildings AB, June 2011
04-00124-06-en
TAC Xenta Server – Gateway, Technical Manual
B.7.4
B Protocols
M-Bus I/O Signals
Each M-Bus device represents a specific type of hardware meter. The
device editor is used to create new device types, or to modify existing
types, as shown in the following screenshot.
Each signal can be used to read or write the value of one or more
metered values within any meter devices of the type being defined.
•
Field Type and Sub-Type – Allow the required metered value
type to be selected for the applicable meter. The selected field type
automatically sets the applicable raw value type, and the field type
name indicates the engineering units of the value returned by the
meter.
Note
•
Normally Sub-Type is left blank, but it may be used to select
between two slightly different variations of a single field type
(for example,. +ve and -ve for heating/cooling respectively).
Schneider Electric Buildings AB, June 2011
04-00124-06-en
171 (184)
B Protocols
TAC Xenta Server – Gateway, Technical Manual
•
Storage# – Allows the applicable storage level of the Metered
Value to be defined. Normally this can be left blank or set to 0 to
select the instantaneous metered value. However, to read stored or
historical metered values a whole number between 1 and 10 can be
entered to represent the storage depth of the required value.
Note
•
Stored values are likely to only update periodically, such as once
per month. So it is unlikely that a storage value greater than 1
will ever need to be monitored by the Xenta 913.
•
Sub-Unit – Allows the applicable sub-unit level of the Metered
Value to be defined. Normally this can be left blank or set to 0 to
select the only metered value of a specific field type. However, if a
meter provides more than one value of a specific field type, such
as multi- zone Energy [Wh] readings, then individual values may
be selectable using a sub-unit number.
Note
•
Sub-Unit may also be referred to as Module or just Unit in some
meter’s documentation.
•
Tariff# – Allows the applicable tariff type of the Metered Value to
be defined. Normally this can be left blank or set to 0 to select the
only metered value of a specific field type. However, if a meter
supports multiple tariff regimes then the individual values may be
selectable using a tariff number.
Note
172 (184)
•
Different tariff versions of a given metered value will not normally update at the same time, because only one tariff can apply
at any given instant.
•
I/O Signal Direction – The Xenta 913 can only be used to monitor a register’s value, so all I/O column parameter should be left as
Read-only (R).
•
Coefficient Gain and Offset – Allow the metered value to be
converted into the desired absolute units. In most cases it will
acceptable to use the default gain and offset of 1 and 0. However,
other coefficients may be entered if preferred, such as converting a
Volume [m3] value from cubic meters to liters.
Schneider Electric Buildings AB, June 2011
04-00124-06-en
TAC Xenta Server – Gateway, Technical Manual
B Protocols
•
Signal DataType – Is set to a default of INTEGER or REAL
based on the selected field type. But the default data type may subsequently need to be changed to suit the applied conversion coefficient. For example, if a gain of 0.1 is applied to an integer it will
produce a real value, so the default DataType would be changed
to REAL in this case.
•
Signal Measurement System – The measurement system parameters are normally set to match the units shown in the [] brackets
of the selected field type. But the standard units may need to be
changed to suit the applied conversion coefficient. For example, if
a gain of 0.001 is applied to convert from kWh to Wh then a prefix
of k would need to be selected for the measurement system units.
Schneider Electric Buildings AB, June 2011
04-00124-06-en
173 (184)
B Protocols
B.8
TAC Xenta Server – Gateway, Technical Manual
Clipsal C-Bus Lighting Control
The Xenta 913 can be configured to connect to a Clipsal C-Bus serial
adaptor to allow monitoring and control of a lighting system through an
I/NET or LON control system.
Clipsal C-Bus
LON or I/NET Control System
Value exchange
Xenta 913
RS-232 A
Clipsal C-Bus
PC Interface
C-Bus Network
RTU or ASCII
Fig. B.8: Clipsal C-Bus lighting control
A number of C-Bus Group Variables can be connected to a corresponding set of LON Network Variables or I/Net Points to allow C-Bus lighting groups to be monitored and/or controlled. These Group Variables
may be distributed amongst one or more C-Bus applications as applicable.
174 (184)
Schneider Electric Buildings AB, June 2011
04-00124-06-en
TAC Xenta Server – Gateway, Technical Manual
B.8.1
B Protocols
C-Bus Lighting Networks
Each C-Bus Lighting Network consists of a number of input and output
nodes. An output node can be a relay or a dimmer that is connected to a
bank of lights. An input node can be either human-operated or automated, and can cause messages to be sent to any output nodes OVER
the C-Bus to control these banks of lights. Optional C-Bus bridges can
be used to extend the number of nodes on a network.
To allow flexible control without re-wiring, the C-Bus system also
allows one or more banks of lights to be assigned to logical groups. Subsequently, Input nodes can be programmed to direct messages to these
logical groups using Group Variables. Hence control of a group can be
achieved without knowledge of the network architecture or its node
addressing. Group Variables can be assigned a number between 0 and
254 (hex 00 to FE), allowing a maximum of 255 lighting groups in a single application.
Each Group Variable belongs to a single C-Bus lighting application. On
smaller networks there may be only a single lighting application, but on
larger networks more may be used to further partition the control logic.
Applications can be assigned a number between 48 and 95 (hex 30–5F),
although 56 (hex 38) is the default for lighting applications.
Note
•
Currently the SP9121 CBus C-Bus Xenta 913 only supports
lighting applications, and does not explicitly support inter-bridge
routing. If any C-Bus Bridges are employed then these should be
configured to transparently pass lighting messages as applicable.
Schneider Electric Buildings AB, June 2011
04-00124-06-en
175 (184)
B Protocols
B.8.2
TAC Xenta Server – Gateway, Technical Manual
C-Bus Lighting Interface
The Clipsal C-Bus interface is added into the network pane of XBuilder,
as shown for a Workshop example network in the following screenshot.
Interface Properties
•
Port Type – Only the RS-232 option can be used for the Clipsal
C-Bus PC Interface.
•
Baud Rate, Parity, #Data Bits, #Stop Bits – All the communication parameters, such as baud rate and parity, must be set to match
those of the C-Bus PC Interface.
Interface Status Signals
The Clipsal C-Bus interface driver generates a network specific communication status signal.
176 (184)
•
ComsFail – Flags if communications with the Clipsal C-Bus PC
Interface have failed. Normally caused by incorrect communication property settings, or by faulty wiring of the RS-232 link
between the Xenta 913 and the PC Interface.
•
online – Flags ONLINE during normal network communications,
and will change to OFFLINE only if communication has failed to
the Clipsal C-Bus PC Interface. An OFFLINE condition normally
indicates incorrect communication property settings, or faulty wiring of the network between the Xenta 913 and the PC Interface.
Schneider Electric Buildings AB, June 2011
04-00124-06-en
TAC Xenta Server – Gateway, Technical Manual
B.8.3
B Protocols
C-Bus Application Pseudo-Devices
One or more application pseudo-devices are added to the C-Bus interface node in the network pane of XBuilder, as shown for the dimmer
application of the Workshop example network in the following screenshot.
Device Template
Device templates having a [CBus] filename prefix are used to create
C-Bus application pseudo-devices in XBuilder. Subsequently, each
device node is used to define the application it represents on the C-Bus
network.
Device Properties
•
Application# – Allows the required application number to be
entered. The entered number should correspond to that of an application on the C-Bus network. Each pseudo-device defines a set of
Group Variables associated with the application number.
In most cases only one application will exist on a C-Bus system
(numbered hex 38 as shown in the table above). However, on larger
systems additional application entries will be required.
Note
•
Two or more applications can have the same number. This allows
splitting a large set of Group Variables into smaller sub-applications, each represented by a separate node in XBuilder.
Device Status Signal
For each device the Clipsal C-Bus interface driver generates a communication status signal.
•
ComsFail – Flags if communications with the C-Bus application
have failed. Normally caused by an incorrect Application# having
been entered.
•
online – Flags ONLINE during normal device communications,
and will change to OFFLINE if communications with the C-Bus
application have failed. An OFFLINE condition normally indi-
Schneider Electric Buildings AB, June 2011
04-00124-06-en
177 (184)
B Protocols
TAC Xenta Server – Gateway, Technical Manual
cates an incorrect Application# having been entered, or by incorrect wiring of the network connection to it.
B.8.4
C-Bus I/O Signals
Each C-Bus pseudo-device represents a specific set of lighting groups
in an application. The device editor is used to create new pseudo-device
types, or to modify existing types, as shown in the following screenshot.
Each signal can be used to read or write the value of one or more C-Bus
lighting group variables within any applications of the type being
defined.
•
Group Variable Number – Allows the required Group Variable’s
number to be entered. The entered number should correspond to
that of a group variable within the applicable C-Bus application.
•
Group Variable Type – Allows the applicable type of the Group
Variable to be defined. Select ON/OFF for switched only lighting
groups, or LEVEL for groups where dimmer outputs are available. For write-only values the type may also be set to ON Only or
OFF Only.
For ON Only groups the Xenta 913 will only send the On command onto the C-Bus. Similarly, for OFF Only groups the Xenta
913 will only send the Off command. Use of these output types can
178 (184)
Schneider Electric Buildings AB, June 2011
04-00124-06-en
TAC Xenta Server – Gateway, Technical Manual
B Protocols
allow group control to be cooperatively shared with other control
devices.
Note
B.8.5
•
ON Only and OFF Only types are NOT applicable to read-only
values.
•
Group Ramp Rate – Optional parameter that is normally left
blank or set to Instant to cause lighting state changes to occur
immediately. However, if dimming is available then some other
rate may be selected to cause the light level to ramp gradually if
preferred. The C-Bus allows the ramp rate to be achieved with a
single message, so there is no overhead when electing not to
switch instantly.
•
I/O Signal Direction – Most C-Bus Group Variable signals are
used to control a lighting group’s level, in which case the I/O column parameter should be set to Write-only (W). Where it is necessary to monitor the state of a group variable the I/O direction
should be set to Read-only (R).
•
Coefficient Gain and Offset – The conversion coefficient gain is
automatically set based on the group variable type selection. The
gain is 1 for every ON/OFF, ON Only or OFF Only type, or
100/255 for every LEVEL type so that the C-Bus level is
expressed as a percentage between 0 and 100.
•
Signal DataType – The signal data type is automatically set based
on the group variable type selection. Each ON/OFF, ON Only or
OFF Only value is a 2-state BOOL, whereas each LEVEL value
is expressed as a REAL percentage number.
•
Signal Measurement System – The measurement system units
are automatically set based on the group variable type selection.
Each ON/OFF, ON Only or OFF Only is an ON/OFF enumeration, whereas each LEVEL type has percentage units (%).
Multiple Write-Only Signals Per Group Variable
Normally only one write-only signal is used to control a Group Variable. However, with care, multiple signals can share control if required.
This is because a group control message is only sent onto the C-Bus network when an signal changes state, so conflicting control requests do
not cause problems if the state changes occur at sufficiently separate
times.
As an example, it could be useful to have 2 write-only signals controlling one group so that a warning of shutdown could be issued. In this
case, one signal could request a ramp down to a 50% lighting level 5
minutes before a 2nd signal turned off the lights completely.
Schneider Electric Buildings AB, June 2011
04-00124-06-en
179 (184)
B Protocols
B.8.6
TAC Xenta Server – Gateway, Technical Manual
Multiple Read-Only Signals Per Group Variable
During normal operation each read-only signal should reflect the state
of its associated Group Variable on the C-Bus network. However, input
values are only updated in response to C-Bus events, so the value will
be “unknown” for 5 to 10 seconds after startup.
Generally only one read-only signal is assigned to monitor a Group
Variable, and its ON/OFF or LEVEL type is set to match that of the
corresponding group variable. Although it is possible to have more than
one input value monitoring a group variable, there is no real advantage
in doing so.
Note
•
B.8.7
If an ON/OFF input value is incorrectly associated with a “dimmer” type group variable then the value will be ON for a
non-zero level, so a change to OFF will be delayed when the
group variable’s level is ramped to 0 over time.
Read/Write Signal For A Group Variable
One Write-Only and one Read-Only signal can be associated with a single Group Variable. In this case the read-only signal should normally
reflect back the state set by the write-only signal. However, if an external C-Bus node also controls the Group Variable then the read and write
signals may differ. This can be used by the control system in 2 ways:
180 (184)
1
Propagate the manual switch change throughout the control system by changing the write-only signal to correspond to the new
Group Variable state.
2
Cancel the external node change by re-enforcing the required control state onto the write-only signal. Note, however, that the Xenta
913 only sends messages onto the C-Bus when a signal changes,
so it will be necessary to first set the signal’s value to correspond
to the external node’s state before re-setting it to the required control state.
Schneider Electric Buildings AB, June 2011
04-00124-06-en
TAC Xenta Server – Gateway, Technical Manual
Index
B
BackupLM (folder) 27
BACnet IP (Internet Protocol) 145
BACnet MS/TP (Master Slave/Token Passing)
(protocol) 152
BACnet PTP (Point To Point) (protocol) 158
Index
F
folder
add 45
folder structure, see project folder structure
G
gateway application
verify 71
Graphics (folder) 27
C
I
Clipsal C-Bus Lighting Control (protocol) 174
communication
monitor 54
test target communication 100
communication diagnostics 99
communication interface 92
connection manager
find 90
replace 90
connection object 87
add 66
controller object
add 73
define 81
input SNVT 85
D
device template 93
create 37
file format 94
open 95
replace device template file 97
working with existing 95
DeviceDescr (folder) 27
devices
update in a TAC XBuilder project 96
diagnostics terminal, connect 99
Documentation (folder) 27
L
logical structure
create 43
LonWorks communication
monitor 71
LonWorks network
connect to 59
insert in TAC XBuilder 59
M
M-Bus Metering (protocol) 165
Modbus communication
verify 54
Modbus Master interface
add 36
Modbus serial line master (protocol) 117
Modbus serial line slave (protocol) 127
Modbus TCP client (protocol) 136
multi-connection object 88
add 68
N
network
update in TAC XBuilder 63
E
O
enumeration 98
create 98
use 98
Ethernet communication
configure 91
output SNVT 83
Schneider Electric Buildings AB, June 2011
04-00124-06-en
P
project
create 30
save 34
181 (184)
Index
project folder
BackupLM 27
DeviceDescr 27
Documentation 27
Graphics 27
VistaDb 27
project folder structure
on hard disk 27
project folder, create on hard disk 27
TAC Xenta Server – Gateway, Technical Manual
values page
add 51
VistaDb (folder) 27
R
root folder, rename 44
S
serial communication
configure 91
signal
add 48
change unit of 50
connect to an output SNVT 76
connect to and from LON 64
validate 89
visualizing 47
signal object
add 65
SNVT
add 73
adding in the TAC Xenta 913 81
define 81
input SNVT 85
output SNVT 83
T
TAC XBuilder project
update devices 96
TAC Xenta 913
add as LonWorks device in TAC Vista 55
add SNVT 81
add to LonWorks network 55
TAC Xenta 913 object
configure 33
target communication
diagnose incorrect 104
start 102
stop 102
test 100
target communication log
disable 102
enable 102
V
value exchange commands 100
182 (184)
Schneider Electric Buildings AB, June 2011
04-00124-06-en
Copyright © 2009-2011, Schneider Electric Buildings AB
All brand names, trademarks and registered trademarks are
the property of their respective owners. Information contained within this document is subject to changewithout notice. All rights reserved.
04-00124-06-en
For more information visit
www.schneider-electric.com/buildings
Last Manual Page