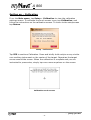
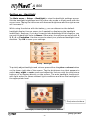
1
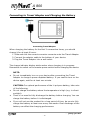
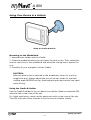
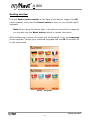
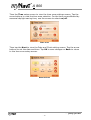
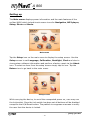
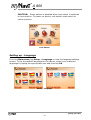
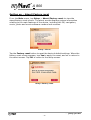
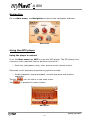
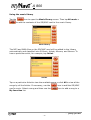
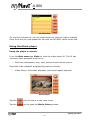
A 800 … getting you there A800 Hardware User Manual Version 1.10 AMTEL CELLULAR SDN BHD No. 5, Jalan PJS 7/19, Bandar Sunway, 46150, Petaling Jaya, Selangor, Malaysia www.mynavi.com.my Note : i) ‘myNavi’ and ‘… getting you there’ are trademarks of Amtel Cellular Sdn Bhd ii) iii) All other trademarks belongs to each registered companies. -1The contents of the manual may be modified without further notice. ... getting you there A 800 TERMS & CONDITIONS 1. The maps data and/or preloaded software (“Software”) in this device are licensed by third parties to Amtel Cellular Sdn Bhd (“The Company”). The Software is sub-licensed on a limited, non-exclusive, non-transferable and revocable basis for use by you solely on this device only and is not sold together with the device. If upgrades, updates or supplements to the Software are obtained, the use of such upgrades, updates or supplements is governed by these Terms and Conditions and any amendments that may accompany them and may be subject to additional payments and conditions. You must not reproduce, distribute, publish, transmit, modify, adapt, translate, display, distribute, sell, license, publicly perform, prepare derivative works based upon, or otherwise use or exploit the Software. The foregoing limited right does not give you any ownership of Software and nothing contained in this Agreement may be construed as conferring to you any licence or right to the Software under any copyright or any other intellectual property right. 2. The Software is provided by the copyright holders "AS IS" and any express or implied warranties, including, but not limited to, the implied warranties of merchantability and fitness for a particular purpose, are disclaimed. In no event shall the copyright owner be liable for any direct, indirect, incidental, special, exemplary, or consequential damages however caused and on any theory of liability, whether in contract, strict liability, or tort (including negligence or otherwise) arising in any way out of the use of the Software, even if advised of the possibility of such damage. The entire risk to the quality and performance of the Software is borne by you. This disclaimer of warranty constitutes and essential part of the licence granted to you to use the Software. 3. The trademarks, logos, and service marks (“Trademark”) displayed on this Software and device, are owned by the Company and third parties. All Trademarks not owned by the Company are the property of their respective owners, and are used with permission. Nothing contained herein may be construed as granting any right or licence to use any Trademark. ... getting you there -2- A 800 4. The maps and any information stored in this device is strictly a navigation guide for reference use only. It is the sole responsibility of the User’s to use this device prudently. Information provided may change over time and you should decide the route based on the actual road conditions and traffic laws. The Company makes no representation or warranty, whether expressly or impliedly as to the accuracy, completeness, timeliness, reliability or fitness for any particular purpose of the maps stored therein. 5. The planned, shortest, quickest routes and estimated time to desired destinations are obtained from optimal route calculations based on the map database and should be used as a reference only. This device must not be used for any purpose requiring precise measurement of direction, distance, location or topography. 6. Do not fix or mount the device on such part of the windscreen that will interfere with driving of the motor vehicle or be hazardous or dangerous to the driver or occupants in the motor vehicle. User shall be responsible for his/her use of the maps stored therein and the device, and shall at all times comply with all traffic laws and regulations of the country of usage. 7. The usage of this device is dependent on the Global Positioning System (GPS) which is operated by the United States government and is solely responsible for its accuracy and maintenance. The system is subject to changes which may affect the performance and accuracy of the GPS navigator devices. 8. The use of the device is at the User’s own risk. myNavi and the Company is not liable for any fines, penalties, damages or loss whether direct, indirect, incidental, special, exemplary, or consequential damages however caused and on any theory of liability, whether in contract, strict liability, or tort (including negligence or otherwise) arising in any way out of the use of the device. ... getting you there -3- A 800 A800 Product User Manual This User Manual describes Getting started, Setting up, Navigating, Using the MP3 player, and common Warning screens of your myNavi A800. Read this guide in its entirety before attempting to use or configure the device. Before getting started, check that each item listed below in the package contents is accounted for and observe the outward features of the device. Package contents Standard Package: The myNavi A800 navigator Cradle Holder In-Car Charger USB cable Map & manual CD Travel Adaptor 1GB SD/MMC Card containing navigating system software and MAP data ... getting you there -4- A 800 Precautions and Notices For your own safety, do not operate the controls of the product while driving. When you get off the car, do not leave your device on the dashboard that is subject to direct sunlight. The overheating of the battery can cause malfunction and/or danger. Global Positioning System (GPS) is operated and managed by the United States of America Department of Defense, which is solely responsible for the performance of GPS. Any change or modification may affect the accuracy of the GPS and its related systems. GPS satellite signals cannot pass through solid materials (except glass). When you are inside a tunnel or building, GPS positioning is not available. A minimum of 3 GPS satellite signals is needed to determine current GPS position. Signal reception can be affected by situations such as bad weather or dense overhead obstacles (e.g. trees and tall buildings). Other wireless devices in the vehicle might interfere with the reception of satellite signals and cause the reception to be unstable. A car holder is needed when using the device in a car. Be sure to place the device in an appropriate place, so as not to obstruct the driver’s view, or deployment of airbags. Please remove SD/MMC card only when the device is in power off status. When USB transmitting, Do Not disconnect the USB cable. When other applications are operating, Do Not connect USB cable. The navigation software may be updated from time to time. If the description shown in this manual is different, please follow the software version currently on hand. ... getting you there -5- A 800 INDEX Usage Guideline for Extended Battery Life Getting to know your myNavi A800 08 Connecting External Antenna (Optional) Connecting the In-Car Charger 07 11 11 Connecting to USB and charging the device 12 Connecting to Travel Adaptor and Charging the Battery Using Your Device in a Vehicle Getting started Setting up 14 16 19 Language 20 Calibration Backlight Time 21 22 24 About / Factory reset Navigating 13 25 26 Using the MP3 player 26 Using the Movie player 28 Using the Photo viewer 30 Common warning screens System Specifications 31 32 ... getting you there -6- A 800 Usage Guideline for Extended Battery Life For optimal performance of the Li-polymer battery, take note of the following: This unit contains a non user replaceable internal Li-polymer battery. The battery can inflate and release hazardous chemicals. To reduce the risk of fire or burns, do not disassemble, crush, puncture, or dispose of in fire or water. Battery of this device need to be full charged if master power switch is switched off and on again. Do not immediately turn on your device after connecting the Travel Adaptor to charge a power-depleted battery. If you need to turn on the device again, wait for at least one minute. Do not charge the battery where the temperature is high. This may be harmful to the battery. (e.g. in direct sunlight). There is no need to fully discharge the battery before charging. You can charge the battery before it is discharged. If you will not use the product for a long period of time, be sure to fully charge the battery at least once every two weeks. Over discharge battery can affect the charging performance. ... getting you there -7- A 800 Getting to know your myNavi A800 Outward features (front) Component Description Power and Charge Static amber to indicate that external power is connected and Indicator charging. Flashing red to indicate battery power is low. GPS Indicator Flashes green to indicate that the GPS is positioning, and stops flashing when the GPS completes positioning. External Antenna This connector (under rubber dust cover) allows use of an Connector optional external antenna with magnetic mount, which may be positioned on top of the car for better signal reception in areas with poor reception. ... getting you there -8- A 800 Outward features (back) Component Description GPS Receiver Receives signals from the GPS satellites overhead. Make sure that it has a clear view of the sky. Speaker Sends out music, sounds and voice. SD/MMC Card Slot Accepts a SD (Secure Digital) card for accessing data such as MP3 music. Headphone Connector Connects to stereo headphones Mini-USB Connector Connects to the USB cable. Master Power Switch The main power/battery cutoff switch. When switch off the master power, the date, time and language setting will be reset and the files in MP3, movie player and photo viewer need to be reloaded. Reset Button Restarts your device (soft reset) ... getting you there -9- A 800 Outward features Component Description Return to menu Opens the Main Menu of your device. Set destination When in the map screen: Power button Use the power button to turn on and off your device. You could add your favorite destination to bookmark by press this button. When you press the power button to turn off the unit, your device actually enters a suspend state and the system stops operating. Once you turn on the system again, it resumes. Volume Adjusts the volume or backlight level of your device /Backlight Control Figure. Outward features Component Description AC-in port Connects to the AC adaptor. Lock Switch To prevent accidental screen taps. Once the lock switch has been set all buttons will be disabled except for the H/W Reset button. The padlock icon appears onscreen to notify the user that the device is locked. ... getting you there - 10 - A 800 Connecting External Antenna (Optional) Place the device in such a way that the external antenna wire is routed conveniently out the driver's side window. The magnetized antenna casing will attach firmly to the roof of your car. Connecting external GPS active antenna (Optional Accessory) Connecting the In-Car Charger Connecting the In-Car Charger The car charger supplies power to your device when you are using the device in a car. ... getting you there - 11 - A 800 CAUTION: In-Car charger output is 12V DC, do not use this car charger for other device. 1. Connect one end of the In-Car charger to the power connector of your device. 2. Connect the other end to the cigarette lighter in the car to power and charge your device. The indicator on the car charger lights in amber to indicate that power is being supplied to your device. Important. Only connect the In-Car Charger to the device after starting the car. Failure to do so may cause irreversible damage to the device. Connecting to USB and charging the device You can charge battery through USB connector. Connect your device as below picture. For short charging time, please turn off device while charging through USB connector. Connect to USB port. Connecting the USB Cable ... getting you there - 12 - A 800 Connecting to Travel Adaptor and Charging the Battery Connecting Travel Adaptor When charging the battery for the first 3 consecutive times, you should charge it for at least 8 hours. 1. Slide and click the correct connector converter onto the Travel Adaptor. 2. Connect the adaptor cable to the bottom of your device. 3. Plug the Travel Adaptor into a wall outlet. The charge indicator display static amber when charging is in progress. Remember to switch on the master power switch before charging the device. NOTE: Do not immediately turn on your device after connecting the Travel Adaptor to charge a power-depleted battery. If you need to turn on the device again, wait for at least one minute. CAUTION: For optimal performance of the Li-polymer battery, take note of the following: Do not charge the battery where the temperature is high (e.g. in direct sunlight). There is no need to fully discharge the battery before charging. You can charge the battery before it is discharged. If you will not use the product for a long period of time, be sure to fully charge the battery at least once every two weeks. Over discharge of the battery can affect the charging performance. ... getting you there - 13 - A 800 Using Your Device in a Vehicle Using the Cradle & Holder Mounting on the Windshield 1. Assemble the Holder and the Cradle. 2. Clean the windshield where you will apply the suction cup. Then, attach the suction cup firmly to the windshield and press the locking tab to secure the cup. 3. Carefully fit your navigator into the Cradle. CAUTION: After the suction cup is secured to the windshield, never try to pull or wriggle the arm. Always adjust the arm of the car holder for the best viewing angle BEFORE driving. Avoid adjusting the device with one hand while driving. Using the Cradle & Holder Use the Cradle & Holder to fix your device in a vehicle. Make sure that the GPS antenna has a clear view of the sky. For initial positioning, remain at the same spot with a clear view of the sky. The GPS may take a few minutes to find its current location initially. ... getting you there - 14 - A 800 CAUTION: Select an appropriate location for the Cradle & Holder. Never place the Holder where the driver’s field of vision is blocked. If the car’s windshield is tinted with a reflective coating, an external antenna (optional) may be needed to route the antenna to the top of the car through a window. When closing the car window, be careful not to pinch the antenna cable. (Cars with an anti-jam window design may automatically leave adequate space as needed.) ... getting you there - 15 - A 800 Getting started Find the Master power switch on the back of the device, toggle it to ON (push upward), and press the Power button to turn on your myNavi A800 navigator. Note: When using the device later, if the device controls fail to respond, you can also use the Reset button switch to restart the device. While starting up, a series of screens will be displayed. First, the Language screen appears. Choose your preferred language and tap OK to continue on to the next screen. Setup – language ... getting you there - 16 - A 800 Then the Time setup screen to view the time zone settings screen. Tap the arrow buttons to view the time zone selection. For the time zones affected by seasonal daylight saving time, use the arrows to select on/off. Time zone Then tap the Next to view the Date and Clock setting screen. Tap the arrow buttons to set the date and time. Tap OK to save changes or Back to return to the time zone setup screen. Date & Clock ... getting you there - 17 - A 800 Next, a calibration screen will appear. The calibration screen will only appear on the initial start up and afterward can be accessed via Main menu > Setup > Calibration. Press and briefly hold a stylus or any similar non-marking instrument on the center of the target. Repeat as the target moves around the screen. When the calibration is complete and you are instructed to press enter, simply tap once more anywhere on the screen. Calibration Finally, a warning will appear. Read the warning carefully and tap OK. Warning ... getting you there - 18 - A 800 Setting up The Main menu displays power information and the main features of the myNavi A800 which include touch screen icons for Navigation, MP3 player, Setup, Photo and Movie. Main menu Tap the Setup icon on the main menu to display the setup screen. Use the Setup screen to set Language, Calibration, Backlight, Clock and also to view system software information and perform a factory reset via the About icon. To select an item from the setup screen simply tap its icon. Tap the Return icon to go back to the main menu. Setup screen While carrying the device, to avoid the unexpected power on, user may use the lock switch. Once the lock switch has been set all buttons will be disabled except for the H/W Reset button. The padlock icon appears onscreen to notify the user that the device is locked. ... getting you there - 19 - A 800 CAUTION: Power button is disabled when lock switch is switched to lock position. To power on device, lock switch must switch to unlock position. Lock Switch Setting up - Language From the Main menu, tap Setup > Language to view the language settings screen. To set the default language for the device, select your preferred language by taping the appropriate icon and then tap OK. Setup – language ... getting you there - 20 - A 800 Setting up – Calibration From the Main menu, tap Setup > Calibration to view the calibration settings screen. To calibrate the touch screen icons, tap Calibration, and follow the instructions on the calibration screen. To return to the setup screen tap Return. Setup – Calibration Tap YES to continue Calibration. Press and briefly hold a stylus or any similar non-marking instrument on the center of the target. Repeat as the target moves around the screen. When the calibration is complete and you are instructed to press enter, simply tap once more anywhere on the screen. Calibration touch screen ... getting you there - 21 - A 800 Setting up - Backlight Tap Main menu > Setup > Backlight to view the backlight settings screen. Set the backlight brightness level for either day mode or night mode with the arrow icons. Taping the left arrow will decrease brightness and the right arrow will increase it. While using the device with the battery, you can determine the default backlight display time so power isn’t wasted by displaying the backlight indefinitely. However, if you don’t want to take advantage of this feature, you can set the backlight timer to Never. Otherwise, the options are as follows: 1, 2, 3, 4, or 5 minutes. Use the arrows to select your preferred backlight timer duration. Tap OK to save your settings. Setup - Backlight To quickly adjust backlight and volume press either the plus or minus button on the lower right side of the screen. Tap the brightness icon that appears to switch day, night or auto mode and adjust the volume with the plus/minus buttons or by tapping directly on the screen. The auto backlight mode work with light sensor to sense ambient light conditions and dims the backlight to the appropriate level. Plus/minus buttons Backlight/volume quick adjustment buttons ... getting you there - 22 - A 800 Auto Backlight Mode ... getting you there - 23 - A 800 Setting up - Time From the Main menu, tap Setup > Time to view the time zone settings screen. Tap the arrow buttons to view the time zone selection. For the time zones affected by seasonal daylight saving time, use the arrows to select on/off. Time zone Then tap the Next to view the Date and Clock setting screen. Tap the arrow buttons to set the date and time. Tap OK to save changes or Back to return to the time zone setup screen. Date & Clock ... getting you there - 24 - A 800 Setting up – About/Factory reset From the Main menu, tap Setup > About/Factory reset to view the about/factory reset screen. The about screen displays system information relating to the main features of the device, including the OS, navigation, music, photo and movie software vendors and versions. Setup – About Tap the Factory reset button to reset the device’s default settings. When the factory reset screen appears, tap Yes to apply the reset, and no to return to the about screen. Tap OK to return to the setup screen. Setup –Factory reset ... getting you there - 25 - A 800 Navigating On the Main menu, tap Navigation to launch the navigation software. Main menu Using the MP3 player Using the player's controls From the Main menu tap MP3 to view the MP3 player. The MP3 player has onscreen music playback control buttons controls for: o Seek bar, play/pause, stop, next, previous and volume control. Onscreen music playback programming options include: o Single playback, repeat playback, normal sequence and random sequence. Tap the Tap icon to return to the main menu. to access the music Library. MP3 player ... getting you there - 26 - A 800 Using the music library Tap the icon to open the Music library screen. Then tap All music > to add the contents of the SD/MMC card to the music library. Music library The MP3 and WMA files on the SD/MMC card will be added to the Library automatically and classified into All Music, Artists, Albums, and Genres. To hear a particular artist, for example, tap Artist. Artists Tap on a particular Artist to view the available songs or click All to view all the songs by all the Artists. If necessary, use the icon to add the SD/MMC card's music. Select a song and then use the My favorites list. icon to add a song to a ... getting you there - 27 - A 800 My Favorites On the My Favorites list, you can select tracks to listen to, add or subtract them from the list, and update the list with the SD/MMC card's music files. Using the Movie player Using the player's controls From the Main menu tap Video to view the video player UI. The UI has onscreen video playback controls for: o Seek bar, play/pause, stop, next, previous and volume control. Onscreen video playback programming options include: o Video library, full-screen playback, and linear/repeat playback Movie player Tap the Tap the icon to return to the main menu. icon to open the Movie library screen. ... getting you there - 28 - A 800 Using the Movie library Tap the icon to open the Movie library screen. Then tap All movie > icon to add the contents of the SD/MMC card to the library. Movie library Supported file types include ASF, WMV, MPEG and AVI (Microsoft MPEG-4, RLE and MPEG1 codec) files. Files of these types on the SD/MMC card will be added to the Movie library automatically and classified according to file name. Movie Playlist On Movie Playlist, you can select files and add or subtract them from the list, or view the files directly. ... getting you there - 29 - A 800 Using the Photo viewer Using the viewer's controls From the Main menu tap Photo to view the photo library UI. The UI has onscreen playback controls for: o Home, return to previous page, slide show, next/previous and select. Photo library The SD/MMC card's contents will automatically be displayed on the Photo library UI. Images supported include BMP, JPEG, and 24-bit true color. To open a folder, either tap on the folder directly, or use the next/previous arrow buttons and the select check button. The contents will be displayed as thumbnails that you can either browse using the next/previous arrow buttons, or the slide show function. To see a full-screen view of a photo double tap on the particular photo or tap the select check button. Tap the icon to return to the main menu. Using the Photo Viewer The photo viewer enables you view and manipulate your photos. To zoom in, tap , and to zoom out, tap the icon. Tap the icon to rotate the photo. You can also view a slide show with the photo viewer UI by tapping the slide show icon . Tap to move back to a previous screen, and to escape from either full-screen mode or slide show mode, press the menu button on the console. ... getting you there - 30 - A 800 Photo Viewer Common warning screens Common warning screens include: Lost external power warning USB connection warning SD/MMC Card removed warning USB connection warning Lost external power warning SD card missing warning ... getting you there - 31 - A 800 System Specifications Category General Hardware Item Specifications Model myNavi A800 Colours Black Dimensions 119 x 83 x 21 - 24mm Weight 190 grams CPU Samsung S3C2440, 400Mhz Memory RAM 64MB, Flash ROM 32 Power DC 12V 1A Support USB charger from Mini-USB port Battery 1350 mAh Li-Polymer 4 hours with GPS operation in power saving mode 7 hours with MP3 playback only Charging time : 4 hours Input mode Touch screen LCD Anti glare 3.5” TFT LCD, landscape QVGA 320 x 240, touch screen & automatic backlight control Memory card SD/MMC card slot Speaker Built-in speaker, 1W Earphone output 3.5mm stereo earphone jack GPS SiRFstarIII, 20-channels Acquisition time Cold start : 42 sec average Warm Start : 38 sec average Software Hot start : 8 sec average USB USB spec. 1.1 full speed (12Mb/s) OS Version Windows CE 5.0 Music Player File format MP3 Movie Player File format MP4 Picture File format JPG, BMP Viewer ... getting you there - 32 - A 800 For the latest version of this manual, please visit www.mynavi.com.my ... getting you there - 33 -