1
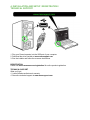
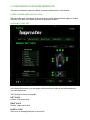
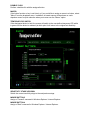
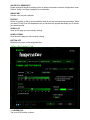
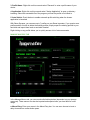
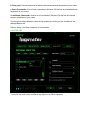
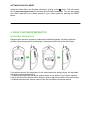
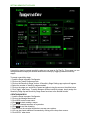
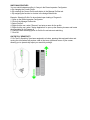
The new Razer Imperator is outfitted with an ultra-precise 4G Dual Sensor System, that makes
use of both a laser and an optical sensor to enhance tracking precision by calibrating to different
surfaces and allowing adjustment of liftoff tracking distance. Add to that an improved rubberized
side grip to provide maximum comfort and control, ensuring you're geared to win all the time.
MASTER GUIDE
CONTENTS
1. Package Contents
2. System Requirements
3. Key Features
4. Installation and Setup / Registration / Technical Support
5. Configuring Your Razer Imperator
6. Using Your Razer Imperator
7. Legalese
1. PACKAGE CONTENTS
- Razer Imperator
- Quick Start Guide
- Master Guide
2. SYSTEM REQUIREMENTS
- PC with USB port
- Windows® 7 / Windows Vista® / Windows® XP
- Internet connection (for driver installation)
- 75MB of free hard disk space
3. KEY FEATURES
A.
B.
C.
D.
E.
F.
G.
H.
I.
J.
K.
Left Click
Right Click
Scroll Click / Scroll Up & Down
Sensitivity Stage Up
Sensitivity Stage Down
Mouse Button 5
Mouse Button 4
Ultraslick Mouse Feet
Razer Synapse Onboard Memory
4G Dual Sensor System
Side Button Selector Switch
4. INSTALLATION AND SETUP / REGISTRATION /
TECHNICAL SUPPORT
1. Plug your Razer Imperator into the USB port of your computer.
2. Download the driver installer at www.razersupport.com
3. Run the installer and follow the onscreen instructions.
REGISTRATION
Please visit www.razerzone.com/registration/ for online product registration.
TECHNICAL SUPPORT
What you’ll get:
• 2 years limited manufacturer’s warranty
• Free online technical support at www.razersupport.com.
5. CONFIGURING YOUR RAZER IMPERATOR
The features listed here require the Razer Imperator software driver to be installed.
RAZER SYNAPSE ONBOARD FUNCTONS
With Razer Synapse, all settings will be saved on the profile selected and will apply on another
computer even without the Razer Imperator Configurator installed.
ASSIGN BUTTONS TAB
In the Assign Buttons tab, you can assign various functions to each of the buttons based on
your own preferences.
The following functions are possible:
LEFT CLICK
Perform a left mouse click.
RIGHT CLICK
Perform a right mouse click.
SCROLL CLICK
Click once on the assigned button to scroll click.
DOUBLE CLICK
Perform a double click with the assigned button.
MACRO
If the button function or key is not listed, or if you would like to assign a macro to a button, select
"Macro" from the dropdown menu. In addition, all saved macros will be shown on a sub
dropdown menu for quick selection when you mouse over the "Macro" option.
TEMPORARY DPI SWITCH
If the designated button is held, the mouse will switch to the user-defined temporary DPI whilst
in-game until the button is released (at which point it will return to the original set sensitivity.
SENSITIVITY STAGE UP/DOWN
Switch the current sensitivity stage to the next/previous stage.
MOUSE BUTTON 5
Assign a "Forward" command in Windows Explorer / Internet Explorer.
MOUSE BUTTON 4
Assign a "Back" command in Windows Explorer / Internet Explorer.
ON-THE-FLY SENSITIVITY
Enable change of sensitivity settings on the fly without the need to enter the configuration menu.
Refer to 'Using Your Razer Imperator' for more details.
SINGLE KEY
Activate a key on your keyboard.
PROFILE
Switch to a profile on the fly and immediately load all your pre-configured mouse settings. When
you select "Profile" from the dropdown menu, a sub-menu will appear that allows you to choose
your desired profile.
SCROLL UP
Scroll up the page you are currently viewing.
SCROLL DOWN
Scroll down the page you are currently viewing.
BUTTON OFF
Disable any function on the assigned button.
TWEAK PERFORMANCE TAB
1. CURRENT DPI
The current DPI setting is shown.
2. SENSITIVITY
The current sensitivity of your Razer Imperator can be easily adjusted by moving the arrow
along the slider.
a. Sensitivity Stage
Click on this to adjust the Sensitivity Stage settings.
Refer to 'Using Your Razer Imperator' for more details.
b. To set a different sensitivity level in the X and Y axis, you can select the "Enable independent
X-Y sensitivity" option and move the individual X and Y arrows along the slider.
c. To display the On-The-Fly Sensitivity indicator onscreen whenever you make changes on the
fly, select the "Enable On-The-Fly sensitivity on-screen display" option.
3. ACCELERATION
You can activate acceleration by checking the "Enable Acceleration" box and moving the arrow
along the slider.
4. POLLING RATE
You can switch between 125Hz (8ms), 500Hz (2ms) and 1000Hz (1ms) by clicking on the
individual polling rate buttons.
5. SURFACE CALIBRATION
a. On/Off
When set to "On", the 4G Dual Sensor System will calibrate your mouse to the specific surface,
optimizing it for fast and precise tracking.
When set to "Off", your mouse will perform without the added benefit of surface calibration by
the 4G Dual Sensor System. This is only necessary in certain circumstances such as when a
surface is multicolored. Otherwise, the general recommendation is to keep the surface
calibration setting to "On" permanently to get the best out of your mouse.
b. Lift-Off Range
i. Auto - The mouse will automatically calibrate to your surface whenever the mouse is plugged
into your system.
ii. Custom - Increase or decrease the height where tracking is cut off as soon as the mouse is
lifted from the surface.
MANAGE PROFILES TAB
In the Manage Profiles tab, you can create and activate customized profiles based on the
application you have launched.
1. Current: Indicates the current active profile.
2. Profile: Indicates the profile number
3. Profile Name: Right-click on this row and select "Rename" to enter a profile name of your
choice.
4. Application: Right-click on this row and select "Assign Application" to open up directory
browsing. Select the executable file of the program you want the profile to be linked to.
5. Auto Switch: Check the box to enable automatic profile switching when the chosen
application is launched.
With Razer Synapse, you can save up to 7 profiles on your Razer Imperator. If you require more
profiles and do not wish to delete the existing profiles, simply export the existing profiles to your
hard disk and import them back as and when needed.
Right-clicking on any profile allows you to quickly access a list of extra commands.
MANAGE MACROS TAB
In the Manage Macros tab, you can record unlimited keystrokes (dependent on your storage
resources). These macros can also be imported and exported onto your hard disk for future
usage.
a. Macro Entry: Enter your macro in the Macro Entry box. You can even choose to insert a
delay time and/or a mouse-button press.
b. Delay (ms): Choose the amount of delay to be inserted between keystrokes of your macro.
c. Basic Commands: A list of basic commands in Windows OS that can be inserted between
keystrokes of your macro.
d. Additional Commands: Another list of commands in Windows OS that can be inserted
between keystrokes of your macro.
You can ignore delays between events during recording by clicking on the checkbox in the
Manage Macros tab.
Refer to 'Using Your Razer Imperator' for more details.
LIGHTING TAB
Turn on/off the scroll button and Razer logo lights on the Razer Imperator.
SOFTWARE UPDATE & RESET
Update the Razer driver and firmware software by clicking on the
button. This will connect
you to www.razersupport.com for the latest driver/firmware downloads. You can also restore
your Razer Imperator to the default settings of your current profile by pressing the RESET
button.
6. USING YOUR RAZER IMPERATOR
ADJUSTABLE SIDE BUTTONS
Designed after extensive ergonomic studies with professional gamers, the Razer Imperator
provides improved ergonomics by allowing the customized positioning of the side buttons.
For maximum reach of the side buttons to suit various palm size and grip styles, the adjustable
side buttons can be positioned by:
1. Pressing and holding the side button selector switch on the bottom of your Razer Imperator.
2. Move the side button selector switch along the slider to adjust the position of the side buttons.
3. Release the side button selector switch to lock the side buttons at the new position.
SETTING SENSITIVITY STAGES
A sensitivity stage is a preset sensitivity value you can swap to On-The-Fly. This means you can
change between multiple pre-defined sensitivities instantly by toggling between sensitivity
stages.
To preset a sensitivity stage:
1. Load the Razer Imperator Configurator.
2. Click on the Tweak Performance tab.
3. Click on the"Sensitivity Stage" button. A Sensitivity Stage Settings pop up box will appear.
4. Select the number of sensitivity stages needed.
5. Click on the stage you would like to preset and adjust using the arrow on the slider below.
6. Click "Apply" when done. To switch between different sensitivity stages, simply assign the
Sensitivity Stage Up and Sensitivity Stage Down functions to the desired buttons.
CREATING MACROS
1. Load the Razer Imperator Configurator.
2. Click on the Manage Macros tab.
3. Click NEW to start a new macro
4. Click
to start creating a macro.
5. Type in the desired sequence of keystrokes.
6. Click
to end the recording.
7. Right-click on the recorded keystroke to access more options.
8. You can also insert additional commands by clicking on the drop down menus.
9. Click APPLY when done.
SWITCHING PROFILES
You can switch between profiles in 3 ways in the Razer Imperator Configurator:
a. By changing the Current Profile.
b. By selecting the Current Profile radio button in the Manage Profiles tab..
c. By assigning the function to a button in the Assign Buttons tab.
Example: Selecting Profile 5 to be activated upon loading of Program A
1. Open up the Razer Imperator Configurator
2. Click on the Manage Profiles tab.
3. Select Profile 5
4. Right-click the row, select "Rename" and enter a name for the profile.
5. Right-click the row, select "Assign Application" to open up the directory browser and locate
the executable file for Program A
6. Check the auto-switching option for Profile 5 to activate auto-switching.
7. Click OK.
ON-THE-FLY SENSITIVITY
If "On-The-Fly Sensitivity" has been assigned to a button, pressing that assigned button and
moving the scroll wheel will produce a bar at the lower right-hand corner of your screen,
allowing you to dynamically adjust your sensitivity settings.
GLOSSARY
Acceleration
Acceleration is an internal filter of the driver, and is primarily a legacy option for low dpi mice
users. With acceleration enabled, faster mouse movements cover additional on-screen
distance. Windows has acceleration turned on by default as a convenience for users assuming
that everyone will have 400DPI mice, but this will likely be a hindrance to most gamers and
precision users who require greater accuracy.
DPI switcher - Resolution
Resolution is the number of counts per inch of movement sent by the mouse hardware to the
OS. E.g. 400DPI means a movement of one inch will result in 400 counts of movement. Without
any of the above filters operating, this will result in 400 pixels of movement on the screen.
Independent X and Y-axis Settings
You can preset independent X-axis (sensitivity movements side to side) and Y-axis (sensitivity
movements up and down). When this feature is enabled and On-The-Fly Sensitivity is used, a
new on-the-fly interface bar that allows further sensitivity adjustments will appear on-screen.
Lift-off Distance
This is the distance (height) between surface and mouse as it is lifted-off, a technique employed
by low-sensitivity gamers (i.e. preferred for better accuracy in first-person shooters) for more
efficient swiping during gameplay. These gamers lift-off their mice in order to quickly reposition it
back at the centre of the mat for onscreen mouselook-to-hand movement realignment.
Macros
A macro is a sequence of keystrokes executed in a particular order and timing. It allows you to
execute a chain of commands, with the press of just one button for faster response in your
games.
Mouse to Surface Calibration
By calibrating the mouse to the particular surface i.e. your preferred mouse mat, it will ensure
the mouse tracks your swipes more rapidly and accurately for the best in-game performance at
all times. Calibration occurs when the system detects the distance between the sensor and the
surface.
Polling Rate
The polling rate determines the time intervals that the PC retrieves data from your mouse. A
higher value would mean shorter intervals and therefore less latency.
Profiles
A profile allows you to store your various settings such as button assignments and macros as a
single group for your convenience. In addition, you can also set your Razer Imperator to change
profiles once a particular program is launched.
Sensitivity Stage
A sensitivity stage is a preset sensitivity value you can swap to on-the-fly.
7. LEGALESE
COPYRIGHT AND INTELLECTUAL PROPERTY
INFORMATION
©2011 Razer USA Ltd. Patent Pending. All Rights Reserved. Razer, the Razer Triple-Headed
Snake logo, the Razer distressed word logo and other trademarks contained herein are the
trademarks or registered trademarks of Razer USA Ltd and/or its affiliated or associated
companies, registered in the United States and/or other countries. Windows and the Windows
logo are trademarks of the Microsoft group of companies. Mac OS, Mac and the Mac logo are
trademarks or registered trademarks of Apple Inc., registered in the U.S. and other countries. All
other trademarks are the property of their respective owners.
Razer USA Ltd (“Razer”) may have copyright, trademarks, trade secrets, patents, patent
applications, or other intellectual property rights (whether registered or unregistered) concerning
the product in this Master Guide. Furnishing of this Master Guide does not give you a license to
any such copyright, trademark, patent or other intellectual property right. The Razer Imperator
product (the “Product”) may differ from pictures whether on packaging or otherwise. Razer
assumes no responsibility for such differences or for any errors that may appear. Information
contained herein is subject to change without notice.
LIMITED PRODUCT WARRANTY
For the latest and current terms of
http://warranty.razerzone.com.
the Limited Product Warranty,
please visit
LIMITATION OF LIABILITY
Razer shall in no event be liable for any lost profits, loss of information or data, special,
incidental, indirect, punitive or consequential or incidental damages, arising in any way out of
distribution of, sale of, resale of, use of, or inability to use the Product. In no event shall Razer’s
liability exceed the retail purchase price of the Product.
COSTS OF PROCUREMENT
For the avoidance of doubt, in no event will Razer be liable for any costs of procurement unless
it has been advised of the possibility of such damages, and in no case shall Razer be liable for
any costs of procurement liability exceeding the retail purchase price of the Product.
GENERAL
These terms shall be governed by and construed under the laws of the jurisdiction in which the
Product was purchased. If any term herein is held to be invalid or unenforceable, then such term
(in so far as it is invalid or unenforceable) shall be given no effect and deemed to be excluded
without invalidating any of the remaining terms. Razer reserves the right to amend any term at
any time without notice.