1
PHONES
(044) 360-7-130
(050) 336-0-130
(063) 788-0-130
(067) 233-0-130
(068) 282-0-130
Internet store of
autogoods
ICQ
294-0-130
597-0-130
SKYPE
km-130
CAR RECEIVERS — Receivers • Media receivers and stations • Native receivers • CD/DVD changers • FM-modulators/USB adapters • Flash memory • Facia plates and adapters • Antennas • Accessories |
CAR AUDIO — Car audio speakers • Amplifiers • Subwoofers • Processors • Crossovers • Headphones • Accessories | TRIP COMPUTERS — Universal computers • Model computers • Accessories |
GPS NAVIGATORS — Portable GPS • Built-in GPS • GPS modules • GPS trackers • Antennas for GPS navigators • Accessories | VIDEO — DVR • TV sets and monitors • Car TV tuners • Cameras • Videomodules
• Transcoders • Car TV antennas • Accessories | SECURITY SYSTEMS — Car alarms • Bike alarms • Mechanical blockers • Immobilizers • Sensors • Accessories | OPTIC AND LIGHT — Xenon • Bixenon • Lamps
• LED • Stroboscopes • Optic and Headlights • Washers • Light, rain sensors • Accessories | PARKTRONICS AND MIRRORS — Rear parktronics • Front parktronics • Combined parktronics • Rear-view mirrors
• Accessories | HEATING AND COOLING — Seat heaters • Mirrors heaters • Screen-wipers heaters • Engine heaters • Auto-refrigerators • Air conditioning units • Accessories | TUNING — Vibro-isolation
• Noise-isolation • Tint films • Accessories | ACCESSORIES — Radar-detectors • Handsfree, Bluetooth • Windowlifters • Compressors • Beeps, loudspeakers • Measuring instruments • Cleaners • Carsits
• Miscellaneous | MOUNTING — Installation kits • Upholstery • Grilles • Tubes • Cable and wire • Tools • Miscellaneous | POWER — Batteries • Converters • Start-charging equipment • Capacitors
• Accessories | MARINE AUDIO AND ELECTRONICS — Marine receivers • Marine audio speakers • Marine subwoofers • Marine amplifiers • Accessories | CAR CARE PRODUCTS — Additives • Washer fluid •
Care accessories • Car polish • Flavors • Adhesives and sealants | LIQUID AND OIL — Motor oil • Transmission oil • Brake fluid • Antifreeze • Technical lubricant
In store "130" you can find and buy almost all necessary goods for your auto in
Kyiv and other cities, delivery by ground and postal services. Our experienced
consultants will provide you with exhaustive information and help you to chose
the very particular thing. We are waiting for you at the address
http://130.com.ua
FOR CAR USE ONLY/NUR FÜR AUTOMOBIL GEBRAUCH/POUR APPLICATION AUTOMOBILE UNIQUEMENT/
PARA USO EN AUTOMÓVILES/SOLO PER L’UTILIZZO IN AUTOMOBILE/ENDAST FÖR BILBRUK
2
EN
SYSTEM INTEGRATION AUDIO PROCESSOR
PXA-H800
• INSTALLATION
FR
MANUAL
ES
• INSTALLATIONSANLEITUNG
D’INSTALLATION
DE INSTALACIÓN
• MANUALE DI INSTALLAZIONE
• INSTALLATIONSHANDBOK
a
• GUIDE
IT
.u
• MANUAL
0.
co
m
SE
13
ALPINE ELECTRONICS MARKETING, INC.
1-1-8 Nishi Gotanda,
Shinagawa-ku,
Tokyo 141-0031, Japan
Phone 03-5496-8231
ALPINE ELECTRONICS OF AMERICA, INC.
19145 Gramercy Place, Torrance,
California 90501, U.S.A.
Phone 1-800-ALPINE-1 (1-800-257-4631)
ALPINE ELECTRONICS OF CANADA, INC.
777 Supertest Road, Toronto,
Ontario M3J 2M9, Canada
Phone 1-800-ALPINE-1 (1-800-257-4631)
ALPINE ELECTRONICS OF AUSTRALIA PTY. LTD.
161-165 Princes Highway, Hallam
Victoria 3803, Australia
Phone 03-8787-1200
ALPINE ITALIA S.p.A.
Viale C. Colombo 8, 20090 Trezzano
Sul Naviglio (MI), Italy
Phone 02-484781
ALPINE ELECTRONICS GmbH
Wilhelm-Wagenfeld-Str. 1-3,
80807 München, Germany
Phone 089-32 42 640
ALPINE ELECTRONICS DE ESPAÑA, S.A.
Portal de Gamarra 36, Pabellón, 32
01013 Vitoria (Alava)-APDO 133, Spain
Phone 945-283588
ALPINE ELECTRONICS OF U.K. LTD.
Alpine House
Fletchamstead Highway,
Coventry CV4 9TW, U.K.
Phone 0870-33 33 763
ALPINE ELECTRONICS (BENELUX) GmbH
Leuvensesteenweg 510-B6,
1930 Zaventem, Belgium
Phone 02-725-13 15
ALPINE ELECTRONICS FRANCE S.A.R.L.
(RCS PONTOISE B 338 101 280)
98, Rue de la Belle Etoile, Z.I. Paris Nord Il,
B.P. 50016, 95945 Roissy Charles de Gaulle
Cedex, France
Phone 01-48638989
Designed by ALPINE Japan
Printed in China (Y)
68-13530Z69-A
M3514450010
Qingdao Dongli Xinhaiyuan Printing Co., Ltd.
No.17, jiushuidong road, Qingdao, China
DE
Autogood products «130»
ALPINE PXA-H800_EN 68-13530Z69-A (B5)
a
.u
co
m
0.
13
Autogood products «130»
ALPINE PXA-H800_EN 68-13530Z69-A (B5)
ENGLISH
Contents
WARNING
WARNING ............................................................ 2
CAUTION ............................................................. 2
PRECAUTIONS .................................................... 2
Installation and Connections
Mounting the Base Unit (PXA-H800) .................3
Preparation ...........................................................................3
Installation example 1 .........................................................3
Installation example 2 .........................................................3
Mounting the Microphone. ................................................4
co
m
Connections ............................................................8
System Example ...................................................12
.u
Preparation ...........................................................................5
Installing with Adhesive sheet............................................5
Installing with Commander unit holder...........................5
a
Mounting the Commander Unit (RUX-C800)
(Sold separately) .................................................5
13
0.
Connecting an automobile factory system (standard
audio, etc.) and External Amplifier ............................. 12
Connecting a Non Ai-NET AV Head Unit, External
Input and External Amplifier ....................................... 14
Connecting a Non Ai-NET Head Unit, External Input
and External Amplifier ................................................. 15
Connecting an Ai-NET compatible AV Head Unit
(IVA-D800R), ALPINE Navigation System, Ai-NET
compatible Changer and External Amplifier ............. 16
Connecting an Ai-NET compatible Head Unit, Ai-NET
compatible Changer and External Amplifier ............. 18
Confirmation ........................................................19
Autogood products «130»
1-EN
ALPINE PXA-H800_EN 68-13530Z69-A (B5)
DO NOT DISASSEMBLE OR ALTER.
Doing so may result in an accident, fire or electric shock.
KEEP SMALL OBJECTS SUCH AS BOLTS OR SCREWS OUT OF THE REACH
OF CHILDREN.
Swallowing them may result in serious injury. If swallowed, consult a physician
immediately.
USE THE CORRECT AMPERE RATING WHEN REPLACING FUSES.
Failure to do so may result in fire or electric shock.
BEFORE WIRING, DISCONNECT THE CABLE FROM THE NEGATIVE
BATTERY TERMINAL.
Failure to do so may result in electric shock or injury due to electrical shorts.
DO NOT SPLICE INTO ELECTRICAL CABLES.
Never cut away cable insulation to supply power to other equipment. Doing so
will exceed the current carrying capacity of the wire and result in fire or electric
shock.
DO NOT INSTALL IN LOCATIONS WHICH MIGHT HINDER VEHICLE
OPERATION, SUCH AS THE STEERING WHEEL OR SHIFT LEVER.
Doing so may obstruct forward vision or hamper movement etc. and results in
serious accident.
CAUTION
This symbol means important instructions. Failure to heed
them can result in injury or material property damage.
USE SPECIFIED ACCESSORY PARTS AND INSTALL THEM SECURELY.
Be sure to use only the specified accessory parts. Use of other than designated
parts may damage this unit internally or may not securely install the unit in
place. This may cause parts to become loose resulting in hazards or product
failure.
DO NOT INSTALL IN LOCATIONS WITH HIGH MOISTURE OR DUST.
Avoid installing the unit in locations with high incidence of moisture or dust.
Moisture or dust that penetrates into this unit may result in product failure.
HAVE THE WIRING AND INSTALLATION DONE BY EXPERTS.
The wiring and installation of this unit requires special technical skill and
experience. To ensure safety, always contact the dealer where you purchased this
product to have the work done.
ARRANGE THE WIRING SO IT IS NOT CRIMPED OR PINCHED BY A SHARP
METAL EDGE.
Route the cables and wiring away from moving parts (like the seat rails) or sharp
or pointed edges. This will prevent crimping and damage to the wiring.
co
m
DO NOT DAMAGE PIPE OR WIRING WHEN DRILLING HOLES.
When drilling holes in the chassis for installation, take precautions so as not to
contact, damage or obstruct pipes, fuel lines, tanks or electrical wiring. Failure
to take such precautions may result in fire.
USE THIS PRODUCT FOR MOBILE 12V APPLICATIONS.
Use for other than its designed application may result in fire, electric shock or
other injury.
a
This symbol means important instructions. Failure to heed
them can result in serious injury or death.
KEEP THE VOLUME AT A LEVEL WHERE YOU CAN STILL HEAR OUTSIDE
NOISES WHILE DRIVING.
Excessive volume levels that obscure sounds such as emergency vehicle sirens or
road warning signals (train crossings, etc.) can be dangerous and may result in
an accident. LISTENING AT LOUD VOLUME LEVELS IN A CAR MAY ALSO
CAUSE HEARING DAMAGE.
.u
WARNING
WARNING
DO NOT USE BOLTS OR NUTS IN THE BRAKE OR STEERING SYSTEMS TO
MAKE GROUND CONNECTIONS.
Bolts or nuts used for the brake or steering systems (or any other safetyrelated system), or tanks should NEVER be used for installations or ground
connections. Using such parts could disable control of the vehicle and cause
fire etc.
13
0.
DO NOT ALLOW CABLES TO BECOME ENTANGLED IN SURROUNDING
OBJECTS.
Arrange wiring and cables in compliance with the manual to prevent
obstructions when driving. Cables or wiring that obstruct or hang up on places
such as the steering wheel, shift lever, brake pedals, etc. can be extremely
hazardous.
MAKE THE CORRECT CONNECTIONS.
Failure to make the proper connections may result in fire or product damage.
DO NOT INSTALL THE MONITOR NEAR THE PASSENGER SEAT AIR BAG.
If the unit is not installed correctly the air bag may not function correctly and
when triggered the air bag may cause the monitor to spring upwards causing an
accident and injuries.
PRECAUTIONS
• Be sure to disconnect the cable from the (–) battery post before installing
your PXA-H800. This will reduce any chance of damage to the unit in case of
a short-circuit.
• Be sure to connect the color coded leads according to the diagram. Incorrect
connections may cause the unit to malfunction or damage to the vehicle’s
electrical system.
• When making connections to the vehicle’s electrical system, be aware of the
factory installed components (e.g. on-board computer). Do not tap into these
leads to provide power for this unit. When connecting the PXA-H800 to the
fuse box, make sure the fuse for the intended circuit of the PXA-H800 has
the appropriate amperage. Failure to do so may result in damage to the unit
and/or the vehicle. When in doubt, consult your Alpine dealer.
• The PXA-H800 uses female RCA-type jacks for connection to other units (e.g.
amplifier) having RCA connectors. You may need an adaptor to connect other
units. If so, please contact your authorized Alpine dealer for assistance.
• Be sure to connect the speaker (–) leads to the speaker (–) terminal. Never
connect left and right channel speaker cables to each other or to the vehicle
body.
DO NOT BLOCK VENTS OR RADIATOR PANELS.
Doing so may cause heat to build up inside and may result in fire.
USE ONLY IN CARS WITH A 12 VOLT NEGATIVE GROUND.
(Check with your dealer if you are not sure.) Failure to do so may result in fire,
etc.
DO NOT OPERATE ANY FUNCTION THAT TAKES YOUR ATTENTION AWAY
FROM SAFELY DRIVING YOUR VEHICLE.
Any function that requires your prolonged attention should only be performed
after coming to a complete stop. Always stop the vehicle in a safe location before
performing these functions. Failure to do so may result in an accident.
IMPORTANT
Please record the serial number of your unit in the space provided below
and keep it as a permanent record. The serial number or the engraved
serial number is located on the bottom of the unit.
2-EN
ALPINE PXA-H800_EN 68-13530Z69-A (B5)
SERIAL NUMBER: __________________________________
INSTALLATION DATE: ______________________________
INSTALLATION TECHNICIAN: _______________________
PLACE OF PURCHASE:______________________________
Autogood products «130»
Installation and Connections
2
Mounting the Base Unit (PXA-H800)
3
Preparation
1
Mark the installation screw positions at the
installation location.
Drill (3mm diameter max.) in the marked positions.
WARNING
When making holes, be careful not to damage pipes, tanks, electric wires,
etc. Doing so could lead to an accident or fire.
Check accessory parts.
A Power cable
B Ai-NET extension cable (5.5 m)
C USB cable (5 m)
4
Install the device tightly with 4 self-tapping screws
(M4 × 14 mm) H.
D Speaker-RCA Conversion cable
(20 cm) (Red/White ×3 sets)
Self-tapping screw (M4 × 14 mm) (×4)
Base Unit
E Bracket
(×4)
<Microphone>
<Clip>
<Adhesive tape>
H Self-tapping screw (M4 × 14 mm)
co
m
G Screw (M3 × 6 mm)
(×4)
(×4)
Installation example 2
J CD-ROM*2, *3
I Velcro fastener*1
(×2)
(×2)
13
0.
*1 Use when necessary.
*2 For details on how to install and use the CD-ROM, “Sound
Manager for PXA-H800,” refer to the Owner’s Manual – PC
guide.
*3 For details on how to install and use the CD-ROM, “SETUP
DISC,” refer to the Owner’s Manual – PC guide.
1
2
3
Cut out the external box paper template along the
perforation.
Temporarily hold the paper template in place at the
installation position with adhesive tape.
Put a bracket E in a predetermined position on the
paper template and mark where a screw is to be fixed.
For details on how to install the brackets, refer to step 5.
Installation example 1
4
e Set the installation location.
• Check that the provided cord is sufficiently long. Install the unit where
it is not exposed to water.
Do not install the unit or wiring where it interferes with driving or
an air bag.
1
.u
a
F Microphone (1 set)
Drill a hole (3mm diameter max.).
WARNING
When making holes, be careful not to damage pipes, tanks, electric wires,
etc. Doing so could lead to an accident or fire.
Affix the bracket E to the device tightly with the 4
screws (M3 × 6 mm) G.
Screw (M3 × 6 mm)
Base Unit
Bracket (×4)
Autogood products «130»
3-EN
ALPINE PXA-H800_EN 68-13530Z69-A (B5)
5
Tightly install the bracket E at the designated paper
template position with the 4 self-tapping screws (M4 ×
14 mm) H.
Self-tapping screw
(M4 × 14 mm) (×4)
Mounting the Microphone.
When measuring ImprintEQ or AutoTCR before implementing
RoadEQ automated measurement, the installation position is different.
Before installing the microphone, make sure to refer to “Automatic
Measurement Function” in the Owner’s Manual – PC or Commander
guide.
For safe use, make sure of the following:
• location is stable and firm.
• driver’s view and operations are not obstructed.
Mou
C800
Prepa
1
Ch
A Com
• Mount the road noise measurement microphone on the sun
visor, dashboard or roof interior.
• Installation on the sun visor is the most common installation
position to measure road noise while driving.
Bracket (×4)
• Do not install the unit or wiring in a location that interferes
Paper template
with driving or an air bag.
Mount the brackets
symmetrically along
the paper template.
E Self(M4
a
Microphone
Cable clamp
(Sold separately)
Remove the paper template.
Place the Base unit on the bracket E and install the
device tightly with the 4 screws (M3 x 6 mm) G.
co
m
Base Unit
.u
6
7
C Brac
Instal
• The mounting clip can be removed from the microphone base,
0.
as in the illustration below. If you mount the microphone using
the base without the clip, use the supplied adhesive tape as
needed.
Microphone base
e Set
• Check
it is no
Do no
an air
1
Clip
Us
or
13
Screw (M3 × 6 mm)
Adhesive tape
C
4-EN
ALPINE PXA-H800_EN 68-13530Z69-A (B5)
Autogood products «130»
erent.
c
der
Mounting the Commander Unit (RUXC800) (Sold separately)
Installing with Commander unit holder
e Set the installation location.
• Check that the provided cord is sufficiently long. Install the unit where
it is not exposed to water.
Do not install the unit or wiring where it interferes with driving or
an air bag.
• Console or dashboard, etc.
* Remove the components to which this product will be installed from
the automobile before installing.
Preparation
1
Check accessory parts.
A Commander cable (5 m)
B Commander unit holder
1
sun
ation
2
D Screw (M3 × 6 mm)
3
(×2)
(×2)
E Self-tapping screw
(M4 × 14 mm)
Cut installation holes along the paper template with a
utility knife.
F Adhesive sheet (1 set)
(a)
WARNING
(b)
(×4)
(c)
Installing with Adhesive sheet
e Set the installation location.
When making holes, be careful not to damage pipes, tanks, electric wires,
etc.
Doing so could lead to accidents or fire.
Console or Dashboard etc.
co
m
(d)
• Check that the provided cord is sufficiently long. Install the unit where
1
0.
it is not exposed to water.
Do not install the unit or wiring where it interferes with driving or
an air bag.
Using the Adhesive sheet (a) F, install on the console
or dashboard.
Console or Dashboard etc.
13
e base,
e using
as
Temporarily hold the paper template in place at the
installation position with adhesive tape.
a
C Bracket
.u
eres
Cut out the external box paper template along the
perforation.
Paper template
CAUTION
If the installation holes are too big, the Commander unit can rattle or come
off while driving. Make sure to use the paper template.
Adhesive sheet (a)
Commander Unit
Peel off
Autogood products «130»
5-EN
ALPINE PXA-H800_EN 68-13530Z69-A (B5)
4
Bend the bracket C to follow the curvature of the
Commander unit holder B and the console or the
underside of the dashboard.
Screw holes
6
Screw holes
Tightly fix the Commander unit to the Commander
unit holder B with the provided 2 binding screws (M3
× 6 mm) D and apply Adhesive sheets (b) and (c) to
the predetermined unit holder mounting positions.
Bracket
Commander Unit
8
Aff
Ad
14
Adhesive sheet (b) (×2)
Bracket
Console or
Dashboard etc.
Commander unit holder
Adhesive sheet (c) (×2)
Screw (M3 × 6 mm) (×2)
Commander
unit holder
Install the Commander unit from step 6 above in the
installation position.
co
m
• To bend the bracket C, it is recommended to use a vise or pliers.
• Use the appropriate screw holes of the bracket according to the shape
.u
a
7
of the vehicle installation position (i.e., console or dashboard).
5
Run the connector plug of the Commander cable
through the hole of the Commander unit holder B.
0.
* With the plug claw facing up, run the plug though the hole
diagonally (as shown below).
Commander unit holder
13
Commander Unit
Connector plug
CAUTION
Doing so forcibly may break the plug.
6-EN
ALPINE PXA-H800_EN 68-13530Z69-A (B5)
Autogood products «130»
Console or Dashboard etc.
C
Make su
Comma
er
ws (M3
) to
ons.
8
Affix the Commander unit holder B tightly using the 4
Adhesive sheets (d) F and 4 self-tapping screws (M4 ×
14 mm) E.
Self-tapping screw
(M4 × 14 mm) (×4)
2)
Bracket (×2)
Adhesive sheet
(d) (×4)
2)
the
CAUTION
13
0.
co
m
Make sure the Commander unit is tightly affixed. If any screws are loose, the
Commander unit can rattle or fall while driving.
.u
a
Console or Dashboard
underside
c.
Autogood products «130»
7-EN
ALPINE PXA-H800_EN 68-13530Z69-A (B5)
*3 Th
Connections
e Left side
4
Blue/
White
Black
Cord colors and cord/terminal specifications
Connect to:
Remote On Lead (REM IN) *1
Connect to the head unit for RCA connections.
(Non Ai-NET connection)
Connect to the Remote On cord
of the head unit.
Ground Lead (GND)
Connect securely to a metal part of the vehicle’s
body.
Battery power Lead (BATT)
Power is supplied constantly to the PXA-H800
regardless of whether the engine key is on or off.
Yellow
a
Guide control Lead (GUIDE)
Used to interrupt the navigation system’s sound.
White/
Green
0.
Navigation audio input connector (RCA input)
(NAVI)
Used to input the audio output signals of a
navigation system.
Changer input terminal (optical digital input)
Used when connecting an Optical Digital
compatible Changer, etc.
13
Connect to the vehicle’s body.
Connect this lead to the
positive(+) post of the vehicle’s
battery.
To the instrument cluster
illuminationlead.
Use if the RUX-C800 (sold
separately) is connected.
Remote Out Lead (REM OUT)
Connect to the amplifier or other peripheral device. Connect to the Remote On Lead
of an amplifier.
co
m
Blue/
White
.u
Orange
Illumination Lead (ILLM)
This lead may be connected to the vehicle’s
instrument cluster illumination lead. This will allow
the backlighting of the RUX-C800 (sold separately)
to dim whenever the vehicle’s lights are turned on.
• For de
Head unit input terminal (optical digital input)
Used when connecting an Optical Digital
compatible Head Unit, etc.
Changer input terminal (Ai-NET input) *2
Used for system expansion (Ai-NET changer, etc.).
Head unit input terminal (Ai-NET input) *2
Used for system expansion (Head unit, etc.).
Microphone jack
Use when implementing an automatic
measurement of the automobile interior acoustics
(ImprintEQ/Auto TCR) or when implementing
an automatic adjustment of EQ characteristics
(RoadEQ) along with the quantity of road noise
while driving.
Audio input jacks (RCA inputs) *3
Used to input the audio output signals of a head
unit connected with RCA connections to the
PXA-H800.
Connect to the Guide Control
Lead of GUIDE SIGNAL I/F FOR
EXTERNAL NAVIGATION (KCE900E) (sold separately).
Connect to the Guide output
terminal of GUIDE SIGNAL I/F
FOR EXTERNAL NAVIGATION (KCE900E) (sold separately).
Connect to an Optical Digital
compatible product with a
optical fiber cable.
Connect to an Optical Digital
compatible product with a
optical fiber cable.
Connect to an Ai-NET product
using an Ai-NET cord.
For connection to the PXA-H800,
use the straight side.
Connect to an Ai-NET product
using an Ai-NET cord.
For connection to the PXA-H800,
use the straight side.
Connect to the microphone
(included)
Used for RCA connections.
Connect to the head unit.
*1 If connecting to a system without the Remote On cord (such as a factory system), connect to an incoming power supply cord (accessory power)
in the ACC position.
*2 With Ai-NET/RCA Interface cable (KCA-121B) (sold separately), a television or video player with RCA audio output can be input to the
device. For details, refer to “System Example” (page 12).
8-EN
ALPINE PXA-H800_EN 68-13530Z69-A (B5)
Autogood products «130»
guide,
• If conn
• For de
*3 The allocation patterns for the device’s audio input (RCA input) are the following 3 patterns.
RCA Input
Pattern
AUX INPUT
CH-1 (L)
CH-2 (R)
CH-3 (L)
CH-4 (R)
CH-5 (L)
CH-6 (R)
RL
(Rear Left)
RR
(Rear Right)
C
(Centre)
SubW
(Subwoofer)
RR
(Rear Right)
L
(Left)
R
(Right)
L
(Left)
AUX1
5.1ch Input
FL
(Front Left)
FR
(Front Right)
4ch&2ch Input
FL
(Front Left)
FR
(Front Right)
RL
(Rear Left)
2ch×3 Input
L
(Left)
R
(Right)
L
(Left)
AUX1
AUX2
AUX1
AUX2
R
(Right)
AUX3
R
(Right)
• For details on how to set the RCA input pattern, refer to “Setting the AUX Input System (AUX Input System Select)” in the Owner’s Manual – PC
n cord
ody.
guide, or “Setting the AUX Input System (AUX Input System Select)” in the Owner’s Manual – Commander guide.
• If connecting to an Ai-NET Head Unit/AV Head Unit, RCA input (AUX INPUT) connection is not available.
• For details on each “AUX INPUT” input pattern, refer to “System Example” (page 12).
.u
a
icle’s
ital
a
ital
a
0.
put
I/F
ON (KCE-
13
trol
FOR
CE-
co
m
n Lead
duct
-H800,
duct
-H800,
ne
power)
he
Autogood products «130»
9-EN
ALPINE PXA-H800_EN 68-13530Z69-A (B5)
e Right side
e Sp
terminal specifications
Connect to:
Audio output jacks(RCA output) *
Outputs an audio signal
Connect to amplifier
RESET switch
The system of this unit is reset.
−
Commander connection terminal
Use when operating this unit from the RUX-C800
(sold separately).
Connect to the RUX-C800 (sold
separately).
Computer connection terminal (USB terminal)
Use when operating this unit via a computer.
Connect to a computer with the
USB cable accessory.
F-2way+R+SW
(4.2ch system)
CH-1(L)
CH-2(R)
Front High(L)
Front High(R)
CH-4(R)
Front High(L)
Front High(R)
F-3way+R
(4.0ch system)
Front High(L)
Front High(R)
CH-5(L)
Front Low(L)*1
Front Low(R)*1
Front Mid(L)*1
Front Mid(R)*1
Rear(L)
Front Low(L)
co
m
Front3Way
Front Mid(L)*1
Front Mid(R)*1
Front Low(L)
Front2Way
Front High(L)
Front High(R)
CH-6(R)
CH-7(L)
Rear
Front3Way
F-3way+SW
(2.2ch system)
F-2way+R+C+SW
(5.1ch system)
CH-3(L)
Front2Way
.u
Speaker System
a
* The location of the connection to the external amp for the audio output terminal (RCA output) varies, as specified below, depending on the
connected speaker system.
Front Low(L)*1
Front Low(R)*1
Rear(R)
Subwoofer(L)*2
Subwoofer(R)*2
Subwoofer
Front Low(R)
Subwoofer(L)*2
Front Low(R)
Rear(L)
Subwoofer(R)*2
Rear(R)
Centre
Subwoofer
Centre
Subwoofer
Rear
Rear
Rear(L)
CH-8(R)
Subwoofer
Rear(R)
• For details on how to set the speaker system, refer to “Setting the Speaker System (Output System Select)” in the Owner’s Manual – PC guide, or
13
0.
“Setting the Speaker System (System Select)” in the Owner’s Manual – Commander guide.
*1 An OFF setting is not available.
*2 If connecting 2 subwoofers, the subwoofer output can be set to stereo or monaural output. If connecting a subwoofer, set the subwoofer output
(Subwoofer 2) to “OFF.” For details, refer to “Setting the Speaker System (Output System Select)” in the Owner’s Manual – PC guide, or
“Setting the Speaker System (System Select)” in the Owner’s Manual – Commander guide.
10-EN
ALPINE PXA-H800_EN 68-13530Z69-A (B5)
Autogood products «130»
e Speaker System Example
F-2way+R+SW(4.2ch System)
Front High(L)
Front High(R)
Front Low(L)
Front Low(R)
Rear(L)
F-3way+SW(2.2ch System)
Front High(L)
Front Mid(L)
Front High(R)
Front Mid(R)
Front Low(L)
Front Low(R)
Rear(R)
(sold
Subwoofer(L) Subwoofer(R)
Subwoofer(L) Subwoofer(R)
th the
F-3way+R(4.0ch System)
F-2way+R+C+SW(5.1ch System)
ofer(R)*2
Front High(L)
Front High(R)
Front Mid(L)
Front Mid(R)
Front Low(L)
Front Low(R)
r(R)
e, or
r output
or
Front Low(R)
Rear(R)
Rear(L)
Rear(R)
Subwoofer
0.
oofer
Rear(L)
Front High(R)
Front Low(L)
13
oofer
Centre
Front High(L)
co
m
ofer(R)*2
.u
8(R)
a
he
Autogood products «130»
11-EN
ALPINE PXA-H800_EN 68-13530Z69-A (B5)
System Example
Connecting an automobile factory system (standard audio, etc.) and External Amplifier
e Input Pattern: 4ch&2ch Input
AUX INPUT
CH-1 (L)
CH-2 (R)
CH-3 (L)
CH-4 (R)
CH-5 (L)
AUX1
FL
(Front Left)
FR
(Front Right)
CH-6 (R)
AUX2
RL
(Rear Left)
RR
(Rear Right)
L
(Left)
R
(Right)
*3
RUX-C800 (Sold separately)*1
Commander cable
(RUX-C800 included)
Audio output jacks
.u
To External Amplifier
(see page 10)
External Amplifier
Rear speaker (L) output lead
co
m
Computer connection
terminal
a
White
Rear speaker (R) output lead
Front speaker (L) output lead
Rear speaker (L)
Rear speaker (R)
Front speaker (L)
Front speaker (R)
0.
Front speaker (R) output lead
*5
13
*1 When using a factory car audio system, the RUX-C800 Commander (sold separately) is required.
*2 If your factory system does not have a Remote Turn-On Lead, connect a cable that enables an incoming power supply (accessory power) in
the ACC position.
*3 If using the Speaker-RCA Conversion cable, up to 6 channels can be input. Make connections according to your system.
*4 Before using the Speaker-RCA Conversion cable, remove the cord tip coating, cut the cord into 2 cables, connect the cable with commercially
available bullet or solderness terminals attached to the tips.
*5 When connecting a speaker input cable, connect via a solderless terminal or solderless connector after disconnecting the automobile’s speaker
cable.
Automobile speaker cable
CAUTION
Make sure to disconnect the factory speakers and the speaker output cable for the factory system.
When using fiber cable, follow the guidelines below:
• When laying or bundling optic fiber cables, the minimum bending radius should be 30 mm. Bending beyond the radius will break the cable, resulting in no
digital sound being output.
• Do not put the product or other items on the optic fiber cable.
12-EN
ALPINE PXA-H800_EN 68-13530Z69-A (B5)
Autogood products «130»
Ai-NET/RCA Interface
cable KCA-121B
(Sold separately)
White White
Red Red
Ai-NET/RCA Interface
cable KCA-121B
(Sold separately)
White White
Red Red
RCA extension cable
(Sold separately)
To Digital Output
Terminal
Fiber optic cable
(Sold separately)
To Digital Output
Terminal
Fiber optic cable
(Sold separately)
White
RCA extension cable
(Sold separately)
Red
TV Tuner or Video
Player, etc.
White
TV Tuner or Video
Player, etc.
Red
Optical Digital Compatible
DVD Player, etc.
Optical Digital Compatible
DVD Player, etc.
*3
*5
L)
R)
(L)
(R)
White
Guide Control Lead
White/Green
Navigation audio input connector
a
Red
White
Not Connected
.u
Red
Illumination Lead
Orange
Illumination Lead
(Orange)
Remote Control Output Lead
Blue/White
To Remote On Lead of an
External Amplifier
Remote On Lead
Blue/White
*2
co
m
Red
Ground Lead
Black
Connect to a metal part of
chassis body with a screw.
Battery Lead
Yellow
0.
White
ercially
13
Fuse 10A
er) in
RCA extension cable
(Sold separately)
White
TV Tuner or Video Player, etc.
Red
Black/White
Black
Black/White
Black
Black/White
Black
Speaker-RCA Conversion cable
speaker
12V
Speaker-RCA Conversion cable
Speaker-RCA Conversion cable
Black/White
Black
Speaker-RCA Conversion cable
*4
Rear speaker (L) output lead
Rear speaker (R) output lead
Front speaker (L) output lead
Standard Car
Audio System
Front speaker (R) output lead
*5
n no
Autogood products «130»
13-EN
ALPINE PXA-H800_EN 68-13530Z69-A (B5)
Connecting a Non Ai-NET AV Head Unit, External Input and External Amplifier
Conn
e Input Pattern : 5.1ch Input
e Inp
AUX INPUT
CH-1 (L)
CH-2 (R)
CH-3 (L)
CH-4 (R)
CH-5 (L)
CH-6 (R)
CH
RR
(Rear Right)
C
(Centre)
SubW
(Subwoofer)
L
AUX1
FL
(Front Left)
FR
(Front Right)
RL
(Rear Left)
Ai-NET/RCA Interface
cable KCA-121B
(Sold separately)
White White
Red Red
Ai-NET/RCA Interface
cable KCA-121B
(Sold separately)
White White
RCA extension cable
(Sold separately)
White
RCA extension cable
(Sold separately)
Red Red
To Digital Output
Terminal
Fiber optic cable
(Sold separately)
To Digital Output
Terminal
TV Tuner or Video
Player, etc.
White
TV Tuner or Video
Player, etc.
Red
Optical Digital Compatible
DVD Player, etc.
Optical Digital Compatible
DVD Player, etc.
co
m
.u
a
Fiber optic cable
(Sold separately)
Red
Computer
connection
terminal
White Red
Guide Control Lead
White/Green
Navigation audio input connector
0.
Red White
13
Remote Control Output Lead
Blue/White
Ground Lead
Black
Battery Lead
Yellow
Fuse 10A
Audio output jacks
To External Amplifier (see page 10)
White
Commander cable
(RUX-C800 included)
RUX-C800 (Sold separately)
Not Connected
To Remote On Lead of an
External Amplifier
Connect to a metal part of
chassis body with a screw.
12V
Illumination Lead
Orange
Illumination Lead
Orange
Remote On Lead
Blue/White
RCA extension cable (Sold separately)
Remote On Lead
Blue/White
Centre Speaker Output
RCA extension cable (Sold separately)
Subwoofer Output
RCA extension cable (Sold separately) White
Non Ai-NET AV Head
Unit (Sold separately)
Rear Output *2
Red
RCA extension cable (Sold separately)
Red
Front Output *2
White
*1 When using a head unit that is not Ai-NET compatible, the RUX-C800 Commander (sold separately) is required.
C
CAUTION
When using fiber cable, follow the guidelines below:
• When laying or bundling optic fiber cables, the minimum bending radius should be 30 mm. Bending beyond the radius will break the cable, resulting in no
digital sound being output.
• Do not put the product or other items on the optic fiber cable.
14-EN
ALPINE PXA-H800_EN 68-13530Z69-A (B5)
*1
*2
Autogood products «130»
When u
• When
digita
• Do no
Connecting a Non Ai-NET Head Unit, External Input and External Amplifier
e Input Pattern : 2ch×3 Input
AUX INPUT
CH-1 (L)
CH-2 (R)
CH-3 (L)
CH-4 (R)
AUX1
L (Left)
CH-5 (L)
AUX2
R (Right)
L (Left)
R (Right)
Ai-NET/RCA Interface
cable KCA-121B
(Sold separately)
deo
White
Red
Ai-NET/RCA Interface
cable KCA-121B
(Sold separately)
CH-6 (R)
AUX3
White
Red
deo
L (Left)
White
R (Right)
RCA extension cable
(Sold separately)
White
TV Tuner or Video
Player, etc.
Red
Red
White
Red
RCA extension cable
(Sold separately)
White
TV Tuner or Video
Player, etc.
Red
To Digital Output
Terminal
Optical Digital Compatible
DVD Player, etc.
Fiber optic cable
(Sold separately)*2
Fiber optic cable
(Sold separately)*2
Optical Digital Compatible
DVD Player, etc.
.u
a
To Digital Output
Terminal
Audio output jacks
co
m
Computer
connection
terminal
White Red
rately)
Red White
Remote Control Output Lead
Blue/White
Ground Lead
Black
Battery Lead
13
Red White
0.
Guide Control Lead
White/Green
Navigation audio input connector
To External Amplifier
(see page 10)
Commander cable
(RUX-C800 included)
*1
RUX-C800 (Sold separately)
Not Connected
To Remote On Lead of an
External Amplifier
Connect to a metal part of
chassis body with a screw.
Yellow
Fuse 10A
RCA extension cable
(Sold separately)
12V
Illumination Lead
Orange
Remote On Lead
Blue/White
White
White
Red
Head
rately)
White
Red
Red
Red
Red
Red
White
TV Tuner or Video
Player, etc.
Non Ai-NET Head Unit
(Sold separately)
White
RCA extension cable (Sold separately)
RCA extension cable (Sold separately)
Illumination Lead
Orange
Remote On Lead
Blue/White
TV Tuner or Video
Player, etc.
White
*1 When using a head unit that is not Ai-NET compatible, the RUX-C800 Commander (sold separately) is required.
*2 Use when connected with an Optical Digital compatible Unit.
CAUTION
n no
When using fiber cable, follow the guidelines below:
• When laying or bundling optic fiber cables, the minimum bending radius should be 30 mm. Bending beyond the radius will break the cable, resulting in no
digital sound being output.
• Do not put the product or other items on the optic fiber cable.
Autogood products «130»
15-EN
ALPINE PXA-H800_EN 68-13530Z69-A (B5)
Connecting an Ai-NET compatible AV Head Unit (IVA-D800R), ALPINE Navigation System, Ai-NET
compatible Changer and External Amplifier
Ai-NET extension cable (Changer included)
To Ai-NET Output
Terminal
Fiber optic cable (Sold separately) *2
To Digital Output
Terminal (Optical)
Ai-NET compatible
Changer *4, *5
To Remote
Control Eye Jack
Audio output jacks
Computer
connection
terminal
To External Amplifier
(see page 10)
a
Not Used
RUX-C800 (Sold separately)
Not Connected
KCE-900E (Sold
Guide Control separately)
Lead
White/Green Guide
RGB Cable
Signal I/F
RCA extension cable for External
To RGB
(Sold separately)
Navigation
Output
To GUIDE Output
Terminal
Terminal
To RGB
Output
To Remote On Lead of
Terminal
an External Amplifier
co
m
Remote On Lead
Blue/White
.u
Commander cable
(RUX-C800 included)
Remote Control
Eye (DVD Changer
included) *6
Guide Control Lead
White/Green
Navigation audio
input connector
Remote Control
Output Lead
0.
Blue/White
13
Ground Lead
Black
Connect to a metal
part of chassis body
with a screw.
Battery Lead
Yellow
Fuse 10A
ALPINE
Navigation
System (Sold
separately)
To RGB Input Terminal
(KCE-900E included)
12V
Illumination
Lead*1
Orange
Illumination Lead*1
Orange
Fiber optic cable (Sold separately)
To Digital
Output Terminal
(Optical)
Ai-NET extension cable*7
*1
*2
*3
*4
*5
*6
*7
To RGB Input Terminal
Ai-NET compatible
AV Head Unit
(IVA-D800R) (Sold
separately) *3
To Ai-NET Output
Terminal
Use when connected with the RUX-C800 Commander (sold separately).
Use when connected with an Optical Digital compatible Changer.
Set the system switch to [EQ/DIV] or [EXT AP]. For details, refer to the Owner’s Manual for the product connected.
Setting the system switch is required. For details, refer to the Owner’s Manual for the connected changer.
If the Ai-NET compatible Changer is a DVD Changer (DHA-S690 Series or DHA-S680 Series), do not connect its Switched Power Lead
(Red).
If the Ai-NET compatible Changer is a DVD Changer (DHA-S690 Series or DHA-S680 Series), do not connect the Remote Control Eye in
a system that uses an Ai-NET compatible AV Head Unit. (Connection of the remote input cord (white/brown) is required.) Use the Remote
Control Eye in a system that uses any other manufacturer’s monitor. For details, refer to the connected DVD changer’s instruction manual.
If connecting DVA-5210, connect it between the unit and the head unit using an additional Ai-NET extension cable. In this case, also
connect the audio output jacks (L=white/R=red) of DVA-5210 to the AUX INPUT CH-1 (L)/CH-2 (R) jacks of the unit.
16-EN
ALPINE PXA-H800_EN 68-13530Z69-A (B5)
Autogood products «130»
C
When u
• When
digita
• Do no
NET
CAUTION
tput
When using fiber cable, follow the guidelines below:
• When laying or bundling optic fiber cables, the minimum bending radius should be 30 mm. Bending beyond the radius will break the cable, resulting in no
digital sound being output.
• Do not put the product or other items on the optic fiber cable.
te
ye Jack
ntrol
hanger
a
6
co
m
13
0.
tion
(Sold
tely)
.u
arately)
ad
ye in
emote
nual.
Autogood products «130»
17-EN
ALPINE PXA-H800_EN 68-13530Z69-A (B5)
Connecting an Ai-NET compatible Head Unit, Ai-NET compatible Changer and External Amplifier
Conf
Ai-NET extension cable (Changer included)
To Ai-NET Output
Terminal
Fiber optic cable (Sold separately) *2
To Digital Output
Terminal (Optical)
Ai-NET compatible
Changer *4, *5
1
Se
Ma
sea
pro
2
3
Co
Tu
co
Ch
we
4
Audio output jacks
Computer
connection
terminal
Not Used
To External Amplifier
(see page 10)
Remote On Lead
Blue/White
RUX-C800 (Sold separately)
.u
Guide Control Lead
White/Green
a
Commander cable
(RUX-C800 included)
Not Connected
co
m
Navigation audio input connector
Remote Control Output Lead
Blue/White
To Remote On Lead of an
External Amplifier
Illumination Lead*1
Orange
0.
Ground Lead
Black
Illumination Lead*1
Orange
Connect to a metal part of
chassis body with a screw.
Ai-NET compatible
Head Unit (Sold
separately)*3
13
Battery Lead
Yellow
Fuse 10A
12V
Ai-NET extension cable*6
*1
*2
*3
*4
*5
*6
To Ai-NET Output
Terminal
Use when connected with the RUX-C800 Commander (sold separately).
Use when connected with an Optical Digital compatible Changer.
Checking and setting of the system switch are required. For details, refer to the Owner’s Manual for the product connected.
If connecting with an Optical Digital compatible Changer, setting the system switch is required. For details, refer to the Owner’s Manual for
the connected changer.
If the Ai-NET compatible Changer is a DVD Changer (DHA-S690 Series or DHA-S680 Series), do not connect its Switched Power Lead
(Red).
If connecting DVA-5210, connect it between the unit and the head unit using an additional Ai-NET extension cable. In this case, also
connect the audio output jacks (L=white/R=red) of DVA-5210 to the AUX INPUT CH-1 (L)/CH-2 (R) jacks of the unit.
CAUTION
When using fiber cable, follow the guidelines below:
• When laying or bundling optic fiber cables, the minimum bending radius should be 30 mm. Bending beyond the radius will break the cable, resulting in no
digital sound being output.
• Do not put the product or other items on the optic fiber cable.
18-EN
ALPINE PXA-H800_EN 68-13530Z69-A (B5)
Autogood products «130»
Ma
lam
ifier
tput
Confirmation
1
Securing leads, etc.
Make sure leads are not pinched by moving such as the
seat rail, etc. Also check for damaged from sharp edges or
protrusion.
2
3
Connect the battery (−) terminal.
Turn on the engine key. Make sure the unit operating
correctly by referring to the Owner’s Manual.
Check the Owner’s Manuals for the connected products as
well.
Make sure all factory components such the brake
lamps, etc. work correctly.
a
4
Output
13
ble
0.
co
m
.u
arately)
ual for
ad
n no
Autogood products «130»
19-EN
ALPINE PXA-H800_EN 68-13530Z69-A (B5)
01GB00PXAH800.book Page 1 Tuesday, February 8, 2011 9:04 PM
R
EN
SYSTEM INTEGRATION
AUDIO PROCESSOR
PXA-H800
co
m
.u
a
FR
0.
ES
13
• OWNER’S MANUAL
Please read before using this equipment.
• MODE D’EMPLOI
Veuillez lire avant d’utiliser cet appareil.
• MANUAL DE OPERACIÓN
Léalo antes de utilizar este equipo.
ALPINE ELECTRONICS MARKETING, INC.
1-1-8 Nishi Gotanda,
Shinagawa-ku,
Tokyo 141-0031, Japan
Phone 03-5496-8231
ALPINE ELECTRONICS OF AMERICA, INC.
19145 Gramercy Place, Torrance,
California 90501, U.S.A.
Phone 1-800-ALPINE-1 (1-800-257-4631)
ALPINE ELECTRONICS OF CANADA, INC.
777 Supertest Road, Toronto,
Ontario M3J 2M9, Canada
Phone 1-800-ALPINE-1 (1-800-257-4631)
ALPINE ELECTRONICS OF AUSTRALIA PTY. LTD.
161-165 Princes Highway, Hallam
Victoria 3803, Australia
Phone 03-8787-1200
ALPINE ITALIA S.p.A.
Viale C. Colombo 8, 20090 Trezzano
Sul Naviglio (MI), Italy
Phone 02-484781
ALPINE ELECTRONICS GmbH
Wilhelm-Wagenfeld-Str. 1-3,
80807 München, Germany
Phone 089-32 42 640
ALPINE ELECTRONICS DE ESPAÑA, S.A.
Portal de Gamarra 36, Pabellón, 32
01013 Vitoria (Alava)-APDO 133, Spain
Phone 945-283588
ALPINE ELECTRONICS OF U.K. LTD.
Alpine House
Fletchamstead Highway, Coventry CV4 9TW, U.K.
Phone 0870-33 33 763
ALPINE ELECTRONICS (BENELUX) GmbH
Leuvensesteenweg 510-B6,
1930 Zaventem, Belgium
Phone 02-725-13 15
ALPINE ELECTRONICS FRANCE S.A.R.L.
(RCS PONTOISE B 338 101 280)
98, Rue de la Belle Etoile, Z.I. Paris Nord Il,
B.P. 50016, 95945 Roissy Charles de Gaulle
Cedex, France
Phone 01-48638989
Qingdao Dongli Xinhaiyuan Printing Co., Ltd.
No.17, jiushuidong road, Qingdao, China
Designed by ALPINE Japan
Printed in China (Y)
68-13530Z65-A
M3514447010
Autogood products «130»
01GB01PXAH800.fm
ALPINE PXA-H800_EN 68-13530Z65-A (B5)
13
0.
co
m
.u
a
01GB00PXAH800.book Page 2 Tuesday, February 8, 2011 9:04 PM
Autogood products «130»
01GB02PXAH800.fm
ALPINE PXA-H800_EN 68-13530Z65-A (B5)
01GB00PXAH800.book Page 1 Tuesday, February 8, 2011 9:04 PM
ENGLISH
Contents
Setting Defeat ................................................. 12
Operating Instructions
Storing the Preset Values (Preset Store) ......... 12
Switching the Sources ..................................... 12
Recalling a Stored Setting (Preset Call) ......... 13
Setting the Speaker System
(Output System Select) ................................ 13
WARNING
WARNING ................................................. 4
CAUTION .................................................. 4
NOTICE ..................................................... 4
Getting Started
How to Read this Manual ................................. 5
Setting the AUX Input System
(AUX Input System Select) ......................... 14
Setting and Adjusting the AUX Input/Digital
Input (Analog AUX Input/Digital AUX
Input) ........................................................... 15
Setting the AUX Input (AUX IN) ............... 15
Setting the Digital Input (Digital AUX) ...... 15
Setting the AUX Volume Input level
(AUX IN Gain) ........................................ 15
Adjusting the AUX Volume level
(AUX Level) ............................................ 15
Naming the AUX Input (AUX Name) ......... 16
Setting/Adjusting the Navigation Guidance
Volume (Navi Mix) ..................................... 16
co
m
.u
a
Location of Controls ........................................ 6
PXA-H800 .................................................... 6
Sound Manager for PXA-H800 .................... 6
RUX-C800 Commander (sold separately) .... 7
Features ............................................................ 8
About Operating ........................................... 8
About the Audio Setting ............................... 8
Before You First Use the Unit .......................... 8
Setting the Speakers (Speaker Setup)/
Setting the Subwoofers ................................ 14
Installing Sound Manager for PXA-H800 ....... 9
From a PC
13
Basic Operation
0.
Automatic Measurement Function
Initial System Start-Up ................................... 10
Using with Ai-NET Connections ................... 10
Turning Power On and Off ............................. 10
Operating the Sound Manager for PXA-H800
Menu ........................................................... 10
Saving the Setup Data (File) ....................... 10
Loading the Setup Data (File) ..................... 10
Loading the ImprintEQ Measurement Data
(File) ........................................................ 11
Downloading the Software (Option) ........... 11
Viewing the Version Information
(Option) ................................................... 11
Audio Adjustment .......................................... 11
Adjusting Fader
(Between Front and Rear) ....................... 12
Adjusting Balance
(Between Left and Right) ........................ 12
Adjusting Subwoofer (SubW Lv) ............... 12
Adjusting Volume ....................................... 12
Before Performing Automatic Measurement .. 16
Setting ImprintEQ ........................................... 17
Turning ImprintEQ On/Off ......................... 19
Saving ImprintEQ Measurement Data on a
PC ............................................................. 19
Adjusting and Saving the Target Curve ....... 19
Adjusting the Time Correction Automatically
(Auto TCR) ................................................. 20
Adjusting for Road Noise (RoadEQ) .............. 20
Turning RoadEQ On/Off ............................. 21
Audio Setup/Adjustment
Setting MX Plus (Ai-NET Mode) ................... 22
Setting MX Plus (Standalone Mode) .............. 22
Setting the Graphic EQ ................................... 23
Setting the Parametric EQ .............................. 25
About the Crossover (X-Over) ....................... 26
Adjusting X-Over and Switching the
Phases .......................................................... 26
Adjusting the Time Correction (TCR) ............ 28
Autogood products «130»
1-EN
01GB03PXAH800TOC.fm
ALPINE PXA-H800_EN 68-13530Z65-A (B5)
01GB00PXAH800.book Page 2 Tuesday, February 8, 2011 9:04 PM
Use the Multi Channel Function
Setting the 2-Channel Signal Playback Mode
(2ch Playback Mode) .................................. 30
Setting the 2-Channel Signal Playback Mode
(2ch Playback Mode) ............................... 30
Setting EUPHONY (EUPHONY) ............... 30
Using Dolby Pro Logic II
(Dolby Pro Logic II) ................................ 31
Multi Channel Function Adjustment
Procedure ..................................................... 32
Setting the AUX Input System
(AUX Input Setup) .......................................39
Setting the AUX Input (AUX IN) ...................39
Setting the Digital Input (Digital AUX) ..........40
Setting the AUX Volume Input Level
(AUX IN Gain) ............................................40
Adjusting the AUX Volume Level
(AUX Level) ................................................40
Naming the AUX Input (AUX Name) ............41
Mixing Navi Audio Guidance
(Navi Mix Setup) .........................................41
Automatic Measurement Function
Before Performing Automatic Measurement ..42
Turning ImprintEQ On/Off .............................42
co
m
.u
a
Multi Channel Setup ....................................... 32
Adjusting the Speaker Volume Level
(Output Level) .......................................... 33
Adjusting the Acoustic Image
(BI-PHANTOM) ...................................... 33
Mixing the Low Range Audio for the Rear
(Rear Mix) ................................................ 33
Mixing the Low Range Audio of the Center
with the Front L/R (Center Bass Split) .... 34
Setting the Linear PCM (PCM Mode) ........ 34
Achieving Powerful High Volume Sound
(Listening Mode) ..................................... 34
Adjusting the DVD Level (DVD Level) ...... 34
Setting the Subwoofer Output
(SW Channel) ..............................................38
Adjusting the Time Correction Automatically
(Auto TCR) ..................................................42
Adjusting for Road Noise (RoadEQ) ..............43
Turning RoadEQ On/Off .............................43
Audio Setup/Adjustment
From the Commander
Setting the MX Plus (Ai-NET Mode) .............44
Setting the MX Plus (Standalone Mode) ........45
Basic Operation
Setting the Equalizer Mode (EQ Mode) .........46
0.
Initial System Start-Up ................................... 35
Setting the Graphic EQ ...................................46
Setting the Parametric EQ ...............................47
Turning Power On and Off ............................. 35
About the Crossover (X-Over) ........................48
13
Using with Ai-NET Connections ................... 35
Audio Adjustment ........................................... 35
Adjusting Subwoofer (SUBWOOFER) ...... 35
Navigation Audio Volume Adjustment
(NAVI LEVEL) ........................................ 35
Adjusting the MX Plus Level (MX PLUS
SETUP/LEVEL ADJUSTMENT) ........... 36
Adjusting Balance (Between Left and Right)
(BALANCE) ............................................ 36
Adjusting Fader (Between Front and Rear)
(FADER) .................................................. 36
Setting Defeat (DEFEAT) ........................... 36
Adjusting Volume (VOLUME) ................... 36
Switching the Sources .................................... 36
Storing the Preset Values (Preset Store) ......... 36
Recalling a Stored Setting (Preset Call) ......... 37
Setting the Speaker System
(System Select) ............................................ 37
Setting the Speakers (Speaker Setup) ............. 38
2-EN
Adjusting X-Over and Switching the
Phases ..........................................................49
Adjusting the Time Correction (TCR) ............50
Setting the Time Correction Adjustment Unit
(TCR Parameter) ..........................................51
Use the Multi Channel Function
Setting the 2-Channel Signal Playback Mode
(Mode) .........................................................52
Setting EUPHONY (EUPHONY) ..................52
Using Dolby Pro Logic II (Dolby PLII) ..........53
Multi Channel Function Adjustment
Procedure .....................................................54
Adjusting the Speaker Volume Level
(Output Level) ..............................................54
Adjusting the Acoustic Image
(BI-PHANTOM) ..........................................55
Autogood products «130»
01GB03PXAH800TOC.fm
ALPINE PXA-H800_EN 68-13530Z65-A (B5)
01GB00PXAH800.book Page 3 Tuesday, February 8, 2011 9:04 PM
Mixing the Low Range Audio for the Rear
(Rear Mix) ................................................... 55
Mixing the Low Range Audio of the Center with
the Front L/R (Center Bass Split) ............... 56
Setting the Linear PCM (PCM Mode) ........... 56
Achieving Powerful High Volume Sound
(Listening Mode) ........................................ 56
Adjusting the DVD Level (DVD Level) ......... 57
Other Useful Features
Lowering Volume Quickly (Mute) ................. 57
Turning the Back Light Off
(BLACK OUT function) ............................. 57
Setting the Color for the Commander
Illumination Button (ILLUMINATION) .... 58
Adjusting the Brightness of the Display
(Dimmer) .................................................... 58
co
m
.u
a
Adjusting the Brightness Level of the Display
(Dimmer Level) .......................................... 58
Switching the Display .................................... 59
Information
System Configuration ..................................... 60
Terminology ................................................... 61
In Case of Difficulty ....................................... 62
13
0.
Specifications ................................................. 63
Autogood products «130»
3-EN
01GB03PXAH800TOC.fm
ALPINE PXA-H800_EN 68-13530Z65-A (B5)
01GB00PXAH800.book Page 4 Tuesday, February 8, 2011 9:04 PM
Operating Instructions
NOTICE
WARNING
Product Cleaning
Use a soft dry cloth for periodic cleaning of the product. For more
severe stains, please dampen the cloth with water only. Anything
else has the chance of dissolving the paint or damaging the plastic.
WARNING
This symbol means important instructions.
Failure to heed them can result in serious injury
or death.
DO NOT OPERATE ANY FUNCTION THAT TAKES YOUR
ATTENTION AWAY FROM SAFELY DRIVING YOUR VEHICLE.
KEEP THE VOLUME AT A LEVEL WHERE YOU CAN STILL
HEAR OUTSIDE NOISES WHILE DRIVING.
Excessive volume levels that obscure sounds such as emergency
vehicle sirens or road warning signals (train crossings, etc.) can be
dangerous and may result in an accident. LISTENING AT LOUD
VOLUME LEVELS IN A CAR MAY ALSO CAUSE HEARING
DAMAGE.
DO NOT DISASSEMBLE OR ALTER.
Be sure the temperature inside the vehicle is between +60°C
(+140°F) and –10°C (+14°F) before turning your unit on.
Maintenance
If you have problems, do not attempt to repair the unit yourself.
Return it to your Alpine dealer or the nearest Alpine Service
Station for servicing.
co
m
.u
a
Any function that requires your prolonged attention should only be
performed after coming to a complete stop. Always stop the vehicle
in a safe location before performing these functions. Failure to do
so may result in an accident.
Temperature
Make sure the PXA-H800 will not be installed in a location
subjected to:
•
•
•
•
Direct sun and heat
High humidity and water
Excessive dust
Excessive vibrations
CAUTION
Alpine accepts no responsibility for lost data, etc., even if data, etc.,
is lost while using this product.
0.
Doing so may result in an accident, fire or electric shock.
Installation Location
KEEP SMALL OBJECTS SUCH AS BOLTS OR SCREWS OUT
OF THE REACH OF CHILDREN.
13
Swallowing them may result in serious injury. If swallowed,
consult a physician immediately.
USE THIS PRODUCT FOR MOBILE 12V APPLICATIONS.
Use for other than its designed application may result in fire,
electric shock or other injury.
CAUTION
This symbol means important instructions.
Failure to heed them can result in injury or
material property damage.
HALT USE IMMEDIATELY IF A PROBLEM APPEARS.
Failure to do so may cause personal injury or damage to the
product. Return it to your authorized Alpine dealer or the nearest
Alpine Service Center for repairing.
4-EN
Autogood products «130»
01GB04PXAH800.fm
ALPINE PXA-H800_EN 68-13530Z65-A (B5)
01GB00PXAH800.book Page 5 Tuesday, February 8, 2011 9:04 PM
Function list
Getting Started
Item
How to Read this Manual
The Commander (RUX-C800) for PXA-H800 is sold separately. Audio
setup and adjustments are performed using the RUX-C800 or a PC
running the Sound Manager software for PXA-H800.
Because the operation differs significantly between these two methods,
each are described in separate sections for clarity. Each section is
labeled as shown below.
Basic
Operation
10
35
Adjusting Balance
12
36
Adjusting Fader
12
36
Adjusting Subwoofer
12
35
Adjusting Volume
12
36
Setting Defeat
12
36
Adjusting the MX Plus Level
–*1
36
Switching the Sources
12
36
Storing the Preset Values (Preset
Store)
12
36
Recalling a Stored Setting (Preset Call)
13
37
Setting the Speaker System
13
37
Setting the Speakers
14
38
Setting the Subwoofers
14
38
Setting the AUX Input System
14
39
Setting the AUX input
15
39
Setting the Digital Input
15
40
Setting the AUX Volume Input Level
15
40
Adjusting the AUX Volume Level
15
40
Naming the AUX Input
16
41
Mixing Navi Audio Guidance
16
41
Adjusting the Navigation Guidance
Volume
16
35
Setting ImprintEQ
Automatic
Turning ImprintEQ On/Off
Measurement
Auto TCR
Function
RoadEQ
–
19
42
20
42
20
43
22
44
Setting MX Plus (Standalone Mode)
22
45
Audio Setup/ Setting the Graphic EQ
Adjustment
Setting the Parametric EQ
Adjusting X-Over
Adjusting the Time Correction (TCR)
Setting the TCR Parameter
0.
17
Setting MX Plus (Ai-NET Mode)
Setting the Equalizer Mode
13
Commander
Turning Power On and Off
co
m
.u
a
e From a PC
e From the Commander
Page
PC
23, 25*2
46
23
46
25
47
26
49
28
50
29*3
51
Setting the 2-Channel Signal Playback
Mode
30
52
Setting EUPHONY
30
52
Customizing EUPHONY
31
–
Using Dolby Pro Logic II
31
53
33
54
33
55
Use the Multi Adjusting the Speaker Volume Level
Channel
Adjusting BI-PHANTOM
Function
Setting Rear Mix
33
55
Setting Center Bass Split
34
56
Setting the Linear PCM
34
56
Setting the Listening Mode
34
56
Adjusting the DVD Level
34
57
Mute
–
57
BLACK OUT Function
–
57
–
58
–
58
Setting the Color for the Commander
Other Useful Illumination Button
Features
Adjusting the Dimmer
Adjusting the Dimmer Level
–
58
Switching the Display
–
59
*1 The method to adjust MX Plus Level is described in “Setting MX
Plus (Ai-NET Mode)”/“Setting MX Plus (Standalone Mode)”.
*2 “Setting the Equalizer Mode” is included in the “Setting the Graphic
EQ”/“Setting the Parametric EQ” operation.
*3 “Setting the TCR Parameter” is included in the “Adjusting the Time
Correction (TCR)” operation.
Autogood products «130»
5-EN
01GB05PXAH800.fm
ALPINE PXA-H800_EN 68-13530Z65-A (B5)
01GB00PXAH800.book Page 6 Tuesday, February 8, 2011 9:04 PM
Sound Manager for PXA-H800
Location of Controls
Consists of two screens: the main screen and the sub screen. The sub
screen varies depending on the function.
PXA-H800
<Main screen sample>
co
m
.u
a
<Top surface>
Lights when Power is on.
B Dolby Digital indicator
0.
A POWER indicator
Lights when Dolby Digital decoding is enabled.
13
C Dolby Pro Logic II indicator
Lights when Dolby Pro Logic II is enabled.
D DTS indicator
A Menu
B Function switching tab
C Shortcut switch to each function
D Status indication
Lights when DTS decoding is enabled
OFFLINE/ONLINE
status display
Display indication
when a microphone
is connected
Playback format
display
E Basic setting switching switch
F Speaker system and Fader/Balance status indication
6-EN
Autogood products «130»
01GB05PXAH800.fm
ALPINE PXA-H800_EN 68-13530Z65-A (B5)
01GB00PXAH800.book Page 7 Tuesday, February 8, 2011 9:04 PM
<Sub screen sample>
RUX-C800 Commander (sold separately)
About Operation on a PC
Operating the Function Switching Tab
co
m
.u
a
• Select and click the setup item or value.
• You can also use the [Tab], [ ], [ ], [ ], and [ ] keys
on your PC to select the setup value or mode.
• For File(F) and Option(O) operation, refer to “Operating the
Sound Manager for PXA-H800 Menu” (page 10).
• Common PC operation
[CANCEL]:
Cancels the operation and takes you back
to the previous screen.
[Close Window]: Closes the current window.
Operate the Function switching tab in the Main screen as follows:
1
A SOURCE button
Click Function switching tab.
Switches the sources.
A pull-down menu will be displayed.
B CHANNEL button
Switches the adjustment channels. When pressed and held,
the channel mode (“L or R” - “L+R”) switching screen is
displayed.
13
0.
C FUNC. button
Displays the setup screen. When pressed and held,
switches the ImprintEQ mode.
D VIEW button
Switches the display. When pressed and held, the Preset
Call screen is displayed.
E Rotary encoder
Normal screen:
Adjust the volume by turning to the left or right. When
pressed and held, turns off the back light of the illuminated
switch and the display. (BLACK OUT function)
Setup/Adjustment screen:
Select a item by turning to the left or right. When pressed,
the item is set. When pressed and held, the Defeat setup
screen is displayed.
Click
2
From the pull-down menu, select the tab to be
switched to, and click it.
The screen will be switched to the selected tab.
F MUTE button
Lowers the volume by 20 dB instantly. In the adjustment
screen, mutes the channel being adjusted.
G
(Return) button
Returns to the previous item/screen. When pressed and
held, the screen returns to the normal screen.
H Display
I BLACK OUT indicator
Click
Illuminates during BLACK OUT.
Autogood products «130»
7-EN
01GB05PXAH800.fm
ALPINE PXA-H800_EN 68-13530Z65-A (B5)
01GB00PXAH800.book Page 8 Tuesday, February 8, 2011 9:04 PM
MX Plus
MX (Media Xpander) Plus enhances the vocal and instrumental
sounds for each music source. MX Plus generates harmonics and
compensates high frequency information. This helps improve music
clarity even in a cabin with loud road noise.
Features
About Operating
Install the included Sound Manager software for PXA-H800 on a PC.
This provides the user with access to the all functions/features of this
device.
Use the RUX-C800 (sold separately) to have access to many of the
PXA-H800 functions without the need for a PC.
An Ai-NET compatible head unit provides limited functionality through
its controls.
• The RUX-C800 Commander provides access to most of the
PXA-H800 functions.
• To use all Automatic Measurement and Audio Setting/
Adjustment functions, a PC connection is required.
e Availability of operations
Automatic
adjustment
Audio setup/
adjustment
{
U
(Only some
functions
available*1)
{
{
PC (Sound
Manager for
PXA-H800)
×
{
Ai-NET
compatible head
unit
{
×
Parametric Equalizer
The Parametric EQ has fewer bands but gives more control over
where the band is located in the audio spectrum. The user can also
control how much overlap with adjacent frequencies (Q). This
provides you with a sound control feature of professional-level, which
allows you to adjust an extremely narrow range in pin-point fashion
without affecting the neighboring sound regions.
X-Over
The X-Over allows this processor to output audio within a specific
band. These specific bands are sent to drive speakers optimized to
reproduce those bands. Use the integrated HPF (High Pass Filter) or
LPF (Low Pass Filter) to create a specified output for each channel.
The Slope and Level of each channel is also adjustable.
5.1 ch theater surround compatible
Get true, 5.1 “Theater Surround.” Create a concert hall experience in
your vehicle.
co
m
.u
a
Commander (sold
separately)
(RUX-C800)
Power ON/OFF
Graphic Equalizer
The Graphic EQ divides the audio band into 31 individual bands.
Each band is individually controlled to balance the sound and
enhance detail.
U
(Only some
functions
available*2)
*1 You cannot run ImprintEQ measurement.
*2 For details about the functions available on the Ai-NET compatible
head unit, refer to “Using with Ai-NET Connections” (page 10)/
(page 35).
13
0.
• When Sound Manager for PXA-H800 is running, the RUX-C800
Commander becomes disabled.
• For details about the functions available on the Commander and on
the PC, refer to “Function list” (page 5).
EUPHONY
EUPHONY is an innovative sound field reproduction method which
DiMAGIC has created with the latest acoustic technology based on
the core concept of “enjoying beautiful sound.” Taking maximum
advantage of minute differences of sound between the right and left
stereo signals, reverberation, and acoustics, with adaptive filters, the
realistic sensation of sound field is created. The system features
sound quality that is pleasant even after long listening, which is the
optimum sound for long distance driving.
Before You First Use the Unit
When you first use the unit, set the following:
Turning Power On (page 10)/(page 35)
About the Audio Setting
Setting the Speaker System (page 13)/(page 37)
The inherent sound quality inside a vehicle varies widely. Numerous
factors, including media used, vehicle type, speakers, etc., contribute to
this inconsistency. This processor is able to compensate for many of
these factors to optimize the sound automatically.
Setting the AUX Input System (page 14)/(page 39)
ImprintEQ
ImprintEQ is a system to obtain the optimum acoustic effect at each
seat based on the automatically measured acoustic data of the
cabin.
RoadEQ
Road EQ (REAL-TIME OPTIMIZED ADAPTIVE DRIVING EQ) is a
function to automatically adjust the EQ properties in accordance with
the road noise while driving.
TCR (Time Correction)/Auto TCR (Automatic Time Correction)
In a vehicle, it is not possible to change the listening positions of the
user. Using Time Correction, an optimized listening position is
created no matter where the user is seated. This automated
adjustment is able to focus the auditory image as well as expand the
sound field making for a more natural sound.
“TCR” digitally delays the sound output from each speaker in order to
align the timing of the sound reaching the listener.
8-EN
Autogood products «130»
01GB05PXAH800.fm
ALPINE PXA-H800_EN 68-13530Z65-A (B5)
01GB00PXAH800.book Page 9 Tuesday, February 8, 2011 9:04 PM
Installing Sound Manager for PXA-H800
When you install Sound Manager for PXA-H800 on a PC, you can set/
adjust the audio settings on the PC.
About the OFFLINE mode
Sound Manager for PXA-H800 checks the connection with the PXAH800 at startup. When the connection is detected, it starts in the online
mode. If the connection is not detected, a message will be displayed.
Caution before installing:
• This Program runs under Microsoft® Windows® XP, Vista, 7
only.
Recommended specifications
OS: Windows XP, Windows Vista , Windows 7
CPU: 1.6 GHz or higher
Memory: 1 GB or higher
HDD: 512 MB or more available space
Display: 1024×576 or higher
• Install the Sound Manager software for PXA-H800 before
connecting the PXA-H800 to your personal computer.
• Before installing, all active programs must be stopped.
2
Insert the supplied CD-ROM (Sound Manager for
PXA-H800) into the CD-ROM drive. Run the
setup.exe file. Follow the installation instructions on
the screen.
Connect a PC to Computer connection terminal of
PXA-H800 with the included USB cable.
1
2
3
After making adjustments and settings, save the
data on the PC, referring to “Saving the Setup Data
(File)” (page 10).
Close Sound Manager for PXA-H800.
co
m
.u
a
1
To start the PXA-H800 in the offline mode, click [OFFLINE]. To
set in the offline mode, perform the following steps to reflect the
settings on the PXA-H800.
Connect to the PXA-H800 to your PC and start
Sound Manager for PXA-H800 in the online mode.
• Install the PXA-H800 in your vehicle before you connect a PC to it
(refer to the Installation manual). Turn the ignition key to the ACC or
ON position.
USB Cable
4
Load the data saved on the PC referring to “Loading
the Setup Data (File)” on page 10.
The settings of Sound Manager for PXA-H800 are reflected
on the PXA-H800.
Start Sound Manager for PXA-H800.
13
3
0.
• Install the PXA-H800 in your vehicle before you connect a PC to it
(refer to the Installation manual). Turn the ignition key to the ACC or
ON position.
CAUTION
• Strictly observe the Warnings and Cautions written by the
manufactures of your PC and peripheral equipment.
• We do not accept responsibility for data lost due to the
incorrect operation of the Sound Manager for PXA-H800.
We recommend you to back-up your important data
regularly.
Autogood products «130»
9-EN
01GB05PXAH800.fm
ALPINE PXA-H800_EN 68-13530Z65-A (B5)
01GB00PXAH800.book Page 10 Tuesday, February 8, 2011 9:04 PM
From a PC
Operating the Sound Manager for PXAH800 Menu
Basic Operation
On the Main menu, you can upgrade the software and save/load the
setup value, etc.
Initial System Start-Up
If the system stops working properly, turn the ignition switch to off, and
then on again. If the system still does not work properly, reset the unit.
1
Press RESET switch with a ballpoint pen or similar
pointed object.
<Right side>
Saving the Setup Data (File)
You can save the current setup values in your PC as a file.
Up to 6 setup data sets can be stored in the preset of the device. Use this
feature if you want to store more, or for backing up.
1
2
Click [File(F)].
Click [Save Current Data(S)].
RESET switch
The system will be reset and restarted.
co
m
.u
a
• Reset when power is off.
• Resetting does not erase the settings stored in the system.
Using with Ai-NET Connections
When the unit is connected to the head unit through Ai-NET, some
operations can be controlled with the head unit.
0.
The following operations are controlled with the head unit. The
Commander and PC will no longer control these when the head unit is
connected.
• Turning Power On and Off (page 10)
• Switching the Sources (page 12)
• Adjusting Subwoofer/Balance/Fader/Volume (page 11, 12)
You can set Defeat (page 12) and Calling of the stored settings (Preset
Call) (page 13) with the head unit, Commander, or PC.
13
• Please refer to the Owner’s Manual of the head unit.
The “Save As” box will be shown.
3
Select the location where you want to save the file
and enter a name for the file to save.
• The file extension of the setup data file is “.pre”.
Loading the Setup Data (File)
You can load the data saved in “Saving the Setup Data (File)” (previous
section).
1
2
Click [File(F)].
Click [Load Current Data(L)].
Turning Power On and Off
You cannot turn power on/off from the PC. Turn power on/off on the
Commander. Refer to Commander Section “Turning Power On and Off”
(page 35).
When an Ai-NET compatible head unit is connected, the power of the
unit is linked with the power of the head unit.
• When the power for PXA-H800 is turned off, Sound Manager for
PXA-H800 will be closed.
• If an Ai-NET compatible head unit is not connected, the PXA-H800 is
automatically turned on when Sound Manager for PXA-H800 is
started.
“Open File” box will be shown.
3
Select the setting data and click [Open].
The selected file will be loaded.
• If the speaker/AUX input system stored in the data does not match the
current system, the data cannot be loaded.
10-EN
Autogood products «130»
01GB06PXAH800.fm
ALPINE PXA-H800_EN 68-13530Z65-A (B5)
01GB00PXAH800.book Page 11 Tuesday, February 8, 2011 9:04 PM
From a PC
Loading the ImprintEQ Measurement Data
(File)
Load the ImprintEQ measurement data stored in the PC into PXAH800.
1
2
Click [File(F)].
Click [Send ImprintEQ Data to PXA-H800(I)].
4
Click [OK] when a confirmation message appears.
“Open File” box will be shown.
5
Select the file you have stored in Step 1 and click
[Open].
The file will be downloaded and the version upgrade
process will be started. When the download is completed, a
confirmation message will be displayed.
6
“Open File” box will be shown.
co
m
.u
a
3
Select the ImprintEQ measurement data stored in
the PC and click [Open].
The selected file will be loaded. The Memory Selection
screen will be displayed.
4
Click [OK].
Following the instructions on the screen, restart the PXAH800 unit and Sound Manager for PXA-H800.
• The file extension of the ImprintEQ measurement data file is “.ieq”.
Select [ImprintEQ Memory 1] or [ImprintEQ Memory
2], and click [OK].
The file is written in the PXA-H800 memory.
• Select [File] to save ImprintEQ measurement data on a PC.
• For the ImprintEQ, refer to “Setting ImprintEQ” (page 17).
Viewing the Version Information (Option)
You can view the version information for PXA-H800 and Sound
Manager for PXA-H800.
1
2
Click [Option(O)].
Click [Version Information (V)].
0.
Downloading the Software (Option)
You can download the software to a newer version.
Warning for downloading
13
• When you download a file, all setup data in the PXA-H800 will
be deleted. Please note that once deleted it cannot be
recovered. Before downloading, it is recommended to save
the setting data. Refer to “Saving the Setup Data (File)”
(page 10).
• Downloading takes approximately 20 minutes. Do not turn off
the PXA-H800 or disconnect the USB cable until the
download is completed.
1
From the Alpine Web site, download the file for
upgrading the software and store it in your PC.
• For details on the procedure, refer to the Alpine Web site.
2
3
Click [Option(O)].
Click [Software Download(D)].
The version information will be shown.
Audio Adjustment
When an Ai-NET compatible head unit is connected, the audio settings
are adjusted at the head unit and you cannot adjust the unit from the PC.
1
Make adjustments using [ ], [ ], [ ], [ ], [
],
and [
] for “Fader,” “Balance,” “SubW Lv,” or
“Master Volume” in the main menu.
Autogood products «130»
11-EN
01GB06PXAH800.fm
ALPINE PXA-H800_EN 68-13530Z65-A (B5)
01GB00PXAH800.book Page 12 Tuesday, February 8, 2011 9:04 PM
From a PC
Setting contents: Auxiliary*(AUX1)/Auxiliary(AUX2)/
Auxiliary(AUX3)/Auxiliary(Ai-NET(HU))/
Auxiliary(Ai-NET(CHG))/Auxiliary(Digital1)/
Auxiliary(Digital2)
Adjusting Fader (Between Front and Rear)
Adjust the Front and Rear speaker volume (Initial setting: “0”).
Setting contents: F (Front) 15 to C (Center) 0 to R (Rear) 15
Adjusting Balance (Between Left and
Right)
Adjust the Right and Left speaker volume (Initial setting: “0”).
Setting contents: L (Left) 15 to C (Center) 0 to R (Right) 15
Adjusting Subwoofer (SubW Lv)
* Names selected in “Naming the AUX Input (AUX Name)” (page 16)
are displayed as the source names. The initial setting is “Auxiliary.”
• The number of analog signal inputs varies depending on the setting
in “Setting the AUX Input System (AUX Input System Select)”
(page 14).
• Only sources set as ON in “Setting the AUX Input (AUX IN)”
(page 15) and “Setting the Digital Input (Digital AUX)” (page 15)
are displayed.
Storing the Preset Values (Preset Store)
Adjust the subwoofer output (Initial setting: “0”).
You can store up to 6 sets of the adjustment/setting values. All of the
following adjustment/setting values are stored in a single preset
memory.
Setting contents: 0 to 15
• This has no effect when the subwoofer is off.
Adjustment/Setup items
Adjusting Volume
1
Drag [
] or click [
] or [
] to make adjustments.
Pressing and holding [
] or [
decrease/increase volume.
Setting contents: -INF. to 0 dB
Setting Defeat
] will continuously
0.
When Defeat is set to [ON], the settings for ImprintEQ, Graphic EQ,
Parametric EQ, MX Plus, RoadEQ, and Time Collection are restored to
the initial values (Initial setting: “OFF”).
Click [ON] or [OFF] for “Defeat” in the main menu.
13
1
Switching the Sources
The unit accepts up to five analog signal input lines and 2 digital signal
input lines. For the connection, refer to the installation manual.
When an Ai-NET compatible head unit is connected, the source should
be switched at the head unit.
1
13
Setting the Speakers (Speaker Setup)/Setting the
Subwoofers
Setting the AUX Input System (AUX Input System Select)
14
14
Setting the AUX Input (AUX IN)
Setting the Digital Input (Digital AUX)
15
15
Setting the AUX Volume Input Level (AUX IN Gain)
Adjusting the AUX Volume Level (AUX Level)
15
15
co
m
.u
a
Adjust the volume. (Initial setting: “-INF. dB”)
Click [ ] for “Source” in the main menu and select
and click the source you want from the pull-down
menu.
Pages
Setting the Speaker System (Output System Select)
Naming the AUX Input (AUX Name)
16
Turning ImprintEQ On/Off
19
Turning RoadEQ On/Off
Setting MX Plus (Ai-NET Mode)
21
22
Setting MX Plus (Standalone Mode)
Setting the Graphic EQ
22
23
Setting the Parametric EQ
25
Adjusting X-Over and Switching the Phases
26
Adjusting the Time Correction (TCR)
Setting the 2-Channel Signal Playback Mode (2ch
Playback Mode)
28
30
Setting EUPHONY (EUPHONY)
Using Dolby Pro Logic II (Dolby Pro Logic II)
30
31
Adjusting the Center Width (Center Width)
Adjusting the Speaker Volume Level (Output Level)
32
33
Adjusting the Acoustic Image (BI-PHANTOM)
Mixing the Low Range Audio for the Rear (Rear Mix)
33
33
Mixing the Low Range Audio of the Center with the Front
L/R (Center Base Split)
34
Setting the Linear PCM (PCM Mode)
Achieving Powerful High Volume Sound (Listening Mode)
34
34
Adjusting the DVD Level (DVD Level)
34
1
2
Adjust the value you want to store and set it.
Click [Store] for “Preset” in the main menu.
The source is switched to the selected one.
12-EN
Autogood products «130»
01GB06PXAH800.fm
ALPINE PXA-H800_EN 68-13530Z65-A (B5)
01GB00PXAH800.book Page 13 Tuesday, February 8, 2011 9:04 PM
From a PC
3
Click one from [Preset 1] to [Preset 6], and then click
[OK].
1
Click [Output System] for [Shortcut] tab in the main
menu.
The Output System Select screen is displayed.
• When you click [I/O Configuration] on the Function switching tab
and then [Output System Select], the Output System Select screen
will also be displayed. Refer to “Operating the Function Switching
Tab” (page 7).
2
Select and click the speaker system, and then click
[NEXT].
The data is stored in the preset number.
• The function is operable when Defeat is set to OFF.
• Measurement values will not be lost in the event the system is reset or
battery power is disconnected.
Recalling a Stored Setting (Preset Call)
1
2
co
m
.u
a
The preset memory stores various setting/adjustment information. Thus,
it takes some time to call data from the preset memory.
Click [Call] for “Preset” in the main menu.
System 1 (4.2ch):
System 2 (2.2ch):
System 3 (4.0ch):
System 4 (5.1ch):
Click one from [Preset 1] to [Preset 6], and then click
[OK].
Front 2way+Rear+SubW
Front 3way+SubW
Front 3way+Rear
Front 2way+Rear+Center+SubW
• Refer to Table 1 (Output System) in “System Configuration”
(page 60).
Click [OK] when a confirmation message appears.
The Speaker Setup screen will be automatically displayed.
• If no changes are made to current system settings, the operation will
close without displaying the confirmation screen.
0.
3
Click [Full Range], [ON] or [OFF], etc., to set the
speakers.
13
The values of the selected preset number are retrieved.
• The function is operable when Defeat is set to OFF.
• If the speaker system in the preset and the current speaker system do
not match, the preset cannot be retrieved.
• If the AUX input system in the preset and the current AUX input
system do not match, the items concerning the AUX input system are
unavailable for retrieval.
Setting the Speaker System (Output
System Select)
Unless you select the output system, you cannot set any features. Be
sure to set the system first. If the selected system and the actual speaker
connections do not match, the speakers may be damaged. Make sure to
check the specifications of the speakers before selecting the system.
Only for the initial startup:
1
Click [OK] when a message appears.
The Output System Select screen is displayed. Go to
Step 2.
Front High*1:
Front Mid:
Front Low:
Rear:
Center:
Subwoofer (1, 2):
Subwoofer Output:
Full Range/Tweeter/OFF
Full Range
Full Range/OFF
Full Range/OFF
Full Range/OFF
ON/OFF
Stereo/Mono *2
*1 When you modify the “Front High” speaker setting to [Full Range],
a message to confirm the change will be displayed. To set up at “Full
Range,” select [YES] and click [OK]. Make sure the speaker being
used for this output is able to handle a full range source. Many
tweeters can be damaged when driven by a full range signal.
*2 Only when two subwoofers are connected, is this item able to be set.
Stereo: Subwoofer stereo (L/R) output
Mono: Subwoofer monaural output
Autogood products «130»
13-EN
01GB06PXAH800.fm
ALPINE PXA-H800_EN 68-13530Z65-A (B5)
01GB00PXAH800.book Page 14 Tuesday, February 8, 2011 9:04 PM
From a PC
• Speakers that cannot be turned off do not show “OFF. ” Refer to
Table 1 (Output System) in “System Configuration” (page 60).
• If the speaker system is changed, all setup values except those for
AUX input will be restored to the initial setup values.
• You can also set the speakers from “Setting the Speakers (Speaker
Setup)/Setting the Subwoofers” (page 14).
• When you connect just one subwoofer, turn off “Subwoofer2.”
• After the setting, storing the setting contents on the unit is
recommended. For details, refer to “Storing the Preset Values (Preset
Store)” (page 12).
4-1First time start-up:
Click [NEXT]. The AUX Input System Select screen will
display automatically. Continue to set, referring to
“Setting the AUX Input System (AUX Input System
Select)” (page 14).
4-2Subsequent start-up:
Click [Close Window]. The confirmation screen will be
displayed. Click [OK]. Sound Manager for PXA-H800 will
be closed. Turn the ignition key to off and then on again.
The settings become effective.
Turn on the connected speakers.
If 2 subwoofers are connected, you can choose either stereo or monaural
for the subwoofer output. Set depending on the subwoofers to be
connected (Initial setting: “Mono”).
1
Click [Speaker Setup] for [Shortcut] tab in the main
menu.
The Speaker Setup screen is displayed.
0.
• If you click [I/O Configuration] on the Function switching tab, and
then [Speaker Setup], the Speaker Setup screen will also be
displayed. Refer to “Operating the Function Switching Tab”
(page 7).
Click [Full Range], [ON] or [OFF], etc., to set the
speakers.
13
2
Front High*1:
Full Range/Tweeter/OFF
Front Mid:
Full Range
Front Low:
Full Range/OFF
Rear:
Full Range/OFF
Center:
Full Range/OFF
Subwoofer (1, 2): ON/OFF
Subwoofer Output: Stereo/Mono *2
14-EN
• Speakers that cannot be turned off do not show “OFF. ” Refer to
Table 1 (Output System) in “System Configuration” (page 60).
• When you connect just one subwoofer, turn off “Subwoofer2.”
• The speaker settings here will depend on which system was selected
in “Setting the Speaker System (Output System Select)” (page 13).
3
When setting is complete, click [Close Window].
• When the speaker setting is changed while ImprintEQ/RoadEQ is on,
ImprintEQ/RoadEQ will be turned off after a confirmation message
is displayed.
• After the setting, it is recommended to store the setting contents on
the unit. For details, refer to “Storing the Preset Values (Preset
Store)” (page 12).
Setting the AUX Input System (AUX Input
System Select)
co
m
.u
a
Setting the Speakers (Speaker Setup)/
Setting the Subwoofers
*1 When you modify the “Front High” speaker setting to [Full Range],
a message to confirm the change will be displayed. To set at “Full
Range,” select [YES] and click [OK]. Make sure the speaker being
used for this output is able to handle a full range source. Many
tweeters can be damaged when driven by a full range signal.
*2 Only when two subwoofers are connected, is this item able to be set.
Stereo: Subwoofer stereo (L/R) output
Mono: Subwoofer monaural output
This step sets the six channel RCA input of the unit. The input volume
levels can also be set.
At initial startup, the AUX Input System Select screen is displayed
automatically after the speakers are set. Step 1 is unnecessary.
1
Click [AUX Input System] for [Shortcut] tab in the
main menu.
The AUX Input System Select screen is displayed.
• When you click [I/O Configuration] on the Function switching tab,
and then [AUX Input System Select], the AUX Input System Select
screen will also be displayed. Refer to “Operating the Function
Switching Tab” (page 7).
2
Select and click the AUX Input System, and then
click [NEXT].
Analog 5.1ch. Input:
AUX1 (Front Left, Front Right, Rear Left, Rear Right,
Center, Subwoofer)
Analog 4ch. +2ch. Input:
AUX1 (Front Left, Front Right, Rear Left, Rear Right)/
AUX2 (Left, Right)
Analog 2ch. ×3 Input:
AUX1 (Left, Right)/AUX2 (Left, Right)/AUX3 (Left,
Right)
Autogood products «130»
01GB06PXAH800.fm
ALPINE PXA-H800_EN 68-13530Z65-A (B5)
01GB00PXAH800.book Page 15 Tuesday, February 8, 2011 9:04 PM
From a PC
• Refer to Table 2 (Input System) in “System Configuration” (page 60).
Setting the Analog AUX Input
Click [OK] when a confirmation message appears.
The AUX Gain Setup screen is displayed.
3
AUX 1~3*1/Ai-NET(HU) *2/
Ai-NET(CHG) *2
Setting contents: AUX IN/AUX IN Gain/AUX Level/AUX
Name
Setting item:
Click either [High] or [Low] for each AUX to set and
click [OK].
*1 The number of AUX channels to be set varies depending on the
system set in “Setting the AUX Input System (AUX Input System
Select)” (page 14).
*2 When you connect Ai-NET/RCA Interface cable (KCA-121B) to the
terminals of the device Head Unit input terminal (Ai-NET input) /
Changer input terminal (Ai-NET input), you can use it as AUX.
Setting the Digital AUX Input
Setting item:
Digital1/Digital2
Setting contents: Digital AUX/AUX Name
High: When the volume level of the external input is high.
Low: When the volume level of the external input is low.
4
3
Click [OK] when a confirmation message appears.
Exit Sound Manager for PXA-H800. Turn the ignition key to
off, and then on again. The settings become effective.
• After the setting, it is recommended to store the setting contents on
the unit. For details, refer to “Storing the Preset Values (Preset
Store)” (page 12).
Setting the AUX Input (AUX IN)
co
m
.u
a
• Gain can also be set in “Setting the AUX Volume Input level (AUX IN
Gain)” (page 15).
• When the AUX input system is changed, all the setup values for AUX
input will be restored to the initial setup values.
• After the setting, it is recommended to store the setting contents on
the unit. For details, refer to “Storing the Preset Values (Preset
Store)” (page 12).
When setting is complete, click [Close Window].
A TV or VCR with RCA audio output can be connected to the unit.
Select OFF the external input not is connected (Initial setting: “ON”).
Setting item:
AUX IN
Setting contents: ON/OFF
• AUX1 cannot be set.
Setting and Adjusting the AUX Input/
Digital Input (Analog AUX Input/Digital
AUX Input)
Setting the Digital Input (Digital AUX)
Select OFF if no optical digital product is connected (Initial setting:
“ON”).
0.
This step sets and adjusts the Analog AUX and Digital AUX.
1
13
• When an Ai-NET compatible head unit is connected, external input of
the PXA-H800 becomes unavailable, and this setting will be
disabled.
Click [Input Setup] for [Shortcut] tab in the main
menu.
• If you click [I/O Configuration] on the Function switching tab, and
then [Input System Setup], the Input System Setup screen will also be
displayed. Refer to “Operating the Function Switching Tab”
(page 7).
For each AUX, click [ON]/[OFF], [High]/[Low], or [
[ ] to set and adjust each item.
Setting the AUX Volume Input level (AUX IN
Gain)
If the external input audio becomes distorted, select High (Initial
setting: “High”).
The Input System Setup screen is displayed.
2
Setting item:
Digital AUX
Setting contents: ON/OFF
]/
Setting item:
AUX IN Gain
Setting contents: High/Low
High: When the volume level of the external input is high.
Low: When the volume level of the external input is low.
• This item becomes possible to set only when AUX IN setting is on.
• You can only adjust the Analog AUX with this setting.
Adjusting the AUX Volume level (AUX
Level)
You can adjust the volume level of the external RCA input. Adjust this
when the volume is higher or lower compared to that of the optical
digital source (Initial setting: “0 dB”).
Setting item:
AUX Level
Setting contents: -10 to +10 dB
• This item becomes possible to set only when AUX IN setting is on.
• You can only adjust the Analog AUX with this setting.
Autogood products «130»
15-EN
01GB06PXAH800.fm
ALPINE PXA-H800_EN 68-13530Z65-A (B5)
01GB00PXAH800.book Page 16 Tuesday, February 8, 2011 9:04 PM
From a PC
Naming the AUX Input (AUX Name)
When you connect an external input source, you can name it with a
suitable name (Initial setting: “Auxiliary”).
1
Click [ ] for each AUX and select and click the
external input product name from the pull-down
menu.
Automatic
Measurement
Function
Before Performing Automatic
Measurement
Setting item:
AUX Name
Setting contents: Auxiliary/TV/EXT.DVD/Portable/Game
• This item becomes possible to set only when AUX IN setting is on.
If a navigation system is connected, its voice guidance will be mixed
with the system and output from the front speakers (Initial setting:
“OFF”). You can adjust the navigation guidance volume (Initial setting:
“0 dB”).
1
Click [ON] or [OFF] for “Navi Mix” in the main menu.
Click [
] or [
0.
If you click [ON], select the setting value.
2
WARNING
• Do not perform automatic measurement while the vehicle is
running.
Automatic measurement requires microphones to be installed
in the cabin to measure acoustic characteristics, and the
speakers may output loud noise for measurement. This may
interfere with safe driving and lead to an accident.
co
m
.u
a
Setting/Adjusting the Navigation
Guidance Volume (Navi Mix)
This unit is equipped with ImprintEQ, RoadEQ, and AutoTCR
automatic measurement functions.
] to adjust the volume.
Setting contents: -10 to +10 dB
13
• For details on the connection of a navigation system, refer to the
installation manual.
Be sure to read before performing automatic
measurement.
• The automatic measurement should be performed in a quiet place
with the engine, air-conditioner, and heater turned off. If a mobile
phone or car phone is installed in the vehicle, move them outside of
the cabin, or turn the power off. Sound other than the measuring
sound (ambient noise around the vehicle, engine noise, and
ringtones) may interfere with measurement, resulting in inaccurate
measurement of the acoustic characteristics of the cabin.
• Be aware that the battery may be drained if you use the unit for an
extended period of time without running the engine.
• The microphone supplied with this product is specifically designed
for this type of measurement. Use of any other microphone will give
poor or no results. Use of microphones other than the one supplied is
not recommended.
• If the system is equipped with a power amplifier with input level
control or a powered subwoofer, the measurement may not be
possible if the input level is set low. However, to perform correct
measurement, the input level should not be set too high.
• For a power amplifier with low-pass filter, turn off the low-pass filter
of the power amplifier to make measurement. The low-pass filter in
the powered subwoofer or the power amplifier for a subwoofer
should be set at the highest cutoff frequency.
Measurement sequence for the automatic measurement
functions
Perform the automatic measurement in the following sequence.
When ImprintEQ is used:
First, ImprintEQ, then RoadEQ.
When ImprintEQ is not used:
First, Auto TCR, then RoadEQ.
• When ImprintEQ is used, AutoTCR is not required.
• When ImprintEQ and AutoTCR are performed after RoadEQ, reperform RoadEQ.
16-EN
Autogood products «130»
01GB06PXAH800.fm
ALPINE PXA-H800_EN 68-13530Z65-A (B5)
01GB00PXAH800.book Page 17 Tuesday, February 8, 2011 9:04 PM
From a PC
4
Setting ImprintEQ
Click [ImprintEQ] for [Shortcut] tab in the main
menu.
The Automatic Measurement tab screen will be displayed.
ImprintEQ is a system to obtain the optimum acoustic effect from each
seat position, based on the automatically measured acoustic data of the
cabin.
To use ImprintEQ, you should perform acoustic measurement of the
cabin beforehand.
• When you click [Automatic Measurement] in the Function switching
tab, the Automatic Measurement tab screen will also be displayed.
Refer to “Operating the Function Switching Tab” (page 7).
5
Click [Setup] for “ImprintEQ.”
The ImprintEQ mode selection screen will be displayed.
ImprintEQ measurement flow
6
Prepare the vehicle and install the microphone.
Factory Audio: When an automobile factory system is
connected to AUX1, choose this.
Other:
Choose [Other] when a head unit other than
an automobile factory system (commercially
available unit including ALPINE products) is
connected.
Turn the ignition key to ACC ON position, and start ALPINE
PXA-H800 Sound.
When it is an automobile
factory system
Play back the SETUP DISC that comes
with the unit on the head unit.
If you select [Factory Audio], go to Step 7.
If you select [Other], go to Step 10.
7
8
Insert the SETUP DISC into the head unit. Click
[START] within 10 seconds of Track01 starting.
co
m
.u
a
For a system
other than an
automobile
factory system
Select either [Factory Audio] or [Other] and click.
Select the listening position.
9
Following the instructions on the screen, conduct the
automatic measurement.
Following the instructions on the screen, adjust the
input level of the device connected to AUX1. When
“OK” is displayed, click [OK].
Click [START] within 10 seconds of Track02 starting.
Measurement of the frequency characteristic will be started.
When measurement is completed, a confirmation message
will be displayed.
• If you want to stop measurement, click [CANCEL].
10 Click [OK] when a message appears.
The Area Selection screen is displayed.
0.
Select the target curve.
1
[ALL], [FRONT], [FRONT LEFT], [FRONT RIGHT], and
[REAR], and click [Next].
If [ALL] is selected, the system will measures the
characteristics from all seat positions.
Preparing for measurement.
•
•
•
•
2
13
Save the measurement values.
11 Select the listening position. Select the area from
Park the vehicle in a quiet location.
Close doors, windows, sunroof, etc.
Turn the air-conditioner and heater OFF.
Turn off the engine of the vehicle.
Preparing the microphone.
Place the microphone at ear level (a camera tripod is useful
for this purpose).
• The direction of the microphone does not affect the measurement.
3
Turn the ignition switch of the vehicle to ACC (On).
• If an air-conditioner or heater is turned on, turn it off. Measurement
should not be performed if air-conditioner or heater noise is present.
The measurement screen will be displayed.
Autogood products «130»
17-EN
01GB06PXAH800.fm
ALPINE PXA-H800_EN 68-13530Z65-A (B5)
01GB00PXAH800.book Page 18 Tuesday, February 8, 2011 9:04 PM
From a PC
12 Move the microphone to a spot specified in the
16 When measurement is complete, click [Result].
The result screen will be displayed.
The adjustment result when the Target Curve is
“REFERENCE” will be displayed.
screen and position it firmly.
If you want to select another target curve, go to Step 17.
If you want to save the adjustment result, go to Step 19.
17 Click [Target Curve Select].
• The microphone should be placed at shoulder height.
13 Click [Measure]. When the measurement start
screen appears, click [START].
Countdown will start.
co
m
.u
a
The name of the curve currently selected.
The Target Curve Selection screen will be displayed.
18 Select and click the target curve you want. Then,
click [OK].
0.
During the 10 second countdown, go outside the vehicle
and close the door.
A test signal will be output from the speakers to measure the
acoustic characteristics of the cabin. Do not open any
doors until the finish message appears on the screen. If
external noise interferes with the measurement, click the
[Measure] again to re-measure.
13
• Measurement takes approximately 5 to 15 minutes.
• If you want to stop measurement, click [CANCEL].
14 Click [OK] when a completed message appears.
15 When measurement for Position 1 is completed,
move the microphone to the next measuring position
and secure it following the guidance on the screen.
When the microphone is properly located, repeat
Step 13 following the guidance on the screen.
• You can perform measurement from up to 6 listening
positions.
• We recommend that you should take measurements from
at least 2 listening positions.
• To close measurement, go to Step 16.
• For more accurate measurement, you can make
measurements from 6 listening positions. However, it
takes approximately 70 minutes to complete the entire
procedure. Therefore, be sure to charge the vehicle
battery while taking measurements.
• If no microphone is connected, a confirmation message will be
displayed and measurement will not be carried out. Click [OK] to
cancel the indication.
• If you want to re-measure from the same position, click [Reset].
18-EN
The adjustment result for the selected Target Curve will be
displayed.
REFERENCE:
Enjoy the rhythm and balance of music to the best
acoustic effect, suitable for the vehicle interior.
Reference With Mid-range Comp.:
Select this if the tweeter and midrange speakers are
installed in the dashboard, and mid or high range
harshness is apparent.
LINEAR:
A linear (flat) acoustic effect is actualized. This setting
recreates the balanced sound of a studio listening
room.
USERS:
You can select this only when you have adjusted the
curve. Refer to “Adjusting and Saving the Target
Curve” (page 19).
• If you are not satisfied with the measurement result, click [ReMeasure] to perform measurement again.
19 Click [Send Filter].
The Memory selection screen will be displayed.
Autogood products «130»
01GB06PXAH800.fm
ALPINE PXA-H800_EN 68-13530Z65-A (B5)
01GB00PXAH800.book Page 19 Tuesday, February 8, 2011 9:04 PM
From a PC
20 Select and click the memory where the curve is to be
saved from [ImprintEQ Memory 1] or [ImprintEQ
Memory 2]. Click [OK].
• After the setting, it is recommended to store the setting contents on
the unit. For details, refer to “Storing the Preset Values (Preset
Store)” (page 12).
Saving ImprintEQ Measurement Data on a
PC
1
Click [File] in Step 20 for “Setting ImprintEQ”, and
click [OK].
The “Save As” box will be shown.
2
• Select [File] to save ImprintEQ measurement data on a PC. Refer to
“Saving ImprintEQ Measurement Data on a PC” (page 19).
21 Click [Close Window].
Turning ImprintEQ On/Off
1
• For the method to load the data saved on a PC, refer to “Loading the
ImprintEQ Measurement Data (File)” (page 11).
Adjusting and Saving the Target Curve
You can adjust the target curve and save it on a PC.
1
Click [Target Curve Setting] in Step 17 for “Setting
ImprintEQ.”
The Target Curve Setting screen will be displayed.
co
m
.u
a
• To enable this function, Defeat should be is set to ON.
• Graphic EQ, Parametric EQ and X-Over Level are set to their initial
values during ImprintEQ measurement.
• The file extension of the ImprintEQ setting data file is “.ieq”.
• When you save the measurement result of ImprintEQ in Memory 1 or
2 for the second time, the memory will be overwritten and the
previous data will be lost.
• Sound may arrive at the listening position at slightly different times,
depending on the speaker and enclosure. To compensate for this, the
distance can be adjusted to be larger than the actual distance.
• Measurement values will not be lost in the event the system is reset or
battery power is disconnected.
Select the location where you want to save the file
and enter a name for the file to save.
• When you click [Target Curve] for the [Shortcut] tab in the main
menu, the Target Curve Setting screen will be displayed.
2
Drag the curve to adjust it.
Click [ImprintEQ] for [Shortcut] tab in the main
menu.
The Automatic Measurement tab screen will be displayed.
Click [ON] or [OFF] for “ImprintEQ.”
13
2
0.
• When you click [Automatic Measurement] in the Function switching
tab, the Automatic Measurement tab screen will also be displayed.
Refer to “Operating the Function Switching Tab” (page 7).
If you click [ON], select the setting value.
3
Click [ ] and select and click either [Memory 1] or
[Memory 2].
Setting contents: -6 to +6dB
3
Click [Save].
The “Save As” box will be shown.
4
• If you do not use ImprintEQ is not used, select [OFF].
• If the speaker system in the “Memory” and the current speaker
system do not match, the Memory cannot be retrieved.
• When you turn on ImprintEQ, the Graphic EQ, Parametric EQ, Time
Correction, and Output Level are automatically adjusted. Each of
these values can be further adjusted, but the adjustment ranges for
the Graphic EQ and the Parametric EQ are restricted.
• When ImprintEQ is on, the Time Correction and X-Over channel will
be automatically set at the L/R Separate Adjustment mode.
Select the location where you want to save the file
and enter a name for the file to save.
• The file extension of the measurement data file is “.tcv”.
• You can retrieve the saved data by clicking [Load].
• To restore the target curve to the initial settings, click [Reset]. Click
[OK] when confirmation message appears.
• Mouse trace function
When you click [Mouse Trace OFF], the mouse trace function
becomes enabled, and [Mouse Trace OFF] changes to [Mouse Trace
ON]. When dragged, the curve (settings) changes in accordance with
the movement of the cursor.
To disable the mouse trace function, click the [Mouse Trace ON].
Autogood products «130»
19-EN
01GB06PXAH800.fm
ALPINE PXA-H800_EN 68-13530Z65-A (B5)
01GB00PXAH800.book Page 20 Tuesday, February 8, 2011 9:04 PM
From a PC
8
Adjusting the Time Correction
Automatically (Auto TCR)
Click [START] in the measurement start screen.
Countdown will start.
A vehicle poses a unique listening environment. Speaker distances vary
widely to each listening position. These special conditions can be
overcome using the included microphone and the powerful
measurement system in this processor. The processor measures and
analyzes data automatically to optimize time correction for each speaker
and listening position selected.
1
Preparing for measurement.
•
•
•
•
2
During the 10 second countdown, go outside the vehicle
and close the door.
A test signal will be output from the speakers to measure the
acoustic characteristics of the cabin. Do not open any
doors until the finish message appears on the screen. If
external noise interferes with the measurement. If the error
screen is displayed, perform the measurement again.
Park the vehicle in a quiet location.
Close doors, windows, sunroof, etc.
Turn the air-conditioner and heater OFF.
Turn off the engine of the vehicle.
Preparing the microphone.
Place the microphone at the listening position (driver’s seat,
etc.). A camera tripod is recommended for this purpose.
3
Turn the Ignition switch of the vehicle to ACC (On).
• If an air-conditioner or heater is turned on, turn it off. Measurement
should not be performed if air-conditioner or heater noise is present.
4
Click [Auto TCR] for [Shortcut] tab in the main menu.
The Automatic Measurement tab screen will be displayed.
• When you click [Automatic Measurement] in the Function switching
tab, the Automatic Measurement tab screen will also be displayed.
Refer to “Operating the Function Switching Tab” (page 7).
Click [Setup] for “Auto TCR.”
13
0.
5
9
co
m
.u
a
• The microphone should be placed at shoulder height.
• When you save the measurement data values for various listening
positions in the preset, you can easily load one of them as necessary.
• If you want to stop measurement, click [CANCEL].
• If no microphone is connected, a confirmation message will be
displayed and measurement will not be carried out. Click [OK] to
cancel the indication.
• To enable this function, Defeat should be is set to ON.
• Measurement of Auto TCR takes approximately 5 minutes.
• Auto TCR measurement result overwrites the manual TCR
measurement result.
• Sound may arrive at the listening position at slightly different times,
depending on the speaker and enclosure. To compensate for this, the
distance can be adjusted to be larger than the actual distance.
• After the setting, it is recommended to store the setting contents on
the unit. For details, refer to “Storing the Preset Values (Preset
Store)” (page 12).
Adjusting for Road Noise (RoadEQ)
RoadEQ (REAL-TIME OPTIMIZED ADAPTIVE DRIVING EQ) is a
function to automatically adjust the EQ properties in accordance with
the road noise while driving.
The Road Equalizer compensates for constantly changing noise, so
always keep the microphones connected.
1
6
7
When a confirmation message for closing the screen
is displayed, click [OK].
•
•
•
•
When the confirmation message is displayed, check
the content and click [OK].
When the confirmation message is displayed again,
check the content and click [OK].
Preparing for measurement.
2
Park the vehicle in a quiet location.
Close doors, windows, sunroof, etc.
Turn the air-conditioner and heater OFF.
Turn off the engine of the vehicle.
Preparing the microphone.
Refer to the installation manual.
3
Turn the ignition switch of the vehicle to ACC (On).
• If an air-conditioner or heater is turned on, turn it off. Measurement
should not be performed if air-conditioner or heater noise is present.
4
Click [RoadEQ] for [Shortcut] tab in the main menu.
The Automatic Measurement tab screen will be displayed.
• When you click [Automatic Measurement] in the Function switching
tab, the Automatic Measurement tab screen will also be displayed.
Refer to “Operating the Function Switching Tab” (page 7).
20-EN
Autogood products «130»
01GB06PXAH800.fm
ALPINE PXA-H800_EN 68-13530Z65-A (B5)
01GB00PXAH800.book Page 21 Tuesday, February 8, 2011 9:04 PM
From a PC
5
Click [Setup] for “RoadEQ.”
Turning RoadEQ On/Off
When automatic measurement is completed, RoadEQ can be turned on
or off and its level can be selected.
1
Click [RoadEQ] for [Shortcut] tab in the main menu.
The Automatic Measurement tab screen will be displayed.
• When you click [Automatic Measurement] in the Function switching
tab, the Automatic Measurement tab screen will also be displayed.
Refer to “Operating the Function Switching Tab” (page 7).
2
6
7
Click [ON] or [OFF] for “RoadEQ.”
When you click [ON], select the level.
When a confirmation message is displayed, check
the content and click [OK].
• When you do not use RoadEQ, select [OFF].
Click [START] in the measurement start screen.
3
co
m
.u
a
Countdown will start.
Click [ ] and select and click either [Level 1], [Level
2], or [Level 3].
During the 10 second countdown, go outside the vehicle
and close the door.
A test signal will be output from the speakers to measure the
acoustic characteristics of the cabin. Do not open any
doors until the finish message appears on the screen. If
external noise interferes with the measurement. If the error
screen is displayed, perform the measurement again.
When a confirmation message for closing the screen
is displayed, click [OK].
13
8
0.
• If you want to stop measurement, click [CANCEL].
• If no microphone is connected, a confirmation message will be
displayed and measurement will not be carried out. Click [OK] to
cancel the indication.
• To enable this function, Defeat should be is set to ON.
• Measurement of RoadEQ takes approximately 7 minutes.
• Measurement values will not be lost in the event the system is reset or
battery power is disconnected.
Level 1: Low correction level. Suitable for quiet vehicles.
Level 2: Moderate correction level.
Level 3: High correction level. Suitable for high speed
driving.
• If measurement is not completed, or a microphone is not connected,
this setting cannot be performed.
• When you change the speaker setting of On/Off, RoadEQ
automatically becomes off. When you have changed the speaker
settings, start the measurement step over again.
• After the setting, it is recommended to store the setting contents on
the unit. For details, refer to “Storing the Preset Values (Preset
Store)” (page 12).
Autogood products «130»
21-EN
01GB06PXAH800.fm
ALPINE PXA-H800_EN 68-13530Z65-A (B5)
01GB00PXAH800.book Page 22 Tuesday, February 8, 2011 9:04 PM
From a PC
DVD (Cinema, Action, Music, OFF):
Audio Setup/
Adjustment
Cinema:
Movie dialogue is clearly reproduced. Action movies are
reproduced with more powerful sound.
Action:
Action movies are reproduced with more powerful sound.
Music:
Lower register sounds (drums, bass, etc.) and vocals are
emphasized for clean and clear output.
Setting MX Plus (Ai-NET Mode)
MX (Media Xpander) Plus enhances the vocal and instrumental sounds
for music sources such as radio/CD/MP3, by generating harmonics lost
during digital processing. This high frequency compensation adds
clarity and detail normally lost to road noise.
This feature becomes enabled when an Ai-NET compatible head unit
with MX Plus linking function is connected. If MX Plus mode is set for
each source beforehand, it automatically switches according to the
music source of the head unit.
• When a head unit with the MX Plus linking function, such as INAW910, is connected, it should be set to Ai-NET mode. Other head
units should be set in the Standalone mode.
Click [ON] for “MX Plus” in the main menu.
MX Plus becomes enabled.
• When you click the [OFF], MX Plus for all music sources becomes
will be disabled.
• To enable this function, Defeat should be is set to ON.
• After the setting, it is recommended to store the setting contents on
the unit. For details, refer to “Storing the Preset Values (Preset
Store)” (page 12).
MX (Media Xpander) Plus enhances the vocal and instrumental sounds
for music sources such as radio/CD/MP3, by generating harmonics lost
during digital processing. This high frequency compensation adds
clarity and detail normally lost to road noise.
In the Standalone mode, MX Plus does not become linked with the
source of the head unit. MX Plus should be set for each external input.
MX Plus mode will be switched, linked with the source switching of
PXA-H800.
1
Click [MX Plus] for [Shortcut] tab in the main menu.
MX Plus setup screen will be displayed.
0.
Click [Ai-NET] for “MX Plus Setup” in the main menu.
MX Plus will become linked to the head unit.
Click [ ] for “Level Adjustment” in the setup
screen, and select and click the level from the pulldown menu.
13
4
When setting is complete, click [Close Window].
Setting MX Plus (Standalone Mode)
• When you click [Media Sound Manager] on the Function switching
tab, and then [Setup], the MX Plus setup screen will also be
displayed. Refer to “Operating the Function Switching Tab”
(page 7).
3
5
Click [MX Plus] for [Shortcut] tab in the main menu.
MX Plus setup screen will be displayed.
2
• When “OFF” is selected, MX Plus becomes disabled.
co
m
.u
a
1
AUX / Others (Compressed, Music, DVD, OFF):
MX mode suitable for the media (Compressed Data, Music,
DVD) can be selected.
MX Plus level increases in the following order: 1
• When you click [Media Sound Manager] on the Function switching
tab, and then [Setup], the MX Plus setup screen will also be
displayed. Refer to “Operating the Function Switching Tab”
(page 7).
2
Click [ON] for “MX Plus” in the main menu.
MX Plus becomes enabled.
• When you click the [OFF], MX Plus for all music sources becomes
will be disabled.
2
3.
FM (Level 1 to 3, OFF):
The medium to high frequencies become clearer, and produces
well balanced sound at all frequencies.
CD (Level 1 to 3, OFF):
CD mode processes a large amount of data during playback.
MX Plus takes advantage of this large data quantity to
reproduce a more clear, clean output.
If an Ai-NET compatible head unit is connected, go to
step 3.
If an Ai-NET compatible head unit is not connected, go to
step 4.
3
Click [Standalone] for “MX Plus Setup” in the main
menu.
• When a head unit without the MX Plus linking function is connected,
this should be set as “Standalone,” even if it is an Ai-NET compatible
head unit.
Compressed Data/Digital Radio (Level 1 to 3, OFF):
This corrects information that was lost at the time of
compression. This reproduces a well-balanced sound close to
the original.
22-EN
Autogood products «130»
01GB06PXAH800.fm
ALPINE PXA-H800_EN 68-13530Z65-A (B5)
01GB00PXAH800.book Page 23 Tuesday, February 8, 2011 9:04 PM
From a PC
4
Click [ ] for “Level Adjustment” for each external
input in the setup screen and select and click the
level from the pull-down menu.
Setting the Graphic EQ
The graphic equalizer allows you to modify the sound using 31 bands
each for the front (left and right), rear (left and right) and center
speakers. An additional 10 bands are available for the subwoofer. This
allows you to customize the sound to suit your taste.
1
Click [G.EQ] for [Shortcut] tab in the main menu.
The EQ Setup screen is displayed.
• When you click [Mobile Sound Manager] on the Function switching
tab, and then [EQ Setup], the EQ Setup screen will also be displayed.
Refer to “Operating the Function Switching Tab” (page 7).
MX Plus level increases in the following order: 1
2
3.
Compressed 1 to 3:
This corrects information lost in the compression process. This
reproduces a well-balanced sound close to the original. By
supplementing mid- to high- frequency sound data, the sound is
reproduced with more brightness and ambience.
2
Click [G.EQ] in the main menu.
Music 1 to 3:
Lower register sounds (drums, bass, etc.) and vocals are
emphasized for clean and clear output.
co
m
.u
a
Cinema:
Video dialogue is reproduced more clearly. Action movies are
reproduced with more powerful sound.
Action:
Action movies are reproduced with more powerful sound.
Drama/Talk:
The dialogue portion of a video is reproduced more clearly.
The EQ mode switches to the Graphic EQ mode.
• You can choose either Graphic EQ or Parametric EQ. When you
click [OFF], EQ mode becomes disabled.
3
Click either [
] or [
].
• When “Non Effect” is selected, MX Plus becomes disabled.
• External Inputs to be set vary depending on the system set in “Setting
the AUX Input System (AUX Input System Select)” (page 14).
5
When setting is complete, click [Close Window].
13
0.
• To enable this function, Defeat should be is set to ON.
• After the setting, it is recommended to store the setting contents on
the unit. For details, refer to “Storing the Preset Values (Preset
Store)” (page 12).
: Both R and L channels are set at the same value (The
initial setting).
: Channels R and L can be set independently.
• When you select “
” a message to confirm which of the R or L
channel set up values is to be applied will be displayed. Click either
[LEFT] or [RIGHT].
4
Click the channel you want to adjust.
• Channels to be set vary depending on the system set in “Setting the
Speaker System (Output System Select)” (page 13).
Autogood products «130»
23-EN
01GB06PXAH800.fm
ALPINE PXA-H800_EN 68-13530Z65-A (B5)
01GB00PXAH800.book Page 24 Tuesday, February 8, 2011 9:04 PM
From a PC
5
Click a frequency and drag up or down to adjust the
level.
• After the setting, it is recommended to store the setting contents on
the unit. For details, refer to “Storing the Preset Values (Preset
Store)” (page 12).
Displaying the data
1
Click [Show All Data].
The setup values for all the channels will be displayed.
Frequency:
Front/Rear/Center: 20Hz~20kHz (1/3 octave step)
(1 to 31 Band)
SubW:
20Hz to 160Hz (1/3 octave step)
(1 to 10 Band)
Level: -12 to +12dB (in 0.5dB step)*
* When ImprintEQ is enabled, -6 to +6 dB (in 0.5 dB steps)
To adjust another channel, repeat Steps 4 through 5.
0.
6
co
m
.u
a
• Mouse trace function
When you click [Mouse Trace OFF], the mouse trace function
becomes enabled, and [Mouse Trace OFF] changes to [Mouse Trace
ON]. When dragged, the curve (settings) changes in accordance with
the movement of the cursor.
To disable the mouse trace function, click the [Mouse Trace ON].
• You can also make adjustments by operating the settings indication
area (Frequency, Level).
The current setup value will be displayed at the bottom of the Screen.
Click [ ] and select and click a setup value. You can also use the
[Tab], [ ], [ ], [ ], and [ ] keys on your PC to select the
setup value.
13
• You can listen with Defeat OFF (adjusted setup values) or with
Defeat ON (Initial value) to compare, by clicking either [ON] or
[OFF] of “Defeat” in the main menu while in the adjustment mode.
• By clicking either [
] or [
] of “Mute” while in the adjustment
mode, you can mute the selected channel.
7
When setting is complete, click [Close Window].
• To enable this function, Defeat should be is set to ON.
• To restore the channel which is currently being adjusted to the
default, click [Ch. Flat]. To restore all the channels to the initial
settings, click [All Reset]. Click [OK] when each confirmation
message appears.
• When the speaker is set to the “OFF” mode, the graphic equalizer
for that speaker cannot be set. Refer to “Setting the Speaker System
(Output System Select)” (page 13)/ “Setting the Speakers (Speaker
Setup)/Setting the Subwoofers” (page 14).
• Check the playable frequency ranges of the connected speakers
before making equalizer adjustments. If the speaker’s playable
frequency range is 55 Hz to 30 kHz, for example, adjusting the 40 Hz
or 20 Hz band has no effect. Additionally, you may overload and
damage the speakers.
24-EN
Autogood products «130»
01GB06PXAH800.fm
ALPINE PXA-H800_EN 68-13530Z65-A (B5)
01GB00PXAH800.book Page 25 Tuesday, February 8, 2011 9:04 PM
From a PC
5
Setting the Parametric EQ
The frequency bands of the graphic equalizer are fixed. This makes it
very difficult to correct for undesired peaks and dips at specific
frequencies. The parametric equalizer’s center frequency can be tuned
to these specific frequencies. Then, the bandwidth (Q) and level are
fine-tuned, independently, to make the necessary corrections. The
parametric equalizer function is an advanced tool for serious
audiophiles.
1
Click [P.EQ] for [Shortcut] tab in the main menu.
The EQ Setup screen is displayed.
Band:
• When you click [Mobile Sound Manager] on the Function switching
tab, and then [EQ Setup], the EQ Setup screen will also be displayed.
Refer to “Operating the Function Switching Tab” (page 7).
2
Click each band and drag up or down to adjust the
level. Drag to the right or left to adjust the frequency.
Adjust the bandwidth (Q) by dragging diagonally on
the curve.
Click [P.EQ] in the main menu.
Front/Rear/Center: 1 to 10
SubW: 1 to 5
Frequency:
Front/Rear/Center: 20 Hz to 20kHz (in 1/6
octave steps)
SubW: 20 Hz to 200 Hz (in 1/6 octave
steps)
Level:
-12 to +12 dB (in 0.5 dB steps)*
Q Factor:
0.5/1.0/1.5/2.0/2.5/3.0/4.0/5.0
* When ImprintEQ is enabled, 6 to +6 dB (in 0.5 dB steps)
co
m
.u
a
• You can also make adjustments by operating the settings indication
area.
The current setup value will be displayed at the bottom of the screen.
Click [ ] and select and click a setup value. You can also use the
[Tab], [ ], [ ], [ ], and [ ] keys on your PC to select the
setup value.
The EQ mode switches to the Parametric EQ mode.
• You can choose either Graphic EQ or Parametric EQ. When you
click [OFF], EQ mode becomes disabled.
3
Click either [
] or [
].
To adjust another channel, repeat Steps 4 through 5.
• You can listen with Defeat OFF (adjusted setup values) or with
Defeat ON (Initial value) to compare, by clicking either [ON] or
[OFF] of “Defeat” in the main menu while in the adjustment mode.
• By clicking either [
] or [
] of “Mute” while in the adjustment
mode, you can mute the selected channel.
13
0.
6
: Both R and L channels are set at the same value (The
initial setting).
: Channels R and L can be set independently.
• When you select “
” a message to confirm which of the R or L
channel set up values is to be applied will be displayed. Click either
[LEFT] or [RIGHT].
4
Click the channel you want to adjust.
7
When setting is complete, click [Close Window].
• To enable this function, Defeat should be is set to ON.
• To restore the channel which is currently being adjusted to the
default, click [Ch. Flat]. To restore all the channels to the initial
settings, click [All Reset]. Click [OK] when each confirmation
message appears.
• When the speaker is set to the “OFF” mode, the parametric
equalizer for that speaker cannot be set. Refer to “Setting the
Speaker System (Output System Select)” (page 13)/ “Setting the
Speakers (Speaker Setup)/Setting the Subwoofers” (page 14).
• Check the playable frequency ranges of the connected speakers
before making equalizer adjustments. If the speaker’s playable
frequency range is 55 Hz to 30 kHz, for example, adjusting the 40 Hz
or 20 Hz band has no effect. Additionally, you may overload and
damage the speakers.
• If you boost the sound too much in the same frequency range,
distortion may occur.
• Channels to be set vary depending on the system set in “Setting the
Speaker System (Output System Select)” (page 13).
Autogood products «130»
25-EN
01GB06PXAH800.fm
ALPINE PXA-H800_EN 68-13530Z65-A (B5)
01GB00PXAH800.book Page 26 Tuesday, February 8, 2011 9:04 PM
From a PC
• After the setting, it is recommended to store the setting contents on
the unit. For details, refer to “Storing the Preset Values (Preset
Store)” (page 12).
Displaying the data
1
Click [Show All Data].
The setup values for all the channels will be displayed.
• The higher the slope value, the steeper the slope becomes.
• Adjust the slope to FLAT (0 dB/oct) to bypass the HP or LP filters.
• Do not use a tweeter without the HPF on or set to a low frequency, as
it may cause damage to the speaker due to the low frequency content.
• You cannot adjust the crossover frequency higher than the HPF or
lower than the LPF.
• Adjustment should be made according to the recommended crossover
frequency of the connected speakers. Determine the recommended
crossover frequency of the speakers. Adjusting to a frequency range
outside that recommended may cause damage to the speakers.
For the recommended crossover frequencies of Alpine speakers, refer
to the respective Owner’s Manual. We are not responsible for
damage or malfunction of speakers caused by using the crossover
outside the recommended value.
Adjusting X-Over and Switching the
Phases
This section describes how to adjust X-Over. Before working on this,
refer to “About the Crossover (X-Over)” (page 26).
Hint for adjusting the subwoofer
If the subwoofer is installed on the rear deck, setting a gentle
L.P.F. slope (for example 6 dB/ oct.) makes the sound
localization more to the rear. This can also affect the acoustic
localization of the front.
co
m
.u
a
About the Crossover (X-Over)
Crossover (X-Over):
0.
This unit is equipped with an active crossover. The crossover limits the
frequencies delivered to the outputs. Each channel is controlled
independently. Thus, each speaker pair can be driven by the frequencies
for which they have been optimally designed.
The crossover adjusts the HPF (high pass filter) or LPF (low pass filter)
of each band, and also the slope (how fast the filter rolls off the highs or
lows).
Adjustments should be made according to the reproduction
characteristics of the speakers. Depending on the speakers, a passive
network may not be necessary. If you are unsure about this point, please
consult your authorized Alpine dealer.
Front High
Front Mid
Front Low
Rear
Center
Subwoofer
13
Cutoff frequency adjustment range
(1/6 octave steps)
HPF
LPF
20Hz to 18kHz
1kHz to 18kHz
(Tweeter only)
20Hz to 18kHz
20Hz to 18kHz
20Hz to 18kHz
20Hz to 18kHz
20Hz to 180Hz
22Hz to 20kHz
1.1kHz to 20kHz
(Tweeter only)
22Hz to 20kHz
22Hz to 20kHz
22Hz to 20kHz
22Hz to 20kHz
22Hz to 200Hz
Hints for adjusting the high range
Depending on the speaker, inputting low frequency component
signals (about 2 kHz or less) with the H.P.F. adjustment could
result in distortion. If so, set a steep slope (for example
30 dB/oct.).
When doing so, adjust so that the mid and high range sounds do
not separate.
Normally use with the L.P.F. off. If the high range is too strong,
we recommend adjusting for a gentle slope.
Hint for adjusting the low range
When a subwoofer is connected and you are using a speaker
with a low range of under 10 or 12 cm (3-15/16” or 4-3/4”),
setting the low range H.P.F. to “OFF” can result in distortion
when low frequency components are input.
If so, set the H.P.F. slope to a value suited for the speaker’s
frequency response.
1
The X-Over Setup screen is displayed.
• When you click [Mobile Sound Manager] on the Function switching
tab, and then [X-Over], the X-Over Setup screen will also be
displayed. Refer to “Operating the Function Switching Tab”
(page 7).
2
Level adjustment
Output frequency range
(0 to -12 dB)
Click [X-Over] for [Shortcut] tab in the main menu.
Click either [
] or [
].
Slope FLAT
Slope adjustment
20 Hz
(Different from actual display)
HPF cut-off LPF cut-off
frequency
frequency
• HPF (high pass filter): Cuts the lower frequencies and allows the
higher frequencies to pass.
• LPF (low pass filter): Cuts the higher frequencies and allows the
lower frequencies to pass.
• Slope: The level change (in dB) for a frequency change of one octave.
26-EN
Autogood products «130»
01GB06PXAH800.fm
ALPINE PXA-H800_EN 68-13530Z65-A (B5)
01GB00PXAH800.book Page 27 Tuesday, February 8, 2011 9:04 PM
From a PC
: Both R and L channels are set at the same value (The
initial setting).
: Channels R and L can be set independently.
• When you select “
,” a message to confirm which of the R or L
channel set up values is to be applied will be displayed. Click either
[LEFT] or [RIGHT].
3
Click the channel you want to adjust.
• The unadjusted curve display can be turned off in the following steps.
1 Click the indicator of “Show.”
Indicator
4
co
m
.u
a
• Channels to be set vary depending on the system set in “Setting the
Speaker System (Output System Select)” (page 13).
Drag the setup point up or down or to the right or left
to make adjustments.
The arrow indicating the dragging direction appears.
Frequency
Level
The indicator will be turned off and the curve display of
the selected channel is hidden.
2 To turn on the display, click the indicator of “Show” again.
5
6
Click [0°] or [180°] to switch the phase.
To adjust another channel, repeat Steps 3 through 5.
Slope
13
0.
• By clicking either [
] or [
] of “Mute” while in the adjustment
mode, you can mute the selected channel.
Setup point
The cutoff frequency band varies depending on the channel
(speaker) (see “About the Crossover (X-Over)” page 26).
Slope: 0 (OFF)/-6/-12/-18/-24/-30/-36 dB/oct*
Level: -24 to 0dB (in 0.5 dB steps)
* Neither LPF of Subwoofer nor HPF of Front High can be set at 0
(OFF).
• Show All Curves:
When you click the [Show All Curves], the curves for all the channels
will be displayed.
• Hide Other Curves:
When you click the [Hide Other Curves], only the curve of the
channel for which you are making adjustments is displayed.
• You can also make adjustments by operating the settings indication
area.
The current setup value will be displayed at the bottom of the Screen.
Click [ ] and select and click a setup value. You can also use the
[Tab], [ ], [ ], [ ], and [ ] keys on your PC to select the
setup value.
7
When setting is complete, click [Close Window].
• To restore the channel which is currently being adjusted to the
default, click [Ch. Flat]. To restore all the channels to the initial
settings, click [All Reset]. Click [OK] when each confirmation
message appears.
• When Tweeter is selected for “Front 1” to protect the speaker, there
is no filter off (Slope OFF) setting for HPF. There is no filter off
(Slope OFF) setting for Subwoofer LPF, either.
• When the speaker is set to the “OFF” mode, the X-Over for that
speaker cannot be set. Refer to “Setting the Speaker System (Output
System Select)” (page 13)/ “Setting the Speakers (Speaker Setup)/
Setting the Subwoofers” (page 14).
• Check the playback frequencies of the connected speakers before
adjusting.
• After the setting, it is recommended to store the setting contents on
the unit. For details, refer to “Storing the Preset Values (Preset
Store)” (page 12).
Autogood products «130»
27-EN
01GB06PXAH800.fm
ALPINE PXA-H800_EN 68-13530Z65-A (B5)
01GB00PXAH800.book Page 28 Tuesday, February 8, 2011 9:04 PM
From a PC
Displaying the data
1
Concrete examples
1 Calculating the time correction value for the front left
speaker on the diagram below.
Click [Show All Data].
The setup values for all the channels will be displayed.
Conditions:
Distance between farthest speaker and listening position: 2.25
m (88-3/4")
Distance between front left speaker and listening position: 0.5 m
(20")
Calculation: L = 2.25 m (88-3/4") – 0.5 m (20") = 1.75 m (68-3/4")
Compensation time = 1.75 ÷ 343 x 1000 = 5.1 (ms)
In other words, setting the time correction value for the front left
speaker to 5.1 (ms) sets a virtual distance matching the
distance to the farthest speaker.
5.1ms
Adjusting the Time Correction (TCR)
e Calculation of time correction
2
Sit in the listening position (the driver’s seat, for
example) and measure the distance (in meters)
between your head and the various speakers.
Calculate the difference in distance between the
farthest speaker and the other speakers.
0.
1
13
L = (distance of farthest speaker) – (distance of other
speakers)
3
0.5m
2.25m
co
m
.u
a
Because of the particular conditions inside the vehicle, there are major
differences in the distances between the different speakers and the
various listening positions. The proper time correction can be obtained
using the automatic time correction function (“Auto TCR”), but it is also
possible to calculate the optimum correction values and eliminate the
time error at the listening position using this function.
The unit for the time correction can be chosen to be either “cm” or
“inch.” (Initial setting: “cm”)
Divide the distances calculated for the different
speakers by the speed of sound (343 m/s
temperature 20°C).
This value is the time correction value for the different
speakers.
The sound is
uneven because the distance
between the listening position
and the different speakers is
different.
The difference in the distance
between the front left and rear
right speakers is 1.75 meters
(68-3/4").
Time correction eliminates the
difference between the time
required for the sound from the
different speakers to reach the
listening position.
Setting the time correction of the
front left speaker to 5.1 ms
makes it possible to coordinate
the distance from the listening
position to the speaker.
e Entering the time correction
4
Click [TCR] for [Shortcut] tab in the main menu.
The TCR Setup screen is displayed.
• When you click [Mobile Sound Manager] on the Function switching
tab, and then [TCR], the TCR Setup screen will also be displayed.
Refer to “Operating the Function Switching Tab” (page 7).
5
Click [ON] for “TCR” in the main menu.
• Choose OFF to disable the TCR function.
6
Click either [
] or [
].
: Both R and L channels are set at the same value (The
initial setting).
: Channels R and L can be set independently.
• When you select “
,” a message to confirm which of the R or L
channel set up values is to be applied will be displayed. Click either
[LEFT] or [RIGHT].
28-EN
Autogood products «130»
01GB06PXAH800.fm
ALPINE PXA-H800_EN 68-13530Z65-A (B5)
01GB00PXAH800.book Page 29 Tuesday, February 8, 2011 9:04 PM
From a PC
7
Click either [cm] or [inch.]
Entering numerical values
You can directly enter the distances (actual measurements) to all the
speakers to make adjustments.
1
Click [Value Input].
cm: The unit for the time correction becomes “cm.”
inch: The unit for the time correction becomes “inch.”
8
Drag [
] of the channel you want to adjust to the
right or left. Or click either [
] or [
] to set.
2
3
Click [cm] or [inch].
Enter the number directly or click [ ] or [ ] to enter
the actual measurements (distances to the
speakers).
The time correction value.
0.00 to 20.00 ms (in 0.05 ms steps)
co
m
.u
a
Setting contents:
• Channels to be set vary depending on the system set in “Setting the
Speaker System (Output System Select)” (page 13).
• By clicking [
] while in the adjustment mode, you can
mute the selected channel. Click [
] again to output
audio.
• You can listen with Defeat OFF (adjusted setup values) or with
Defeat ON (Initial value) to compare, by clicking either [ON] or
[OFF] of “Defeat” in the main menu while in the adjustment mode.
9
When setting is complete, click [Close Window].
4
0.0 to 270.1
0.0 to 686.0
Click [OK].
The mode will change to the channel L/R individual
adjustment mode. The number you enter will be reflected in
the setting screen.
13
0.
• To enable this function, Defeat should be is set to ON.
• When the speaker is set to the “OFF” mode, the time correction for
that speaker cannot be set. Refer to “Setting the Speaker System
(Output System Select)” (page 13)/ “Setting the Speakers (Speaker
Setup)/Setting the Subwoofers” (page 14).
• Sound may arrive at the listening position at slightly different times,
depending on the subwoofer and enclosure. After this setting, preview
the sound and adjust as necessary. A correction of 10ms (135.0 inch/
343.0 cm) may be necessary.
• After the setting, it is recommended to store the setting contents on
the unit. For details, refer to “Storing the Preset Values (Preset
Store)” (page 12).
Setting contents:
inch:
cm:
Autogood products «130»
29-EN
01GB06PXAH800.fm
ALPINE PXA-H800_EN 68-13530Z65-A (B5)
01GB00PXAH800.book Page 30 Tuesday, February 8, 2011 9:04 PM
From a PC
Use the Multi
Channel Function
Setting the 2-Channel Signal Playback
Mode (2ch Playback Mode)
These steps set the 2-channel signal playback mode.
1
Click [Multi Channel Manager] of the Function
switching tab.
• If the setting of Rear Fill is made when Rear Mix is ON, sound is
unchanged in the rear fill setting because Rear Mix is given priority
during 2 channel decoder other than linear PCM.
Setting EUPHONY (EUPHONY)
EUPHONY creates 5.1 channel surround using Adaptive Surround
technology based on a music signal recorded in 2-channel.
When you set up EUPHONY and play back a CD or iPod stereo source,
you can enjoy the realistic sensation of musicians playing around you.
For DVD movie playback, you can enjoy the sense of localization of the
dialogue and impressive three-dimensional sound effects.
In this setting, EUPHONY Mode can be selected. (Initial setting:
“ACOUSTIC”)
1
Multi Channel Manager tab screen will be displayed.
Click [ ] for “2ch Playback Mode” and select and
click [EUPHONY] from the pull-down menu.
• Refer to “Operating the Function Switching Tab” (page 7).
2
Set and adjust “2ch Playback Mode,” “EUPHONY,”
“Dolby Pro Logic II.”
co
m
.u
a
• When both Rear and Center speakers are off in “Setting the Speaker
System (Output System Select)” (page 13)/ “Setting the Speakers
(Speaker Setup)/Setting the Subwoofers” (page 14), this item cannot
be set.
• After the setting, it is recommended to store the setting contents on
the unit. For details, refer to “Storing the Preset Values (Preset
Store)” (page 12).
Setting the 2-Channel Signal Playback
Mode (2ch Playback Mode)
When playing back 2-Channel Stereo, select a playback mode best
suited to the music. (Initial setting: “Stereo”)
2
Click [ ] for “EUPHONY” and select and click the
mode from the pull-down menu.
0.
Click [ ] for “2ch Playback Mode” and select and
click the playback mode you want from the pulldown menu.
13
1
• If you click [EUPHONY] for [shortcut] tab in the main menu, the
Multi Channel Manager tab screen can also be displayed and you
can set up EUPHONY.
Setting contents:
ACOUSTIC/LIVE/CINEMA/TV SHOW/
Custom 1/Custom 2/Custom 3
ACOUSTIC:
Setting contents:
Stereo/Rear Fill/EUPHONY/Dolby Pro
Logic II
Stereo:
Rear Fill:
EUPHONY:
Plays back in 2ch stereo.
Outputs the front signal from the rear.
Plays back in 5.1 channel surround
(page 30).
Dolby Pro Logic II: Plays back in Dolby Pro Logic II
surround (page 31).
• For linear PCM, the front signals are sent to the rear channel even if
the system is set up for “Stereo.”
• “Rear Fill” function
Depending on the input signals, the sound may only be output from
the front speakers. In this case, the “Rear Fill” function can be used
to output signals from the rear speakers as well.
30-EN
Localization is emphasized; the
mode with regular sound field
resonance.
LIVE:
Ambience is emphasized; the mode
in which sound field resonance is
more strongly felt.
CINEMA:
Mode suitable for movie audio.
Dialogues are reproduced clearly
and sound effect is crisp.
TV SHOW:
Mode suitable for broadcasting
audio such as the digital
broadcasting.
Custom 1/Custom 2/ These can be selected only when
Custom 3:
EUPHONY is customized in
“Customizing EUPHONY” (page 31).
• This function only works with 2-channel signals.
Autogood products «130»
01GB06PXAH800.fm
ALPINE PXA-H800_EN 68-13530Z65-A (B5)
01GB00PXAH800.book Page 31 Tuesday, February 8, 2011 9:04 PM
From a PC
6
Customizing EUPHONY
You can customize the sense of ambience (localization and ambience)
of the cabin sound field and the balance (Level) between surround
channels and save the settings.
1
The Memory selection screen is displayed.
7
Click [Custom] for “EUPHONY.”
8
The EUPHONY custom screen is displayed.
Click [Store] for “Custom Memory” to save the
settings.
Click either [Custom 1], [Custom 2], or [Custom 3]
and click [OK].
When setting is complete, click [Close Window].
• This setting is only available for 2-channel signal playback.
• If you click [Call] in Step 6, you can call and readjust the stored
setting values. Click either [Custom 1], [Custom 2], or [Custom 3] in
the setting value selection screen and click [OK].
• By clicking
of “Mute” while in the adjustment mode, you can
mute the selected channel.
Using Dolby Pro Logic II (Dolby Pro Logic
II)
Click [Standard], [Wide], or [Off] in the “Localization/
Ambience” to choose the localization/ambience.
co
m
.u
a
2
Pro Logic processing can be applied to the music signals recorded in 2channel stereo. This gives normal 2-channel stereo a more live, concert
hall effect. When you select “Music,” you can adjust the center width.
This function provides the optimum vocal localization by adjusting the
center channel localization in between the center speaker and the L/R
speakers. (Initial setting: “Music”)
1
Click [ ] for “2ch Playback Mode” and select and
click [Dolby Pro Logic II] from the pull-down menu.
Standard: Setup of the regular ambience of Ls/Rs sound.
Choose this for a subtle expansion in sound.
Wide:
The ambience of Ls/Rs sound is more easily
recognizable. Use this when you want brightness
and crispness.
OFF:
This disables EUPHONY.
Adjust the localization/ambience for each channel.
Drag [
] for “Localization/Ambience” or click [ ]
or [ ].
0.
3
4
Click either [
13
Setting channel: C (Center), L (Left Front) / R (Right Front),
Ls (Left Surround) /Rs (Right Surround)
Setting contents: 0.0 to 1.0 (in 0.05 steps)
] or [
Click either [Music] or [Movie] for “Dolby Pro Logic
II.”
] for “L/R Group.”
: Both R and L channels are set at the same value.
: Channels R and L can be set independently.
• When you select “
,” a message to confirm which of the R or L
channel set up values is to be applied will be displayed. Click either
[LEFT] or [RIGHT].
5
2
Adjust the level for each channel. Drag [
] for
“EUPHONY Output Level” or click [ ] or [ ].
Music: Suits stereo TV shows and all programs encoded in
Dolby Surround. Creates a sound field directivity
near that of discrete 5.1-channel sound.
Movie: Can be used for all stereo music recordings, and
provides a wide, deep sound field.
• For details on Dolby Pro Logic II, see page 61.
• This function only works with 2-channel signals.
Setting channel: C (Center), L (Left Front) / R (Right Front),
Ls (Left Surround) /Rs (Right Surround)
Setting contents: -12 to 0 dB (in 0.05 steps)
Autogood products «130»
31-EN
01GB06PXAH800.fm
ALPINE PXA-H800_EN 68-13530Z65-A (B5)
01GB00PXAH800.book Page 32 Tuesday, February 8, 2011 9:04 PM
From a PC
Adjusting the Center Width (Center Width)
When you select “Music” for “Dolby Pro Logic II,” you can further
adjust the center width in the following steps. This function offers the
optimum vocal position by adjusting the center channel position
between the center speaker and the L/R speaker. (The adjustments
established in “Adjusting the Acoustic Image (BI-PHANTOM)”
(page 33) are ineffective while this function is activated.) (Initial setting:
“OFF”, “Level 0”)
1
2
Mixing the Low Range Audio for the Rear (Rear Mix) (page 33)
Achieving smooth sound in the rear seat by mixing the front
audio signals with the rear speaker signals.
Achieving Powerful High Volume Sound (Listening Mode)
(page 34)
Click [ON] for “Dolby Pro Logic II” - “Center Width.”
Click [
Achieving energetic sound with even greater power, like the
sound in a movie theater.
] and select and click a level.
Adjusting the DVD Level (DVD Level) (page 34)
Adjust the volume signal level in each of the Dolby Digital,
Dolby Pro Logic II, DTC and PCM modes.
Adjusting the Speaker Volume Level (Output Level) (page 33)
Level settings: Level 0 to Level 7
co
m
.u
a
Adjust each speaker’s volume so they are the same level.
When the level becomes higher, the center channel
localization shifts from the center speaker toward both
sides.
Storing the Preset Values (Preset Store) (page 12)
Storing all the settings and adjustments made on the PXAH800 (not only the above settings/adjusts) in the memory.
In case of combining the Automatic adjustments, etc.
Multi Channel Function Adjustment
Procedure
Multi Channel Setup
0.
• When the Center speaker is off in “Setting the Speaker System
(Output System Select)” (page 13)/ “Setting the Speakers (Speaker
Setup)/Setting the Subwoofers” (page 14), this item cannot be set.
13
Make the adjustments described below in order to reproduce Dolby
Digital and DTS sound with greater accuracy.
We recommend to make the Automatic adjustments before the Dolby
Surround adjustments.
These steps set multi channel playback.
1
Setting the 2-Channel Signal Playback Mode (2ch Playback
Mode) (page 30)
This sets the 2-channel signal playback mode.
Adjusting the Acoustic Image (BI-PHANTOM) (page 33)
Adjusting the acoustic image to achieve a sound as if the
center speaker were directly in front of the listener.
Click [Multi Ch. Setup] for [Shortcut] tab in the main
menu.
The Multi Channel Setup screen is displayed.
• When you click [Multi Channel Manager] on the Function switching
tab, and then [Multi Channel Setup], the Multi Channel Setup screen
will also be displayed. Refer to “Operating the Function Switching
Tab” (page 7).
2
Set and adjust each item.
Setting the Linear PCM (PCM Mode) (page 34)
You can choose either 2ch or 3ch for the playback output of a
disc recorded on the linear PCM.
Mixing the Low Range Audio of the Center with the Front L/R
(Center Bass Split) (page 34)
Turning this feature on makes the audio signals emitted from
the front L/R speakers mixed with the center audio signals
(low range).
32-EN
Setting item: Output Level/BI-PHANTOM/Rear Mix/Center
Bass Split/PCM Mode/Listening Mode/DVD
Level
Autogood products «130»
01GB06PXAH800.fm
ALPINE PXA-H800_EN 68-13530Z65-A (B5)
01GB00PXAH800.book Page 33 Tuesday, February 8, 2011 9:04 PM
From a PC
3
When setting is complete, click [Close Window].
• After the setting, it is recommended to store the setting contents on
the unit. For details, refer to “Storing the Preset Values (Preset
Store)” (page 12).
Adjusting the Speaker Volume Level
(Output Level)
The test tones guide you through the volume adjustments of the
different speakers. When levels are balanced, a strong sense of presence
can be heard from the different speakers at the listening position. (Initial
setting: “±0dB”)
1
Adjusting the Acoustic Image (BIPHANTOM)
To install a center speaker, it must be located in the dash, an equal
distance between the Left and Right speakers. In most cases, this is very
difficult to achieve. Using Bi-PHANTOM, a virtual center speaker is
created by sending the center channel information to both the Left and
Right speakers. Adjusting the center width in Dolby Pro Logic II
“Music” (see “Using Dolby Pro Logic II (Dolby Pro Logic II)” on
page 31), makes this function ineffective. (Initial setting: “OFF”,
“±0dB”)
1
Click [ON] for “BI-PHANTOM.”
Click [Start] for “Test Tone Output.”
Output Level screen will be displayed and the test tone is
produced from the left front speaker.
Turning this feature on creates the acoustic image in which
the center speaker is virtually located exactly in front of the
listener by sending the sound of the center speaker to both
sides.
Click [ ] for “Level” and select and click the level
you want from the pull-down menu.
co
m
.u
a
2
Level: -5 to +5 dB (in 1 dB step)
The level can be adjusted between -5 and +5. When the
level becomes greater, the acoustic image moves from the
center speaker location towards both sides.
2
Select a channel and click.
0.
Setting channel: Left/Center/Right/Right Surround/Left
Surround
3
13
• Channels to be set vary depending on the system set in “Setting the
Speaker System (Output System Select)” (page 13).
Adjust the speaker volumes for each channel to
make them equal while the test tone is output from
each channel. Drag [
] or click [ ] or [ ] to make
adjustments.
Level: -10 to +10 dB (in 1 dB steps)
Adjust based on the front speakers.
4
5
Repeat Steps 2 and 3 to set the level for each
channel.
• Avoid stopping, pausing, switching the disc, cueing, fast-forwarding
or switching the audio channel of this unit while making this
adjustment. The setting is cancelled if the decode mode is switched.
• When the Center speaker is off in “Setting the Speaker System
(Output System Select)” (page 13)/ “Setting the Speakers (Speaker
Setup)/Setting the Subwoofers” (page 14), this item cannot be set.
• Effective only for Dolby Pro Logic II, EUPHONY and DTS (with
Center signal).
Mixing the Low Range Audio for the Rear
(Rear Mix)
This function mixes the front channel audio signals with the audio
signals output from the rear speakers, improving the sound in the
vehicle’s rear seat. This is used in a system where there is no subwoofer
and the rear speakers can produce lower frequency sounds than the front
speakers. (Initial setting: “OFF”, “±0dB”)
1
Click [ON] for “ Rear Mix.”
To stop the test tone, click [Stop].
• Avoid stopping, pausing, switching the disc, cueing, fastforwarding or switching the audio channel of this unit while
making this adjustment. The setting is cancelled if the decode
mode is switched.
Turning this feature on mixes the audio signals output from
the rear speakers with the front audio signals.
2
Click [ ] for “Level” and select and click the level
you want from the pull-down menu.
Level: -6/-3/0/+3/+6 dB
The level can be adjusted in 5 steps. The higher the level,
the more the low range audio is output from the rear
speakers. (Depending on the software such as DVD, the
effect may vary.)
Autogood products «130»
33-EN
01GB06PXAH800.fm
ALPINE PXA-H800_EN 68-13530Z65-A (B5)
01GB00PXAH800.book Page 34 Tuesday, February 8, 2011 9:04 PM
From a PC
• Avoid stopping, pausing, switching the disc, cueing, fast-forwarding
or switching the audio channel of this unit while making this
adjustment. The setting is cancelled if the decode mode is switched.
• When the Rear speaker is off in “Setting the Speaker System (Output
System Select)” (page 13)/ “Setting the Speakers (Speaker Setup)/
Setting the Subwoofers” (page 14), this item cannot be set.
• Effective only for Dolby Pro Logic II, EUPHONY and DTS (with rear
signal).
Mixing the Low Range Audio of the Center
with the Front L/R (Center Bass Split)
Achieving Powerful High Volume Sound
(Listening Mode)
With Dolby Digital, the dynamic range is compressed so that powerful
sound can be achieved at regular volume levels. This compression can
be cancelled to achieve an energetic sound with even greater power, like
the sound in a movie theater. This function works only in the Dolby
Digital mode. (Initial setting: “Standard”)
1
Click [ ] for “Listening Mode” and click either
[Standard] or [Maximum] from the pull-down menu.
Turning on this function sends the Center channel low frequencies,
equally to the front Left and Right speakers. This enhances the overall
sound when using a small center speaker. This is used when the center
speaker has a small diameter and cannot produce low frequency sounds.
(Initial setting: “OFF”, “315 Hz”)
Standard: To enjoy the dynamic sound at regular volume
Maximum: To enjoy the dynamic sound at maximum volume
Click [ON] of “Center Bass Split.”
Turning this feature on mixes the audio signals output from
the rear speakers with the front audio signals.
2
• This feature is effective only for Dolby Digital.
• Use this feature at a volume level at which you can still hear sound
outside of the cabin.
• Depending on the types of source, such as DVD software, this feature
may be ineffective.
co
m
.u
a
1
Click [ ] for “Frequency” and select and click a
frequency you want from the pull-down menu.
Frequency:
200 Hz/225 Hz/250 Hz/280 Hz/315 Hz/350 Hz/400 Hz/450
Hz/500 Hz
The volume level for Dolby Digital, Dolby Pro Logic II, DTS,
EUPHONY and PCM modes can be set. (Initial setting: “±0dB”)
1
Click [ ] for “DVD Level” and select and click the
level of mode you want from the pull-down menu.
13
0.
• Avoid stopping, pausing, switching the disc, cueing, fast-forwarding
or switching the audio channel of this unit while making this
adjustment. The effect may not be recognized easily depending on the
decoding conditions.
• When the Center speaker is off in “Setting the Speaker System
(Output System Select)” (page 13)/ “Setting the Speakers (Speaker
Setup)/Setting the Subwoofers” (page 14), this item cannot be set.
• Effective only for Dolby Pro Logic II, EUPHONY and DTS (with
Center signal).
Adjusting the DVD Level (DVD Level)
Setting the Linear PCM (PCM Mode)
The output can be set to 2 or 3 channels when playing discs recorded in
linear PCM. (Initial setting: “2ch”)
1
Click [ ] for “PCM Mode” and click either [2ch] or
[3ch] from the pull-down menu.
Adjustment modes: Dolby Digital/Dolby Pro Logic II/DTS /
PCM/EUPHONY
Level:
-10 to +10 dB (in 1 dB steps)
• Avoid stopping, pausing, switching the disc, cueing, fast-forwarding
or switching the audio channel of this unit while making this
adjustment. The effect may not be recognized easily depending on the
decoding conditions.
2ch: 2ch Output (L/R)
3ch: 3ch Output (L/R/CENTER)
• When the Center speaker is off in “Setting the Speaker System
(Output System Select)” (page 13)/ “Setting the Speakers (Speaker
Setup)/Setting the Subwoofers” (page 14), this item cannot be set.
34-EN
Autogood products «130»
01GB06PXAH800.fm
ALPINE PXA-H800_EN 68-13530Z65-A (B5)
01GB00PXAH800.book Page 35 Tuesday, February 8, 2011 9:04 PM
From the Commander
• Please refer to the Owner's Manual of the head unit.
Basic Operation
Turning Power On and Off
FUNC.
When you turn on the power for the first time, to protect the speakers,
no sound is output until you select the system in “Setting the Speaker
System (System Select)” (page 37)/ “Setting the AUX Input System
(AUX Input Setup)” (page 39) and set them. First, set the speaker
system / input system.
You cannot turn power on/off from the PC. When an Ai-NET
compatible head unit is connected, the power of the unit is linked with
the power of the head unit.
SOURCE
1
VIEW
e About the Commander display
<Items that have been selected>
2
AUX 2
co
m
.u
a
Audio Adjustment
1
Initial System Start-Up
0.
Press RESET switch with a ballpoint pen or similar
pointed object.
13
Press the [Rotary encoder] repeatedly.
Select the adjusting mode.
SUBWOOFER*1
NAVI LEVEL*2
MX PLUS SETUP
(LEVEL ADJUSTMENT) *3
BALANCE
FADER
DEFEAT
VOLUME
SUBWOOFER
If the system stops working properly, turn the ignition switch to off, and
then on again. If the system still does not work properly, reset the unit.
<Right side>
Press and hold [SOURCE] for at least 2 seconds to
turn off the unit.
• Either switch will turn the power on.
• When the ignition key is turned to off, the power of the unit is also
turned off.
<Items that have not been selected>
1
Turn the ignition key to the ACC or ON position.
The power turns on.
Rotary encoder
*1 This is not displayed when the subwoofer is off.
*2 This is not displayed when “Mixing Navi Audio Guidance (Navi Mix
Setup)” (page 41) is off.
*3 This is not displayed when MX Plus is off.
2
Rotate the [Rotary encoder].
Select the level you want.
• Volume can be adjusted by rotating the rotary encoder without
selecting the Volume mode.
• If there is no operation within 5 seconds, the adjustment mode is
cancelled.
RESET switch
The system will be reset and restarted.
• Reset when power is off.
• Resetting does not erase the settings stored in the system.
Adjusting Subwoofer (SUBWOOFER)
Adjust the subwoofer output (Initial setting: “00”).
Using with Ai-NET Connections
Setting contents: 00 to 15
When the unit is connected to the head unit through Ai-NET, some
operations can be controlled with the head unit.
The following operations are controlled with the head unit. The
Commander and PC will no longer control these when the head unit is
connected.
• Turning Power On and Off (page 35)
• Switching the Sources (page 36)
• Adjusting Subwoofer/Balance/Fader/Volume (page 35, 36)
You can set Defeat (page 36) and Calling of the stored settings (Preset
Call) (page 37) with the head unit, Commander, or PC.
• When an Ai-NET compatible head unit is connected, the audio
settings are adjusted at the head unit and you cannot set them on the
unit itself.
Navigation Audio Volume Adjustment
(NAVI LEVEL)
Adjusts the Navigation audio guidance volume (Initial setting: “0 dB”).
Setting contents: -10 to +10 dB
Autogood products «130»
35-EN
01GB07PXAH800.fm
ALPINE PXA-H800_EN 68-13530Z65-A (B5)
01GB00PXAH800.book Page 36 Tuesday, February 8, 2011 9:04 PM
From the Commander
Adjusting the MX Plus Level (MX PLUS
SETUP/LEVEL ADJUSTMENT)
Adjust the MX Plus level. In the Ai-NET mode, the adjustment is
performed for the current source (Initial setting: “OFF” / “Non Effect”).
When an Ai-NET compatible head unit is connected:
Setting item:
DVD: OFF/Cinema/Action/Music
AUX/Others: OFF/Compressed/Music/
DVD
CD/Compressed Data/FM/Digital Radio:
OFF/Level1/Level2/Level3
1
Press [SOURCE].
Each push switches the source.
AUX1
AUX2
AUX3
Ai-NET(HU)
DIGITAL1
DIGITAL2
AUX1
Ai-NET(CHG)
• The number of analog signal inputs varies depending on the setting
in “Setting the AUX Input System (AUX Input Setup)” (page 39).
• Only the sources set as ON in “Setting the AUX Input (AUX IN)”
(page 39) and “Setting the Digital Input (Digital AUX)” (page 40)
are displayed.
• Names selected in “Naming the AUX Input (AUX Name)” (page 41)
are displayed as the source names.
Storing the Preset Values (Preset Store)
When an Ai-NET compatible head unit is not connected:
Setting item:
Non Effect/Compressed 1/Compressed 2/
Compressed 3/Music 1/Music 2/Music 3/
Cinema/Action/Drama/Talk
• For MX Plus, refer to “Setting the MX Plus (Ai-NET Mode)”
(page 44) and “Setting the MX Plus (Standalone Mode)” (page 45).
Adjustment/Setup items
Adjust the Right and Left speaker volume (Initial setting: “0”).
Setting contents: L (Left) 15 to 0 (Center) to R (Right) 15
• When an Ai-NET compatible head unit is connected, the audio
settings are adjusted at the head unit and you cannot set them on the
unit itself.
Adjusting Fader (Between Front and Rear)
(FADER)
0.
Adjust the Front and Rear speaker volume (Initial setting: “0”).
Setting contents: F (Front) 15 to 0 (Center) to R (Rear) 15
13
• When an Ai-NET compatible head unit is connected, the audio
settings are adjusted at the head unit and you cannot set them on the
unit itself.
Setting Defeat (DEFEAT)
When is set to “ON”, the settings for ImprintEQ, Graphic EQ,
Parametric EQ, MX Plus, RoadEQ, and Time Collection are restored to
the initial values (Initial setting: “OFF”).
Setting contents: ON/OFF
Adjusting Volume (VOLUME)
Adjust the volume (Initial setting: “-∞ dB”).
Setting contents: -∞ to 0.0 dB
• When an Ai-NET compatible head unit is connected, the audio
settings are adjusted at the head unit and you cannot set them on the
unit itself.
37
Setting the Speakers(Speaker Setup)
Setting the Subwoofer Output (SW Channel)
38
38
Setting the AUX Input System (AUX Input Setup)
Setting the AUX Input (AUX IN)
39
39
Setting the Digital Input (Digital AUX)
Setting the AUX Volume Input Level (AUX IN Gain)
40
40
Adjusting the AUX Volume Level (AUX Level)
Naming the AUX Input (AUX Name)
40
41
Turning ImprintEQ On/Off
42
Turning RoadEQ On/Off
43
Setting the MX Plus (Ai-NET Mode)
Setting the MX Plus (Standalone Mode)
44
45
Setting the Equalizer Mode (EQ Mode)
Setting the Graphic EQ
46
46
Setting the Parametric EQ
47
Adjusting X-Over and Switching the Phases
49
Adjusting the Time Correction (TCR)
Setting the 2-Channel Signal Playback Mode (Mode)
50
52
Setting EUPHONY (EUPHONY)
Using Dolby Pro Logic II (Dolby PLII)
52
53
Adjusting the Center Width (Center Width)
Adjusting the Speaker Volume Level (Output Level)
53
54
Adjusting the Acoustic Image (BI-PHANTOM)
Mixing the Low Range Audio for the Rear (Rear Mix)
55
55
Mixing the Low Range Audio of the Center with the Front
L/R (Center Bass Split)
56
Setting the Linear PCM (PCM Mode)
Achieving Powerful High Volume Sound (Listening Mode)
56
56
Adjusting the DVD Level (DVD Level)
57
1
2
3
4
Switching the Sources
Pages
Setting the Speaker System (System Select)
co
m
.u
a
Adjusting Balance (Between Left and
Right) (BALANCE)
You can store up to 6 sets of the adjustment/setting values. All of the
following adjustment/setting values are stored in a single preset
memory.
Adjust the value you want to store and set it.
Press [FUNC.].
Rotate the [Rotary encoder] to select “Preset,” and
then press the [Rotary encoder].
Rotate the [Rotary encoder] to select “Store,” and
then press the [Rotary encoder].
The unit accepts up to five analog signal input lines and 2 digital signal
input lines. For the connection, refer to the installation manual.
When an Ai-NET compatible head unit is connected, the source should
be switched at the head unit. This feature is disabled on the Commander.
36-EN
Autogood products «130»
01GB07PXAH800.fm
ALPINE PXA-H800_EN 68-13530Z65-A (B5)
01GB00PXAH800.book Page 37 Tuesday, February 8, 2011 9:04 PM
From the Commander
Only for the initial startup:
1
5
Press the [FUNC.] or [Rotary encoder].
The Output System selection screen is displayed. Go to
Step 3.
Select one from “P.1” through “P.6” by rotating the
[Rotary encoder], and press the [Rotary encoder].
1
2
3
The data is stored in the selected preset number.
Press [FUNC.].
Rotate the [Rotary encoder] to select “Output
Setup,” and then press the [Rotary encoder].
Rotate the [Rotary encoder] to select “System
Select,” and then press the [Rotary encoder].
• The function is operable when Defeat is set to OFF.
• The stored contents are not deleted even when resetting the unit or
disconnecting the battery.
Recalling a Stored Setting (Preset Call)
1
2
4
Rotate the [Rotary encoder] to select a system, and
then press the [Rotary encoder].
co
m
.u
a
The preset memory stores various setting/adjustment information. Thus,
it takes some time to call data from the preset memory.
The Output System selection screen is displayed.
Press and hold [VIEW] for at least 2 seconds.
Select a preset from “P.1” through “P.6” by rotating
the [Rotary encoder], and press the [Rotary
encoder].
The values of the selected preset number are retrieved.
4.2ch system
(Front2Way+Rear+Subwoofer)
F-3way+SW:
2.2ch system (Front3Way+Subwoofer)
F-3way+R:
4.0ch system (Front3Way+Rear)
F-2way+R+C+SW: 5.1ch system
(Front2Way+Rear+Center+Subwoofer)
• Refer to Table 1 (Output System) in “System Configuration”
(page 60).
5
Select “OK” by rotating the [Rotary encoder] when a
confirmation message appears, and press the
[Rotary encoder].
13
0.
• You can call the Preset even by the following procedure:
1 Press [FUNC.].
2 Rotate the [Rotary encoder] to select “Preset, ” and then
press the [Rotary encoder].
3 Rotate the [Rotary encoder] to select “Call,” and then
press the [Rotary encoder].
4 Select a preset from “P.1” through “P.6” by rotating the
[Rotary encoder], and press the [Rotary encoder].
The values of the selected preset number are retrieved.
F-2way+R+SW:
• The function is operable when Defeat is set to OFF.
• If the speaker system in the preset and the current speaker system do
not match, the preset cannot be retrieved.
• If the AUX input system in the preset and the current AUX input
system do not match, the items concerning the AUX input system are
unavailable for retrieval.
The Speaker Setup screen is displayed.
• When “OK” is selected, the audio output is stopped until the ignition
key is turned on/off.
6
Turn off any unconnected speakers. Rotate the
[Rotary encoder] to select “ON” or “OFF,” etc., and
then press the [Rotary encoder].
Setting the Speaker System (System
Select)
First, set the system and the speakers. Unless you set the system, you
cannot set any features. Be sure to set the system first. If the selected
system and the connections of the speakers do not match, the speakers
may be damaged. Make sure to check the connections of the speakers
before selecting the system.
Repeat the steps until all the speakers are set.
FRONT HIGH*1:
FRONT LOW:
REAR:
CENTER:
SUBWOOFER(1, 2):
SW CHANNEL:
Autogood products «130»
OFF/Tweeter/Full
OFF/ON
OFF/ON
OFF/ON
OFF/ON
Mono/Stereo*2
37-EN
01GB07PXAH800.fm
ALPINE PXA-H800_EN 68-13530Z65-A (B5)
01GB00PXAH800.book Page 38 Tuesday, February 8, 2011 9:04 PM
From the Commander
*1 When you modify the “FRONT HIGH” speaker setting to [Full], a
message to confirm the change will be displayed. To set up at “Full
Range,” rotate the [Rotary encoder] to select “OK”, and then press
the [Rotary encoder]. Make sure the speaker being used for this
output is able to handle a full range source. Many tweeters can be
damaged when driven by a full range signal.
2 This item is enabled for setup only when 2 subwoofers are connected.
*
Rotate the [Rotary encoder] to select “Stereo” or “Mono”, and then
press the [Rotary encoder].
Stereo: Subwoofer stereo (L/R) output
Mono: Subwoofer monaural output
• Speakers that cannot be turned off are disabled for setup. Refer to
Table 1 (Output System) in “System Configuration” (page 60).
• When you connect just one subwoofer, turn off “Subwoofer2.”
7-1First time start-up:
The AUX Input System Select screen will be
automatically displayed. Continue to set, referring to
“Setting the AUX Input System (AUX Input Setup)”
(page 39).
7-2Subsequent start-up:
Rotate the [Rotary encoder] to select “ON” or “OFF,”
etc., and then press the [Rotary encoder].
Repeat the steps until all the speakers are set.
Front High*:
Front Low:
Rear:
Center:
Subwoofer(1, 2):
OFF/Tweeter/Full
OFF/ON
OFF/ON
OFF/ON
OFF/ON
* When you modify the “Front High” speaker setting to [Full], a
message to confirm the change will be displayed. To set up at “Full
Range,” rotate the [Rotary encoder] to select “OK”, and then press
the [Rotary encoder]. Make sure the speaker being used for this
output is able to handle a full range source. Many tweeters can be
damaged when driven by a full range signal.
• When you connect just one subwoofer, turn off “Subwoofer2.”
6
7
To set up other speakers, press [
Steps 4 and 5.
] and repeat
When the setting is complete, press and hold [
for at least 2 seconds.
]
• If [
] is pressed during setting, the unit returns to the previous
item.
• When the speaker setting is changed while ImprintEQ/RoadEQ is on,
ImprintEQ/RoadEQ will be turned off after a confirmation message
is displayed.
• After the setting, it is recommended to store the setting contents on
the unit. For details, refer to “Storing the Preset Values (Preset
Store)” (page 36).
co
m
.u
a
The “Turn ACC Off” screen will be displayed. Turn the
ignition key to off and then on again. The settings
become effective.
5
• If [
] is pressed during setting, the unit returns to the previous
item.
• If the speaker system is changed, all setup values except those for
AUX input will be restored to the initial setup values.
• You can also set the speakers from “Setting the Speakers (Speaker
Setup)” (page 38).
• You can also set the subwoofer output from “Setting the Subwoofer
Output (SW Channel)” (page 38).
• After the setting, it is recommended to store the setting contents on
the unit. For details, refer to “Storing the Preset Values (Preset
Store)” (page 36).
1
2
3
Press [FUNC.].
13
Turn on the connected speakers.
0.
Setting the Speakers (Speaker Setup)
Rotate the [Rotary encoder] to select “Output
Setup,” and then press the [Rotary encoder].
Setting the Subwoofer Output (SW
Channel)
You can set the subwoofer output to stereo or monaural. Make sure to
set the correct output for your subwoofer type. (Initial Setting: “Mono”)
1
2
3
Press [FUNC.].
Rotate the [Rotary encoder] to select “Output
Setup,” and then press the [Rotary encoder].
Rotate the [Rotary encoder] to select “SW Channel,”
and then press the [Rotary encoder].
Rotate the [Rotary encoder] to select “Speaker
Setup,” and then press the [Rotary encoder].
The Subwoofer Channel selection screen is displayed.
4
The Speaker selection screen is displayed.
4
Rotate the [Rotary encoder] to select “Mono” or
“Stereo,” and then press the [Rotary encoder].
Rotate the [Rotary encoder] to select the speaker to
be set, and then press the [Rotary encoder].
Setting contents: Front High/Front Mid/Front Low/Rear/
Center/Subwoofer (1, 2)
• Speakers to be set vary depending on the system set in “Setting the
Speaker System (System Select)” (page 37).
• Speakers that cannot be turned off are disabled for setup. Refer to
Table 1 (Output System) in “System Configuration” (page 60).
38-EN
Mono: Subwoofer monaural output
Stereo: Subwoofer stereo (L/R) output
Autogood products «130»
01GB07PXAH800.fm
ALPINE PXA-H800_EN 68-13530Z65-A (B5)
01GB00PXAH800.book Page 39 Tuesday, February 8, 2011 9:04 PM
From the Commander
5
When the setting is complete, press and hold [
for at least 2 seconds.
]
• Only when two subwoofers are connected in “Setting the Speaker
System (System Select)” (page 37)/“Setting the Speakers (Speaker
Setup)” (page 38), is this item able to be set.
• If [
] is pressed during setting, the unit returns to the previous
item.
• After the setting, it is recommended to store the setting contents on
the unit. For details, refer to “Storing the Preset Values (Preset
Store)” (page 36).
Setting the AUX Input System (AUX Input
Setup)
This step sets the six channel Analog (RCA) input of the unit. The input
volume levels can also be set.
At the initial startup, the AUX Input System Select screen is
displayed automatically after the speakers are set. Go to Step 3.
3
The settings become effective.
• If [
] is pressed during setting, the unit returns to the previous
item.
• Gain can also be set in “Setting the AUX Volume Input Level (AUX
IN Gain)” (page 40).
• When the AUX input system is changed, all the setup values for AUX
input will be restored to the initial setup values.
• After the setting, it is recommended to store the setting contents on
the unit. For details, refer to “Storing the Preset Values (Preset
Store)” (page 36).
Setting the AUX Input (AUX IN)
A TV or VCR with RCA audio output can be connected to the unit.
Select OFF for the external input not connected (Initial setting: “ON”).
Press [FUNC.].
1
2
Rotate the [Rotary encoder] to select “Input Setup,”
and then press the [Rotary encoder].
3
Rotate the [Rotary encoder] to select “AUX Input
Setup,” and then press the [Rotary encoder].
The AUX Input setup screen is displayed.
4
The “Turn ACC Off” screen will be displayed. Turn
the ignition key to and then on again.
Press [FUNC.].
Rotate the [Rotary encoder] to select “Input Setup,”
and then press the [Rotary encoder].
co
m
.u
a
1
2
7
Rotate the [Rotary encoder] to select “AUX IN,” and
then press the [Rotary encoder].
The AUX selection screen is displayed.
4
Rotate the [Rotary encoder] to select the desired
system, and then press the [Rotary encoder].
Select the AUX you want to set by rotating the
[Rotary encoder], and press the [Rotary encoder].
Settings item:
0.
AUX1 (Front Left, Front Right, Rear Left,
Rear Right, Center, Subwoofer)
4ch&2ch Input: AUX1 (Front Left, Front Right, Rear Left,
Rear Right)/AUX2 (Left, Right)
2ch×3 Input: AUX1 (Left, Right)/AUX2 (Left, Right)/AUX3
(Left, Right)
13
5.1ch Input:
• Refer to Table 2 (Input Configuration) in “System Configuration”
(page 60).
5
AUX 2/AUX 3/Ai-NET(HU)/Ai-NET(CHG)
• AUX1 cannot be set.
• If you connect Ai-NET/RCA Interface cable (KCA-121B) to the
terminals of the device Head Unit input terminal (Ai-NET input) /
Changer input terminal (Ai-NET input), you can use it as AUX.
• The number of AUX varies depending on the AUX Input Setup
(page 39).
5
Rotate the [Rotary encoder] to select “ON” or “OFF”,
and then press the [Rotary encoder].
Select “OK” by rotating the [Rotary encoder] when a
confirmation message appears, and press the
[Rotary encoder].
The AUX IN Gain Setup screen is displayed.
• When “OK” is selected, the audio output is stopped until the ignition
key is turned on/off.
6
Select either “High” or “Low” for each AUX by
rotating the [Rotary encoder], and press the [Rotary
encoder].
High: When the volume level of the external input is high.
Low: When the volume level of the external input is low.
6
7
To set another AUX, press [
and 5.
] and repeat Steps 4
When the setting is complete, press and hold [
for at least 2 seconds.
]
• When an Ai-NET compatible head unit is connected, external input of
the PXA-H800 becomes unavailable, and this setting will be
disabled.
• If [
] is pressed during setting, the unit returns to the previous
item.
• After the setting, it is recommended to store the setting contents on
the unit. For details, refer to “Storing the Preset Values (Preset
Store)” (page 36).
Autogood products «130»
39-EN
01GB07PXAH800.fm
ALPINE PXA-H800_EN 68-13530Z65-A (B5)
01GB00PXAH800.book Page 40 Tuesday, February 8, 2011 9:04 PM
From the Commander
4
Setting the Digital Input (Digital AUX)
A TV or VCR with RCA audio output can be connected to the unit.
Select OFF for any external input that is not connected (Initial setting:
“ON”).
1
2
3
Settings item:
Rotate the [Rotary encoder] to select “Digital AUX,”
and then press the [Rotary encoder].
High: When the volume level of the external input is high.
Low: When the volume level of the external input is low.
Rotate the [Rotary encoder] to select “Digital 1,” and
then press the [Rotary encoder].
6
7
9
] and repeat Steps 4
When the setting is complete, press and hold [
for at least 2 seconds.
]
• If [
] is pressed during setting, the unit returns to the previous
item.
• After the setting, it is recommended to store the setting contents on
the unit. For details, refer to “Storing the Preset Values (Preset
Store)” (page 36).
co
m
.u
a
8
To set another AUX, press [
and 5.
Adjusting the AUX Volume Level (AUX
Level)
Press [
].
Rotate the [Rotary encoder] to select “Digital 2,” and
then press the [Rotary encoder].
Rotate the [Rotary encoder] to select “ON” or “OFF,”
and then press the [Rotary encoder].
0.
6
7
Rotate the [Rotary encoder] to select “ON” or “OFF,”
and then press the [Rotary encoder].
When the setting is complete, press and hold [
for at least 2 seconds.
You can adjust the volume signal level of the external RCA input.
Adjust this when the volume is higher or lower compared to that of the
optical digital product. (Initial setting: “0 dB”)
1
2
]
13
5
Rotate the [Rotary encoder] to select “High” or
“Low”, and then press the [Rotary encoder].
Rotate the [Rotary encoder] to select “Input Setup,”
and then press the [Rotary encoder].
The AUX selection screen is displayed.
4
AUX 1, AUX2, AUX 3
• The number of AUX varies depending on the AUX Input Setup
(page 39).
5
Press [FUNC.].
Select the AUX you want to set by rotating the
[Rotary encoder], and press the [Rotary encoder].
• When an Ai-NET compatible head unit is connected, external input of
the PXA-H800 becomes unavailable, and this setting will be
disabled.
• If [
] is pressed during setting, the unit returns to the previous
item.
• After the setting, it is recommended to store the setting contents on
the unit. For details, refer to “Storing the Preset Values (Preset
Store)” (page 36).
Setting the AUX Volume Input Level
(AUX IN Gain)
3
Press [FUNC.].
Rotate the [Rotary encoder] to select “Input Setup,”
and then press the [Rotary encoder].
Rotate the [Rotary encoder] to select “AUX Level,”
and then press the [Rotary encoder].
The AUX Selection screen is displayed.
4
Select the AUX you want to set by rotating the
[Rotary encoder], and press the [Rotary encoder].
Settings item:
AUX 1/AUX 2/AUX 3/Ai-NET(HU)/AiNET(CHG)
• The number of AUX varies depending on the AUX Input Setup
(page 39).
5
Adjust the volume level by rotating the [Rotary
encoder].
If the external input audio becomes distorted, select High. (Initial
setting: “High”)
1
2
3
Press [FUNC.].
Rotate the [Rotary encoder] to select “Input Setup,”
and then press the [Rotary encoder].
Rotate the [Rotary encoder] to select “AUX IN Gain,”
and then press the [Rotary encoder].
Setting contents: -10 to +10 dB
6
To set another AUX, press [
and 5.
] and repeat Steps 4
The AUX selection screen is displayed.
40-EN
Autogood products «130»
01GB07PXAH800.fm
ALPINE PXA-H800_EN 68-13530Z65-A (B5)
01GB00PXAH800.book Page 41 Tuesday, February 8, 2011 9:04 PM
From the Commander
7
When the setting is complete, press and hold [
for at least 2 seconds.
]
• If [
] is pressed during setting, the unit returns to the previous
item.
• After the setting, it is recommended to store the setting contents on
the unit. For details, refer to “Storing the Preset Values (Preset
Store)” (page 36).
Naming the AUX Input (AUX Name)
When you connect an external input product, you can assign it a name
of your choice. After setting the value to ON in “Setting the AUX Input
(AUX IN)” (page 39), “Setting the Digital Input (Digital AUX)”
(page 40), set this item (Initial setting: “Auxiliary”).
3
3
Press [FUNC.].
Rotate the [Rotary encoder] to select “Input Setup,”
and then press the [Rotary encoder].
Rotate the [Rotary encoder] to select “Navi Mix
Setup,” and then press the [Rotary encoder].
The NAVI MIX SETUP screen is displayed.
Rotate the [Rotary encoder] to select “Input Setup,”
and then press the [Rotary encoder].
4
Rotate the [Rotary encoder] to select “ON” or “OFF,”
and then press the [Rotary encoder].
Rotate the [Rotary encoder] to select “AUX Name,”
and then press the [Rotary encoder].
Select the AUX you want to set by rotating the
[Rotary encoder], and press the [Rotary encoder].
Settings item:
OFF: No mixing of the navigation voice guidance.
ON: Navigation voice guidance is mixed.
AUX 1/AUX 2/AUX 3/Ai-NET(HU)/AiNET(CHG)/Digital 1/Digital 2
• If you select [ON], set the setting value.
5
• The number of AUX varies depending on the AUX Input Setup
(page 39).
Select from “Auxiliary,” “TV,” “EXT.DVD,” “Portable,”
and “Game” by rotating the [Rotary encoder], and
press the [Rotary encoder].
Press [
] for at least 2 seconds to go back to the
normal mode, and repeatedly press the [Rotary
encoder].
The NAVI LEVEL adjustment screen will be displayed.
6
Rotate the [Rotary encoder] to make adjustment.
6
7
13
0.
5
1
2
Press [FUNC.].
The AUX selection screen is displayed.
4
When a navigation system is connected, its voice guidance will be
mixed with the system and output from the front speakers (Initial
setting: “OFF”). You can adjust the navigation guidance volume. (Initial
setting: “0 dB”)
co
m
.u
a
1
2
Mixing Navi Audio Guidance (Navi Mix
Setup)
To set another AUX, press [
and 5.
] and repeat Steps 4
When the setting is complete, press and hold [
for at least 2 seconds.
]
• When an Ai-NET compatible head unit is connected, the audio
settings are adjusted at the head unit, and you cannot set them on the
unit itself.
• If [
] is pressed during setting, the unit returns to the previous
item.
• After the setting, it is recommended to store the setting contents on
the unit. For details, refer to “Storing the Preset Values (Preset
Store)” (page 36).
Setting contents: -10 to +10 dB
7
When the setting is complete, press [
].
• If [
] is pressed during setting, the unit returns to the previous
item.
• For the connection of a navigation system, refer to the installation
manual.
Autogood products «130»
41-EN
01GB07PXAH800.fm
ALPINE PXA-H800_EN 68-13530Z65-A (B5)
01GB00PXAH800.book Page 42 Tuesday, February 8, 2011 9:04 PM
From the Commander
Measurement sequence for the automatic measurement
functions
Automatic
Measurement
Function
Perform the automatic measurement in the following sequence.
When ImprintEQ is used:
First, ImprintEQ, then RoadEQ.
When ImprintEQ is not used:
First, AutoTCR, then RoadEQ.
• When ImprintEQ is used, AutoTCR is not required.
• When ImprintEQ and AutoTCR are performed after RoadEQ, reperform RoadEQ.
FUNC.
Turning ImprintEQ On/Off
ImprintEQ setting is performed on a PC. The commander can only
switch the ImprintEQ memory settings.
1
Press and hold [FUNC.] for at least 2 seconds.
The memory setting switches with each press.
ImprintEQ 1
ImprintEQ 2
ImprintEQ OFF
ImprintEQ 1
Rotary encoder
co
m
.u
a
ImprintEQ 1/ImprintEQ 2: ImprintEQ ON mode
• Memory settings that do not include ImprintEQ measurement data
are skipped.
• For further details on ImprintEQ, refer to PC Operation Section
“Setting ImprintEQ” (page 17).
Before Performing Automatic
Measurement
This unit is equipped with ImprintEQ, RoadEQ, and AutoTCR as
automatic measurement functions.
• The Commander cannot set ImprintEQ setup. Refer to PC Operation
Section “Setting ImprintEQ” (page 17).
WARNING
13
0.
• Do not perform automatic measurement while the vehicle is
running.
Do not perform automatic measurement while the vehicle is
running. Automatic measurement requires microphones to be
installed in the cabin to measure acoustic characteristics, and
the speakers may output loud noise for measurement. This
may interfere with safe driving and lead to an accident.
Be sure to read before performing the automatic
measurement.
• The automatic measurement should be performed in a quiet place
with the engine, air-conditioner, and heater turned off. If a mobile
phone or car phone is installed in the vehicle, move them outside of
the cabin, or turn the power off. Sound other than the measuring
sound (ambient noise around the vehicle, engine noise, and
ringtones) may interfere with measurement, resulting in inaccurate
measurement of the acoustic characteristics of the cabin.
• Be aware that the battery may be drained if you use the unit for an
extended period of time without running the engine.
• The microphone supplied with this product is specifically designed
for this type of measurement. Use of any other microphone will give
poor or no results. Use of microphones other than the one supplied is
not recommended.
• If the system is equipped with a power amplifier with input level
control or a powered subwoofer, the measurement may not be
possible if the input level is set low. However, to perform correct
measurement, the input level should not be set too high.
• For a power amplifier with low-pass filter, turn off the low-pass filter
of the power amplifier to make measurement. The low-pass filter in
the powered subwoofer or the power amplifier for a subwoofer
should be set at the highest cutoff frequency.
42-EN
Adjusting the Time Correction
Automatically (Auto TCR)
A vehicle poses a unique listening environment. Speaker distances vary
widely to each listening position. These special conditions can be
overcome using the included microphone and the powerful
measurement system in this processor. The processor measures and
analyzes data automatically to optimize time correction for each speaker
and listening position selected.
1
Preparing for measurement.
•
•
•
•
2
Park the vehicle in a quiet location.
Close doors, windows, sunroof, etc.
Turn the air-conditioner and heater OFF.
Turn off the engine of the vehicle.
Preparing the microphone.
Place the microphone at the listening position (driver’s seat,
etc.). A camera tripod is recommended for this purpose.
• The microphone should be placed at shoulder height.
• When you save the measurement data values for various listening
positions in the preset, you can easily load one of them as necessary.
3
Turn the ignition switch of the vehicle to ACC (On).
• If an air-conditioner or heater is turned on, turn it off. Measurement
should not be performed if air-conditioner or heater noise is present.
4
5
Press [FUNC.].
Rotate the [Rotary encoder] to select “Sound Field
Adj.,” and then press the [Rotary encoder].
Autogood products «130»
01GB07PXAH800.fm
ALPINE PXA-H800_EN 68-13530Z65-A (B5)
01GB00PXAH800.book Page 43 Tuesday, February 8, 2011 9:04 PM
From the Commander
6
Rotate the [Rotary encoder] to select “Auto TCR,”
and then press the [Rotary encoder].
5
6
Rotate the [Rotary encoder] to select “RoadEQ,” and
then press the [Rotary encoder].
Rotate the [Rotary encoder] to select “Calibration,”
and then press the [Rotary encoder].
The AUTO TCR screen is displayed.
7
Press the [Rotary encoder].
Countdown will start.
The CALIBRATION screen is displayed.
7
• If you want to stop measurement, press [
].
• If the microphone is not connected, “No Mic” will be displayed and
the measurement will not be carried out. Press [
] or [Rotary
Encoder] to cancel the indication.
8
Countdown will start.
During the 10 second countdown, go outside the vehicle
and close the door.
A test signal will be output from the speakers to measure the
acoustic characteristics of the cabin. Do not open any
doors until the screen indicates “Finished.” If external noise
interferes with the measurement, the “Calibration Error”
message will appear on the screen. In this case, click
[Rotary encoder] again to re-measure.
• If you want to stop measurement, press [
].
• If the microphone is not connected, “No Mic” will be displayed and
the measurement will not be carried out. Press [
] or [Rotary
Encoder] to cancel the indication.
co
m
.u
a
During the 10 second countdown, go outside the vehicle
and close the door.
A test signal will be output from the speakers to measure the
acoustic characteristics of the cabin. Do not open any
doors until the screen indicates “Finished.” If external noise
interferes with the measurement, the “Calibration Error”
message will appear on the screen. In this case, click
[Rotary encoder] again to re-measure.
Press the [Rotary encoder].
When “Finished” appears, press [Rotary encoder].
13
0.
• This function is not available when Defeat is set to ON.
• Measurement of Auto TCR takes approximately 5 minutes.
• Auto TCR measurement result overwrites the manual TCR
measurement result.
• Sound may arrive at the listening position at slightly different times,
depending on the speaker and enclosure. To compensate for this, the
distance can be adjusted to be larger than the actual distance.
• After the setting, it is recommended to store the setting contents on
the unit. For details, refer to “Storing the Preset Values (Preset
Store)” (page 36).
Adjusting for Road Noise (RoadEQ)
RoadEQ (REAL-TIME OPTIMIZED ADAPTIVE DRIVING EQ) is a
function to automatically adjust the EQ properties in accordance with
the road noise while driving.
8
When “Finished” appears, press [Rotary encoder].
• This function is not available when Defeat is set to ON.
• Measurement of RoadEQ takes approximately 7 minutes.
• When you select “Calibration” again, the previous setup data will be
erased when count-down is started.
• Measurement values will not be lost in the event the system is reset or
battery power is disconnected.
Turning RoadEQ On/Off
When automatic measurement is completed, RoadEQ can be turned on
or off and its level can be selected.
1
2
3
Press [FUNC.].
Rotate the [Rotary encoder] to select “Road EQ,”
and then press the [Rotary encoder].
Rotate the [Rotary encoder] to select “Level
Adjustment,” and then press the [Rotary encoder].
The Road Equalizer compensates for constantly changing noise, so
always keep the microphones connected.
1
Preparing for measurement.
•
•
•
•
2
Park the vehicle in a quiet location.
Close doors, windows, sunroof, etc.
Turn the air-conditioner and heater OFF.
Turn off the engine of the vehicle.
The LEVEL ADJUSTMENT screen is displayed.
Preparing the microphone.
Refer to the installation manual.
3
Turn the ignition switch of the vehicle to ACC (On).
• If an air-conditioner or heater is turned on, turn it off. Measurement
should not be performed if air-conditioner or heater noise is present.
4
Press [FUNC.].
Autogood products «130»
43-EN
01GB07PXAH800.fm
ALPINE PXA-H800_EN 68-13530Z65-A (B5)
01GB00PXAH800.book Page 44 Tuesday, February 8, 2011 9:04 PM
From the Commander
4
Select one from “OFF” and “Level 1” through “Level
3” by rotating the [Rotary encoder], and press the
[Rotary encoder].
Audio Setup/
Adjustment
CHANNEL
Level 1: Low correction level. Suitable for quiet vehicles.
Level 2: Moderate correction level.
Level 3: High correction level. Suitable for high speed
driving.
• If you do not use RoadEQ is not used, select “OFF”.
5
When the setting is complete, press and hold [
for at least 2 seconds.
]
FUNC.
MUTE
Rotary encoder
Setting the MX Plus (Ai-NET Mode)
co
m
.u
a
• If [
] is pressed during setting, the unit returns to the previous
item.
• If measurement is not yet completed, or no microphone is connected,
this setup is disabled.
• When you change the speaker setting of On/Off, RoadEQ
automatically becomes off. When you have changed the speaker
settings, start the measurement step over again.
• After the setting, it is recommended to store the setting contents on
the unit. For details, refer to “Storing the Preset Values (Preset
Store)” (page 36).
MX (Media Xpander) Plus enhances the vocal and instrumental sounds
for music sources such as radio/CD/MP3, by generating harmonics lost
during digital processing. This high frequency compensation adds
clarity and detail normally lost to road noise.
This feature becomes enabled when an Ai-NET compatible head unit
with MX Plus linking function is connected. If MX Plus mode is set for
each source beforehand, it automatically switches according to the
music source of the head unit.
13
0.
• When a head unit with the MX Plus linking function, such as INAW910, is connected, it should be set to Ai-NET mode. Other head
units should be set in the Standalone mode.
1
2
3
4
Press [FUNC.].
Rotate the [Rotary encoder] to select “MX Plus,” and
then press the [Rotary encoder].
Rotate the [Rotary encoder] to select “MX Plus
Setup,” and then press the [Rotary encoder].
Rotate the [Rotary encoder] to select “ON,” and then
press the [Rotary encoder].
• When you select [OFF], MX Plus for all music sources becomes
disabled.
5
Rotate the [Rotary encoder] to select “Ai-NET,” and
then press the [Rotary encoder].
MX Plus will become linked to the head unit.
• When a head unit without the MX Plus linking function is connected,
this should be set as “Standalone,” even if it is an Ai-NET compatible
head unit.
44-EN
Autogood products «130»
01GB07PXAH800.fm
ALPINE PXA-H800_EN 68-13530Z65-A (B5)
01GB00PXAH800.book Page 45 Tuesday, February 8, 2011 9:04 PM
From the Commander
6
7
8
Press [
] twice to go back to the screen for Step 3.
Rotate the [Rotary encoder] to select “Level
Adjustment,” and then press the [Rotary encoder].
Setting the MX Plus (Standalone Mode)
MX (Media Xpander) Plus enhances the vocal and instrumental sounds
for music sources such as radio/CD/MP3, by generating harmonics lost
during digital processing. This high frequency compensation adds
clarity and detail normally lost to road noise.
Select the source for the head unit by rotating the
[Rotary encoder], and press the [Rotary encoder].
In the Standalone mode, MX Plus does not become linked with the
source of the head unit. MX Plus should be set for each external input.
MX Plus mode will be switched, linked with the source switching of
PXA-H800.
1
2
CD/Compressed Data/FM/Digital Radio/DVD/AUX/Others
9
Select the level you want by rotating the [Rotary
encoder], and press the [Rotary encoder].
MX Plus level increases in the following order: 1
2
3.
FM (Level 1 to 3, OFF):
The medium to high frequencies become clearer, and produces well
balanced sound at all frequencies.
3
Press [FUNC.].
Rotate the [Rotary encoder] to select “MX Plus,” and
then press the [Rotary encoder].
Rotate the [Rotary encoder] to select “MX Plus
Setup,” and then press the [Rotary encoder].
co
m
.u
a
CD (Level 1 to 3, OFF):
CD mode processes a large amount of data during playback.
MX takes advantage of this large data quantity to reproduce a more
clear, clean output.
4
Compressed Data/Digital Radio (Level 1 to 3, OFF):
This corrects information that was lost at the time of compression.
This reproduces a well-balanced sound close to the original.
DVD (Cinema, Action, Music, OFF):
Rotate the [Rotary encoder] to select “ON,” and then
press the [Rotary encoder].
Cinema:
Movie dialogue is clearly reproduced. Action movies are
reproduced with more powerful sound.
When you select [OFF], MX Plus for all music sources
becomes disabled.
Music:
Lower register sounds (drums, bass, etc.) and vocals are
emphasized for clean and clear output.
If an Ai-NET compatible head unit is connected, go to
Step 5.
If an Ai-NET compatible head unit is not connected, go to
Step 6.
0.
Action:
Action movies are reproduced with more powerful sound.
13
AUX / Others (Compressed, Music, DVD, OFF):
MX mode suitable for the media (Compressed Data, Music,
DVD) can be selected.
10 To adjust another source, press [
5
] and repeat
Steps 8 through 9.
• You can listen with Defeat OFF (adjusted setup values) or with
Defeat ON (Initial value) to compare, by following the steps below.
1 Press and hold the [Rotary Encoder] for 2 seconds or
longer while in the adjustment mode.
2 Rotate the [Rotary Encoder] to switch on/off Defeat, and
listen to compare.
3 To exit, select “OFF” and then press [
].
11 When the setting is complete, press and hold [
Rotate the [Rotary encoder] to select “Standalone,”
and then press the [Rotary encoder].
• When a head unit without the MX Plus linking function is connected,
this should be set as “Standalone,” even if it is an Ai-NET compatible
head unit.
6
7
Press [
] once or twice to go back to the screen
for Step 3.
Rotate the [Rotary encoder] to select “Level
Adjustment,” and then press the [Rotary encoder].
]
for at least 2 seconds.
• If [
] is pressed during setting, the unit returns to the previous
item.
• To enable this function, Defeat should be is set to ON.
• After the setting, it is recommended to store the setting contents on
the unit. For details, refer to “Storing the Preset Values (Preset
Store)” (page 36).
8
Select the source for each external input by rotating
the [Rotary encoder], and press the [Rotary
encoder].
Autogood products «130»
45-EN
01GB07PXAH800.fm
ALPINE PXA-H800_EN 68-13530Z65-A (B5)
01GB00PXAH800.book Page 46 Tuesday, February 8, 2011 9:04 PM
From the Commander
9
Select the level you want by rotating the [Rotary
encoder], and press the [Rotary encoder].
EQ MODE
G.EQ
Compressed 1 to 3:
This corrects information lost in the compression process. This
reproduces a well-balanced sound close to the original. By
supplementing mid- to high- frequency sound data, the sound is
reproduced with more brightness and ambience.
Music 1 to 3:
Lower register sounds (drums, bass, etc.) and vocals are
emphasized for clean and clear output.
6
Cinema:
Video dialogue is reproduced more clearly. Action movies are
reproduced with more powerful sound.
Drama/Talk:
The dialogue portion of a video is reproduced more clearly.
• When “Non Effect” is selected, MX Plus becomes disabled.
• Sources to be set vary depending on the system set in “Setting the
AUX Input System (AUX Input Setup)” (page 39).
Setting the Graphic EQ
] and repeat
• You can listen with Defeat OFF (adjusted setup values) or with
Defeat ON (Initial value) to compare, by following the steps below.
1 Press and hold the [Rotary Encoder] for 2 seconds or
longer while in the adjustment mode.
2 Rotate the [Rotary Encoder] to switch on/off Defeat, and
listen to compare.
3 To exit, select “OFF” and then press [
].
11 When the setting is complete, press and hold [
for at least 2 seconds.
]
The graphic equalizer allows you to modify the sound using 31 bands
each for the front (left and right), rear (left and right) and center
speakers. An additional 10 bands are available for the subwoofer. This
allows you to customize the sound to suit your taste.
co
m
.u
a
Steps 8 through 9.
When the setting is complete, press and hold [
for at least 2 seconds.
• If [
] is pressed during setting, the unit returns to the previous
item.
• This function is not available when Defeat is set to ON.
• After the setting, it is recommended to store the setting contents on
the unit. For details, refer to “Storing the Preset Values (Preset
Store)” (page 36).
Action:
Action movies are reproduced with more powerful sound.
10 To adjust another source, press [
G.EQ: Graphic EQ is used.
P.EQ: Parametric EQ is used.
OFF: EQ mode is disabled.
]
• Set “Setting the Equalizer Mode (EQ Mode)” on page 46 to “G.EQ.”
1
2
3
Press [FUNC.].
Rotate the [Rotary encoder] to select “Sound Field
Adj.,” and then press the [Rotary encoder].
Rotate the [Rotary encoder] to select “EQ
Adjustment,” and then press the [Rotary encoder].
The G-EQ screen is displayed.
13
0.
• If [
] is pressed during setting, the unit returns to the previous
item.
• This function is not available when Defeat is set to ON.
• After the setting, it is recommended to store the setting contents on
the unit. For details, refer to “Storing the Preset Values (Preset
Store)” (page 36).
Setting the Equalizer Mode (EQ Mode)
4
Press and hold [CHANNEL] for at least 2 seconds.
Rotate the [Rotary encoder] to select either “L+R” or
“L or R,” and press the [Rotary encoder].
You can choose either the Graphic EQ or the Parametric EQ for the
equalizer mode. You can also turn it off. (Initial setting: “OFF”)
1
2
3
4
5
Press [FUNC.].
Rotate the [Rotary encoder] to select “Sound Field
Adj.,” and then press the [Rotary encoder].
Rotate the [Rotary encoder] to select “Setup,” and
then press the [Rotary encoder].
Rotate the [Rotary encoder] to select “EQ Mode,”
and then press the [Rotary encoder].
L or R: Channels Right and Left can be set independently.
L+R: Both Right and Left channels are set at the same
value (The initial setting).
• When you switch from “L or R” to “L+R,” choose which adjustment
of the R and L channels to be applied.
1 Select either “L R” or “R L” by rotating the [Rotary
encoder], and press the [Rotary encoder].
L
Select either “G.EQ,” “P.EQ,” or “OFF” by rotating
the [Rotary encoder], and press the [Rotary
encoder].
46-EN
R
R: The adjustment of the Left channel is to be applied
to both Right and Left channels.
L: The adjustment of the Right channel is to be applied
to both Right and Left channels.
Autogood products «130»
01GB07PXAH800.fm
ALPINE PXA-H800_EN 68-13530Z65-A (B5)
01GB00PXAH800.book Page 47 Tuesday, February 8, 2011 9:04 PM
From the Commander
5
Select the channel you want to adjust by pressing
[CHANNEL].
Setting the Parametric EQ
L+R selected:
FRONT
REAR
CENTER
SUBWOOFER*1
FRONT
L or R selected: FRONT L
FRONT R
REAR L
REAR R
CENTER
SUBWOOFER*2
FRONT L
*1 If the Subwoofer output is set for Monaural, you can set both
SUBWOOFER 1 and 2.
*2 If the Subwoofer output is set for Monaural, you can set
SUBWOOFER 1 and 2. If the Subwoofer output is set for Stereo, you
can set SUBWOOFER L and R.
• Channels to be set vary depending on the system set in “Setting the
Speaker System (System Select)” (page 37).
6
Select the frequency by rotating the [Rotary
encoder], and press the [Rotary encoder].
The frequency bands of the graphic equalizer are fixed. This makes it
difficult to correct for undesired peaks and dips at specific frequencies.
The parametric equalizer’s center frequency can be tuned to these
specific frequencies. The bandwidth (Q) and level are then fine-tuned
independently, to make the necessary corrections. The parametric
equalizer function is an advanced tool for serious audiophiles.
• Set “Setting the Equalizer Mode (EQ Mode)” on page 46 to “P.EQ.”
1
2
3
fc:
8
9
Rotate the [Rotary encoder] to select “EQ
Adjustment,” and then press the [Rotary encoder].
co
m
.u
a
*3
Rotate the [Rotary encoder] to select “Sound Field
Adj.,” and then press the [Rotary encoder].
The P-EQ screen is displayed.
FRONT/REAR/CENTER:
20 Hz to 20kHz (in 1/3 octave steps) (1 to 31 Band)
SUBWOOFER:
20 Hz to 160 Hz (in 1/3 octave steps) (1 to 10 Band)
7
Press [FUNC.].
Adjust the level by rotating the [Rotary encoder], and
press the [Rotary encoder].
Level: -12 to +12 dB (in 0.5 dB steps)*3
When ImprintEQ is enabled, 6 to +6 dB (in 0.5 dB steps)
4
Press and hold [CHANNEL] for at least 2 seconds.
Rotate the [Rotary encoder] to select either “L+R” or
“L or R,” and press the [Rotary encoder].
To adjust another frequency, repeat Steps 6 and 7.
To adjust another channel, repeat Steps 5 through 8.
0.
• You can listen with Defeat OFF (adjusted setup values) or with
Defeat ON (Initial value) to compare, by following the steps below.
1 Press and hold the [Rotary Encoder] for at least 2
seconds while in the adjustment mode.
2 Rotate the [Rotary Encoder] to switch on/off Defeat, and
listen to compare.
3 To exit, select “OFF” and then press [
].
13
• You can mute the channel you are adjusting.
1 Press [MUTE] while in the adjustment mode to mute the
channel.
2 To cancel muting, press [MUTE] again.
10 When the setting is complete, press and hold [
L or R: Channels R and L can be set independently.
L+R: Both R and L channels are set at the same value
(The initial setting).
• When you switch from “L or R” to “L+R,” choose which adjustment
of the R and L channels to be applied.
1 Select either “L R” or “R L” by rotating the [Rotary
encoder, and press the [Rotary encoder].
]
for at least 2 seconds.
• If [
] is pressed during setting, the unit returns to the previous
item.
• This function is not available when Defeat is set to ON.
• When the speaker is set to the “OFF” mode, the graphic equalizer
for that speaker cannot be set. Refer to “Setting the Speaker System
(System Select)” (page 37) /“Setting the Speakers (Speaker Setup)”
(page 38).
• Check the playable frequency ranges of the connected speakers
before making equalizer adjustments. If the speaker’s playable
frequency range is 55 Hz to 30 kHz, for example, adjusting the 40 Hz
or 20 Hz band has no effect. Moreover, you may overload and
damage the speakers.
• After the setting, it is recommended to store the setting contents on
the unit. For details, refer to “Storing the Preset Values (Preset
Store)” (page 36).
L
R
5
R: The adjustment of the L channel is to be applied to
both R and L channels.
L: The adjustment of the R channel is to be applied to
both R and L channels.
Select the channel you want to adjust by pressing
[CHANNEL].
L+R selected:
FRONT
REAR
CENTER
SUBWOOFER*1
FRONT
L or R selected: FRONT L
FRONT R
REAR L
REAR R
CENTER
SUBWOOFER*2
FRONT L
*1 If the Subwoofer output is set for Monaural, you can set both
SUBWOOFER 1 and 2.
*2 If the Subwoofer output is set for Monaural, you can set
SUBWOOFER 1 and 2. If the Subwoofer output is set for Stereo, you
can set SUBWOOFER L and R.
• Channels to be set vary depending on the system set in “Setting the
Speaker System (System Select)” (page 37).
Autogood products «130»
47-EN
01GB07PXAH800.fm
ALPINE PXA-H800_EN 68-13530Z65-A (B5)
01GB00PXAH800.book Page 48 Tuesday, February 8, 2011 9:04 PM
From the Commander
6
Select the band by rotating the [Rotary encoder], and
press the [Rotary encoder].
Band:
FRONT/REAR/CENTER: 1 to 10
SUBWOOFER:
1 to 5
7
Crossover (X-Over):
This unit is equipped with an active crossover. The crossover limits the
frequencies delivered to the outputs. Each channel is controlled
independently. Thus, each speaker pair can be driven by the frequencies
for which they have been optimally designed.
The crossover adjusts the HPF (high pass filter) or LPF (low pass filter)
of each band, and also the slope (how fast the filter rolls off the highs or
lows).
Adjustments should be made according to the reproduction
characteristics of the speakers. Depending on the speakers, a passive
network may not be necessary. If you are unsure about this point, please
consult your authorized Alpine dealer.
Adjust the frequency by rotating the [Rotary
encoder], and press the [Rotary encoder].
fc:
FRONT/REAR/CENTER:
20 Hz to 20kHz (in 1/6 octave steps)
SUBWOOFER:
20 Hz to 200 Hz (in 1/6 octave steps)
8
About the Crossover (X-Over)
Adjust the bandwidth (Q) by rotating the [Rotary
encoder], and press the [Rotary encoder].
Cutoff frequency adjustment range
(1/6 octave steps)
HPF
LPF
Q: 0.5/1.0/1.5/2.0/2.5/3.0/4.0/5.0 (8 steps)
9
Adjust the level by rotating the [Rotary encoder], and
press the[Rotary encoder].
Level: -12 to +12 dB (in 0.5 dB steps)*3
*3 When ImprintEQ is enabled, 6 to +6 dB (in 0.5 dB steps)
Front Mid
20Hz to 18kHz
1kHz to 18kHz
(Tweeter only)
20Hz to 18kHz
20Hz to 18kHz
20Hz to 18kHz
20Hz to 18kHz
20Hz to 180Hz
co
m
.u
a
Front Low
Rear
10 To adjust another band, repeat Steps 6 through 9.
11 To adjust another channel, repeat Steps 5 through
10.
Center
Subwoofer
• You can listen with Defeat OFF (adjusted setup values) or with
Defeat ON (Initial value) to compare, by following the steps below.
1 Press and hold the [Rotary Encoder] for at least 2
seconds while in the adjustment mode.
2 Rotate the [Rotary Encoder] to switch on/off Defeat, and
listen to compare.
3 To exit, select “OFF” and then press [
].
0.
• You can mute the channel you are adjusting.
1 Press [MUTE] while in the adjustment mode to mute the
channel.
2 To cancel muting, press [MUTE] again.
13
12 When the setting is complete, press and hold [
]
for at least 2 seconds.
• If [
] is pressed during setting, the unit returns to the previous
item.
• This function is not available when Defeat is set to ON.
• When the speaker is set to the “OFF” mode, the parametric
equalizer for that speaker cannot be set. Refer to “Setting the
Speaker System (System Select)” (page 37)/“Setting the Speakers
(Speaker Setup)” (page 38).
• Check the playable frequency ranges of the connected speakers
before making equalizer adjustments. If the speaker’s playable
frequency range is 55 Hz to 30 kHz, for example, adjusting the 40 Hz
or 20 Hz band has no effect. Moreover, you may overload and
damage the speakers.
• After the setting, it is recommended to store the setting contents on
the unit. For details, refer to “Storing the Preset Values (Preset
Store)” (page 36).
48-EN
Front High
22Hz to 20kHz
1.1kHz to 20kHz
(Tweeter only)
22Hz to 20kHz
22Hz to 20kHz
22Hz to 20kHz
22Hz to 20kHz
22Hz to 200Hz
Level adjustment
Output frequency range
(0 to -12 dB)
20 Hz
Slope FLAT
Slope adjustment
(Different from actual display)
HPF cut-off LPF cut-off
frequency
frequency
• HPF (high pass filter): Cuts the lower frequencies and allows higher
frequencies to pass.
• LPF (low pass filter): Cuts the higher frequencies and allows lower
frequencies to pass.
• Slope: The level change (in dB) for a frequency change of one octave.
• The higher the slope value, the steeper the slope becomes.
• Adjust the slope to FLAT (0 dB/oct) to bypass the HP or LP filters.
• Do not use a tweeter without the HPF on or set to a excessive low
frequency, as it may cause damage to the speaker due to the low
frequency content.
• You cannot adjust the crossover frequency higher than the HPF or
lower than the LPF.
• Adjustment should be made according to the recommended crossover
frequency of the connected speakers. Determine the recommended
crossover frequency of the speakers. Adjusting to a frequency range
outside that recommended may cause damage to the speakers.
For the recommended crossover frequencies of Alpine speakers, refer
to the respective Owner’s Manual. We are not responsible for
damage or malfunction of speakers caused by using the crossover
outside the recommended values.
Autogood products «130»
01GB07PXAH800.fm
ALPINE PXA-H800_EN 68-13530Z65-A (B5)
01GB00PXAH800.book Page 49 Tuesday, February 8, 2011 9:04 PM
From the Commander
Adjusting X-Over and Switching the
Phases
This section describes how to adjust X-Over. Before working on this,
refer to “About the Crossover (X-Over)” (page 48).
Note on adjusting the subwoofer
If the subwoofer is installed on the rear deck, setting a gentle
LPF slope (for example 6 dB/ oct.) makes the sound localization
more to the rear. This can also affect the acoustic localization of
the front.
Note on adjusting the high range
Depending on the speaker, inputting low frequency component
signals (about 2 kHz or less) with the HPF adjustment could
result in distortion. If distortion occurs, set a steep slope (for
example 30 dB/oct.).
Adjust so that the mid and high range sounds do not separate.
Normally use with the LPF turned off. If the high range is too
strong, we recommend adjusting for a gentle slope.
1
2
3
Press [FUNC.].
Rotate the [Rotary encoder] to select “Sound Field
Adj.”, and then press the [Rotary encoder].
Rotate the [Rotary encoder] to select “X-Over,” and
then press the [Rotary encoder].
4
13
0.
The X-OVER screen is displayed.
Select the channel you want to adjust by pressing
[CHANNEL].
L+R selected:
FRONT HIGH FRONT MID
FRONT LOW REAR CENTER
SUBWOOFER*1 FRONT HIGH
L or R selected: FRONT L HIGH FRONT R HIGH
FRONT L MID FRONT R MID
FRONT L LOW FRONT R LOW
REAR L REAR R CENTER
SUBWOOFER*2 FRONT L HIGH
*1 If the Subwoofer output is set for Monaural, you can set both
SUBWOOFER 1 and 2.
*2 If the Subwoofer output is set for Monaural, you can set
SUBWOOFER 1 and 2. If the Subwoofer output is set for Stereo, you
can set SUBWOOFER L and R.
• Channels to be set vary depending on the system set in “Setting the
Speaker System (System Select)” (page 37).
6
Rotate the [Rotary encoder] to select “HPF,” and
then press the [Rotary encoder].
co
m
.u
a
Note on adjusting the low range
When a subwoofer is connected and you are using a speaker
with a low range of under 10 or 12 cm (3-15/16” or 4-3/4”),
setting the low range HPF to “OFF” can result in distortion when
low frequency components are input.
If so, set the H.P.F. slope to a value suited for the speaker’s
frequency response.
5
Press and hold [CHANNEL] for at least 2 seconds.
Rotate the [Rotary encoder] to select either “L+R” or
“L or R,” and press the [Rotary encoder].
7
Select the cut-off frequency (fc) by rotating the
[Rotary encoder], and press the [Rotary encoder].
• The frequency that can be adjusted may vary depending on the
channel (speaker). Refer to “About the Crossover (X-Over)”
(page 48).
8
Adjust the slope by rotating the [Rotary encoder],
and press the [Rotary encoder].
Slope: 0(OFF)/-6/-12/-18/-24/-30/-36 dB/oct*3
*3 Neither LPF of Subwoofer nor HPF of Front High can be set at 0
(OFF).
9
Adjust the gain by rotating the [Rotary encoder], and
press the [Rotary encoder].
Gain: -24 to 0 dB (in 0.5 dB steps)
10 Switch the phase by rotating the [Rotary encoder],
and press the [Rotary encoder].
L or R: Channels R and L can be set independently.
L+R: Both R and L channels are set at the same value
(The initial setting).
• When you switch from “L or R” to “L+R,” choose which adjustment
of the R and L channels to be applied.
1 Select either “L R” or “R L” by rotating the [Rotary
encoder], and press the [Rotary encoder].
Phase: 0°/180°
This will take you back to the Step 6 screen.
11 Next, select “LPF” in Step 6, and repeat Steps 7
through 10 to adjust HPF.
L
R
R: The adjustment of the L channel is to be applied to
both R and L channels.
L: The adjustment of the R channel is to be applied to
both R and L channels.
Autogood products «130»
49-EN
01GB07PXAH800.fm
ALPINE PXA-H800_EN 68-13530Z65-A (B5)
01GB00PXAH800.book Page 50 Tuesday, February 8, 2011 9:04 PM
From the Commander
12 To adjust another channel, repeat Steps 5 through
In other words, setting the time correction value for the front left
speaker to 5.1 (ms) sets a virtual distance matching the
distance to the farthest speaker.
11.
• You can mute the channel you are adjusting.
1 Press [MUTE] while in the adjustment mode to mute the
channel.
2 To cancel muting, press [MUTE] again.
13 When the setting is complete, press and hold [
]
for at least 2 seconds.
5.1ms
Adjusting the Time Correction (TCR)
Because of the particular conditions inside the vehicle, there are major
differences in the distances between the different speakers and the
listening position. The proper time correction can be obtained using the
automatic time correction function (“Auto TCR”), but it is also possible
to calculate the optimum correction values and eliminate the time error
at the listening position yourself using this function.
e Calculation of time correction
2.25m
The sound is uneven because
the distance between the
listening position and the
different speakers is different.
The difference in the distance
between the front left and rear
right speakers is 1.75 meters
(68-3/4").
Time correction eliminates the
difference between the time
required for the sound from the
different speakers to reach the
listening position.
Setting the time correction of the
front left speaker to 5.1 ms
makes it possible to coordinate
the distance from the listening
position to the speaker.
e Entering the time correction
4
5
6
0.
2
Sit in the listening position (the driver’s seat, for
example) and measure the distance (in meters)
between your head and the various speakers.
Press [FUNC.].
Rotate the [Rotary encoder] to select “Sound Field
Adj.,” and then press the [Rotary encoder].
Rotate the [Rotary encoder] to select “TCR”, and
then press the [Rotary encoder].
The TCR screen is displayed.
Calculate the difference in distance between the
farthest speaker and the other speakers.
13
1
0.5m
co
m
.u
a
• If [
] is pressed during setting, the unit returns to the previous
item.
• When Tweeter is selected for FRONT HIGH to protect the speaker,
there is no filter off (Slope OFF) setting for HPF. There is no filter off
(Slope OFF) setting for Subwoofer LPF, either.
• When the speaker is in Off mode, X-Over does not affect the speaker.
Refer to “Setting the Speaker System (System Select)” (page 37)/
“Setting the Speakers (Speaker Setup)” (page 38).
• Check the playback frequencies of the connected speakers before
adjusting.
• After the setting, it is recommended to store the setting contents on
the unit. For details, refer to “Storing the Preset Values (Preset
Store)” (page 36).
L = (distance of farthest speaker) – (distance of other
speakers)
3
Divide the distances calculated for the different
speakers by the speed of sound (343 m/s
temperature 20°C).
7
This value is the time correction value for the different
speakers.
• When “OFF” is selected, the TCR function becomes disabled.
Concrete examples
1 Calculating the time correction value for the front left
speaker on the diagram below.
Conditions:
Distance between farthest speaker and listening position: 2.25
m (88-3/4")
Distance between front left speaker and listening position: 0.5 m
(20")
Calculation: L = 2.25 m (88-3/4") – 0.5 m (20") = 1.75 m (68-3/4")
Compensation time = 1.75 ÷ 343 x 1000 = 5.1 (ms)
50-EN
8
Select [ON] for “TCR” by rotating the [Rotary
encoder], and press the [Rotary encoder].
Press and hold [CHANNEL] for at least 2 seconds.
Rotate the [Rotary encoder] to select either “L+R” or
“L or R,” and press the [Rotary encoder].
L or R: Channels R and L can be set independently.
L+R: Both R and L channels are set at the same value
(The initial setting).
Autogood products «130»
01GB07PXAH800.fm
ALPINE PXA-H800_EN 68-13530Z65-A (B5)
01GB00PXAH800.book Page 51 Tuesday, February 8, 2011 9:04 PM
From the Commander
• When you switch from “L or R” to “L+R,” choose which adjustment
of the R and L channels to be applied.
1 Select either “L R” or “R L” by rotating the [Rotary
encoder], and press the [Rotary encoder].
L
R
9
R: The adjustment of the L channel is to be applied to
both R and L channels.
L: The adjustment of the R channel is to be applied to
both R and L channels.
Select the channel you want to adjust by pressing
[CHANNEL].
FRONT HIGH FRONT MID
FRONT LOW REAR CENTER
SUBWOOFER*1 FRONT HIGH
L or R selected: FRONT L HIGH FRONT R HIGH
FRONT L MID FRONT R MID
FRONT L LOW FRONT R LOW
REAR L REAR R CENTER
SUBWOOFER*2 FRONT L HIGH
*1 If the Subwoofer output is set for Monaural, you can set both
SUBWOOFER 1 and 2.
*2 If the Subwoofer output is set for Monaural, you can set
SUBWOOFER 1 and 2. If the Subwoofer output is set for Stereo, you
can set SUBWOOFER L and R.
]
for at least 2 seconds.
• If [
] is pressed during setting, the unit returns to the previous
item.
• This function is not available when Defeat is set to ON.
• When the speaker is set to the “OFF” mode, the time correction for
that speaker cannot be set. Refer to “Setting the Speaker System
(System Select)” (page 37)/“Setting the Speakers (Speaker Setup)”
(page 38).
• After the setting, it is recommended to store the setting contents on
the unit. For details, refer to “Storing the Preset Values (Preset
Store)” (page 36).
Setting the Time Correction Adjustment
Unit (TCR Parameter)
The unit of measurement for time correction can be set as either “cm” or
“inch.” (Initial setting: “cm”)
1
2
Press [FUNC.].
Rotate the [Rotary encoder] to select “Sound Field
Adj.,” and then press the [Rotary encoder].
co
m
.u
a
L+R selected:
12 When the setting is complete, press and hold [
3
4
• Channels to be set vary depending on the system set in “Setting the
Speaker System (System Select)” (page 37).
Rotate the [Rotary encoder] to select “Setup,” and
then press the [Rotary encoder].
Rotate the [Rotary encoder] to select “TCR
Parameter,” and then press the [Rotary encoder].
10 Adjust the calculated time correction value (0.00 to
0.
20.00 ms) by rotating the [Rotary encoder].
5
Select either “cm” or “inch” by rotating the [Rotary
encoder], and press the [Rotary encoder].
13
Displaying the distances from the listening
positions to the speakers
Setting contents: 0.00 to 20.00 ms (in 0.05 ms steps)
• The distances can be displayed in either “cm” or “inch” (see
“Setting the Time Correction Adjustment Unit (TCR Parameter)”
page 51).
11 To adjust another channel, repeat Steps 9 through
10.
• You can listen with Defeat OFF (adjusted setup values) or with
Defeat ON (Initial value) to compare, by following the steps below.
1 Press and hold the [Rotary Encoder] for at least 2
seconds while in the adjustment mode.
2 Rotate the [Rotary Encoder] to switch on/off Defeat, and
listen to compare.
3 To exit, select “OFF” and then press [
].
cm: The unit for the time correction becomes “cm.”
inch: The unit for the time correction becomes “inch.”
6
When the setting is complete, press and hold [
for at least 2 seconds.
• If [
item.
]
] is pressed during setting, the unit returns to the previous
• You can mute the channel you are adjusting.
1 Press [MUTE] while in the adjustment mode to mute the
channel.
2 To cancel muting, press [MUTE] again.
Autogood products «130»
51-EN
01GB07PXAH800.fm
ALPINE PXA-H800_EN 68-13530Z65-A (B5)
01GB00PXAH800.book Page 52 Tuesday, February 8, 2011 9:04 PM
From the Commander
• If the setting of Rear Fill is made when Rear Mix is ON, sound is
unchanged in the rear fill setting because Rear Mix is given priority
during 2 channel decoder other than linear PCM.
• When both Rear and Center speakers are off in “Setting the Speaker
System (System Select)” (page 37)/“Setting the Speakers (Speaker
Setup)” (page 38), this item cannot be set.
• After the setting, it is recommended to store the setting contents on
the unit. For details, refer to “Storing the Preset Values (Preset
Store)” (page 36).
Use the Multi
Channel Function
CHANNEL
Setting EUPHONY (EUPHONY)
EUPHONY creates 5.1 channel surround using Adaptive Surround
technology based on a music signal recorded in 2-channel.
When you set up EUPHONY and play back a CD or iPod stereo source,
you can enjoy the realistic sensation of musicians playing around you.
For DVD movie playback, you can enjoy the sense of localization of the
dialogue and impressive three-dimensional sound effects.
In this setting, EUPHONY Mode can be selected. (Initial setting:
“ACOUSTIC”)
FUNC.
Rotary encoder
Setting the 2-Channel Signal Playback
Mode (Mode)
When playing back 2-Channel Stereo, select a playback mode best
suited to the music. (Initial setting: “Stereo”)
1
2
3
Press [FUNC.].
co
m
.u
a
1
2
Press [FUNC.].
3
Rotate the [Rotary encoder] to select “Playback
Mode,” and then press the [Rotary encoder].
Rotate the [Rotary encoder] to select “Mode,” and
then press the [Rotary encoder].
The Mode selection screen is displayed.
Rotate the [Rotary encoder] to select “Playback
Mode,” and then press the [Rotary encoder].
4
Rotate the [Rotary encoder] to select “Mode,” and
then press the [Rotary encoder].
5
Rotate the [Rotary encoder] to select “EUPHONY,”
and then press the [Rotary encoder].
Press [
].
0.
This will take you back to the Step 3 screen.
6
Rotate the [Rotary encoder] to select “EUPHONY,”
and then press the [Rotary encoder].
4
13
The Mode selection screen is displayed.
Select the playback mode you want by rotating the
[Rotary encoder], and press the [Rotary encoder].
7
Rotate the [Rotary encoder] to select the mode, and
then press the [Rotary encoder].
Setting contents: Stereo/Rear Fill/EUPHONY/Dolby PLII
Stereo:
Rear Fill:
EUPHONY:
Dolby PLII:
5
Plays back in 2ch stereo.
Outputs the front signal from the rear.
Plays back in 5.1 channel surround (page 52).
Plays back in Dolby Pro Logic II surround
(page 53).
When the setting is complete, press and hold [
for at least 2 seconds.
]
• If [
] is pressed during setting, the unit returns to the previous
item.
• For linear PCM, the front signals are sent to the rear channel even if
the system is set up for “Stereo.”
• “Rear Fill” function
Depending on the input signals, the sound may only be output from
the front speakers. In this case, the “Rear Fill” function can be used
to output signals from the rear speakers as well.
52-EN
Setting contents: ACOUSTIC/LIVE/CINEMA/TV SHOW/
Custom 1/Custom 2/Custom 3
ACOUSTIC: Localization is emphasized; the mode with
regular sound field resonance.
LIVE:
Ambience is emphasized; the mode in which
sound field resonance is more strongly felt.
CINEMA:
Sound suitable for movie audio. Dialogues are
reproduced clearly and sound effect is crisp.
TV SHOW: Sound suitable for broadcasting audio such as
the digital broadcasting.
• Custom 1/Custom 2/Custom 3 can be selected only when the feature
is set on a PC (see “Customizing EUPHONY” page 31).
Autogood products «130»
01GB07PXAH800.fm
ALPINE PXA-H800_EN 68-13530Z65-A (B5)
01GB00PXAH800.book Page 53 Tuesday, February 8, 2011 9:04 PM
From the Commander
8
When the setting is complete, press and hold [
for at least 2 seconds.
]
8
When the setting is complete, press and hold [
for at least 2 seconds.
]
• If [
] is pressed during setting, the unit returns to the previous
item.
• When both Rear and Center speakers are off in “Setting the Speaker
System (System Select)” (page 37)/“Setting the Speakers (Speaker
Setup)” (page 38), this item cannot be set.
• This function only works with 2-channel signals.
• After the setting, it is recommended to store the setting contents on
the unit. For details, refer to “Storing the Preset Values (Preset
Store)” (page 36).
• If [
] is pressed during setting, the unit returns to the previous
item.
• For the details of Dolby Pro Logic II, see page 61.
• When both Rear and Center speakers are off in “Setting the Speaker
System (System Select)” (page 37)/“Setting the Speakers (Speaker
Setup)” (page 38), this item cannot be set.
• This function only works with 2-channel signals.
• After the setting, it is recommended to store the setting contents on
the unit. For details, refer to “Storing the Preset Values (Preset
Store)” (page 36).
Using Dolby Pro Logic II (Dolby PLII)
Adjusting the Center Width (Center Width)
Pro Logic processing can be applied to the music signals recorded in 2channel stereo. This gives normal 2-channel stereo a more live, concert
hall effect. When you select “Music,” you can adjust the center width.
This function provides the optimum vocal localization by adjusting the
center channel localization in between the center speaker and the L/R
speakers. (Initial setting: “Music”)
When you select “Music” for “Dolby Pro Logic II,” you can further
adjust the center width in the following steps. This function offers the
optimum vocal position by adjusting the center channel position
between the center speaker and the L/R speaker. (The adjustments
established in “Adjusting the Acoustic Image (BI-PHANTOM)”
(page 55) are ineffective while this function is activated.) (Initial setting:
“OFF”, “Level 0”)
1
2
1
2
Rotate the [Rotary encoder] to select “Playback
Mode,” and then press the [Rotary encoder].
Rotate the [Rotary encoder] to select “Mode,” and
then press the [Rotary encoder].
The Mode selection screen is displayed.
4
5
3
4
Rotate the [Rotary encoder] to select “Dolby PLII,”
and then press the [Rotary encoder].
Press [
].
Press [FUNC.].
co
m
.u
a
3
Press [FUNC.].
Rotate the [Rotary encoder] to select “Playback
Mode,” and then press the [Rotary encoder].
Rotate the [Rotary encoder] to select “Center Width,”
and then press the [Rotary encoder].
Rotate the [Rotary encoder] to select “ON,” and then
press the [Rotary encoder].
This will take you back to the Step 3 screen.
0.
Rotate the [Rotary encoder] to select “Dolby PLII,”
and then press the [Rotary encoder].
13
6
Rotate the [Rotary encoder] to select “Music” or
“Movie,” and then press the [Rotary encoder].
Adjust the level by rotating the [Rotary encoder].
LEVEL: 0 to 7
When the level becomes higher, the center channel
localization shifts from the center speaker toward both
sides.
6
The DOLBY PLII screen is displayed.
7
5
When the setting is complete, press and hold [
for at least 2 seconds.
]
• When the Center speaker is off in “Setting the Speaker System
(System Select)” (page 37)/“Setting the Speakers (Speaker Setup)”
(page 38), this item cannot be set.
• After the setting, it is recommended to store the setting contents on
the unit. For details, refer to “Storing the Preset Values (Preset
Store)” (page 36).
Music: Suits the stereo TV shows and all programs
encoded in Dolby Surround. It improves the sound
field directivity to near that of discrete 5.1-channel
sound.
Movie: Can be used for all stereo music recordings, and
provides a wide, deep sound field.
Autogood products «130»
53-EN
01GB07PXAH800.fm
ALPINE PXA-H800_EN 68-13530Z65-A (B5)
01GB00PXAH800.book Page 54 Tuesday, February 8, 2011 9:04 PM
From the Commander
Multi Channel Function Adjustment
Procedure
Adjusting the Speaker Volume Level
(Output Level)
Make the adjustments described below in order to reproduce Dolby
Digital and DTS sound with greater accuracy.
The test tones help to make the volume adjustments of the different
speakers. When levels are equal, a strong sense of presence can be heard
from the different speakers at the listening position. (Initial setting:
“±0dB”)
Setting the 2-Channel Signal Playback Mode (Mode) (page 52)
This sets the 2-channel signal playback mode.
1
2
Adjusting the Acoustic Image (BI-PHANTOM) (page 55)
Adjusting the acoustic image to achieve a sound as if the
center speaker were directly in front of the listener.
3
Press [FUNC.].
Rotate the [Rotary encoder] to select “Multi Ch.
Setup,” and then press the [Rotary encoder].
Rotate the [Rotary encoder] to select “Output Level,”
and then press the [Rotary encoder].
Setting the Linear PCM (PCM Mode) (page 56)
You can choose either 2ch or 3ch for the playback output of a
disc recorded on the linear PCM.
co
m
.u
a
OUTPUT LEVEL screen will be displayed and the test tone
is produced from the left front speaker.
4
Mixing the Low Range Audio of the Center with the Front L/R
(Center Bass Split) (page 56)
Select the channel by pressing [CHANNEL].
Test tone is output from the selected channel.
Turning this feature on makes the audio signals emitted from
the front L/R speakers mixed with the center audio signals
(low range).
ch.: Left/Center/Right/R-Surround/L-Surround
Mixing the Low Range Audio for the Rear (Rear Mix) (page 55)
• Channels to be set vary depending on the system set in “Setting the
Speaker System (System Select) (page 37).”
5
0.
Achieving smooth sound in the rear seat by mixing the front
audio signals with the rear speaker signals.
13
Achieving Powerful High Volume Sound (Listening Mode)
(page 56)
Achieving energetic sound with even greater power, like the
sound in a movie theater.
Adjusting the DVD Level (DVD Level) (page 57)
Adjust the volume signal level in each of the Dolby Digital,
Dolby Pro Logic II, DTC and PCM modes.
Adjusting the Speaker Volume Level (Output Level) (page 54)
Adjust each speaker’s volume so they are the same level.
Adjust the speaker volumes for each channel to
make them equal while the test tone is output from
each channel. Adjust the level by rotating the
[Rotary encoder].
LEVEL: -10 to +10 dB (in 1 dB steps)
Adjust based on the front speakers.
6
7
To adjust another channel, repeat Steps 4 and 5.
When the setting is complete, press and hold [
for at least 2 seconds.
]
• If [
] is pressed during setting, the unit returns to the previous
item.
• Avoid stopping, pausing, switching the disc, cueing, fast-forwarding
or switching the audio channel of this unit while making this
adjustment. The setting is cancelled if the decode mode is switched.
• After the setting, it is recommended to store the setting contents on
the unit. For details, refer to “Storing the Preset Values (Preset
Store)” (page 36).
Storing the Preset Values (Preset Store) (page 36)
Storing all the settings and adjustments made on the PXAH800 (not only the above settings/adjusts) in the memory.
In case of combining the Automatic adjustments, etc.
We recommend to make the Automatic adjustments before the Dolby
Surround adjustments.
54-EN
Autogood products «130»
01GB07PXAH800.fm
ALPINE PXA-H800_EN 68-13530Z65-A (B5)
01GB00PXAH800.book Page 55 Tuesday, February 8, 2011 9:04 PM
From the Commander
Adjusting the Acoustic Image (BIPHANTOM)
Mixing the Low Range Audio for the Rear
(Rear Mix)
To install a center speaker, it must be located in the dash, an equal
distance between the Left and Right speakers. In most cases, this is very
difficult to achieve. Using Bi-PHANTOM, a virtual center speaker is
created by sending the center channel information to both the Left and
Right speakers. Adjusting the center width in Dolby Pro Logic II
“Music” (see “Using Dolby Pro Logic II (Dolby PLII)” on page 53),
makes this function ineffective. This is used in a system where there is
no sub-woofer and the rear speakers can produce lower frequency
sounds than the front speakers. (Initial setting: “OFF”, “±0 dB”)
This function mixes the front channel audio signals to the audio signals
output from the rear speakers, improving the sound in the vehicle’s rear
seat. This is used in a system where there is no subwoofer and the rear
speakers can produce lower frequency sounds than the front speakers.
(Initial setting: “OFF”, “±0 dB”)
1
2
3
1
2
3
Press [FUNC.].
Rotate the [Rotary encoder] to select “Multi Ch.
Setup,” and then press the [Rotary encoder].
Rotate the [Rotary encoder] to select “Multi Ch.
Setup,” and then press the [Rotary encoder].
Rotate the [Rotary encoder] to select “Rear Mix,” and
then press the [Rotary encoder].
Rotate the [Rotary encoder] to select “BIPHANTOM,” and then press the [Rotary encoder].
co
m
.u
a
4
4
Press [FUNC.].
Rotate the [Rotary encoder] to select “ON,” and then
press the [Rotary encoder].
Rotate the [Rotary encoder] to select “ON,” and then
press the [Rotary encoder].
Turning this feature ON mixes the audio signals output from
the rear speakers with the front audio signals.
5
Turning this feature on creates the acoustic image in which
the center speaker is virtually located exactly in front of the
listener by splitting the sound of the center speaker into
both sides.
0.
The level can be adjusted in 5 steps. The higher the level,
the more the low range audio is output from the rear
speakers. (Depending on the software such as DVD, the
effect may vary.)
6
LEVEL: -5 to +5 dB (in 1 dB steps)
The level can be adjusted between -5 and +5. When the
level becomes greater, the acoustic image moves from the
center speaker location toward both sides.
6
LEVEL: -6/-3/0/+3/+6 dB
Adjust the level by rotating the [Rotary encoder].
13
5
When the setting is complete, press and hold [
for at least 2 seconds.
]
• If [
] is pressed during setting, the unit returns to the previous
item.
• Do not perform operations such as Stop/Pause/Disc Exchange/Cue/
Fast Forward/Audio Switching on the player during this setup
adjustment. When the decode state switches, the settings will be
cancelled.
• When the Center speaker is off in “Setting the Speaker System
(System Select)” (page 37)/“Setting the Speakers (Speaker Setup)”
(page 38), this item cannot be set.
• Effective only for Dolby Pro Logic II, EUPHONY and DTS (with
Center signal).
• After the setting, it is recommended to store the setting contents on
the unit. For details, refer to “Storing the Preset Values (Preset
Store)” (page 36).
Adjust the level by rotating the [Rotary encoder].
When the setting is complete, press and hold [
for at least 2 seconds.
]
• If [
] is pressed during setting, the unit returns to the previous
item.
• Avoid stopping, pausing, switching the disc, cueing, fast-forwarding
or switching the audio channel of this unit while making this
adjustment. The setting is cancelled if the decode mode is switched.
• When the Rear speaker is off in “Setting the Speaker System (System
Select)” (page 37)/“Setting the Speakers (Speaker Setup)”
(page 38), this item cannot be set.
• Effective only for Dolby Pro Logic II, EUPHONY and DTS (with
Rear signal).
• After the setting, it is recommended to store the setting contents on
the unit. For details, refer to “Storing the Preset Values (Preset
Store)” (page 36).
Autogood products «130»
55-EN
01GB07PXAH800.fm
ALPINE PXA-H800_EN 68-13530Z65-A (B5)
01GB00PXAH800.book Page 56 Tuesday, February 8, 2011 9:04 PM
From the Commander
Mixing the Low Range Audio of the
Center with the Front L/R (Center Bass
Split)
Turning on this function sends the Center channel low frequencies,
equally to the front Left and Right speakers. This enhances the overall
sound when using a small center speaker. This is used when the center
speaker has a small diameter and cannot produce low frequency sounds.
(Initial setting: “OFF”, “315 Hz”)
1
2
3
2
3
4
Press [FUNC.].
Rotate the [Rotary encoder] to select “Center Bass
Split,” and then press the [Rotary encoder].
0.
Adjust the frequency by rotating the [Rotary
encoder].
13
fc: 200 Hz/225 Hz/250 Hz/280 Hz/315 Hz/350 Hz/400 Hz/
450 Hz/500 Hz
6
Rotate the [Rotary encoder] to select “2ch” or “3ch,”
and then press the [Rotary encoder].
2ch: 2ch Output (L/R)
3ch: 3ch Output (L/R/CENTER)
When the setting is complete, press and hold [
for at least 2 seconds.
]
co
m
.u
a
Rotate the [Rotary encoder] to select “ON,” and then
press the [Rotary encoder].
Turning this feature ON mixes the audio signals output from
the front L/R speakers with the center audio signals (low
range).
5
Rotate the [Rotary encoder] to select “PCM Mode,”
and then press the [Rotary encoder].
Rotate the [Rotary encoder] to select “Multi Ch.
Setup,” and then press the [Rotary encoder].
5
4
Rotate the [Rotary encoder] to select “Multi Ch.
Setup,” and then press the [Rotary encoder].
Press and hold [
] for at least 2 seconds.
• If [
] is pressed during setting, the unit returns to the previous
item.
• Avoid stopping, pausing, switching the disc, cueing, fast-forwarding
or switching the audio channel of this unit while making this
adjustment. The effect may not be recognized easily depending on the
decoding conditions.
• When the Center speaker is off in “Setting the Speaker System
(System Select)” (page 37)/“Setting the Speakers (Speaker Setup)”
(page 38), this item cannot be set.
• Effective only for Dolby Pro Logic II, EUPHONY and DTS (with
Center signal).
• After the setting, it is recommended to store the setting contents on
the unit. For details, refer to “Storing the Preset Values (Preset
Store)” (page 36).
• If [
] is pressed during setting, the unit returns to the previous
item.
• When the Center speaker is off in “Setting the Speaker System
(System Select)” (page 37)/“Setting the Speakers (Speaker Setup)”
(page 38), this item cannot be set.
• After the setting, it is recommended to store the setting contents on
the unit. For details, refer to “Storing the Preset Values (Preset
Store)” (page 36).
Achieving Powerful High Volume Sound
(Listening Mode)
With Dolby Digital, the dynamic range is compressed so that powerful
sound can be achieved at regular volume levels. This compression can
be cancelled to achieve an energetic sound with even greater power, like
the sound in a movie theater. This function works only in the Dolby
Digital mode. (Initial setting: “Standard”)
1
2
3
4
Press [FUNC.].
Rotate the [Rotary encoder] to select “Multi Ch.
Setup,” and then press the [Rotary encoder].
Rotate the [Rotary encoder] to select “Listening
Mode,” and then press the [Rotary encoder].
Rotate the [Rotary encoder] to select “Standard” or
“Maximum,” and then press the [Rotary encoder].
Setting the Linear PCM (PCM Mode)
The output can be set to 2 or 3 channels when playing discs recorded in
linear PCM. (Initial setting: “2ch”)
1
Press [FUNC.].
56-EN
Standard: To enjoy the dynamic sound at regular volume
Maximum: To enjoy the dynamic sound at maximum volume
Autogood products «130»
01GB07PXAH800.fm
ALPINE PXA-H800_EN 68-13530Z65-A (B5)
01GB00PXAH800.book Page 57 Tuesday, February 8, 2011 9:04 PM
From the Commander
5
When the setting is complete, press and hold [
for at least 2 seconds.
]
• If [
] is pressed during setting, the unit returns to the previous
item.
• This feature is effective only for Dolby Digital.
• Use this feature at a volume level at which you can still hear sound
outside of the cabin.
• Depending on the types of source, such as DVD software, this feature
may be ineffective.
• After the setting, it is recommended to store the setting contents on
the unit. For details, refer to “Storing the Preset Values (Preset
Store)” (page 36).
Other Useful
Features
FUNC.
BLACK OUT indicator
Adjusting the DVD Level (DVD Level)
The volume level for Dolby Digital, Dolby PLII, DTS, EUPHONY and
PCM modes can be set. (Initial setting: “±0dB”)
3
MUTE
Rotary encoder
Press [FUNC.].
Rotate the [Rotary encoder] to select “Multi Ch.
Setup,” and then press the [Rotary encoder].
Lowering Volume Quickly (Mute)
co
m
.u
a
1
2
VIEW
Rotate the [Rotary encoder] to select “DVD Level,”
and then press the [Rotary encoder].
Activating this function will instantly lower the volume level by 20 dB.
1
Press [MUTE].
The audio level decreases by about 20 dB. “-20 dB Mute”
will be shown in the screen during muting.
4
Select the mode you want to adjust by rotating the
[Rotary encoder], and press the [Rotary encoder].
0.
2
5
13
Adjustment modes: Dolby D/Dolby PLII/DTS/PCM/
EUPHONY
Turning the Back Light Off (BLACK OUT
function)
Select the level by rotating the [Rotary encoder].
Adjustment level: -10 to +10 dB (in 1 dB steps)
6
7
Press [
]. Repeat Steps 4 and 5 to set the levels
for each mode.
When the setting is complete, press and hold [
for at least 2 seconds.
To cancel muting, press [MUTE] again.
• Either switch will cancel muting.
• When an Ai-NET compatible head unit is connected, you cannot use
this function.
]
• If [
] is pressed during setting, the unit returns to the previous
item.
• Avoid stopping, pausing, switching the disc, cueing, fast-forwarding
or switching the audio channel of this unit while making this
adjustment. The effect may not be recognized easily depending on the
decoding conditions.
• After the setting, it is recommended to store the setting contents on
the unit. For details, refer to “Storing the Preset Values (Preset
Store)” (page 36).
When Blackout Mode is turned on, the backlight and illuminated
buttons of the Commander display and the PXA-H800 indicators will be
turned off to reduce power consumption. This additional power
enhances the sound quality.
1
Press and hold the [Rotary encoder] for at least 2
seconds.
The backlight is turned off. The BLACK OUT indicator will
turn on.
2
To cancel this, press and hold the [Rotary encoder]
again for at least 2 seconds.
• When another switch is operated while the backlight is off, the
illumination backlight for the display is turned on for 5 seconds and
then turned off again.
Autogood products «130»
57-EN
01GB07PXAH800.fm
ALPINE PXA-H800_EN 68-13530Z65-A (B5)
01GB00PXAH800.book Page 58 Tuesday, February 8, 2011 9:04 PM
From the Commander
5
Setting the Color for the Commander
Illumination Button (ILLUMINATION)
3
Press [FUNC.].
Rotate the [Rotary encoder] to select “Display
Setup,” and then press the [Rotary encoder].
Adjusting the Brightness Level of the
Display (Dimmer Level)
Rotate the [Rotary encoder] to select
“ILLUMINATION,” and then press the [Rotary
encoder].
With the Dimmer control ON, three Dimmer levels are available. The
highest, Level 3, being the most dim with the vehicle's headlights ON.
(Initial setting: “Level 1”)
1
2
5
Rotate the [Rotary encoder] to select “BLUE” or
“RED.”
When the setting is complete, press and hold [
for at least 2 seconds.
• If [
item.
3
]
0.
4
Press [FUNC.].
13
Set the Dimmer control to “Auto” to decrease the illumination
brightness of the unit with the head lights of the vehicle ON. This mode
is useful if you feel the unit’s backlighting is too bright at night. (Initial
setting: “Auto”)
3
4
] is pressed during setting, the unit returns to the previous
Adjusting the Brightness of the Display
(Dimmer)
1
2
Press [FUNC.].
Rotate the [Rotary encoder] to select “Display
Setup,” and then press the [Rotary encoder].
Rotate the [Rotary encoder] to select “Dimmer
Level,” and then press the [Rotary encoder].
co
m
.u
a
4
]
• If [
] is pressed during setting, the unit returns to the previous
item.
• When “Manual” is selected, the brightness of the display does not
change if you turn on the headlamps. This always sets the brightness
at the level specified in “Adjusting the Brightness Level of the
Display (Dimmer Level)” (page 58).
You can change the lighting color of the buttons. (Initial setting:
“BLUE”)
1
2
When the setting is complete, press and hold [
for at least 2 seconds.
5
Select one from “Level 1” through “Level 3” by
rotating the [Rotary encoder].
When the setting is complete, press and hold [
for at least 2 seconds.
• If [
item.
]
] is pressed during setting, the unit returns to the previous
Rotate the [Rotary encoder] to select “Display
Setup,” and then press the [Rotary encoder].
Rotate the [Rotary encoder] to select “Dimmer,” and
then press the [Rotary encoder].
Rotate the [Rotary encoder] to select “Auto” or
“Manual.”
58-EN
Autogood products «130»
01GB07PXAH800.fm
ALPINE PXA-H800_EN 68-13530Z65-A (B5)
01GB00PXAH800.book Page 59 Tuesday, February 8, 2011 9:04 PM
From the Commander
Switching the Display
You can select the display mode you want.
1
Press [VIEW].
The display mode switches for every push.
ALPINE LOGO
Voltage/Temperature display
co
m
.u
a
Source display*
Power voltage
Temperature inside the unit
13
0.
Currently playing input audio stream channel information display
Effective status of each function and playing stream format
information display
ALPINE LOGO
* When an Ai-NET compatible head unit is connected, the source
screen will not be displayed.
Autogood products «130»
59-EN
01GB07PXAH800.fm
ALPINE PXA-H800_EN 68-13530Z65-A (B5)
01GB00PXAH800.book Page 60 Tuesday, February 8, 2011 9:04 PM
Information
System Configuration
Table 1 (Output System)
Speaker System
CH-1(L)
F-2way+R+SW
(4.2ch system)
Front High(L)
F-3way+SW
(2.2ch system)
Front High(L)
F-3way+R
(4.0ch system)
Front High(L)
F-2way+R+C+SW
(5.1ch system) Front High(L)
CH-2(R)
CH-3(L)
CH-4(R)
CH-5(L)
CH-6(R)
CH-7(L)
CH-8(R)
Front2Way
Rear
Subwoofer
Front High(R) Front Low(L)* Front Low(R)*
Rear(L)
Rear(R)
Subwoofer(L) Subwoofer(R)
Front3Way
Subwoofer
Front High(R) Front Mid(L)* Front Mid(R)* Front Low(L) Front Low(R) Subwoofer(L) Subwoofer(R)
Front3Way
Rear
Front High(R) Front Mid(L)* Front Mid(R)* Front Low(L) Front Low(R)
Rear(L)
Rear(R)
Front2Way
Rear
Center
Subwoofer
Front High(R) Front Low(L)* Front Low(R)*
Rear(L)
Rear(R)
Center
Subwoofer
* Cannot be set to OFF.
Table 2 (Input System)
CH-1 (L)
CH-2 (R)
AUX INPUT
CH-3 (L)
CH-4 (R)
co
m
.u
a
RCA Input Pattern
CH-5 (L)
CH-6 (R)
AUX1
5.1ch Input
4ch&2ch Input
FR
RL
RR
(Front Right) (Rear Left) (Rear Right)
AUX1
FL
FR
RL
RR
(Front Left) (Front Right) (Rear Left) (Rear Right)
AUX1
AUX2
L
R
L
R
(Left)
(Right)
(Left)
(Right)
C
(Center)
SubW
(Subwoofer)
AUX2
L
R
(Left)
(Right)
AUX3
L
R
(Left)
(Right)
13
0.
2ch×3 Input
FL
(Front Left)
60-EN
Autogood products «130»
01GB08PXAH800.fm
ALPINE PXA-H800_EN 68-13530Z65-A (B5)
01GB00PXAH800.book Page 61 Tuesday, February 8, 2011 9:04 PM
Dolby Pro Logic II
Terminology
Dolby Digital
Dolby Digital is a digital audio compression technology
developed by Dolby Laboratories that allows large quantities of
audio data to be efficiently recorded on discs. It is compatible
with audio signals from mono (1 channel) all the way up to 5.1channel surround sound. The signals for the different channels
are completely independent, and since the sound is high quality
digital there is no loss of sound quality.
Dolby Pro Logic II provides multichannel surround sound from
any 2 channel source. It reproduces extended bandwidth
playback with 5.1 channels.
This is made possible by an advanced matrix surround decoder.
This new decoder is able to draw out spatial characteristics of
the recording without adding tonal coloration or artificial delays
that did not exist in the original.
Linear PCM audio
LPCM is a signal recording format used for music CDs. Whereas
music CDs are recorded at 44.1 kHz/ 16 bits, DVDs are recorded
at 48 kHz/16 bits to 96 kHz/24 bits, thereby achieving higher
sound quality than music CDs.
Front
speakers
Rear
speakers
0.
Subwoofer
co
m
.u
a
Center
speaker
DTS
13
Speaker layout for enjoying
Dolby Digital sound/DTS sound
This is a home-use digital sound format of the DTS Sound
System. This is a high quality sound system, developed by
Digital Theater Systems Corp for use in movie theaters.
DTS has six independent sound tracks. The theater presentation
is fully realized in the home and other settings. DTS is the
abbreviation for Digital Theater Systems
Autogood products «130»
61-EN
01GB08PXAH800.fm
ALPINE PXA-H800_EN 68-13530Z65-A (B5)
01GB00PXAH800.book Page 62 Tuesday, February 8, 2011 9:04 PM
In Case of Difficulty
If you encounter a problem, please turn the power off, then on again. If
the unit is still not functioning normally, please review the items in the
following checklist. This guide will help you isolate the problem if the
unit is at fault. Otherwise, make sure the rest of your system is properly
connected or consult your authorized Alpine dealer.
An error during Automatic ImprintEQ adjustment has
occured.
• External noise is interfering with measurement.
- Conduct the measurement in a quiet location.
• The speaker bandwidth may be too narrow.
- Check the X-Over setting of each speaker.
• Gain setting of the amplifier may be too low.
- Check the Gain setting.
Software upgrade to a newer version failed.
• During software upgrade, the USB cable was unplugged, the
ignition key is turned to OFF position, the unit was affected by
another program, etc.
- Stop all active programs, and then upgrade the software again
(see page 11).
- If you still have trouble, stop use of the unit and consult your
Alpine dealer.
co
m
.u
a
No function or display.
• Vehicle’s ignition is off.
- Turn the ignition key on. If connected as per the instructions,
the unit will not operate with the vehicle’s ignition off.
• Unit’s power is not on.
- Turn the ignition key on. Press one of the switches on the
Commander to turn power on. If an Ai-NET compatible head
unit is connected, turn on the power by the head unit.
• Power cord connection is faulty.
- Connect the power cord correctly.
• Display does not show anything (BLACK OUT function).
- Cancel BLACK OUT function (see page 57).
• Blown fuse.
- Check the fuse of the unit; replace with the proper value if
necessary.
• Internal micro-computer malfunctioned due to interference noise
etc.
- Press the RESET switch with a ball-point pen or other pointed
article.
RoadEQ does not work.
• Microphone not connected.
- Check to see that the microphone is correctly connected. Also,
make sure that the cord is not extremely bent.
• RoadEQ setup not completed.
- Check to see that RoadEQ is correctly completed.
13
0.
Power is on but no sound is coming out.
• Volume level is at Minimum.
- Raise the volume level (see pages 12, 36).
• External input system does not match the setup.
- Set the system so that it matches the connected input (see
pages 14, 39).
The sound is not output from the speakers.
• Cord connection is faulty.
- Connect the cord correctly.
• Speaker is in "OFF mode."
- Put the speakers in "ON mode" (see pages 14, 38).
• Subwoofers are "OFF."
- Turn the subwoofers "ON" (see pages 14, 38).
Sound adjustment disabled.
• Defeat is "ON."
- Turn Defeat Off (see pages 12, 36).
DVD volume low.
• Volume levels can be different between CD and DVD.
- Adjust the DVD Level (see pages 34, 57).
Sources cannot be selected.
• Ai-NET device is connected.
- When an Ai-NET compatible head unit is connected, the
source should be switched at the head unit.
Dolby Pro Logic II volume level low.
• Dolby Pro Logic II volume level is generally lower.
- Raise the volume level (see pages 12, 36).
Indication (Commander RUX-C800)
Calibration Error
• Automatic measurement failed for whatever reason.
- Press "Rotary Encoder" to go back to the previous screen and
perform the measurement again.
No Mic
• Microphone not connected.
- Check to see that the microphone is correctly connected. Also,
make sure that the cord is not extremely bent.
No Mic/RoadEQ Off
• Even when RoadEQ is turned on, if no microphone is connected,
RoadEQ is turned off.
- Check to see that the microphone is correctly connected. Also,
make sure that the cord is not extremely bent.
No Data
• Settings are called but there is no preset data stored in the
system.
- Store the preset values.
System Mismatch
Dolby D/Dolby PLII/DTS indicators flash at 1 second
intervals simultaneously.
• Software upgrade to a newer version failed.
- Consult your Alpine dealer.
• The called preset values do not match the current speaker
system.
- Store the preset values again, using the current speaker system.
POWER indicator flashes at 1 second intervals.
• A failure has occurred.
- Following the instruction on the screen, conduct the corrective
measures. Or, consult your Alpine dealer.
62-EN
Autogood products «130»
01GB08PXAH800.fm
ALPINE PXA-H800_EN 68-13530Z65-A (B5)
01GB00PXAH800.book Page 63 Tuesday, February 8, 2011 9:04 PM
Specifications
HI-TEMP (Over 85°C)
• Cabin temperature is too high (temperature inside the unit 85°C
or higher).
- Lower the cabin temperature to normal.
Audio Supply Voltage Low
• Unit internal voltage is abnormal.
- Turn off the system immediately and contact an Alpine dealer.
Remote Out Voltage Low
• Connected device voltage is abnormal.
- Check for any abnormal connection with the externally
connected devices including amplifiers.
Graphic EQ number of bands
Front (left and right)
Rear (left and right)
Center
Subwoofer
Graphic EQ boost cut range
Parametric EQ number of bands
Front/Rear/Center
Subwoofer
Parametric EQ frequency
Front/Rear/Center
• Vehicle battery voltage is high.
- Check the battery voltage.
Battery Voltage Low
• Vehicle battery voltage is low.
- Check the battery voltage.
co
m
.u
a
Battery Voltage High
13
0.
• Analog input audio signal level too high causing clipping.
- Lower the Analog input audio signal level.
• The level was raised too much with EQ settings and DSP output
was clipped.
- Lower the adjusted level of EQ, etc.
- Lower the volume.
Initial setting:
Band 1
Band 2
Band 3
Band 4
Band 5
Band 6
Band 7
Band 8
Band 9
Band 10
Subwoofer
Initial setting:
Band 1
Band 2
Band 3
Band 4
Band 5
Parametric EQ boost cut range
Time correction control range
Frequency response
S/N ratio
• Cabin temperature is too high. (Internal temperature warning)
- Lower the cabin temperature to normal.
Channel separation
Input sensitivity
Subwoofer crossover
Rated output
Distortion factor
Input impedance
Output impedance
Weight
PXA-H800
RUX-C800
Autogood products «130»
31 bands
31 bands
31 bands
10 bands
±12 dB (in 0.5 dB steps)
10 bands
5 bands
20/22/25/28/31.5/36/40/45/50/
56/63/71/80/90/100/110/125/
140/160/180/200/220/250/280/
315/360/400/450/500/560/630/
710/800/900/1k/1.1k/1.2k/1.4k/
1.6k/1.8k/2k/2.2k/2.5k/2.8k/3.2k/
3.6k/4k/4.5k/5k/5.6k/6.3k/7.1k/
8k/9k/10k/11k/12.5k/14k/16k/
18k/20k(Hz)
31.5 Hz
63 Hz
125 Hz
250 Hz
500 Hz
1 kHz
2 kHz
4 kHz
8 kHz
16 kHz
20/22/25/28/31.5/36/40/45/50/
56/63/71/80/90/100/110/125/
140/160/180/200(Hz)
25 Hz
40 Hz
63 Hz
100 Hz
160 Hz
±12 dB (in 0.5 dB steps)
0 to 20 ms (0.05 ms steps)
20 Hz to 20 kHz
>103 dB (IHF-A) (RCA INPUT)
>110 dB (IHF-A) (DIGITAL
INPUT)
90 dB
2 V (Analog) (RCA AUX
INPUT)
7 V (Analog) (SP AUX INPUT)
20 to 200 Hz (1/6 oct. steps)
4V (with 10 k ohms load)
0.01%
10 k ohms or higher
1 k ohm or less
1.35 kg
0.11 kg
63-EN
01GB08PXAH800.fm
ALPINE PXA-H800_EN 68-13530Z65-A (B5)
01GB00PXAH800.book Page 64 Tuesday, February 8, 2011 9:04 PM
Dimensions
PXA-H800
Width
Height
Depth
RUX-C800
Width
Height
Depth
169 mm (6-3/4")
50.8 mm (2")
215 mm (8-1/2")
161 mm (6-3/8")
40 mm (1-5/8")
28 mm (1-1/8")
<Components>
Parts name
Quantity
Parts for mounting ......................................... 1set
Manual .......................................................... 1set
Microphone ................................................... 1set
CD-ROM .................................................. 2pieces
Due to continuous product improvement, specifications and
design are subject to change without notice.
The illustrations included in these instructions may appear
different from the actual product due to printing conditions.
13
0.
co
m
.u
a
• Manufactured under license from Dolby Laboratories. Dolby,
Pro Logic, and the double-D symbol are trademarks of Dolby
Laboratories.
• Manufactured under license under U.S. Patent #’s:
5,451,942; 5,956,674; 5,974,380; 5,978,762; 6,487,535 &
other U.S. and worldwide patents issued & pending. DTS
and the Symbol are registered trademarks & DTS Digital
Surround and the DTS logos are trademarks of DTS, Inc.
Product includes software. © DTS, Inc. All Rights Reserved.
• EUPHONY and EUPHONY AUTOMOBILE are trademarks of
DiMAGIC Co., Ltd.
64-EN
Autogood products «130»
01GB08PXAH800.fm
ALPINE PXA-H800_EN 68-13530Z65-A (B5)
13
0.
co
m
.u
a
01ES00PXAH800.book Page 66 Tuesday, February 8, 2011 9:57 PM
Autogood products «130»
01ES08PXAH800.fm
ALPINE PXA-H800_ES 68-13530Z65-A (B5)

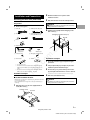
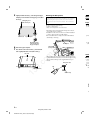
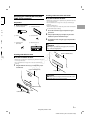
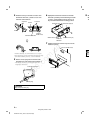
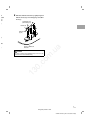
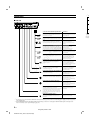

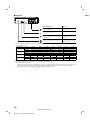
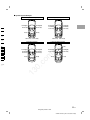
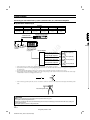
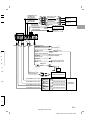
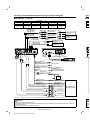
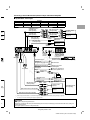
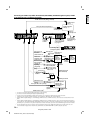

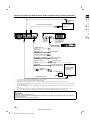


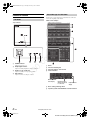
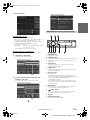
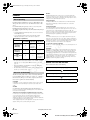


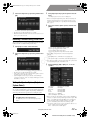
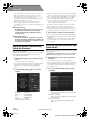
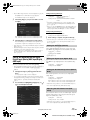
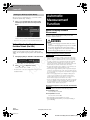
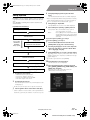
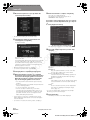
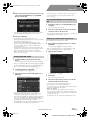
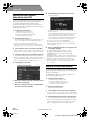
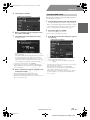


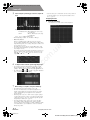
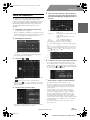

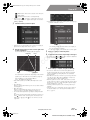
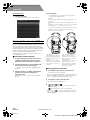
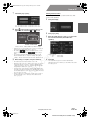
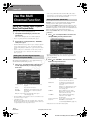
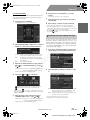
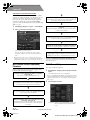
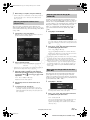


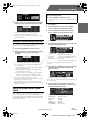
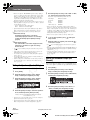
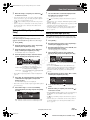
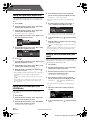
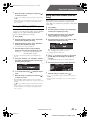

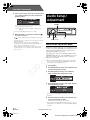
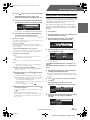
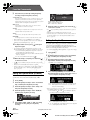

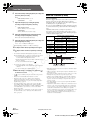

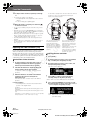
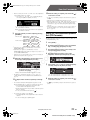
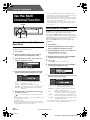
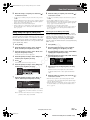
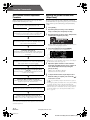
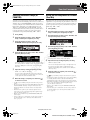


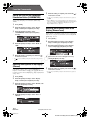
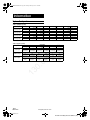
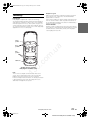

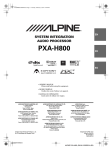
![2 Gire el [Codificador giratorio] para seleccionar](http://vs1.manualzilla.com/store/data/006238366_1-359311a6108ed310ba7d779d3b792145-150x150.png)