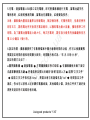
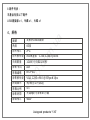
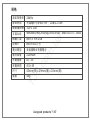
1
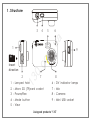
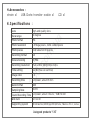
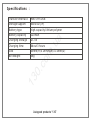
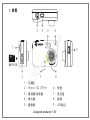
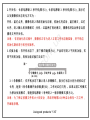
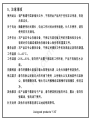
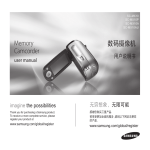
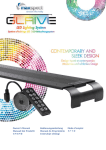
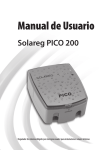
PHONES
(044) 360-7-130
(050) 336-0-130
(063) 788-0-130
(067) 233-0-130
(068) 282-0-130
Internet store of
autogoods
ICQ
294-0-130
597-0-130
SKYPE
km-130
CAR RECEIVERS — Receivers • Media receivers and stations • Native receivers • CD/DVD changers • FM-modulators/USB adapters • Flash memory • Facia plates and adapters • Antennas • Accessories |
CAR AUDIO — Car audio speakers • Amplifiers • Subwoofers • Processors • Crossovers • Headphones • Accessories | TRIP COMPUTERS — Universal computers • Model computers • Accessories |
GPS NAVIGATORS — Portable GPS • Built-in GPS • GPS modules • GPS trackers • Antennas for GPS navigators • Accessories | VIDEO — DVR • TV sets and monitors • Car TV tuners • Cameras • Videomodules
• Transcoders • Car TV antennas • Accessories | SECURITY SYSTEMS — Car alarms • Bike alarms • Mechanical blockers • Immobilizers • Sensors • Accessories | OPTIC AND LIGHT — Xenon • Bixenon • Lamps
• LED • Stroboscopes • Optic and Headlights • Washers • Light, rain sensors • Accessories | PARKTRONICS AND MIRRORS — Rear parktronics • Front parktronics • Combined parktronics • Rear-view mirrors
• Accessories | HEATING AND COOLING — Seat heaters • Mirrors heaters • Screen-wipers heaters • Engine heaters • Auto-refrigerators • Air conditioning units • Accessories | TUNING — Vibro-isolation
• Noise-isolation • Tint films • Accessories | ACCESSORIES — Radar-detectors • Handsfree, Bluetooth • Windowlifters • Compressors • Beeps, loudspeakers • Measuring instruments • Cleaners • Carsits
• Miscellaneous | MOUNTING — Installation kits • Upholstery • Grilles • Tubes • Cable and wire • Tools • Miscellaneous | POWER — Batteries • Converters • Start-charging equipment • Capacitors
• Accessories | MARINE AUDIO AND ELECTRONICS — Marine receivers • Marine audio speakers • Marine subwoofers • Marine amplifiers • Accessories | CAR CARE PRODUCTS — Additives • Washer fluid •
Care accessories • Car polish • Flavors • Adhesives and sealants | LIQUID AND OIL — Motor oil • Transmission oil • Brake fluid • Antifreeze • Technical lubricant
In store "130" you can find and buy almost all necessary goods for your auto in
Kyiv and other cities, delivery by ground and postal services. Our experienced
consultants will provide you with exhaustive information and help you to chose
the very particular thing. We are waiting for you at the address
http://130.com.ua
13
0.
co
m
.u
a
Manual
1280 x 960 full real-time video & 8 million-pixel digital camera
Autogood products “130”
1. Structure
M
4
5
6
.u
a
3
9
co
m
1
13
2
0.
Insert
direction
7
8
1 : Lanyard hole
6 : DV indicator lamps
2 : Micro SD (TF)card socket
7 : Mic
3 : Power/Rec
8 : Camera
4 : Mode button
9 : Mini USB socket
5 : View
Autogood products “130”
2. Introduction
This product is market demand for the introduction of a super-small,
high-definition digital video cameram, and outstanding high-definition
digital video recording camera , high-speed USB data transfer , USB
charging function , webcam function , motion detection video
.u
a
recording function 、portable camera function and other functions
m
that has a number of inventions and technical patents.
a. Parts Description :
co
3. Operating
0.
a.1 Indicator : Blue light is a photo mode indicator ; Red light is
13
video model indicator.
a.2 Micro SD Socket : Part (2) is Micro SD (TF) Card socket , Insert
the card with direction arrow please.
a.3 Button(3) : Press the button to turn on, turn off, start, stop, video
recording, sound recording.
Autogood products “130”
a.4 Socket : USB socket (2) is used to connect computer or charger.
It is the interface for data transfer and charging.
a.5 Microphone and camera : Microphone (6) is used to get the
sound signal ; Camera(7) is used to get the image signal.
.u
a
b. Turn on/off :
Press the button "Power" for 2 seconds long , to turn on (Structure 3).
m
Press the button "Power" for 3 seconds long , to turn off (Structure 3).
co
The changes in the status of the indicator lamp and the camera
will be :
0.
Turn On : The blue lamp keeps lighting up. The camera enters the
process of initialization. After the initialization is completed , the blue
13
lamp goes out , but the red lamp keeps lighting up , and then the
preset mode of general recording begins.
Turn Off : The red lamp and the blue lamp go out simultaneously.
The camera will automatically save the currently-recorded file and
then turn off.
Note : In the process of initialization , the camera is preparing for
Autogood products “130”
entering the status of normal operation , and it will not respond to
any operation performed during the period of initialization.
c. Switch Function :
In the status of turning on , press the button "Mode"(Structure 4)
.u
a
, and the product will enter a different mode , to realize different
functions. The concrete way to switch the function is listed as
Press the button “Mode”shortly, to make a switch
0.
co
Picture 1
m
follows :
General Recording
Sound Recording
Photo Taking
13
(preset mode)
c.1 General Recording : In the status of turning on , the preset
mode is the mode of general recording. The status of the indicator
lamp will respectively be : When standing by , the red lamp keeps
lighting up ; press the button "Record" for one second shortly , the
recording begins(Structure 3) , and the red lamp will blink when the
Autogood products “130”
operation is performed. If the current work mode is the Motion
Detection Mode , please press the button "Power" for one second
shortly to enter the mode of General Recording (Structure 3).
Note : In order to guarantee the size and security of files , the
camera will automatically save files in every 30 minutes, and then
.u
a
record automatically.
c.2 Recording of Motion Detection : In any mode , press the button
m
"Mode" for long (Structure 4). When the indicator lamp has changed
to be that the red lamp keeps lighting up while the blue lamp blinks
co
, release the button , and the camera will enter the status of
0.
standing-by in the Motion Detection Mode. When the frame change
has exceeded to a certain range, the product will be automatically
13
triggered to begin recording ; at this moment , the red lamp blinks
while the blue lamp keeps lighting up. If the detected frame has no
changes for incessant 30 seconds , the product will stop recording
automatically and then enters the status of standing-by in the Motion
Detection Mode. When the motion detection recording is triggered ,
press any button and the recording will cease , to enter the mode
Autogood products “130”
of General Recording. At this moment , the red lamp will light up
forlong , to be in the status of standing-by.
Note : When the camera is in the environment in which the light is
constantly changing , or when the camera is fixed on an object
.u
a
which has greater vibration , the product will be automatically
triggered to begin recording.
c.3 Sound Recording : Refer to Picture 1 , and please press the
m
button "Mode" (Structure 4) , to switch to the mode of Sound
co
Recording. The status of standing-by in that mode is that the blue
lamp lights up for long. Press the button "Record" shortly , and the
0.
sound recording begins. At this moment , the blue lamp blinks
slowly. In the process of sound recording , press the button "Record"
13
to stop recording , and then the document will be saved.
c.4 Photo Taking : Refer to Picture 1 , and please press the button
“Mode” (Structure 4) , to switch to the mode of Photo Taking. The
status of standing-by in that mode is that the blue lamp and the
red lamp light up for long. Every time when the button "Record" is
pressed shortly , the red lamp and the blue lamp will blink once ,
Autogood products “130”
for taking a photo and saving the file , and then returning to the
status of standing-by.
Note : Please keep a distance above 50cm , so as to obtain a
clear picture.
c.5 PC Camera : In the status of turning-on in any mode , please
.u
a
make the USB port in a PC be connected , and then you can
enter the online camera mode of PC Camera. In such a mode ,
m
you can utilize the camera to be the PC lens , so as to have a
video chat online, take mug shots , etc.
co
Note : Depending on PC placement or system differences , the PC
0.
may not be able to detect the camera function at once. If it
occasionally happens that the PC fails to unfold the camera
13
function but enters the removable disk instead , please remove the
camera. Then , after the camera is turned on again , reconnect it
to the PC again. If you are using the camera’s PC photographing
function on the PC for the first time , please install the camera
driver contained in the attached CD or provided by the distributor.
Autogood products “130”
d. Connect to PC :
In the status of turning-off or turning-on , it can be connected to
PC. At this moment , a mark of removable disk will be ejected
and displayed on the PC. The directory for saving the video files is
"*Disk \_REC\100MEDIA". When the camera is exchanging the data
.u
a
with the PC , the blue lamp will blink quickly. If you need to
remove the camera , please click the icon for removing the
m
removable disk at the right corner of the queue of the resident
programs , and then remove such storage equipment. After the
co
system has confirmed that the hardware can be pulled out safely ,
0.
you can disconnect the camera from the PC.
Note : Depending on PC placement or system differences , the
13
time for distinguishing the removable disk will be different. Please be
patient , and you’d better not to perform any operation of the
camera during this period, for fear of causing influence on the
process of distinguishing the hardware performed by the PC. If the
PC fails to distinguish the removable disk for a long time , please try
to insert it again. If the PC still fails to do so, please make sure that
Autogood products “130”
the operating system, driver, USB hole and connecting line are
normal. Please remove the hardware according to the procedures
in the stipulations , for fear of causing damage to the PC or the
camera.
.u
a
e. Charge :
Please connect it to the USB hole on the PC or to the charger ,
m
and the camera can be charged. When the battery is in the status
of charging , the red lamp will blink slowly. When the battery
co
charge is full , the red lamp will light up for long.
0.
Note : A high-volume polymer lithium battery is installed within the
camera. It has no memory function , but it can be charged at
13
any time. However , at the preceding five times of usage , please
recharge the battery fully after its volume is used up , in order to
obtain the maximum volume of the battery as well as the standard
work time. Every time when you charge the battery , please
continue to keep charging it for 30 minutes to one hour after the
indicator lamp lights up for long , in order to maximize the battery’s
Autogood products “130”
power storage capacity.
f. Time Setting :
The camera can display the time and the date of the recording in
a video file. Depending on your real needs , you can set up the
.u
a
numbers for the time and whether to display the time.
The layout for showing the time is :
m
"Year, Month, Day, Hour, Minute, Second"
co
The way to set up the time :
a. Turn off the camera
Connect to the PC
In the empty place of the root
0.
removable disk in the camera
Turn on the
directory in the camera , click the mouse’s right button once
13
Move the mouse to the item "Add" in the ejected directory
Choose "Text Document"
Entitle that text document to be "time" ;
be careful that its filename is ".txt"
The document establishment of
time setting is completed. Also , by following the aforementioned
steps , you can establish the document on the PC desk-top , other
disk division , or other document file , and then copy it to the root
Autogood products “130”
directory in the removable disk.
b. Open the text document "time" , and input the word-string of
time setting within it. The word-string comprises the several parts
"Year, Month, Day, Hour, Minute, Second" and "Display/Conceal the
Switch". To set up the time , please set it up according to the
.u
a
following format :
Time display : 2010.01.01 12:01:01 Y
m
No Time Display : 2010.01.01 12:01:01 N
The aspects of time-string in the aforementioned format are the time
co
numbers you intend to set up. Notice the blanks in "Year, Month,
0.
Day" and "Hour, Minute, Second" , in which the "Y" and "N" in the
last part are the word-strings for time display— the "Y" shows "Yes" ,
13
while the "N" shows "No".
c. After confirming the document of time setting has been copied
to the root directory , remove the hardware and turn on. Then ,
time setting is completed.
d. The already-set time will be stored in the camera.
Autogood products “130”
H. Accessories :
chain x1
USB Data transfer cable x1
CD x1
4. Specifications :
High-end quality lens
60 degree
.u
a
Lens
View range
Photo forma t
JPG
Photo resolution
8.0 Me ga pixels , 3264 x 2448 pixels
1GB/ about 2100 pieces
AVI
Video encoding
M- JPEG
Recording resolution
VGA,1280 x 960@3 0fps±1fps
Time setting
Yes/No(You can set free)
0.
co
m
Photo pieces
Recording forma t
4:3
13
Ima ge ratio
Recording time
Full power, about 85 mi n
Audio forma t
WA V
Samp ling Rate
24kHz
Sound Recording Time Full power, about 3 hours;1GB /12.34h
We b Cam
320 x 240
Supporting system
Wi ndows me /2000/xp/2003/Vista;Ma c os 10.4;Linux;
Autogood products “130”
Specifications :
Mini 5 Pin USB
Storage support
Micro SD (TF)
Battery type
high-capacity lithium polymer
Battery capacity
220mAh
Charging Voltage
DC-5V
Charging time
About 3 hours
Size
45mm(H) x 29mm(W) x 10mm(D)
Net Weight
46g
13
0.
co
m
.u
a
Transfer interface
Autogood products “130”
5. Warning :
Application : Please strictly abide relevant regulations and
laws. This product should not be used for any illegal purposes.
The user is fully responsible for its using purpose.
Battery : If do not use this recording function after long time,
.u
a
please charged it fully before using.
File security : This product is not a professional storage
m
device. It does not guarantee the integrity and security of
co
saved files. Please back up your important documents on the
computer or other storage device timely.
0.
Video quality : This product is not a professional video
recording device. It does not guarantee the video effect can
13
meet your expectations.
Operating temperature : 0—40°C.
Operating humidity : 20% -80%. This product does not have
the waterproof function. So it can not work under the humid
environment.
Autogood products “130”
Shooting brightness : Do not expose the camera directly to
Strong light, such as the sun light, to avoid damage to optical
devices.
Cleaning : Do not use it under the environment with high dust
density to avoid the contamination of camera lens or other
.u
a
components. It may affect the working of camera. The
is used to clean glasses.
m
camera lens can be cleaned gently by paper or cloth which
co
Other matters : The product belongs to sophisticated
electronic products. Please make sure that it is not damaged
0.
by strong impact and strong vibration. Do not use it in the
place with strong magnetic or strong electric power.
13
Note : Please contact with your local dealer for other matters.
Autogood products “130”
1. 總覽
M
5
4
6
.u
a
3
2
13
插卡方向
0.
co
m
1
7
8
1 : 吊繩孔
2 : Micro SD (TF)卡
6 : 燈號
3 : 電源鍵/錄 影 鍵
7 : 麥克風
4 : 模式鍵
8 : 鏡頭
5 : 觀景窗
9 : USB插 孔
Autogood products “130”
9
2、產品簡介
此款產品是針對市場需求推出的一款超小型高畫質數位攝影機,該產品具有領先
群雄的高畫質數位影音錄影、拍照、錄音、位移偵測錄影、USB數據傳輸、USB
充電、網路攝影機等功能,並擁有多項發明及技術專利。
.u
a
3、操作說明
1. 各部件說明:
co
示攝影機的工作狀態。
m
1.1 指示燈說明:狀態指示燈由紅燈和藍燈組成,通過不同點亮方式的組合來指
1.2 卡座說明:圖示2 為 Micro SD(TF)卡插槽,請按照圖示方向插入儲存卡。
0.
1.3 按鈕說明:輕觸按鈕用於開關機、開始和停止攝影、拍照(圖示3)。
13
1.4 插頭說明:USB 插座(圖示9),用於連接電腦或者充電器,是進行數據傳
輸和充電的接口。
1.5 麥克風和鏡頭:麥克風(圖示7),用來錄制聲音訊號;鏡頭(圖示8),用來拍攝
影像訊號。
Autogood products “130”
2.開關機:長按電源鍵 2 秒開機(圖示3),長按電源鍵 3 秒關機(圖示3),指示燈以
及攝影機狀態變化方式為:
開機:藍燈恆亮,攝影機進入系統初始化過程,初始化完成後,藍燈熄滅,紅燈
恆亮,進入預設的一般錄影模式;關機:紅燈藍燈同時熄滅,攝影機將自動保存
.u
a
當前錄影檔案並關機。
注意:在初始化的過程中,攝影機正在為進入正常工作狀態做準備,將不回應初
m
始化期間進行的任何操作。
3.切換功能:在開機狀態下,按下模式鍵(圖示4),產品即可進入不同的模式,實
短按模式鍵按壓變化
0.
圖一
co
現不同的功能,具體功能切換方法如下:
一般錄影
錄製聲音
拍攝照片
13
(預設模式)
3.1 一般錄影:在開機狀態下預設為一般錄影模式,指示燈狀態分別為待機紅
燈恆亮,短按 1 秒錄影鍵開始錄影(圖示3),工作時紅燈閃爍 。如果當前工作
模式為位移偵測模式,請短按電源鍵 1 秒鐘進入一般錄影模式(圖示3)。
注意:為了保證檔案的大小和安全性 ,本機將每隔30分鐘自動保存檔案,並自動
錄影。
Autogood products “130”
3.2 位移偵測錄影:於任意模式下長按模式鍵(圖示4),等待指示燈轉為紅燈恆
亮藍燈閃爍時鬆開按鍵,攝影機進入了位移偵測模式的待機狀態。當畫面變動
超過一定幅度時,產品自動被觸發錄影,此時紅燈閃爍,藍燈恆亮。若偵測畫
面連續30秒無變化時,產品將自動停止錄影並進入位移偵測模式的待機狀態。
.u
a
位移偵測錄影觸發時,按任一按鍵即停止錄影,進入一般錄影模式,此時紅燈
長亮為待機狀態。
物體上時,產品將自動觸發錄影 。
m
注意:當攝影機處於光線不斷變化的環境下時,或者攝影機被固定在震動較大的
co
3.3錄製聲音 : 參考圖一,請按下模式鍵(圖示4 ),切換至錄製聲音模式 ,該模
式的待機狀態為藍燈長亮,短按錄影鍵,開始錄音,此時藍燈慢速閃爍;在錄
0.
音過程中,短按錄影鍵,停止錄音,保存文件 。
13
3.4拍攝 照片 : 參考圖一,請按下模式鍵(圖示4),切換至拍攝照片模式 ,該模
式的待機狀態為 紅藍燈長亮,每短按一次錄影鍵,紅藍燈閃 爍一次,拍攝一張
照片並儲存,回到待機狀態。
注意:請保持50cm以上的距離,以得到畫面清晰的影像。
Autogood products “130”
3.5.PC Camera:在任意模式的開機狀態下,連接電腦 USB 接孔,即可進入
PC Camera網路攝影機模式,在該模式下,你可以將攝影機作為電腦鏡頭使用
,與好友網上視訊聊天,拍攝大頭貼,等等。
注意:根據電腦配置或者系統差異,電腦不一定一次就能檢測到攝影機功能,如
果偶然出現電腦無法進入攝影機功能而進入了卸除式磁碟,請移除攝影機,並在
.u
a
攝影機開機後重新連接電腦;如果你是第一次在你電腦上使用攝影機的電腦攝影
m
功能,請安裝隨機光碟裡面或者經銷商提供的攝影機驅動程式。
4.連接電腦:在關機狀態或待機狀態時,可以連接電腦,此時電腦將會彈出 卸除
co
式磁碟 標識,影像文件保存目錄為:*碟\_REC\100MEDIA;當攝影機與電腦交換
0.
資料時,藍燈會快速閃爍;需要移除攝影機時,請點擊常駐程式右下角的 卸除式
磁碟 管理圖示,在裡面移除該儲存設備,待系統確認可以安全拔出硬體後,再斷
13
開攝影機與電腦的連接。
注意:根據電腦配置或者系統差異,識別卸除式磁碟的時間會稍有不同,請耐心
等待,此期間最好不要進行攝影機的操作,以免對電腦識別硬體造成影響。如果
長時間未識別到卸除式磁碟,請嘗試重新插入,如果仍舊無法識別該硬體,請確
認你的操作系統、驅動程示、USB 接孔、連接線是否都正常;請按照規範的流程
移除硬體,以免對電腦或者攝影機造成損害。
Autogood products “130”
5.充電:連接電腦 USB插口或充電器,即可對攝影機進行充電,當電池處於充
電狀態時,紅燈將慢速閃爍,當電池充滿電後,紅燈變為長亮;
注意:攝影機內置高容量聚合物鋰電池,無記憶效應,可隨用隨充,但最初使用
的前五次,請將電池用完後再充電至飽和,以獲取電池最大容量,獲取標準工作
時間。為了讓電池儲電能力最大化,每次充電時,請在指示燈長亮後繼續保持充
.u
a
電 30分鐘至 1個小時。
m
6.設定時間:攝影機提供了在影像檔案中顯示錄像時間的功能,你可以根據實際
連接電腦
打開攝影機 卸除式磁碟
0.
a.關閉攝影機
白處單擊滑鼠右鍵
co
需要設定時間的值和時間顯示與否;時間顯示格式為:“年.月.日時:分:秒”,
設定時間方法如下:
在攝影機根目錄下面空
把滑鼠移至彈出目錄的“新增”選項上方
13
給該文字文件取名為“time”,需要注意它的副檔名為“.txt”
選擇“文字文件”
時間設定文件
建成;你也可以按照上述步驟在電腦桌面、其他磁碟分區、其他文件夾下建好後
再拷貝到 卸除式磁碟 的根目錄。
Autogood products “130”
b. 打開“time”文字文件,在裡面輸入時間設置字串,字串由“年月日時分秒顯示 /
隱藏開關”幾個部分組成,要設置時間,請按以下格式設置:
有時間顯示:2010.01.01 12:01:01 Y
不顯示時間:2010.01.01 12:01:01 N
上述格式中的時間字串部分為你想設置的時間值,注意年月日與時分秒中的空格
.u
a
,末位的“Y”和“N”是時間顯示的字串,“Y”表示“Yes”;“N”表示“No”。
c. 確認時間設置文件已經拷貝到根目錄之後,移除硬體,開機,時間設置完成。
7.異常處理:
co
m
d. 設置好的時間將儲存到攝影機裡面。
0.
攝影機儲存空間不足時,將在藍燈和紅燈同時閃爍約 5 秒後,自動儲存當前影像
13
文件並關機。如果你要繼續使用攝影機,請在電腦上備份重要的影像 檔案 ,並刪
除儲存器內的舊文件,以騰出足夠儲存空間;
攝影機電池餘量不足時,將在藍燈和紅燈交替閃爍約 5 秒後,自動儲存當前影像
檔並關機。如果你要繼續使用攝影機,請先充電。
Autogood products “130”
8.配件列表:
本產品包括以下配件
USB連接線 x1、吊繩 x1、光碟 x1
高解析CMOS鏡頭
角度
60度
照片格式
JPG
m
鏡頭
.u
a
4、規格
800萬畫素,3264 x 2448 pixels
1GB約可拍攝2100張
錄影 格式
AVI
影像編碼
M-JPEG
錄影解析度
VGA,1280 x960 @30fps±1fps
時間顯示
有/無(可自行設定)
0.
13
影像比例
co
照片解析度
拍照數量
4:3
錄影時間
充滿電約可錄影85分鐘
錄音格式
WAV
Autogood products “130”
規格
音訊採樣率
24kHz
錄音時間
充滿電約可錄音3小時;1GB/12.34h
網路攝影機
320 x 240
Windows me/2000/xp/2003/vista;Mac os 10.4;Linux;
傳輸介面
Mini 5 Pin USB
記憶卡
Micro SD (TF)
電池類型
高容量聚合物鋰電池
電池容量
220mAh
充電電壓
DC-5V
充電時間
約3小時
尺寸
45mm(長) x 29mm(寬) x 10mm(高)
重量
46g
13
0.
co
m
.u
a
支援系統
Autogood products “130”
5、注意事項
使用場合: 請嚴格遵守國家相關法令,不得將此產品用於任何非法用途,否則
後果自負。
關於電池: 隨著使用時間增長,電池工作時間會有所縮短。長久未使用,請在
使用前先充滿電。
.u
a
檔案安全: 本產品非專業儲存設備,不保證內部儲存文件的完整性和安全性,
請即時在電腦或者其他儲存設備上備份您的重要文件。
m
攝錄品質: 本產品非專業攝錄設備,不保證所攝錄文件的效果能達到您的期望。
co
工作溫度: 0—40°C。
工作溼度: 20%—80%,請勿將產品置於潮溼的工作環境,產品不具備防水功
0.
能。
拍攝照度: 請勿將攝像頭直接對着太陽等強光源,以免光學器件受到損傷。
13
保潔要求: 請勿在粉塵密度過大的環境下使用,以免鏡頭以及其他部件沾染粉
塵,影響攝像效果。鏡頭可以用拭鏡紙或眼鏡布輕輕擦拭,保持潔
淨。
其他事項: 該產品屬於精密電子產品,請勿使其受到強烈衝擊、震動;請勿在
強磁場、強電場下使用。
補充說明: 其他未說明事宜請與當地經銷商聯系。
Autogood products “130”
1. 总览
M
5
4
6
.u
a
3
2
13
插卡方向
0.
co
m
1
7
8
1 : 吊绳孔
2 : Micro SD (TF)卡
6 : 灯号
3 : 电源键/录影键
7 : 麦克风
4 : 模式键
8 : 镜头
5 : 观景窗
9 : USB插 孔
Autogood products “130”
9
2、产品简介
此款产品是针对市场需求推出的一款超小型高清数码摄像机,该产品具有领先群
雄的高画质数码摄像、拍照、录音、移动侦测录影、USB数据传输、USB充电、
网络摄像头等功能,并拥有多项发明及技术专利。
.u
a
3、操作说明
1.各部件说明:
co
示摄像机的工作状态。
m
1.1 指示灯说明: 状态指示灯由红灯和蓝灯组成,通过不同点亮方式的组合来指
1.2 卡座说明: 图2 为Micro SD(TF)卡插口,请按照图示方向插入存储卡。
0.
1.3 按钮说明: 轻触按钮用于开关机、开始和停止摄像、拍照(图示3)。
13
1.4 插头说明:USB插座(图示9),用于连接电脑或者充电器,是进行数据传输和
充电的接口。
1.5 麦克风和摄像头: 麦克风(图示7),用来拾取声音信号;摄像头(图示8),用
来拾取影像信号。
Autogood products “130”
2.开关机: 长按电源键 2 秒开机(图示3),长按电源键 3 秒关机(图示3),指示灯
以及摄像机状态变化方式为:
开机:蓝灯点亮,摄像机进入系统初始化过程,初始化完成后,蓝灯熄灭,红灯
长亮,进入默认的录像模式;关机:红蓝两灯同时熄灭,摄像机将自动保存当前
.u
a
摄录文件并关机。
注意: 在初始化的过程中,摄像机正在为进入正常工作状态做准备,将不响应
初始化期间进行的任何操作。
m
3.切换功能: 在开机状态下,按下模式键(图示4),产品即可进入不同的功能,实
短按模式键按压变化
0.
圖一
co
现不同的功能,具体功能切换方法如下:
录像模式
录制声音
拍摄照片
13
(默认模式)
3.1 录像模式: 在开机状态下默认进入录像模式,指示灯状态分别为待机红灯
长亮,短按 1 秒录影键开始录影(图示3),工作时红灯闪亮 。如果当前工作模式
为移动侦测模式,请短按电源键 1 秒钟进入一般录像模式(图示3)。
注意:为了保证拍摄文件的大小和安全,系统将每隔30分钟自动保存一次文件,
并继续录像。
Autogood products “130”
3.2 移动侦测模式: 於任意模式下长按模式键(图示4),等待指示灯转为红灯恒
亮蓝灯闪烁时松开按键,摄像机进入了移动侦测模式的待机状态。当画面变动
超过一定幅度时,产品自动被触发录像,此时红灯闪亮,蓝灯长亮。若侦测画
面连续30秒无变化时,产品将自动停止录像并进入移动侦测模式的待机状态。
.u
a
移动侦测摄像触发时,按任一按键即停止录像,进入录像模式模式,此时红灯
长亮为待机状态。
物体上时,产品将自动触发录影。
m
注意:当摄像机处於光线不断变化的环境下时,或者摄像机被固定在震动较大的
co
3. 3 录制声音 : 参考图一,请按下模式键(图示4),切换至录制声音模式,该模
式的待机状态为蓝灯长亮,短按录影键,开始录音,此时蓝灯慢速闪烁;在录
13
0.
音过程中,短按录影键,停止录音,保存文件。
3. 4 拍摄照片: 参考图一,请按下模式键(图示4),切换至拍摄照片模式,该模式
的待机状态为红蓝灯长亮,每短按一次录影键,红蓝灯闪亮一次,拍摄一张照
片并储存,回到待机状态。
注意:请保持50cm以上的距离,以得到画面清晰的影像。
Autogood products “130”
3.5. PC摄像头: 在任意模式的开机状态下,连接电脑 USB接口,即可进入
PC Camera 网络摄像头模式,在该模式下,你可以将摄像机作为电脑摄像
头使用,与好友网上视频聊天,拍摄大头贴,等等。
注意: 根据电脑配置或者系统差异,电脑不一定一次就能检测到摄像头功能,
.u
a
如果偶然出现电脑无法进入摄像头功能而进入了可移动磁盘,请移除摄像机,
并在摄像机开机后重新连接电脑;如果你是第一次在你电脑上使用摄像机的电
m
脑摄像头功能,请安装随机光盘里面或者经销商提供的摄像头驱动程序。
co
4.连接电脑: 在关机状态或者待机状态时,可以连接电脑,此时,电脑将会弹出
可移动磁盘标识,影像文件保存目录为:*盘\_REC\100MEDIA;当摄像机与电
0.
脑交换数据时,蓝灯会快速闪烁;需要卸载摄像机时,请点击任务栏右下角的可
13
移动设备管理图标,在里面卸载该可移动存储设备,待系统确认可以安全拔出硬
件后,再断开摄像机与电脑的连接。
Autogood products “130”
注意: 根据电脑配置或者系统差异,识别可移动磁盘的时间会稍有不同,请耐
心等待,此期间最好不要进行摄像机的操作,以免对电脑识别硬件造成影响。如
果长时间未识别到可移动磁盘,请尝试重新插入,如果仍旧无法识别该硬件,请
确认你的操作系统、驱动程序、usb接口、连接线是否都正常;请按照规范的流
.u
a
程卸载硬件,以免对电脑或者摄像机造成损害。
5.充电: 连接电脑USB接口或充电器,即可对摄像机进行充电,当电池处于充电
m
状态时,红灯将慢速闪烁,当电池充满电后,红灯变为长亮;
注意: 摄像机内置高容量聚合物锂电池,无记忆效应,可随用随充,但最初使用
co
的前五次,请将电池用完后再充电至饱和,以激活电池最大容量,获取标准工作
0.
时间。为了让电池储电能力最大化,每次充电时,请在指示灯长亮后继续保持充
13
电 30 分钟至 1 个小时。
6.设置时间: 摄像机提供了在视频文件中显示录像时间的功能,你可以根据实际
需要设置时间的值和时间显示与否;时间显示格式为:“年.月.日时:分:秒”,设置时
间方法如下:
a. 关闭摄像机
连接电脑
打开摄像机可移动磁盘
Autogood products “130”
在摄像机根目录下面空
白处单击鼠标右键
把鼠标移至弹出菜单的“新建”选项上方
选择“文本文档”
给该文本文档取名为“time”,需要注意它的扩展名为“.txt”
时间设置文件
建成;你也可以按照上述步骤在电脑桌面、其他磁盘分区、其他文件夹下建好
后再拷贝到可移动磁盘的根目录。
b. 打开“time”文本文档,在里面输入时间设置字符串,字符串由“年月日时分秒
带时间显示:2010.01.01 12:01:01 Y
m
不显示时间:2010.01.01 12:01:01 N
.u
a
显示/隐藏开关”几个部分组成,要设置时间,请按以下格式设置:
co
上述格式中的时间字符串部分为你想设置的时间值,注意年月日与时分秒中的空
格,末位的“Y”和“N”是时间显示的标志字符,“Y”表示“Yes”;“”表示“No”。
0.
c. 确认时间设置文件已经拷贝到根目录之后,卸载硬件,开机,时间设置完成。
7.异常处理:
13
d. 设置好的时间将保存到摄像机里面。
摄像机存储空间不足时,将在蓝灯和红灯同时闪烁约5秒后,自动保存当前影像
文件并关机。如果你要继续使用摄像机,请在电脑上备份重要的影像文件,并删
除存储器内的旧文件,以腾出足够存储空间;摄像机电池余量不足时,将在蓝灯
Autogood products “130”
和红灯交替闪烁约5秒后,自动保存当前影像文件并关机。如果你要继续使用摄
像机,请先充电。
8.配件列表:
本产品包括以下配件
.u
a
USB 连接线 x1
吊绳 x1
13
0.
co
m
光碟 x1
Autogood products “130”
4、规 格
高解析CMOS镜头
角度
60度
照片格式
JPG
照片解析度
800万画素,3264 x 2448 pixels
.u
a
镜头
1GB约可拍摄2100张
录影格式
AVI
影像编码
M-JPEG
录影解析度
VGA,1280 x 960@30fps±1fps
时间显示
有/无(可自行设定)
影像比例
4:3
录影时间
充满电约可录影85分钟
录音格式
WAV
13
0.
co
m
拍照数量
音讯采样率
24kHz
录音时间
充满电约可录音3小时;1GB/12.34h
网路摄影机
320 x 240
支援系统
Windows me/2000/xp/2003/vista;Mac os 10.4;Linux;
Autogood products “130”
规格
Mini 5 Pin USB
記憶卡
Micro SD (TF)
電池類型
高容量聚合物鋰電池
電池容量
220mAh
充電電壓
DC-5V
充電時間
約3小時
尺寸
45mm (長) x 29 mm (寬) x 1 0mm (高)
重量
46 g
13
0.
co
m
.u
a
传输介面
Autogood products “130”
5、注意事项
使用场合:请严格遵守国家相关法令,不得将此产品用于任何非法用途,否则
后果自负。
关于电池:随着使用时间增长,电池工作时间会有所缩短。长久未使用,请在
使用前先充满电。
.u
a
文件安全:本产品非专业存储设备,不保证内部存储文件的完整性和安全性,
请即时在电脑或者其他存储设备上备份您的重要文件。
m
摄录品质:本产品非专业摄录设备,不保证所摄录文件的效果能达到您的期望。
工作温度:0—40°C。
能。
co
工作湿度:20%—80%,请勿将产品置于潮湿的工作环境,产品不具备防水功
0.
拍摄照度:请勿将摄像头直接对着太阳等强光源,以免光学器件受到损伤。
13
保洁要求:请勿在粉尘密度过大的环境下使用,以免镜头以及其他部件沾染粉
尘,影响摄像效果。镜头可以用擦镜纸或眼镜布轻轻擦拭,保持洁
净。
其他事项:该产品属于精密电子产品,请勿使其受到强烈冲击、震动;请勿在
强磁场、强电场下使用。
补充说明:其他未说明事宜请与当地经销商联系。
Autogood products “130”
.u
a
m
co
0.
13
Autogood products “130”