1
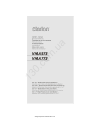
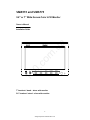
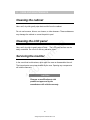
PHONES (044) 360-7-130 (050) 336-0-130 (063) 788-0-130 (067) 233-0-130 (068) 282-0-130 Internet store of autogoods ICQ 294-0-130 597-0-130 SKYPE km-130 CAR RECEIVERS — Receivers • Media receivers and stations • Native receivers • CD/DVD changers • FM-modulators/USB adapters • Flash memory • Facia plates and adapters • Antennas • Accessories | CAR AUDIO — Car audio speakers • Amplifiers • Subwoofers • Processors • Crossovers • Headphones • Accessories | TRIP COMPUTERS — Universal computers • Model computers • Accessories | GPS NAVIGATORS — Portable GPS • Built-in GPS • GPS modules • GPS trackers • Antennas for GPS navigators • Accessories | VIDEO — DVR • TV sets and monitors • Car TV tuners • Cameras • Videomodules • Transcoders • Car TV antennas • Accessories | SECURITY SYSTEMS — Car alarms • Bike alarms • Mechanical blockers • Immobilizers • Sensors • Accessories | OPTIC AND LIGHT — Xenon • Bixenon • Lamps • LED • Stroboscopes • Optic and Headlights • Washers • Light, rain sensors • Accessories | PARKTRONICS AND MIRRORS — Rear parktronics • Front parktronics • Combined parktronics • Rear-view mirrors • Accessories | HEATING AND COOLING — Seat heaters • Mirrors heaters • Screen-wipers heaters • Engine heaters • Auto-refrigerators • Air conditioning units • Accessories | TUNING — Vibro-isolation • Noise-isolation • Tint films • Accessories | ACCESSORIES — Radar-detectors • Handsfree, Bluetooth • Windowlifters • Compressors • Beeps, loudspeakers • Measuring instruments • Cleaners • Carsits • Miscellaneous | MOUNTING — Installation kits • Upholstery • Grilles • Tubes • Cable and wire • Tools • Miscellaneous | POWER — Batteries • Converters • Start-charging equipment • Capacitors • Accessories | MARINE AUDIO AND ELECTRONICS — Marine receivers • Marine audio speakers • Marine subwoofers • Marine amplifiers • Accessories | CAR CARE PRODUCTS — Additives • Washer fluid • Care accessories • Car polish • Flavors • Adhesives and sealants | LIQUID AND OIL — Motor oil • Transmission oil • Brake fluid • Antifreeze • Technical lubricant In store "130" you can find and buy almost all necessary goods for your auto in Kyiv and other cities, delivery by ground and postal services. Our experienced consultants will provide you with exhaustive information and help you to chose the very particular thing. We are waiting for you at the address http://130.com.ua a m .u co 0. 13 Autogood products Internet store “130” VMA573 and VMA773 5.6” or 7” Wide Screen Color LCD Monitor Owner’s Manual 13 0. co m .u a Installation Guide 7” headrest / stand – alone wide monitor 5.6” headrest / stand – alone wide monitor 2 Autogood products Internet store “130” WARINING ! The Clarion VMA 573 and VMA773 monitors are only designed to be viewed by rear-seat occupants. Digital video products are not intended for viewing by the driver while the vehicle is in motion. Such use may distract the driver or interfere with the driver’s safe operation of the vehicles, and thus result in serious injury or death. Such use may also violate a government law. m .u Clarion disclaims any liability for any bodily injury, including fatalities, or property 13 0. co damage that may result from any improper or unintended uses of this product. 3 Autogood products Internet store “130” About Installation Installation of mobile audio and video components requires experience with a variety of mechanical and electrical procedures. Although this manual provides general installation and operation instructions, it does not show the exact installation methods for your particular vehicle. 13 0. co m .u a If you do not have the required knowledge and experience to successfully complete the installation, we strongly recommend consulting an authorized Clarion dealer about professional installation options. 4 Autogood products Internet store “130” Contents About Installation ……………………………………………………….. 4 1. Introduction …………………………………………………………… . 7 Features…………………………………………………………………….. 7 Precautions ………………………………………………………………… 8 Please note ………………………………………………………………… 9 a 2. Using the monitor ………………………………………………………..10 m .u Front panel controls ………………………………………………………..11 Wireless headphones …………………………………………………….. 12 Playing a video or game ………………………………………………….. 13 Display mode setting ……………………………………………………….14 Adjusting the picture …………………………………………………….. ..15 Turning the unit off and on ……………………………………………….. 16 0. co Switching between video sources ……………………………………….. 16 Playing two videos or games at once …………………………………... 17 Disabling automatic power on ……………………………………………. 17 Returning adjustments to the factory settings ( Reset )……………….. 18 13 Remote IR Function ……………………………………………………. 18 Connecting a video source ……………………………………………….. 19 3. Care and Maintenance …………………………………………………. 20 Cleaning the cabinet ……………………………………………….… ……20 Cleaning the LCD panel ……………………………………………..…….. 20 Servicing the monitor ………………………………………………………. 20 4. Installation and Wiring ……………………………………………………21 What is included in the box ………………………………………………. 21 Before Starting ……………………………………………………………… 22 Installing the monitor ………………………………………………………. 23 Wiring the monitor ………………………………………………………….. 26 5 Autogood products Internet store “130” 5. Troubleshooting ………………………………………………………… .. 29 6. Specification …………………………………………………………… … 31 VMA573 General Specifications ………………………………………….. 31 VMA573 Specifications ……………………………………………………. 31 13 0. co m .u a VMA773 General Specifications ………………………………………….. 32 VMA773 Specifications ……………………………………………………. 32 6 Autogood products Internet store “130” 1. INTRODUCTION The Clarion 5.6-inch VMA573 and 7-inch VMA773 are high performance video monitors designed specifically for the mobile environment. Intended for use with other Clarion multimedia products, they can also be integrated with many other products as part of a complete mobile video solution. Features m .u a Two video inputs support simultaneous connection to both dedicated video source units and optional audio/video components, such as camcorders or videogames. The infrared remote control receiver output allows integration with select Clarion DVD unit. The monitors automatically switch to operate with either NTSC & PAL 0. The 16:9 aspect ratio screen allows DVD films to be viewed in their original aspect ratio for the best cinematic experience. 13 co video signals ( NTSC is the standard of North American video format ) . 7 Autogood products Internet store “130” Precautions Do not operate your monitor in ways other than those described in this manual. Do not play a multimedia system when the car’s engine is turned off. Doing so runs down the car’s battery. Do not disassemble or modify your monitor. Keep moisture away from the monitor. Water and humidity may damage internal circuitry. Do not let the monitor become overheated. m .u a Keep all liquids, including beverages and cleaning fluids away from the monitor. Liquids in the monitor can damage the electronics and result in electrical shock or fire . If the unit becomes wet, turn off all power and 0. co If the temperature in the vehicle is high or the monitor has been exposed to direct sunlight, cool the monitor ( such as, by running the air conditioning ) before you turn it on. 13 contact an authorized Clarion dealer to have the monitor inspected. Never press on the liquid crystal display ( LCD) panel. You may damage it . Failure to observe these precautions may damage your car, the monitor, or the video source, and may void the warranty. 8 Autogood products Internet store “130” Please note In extremely cold weather the movement of the picture may slow and the picture may darken. The picture will return to normal once the temperature rises. You may see small black or shiny dots in the liquid crystal panel. These non-conforming pixels are normal and do not indicate a product defect. Please tear off the liquid crystal panel protect film before using the monitor. m .u [And following the provisions of 2004/104/EC Directive. 0. co according to paragraph 3.2.9 of Annex I, products meets the limits defined in paragraph 6.5, 6.6, 6.8 and 6.9 of Annex I.] 13 a The protect film is on the panel’s surface to prevent scratch during transportation. Please remove this film before use. 9 Autogood products Internet store “130” 2. USING THE MONITOR These monitors are components in a full audio/video system that may include a VCR, DVD player, game player, camcorder or other video source unit. Note : If you have any questions about compatible components, such as system controllers, source units, FM modulators, or other audio/video products, please contact your authorized Clarion dealer. m .u a To operate the monitor, the vehicle ignition key switch must be in the ACC or ON (run) position. ACC or engine ON position co WARINING ! 13 0. To prevent the battery from going dead, always operate this unit with the engine running, if possible . The video source unit ( such as a DVD player) may turn on automatically when you turn the ignition on. 10 Autogood products Internet store “130” Wired Headphone POWER ON LED IR ( Infrared ) receiver 13 Input Jack 0. co m .u a Front panel controls for use with Clarion’s remote controller AV2 Input Jack Increases, decreases or IR Lens, IR LED inside selects , disable the item to transmit Infrared to be adjusted from menu signals to the headphone Turn on/off the monitor Adjustment for Tint, Color, Bright, Contrast, Display Mode , Auto Power ON/OFF , and IR Channel, each time this key is being pressed , the select menu goes to the next Selects the video sources setting option for AV1 or AV2 11 Autogood products Internet store “130” Wireless headphones ( optional ) Power OFF/ON turns the headphones power on and off. Single channel wireless headphones ( WH143H) are appropriate if only one monitor is installed in the passenger compartment. Configuration 2 Configuration 1 Monitor Monitor IR CH A IR CH B IR CH A Monitor IR CH B m .u a Monitor Video Source Video Source Video Source 0. co If two monitors are used for rear entertainment systems, dual channel wireless headphones (WH253H) are most appropriate. In this circumstance, channels A and B on both headphone and monitor should be set respectively. 13 Volume adjusts the headphone’s audio volume. Battery compartment requires two AAA 1.5 volt batteries ( not included ) 12 Autogood products Internet store “130” Playing a video or game The monitor is preset at the factory to turn on automatically when you start your car’s ignition. The monitor remains dark until it detects a video signal. 1. Insert the media ( tape , cartridge , game or disc ) into the video source . 2. Turn on the headphones. If this is the first time you’ve used the unit, make sure your wireless a headphones have fresh batteries installed. m .u Note : Your wireless headphones must be in view of the monitor for the infrared transmission to work. Press play on the video source. 4. Adjust the volume on your wireless headphone. 13 0. co 3. 13 Autogood products Internet store “130” Display mode setting To choose the proper displaying mode for the different video program sources, please refer to display mode setting as below. 1. Press MENU key until goes to DISPLAY MODE. 2. Press (down key ) or ( up key )to select the displaying mode for : NORMAL, FULL WIDE, WIDE. m .u a 3. WIDE may stretch the image to fill the entire screen, NORMAL displays the image at its true aspect ratio (4:3), FULL WIDE stretches the image horizontally to fit the screen for aspect ratio of 16:9. 4:3 When using a DVD player as the source, make sure that the unit’s output mode is set to “ FULL WIDE “ or “ 16:9 ”. This ensures that the DVD player 0. co Notes : 16 : 9 13 will generate a video signal which can take advantage of the monitor’s aspect ratio. When using a source that generates a “ normal “, 4:3 image signal , such as a videogame or videocassette player, the FULL WIDE mode stretches the image to fit the screen. Some minor image distortion may be visible. Video format are automatically changed for PAL or NTSC depends on video program. 14 Autogood products Internet store “130” Adjusting the picture If the temperature is normal and the picture still doesn’t look right, you may adjust the tint, color, brightness, and contrast. 1. Press MENU key to display the picture adjustment menus. The monitor displays the adjustment menus. 2. Press MENU key again until you reach the option you wish to adjust. m .u a The monitor displays the adjustment bar as below. TINT adjusts the tone of color. ( only for NTSC ) co COLOR adjusts the color saturation. BRIGHT adjusts the monitor’s brightness. Press the ( up key ) controls button to increase the adjustment . 13 3. 0. CONTRAST adjusts the differences between light and dark areas. Press the ( Down key ) controls button to decrease the adjustment . Each setting has 30 steps of adjustment range and is preset to 15 at the factory . Once you’ve adjusted the picture , wait a moment and the adjustment menus disappear . 15 Autogood products Internet store “130” Turning the unit off and on Press POWER at any time to turn the unit off. When you turn the vehicle’s ignition off , the monitor automatically shuts off. Switching between video sources If your vehicle has two video sources, for example, a DVD player goes to AV1 Press SOURCE. m .u 1. a and a game console goes to AV2, you can easily switch between them. The monitor will display AV1 and press SOURCE key to select the input for AV2 for game console. Note : If you’re using only one video source, the screen remains dark when you select the unavailable source. Default setting for VMA573 / VMA773 is AV1 for normal case. 13 co Press SOURCE again to select AV1 input for DVD player. 0. 2. 16 Autogood products Internet store “130” Playing two videos or games at once If your vehicle is equipped with two LCD monitors in the headrests and two video source units, two different videos or games can play at the same time. Each monitor transmits the infrared audio signal over its own channel, A or B. When a vehicle has two monitors, the default is to configure the monitor in the driver’s headrest to use IR channel A, and the monitor in the passenger’s headrest to use IR channel B. You can change this. Press MENU key several times to locate the IR CH option. 2. Press down () or up () to alternate between A and B or OFF. m .u a 1. Note: You don’t need to select the IR channel if your vehicle has only one monitor. co Disabling automatic power on 0. Your monitor is preset at the factory to switch on when you turn on your vehicle’s ignition. However, you can set it up to remain the VMA off until you 1. 2. 13 press POWER on the monitor. Press MENU several times until you reach the AUTO POWER option. Press down () or up () to turn automatic power ON and OFF. 17 Autogood products Internet store “130” Returning adjustments to the factory settings ( Reset ) 1. Press MENU several times to locate the RESET option. 2. Press either down () or up () to reset the settings. If you don’t wish to reset the settings, either press MENU again or wait for the monitor to exit the picture adjustment menus automatically. The reset settings only valid for the Tint, Color, Brightness, Contrast, Volume that setting those parameter back to default value 15, and set to IR CHA, AUTOPOWER ON. co y m .u a Note : y If you reset the options and the monitor was set to source2 ( AV2 ), the monitor reverts to the default setting of AV1. If there is no active video source on AV1, the screen may go dark. Press SOURCE to switch the monitor back to AV2. 0. Remote IR Function 13 The LCD monitor comes with an IR receiver that works with Clarion remote control devices. Aim the remote control at the IR receiver during use. Note: The IR receiver only functions with select Clarion multimedia equipment. 18 Autogood products Internet store “130” Connecting a video source The video sources you are using may be preinstalled for you, or your configuration may be designed to allow you to change devices. For example, returning from a day at the beach, you may disconnect your game from the game port and connect your camcorder to view the video you just shot . a CAUTION ! 13 0. co m .u Always take care when disconnecting and connecting electronic devices. 19 Autogood products Internet store “130” 3. CARE AND MAINTENANCE Cleaning the cabinet Use a soft, dry cloth gently wipe dust and dirt from the cabinet. Do not use benzene, thinner, car cleaner, or other cleaners. These substances may damage the cabinet or cause the paint to peel. a Cleaning the LCD panel m .u Use a soft, dry cloth to gently wipe off dust. The LCD panel surface can be easily scratched. Do not rub it with any abrasive object. co Servicing the monitor 13 0. In the event that trouble arises, never open the case or disassemble the unit. The internal parts are not serviceable by the user. Opening any components will void the warranty. CAUTION ! Changes or modifications to this product not approved by the manufacturer will void the warranty. 20 Autogood products Internet store “130” 4. INSTALLATION AND WIRING Read these instructions and the following precautions carefully. What is included in the box In addition to this manual, the box contains: Either a 5.6” VMA573 or 7” VMA773 monitor unit with wiring harness y y y y One 1.2M RCA A/V cable One power cable One 25cm 3.5Φ Jack to RCA adaptor cable Owner’s manual & Installation guide y y Bezel Metal insert card 13 0. co m .u a y 21 Autogood products Internet store “130” Before Starting Disconnect the minus() terminal on the vehicle’s battery. WARNING ! To prevent short circuits during installation, be sure to disconnect the battery. a Precautions This unit is exclusively for vehicles with a negative ground, 12V power supply. Do not open the case. There are no user-serviceable parts inside. If you require assistance, consult your Clarion dealer or an authorized Clarion service center. Use a soft, dry cloth to clean the screen. Never use a rough cloth, thinner, benzene, alcohol, or other solvent. The screen surface is easy to scratch-do not rub it when cleaning. Always use great care when attaching anything to a vehicle! Visually inspect all sides of any potential screw location to ensure no damage will occur. 13 0. co m .u WARNING ! NEVER install this monitor where it is visible from the driver’s seat, or where it could injure any vehicle occupant in case of an accident. Ensure that your installation does not create risk of head-strike injury, and that the monitor will remain securely mounted in the case of an accident or sudden maneuver. 22 Autogood products Internet store “130” Installing the monitor Flush mounting in the headrest You may use the included bezel to mount the monitor. Ensure that you will have sufficient clearance for the monitor and its rear-located wiring harness. 2. Cut the opening. 3. Route the pigtail cable end of the wiring harness into the opening from the rear out the front. 4. Insert the bezel and route the wiring harness through the opening in the rear. 5. Firmly attach the bezel to the mounting surface and/or to the interior of 0. co the mounting surface. m .u a 1. 13 Mounting tabs Mounting screw holes Wire harness opening 23 Autogood products Internet store “130” Installing the monitor 6. Connect the wiring harness to the monitor, and tuck the excess wiring harness length carefully out of the way behind the bezel. Press edges to fit monitor into bezel , do not press monitor Spring clips to lock screen the monitor on its m .u a position Bezel Gently insert the monitor into the bezel. 0. Press only on the edges of the monitor, not on the screen. You should hear a few soft clicks as the monitor locks into place by four spring clips on the bezel. 13 7. co Monitor CAUTION ! NEVER press on the surface of the screen! Gently press on the edges of the monitor case. If you find that you can not insert the monitor without excessive force, you may need to check your wire harness position for interference with the insertion process. Your may also need make the opening slightly larger. 24 Autogood products Internet store “130” Installing the monitor Removing the monitor from the bezel m .u a To remove the monitor from the bezel, insert the metal insert card between the monitor case and the side of the bezel to release the spring clips. 13 0. co Insert the metal insert card to take monitor out of the bezel 25 Autogood products Internet store “130” Wiring the monitor Precautions Disconnect the negative battery terminal before making any wiring connections. y Be particularly careful where you route wires. Keep them away from the engine, exhaust system, etc. Heat may damage wires. y If the fuse should blow, make sure all connections are correct and no wires are damaged before replacing the fuse. Always use fuses that are the same amperage value as the original. When replacing a fuse, never let the battery side touch any metal part or any other wire. m .u a y co WARNING ! Be sure to disconnect the battery (-) terminal before starting. This 13 0. is to prevent short circuits during installation. Procedure 1. 2. Disconnect the negative(-) lead from the vehicle’s battery. Find a place in the vehicle for the video source(s). 26 Autogood products Internet store “130” Wiring the monitor 3. Create passage holes for the power and video cables. When drilling through metal or plastic, use grommets to protect the cables from sharp edges that could penetrate the insulation and cause a short circuit and device failure. 4. Connect the ground lead (black) securely to a clean metal plate on the vehicle. 5. m .u a Use sand paper to remove any paint from the surface where you attach the ground terminal. Reconnect the negative (-) lead to the battery. co Monitor connections CAUTION ! 0. Some non-Clarion automotive DVD and VCP source units use a similar connector for an external IR receiver, but use different pin polarity than the Clarion uses. 13 Connecting non-Clarion source equipment to this connector could cause equipment damage not covered by the warranty! IR connector polarity : PLASTIC COVER This 3.5Φ IR Jack has plastic cover to prevent short, to remove the plastic cover, please do not pull it out directly, please rotate the plastic cover and put it out slowly. 27 Autogood products Internet store “130” 13 0. co m .u a Connections diagram 28 Autogood products Internet store “130” 5. TROUBLESHOOTING The system does not work A fuse may be blown. Replace the external fuse with a fuse of the same amperage. The power wires may not be connected. Check the wiring connections and reset. a No picture. m .u Press SOURCE to make sure the proper input is selected. If there is still no picture, press MENU. If the menu appears, check the source unit and video connections. If no menu appears, check all fuses and power connections to the monitor and the associated equipment. co The noise comes out 0. If portable audio-visual devices is connected to this monitor in the state where it connected with the vehicles power supply for charge etc., a noise may occur 13 rarely. In this case, please use portable audio-visual devices without connecting with a vehicles power supply. Please use it with the internal battery of devices etc. Note: The monitor has an operating temperature range of -10℃ to +70℃ ( +15°F ~ +158°F ). If the temperature is outside this operating range, the unit may not turn on, or the screen may be slow to react to image changes. The monitor will function normally once it returns to its proper operating range . With a DVD player and widescreen DVD disc, there are black bars above and below the picture. Change the TV display mode to “ FULL WIDE” in the DVD player’s Setup menu. 29 Autogood products Internet store “130” After changing this setting, if there are still black bars, set the Display mode to “ FULL WIDE “ by push MENU key as mentioned before . 13 0. co m .u a The screen is dark The brightness is set too low. Press MENU and adjust the BRIGHT option. The interior of the vehicle is too hot or too cold. The monitor’s operating temperature is -10℃ to +70℃ ( +15°F ~ +158°F ). 30 Autogood products Internet store “130” 6. SPECIFICATION Note: The technical data and the design of the equipment may change for the sake of technical improvement without prior notice. VMA573 General Specifications : 12V DC ( 10.8V-15.6V) Power consumption : 7 watts, power on - typical 0.6 amps (600mA) - typical : 300 g : 160.8 x 111.8 x 32.5 mm ( with Bezel ) Included parts m .u Weight Dimension(w x h x d ) a Power requirement : • LCD monitor with wiring harness • One 1.2M RCA A/V cable • One power cable • 3.5Φ Jack to RCA connector cable 0. co • Owner’s manual and installation guide • Bezel • Metal insert card 13 VMA573 Specifications Display type Screen size Pixels Screen resolution : : : : Color TFT Active Matrix LCD 5.6” 480 RGB (H) x 234 (V) 336,960 dots Video input lever ( RCA) : 1.0 volts peak to peak Video format : NTSC, PAL 31 Autogood products Internet store “130” VMA773 General Specifications Power requirement Power consumption Weight Dimension(w x h x d ) Included parts : 12V DC ( 10.8V-15.6V) : 7 watts, power on - typical 0.6 amps (600mA) - typical : 400 g : 192.7 x 133.5 x 32.5 mm ( with Bezel ) : • LCD monitor with wiring harness • One 1.2M RCA A/V cable • One power cable m .u a • 3.5Φ Jack to RCA connector cable • Owner’s manual and installation guide • Bezel • Metal insert card VMA773 Specifications Color TFT Active Matrix LCD 7” 480 RGB (H) x 234 (V) 336,960 dots co : : : : 0. Display type Screen size Pixels Screen resolution 13 Video input lever ( RCA) : 1.0 volts peak to peak Video format : NTSC, PAL 32 Autogood products Internet store “130” a m .u co 0. 13 33 Autogood products Internet store “130”