1
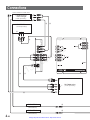
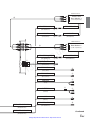
PHONES
(044) 360-7-130
(050) 336-0-130
(063) 788-0-130
(067) 233-0-130
(068) 282-0-130
Internet store of
autogoods
ICQ
294-0-130
597-0-130
SKYPE
km-130
CAR RECEIVERS — Receivers • Media receivers and stations • Native receivers • CD/DVD changers • FM-modulators/USB adapters • Flash memory • Facia plates and adapters • Antennas • Accessories |
CAR AUDIO — Car audio speakers • Amplifiers • Subwoofers • Processors • Crossovers • Headphones • Accessories | TRIP COMPUTERS — Universal computers • Model computers • Accessories |
GPS NAVIGATORS — Portable GPS • Built-in GPS • GPS modules • GPS trackers • Antennas for GPS navigators • Accessories | VIDEO — DVR • TV sets and monitors • Car TV tuners • Cameras • Videomodules
• Transcoders • Car TV antennas • Accessories | SECURITY SYSTEMS — Car alarms • Bike alarms • Mechanical blockers • Immobilizers • Sensors • Accessories | OPTIC AND LIGHT — Xenon • Bixenon • Lamps
• LED • Stroboscopes • Optic and Headlights • Washers • Light, rain sensors • Accessories | PARKTRONICS AND MIRRORS — Rear parktronics • Front parktronics • Combined parktronics • Rear-view mirrors
• Accessories | HEATING AND COOLING — Seat heaters • Mirrors heaters • Screen-wipers heaters • Engine heaters • Auto-refrigerators • Air conditioning units • Accessories | TUNING — Vibro-isolation
• Noise-isolation • Tint films • Accessories | ACCESSORIES — Radar-detectors • Handsfree, Bluetooth • Windowlifters • Compressors • Beeps, loudspeakers • Measuring instruments • Cleaners • Carsits
• Miscellaneous | MOUNTING — Installation kits • Upholstery • Grilles • Tubes • Cable and wire • Tools • Miscellaneous | POWER — Batteries • Converters • Start-charging equipment • Capacitors
• Accessories | MARINE AUDIO AND ELECTRONICS — Marine receivers • Marine audio speakers • Marine subwoofers • Marine amplifiers • Accessories | CAR CARE PRODUCTS — Additives • Washer fluid •
Care accessories • Car polish • Flavors • Adhesives and sealants | LIQUID AND OIL — Motor oil • Transmission oil • Brake fluid • Antifreeze • Technical lubricant
In store "130" you can find and buy almost all necessary goods for your auto in
Kyiv and other cities, delivery by ground and postal services. Our experienced
consultants will provide you with exhaustive information and help you to chose
the very particular thing. We are waiting for you at the address
http://130.com.ua
FOR CAR USE ONLY / POUR APPLICATION AUTOMOBILE UNIQUEMENT / PARA USO EN AUTOMÓVILES
R
EN
AUDIO/VISUAL SELECTOR
VPE-S431
FR
a
.u
• OWNER'S MANUAL
Please read before using this equipment.
• MODE D'EMPLOI
Veuillez lire avant d'utiliser cet appareil.
m
o
.c
ES
• MANUAL DE OPERACIÓN
Léalo antes de utilizar este equipo.
0
3
1
ES
IT
ALPINE ELECTRONICS MARKETING, INC.
1-1-8 Nishi Gotanda,
Shinagawa-ku,
Tokyo 141-0031, Japan
Phone 03-5496-8231
ALPINE ELECTRONICS OF AMERICA, INC.
19145 Gramercy Place, Torrance,
California 90501, U.S.A.
Phone 1-800-ALPINE-1 (1-800-257-4631)
ALPINE ELECTRONICS OF CANADA, INC.
7300 Warden Ave., Suite 203, Markham,
Ontario L3R 9Z6, Canada
Phone 1-800-ALPINE-1 (1-800-257-4631)
ALPINE ELECTRONICS OF AUSTRALIA PTY. LTD.
6-8 Fiveways Boulevarde Keysborough,
Victoria 3173, Australia
Phone 03-9769-0000
ALPINE ELECTRONICS GmbH
Frankfurter Ring 117,
80807 München, Germany
Phone 089-32 42 640
ALPINE ELECTRONICS OF U.K. LTD.
Alpine House
Fletchamstead Highway, Coventry CV4 9TW,
U.K.
Phone 0870-33 33 763
ALPINE ELECTRONICS FRANCE S.A.R.L.
(RCS PONTOISE B 338 101 280)
98, Rue de la Belle Etoile, Z.I. Paris Nord Il,
B.P. 50016, 95945 Roissy Charles de Gaulle
Cedex, France
Phone 01-48638989
ALPINE ITALIA S.p.A.
Viale C. Colombo 8, 20090 Trezzano
Sul Naviglio (MI), Italy
Phone 02-484781
ALPINE ELECTRONICS DE ESPAÑA, S.A.
Portal de Gamarra 36, Pabellón, 32
01013 Vitoria (Alava)-APDO 133, Spain
Phone 945-283588
(RCS PONTOISE B 338 101 280)
JEIL Moon Hwa Co.
18-6, 3Ga, Pil-dong, Jung-gu, Seoul, Korea
Printed in Korea (Y)
68P04190K40-O
Autogood products internet store http://130.com.ua
SE
Points to Observe for Safe Usage
WARNING
CAUTION
This symbol means important instructions.
Failure to heed them can result in serious
injury or death.
DO NOT DISASSEMBLE OR ALTER.
Doing so may result in an accident, fire or electric shock.
KEEP SMALL OBJECTS SUCH AS BATTERIES OUT OF THE
REACH OF CHILDREN.
Swallowing them may result in serious injury. If swallowed,
consult a physician immediately.
USE THE CORRECT AMPERE RATING WHEN REPLACING
FUSES.
Failure to do so may result in fire or electric shock.
USE ONLY IN CARS WITH A 12 VOLT NEGATIVE GROUND.
This symbol means important instructions.
Failure to heed them can result in injury or
material property damage.
USE SPECIFIED ACCESSORY PARTS AND INSTALL THEM
SECURELY.
Be sure to use only the specified accessory parts. Use of other
than designated parts may damage this unit internally or may not
securely install the unit in place. This may cause parts to become
loose resulting in hazards or product failure.
DO NOT INSTALL IN LOCATIONS WITH HIGH MOISTURE
OR DUST.
Avoid installing the unit in locations with high incidence of
moisture or dust. Moisture or dust that penetrates into this unit
may result in product failure.
a
.u
(Check with your dealer if you are not sure.) Failure to do so may
result in fire, etc.
HAVE THE WIRING AND INSTALLATION DONE BY
EXPERTS.
BEFORE WIRING, DISCONNECT THE CABLE FROM THE
NEGATIVE BATTERY TERMINAL.
The wiring and installation of this unit requires special technical
skill and experience. To ensure safety, always contact the dealer
where you purchased this product to have the work done.
m
o
.c
Failure to do so may result in electric shock or injury due to
electrical shorts.
DO NOT SPLICE INTO ELECTRICAL CABLES.
Never cut away cable insulation to supply power to other
equipment. Doing so will exceed the current carrying capacity of
the wire and result in fire or electric shock.
0
3
1
DO NOT DAMAGE PIPE OR WIRING WHEN DRILLING
HOLES.
ARRANGE THE WIRING SO IT IS NOT CRIMPED OR
PINCHED BY A SHARP METAL EDGE.
Route the cables and wiring away from moving parts (like the
seat rails) or sharp or pointed edges. This will prevent crimping
and damage to the wiring. If wiring passes through a hole in
metal, use a rubber grommet to prevent the wire’s insulation from
being cut by the metal edge of the hole.
When drilling holes in the chassis for installation, take
precautions so as not to contact, damage or obstruct pipes, fuel
lines, tanks or electrical wiring. Failure to take such precautions
may result in fire.
DO NOT USE BOLTS OR NUTS IN THE BRAKE OR
STEERING SYSTEMS TO MAKE GROUND CONNECTIONS.
Bolts or nuts used for the brake or steering systems (or any other
safety-related system), or tanks should NEVER be used for
installations or ground connections. Using such parts could
disable control of the vehicle and cause fire etc.
DO NOT ALLOW CABLES TO BECOME ENTANGLED IN
SURROUNDING OBJECTS.
Arrange wiring and cables in compliance with the manual to
prevent obstructions when driving. Cables or wiring that obstruct
or hang up on places such as the steering wheel, shift lever, brake
pedals, etc. can be extremely hazardous.
USE THIS PRODUCT FOR MOBILE 12V APPLICATIONS.
Use for other than its designed application may result in fire,
electric shock or other injury.
MAKE THE CORRECT CONNECTIONS.
Failure to make the proper connections may result in fire or
product damage.
Autogood products internet store http://130.com.ua
1-EN
2
Feature
AUX-1 → AUX-2 → AUX-3 → DVD PLAYER*1 →
VISUALIZER*2 → OFF → SETUP → RETURN
This unit is designed to connect to the IVA-D300 series to
expand their functions.
In addition, when this unit is not connected to the IVA-D300
series, it can perform visual effects, switch video output to a
rear monitor connected to this unit, etc.
a Operations can be performed from the IVA-D300 series
when connected. For details, refer to the Owner's
Manual of the IVA-D300 series.
a Operations can be performed from the touch panel
monitor when connected. For details, refer to the
Owner's Manual of the touch panel monitor.
Press the REAR SEL 1 or the REAR SEL 2
switch to select an item from the list below.
*1 Displayed only when the IVA-D300 series are
connected.
*2 Displayed when VISUALIZER is set to other than
OFF.
When the IVA-D300 series are connected, this is
displayed only when VISUALIZER is set to ON in the
IVA-D300 series.
• The AUX NAME set in "SETUP" is displayed for
AUX-1, 2 or 3.
3
Press and hold the REAR SEL 1 or the REAR
SEL 2 switch for more than 2 seconds.
The selected source is displayed on the monitor.
Operation
• When RETURN is selected, the display returns to the
one prior to the SOURCE SEL.
This unit can be operated by connecting REAR SEL1 and
REAR SEL 2 leads to a push switch (sold separately). For
details, consult an authorized ALPINE dealer.
REAR SEL
1,2 leads
Push switch, etc.
30
• Use a switch (sold separately) which has an automatic
return function to connect with REAR SEL 1,2 leads.
• When operating with the Monitor Control 1,2 leads,
connect to a switch (sold separately) as well. The
automatic return function is not necessary. (Refer to
"SWITCHING THE REMOTE SENSOR" page 3.)
1
Switching the Output Source
• When IVA-D300 series is connected, the VISEAL EFFECT,
VISUALIZER and AUX IN-1, 2, 3 NAME cannot be set in
this unit. Set these functions in the IVA-D300 series.
1
Press the REAR SEL 1 or the REAR SEL 2
switch.
2
3
4
2-EN
Press and hold the REAR SEL 1 or the
REAR SEL 2 switch for more than 2 seconds.
Press the REAR SEL 1 or the REAR SEL 2
switch to select the desired setting item.
VISUAL EFFECT → VISUALIZER →
AUX IN-1,2,3 SIGNAL → AUX IN-1,2,3 NAME
→ RETURN
SOURCE SEL.
5
6
REAR SEL 1: The source of the external monitor
connected to the AUX OUT 1.
REAR SEL 2: The source of the external monitor
connected to the AUX OUT 2.
Press the REAR SEL 1 or the REAR SEL 2
switch to change the setting item. Select
SETUP.
The SETUP display appears.
The SOURCE SEL. display appears.
AUX-1
AUX-2
AUX-3
DVD PLAYER
VISUALIZER
OFF
SETUP
RETURN
Press the REAR SEL 1 or the REAR SEL 2
switch.
The SOURCE SEL. display appears.
Video output from AUX OUT 1/2 for each monitor can be
switched.
1
a
.u
Each setting can be performed by the procedure shown below.
The setup menu is common for both REAR SEL 1 and
REAR SEL 2.
m
o
.c
Body of
your car
OK
SETUP
Press and hold the REAR SEL 1 or the
REAR SEL 2 switch for more than 2 seconds
to change the setting.
After settings, press the REAR SEL 1 or the
REAR SEL 2 switch to select RETURN, and
press and hold the switch for more than 2
seconds.
The SOURCE SEL. display is restored. To return to
normal mode, select RETURN again, and press
and hold the switch for more than 2 seconds.
Either VISUAL EFFECT or VISUALIZER will start if
set to on.
Autogood products internet store http://130.com.ua
VISUAL EFFECT (Visual Effect Mode)
Installation
For a visual source, Visual Effect is applied to each
monitor.
• When the VISUALIZER mode is on, VISUAL EFFECT is
canceled.
• When no image is input, the picture in VISUAL EFFECT
may be distorted. This is not a malfunction. In this case,
set VISUAL EFFECT with an input image, such as DVD.
• This function cannot be set in the navigation mode.
• When VISUAL EFFECT is set to on, the visual source of
the rear monitor automatically changes to the same
source as the front monitor.
Screw-down Mounting
1
2
VISUALIZER
You can select your desired mode from MODE1
through 6.
SCAN: MODE1 to 6 are automatically switched.
Using the unit as a template, hold it at its
mounting location and mark the holes to be
drilled. Before drilling, make sure that there
are no objects that could be damaged behind
the mounting surface.
Drill holes and secure the unit with the selftapping screws (M4 x 14) supplied.
• When the VISUAL EFFECT is on, the VISUALIZER mode
is canceled.
AUX IN-1,2,3 SIGNAL
Set the video output configuration to NTSC or PAL
according to the type of television and the disc
recording method.
• The image output configuration must be correct. Otherwise
the following message appears and playback does not
start: “VIDEO SIGNAL SYSTEM IS NOT CORRECT”.
• The system is set to NTSC at time of shipment from the
factory. Change the system to PAL, as necessary.
a
.u
m
o
.c
AUX IN-1,2,3 NAME
0
3
1
When more than one external device is connected, you
can name each (up to 3) as you like.
AUX / VCR / GAME-1,2 / TV/ NAV.*
• The selected source name is displayed instead of the AUX
source name.
* When IVA-D300 series is connected, “NAV.” can be set
only in AUX-3 mode.
Switching the Remote Sensor
When an Alpine monitor which does not work with the touch
panel is connected, the remote sensor can be switched by
connecting the Monitor Control 1,2 lead to a push switch, or
similar (sold separately).
1
Press the Monitor Control 1 or 2 switch.
While the switch is on, the remote sensor of the
rear monitor connected to AUX OUT 1 or 2 is prior
to the other, and the monitor can be operated with
the remote control.
Autogood products internet store http://130.com.ua
3-EN
Connections
DVA-5210/DHA-S680 series
.
*1 DVD Player or
+
DVD Changer
(Sold separately)
,
~
ALPINE TV Tuner
%
(Sold separately)
-
)
a
.u
m
o
.c
*2
%
#
30
1
" *3
$
IVA-D300 series
&*
2
.
/
REMOTE IN
!
(White/Brown)
REMOTE IN
(White/Brown)
4-EN
Autogood products internet store http://130.com.ua
!
(Sold separately)
TME-M770 etc.
(
%
Touch Panel
Rear Monitor 1
(Sold separately)
REMOTE OUT
REMOTE IN AUX1
(White/Brown)
(White/Brown)
2
M.CONT
M.CONT1
(White/Pink)
(White/Pink)
3
TME-M760 etc.
(
%
a
.u
m
o
.c
REMOTE IN AUX2
(White/Brown)
0
3
1
1
2
Rear Monitor 2
(Sold separately)
REMOTE OUT
(White/Brown)
M.CONT2
(White/Pink)
3
REAR SEL1
4
(Gray/Pink)
5
REAR SEL2
(Black/Pink)
6
IGNITION
(Red)
BATTERY
8
7
(Yellow)
GND
9
(Black)
REMOTE OUT AUX3
REMOTE OUT AUX2
!
(White/Brown)
(White/Brown)
REMOTE OUT AUX1
(White/Brown)
Autogood products internet store http://130.com.ua
Continued
5-EN
1 Power Supply Connector
2 Remote Control Input Lead (White/Brown)
Connect an external Alpine product to the remote
control output lead.
3 Monitor Control Lead (White/Pink)
Connect to the monitor control lead of the touch
panel monitor.
To connect to a monitor which does not correspond
to the touch panel, ground the unit with a
commercially available switch, etc., and the remote
sensor can be switched.
4 Rear Select 1 Lead (Gray/Pink)
• Refer to the instruction manuals of the connected devices.
• To connect with IVA-D300 series, some settings are
necessary in IVA-D300 series. Refer to the operating
instructions of IVA-D300 series for details.
*1 For details about connection to a DVD changer, refer to
the Owner's Manuals of the DVD changer and the
IVA-D300 series.
*2 Navigation (if connected to IVA-D300 series) picture
and sounds can be output to the rear monitor.
Set AUX IN-3 NAME to "NAV."
*3 If IVA-D300 series is connected, remove the head unit
connector cover. If IVA-D300 series is not connected,
leave the head unit connector cover on.
Connect to ground with a push switch etc.
Specifications
5 Rear Select 2 Lead (Black/Pink)
Connect to ground with a push switch etc.
6 Switched Power Lead (Ignition) (Red)
Connect this lead to an unused terminal on the
vehicle's fuse box or another unused power source
which provides (+)12V only when the ignition is
turned on, or in the accessory position.
External dimensions
Wide
Height
Depth
Weight
a
.u
7 Battery Lead (Yellow)
Connect this lead to the positive (+) post of the
vehicle's battery.
8 Fuse Holder (7.5A fuse)
m
o
.c
9 Ground lead (Black)
Connect the lead to a good chassis ground on the
vehicle. Make sure the connection is made to bare
metal and is securely fastened using the sheet
metal screw provided.
0
3
1
! Remote Control Output Lead (White/Brown)
Connect this lead to the remote control input lead.
This lead outputs the control signals from the
remote control.
" Head Unit Terminal
# AV SELECTOR Cable (Included)
$ AV SELECTOR Terminal
% RCA Extension Cable (Sold separately)
& AUX OUT Terminal
( AUX Input Terminal
) RCA Extension Cable
~ RCA Extension Cable (Included with the DVD
Player or DVD Changer)
+ Audio Output Connector
, Video Output Connector
- Video Output Terminal
. Ai-NET Connector
/ Ai-NET Cable (Included with the DVD Player
or DVD Changer)
6-EN
Autogood products internet store http://130.com.ua
180mm (7-3/32")
160mm (6-5/16")
35mm (1-3/8")
0.75kg (1lbs. 10oz)