1
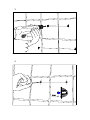
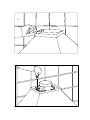
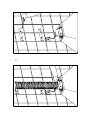
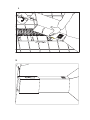
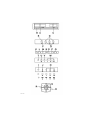
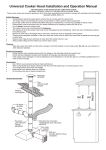
600-900 Canopy Installation and Operation Manual The instructions in this manual are for cooker hood models: CS601, CS901, WRF600, WRF900,WRG950CGS These cooker hoods are domestic appliances which have been manufactured and tested to comply with Australian and New Zealand Standard AS/NZS 3350.2.31. Safety Warnings Young children should be supervised to ensure they do not play with the cooker hood. The cooker hood is not intended for use by young children or infirm persons without supervision. Ensure the cooker hood is switched off before carrying out maintenance, to avoid any possibility of electric shock. Grease filters must be removed every four weeks (maximum) for cleaning to reduce the risk of fire. Do not flamb’e under the cooker hood. This cooker hood is not recommended for barbeques. The exhaust air from the cooker hood must not be discharged into any heating flue, which may carry combustion products from other sources. Exhaust air must not be discharged into a wall cavity, unless the cavity is designed for the purpose. There must be adequate ventilation of the room when the cooker hood is used at the same time as appliances burning gas or other fuels. Always cover lit gas burners with pots or pans when the cooker hood is in use. Always switch off gas burners before you remove pots or pans. Cleaning Wipe the cooker hood body and flue with a sponge or soft cloth soaked in warm soapy water. Do not use oven cleaners or other abrasive materials. Electrical Connection Check that the mains voltage matches with the voltage on the data plate inside the cooker hood. Check that the installation complies with standards of local gas and electricity authorities. If the supply cord is damaged, it must be replaced by the manufacturer or its service agent or a similarly qualified person in order to avoid a hazard. Accessories Use 125mm round exhaust ducting for best performance. When using flexible duct always install duct with the wire helix pulled taut to minimise pressure loss. Try to keep exhaust duct short and straight. Keep bends in the exhaust duct to a minimum. INSTALLATION OPTIONS Do not reduce the size or restrict exhaust duct. DUCTING ACCESSORIES Roof cowl AR125RC Flue 1200mm length AR125F Top Exhaust to atmosphere Flashing Not Supplied Wall vent (includes 400mm of flue) AR125WV Rear Exhaust to atmosphere AR500FS 90º bend AR125B Recirculating Installation AR125FD Alternative flue connection 1 metre flexible duct with joiners Side Exhaust to atmosphere AR500RK Part Numbers: Description: AR125RC AR125B AR125F AR125FD AR125VW AR500FS AR500RK AR500CF Roof Cowl 90º Bend Flue 1200mm Long Flexible Duct - 1 Metre Long When Expanded Wall Vent Kit Extra Length Flue Cover 1100mm Length Brushed Stainless Steel Recirculating Kit Replacement Carbon Filters 1 2 3 4 5 6 7 8 9 10 Washer:Only for the glass version. 10.06.2004 DECORATIVE EXTRACTOR HOODS Dear client, We are sure that the purchase of our extractor hood will fully satisfy all of your needs. Please read this instruction manual carefully in order to obtain the best results from the use of the hood. INSTRUCTIONS FOR INSTALLATION, MAINTENANCE AND USE General indications Before installing and using the hood, be sure that the voltage (V) and the frequency (Hz) indicated on the feature plate match the voltage and frequency at the installation site. The feature plate and technical data are shown on the inside of the product. For better performance in extracting fumes we advise that tubing installed should be of a diameter not less than 120 mm. We also advise using rigid PVC tubing. ELECTRICAL CONNECTION Connect the cord to a socket or double pole switch, which must have a minimum contact opening distance of 3 mm. The manufacturer shall not be liable for failure to observe all safety regulations in force for the correct and normal operation of electrical parts. This hood complies with European Directives EMC No. 89/336 EEC on protection against radial interference. CONTROL PANELS: All of the figures of the control panels can be found on the penultimate page. Slider control panel This panel is located on the lower part of the hood and includes: 4 position motor control switch (OFF, 1st, 2nd and 3rd speed positions) (Ref. A). Motor control light (Ref. B). Light switch (Ref. C). Electronic switch control panel This panel is located on the front part of the hood and includes: 3 position motor control switch (1st, 2nd, and 3rd speed) (Ref. D). Lighting control lamp. Fig. 6. (Ref. E). Motor control lights. (Ref. G). Light switch (Ref. F). TIMING: To operate the canopy timer, having selected the speed, press the button for two seconds until the LED light blinks. The timer will then work for 15 minutes. At the end of this time, the motor will stop and the light will go out. If it is still on, and you wish to cancel the timing, press the timer button once and the motor will stop. Four-speed control panel with digital indicator This panel is situated on the front of the extractor and includes: Button for the light (ref. K). On/off button of the motor (ref. L). Button for reducing the motor speed (ref. M). Motor speed indicator (ref. N). Button for increasing the motor speed (ref. O). Button for directly activating the TURBO speed of the motor (ref. P). Button for setting the timer of the motor (ref. Q). The extractor will operate for 5 minutes at the current speed and 5 minutes at each of the lower speeds until coming to a complete stop. Five-button control panel This panel is situated on the front of the extractor and includes: 3 control switches for the motor (speed positions 1, 2 and 3) (ref W) Off button of the motor (ref V) On/off light of the motor (ref T) Light switch (ref. U) Mechanical push Four-button control panel: This panel is located on the front part of the hood and includes: 3 position motor control switch (1st, 2nd, and 3rd speed) (Ref. H). Motor control light (Ref. I). Light switch (Ref. J). NOTE: To operate at the 2nd and 3rd speeds, the first speed must be activated. Four-speed control panel This panel is situated on the front of the extractor and includes: 4 buttons for controlling the operation of the motor (position 1, 2, 3 and turbo) (Ref R) Button for the light. MAINTENANCE -Cleaning Before any type of operation, always make sure that the electrical cord is disconnected and the switch is in the off position. Clean the external part with a mild, liquid detergent and avoid the use of abrasive cleaning products. -Changing the light Before changing the light make sure that the hood is not connected. Remove the grease filter and replace the light with a light bulb no more powerful than that specified in the Technical Characteristics. Place the filter in position. -Cleaning the grease filter. Depending on use, and at least once a month the grease filters should be disassembled and cleaned in a dishwasher or with hot soapy water. If washed in a dishwasher, the filters should be placed in an upright position to prevent food remains from falling on them. After rinsing and drying, replace the filters by following the steps for disassembly in reverse order. IMPORTANT: Do not connect the hood to chimneys, ventilation pipes or hot air pipes. Before connecting any pipes, • consult municipal ordinances on exhaust air and request permission from the person in charge of the building. Be sure there is adequate ventilation, even in cases where the hood is to be used simultaneously with another product. Never leave frying food unattended since grease can overheat and catch fire. The risk of fire is even • greater in the case of used oil. Never use the hood in areas where devices with exhaust pipes connected to the outside are already • operating unless perfect ventilation can be guaranteed. To avoid the possibility of fire, adhere strictly to all of the recommendations included here and to the • periodic cleaning of the grease filters. • During an electrostatic discharge (ESD) it is possible that the device will stop working. By switching the device OFF an ON the device will again work as intended. There is no risk and no risk will appear. • During climatic conditions causing electrical interference, it is possible that the device may stop working. By switching the device OFF an ON the device will resume normal operation safety. If the supply cord of this equipment is damaged, it must only be replaced by manufacturer or it’s service • agent or similarly qualified person in order to avoid a hazard. • Never have a lighted flame under the extractor hood. • The appliance must be placed in such a way, that the supply plug is accessible. The hood must be installed at a minimum distance of 65cm from the stovetop. • IMPORTANT WARNING FOR EXTRACTOR HOODS WITH HALOGEN LAMPS If the halogen lamps need replacing, they must be replaced by lamps with an aluminium reflector, never dichroic lamps, to avoid unnecessary overheating in the lamp holders. THE MANUFACTURER WAIVES ALL LIABILITY FOR FAILURE TO OBSERVE THE INSTRUCTIONS FOR THE APPROPRIATE INSTALLATION, MAINTENANCE AND USE OF THE EXTRACTOR HOOD. If you need any technical help or would like more information about our products, please do not hesitate to contact our official distributor. THE MANUFACTURER reserves the right to effect any technological improvement or modification without prior notice. Warranty FOR SALES IN AUSTRALIA AND NEW ZEALAND APPLIANCE: COOKERHOOD This document sets out the terms and conditions of product warranties for Electrolux branded appliances. It is an important document. Please keep it with your proof of purchase documents in a safe place for future reference should you require service for your Electrolux appliance. General Terms and Conditions 1. In this warranty (a) 'Electrolux' means Electrolux Home Products Pty Ltd ABN 51 004 762 341 in respect of Appliances purchased in Australia and Electrolux (NZ) Limited in respect of Appliances purchased in New Zealand; (b) 'Appliance' means any Electrolux product purchased by you accompanied by this document; (c) 'Warranty Period' means (i) where you use the Appliance for personal, domestic or household purposes in Australia the period of 24 months and in New Zealand the period of 24 months; (ii) where you use the Appliance for commercial purposes, the period of 0 months; (if the period stated is 0 months you are not covered by this product warranty) following the date of original purchase of the Appliance; (d) 'you' means the purchaser of the Appliance not having purchased the appliance for re-sale, and 'your' has a corresponding meaning. 2. This warranty only applies to Appliances purchased and used in Australia or New Zealand and is in addition to (and does not exclude, restrict, or modify in any way) any non-excludable statutory warranties in Australia or New Zealand. 3. Electrolux warrants that, when dispatched from an Electrolux warehouse, the Appliance is free from defects in materials and workmanship for the Warranty Period. 4. During the Warranty Period Electrolux or its Authorised Service Centre will, at no extra charge and subject to these terms and conditions, repair or replace any parts which it considers to be defective. You agree that any replacedAppliances or parts become the property of Electrolux. This warranty does not apply to light globes, batteries, filters or similar perishable parts. 5. .Parts and Appliances not supplied by Electrolux are not covered by this warranty. 6. Where you are within an Electrolux service area, this warranty covers the cost of transport of the Appliance to and from Authorised Service Centres of Electrolux and travelling costs for representatives of the Authorised Service Centre to and from your home or business. If you are outside an Electrolux service area, you will bear these costs. For information about whether you are within an Electrolux service area, please phone 13 13 49 in Australia, or 0800 10 66 10 in New Zealand. 7. Proof of purchase is required before you can make a claim under this warranty. 8. You may not make a claim under this warranty unless the defect claimed is due to faulty or defective parts or workmanship. Electrolux is not liable in the following situations (which are not exhaustive): (a) The Appliance is damaged by: (i) accident (ii) misuse or abuse, including failure to properly maintain or service (iii) normal wear and tear (iv) power surges, electrical storm damage or incorrect power current (v) incomplete or improper installation (vi) incorrect, improper or inappropriate operation (vii) insect or vermin infestation. (b) The Appliance is modified without authority from Electrolux in writing. (c) The Appliance's serial number or warranty seal has been removed or defaced. (d) The Appliance was serviced or repaired by anyone other than Electrolux or its Authorised Service Centres. 9. This warranty, the contract to which it relates and the relationship between you and Electrolux are governed by the law applicable in the Australian State where the Appliance was purchased or the law applicable in New Zealand if the Appliance was purchased in New Zealand. Where the Appliance was purchased in New Zealand for business purposes the Consumer Guarantee Act does not apply. Limitation of Liability 10.To the extent permitted by law: (a) Electrolux excludes all warranties other than as contained in this document; (b) Electrolux shall not be liable for any loss or damage whether direct or indirect or consequential arising from your purchase, use or non-use of the Appliance. 11.Provisions of the Trade Practices Act and State consumer legislation in Australia, and the Consumer Guarantees Act, the Sale of Goods Act and the Fair Trading Act in New Zealand, imply warranties or conditions, or impose obligations, upon Electrolux which cannot be excluded, restricted or modified. To the extent permitted by law, the liability of Electrolux (if any) arising out of or in relation to the Appliance or any services supplied by Electrolux shall be limited (where it is fair and reasonable to do so),: (a) in the case of Appliances, at its option, to the replacement or repair of the Appliances or the supply of equivalent products or the payment of the cost of replacing the Appliances or having the Appliances repaired or of acquiring equivalent Appliances. Upon being replaced, parts and Appliances become the property of Electrolux; or (b) in the case of services, at its option, to the supply of the services again or the payment of the cost of having the services resupplied; and in the case of Appliances or services supplied in New Zealand, loss or damage whether direct or indirect or consequential that is reasonably forseeable. Privacy You acknowledge that in the event that you make a warranty claim it will be necessary for Electrolux and its Authorised Service Centres to exchange information in relation to you to enable Electrolux to meet its obligations under this warranty. Important Notice Before Calling a Service Technician please check carefully the operating instructions, service booklet and the warranty terms and conditions. FOR SERVICE OR TO FIND THE ADDRESS OF YOUR NEAREST STATE SERVICE CENTRE IN AUSTRALIA Please call 13 13 49 For the cost of a local call (Australia only) SERVICE AUSTRALIA ELECTROLUX HOME PRODUCTS FOR SPARE PARTS OR TO FIND THE ADDRESS OF YOUR NEAREST STATE SPARE PARTS CENTRE IN AUSTRALIA Please call 13 13 50 For the cost of a local call (Australia only) NEW ZEALAND SPARE PARTS CENTRES FOR SERVICE OR TO FIND THE ADDRESS OF YOUR NEAREST AUTHORISED SERVICE CENTRE IN NEW ZEALAND Free call 0800 10 66 10 (New Zealand only) AUCKLAND Prime Distributors Ltd. 8 Highbrook Drive, East Tamaki…………….…… WELLINGTON Prime Distributors Ltd. 68 Victoria Street, Petone…………………….. CHRISTCHURCH Prime Distributors Ltd. Unit 1, 127 Montreal Street……………….. R. Redpath Ltd. 55 Ferry Road……………………………….……… DUNEDIN South City Champion, 590 Hillside Road……………………………...………. (09) 273 3580 (04) 586 2150 (03) 377 1009 (03) 379 0446 (03) 455 5443 ELECTROLUX HOME PRODUCTS Issue 01 30/9/04