1
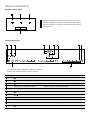
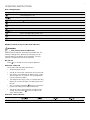
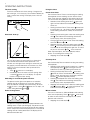
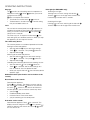
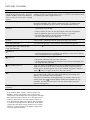
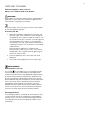
User manual
Ceramic Glass Induction Hob EHI935BAEHI938BA
2
WE’RE THINKING OF YOU
hank you for purchasing an Electrolux appliance.
T
You’ve chosen a product that brings with it decades
of professional experience and innovation. Ingenious
and stylish, it has been designed with you in mind.
So whenever you use it, you can be safe in the
knowledge that you’ll get great results every time.
Welcome to Electrolux.
BEFORE USING YOUR APPLIANCE
efore you use the cooktop, we recommend that you
B
read through the whole user manual which provides the
description of the cooktop and its functions. To avoid
the risks that are always present when you use a gas
appliance, it is important that the cooktop is installed
correctly and that you read the safety instructions carefully
to avoid misuse and hazards.
For future reference, please store this booklet in a safe
place.
Contents
3
Safety information
4
Installation instructions
6
Product description
7
Operating instructions
7
On and off
7
Automatic switch off
8
The heat setting
8
Automatic heat up
8
Switching on and off the power function
8
Using the timer
9
Stop+Go
9
Lock
9
The child safety device
9
Offsound control (deactivation and activation of
the sounds)
10 Helpful hints and tips
CONDITIONS OF USE
This appliance is intended to be used in household and
similar applications such as:
• Staff kitchen areas in shops, offices and
other working environments
• Farm houses
• By clients in hotels, motels and other residential
type environments
• Bed and breakfast type environments
BEFORE YOU CALL
Please ensure you read the instruction manual fully before
you call for service, or a full service fee could be applicable.
Record model and serial
number here:
Model:
Serial No:
12 Troubleshooting
13 Care and cleaning
13 Environment concerns
13 Packaging material
14 Notes
15 Warranty
LEGEND
Warning!
This symbol indicates information concerning your
personal safety.
Caution!
This symbol indicates information on how to avoid
damaging the cooktop.
Important!
This symbol indicates tips and information about use of
the cooktop
ENVIRONMENT!
This symbol indicates tips and information about
economical and ecological use of the cooktop.
3
safety information
lease read the user manual carefully and store in a handy
P
place for later reference. Pass the user manual on to
possible new owners of the cooktop.
Warning!
Fire danger! Overheated fats and oils can catch fire very
quickly.
Read the following carefully to avoid damage or injury.
This symbol indicates never to do this
This symbol indicates always do this
General safety
Warning!
Persons (including children) with reduced physical sensory,
mental capabilities or lack of experience and knowledge
must not use the appliance. They must have supervision or
instruction for the operation of the appliance by a person
responsible for their safety.
Child safety
Only adults can use this appliance. Children must
get supervision to make sure that they do not play
with the appliance.
Keep all packaging away from children. There is a
risk of suffocation.
Keep children away from the appliance when it is on.
Warning!
Activate the child safety device to prevent small children and
pets from an accidental activation of the appliance.
Safety during operation
Remove all packaging, stickers and layers from the
appliance before the first use.
Set the cooking zones to “off” after each use. Do not
reply on the pan detector.
Risk of burns! Do not put metallic objects, for
example cutlery or saucepan lids, on the cooking
surface, as they can become hot.
Users with an implanted pacemaker must keep their
upper body minimum 30cm from induction cooking
zones that are switched on.
Correct operation
Always monitor the appliance during operation. Do
not use an external timer or a separated remote
control system to operate the appliance.
Only use the appliance for domestic cooking tasks!
Do not use the appliance as a work or a storage
surface.
Do not put or keep very flammable liquids and
materials, or fusible objects (made of plastic or
aluminium) on or near the appliance.
Other than the connection point in the terminal
block, do not let the electrical supply cord touch the
appliance or hot cookware. Ensure electrical supply
cord is not tangled.
How to prevent damage to the appliance
If objects or cookware fall on the ceramic glass, the
surface can be damaged.
Cookware made of cast iron, cast aluminium or with
damaged bottoms can scratch the glass ceramic if
you move them on the surface.
Do not let cookware boil dry to prevent damage to
cookware and the ceramic glass.
Do not use the cooking zones with empty cookware
or without cookware.
Do not cover the parts of the appliance with
aluminium foil.
Do not cover the ventilation space of 5mm between
the worktop and front of the unit below it.
Please note: Damage including broken glass or
scratches caused by misuse outlined above is not
covered under warranty.
Warning!
If there is a crack on the surface, disconnect power supply to
prevent the electric shock.
4
INSTALLATION INSTRUCTIONS
Safety instructions
Warning!
Make sure that the appliance is not damaged because of
transportation. Do not connect a damaged appliance. If it is
necessary, speak to the supplier.
Sticking on the seal
• Clean the worktop in the area of the cut-out section.
• Bond the sealing tape to the lower edge of the cooking
surface along the outer edge of the glass ceramic. Do
not extend it. Align the cut ends in the middle of one
side. When you have cut it to length (add some mm),
push the two ends together.
Only an authorised service technician can install,
connect or repair this appliance. Use only original
spare parts.
Only use built-in appliances after you assemble
the appliance into correct built-in units and work
surfaces that align to the standards.
Assembly
Do not change the specifications or modify this
product. Risk of injury and damage to the appliance.
Fully obey the laws, ordinances, directives and
standards in force in the country where you use the
appliance (safety regulations, recycling regulations,
electrical safety rules etc). Keep the minimum
distances to other appliances and units.
Install anti-shock protection, for example install the
drawers only with a protective floor directly below
the appliance.
Protect the cut surfaces of the worktop against
moisture with a correct sealant. Seal the appliance
to the work top with no space left with a correct
sealant. Protect the bottom of the appliance from
steam and moisture, e.g. from a dishwasher or oven.
Do not install the appliance adjacent to doors and
below windows. If not, hot cookware can be hit off
the hob when you open doors or windows.
Warning!
Risk of injury from electrical current. Carefully obey the
instructions for electrical connections.
The electrical mains terminal is live.
min. 500 mm
Make electrical mains terminal free of voltage.
min.
50 mm
Install correctly to give anti-shock protection.
Loose and incorrect plug and socket connections
can make the terminal become too hot.
A qualified electrician must install the clamping
connections correctly.
Use a strain relief clamp on cable.
min.
5 mm
Use the correct mains cable of type H05BB-F Tmax
90°C (or higher) for a single-phase or two-phase
connection.
Replace the damaged mains cable with a special
cable (type H05BB-F Tmax 90°C; or higher). Speak
to your local service agent.
The appliance must have the electrical installation which
lets you disconnect the appliance from the mains at all
poles with a contact opening width of minimum 3mm. You
must have correct isolation devices: line protecting cutouts, fuses (screw type fuses removed from the holder),
earth leakage trips and contactors.
min.
50 mm
5
For EHI935BA
R 5 mm
600 mm
+1
380 +1 mm 880 mm
=
=
min.
38 mm
For EHI938BA
min.
5 mm
R 5 mm
=
600 mm
R 5 mm392
+1 mm
892 +1 mm
600 mm
=
+1
380 +1 mm 880 mm
=
=
For both models
min.
20 mm
R 5 mm
=
min.
25 mm
min.
min.
5 38
mmmm
min.
5 mm
600 mm
+1
392 +1 mm 892 mm
=
min.
20 mm
min.
25 mm
min.
5 mm
Important!
If you use a protection box (additional accessory), the front
ventilation space of 5mm and protective floor directly below
the appliance are not necessary.
6
Product description
Cooking surface layout
1
2
3
1
2
3
4
Induction cooking zone 2300W, with Power function 3200W
Induction cooking zone 2300W, with Power function 3200W
Induction cooking zone 2300W, with Power function 3200W
Control panel
4
Control panel layout
1
2
3
4
5
6
7
11
8
9
10
Use the sensor fields to operate the appliance. Indicators,
displays and sounds tell which functions operate.
Sensor field
Function
1
Starts and stops the hob
2
Starts and stops the key lock or child lock
3
Sets all operating zones to a keep warm setting
4
Cooking zones’ indicators of timer
Shows for which zone you set the time
5
Timer display
Shows the time in minutes
6
Selects the cooking zone
7
Increases or decreases the time
8
Starts the Power function
9
Heat setting display
Shows the heat setting
10
Control bar
To adjust the heat setting
11
Halo Light (for EHI938BA only)
Turns Halo light on/off, perimeter light activates after 3 seconds
7
Operating instructions
Heat setting displays
Display
Description
The cooking zone is off
The cooking zone operates
The
function operates
The automatic heat up function is on
Power function is on
There is a malfunction
+ digit
OptiHeat Control (3 step Residual heat indicator) : continue cook / keep warm / residual heat
Lock / The child safety function is on
Not correct cookware or too small or no cookware on the cooking zone
The automatic switch off is on
OptiHeat control (3 step residual heat indicator)
Warning!
Risk of burns from residual heat!
OptiHeat Control indicates the level of the residual heat. The
induction cooking zones generate the heat necessary for
cooking directly in the bottom of the cookware. The glass
ceramic is heated by the heat of the cookware.
On and off
Touch
for 1 second to start or stop the appliance.
Automatic switch off
The function stops the hob automatically if:
• All cooking zones are off.
• You do not set the heat setting after you start the hob.
• You cover a sensor field with an object (a pan, a cloth,
etc) for longer than 10 seconds. The sound operates
until you remove the object.
• The hob gets too hot (e.g. when a saucepan boils dry).
Before you use the hob again, the cooking zone must
be cool.
• You use incorrect cookware. comes on and after 2
minutes the cooking zone stops automatically.
• You do not stop a cooking zone or change the heat
setting. After some time comes on and the hob
stops. See the table.
Automatic switch off times
Heat setting
Stops after
6 hours
5 hours
4 hours
1.5 hours
8
Operating instructions
Using the timer
The heat setting
Touch the control bar at the heat setting. Change to the
left or the right, if it is necessary. Do not release before you
have a correct heat setting. The display shows the heat
setting.
P
Automatic heat up
Count down timer
Use the Count Down Timer to set how long the cooking
zone operates for one cooking session. Set the Count
Down Timer after the selection of the cooking zone. You
can set the heat setting before or after you set the timer.
• Selection of the cooking zone: touch again and
again until the indicator of the required cooking zone
comes on.
• Starting the Count Down Timer: touch of the timer
to set the time ( 00 - 99 minutes). When the indicator
of the cooking zone flashes slower, the time counts
down.
• Checking the remaining time: select the cooking zone
with . The indicator of the cooking zone flashes
faster. Display shows the remaining time.
• Changing the Count Down Timer: select the cooking
zone with touch or .
• Stopping the timer: select the cooking zone with .
Touch . The remaining time counts backwards to 00.
The indicator of the cooking zone goes out. To switch
off you can also touch and at the same time.
When the time elapses, the sound operates and 00
flashes. The cooking zone switches off.
• Stopping the sound: touch .
You can get a necessary heat setting in a shorter time
if you activate the Automatic Heat Up function. This
function sets the highest heat setting for some time (see
the graphic), and then decreases to the necessary heat
setting. To start the Automatic Heat Up function for a
cooking zone:
1.Touch ( comes on in the display).
2.Immediately touch the necessary heat setting. After
3 seconds comes on in the display. To stop the
function change the heat setting.
Switching on and off the power function
The power function gives more power to an induction
cooking zone for no longer than 10 minutes. After that
time, the induction cooking zone automatically sets back
. To start it , touch and comes on. To stop it, set
to
a heat setting between and
.
Power management
Countup timer
Use the CountUp Timer to monitor how long the cooking
zone operates.
• Selection of the cooking zone (if more than 1 cooking
zone operate): touch again and again until the
indicator of a necessary cooking zone comes on.
• Starting the CountUp Timer: touch of the timer
comes on. When the indicator of the cooking zone
flashes slower, the time counts up, display switches
between and time elapsed (minutes).
• Checking the elapsed time: select the cooking zone
with . The indicator of the cooking zone flashes
faster. Display shows the elapsed time.
• Stopping the CountUp Timer: select the cooking zone
with and touch or to switch off the timer. The
indicator of the cooking zone goes out.
Minute minder
You can use the timer as a Minute Minder while cooking
zones are not operating. Touch or or of the timer
to select the time. When the time elapses, the sound
operates and 00 flashes.
• Stopping the sound: touch .
The power management divides the power between two
cooking zones in a pair (see the figure). The power function
increases the power to the maximum level for one cooking
zone in the pair and automatically decreases in the second
cooking zone to a lower power level. The display for the
reduced zone alternates.
9
Operating instructions
Stop+go
function sets all cooking zones that operate to a
The
Keep Warm setting( ). When
operates, you cannot
change the heat setting.
does not stop the timer function.
• To activate this function touch . comes on.
• To deactivate this function touch . The heat setting
that you set before comes on.
Lock
You can lock the control panel, but not . It prevents an
accidental change of the heat setting. First set the heat
setting. To start this function touch . The symbol
comes on for 4 seconds.
The Timer stays on. To stop this function touch . The
heat setting that you set before comes on. When you stop
the appliance, you also stop this function.
The child safety device
This function prevents an accidental operation of the hob.
Starting the child safety device:
• Start the hob with . Do not set the heat settings.
• Touch for 4 seconds. The symbol comes on.
• Stop the hob with .
Switching off the child safety device:
• Start the hob with . Do not set the heat settings .
Touch for 4 seconds. The symbol comes on.
• Stop the hob with .
Overriding the child safety device for one cooking session:
• Start the hob with . The symbol comes on.
• Touch for 4 seconds. Set the heat setting in less
than 10 seconds. You can operate the hob.
• When you stop the hob with , the child safety device
operates again.
OffSound Control (deactivation and activation of the
sounds)
Deactivation of the sounds
Deactivate the appliance.
Touch for 3 seconds. The displays come on and go
out. Touch for 3 seconds. comes on, the sound is
on. Touch , comes on, the sound is off. When this
function operates, you can hear the sounds only when:
• you touch
• the Minute Minder comes down
• the Count Down Timer comes down
• you put something on the control panel.
Activation of the sounds
Deactivate the appliance. Touch for 3 seconds. The
displays come on and go out. Touch for 3 seconds.
comes on, because the sound is off. Touch , comes
on. The sound is on.
Halo light (for EHI938BA only)
Switching on the light:
Halo light turns on when starting the hob with .
Or touch
to turn on the light when the hob is off.
Perimeter light activates after 3 seconds.
Switching off the light:
Halo light turns off when switching off the hob with .
Or touch
to turn off the light when the hob is on.
10
HELPFUL HINTS AND TIPS
Energy saving
Use the induction cooking zones with suitable cookware.
Put the cookware on the cross which is on the cooking
surface. Cover the cross fully. The magnetic part of the bottom
of the cookware must be 120mm minimum. Recommended
size for optimum performance is up to 240mm. Induction
cooking zones adapt to the dimension of the bottom of
the cookware automatically. You can cook with the large
cookware on two cooking zones at the same time.
Cookware for induction cooking zones
In induction cooking a powerful electromagnetic field
generates an almost instant heat inside the cookware.
Cookware material:
• Correct: cast iron, steel, enamelled steel, stainless
steel, a multi-layer bottom (marked as correct by a
manufacturer, example of marking included as per
below).
• Incorrect: aluminium, copper, brass, glass, ceramic,
porcelain.
• Cookware is correct for an induction hob if water boils
very quickly on a zone set to the highest heat setting
or;
• A magnet pulls on to the bottom of the cookware.
Cookware which has a thick and flat bottom gives best
cooking results.
Operating noises
If you can hear:
• Cracking noise: cookware is made of different
materials (Sandwich construction).
• Whistling: you use one or more cooking zones with
high power levels and the cookware is made of
different materials (Sandwich construction).
• Humming: you use high power levels.
• Clicking: electric switching occurs.
• Hissing, buzzing: the fan operates.
The noises are normal and do not refer to any defects.
If unfamiliar with induction units please first compare the
operating sounds of a demonstration model at your retailer
before calling service. If a service call is placed and the
sounds are normal you will be charged for the visit.
• If possible, always put lids on cookware.
• Put cookware on a cooking zone before you start it.
• Stop the cooking zones before the end of the cooking
time to use residual heat.
• For optimum performance, the bottom of pans and
cooking zones must have the same dimension
Öko Timer (Eco Timer)
To save the energy, the heater of the cooking zone
switches itself off earlier than count down timer signal.
The heating time reduction depends on cooking level and
cooking time.
11
HELPFUL HINTS AND TIPS
Examples of cooking applications Heat setting
The data in the table is for guidance only.
Use to:
Time
Hints
Keep cooked foods warm
as required
Cover
1-3
Hollandaise sauce, melt: butter, chocolate,
gelatine
5 - 25 min
Mix occasionally
1-3
Solidify: fluffy omelettes, baked eggs
10-40 min
Cook with a lid on
3-5
Simmer rice and milk- based dishes, heating up
ready-cooked meals
25-50 min
Add at least twice as much liquid
as rice, stir milk dishes part way
through
5-7
Steam vegetables, fish, meat
20-45 min
Add some tablespoons of liquid
7-9
Steam potatoes
20-60 min
Use max. 1⁄4 L water for 750 g of
potatoes
7-9
Cook larger quantities of food, stews and soups
60 - 150 min
Up to 3 L liquid plus ingredients
9-12
Gentle fry: escalope, veal cordon bleu, cutlets,
rissoles, sausages, liver, roux, eggs, pancakes,
doughnuts
as necessary
Turn halfway through
12-13
Heavy fry, hash browns, loin steaks, steaks
5 - 15 min
Turn halfway through
14
Boil large quantities of water, cook pasta, sear
meat (goulash, pot roast), deep fry chips
1
The Power function is suitable for heating large quantities of water.
Information on acrylamides
Important! According to the newest scientific knowledge,
if you brown food (especially food that contains starch),
acrylamides can pose a health risk. Thus, we recommend
that you cook at the lowest temperatures and do not
brown food too much.
12
care and cleaning
Problem
Possible cause and remedy
Red rings, limescale or water rings, shiny
metallic or other discolouration, stratches/
shadows, bubbles or other miscellaneous
marks or stains on ceramic glass cooktop
surface
Use a ceramic glass cleaner such as Cerapol. Cleaning/ maintenance of the
cooktop surface is not covered under warranty. If a service call is placed to clean
the cooktop you will be charged for the visit.
Pitting of ceramic glass surface
Spillovers of liquid with high sugar content. These types of spills must be
removed immediately with a special scraper for the glass. If not permanent
damage to the cooktop can occur which is not covered under warranty.
You cannot start the appliance or
operate it
• You touched 2 or more sensor fields at the same time.
Only touch one sensor field.
• There is water or fat stains on the control panel. Clean the control panel.
• Start the appliance again and set the heat setting in 10 seconds.
• The child safety device or key lock or Stop+Go operates.
See the chapter Operating the appliance.
The residual heat indicator does not
come on
The cooking zone is not hot because it operated only for a short time. If the
cooking zone is supposed to be hot, speak to the after sales service.
Heat setting alternates
The Power management is active. See the section Power management.
A sound operates and appliance starts
and stops again. After 5 seconds one
more sound operates
You covered
. Uncover the sensor field.
comes on
• The automatic switch-off operates. Stop the appliance and start it again.
• Overheating protection for the cooking zone operates. Switch off the cooking
zone, use cookware with a larger diameter.
comes on
• No cookware on the cooking zone. Put cookware on the cooking zone.
• Not correct cookware. Use the correct cookware.
• The diameter of the bottom of the cookware is too small for the cooking zone.
Use larger diameter cookware.
and number comes on
There is an error in the appliance. Disconnect the appliance from the electrical
supply for some time. Reset the fuse from the electrical system of the house.
Ensure unit has ventilation gap at front as per installation instructions. Connect
again. If comes on again, speak to the after sales service.
comes on
There is no signal when you touch
panel keys
There is an error in the appliance, because either the cookware boils dry or
you’ve used incorrect cookware. Overheating protection for cooking zone
operates. The automatic switch-off operates.
Remove the hot cookware. After approximately 30 seconds switch on the
cooking zone again.
should disappear, residual heat indicator can stay.
Cool down the cookware and check it with the section Cookware for the
induction cooking zone.
The signals are off. Switch on the signals.
If you tried the above solutions and cannot repair the
problem, speak to your dealer or the Customer Care
Department. Give the data from the rating plate, three digit
letter code for the glass ceramic (it is in the corner of the
cooking surface) and an error message that comes on.
If you operated the appliance incorrectly, the servicing by
a customer service technician or dealer will not be free of
charge, even during the warranty period. The instructions
about the customer service and conditions of guarantee
are in the guarantee booklet.
13
care and cleaning
Clean the appliance after each use. Always use cookware with clean bottom.
Warning!
Sharp objects and abrasive cleaning agents will damage the
appliance. For your safety, do not clean the appliance with
steam blasters or high-pressure cleaners.
Scratches or dark stains on the glass ceramic have no effect
on how the appliance operates.
To remove the dirt
1. Remove immediately: melted plastic, plastic foil, and
food with sugar. If not, the dirt can cause damage to
the appliance. Use a special scraper for the glass. Put
the scraper on the glass surface at an acute angle and
move the blade on the surface. It is very important
that spillovers with high sugar content are removed. If
not pitting of the glass can result which is not covered
under warranty.
Remove after the appliance is sufficiently cool:
limescale rings, water rings, fat, stains, shiny metallic
discolorations. Use a special cleaning agent for glass
ceramic or stainless steel.
2.Clean the appliance with a moist cloth and some
detergent.
3. At the end rub the appliance dry with a clean cloth.
ENVIRONMENT!
Environmental concerns
The symbol on the product or on its packaging indicates
that this product may not be treated as household waste.
Instead it should be taken to the appropriate collection point
for the recycling of electrical and electronic equipment. By
ensuring this product is disposed of correctly, you will help
prevent potential negative consequences for the environment
and human health, which could otherwise be caused by
inappropriate waste handling of this product. For more
detailed information about recycling of this product, please
contact your local council, your household waste disposal
service or the shop where you purchased the product.
Packaging material
The packaging materials are friendly to the environment and
can be recycled. The plastic components are identified by
marking: >PE<,>PS<, etc. Discard the packaging materials
as household waste at the waste disposal facilities in your
municipality.
14
Notes
15
Warranty
FOR SALES IN AUSTRALIA AND NEW ZEALAND
APPLIANCE: BUILT-IN OVEN, COOKTOP
AND FLOOR MOUNTED COOKER
This document sets out the terms and conditions of the product
warranties for Electrolux Appliances. It is an important document.
Please keep it with your proof of purchase documents in a safe place
for future reference should you require service for your Appliance.
1. In this warranty
(a) ‘acceptable quality’ as referred to in clause 10 of this warranty has
the same meaning referred to in the ACL;
(b) ‘ACL’ means Trade Practices Amendment (Australian Consumer
Law) Act (No.2) 2010;
(c) ‘Appliance’ means any Electrolux product purchased by you
accompanied by this document;
(d) ‘ASC’ means Electrolux’ authorised service centres;
(e) ‘Electrolux’ means Electrolux Home Products Pty Ltd of 163
O’Riordan Street, Mascot, NSW 2020, ABN 51 004 762 341 in
respect of Appliances purchased in Australia and Electrolux (NZ)
Limited of 3-5 Niall Burgess Road, Mount Wellington, in respect
of Appliances purchased in New Zealand;
(f) ‘major failure’ as referred to in clause 10 of this warranty has the
same meaning referred to in the ACL and includes a situation when
an Appliance cannot be repaired or it is uneconomic for Electrolux, at
its discretion, to repair an Appliance during the Warranty Period;
(g) ‘Warranty Period’ means:
(i) where the Appliance is used for personal, domestic or household
use (i.e. normal single family use) as set out in the instruction
manual, the Appliance is warranted against manufacturing
defects in Australia for 24 months and in New Zealand for 24
months, following the date of original purchase of the Appliance;
(ii) where the Appliance is used for commercial purposes (including
being used to directly assist a business or where the Appliance is
used in a multi-family communal or share type environment), the
Appliance will then be warranted against manufacturing defects
in Australia for 3 months and in New Zealand for 3 months,
following the date of original purchase of the Appliance.
(h) ‘you’ means the purchaser of the Appliance not having purchased
the Appliance for re-sale, and ‘your’ has a corresponding meaning.
2. This warranty only applies to Appliances purchased and used in Australia
or New Zealand and is in addition to (and does not exclude, restrict, or
modify in any way) any non-excludable statutory warranties in Australia
or New Zealand.
3. During the Warranty Period Electrolux or its ASC will, at no extra charge
if your Appliance is readily accessible for service, without special
equipment and subject to these terms and conditions, repair or replace
any parts which it considers to be defective. Electrolux or its ASC may
use remanufactured parts to repair your Appliance. You agree that
any replaced Appliances or parts become the property of Electrolux.
This warranty does not apply to light globes, batteries, filters or similar
perishable parts.
4. Parts and Appliances not supplied by Electrolux are not covered by
this warranty.
5. You will bear the cost of transportation, travel and delivery of the
Appliance to and from Electrolux or its ASC. If you reside outside of the
service area, you will bear the cost of:
6. Proof of purchase is required before you can make a claim under
this warranty.
7. You may not make a claim under this warranty unless the defect claimed
is due to faulty or defective parts or workmanship. Electrolux is not liable
in the following situations (which are not exhaustive):
(a) the Appliance is damaged by:
(i) accident
(ii) misuse or abuse, including failure to properly maintain or service
(iii) normal wear and tear
(iv) power surges, electrical storm damage or incorrect power supply
(v) incomplete or improper installation
(vi) incorrect, improper or inappropriate operation
(vii) insect or vermin infestation
(viii) failure to comply with any additional instructions supplied with
the Appliance;
(b) the Appliance is modified without authority from Electrolux in writing;
(c) the Appliance’s serial number or warranty seal has been removed
or defaced;
(d) the Appliance was serviced or repaired by anyone other than
Electrolux, an authorised repairer or ASC.
8. This warranty, the contract to which it relates and the relationship
between you and Electrolux are governed by the law applicable where
the Appliance was purchased. Where the Appliance was purchased in
New Zealand for business purposes the Consumer Guarantee Act does
not apply.
9. To the extent permitted by law, Electrolux excludes all warranties and
liabilities (other than as contained in this document) including liability for
any loss or damage whether direct or indirect arising from your purchase,
use or non use of the Appliance.
10. For Appliances and services provided by Electrolux in Australia,
the Appliances come with a guarantee by Electrolux that cannot be
excluded under the Australian Consumer Law. You are entitled to a
replacement or refund for a major failure and for compensation for any
other reasonably foreseeable loss or damage. You are also entitled to
have the Appliance repaired or replaced if the Appliance fails to be of
acceptable quality and the failure does not amount to a major failure.
The benefits to you given by this warranty are in addition to your other
rights and remedies under a law in relation to the Appliances or services
to which the warranty relates.
11. At all times during the Warranty Period, Electrolux shall, at its discretion,
determine whether repair, replacement or refund will apply if an
Appliance has a valid warranty claim applicable to it.
12. For Appliances and services provided by Electrolux in New Zealand,
the Appliances come with a guarantee by Electrolux pursuant to the
provisions of the Consumer Guarantees Act, the Sale of Goods Act and
the Fair Trading Act.
13. To enquire about claiming under this warranty, please follow these steps:
(a) carefully check the operating instructions, user manual and the terms
of this warranty;
(b) have the model and serial number of the Appliance available;
(c) have the proof of purchase (e.g. an invoice) available;
(a) travel of an authorised representative;
(b) transportation and delivery of the Appliance to and from Electrolux or
its ASC,
In all instances, unless the Appliance is transported by Electrolux or an
Electrolux authorised representative, the Appliance is transported at the
owner’s cost and risk while in transit to and from Electrolux or its ASC.
(d) telephone the numbers shown below.
14. You accept that if you make a warranty claim, Electrolux and its ASC
may exchange information in relation to you to enable Electrolux to meet
its obligations under this warranty.
Important Notice
Before calling for service, please ensure that the steps listed in point 13 above have been followed.
FOR SERVICE
or to find the address of your nearest
state service centre in Australia
PlEASE CAll 13 13 49
For the cost of a local call (Australia only)
FOR SERVICE
or to find the address of your nearest
authorised service centre in New Zealand
FREE CAll 0800 10 66 10
(New Zealand only)
GOV_Warr_Apr11
SERVICE AUSTRAlIA
ELECTROLUX HOME PRODUCTS
www.electrolux.com.au
SERVICE NEW ZEAlAND
ELECTROLUX HOME PRODUCTS
www.electrolux.co.nz
FOR SPARE PARTS
or to find the address of your nearest
state spare parts centre in Australia
PlEASE CAll 13 13 50
For the cost of a local call (Australia only)
FOR SPARE PARTS
or to find the address of your nearest
state spare parts centre in New Zealand
FREE CAll 0800 10 66 20
(New Zealand only)
16
Electrolux Home Products Australia
telephone: 1300 363 640
fax:
1800 350 067
email:[email protected]
web:www.electrolux.com.au
Electrolux Home Products New Zealand
telephone: 0800 234 234
fax:
0800 363 600
email:[email protected]
web:www.electrolux.co.nz
The Thoughtful Design Innovator.
Do you remember the last time you opened a gift that made you say
“Oh! How did you know? That’s exactly what I wanted!” That’s the kind
of feeling that the designers at Electrolux seek to evoke in everyone who
chooses or uses one of our products. We devote time, knowledge, and
a great deal of thought to anticipating and creating the kind of appliances
that our customers really need and want.
This kind of thoughtful care means innovating with insight. Not design for design’s
sake, but design for the user’s sake. For us, thoughtful design means making
appliances easier to use and tasks more enjoyable to perform, freeing our
customers to experience that ultimate 21st century luxury, ease of mind. Our aim
is to make this ease of mind more available to more people in more parts of their
everyday lives, all over the world. So when we say we’re thinking
of you, you know we mean just that.
The “Thinking of you” promise from Electrolux goes beyond meeting the needs of
today’s consumers. It also means we’re committed to making appliances safe for
the environment—now and for future generations.
Electrolux. Thinking of you.
Share more of our thinking at www.electrolux.com.au or www.electrolux.co.nz
P/No. 0342-001-610 Rev A
© 2013 Electrolux Home Products Pty Ltd.
ABN 51 004 762 341
EMAN_CERAMICGLASSHOB_UM_July13