1
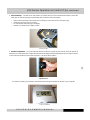
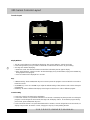
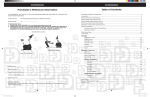
Purchaser’s Reference Information
IT IS IMPERATIVE THAT YOU FILL IN THE FOLLOWING INFORMATION AND REFER TO IT
SHOULD THE NEED FOR SERVICE ARISE.
Product Name: Diamondback 300 Series (Upright / Recumbent / Elliptical)
___________
Serial Number: P
To Activate Warranty:
COMPLETELY FILL OUT THE ATTACHED WARRANTY CARD (SEE BACK COVER) AND
RETURN TO DIAMONDBACK WITHIN 15 DAYS OF THE DATE OF PURCHASE. FAILURE
TO COMPLY WITH THE WARRANTY ACTIVATION PROCEDURE MAY VOID THE
MANUFACTURER’S WARRANTY.
Serial Number Location
SERIAL NUMBER
P000 0 0 0 0 0 0 0
300U Upright
300R Recumbent
Serial No. Sticker
Serial No. Sticker
300EL Elliptical
2
Serial No. Sticker
Dealer Name: _____________________________________________________________________
Dealer Address: ___________________________________________________________________
Dealer Phone Number: ________________________________
Dealer Contact Name: (________________________________
)
Date Purchased: _____________________________________
Shipping Materials
Diamondback recommends that you retain the original packing materials (box and packing items)
for future shipping needs.
3 0 0 S E R I E S O W N E R’ S M A N U A L
Table of Contents
Purchaser’s reference information .....................
Inside cover
Introduction .......................................................... 2
Safety instructions & Warnings ..........................
3
Assembly instruction
•
300U assembly drawing .......................... 4
•
300U assembly instructions .................... 5
•
300R assembly drawing .......................... 6
•
300R assembly instructions .................... 7
•
300EL assembly drawing ........................ 8
•
300EL assembly instructions ................... 9
Operation & Comfort tips ....................................
Console Layout .................................................... 12
Programs ..............................................................
•
Quick Start Program ................................ 13
•
Time Target Program ............................... 13
•
Distance Target Program ......................... 14
•
Calories Target Program .......................... 14
Exercise Guidelines ............................................. 15-17
Domestic Warranty information .........................
18
Maintenance ......................................................... 18
Warranty registration card ..................................
Back cover
10-11
3
3
3 0 0 S E R I E S O W N E R’ S M A N U A L
00
I ntroduction
Thank you for selecting Diamondback Fitness as your brand choice for the 300 Series cardiovascular
equipment. You have made a positive step toward adding the convenience of working out at home at a
feature packed price.
The quality of your workout will be more enjoyable with:
•
A consumer friendly console.
•
The ECB brake system with easy to adjust tension knob.
•
The contact heart rate monitor.
•
A Comfort Plus ® adjustable seat.
It took a company like Diamondback to create such a hard working, easy on your wallet line. We’ve been
one of the premiere names in mountain and racing bikes for over two decades. And now, with industry
firsts like our Heart Rate Control System, we’re a leading contender in the fitness arena, as well.
4
Whether you are just starting an exercise program, or maintaining, Diamondback Fitness has equipment
to fit your needs. Please feel free to check out our consumer web site at www.diamondbackfitness.com
to learn more about our additional product offerings.
Remember to start your exercise efforts slow, with intensity low, until you build endurance and
strength. And always consult your physician before beginning any exercise program.
3 0 0 S E R I E S O W N E R’ S M A N U A L
Safety Instructions & Warnings
The 300 series is built for optimum safety and is designed
to meet or exceed all domestic and international standards.
However, certain precautions need to be followed when
operating any exercise equipment. BE SURE TO READ
THE ENTIRE OWNER’S MANUAL BEFORE OPERATING
YOUR 300 SERIES UNIT.
THE NEXT STEP
The fitness experts at Diamondback believe that
IN WORKOUT
working out is not just for athletes but for all people.
TECHNOLOGY.
CAUTION – FOR SAFE OPERATION
1. Before beginning any exercise program on the 300
series equipment, it is important to consult with
your physician if you have any of the following:
History of heart disease, high blood pressure,
diabetes, chronic respiratory diseases, elevated
cholesterol, or if you smoke cigarettes or
experience any other chronic diseases or physical
complaints.
2. If over the age of 35 or overweight, consult with
your physician before beginning any exercise
program.
3. Pregnant women should consult with their
physician before beginning an exercise program.
4. If you experience dizziness, nausea, chest pains
or other abnormal symptoms during exercise, stop
the exercise session immediately. Consult your
physician before continue your exercise.
5. Drink fluids if you exercise for twenty or more
minutes on any 300 series unit.
3. User weight is not to exceed 275 pounds / 125
kilograms.
4. Keep children away from 300 series equipment.
Hands and feet may get caught in the pedals or
other moving parts which could result in serious
injury.
5. Place the 300 series unit in an area that will meet
minimum clearance requirements: Front, Back &
Sides: 2 feet / 60cm
6. Place Keep 300 series equipment away from walls
to allow proper ventilation. Air should be able to
circulate freely around the units. Keep all air
openings free of dirt and dust. Never insert
anything into openings.
7. The 300 series is intended for indoor use in the
home environment. It is not intended for outdoor
use.
8. Place your 300 series unit on a solid, level surface
when in use.
WARNING – TO REDUCE RISK OF INJURY TO
YOURSELF OR OTHERS
1. To ensure proper functioning of your 300 series
equipment, do not install attachments or
accessories not provided or recommended by
Diamondback.
9. Use the handlebars or handrails when getting on
and off your 300 series unit.
10. Never operate the unit if it is damaged or broken.
Contact your local authorized Diamondback
fitness dealer for service. Make sure all
components are fastened securely (i.e. seat post,
saddle, handlebars, pedals) at all times.
2. Always wear proper clothing and shoes when
exercising on any 300 series unit.
SAVE THIS OPERATING INSTRUCTIONS MANUAL.
3 0 0 S E R I E S O W N E R’ S M A N U A L
5
300U Assembly Drawing
6
3 0 0 S E R I E S O W N E R’ S M A N U A L
300U Assembly Instructions
Frame and Seat Assemblies
1. Place the unit and all accompanying parts in a
clean, flat, and open space.
2. Attach the Transport Bar to the Front of the Frame
using two M10 x 20mm bolts.
3. Attach the Stabilizer Bar to the rear of the Frame
using two M10 x 20mm bolts.
4. Slide the Seat Post in place on the frame and
screw in the Release Knob to hold it in place. Let
go of the Release Knob so that it’s pin will go into
one of the Post’s adjustment holes and then turn
the Knob clockwise to lock it in place.
5. Place the Seat on the rod at the top of the Seat
Post. Adjust the seat so that it is flat and pointing
forward and then tighten the nuts on the Seat’s
bottom simultaneously using two wrenches.
Console Mast Assembly
1. Hold up the Console Mast with the tube end facing
down and slide the Console Mast Cover onto it
as far as possible, with the tabs facing down.
2. Hold the Console Mast up slightly above its
mounting post on the front of the Frame. Hook
the Tension Cable together and position the
connectors so that the cable is fixed securely.
Attach the wire in the Mast to the wire in the post.
3. Slide the Mast onto the mounting post.
NOTE: Be careful not to pinch the wire while doing
this, doing so could cause the unit to malfunction.
Attach the Mast to the mounting post using four
M8 x 15mm bolts with four M8 arc washers (bent)
on the front and back and two M8 x 15mm bolts
with two M8 flat washers on the sides. Carefully
snap the Console Mast Cover into place on the
Frame.
4. Align the Handlebar with its post near the top of
the Console Mast so that only one bolt hole is
facing upward. Feed the wire from the Handlebar
up through the top of the Console Mast. Slide
the handlebar onto the Console Mast while pulling
gently on the wire to take up the slack. Attach
the Handlebar to the Console Mast using three
M8 x 15mm bolts and three M8 flat washers.
Console Assembly
1. Hold the Console up to the top of the Console
Mast and attach the two wires from the top of the
Mast to the back of the Console. Raise the
Console to the front of the Mast and slide the slot
in the back of the Console onto the top of the
Mast. While sliding the Console on, feed the slack
in the wires into the Mast.
NOTE: Be careful not to pinch the wires while
doing this, doing so could cause the unit to
operate incorrectly.
2. Once the Console is in place on the Mast, attach
it in place using four M5 x 15mm bolts.
Pedal Assembly
1. Use a crescent wrench to firmly affix the pedals
to the cranks.
2. The left and right pedals are different and are
denoted as right or left on the bottom of each
pedal.
NOTE: Left pedal threads counter-clockwise.
3. Retighten cranks after approximately 10 hours of
use.
3 0 0 S E R I E S O W N E R’ S M A N U A L
7
300R Assembly Drawing
8
3 0 0 S E R I E S O W N E R’ S M A N U A L
300R Assembly Instructions
Frame and Seat Assemblies
1. Place the unit and all accompanying parts in a
clean, flat, and open space.
2. Attach the Transport Bar to the front of the Frame
using two M10 x 20mm bolts.
3. Slide the Seat Track Support onto the lower bar
of the Frame and bolt it in place using four M8 x
15mm bolts and four M8 washers.
4. Attach the Stabilizer Bar to the rear of the Seat
Track Support using two M10 x 20mm bolts.
down and slide the Console Mast Cover onto it
as far as possible, with the tabs facing down.
5. Hold the Seat Track up to the frame horizontally
with the bolt holes facing to the sides. Slide the
Seat Track Cover and the Seat Frame onto the
middle of the Seat Track, checking to make sure
they are oriented right side up and facing the
correct direction.
2. Hold the Console Mast up slightly above its
mounting post on the front of the Frame. Hook
the Tension Cable together and position the
connectors so that the cable is fixed securely.
Attach the two wires in the Mast to the wires in
the post.
6. Slide the front of the Seat Track onto the upper
bar of the Frame, while placing the rear end of the
Seat Track into the upper arm of the Seat Track
Support. Attach the Seat Track to the Frame using
four M8 x 15mm bolts with two M8 washers on
the front holes and two rubber stops on the rear
holes. Attach the Seat Track to the Seat Track
Support using four M8 x 15mm bolts and four M8
washers.
3. Slide the Mast onto the mounting post.
NOTE: Be careful not to pinch the wires while
doing this, doing so could cause the unit to
malfunction. Attach the Mast to the mounting
post using three M8 x 15mm bolts and three M8
arc washers (bent). Carefully snap the Console
Mast Cover into place on the Frame.
7. Thread the male end of the Hand Pulse Cable
through the Seat Track Cover and plug it into the
wire on the upper bar of the Frame. Snap the
Seat Track Cover into places on the Frame by
squeezing gently along the sides, then press in
first the top two tabs and next the bottom two
tabs.
8. Place the Seat Handlebar on the Seat Frame with
the metal pulse grips facing upward and the
handles facing forward. Attach it in place using
four M8 x 10mm bolts and four M8 washers.
9. Place the Seat Pad on the Seat Frame with the
wide end at the back and attach it using four M6
x 45mm bolts. Hold the Seat Back against the
Seat Frame with the wide end down and attach it
in place using four M6 x 45mm bolts.
10. Stretch the free end of the Hand Pulse Cable along
the Seat Track to the back of the Seat and plug it
into the wire from the Seat Handlebar. Align the
Cable so that it will not be pinched by the Seat,
test by moving the Seat back and forth, and use
the plastic zip tie provided to hold the wire against
the Seat in this safe position.
Console Mast Assembly
1. Hold up the Console Mast with the tube end facing
4. Align the Handlebar with its post near the top of
the Console Mast so that only one bolt hole is
facing upward. Slide the handlebar onto the Mast
and attach it using three M8 x 15mm bolts and
three M8 flat washers.
Console Assembly
1. Hold the Console up to the top of the Console
Mast and attach the two wires from the Mast to
the back of the Console. Raise the Console to
the front of the Mast and slide the slot in the back
of the Console onto the top of the Mast. While
sliding the Console on, feed the slack in the wires
into the Mast.
NOTE: Be careful not to pinch the wires while
doing this, doing so could cause the unit to
operate incorrectly.
2. Once the Console is in place on the Mast, attach
it in place using four M5 x 15mm bolts.
Pedal Assembly
1. Use a crescent wrench to firmly affix the pedals
to the cranks.
2. The left and right pedals are different and are
denoted as right or left on the bottom of each
pedal. NOTE: Left pedal threads counterclockwise.
3. Retighten cranks after approximately 10 hours of
use.
3 0 0 S E R I E S O W N E R’ S M A N U A L
9
300EL Assembly Drawing
10
3 0 0 S E R I E S O W N E R’ S M A N U A L
300EL Assembly Instructions
Frame Assembly
1. Place the unit and all accompanying parts in a
clean, flat and open space.
2. Attach the Stabilizer Bar to the Frame using two
M10 bolts with two M10 nuts. Tighten these bolts
firmly using an Allen wrench on the bolt and a box
wrench on the nut.
Console Mast Assembly
1. Hold the Console Mast up above the post on the
front of the frame, with the Tension Adjuster facing
toward the rear.
Handlebar Assembly
1. Slide one Handlebar onto its post on the top of
the Frame. If the Handlebar is on the correct side,
the bolt holes at the bottom of the bar will line up
with those on the post and the Handlebar will arc
forward from the frame.
2. Slide the second Handlebar onto the other post.
Check both handlebars to make sure they are on
the correct sides.
3. Attach both Handlebars on the posts using three
M8 bolts on each.
2. Slide the Console Mast onto the post. Note: Be
careful not to pinch the wire or tension cable
while doing this, doing so could cause the unit
to operate incorrectly.
3. Slide the Console Mast Cover up the Console
Mast to allow access to the boltholes at the bottom of the Console Mast. Attach the Console Mast
to the Frame using three M8 bolts.
Console Assembly
1. Hold the Console up to the top of the Console
Mast and attach the three wires from the Mast to
the back of the Console. Raise the Console to the
front of the Mast and slide the slot in the back of
the Console onto the top of the Mast. While sliding the Console on, feed the slack in the wires
into the Mast.
Note: Be careful not to pinch the wires while
doing this, doing so could cause the unit to
operate incorrectly.
2. Once the Console is in place on the Mast, attach
it in place using four M5 x 15mm bolts.
3 0 0 S E R I E S O W N E R’ S M A N U A L
11
300 Series Operation & Comfort Tips
Proper adjustment of seat position and knowledge of pedaling cadence will allow effective use of your leg muscles
without producing undue muscular fatigue. Applying these proper techniques will allow you to ride comfortably and
efficiently. The 300 series products are biomechanically designed and are fully adjustable to optimize comfort.
1. Leg Extension: The seat should be positioned such that the leg is almost fully extended when the ball of the foot
is on the pedal and the pedal is in the position furthest from the body. This will allow for great use of more leg
muscles, thereby maximizing cardiovascular benefit while minimizing fatigue.
300U Seat Adjustment
12
300R Seat Adjustment
2. Foot Position: The ball of the foot should be on the pedal, directly over the pedal axle. This position allows you
to maximize the action of your calf muscles. Avoid pedaling with the arch of your foot on the pedal. If toe clips and
straps are attached to the pedals, use them to stabilize your foot on the pedals but do not use them if they place
your foot in an unnatural position.
Pedal Strap Adjustment
3 0 0 S E R I E S O W N E R’ S M A N U A L
300 Series Operation & Comfort Tips continued
3. Pulse Hand Grips: The 300 series units monitor your heart rate and come standard with stainless steel pulse
hand grips. To activate, gently grasp both hand grips to obtain a heart rate reading.
•
•
•
•
Make sure that the palms of the hands are touching the contact area of each hand pulse grip.
Maintain an even pressure on the grips.
Do not hold the hand pulse grips too tightly.
Moisten your hands to get a better contact.
Hand Pulse Grips
4. Resistance adjustment: You could adjust the levels of resistance any time of your workout. There are 8 levels of
resistance you could select from. To adjust the resistance level simply turning the adjustment knob. Turning it clockwise
(+) to increase the resistance and counter-clockwise (-) to reduce the resistance.
13
Adjustment Knob
You could also obtain your resistance level reading from the big LCD window on the top of your computer.
Console LCD Window
3 0 0 S E R I E S O W N E R’ S M A N U A L
300 Series Console Layout
Console Layout:
Display Windows
14
• The 300 console features 5 LCD windows displaying: Time, Speed, Distance, Calories and Pulse
• Pulse reading window: place your hands on the both of contact heart rate sensors to get a reading.
• One large LCD window displaying:
o Resistance Level: The selected resistance level will be indicated by the bar graphic display.
o Time, Speed, Distance, Calories or Pulse: To select the display of any of above Data, simply press “MODE” key
during anytime of the program.
o Scan: Each Data will be displayed for 5 seconds.
Keys
• START/STOP key: Press START/STOP key once to start or pause the program. Press and Hold for 2 seconds to
Reset the console.
• UP/DOWN key: Press UP or DOWN key to adjust the default reading of Time, Distance and Calories during the
programming.
• MODE key: To select a different data display on the large LCD window or to select a different program.
Console Setting
• Power Up: Console is powered up by 2AA battery.
• Pause mode: If there is no speed been detected for 25 seconds or Start/Stop key been pressed once during the
program, Console will get into Pause mode, the large LCD will display “PAUS”. To resume the program during
pause mode, press START/STOP key once.
• Power save mode: If there is no speed been detected for 5 minutes, Console will get into Power save mode, no
display at any window. To start the console, simply press any key or start pedaling the bike.
3 0 0 S E R I E S O W N E R’ S M A N U A L
Programs
QUICK START PROGRAM
Getting Started:
Start pedaling the bike. Press “START/STOP” button Once to start the console and accumulate all the data.
Adjusting Load:
Manually adjust the tension knob to the desired resistance level, see Operation section at page 11 for instruction.
The selected resistance level will be displayed on the large LCD window for viewing.
Note: You could adjust the tension at anytime during your workout.
Program Notes:
• Pause the program – Press START/STOP button Once at anytime to Pause the program. All 5 windows will
display the last accumulated data for viewing. The large LCD window will display “PAUS”.
• Resume the program – Press START/STOP button One more time after Pause to continue the program. All
the windows will continue accumulating all the data.
• Stop or Re-start the program: Press and Hold the START/STOP button for 2 seconds to reset the console.
All the windows will reset back to “0”.
TIME TARGET PROGRAM
Getting Started:
Start pedaling the bike. Press “MODE” button Once to enter the Time target program. Press “UP” or “DOWN” key to
set your target Time. Then press START/STOP button Once to start your program.
Adjusting Load:
Manually adjust the tension knob to the desired resistance level, see Operation section at page 11 for instruction.
The selected resistance level will be displayed on the large LCD window for viewing.
Note: you could adjust the tension at anytime during your workout.
Program Notes:
• Pause the program – Press START/STOP button Once at anytime to Pause the program. All 5 windows will
display the last accumulated data for viewing. The large LCD window will display “PAUS”.
• Resume the program – Press START/STOP button One more time after Pause to continue the program. All
the windows will continue accumulating all the data.
• Stop or Re-start the program: Press and Hold the START/STOP button for 2 seconds to reset the console.
All the windows will reset back to “0”.
3 0 0 S E R I E S O W N E R’ S M A N U A L
15
Programs continued
DISTANCE TARGET PROGRAM
Getting Started:
Start pedaling the bike. Press “MODE” button Twice to enter the Distance target program. Press “UP” or “DOWN”
key to set your target Distance. Then press START/STOP button Once to start your program.
Adjusting Load:
Manually adjust the tension knob to the desired resistance level, see Operation section at page 11 for instruction.
The selected resistance level will be displayed on the large LCD window for viewing.
Note: You could adjust the tension at anytime during your workout.
Program Notes:
• Pause the program – Press START/STOP button Once at anytime to Pause the program. All 5 windows will
display the last accumulated data for viewing. The large LCD window will display “PAUS”.
• Resume the program – Press START/STOP button One more time after Pause to continue the program. All
the windows will continue accumulating all the data.
• Stop or Re-start the program: Press and Hold the START/STOP button for 2 seconds to reset the console.
All the windows will reset back to “0”.
CALORIES TARGET PROGRAM
16
Getting Started:
Start pedaling the bike. Press “MODE” button Three times to enter the Calories target program. Press “UP” or
“DOWN” key to set your target Calories. Then press START/STOP button Once to start your program.
Adjusting Load:
Manually adjust the tension knob to the desired resistance level, see Operation section at page 11 for instruction.
The selected resistance level will be displayed on the large LCD window for viewing.
Note: You could adjust the tension at anytime during your workout.
Program Notes:
• Pause the program – Press START/STOP button Once at anytime to Pause the program. All 5 windows will
display the last accumulated data for viewing. The large LCD window will display “PAUS”.
• Resume the program – Press START/STOP button One more time after Pause to continue the program. All
the windows will continue accumulating all the data.
Stop or Re-start the program: Press and Hold the START/STOP button for 2 seconds to reset the console.
All the windows will reset back to “0”.
3 0 0 S E R I E S O W N E R’ S M A N U A L
Exercise Guidelines
Good health is an exercise in common sense.
Surgeon General releases a new study in 2001, The Surgeon General’s Call To Action To Prevent and Decrease Overweight
and Obesity. It indicates that there is 61% of American adults are either overweight or obese. Noting also that overweight
increases the risk of health problems, such as heart disease, certain type of cancer, type 2 diabetes, etc. It states that
overweight needs to be regarded primarily as Health rather than as Appearance issues.
Surgeon General’s Healthy weight advice for consumers is:
1. Aim for a healthy weight: Find your Body Mass Index (BMI) on the chart below.
2. Be active: Keep physically active to balance the calories you consume.
3. Eat well: Select sensible portion sizes.
BMI = (weight (pounds) / height (inches)
2
) x 703
17
Note: This chart is for adults (aged 20 years and older)
Heart rate is an important key to your exercise.
The Surgeon General also released a report on physical activity and health. This report definitively stated that exercise
and fitness are beneficial for a person’s health and redefined that exercise is a key component of disease prevention
and healthier living.
Medical research has shown us that there is an amount of exercise, which is enough to condition the cardio respiratory
system and the muscles of the body. This amount of exercise is between 60% and 85% of your maximum heart rate
measured during a training session. This range allows enough exercise to achieve fitness, but not an excessive amount
to cause injury. Your heart rate is an excellent indicator of the amount of stress placed on the cardiovascular system.
Taking full advantage of this information, the 600T is designed to include heart rate monitoring features.
3 0 0 S E R I E S O W N E R’ S M A N U A L
Exercise Guidelines continued
If exercise intensity is too low or too high, no gains will be made in fitness. If the intensity is too low, the stress levels are
ineffective. If the intensity is too high, injury or fatigue may set your exercise program back as you try to recover.
The best way to monitor exercise intensity is to accurately count your pulse during exercise. Your heart rate can easily
be determined by counting your pulse at the chest, wrist or at the carotid artery on your neck. It is difficult to count your
own pulse during exercise, mainly because you cannot count fast enough to get an accurate number. The 600T is
equipped with a wireless telemetry receiving system. What it does is automatically count your heart rate while you are
wearing a heart rate chest belt during your exercising period. Heart rate is monitored and electronically displayed as a
digital readout. Your target heart rate, the intensity needed to improve cardiovascular fitness, depends primarily on
your age and not your state of fitness. It is calculated as a percentage of your maximum heart rate, estimated as 220
minus your age. It is most effective to train at your target heart rate which is between 60% and 85% of your maximum
heart rate.
Maximum Heart Rate & Training Zone
To calculate your maximum heart rate and find your training zone, use the following formula. An example has been
provided below based on a 35-year –old person:
220 – Age = Maximum Heart Rate
(220 – 35 = 185)
60% of Maximum Heart Rate
(60% x 185 = 111 bpm)
85% of Maximum Heart Rate
(85% x 185 = 157 bpm)
Training Zone: 111 bpm – 157 bpm
18
3 0 0 S E R I E S O W N E R’ S M A N U A L
Exercise Guidelines continued
Quantity & Quality
It is recommended that you accumulate at lease 30 minutes of physical activity most days of the week. Physical activity
should be initiated slowly and the intensity should be increased gradually. You should select activities that you enjoy
and can fit into your daily life. Having Diamondback equipment at home certainly gives you the comfortable and convenient
workout you want.
The American College of Sports Medicine makes the following recommendations for the quantity and quality of training
for developing and maintaining cardiorespiratory fitness in healthy adults:
•
•
•
•
•
An activity that uses large muscle groups, maintained continuously, and is rhythmical and aerobic in nature.
Duration: 20 to 60 minutes of continuous aerobic activity, including a warm-up and cool-down period for each
exercise session.
Frequency: 3 to 5 times per week.
Intensity: 60% to 85% of maximum heart rate.
In addition to aerobic exercise, it is recommended that you add strength training of moderate intensity twice
per week to your program.
Get a smart start on exercising.
Anyone over the age of 35, as well as younger persons whom are overweight, should check with his/her physician
before beginning any type of exercise program. People who have diabetes or high blood pressure, a family history of
heart disease, high cholesterol or have lead a sedentary lifestyle should protect themselves with a medical check-up
and a stress test, preferably administered during exercise by a healthcare professional.
1. Always stretch before your workout to loosen muscles, and afterwards to cool down.
2. The first few minutes of your workout should be devoted to warming up muscles before a vigorous workout,
and building your heart rate slowly.
3. After your aerobic workout of about 24-32 minutes, spend 10 minutes gradually reducing your heart rate with a
lower resistance level.
19
Remember, start slow, with intensity low, until you build endurance and strength. And always consult your
physician before beginning any exercise program.
3 0 0 S E R I E S O W N E R’ S M A N U A L
Domestic Warranty Information & Maintenance
(Applies to all product sold and placed within the continental US only)
Effective: August 2002
Diamondback warrants its 300 series products to be free from defects in material and workmanship under normal use in the
home. Diamondback’s obligation under this warranty is limited to repair or replacement of any defective part without charge
for the part to the original purchaser with the following parameters:
Who is Covered
The warranty is extended to the individual or legal entity whose name appears on the warranty registration card filed with
Diamondback and may not be transferred to any other individual or legal entity. The warranty is valid on home use only,
approximately 1 hour a day, 7 days a week. Warranty is void if this 300 series product is placed in a commercial or light
commercial environment. (I.e. hotel, motel, apartment/condo complex or business center, rehab facility, health club, school or
correctional facility.)
Warranty Registration
WARRANTY COMMITMENTS ARE VALID ONLY WITH A COMPLETED WARRANTY CARD THAT IS RETURNED WITHIN 15
DAYS FROM THE DATE OF PURCHASE AND INCLUDES THE PRODUCT SERIAL NUMBER.
• Proof of purchase from Diamondback’s authorized dealer or distributor will be required if the warranty card is not registered
prior to any consideration of warranty claim.
What is covered
Frame:
Parts & Electronics:
Normal Wear Items:
Labor:
Lifetime limited warranty, covers defects in welds, materials and workmanship.
2 Years
90-day limited on foam grips, etc.
1 Year
Items Not Covered
The warranty does not apply to any failure of the product, or any parts of the product, due to not been assembled correctly or
alterations, modifications, misuse, abuse, accident, improper maintenance, or if the serial number on the product has been
removed, altered or defaced. Adequate packaging must be used for returned goods to prevent freight damage.
20
Parts & Service
Contact the authorized Diamondback dealer where unit as originally purchased. If that retailer is unavailable, contact
Diamondback Warranty at (800) 776-7642.
• Diamondback is not responsible for arranging warranty service and/or honoring extended warranties provided by dealers.
Additional Rights
This warranty gives the purchaser specific legal rights, and the purchaser may also have other rights depending on state law.
MAINTENANCE
CAUTION – FOR SAFE OPERATION
Always inspect hardware prior to any exercise session. Look for loose hardware, loose pedals, loose cranks and frayed wires.
Repair or replace any damaged or worn parts, tighten all loose hardware.
As part of Diamondback’s normal installation and set-up process, all pedal cranks must be tightened after 8 to 10 hours of
initial riding to ensure parts are properly seated to axle. This is standard initial “break-in” service which must be performed
after the first 8 to 10 hours of use. Untightened pedal cranks may become loose, causing damage which may void the
warranty.
After training, always wipe down your 300 series unit. Perspiration that continuously settles on frame, pads or casing may
eventually cause rust or damage to the unit. Damage resulting from lack of proper maintenance will not be covered under
warranty. To clean pads, use a mild soap and warm water. Dry with a clean towel.
If noises develop or malfunctions occur, contact your authorized Diamondback fitness dealer.
3 0 0 S E R I E S O W N E R’ S M A N U A L
IMPORTANT!
IMPORTANT!
IMPORTANT!
IMPORTANT!
Warranty Card must be completed and returned to Diamondback within
days of purchase. Failure to comply may void manufacturer’s warranty.
15
Your Name: ____________________________________________________________________________________________________
Address: ______________________________________________________________________________________________________
City: __________________________________________________
State: _____________________
Zip ___________________
Daytime Phone No.: ____________________________________
Evening Phone No.: ___________________________________
Dealer Store Name: _____________________________________________________________________________________________
Address: ______________________________________________________________________________________________________
City: __________________________________________________
State: _____________________
Zip ___________________
Model : ________________________________________________
Serial No. : __________________________________________
Environment Unit Placed:
■ Home ■ Light Commercial
Mail Completed form to:
Purchase Date : ________________
300 Camarillo Ranch Road
Camarillo, California 93012
Diamondback Fitness - Warranty Card
✁
21
3 0 0 S E R I E S O W N E R’ S M A N U A L
22
Sales & Distribution
Corporate Headquarters
300 Camarillo Ranch Road
Camarillo, CA 93012
T 800-776-7642 • F 800-395-9548
6004 S. 190th Street, Suite 101,
P.O. Box 97072, Kent, WA 98032
T 253-395-1100 • F 253-872-0257
Part Number:
22-03-530
04-16-03
3 0 0 S E R I E S O W N E R’ S M A N U A L