1
OPERATING
INSTRUCTIONS
AND PARTSLIST
INSTRUCTIONS
D'UTILISATION
ET LISTEDE PIECES
INSTRUCCIONES
DE OPERACION
Y LISTADE PIEZAS
v
-
TM-75Tile Saw
FEL}<EFI.
174OOWest 119th Street
Olathe, Kansas 66061
CustomerSeruice......800-365-4003
Corp.Office
913-928-1000
Cust.ServiceFAX......800-825-0028
Corp.OfficeFAX .......91
3-438-7951
I
l+cIIAMANT
ElclaFrr
-f
I
v
0AF041
07
O C o p y r i g hA
t , u g u s t2 0 , 2 0 0 1 ,D i a m a nB
t o a r t ,I n c .
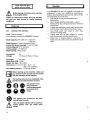
EVERY MACHINE IS THOROUGHLY TESTED BEFORE LEAVING THE FACTORY. EACH MACHINE IS
S UP P LI E DW IT H A C OP Y OF T H IS M A N U A L. OP E R A TOR SOF TH IS E QU IP ME N TMU S T R EAD AND BE
FAMILIARWITH THE SAFETY WARNINGS. FAILURE TO OBEY WARNINGS MAY RESULT IN INJURY OR
STRICTLYTO ENSURELONG SERVICEIN NORMALOPERATION.
DEATH. FOLLOWINSTRUCTIONS
CONTENTS
S y m b oD
l efinitions............
and Locations
DecalDescriptions
ReferencF
e igures
SafetyWarnings- DO's& DO NOT's.
Instructions
1. Features
2. Benefits
3 . M a c h i n eS e t - U p
4 . O p e r a t i n gP r o c e d u r e s . . . . . . . . . .
5 . A l i g n m e nPt r o c e d u r e s . .
6. Maintenance.........
7 . T r o u b l eS h o o t i n G
g uide.
8. Repairs
9 . S p a r eP a r t s
Diagramsand SparePafts
3-4
................5
. . . . . . . . . . . . .-.76
-9
...........8
............10
..............10
11- 12
12- 13
. . . . .1 3
............14
.....15
....15
...........15
16 - 17
AWARNING
HAZARD
HEARING
DURINGNORMALUSE OF THIS MACHINE,OPERATORMAY BE EXPOSEDTO A
NOISELEVELEQUALTO OR SUPERIORTO 85 dB (A)
AATTENZIONEIIIA
RISCHIO DE LESIONE ALL'APPARATO UDITIVO
NELLE NORMALI CONDIZIONI DI UTILIZZO,
MACCHINA
PUO
COMPORTARE PER L'OPERATORE ADDETTO UN ESPOSZIONE
QUESTA
ACUSTICA DI LIVELLO PARI O SUPERIOREA
8s dB (A)
A
AArENcroN
RIESGODE DANOAUDITIVO
E N C O N D I C I O N EN
S O R M A L E SD E U T I L I Z A C I O NE,L O P E R A D O RD E E S T AM A Q U I N AP U E D E
A 85 dB (A)
E S T A RE X P U E S T OA U N N T V E LD E R U T D OI G U A LO S U P E R I O R
SymbolsDefinitions
Symboles
DefinicionDe Simbolos
A
o
. Pleasereadthe instructions
for use priorto operatingthe machinefor the firsttime.
' Avanttoute mise en service,lireattentivement
la noticeet se familiariseravec la machine.
. Antesde la puestaen marcha,lea detenidamente
y familiaricese
las instrucciones
con la m6quina.
. Mandatory
. Obligatoire
. Obligatorio
o
. lndication
. Indicazione
e Indicacion
o
. Prohibition
. Interdiction
. Prohibicion
A
@
@
@
@
. WarningTriangle
. Triangled'advertissement
. TridngwuloDe Advertencia
. Wear Eye Protection
. Portobligatoiredes lunettesde protection
' Usar Gafas De Protecci6n
. Wear BreathingProtection
. Portobligatoired'un masquerespiratoire
protecteur
. Usar MdscaraDe Protecci6n
. The Use Of Ear Protectionls Mandatory
. Portobligatoireda casqueantibruit
. Es ObligatorioEl Uso De ProteccionAuditiva
. Wear SafetyShoes
. Portobligatoiredes chaussuresde s6curite
. UsarZapatosDe Seguridad
@
A
@
. Wear Appropriate
Clothing
. Portobligatoirede la tenueappropri6e
. Usar RopaAdecuada
. MachineryHazard,Keep HandsAnd Feet Clear
. Danger!Restera distancede la machine
. MdquinaPeligrosa- MantengaManosY PiesAlejadosDe La Mdquina
. No Non-Working
PersonnelIn Area
. Zone interditeau personnelnon-ouvrier
o ProhibidoParaPersonas
AjenasA La Obra
A
. Ke€pWork Area CleanAlVell
Lit, RemoveAll SafetyHazards
. La zone de travaildoittoujours6tre propre,bien eclaireeet ne pr6senteraucun risque
o MantengaLimpioEl SitioDe Trabajo/Bienlluminado,ElimineTodos Los RiesgosDe Seguridad
A
. DangerouslyHigh NoiseLevel
. Niveaude bruitdangereux
. NivelDe RuidoElevadamente
Peligroso
@
. RepairsAre To Be Done By An AuthorizedDealerOnly
. Les r6parationsne peuvent6tre ex6cut6esque par un distributeur
agr66
. Las ReparacionesDebenSer EfectuadasUnicamentePor Un Distribuidor
Autorizado
A
. AlwaysKeepthe BladeGuardsln Place
. Toujoursv6rifierque les protectionsde disquesont bien en place
. Mantengasiemprelas protecciones
de la hoja en su sitio
f\
. DiamondBlade
. Disquediamant6
. SierraDiamantada
A
o ElectricalShock Hazard
. Risquede secousses6lectriques
. Peligrode sacudidael6ctrica
t-t
DECAL DESCRIPTIONS
& LOCATION
AUTOCOLLANTS- DESCRIPTIONS
ET EMPLACEMENTS
DESCRIPTION
DE CALCAMONIASY UBICACIONES
P/N 185262
Location:Tray - Front
P/N 169866
Location:Rip Guide
P/N 185263
Location:MotorCover- Front
P/N 185264
Location:BladeGuard- Side
O U T L E TI S N O T F O R
G E N E R A LP U R P O S E
USE.
U S E O N L YF O RV E N D O R
A P P R O V E DW A T E RP U M P .
P/N 189247
Location:MotorCover- Rear
v
Read manual.
Lea el manml.
V e u r l l e zl i r e l e m a n u e . .
P/N 187043
Location:MotorCover- Top
FIGURES
REFERENCE
FrcuRES
DEnErEnENcE
F I G U R AD E R E F E R E N C I A
*4
tl
t
$tr';
F i g3
F i g5
F i g6
Fig 7
F i g8
F i g9
F i g1 0
F i g1 1
F i g4
%,'\
*.
Fig 12
REFERENCE
FIGURES
FrcuRES
DEnErEnENcE
FIGURADE REFERENCIA
F i g1 3
F i g1 a
F i g1 5
F i g1 6
F i g1 7
F i g1 8
F i g1 9
Fig 22
187076 90' AdjustableProtractor
F i g2 1
Fig 23
187077 Dual45'Angle Guide
Fig 24
187078 BullNoseMiterGuide
SAFETYFIRST!
WARNINGS
DO'sAND DO NOT's
TOCOMPLYWITHTHESEWARNINGSAND OPERATING
WARNING: FAILURE
INSTRUCTIONS
COULDRESULTIN DEATHOR SERIOUSBODILYINJURY.
DO
DO
DO
DO
DO
DO
DO
DO
DO
DO
DO
DO
DO
DO
DO
DO
DO
DO
DO
DO
DO
DO
DO
DO
DO
DO
DO
DO
DO
DO
DO
DO
DO
DO
DO
DO
DO
DO
DO
andcontrols.
all warnings,instructions,
readthisentireoperato/smanualbetoreoperatingthis machine.Understand
keepall guardsin placeand in goodcondition.
protection.
wearsafetyapprovedhearing,eye,headand respiratory
on the machine.
readand understand
all warningsand instructions
containedin this manual.
readand understand
the symboldefinitions
keepall partsof yourbodyawaylrom the blade.
knowhowto stopthe machinequicklyin caseof emergency.
turnthe "ON/OFF"switchto the "OFF"positionpriorto connectingtho machineto the powersource.
inspectthe blade,flangesandshattsfor damageor dirt beforeinstallingthe blade.
alwayskeepchildrenawaytromthis machine.
use onlybladesmarkedwitha maximumoperatingspeedgreaterthanthe bladeshaftspeed.
whenwetsawing.
alwaysusea groundfaull circuilinlerrupter
thataccompany
any bladeusedwiththismachine.
readall safetymaterialsand instructions
inspecteachbladecarefullybetoreusingit. lt thereare any signs ol damageor unusualwear,DO NOT USE THE
BLADE,
mountthe bladesolidlyandtirmly. Wrenchtightenthe arbornut.
il you do not knowil blade is
use lhe correctbladefor the type ot workbeingdone. Checkwith blademanufacturer
correcl.
operatethis machineonlyin wellventilaledareas.
establisha trainingprogramlor all operatorsot this machine.
people.Neverallowanyoneto standin lront of or behindthe bladewhilethe motor
clearthe workareaoI unnecessary
is running.
makesurethe bladeis notcontactinganylhingbetorestartingthe motor.
usecautionwhenlittingandlransporlingthismachine.
alwaystie downthe machinewhentransporting.
whensettingup the machine.
usecautionandfollowinstructions
haveall serviceperformedby competentservicepersonnel.
makesureelectricpoweredmachinesare pluggedintoa properlygroundedcircuii.
rnakesurepowercordsare the propersizeand in goodcondition.
maintaina securegripon the materialbeingcut.
verifythe bladearborholematchesthe machinespindlebetoremountingthe blade.
cleanthe machineattereachday'suse.
followall electricalcodesin yourarea.
considerworkareaenvironment.Don'texposepowertoolsto rain. Don'tuse powertoolsin wet locations.
use cautionto guard againslelectricshock. Preventbody contactwith groundedsurlaces(i.e., pipes, radiators,
ranges,relrigerators).
use correctvoltageand properextensioncords. Nevercarrytool by cord or yank it to disconnectit trom receptacle.
Keepcordawayfromheat,oil and sharpedges.
alwayscarrythe machinewiththe molorstoppedand powercord disconnected.
disconnect
toolsfrompowersourcewhennot in use,beforeservicingandwhenchangingaccessories.
for changingaccessories.Inspect
carefullymaintainand cleanlor betterand saferperformance.Followinstructions
and,if damaged,haverepairedby authorizedservicefacility.
tool cordsperiodically
onlycut in a straightline.
alwaysgivea copyol this manualto the equipmentuser. lf you needextracopies,callTOLLFREE 1-800-365-4003.
SAFETY FIRST!
WARNINGS
DO'SAND DO NOTS
WARNING: FAILURE
To COMPLYWITH THESEWARNINGSAND OPERATING
INSTRUCTIONS
COULDRESULTIN DEATHOR SERIOUSBODILYINJURY.
DO NOT
DO NOT
DO NOT
DO NOT
DO NOT
DO NOT
DO NOT
DO NOT
DO NOT
DO NOT
DO NOT
DO NOT
DO NOT
DO NOT
DO NOT
DO NOT
DO NOT
DO NOT
DO NOT
DO NOT
DO NOT
DO NOT
DO NOT
DO NOT
DO NOT
DO NOT
DO NOT
DO NOT
DO NOT
DO NOT
DO NOT
DO NOT
operatethis machine unless you have read and understoodthis operator'smanual.
operatethis machine withoutthe blade guard, or other protectiveguards in place.
stand behind or in front of the blade path while the motor is running.
leave this machine unattendedwhile the motor is running.
work on this machinewhile the motor is running.
operatethis machine when you are tired or fatigued.
use a wet blade without adequatewater supply to the blade.
exceed maximum blade speed shown for each blade size. Excessivespeed could result in blade breakage.
operatethe machine if you are uncertainof how to run the machine.
use damaged equipmentor blades.
touch or try to stop a moving blade with your hand.
cock, jam, wedge or twist the blade in a cut.
use a blade that has been droppedor damaged.
use carbidetipped blades.
use abrasiveblades.
touch a dry cutting diamond blade immediatelyafter use. These blades require several minutes to cool
after each cut.
use damaged or worn blade flanges.
allow other personsto be near the machinewhen startingor when the machine is in operation.
operatethis machine in an enclosedarea unless it is properlyvented.
operate this machine in the vicinity of anything that is flammable. Sparks could cause a fire or an
ex plos i o n .
allow blade exposurefrom the guard to be more than 180 degrees.
operatethis machine with the blade guard removed.
operatethis machine unless you are specificallytrainedto do so.
use a blade that has been over heated (Core has a bluish color).
jam materialinto the blade.
gr ind o n th e s i d e o f th e b l a d e .
lay power cords in or near the water.
replacethe motor with any motor that does not have a specialgroundingconnection.
s t and o r l e a n o n ma c h i n e .
start cuttingwith a saw until you have a clear work area and secure footing.
oper a teth i s m a c h i n ew h i l e u s i n gd rugs or al cohol .
This saw was designedfor certain applicationsonly. DO NOTmodity this saw or use lor any application
other than for which it was designed.lf you have any questions relativeto its application,DO NOTuse the
saw until you havewritten DiamantBoart, Inc. and we have advisedyou.
-
V
-
Diamant Boart, Inc.
17400West 119th Street
Olathe, Kansas 66061
1-800-365-4003
rruDrcAnotl
)ATORY
LJ:il5?IJH,8il
A
*ARNTNG
S
PRoHrBrroN
These signs will give
advise for vour
Before leaving our factory every machine
is thoroughly tested.
Follow our instructions strictly and your machine
will give you long service in normal operating
conditions.
1.
Features
Use:
Sawing of tile materials.
Tools: Diamondblades-(For information contact your FELKER@ supplie)
Bfade Capacity:A 8" (200 mm) - bore 5/8"
( 1 5 . 9m m ) .
(CCW).
Blade Rotation: Counter-Clockwise
Cutting Thickness (material): 1 518'(41.2mm)
Cutting Diagonal@ 10" (254mm)
Gutting Length: 14" (356mm)
Blade Cooling: Waterpump
Horsepower:
Voltage:
314
115 Volts,60 Hertz,1-Phase
4.2 amps
Amperage:
Blade Shaft RPM: (3300)
Weight lbs. (kg.): 36.5 (16.5)
Dimensions (L x W x H): 26" x16.5" x 14'
(660x 419 x 356mm)
Pan Holding Capacity: 9.3 quarts(8 liters)
Before starting up the machine, make sure
you read this entire manual and are familiar
with the operation of this machine.
The working area must be completely clear,
well lit and all safety hazards removed.
The operator must
wear protective
clothing appropriate
to the work he is
doing.
@@@
@e@
@
A
l0
Any persons not involved in the work
should leave the area.
Use only blades marked with a maximum
speed greater than the blade shaft
speed.
2.
Benefits
Your FELKER@tile saw is a ruggedlyconstructedunit
engineeredto give long, satisfactoryperformance.
Simple,daily maintenanceand care will add to the life
of your tile saw.
and productivity
.
and
Lightweightfor easy maneuverability
maintenance.
.
Has a durablepolymercuttingtable- able to
handlealmostany cuttingjob due to its reinforced
construction.
Cuttingtabledesignedto drainwater quicklyback
intothe watertrayfor efficientrecyclingof water.
Cast blade guard with hinge to allow easy
removalof cuttingblade.
Cutting table runs on nylon wheels for smooth
and accuratecuts and easy maintenance.
Water tray of durable polymer constructionto
resistrust and to drainwater and sedimentmuch
faster.
3.
MachineSet-Up
WATERPUMPSAFETYGUIDELINESAND
MAINTENANCE.
Follow all of the assembly and
i n s ta l l a ti o ni n s tru c ti o n sc o mpl etel y
before connecting this saw to a power
source.
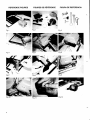
UNPACKING
( F i g ' s1., 2 & 3 )
Carefully
openthe containerand removeall the saw
components
and packingmaterials.Be certainyou
havecheckedeach item with the checklistbelow
beforediscarding
the containeror the packing
materials.The contentsare as follows:
Always plug the saw power cord into a
GFCI outlet when using. lf a GFCI type
outlet is not available, use a plug-in type
GFCI plugged into a properly grounded
outlet. Do not use any temporary plug
adapters.
.
o
1. Operator'sManual
2. DurableWater Tray
3. Saw Framew/Cart
4. PowerHead
5. BladeGuard
6. CuttingGuides(4)
7. Water Pumpw/ Hose
8. Blade- B" [200mm]
9. Misc.Tools & Hardware
'
.
.
The waterpump is equippedwith a ground
electricalplug,to reducethe risk of possible
shock. Be sureto connectto a properlygrounded
type receptacle.
Neverpickthe waterpump up out of the water
when it is pluggedin.
DO NOT EVER use the water pump to pump
anythingbut water.
Neverseruicethe pumpwhen it is stillpluggedin.
Neverlet the pump operatedry. lt is self-cooled
by pumpingwater. Dry use willcausethe pumpto
fail.
Maintainregularlyand cleanout debrisfrom intake
screen.
Checkthe powercord for nicksor fraysand never
try to alterthe powercord in any way.
NOTE:lF ANYOFTHEPARTSAREMISSING
OR
DAMAGED
PLEASECONTACT
YOURFELKER
CUSTOMER
SERVICE
FORINSTRUCTIONS.
CALL1-800-365-4003
.
ASSEMBLY
. AssemblyTools required:
- fourwrenchessupplied(2 allentype)
.
Placesaw frame with cart intowatertray. (Fig4)
.
Feedthe powerheadassemblyonto the arm of the
saw framethroughthe openingin the backof the
powerhead.(Fig5)
.
Allignthe threeholesin the powerheadwiththe
threethreadedholesin the saw f ramearm and
installthe M5 x 1Ommcapscrewsand lock
washers.(Fig6)
.
LooselyInstallthe MGx 40mm capscrewand
washersat the rearof the saw frame. lnsertjust
enoughbrassspacersto fill any gap betweenthe
saw f rameand the powerhead,
and thenfully
tightenthe capscrew.Not usingspacerscan
adverselyaffectallignment.(Fig7)
o lnstallbladeguardontothe powerheadwith
s u p p l i e dk n o b . ( F i g8 )
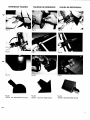
FITTINGOR CHANGINGTHE BLADE
WATER PUMP INSTALLATION
.
Removethe waterpumpfrom its packagingand
checkit to be sure it is not crackedor damagedin
any way.
a
Routethe 8mm plastictubingas shown. (Figg)
o
Attachthe endsof the 8mm plastictubingto the
b l a d eg u a r da n d t o t h e w a t e rp u m p . ( F i g1 0 & 11 )
Placethe waterpump in the rearof the watertray
and set in placeusingthe mountingbracketas
s h o w n .( F i g1 2 )
Keepthe powercord out of the waterand pluginto
the motorpigtailthree-pronged
outlet. (Fig 16)
.
/\
ANDREMOVAL
r " 1 BLADEINSTALLATION
\r-Y
(Fig13_15)
o
o
o
Turn motorswitchoff.
Disconnectpowercord.
Carefullyraisethe bladeguardto its highest
positionand tightenthe adjustmentknob on the
rear support,so as to put firmlyin place.
Then removethe bladeshaft nut and the outer
f lange. (Fig13) Use the Smm allenwrenchto hold
the shaftand the box end wrenchto turn the nut
(Fig 15)
counter-clockwise.
Placebladeontothe shaft,pushingit up against
the innerflange. Makesurethe bladeis mounted
with the directionalarrowpointingcounterclockwise.(Fig1 )
Next replacethe outerflangeand shaft-nutand
tightendown. (Fig14, 15) Do not over-tighten.
Next lowerthe bladeguardback into positionand
tightenthe knob.
Pay attention to the direction of rotation
shown by the arrow on one side of the
Blade (rotation in the opposite direction
to the tightening of the nut). Blade should
rotate counter-clockwise when facing the
bladeshaftnut.
l1
Make sure that the supporting surfaces of
the Blade, the Flanges and the arbor are
clean.
ELECTRICALCONNECTIONS
.
Use a groundedcircuit.
.
Use a GFCIwhenwet sawing.
.
Usethe correctplugand outlet.
.
Check that the main voltageis identicalto that of
the machine.
.
Extensioncord: Use the correct size extension
cord. Be certainthat the cord is in good seruice
condition.
.
lf, on position1 (on),motordoes not run:
. check the electric power on the site (fuses,
cutouts,sockets,etc);
. check the extension being used (faulty
connection,wire break)
. check powercable,it's connection;
. checkthe operationof the on-offswitch.
Before any examination,
machines power cord.
4.
o
.
.
o
the
inq Procedures
.
.
.
unplug
Always be very careful.
Find a comfortable, well-balanced
position.
Always keep protective casing in
place while working.
Placethe machineon a dry sudace or the optional
stand.
Fill the holdingtank with clean water [holds 9.3
quarts(8 liters).
Plug the machine into the power outlet and turn
the motorswitchto the on position.
CUTTINGTABLE
THE CUTTINGTABLEIS MARKEDIN INCHESAND
M I L L I M E T E RTSO M A K EY O U RD I M E N S I O N A L
CUTSACCURATE.
GH E 9 0 D E G R E ER I P
S T E P SF O R P O S I T I O N I N T
.
guide
onto the tablebackstopfrom
Slidethe rip
one end. (Fig 17)
.
Set the rip guideby positioningit at the desired
pointon the front end of the cuttingtablef ront lip
and flippingdownthe thumblbck untilthe rip guide
is firmlylockedin place.(Fig 18) Notethat the
thumb lock will hold accessoryfirmlyin place
withoutusingthe full travelof the thumb lock.
t2
.
.
.
movementis designedfor any long
Additional
term wearingthat may be experienced.
Unnecessary
clampingwiththe thumblockcould
raisethe end of the accessoryup off the table
surface.
The rip guidecan be usedfor straight90" cuts
from boththe left and rightsides.
for the desiredcut,
Afterthe rip guideis positioned
placematerialflushagainstthe rip guideand the
measurement
rail.
Now you are readyto make your cut.
CUTTINGDEPTH
The 8" (2O0mm)bladecapacityyieldsa cuttingdepth
of 1 5/8"(41,2mm).
After completingany work, switch off the
machine.There is no point in leavingthe
motorrunningand the bladeturning.
QUICKTIPS FOR WATER PUMPOPERATION
lf you are havingtroublegettingwaterflow properly
throughthe waterpump,try this:
.
First,checkto see thatthe pump is fully
submergedin water.Fillthe watertray with clean
waterto completelycoverthe pump.
.
Second,checkto see if all tubingis connectedto
the pump correctlyand its feeds are properly
attached.
Sometimesthe tubingis not pushedfar enoughintoits
attachment,allowingwaterto escapeat the
attachmentpoint.Simplypushtubingfirmlyintofitting
untilit stopsand willnot pullbackout.
.
Third,if there is a problemgettingwaterto flow
out properly,checkthe watercontrolvalvesetting
on the front of the pump. lt can be adjustedf rom
"Min"to "Max"(Fig 19)
Oftentimesthe watercontrolvalveis set to "Min"and
is not capableof pumpingenoughwaterwhen first
turnedon. This is easilycorrectedby turningthe valve
to "Max"and then adjustingto the desiredwaterflow.
.
Fourth,if problemsstillpersist,there is also a
chancethatdebrisor sedimentis cloggingthe
waterpumpintakescreen,the pump impelleror
insidethe tubing.
- Clearingtheseareaswith f resh watercan
alleviatethe clogging.The buildup sediment
needsto be cleanedfrom the bottomof the
Water Tray and the intakescreencleaned.Fill
tray withf reshwater.
- With pump intakeremoved,look insidethe
area impellerand checkfor debris.Cleanas
neededwith freshwater.(Fig 20)
lf the tubingis clogged,removeendsfrom the
waterpumpand Bladeguardfitting.Flush
with freshwater untilall debrisis removedand
r e c o n n e ct u
t b i n g (. F i g1 0 & 1 1 )
WATER
(Fig's10,11)
TUBING
REMOVAL
Plastictubingconnectsthe waterpump to the blade
guard.The fittingsusedto connectthistubingsealand
gripthe outsidediameterof the tubing.Specialinternal
lockingfingersattachedto the flangedcolletholdthe
tubingfast.To cleanthe watertubingrequiresthe
tubingto be removedfrom the fittings.To releasethe
tubingform the fitting,fullydepressthe colletbefore
pullingthe tube out of the fitting.When you press
down on the colletyou are openingthe lockingfingers
and freeingthe tubingto be easilyremoved.
WATER TRAY REMOVALAND INSTALLATION
THE REMOVALAND INSTALLATION
OF THE
WATER TRAY IS EASY.
.
First turn off the saw and unplugthe power cord.
Do the same for the waterpump.
. Then removewaterpump from tray.
. Then take frame and motor assemblyout of the
water tray.
.
Take tray and drainwaterand contents(sediment)
. To installsimplyreversethis process.
NOTE: THERE ARE NO ADJUSTMENTS
TO WATER
TRAY
5.
Aliqnment Procedures
the fasteners.lt is recommendedthat the
ParallelAlignmentin step2 be checkedto
insurethe bestqualitycuts.
2. Checkthe ParallelAlignment
.
The conveyorcart shouldtravelparallelto the
planeof the blade.
.
Placea squarerule againstthe backstop,
lightlyin contactwiththe blade. The blade
surfaceshouldbe parallelto the square;e.9.,
no gap betweenthe bladeand the squareat
eitherthe frontor backedgeof the blade.
Next,holdingthe squarefirmlytraversethe cart
fore and aft. The bladeshouldremainparallel
to the square,stayingslightlyin contactwith it
throughoutits fulltravel. lf the bladedoes not
stay in contactwith the square,the Parallel
Alignmentmust be performed.
ParallelAlignment (See Parts List, Diagram 1 &
F i g2 1 )
.
Loosenthe fronttwo RollerGuidefasteners
(ltem6 & 8). Movethe RollerGuideBar (item
3) and Cart by the AdjustmentClamp(itema)
untilthe squareis flushwiththe blade.Tighten
the fastenersand recheckthe alignmentagain.
The cart shouldnow travelparallelto the blade
and the bladeshouldbe centeredin the slot.
Your TM-75tile saw is factoryassembledand
alignedpriorto shipmentto ensureaccuratecuts
when your saw is delivered.However,since FELKER
@cannotcontrolroughhandlingduringshipping,it is
suggestedthat the alignmentbe checked. lf the saw
is found in need of adjustment,referto the appropriate
section(s)below.
There are two basic TM-75alignmentchecks. Any
adjustmentsmade mustfollowthese proceduresto
ensurethat the unitfunctionsfreely.
Adjustmenttools required:Carpenter'sSquareand
the smallopen-endwrenchprovidedwith your new
saw. (Fig 3)
1. Check the Blade in Slot Alignment
.
The bladeshouldbe centeredin the conveyor
cart slot.
.
Set-upyour saw as describedabove,move the
conveyorcaft back and forthform the f rontto
the rear of the pan. lf the bladecontactseither
side of the slot,the Cart Slot Location
Adjustmentmustbe performed.
Cart Slot Location Adjustment (See Parts List,
Diagram1)
.
Movethe ConveyorCart so the Bladeis
approximately
midwaybetweenthe front and
backof Cart.Loosenthe three(3) RollerGuide
fasteners(ltems6 & 8) withthe supplied
wrench. Movethe AdjustmentClamp(item4),
RollerGuideBar (item3) and Carttogether
untilthe bladeis centeredin the slot.Tighten
l3
Before performing any maintenance'
ALWAYd Place the machine on a level
surface with the motor OFF and
disconnect the electrical current' Let
the machinecool down!!
FOR LONGESTLIFEAND BESTPERFORMANCE
.
Alwayscleanthe saw aftereveryuse'
. wipe all of the exteriorsediment or dirt off the
the
motor. Never spray water directly onto
motor!
. Wipe all exterior surfaces and keep the cutting
tablecleanand free of all debris'
. Wipe the rollerguidebar on the f rame'
r Always check lhe blade for cracks or signs of
damage.
OPTIONALACCESSORIES
FoldingStand:
- #187073Standwith wheels
Store in a safe Place, out of reach of
children.
Maintain atl tools carefullY'
WJ
'"-J
t4
7.
The manufacturer accepts no
responsibility caused by unsuitable use
or modifications. At the workstation, the
sound pressure level may exceed 85 dB
(A). ln this case hearing protection must
be worn.
T r o u b l eS h o o t i n gG u i d e
SAW WON'T START,SAW IS TOO SLOW TO
S T A R T ,S A W M O T O RM A K E SH U M M I N GN O I S E
.
Makesure plugis in liveelectrical
circuit.
.
Voltagefrom sourcemay be too low.
SAW SHUTSOFF ABRUPTLY
.
Poweris interrupted,
checkpowersourceand
restartthe saw.
r Voltagefrom sourcemay be too low. Checkfor
low voltage.
WATER PUMPSYSTEMWON'T STARTOR STOPS
ABRUPTLY
.
Checkto see that pump is pluggedin and is
connectedto plastictubing.
.
Checkto see if pumpis completelysubmerged.
.
Checkto see if the waterpump is cleanand f ree
o f a n yc h i p s ,d e b r i sc, l o g g i n ge, t c .
SAW WON'T CUT STRAIGHT
.
Checkto see if saw f rameor rollingguidebar is
bent.
.
Checkto see if the supportfor the cuttingtableis
bent.
.
Checkfor possibledefectiveblade.
.
Materialsmay havebeenpushedor forced
throughthe cut. Let bladepullmaterialfor a clean
cut.
.
Checkcarttrackingadjustment.
S A W B L A D ED O E S N ' TC U T W E L L
.
Bladeneedsto be dressed.
.
Blademay be mountedon saw backwards.
.
Blademay be wornor damaged.
.
Bladeslifemay be usedup (oldblade)
8.
Repairs
Entrust all repairs to your authorized
dealeronly.
We carry out all repairsin the shoftestpossibletime
and at the most economicalprices. (See front page
for our'addressand phone numbers) Contactyour
authorizedFELKER@dealerconcerningmaintenance
and repairs.
9.
SpareParts
For quick supplyof spare pafis and to avoid any lost
time, it is essential to quote the data on the
platefixedto the side of the motorand
manufacturer's
the part number(s)and description
to be replacedwith
everyorder.
The instructions for use and spare parts found in this
document are for informationonly and are not binding.
As part of our product quality improvementpolicy, we
reserue the right to make any and all technical
modifications without prior notice.
The manufacturer accepts no responsibility caused by unsuitabte use or modifications.
l5
\,
\1
l6
DIAGRAM1 ..- TM.75 PARTS LIST
Loc
1
2
3
4
5
6
7
8
9
10
11
12
13
't4
15
16
17
18
19
20
21
22
23
24
25
26
27
28
29
30
31
32
33
34
35
36
37
38
39
40
41
42
43
44
45
46
47
48
49
50
51
52
P/N
185108 Frame Assy (incl. 2-8)
185106 Frame
185107 Bar. RollerGuide
18 5 15 9 Clamp,RollerBar Adj.
17301I Lockwasher,ExternalTooth, M8
167478 Capscrew,Hex Hd M8 x 1.25x 25mm
139746 Washer, Flat M6
185255 Screw,Mach Pan Hd M6 x 1.0 x 1Omm
1 8 5 1 1 1Water Tray
1 8 5 1 3 0 &"y, Cutting Table (incl. 11-24)
185136 CuttingTable
185125 Bracket.U Roller
185126 Stud,UpperU Roller
185127 Stud, LowerU Roller
185137 Roller,U ShapedNylon
139745 Locknut,FiberM6 x 1.0
't39737 Capscrew,Hex Hd M8 x '1.25
x 20mm
185129 Bracket,SingleRoller
172027 N u t .H e xH d M 8 x 1 . 2 5
185138 Roller,RightSide Nylon
18 5 13 1 Stud,SingleRoller
17301I Lockwasher,ExternalTooth, M8
173059 Washer,Flat M8
139738 Locknut,FiberM8 x 1.25
185245 tusy, Power Head w/ Guard (incl. 26-53)
185235 Bracket.Motor Base Wldmnt
18s260 Plate,Spacer
185221 Motor k"y, 3l4HP 4.2A115V (incl. 29-35)
185216 SpacerSleeve
185215 Seal, Shaft
18 5 2 1I Flange,Inner
18 5 2 1I Outer Flange
185220 Nut,ArborM12
185248 Cover,Fan
185274 Slinger,Shaft
185239 Cover.Motor- Machined
185238 Bushing,StrainRelief
185214 Capacitor
185246 Cord, 16/3 SJTW w/ Male Plug
185247 Cord, 16/3 SJTW w/ FemalePlug
020762 Washer.Flat .250 SAE
163689 Lockwasher,Split M6
185252 Capscrew,Soc Bt Hd M6 x 1.0 x 16mm SS
185253 Switch,Toggle3/4hp
090552 Plate,Switch
032503 S h i m ,B r a s s . 0 2 0
173059 Washer,Flat M8
185258 Capscrew,Soc Bt Hd M6 x 1.0 x 40mm SS
020782 Lockwasher,
Split#10
185259 Capscrew,Soc Bt Hd M5 x 0.8 x 16mm SS
17201',| Nut, Hex Hd M5 x 0.80
174432 Capscrew,Soc Hd M5 x 0.8 x 1Omm
Loc
53
54
55
56
57
58
59
60
61
62
63
64
65
66
67
68
P/N
185243
185241
18 5 15 0
't85257
Descri
kty, Blade Guard (incl. 54-61)
Guard.Blade8in - Machined
Adaptor-YWaterTube
Tube.Water6x4x280mm
185140 Knob,M8 x 45
18 5 14 1 Screw,M4 x 20mm
185244 Flap,Splash
020762 Washer.Flat.250SAE
185251 Capscrew,Soc Bt Hd M6 x 1.0 x 1OmmSS
185237 Blade,Sin (200mm)Cont Rim
185160 Bracket,Pump Mounting
1 8 5 1 3 2 Assy, Water Pump (incl. 65-66)
185146 Water Pump 115V/60H2
185158 Adaptor,90'Tube - Water Pump
185201 T u b e . W a t e r B x 6 x 6 0 0 m m
169887 Guide,Rip - Plain
-
lls6e Not Shown -
P/N
169866
185262
185263
185264
187043
189247
Decal,FelkerRip Guide
Decal,TM-75 Pan
Decal.TM-75 MotorCover
Decal,FelkerB" [200mm]Guard
Decal,Warning
Decal,Water Pump Outlet
192001
185233
18 5 1 4 5
185272
Wrench,Allen4mm
Wrench.Allen5mm
W r e n c h ,O p e n[ 1 7x 1 3 ]
Wrench,Bo></Open
[18 x 10]
187076 90' AdjustableProtractor
187077 D u a l 4 5 ' A n g l eG u i d e
187078 Bull Nose MiterGuide
2
'l
'l
1
4
5
4
1
1
5
1
1
7
4
4
3
t7
ffi ffiHmcfrmlus(
Electrolux
Construction
Products
INSTRUCTION
SHEET
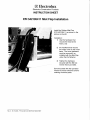
P/N 542195411 Mist Flap Installation
Installthe RubberMist Flap
(P/N 542195411) as shown in the
pictureon the left.
Installation:
1) Use the hardwarethat
mountsthe headto the
frame,and
2) the hardwarethat mounts
the motorcoverto the motor
base. The cover hardware
must be removed& reinstalledwith the Mist Flap
underthe FlatWasher.
3) Tightenthe hardware
securelywith the M4 hex
wrenchthat is provided.
Save this sheetwith the operation
manualfor futurereferenceand for
orderingof seruiceparts.
- P/N 5422010-65INSTRUCTION
Rev.0 - 05-17-2005
SHEET
Felker's New Equipment Warranty
Except as noted below. Felker warrants that its new equipment will be free from manufacturing defectsfor a
period of two (2) yearsfrom date of purchase b1'the original consumerpurchaser.
-
The abovewarrantyis subjectto the following new equipmentexceptions:
l. The warrantytime period for the following new equipmentis limited as follows:
T M-7 5 rM,F T S-1 5 0 F
, R S -3 0,FR S -38,FR S -51--- One (l ) year
FIS-7OrM,Little Jack,JackJuniorand SlammerJacktools--- Six (6) months
FIS-5OrM--- Ninety (90) days
2. To the extentthe following componentsare part of any the new equipment,Felker's warrantyon the
componentpartsis limited to the manufacturer'swarrantyperiod set out below:
Manufacturer.....WarrantyPeriod
GAS and DIESEL ENGINES
Manufacturer.....WarrantyPeriod
ELECTRIC MOTORS
Manufacturer.....WarrantyPeriod
TRANSMISSIONS
B r ig g s& S tra tto n .
.Z y e a rs
K ole rGa s ...........
....2y e a rs
Rob i nGa s ................2
y rs ./2 ,0 0h0rs .
HondaGas...........
.2 years
W is c i n s iG
n a s ..........
I y e a rl 2 ,0 0h0rs .
H a t zD i e s e l . . . . . . . . . . . . . . . . 1 y e a r
v
B al dor.......
I year E aton........
........ . .year
. 3 s*
Leeson......
yrs./1, 000
I year S unstrand................3
hr s. *
(* fromdateof m anuf act ur e)
B osch........
.........6
months
Milwaukee
..........Lifetime
HYDRAULIC PUMPS
B l ack& D ecker..
....1year Fenner-S tone............. . I year
D M1 0 0 . . . . .
. . . . . . . .m
. 6o n t h s J o h nS .B a r n eCs o . . . . . . . . . . . . . . y. .e. .a. r. 1
AIR MOTORS and VAC. PUMPS
WATER PUMPS
Gast..........
I year Jasbsco.....
I year
Beckett......
I year
3. Felker'sobligationunderthis warrantyis expresslylimited to the replacementor repair at Felker,Olathe,
KS 66061,or at a servicefacility designated
by Felker,of suchpartsas inspectionshalldiscloseto have been
defective.This warrantydoes not cover labor, exceptfor gas poweredQuickie Super sawsand does not cover
maintenance
items suchas belts,air filters,bearingsand wheels.Purchaserwill be responsibilefor payingfor
shippingcoststo and from the locationwherethe equipmentis to be repairedor replaced.Motors and engines
are to be servicedby the nearestfactory authorizedsericecenter.Theseservicecentersare designatedby the
manufacturerof the engine/motor.Under no circumstances will Felker be responsible for incidental or
consequentialdamages.
1. Felker'swarrantydoes not apply to defectscausedby damage,abuse,modifications,low voltage,actsof
God, unreasonbleuse, faulty repairs made by others or defects caused by failure to plrovide reasonable
maintenance.
All warrantiesare void if the equipmentor any of its componentsare alteredor modified by the
purchaser,
or of the productis usedin a manneror with a bladenot recommended
by the manufacturer.
-s. The forgoingexpresswarrantiesare in lieu of all otherwarranties.FELKER EXPRESSLY DISCLAIMS
ALL
OTHER WARRANTIES, INCLUDING, WITHOUT
LIMITATION,
THE IMPLIED
\\"{RRANTIES OF MERCHANTABILITY AND FITNESS FOR A PARTICULAR PURPOSE.
Plc'ascrecord the Date of Purchaseand the Serial Number of your saw in the spacebelow. (The serial number
is locatedon the sideof the motor.)When orderingserviceitems,pleasehavethis informationavailable.
S er ia lN u m b e r:
Date of Purchase:
lvlodcl Number:
Where Purchased:
For any missing,damagedor serviceitems needed,DO NOT return to original storeof purchase,
insteadcontact:
FELKER CUSTOMER SERVICE
Cust.ServicePhone.....
I -800-365-4003
Cust.ServiceFAX.......1-800-825-0028
-
l9