1
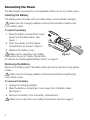
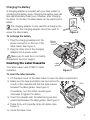
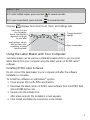
Quick Reference Guide LabelManager ® 280 Copyright © 2012 Sanford, L.P. All rights reserved. No part of this document or the software may be reproduced or transmitted in any form or by any means or translated into another language without the prior written consent of Sanford, L.P. Trademarks DYMO, DYMO Label, and LabelManager are registered marks in the US and other countries. All other trademarks are the property of their respective holders. Quick Reference Guide This guide describes some of the features of your DYMO® LabelManager® 280 label maker. Read the following sections for information about using your label maker. Registering Your Label Maker Connecting the Power Inserting the Label Cassette Getting to Know Your Label Maker Installing DYMO Label Software Connecting the Label Maker to Your Computer Using DYMO Label Software For complete information on using your label maker, download the full LabelManager 280 User Guide at http://userguides.dymo.com. Registering Your Label Maker Visit www.dymo.com/register to register your label maker online. During the registration process, you will need the serial number, which is located inside the back cover of the label maker. Register your label maker to receive these benefits: Notification of software upgrades by email Special offers and new product announcements 1 Connecting the Power The label maker is powered by a rechargeable, lithium-ion (Li-ion) battery pack. Inserting the Battery The battery pack included with your label maker comes partially charged. Make sure the charging adapter is disconnected before handling the Li-ion battery pack. To insert the battery 1 Slide the battery compartment cover away from the label maker. See Figure 1. 2 Insert the battery into the battery compartment as shown in Figure 1. 3 Replace the battery cover. Make sure to read the Li-ion Safety Precautions found on "Safety Precautions for Lithium-ion Rechargeable Battery Pack" on page 8. Figure 1 Removing the Battery Remove the battery pack if the label maker will not be used for a long period of time. Make sure the charging adapter is disconnected before handling the Li-ion battery pack. To remove the battery 1 Unplug the charging adapter. 2 Slide the battery compartment cover away from the label maker. See Figure 1. 3 Remove the battery from the battery compartment. Make sure to read the Li-ion Safety Precautions found on page 8. 2 Charging the Battery A charging adapter is included with your label maker for recharging the battery pack. Charging the battery pack will take approximately three hours; however, after charging for about 10 minutes, the label maker can be used to print labels. The charging adapter is only used for recharging the battery pack; the charging adapter cannot be used to power the label maker. Figure 2 To recharge the battery 1 Plug the charging adapter into the power connector on the top of the label maker. See Figure 2. Ribbon rewind spool 2 Plug the other end of the charging adapter into a power outlet. Make sure to read the Li-ion Safety Precautions found on page 8. Inserting the Label Cassette Label guides Your label maker uses DYMO D1 label cassettes. Figure 3 To insert the label cassette 1 Lift the back cover of the label maker to open the label compartment. 2 Make sure the tape and ribbon are taut across the Click! mouth of the cassette and that the tape passes between the label guides. See Figure 3. If necessary, turn the ribbon rewind spool clockwise to tighten the ribbon. 3 Insert the cassette with the label facing out and positioned between the label guides. See Figure 3. 4 Press firmly until cassette clicks into place. See Figure 4. Figure 4 5 Close the back cover. 3 Getting to Know Your Label Maker Become familiar with the features shown in Figure 5. 1 2 24 3 23 4 5 22 6 7 8 9 10 21 20 11 19 12 18 13 14 17 16 15 Figure 5 1 USB port 9 2 Power port 10 Save/Open 18 Navigation 3 LCD display 11 Numeric keys 19 OK 4 Cutter 12 Symbols 20 New Label/Clear 5 Italics 13 Backspace 21 Menu 6 Underline 14 Return 22 On/Off 7 Vertical text 15 Space bar 23 Text size 8 Print/Copies 16 Caps 24 Bold 4 Back 17 Accented characters Quick Tips To print multiple copies, press and hold To open saved labels, press and hold Pressing for several seconds. for several seconds. displays the Format, Insert, Open, and Settings tabs. Select the font, font size, formatting, border, text direction, alignment and length for your label. Change the default settings. A cba Insert symbols, clip art, date and time, autonumbering, or saved text into a label. Open a saved label. Using the Label Maker with Your Computer Your label maker can be used as a standalone label printer or you can print labels directly from your computer using the latest version of DYMO Label™ software. Installing DYMO Label Software Do not connect the label maker to your computer until after the software installation is complete. To install the software on a Windows® system 1 Close all open Microsoft® Office applications. 2 Download the latest version of DYMO Label software from the DYMO Web site at lm280.dymo.com. 3 Double-click the Installer icon. After a few seconds, the installation screen appears. 4 Click Install and follow the instructions in the installer. 5 To install the software on a Mac OS® system 1 Download the latest version of DYMO Label software from the DYMO Web site at lm280.dymo.com. 2 Double-click the Installer icon and follow the on-screen instructions. Connecting the Label Maker to Your Computer The label maker connects to your computer using the USB connection located on the top of the label maker. Do not connect the label maker to your computer until after the software installation is complete. To connect the label maker to your computer 1 Plug the USB cable into the USB port on the top of the label maker. See Figure 6. 2 Plug the other end of the USB cable into an available USB port on your computer. 3 If necessary, press to turn on the label maker. Figure 6 6 Using DYMO Label Software The following figure shows some of the major features available in DYMO Label software. Visually choose your label type and apply layouts. Apply a layout to a label. Capture an area of the screen to insert on your label. Insert text, addresses, images, shapes, lines, barcodes, dates, and counters. Store your favorite addresses or other data in the Address Book; automatically insert the data on your label. Select a label maker to print your labels. Print a label. To print your first label 1 Click once on the label in the Edit area and type some text. 2 Click to print the label. 3 Press the cutter on the label maker to cut the label. 7 Safety Precautions for Lithium-ion Rechargeable Battery Pack Inaccurate handling of a lithium-ion rechargeable battery may cause leakage, heat, smoke, an explosion, or fire. This could cause deterioration of performance or failure. This may also damage the protection device installed in the battery pack. This could damage equipment or injure users. Thoroughly follow the instructions below. While Charging the Battery Danger When charging the battery, use dedicated chargers and follow the specified conditions. Do not connect directly to an electric outlet or cigarette lighter charger. Do not use or store battery close to fire or inside the car where temperature may be over 60°C. Warning Stop charging the battery if charging is not completed within the specified time. Caution Thoroughly read this document before charging the battery. Do not charge in a place that generates static electricity. Battery can only be charged within 0°C~45°C temperature range. When Discharging the Battery Danger Use the battery only in the specified equipment. Do not use or store battery close to fire or inside the car where temperature may be over 60°C. Caution Do not charge in a place that generates static electricity. Battery can only be used within -20°C~60°C temperature range. 8 1-Year Warranty for Your DYMO Product Your electronic DYMO product is sold with a 1-year warranty from the date of purchase against defects in material and workmanship. DYMO will repair or replace your product free of charge on the following conditions: 1 Products returned under this warranty must be accompanied by a description of the defect together with a copy of the product’s proof of purchase and your full contact and delivery details: name, telephone, complete address – street, house number, postal code, city, country. 2 Products returned to DYMO must be adequately packaged. DYMO will accept no liability for goods lost or damaged in transit from the customer. 3 Products must have been used strictly in accordance with operating instructions supplied. DYMO will have no liability for defects caused by accident, misuse, alteration or neglect. 4 DYMO accepts no liability for any consequential loss, damage or expense of any kind resulting from the machines or accessories or the use thereof, save that liability for death or bodily injury caused by such products is not excluded. 5 DYMO label printers are designed for use only with DYMO-branded labels. This warranty does not cover any malfunction or damage caused by the use of third-party labels. 6 This warranty does not affect your statutory rights as a consumer. What to do if your product is defective? DYMO offers you the following service options: DYMO Web site: In most situations a visit to www.dymo.com will give you the right assistance. In the Customer Support area, you will find information about your DYMO product, such as Frequently Asked Questions and solutions to known problems. The User Guide also gives you additional information. Dealer: Your DYMO dealer can help you to determine the exact nature of the problem and assist you further. DYMO Help Desk: You can also contact the DYMO Help Desk where an associate will help you to determine the exact nature of the problem and advise you what to do next: US 1 877 724 8324 Intl +44 203 564 8356 Repair Center: You can send your defective product to a DYMO repair center (please see the above-mentioned conditions 1 and 2 on how to replace a defective product). The address of your nearest DYMO repair center can be found at www.dymo.com or you can contact the DYMO Help Desk. 9 10 DISTRIBUTED BY: DYMO, ATLANTA, GA 30328 800-426-7827: WWW.DYMO.COM ©2012 SANFORD, L.P. W012556_B