1
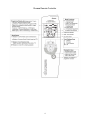
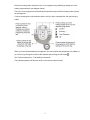
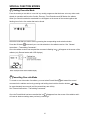
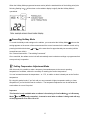
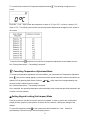
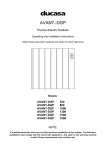
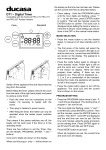
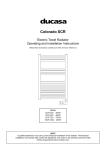
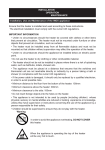
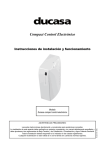
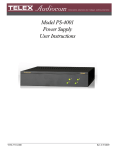
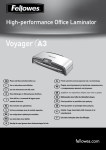
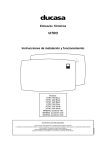
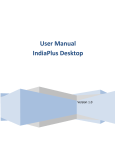
Ducasa Digital Programmer
Hand Held Remote Control Unit
Instructions for Operation and Programming
(Read these instructions carefully and retain for further reference.)
Model:
DUCASA REMOTE CONTROLLER - 0.638.165
1
CONTENTS
Main Features
Page 3
The Ducasa Remote Diagram
Page 4
General Instructions
Page 5
•
•
•
•
Installing the Batteries
Low Battery Indicator
Replacing the Batteries
Transmitting Commands
Operating Instructions
•
•
•
•
Page 6
Start Up
Navigating the Function Modes
Switching On
Switching Off
Page 7
Basic Function Modes
•
•
•
•
Automatic Mode
Stand by/Off Mode
Adjust Date/time Mode
Programming Mode
Special Function Modes
•
•
•
•
Page 10
Over-ride Mode
Holiday Mode
Temperature Adjustment Mode
Keypad Lock / Anti-tamper Mode
Guarantee
Page 15
2
MAIN FEATURES
The Ducasa Remote is a hand held central digital programmer able to programme Ducasa electric
radiator heating systems by infra-red.
The controller allows precise programming of every compatible heater in your home or office.
Energy saving can be achieved by programming the radiators to your particular requirements - 24 hours
of the day / 7 days of the week.
•
Digital control with LCD display
• On-screen indicator of time
• 4 basic remote modes: Automatic, Standby/stop, Adjust Date/Time and Programming
• 4 special remote modes: Over-ride (forced), Holidays, Temperature Adjustment and Keypad
Locking (Anti-tamper)
• 7 days, 24hrs. programming in segments of 30mins.
• Programme functions: Comfort, Economy, Frost Protection and Off modes
• 9 factory predefined programmes, which cannot be changed
• 5 customisable programmes
• Battery to retain personalized programmes, date and time.
• Low battery indicator.
• Battery replacement without loss of programming
• Alkaline batteries: 3 x AA 1.5V LR6
3
Ducasa Remote Controller
4
GENERAL INSTRUCTIONS
Installing the Batteries
The remote control unit uses 3 AA 1.5V LR6 alkaline batteries
•
Open the battery compartment cover in the back of the unit.
•
Insert the batteries matching their polarities ( + and - ) to the markings inside the compartment
•
Replace the cover.
NOTE: Do not mix old and new batteries nor mix battery brands. Do not mix battery types. i.e. alkaline
and manganese.
Once the batteries are installed the following will appear on the screen, you then need to set the time
and date – please see ‘Adjust Date / Time Mode’
Low Battery Indicator
When the batteries need replacing the Low Battery Indicator will appear on the screen.
Replacing the Batteries
To replace the batteries you must select the Stand by/Off Mode
pressing the OK button
and turn off the Ducasa Remote by
. This will safeguard any programmes and settings stored in the memory of
the remote.
The screen will now be blank.
Remove the battery compartment cover and replace all three batteries with new ones. See notes for
installing the batteries.
IMPORTANT: You have 30 seconds to remove and replace the batteries before the programmes and
settings stored in the memory are lost.
To switch the Ducasa Remote back on you must press the OK button
Transmitting Commands
When an instruction is being sent from the Ducasa Remote to the receiver of the radiator 2 horizontal
bars increasing from left to right will appear on the screen of the remote. Throughout the transmission of
the instruction the Ducasa Remote must be near to, and pointing in the direction of the radiator control
unit.
5
OPERATING INSTRUCTIONS
Switching On
To switch on the remote, from a state where the screen is completely blank, you must press the OK
button
. This will set the remote to stand by mode and the following screen will be displayed:
Switching Off
To switch off the remote ensure the Stand by/Off mode
is selected and then press the OK button
.
NOTE: When selecting functions modes or programming the remote, if there is no activity during a 30
second period the function will automatically reset to the Auto Mode. After a 5 minute period without any
activity the screen will shut down and the remote will go to Stand by/Off mode. Press the OK button
to restart the operation.
Navigating the Function Modes
The different function modes (basic and special modes) are indicated with icons on the panoramic LCD
screen of the remote.
To move from one function mode to another, you will have to go backwards or forwards by pressing the
direction buttons
.
Please note: the comfort temperature must be set by using the radiator controls before using the
remote control features.
6
BASIC FUNCTION MODES:
AUTO Automatic Mode
In this mode the screen will display the day of the week and the time (1), the last programme selected (2)
and the status of the radiator operating mode at that time (3) in accordance with what is determined by
the programme shown.
In the example above, the hour is 12:43 on Wednesday and it shows that the radiator will operate under
the control of Programme P1, and will be in Economy Mode
at that time.
Use the + and - buttons on the remote to navigate between the different Programmes.
Pressing the OK button
will transmit whatever Programme is displayed on the screen at that time to
the radiator receiver. See “General Instructions – Transmitting Commands”.
Stand by/Off Mode
Please see ‘Switching On’ and ‘Switching Off’ in previous section.
Adjust Date/time Mode
In this mode the date (day, month and year) and the time can be set or changed on the remote. To enter
this Adjust Date/time Mode
select it from the function modes (see section “Navigating the Function
Modes”) and press the OK button
.
The settings must be entered/adjusted in the following sequence:
YEAR --- MONTH --- DAY --- HOUR --- MINUTES
•
Adjust setting by using the + and - buttons.
•
Once a setting has been correctly entered, validate it by pressing the OK button
.
While you adjust each setting, the numerals will be flash on the screen.
NOTE: If it should be necessary to correct a choice after it has been validated, it is possible to go back
by pressing the back button
7
Example of editing: Adjust the Year
The year 2006 is displayed split (i.e. 20:06) and flashing. Alter the year to the current one by using the
+ and - buttons. When you have set the year, validate it by pressing the OK button
.
The Month will now appear (flashing) on the screen ready to be adjusted if necessary.
This process can be repeated successively to adjust the month, day, hours and minutes.
Programming Mode
Once you have selected this mode press the OK button
and the programme number will begin to flash
(eg P1 as in diagram below), you can then scroll through the days of the selected programme by using
the
buttons.
Different programmes can be selected by using the + and – buttons (eg P2, P3).
Programmes P1 to P9 are factory set programmes; these cannot be cannot be altered by the user.
Select one that suits your needs and press the OK button
to transmit the chosen program to the
radiator receiver. See “General Instructions – Transmitting Commands”.
Programmes U1 to U5 can be personalized by the user. Select one of these programmes and press the
OK button
in order to edit the times and heating modes to suit your needs.
Editing/Modifying User Programmes U1 to U5
Select the programme you wish to edit and press the OK button
. The time of the first segment
to be edited will be flashing on the screen. Remember that each segment represents ½ an hour
and a new programme will start at 12 midnight, which is
8
.
Select the heating mode required for the ½ hour segment being edited by pressing one of the
heating mode selectors (see diagram below).
The next ½ hour segment will automatically be selected ready to edit the heating mode required
for that segment.
Continue pressing the mode selection buttons until you have completed the 24hr period being
edited.
When you have finished editing the programme you can transmit that programme to a radiator of
your choice by pointing the remote at that radiator and pressing the OK button
See “General Instructions – Transmitting Commands”.
The edited programme will then be stored in the remote control memory
9
.
SPECIAL FUNCTION MODES
Setting Over-ride Mode
From the remote you are able to ‘over-ride’ any weekly programme that has been set or any other mode
already in operation and force the Comfort, Economy, Frost Protection and Off Modes of a radiator.
When you select this mode the associated icon will appear on the screen of the remote together with
flashing icons for the four modes that can be forced.
Select the mode that you wish to force by pressing the corresponding mode selection button.
Press the OK button
to transmit your over-ride selection to the radiator receiver. See “General
Instructions – Transmitting Commands”.
Once the radiator receiver has accepted the command a flashing icon
will appear on the screen of the
radiator (only Ducasa heaters with LCD displays)
Cancelling Over-ride Mode
To cancel an over-ride mode of a radiator, you must select Forced Mode
and transmit the cancel
command to the radiator receiver by pressing and holding down both the direction buttons
and
for approxiamately two seconds (until the transmit bars are visible).
See “General Instructions – Transmitting Commands”.
Once the Forced Mode has been cancelled the icon
disappears from the screen of the radiator and it
will reset to whatever settings were previously controlling it.
10
Setting Holiday Mode
In this mode you over-ride any existing programme and set a temporary alternative programme during a
holiday period, or other absence from the home, between two specific dates.
When this mode is selected the Holiday Mode icon
will appear on the screen.
To enter your holiday period programming you must now press the OK button
.
You must now enter the date and time for the start of holiday period, and the date and time for the end of
holiday period.
The settings must be entered in the following sequence:
YEAR --- MONTH --- DAY --- HOUR
•
Adjust setting by using the + and - buttons.
•
Once a setting has been correctly entered, validate it by pressing the OK button
and proceed
to adjust the next setting.
Once both the start and end dates/times of the holiday period have been entered the icons for the 4
possible radiator operating modes (Comfort, Economy, Frost Protection and OFF) will appear flashing on
the screen of the remote.
Decide which radiator mode you require for the holiday period and press the corresponding mode
selection button on the remote.
Once you have selected the radiator mode you can transmit the Holiday Mode programme to the radiator
receiver by pressing the OK button
. See “General Instructions – Transmitting Commands”.
Notes:
After transmitting the holiday command the holiday icon
will flash for approxiamately 5 seconds.
Press the OK button again while the icon is flashing to send the same holiday programme to another
radiator.
The holiday start / finish dates and times entered into the remote will be stored making it easy to
programme the holiday mode in every room of the home or office.
11
When the Holiday Mode programme becomes active (after the start date/time of the holiday period) the
following flashing icon
will be shown on the radiator display to signify that the Holiday Mode is
operational.
Cancelling Holiday Mode
To cancel the holiday mode settings on the radiator, you must select the Holiday Mode
and once the
setting appears on the screen of the remote transmit the cancel command to the radiator control unit by
pressing both direction buttons
and
at the same time for approxiamately two seconds (until the
transmit bars are visible).
See “General Instructions – Transmitting Commands”.
Once cancelled, the radiator control unit will automatically reset to whatever settings or programmes that
were previously in operation.
Setting Temperature Adjustment Mode
With this mode it is possible to make a temporary increase/decrease to the current operating
temperature of a radiator, without the necessity of resetting the Comfort temperature.
You can increase/decrease the temperature + or - 5ºC, in relation to what is already set as the Comfort
temperature.
By using this special mode, if you feel cold you can command a higher temperature setting, or lower
temperature if you feel that the heat is excessive. The temperature adjustment can be transmitted to
each radiator in a room if required.
Important
This function is only available when a radiator is functioning in Comfort Mode
Mode
or in Economy
and being manually controlled. It cannot be used when a radiator is being used with any
of the programmes P1 to P9 or U1 to U5.
12
To use this function select the Temperature Adjustment Mode
. The following will appear on the
screen.
Press the + and - keys to raise the temperature in steps of 1ºC up to 5ºC, or lower it in steps of 1ºC
down to -5ºC. The following chart shows how the temperature adjustments will appear on the screen of
the remote.
Press the OK button
to transmit your selection of temperature adjustment to the radiator receiver.
See “General Instructions – Transmitting Commands”.
Cancelling Temperature Adjustment Mode
To cancel the temperature adjustment set on the radiator, you must select the Temperature Adjustment
Mode
and once the setting appears on the screen of the remote transmit the cancel command to the
radiator CCD by pressing both direction buttons
and
at the same time for approxiamately two
seconds (until the transmit bars are visible).
See “General Instructions – Transmitting Commands”.
Once cancelled, the operating temperature will automatically reset to what was previously selected in the
Comfort or economy Modes.
Setting Keypad Locking (Anti-tamper) Mode
From the remote you are able to lock the controls of a radiator, in order to prevent any unauthorised
people (children, people in public places, nurseries, offices, hotels etc.) altering the settings of the
radiator.
To select the keypad lock mode
on the remote press and hold both the + and – buttons for
aproxiamatley 2 seconds until you see the following screen.
13
Transmit the locking command to the radiator receiver by pressing the OK button
.
See “General Instructions – Transmitting Commands”.
Once the radiator control unit has been locked it is not possible for the settings of the radiator to be
altered manually or from the remote.
Cancelling Keypad Locking (Anti-tamper) Mode
To cancel the keypad locking of a radiator you must select the Keypad Locking Mode
unlocking command to the radiator receiver by pressing both direction buttons
and
and transmit an
at the same
time for approxiamately two seconds (until the transmit bars are visible).
See “General Instructions – Transmitting Commands”.
Once cancelled, you will again be able to control the radiator CCD manually or from the remote.
14
Guarantee
Your appliance is guaranteed for two years from the date of purchase – during this period we will repair
or exchange, at our discretion, any faulty or defective parts providing the appliance has been used in
accordance with the operating & installation instructions and has not been misused or mistreated in any
way. Any unauthorised repair or attempted repair will invalidate the guarantee.
This guarantee is additional to your statutory rights.
In the unlikely event of a problem with your appliance please contact your supplier.
Correct Disposal of This Product
(Waste Electrical & Electronic Equipment)
(Applicable in the European Union and other European countries with separate collection
systems)
This marking shown on the product or its literature, indicates that it should
not be disposed of with other household wastes at the end of its working
life. To prevent possible harm to the environment or human health from
uncontrolled waste disposal, please separate this from other types of
wastes and recycle it responsibly to promote the sustainable reuse of
material resources.
Household users should contact either the retailer where they purchased this product, or their local
government office, for details of where and how they can take this item for environmentally safe
recycling. Business users should contact their supplier and check the terms and conditions of the
purchase contract. This product should not be mixed with other commercial wastes for disposal.
UK Distributor of Ducasa Products:
Heattend Products Ltd
Web: www.heattend.co.uk
Email: [email protected]
15