1
Official Users Manual
Version 1.0
Created by
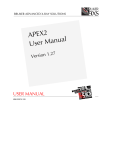
Auto-Installer Deluxe Manual
Version 1.0
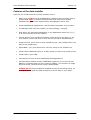
Table of Contents
Chapter 1: Introduction............................................................................3
Chapter 2: Features..................................................................................4
Contents of the Auto-Installer ...................................................................4
Features of the Auto-Installer....................................................................7
Chapter 3: Burning and Preparing the ISO ...............................................8
Burning the ISO ......................................................................................8
Using DummyCD .....................................................................................8
Using Recreate........................................................................................8
Chapter 4: The Main Menu........................................................................9
Chapter 5: Install Guide for a Retail HDD ...............................................10
Unlocking your HDD .............................................................................. 10
Formatting your HDD............................................................................. 10
Preparing the needed folders for your HDD ............................................... 11
Installing the MS Dashboard on your HDD................................................. 11
Locking your HDD ................................................................................. 11
Chapter 6: Install Guide for a Large HDD ...............................................12
Unlocking your HDD .............................................................................. 12
Formatting your HDD............................................................................. 12
Preparing the needed folders for your HDD ............................................... 13
Installing the MS Dashboard on your HDD................................................. 13
Locking your HDD ................................................................................. 13
Chapter 7: Installing Hacked Dashboards ..............................................14
Chapter 8: Installing Applications ..........................................................14
Chapter 9: Installing Emulators .............................................................14
Chapter 10: The Tools Section................................................................15
LTools ................................................................................................. 15
PBL (Phoenix BIOS Loader) Metoo Edition ................................................. 15
XSelect ................................................................................................ 16
UXE..................................................................................................... 16
File Manager......................................................................................... 16
Appendix A: Xbox Error Codes................................................................17
Appendix B: Xbox Media Compatibility ...................................................18
Appendix C: Xbox DVD Drive Identification ............................................18
Appendix D: Menu Structure ..................................................................19
Appendix E: File Locations on the ISO ....................................................23
Appendix F: Setting up your Debug Xbox ...............................................25
Bibliography...........................................................................................27
Credits ...................................................................................................28
Written by DJB
12 December 2004
Page: 2 of 28
Auto-Installer Deluxe Manual
Version 1.0
Chapter 1: Introduction
Welcome to Xbox-Hq’s latest piece of work, the Auto-Installer Deluxe v1.0.
This has been developed on and off since September 2004, just after the
Xbox-Hq EvoX Auto-Installer v1.3 Final was released.
It has evolved from being just an EvolutionX / Microsoft Dashboard installer with
a few Applications, into a Multi-Dashboard installer with many Applications and
Emulators. In other words, there’s no need for separate Emulator and Application
Auto-Installers now, as its all-in-one now.
What you have here is also the most up-to-date Installer, including the latest
versions of software possible, and offcourse the latest BIOS ROMs (Evox M8+).
Thanks must go to all the Xbox-Hq members, without your support I wouldn’t
have bothered to push this latest version to the limits it has reached. I have tried
to incorporate most of the suggestions and ideas I have gathered over the
months via our forums, but alas some of them just weren’t practical once
implemented into the package. I hope that you all still find this useful enough to
meet most (if not all) of your needs.
Big thanks must go Forahobby, Realmccloy, and Sjohn for their efforts
contributing to this package, without your help I’d probably release yet another
non-fully tested installer.
Because of their help we’ve have been able to test on various versions of Xboxes,
from v1.0 up to v1.6, so hopefully there shouldn’t be any problems this time
around.
Now, for some actual details about this User Manual.
This Manual will explain how to do the following things:
•
•
•
•
•
•
•
•
Burn the ISO image on to appropriate media for your Xbox DVD Drive.
Format a New Hard Drive.
Prepare a Retail / New Hard Drive with needed folders.
Install the Microsoft Dashboard and another dashboard of your choice.
Install Applications needed to play Media and rip from DVDs.
Install Emulators and how to insert your favourite ROM files before you
burn the ISO.
How to set up a BFM BIOS on your Xbox (useful for Debug reasons and
when you want to use a more recent BIOS without re-flashing your chip).
How to set up XSelect so you can boot a program of your choice when
your Xbox boots.
The installer will also install lTools (which is game save exploits used for
softmodding) to your Hard Drive, but as of yet we haven’t been able to create
documentation on preparing a new HDD in an existing modded Xbox and then
using it in a non-modded Xbox. This will be covered more in a later version.
I hope you all enjoy our work…
DJB
http://www.xbox-hq.com
Written by DJB
12 December 2004
Page: 3 of 28
Auto-Installer Deluxe Manual
Version 1.0
Chapter 2: Features
Contents of the Auto-Installer
This installer boasts to have more installable features than any other installer.
Here is a list of what’s included in the package.
BIOS
Comes in 256k, 512k, and 1mb flavours (except for X3 which is only 1mb, and
the MS BIOSes which are set sizes).
Evox M8+
Evox M8+ 137 GB+
Evox M8+ Stealth
Evox M8+ Stealth 137 GB+
Evox M8+ 1.6
Evox M8+ 1.6 137 GB+
Evox M8+ 1.6 Stealth
Evox M8+ 1.6 Stealth 137 GB+
iND 5003.06
iND 5003.06 Stealth
iND 5003.67
iND 5003.67 Stealth
MS BIOS 3944
MS BIOS 4034
MS BIOS 4132
MS BIOS 4627
MS BIOS 4817
MS BIOS 5101
MS BIOS 5530
MS BIOS 5713
MS BIOS 5838
Xecuter2 4981.06
Xecuter2 4981.06 EjectFix
Xecuter2 4981.06 Stealth
Xecuter2 4981.06 Stealth + Ejectfix
Xecuter2 4981.67
Xecuter2 4981.67 EjectFix
Xecuter2 4981.67 Stealth
Xecuter2 4981.67 Stealth + Ejectfix
Xecuter2 4983.06
Xecuter2 4986.67
Xecuter3 1957
Xecuter3 1957 v1.6
PBL BFM BIOSES
Evox M8+ 1.6 Ejectfix
Complex Debug (evoxdash Boot)
Softmod Packages
lTools 007 v1.7.5
lTools MechAssault v1.8.rc1
lTools Splinter Cell v1.7.5 (NTSC + PAL)
Written by DJB
12 December 2004
Page: 4 of 28
Auto-Installer Deluxe Manual
Version 1.0
Dashboards
Install the non-MS dashboards to either C, E, F, or G.
The config files have been set up to search these setups:
E Drive - E+F Drive - E+F+G Drive
Microsoft Dashboard v5960 Revision 185EAD00
AvaLaunch 0.49.2
EvolutionX 1.8.3921
EvolutionX 1.8.3935
Media X Menu 0.9n6
UnleashX 0.37.1205A Build 534
Xbox Media Center 2004-12-08
Applications
Install to E, F, or G either as a package or individually.
BiosCheck 5.0 Beta
BoXplorer 0.96
ConfigMagic Final 1.6
Complex Tools 1.60 (Public Release)
Dvd2XboX 0.6.1 (with Rahszhul ACL files 2004-03-04)
Enigmah NTSC-PAL Video Switcher
DVD-X 1.0 (Team Gueux version)
DVD-X 2.0 (Team Xecuter version)
Halo Cache Editor V0.7
LinksBoks 0.92 (Dr Zoidberg Edition)
MouseTestApp
Phoenix BIOS Loader MeToo 1.4.1
ProjectX HDDLoader 1.3a
X2 Config Tool
X3 Eeprom Eraser
Xbox FTP client 0.62
Xbox Media Center 2004-12-08
Xbpartitioner 1.0
XBWatch 0.03
XCommanderR2
XeniumTest
XToolbox 0.4.1
YAMP
Written by DJB
12 December 2004
Page: 5 of 28
Auto-Installer Deluxe Manual
Version 1.0
Emulators
Install to E, F, or G either as a package or individually.
AdamxX v2 (ColecoVision/Adam)
ArnoldX v2 (Amstrad CPC)
AtariXLBox v5 (Atari 800/5200/130/320/XL/XE)
BlissX v5 (Intellivision)
BlueMSXBox v1 (BlueMSX)
DOSXbox v5 (MS-DOS)
FCEUltraX v16 (Nintendo)
Gnuboy v4 (Gameboy/Gameboy Colour)
HU-GO! V10 (PC-Engine/TurboGrafx-16)
KEGS-X v3 (Apple IIgs/e/c/+)
LynXBox v1 (Atari Lynx Handy)
MAMEoX v0.84 b3 (Arcade)
NeoGenesis v16 (Sega Genesis)
NeoPopX v4 (NeoGeo Pocket Color)
OdysseyX v1 (Odyssey 2)
Pcsxbox v13 (Sony PSOne)
SC3X v0.04 (SEGA SC 3000)
ScummVMx v0.6.0 (SCUMM)
SMSPlusX v9 (Game Gear/Sega Master System)
SpeXtrum v0.3 Beta (ZX Spectrum)
Stella v2 (Atari 2600)
Surreal64 FDB v3 (Nintendo 64)
Vice20x v3 (Commodore Vic 20)
Vice64x v4 (Commodore 64)
VicePETX v2 (Commodore PET)
WinSTonX v6 (Atari ST)
WinUAEX v8 (Commodore Amiga)
X68000X v3 (X68000)
XBoyAdvance v17 (Gameboy Advance)
xSnes9x v1.42 (Super Nintendo)
Available Tools launchable through the Auto-Installer
BIOS Checker
ConfigMagic Final v1.6
Xbpartitioner
Written by DJB
12 December 2004
Page: 6 of 28
Auto-Installer Deluxe Manual
Version 1.0
Features of the Auto-Installer
Here is a list of features that the auto-installer covers:
•
Boots on a modded or soft-modded Xbox. Modchip users must be using a
proper BIOS (NOT Cromwell) and Softmod users must have already
installed their game save exploit before attempting to launch this.
•
Install Dashboards, Applications, and Emulators anywhere on your Xbox.
•
File Manager built into the installer, for easy deleting / copying.
•
Boot either the Microsoft Dashboard, or any Dashboard stored on C, E, F,
or G Drive directly from the installer.
•
Format Drives (now includes formatting cache drives as an option, it will
even detect a new hard drive on first use and Format it automatically).
•
Prepare Drives (each drive is done separately now, and includes DVD-X as
part of the preparation).
•
Flash BIOS / (Un) Lock Hard Drive via Evox setup on the Installer CD.
•
Install Ltools (Softmod tools) to a HDD, ready to export to a memory card.
•
Install UXE to your HDD.
•
Use XSelect to boot various Dashboards and Applications.
•
Use PBL Metoo Edition to boot a BFM BIOS (great for if you have an old
BIOS on a modchip and you don’t want to reflash). This comes in a single
and dual mode, the dual mode using a Debug BIOS.
PLEASE NOTE: Only the BIOS is supplied as part of the Debug setup, so
it is up to you to grab the XDK and put the correct files on your Xbox.
Written by DJB
12 December 2004
Page: 7 of 28
Auto-Installer Deluxe Manual
Version 1.0
Chapter 3: Burning and Preparing the ISO
Burning the ISO
I’d suggest using DVD Decrypter as the burning program, mainly for the fact that
it will allow you to verify the DVD once it’s recorded. Alas, if you don’t have a
DVD Writer you can just use Nero to burn it to a CD-RW.
A wise move would also be not to burn the DVD / CD at the fastest possible
speed, for DVD’s I recommend 2x or lower. If you are using a CD, about 24x
should be sufficient. A small tip with using a CD-RW: If the CD-RW has been
previously used, erase the CD completely using a Full Erase (not a Quick one).
It’s been well documented that Xbox DVD Drives will only play certain types of
media, so in order to help you out I managed to find a nice little table showing
what’s compatible with what drive (check Appendix B for more information).
If you need to determine which kind of Drive you have, take a look at the pictures
in Appendix C, and that might be able to help you out.
Using DummyCD
This is a little PC/DOS program I quickly threw together.
When I built the ISO I put a 1 gigabyte dummy file in the ISO, this is so when it’s
burned to DVD it should be able to be read easier. This program replaces the 1
gigabyte dummy file with a more appropriate 100 megabyte file, which will allow
it to be burned to a CD-R / CD-RW.
The process is quite simple; just make a copy of the ISO into the folder which
contains the files for the DummyCD program. Then, just click on Start.bat
(located in the DummyCD folder) and it will do the rest. Once it’s finished it will
create a file called aid10new.iso, which is the resized ISO.
Using Recreate
This is another little PC/DOS program I made.
It will extract the ISO to a folder called temp (which is stored in the same folder
as the program), then gives the user a pause break (opting you to press a key to
continue). This gives you the opportunity to manipulate the files in any way you
see fit, before recreating the ISO. Just follow the on-screen prompts and you
should be fine. Just like DummyCD it will create a file called aid10new.iso with
all the additions. To execute this program, just click on the Start.bat program
found in the Recreate folder.
In Appendix E I’ve explained all the different locations of the files, so you can
now easily change things like adding your own personal IP settings, adding skins,
or even adding ROMs into the Emulators.
Written by DJB
12 December 2004
Page: 8 of 28
Auto-Installer Deluxe Manual
Version 1.0
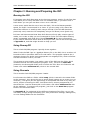
Chapter 4: The Main Menu
Here is our first glimpse at the main menu for the installer:
As you can see there are only 8 options available at the front of the menu, this is
because I’m using a tree structure inside them.
Appendix D goes into complete detail on where everything is in the main menu,
and what you have to select in order to reach it.
Written by DJB
12 December 2004
Page: 9 of 28
Auto-Installer Deluxe Manual
Version 1.0
Chapter 5: Install Guide for a Retail HDD
This little walkthrough will get you up to the point where your Hard Drive is ready
to store games / data, plus 2 dashboards.
The Retail Xbox HDD is already formatted, and has the Microsoft Dashboard
already installed, so unless you want to do a total rebuild of the Hard Drive, it is
unnecessary to format the whole drive.
NOTE: Make sure you back up your E Drive which contains all your game saves;
otherwise you will not be able to recover them after a format.
Unlocking your HDD
There’s two ways this can be done, either through the Flash Bios / (Un) Lock
Hard Drive section of the Auto-Installer (which is very quick and efficient), or
there is the program called ConfigMagic (which seems to be more popular).
When using the option from the Auto-Installer (which launches the Flash Bios /
(Un) Lock HDD section) all you have to do is scroll down to the bottom of the new
menu that appears (you’ll notice that it’s a completely different format from the
rest of the Installer) and select Unlock HDD. The program will ask for
confirmation, and upon confirmation it will unlock your Hard Drive.
When using ConfigMagic, wait for the program to start and show you all the
information about your Xbox (the DVD and Hard Drive). It will say whether or not
your Hard Drive is locked or unlocked. To change this, press the START button,
and a menu will appear on the left-hand side of the screen. Then you’ll be given
the option to unlock your Hard Drive. After this is done, reset your Xbox to
continue with the rest of the installation.
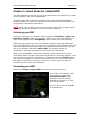
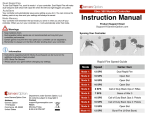
Formatting your HDD
Select the Format / Prepare HDD menu and you’ll see this screen:
If you want to completely clean
your Hard Drive, select the
Format Retail HDD option,
otherwise the other options
available are Format C, E, and
your Cache Drives.
Drives F and G are not available
on a Retail Drive.
Written by DJB
12 December 2004
Page: 10 of 28
Auto-Installer Deluxe Manual
Version 1.0
Preparing the needed folders for your HDD
Preparing the HDD will copy blank folders on your desired drive. This is a list of
the folders that it will produce
Apps
Emulators
Games
GamesHomeBrew
Music
Videos
As well as this, it will also copy DVD-X to your Apps folder.
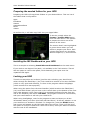
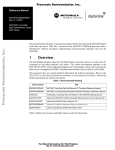
To do this, simply select the
Format / Prepare HDD Option
from the main menu. The options
to prepare the drive are at the
bottom of this menu:
The section that I have highlighted
in green shows where you can
select to prepare your drive. Of
course since it’s only a Retail HDD
we can only prepare E Drive on
this one.
Installing the MS Dashboard on your HDD
This is as simple as selecting Install Microsoft Dashboard on the main menu.
If you wish to use Region-Free patch, it’s available in the Tools section. There’s
also an option to remove the patch, which basically just copies over the
unpatched file again.
Locking your HDD
There’s two ways this can be done (just like with unlocking your Hard Drive),
either through the Flash Bios / (Un) Lock Hard Drive section of the Auto-Installer
(which is very quick and efficient), or there is the program called ConfigMagic
(which seems to be more popular).
When using the option from the Auto-Installer (which launches the Flash Bios /
(Un) Lock HDD section) all you have to do is scroll down to the bottom of the new
menu that appears (you’ll notice that it’s a completely different format from the
rest of the Installer) and select Lock HDD. The program will ask for confirmation,
and upon confirmation it will lock your Hard Drive.
When using ConfigMagic, wait for the program to start and show you all the
information about your Xbox (the DVD and Hard Drive). It will say whether or not
your Hard Drive is locked or unlocked. To change this, press the START button,
and a menu will appear on the left-hand side of the screen. Then you’ll be given
the option to lock your Hard Drive. After this is done, reset your Xbox to continue
with the rest of the installation.
Written by DJB
12 December 2004
Page: 11 of 28
Auto-Installer Deluxe Manual
Version 1.0
Chapter 6: Install Guide for a Large HDD
This little walkthrough will get you up to the point where your Hard Drive is ready
to store games / data, plus 2 dashboards.
Once a brand new Hard Drive is detected by the Auto-Installer, it will
automatically format it for you, so there is no need to format drives unless you
want to start fresh with your Xbox.
NOTE: Make sure you back up ALL of your Drives which contains all your game
saves; otherwise you will not be able to recover them after a format.
Unlocking your HDD
There’s two ways this can be done, either through the Flash Bios / (Un) Lock
Hard Drive section of the Auto-Installer (which is very quick and efficient), or
there is the program called ConfigMagic (which seems to be more popular).
When using the option from the Auto-Installer (which launches the Flash Bios /
(Un) Lock HDD section) all you have to do is scroll down to the bottom of the new
menu that appears (you’ll notice that it’s a completely different format from the
rest of the Installer) and select Unlock HDD. The program will ask for
confirmation, and upon confirmation it will unlock your Hard Drive.
When using ConfigMagic, wait for the program to start and show you all the
information about your Xbox (the DVD and Hard Drive). It will say whether or not
your Hard Drive is locked or unlocked. To change this, press the START button,
and a menu will appear on the left-hand side of the screen. Then you’ll be given
the option to unlock your Hard Drive. After this is done, reset your Xbox to
continue with the rest of the installation.
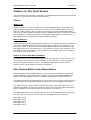
Formatting your HDD
Select the Format / Prepare HDD menu and you’ll see this screen:
If you want to completely clean
your Hard Drive, select the
Format Large HDD option,
otherwise the other options
available are Format C, E, F, G,
and your Cache Drives.
Written by DJB
12 December 2004
Page: 12 of 28
Auto-Installer Deluxe Manual
Version 1.0
Preparing the needed folders for your HDD
Preparing the HDD will copy blank folders on your desired drive. This is a list of
the folders that it will produce
Apps
Emulators
Games
GamesHomeBrew
Music
Videos
As well as this, it will also copy DVD-X to your Apps folder.
To do this, simply select the
Format / Prepare HDD Option
from the main menu. The options
to prepare the drive are at the
bottom of this menu:
The section that I have highlighted
in green shows where you can
select to prepare your drive. With
a larger hard drive you should be
able to Prepare E, F, and G Drives.
Installing the MS Dashboard on your HDD
This is as simple as selecting Install Microsoft Dashboard on the main menu.
If you wish to use Region-Free patch, it’s available in the Tools section. There’s
also an option to remove the patch, which basically just copies over the
unpatched file again.
Locking your HDD
There’s two ways this can be done (just like with unlocking your Hard Drive),
either through the Flash Bios / (Un) Lock Hard Drive section of the Auto-Installer
(which is very quick and efficient), or there is the program called ConfigMagic
(which seems to be more popular).
When using the option from the Auto-Installer (which launches the Flash Bios /
(Un) Lock HDD section) all you have to do is scroll down to the bottom of the new
menu that appears (you’ll notice that it’s a completely different format from the
rest of the Installer) and select Lock HDD. The program will ask for confirmation,
and upon confirmation it will lock your Hard Drive.
When using ConfigMagic, wait for the program to start and show you all the
information about your Xbox (the DVD and Hard Drive). It will say whether or not
your Hard Drive is locked or unlocked. To change this, press the START button,
and a menu will appear on the left-hand side of the screen. Then you’ll be given
the option to lock your Hard Drive. After this is done, reset your Xbox to continue
with the rest of the installation.
Written by DJB
12 December 2004
Page: 13 of 28
Auto-Installer Deluxe Manual
Version 1.0
Chapter 7: Installing Hacked Dashboards
Firstly, select the Install Hacked Dashboards option from the menu.
Next, it will give you a selection on where you wish to install the dashboard
(either C, E, F, or G). People using the stock standard HDD that came with their
Xbox will only be able to use C or E, and if you HDD isn’t larger than 120
gigabytes you can only use C, E, and F.
After you’ve selected the drive to install it to, you are given the option on what
dashboard you want to install. So select your choice of dashboard and continue….
The next screen can vary depending on what drive you’ve decided to install to.
This is where you select how the dashboard will scan the drives for files to
execute from the dashboard. Here’s a list of the choices:
Retail HDD (E)
Large HDD (E+F)
Larger HDD (E+F+G)
So, if you have a stock HDD you’d obviously pick the first option, as it will only
scan the E Drive. If you have an upgraded HDD (120 gigabytes or less) you would
select the second option, as it scans both E and F drives. And of course there is
the last option which is used for hard drives bigger than 120 gigabytes.
Small tip, you might want to delete the game save that the Auto-Installer creates
after you are done. It will be an UnleashX game save. Please note this will always
delete settings if you were using it prior to using the Auto-Installer.
Chapter 8: Installing Applications
Select the Install Applications option from the main menu.
Next it will ask where you want to install the Applications, the possible choices
are E, F, or G Drive.
Once you’ve selected that you can either choose to install all the applications, or
install them individually. To install all of them at once, select Install All
Applications. To install them separately, just select the name of the program
and it will install it for you to your desired location.
Chapter 9: Installing Emulators
Select the Install Emulators option from the main menu.
Next it will ask where you want to install the Applications, the possible choices
are E, F, or G Drive.
Once you’ve selected that you can either choose to install all the applications, or
install them individually. To install all of them at once, select Install All
Emulators. To install them separately, just select the name of the program and
it will install it for you to your desired location.
Written by DJB
12 December 2004
Page: 14 of 28
Auto-Installer Deluxe Manual
Version 1.0
Chapter 10: The Tools Section
The tools section is basically a collection of modifications and add-ons that can be
used on to your Xbox to enhance functionality.
LTools
What is it?
Simply, this is a set of Auto-Installers for softmodding Xboxes. The main draw
behind using this program is that all you have to do is load the game save, and
then hit a few buttons, and you then have yourself a newly Softmodded Xbox.
This tool is feature packed, including up to 4 dashboards (Evox, Avalaunch, MXM,
and UnleashX); a choice of the two most popular BIOS packs (X2 and Evox). It
also allows you to play backed up and homebrew games.
Who is this for?
Those that want to play backup games without ever having to install a modchip in
your Xbox, especially those that are worried about voiding your warranty if you
wish not to open it. Of course if something happens and you are not able to get
the exploit files off of your hard drive, your warranty will be void; however, you
can always run this tool again, and uninstall to the configuration you had before
you tried to mod your Xbox.
How is it used in this Auto-Installer?
Basically it only serves the simple purpose of copying itself to your E Drive. This
is mainly for users currently with Modchips in their system, so they can easily
transfer the game saves to either a compatible USB Memory Stick or Xbox
Memory Card, and proceed to perform a Softmod.
PBL (Phoenix BIOS Loader) Metoo Edition
What this does is boot a BIOS file from your Hard Drive, instead of completely
using the BIOS on a modchip. This is good if you have an outdated BIOS that
doesn’t have the greatest support for IGR (In-Game Reset) like mine does.
The BIOS included in this package is the EvoX M8+, and I’ve pre-configured it so
it has the Eject Fix and LBA48 (larger hard drives over 120 gigabytes) support.
I’ve made several versions that will allow the Xbox to boot different drives. So,
basically the BIOS will boot the first drive (being the first letter after EvoX M8+),
then if it doesn’t find nothing there it will check E, then check F.
The BIOS searches for a evoxdash.xbe file, so if your dashboard isn’t called this,
you will have to change it. Here’s a list of the BIOSes that are included:
EvoX
EvoX
EvoX
EvoX
EvoX
M8+
M8+
M8+
M8+
M8+
C,E,G
C,F,G
E,F,G
F,E,C
G,F,E
Written by DJB
12 December 2004
Page: 15 of 28
Auto-Installer Deluxe Manual
Version 1.0
There’s also a dual-boot option which will allow you to use a second BIOS when
you have your DVD tray open. I have set this to be a Debug (development) BIOS,
as I feel it could be handy to a few people.
Even though I have included the Debug BIOS, you will still need to obtain the
Xbox Development Kit (XDK) to finalise the installation of your debug setup. More
information given in Appendix F on how to set this up. If you wish to use the
Debug BIOS as your main, just simply rename xboxrom.bin to xboxrom3.bin (just
temporarily), rename xboxrom2.bin to xboxrom.bin, and then rename
xboxrom3.bin to xboxrom2.bin. Next time you boot, the debug will be default.
XSelect
This program is great for people that would like to launch a particular application,
emulator, dashboard etc. on startup of their Xbox. Even though XSelect does
take a little bit of configuring before you have it set the way you want, it’s not too
complicated and be done quite quickly.
One small tip though, when setting the search parameters to look for files, make
sure you clear the existing list and make it only search for *.xbe files, otherwise
you’ll end up with hundreds of possibilities.
The best way to install this is to put it on the drive which is first booted by your
BIOS (usually C, but sometimes it can be F). If you need to install a dashboard to
the same drive as well, do that first. Then, rename the evoxdash.xbe file to
something like evoxdash2.xbe, so that you can install XSelect without any
problems. The good thing about XSelect is it will boot any file you want; all you
have to do is set up a button to launch it.
UXE
UXE is an exploit package to use with Softmodded machines. It consists of a
hacked xboxdash.xbe file, the exploit fonts, plus a BIOS Loader which will boot a
dashboard stored on F, E, or C Drive. It originally only had the EvoX dashboard,
but I customised this to get better use out of it.
There are two versions, UXE 61 and UXE 71. It’s recommended that you try UXE
71 first as it must be the most versatile. However if this doesn’t work you’ll have
to use the UXE 61 exploits.
After this is done, just install a hacked Dashboard to either F, E, or C Drive
(remember normal retail Hard Drives only have E and C) and you should be able
to boot a dashboard straight away upon turning on your Xbox, after you install a
dashboard through the Install Hacked Dashboards option in the main menu.
File Manager
This is a section built into the Auto-Installer which will allow you to have access
to your Xbox hard drive. You can move, edit, delete, copy, basically everything
you can with a normal windows interface, even view and create ZIP files.
This tool can come very handy while using this installer, especially if you want to
rename and move files while installing various applications (for example installing
XSelect and a Dashboard in the same root folder of a drive).
Written by DJB
12 December 2004
Page: 16 of 28
Auto-Installer Deluxe Manual
Version 1.0
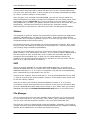
Appendix A: Xbox Error Codes
Error
Cause
Description
01
Bootloader
Motherboard Error
02
Bootloader
Eeprom check failed
03
Bootloader
Unknown
04
Bootloader
Ram check failed
05
Kernel
HDD not locked (retail bioses require the HDD to be locked)
06
Kernel
Cannot unlock HDD
07
Kernel
HDD timeout
08
Kernel
HDD not found
09
Kernel
HDD parameters (PIO/DMA/or size {debug}, certain size
minimum is required for debug)
10
Kernel
DVD drive timeout
11
Kernel
DVD not found
12
Kernel
DVD parameters (PIO/DMA)
13
Kernel
Dashboard launch fail (due to missing/bad key, or anything
else that would prevent it from running) and the dashboard
didn't specify why it failed
14
Dashboard
Error loading dashboard (dashboard generic error)
15
Kernel
Unknown
16
Dashboard
Other files to do with dashboard / dashboard settings (specific
dashboard error)
17
Kernel
Unknown
18
Kernel
Unknown
19
Kernel
Unknown
Kernel
The dashboard has attempted to load and failed: It was a cold
boot, and the dashboard didn't specify why it failed, but it (for
some reason) needed to be noted that the DVD passed the
challenge/response authentication
Anywhere
Typically means you're missing .dip files on your c: Drive or
you have .xip's from a different (wrong) dashboard version. To
fix simply restore a complete backup of the c: drive.
20
21
Written by DJB
12 December 2004
Page: 17 of 28
Auto-Installer Deluxe Manual
Version 1.0
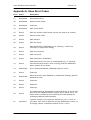
Appendix B: Xbox Media Compatibility
Here is a table showing how compatible the various DVD Drives are. This
information was taken from www.xbox-linux.org.
Thomson
Untweaked
Thomson
Tweaked
Phillips
Untweaked
Phillips
Tweaked
Samsung
605 Rev.B
Samsung
605 Rev.F
CD-R
CD-RW
DVD-R
DVD-RW
DVD+R
DVD+RW
Key:
Description
Doesn’t work with most Media
Works with some Media
Works with most Media
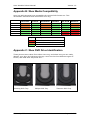
Appendix C: Xbox DVD Drive Identification
These pictures were taken from Xbox-Linux.org, and show how you can easily
identify your drive by looking at the tray. Here are the three different types of
Drives, and what their trays look like:
Samsung DVD Tray
Written by DJB
Phillips DVD Tray
12 December 2004
Thomson DVD Tray
Page: 18 of 28
Auto-Installer Deluxe Manual
Version 1.0
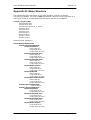
Appendix D: Menu Structure
This shows the menu structure of the Auto-Installer, and how to access
everything available. The text in bold represents a branch in this huge tree of a
menu and needs to be selected before the other options are available.
Format / Prepare HDD
Format Retail HDD
Format Large HDD
Format Cache Drives (X, Y, and Z)
Format C Drive
Format E Drive
Format F Drive
Format G Drive
Prepare E Drive
Prepare F Drive
Prepare G Drive
Install Microsoft Dashboard
Install Hacked Dashboards
Install C Drive Dashboards
Install Avalaunch
Retail HDD (E)
Large HDD (E+F)
Larger HDD (E+F+G)
Install EvolutionX 3921
Retail HDD (E)
Large HDD (E+F)
Larger HDD (E+F+G)
Install EvolutionX 3935
Retail HDD (E)
Large HDD (E+F)
Larger HDD (E+F+G)
Install Media X Menu
Retail HDD (E)
Large HDD (E+F)
Larger HDD (E+F+G)
Install UnleashX
Retail HDD (E)
Large HDD (E+F)
Larger HDD (E+F+G)
Install Xbox Media Center
Retail HDD (E)
Large HDD (E+F)
Larger HDD (E+F+G)
Install E Drive Dashboards
…same as above
Install F Drive Dashboards
Install Avalaunch
Large HDD (E+F)
Larger HDD (E+F+G)
Install EvolutionX 3921
Large HDD (E+F)
Larger HDD (E+F+G)
Install EvolutionX 3935
Large HDD (E+F)
Larger HDD (E+F+G)
Install Media X Menu
Large HDD (E+F)
Larger HDD (E+F+G)
Written by DJB
12 December 2004
Page: 19 of 28
Auto-Installer Deluxe Manual
Version 1.0
Install UnleashX
Large HDD (E+F)
Larger HDD (E+F+G)
Install Xbox Media Center
Large HDD (E+F)
Larger HDD (E+F+G)
Install G Drive Dashboards
Install Avalaunch
Larger HDD (E+F+G)
Install EvolutionX 3921
Larger HDD (E+F+G)
Install EvolutionX 3935
Larger HDD (E+F+G)
Install Media X Menu
Larger HDD (E+F+G)
Install UnleashX
Larger HDD (E+F+G)
Install Xbox Media Center
Larger HDD (E+F+G)
Install Applications
Install to E Drive
Install All Applications
Install BiosCheck
Install BoXplorer
Install ConfigMagic
Install Complex Tools
Install Dvd2XboX
Install DVD-X 1.0 (Gueux)
Install DVD-X 2.0 (Xecuter)
Install Enigmah NTSC-PAL
Install Halo Cache Editor
Install HDDLoader
Install LinksBoks
Install MouseTestApp
Install PBL MeToo
Install X2 Config Tool
Install X3 Eeprom Eraser
Install XBFTP
Install Xbox Media Center
Install Xbpartitioner
Install XBWatch
Install XCommanderR2
Install XeniumTest
Install XToolbox
Install YAMP
Install to F Drive
...same as above
Install to G Drive
…same as above
Install Emulators
Install to E Drive
Install All Emulators
Install AdamxX
Install ArnoldX
Install AtariXLBox
Install BlissX
Install BlueMSXBox
Install DOSXbox
Install FCEUltraX
Install Gnuboy
Install KEGS-X
Written by DJB
12 December 2004
Page: 20 of 28
Auto-Installer Deluxe Manual
Version 1.0
Install HU-GO!
Install LynXBox
Install MAMEoX
Install NeoGenesis
Install NeoPopX
Install OdysseyX
Install Pcsxbox v13
Install SC3X
Install ScummVMx
Install SMSPlusX
Install SpeXtrum
Install Stella
Install Surreal64
Install Vice20x v3
Install Vice64x v4
Install VicePETX
Install WinSTonX
Install WinUAEX
Install X68000X
Install XBoyAdvance
Install xSnes9x
Install to F Drive
...same as above
Install to G Drive
…same as above
Tools
Flash Bios / (Un) Lock HDD (Takes you to EvoX part of the Installer).
BIOS Checker
ConfigMagic
Install lTools
Install lTools for 007 Agent Under Fire
Install lTools for MechAssault
Install lTools for Splinter Cell (PAL)
Install lTools for Splinter Cell (NTSC)
Install PBL MeToo
Install PBL
Install to C Drive
Install to E Drive
Install to F Drive
Install to G Drive
Install PBL (Dual w/Debug)
Install to C Drive
Install to E Drive
Install to F Drive
Install to G Drive
Install BFM BIOS
EvoX M8+ C, E, G
Install to E Drive
Install to F Drive
Install to G Drive
Evox M8+ C, F, G
Install to E Drive
Install to F Drive
Install to G Drive
EvoX M8+ E, F, G
Install to C Drive
Install to F Drive
Install to G Drive
EvoX M8+ F, E, C
Install to C Drive
Install to E Drive
Install to G Drive
Written by DJB
12 December 2004
Page: 21 of 28
Auto-Installer Deluxe Manual
Version 1.0
EvoX M8+ G,
Install
Install
Install
Install UXE
Install UXE 61
Install UXE 71
Install XSelect
Install to C Drive
Install to E Drive
Install to F Drive
Install to G Drive
Install MS DVD Region-Free
Remove MS DVD Region-Free
Xbpartitioner
File Manager
Reset FTP
Reset Network
F,
to
to
to
E
C Drive
E Drive
F Drive
Boot Dashboards
Boot Microsoft Dashboard
Boot C Drive Dashboard
Boot E Drive Dashboard
Boot F Drive Dashboard
Boot G Drive Dashboard
Turn off Xbox
Written by DJB
12 December 2004
Page: 22 of 28
Auto-Installer Deluxe Manual
Version 1.0
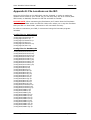
Appendix E: File Locations on the ISO
Here are all the files on the ISO which can be changed, in order to make the
installer more suited to your needs. As you can see, they are all in normal plain
ZIP format, so basically extract the ZIP file and edit as needed.
PLEASE NOTE: When extracting the Emulators you’ll notice that the Emulators
are stored in a folder within the ZIP file. Make sure when you re-zip the Emulator
that you ZIP it in that folder, otherwise it will not install correctly.
In order to customize your ISO, I recommend using the Recreate program
included.
Config Files for Applications
/Config/Apps/E/dvd2xbox.zip
/Config/Apps/E/xbmc.zip
/Config/Apps/F/dvd2xbox.zip
/Config/Apps/F/xbmc.zip
/Config/Apps/G/dvd2xbox.zip
/Config/Apps/G/xbmc.zip
Config Files for Dashboards
/Config/Dash/AvaLaunch/e.zip
/Config/Dash/AvaLaunch/f.zip
/Config/Dash/AvaLaunch/g.zip
/Config/Dash/EvoX3921/e.zip
/Config/Dash/EvoX3921/f.zip
/Config/Dash/EvoX3921/g.zip
/Config/Dash/EvoX3935/e.zip
/Config/Dash/EvoX3935/f.zip
/Config/Dash/EvoX3935/g.zip
/Config/Dash/MXM/e.zip
/Config/Dash/MXM/f.zip
/Config/Dash/MXM/g.zip
/Config/Dash/MXM-E/e.zip
/Config/Dash/MXM-E/f.zip
/Config/Dash/MXM-E/g.zip
/Config/Dash/MXM-F/e.zip
/Config/Dash/MXM-F/f.zip
/Config/Dash/MXM-F/g.zip
/Config/Dash/MXM-G/e.zip
/Config/Dash/MXM-G/f.zip
/Config/Dash/MXM-G/g.zip
/Config/Dash/UnleashX/e.zip
/Config/Dash/UnleashX/f.zip
/Config/Dash/UnleashX/g.zip
/Config/Dash/XBMC/e.zip
/Config/Dash/XBMC/f.zip
/Config/Dash/XBMC/g.zip
/Config/Dash/XBMC-E/e.zip
/Config/Dash/XBMC-E/f.zip
/Config/Dash/XBMC-E/g.zip
/Config/Dash/XBMC-F/e.zip
/Config/Dash/XBMC-F/f.zip
/Config/Dash/XBMC-F/g.zip
/Config/Dash/XBMC-G/e.zip
/Config/Dash/XBMC-G/f.zip
/Config/Dash/XBMC-G/g.zip
Written by DJB
12 December 2004
Page: 23 of 28
Auto-Installer Deluxe Manual
Version 1.0
Config Files for Emulators
/Config/Emus/E/xSnes9x.zip
/Config/Emus/F/xSnes9x.zip
/Config/Emus/G/xSnes9x.zip
Paths for Emulator ROMs
All Emulator files are stored at /Files/Emus/
AdamX:
ArnoldX:
AtariXLBox:
BlissX:
BlueMSXBox:
DOSXbox:
FCEUltraX:
GNUBoy:
HU-GO!
KEGS-X:
LynXBox:
MAMEoX:
NeoGenesis:
NeoPopX:
OdysseyX:
Pcsxbox:
SC3X:
SMSPlusX:
SpeXtrum:
Stella:
Surreal64:
Vice20x:
Vice64x:
VicePETx:
WinSTonX:
WinUAEX:
x68000x:
XBoyAdvance:
xSnes9x:
AdamX/AdamGames/
ArnoldX/CPCRoms/
AtariXLBox/AtariDisks/
BlissX/INTVRoms/
BlueMSXbox/MSXRoms/
DOSXbox/DosFiles/
FCEUltraX/Roms/
GNUBoy/GBRoms/
HU-GO!/PCERoms/
KEGS-X/AppleDisks/
LynXBox/LynxRoms/
MAMEoX/Roms/
NeoGenesis/SGenRoms/
NeoPopX/NGPCRoms/
OdysseyX/O2Roms/
Pcsxbox/PSXCDs/
SC3X/Roms/
SMSPlusX/SMSROMS/
SpeXtrum/Images/
Stella/A26Roms/
Surreal64/Roms/
Vice20x/VIC20Games/
Vice64x/C64Disks/
VicePETx/PETGames/
WinSTonX/STDisks/
WinUAEX/AmigaDisks/
x68000x/X68kDisks/
XBoyAdvance/GBARoms/
xSnes9x/Roms/
Sorry, not sure on where to put ROMS for ScummVMx.
Written by DJB
12 December 2004
Page: 24 of 28
Auto-Installer Deluxe Manual
Version 1.0
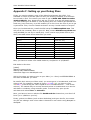
Appendix F: Setting up your Debug Xbox
Firstly you need to obtain a copy of the Xbox Development Kit (XDK). It is
available on most of the P2P (Peer-to-Peer) file sharing networks so it shouldn’t
be too hard to find. The version you want to get is XBOX SDK 5849 December
2003-COMPLEX. Also, please don’t ask any of us for it as we will simply ignore
you. Not meaning to be harsh or rude by doing this, but I had to get the XDK the
hard way (very hard way, on a 56k modem) so it won’t hurt the rest of you to get
it yourselves. Also, it’s over 700mb so there’s no way I could email it to anyone.
Once you’ve obtained this, install the XDK setup file XDKSetup5849.exe. This
will put all the necessary files on your PC. Now, extract XDKRecovery5849.exe
using WinRAR (Do not try to install this). You’ll need to copy these files to your
Xbox; the table below shows what files you need.
Source (PC)
Destination (Xbox)
Files to copy / Notes
\XDASH
\C\
xshell.xbe only
\XDASH\data
\C\data
All files, recursive
\XDASH\images
\C\images
All files, recursive
\XDASH\media
\C\media
All files, recursive
\XDASH\sounds
\C\sounds
All files, recursive
\XDKSAMPLES
\C\XDKSAMPLES
All files, recursive
\XBOX
\E\
dashboard.xbx and xbdm.dll
\DEVKIT
\E\DEVKIT
All files, recursive
\TDATA
\E\TDATA
All files, recursive
Now, you have to create a file called xbdm.ini, and place it in \E\DEVKIT.
Edit xbdm.ini like this:
[xbdm]
dbgname name=XXXX
staticip addr=EEDDCCBBAA
memtrack flags=0x0 stackdepth=0x0
XXX is the name you want to give to your Xbox (i.e.: Xbox) and EEDDCCBBAA is
the static IP address you want.
Be careful don't write your IP as usual, you must type it in hexadecimal, and from
right to left. For example, instead of typing 192.168.0.82 you have to write
5200A8C0 (it works by pair 192 is equal to C0 in hexadecimal etc.... look at the
colours). The easiest way to convert Decimal values in hexadecimal is to use the
calculator in windows, using scientific mode. To access this, open up the
calculator and select View -> Scientific.
Next, you have to have to edit the file dashboard.xbx located on your Xbox’s E
Drive (or in \XBOX on your PC).
Firstly, grab a Hex Editor (such as Hex Workshop) and open the file, the reason
why we are editing it with a hex editor is because it won’t work using Notepad or
Wordpad.
Written by DJB
12 December 2004
Page: 25 of 28
Auto-Installer Deluxe Manual
Version 1.0
You’ll see this line in the file: \Device\Harddisk0\Partition2;xshell.xbe
You have to edit this so it will boot a dashboard of your choice.
Firstly change the Partition number. The numbers are as follows: 2 boots C, 1
boots E, 6 boots F, and 7 boots G.
Secondly, edit the name of the file which will be booted (for example, change
xshell.xbe to evoxdash.xbe). If you still want to have the XDK Dashboard you can
easily just add a link in your dashboard to launch /C/xshell.xbe
Here’s some examples:
\Device\Harddisk0\Partition2;evoxdash.xbe
\Device\Harddisk0\Partition1;evoxdash.xbe
\Device\Harddisk0\Partition6;evoxdash.xbe
\Device\Harddisk0\Partition7;evoxdash.xbe
-
Boots
Boots
Boots
Boots
evoxdash.xbe
evoxdash.xbe
evoxdash.xbe
evoxdash.xbe
from
from
from
from
C Drive
E Drive
F Drive
G Drive
That’s the hardest part done…
Once that is all done, go to C:\Program Files\Microsoft Xbox SDK\Xbox\bin
on your PC and install the 2 following programs (Note: you will need
Administrator’s Privileges to install these)
netsimsetup.exe
XBSESetup.exe
Once you’ve installed these programs, you should see this icon on your desktop:
When this appears, double-click on it and it will take you to your
Xbox Neighbourhood.
The first thing to do is to set it up with your Xbox, which can easily
be done by selecting Add Xbox. Type in your IP Address for your
Xbox when prompted, and when it asks is this the default Xbox, say Yes.
In order to get the Xbox to boot in Debug mode, you need to use the Phoenix
BIOS Loader. I have already included a debug bios as the 2nd booting BIOS, so
to start your Xbox in Debug mode, turn your Xbox on (with the modchip on
offcourse), then as soon as you see something on your Monitor / TV, open your
DVD Drive Tray, this will tell PBL that you want to use the 2nd BIOS, which is of
course the Debug BIOS.
Once you have this installed, there are so many more capabilities of your Xbox.
Here are 3 of the most common uses:
Developing your own Xbox software and being able to use full remote debugging
facilities
Screen grabbing and movie grabbing
Reverse engineering software (for making game trainers, etc)
So in general, normal gamers will not have to worry about using this, as it’s only
for developers and advanced enthusiasts.
Written by DJB
12 December 2004
Page: 26 of 28
Auto-Installer Deluxe Manual
Version 1.0
Bibliography
•
www.xbox-hq.com
Ltools information (provided by Sjohn).
Various Tutorials & Forum Posts.
•
www.xbox-linux.org
Xbox DVD Drive Identification HOWTO. (link)
Xbox CD / DVD Burning HOWTO. (link)
•
www.xbox-scene.com
Various Tutorials & Forum Posts.
•
www.hydras-world.com
Debug Xbox Information. (link)
Written by DJB
12 December 2004
Page: 27 of 28
Auto-Installer Deluxe Manual
Version 1.0
Credits
Yursoft® Free XBOX Game Disc
Premastering Utility 1.01
ISO created using:
Intro Credits
Programming & Graphics by:
Forahobby
(a big thanks thanks to http://www.xbdev.net
for all their help and support).
Music:
“Ocean Loader 3 – Rockin’ Mix”
Written by Peter Clarke on the C-64
Remixed on PC by the Marsland Brotherhood
Tested by:
Forahobby
DJB
Sjohn
Installer Credits
Installer Developed by:
DJB
Main Installer Skin by:
*
Second Installer Skin by: +
Jezz (Modified by DJB)
DJB
Music:
“Anal-0gue (To the Higher State)”
Written by Sǿren “Jeff” Lund on the C-64
Remixed on PC by Jouni “Mixer” Ikonen
Tested by:
DJB
Forahobby
Realmccloy
Slamscaper
Bobrownik
Sjohn
Software collected from:
Xbins
* = Skin designed for UnleashX
+ = Skin designed for EvolutionX
Documentation Credits
Documentation Writing,
Screenshots, Graphics, and
DVD / CD Cover Art by:
DJB
Proof Readers:
DJB
Forahobby
Sjohn
rs6 n2o
Written by DJB
12 December 2004
Page: 28 of 28