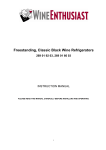
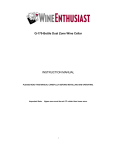
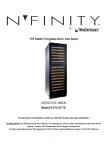
1
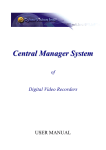
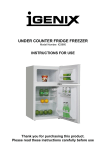
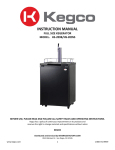
INSTRUCTION MANUAL FOR WINE COOLER MODEL NO. DAU-52.146SS DAU-52.146B [ Thanks for buying our Wine cooler, Hope our advanced product will give your wine a different joyful taste. Before use, please read and follow all safety rules and operating instructions. 1 WARNING To prevent damaging the door gasket, make sure to have the door all the way opened when pulling shelves out of the rail compartment. The appliance must be positioned so that the plug is accessible. Release the electric cord. Move your cabinet to its final location. Do not move your Cabinet while loaded with wine. You might distort the body. The wine cellar should be installed in a suitable place in order to avoid Touching the compressor with the hand. The appliance must be positioned so that the plug is accessible. Release the electric This appliance is not intended for use by persons (including children) with reduced physical,sensory or mental capabilities,or lack of experience and knowledge,unless they have been given supervision or instruction concerning use of the appliance by a person responsible for their safety. If the supply cord is damaged, it must be replaced by manufacturer of its Service agent or a similarly qualified person in order to avoid a hazard. PLEASE DON’T TRY TO PLUG INTO OR EXTENSION THE CABLE IN ANY CASE. IMPORTANT SAFETY INSTRUCTIONS To reduce the risk of fire, electrical shock, or injury when using your appliance, follow these basic precautions: WARNING Read all instructions before using the Wine cooler. DANGER or WARNING: Risk of child entrapment. Child entrapment and suffocation are not problems of the past. Junked or abandoned appliances are still dangerous . . . even if they will “just sit in the garage a few days”. Before you throw away your old Wine cooler: Take off the door. Leave the shelves in place so that children may not easily climb inside. Never allow children to operate, play with, or crawl inside the appliance. Never clean appliance parts with flammable fluids. The fumes can create a fire hazard or explosion. Do not store or use gasoline or any other flammable vapors and liquids in the vicinity of this or any other appliance. The fumes can create a fire hazard or explosion. Do not store explosive substances such as aerosol cans with a flammable propellant in this appliance. WARNING:keep ventilation openings, in the appliance enclosure or in the built-in structure, clear of obstruction; WARNING:Do not use mechanical devices or other means to accelerate the defrosting process, other than those Recommended by the manufacturer; To avoid a hazard due to instability of the appliance, it must be fixed in accordance with the instructions. WARNING:Do not damage the refrigerant circuit; WARNING:Do not use electrical appliances inside the food storage compartments of the appliance, unless they are the type recommended by the manufacturer. If the refrigerant of these appliances are R600a , Flammable and explosive articles should not be put in or near the cabinet, to avoid the fire or explode caused. -Save these instructions- 2 INSTALLATION INSTRUCTIONS Before Using Your Wine cooler Remove the exterior and interior packing. Before connecting the Wine cooler to the power source, let it stand upright for approximately 2 hours. This will reduce the possibility of a malfunction in the cooling system from handling during transportation. Clean the interior surface with lukewarm water using a soft cloth. This appliance is intended to be used in household and similar applications such as – staff kitchen areas in shops, offices and other working environments; – farm houses and by clients in hotels, motels and other residential type environments; – bed and breakfast type environments; – catering and similar non-retail applications. When disposing your appliance, please choose an authorized disposal site. Installation of Your Wine cooler This appliance is designed to be for free standing installation or built-in (fully recessed) (Refer to sticker location the back of this appliance). This appliance is intended to be used exclusively for the storage of wine . Place your Wine cooler on a floor that is strong enough to support it when it is fully loaded. To level your Wine cooler, adjust the front leveling leg at the bottom of the Wine cooler. This appliance is using flammability refrigerant.So never damage the cooling pipework during the transportation.Locate the Wine cooler away from direct sunlight and sources of heat (stove, heater, radiator, etc.). Direct sunlight may affect the acrylic coating and heat sources may increase electrical consumption. Extreme cold ambient temperatures may also cause the unit not to perform properly. Avoid locating the unit in moist areas. Plug the Wine cooler into an exclusive, properly installed-grounded wall outlet. Do not under any circumstances cut or remove the third (ground) prong from the power cord. Any questions concerning power and/or grounding should be directed toward a certified electrician or an authorized Products service center. Attention Store wine in sealed bottles; Do not overload the cabinet; Do not open the door unless necessary; Do not cover shelves with aluminum foil or any other shelf material which may prevent air circulation; Should the Wine cooler be stored without use for long periods it is suggested, after a careful cleaning, to leave the door ajar to allow air to circulate inside the cabinet in order to avoid possible formations of condensation, mold or odors. Ambient Room Temperature Limits This appliance is designed to operate in ambient temperatures specified by its temperature class marked on the rating plate. Class Extended Temperate Temperate Subtropical Tropical Ambient Temperatures range(℃) ﹢10 to﹢32 ﹢16 to﹢32 ﹢16 to﹢38 ﹢16 to﹢43 Symbol SN N ST T 3 OPERATING YOUR WINE COOLER AND SETTING THE TEMPERATURE CONTROL Control System Instruction LIGHT Control the interior light ON/OFF RUN When it’s ON, the cooling system runs. POWER control this appliance turn on/off. ( press and hold this buttons for approximately 3 seconds); “UP” BUTTON Press once the “UP” button, the temperature will raise 1 ℃. “DOWN” BUTTON Press once the “DOWN” button, the temperature will lower 1 ℃. “DISPLAY” Display the actual temperature indoor. Setting The Temperature Controls You can set the temperature as you desire by pushing the UP or DOWN button. When you push the two buttons for the first time, the LED readout will show the original temperature set at previous time. The temperature that you desire to set will increase 1ºC if you push the UP button once, on the contrary the temperature will decrease 1ºC if you push the DOWN button once. To view the “set” temperature. (anytime) press and hold the corresponding button for approximately 5 seconds, the “set” temperature will temporarily “flash” in the LED display for 5 seconds. The temperature setting can be adjusted from 5℃ to 18℃. The temperature preset at the factory is 12℃. Attention If the unit is unplugged, power lost, or turned off, you must wait 3 to5 minutes before restart the unit. If you need attempt to restart before this time delay, the Wine cooler will not start. If first time use or longer absence of using, the temperature will difference between setting and LED display temperature. After running a period, the temperature will be reverting back. In order to reduce energy consumption, this wine cabinet will automatically switch off the LED lights after 10 minutes. If you want the LED light to remain on continuously, this is possible. Please press and hold the "LIGHT" button for 5 seconds, the display will show "LP". After 4 seconds the display will revert back to normal and the light will remain on until manually switched off. If you want to revert back and conserve energy (recommended), please press and hold the "LIGHT" button for 5 second, the display will show "LF", after 4 seconds the display will revert back to normal, and the light will automatically switch off after 10 minutes. 4 Shelves To prevent damaging the door gasket, make sure to have the door all the way opened when pulling shelves out of the rail compartment. For easy access to the storage content, you must pull the shelves approximately 1/3 out of the rail compartment, however this unit was designed with a notch on each sides of the shelf tracks to prevent bottles from falling. Please refer to the following direction for replace shelf with different method. When removing any of these shelves out of the rail compartment, To fit or remove the shelf, tilt the shelf as per the diagram and simply pull out, or push in the shelf until it sits on the support brackets securely. 5 Reverse the door This appliance has the capability of the door opening from either the left or right side. The unit is delivered to you with the door opening from the left side. Should you desire to reverse the opening direction, please follow…... 1. Lower hinge (Right) 4. Door 7. Top hinge (Left) 10. Door limit device 2 . Screws 5. Top hinge (Right) 8. Hole cover 11. Screw 3 .Door axis 6. Hinge Screws 9. Lower hinge (Left) Open the door to a 90 degrees angle, take out the 2 screws (2) from lower door axis (3), remove the door (4), Remove the axis plate (3) from the door, (Fig. A). Unscrew the screw (11) located underneath the doorframe and the limit device (10), and relocate it at left end side of the door frame. (Fig. A/B) Take out the 3 hinge screws (6) from the top hinge (right) (5) and remove it. (Fig. C) Remove decorative nail (8) from left top of cabinet and install spare top hinge (Left) (7) at left top of cabinet with 3 screws. (Fig. D) Following the above procedure, install the spare lower hinge to the left (9). (Fig. E) Install and aligned the door. Insert the plastic caps to cover the holes(8). 6 Installation specifications for built-in purposes 7 CARE & MAINTENANCE Clean your Wine cooler Turn off the power, unplug the appliance, and remove all items including shelves and rack. Wash the inside surfaces with a warm water and mild solution. Wash the shelves with a mild detergent solution. Wring excess water out of the sponge or cloth when cleaning area of the controls, or any electrical parts. Wash the outside cabinet with warm water and mild liquid detergent. Rinse well and wipe dry with a clean soft cloth. Power failure Most power failures are corrected within a few hours and should not affect the temperature of your appliance if you minimize the number of times the door is opened. If the power is going to be off for a long period of time, you need to take the proper steps to protect your contents. Vacation Time Short vacations: Leave the Wine cooler operating during vacations of less than three weeks. If the appliance will not be used for several months, remove all items and turn off the appliance. Clean and dry the interior thoroughly. To prevent odor and mold growth, leave the door open slightly: blocking it open if necessary. Moving your Wine Cooler/Beverage Cooer: Remove all items. Take out the loose items inside the Wine cooler (such as shelf), or fix the loose items with the foam. Turn the adjustable leg up to the base to avoid damage. Tape the door shut. Be sure the appliance stays secure in the upright position during transportation. Also protect outside of appliance with a blanket or similar items. Energy saving tips The Wine cooler should be located in the coolest area of the room, away from producing appliances, and out of the direct sunlight. 8 PROBLEMS WITH YOUR WINE COOLER You can solve many common Wine cooler problems easily, saving you the cost of a possible service call. Try the suggestions below to see if you solve the problem before calling the servicer. Troubleshooting Guide Problem Wine cooler does not operate Wine cooler is not cold enough Turns on and off frequently The light does not work Vibrations Too much noise The door will not close properly Possible Cause No plugged in. The appliance is turned off. The circuit breaker tripped or a blown fuse. Check the temperature control setting. External environment may require a higher setting. The door is opened too often. The door is not closed completely. The door gasket does not seal properly. The room temperature is hotter than normal. Overload of the cabinet The door is opened too often. The door is not closed completely. The temperature control is not set correctly. The door gasket does not seal properly. Not plugged in. The circuit breaker tripped or a blown fuse. The bulb has burned out. The light button is “OFF” check to sure that the Wine cooler is level. The rattling noise may come form the flow of the refrigerant, which is normal. As each cycle ends, you may hear gurgling. Contraction and expansion of the inside walls may cause popping and crackling noises. The Wine cooler is not level. The Wine cooler is not level. The door was reversed and not properly installed. The gasket is dirty. The shelves are out of position. 9 Before disposal of the appliance. 1. Disconnect the main plug from the main socket. 2. Cut off the main cable and discard it. 10