1
Model 3275 Checkweigher
User’s Manual
CAUTION
Risk of electrical shock. Do not remove cover. No user serviceable parts inside. Refer servicing to qualified service personnel.
Weigh-Tronix reserves the right to change
specifications at any time.
12/13/04 3275_U.P65 PN 7424-12343N e1 Printed in USA
2
Model 3275 Checkweigher User’s Manual
Table Of Contents
Table of Contents ......................................................................................................................3
Specifications ............................................................................................................................4
Introduction ...............................................................................................................................5
Initial Inspection.......................................................................................................... 5
Leveling the Scale ........................................................................................................ 5
AC Electrical Requirements ........................................................................................ 5
Transmitting Serial Data ............................................................................................. 5
Operation with a Computer ......................................................................................... 6
Display Features ..........................................................................................................7
3275 Control Keys ........................................................................................................ 7
Scale Operation
Applying Power to the Scale ........................................................................................8
Entering or Changing a Target Weight Using Product ................................................. 8
Setting or Changing a Target Weight by Entering a Numerical Value .......................... 8
Entering or Changing a Pushbutton Tare Value ........................................................... 9
Entering or Changing a Numerical Tare Value ............................................................. 9
Entering or Changing an Over Tolerance .................................................................... 10
Entering or Changing an Under Tolerance .................................................................. 10
Reviewing an Entered Tare, Over, Under or Target Value ........................................... 11
Clearing Over, Under, Accept and Tare Values .......................................................... 11
Viewing and / or Resetting the Transaction Counter .................................................... 12
Remote Keypad (Option) ......................................................................................................... 13
Entering or Changing Over, Under, Accept, Tare or Over and Under Alarm
Values Using the Optional Remote Keypad ............................................................... 14
Reviewing Entered Values Using the Remote Keypad ................................................ 14
Clearing Over, Under, Accept, Tare, Over Alarm and Under Alarm
Values Simultaneously Using the Remote Keypad .................................................... 15
RS-232/RS-485 Optional Communications .............................................................................. 16
Software Options ..................................................................................................................... 18
Multiple Setup Program .............................................................................................. 18
Multiple Setup with Manual Recall Program ................................................................ 19
Standard Deviation Program ....................................................................................... 21
X-Bar R Program ........................................................................................................ 23
LB-OZ Program .......................................................................................................... 29
Percent Program ........................................................................................................ 30
Setpoint Option .......................................................................................................... 32
Plastic Knob Installation for USDA Approved Applications ....................................................... 33
Pages are numbered consecutively beginning with the cover page.
Model 3275 Checkweigher User’s Manual
3
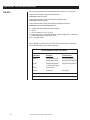
Specifications*
DIMENSIONS:
Overall
6 lb and 12 lb scales
30 lb, 60 lb, and 100 lb scales
100 lb scale
200 lb scale
8.85W x 13.25D x 17.21H
13.69W x 16.50D x 17.21H
20W x 26.56D x 35H
24W x 30.56D x 35H
Scale Platter
6 lb and 12 lb scales
8x8
30 lb, 60 lb, and 100 lb scales 12 x 14
100 lb scale
20 x 20
200 lb scale
24 x 24
CONSTRUCTION:
POWER REQUIREMENTS:
DISPLAY AND ANNUNCIATORS:
CONTROL KEYS:
ENVIRONMENTAL LIMITS:
OPTIONS:
All stainless steel sheet and hardware.
117 VAC (+10%, -15), 50/60Hz (±3 Hz), .25 Amp. Max.
Fluorescent four-color display, with annunciators for unit of measure (lb, kg,
oz, and g), over, under, accept, center of zero, and net mode, as well as a 6
digit weight display with 1/2 inch high numerals.
10 membrane keys.
Temperature: -10C to +40C (14F to 104F)
Humidity: 10% to 95% relative, non-condensing
Remote Keypad
RS-232 and RS-485 Communications I/O
234 VAC, 50/60 Hz Power
Setpoint I/O connections
CAPACITY & RESOLUTION
Pounds
6 lb x .001
6 lb x .002
Ounces
100 oz x .02
100 oz x .05
Kilograms
3 kg x .0005
3 kg x .001
Resolution
6000/5000/6000d
3000/2000/3000d
12 lb x .002
12 lb x .005
200 oz x .05
200 oz x .1
6 kg x .001
6 kg x .002
6000/4000/6000d
2400/2000/3000d
30 lb x .005
30 lb x .01
60 lb x .01
60 lb x .02
100 lb x .02
100 lb x .05
200 lb x .05
200 lb x .1
480 oz x .1
480 oz x .2
960 oz x .2
960 oz x .5
1600 oz x .5
1600 oz x 1
3200 oz x 1
3200 oz x 2
15 kg x .002
15 kg x .005
30 kg x .005
30 kg x .01
45 kg x .01
45 kg x .02
90 kg x .02
90 kg x .05
6000/4800/7500d
3000/2400/3000d
6000/4800/6000d
3000/1920/3000d
5000/3200/4500d
2000/1600/2250d
4000/3200/4500d
2000/1600/1800d
*WEIGH-TRONIX reserves the right to change specifications and features
without notice and without incurring obligation.
4
Model 3275 Checkweigher User’s Manual
Introduction
The Model 3275 Checkweigher is a reliable, easy to operate, high speed
weighing scale, designed to allow entry of a target weight, along with selected over and under weight limits for the rapid processing of items that
must be checked for conformity to a precise weight range. It may be used in
stand-alone or interfaced applications. The Model 3275 incorporates advanced electronic design, including a graphic over/under display, optional
handheld remote keypad and serial multi-scale communications. The scale
is housed in a watertight enclosure to permit use in wet environments and
can be washed down as necessary to meet sanitary requirements.
Initial Inspection
This scale has been calibrated and inspected for mechanical and electronic
integrity prior to shipment. It should be free of defects and in perfect operating condition upon receipt. To confirm this, the scale should be inspected
immediately for any physical damage incurred in transit. If the scale is
damaged, contact your local Weigh-Tronix supplier.
Leveling the Scale
Place the scale on a stable, non-vibrating, level surface. Adjust the platform
feet so that the platform is level and all four feet are in equal contact with the
surface, then tighten the lock nut on each of the feet. Use the leveling
bubble to make the proper adjustment.
AC Electrical
Requirements
The scale requires a 117 VAC, 50/60 Hz power source, isolated from
electrical noise inducing equipment such as motor starters, fluorescent
lighting, etc. The scale is supplied with a UL standard 3-prong plug for AC
operation and must be connected to an outlet which provides a third wire
earth ground to insure proper operation and safety. The ground wire must
be connected to the building safety (earth) ground and neutral bus at the
main fuse box.
Connecting the scale to an
outlet without a safety ground,
bypassing the safety ground,
or in any other way disrupting
the safety earth ground, could
make the scale an electrical
shock hazard, or could affect
its operation.
Transmitting Serial
Data (Requires Serial
Option)
Print out of checkweighing transactions may be obtained by manual key
actuation or by automatic transmission when the scale is stable and a
positive net weight is present. Automatic transmission is selectable in the
scale configuration menu.
Model 3275 Checkweigher User’s Manual
5
Manual Transmission
Of Serial Data
Automatic Transmission
Of Serial Data
Data Transmitted
When the scale is stable and displays a positive net weight, press the PRINT
key to transmit data (weight display will flash).
The scale initiates an automatic transmission when the scale is stable, a
positive net weight is present and the scale has registered a minimum of 20
graduations of motion since the last print (weight display will flash).
The data transmitted when a print command is actuated is selected in the
scale configuration menu. The choices of data sent are:
1. Displayed weight or displayed weight with status identification (over,
accept, under)
2. Displayed weight with status identification and weight deviation from
target weight.
Operation with a
Computer
Up to 32 Model 3275 checkweighers can be connected through their respective RS-485 I/O ports to an IBM PC/AT®* or compatible computer which may
be used as a controller for the scale(s). The controller continuously polls the
connected scales and can handle 5 transactions per second.
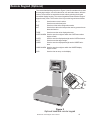
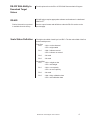
Figure 1
Front panel control keys and displays
* IBM Personal Computer ATâ is a registered trademark of International
Business Machines Corporation.
6
Model 3275 Checkweigher User’s Manual
Display Features
The display and control keys are located in a stainless steel housing on
top of a stainless steel column. See Figure 1. The housing can be tilted
20 degrees on its axis to allow the operator to select the best viewing
angle.
The Over/Under/Accept display consists of 45 segments, 19 Over (Yellow), 19 Under (Red), and 7 Accept (Green), plus the legend block for
each. In operation, only one segment and the legend illuminate for the
Accept range. If the weight on the scale is in the Over or Under range, an
increasing number of segments, radiating outward from the center,
“illuminate’’ in proportion to the amount the weight is over or under target
weight. The Over or Under legend also illuminates.
The Center-of-Zero illuminates when the scale is within ±¼
division of reference pushbutton zero.
The N illuminates to indicate that tare is in effect.
The Weight display consists of six 7-segment digits and accompanying
decimals. The appropriate unit of measure for the displayed weight is
illuminated to the right of the weight display.
3275 Control Keys
There are ten membrane type control keys on the face of the display
housing.
UNDER/OVER/ACCEPT
Used as selection keys during operation.
TEST
Initiates the display test sequence.
ZERO
Zeros the scale, and returns scale to
normal operation from any operator setup
function.
SETUP
Places the scale in the setup mode.
PRINT
Initiates the transmission of serial data to
a peripheral device.
UNITS
Used to select unit of measure for the
weight displayed.
TARE
Enters a pushbutton tare value, and used
to enter a numerical tare value.
GROSS
Displays gross weight when the scale is in
net mode.
Model 3275 Checkweigher User’s Manual
7
Scale Operation
Applying Power
to the Scale
The 3275 has no on/off switch as it is best to have power supplied continuously. Simply plug the cord from the indicator into the nearest AC source.
When power is initially applied the following sequence occurs: the entire
display will briefly light up; the scale model number will be displayed; the
software revision number will be displayed; the calibration and configuration
audit trail counters are displayed; the scale will cycle through a display test
and countdown from 999999 to 000000.
Entering or Changing a
Target Weight Using
Product
Entering a target weight using product will illuminate the center accept
segment when the target weight on the platform is equal to the target value
entered. The tolerance at which the over or under graphic display will illuminate is set at ± one increment. Each of the remaining nineteen graphic
segments within the over or under display will light consecutively, each
representing an additional increment beyond the target value.
1. Place the product on the scale.
Setting or Changing a
Target Weight by
Entering a Numerical
Value
8
2. Press the SETUP key. . .
The display shows “SEtuP”
3. Press SETUP key again. . .
The display shows “SAVEd” and the
scale returns to normal operation
with the ACCEPT annunciator
illuminated.
Setting a target weight by entering a numerical value will illuminate the center
accept segment when the target weight on the platform is equal to the target
value entered. The tolerance at which the over or under graphic display will
illuminate is set at ± one increment. Each of the remaining nineteen graphic
segments within the over or under display will light consecutively each
representing an additional increment beyond the target value.
1. Press the SETUP key. . .
The display shows “SEtuP”.
2. Press the ACCEPT key. . .
The ACCEPT annunciator flashes
and the display shows the current
target weight.
Model 3275 Checkweigher User’s Manual
3. To increase the target weight,
press OVER. To decrease the
target weight press UNDER.
(The target weight value begins
to change at a rate of 2
graduations per second, then
begins increasing speed. If the
key is released and pressed
again, the rate of change returns
to 2 graduations per second.)
4. With the desired target weight
displayed, press ACCEPT. . .
Entering or Changing a
Pushbutton Tare Value
Tare is not retained if power is
lost.
Entering or Changing a
Numerical Tare Value
The display shows “SAVEd” and
the scale returns to normal
operation.
The TARE key can be used to store the displayed weight into the tare
memory of the indicator.
1. Place container (or equal weight)
to be tared on the scale.
2. Press the TARE key.
The display shows zero weight,
and the NET and TARE annunciators illuminate.
A known numerical tare value can be programmed into the tare memory
of the indicator.
1. Press the SETUP key.
The display shows “SEtuP”.
2. Press the TARE key.
The TARE annunciator flashes
and the display shows the current
tare value.
3. To increase the tare value,
press OVER. To decrease the
tare value, press UNDER. The
tare value begins to change at a
rate of 2 graduations per second,
then begins increasing speed. If
the key is released and pressed
again, the rate of change returns
to 2 graduations per second.
Model 3275 Checkweigher User’s Manual
9
4. With the desired tare value
displayed, press the ACCEPT
key.
Entering or Changing an
Over Tolerance
You cannot enter negative
values for tolerances.
The display shows “SAVed”. The
tare, net and center of zero annunciators illuminate and the display
shows tare value and the scale is
ready for operation.
Entering an over tolerance value will determine when the first over segment
of the over graphic display region will light. Each of the remaining graphic
segments within the over display region will light consecutively representing
each additional increment beyond the target value.
To the right of the center accept segment are three additional green segments. These segments will now alternately light to represent equal thirds of
the weight value between the target weight and the entered over value.
1. Press the SETUP key.
The display shows “SEtuP”.
2. Press the OVER key.
The over annunciator flashes and
the display shows the existing over
tolerance value.
3. To increase over tolerance,
press OVER. To decrease over
tolerance, press UNDER. The
tolerance value begins to change
at a rate of two graduations per
second, then begins increasing
speed. If the key is released and
pressed again, the rate of
change returns to two
graduations per second.
4. With the desired over tolerance
value displayed, press
ACCEPT. . .
Entering or Changing
an Under Tolerance
The display shows “SAVEd” and the
scale returns to normal operation.
Entering an under tolerance value will determine when the first under
segment of the under graphic display region will light. Each of the remaining
graphic segments within the under display region will light consecutively
representing each additional increment below the target value.
To the left of the center accept segment are three additional green segments. These segments will now alternately light to represent equal thirds of
the weight value between the target weight and the entered under value.
10
1. Press the SETUP key.
The display shows “SEtuP”.
2. Press the UNDER key.
The under annunciator flashes and
the display shows the existing under
tolerance value.
Model 3275 Checkweigher User’s Manual
3. To increase under tolerance,
press OVER. To decrease under
tolerance, press UNDER. The
tolerance value begins to change
at a rate of two graduations per
second, then begins increasing
speed. If the key is released and
pressed again, the rate of change
returns to two graduations per
second.
4. With the desired under tolerance
value displayed, press
ACCEPT. . .
Reviewing an Entered
Tare, Over, Under or
Target Value
Reviewing an entered target value can be performed anytime the indicator is in the normal operating mode.
1. Press the SETUP key. . .
2. Press the TARE, OVER, UNDER
or ACCEPT key. . .
3. Press ACCEPT. . .
Clearing Over, Under,
Accept and Tare Values
The display shows “SAVEd” and
the scale returns to normal
operation.
The display shows “SEtuP”.
The weight display shows the
current value entered, and the
appropriate annunciator flashes.
The display shows “SAVEd” and
the scale returns to normal
operation.
Performing this routine will simultaneously clear all values entered.
1. Ensure the scale platform is
empty, with the CENTER OF
ZERO annunciator illuminated.
2. Press the SETUP key.
The display shows “SEtuP”.
3. Press the SETUP key again.
The display shows “CLEAr?.
4. Press the ACCEPT key.
All items are cleared and the
scale momentarily displays
“buSY” then “SAVEd” before
returning to normal operation.
Model 3275 Checkweigher User’s Manual
11
Viewing and/or
Resetting the
Transaction Counter
The 3275 has a transaction counter which records the number of weighments or transactions performed by your 3275. A transaction occurs only
when a target weight is active. Refer to the service manual for setting a
threshold level for the target weight. The threshold is adjustable from 0-50%
of target weight.
1. To view the transaction counter
value, press the SETUP key,
then the TEST key. . .
2. To retain the current transaction
counter value and return to
normal operation, press the
ZERO key. . .
3. To reset the transaction counter
to zero and return to normal
operation, press the ACCEPT
key. . .
12
Model 3275 Checkweigher User’s Manual
tc xxx is briefly displayed, then
CLEAr? is displayed. The tc stands
for transaction counter and x
represents the current value.
CLEAr? means the scale is asking
if you want to save the value or not.
You can retain this value and
continue with normal operation
(Step 2), or reset the value to zero
and return to normal operation (Step
3).
3275 returns to normal operation
mode.
the counter value is reset to zero
and the scale returns to normal
operation.
Remote Keypad (Optional)
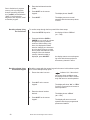
The remote handheld keypad (refer to Figure 2) has 20 membrane keys used
to enter target weight, over and under limits, over and under alarms, and tare
values. These values are transmitted to the scale by pointing the keypad
toward the display housing. The remote keypad has a transmission range of
approximately 5 feet. The function of the keys on the keypad are as follows:
0-9
Used to enter numeric values.
.
EXIT
Used to enter a decimal point.
Used to exit the scale configuration mode.
ALT
Used to have the scale interpret the next key pressed as an
alternate function.
Used to enter the value displayed as tare.
TARE
OVER ALARM Used to enter the weight at which the OVER annunciator
begins to flash.
OVER
Used to enter the displayed weight as the OVER tolerance.
ACPT
UNDR
Used to enter the target weight.
Used to enter the displayed weight as the UNDER tolerance.
UNDR ALARM Used to enter the weight at which the UNDER display
begins to flash.
CLR
Used to clear an entry on the display.
Figure 2
Optional handheld remote keypad
Model 3275 Checkweigher User’s Manual
13
Entering or Changing
Over, Under, Accept,
Tare or Over and Under
Alarm Values Using the
Optional Remote
Keypad
The remote keypad allows the operator to send values to the indicator representing tare, over, accept, under, over alarm and under alarm values.
Two new modes of operation are now selectable that are not available without
this keypad. They are the ability to enter over and under alarm values. When
an over or under alarm value is programmed, the value entered determines
when the OVER or UNDER graph will flash. The individual graphic display
segments for the over or under regions will each represent 1/20th of the
programmed alarm value or one display count whichever is greater.
1. Press SETUP on the Model
3275. (If the SETUP key has
been disabled in the
configuration of the scale, input
from the remote keypad must
begin within 5 seconds or the
Setup Mode is automatically
exited.) . . .
2. Point the remote keypad at the
Model 3275 display housing and
enter the numeric information to
be sent to the scale. . .
3. Press the key on the remote
keypad that defines the meaning
of the value entered. . .
The display shows “SEtuP”.
The display shows the numbers as
they are entered.
The scale flashes “SAVEd” to
acknowledge receipt and acceptance of the information, then
displays “SEtuP”.
4. Repeat steps 2 and 3 until all
data has been entered.
5. Press the EXIT key on the
remote keypad to return the
scale to normal operation.
Reviewing Entered
Values Using the
Remote Keypad
All weight values entered can be recalled for viewing.
1. Press SETUP on the Model
3275. . .
2. Point the remote keypad at the
scale display housing and press
the key on the remote keypad
corresponding to the setup value
to be recalled. . .
3. After all desired values have
been reviewed, press the EXIT
key on the remote keypad to
return the scale to normal
operation.
14
Model 3275 Checkweigher User’s Manual
The display shows “SEtuP”.
The display shows the recalled value
for three seconds.
Clearing Over, Under,
Accept, Tare, Over
Alarm and Under Alarm
Values Simultaneously
Using the Remote Keypad
Performing this routine will simultaneously clear all values entered.
1. Press SETUP on the Model
3275. (If the SETUP key has
been disabled in the
configuration of the scale, input
from the remote keypad must
begin within 5 seconds or the
Setup Mode is automatically
exited.) . . .
The display shows “SEtuP”.
2. Press ALT on the remote
keypad. . .
The display shows “ALt”.
3. Press CLR on the remote
keypad. . .
The display shows “SAVEd” and
then “SEtuP”.
4. Press the EXIT key on the
remote keypad to return the
scale to normal operation.
Model 3275 Checkweigher User’s Manual
15
Optional Communications
RS-232
RS-232 is programmable to communicate with a printer or a computer.
Output Format Without Target Values Entered
dddddddouuotttooooo (CR)
Output Format With Target Values Entered (Display Net)
dddddddouuotttosssso (CR)
Output Format With Target Values Entered (Display Deviation)
dddddddouuotttossssotttodddddddo (CR)
d = weight data with polarity and decimal point
o = space
u = unit of measure, (lb, oz, kg, gm)
t = weight type (Net = net weight, Spaces = gross weight, DEV = deviation)
s = check weigh status (Over, Undr, Acpt)
(CR) = carriage return
When “bi232” is selected from the RS232 setup parameter, a computer
command will result in an indicator response.
RS-232 BIDIRECTIONAL PROTOCOL
Computer
Command
Request
Scale
Transmission
W (CR)
Send Weight And
Scale Status Data
(LF)XXX.XLB(CR)
(LF)hh(STATUS)(ETX)
S(CR)
Send Scale Status
In Two ASCII Digits
(LF)hh(STATUS)(CR)
Z(CR)
Zeros Scale
All Else
Unknown
(CR) = ASCII carriage return
(LF) = ASCII line feed
16
Model 3275 Checkweigher User’s Manual
(LF)?(CR)
RS-232 With Ability to
Download Target
Values
For this option refer to the PC to 3275 RS-485 Communication Program.
RS-485
RS-485 option requires appropriate software and hardware in a dedicated
IBM PC/AT®.
Further information on protocol
is available from the factory.
Scale Status Definition
See the output formats and definitions under the RS-232 section on the
previous page.
The high order nibble of each byte is a HEX 3. The low order nibble of the first
and second bytes are:
First Byte
Bit 0
- High = motion detected
- Low = weight stable
Bit 1
- High = indicator zeroed
- Low = indicator not zeroed
Bit 2
- Not used
Bit 3
- Not used
Second Byte
Bit 0
- High = weight too low
- Low = valid weight
Bit 1
- High = over capacity
- Low = not over capacity
Bit 2
- Not used
Bit 3
- High = faulty calibration data
- Low = valid calibration data
Model 3275 Checkweigher User’s Manual
17
Software Options
The 3275 Checkweigher can be modified with optional software. If you do not
have any of these options installed on your 3275 you may disregard the last
portion of this manual.
If you have one of these software options, follow the directions for your
particular option. The optional programs available are:
• Multiple Setup
• Multiple Setup with Manual Recall
• Standard Deviation
• X-Bar R
• LB-OZ
• Percent
Each of these programs is explained on the following pages. Some of these
programs require additional hardware. Consult the instructions that come
with each program or the 3275 Service Manual.
Multiple Setup Program
This program can only be operated if the Multiple Setup Option is installed
and if you use the optional Remote Keypad.
The Multiple Set Up option allows you to enter and store six weight parameters in up to ninety-nine different memory channels. You may recall any
memory channel and its stored weight parameters by entering a two digit
channel number on the remote keypad thus adding supervisor security to
the settings.
This program will extend power up initialization time to approximately 60
seconds. During initialization, the display will be blank until it is finished.
Current parameter settings are automatically restored following a power loss
and subsequent power up.
The parameters that can be programmed and saved are
• Target Weight
• Tare Value
• Over Tolerance Value
• Under Tolerance Value
• Over Alarm Value
• Under Alarm Value
Operation
The Setup currently installed can be identified at any time by pressing TEST.
The channel number will be displayed temporarily as “SEt xx”. If no Setup is
in use, the display will show “SEt 0”.
If an invalid Setup channel number (1-99 are acceptable) is entered, the
scale will display "Error" momentarily then return to the last setup.
To save Setup values:
1. Set target weight, tare, and
tolerance values as explained on
pages 4-6 of this manual.
2. Press ALT and decimal (.) on
the remote keypad. . .
18
Model 3275 Checkweigher User’s Manual
The display shows “Alt.”.
3. Press the decimal (.) on the
remote keypad. . .
The display shows “SAV _ _”.
4. Enter desired channel number
(1-99).
5. Press ACPT on the remote
keypad. . .
6. Press ACPT. . .
The display shows “SurE?”.
The display shows “buSY” momentarily, then shows “SEtuP”.
7. Repeat the above steps to
program another Setup or press
EXIT on the remote keypad to
return to normal operation.
Recalling a Setup
1. Ensure the scale is at zero. . .
indicator is lit. If the scale is
not at zero when recalling a setup,
the display will show "ZEro" momentarily and return to normal operation.
2. Press ALT on the remote
keypad. . .
Due to limitations in program
memory, the only diagnostic
features remaining are ROM
test ("rotESt") and Initialization
("init"). If more extensive
diagnostics are required, install
a standard program.
Multiple Setup with
Manual Recall Program
Setup values you can enter with
the remote keypad are
•Target weight
•Over tolerance
•Under tolerance
•Tare
•Over tolerance alarm
•Under tolerance alarm
3. Enter the channel number
desired. . .
4. Press ACPT on the remote
keypad. . .
The display will show “Alt”, or “ZEro”
if scale is not zeroed, then returns to
normal operation.
The display shows “rEC xx”
(xx = 1-99)
The display will return to normal
operation with the pre-programmed
parameters installed.
The Multiple Setup with Manual Recall program is similar to the Multiple
Setup program. One difference is that you must enter your setup values with
the remote keypad (see the directions for this in the Remote Keypad section
of this manual). The other difference is that you can recall a setup through
the front panel and the remote keypad.
1. Enter your setup values with the
remote keypad.
2. Press ALT and decimal (.) on the
remote keypad. . .
The display shows “Alt.”.
3. Press the decimal (.) on the
remote keypad. . .
Model 3275 Checkweigher User’s Manual
The display shows “SAV _ _”.
19
Due to limitations in program
memory, the only diagnostic
features remaining are ROM
test ("rotESt") and Initialization
("init"). If more extensive
diagnostics are required, install
a standard program.
Recalling a Setup Using
the Front Panel
4. Enter desired channel number
(1-99).
5. Press ACPT on the remote
keypad. . .
6. Press ACPT. . .
The display shows “SurE?”.
The display returns to normal
operation with the new setup values
in effect.
To recall a setup through the front panel follow these steps:
1. Press the SETUP key twice. . .
the display will show "rEC xx”.
(xx = 1-99)
2. Press and hold the OVER or
UNDER keys to scroll up or down
through the memory channel
numbers. While holding a key
down, the displayed numbers
start out changing one increment
at a time but the longer you hold
the key down the faster the value
changes. When the desired
memory channel number is
displayed, press ACCEPT. . .
the display returns to normal operating mode with the setup values in
that memory channel in effect.
Recalling a Setup Using
the Remote Keypad
Recalling a setup with the remote keypad is the same in this software option
as it is in the Multiple Setup option.
1. Ensure the scale is at zero. . .
indicator is lit. If the scale is
not at zero when recalling a setup,
the display will show "ZEro" momentarily and return to normal operation.
2. Press ALT on the remote
keypad. . .
3. Enter the channel number
desired. . .
4. Press ACPT on the remote
keypad. . .
20
Model 3275 Checkweigher User’s Manual
The display will show “Alt”, or “ZEro”
if scale is not zeroed, then returns to
normal operation.
The display shows “rEC xx”
(xx = 1-99)
The display will return to normal
operation with the pre-programmed
parameters installed.
Standard Deviation
Program
The Standard Deviation statistics option allows the 3275 checkweigher to
operate as a standard checkweigher that provides a statistical summary of
your process. In addition, it allows the operator to select the number of
samples to be weighed, prints out each weighment, or stores the weight
data and prints out the statistical analysis after the last sample weighment.
This option allows you to automatically print each weighment and the
statistical analysis, or to store the weighments in memory and printout just
the statistical analysis without the weighments.
The printout of the statistical analysis contains the following information:
The following features are
unavailable with the Standard
Deviation option:
• Remote keypad operation
• Indicator diagnostics
• RS-485 operation
• 1155 printer interface.
Operation
Sample Printout:
Over tolerance
Under tolerance
Accept value
Number of weights over tolerance
Number of weights under tolerance
Number of weights within tolerance
Average weight
Highest weight
Lowest weight
Standard deviation
Coefficient of variance (percent)
Number of samples taken
1. Set target and tolerance values
as usual.
2. Press the SETUP key. . .
The display shows “SEtuP”
3. Press the TEST key. . .
The display shows “SS” for sample
size and the current sample size.
4. Press the OVER or UNDER
key. . .
5. Press ACCEPT key. . .
The sample size increases or
decreases to your desired sample
size. Sample sizes of 1 to 999 are
possible when the automatic statistical printout is desired.
The 3275 saves the set information.
6. Turn printer or computer ON.
7. Begin sample weighing. . .
Model 3275 Checkweigher User’s Manual
Automatic transmission of the above
statistical information will begin after
the selected sample size is reached.
21
To print sample weights
automatically and statistical
analysis on command:
1. Set target and tolerance values
as usual.
2. Press the SETUP key. . .
The display shows “SEtuP”
3. Press the TEST key. . .
The display shows “SS” for sample
size and the current sample size.
4. Set sample size to “0”.
5. Press ACCEPT key.
The 3275 saves the set information.
6. Turn printer or computer ON.
7. Begin sample weighing. . .
8. Press PRINT key when
statistical analysis is desired. . .
9. Press ACCEPT key to clear the
samples from memory. . .
Printer will print each weighment as
it is made.
Printer will print out the statistical
information and CLEAr? will be
displayed.
Scale is ready to repeat process.
OR
Press ZERO to save the
samples in memory. . .
22
Model 3275 Checkweigher User’s Manual
Scale is ready to add more samples
to memory.
The X-Bar R program is designed to weigh process samples and establish
the average weight, the range between high and low weights, and the trend
of deviation. This program has three operational modes: setup mode, X-Bar
R mode, and checkweighing mode.
X-Bar R Program
The following features are
unavailable with the X-Bar R
option:
• Remote keypad operation
• Indicator diagnostics
• RS-485 operation
• 1155 printer interface.
In setup mode you
• select a target weight,
• select a tolerance limit,
• select a sample size from 1-300
• select to print either A or B as follows:
A. - All sample weighments
- Tolerance limit
- Target weight
- Average weight
- Range
- Trend of deviation, if a trend occurs
B. - Tolerance limit
- Target weight
- Average weight
- Range
- Trend of deviation, if a trend occurs
In X-Bar R mode you
• weigh samples
• obtain A or B, listed above, when last sample is weighed.
In X-Bar R mode the scale
• stores up to eight average weight readings in a memory queue,
• compares each new average weight to this queue to determine the
weight trend,
• displays a trend message if a trend is detected, and
• deletes the oldest average from a full queue as new averages are
added.
In checkweighing mode you can
• compare sample weights with target weight and tolerance limit.
Setup
The first thing you need to do before weighing samples is to access the
setup mode and enter the weight parameters and sample size for your
sample run. The parameters you set are
• target weight
• tolerance limit
• sample size
• type of printout (A or B, shown above)
The following flowchart and instruction steps will guide you through the
process of setting these parameters.
Model 3275 Checkweigher User’s Manual
23
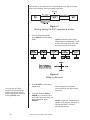
Upon power up, the scale will be in checkweighing mode. Figure 3 shows
how to move between the three modes of operation.
Figure 3
Moving among the 3275 operational modes
1. From Checkweighing Mode
press SETUP to access Setup
Mode. . .
tArGEt representing initial Setup
Mode parameter is displayed. Figure
4 shows the setup mode menu and
the parameters you need to set.
Figure 4
Setup mode menu
2. Press ACCEPT to view target
weight value. . .
You may also set Target
Weight from Checkweighing
Mode by placing the desired
target weight on the scale and
pressing SETUP twice.
24
3. Press and hold the OVER or
UNDER key to scroll the value
up or down. When the value you
want is displayed, press
ACCEPT. . .
Model 3275 Checkweigher User’s Manual
xxx is displayed. x's represent
current setting for the target weight
parameter.
tArGEt is displayed. Target weight is
saved in scale memory, the queue is
cleared and RESET QUEUE is
automatically printed.
4. Press OVER to advance to the
sample size parameter, then
press ACCEPT. . .
If you make no change to the
displayed parameter setting,
when you press ACCEPT,
RESET QUEUE will not be
printed.
5. Press OVER or UNDER to
scroll the value of the sample
size up or down. . .
6. Press ACCEPT to accept
displayed sample size. . .
7. Press OVER to advance to the
weight tolerance limit parameter,
then press ACCEPT. . .
8. Press OVER or UNDER to
change weight tolerance limit. . .
9. Press ACCEPT to accept
displayed limit value. . .
10. Press OVER to advance to print
option parameter, then press
ACCEPT. . .
SASiZE is displayed, then ss x is
displayed. x = number of weight
samples to be included in the weight
average.
Sample size, x, increases or decreases. Sample size must be
between 1-300.
SASiZE is displayed. Sample size is
configured into scale memory,
queue is cleared , and RESET
QUEUE is automatically printed.
Linit is displayed, then xxx is
displayed. x = maximum weight a
sample may be over or under the
target weight and still be acceptable.
The display uses n in place of the
letter m.
Limit value, x, increases or decreases.
Linit is displayed. Limit value is
configured into scale memory,
queue is cleared and RESET
QUEUE is printed.
Print is displayed, then ALL or AUG
is displayed.
Selecting ALL causes all these
fields to print following a sample run:
• weight of each sample
• average weight of samples (X-Bar)
• range (R) of weight deviation
• trend message, if a trend is detected
Selecting AUG, which means
average, causes the above fields to
print, minus the individual weights.
See Figure 5.
Model 3275 Checkweigher User’s Manual
25
11. Press OVER or UNDER to
toggle the options. . .
12. Press ACCEPT to accept the
displayed option. . .
13. Press OVER to advance to the
clear queue parameter, then
press ACCEPT. . .
Display toggles between ALL and
AUG.
Print displayed. Print option parameter is configured.
CLEAr? is displayed, then SurE? is
displayed, asking you if your are
sure you want to clear the present
queue now.
14. This parameter consists of two
choices: preserve the queue or
clear the queue.
A. Press any key but ACCEPT
if you want to preserve the
queue. . .
CLEAr? is displayed and queue
values remain intact.
OR
B. Press ACCEPT if you want
to clear the queue. . .
15. Press ZERO to exit Setup
Mode. . .
26
Model 3275 Checkweigher User’s Manual
CLEAr? is displayed, the queue is
cleared and RESET QUEUE is
automatically printed.
Scale weight is displayed. Annunciator display varies depending on
parameter values set. Scale is in
Checkweighing Mode.
Doing a Sample Run
in the X-Bar R Mode
Now that you have configured your desired parameters into the scale
memory you can weigh samples and obtain a printout of the X-Bar R statistical analysis by following these instructions.
1. From checkweighing mode,
press ACCEPT. . .
2. Place sample on scale. . .
One of two things occurs, A or B:
A. Weight of sample is displayed
and OVER, UNDER, or ACCEPT
illuminates
No weight within 10 divisions of
zero will be accepted as a
sample
OR
B. CLEAr? is displayed if scale was
not stable or zeroed when weight
was placed on the scale.
CLEAr? is also displayed if
weight on scale is within 10
divisions of zero.
The units key will only function
when all averages are cleared.
If a trend occurs, you must
press ACCEPT to continue or
ZERO to clear the trend
registers and return to checkweighing mode. This is done if
an adjustment is made to the
process being checked.
Pt 1 is displayed in X-Bar R mode
prompting you to put sample 1 on
the scale.
If B, remove weight and wait for
display to prompt to replace sample,
then place sample on scale.
3. Remove sample after weight is
displayed. . .
4. Repeat steps 1 - 3 until number
of sample weighments equals
configured sample size. When
you remove last sample. . .
Pt 2 is displayed.
Print is momentarily displayed,
printer outputs statistical analysis of
weights in sample run, and average
weight is added to the queue.
If a trend in the average weights in the queue occurs, a trend message
appears on the printout and on the digital display.
If the errors causing a trend are all in the same direction, the OVER or
UNDER annunciator illuminates indicating the direction of the trend.
If more than one trend occurs, only the highest priority trend message is
printed.
All possible trend messages appear in Table 1. If no trend occurs, the scale
displays Pt 1 and is ready for the next sample run.
5. Press ACCEPT if trend message
is displayed. . .
Model 3275 Checkweigher User’s Manual
Message is cleared, Pt 1 is displayed, and you can start new
sample run.
27
Message
Meaning
1 of 1
The last average in the queue has an error greater
than 3x the limit.
2 of 3
Two of the last three averages in the queue have
an
error greater than 2x the limit.
4 of 5
Four of the last five averages have an error
greater than the limit.
8 of 8
Eight of eight averages are on the same side of
the target weight.
Table 1
Displayed Trend Messages
Figure 5
Examples of Printed Output from a Sample Run
Checkweighing
With the X-Bar R software installed, this scale can also function as a basic
checkweigher.
1. Set target weight and weight
tolerance limit parameters as
instructed in the Setup section.
28
2. Access checkweighing mode. . .
If platform is empty, red UNDER
segments illuminate and 0000 is
displayed.
3. Place sample on scale. . .
OVER, UNDER or ACCEPT illuminates and weight of sample is
displayed.
4. Repeat step 3 for all samples. . .
Appropriate information is displayed.
No printout occurs in checkweighing
mode.
Model 3275 Checkweigher User’s Manual
LB-OZ Program
LB-OZ option may not be
available when combined with
other software. Check with
factory representative for
further information.
LB/OZ units are not legal for
trade in the USA.
This software program provides another unit of measure, LB-OZ. When this
software is installed, access this unit of measure by pressing the UNITS key
until the unit annunciator is blank. The display will now show weight in pound
and ounce units.
The table below shows the LB-OZ capacities and resolutions that correspond to the capacities in the calibration menu.
LB-OZ Capacities
and Resolutions
6 lb x .02 oz
10 lb x .05 oz
30 lb x .1 oz
60 lb x .5 oz
100 lb x 1 oz
200 lb x 1 oz
500 lb x 2 oz
Capacity listed in
Calibration Menu
6 lb
10 lb
30 lb
60 lb
100 lb
200 lb
500 lb
In the 10 lb capacity, if weight exceeds 9 lb 15.95 oz the display will roll over
to 0 lb 0.00 oz.
If the 3275 is in deviation display mode and weight is going in the negative
direction, the minus sign (-) will disappear when there is no more room on
the display. Even though the display may not show the minus sign, the
printout will show all correct weights and minus signs.
Model 3275 Checkweigher User’s Manual
29
Percent Program
Certain features are not
available for use with the
Percent Program software
installed.
• Tare is not available.
• Auto print is not available.
• Indicator diagnostics are
not available.
• Setup is only allowed in the
percent mode.
• Deviation display mode is
not available.
• Optional print format is not
available.
LB/OZ units are not legal for
trade in the USA.
Setting Manual / Auto Option
Setting the Specified
Percentage
The percent program software graphically shows you when a specified
percentage of weight has been added to an initial base weight on the 3275.
During operation the center ACCEPT segment lights when the target
percentage is reached. Target percentage is the base weight (100%) plus
the specified percentage.
EXAMPLE: If you have a product that weighs 50 pounds and you
wish to add 10% to it, the target percentage becomes 110% of the
base weight, or 55 pounds. The center ACCEPT segment illuminates when the percentage reaches 110% or the weight reaches 55
pounds. When the scale weight represents less than the target
percentage, segments illuminate to the left of the center segment.
When scale weight represents more than the target percentage,
segments will illuminate to the right of the center segment. At the
same time, the digital display shows you weight or percentage,
depending on the mode or units you have selected.
During setup procedures you will decide how the scale will accept a new
base weight—manually or automatically, set the specified percentage, and
set over/under tolerances. The instructions are presented as follows:
• Setting Manual/Auto Option
• Setting the Specified Percentage
• Setting the Over/Under Tolerance
• Operation in Manual Mode
• Operation in Automatic Mode
In this section, you select how the scale accepts a new base weight, manually or automatically. You make this selection through the configuration
menu. (Configuration procedures are documented in the 3275 Service
Manual.) In the configuration menu there is an option called Autoprint. Under
this menu option you can choose Autoon or AutooF. With the percent
program installed on your 3275, choose Autoon to enable the automatic
accept feature or choose AutooF to enable the manual accept feature.
The following instructions tell you how to set the specified percentage. This
is the percentage of weight you wish to add to the base weight. Select this
specified percentage while in the percent mode of operation.
1. Press UNITS until no unit is
highlighted. . .
3275 is now in the percent mode.
2. Press SETUP. . .
“SEtuP” is displayed.
3. Press ACCEPT. . .
The ACCEPT key flashes and the
last percentage entered appears in
the digital display.
4. Press OVER to increase the
percentage or UNDER to
decrease the percentage.
30
Model 3275 Checkweigher User’s Manual
5. Press ACCEPT when the
percentage you want is displayed.
Range of percentage available is
0 to 100%.. . .
“SAVEd” is momentarily displayed
then “0.0” is displayed.
Setting the Over/Under
Tolerance
In this section you select over/under tolerances which set a “window” of
acceptable weight around the specified percentage you selected earlier.
Example: If the specified percentage is 10% of base weight and the
under and over tolerances are both 1%, green ACCEPT segments
will be lit when the total scale weight is between 109.0% and
111.0% of the base weight. You can use the remote keypad to enter
these tolerances. (Refer to the 3275 User’s Manual for remote
keypad instructions.)
With no units highlighted on the display:
1. Press SETUP. . .
2. Press OVER to set the over
tolerance or UNDER to set the
under tolerance. . .
3. Press OVER to increase
tolerance or press UNDER to
decrease tolerance. . .
4. When desired tolerance is
displayed press ACCEPT. . .
“SEtuP” is displayed.
OVER or UNDER flashes, depending on which one you pressed, and
the last tolerance setting is displayed.
Tolerance increases or decreases
on digital display.
“SAVEd” is momentarily displayed,
then the scale returns to normal
operation.
5. Repeat steps 1-4 to set the other
tolerance.
Operation in Manual Mode
1. Place your base weight on the
scale.
2. Press ACCEPT. . .
Model 3275 Checkweigher User’s Manual
In percent mode “100.0” is displayed. If a unit is highlighted the
weight is displayed in that unit of
measure. The fan graph in both
cases shows under.
31
In manual and automatic mode
you can choose to view scale
weight as a percentage value
or simply as weight. Press the
UNITS key until the unit of
measure you want to use is
highlighted. If you want to view
the weight as a percentage,
press the UNITS key until no
unit is highlighted.
Operation in Automatic Mode
3. Add new material to the scale
until the fan graph center
ACCEPT segment is lit. At that
weight, the percentage you
preset has been added to your
base weight.
4. Repeat steps 1-3 for any new
object you need to process.
The object’s weight must
exceed 50 divisions in pounds
mode for the scale to accept
the weight.
In automatic mode you must empty the scale and add a new weight of more
than 50 divisions for the scale to accept the new weight. On a six-pound
scale with .002 lb divisions, 50 divisions is .1 pound. Your target percentage
now applies to the new base weight.
1. Place your base weight on the
scale.
2. Add more weight until the center
ACCEPT segment is lit.
3. Repeat steps 1 & 2 with a new
weight.
Setpoint Option
32
The object is automatically accepted
by the scale as the base weight. The
digital display shows “100.0”, for
100%, if in the percent mode. If a
unit of measure is highlighted the
weight of the object is displayed in
that unit of measure.
At that weight, the specified percentage has been added to your base
weight.
The base weight will not change
until the weight on the scale
drops to within 50 divisions of
zero and a new weight is added
which exceeds 50 divisions of
zero.
There is an optional RS-232 board and software package for the use of
setpoints for various functions. If your 3275 is equipped with this option see
the Service Manual for specific instructions on your setup or talk to your
local Weigh-Tronix representative.
Model 3275 Checkweigher User’s Manual
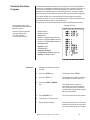
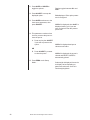
Plastic Knob Installation for USDA Approved Applications
Below are the instructions and illustration for installing the plastic knobs
which are necessary for USDA approved installations.
Install knobs by
• Removing the two 10-32 hexhead screws accompanying the unit.
• Replace with knobs.
• Use supplied Belleville washers between knob and mounting surface.
• Install the washer with the major diameter bearing against mounting
surface.
Figure 6
Plastic knob installation
Model 3275 Checkweigher User’s Manual
33
This page left intentionally blank.
34
Model 3275 Checkweigher User’s Manual
Declaration of Conformance to SMA Standard
Year of Declaration 2002
Production Meets Type
®*
We the manufacturer of
Model
Type
Certificate and Number
Issued by
3275
Electronic Indicator
NTEP CC 94-035
NCWM
Declare in our responsibility the conformance of the above listed models and types to the
mentioned certificates and the requirements of the SMA standard.
This declaration becomes valid when the SMA Conformance Logo, having our name or trademark
is applied to the device or its accompanying documentation.
* SMA PRODUCTION MEETS TYPE DEVICE MANUFACTURER Conformance Logo and Design are a registered
trademark of the Scale Manufacturers Association
Model 3275 Checkweigher User’s Manual
35
Avery Weigh-Tronix USA
1000 Armstrong Dr.
Fairmont, MN 56031 USA
Telephone: 507-238-4461
Facsimile: 507-238-4195
e-mail: [email protected]
www.wtxweb.com
Avery Weigh-Tronix UK
Foundry Lane
Smethwick, West Midlands
England B66 2LP
Tel: +44 870 90 34343
Fax: +44 121 224 8183
Email: [email protected]
Web site:www.averyweightronix.com
Avery Weigh-Tronix Canada, ULC
217 Brunswick Boulevard
Pointe Claire, QC H9R 4R7 Canada
Telephone: 514-695-0380
Toll free: 800-561-9461
Facsimile: 514-695-6820
www.weigh-tronix.ca
Weigh Bar® is a registered trademark of Weigh-Tronix Inc.