1
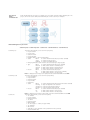
Spark
User Manual - Version 5.3
Spark - User Manual
Version 5.3
Page 1
Contents
4
Spark Overview
Navigation overview
Understanding the Spark main menu and front page
6
Spark Projects
Projects overview
Understanding the Projects menu
How do I create a new Project?
To create a new project:
How do I view project detail at a glance?
How do I edit a project?
How do I close a project?
How do I reopen a project?
12
Spark Proposals
Proposal Overview
Understanding the Proposal menu
How do I create a new Proposal?
How do I move a proposal to a new project?
How do I make a copy of an existing proposal?
18
Spark Jobs
Job sheet overview
Understanding the Job menu
How do I create a new Job?
How do I edit a job sheet?
How do I create comments against the job?
How do I create job change requests?
To view all job changes assigned to you and mark them as Done when completed?
Understanding the Job Usage Report
How do I enter Time and Materials against a job?
How do I edit time and materials incorrectly entered against a job?
How do I delete time and material from a job?
What is the Job sheet JCR?
Understanding the Job sheet JCR
How do I print a job sheet?
How do I reopen a job?
How do I delete a job?
29
Spark Purchase Orders
Spark Purchase Orders overview
Understanding the Purchasing menu
How do I create a new purchase order?
How do I edit a purchase order?
How do I delete a purchase order?
How do I receipt a purchase order into Spark?
34
Spark Invoicing
Spark Invoices overview
Understanding the Spark Invoice menu
How do I create a new Invoice?
How do I edit an Invoice?
How do I delete an Invoice?
Spark - User Manual
Version 5.3
Page 2
41
Spark Jobs Section
Spark Jobs overview
Understanding the Jobs menu
Understanding Jobs -> Time and Materials
43
Spark Workflow
Spark Work in Progress overview
Understanding the WIP menu
What are key timings and presets?
How do I create new key timing tasks?
How do I create new key timing presets?
How do I assign key milestones to a job?
47
Spark Databases
Database overview
Understanding the Products database
How do I add a product?
Understanding the Suppliers database
How do I add a supplier?
Understanding supplier contacts
How do I edit a key contact’s detail?
Understanding the Customers database
How do I add a customer?
Understanding customer notes
How do I add new notes against a customer?
Understanding customer contacts
How do I edit a key contact’s detail?
How do I add a pricing matrix for a customer?
Spark - User Manual
Version 5.3
Page 3
Spark Overview
Navigation overview
The main menu of Spark has nine menu options of which seven will be usable to users. Not all of these may be visible to you depending
on your security level.
When you have logged into Spark it will show you a list of current Proposals ,Jobs and Job changes assigned to you. Your main menu is
on the left hand side and your navigation buttons are on top. When selecting the Proposal or Job number in your assigned field it will
automatically take you to that selected Proposal or Job were you can work on it.
Understanding the Spark main menu
Menus On Left Of Screen
Home
Projects
Workflow
Where you will log into Spark. If your login is unsuccessful, contact your Site Administrator
Where projects, proposals, jobs, purchase orders and invoices can be managed
Where you can view the WIP report, jobs on hold, job changes and key timings for jobs
Jobs
For those people who do not have access to the Projects menu, you will have access to Jobs. Jobs is where you can
find jobs, view all time and materials and amend your time and material entries etc
A database for your suppliers, customers and products is located here
The finalisation of invoices and purchase orders is done here and then transferred across to your financial system
Spark end of month reporting is also located here.
Site Administrators will have access to the Administration menu allowing changes to customised fields, setting up
new users, setting preferences etc
Database
Financial
Administration
When a menu is selected, a sub-menu will appear below the main menu.
Spark will also create a project trail, visible in each screen. Use this trail to easily open the project, proposal, job, purchase order or invoice
you have been working on.
Spark - User Manual
Version 5.3
Page 4
Action Buttons At Top Of Screen
Time Entry
My Timesheet
Courier Entry
Where users load their time and/or materials against jobs
Where users can view and edit time entries loaded against jobs
Where users can load courier costs against jobs
Dashboard
New Project
User Preferences
Logout
Mangement information dashboards
New projects are started here
Users can set up their own user setting preferences here
Once you have finished with Spark, click Logout to end your session
Customer -> Project 1000 (Project Name) -> Proposal 1001 (Proposal Name) -> Job 2
Often after running a report or search, it may be beneficial to open a menu item in a new window or new tab to allow easy access back
to your report or search
To open a link in a new window or new tab:
• Two button mouse: right click on the link and select Open Link in New Window/Tab
• One button mouse: hold down the CTRL key, then click on the link and select Open in New Window/Tab
Optional E-mail
Spark has the option to send out a daily status email of Financial and Production information. This option can be found under
Administration->Dashboard and can be selected if needed.
Spark - User Manual
Version 5.3
Page 5
Spark Projects
Projects overview
Spark uses projects to conveniently store your customer related work for easy access. A project is a container that allows you to create
customer specific proposals, job sheets, purchase orders and invoices. A project consists of the following components:
Project Name
Customer
Project Manager
Deadline
Budget
Notes
Status
Type
Category
A descriptive title for the project, for example: Customer ABC 08-09
The name of the customer who has commissioned this project
Note: the customer must exist in the Customer database for their name to appear in this drop down list
The customer must also have a status of either Active, Prospect or Occasional
The name of the person responsible for delivering the completed order on time and to budget
Note: the project manager must exist in the staff matrix for their name to appear here
The delivery date of the project - for example the end of the financial year. This due date can be defaulted by your Site Administrator
Used for basic budget management, the project balance is calculated by taking the project budget and subtracting off all invoices, the balance is then displayed on screen under List Invoices
A large text area that allows you to write a project brief, or store project specific details
The status of the project (Active or Disabled). The default is Active
The type of project (External, Internal or Mixed). The default is External
Projects can be assigned categories. Your Site Administrator can set these categories
Projects can be used in the following ways:
One Project:
One Job
In this workflow the project acts as a simple container to store a single job, for example:
One Project:
Many
Related Jobs
In this workflow the project acts as a container to store a large project or campaign. The project can now be
used to build, track and bill each component of the project, for example:
Spark - User Manual
Version 5.3
Page 6
One Project:
Many
Unrelated Jobs
In this workflow the project acts as a container to store a single customer’s many unrelated jobs. The
project can now be used to build, track and bill all jobs for the customer, for example:
Understanding the Projects menu
Search Projects – Search Proposals – Search Jobs – Search Purchases – Search Invoices
Search Projects
Search Proposals
Search Jobs
This menu option allows you to search for a project by:
• Project number
• Project name
• Customer name
• Project manager
• Deadline date (I.e. the Project Due Date)
• Status
Blank
=> search criteria includes all project status’ (default)
Active
=> search for active projects
Disabled => search for disabled projects
• Category (limits the search criteria to the selected project category type)
• Type
Blank
=> search criteria includes all projects (default)
External => limits search criteria to external projects
Internal => limits search criteria to internal projects
Mixed
=> limits search criteria to mixed projects
• Closed
Blank
=> search criteria includes all projects
No
=> limits search criteria to open projects (default)
Yes
=> limits search criteria to closed projects
Note: To display a list of all projects in Spark, leave all search fields blank and click GO
This menu option allows you to search for a proposal by:
• Proposal number
• Proposal name
• Customer name
• Proposal date
• Created by
• Status
Blank
=> search criteria includes all proposal order status’ (default)
Pending => proposal supplied to the customer
Accepted => customer order has been placed
Declined => customer declined the proposal
• Closed
Blank
=> search criteria includes all projects (default)
No
=> limits search criteria to open projects
Yes
=> limits search criteria to closed projects
Note: To display a list of all proposals in Spark, leave all search fields blank and click GO
This menu option allows you to search for a job by:
• Job number
• Project number
• Internal reference
• Job name
• Customer name
• Order number
• Job sheet type (i.e. creative, design, media)
• Job manager
• Allocated to
• Start date (i.e. the start date of the job taken from the job sheet)
• Internal deadline date
Spark - User Manual
Version 5.3
Page 7
• • • • • Search Purchases
Search Invoices
External deadline date (i.e. the due date of the job taken from the job sheet)
Location (i.e. the physical location of the job within your workflow, for example design, production, prepress, printing, delivery)
Type
Blank
=> search criteria includes all job types (default)
External => limits the search criteria to external jobs
Internal => limits the search criteria to internal jobs
Closed
Blank
=> search criteria includes all jobs
No
=> limits the search criteria to open jobs (default)
Yes
=> limits the search criteria to closed jobs
Show job costs to date (i.e. displays the following dollar values for each job);
i. the total value of your proposal
ii. time/material expenses incurred to date
iii. purchase orders incurred to date
iv. the job balance to date [proposal - time, materials, purchases]
v. the total amount of all invoices raised to date
Note: To display a list of all jobs in Spark, leave all search fields blank and click GO
This menu option allows you to search for a purchase order by:
• Purchase order number
• Purchase order name
• Customer name
• Supplier name
• Ordered by
• Status
Blank
=> search criteria includes all purchase order status’ (default)
Pending => limits the search criteria to pending purchase orders
Accepted => limits the search criteria to accepted purchase orders
• Purchase type (i.e. print)
• Supplier invoiced received
Blank
=> search criteria includes all purchase orders (default)
No
=> limits the search criteria to exclude receipted purchase orders
Yes
=> limits the search criteria to include only receipted purchase orders
• Billed on invoice (i.e. the Spark invoice number the purchase order was billed on)
Note: To display a list of all purchase orders in Spark, leave all search fields blank and click GO
This menu option allows you to search for an invoice by:
• Invoice number
• Invoice name
• Customer name
• Date invoiced
• Invoiced by
• Description (i.e. uses a wildcard search to locate all invoices that contain the entered keywords)
• SubTotal
Note: To display a list of all invoices in Spark, leave all search fields blank and click GO
IMPORTANT:
Spark will only allow one customer per Project.
Customers with a status of Disabled will not be displayed in customer drop down lists.
TIP:
To revisit any of these search lists (without having to rerun them each time from the projects menu) open the required project, proposal, job, purchase order or invoice in a new window or new tab:
• Two button mouse: right click on the link then select Open Link in New Window/Tab
• One button mouse: hold down the Ctrl key, then click on the link and select Open Link in New Window/Tab
Spark - User Manual
Version 5.3
Page 8
How do I create a new Project?
To create a new project:
1.
2.
4.
Click on the action button New Project at the top of screen (the start new project window opens)
Complete the following details:
a. Project Name (enter a descriptive title for the project)
b. Customer (select the appropriate customer from the drop down list)
• Spark allows one customer per project, when selecting a customer the project inherits the customer’s specific properties
such as add or don’t add GST
• All contacts added to the customer record will be available
a. Project Manager (select the project/account manager from the drop down list)
b. Deadline (enter the project deadline)
c.
Budget (used for very basic budget management)
d. Notes (enter any notes you want to store against the project)
e. Status (select a status for the project)
Active
=>liveproject(default)
Disabled =>closedproject
f.
Type (the project type determines the type options for the job sheet and it’s time and materials)
External =>ThejobsheetwillbeExternal. Time & Materials can be either In house or Client (default)
Internal =>ThejobsheetwillbeInternal. Time & Materials will be In house
Mixed
=>ThejobsheetcanbeeitherInternal or External. Time & Materials can be either In house or Client
g. Category (the project category type)
When complete, click Create.
How do I view project detail at a glance?
To display a high level overview of the project:
1.
2.
Locate and open the project to be edited (from the menu select Projects -> Search Projects)
To view the list of:
a. Client proposals attached to the current project click on the section tab List Proposals
b. Client jobs attached to the current project click on the section tab List Jobs
c.
Invoices raised against the current project click on section tab List Invoices
• This window will display all invoices raised, the project budget (if entered) and the remaining balance
Spark - User Manual
Version 5.3
Page 9
d.
e.
Purchase orders raised against the current project click on the section tab List Purchases
• This window will list all purchase orders raised, their order status and cost
To create a project plan click on the section tab Project Plan
How do I edit a project?
To edit a project:
1.
2.
3.
Locate and open the project to be edited (from the menu select Projects -> Search Projects)
To edit the project, click the section tab Project Detail
Modify the project detail and click Update to save your changes
How do I close a project?
To close a project:
1.
2.
3.
4.
Locate and open the project to be closed (from the menu select Projects -> Search Projects)
Click the action button Close Project
Spark will prompt the following warning:
Warning: Closing this project WILL Close all jobs and proposals related to it.
Continue
To close the project, click on Continue
Note: Project management includes closing projects as they are completed. Ensure all proposals within the project have a status of
Accepted or Declined, and that all jobs are closed.
If proposals within the project have a status of Pending the project will not close. Spark will prompt the following warning:
Warning: Please update all Proposal status from Pending to Accepted/Declined.
Continue
When closing a project, be aware that all jobs and proposals associated with the project are closed automatically.
Spark - User Manual
Version 5.3
Page 10
How do I reopen a project?
To reopen a project:
1.
Contact your Site Administrator, with the project and job numbers required to be reopened
Site Administrators:
1.
2.
3.
4.
5.
6.
From the Administration menu select Reopen
Select Projects from the Re-open drop down list
Select Number from the Search drop down list
Enter the project no. in the That Contains field
Click Go
Locate the project from the Closed Projects list, then click on the project’s Reopen button (this will reopen the project)
Note: To reopen an associated proposal, select Proposal from the Re-open drop down list, locate each proposal from the Closed Proposal
list and click on each proposal’s Reopen button.
To reopen an associated job, select Jobs from the Re-open drop down list, locate each job from the Closed Jobs list and click on each
job’s Reopen button.
Spark - User Manual
Version 5.3
Page 11
Spark Proposals
Proposal Overview
Proposals in Spark are the same as a “Quote or Estimate” in a traditional workflow. Proposals live inside projects and inherit the client
details from the project they belong to.
The Proposal windows inside Spark allow a comprehensive proposal to be built up and presented to the customer (based on your
company’s look and feel) as a PDF document.
Understanding the Proposal menu
List Proposals – Proposal Detail – Time – Fees- Materials – Print Options – Analysis
New Proposal - Generate PDF - Close Proposal
List Proposals
Proposal Detail
Time
Fees
Materials
Print Options
Analysis
New Proposal
Generate PDF
Close Proposal
This section tab displays a list of all proposals attached to the current project
This section tab allows you to create the introduction for the current proposal (or quote) for example: “Thank you for the opportunity to quote for the supply of your brochures”
This section tab allows you to add internal labour based time charges to your proposal (or quote), for example: 2hrs of Design at $150/Hr = $300.00
This section tab allows you to add fees to your proposal (or quote). (Fees are used when Time is not sold
by units of time but as a fee, for example: project management or in-house consultant fee $250.00)
This section tab allows you to add material charges to your proposal (or quote), for example: 1 CD burn
at $15ea = $15.00 or 10 A4 Colour Lasers at $5/sheet = $50.00
This section tab allows you to add any printing options to your proposal (or quote), for example: 1000 x A4 colour posters = $1000.00 or 1500 x A4 colour posters = $1500.00
This section tab allows you to view the retained income from the current proposal, for example: Total cost = $323.50; Total income = $947.50; Retained income = $624.00
This action button allows you to create a new proposal
This action button allows you to create, print and save a copy of the proposal (or quote), the proposal is created as a PDF document
This action button allows you to close the current proposal
IMPORTANT:
You can create an unlimited number of proposals within a project.
A proposal inherits the client details from the project it is attached to. In order to access client contacts – each contact must be created
and saved within the customer database.
TIP:
All menus in Spark are designed to step left to right through your workflow, for example:
When building a proposal the start point is the Proposal Detail menu and the end point is the Generate PDF.
Spark - User Manual
Version 5.3
Page 12
How do I create a new Proposal?
To create a new proposal:
1.
2.
3.
4.
Locate and open the project the proposal is to belong to (from the menu select Projects -> Search Projects)
Click on the action button New Proposal
Complete the following details:
a. Proposal Name (enter a descriptive title for the proposal)
b. Created By (select the person responsible for creating the proposal from the drop down list - Spark will auto-complete any
preset details for you. All presets can be over-typed if required)
c.
Created For (select the customer representative you are creating the proposal for from the drop down list)
d. Proposal Date (the proposal creation date, Spark will default this field with the current date)
e. Proposal Intro (type a short introduction to describe to your customer the reason for this proposal - if you use a standard
cover letter this can be entered as a preset by your Site Administrator)
f.
Proposal Signoff (type closing comments and regards – if you use a standard closing style this can be entered as a preset by
your Site Administrator)
g. PDF Style (select the proposal style and layout from the drop down list)
h. Detailed (Yes=printanitemisedproposal;No=printasummarywithtotal)
i.
Show Letterhead (Yes=printletterheadfromSpark;No=printtopre-printedstock)
j.
Currency (select the appropriate currency from the drop down list)
k. Status (select the status for the proposal)
Pending =>theproposalhasbeenpresentedtothecustomerandadecisionispending(default)
Accepted =>theproposalhasbeenacceptedbythecustomerandthejobistogoahead
Declined =>theproposalhasbeendeclinedbythecustomer
When complete, click Create to save the proposal (the proposal menu opens)
Spark - User Manual
Version 5.3
Page 13
5.
To cost internal labour charges, click on the section tab Time from the proposal menu (use this window to calculate internal hourbasedchargesforthejob,forexample:2hrofDesign=$300.00)
a.
b.
c.
d.
6.
Enter the number of hours in the Quantity field
• When the Spark system preference is set to Staff, the Staff Member and Rate fields are displayed
• When the Spark system preference is set to Product or Product/Staff, the Staff Member and Rate fields are hidden
Select the appropriate Staff Member who you think is best to do the work (optional, please consult you system administrator
to determine how Spark is calculating the time cost)
• When the Spark system preference is set to Staff, Spark will calculate the time cost based on each individual’s bill out rate
Select an appropriate Rate from the rate drop down list (Spark will calculate the time cost based on the individual’s Standard,
Meeting or Custom rates)
If the sub-total for the line is not satisfactory, enter the desired price in the Price Override field
To cost service charges, click on the section tab Fees from the proposal menu (use this window to calculate all fee based charges
forthejob,forexample:1xIn-houseConsultantfee=$250.00)
a.
b.
c.
d.
e.
Click the action button New Fee
Enter a descriptive name for the fee in the Title field (the default title is Untitled Fee)
Type a short overview detailing what the fee covers in the description field
Enter the internal cost of the fee in the Cost field (where known)
Enter the bill out rate for the fee in the Fee field
Note: To delete a fee entry click Remove. To change the order of the fees, edit the Date of the fee
Spark - User Manual
Version 5.3
Page 14
7.
To cost consumables, click the section tab Materials from the proposal menu (use this window to calculate all internal consumables
forthejob,forexample:1xCDBurn=$15.00)
a.
b.
c.
d.
Select the consumable to be added to the proposal from the Product drop down list - the window refreshes and the default
details and pricing structure for the product are displayed
Enter the amount of product you expect to use (in numbers) in the Quantity field
If the sub-total for each line is not satisfactory, enter the desired price in the Unit Override field
To remove materials, select the blank consumable from the Product drop down list
Note: You can add an unlimited number of products (consumables) to your proposal.
Always use the materials section to build proposals that contain multiple print elements as this will allow you to itemise each cost on the
customer proposal.
8.
To cost printing, click on the section tab Print Options from the proposal menu (use this section tab to calculate the cost of each
printoption,forexample1000A4Posters=$1000.00;1500A4Posters=$1500.00)
a.
b.
c.
d.
Enter a descriptive title into the Description field i.e. A4 Posters x 1000
• To enter a detailed print description use the Print Description text box located at the bottom of the printing area
Enter the cost of the print option in the Cost field
Enter the markup as a percentage into the % field
If the sub-total for each line is not satisfactory, enter the desired price in the Price Override field
Spark - User Manual
Version 5.3
Page 15
Note: The Print Options section tab is used to display multiple printing options for the same item, for example:
A4 Posters x 1000
OR
A4 Posters x 1500
Use the Materials section tab to itemise printing costs or itemise multiple print jobs, for example:
Plates for A4 Posters $100.00
Outputting A4 Posters $100.00
AND
A4 Posters x 1000 $1000.00
Business Cards x 1000 $1000.00
9.
To analyse the proposal, click the section tab Analysis from the proposal menu
The analysis section tab displays a breakdown of the proposal’s costs and income structure, retained income and profit/loss percentage.
The ideal use of this window is to ensure that the correct income is retained from this job.
10. To generate the proposal as a PDF, click the action button Generate PDF .
Note: Generating the proposal does not print the proposal, it provides a file that can be printed, faxed, saved or emailed
If some information does not show on the proposal PDF, this does not mean that it has been lost. During the installation process the
PDF template has been designed to use the information specified by your Site Administrator, if a change is required to any of your PDF
templates, please discuss it with your Site Administrator.
TIP:
When starting a new proposal, complete the Proposal Detail window then generate the proposal PDF (this allows you to view
the layout and format of your proposal as you progress through the costing).
To update your Proposal with the latest price information, go to the PDF and click on refresh.
Spark - User Manual
Version 5.3
Page 16
How do I move a proposal to a new project?
1.
2.
3.
Locate and open the proposal to be moved (from the menu select Projects -> Search Proposals)
Click on the section tab Proposal Detail
Select the project the proposal is to be moved to from the Move proposal and related files to project drop down list and click
Move (the proposal and all related files will be transferred)
How do I make a copy of an existing proposal?
To make a copy of an existing proposal:
1.
2.
3.
4.
5.
6.
Locate and open the project you want the proposal assigned to (from the menu select Projects -> Search Projects)
Click the action button New Proposal
Enter the proposal number to be copied into the Copy Proposal Data From field
Click Copy
Click Update (the new proposal is created and all data has now been copied)
To view the proposal, click the section tab List Proposals
To close a proposal:
1.
2.
3.
4.
Locate and open the proposal to be closed (from the main menu select Projects -> Search proposals)
Click the action button Close Proposal
Spark will prompt the following warning:
Warning: Close this Proposal?
Continue with close
To close the Proposal, click Continue with close
Note: Close a Proposal when the job and associated invoicing and purchasing have been completed.
Spark - User Manual
Version 5.3
Page 17
Spark Jobs
Job sheet overview
Job sheets in Spark are the same as a “Job Bag” in a traditional workflow. Job sheets live inside proposals and inherit the customer
details from the project they belong to. Note: There is a one to one relationship between a proposal and job sheet.
Understanding the Job menu
Job Detail – Time and Materials – Key Timings – Job Log - Job Changes – Job Usage Report - JCR – Attachments
Gantt Chart - Generate PDF - Close Job
Time Entry - My Timesheet - Courier Entry
Job Search
Job Detail
Time and Materials
Key Timings
Job Log
Job Changes
Job Usage Report
JCR
Attachments
Gantt Chart
Generate PDF
Close Job
Time Entry
My Timesheet
Courier Entry
This menu option (from the projects menu -> Search Jobs) allows you to search for a job by:
• Job number
• Project number
• Internal reference
• Job name
• Customer name
• Order number
• Job sheet type (i.e. creative, design, media)
• Job manager
• Allocated to
• Start date (i.e. the start date of the job taken from the job sheet)
• Internal deadline date
• External deadline date
• Location (i.e. the physical location of the job within your workflow (i.e. Design, First Proof etc)
• Type Blank
=> search criteria includes All jobs (default)
External => limits search criteria to external jobs
Internal => limits search criteria to internal jobs
• Closed
Blank
=> search criteria includes all jobs
No
=> limits search criteria to open jobs (default)
Yes
=> limits search criteria to closed jobs
• Show job costs to date
Note: To display a list of all jobs in Spark, leave all search fields blank and click GO
To display job costs to date, tick Show Jobs Costs to date
This section tab allows you to edit the job sheet
This section tab allows you to view all time and material components added to the current job
Users can also edit their time and material entries here.
Note: You cannot add time and materials through this window
This section tab allows you to apply key milestones and project plans to the current job
Note: Key timings can be displayed as a Gantt chart
This section tab allows you to enter informative notes about the job
This section tab allows you to create job change requests for the current job
This section tab allows you view the allocated time and materials budget for the current job
This section tab allows you to view the projected job gross profit to date for the current job
This section tab allows you to attach files to the current job
This action button allows you to display a gantt chart of your key timings.
This action button allows you to create, print and save a copy of the job sheet. The job sheet is created as a PDF document
This action button allows you to close the current job
This action button allows you to enter all time and/or materials against a job
This action button allows you to review your timesheet and edit your time for open jobs
This action button allows you to enter courier costs against a job
Note: You must have Couriers access to view this
IMPORTANT:
Spark will only allow one job per proposal.
Be very careful when creating a new job, once you have selected the Job Sheet type and clicked Create you cannot undo your actions or
change the job sheet type.
A job inherits the client details from the project it is attached to, in order to access client contacts – each contact must be created and
saved within the customer database.
TIP:
All menus in Spark are designed to step left to right through your workflow, for example:
When building a job the start point is Time and Materials and the end point is Generate PDF.
Spark - User Manual
Version 5.3
Page 18
How do I create a new Job?
To create a new job:
1.
2.
3.
Locate and open the appropriate proposal (from the main menu select Projects -> Search Proposals)
From the proposal, click the navigation button To Jobsheet
Select the job sheet style from the Job Sheet drop down list, then click Create (a new job is created)
Note: Be very careful when creating a new job, once you have selected the Job Sheet type and clicked Create you cannot undo your
actions or change the job sheet type. Job Sheet types are set by your Site Administrator.
Spark - User Manual
Version 5.3
Page 19
•
•
•
•
•
4.
The Created For contact of the proposal will default as the Created For job contact
The Intro of the proposal will default as the Brief for the job
All dates will default to the current day
The Priority of the job will default to 3 (Normal)
If your jobsheet has custom fields, these will be shown below Job Sheet Type
Complete all fields in the job sheet then click Update to save your changes
How do I edit a job sheet?
To edit a job sheet:
1.
2.
3.
Locate and open the job sheet to be edited (from the main menu select Projects -> Search Jobs)
Select the section tab Job Detail
Modify the job sheet and click Update to save your changes
How do I create comments against the job?
Spark - User Manual
Version 5.3
Page 20
To create a new job comment:
1.
2.
3.
4.
5.
Locate and open the job that requires a comment (from the main menu select Projects -> Search Jobs)
Select the section tab Job Log
Select your name from the Staff Member drop down list
Enter the comment in the Comment field
Click Create to save the job comment
To edit a job comment:
1.
2.
3.
From the job menu click the section tab Job Log
Click on the Date of the comment that requires editing
Modify the comment and click Update to save your changes
How do I create job change requests?
To create a new job change request:
1.
2.
3.
4.
5.
6.
7.
Locate and open the job that requires a change request (from the main menu select Projects -> Search Jobs)
Select the section tab Job Changes
Enter a descriptive title for the change request in the Title field
Enter the Due date and time
Select the person responsible for implementing the job changes from the Assigned To drop down list
Enter the change request details in the Brief field
Click Create to save the job change request
Understanding the Job Usage Report
The job usage report displays the proposed budget versus actual work completed, it allows you to view how much of the proposed
budget is remaining. Time (Labour) is displayed first, then consumables (Materials). Items appearing in red have exceeded the budget set
in the proposal or were not included on the proposal at all.
Spark - User Manual
Version 5.3
Page 21
How do I view job change requests assigned to me?
Open Workflow and the first option WIP overview will show. This consists of multiple columns containing jobs assigned to you and the
rest of your collegues showing the job number, due date and location.
To view all job changes assigned to you and mark them as Done when completed:
1.
2.
3.
4.
5.
From the Workflow menu select Job Changes
Select your name from the Assigned to drop down list
Select the desired status from the Status drop down list
Click GO
Update the Status from To Do to Done from the drop down list only when the job change request is completed.
Note: You can also change the job change request status from To Do to Done (from the main menu select Projects -> Search Jobs ->
enter the job no. -> click GO -> select the section tab Job Changes)
Spark - User Manual
Version 5.3
Page 22
How do I enter Time and Materials against a job?
1.
From the Spark top menus click on the action button Time Entry, use the Timesheet Entry Window to enter all time and/or
materials against a job
a. Select the job you want to add time and/or materials to from the Job drop down list (only open jobs are displayed in the drop
down list
b. Check that the correct Date is displayed
• Spark defaults to the current date. If you need to enter time and/or materials against multiple jobs for another date,
enter the correct date and click Change date - this will force the date field to default to the desired date
c.
The Project Type will determine what options are available in the Correction drop down list
External =>ThejobsheetwillbeExternal. Time & Materials can be either In house or Client
Internal =>ThejobsheetwillbeInternal. Time & Materials will be In house
Mixed
=>ThejobsheetcanbeeitherInternal or External. Time & Materials can be either In house or Client
• To book client changes as chargeable time and/or materials, select Client from the Correction field
• To book time and/or materials that cannot be charged to the client, select In House from the Correction field, this will
allow all time and materials that have been written off to be displayed correctly on the invoice JCR
To book time only to a job:
d.
Follow steps A -> C above, then enter the start and end time in the Start Time and End Time fields and select the labour
product from the Productdropdownlistthatbestdescribestheworkundertaken,(forexample;design,creative,illustration)
then click Add
To book materials only to a job:
e.
Follow steps A -> C above, then enter the number of units used in Units field and select the material used from the
Materials drop down list then click Add
To book time and materials to a job:
f.
Follow steps A -> C above, then enter the start and end time in the Start Time and End Time fields, select the labour
product from the Product drop down list that best describes the work undertaken AND enter the number of units used in
Units field and select the material used from the Materials drop down list, then click Add
Note: Spark allows detailed comments to be entered about any part of a job, for example “extra time was added to the design
component due to a corruption in the customer supplied file”. To use this feature enter all notes in the Comments field when adding
time and/or materials then click Add.
IMPORTANT:
The top of the Timesheet Entry Window will advise if the time and/or materials were added successfully to the job.
Each entry involving time will add to your Day Used amount. If your daily hours is incorrect, for example 7 hrs instead of 8.30 hrs, please
contact your Site Administrator.
Note: Your Day Used amount will only show the time added for the current day.
TIP:
Use the comments field to enter details that will help decide what costs can billed to the client, for example: “Additional time
spent cleaning up client images”
Spark - User Manual
Version 5.3
Page 23
How do I edit time and materials incorrectly entered against a job?
To edit a job’s time and materials:
3.
Locate and open the job to be edited (from the main menu select Projects -> Search Jobs)
Click on the section tab Time and Materials - the time and materials window tab displays all time and materials plus any notes
that have been added against the current job (by all users)
Click on the product name to be edited (the timesheet entry is now available for editing)
4.
Modify the entry then click Update to save your changes
1.
2.
Note: You can only use the Time and Materials section tab to edit time or materials incorrectly entered, you cannot use this window to
add additional time or materials.
How do I delete time and materials from a job?
To delete time and materials from a job:
1.
2.
3.
Locate the job no. to be edited (from the main menu select Projects -> Search Jobs)
Click on the section tab Time and Materials - the time and materials window displays all time and materials plus any notes that
have been entered against the current job (by all users)
Click on the product name to be deleted (the product is now available for editing)
Spark - User Manual
Version 5.3
Page 24
OR
4.
Zero the time and/or quantity, this will force the time and/or materials cost calculation, then click Update to save your changes
Note: Spark does not allow you to delete an incorrectly added product, to delete a product edit the quantity to zero.
To zero time, make sure the Start Time and End Time are the same.
Individual users can also edit and delete their Time entries only (not Material entries) via the action button My Timesheet.
To edit or delete your individual job’s time entires:
1.
2.
3.
4.
Select the action button My Timesheet
Enter the Job No. that is to be edited in the Job No. field (the time entries are now available for editing)
Click on the time product name to be edited or deleted (the product is now available for editing or deleting)
Modify the entry then click Update to save your changes
Spark - User Manual
Version 5.3
Page 25
What is the Job sheet JCR?
The Job Cost Report (JCR) is used to gain an understanding of the job and its current state. The JCR details each invoice raised, all time
and materials used and the cost of any fees or purchase orders. At the bottom of the JCR, Spark calculates the projected job to date
gross profit.
Understanding the Job sheet JCR
In the above example:
The left side shows all current invoices (Total $0.00), Time/Materials used (Total Price: $315.00, Total Cost: $151.00), Purchase Orders
($0.00), Fees Cost (inv) ($0.00) and the Gross Profit ($-151.00). The right side shows the proposal (or quote) versus actual work
completed. This allows you to compare the prices proposed to the customer and how much of that budget you have used.
Note: Work done is calculated based on the charge out price.
Spark - User Manual
Version 5.3
Page 26
How do I print a job sheet?
To print a job sheet:
1.
2.
Locate the job sheet to be edited (from the main menu select Projects -> Search Jobs)
Click on the action button Generate PDF to create an electronic copy of the job sheet in a PDF document
Note: Generating the job sheet does not print the job sheet, it provides a file that can be printed, faxed, saved or emailed.
If some information does not show on the job sheet PDF, this does not mean that it has been lost. During the installation process the
PDF template has been designed to use the information specified by your Site Administrator, if a change is required to any of your PDF
templates, please discuss it with your Site Administrator.
How do I close a job?
To close a job:
1.
2.
3.
4.
Locate and open the job to be closed (from the main menu select Projects -> Search Jobs)
Click the action button Close Job
Spark will prompt one of the following warnings:
Warning: Close this Job and related Proposal?
Continue with close
To close the job, click Continue with close
Spark - User Manual
Version 5.3
Page 27
Note: Close a job when the job and associated invoicing and purchasing have been completed.
How do I delete a job?
To prevent time and materials being entered against a job, close the job. If you have made an error in creating the job (i.e the client never
approved the job and there are no timesheet entries, invoices or purchase orders against it, contact your Site Administrator to delete the
job.
Site Administrators:
1.
2.
3.
4.
5.
6.
From the Administration menu select Delete
Select Jobs from the Delete drop down list
Select Number from the Search drop down list
Enter the job no. in the That Contains field
Click Go
Locate the job from the Deleted Jobs list, then click on the job’s Delete button (this will delete the job)
Spark - User Manual
Version 5.3
Page 28
Spark Purchase Orders
Spark Purchase Orders overview
Creating and managing purchase requests and order’s is essential to manage your externals. It is important to note that using purchasing
simplifies invoicing, as all costs can be seen on the JCR (Job Cost Report).
Spark purchasing is in two parts:
Purchase Requests
Purchase requests are typically used to obtain quotes for work from multiple suppliers, for example to
fax/email a quote request to up to 5 print companies to obtain pricing to do your work
Purchase Orders
Once you have received quotes from each supplier, you can then select the supplier that best suits the
work and issue a purchase order to buy the goods or services – the costs of all purchase orders are then
attached to the proposal and job for easy viewing
Understanding the Purchasing menu
List Purchases – Purchase Detail – Purchase Items – Quote Requests – Purchase Order – Receipt Order
Delete Purchase - New Purchase - Generate PDF
List Purchases
Purchase Detail
Purchase Items
Quote Requests
Purchase Order
Receipt Order
Delete Purchase
New Purchase
Generate PDF
This section tab lists all purchase orders against the current job
This section tab allows you to create the cover letter/description that will be added to the purchase
order
This section tab allows you to select the goods and/or services to be purchased
This section tab allows you to create and send a quote request for pricing to up to 5 different suppliers
This section tab allows you to create and issue the purchase order
This section tab allows you to acknowledge delivery of the purchased goods or services, then receipt in
the supplier invoice ready for transfer to your accounting package
This action button allows you to delete a purchase order providing the supplier field is blank in the
purchase order section tab.
This action button allows you to create a new purchase order
This action button allows you to create, print and save a copy of the purchase order, the purchase order
is created as a PDF document
TIP:
All menus in Spark are designed to step left to right through your workflow, for example:
When building a purchase order the start point is the Purchase Detail menu and the end point is the Receipt Order menu.
How do I create a new purchase order?
To create a purchase order:
1.
2.
3.
Locate and open the job that requires a purchase order (from the main menu select Projects -> Search Jobs)
Click on the navigation button To Purchasing (the create new purchase order window opens)
To create a new purchase quote request or order, click the action button New Purchase (the Purchase Detail window will open
- create the introduction to the purchase order here)
Spark - User Manual
Version 5.3
Page 29
To use the Purchase Detail section tab:
a.
b.
c.
d.
e.
4.
Enter a descriptive title for the purchase order in the Purchase Title field (i.e. Point of Sale stand)
Select the Purchase Typefromthedropdownlist,(i.e.GeneralOrder;Scanning,Printing-thesemenuoptionscanbesetby
your Site Administrator and can preset text into the Description field)
Enter specific instructions regarding the purchase request or order into the Description field
Select the person responsible for creating this purchase order from the Ordered By drop down list
Click Create to save your changes (this will take you to the Purchase Items window)
To add goods and/or services to be purchased, click on the section tab Purchase Items
The purchase items window is divided into two parts:
a.
b.
c.
• The left panes show materials and print that was proposed to complete the job
• The right pane shows the items that will be added to the purchase order
To purchase any item as per the original proposal, click on Proposed Materials and/or the Proposed Print move button
(
), this will transfer the proposal’s materials and/or print elements to the current urchase order
To add additional items to the purchase, select the item from the Product drop down list (this will add a new line item to the
current purchase), then complete the Description, Quantity, Cost (if known) and any comments in the Comments field
To remove items from the current purchase, select the blank field at the top of the Product drop down list (this will remove
the line item from the purchase)
Note: The move button overwrites all manual changes made to the purchase order. Spark removes each item’s move button as it is
ordered to prevent double ordering. Only the selected Print Option will be shown.
Spark - User Manual
Version 5.3
Page 30
To delete an item from the purchase order:
a.
5.
From the Product drop down list select the blank at the top of the product list (this will delete the row from the purchase
order)
To request a quote from up to 5 suppliers, select (
) from the Quote Requests section tab
To use the Quote Requests section tab:
a.
b.
c.
Select the date you require the quote price by from the Request Due field
Select the suppliers you want to be quoted by, from the blank drop down fields (suppliers list)
) next to the supplier’s name for an individual pricing request PDF
Click (
Note: Use the Quote Requests section tab to send pricing requests to suppliers for goods and/or services. Generating the request PDF
does not actually print the document, it provides you with a file that can be printed, faxed, saved or emailed. If some information does
not show on the PDF, this does not mean that it has been lost - during the installation process the PDF template has been designed to
use the information specified by your Site Administrator, if a change is required to any of your PDF templates, please discuss it with your
Site Administrator.
When you issue a price request (Quote Requests section tab), Spark will update the Status of the purchase order to Request Issued.
Spark - User Manual
Version 5.3
Page 31
6.
To issue the purchase order, select the section tab Purchase Order
To use the Purchase Order section tab:
a.
b.
c.
d.
e.
f.
Select the date you require the order to be delivered by in the Order Due field
Select the winning supplier from the Supplier drop down list
Enter the supplier quote number in the Supplier Quote No: field
Select the order Status
Pending =>Thesupplierhasreceivedthepurchaseorderbuthasnotconfirmedfulfillmentanddelivery
Accepted =>Thesupplierhasreceivedthepurchaseorderandconfirmedfulfillmentanddelivery
Click Update to save your changes
Click on the action button Generate PDF to create an electronic copy of the purchase order
Note: Use the Purchase Order section tab to issue a purchase order to suppliers for goods or services. Generate PDF does not actually
print the document, it provides you with a file that can be printed, faxed, saved or emailed. If some information does not show on the
PDF, this does not mean that it has been lost - during the installation process the PDF template has been designed to use the information
specified by your Site Administrator, if a change is required to any of your PDF templates, please discuss it with your Site Administrator.
When you issue a purchase order (Purchase Order section tab), Spark will update the status of the purchase order to Purchase Issued.
How do I edit a purchase order?
To edit a purchase order:
1.
2.
Locate and open the purchase order to be edited (from the main menu select Projects -> Search Purchases)
Modify the purchase order then click Update to save your changes
How do I delete a purchase order?
To delete a purchase order:
1. Locate and open the purchase order to be edited (from the main menu select Projects -> Search Purchases)
2. Click the action button Delete Purchase
Note: You can only delete a purchase order providing the supplier field is blank in the Purchase Order section tab.
Spark - User Manual
Version 5.3
Page 32
How do I receipt a purchase order into Spark?
Use the Receipt Order function to acknowledge the delivery of purchased goods and services and queue them ready for transfer to your
accounting package.
To receipt a purchase order:
1.
2.
Locate and open the purchase order that you have received a supplier invoice for (from the main menu select Projects -> Search
Purchases)
Click on the section tab Receipt Order (the receipt purchase order window opens)
a. Enter the supplier invoice number into the Supplier Invoice Number field
b. Enter the Invoice Date and click Update to save your changes (Supplier Invoice Received will update to Yes)
Note: Receipting a purchase order moves it to the Finalise Purchases queue ready to be moved to the Transfer Purchases queue in
preperation to be transferred to your accounting package.
The purchase order is still availalbe to be edited until the accounts teams click on the purchase order’s Finalise button in the Finalise
Purchases queue.
Spark - User Manual
Version 5.3
Page 33
Spark Invoicing
Spark Invoices overview
Spark’s invoicing module pulls together all time, materials and purchases related to a job with the information about what was proposed
to the client. With this information, account managers can make informed decisions about billing and recovering costs.
Note: Spark allows you to create multiple invoices off a single job.
Understanding the Spark Invoice menu
List Invoices - Invoice Detail - Time - Fees - Materials - Print - JCR
New Invoice - Bill As Proposed - Generate PDF - Invoice Now
List Invoices
Invoice Detail
Time
Fees
Materials
Print
JCR
New Invoice
Bill As Proposed
Generate PDF
This section tab displays all customer invoices (or bills) for the current job
This section tab allows you to create the cover letter/description that will be added to the invoice
This section tab allows you to add time charges to the current invoice
This section tab allows you to add fee based charges to the current invoice. (Fees are used when Time is
not sold by units of time but as a fee, for example: project management or in-house consultant fee)
This section tab allows you to add consumable based charges to the current invoice
This section tab allows you to add printing charges to the current window
This section tab allows you to view the projected gross profit to date for the job
This action button allows you to create a new invoice
This action button allows you to copy and then invoice all proposed Time, Fees, Materials and the
selected Print Option
This action button allows you to create, print and save a copy of the invoice, the invoice is created as a
PDF document
TIP:
All menus in Spark are designed to step left to right through your workflow, for example:
When building an invoice the start point is the Invoice Detail menu and the end point is the Generate Invoice PDF menu.
How do I create a new Invoice?
When invoicing, always check with your accounting team for invoicing procedures and business rules.
To create an invoice:
1.
2.
3.
Locate and open the job to be invoiced (from the main menu select Projects -> Search Jobs)
Click on the navigation button To Invoicing (the create new invoice window opens)
To start a new invoice click the action button New Invoice (the Invoice Detail window will open - create the introduction for the
invoice here)
Spark - User Manual
Version 5.3
Page 34
To use the Invoice Detail section tab:
a.
b.
c.
d.
e.
f.
g.
h.
i.
j.
k.
Enter a descriptive title for the invoice in the Name field (this defaults to the job name)
Enter the invoice date in the Date field (this defaults to the current date)
Select the person responsible for creating this invoice from the Invoiced By field (this defaults to the user logged in)
Select the customer contact for the invoice from the Created For drop down list (this defaults to the job contact)
Select the due date for this invoice from the Invoice Due drop down list
The standard options are:
Custom =>setstheprintedinvoiceduedatetothedateenteredintheCustomer Invoice Due field
20thofmonth
=>setstheprintedinvoicedduedateasthe20th of the following month
7daysafterinvoice =>setstheprintedinvoiceduedatetobe7 days from the invoice date
Immediate
=>setstheprintedinvoiceduedatetothe current date
Enter a description or cover letter for the invoice in the Description field
Use the Add GST drop down list to override the customers GST settings. This should only be used when invoicing items that
are GST exempt i.e. international air travel and international couriers
Select the template style to be used from the PDF Style drop down list
Select the appropriate options to be displayed, Detailedyes/no;Show Letterhead yes/no;Currency
Select whether materials that have the same product code will group on the invoice or not, Group Materials yes/no
Click Update to save your changes
Note: To create an invoice based on the proposal, for ease click the action button Bill As Proposed - this will copy all proposed Time,
Fees, Materials and the selected Print Option
Spark - User Manual
Version 5.3
Page 35
4.
To bill labour based charges on an invoice, click the Time section tab
To use the Time window:
The Time window is divided into two parts:
• The left panes shows time that was proposed and actual time that was used to complete the job.
• The right pane shows the details that will be added to the current invoice. Note: The right pane will only display the Staff
Member and Rate fields if the Spark preference is set to Staff or Product/Staff
a. To bill the job as per the original proposal, click on the Proposed Time move button ( ), this will transfer the proposal’s time
elements to the current invoice
b. To bill the job as per the time used, click on the Time Used move button ( ), this will transfer the proposal’s time elements to
the current invoice
c.
To edit or add time manually into the invoice, from the right pane, enter details into the Quantity, Staff Member, Rate and
Price Override fields
d. To remove Time from the invoice, zero all values and ensure the Sub Total for the line item is $0.00
Note: The move button overwrites all manual changes made to the invoice
5.
To bill Fees on an invoice, click the Fees section tab
To use the Fees window:
The Fees window is divided into two parts:
• The left pane shows fees that was proposed to complete the job.
• The right pane shows the details that will be added to the current invoice.
Spark - User Manual
Version 5.3
Page 36
a.
b.
c.
To bill the job as per the original proposal, click on the Proposed Fees move button ( ), this will transfer the proposal’s fees
elements to the current invoice
To bill additional Fees, select the New Fee action button. Complete the title, description and costs
To remove Fee charges from the current invoice, click on the item’s Remove button (this will remove the line item from the
current invoice)
Note: The move button overwrites all manual changes made to the invoice.
6.
To bill consumables on an invoice, click the Materials section tab
To use the Materials window:
The Materials window is divided into two parts:
• The left panes shows materials that was proposed, materials used and materials ordered to complete the job.
• The right pane shows the details that will be added to the current invoice
a. To bill the job as per the original proposal, click on the Proposed Materials move button ( ), this will transfer the proposed
materials onto the current invoice
b. To bill the job as per the materials used, click on the Materials Used move button ( ), this will transfer the used materials
onto the current invoice
c.
To bill the job as per the materials ordered, click on the Materials Ordered move button ( ), this will transfer the ordered
materials onto the current invoice
d. To bill additional consumables, select the materials to be billed from the Product drop down list (this will add a new line item
to the current invoice, then complete the Description, Quantity, Cost, %, and where necessary Unit Override)
e. To remove materials from the current invoice, select the blank field at the top of the Product drop down list (this will remove
the line item from the invoice)
Note: The move button overwrites all manual changes made to the invoice
Spark - User Manual
Version 5.3
Page 37
7.
To bill out print costs on an invoice, click the Print section tab
To use the Print window:
The Print window is divided into two parts:
• The left panes shows materials that was proposed, materials used and materials ordered to complete the job.
• The right pane shows the details that will be added to the current invoice
a. To bill the job as per the original proposal, click on the Proposed Print move button ( ), this will transfer the proposal’s Print
Option element to the current invoice
b. To bill additional print charges, use the Price Override field to bill the required amount
c.
To remove print charges from the current invoice, zero all values
Note: The move button overwrites all manual changes made to the invoice. Spark does not allow additional print costs to be added as a
new line item
Spark - User Manual
Version 5.3
Page 38
8.
To analyse the invoicing for the current job, click the invoice JCR section tab. The invoice JCR window is used to gain an
understanding of time/materials used and purchase orders created to get the job to its current state
To use the JCR window:
The invoice JCR is divided into two parts:
• The left panes show all invoices raised, time/materials used and all purchase orders created to get the job to its current
state
• The right half of the window shows the Proposed vs Work Done – this allows you to compare the prices proposed to the
client and how much of the original budget has been used. The number of Job Log entries and outstanding Job Changes
are also displayed
Use the invoice JCR to make decisions about what can be recovered to make the job profitable, and what work is required to be written
off:
a. Return to the Time – Fees – Materials – Print Options windows to add additional billable items to the invoice
b. On the invoice JCR, mark all time/materials and purchase orders covered by the current invoice as Billed – this will remove
these items from the Work In Progress report
c.
For all work that cannot be billed to the customer, update the Correction field for each item to be In House (i.e. written off).
Also mark all items to be written off as Billed to remove them from the Work In Progress report
Note: To itemise out all time/materials that have been written off, tick Exclude InHouse Internals. To expand out all multiple entries of
time/materials, click the expand button ( )
If you would like to print the invoice JCR, click on the action button JCR Printable.
9.
To confirm and transfer the invoice to the accounts team for importing into your accounting package, click the action button
Invoice Now. The invoice is now sitting in the Finalise Invoices queue ready to be moved to the Transfer Invoices queue in
preperation to be transferred to your accounting package
Note: Clicking on the action button Invoice Now does not lock the invoice, the invoice is still available to be edited until the accounts
team click on the invoice’s Finalise button in the Finalise Invoices queue
Spark - User Manual
Version 5.3
Page 39
10. To generate the invoice PDF, click on the action button Generate PDF
Note: Generating the invoice does not actually print the invoice, it provides a file that can be printed, faxed, saved or emailed.
If some information does not show on the invoice PDF, this does not mean that it has been lost. During the installation process the
PDF template has been designed to use the information specified by your Site Administrator, if a change is required to any of your PDF
templates, please discuss it with your Site Administrator.
How do I edit an Invoice?
To edit an invoice:
1.
2.
Locate and open the invoice to be edited (from the main menu select Projects -> Search Invoices)
Modify the invoice then click Update to save your changes
How do I delete an Invoice?
You cannot delete an invoice. If you have made an error in creating the invoice, zero all values and click on Invoice Now.
Spark - User Manual
Version 5.3
Page 40
Spark Jobs
Spark Jobs overview
Job sheets in Spark are the same as a “Job Bag” in a traditional workflow. Job sheets live inside proposals and inherit the customer
details from the project they belong to. There is a one to one relationship between a proposal and job sheet.
Note: The Jobs menu contains similar functionality to the Projects -> Search Jobs menu, it is typically used by those users who do not
have access to the Projects menu.
Understanding the Jobs menu
Job Search - Job Detail – Time and Materials – Job Log - Job Changes – Job Usage Report - Attachments
Time Entry - My Timesheet - Courier Entry
Job Search
Job Detail
Time and Materials
Job Log
Job Changes
Job Usage Report
Attachments
Time Entry
My Timesheet
Courier Entry
This menu option allows you to search for a job by:
• Job number
• Job name
• Customer name
• Job sheet type (i.e. creative, design, media)
• Job manager
• Allocated to
• Start date range (i.e. the start date of the job taken from the job sheet)
• Internal deadline date range (i.e. the end date of the job taken from the job sheet)
• Location (i.e. the physical location of the job within your workflow (i.e. Design, First Proof etc)
• Closed (i.e. Yes = search through closed jobs; No = search through open jobs; the standard default is No)
Note: To display a list of all jobs in Spark, leave all search fields blank and click GO
This section tab allows you to view the job detail
This section tab allows you to view all time and material components added to the current job
Users can also edit their time and material entries here.
Note: You cannot add time and materials through this window
This section tab allows you to enter informative notes about the job
This section tab allows you to view all job changes raised against the current job, including who they
have been assigned to
This section tab allows you view the allocated time and materials budget for the current job
Note: No costs are displayed here
This section tab allows you to view attached files for the current job
This action button allows you to enter all time and/or materials against a job
This action button allows you to review your timesheet and edit your time for open jobs
This action button allows you to enter courier costs against a job
Note: You must have Couriers access to view this
IMPORTANT:
The Job menu is a limited subset of the Projects menu; it should only be used when access to the Projects menu has been denied
Spark - User Manual
Version 5.3
Page 41
Understanding Jobs -> Time and Materials
The difference between Projects -> Time and Materials (for a job) and Jobs -> Time and Materials (for a job) is the presence of the
Cost and Price columns located in the section tab Job Usage Report.
Spark - User Manual
Version 5.3
Page 42
Spark Workflow
Spark Work in Progress overview
Spark provides you with the tools to manage your workflow. Spark workflow is defined as work in progress, work on hold, key timings
and job changes.
Understanding the WIP menu
WIP Overview - Work In Progress (WIP) – Work On Hold – Key Timings – Job Changes
WIP Overview
This gives you a view of all your current WIP broken out by “Allocated to”. This allows you to look at
the load balancing across your studio team.
WIP
Work On Hold
Key Timings
Job Changes
This menu option allows you to search your WIP job list by:
• Job number
• Job name
• Internal Reference
• Allocated To
• Job Manager
• Customer name
• Job Status
• Job create date range
• Job internal deadline date range
• Location
• Priority
• Exclude project number(s)
Note: To display the full WIP list, leave all search fields blank and click GO
A simple search and an advanced search is available for workflow – the simple search is the default, for
an advance search click the expand button ( )
At the bottom of the WIP list there is a download file option, this allows you to export this data into Excel
This menu option allows you to display a list of all jobs that have been put on hold, this allows you to track all time and materials being charged to these jobs
At the bottom of the Work On Hold list there is a download file option, this allows you to export this
data into Excel
This menu option allows you to view all tasks and their priority by:
• Job number
• Task
• Customer name
• Job Manager name
• Assigned to person
• Complete status (Default is No)
• Task start date range
• Task finish date range
• Job status
Note: To display the full key timings list, leave all search fields blank and click GO
At the bottom of the Key Timings list there is a download file option, this allows you to export this
data into Excel
This menu option allows you to view job change requests by:
• Job number
• Job title
• Brief (a wild card search in the Change Brief description field)
• Job change due date range
• Customer name
• Assigned to (the person the change request has been assigned to, it is recommended to default to
the current logged in user)
• Status (To do = change request is outstanding (default); Done = change request has been completed)
Note: To display the full listing of Job Change requests, leave all search fields blank and click GO
At the bottom of the Job Changes list there is a download file option, this allows you to export this
data into Excel
What are key timings and presets?
This area allows users to see which key timings have been assigned to them and what tasks they need to work on next according to
priority. Note: Key timings can be displayed as a Gantt chart (via the Job only and based on the current list of key timings), by person,
task due date etc. Ideal use of this feature is for Production Managers to manage production planning and resource work loadings.
Spark - User Manual
Version 5.3
Page 43
How do I create new key timing tasks?
Key Timings are the major milestones required to complete a job, for example concept, design, printing, delivery etc. To create a new Key
Timing Task you must have access to the Admin menu of Spark.
To create key timing tasks:
1.
2.
3.
Click admin from the main Spark menu, then click on Key Timing Tasks
Click Create New Key Timing Task
Enter the Task Name and click Create
Note: Key Timing Tasks should be kept generic so they can be used across many types of jobs.
How do I create new key timing presets?
KeyTimingPresetsarelogicalgroupingsofKeyTimingTasks;theyallowthecreationofstandardprojectplans,resourceassignmentsand
timelines, for example:
To create a new Key Timing Preset you must have access to the Admin menu of Spark.
To create key timing presets:
1.
2.
3.
Click admin from the main Spark menu, then click on Key Timing Presets
Click Create New Key Timings Preset
Enter a preset name for the new project plan then click Update (Spark refreshes the window and displays the new preset name)
4.
5.
Click Edit Tasks (located under the new preset name)
Click Create New Key Timings Task
Spark - User Manual
Version 5.3
Page 44
6.
From the resulting window:
a. Select the task to be added from the Task drop down list
b. Enter any notes or instructions into the Note field
c.
Enter the estimated number of Days to complete this task (this can be manually typed over on the job sheet)
d. Select a resource from the Assigned To drop down list (this can be manually typed over on the job sheet)
e. Enter a Position number to set where in the current order this task is to be appear
f.
Click Update to save your changes
To edit a key timing preset:
a.
b.
Click on the Key Timing Preset name then click on Edit Tasks
To modify or update a task, click on the Task name then click Update to save your changes
How do I assign key milestones to a job?
To assign a key milestone to a job:
1.
2.
Locate and open the job to add a key milestone to (from the main menu select Projects -> Search Jobs)
Click on the section tab Key Timings
To use the Key Timings Preset function you must have set up at least one Key Timings Preset:
a. Select a Key Timing Preset from the Use Key Timing Preset drop down list and click Add Preset (Spark will create a new
end on end project plan for the job, based on the start date entered into the job sheet
b. To edit the project plan or assign other resources to this plan:
i.
To add a new task click on the action button New Task
ii.
To delete a task click on Remove
iii. To modify the length of any task, modify the number of days required in the Days field
iv. To modify or change the Assigned To resource, select the new resource from the Assigned To drop down list
v.
To run tasks in parallel enter a start and finish date into the Start Date and Finish Date fields
vi. To save all changes click Update
Note: Each time you modify or update a project plan Spark will automatically refresh the project Gantt chart.
Spark - User Manual
Version 5.3
Page 45
To use the action button New Task function there must be at least one Key Timing Task:
a. Click the action button New Task (the screen will refresh and a new task will be added to the end of the task list)
b. Select the required Key Timing Task from the Task drop down list
c.
Enter any Notes, the expected number of Days to complete the task, an Assigned To resource or a Start Date and Finish
Date
d. To save all changes click Update
Spark - User Manual
Version 5.3
Page 46
Spark Databases
Database overview
The three main databases required to run Spark are:
Products
The product database stores your product price list and general ledger (GL) mapping
Suppliers
The supplier database stores the physical and postal address details of all your suppliers, and their key
contacts
Note: It is important that the Supplier name in Spark matches the supplier name in your financial system
(case sensitive)
Customer
The customer database stores your customer list, customer specific notes, key contacts, activity level, and
preset discount levels
Note: It is important that the Customer name in Spark matches the customer name in your financial
system (case sensitive)
Understanding the Products database
To access the products database, click Database from the Spark main menu, then select Products.
The Products database contains the following price list details:
Product Code
Your internal product code numbering system
Product Description
A user friendly description for the product
Type
Product definition code (labour=time;materials=consumables)
Cost Price
The cost to you to buy this item
%
Spark will calculate the sell price of this item based on the predefined markup or margin entered here
Override Price
Spark will use the entered dollar value as the sell price for this item
Category
Product category
Supplier
Denotes the preferred supplier when purchasing this item
DR GL Code
Debtor GL mapping
CR GL Code
Creditor GL mapping
Pricing Group
What pricing group the product belongs to
Price
The sell price for this item
Add GST
GST can be set to Yes or No for each product
Enabled
If the product is active and can be charged out. (yes / no)
Spark - User Manual
Version 5.3
Page 47
How do I add a product?
To add a new product:
1.
2.
3.
Locate and open the Products database (from the main menu select Database -> Products)
Click the action button New Product
Complete the product details and click Create
Understanding the Suppliers database
To access the suppliers database, click Database from the Spark main menu, then select Suppliers.
The Suppliers database contains the following supplier details:
Name
The supplier’s name – this is used when creating purchase orders from Spark
PO Details
The supplier’s postal address
Street Details
The supplier’s physical street address
City
The city in which the supplier is located
Country
The country in which the supplier is located
Main phone
The supplier’s main telephone number
Second phone
The supplier’s secondary telephone number for example an 0800 number
Fax
The supplier’s fax number
Company Email
The supplier’s generic email address for example [email protected]
Web
The internet address for the supplier’s homepage
Notes
Supplier specific notes
Supplier Code
Unique supplier code matching your accounting system
Activity Level
The current status of the supplier: Active;Disabled
Spark - User Manual
Version 5.3
Page 48
How do I add a supplier?
To add a new supplier:
1.
2.
3.
Locate and open the Suppliers database (from the main menu select Database -> Suppliers)
Click the action button New Supplier
Complete the supplier details and click Create
Understanding supplier contacts
The suppliers database can contain the following contact details:
Name
The contact’s name
Position
The contact’s job title/position
Direct Phone
The contact’s direct dial telephone number
Mobile Phone
The contact’s mobile telephone
Home Phone
The contact’s home telephone number
Pager Phone
The contact’s personal pager number
Direct Fax
The contact’s direct dial fax number
Personal Email
The contact’s work email address
Personal Web
The contact’s personal website
Notes
Contact specific notes
Activity Level
The current status of the supplier contact: Active;Disabled
Spark - User Manual
Version 5.3
Page 49
To add a key contact to a supplier
1.
2.
3.
4.
5.
Locate the supplier you want to add a contact for (from the main menu select Database -> Suppliers)
Open the supplier by clicking the Supplier ID
Click on the section tab Contacts (the contacts window opens)
Click on the action button New Contact (the add new contact window opens
Complete the contact details and click Create
How do I edit a key contact’s detail?
To edit a contact’s details:
1.
2.
3.
4.
Locate and open the contact you want to edit (from the main menu select Database -> Suppliers)
Click the section tab Contacts (the contacts list for the customer will open)
Click the Contact Name (the contact details window will open)
Edit the contact’s details then click Update to save the contact’s details
Understanding the Customers database
To access the customers database, click Database from the Spark main menu, then select Customers.
The customer database contains the following details:
Name
The customer’s legal trading name – this is used when creating proposals, job sheets and invoices
PO Details
The customer’s postal address
Street Details
The customer’s physical street address
City
The city in which the customer is located
Country
The country in which the customer is located
Main Phone
The customer’s main telephone number
Second Phone
The customer’s secondary telephone number
Fax
The customer’s main fax number
Company Email
The customer’s generic email address, for example [email protected]
Web
The internet address of the customer’s homepage
Notes
Customer specific notes
Client Code
Unique client code matching your accounting system
Account Manager
The staff member responsible for this customer
Activity Level
The current status of this customer: Prospect;Occasional;Active, Disabled
Add GST
The GST status for the customer, Yes or No
Spark - User Manual
Version 5.3
Page 50
How do I add a customer?
To add a new customer:
1.
2.
3.
Locate and open the customers database (from the main menu select Database -> Customers)
Click the action button New Customer
Complete the customer details and click Create
Understanding customer notes
To view notes for a customer:
1.
2.
3.
Locate and open the Customers database (from the main menu select Database -> Customers)
Open the customer by clicking the Customer ID (this will open the customer details window)
Click the section tab Notes (this will open the notes window displaying all notes for the customer)
How do I add new notes against a customer?
Spark - User Manual
Version 5.3
Page 51
To add a note against a customer:
1.
2.
3.
4.
Locate and open the customer you want to add a new note to (from the main menu select Database -> Customers)
Click the section tab Notes (the notes window opens)
Click on the action button New Note (the create new note window opens)
Complete the form and click Create to save the note
Understanding customer contacts
The customers database can contain the following contact details:
Name
The contact’s name
Position
The contact’s job title/position
Direct Phone
The contact’s direct dial telephone number
Mobile phone
The contact’s mobile telephone
Home Phone
The contact’s home telephone number
Pager Phone
The contact’s personal pager number
Direct Fax
The contact’s direct dial fax number
Personal Email
The contact’s work email address
Personal Web
The contact’s personal website
Notes
Contact specific notes
Activity Level
The current status of the customer contact: Active;Disabled
Note: You can not delete a contact if the contact has been used on a Proposal, Job or Invoice.
How do I edit a key contact’s detail?
To edit a contact’s details:
1.
2.
3.
4.
Locate and open the contact you want to edit (from the main menu select Database -> Customers)
Click the section tab Contacts (the contacts list for the customer will open)
Click the Contact Name (the contact details window will open)
Edit the contact’s details then click Update to save the contact’s details
How do I add a pricing matrix for a customer?
A pricing matrix allows a customer to receive a discount on a particular pricing category. This feature can be used in this and previous
versions of Spark - but will be replaced in version 5.4 with a full featured pricing model. This will be called custom pricing and will be
initiated inside the customer record.
Spark - User Manual
Version 5.3
Page 52
Spark - User Manual
Version 5.3
Page 53